

Page 1
USER MANUAL
18
DESCRIPTION
1. DESCRIPTION OF THE APPLIANCE
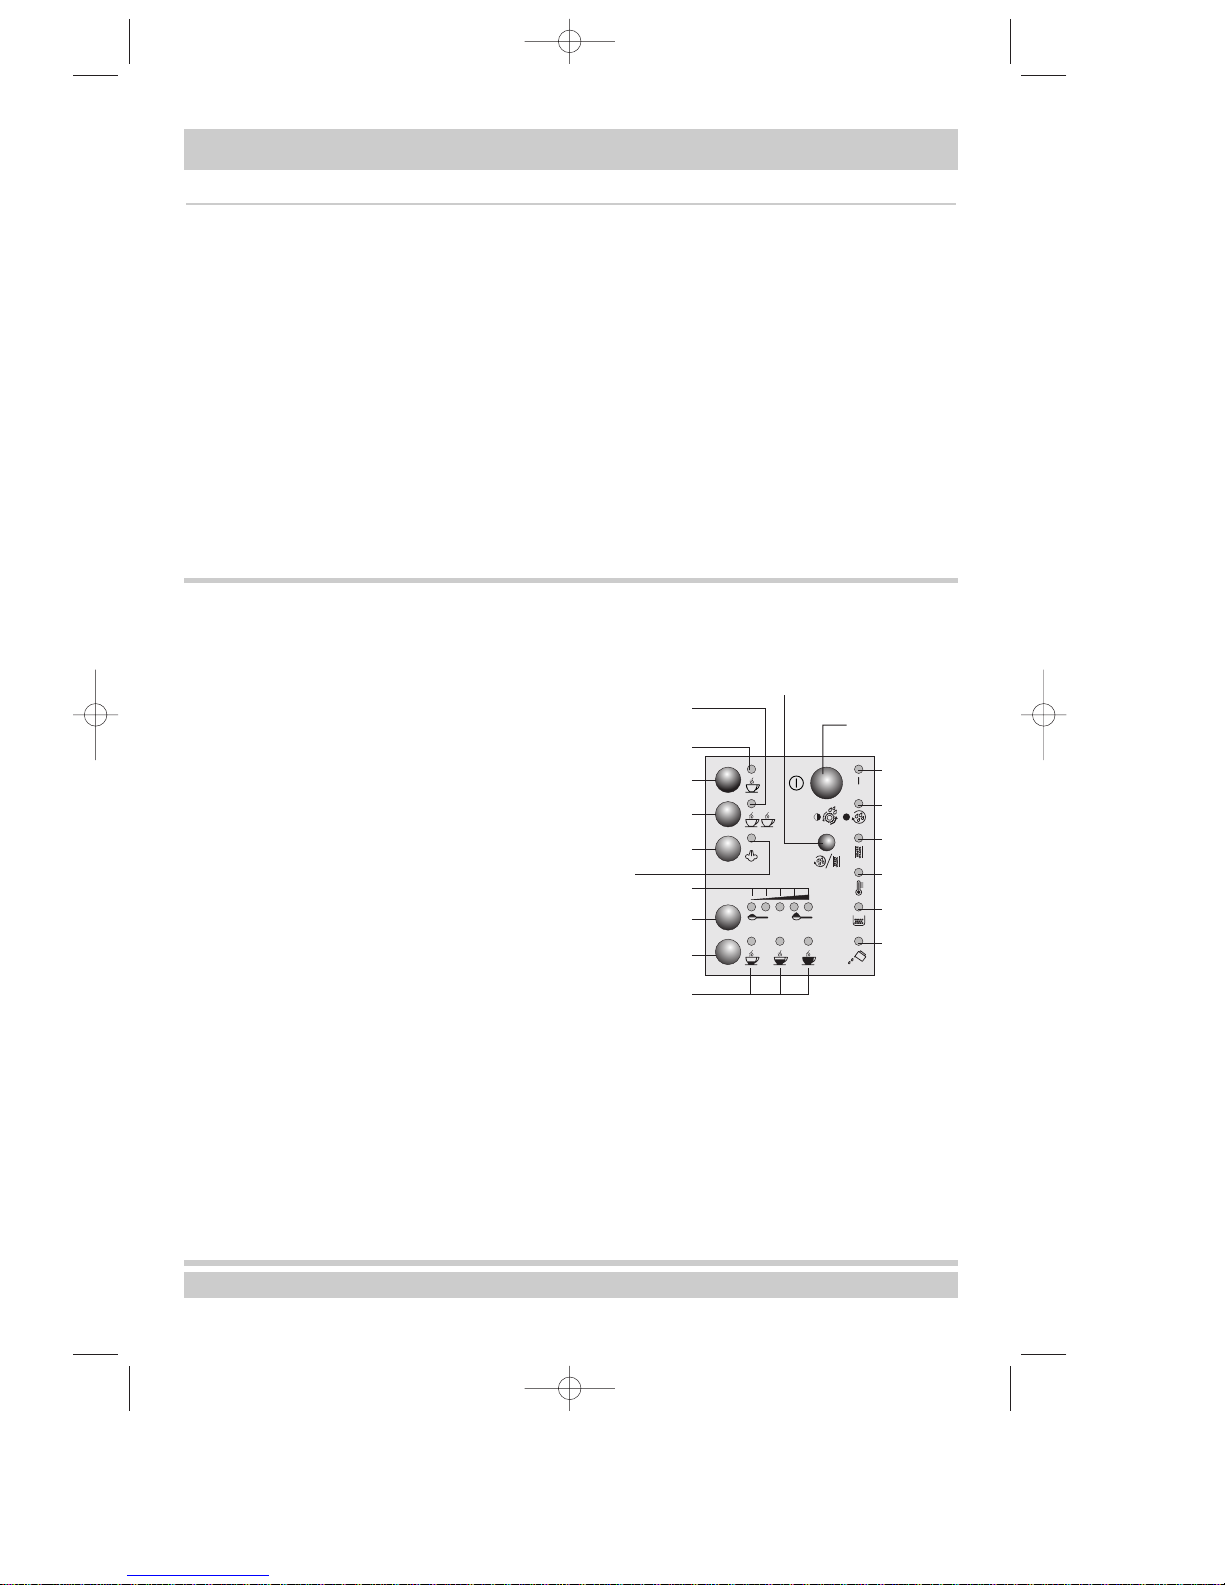
1.
Coffee container position indicator
2. Funnel lid for ground coffee
3. Measuring cup for ground coffee
4. Cover for coffee bean container
5. Container for coffee beans and funnel for
ground coffee
6. Grinding coarseness regulator
7. Control panel
8. Service door
9. Removable water tank with lid
10.Removable container for coffee grounds
11.Cup support grid
12.Removable drip tray
13.Drip tray water level indicator
14.Coffee spout assembly adaptable to cup height
15.Swivelling hot water/steam spout
16.Cappuccino maker
17.Power cable
18.Hot water/steam knob
19.Cup warmer tray
20. Knob for manual cleaning of the spout assembly
21.Cleaning brush
22.Measure for ground coffee
23.Water hardness indicator strip
1.1 Description of control panel (7)
24.
ON/OFF button 0/I
25.ON/OFF indicator 0/I
26.Washing programme and appliance in shut-
down indicator
27.Descaling programme indicator
28.“Coffee ready/steam ready” temperature indi-
cator
29.Coffee grounds container full or absent indicator
30.No water indicator
31.Coffee strength indicators (mild, regular,
strong)
32.Coffee strength button (mild, regular, strong)
33.Coffee quantity button
34.Coffee quantity indicators
35.Steam indicator
36.Steam button
37.Two cup button
38.One cup button
39.One cup indicator
40.Two cup indicator
41.Button for washing or descaling programme.
24
41
25
38
39
40
35
37
36
34
32
33
31
26
27
28
29
30
GB OK 27-09-2002 8:13 Pagina 18
Page 2
GB
USER MANUAL
19
GUIDE TO INDICATORS
IF THE INDICATOR… is on flashes
25 ON/OFF I
The appliance is ready for use The appliance is warming up or switching off
26 Washing and
appliance shut-down
The washing programme should be run
following the instructions in paragraph 9.3
(The indicator flashes while the washing
programme is underway)
The spout assembly is jammed. Turn the
appliance off then on again using the
ON/OFF button (24). This should reposition
the spout assembl correctly. If after two
attempts the problem persists, clean the spout
assembly as described in paragraph 9.4.
If flashing slowly, the appliance is warming
up.
If flashing rapidly, the appliance is cooling
down. To cool the appliance rapidly, see
paragraph 8.1.
27 Descaling
programme
The descaling programme should be run
following the instructions in paragraph 9.5
(The indicator flashes while the descaling
programme is underway)
28 Temperature
The appliance is ready for use
31 Coffee strength
indicators
The indicators for the strength of coffee
chosen (mild, regular, strong) light up The
selection can be modified by pressing
button 32.
The coffee grounds container (10) is full and
should be emptied.
29 Coffee grounds
container full
The coffee grounds container (10) is not in
place
Fill the tank and press button 37 or 38 to make
the coffee. If after the second or third attempt the
indicator continues to flash, run off water from
the spout (15) as described in paragraph 7.
30 No water
The coffee
container (1) is in
the ground coffee
or removal
position. Check
the required
container position.
34 Coffee quantity
indicator
Indicates the quantity of coffee beans set
to make the coffee. The selection can be
modified by pressing button 33.
35 Steam
The machine is in steam mode. To
deactivate, press button 36.
39 o 40 1- or 2-cup
delivery or
Preparation of one or two cups of coffee is
underway.
To interrupt, press button 38 or
37 respectively.
The coffee
container (1) is in
the coffee beans
position.
In order for the appliance to correctly indicate when the container needs emptying, it must calculate the
number of coffees prepared. To reset the counter, the container should always be emptied with the
appliance on.
The appliance also resets the counter when the container is removed for a period longer than 10 seconds
GB OK 27-09-2002 8:13 Pagina 19
Page 3
2. SAFETY WARNINGS
Read these instructions and keep for future consultation.
- Before use, make sure the mains voltage corresponds to the voltage indicated on the appliance
rating plate. Connect the appliance to an efficiently
earthed mains socket with a minimum capacity of
10 A only.
- If the plug of the appliance and mains socket are
incompatible, have the plug changed by a qualified
professional.
- The electrical safety of this appliance is guaranteed
only when it is correctly connected to an efficient
earth system conforming to current electrical safety
standards. Failure to correctly earth the appliance
absolves the manufacturer from all liability for possible damage. If in doubt, contact a qualified professional.
- Never start up the appliance without water or coffee!
- This appliance is designed to make coffee and heat
drinks. Avoid scalds and burns caused by water or
steam jets or improper use of the appliance itself.
- Do not touch hot parts (steam spout, water, delivery
zone)
- After unpacking, make sure the appliance is complete and undamaged. If in doubt, do not use.
Contact a qualified professional.
- Packing elements (plastic bags, polystyrene etc)
must not be left within reach of children as they
may represent a hazard.
- Remove the spout assembly knob from the packaging and keep carefully for future use.
- This appliance is designed for domestic use only.
Any other use is improper and therefore dangerous.
- The manufacturer is not liable for damage caused
by improper, incorrect or unreasonable use of the
appliance.
- Do not touch the appliance with damp hands or
feet.
- Do not use in bath or shower rooms
• The appliance is not intended for use by
young children or infirm persons without
supervision.
•Young children should be supervised to ensure
that they do not play with the appliance.
- Do not immerse the appliance in water
-Before cleaning or carrying out maintenance,
unplug the appliance from the mains.
- In the event of breakdown or faulty operation, turn
the appliance off and do not tamper with it. For
repairs, contact a technical service centre authorised
by the manufacturer only. Request that only original
spare parts be used. Failure to respect the above
may compromise the safety of the appliance.
- Installation should be carried out according to the
manufacturer’s instructions.
-The power cable must not be replaced by the user
as it requires special tools. If the cable is damaged
or needs replacing, contact a technical service centre authorised by the manufacturer only.
- Unplug the appliance from the mains and turn off
the main switch when not in use. Never leave the
appliance plugged in unnecessarily.
This appliance conforms to EC directive 87/308 on the
suppression of radio interference.
3. INSTALLATION
• The appliance must be installed on a stable
horizontal surface. Avoid hot surfaces.
Choose a location out of reach of children
and pets.
Leave at least
10 cm between
the appliance
and the wall or
other objects
.
• Never install
the appliance
where temperatures may drop
to 0°C or below
(the formation
of ice may damage the appliance).
• Unwind the required length of power cable
(
17) (cable housed in the body of the applian-
ce) and plug in to an earthed socket.
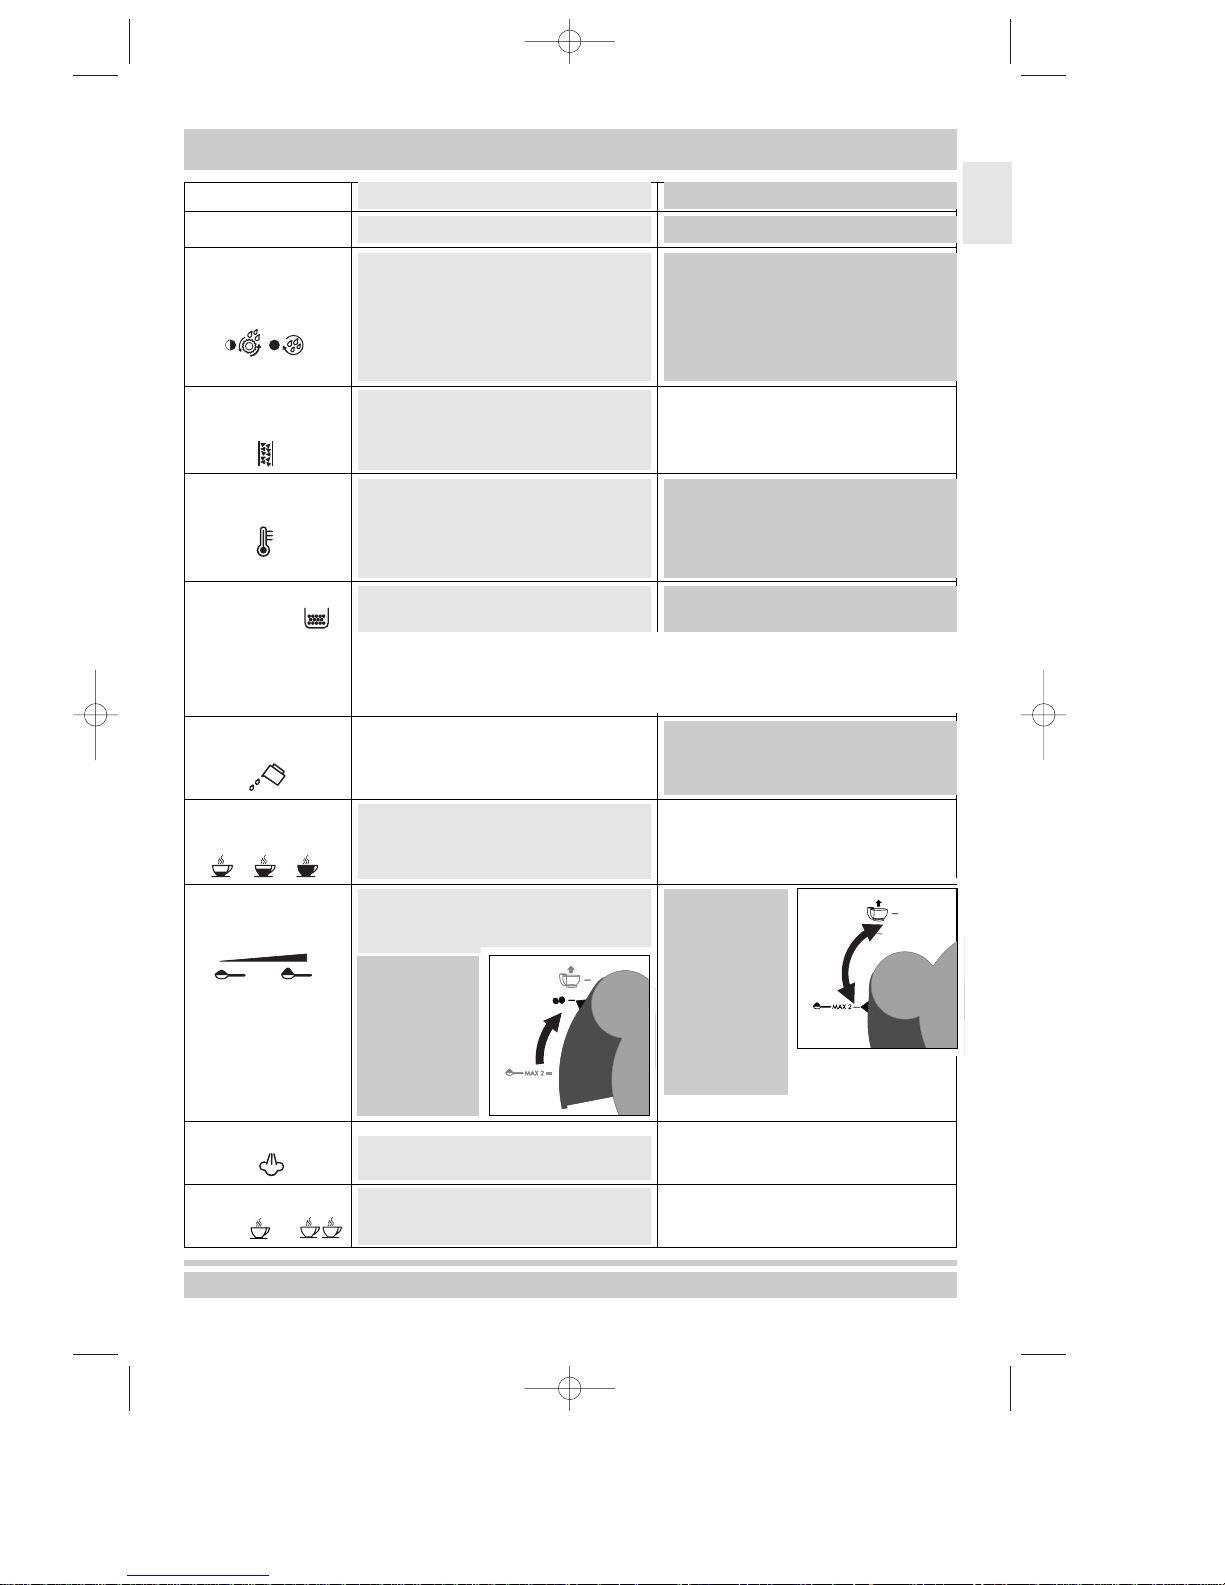
• Remove and fill the water tank (through the
special opening or by removing the lid) with
fresh water (max. 1.5 litres). When replacing
the tank, exert pressure to ensure the rear
valve opens.
•You are advised to customise water hardness
immediately by following the procedure
described in paragraph 5.4.
• Coffee can now be prepared as described in
the following paragraph.
For hygiene reasons, you are advised to throw
away the first coffee.
USER MANUAL
20
SAFETY WARNINGS • INSTALLATION
1,5lt.
MAX
1,5lt.
MAX
GB OK 27-09-2002 8:13 Pagina 20
Page 4
4. HOW TO PREPARE COFFEE…
USER MANUAL
21
HOW TO PREPARE COFFEE… USING COFFEE BEANS
… using coffee beans
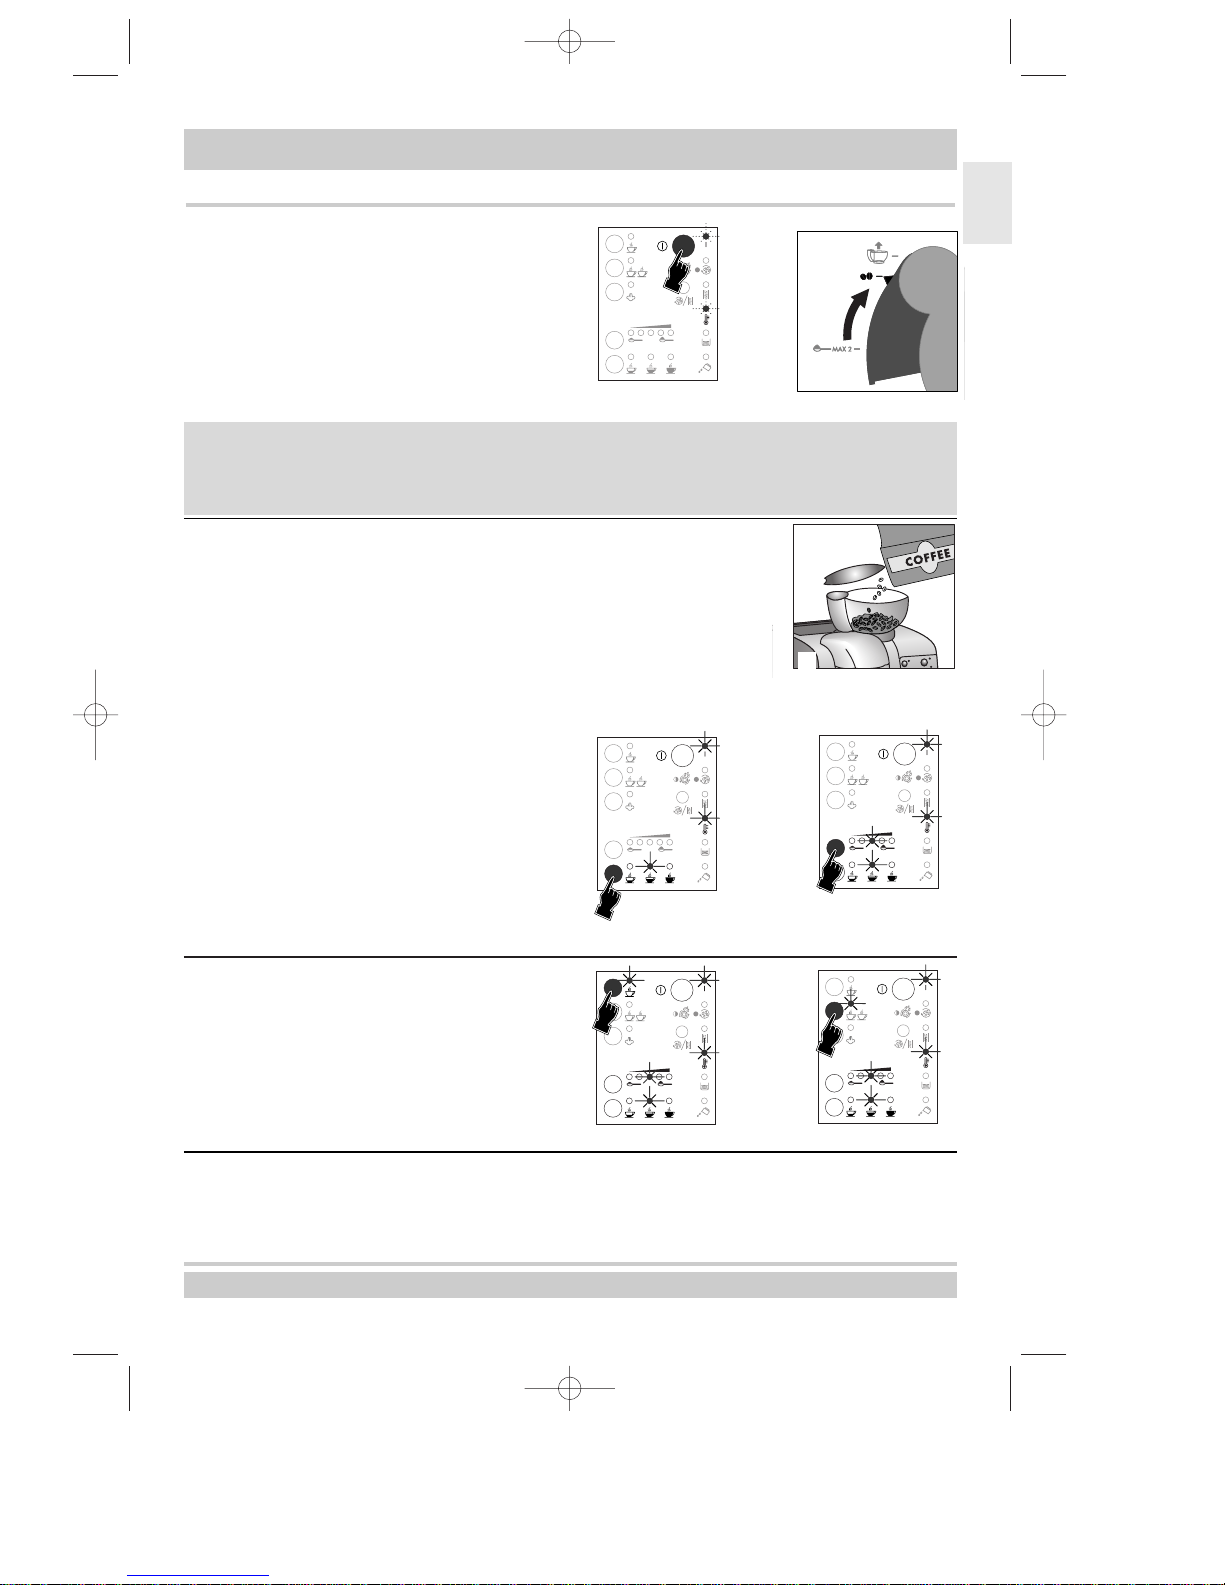
A. Press the ON button (24):
the appliance
warms up and automatically performs a prewash cycle. The appliance on (
25) and tem-
perature (
28) indicators flash during heating.
B. Rotate the container (5) into the position for
using coffee beans (check indicator
1).
It is normal for the appliance to make a noise when turned on, when the coffee container (5) moves or
when it is turned off.
The noise indicates that the dspout assembly is moving into the correct position for
the function set.
When turned on and off, the appliance also rinses the internal circuits.
When the on (25) and temperature (28) indicators stop flashing, the appliance
has reached the ideal temperature and is ready to make coffee. Put the cup (if
A
B
D
E
D. Select the strength of coffee required by
pressing the button (32).
The relative indica-
tor (
31) lights up.
E. Select the quantity of coffee by pressing the
button (33).
The relative indicator (34) lights
up.
If the coffee delivery button (38 or 37) is not pressed
within 8 seconds of setting D and E, the
F/G. P r ess the coffee delivery button: if you want
just one coffee, press button
38 (F), if you
want two cups at the same time, press button
37 (G).
You can interrupt coffee delivery at any moment
by briefly pressing the same coffee delivery button as pressed previously.
F
G
Your appliance is equipped with an automatic pre-infusion system which moistens the ground coffee; consequently delivery begins and then stops for a moment.
This releases the full aroma of the ground coffee to obtain the best possible coffee. Pre-infusion does not
take place when making very long coffee.
C. Remove the lid (4) of the coffee bean container (5) and fill with fresh coffee
beans (capacity 270 g). Replace the lid to close the container well.
Only pure coffee beans should be used, without the addition of caramelised
or flavoured beans.
C
appliance automatically returns to the original setting.
you want to make one cup) or cups (if you want to make two cups) under the spout (
14).
GB
GB OK 27-09-2002 8:13 Pagina 21
Page 5
USER MANUAL
22
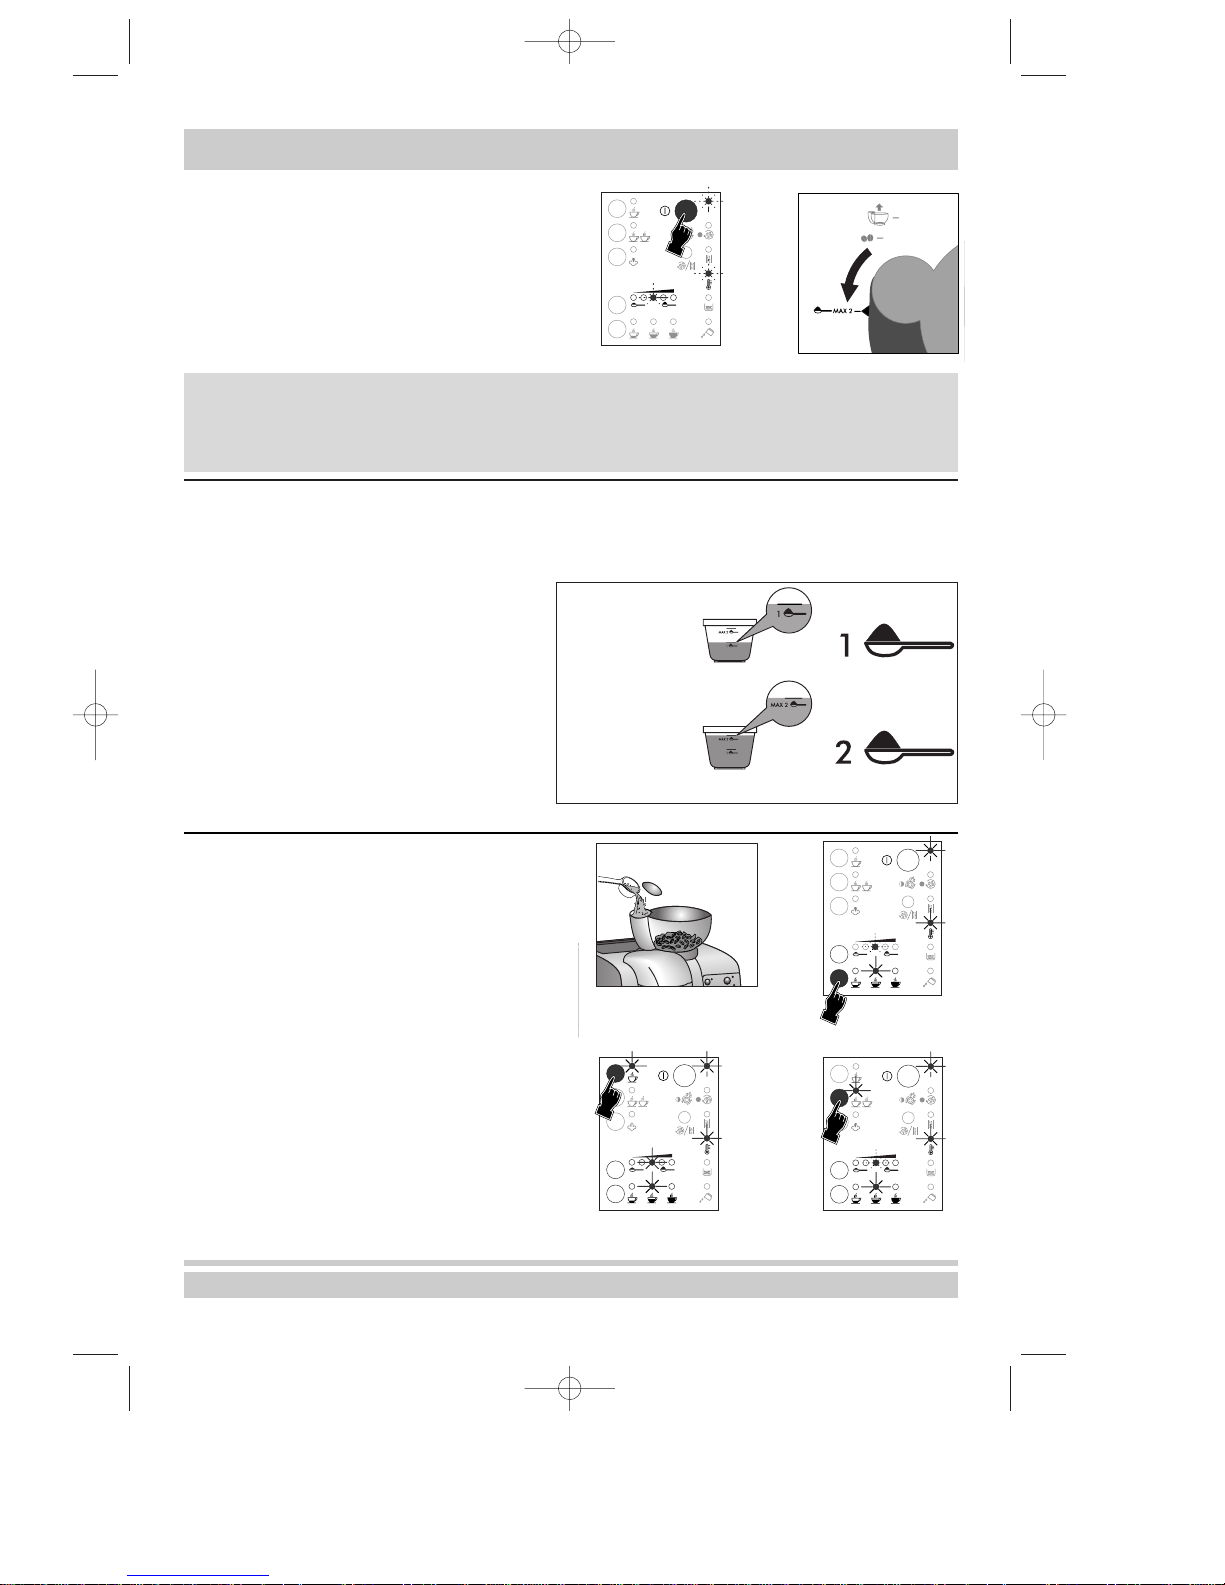
HOW TO PREPARE COFFEE… USING GROUND COFFEE
…using ground coffee
A. Press the ON button (24):
the appliance warms
up and automatically performs a pre-wash
cycle. The appliance on (
25) and temperature
(
28) indicators flash during heating.
B. Rotate the container (5) into the position for
using ground coffee (check indicator 1).
The
coffee quantity indicator (
34) flashes.
A
B
It is normal for the appliance to make a noise when turned on, when the coffee container (5) moves or
when it is turned off.
The noise indicates that the spout assembly is moving into the correct position for the
function set.
When turned on and off, the appliance also rinses the internal circuits.
When the on (25) and temperature (28) indicators stop flashing, the appliance has reached the ideal temperature and is ready to make coffee. Put the cup (if you want to make one cup) or cups (if you want to
make two cups) under the spout (
14).
Preparing the right quantity of coffee to use
To prepare the right quantity of ground coffee,
you can use either the measuring cup (
3) or mea-
sure (
22). Measures other than those provided
must never be used and you must never use
more than two measures
(corresponding to the
MAX quantity on the measuring cup).
Important: the funnel is not a container. Make sure
all the ground coffee introduced feeds down into
the container. If necessary, use the handle of the
measure (22) to help the coffee flow towards the
spout assembly.
=
=
1 coffee =
2 coffees=
D
E
F
C Remove the cover (2) and slowly introduce the
exact quantity of ground coffee necessary
for each preparation
into the ground coffee
funnel.
D. Select the strength of coffee required by
pressing the button (32).
The relative indica-
tor (
31) lights up.
E/F: if you want just one coffee, press button 38
(E),
if you want two cups at the same time,
press button 37 (
F).
You can interrupt coffee delivery at any moment by
briefly pressing the same coffee delivery button as
pressed previously.
You must never use soluble instant coffee, freeze-dried coffee or similar products, but only
pure ground coffee without additional ingredients.
C
GB OK 27-09-2002 8:13 Pagina 22
Page 6

5. CUSTOMISING THE APPLIANCE
USER MANUAL
23
CUSTOMISING
GB
The appliance is pre-set to average values. You can, however, permanently modify the setting according to
your own personal tastes.
After you have used the appliance for a while, we therefore recommended that you identify the right quantities of coffee for each size cup you prefer then memorise them as follows.
5.1Customising the quantity of water for mild,
regular and strong coffee
A
. Select the strength of coffee you require (mild,
regular or strong) by pressing the button (
32).
B.Press the coffee delivery button (38) and hold
it down
until the cup contains the required
amount of coffee (max. 200 ml), then release
it.
In order for the modifications to be memorised
correctly, you must hold the button down throughout the procedure
(from the start of grinding to
the end).
Repeat the operation for each strength of coffee.
A
B
5.2 Programming the quantity of coffee used
A
.Select the strength of coffee required (mild,
regular or strong) by pressing the button (
32).
B.Press the coffee quantity button (33) repea-
tedly until the indicator corresponding to the
required quantity of coffee lights up, then hold
the button down. After a few seconds, all the
other indicators light up.
Release the button (
33). The new value is
memorised.
This procedure can be repeated for the other
strengths of coffee.
A
B
Note: when selecting the quantity of coffee, bear in mind that
the values increase from left to right.
A greater quantity gives a stronger coffee.
A smaller quantity gives a milder coffee.
5.3 Resetting the appliance to the original values
To reset the appliance to the original values, proceed as follows:
A. Hold down the washing programme button (41) for at least 10 seconds. The
appliance goes off.
When turned on again, the original standard values will automatically be reset.
A
GB OK 27-09-2002 8:13 Pagina 23
Page 7

USER MANUAL
24
5.4 Setting water hardness
The appliance is set for average water hardness.
A reactive strip (23) is provided to identify the
hardness of the water normally used. Proceed as
follows:
1. Immerse the reactive strip briefly (1 second) in
the water then shake lightly to eliminate
excess.
2. Leave for 1 minute then read the value:
1 red zone = low hardness = indicator 1
2 red zones = medium/low hardness = indicator 2
3 red zones = medium/high hardness = indicator 3
4 red zones = high hardness = indicator 4
On the basis of the result, set the appliance as follows:
1.Press the washing/descaling button (41) and
hold it down (only the coffee quantity indica-
tor 34 remains lit and now indicates the water
hardness set).
2. Immediately afterwards, hold down the
washing/descaling button (41) and at the
same time press the coffee quantity button
(32) to select one of the four levels. The first
indicator corresponds to value 1.
Important: If you hold button 41 down on its
own for more than 10 seconds, the appliance
will reset to the original values (see paragraph
5.3).
3. Release the washing button. The new water
hardness value is memorised.
CUSTOMISING • THE COFFEE GRINDER
1234
6 THE COFFEE GRINDER
The coffee grinder is preset to an average value suitable for the majority of types of coffee.
If necessary, it can be adjusted
during grinding using
the special lever (
6).
The effect of the different setting will be noted only after
having made a further two to three cups of coffee.
Bear in mind that the result of grinding sometimes varies
according to the type of coffee used. It is therefore worth varying the type of coffee until the right one is
found.
7.1 Foreign bodies safety device
Even with the best coffees, a small stone may sometimes find its way among the coffee beans. If it ends up in
the coffee grinder, you will hear a loud noise.
Turn the appliance off immediately.
If the appliance is not turned off at once, a safety device trips and shuts down the grinder.
fine ground
=
strong coffee
coarse ground
=
mild coffee
To reset the appliance, proceed as follows:
• Remove the coffee beans.
A. Rotate the coffee bean container into the removal position and lift off (indi-
cator
34 flashes).
B. Rotate the grinding regulation lever (6) anticlockwise until it stops.
C. Remove the spring and extract the stone. During this phase, it is preferable to
use a vacuum cleaner to remove the stone and clean the grinder of ground coffee and dust.
• Replace the coffee grinder by carrying out the
above operations in reverse order, replacing
the spring, returning the grinding regulation
lever (
6) to the original position and repositio-
ning the coffee bean container.
A
BC
GB OK 27-09-2002 8:13 Pagina 24
Page 8

USER MANUAL
25
DELIVERING HOT WATER • DELIVERING STEAM
7 DELIVERING HOT WATER
•Wait until the appliance is up to temperature,
then place a glass or cup directly under the
hot water/steam spout (
15).
The orientation of the hot water/steam spout (
15)
can be adjusted to facilitate use with various types
of container (glass, jug, etc).
A. Turn the steam adjustment knob (18) to deliver
hot water. Hot water flows automatically.
•When you have run off the required amount
of water, turn the knob (
18) to off.
While running off hot water, the spout (15) heats
up.
Do not touch to avoid burns.
8. STEAM DELIVERY
Use steam to heat milk or other liquids and to
prepare milk for cappuccino coffee.
A. Press the steam button (36). The temperature
indicator (
28) begins to flash.
B. When the temperature indicator (28) stops
flashing, place an empty container under the
spout and open the steam delivery knob (
18).
Condensate is given off immediately, followed
by genuine steam. Wait until steam is given
off before placing the container with the liquid
to be heated under the spout.
The orientation of the hot water/steam spout (
15)
can be adjusted to facilitate use with various types
of container (glass, jug, etc).
While delivering steam, the spout (15) heats up.
Do not touch to avoid burns.
After use, you are recommended to clean the
cappuccino maker (
16) by rotating clockwise and
pulling downwards.
A
B
8.1 Cooling the appliance after using in steam mode
Two minutes after selecting steam mode, the appliance automatically returns to the “coffee ready” mode
with the temperature indicator (
28) flashing rapidly. You must then wait several minutes before preparing
coffee again. Alternatively, if you need to use the appliance immediately, you can cool it rapidly by running
off hot water as described in paragraph 7 until indicator
28 stops flashing.
GB
GB OK 27-09-2002 8:13 Pagina 25
Page 9

USER MANUAL
26
9. CLEANING AND MAINTENANCE
Before cleaning the appliance, remove the coffee grounds container (10) and empty. You should do this with the appliance turned on as this ensures correct reset of the counter. Then turn off by pressing button 24 and unplug from the mains.
CLEANING AND MAINTENANCE
9.1 Daily and weekly cleaning
To clean the outside of the appliance, wipe with a
damp cloth, then dry.
The drip tray (
12) has an indicator (13, visible
from the cup grid) warning when it needs
emptying. Pull out to empty. For more thorough
cleaning, the cup grid can be removed.
The water tank (
9), drip tray (12), cup grid (11)
and coffee grounds container (
10) must be cleaned regularly with hot water and a non-abrasive
cleaning product.
Never wash in the dishwasher.
NOTE: The appliance must be completely reassembled before turning on (otherwise it will not
come on).
9.2 Cleaning the coffee grinder
The grinder does not normally require cleaning.
However, it may sometimes be necessary to remove the coarser residues of grinding with the special brush (
21). Never put water into the coffee
bean container as this would damage the grinder.
9.3 Built-in washing programme
The appliance has a washing programme to complement normal daily and weekly cleaning. This efficiently
removes coarse coffee residues in points not normally accessible. Together with cleaning of the removable
spout assembly, regular use of this programme guarantees perfect coffee. We recommend cleaning the coffee maker monthly or after
250 cups (indicator 26 comes on). The washing programme takes about 8 minu-
tes.The washing programme lasts about eight minutes and cannot be interrupted.
Proceed as follows:
• Fill the tank (9) with water (washing takes
about 1.3 l of water, including rinsing with
clean water).
A. Position the coffee container (5) in the ground
coffee position (coffee quantity indicator
34
flashes).
• For more efficient cleaning, you are recom-
mended to remove the spout assembly, wash it
and replace it as described in paragraph 9.4.
Close the safety door (
8) and turn the
appliance on.
B. Introduce a tablet of detergent into the ground
coffee funnel of the container (
5).
C. Remove the coffee grounds container (10),
empty it and place it under the coffee spout
(
14). It will collect the water during the
washing cycle. The indicator (
29) comes on.
D. Press the washing button (41) and the one
cup button (
38) simultaneously. The program-
me starts automatically and the indicator (
26)
A B
D
flashes throughout the washing cycle. The programme performs six cycles, interrupted by a pause to
allow the detergent to act.
• When the indicator (
29) flashes, the programme is finished. Empty the water collected in the coffee
grounds container, replace it and fill the water tank. Indicators (
26) and (29) go off and the appliance is
ready for use.
Although the washing programme incorporates prolonged rinsing with clean water, you are recommended
to
throw away the first cup of coffee and drink the second.
C
GB OK 27-09-2002 8:13 Pagina 26
Page 10

USER MANUAL
27
CLEANING AND MAINTENANCE
C
D
9.4 Manual cleaning of the spout assembly
The spout assembly must be cleaned at least once a week or, preferably, whenever you fill the coffee bean
container.
Proceed as follows:
• Turn off the appliance using the ON/OFF but-
ton (
24).
A. Lower the spout (14) and open the service
door (
8).
B. Raise the red safety lever X until it stops.
Press the red safety button
Y on the left and
hold it down. At the same time, lower the red
lock button
Z and remove the spout assembly.
C. Insert the knob (20) into the hole on the right
of the red mount, making sure the knob guide
is inserted in the respective housing in the
spout assembly. Rotate clockwise until it stops.
The spout assembly unit opens and the two filters are accessible.
D. Clean all coffee residues from the sspout
assembly and the filters in particular under
running water. When this has been done,
rotate the knob anticlockwise until it stops to
close the spout assembly.
E. After washing and drying thoroughly, reposi-
tion the spout assembly by inserting it into the
guide
K (metal rod) and making sure it fits
onto the rail
W on the right. Then, holding the
red button
Z on the spout assembly down,
push the unit until it hooks into place. Release
1
2
A
K
W
E
X
Z
Y
B
F
the lock button Z (if working correctly, the button clicks into place automatically). Lower the red safety
lever on the right
X until it stops.
F. Close the service door (8) by pressing with the thumb until you hear it click into place.
If the service door is not well closed, the appliance will not come on.
•Turn the appliance on. The spout assembly automatically returns to the basic position.
At the end of the heating cycle, the appliance is again ready for use.
N.B: Although apparently complex, this operation is quick to learn and enables you to keep the
appliance perfectly clean and hygienic.
GB
GB OK 27-09-2002 8:13 Pagina 27
Page 11

USER MANUAL
28
9.5 Descaling
The appliance must be descaled at least once every four to six months, depending on the hardness of the
local water and frequency of use.
Indicator (
27) lights up to warn that the appliance must be descaled. Although you can go on making coffee, you are recommended to descale immediately.
The appliance has an automatic descaling programme to simplify the operation.
Regular descaling avoids costly repairs. Damage caused by inadequate descaling, incorrect use and failure to
observe these instructions is not covered by the guarantee.
In particular, vinegar must never on any account be used for descaling as it would damage the appliance.
The automatic descaling programme lasts 40 minutes and is divided into two phases, descaling and rinsing.
The entire cycle cannot be interrupted and at the end of the first phase, manual intervention is required. At
the end of the 1st phase, manual intervention is required.
CLEANING AND MAINTENANCE
Proceed as follows
Phase 1: descaling (lasts about 35 minutes)
• Pour 0.5 l of descaler and 0.5 l of water into the water tank and
replace it in the appliance. Empty the coffee grounds container and
position under the spout assembly (
14) to collect the descaling solu-
tion. Place a container under the hot water/steam spout (
15).
B. Press the descaling button (41) and the two cup button (37) simulta-
neously. The indicator (
27) flashes.
• Open the hot water/steam knob (
18) to run off a little water (the equi-
0,5l
0,5l
+
A
valent of one coffee) into the recipient. Close the knob again.
Descaling now passes automatically through the spout assembly. During descaling, the indicator (
27) flashes. The programme performs the washing cycles inter-
rupted by pauses to allow the descaler to act.
Phase 2: rinsing (lasts about 5 minutes)
• When the indicator (27) stops flashing and remains steadily lit, empty the cof-
fee grounds container (
10), rinse the water tank (9) and fill with clean water.
• Replace the coffee grounds container (
10) under the coffee spout assembly (14) to collect the descaling
solution and replace the water tank.
• Open the hot water/steam knob (
18) to run off a little water (the equivalent of one coffee) into the reci-
pient. Close the knob again.
• Rinsing with clean water now passes automatically through the water heater and indicator
27 flashes
again until the cycle ends. The programme performs a rinse with the pump in continuous operation.
The entire descaling programme ends when no more water runs out of the spout assembly (14).
• Empty the coffee grounds container (10) and replace. Indicator 27 goes out and the spout spout assem-
bly returns to the starting position.
Fill the water tank (
9) with fresh water: the appliance is now ready to make coffee.
Although the descaling programme includes prolonged rinsing with clean water, you are recommended to
throw away the first cup of coffee and drink the second.
You can descale at any time, even before the corresponding indicator lights up.
You are recommended to adjust the appliance for water hardness as described in paragraph 5.4.
B
GB OK 27-09-2002 8:13 Pagina 28
Page 12

GB
USER MANUAL
29
HELPFUL HINTS • DISPOSING OF THE APPLIANCE • PROBLEMS: TROUBLESHOOTING
10. HELPFUL HINTS
• The quality of the coffee depends not only on
the appliance, but also the water, the type of
coffee, the grinding, temperature, etc.
Make sure the coffee is fresh and use a blend
specifically for “espresso coffee”. Keep the
coffee in a hermetically sealed container in a
cool place.
• As well as the blend, grinding and water tem-
perature, the quality of the water is also
important in preparing optimum espresso. You
are therefore recommended to use water with
a limited calcium content. This will produce the
best tasting coffee and also protect internal
components from the formation of damaging
scale.
Empty the water tank daily and fill with fresh
water.
Always use fresh water only (never under
any circumstances use sparkling water).
• If the coffee is delivered too fast or too slowly,
it is usually due to incorrect grinding and the
grinder should be adjusted accordingly.
Grinding can only be regulated when the
coffee grinder is working.
• Coffee has a better taste if prepared in prewarmed cups. You are therefore recommended to place the cups to be used on the cupwarmer tray (
19).
11. DISPOSING OF THE APPLIANCE
When no longer used, the appliance should be rendered unusable by unplugging from the mains and cutting the power cable.
Never dispose of household appliances with domestic waste. They must be dispo-
sed of in respect of the environment.
12. PROBLEMS: TROUBLESHOOTING
The appliance may be repaired by an assistance centre authorised by the manufacturer only. Incorrect
repairs may expose the user to considerable risk, absolve the manufacturer from all liability for possible
damage and automatically invalidate the guarantee. Before having the appliance repaired, read the following points carefully. Often the problem can be resolved, saving time and trouble.
PROBLEM
• The ON/OFF button does
not turn the appliance on
• The appliance does not
perform the initial wash
through
CAUSE
• There is no voltage to the
appliance
• The service door is open
• The spout assembly is missing
• The appliance is already hot as
turned off recently
• The coffee grounds container
(
10) is absent or not in the cor-
rect position (indicator
29 fla-
shes).
• There is no water in the tank (
9)
(indicator
30 flashes).
REMEDY
• Check the plug and mains
power supply
•Check the service door (8) is
closed well
(if necessary, refer to
the instructions in paragraph 9.4)
Replace the spout assembly and
close the service door well
• In this condition, the appliance
does not perform the wash through cycle
• Insert the coffee grounds container (
10) correctly
• Refill the water tank (
9) and press
the delivery button (
37 or 38)
GB OK 27-09-2002 8:13 Pagina 29
Page 13

USER MANUAL
30
PROBLEMS: TROUBLESHOOTING
PROBLEM
•While preparing the coffee
using coffee beans, only
hot water is delivered
•While preparing the coffee
using ground coffee, only
hot water is delivered
• After the normal preparation cycle, the appliance
does not delivery coffee
• The appliance requests the
coffee grounds container
(10) to be emptied although
this has already been done
• The spout assembly cannot
be removed
CAUSE
• The container (5) is in the
ground coffee position or removal position (indicator
34 fla-
shes)
• The coffee bean container (
5) is
empty
• The container (
5) is in the remo-
val position.
• The ground coffee is blocked in
the funnel.
• No ground coffee has been
introduced
• There is no water in the tank
(
9). Indicator (30) flashes
• Spout assembly is jammed (the
appliance in shutdown indicator
26 flashes)
• Spout assembly dirty
• The appliance has not correctly
reset the coffee counter
• The spout assembly is not in the
removal position.
REMEDY
• Rotate the container into the
coffee bean position .
• Refill the container (
5)
• Replace the spout assembly and
close the service door well
• Rotate the container into the
ground coffee position (indicator
34 flashes)
• Use the handle of the measure
(
22) to push the ground coffee
towards the spout assembly
• Refill the water tank and press the
coffee delivery button again
• Manually clean the spout
assembly as described in point
9.4
• Manually clean the infuser as
described in point 9.4
• Extract the coffee grounds container (
10) for at least 10 seconds
(the indicator
29 remains alight
while the container is extracted)
• Close the safety door (
8) and
turn the appliance on. After the
normal preparation cycle, turn
the appliance off and remove
the spout assembly.
The coffee counter is reset only when the appliance is turned on (indicator 29 must indicate the absence
of the container for at least 10 seconds). If this operation is performed with the appliance turned off, the
correct coffee count is lost and the appliance calls for the container to be re-emptied before necessary.
To maintain the correct coffee count, you are recommended to empty the container (10) whenever it
is even partially extracted to avoid the appliance resetting the count when the container is not
empty. If this occurs, the appliance could go in shutdown after just a few coffees.
GB OK 27-09-2002 8:13 Pagina 30
Page 14

GB
USER MANUAL
31
PROBLEM
• The control button functions
are not active
• After filling the water tank,
the appliance continues to
indicate the absence of
water (indicator 30 flashes)
• When the knob (18) is rotated, water is not delivered
CAUSE
• Coffee grounds container (10)
full. Indicator
29 flashes
• Coffee grounds container (
1)
absent or incorrectly inserted
(indicator
29 is lit)
• The boiler temperature is too
high (indicator
28 flashes
rapidly)
• The boiler temperature is too
low (indicator
28 flashes slowly)
• The appliance is in steam position (indicator
35 is lit)
• The spout assembly is jammed
(indicator
26 flashes)
• The appliance must be reset
manually
• The steam spout (
15) is clogged
REMEDY
• Empty the container (10) with
the appliance turned on
• Insert the container (
10)
• Place a container under the
spout (
15) and turn the knob
(
18) to run off the water until
the indicator
28 stops flashing
and remains steadily lit.
•Wait for a moment. Indicator
28 no longer flashes but
remains steadily lit.
• If you do not wish to use the
steam function, press the steam
button
36 to return to the coffee
function.
• Manually clean the spout
assembly as described in point
9.4
•Press the coffee delivery button
(
38). If after a couple of
attempts the appliance continues to indicate the absence of
water, run off water from the
spout as described in paragraph 7
• Clean the steam spout (
15) and
cappuccino maker (
16).
GB OK 27-09-2002 8:13 Pagina 31
 Loading...