

Page 1

• Remove the steam nozzle from the delivery spout by pulling it
downwards (Fig. 26).
• Carefully wash the milk frother and the steam nozzle in warm water.
• Check that the two holes indicated by the arrows in Fig. 27 are not
clogged. If necessary, clean them using a needle or pin.
• Replace the steam nozzle by inserting it and vigorously turning it
upwards into the steam spout.
• Replace the milk frother by pushing it upwards and turning it anticlockwise.
10 CLEANING AND MAINTENANCE
• Before performing any cleaning operations, the machine must have
cooled down and must be disconnected from the mains power supply.
• Do not immerse the machine in the water: it is an electrical appliance.
• Do not use solvents or abrasive detergents to clean the coffee maker.
A soft damp cloth will suffice.
• The components of the machine must not be washed in the dishwasher.
10.1 CLEANING THE COFFEE MAKER
•Clean the grounds container (as described in chapter 5, note 6)
whenever the light comes on.
• The water tank should be cleaned regularly.
• The drip tray is fitted with a level indicator (red) showing the level of
water inside. When the indicator starts to protrude from the cup
support tray, the drip tray must be emptied and cleaned.
• Check that the holes in the coffee delivery spout are not blocked. To
clean them, scrape the dry coffee residues with a needle (Fig. 28).
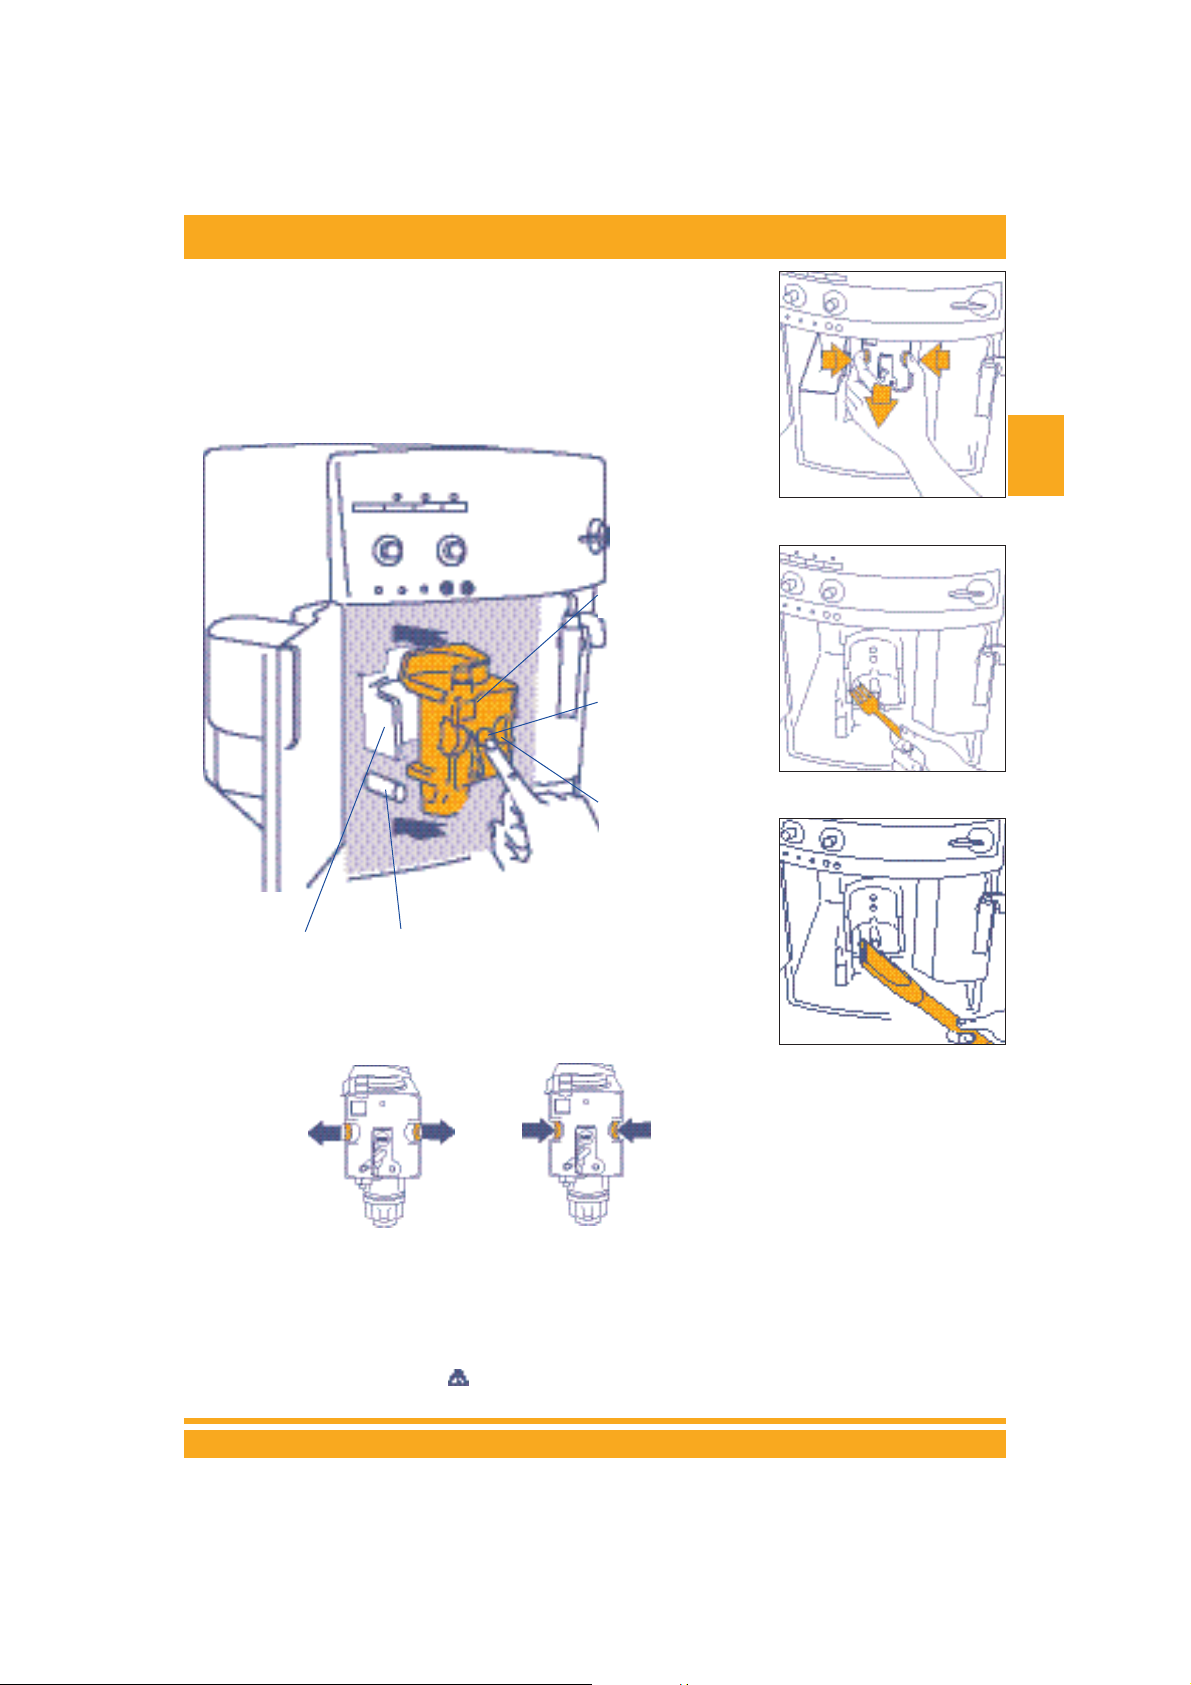
10.2 CLEANING THE INFUSER
The infuser must be cleaned very frequently to prevent it from filling with
coffee deposits (that may lead to malfunctions). To clean it, proceed as follows:
• turn the machine off and
wait for all the indicator lights to go off;
• open the service door (Fig. 15);
•remove the drip tray and the grounds container (Fig. 16) and clean
them;
•press the two red release buttons on the infuser sideways (Fig. 28)
and pull it out;
WARNING: the infuser can only be removed when the machine is off.
Attempting to remove the infuser with the machine on will risk causing
damage.
• wash the infuser under running water, without using detergents.
Never wash the infuser in the dishwasher;
64
OPERATING INSTRUCTIONS
13
Fig.25
Fig.26
Fig.27
Fig.28
Steam
nozzle
Milk frother
Page 2
65
OPERATING INSTRUCTIONS
GB
• carefully clean the inside of the machine. To remove the coffee stuck
to the parts inside the machine, scrape it with a plastic or wooden
fork (Fig. 30) and
then pick up all the residues using a vacuum
cleaner
(Fig. 31);
• Replace the infuser by sliding it onto the white supports and the pin at
the bottom;
then push the PUSH symbol fully in until hearing the click.
Check that the two red buttons have opened back out, otherwise the door
cannot close.
Fig.29
Fig.30
Fig.31
White support
Pin
Infuser
Push the PUSH
symbol fully in until
hearing the click.
After having heard
the click, check that
the red buttons have
opened back out.
The two red buttons have opened
out CORRECTLY
The two red buttons have not
opened out
CORRECT
INCORRECT
•replace the drip tray and the grounds container;
• close the service door.
NOTE 1: If the infuser is not inserted correctly until hearing the
click and the two red buttons have not opened out properly, the
service door will not close and the machine will not operate (when
switching on the machine the light comes on).
 Loading...