

DeLonghi DW97AU Instruction Manual
DW97AU
DeLonghi
To review the section on Troubleshooting Tips
will help you to solve some common problems
by yourself and not needto ask for the help of
professional technicians.
DearCustomer,
Pleaseread this User Information carefully and keep it
to refer to at a later date.
Passit on to any subsequent
owner of the appliance.
This manualcontains sectionsof safety instructions,
operating instructions,
installation instructions
and trouble shootingtips.
Carefully reading i t before using t he d ishw ashe r will help
youtouseandmaintain
the dishwasher properly.
The manufacturer, following a policy of constant
development and up-dating of the product, may
make modifications without giving prior notice.
Control Panel......................................................3
Dishwasher Features............................................3
Water Softener....................................................4
Rinse Aid.........................................................5, 6
Detergent........................................................7, 8
Notsuitable for the dishwasher............................11
At the end of the wash cycle ................................12
Wash Cycle Table...............................................13
Setting the programme.......................................14
Forget to add a Dish................. ...................15........
FilteringSystem..................................................16
Caring for the Dishwasher..............................16, 17
Water Connection......... ......................................25
Before calling for service...............................27, 28
Error codes..................................................29,30
....18Please carefully read the installation instruction
........18Aestheticpanel's dimensions and installation
Tensionadjustment of the door spring ................20
Connection of drain hoses...........................................21
Dishwasher installation steps..............................22
Installation the plinth .
23
..............................
Under certain conditions, Hydrogen gas may be produced in a hot-water system that has not been used for two
weeks or more. HYDROGEN GAS IS EXPLOSIVE.If the hot-water system has not been used for such a period,
before using the dishwasher turn on all hot-water faucets and let the water flow from each for several minutes.
This will release any accumulated hydrogen gas. As the gas is flammable, do not smoke or use an open flame
during this time.
•
•
•
•
•
•
•
•
•
•
•
•
•
Do not abuse, sit on, or stand on the door or dish rack of the dishwasher
Do not operate your dishwasher unlessall enclosure panels are properly in place. Open the door very
carefully if the dishwasher is operating. There is a risk of water squirtingout.
Do not place any heavy objects or stand on the door when it is open.
When loadingitemsto be washed:
Locate sharp items so that they are not likely to damage the door seal;
Load sharp knives with the handles up to reduce the risk of
Warning knives and other utensils with sharp points must be loaded in the basket with their points down
or placed in a horizontal position.
Check that the detergent receptacle is empty after completion of the wash cycle.
Do not wash plastic items unless they are marked dishwasher safe or the equivalent. For plastic items not
so marked, check the manufacturer'srecommendations.
Use only detergent and rinse additives designed for an automatic dishwasher. Never use soap, laundry
detergent, or hand washing detergent in your dishwasher.
Other means for disconnection from the supply must be incorporated in the fixed wiring with at least 3mm
contact separation in all poles.
Keep children away from detergent and rinse aid, keepchildren away from the open door of the dishwasher,
there could still be some detergent left inside.
Young children should be supervised to ensure that they do not play with the appliance.
The appliance is not intended for use by young children or infirm persons without supervision.
Dishwasher detergents are strongly alkaline. They can be extremely dangerous if swallowed. Avoid contact
with skin and eyes and keep children away from the dishwasher when the door isopen.
The door should not be left in the open position since this could present a tripping hazard.
o
o
o
injury
;
•
•
•
•
•
•
If the supply c ord is damaged, it must be replaced by the man ufacturer or its service representative or a
similarly qualified person in order to avoid a hazard.
Please dispose of packing materials properly.
Use the dishwasher only for its intended function.
During installation, the power supply must not be excessively or dangerously bent or flattened.
Do n ot tamper with controls.
The appliance is to be connected to the water mains using new hose sets and the old hose-sets should not
be reused.
1

Dispose of the dishwasher packaging material correctly.
All packaging materials can be recycled.
Plasticparts are marked with the standard international abbreviations:
PE for polyethylene,e.g. sheet wrapping material
PS forpolystyrene,e.g.paddingmaterial
POM polyoxymethylene, e.g. plastic clips
PP polypropylene, e.g. Salt filler
ABS Acrylonitrile Butadiene Styrene, e.g. Control Panel .
Packagingmaterialcould be dangerous for children!
For disposing of package and the appliance pleasego to a recycling centre.
Cardboard packaging is manufactured from recycled paper and should be disposed in the
waste paper collection for recycling.When disposing of any dishwasher please remove the
door or makethe door closing device unusable.
By ensuring this product is disposedof correctly, you will help prevent potential negative
consequences for theenvironment and human health, which could otherwise be caused
by inappropriate waste handling of this product.
For more detailed informationabout recycling of this product, please contact your local
city office and your household waste disposal service.
¾
¾
¾
¾
¾
2
Warning!
To get the best performance from your dishwasher,read all operating instructions before using it for the
first time.
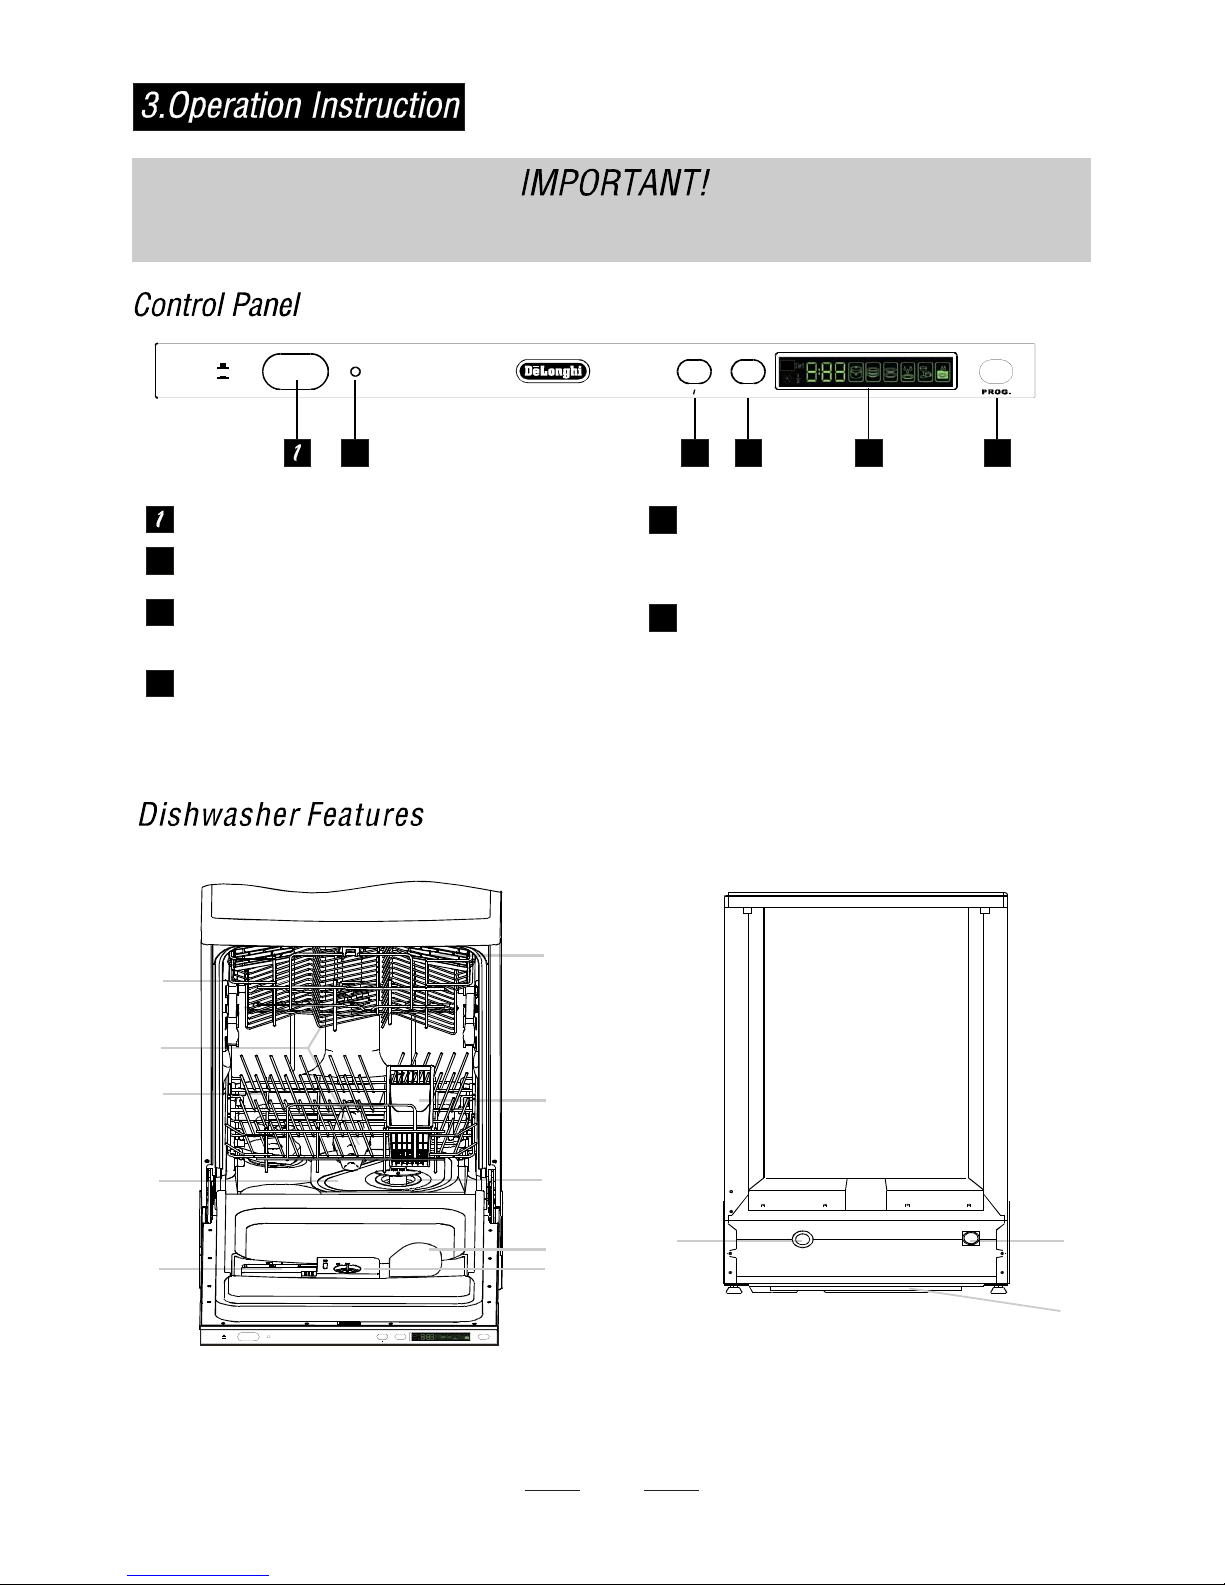
5
Poweronlight:TocomeonwhenPowerON/OFF
button is pressed down.
2
3
4
ON/OFF Button: To turn on/off the power supply.
6
Program Key-press:To select washing program
when press the Key-press.
3
DELAY12
ON
OFF
Delayed Start Button: Press this button to set the
delayed hours for washing. You can delay the start
of washing up to 24 hours. One press on this
button delays the start of washing by one hour.
2
3
4
5
6
Display Window: delay time, running indicator,
faut codes and etc.
on
Off
PROG.
DELAY12
ON
OFF
11
12
Back View
Main Filter
5
Detergent Dispenser
6
Cup Shelf
7
Silverware Basket
8
Coarse Filter
9
Rinse Aid Dispenser
10
Inlet pipe connector
12
Drain pipe connector
11
Lower Basket
3
Spray Arms
2
Upper Basket
1
4
Tray assembly.
1
2
3
4
5
6
7
8
9
10
Front view
13
Turbo dry
13
Half Wash Key: Button to select Half Wash.
(It meansthat the lowersprayarmdoes not run,
so you shouldload the upper basket only)
Before using your dishwasher for the first time:
A. Setthe water softener
B. Pour 1/2 litre of water inside the salt container and then fill with dishwasher salt
C. Fill the rinseaid dispenser
D. Function ofdetergent
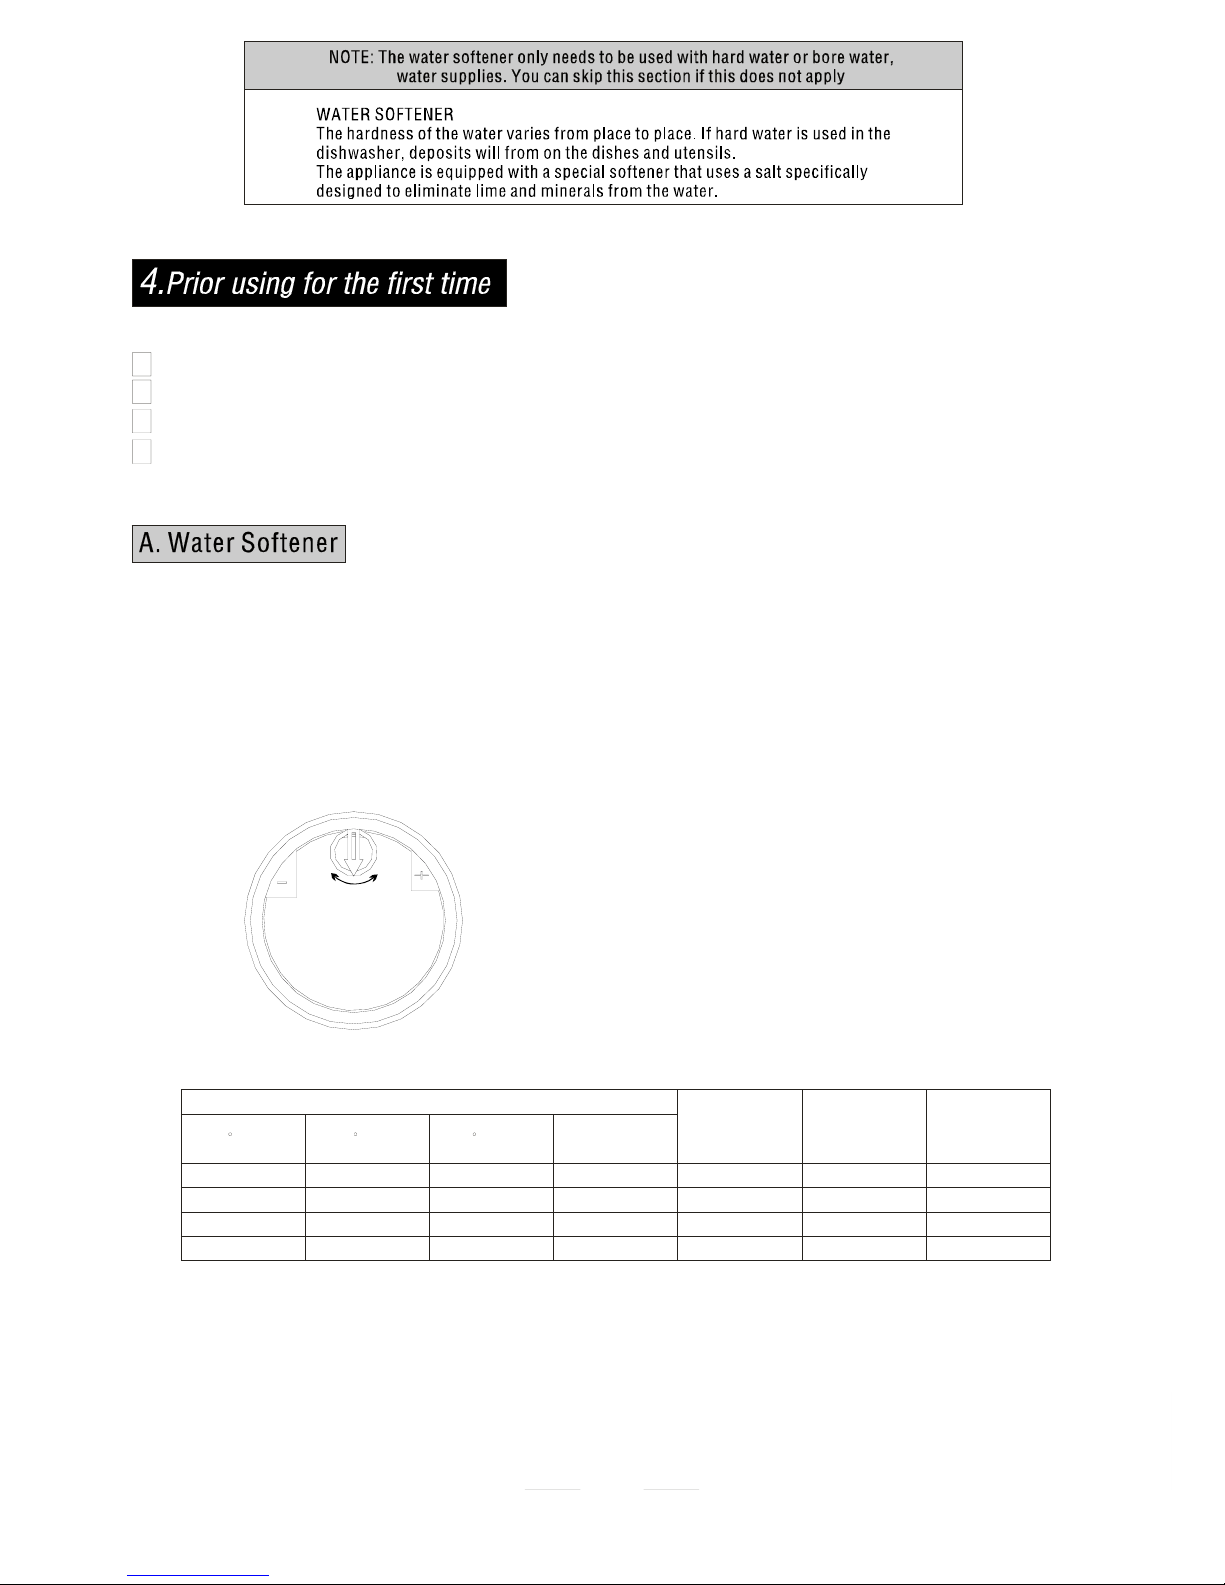
The water softener must be set manually, using the water hardness dial.
The water softener is designed to removeminerals and salts from the water, whichwouldhave
a detrimental or adverse effect on the operation of the appliance. The higher the
content of these minerals andsalts, the harder your water is. The softener should be
adjusted according to the hardness of the water in your area. Your local Water Authority
can advise you on the hardness of the water in your area.
Adjusting Salt Consumption
The dishwasher is designed to allow for adjusting the amount of salt consumed based on
the hardness of the water used. This is inte nded to optimize and customize the level of
salt consumption sothat the salt consumption could be set proceed as follows:
1. Unscrew the cap from thesalt container
2. There is aring onthe container with anarrow on it (see
figureto the side), if necessary, rotatethe ring in the
anticlockwise direction from the “-”Setting toward the
“ ”sign, based on the hardness of the water being used.
Itis recommended thatadjustments should be madein
accordance with the following schema:
+
4
Contact your localwater board for information on the hardness of your water supply.
dH
mmol/l
0~140~8 0~1.4
/
0
/
14~398~22 1.4~3.9
-
20 60
39~8022~45 3.9~8
Mid
40 30
>80>45 >8
+
60 20
fH
0~10
10~28
28~56
>56
Clark
°
Clark: British degree
°
fH : French degree
°
dH : German degree
Note:1°dH=1.25°Clark=1.78°fH=0.178mmol/l
°
Clark: British degree
°
fH : French degree
°
dH : German degree
Note:1°dH=1.25°Clark=1.78°fH=0.178mmol/l
WATER HARDNESS
Selector Position
Salt consumption
(gram/cycle)
Auto nomy
(cycles/1.2kgs)
Always use salt intended for use with dishwasher.
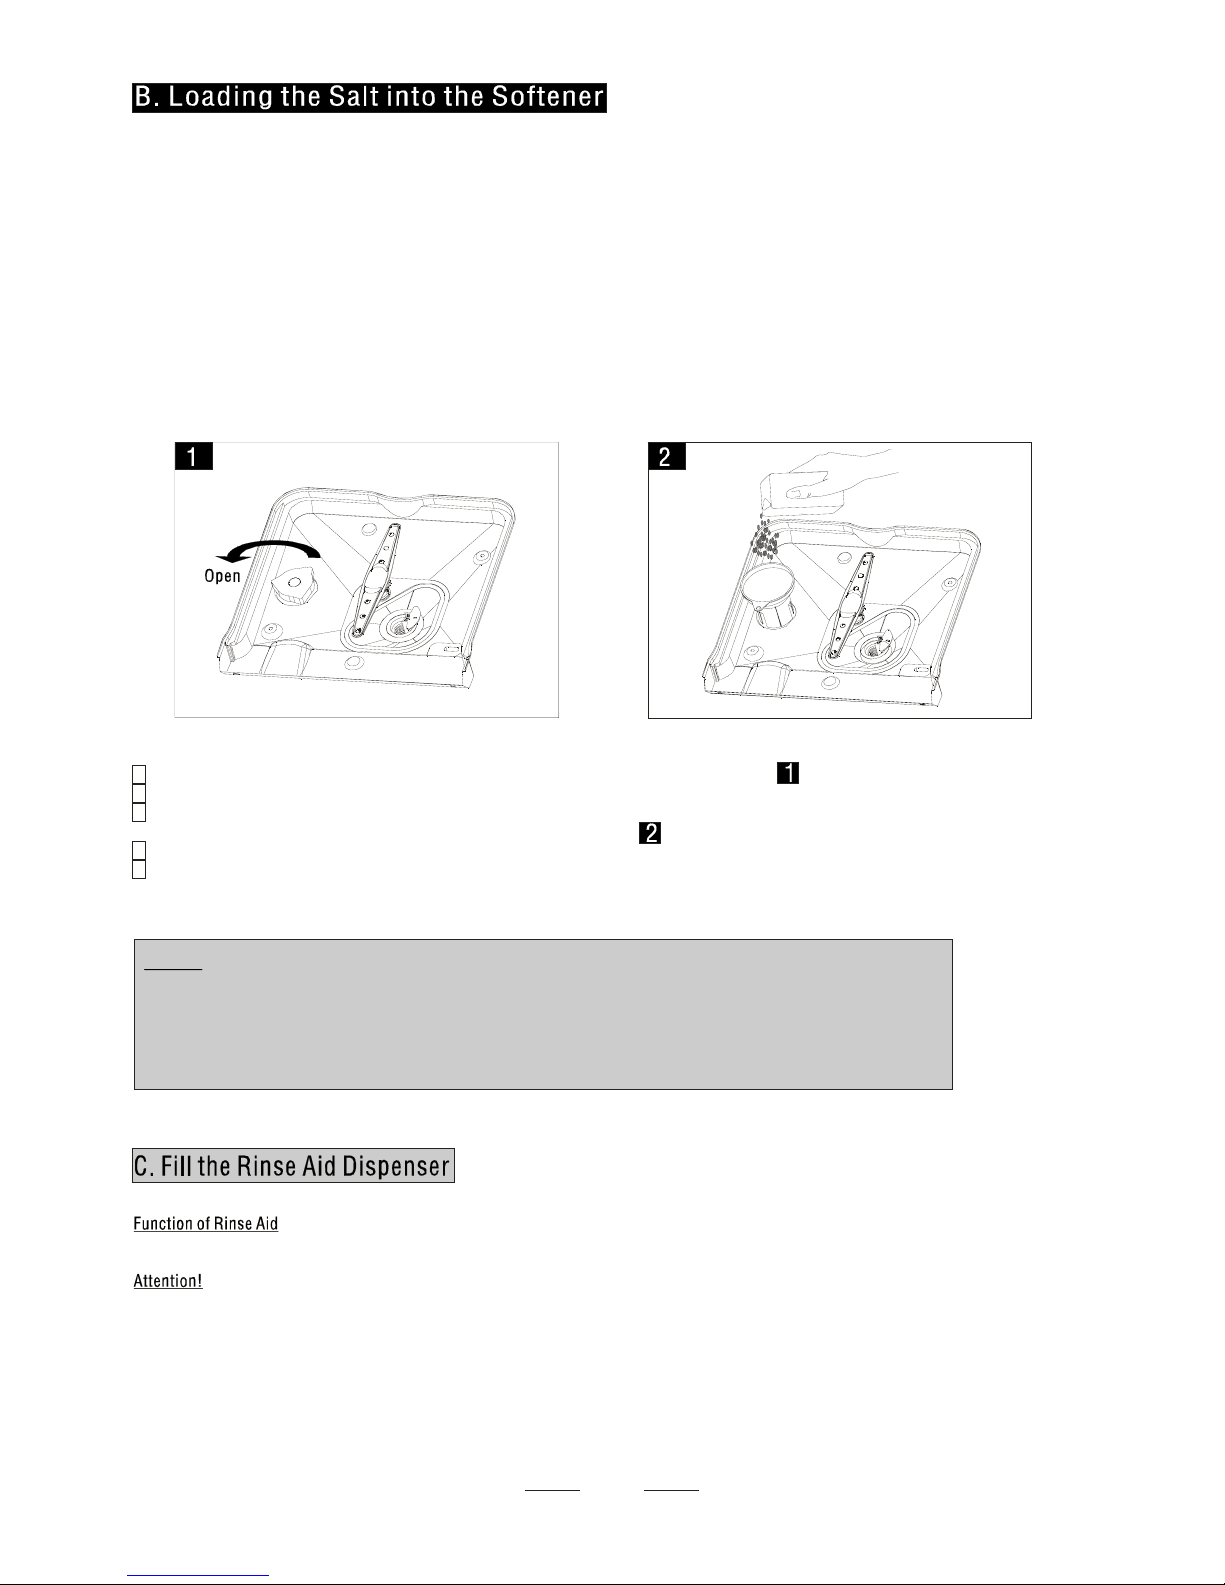
The salt containeris located beneath the lower rackand should be filled as follows:
Attention!
Only use salt specifically designed for use in dishwashers! All other typesof
salt notspecifically designed foruse in a dishwasher, especially table salt, will
damage the water softener. In case of damages caused by the use of unsuitable
salt the manufacturer does not give anywarranty nor is liable for anycaused
damages.
Only fill with salt just before starting one of the complete washing programmes.
This will prevent any grains of salt or salty water, which may have been split,
remaining of the bottom of the machine for any period of time, which may cause
corrosion.
After the first wash cycle the control panel light expires.
A Remove the lower basket and then unscrew and remove the cap from the salt container.
B If you are filling the container for the first time, fill 2/3 of its volume with water(around 500ml).
C Place the end of the funnel (supplied) into the hole and introduce about 1,2kg of salt. It is
Normalfora small amount of water to come out of the salt container.
D Carefully screw the cap back on.
E Usually, the salt warning light will be off in 2-6 after the salt container be filled with salt.days
NOTE:
Rinse aid is automatically added during the last rinse, ensuring thorough rinsing, and spot
andstreakfreedrying.
Only use branded rinse aid for dishwasher. Never fill the rinse aid dispenser with any
other substances (e.g. dishwasher cleaning agent, liquid detergent). This would damage
the appliance.
5
The s alt co ntainer m ust be refi lled when the salt warning light in the control panel comes on.1.
Though the salt c ontainer is filled enough, the indicator light may not black out
before the salt fully dissolve.
If there is no salt warning light in the control panel (for some models) , you can judge when to load
the salt into the softener
by the cycles that the dishwasher had run .
2.
Iftherearespillsofthesalt,asoakprogramcouldberuntowipethemout.
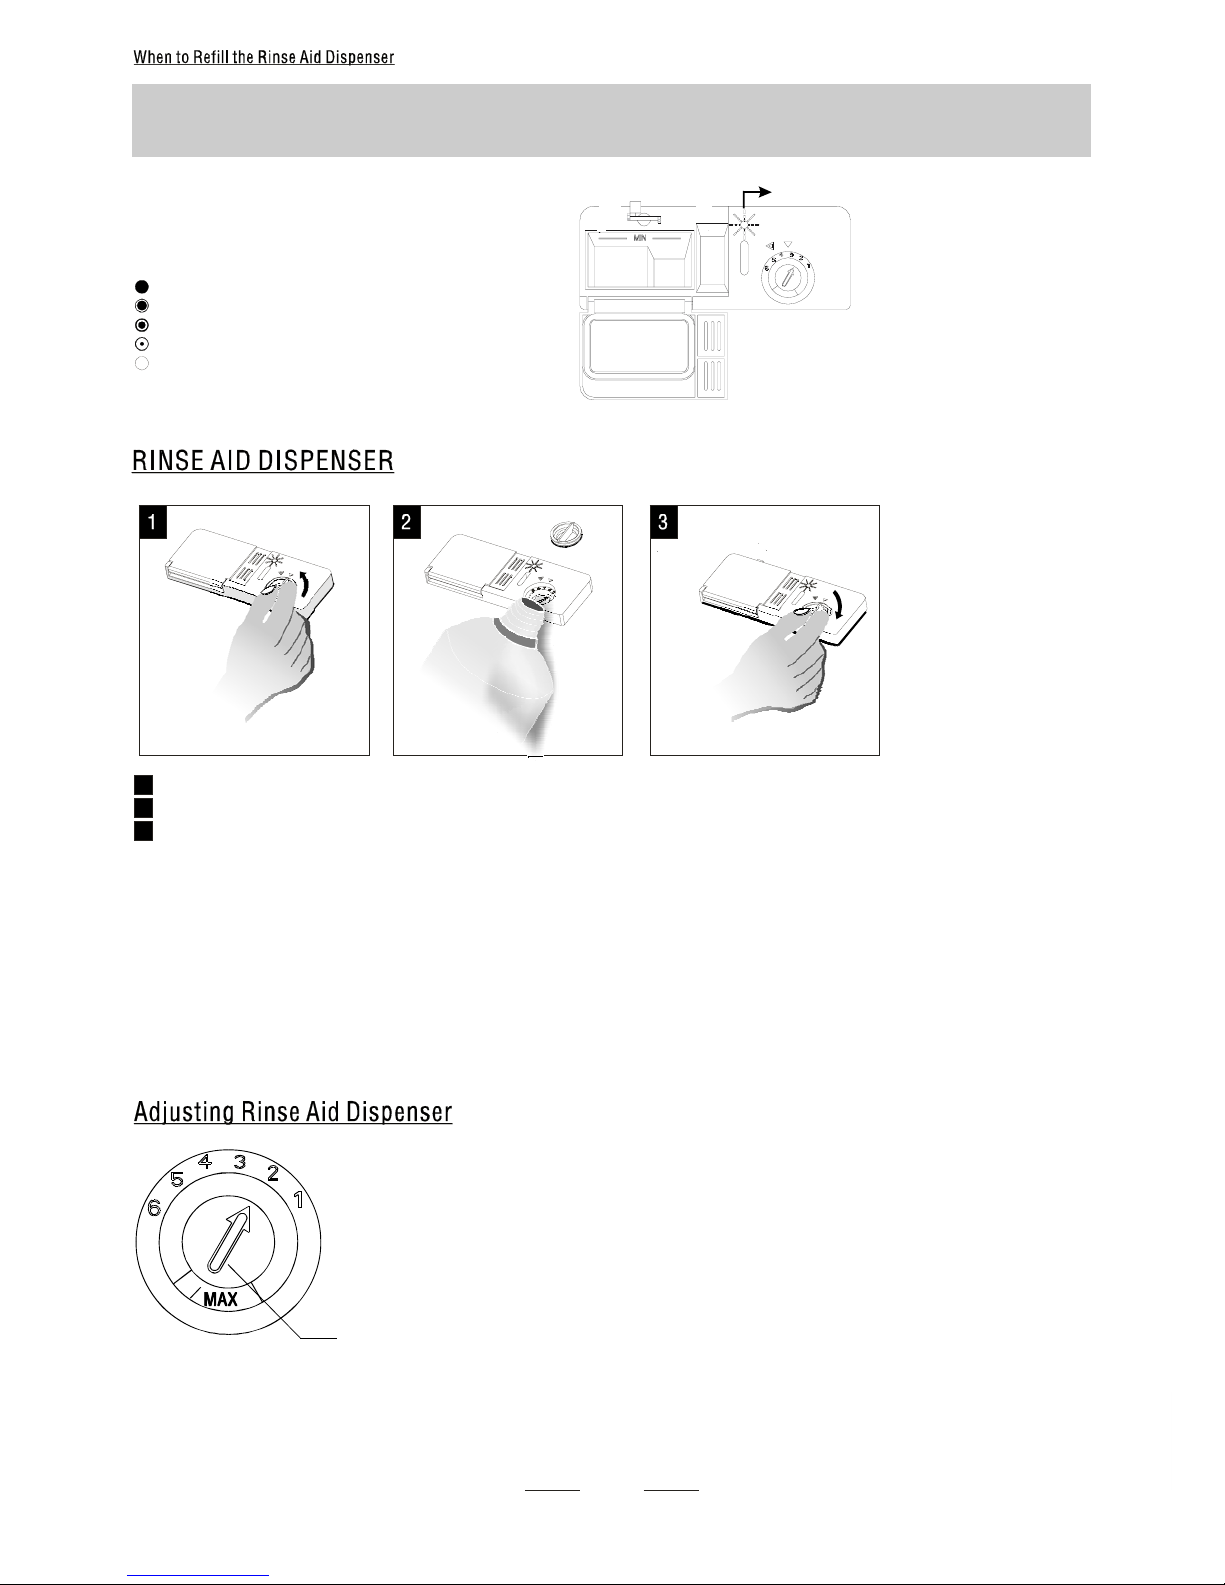
To open the dispenser,turn the capto the "open" (left) arrow and lift it out.
Pour the rinse aid into the dispenser, being careful not to overfill.
Replace the cap by inserting it aligned with "open" arrow and turning it to the closed (right) arrow.
The rinse aid is released during the final rinse to prevent water from forming droplets on your dishes
that can leave spots and streaks. It also improves drying by allowing water to sheet off the dishes.
Your dishwashers are designed to use liquid rinse aids. The rinse aiddispenser is located inside the
door next to the detergent dispenser. To fill the dispenser, open the cap and pour the rinse aid into
the dispenser until the level indicator turns completely black. The volumeoftherinseaidcontainer
is about140ml.
Be careful not to overfillthe dispenser,because this could cause over sudsing.Wipeawayanyspills
with a damp cloth. Don't forget to replace the cap before you close dishwasher door.
Attention!
Clean up any rinse aid split during filling with an absorbent cloth to avoid excess foaming
during the next wash.
The rinse aid dispenser has 6 settings. Always startwith the dispenser set on
“2”.Ifspots and poor drying are problems,increase the amount of rinse aiddispensed
by removing the dispenser lid and rotating the dial to “3”. If the dishes still are not
drying properly or are spotted,adjust the dial to the next higher number until your dishes
are spot-free. We suggest you to set on “2”(Factory value is “2”)
NOTE:
Increase the dose if there are d rops of water or li me spots on the dishes after washing.
Reduceit if there are sticky whitish streaks on the dishesor a bluish film onglasswareor
knife blades.
6
1
2
3
As the rinse aid diminishes, the size of the black dot
on the rinse aid level indicator changes, as illustrated below.
Full
3/4full
1/2full
1 / 4 full - Should refill to eliminate spotting
Empty
You can judge the amount of rinse-aid by the color of the optical level indicator "D" located next to the cap. When the rinse-aid
containerisfull,the wholeindicator willbe dark .Astherinse-aid diminishes, the size of the dark dot decreases. You should never
let the rinse aid getbelow1 / 4 full.
D (Rinse-Aid indicator)
Adjustlever
(Rinse)
Based on their chemical composition, dishwasherdetergent can be:
conventional, alkaline detergents wi th caustic components
low alkaline concentrated d etergents with natural enzymes
The use of “normal”washing programmes in conjunction with concentrated detergents
reduces pollution and is good for your dishes; these wash programmes are specially matched
to the dirt-dissolving properties of the enzymes of the concentrated detergent. For this reason
“normal”wash programmes in whichconcentrated detergentsareused canachieve the
same results that can otherwiseonly be achieved using “intensive” programmes.
Detergent tabletsof different brands dissolve at different speeds. For this reason some
detergent tablets cannot dissolve and develop their full cleaning power during short
programmes. Therefore pleaseuse long programmes when using detergent tablets, to
unsure the complete remova l of detergent residuals.
The dispenser must be refilledbefore the start of each wash cycle following the instructions
provided in the Wash Cycle Table. Generally,only one tablespoon of detergent is needed for
a normal wash load. Also, more heavily soiled items need more detergent. Always add the
detergent just before starting dishwasher, otherwise it could get damp and will not dissolve
properly.
Amount of Detergent to Use
Alwaysadd the detergent just before starting each wash cycle.
Only use branded detergent aid for dishwasher.
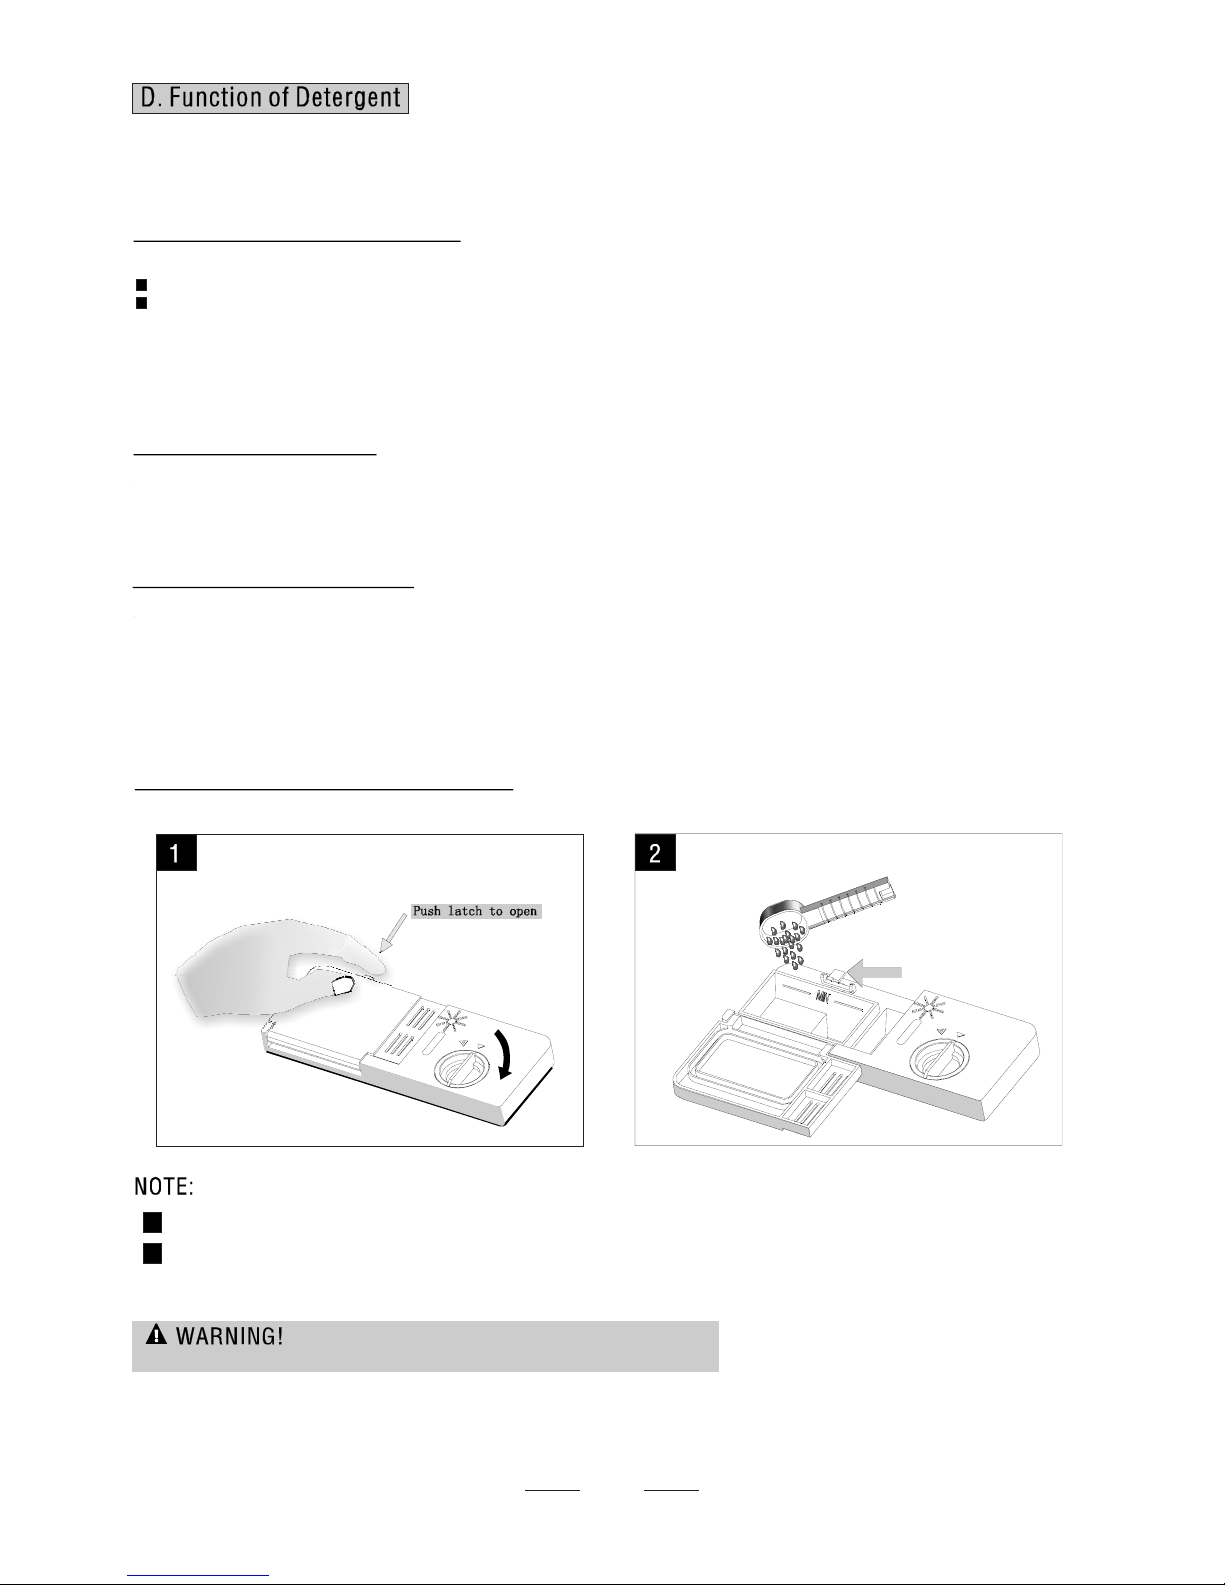
If the lid is closed: press release button. The lid springs open.
Dishwasherdetergent is corrosive!Take care to keep it out of reach of children.
Proper Use of Detergent
Use only detergent spec ifically made for use in dishwashers. Keep your detergent fresh
and dry. Don't put powder detergent into the dispenser until you're ready to wash dishes.
7
Concentrated Detergent
Detergent Tablets
Detergent Dispenser
Detergents with it s chemical ingredients are necessary to remove dirt, dissolved dirt a nd
transport it out of the dishwasher. Most of commercial quality detergents aresuitable
forthis purpose.
1
2
Please refer to the 'WASH CYCLE TABL E' on pag e 15 for the correct amount of detergent to use for each cycle
Fill the detergent dispenser with detergent.
The marki ng indicates the dosing levels , a s
illustrated on right:
Place the detergent for the main wash cyc le he re.
Place the detergent for the pre-wash cycle here.
Please observe the manufacturers dosing and storage
recommendations as stated on the detergent packaging.
Close the lid and press until it loc ks in place.
If the dishes are heavily soiled, place an additional detergent dose in the pre-wash detergent
chamber. This detergent will take effect during the pre-wash phase.
Youfind informationabout the amount ofdetergent for the single programmes on the
last page. Please aware, that according to the level soiling and the specific hardnessof
water differencesare possible.
Please observe the manufacturer's recommendations on the detergent packaging.
NOTE:
1
2
1
2
Filling the detergent container
8
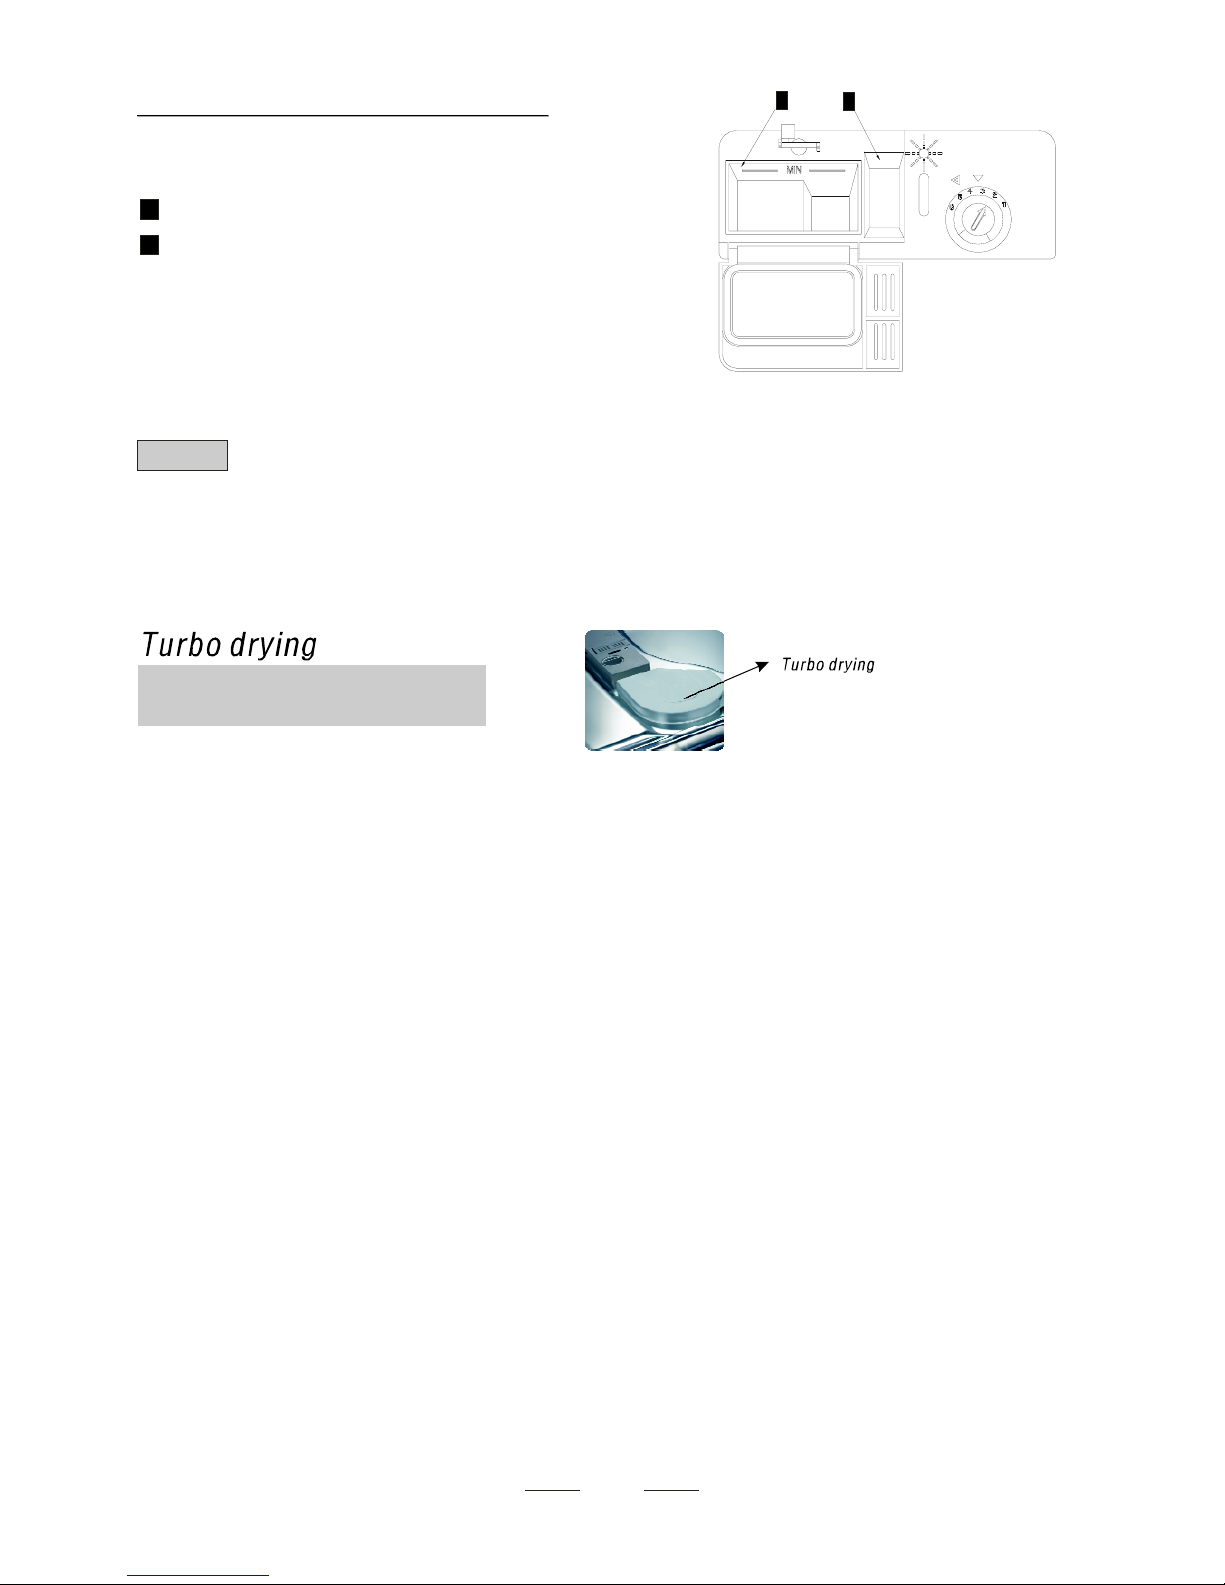
Turbo drying is a very effective drying system.
The moist, warm air is expelled quickly by a fan
to provide optimum drying results.
 Loading...