


TOASTER
INSTRUCTIONS FOR USE
SAVE THESE INSTRUCTIONS
GRILLE-PAIN
MODE D’EMPLOI
CONSERVEZ CE MODE D’EMPLOI
TOSTADORA
INSTRUCCIONES PARA EL USO
REPASE Y GUARDE ESTAS INSTRUCCIONES
LEA CUIDADOSAMENTE ESTE INSTRUCTIVO ANTES DE USAR SU APARATO
MODEL/MODELE/MODELO
DTT02 series
Register this product on-line and receive a free trial issue of Cook's Illustrated. Visit
www.delonghiregistration.com
Visit www.delonghi.com for a list of service centers near you.
Enregistrez ce produit en ligne et recevez un numéro gratuit de Cook's Illustrated. Visitez
www.delonghiregistration.com
Visitez www.delonghi.com pour y voir une liste des centres de réparation proches de
chez vous.
Registre este producto en línea y reciba un ejemplar gratis de Cook's Illustrated. Visite
www.delonghiregistration.com
Visite www.delonghi.com para ver la lista de centros de servicios cercanos a usted.
ELECTRIC CHARACTERISTICS/ CARACTÉRISTIQUES ÉLECTRIQUES
CARACTERISTICAS ELECTRICAS
120 V~ 60 Hz 900 W

2
EN
SHORT CORD INSTRUCTIONS
a) A short power-supply cord or detachable power-supply cord is provided to reduce risks resulting from becoming entangled
in or tripping over a longer cord.
b) Longer detachable power-supply cords or extension cords may be used if care is exercised in their use.
c) If a long detachable power-supply cord or extension cord is used:
1. The marked electrical rating of the detachable power-supply cord or extension cord should be at least as great as the
electrical rating of the appliance;
2. Extension cord should be a grounding-type 3-wire cord;
3. The longer cord should be arranged so that it will not drape over the counter top or table top where it can be pulled on
uby children or tripped over.
FR
INSTRUCTIONS POUR CORDON COURT
a) Un cordon d’alimentation court ou un cordon d’alimentation détachable sera fourni pour réduire les risques de s’emmêler
ou de trébucher sur un cordon plus long.
b) Des cordons d’alimentation détachables ou des rallonges sont disponibles et peuvent être utilisés s’ils le sont de façon sécu-
ritaire.
c) Si un long cordon d’alimentation détachable ou une rallonge est utilisé :
1. La puissance nominale du cordon d’alimentation détachable ou de la rallonge doit être au moins égale à la puissance
électrique nominale de l’appareil;
2. Le cordon devra présenter trois conducteurs dont la terre;
3. Le cordon plus long doit être disposé de façon à ne pas pendre du comptoir ou de la table pour éviter qu’un enfant le tire
ou qu’il trébuche.
ES
INSTRUCCIONES CABLE CORTO
a) Se proporciona un cable corto o un cable desmontable de alimentación eléctrica para reducir el riesgo de enredarse o trope-
zarse con un cable más largo.
b) Los cables desmontables de alimentación eléctrica o cables de extensión largos se pueden utilizar siempre que esto se reali-
ce con cuidado.
c) Si se utiliza un cable desmontable de alimentación eléctrica o un cable de extensión largos:
1. El rango eléctrico del cable desmontable de alimentación eléctrica o del cable de extensión debe ser al menos igual al
rango eléctrico del dispositivo;
2. El cable de prolongación tiene que ser un cable de 3 hilos de tipo con con puesta a tierra;
3. El cable más largo se debe disponer de forma que no cuelgue sobre la mesa o el mostrador. De lo contrario los niños
pueden tirar de él o tropezarse.
3
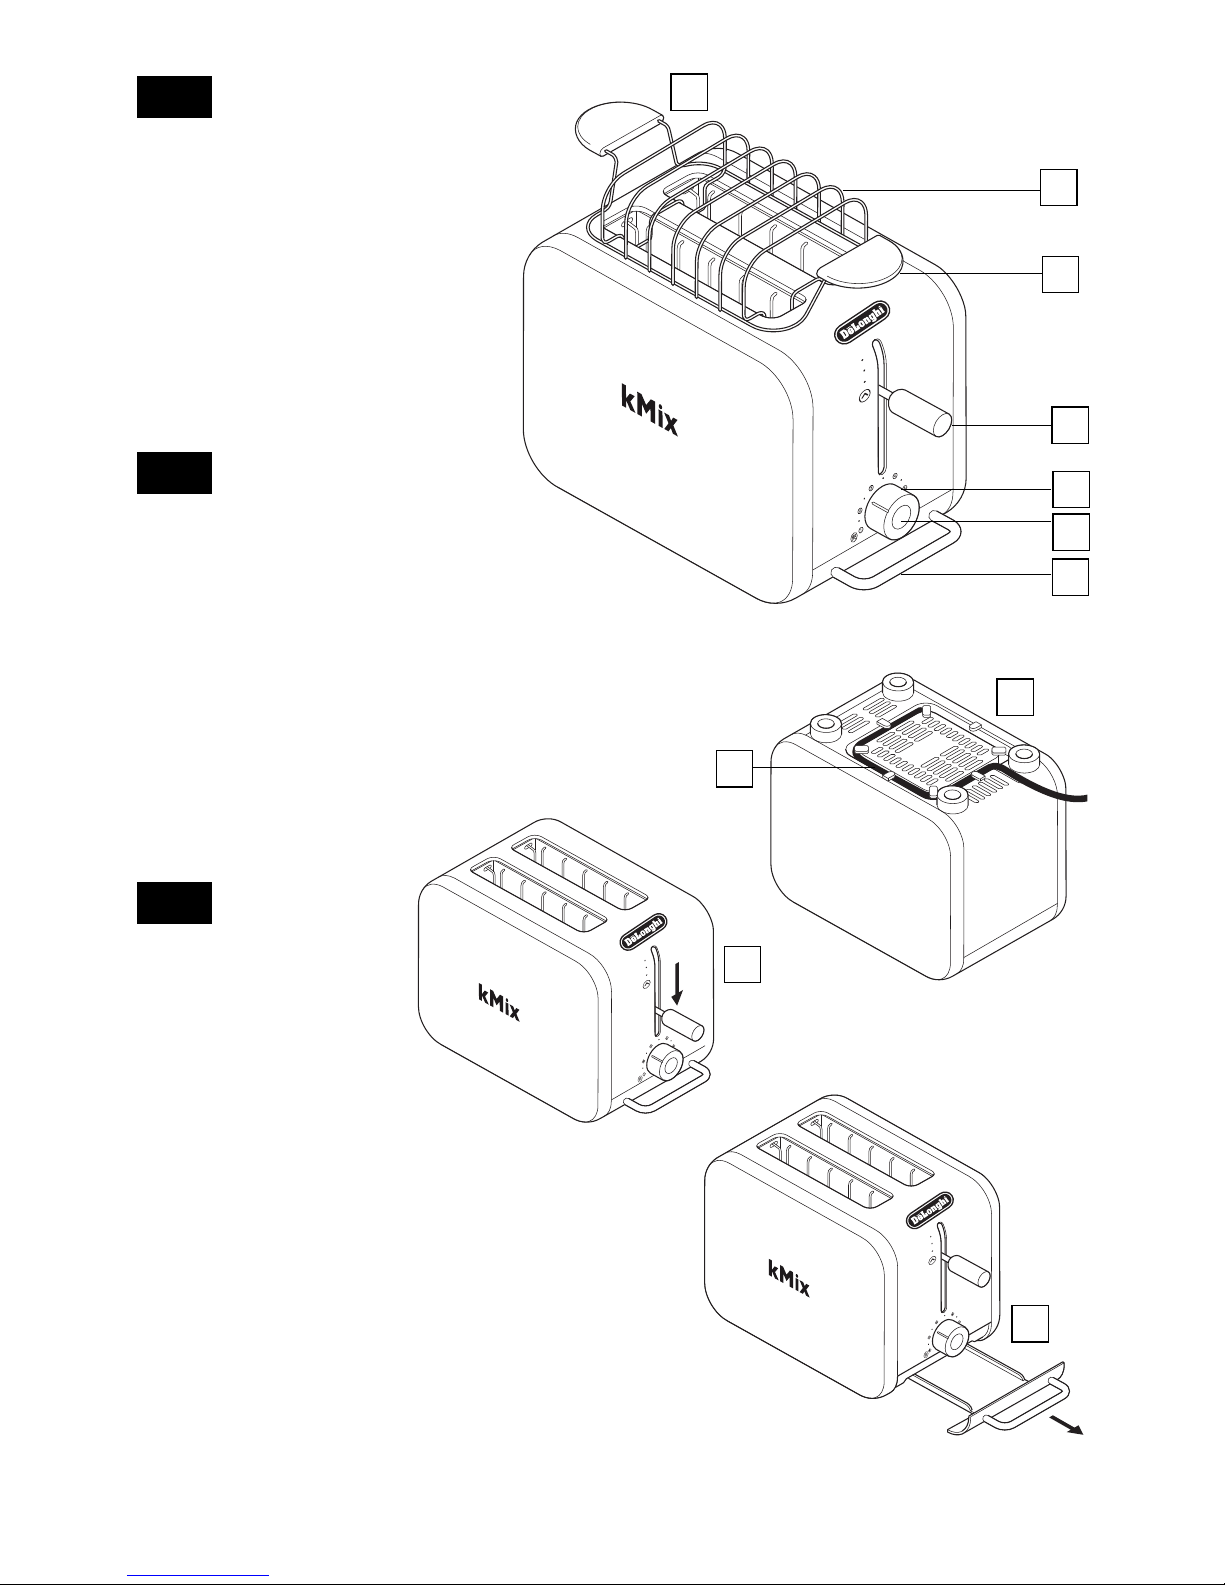
DESCRIPTION OF APPLIANCE
A removable warming
rack/toast rack
B warming rack handle
C Peek & View™ carriage
lever
D browning control
E cancel button with indicator
light
F crumb tray
G cord storage
DESCRIPTION DE L’APPAREIL
A grille chauffante/
porte-toasts amovible
B levier de la grille de
réchauffage
C levier de chariot Peek &
View™
D bouton de contrôle du
grille-pain
E bouton ‘annuler’ avec
témoin lumineux
F tiroirs ramasse-miettes
G rangement du cordon
DESCRIPCIÓN DEL APARATO
A rejilla para tostar o calendar
extraíble
B asa de la resistencia
C palanca de elevación Peek &
View™
D botones de control del
tostado
E botón de “cancelación” con
luz indicadora
F bandejas de migas
G recoge-cables
EN
ES
FR
3
B
A
C
D
E
F
1
G
2
4

4
When using electrical appliances, basic safety precautions should always be followed, including the
following:
1. Read all instructions carefully before using
your toaster. Save these instructions for future
reference.
2. Remove all packaging before using this product. We advise to keep the original packaging
until you are satisfied the product is operating
correctly.
3. To protect against electrical shock, do not
place cord, plug or toaster in water or other
liquid.
4. Position the toaster on a firm, level, heat-resistant surface, close to an electrical outlet and
out of the reach of children.
5. A fire may occur if toasters are covered or
touching flammable material, including curtains, draperies and the like, when in operation.
6. The area around the toasting slots will become
hot during use. Do not touch these surfaces
during operation.
7. When using only one toast slot, do not allow
anything to enter the other slot(s), as all slots
are “on” when the lever is lowered.
8. Do not allow the toasting slots to become covered during operation.
9. Do not cover the air inlet on the bottom of the
toaster.
10. Do not toast items with butter or jam or make
toasted sandwiches, as this could cause a fire
hazard.
11. Pita bread and similar food products are
unsuitable for use in an automatic toaster as
they may expel fats onto the heating elements, creating a fire hazard.
12. Do not use torn, curled up, or misshapen slices
of bread, as these may jam the eject mechanism.
13. Should the lever become jammed during the
toasting cycle do not attempt to release it.
Unplug the toaster and allow it to cool down
before carefully removing the bread. Do not use
a knife, fork or other sharp implement as this
may cause damage to the heating elements.
14. Do not let cord hang over edge of table or
counter, or touch hot surfaces.
15. Do not touch hot surface. Use handles or knobs
16. After use, unplug the toaster and let it cool
down fully before cleaning and storing away.
17. Clean the crumbs out of your toaster frequently. This will avoid a build up of crumbs which
could cause a fire hazard (see ”Cleaning and
Maintenance").
18. Do not operate the toaster unless the crumb
tray is correctly fitted.
19. Close supervision is necessary when any appliance is used by or near children.
20. Do not place toaster on or near a hot gas or
electric burner, or in a heated oven.
21. Do not use outdoors.
22. Always plug cord into the electrical outlet
before turning on any controls. To disconnect,
turn the controls "Off" by pressing the Cancel
button, then remove plug from outlet.
23. Oversize foods, metal foil packages, or utensils
must not be inserted into the toaster as they
may cause the risk of fire or electrical shock.
24. The use of accessory attachments not recommended by the appliance manufacturer may
cause injuries.
25. Do not use the toaster for any purpose other
than those described in these instructions.
26. Do not attempt to dislodge food when the
toaster is plugged in.
27. Do not operate this appliance after it malfunctions or if the power cord or plug is damaged.
Return appliance to an authorized service
facility for examination, repair or adjustment.
WARNING – To prevent electric shock, unplug
before cleaning
EN
IMPORTANT SAFEGUARDS
SAVE THESE INSTRUCTIONS
For Household use only

5
Use the carriage lever to lift the toast to Peek & View™ at
any time without cancelling the toasting cycle.
Before plugging in
- Make sure your electricity supply is the same as the one
shown on the underside of your toaster.
- This appliance conforms to EC directive 2004/108/EC on
Electromagnetic Compatibility and EC regulation no.
1935/2004 of 27/10/2004 on materials intended for contact with food.
Before using for the first time
1 Clip excess cord into the cord storage clips in the base 1.
- Operate the toaster once on a medium setting without
bread. (The lever will not stay down unless the toaster is
plugged in).
- As with all new heating elements, your toaster may emit a
slight burning smell when it is first switched on. This is
normal and not a cause for concern.
To use your toaster
1 Plug the toaster into the power supply.
2 Move the browning control to the desired setting. Use a
low setting
for light toasting and for thin or dry bread.
3 Insert the bread, muffins, bagels etc.
4 Lower the lever until it locks 2. The ‘cancel’ button will illu-
minate. (The lever will not stay down unless the toaster is
plugged in).
- To toast frozen bread, move the browning control to the
defrost position .
- Use the carriage lever to lift the toast to Peek & View™ at
any time without cancelling the toasting cycle.
- To stop toasting during the cycle, press the ‘cancel’ button,
the toast will pop up and the ‘cancel’ button light will go
off.
5 Your toast will pop up automatically, to raise it higher,
lift the lever.
Hints on using your toaster
- Select a lower setting for light browning, for toasting one
slice only or for dry bread.
- When toasting a single slice of bread, you may notice a
variation in toast color from one side to the other - this is
normal.
- Dry/stale bread toasts more quickly than fresh bread and
thinly sliced bread toasts more quickly than thickly sliced
bread. Therefore, the browning control should be set at a
lower setting than usual.
- For best results ensure that the bread slices are of an even
thickness, freshness and size.
- In order to achieve uniform browning we recommend you
wait a minimum of 30 seconds between each toasting so
that the control can automatically reset.
Alternatively, select a lower setting when additional toasting is carried out.
Warming rack safety
1 Never set the browning control higher than 1 when using
the warming rack.
2 Never completely cover the warming rack.
3 When using the warming rack, never wrap the food up.
Plastic wrapping will melt and could catch fire. Foil will
reflect heat, damaging the toaster.
4 If you’re using the toaster slots, always remove the warm-
ing rack so it can’t burn you.
5 Always allow the warming rack to cool before removing
from the toaster. Never place a hot warming rack on a
work surface.
6 Never touch hot surfaces, especially the metal areas of the
warming rack.
To use the warming rack
1 Place the warming rack on top of toaster 3.
2 Put your food on top of the rack (slicing thick items in half
will speed up the warming process).
3 Set the browning control no higher than 1 .
4 Lower the lever.
5 At the completion of the warming cycle the toaster will
switch off automatically. Turn the items over and repeat
the operation. Watch to make sure they don’t burn.
6 To remove the warming rack, allow the toaster to cool and
unplug.
7 Lift off the warming rack.
Hints for the warming rack
- The warming rack can also be used as a toast rack, but
ensure it is cool before removing from the toaster.
Care and cleaning
1 Before cleaning, unplug your toaster and let it cool down.
2 Slide out the crumb tray 4. Clean, then replace. Do this reg-
ularly: crumbs can smoke or even burn.
3 Wipe the outside of the toaster and the warming rack with
a damp cloth, then dry. Do not use abrasives.

LIMITED WARRANTY
This warranty applies to all products with De’Longhi or Kenwood brand names.
What does the warranty cover?
We warrant each appliance to be free from defects in material and workmanship. Our obligation under this warranty is limited to repair at
our factory or authorized service center of any defective parts or part thereof, other than parts damaged in transit. In the event of a products
replacement or return, the unit must be returned transportation prepaid. The repaired or new model will be returned at the company
expense.
This warranty shall apply only if the appliance is used in accordance with the factory directions, which accompany it, and on an Alternating
current ( AC ) circuit.
How long does the coverage last?
This warranty runs for one year (1) from the purchase date found on your receipt and applies only to the original purchaser for use.
What is not covered by the warranty?
The warranty does not cover defects or damage of the appliance, which result from repairs or alterations to the appliance outside our factory
or authorized service centers, nor shall it apply to any appliance, which has been subject to abuse, misuse, negligence or accidents. Also,
consequential and incidental damage resulting from the use of this product or arising out of any breach of contract or breach of this warranty are not recoverable under this warranty. Some states do not allow the exclusion or limitation of incidental or consequential damage,
so the above limitation may not apply to you.
How do you get service?
If repairs become necessary, see contact information below:
U.S. Residents: Please contact our toll free hotline at 1-800-322-3848 or log onto our website at www.delonghi.com
Residents of Canada: Please contact our toll free hotline at 1-888-335-6644 or log onto our website at www.delonghi.com
Residents of Mexico: Please contact our toll free number 01-800-711-8805 for assistance or log onto our website at www.delonghi.com
The above warranty is in lieu of all other express warranties and representations. All implied warranties are limited to the applicable warranty period set forth above. This limitation does not apply if you enter into an extended warranty with De’Longhi. Some states/countries do
not allow limitations on how long an implied warranty lasts, so the above exclusions may not apply to you. De’Longhi does not authorize
any other person or company to assume for it any liability in connection with the sale or use of its appliance.
How does country law apply?
This warranty gives you specific legal rights, and you may also have other rights, which vary from state to state/country to country.
6

7
Lors de l’utilisation d’appareils électriques, des
précautions de sécurité sont nécessaires à suivre:
1. Veuillez lire toutes les instructions attentivement avant d’utiliser votre grille-pain.
Conserver ces instructions pour de futures
consultations.
2. Retirer tout l’emballage avant d’utiliser ce produit. Nous recommandons de conserver l’emballage original jusqu’à ce que vous soyez
satisfait du fonctionnement du produit.
3. Pour éviter les chocs électriques, ne jamais
immerger le cordon, la fiche ou le grille-pain
dans l’eau ou tout autre liquide.
4. Placer le grille-pain sur une surface plane,
stable, résistante à la chaleur, près d'une prise
de courant et hors de la portée des enfants.
5. Un incendie pourrait se déclencher si le grillepain est couvert ou touche à des matériels
inflammables tels que les rideaux, les tissus et
autres similaires pendant le fonctionnement.
6. La zone autour des fentes du grille-pain
devient chaude pendant le fonctionnement.
Ne pas toucher ces surfaces pendant le fonctionnement.
7. Lorsqu’une seule fente est utilisée, ne rien laisser entrer dans la seconde fente, puisque
toutes les fentes fonctionnent/chauffent
lorsque le levier est abaissé.
8. Ne pas couvrir les fentes du grille-pain pendant le fonctionnement.
9. Ne pas couvrir les prises d’air en-dessous du
grille-pain.
10. Ne pas griller d’aliments beurrés, avec de la
confiture ou ne pas utiliser l’appareil pour faire
griller des sandwichs car ils pourraient s’enflammer.
11. Le pain pita, les gaufres et autres produits similaires ne sont pas conçus pour le grille-pain
puisque des graisses pourraient s’écouler sur
les éléments, risquant ainsi de s’enflammer.
12. Ne pas faire griller de tranches ou morceaux de
pain irréguliers puisqu’ils pourraient bloquer le
mécanisme d’éjection.
13. Si le levier se coince pendant le cycle du grillage ne pas tenter de le décoincer.
Débrancher le grille-pain et laisser refroidir
avant de retirer le pain avec précautions.
Ne pas utiliser de couteau, fourchette ou tout
autre ustensile pointu ou coupant car ils pourraient endommager les éléments chauffants.
14. Ne pas laisser le cordon pendre de la table ou
du comptoir, ou toucher des surfaces chaudes.
15. Ne pas toucher les surfaces chaudes. Utiliser
les poignées ou boutons.
16. Après l’utilisation, débrancher le grille-pain et
laisser refroidir complètement avant de le nettoyer et de le ranger.
17. Nettoyer le tiroir ramasse-miettes régulièrement.
Ceci empêchera l’accumulation de miettes qui
pourraient s’enflammer (Voir « Entretien et
nettoyage »).
18. Ne pas utiliser le grille-pain si le tiroir n’est pas
correctement replacé.
19. Il est essentiel de superviser l'utilisation de
tout appareil électrique faite par un enfant ou
près d’un enfant.
20. Ne pas placer le grille-pain sur ou près de brûleur électrique, gaz ou four chaud.
Pour éteindre l'appareil, appuyer sur le bouton
Cancel, et débrancher l’appareil de la prise.
22. Brancher toujours le cordon dans la prise électrique avant de mettre l’appareil en marche.
23. Les aliments trop grands, les emballages de
feuille métallique (papier d’aluminium) ou
ustensiles ne devraient jamais être insérés
dans le grille-pain pour éviter tous les risques
d’incendies ou de chocs électriques.
24. Ne pas utiliser d’accessoires ou attachements
autres que ceux fournis par le fabricant.
25. Ne pas utiliser le grille-pain pour toutes autres
fonctions que celles mentionnées dans ces instructions.
26. Ne pas essayer de déloger des aliments lorsque
le grille-pain est branché.
FR
MISES EN GARDE IMPORTANTES

8
CONSERVEZ CE MODE D’EMPLOI
Pour un usage domestique uniquement
27. Ne pas utiliser cet appareil après une défaillance ou si le cordon d’alimentation ou fiche est
endommagé. Retourner l’appareil au service
après-vente autorisé pour toute vérification,
réparation ou ajustement. UTILISATION
DOMESTIQUE SEULEMENT.
ATTENTION: Pour éviter de choc électrique, retirer
la fiche de la prise électrique avant de nettoyer
l'appareil.
Vous pouvez utiliser le levier Peek & View™ pour soulever et
surveiller les aliments à tout moment, sans annuler le processus.
Avant de brancher l’appareil
- Assurez-vous que le courant électrique que vous utilisez est
le même que celui indiqué sous votre grille-pain.
- Cet appareil est conforme à la directive 2004/108/CE de la
CE sur la compatibilité électromagnétique, et au règlement
1935/2004 de la CE du 27/10/2004 sur les matériaux destinés au contact alimentaire.
Avant d’utiliser votre appareil pour la première fois
1 Rangez l’excès de cordon dans les clips de rangement sous
l’appareil 1.
- Faites fonctionner le grille-pain une fois sur un réglage
moyen sans pain. (Le levier ne peut rester abaissé que si le
grille-pain est branché.)
- Comme tout élément chauffant neuf, votre grille-pain est
susceptible de dégager une légère odeur de brûlé lorsqu’il
est mis en marche pour la première fois. Ce phénomène est
normal et ne doit pas vous inquiéter.
Utilisation de votre grille-pain
1 Branchez le grille-pain sur l’alimentation électrique.
2 Positionnez le bouton de contrôle du brunissage sur le
réglage désiré. Utilisez un niveau de réglage faible pour
griller légèrement et pour les tranches fines ou le pain ras-
sis.
3 Insérez le pain, les muffins, les petits pains, etc.
4 Abaissez le levier 2 jusqu’à ce qu’il se verrouille. Le bouton
‘cancel’ (annulation) s’allume. (Le levier ne reste pas abais-
sé si le grille-pain n’est pas branché).
- Pour griller du pain congelé, placez la commande de gril en
position « décongeler » .
- Vous pouvez utiliser le levier Peek & View™ pour
soulever et surveiller les aliments à tout moment, sans
annuler le processus.
- Pour arrêter le grille-pain, appuyez sur le bouton ‘cancel’,
le toast est éjecté et le témoin du bouton ‘cancel’ s’éteint.
5 Votre toast sera éjecté automatiquement, pour le
lever davantage, soulevez le levier.
Conseils d’utilisation de votre grille-pain
- Sélectionnez un niveau de réglage inférieur pour un
brunissage léger, pour faire griller une seule tranche ou si
le pain est sec.
- Si vous faites griller une seule tranche de pain, il est possible que vous constatiez une différence de brunissage entre
les deux faces ; cette variation est normale.
- Le pain sec/rassis grille plus rapidement que le pain frais et
les tranches fines grillent plus rapidement que les tranches
épaisses. Par conséquent, le contrôle du brunissage doit
alors être réglé à un niveau inférieur à celui habituellement
employé.
- Pour un résultat optimal, assurez-vous que les tranches de
pain sont d’épaisseur, de fraîcheur et de taille égale.
- Afin d’obtenir un brunissage uniforme, nous vous recommandons d’attendre un minimum de 30 secondes entre
chaque utilisation du grille-pain, de sorte que le contrôle
puisse se remettre automatiquement à l’état initial. Vous
pouvez également régler le contrôle du brunissage à un
niveau inférieur, si vous faites davantage griller votre pain.
Sécurité de la grille chauffante
1 Ne réglez jamais la commande de brunissage à plus de 1 en
utilisant la grille chauffante.
2 Ne couvrez jamais complètement la grille chauffante.
3 Lorsque vous utilisez la grille chauffante, ne couvrez jamais

9
les aliments. Un emballage en plastique peut fondre et
prendre feu. Le papier d’aluminium reflète la chaleur et
endommagera le grille-pain.
4 Si vous utilisez les fentes du grille-pain, retirez toujours la
grille chauffante pour ne pas vous brûler.
5 Laissez toujours refroidir le plateau de réchauffage avant
de le retirer du grille-pain. Ne jamais poser le plateau de
réchauffage chaud sur une surface de travail.
6 Ne jamais toucher les surfaces chaudes, en particulier les
parties en métal du plateau de réchauffage.
Utilisation de la grille chauffante
1 Placez la grille chauffante au-dessus du grille-pain 3.
2 Placez les viennoiseries sur le plateau (coupez les articles
épais en deux pour accélérer le réchauffage).
3 Le contrôle du brunissage ne doit pas être réglé au delà
de 1 .
4 Abaissez le levier.
5 À la fin du cycle, le grille-pain s’éteindra automatique-
ment. Retournez vos viennoiseries et répétez l’opération.
Surveillez afin de vous assurer qu’elles ne brûlent pas.
6 Pour retirer la grille chauffante, laissez le grille-pain se
refroidir et débranchez-le. conseils pour la grille chauffante
7 Retirez la grille de réchauffage en la soulevant.
Conseils pour la grille chauffante
- Le plateau de réchauffage peut aussi s’utiliser pour griller,
mais assurez-vous qu’il a refroidi avant de le retirer du
grille-pain.
Entretien et nettoyage
1 Éteignez, débranchez et laissez refroidir votre grille-pain
avant de le nettoyer.
2 Retirez votre plateau 4 ramasse-miettes en glissant.
Nettoyez-le et replacez-le. Faites-le régulièrement: les
miettes peuvent fumer ou brûler.
3 Essuyez l’extérieur du grille-pain et le plateau de
réchauffage avec un chiffon humide, puis séchez-le. Ne pas
utiliser d’abrasifs.

10
Garantie limitée
Cette garantie s’applique à tous les appareils ménagers de marques De’Longhi ou Kenwood.
Qu’est-ce qui est couvert par la garantie?
Nous garantissons que chaque appareil est exempt de vices de matériaux et de fabrication. Notre obligation, dans le cadre de cette garantie,
est limitée à la réparation, à notre usine ou dans un centre de réparation agréé, de toutes les pièces défectueuses ou leurs composants. En
cas de remplacement ou retour d’un produit, il doit être retourné tout port payé. Le modèle neuf ou réparé sera retourné aux frais de la
société.
Cette garantie ne s’applique que dans les cas où l’appareil est utilisé conformément aux instructions de l’usine qui l’accompagnent et sur un
circuit électrique à courant alternatif (c.a.).
Combien de temps dure la garantie?
Cette garantie dure une (1) année à partir de la date d’achat indiquée sur votre reçu et s’applique uniquement à l’acheteur initial pour l’utilisation.
Qu’est ce qui n’est pas couvert par cette garantie?
Cette garantie ne couvre ni les défauts ou dégâts résultant de réparations ou altérations apportées à l’appareil en dehors de notre usine ou
des centres de réparation agréés ni les appareils qui ont été soumis à un mauvais traitement, une mauvaise utilisation, une négligence ou
des accidents. En outre, les dommages-intérêts directs ou indirects résultant de l’utilisation de ce produit ou de la rupture d’un contrat ou du
non-respect de cette garantie ne sont pas recouvrables dans le cadre de cette garantie. Certains états ou provinces n’autorisent pas l’exclusion ou la limitation des dommages-intérêts directs ou indirects. Par conséquent, la limitation ci-dessus peut ne pas s’appliquer à vous.
Comment faire réparer l’appareil?
Si des réparations s’avèrent nécessaires, consultez les informations ci-dessous:
Résidents des États-Unis: Veuillez appeler notre ligne d’assistance sans frais au 1-800-322-3848 ou connectez-vous à notre site Web à
www.delonghi.com
Résidents du Canada: Veuillez appeler notre ligne d’assistance sans frais au 1-888-335-6644 ou connectez-vous à notre site Web à
www.delonghi.com
Résidents du Mexique: Veuillez appeler notre ligne d’assistance sans frais au 01-800-711-8805 ou connectez-vous à notre site Web à
www.delonghi.com
La garantie ci-dessus remplace toutes les autres garanties et représentations explicites. Toutes les garanties implicites sont limitées à la
période de garantie applicable établie ci-dessus. Cette limitation ne s’applique pas si vous concluez un contrat d’extension de garantie avec
De’Longhi. Certains états ou provinces n’autorisent pas les limitations sur la durée des garanties implicites. Par conséquent, les exclusions cidessus peuvent ne pas s’appliquer à vous. De’Longhi n’autorise aucune personne ni société à assumer des responsabilités en association avec
la vente ou l’utilisation de ses appareils.
Comment s’appliquent les lois du pay ou de la province?
Cette garantie vous donne des droits juridiques précis et vous pouvez également avoir d’autres droits qui peuvent varier d’un pay à un autre
ou d’une province à une autre.

11
Al utilizar aparatos eléctricos es conveniente respetar algunas reglas fundamentales de seguridad:
1. Lea atentamente estas instrucciones antes de
utilizar su tostador.
Conserve el manual para su consulta en el
futuro.
2. Desempaque el aparato antes de utilizarlo,
pero conserve los elementos de empaque
hasta que se haya asegurado de que el producto funciona correctamente.
3. Para evitar descargas eléctricas, no permita
que ni el cable, ni la clavija ni el tostador
entren en contacto con el agua o cualquier
otro líquido.
4. Coloque el tostador sobre una superficie esta-
ble, plana y resistente al calor, próxima al
tomacorriente y alejado del alcance de los
niños.
5. Para evitar riesgos de incendio no cubra el
aparato al usarlo o en contacto con materiales
combustibles tales como cortinas, trapos, etc.
6. Durante el funcionamiento el área circundante
de las ranuras están calientes: no toque estas
superficies.
7. No utilice el aparato en exteriores.
8. No cubra las ranuras cuando el aparato esté
funcionando.
9. No utilice el tostador para propósitos distintos
a los descritos en estas instrucciones. No cubra
la admisión de aire al fondo del aparato.
10. Cuando se utilice una sola ranura, preste aten-
ción a que no entre nada en las otras ranuras,
pues tam bién se calientan cuando la palanca
se baja.
11. No tueste alimentos con manteca, mantequilla
o jamón ni introduzca emparedados pues pueden incendiarse.
12. No introduzca en el tostador automático ali-
mentos que puedan ser inapropiados al despedir grasas sobre los elementos calentadores, lo
que puede causar un incendio.
13. No utilice rebanadas de pan partidas, dobladas
o irregulares pues se puede bloquear el mecanismo de expulsión.
14. Si el mecanismo de expulsión se trabase
durante la operación de tostado no intente
arreglarlo.
Desconecte y deje enfriar el tostados antes de
retirar cuidadosamente el pan atascado.
No inserte cuchillos, tenedores ni ningún otro
utensilio con punta al interior del aparato para
extraer el pan, pues esto puede dañar los elementos calentadores.
15. No deje que el cable de alimentación cuelgue
de la superficie o de la mesa de trabajo y evite
dejarlo en contacto con superficies calientes.
16. Permita que el aparato se enfríe antes de limpiarlo o almacenarlo.
17. Limpie frecuentemente las migajas en el tostados.
De esta manera se evita la acumulación de las
migajas, lo que eventualmente puede provocar un incendio (Vea el capítulo “Limpieza y
mantenimiento”).
18. No opere el aparato si la bandeja para las
migajas no se encuentra en su lugar.
20. Durante el funcionamiento, evite el contacto
con partes calientes del aparato. Utilice siempre las manijas o las agarraderas.
21. Preste siempre extrema atención cuando el
aparato se usa por niños o en la cercanía de
éstos.
22. Nunca deje el aparato cerca de una estufa de
gas o eléctrica o en hornos calientes.
23. Para apagar el aparato, coloque la palanca en
la posición “OFF” oprima el botón Stop/Clear y
ES
INSTRUCCIONES IMPORTANTES

12
Use la palanca de elevación para elevar las tostadas a Peek &
View™ en cualquier momento sin cancelar el ciclo de tostado.
Antes de enchufarla
- Asegúrese de que la red eléctrica tiene las mismas características que se muestran en la cara inferior de su tostador.
- Este dispositivo cumple con la Directiva 2004/108/CE sobre
Compatibilidad Electromagnética, y con el reglamento (CE)
nº 1935/2004, de 27 de octubre de 2004, sobre los materiales y objetos destinados a entrar en contacto con alimentos.
Antes de usarla por primera vez
1 Introduzca el cable sobrante en el hueco de la base,
sujetándolo con los ganchos 1.
- Ponga en funcionamiento la tostadora una vez en el ajuste
medio sin pan. (La palanca no permanecerá abajo a menos
que la tostadora esté enchufada.)
- Al igual que todas las resistencias de calor nuevas, su tostadora podrá emanar un ligero olor a quemado cuando la
enchufe por primera vez. Esto es normal y no es motivo de
preocupación.
Para usar su tostadora
1 Enchufe la tostadora a la toma de corriente eléctrica.
2 Ponga el control de tostado en el ajuste deseado. Utilice un
ajuste bajo para un tostado ligero y para las rebanadas
finas o el pan seco.
3 Introduzca el pan, los bollos, etc.
4 Baje la palanca 2 hasta que quede bloqueada. El botón
“cancel” (cancelar) se iluminará. (La palanca no se man-
tendrá bajada si la tostadora no está enchufada).
- Para tostar pan congelado, sitúe el control de tueste en la
posición de descongelación .
- Use la palanca de elevación para elevar las tostadas a Peek
& View™ en cualquier momento sin cancelar el ciclo de
tostado.
- Para detener el proceso de tostado durante el ciclo, pre-
sione el botón “cancel” (cancelar), las tostadas saltarán y la
luz del botón “cancel” (cancelar) se apagará.
5 Las tostadas saltarán automáticamente, para elevar-
las más, levante la palanca.
Consejos sobre el uso de la tostadora
- Elija un ajuste más bajo para un tostado ligero, para tostar
una sola rebanada o para pan seco.
- Al tostar una sola rebanada, podrá apreciar una variación en
el color de las tostadas de un lado a otro – esto es normal.
- El pan seco/duro se tuesta con mayor rapidez que el pan
tierno y las rebanadas finas se tuestan con mayor rapidez
que las gruesas. Por lo tanto, el control de tostado debe
fijarse en un ajuste menor de lo habitual.
- Para obtener los mejores resultados, asegúrese de que las
rebanadas tienen un grosor y tamaño uniformes y no mez-
cle pan duro con pan tierno.
- A fin de lograr un tostado uniforme, recomendamos que
espere al menos 30 segundos entre cada parada automáti-
ca. De forma alternativa, fije el control de tostado en un
ajuste menor al hacer más tostadas.
GUARDE ESTAS INSTRUCCIONES
Únicamente para uso doméstico
retire la clavija del tomacorriente.
24. Antes de encender el aparato recuerde siempre
que debe insertar la clavija en el tomacorriente. No deben introducirse a las ranuras del
tostador alimentos demasiado grandes,
envueltos en metal, u otros utensilios, para
evitar el riesgo de incendio o de descarga eléctrica.
25. No utilice accesorios o aditamentos que no
sean los proporcionados por el fabricante.
26. No intente extraer alimentos estando el aparato conectado a la alimentación eléctrica.
27. No ponga en funcionamiento el aparato si la
clavija o el cable presenten daños o después de
haber dado muestras de estar estropeados.
Las eventuales reparaciones o sustituciones
deben ser realizadas por personal autorizado.
ATENCIÓN:Para evitar el peligro de quemaduras,
retire la clavija del tomacorriente antes de limpiar
el aparato.

Seguridad para la rejilla de calentamiento
1 No ajuste el control de tueste más alto que 1 al usar la rejil-
la de calentamiento.
2 Nunca cubra completamente la rejilla de calentamiento.
3 Cuando utilice la rejilla de calentamiento, no envuelva
nunca los alimentos ya que el plástico se fundiría y podría
prender fuego. El papel de aluminio refleja el calor, lo que
dañaría el tostador.
4 Si usa las ranuras de la tostadora, quite siempre la rejilla de
calentamiento para evitar quemarse.
5 Deje siempre que la rejilla de calentamiento se enfríe antes
de quitarla de la tostadora. Nunca ponga una rejilla de
calentamiento caliente sobre una superficie de trabajo.
6 Nunca toque las superficies calientes, especialmente las
zonas de metal de la rejilla de calentamiento.
Para usar la rejilla de calentamiento
1 Coloque la rejilla de calentamiento sobre el tostador 3.
2 Ponga la comida encima de la rejilla (partir las piezas de
comida gruesas por la mitad acelerará el proceso de calen-
tamiento).
3 Ajuste el control de tostado en un valor no superior a 1
.
4 Baje la palanca.
5 Al final del ciclo de calentamiento, la tostadora se
desconectará automáticamente. Dé la vuelta a las piezas
de comida y repita la operación. Esté atento para evitar que
se quemen.
6 Para quitar la rejilla de calentamiento, deje que se enfríe la
tostadora y desenchufe.
7 Quite la rejilla para calentar levantándola.
Consejos para la rejilla de calentamiento
- La rejilla de calentamiento se puede usar también como
una rejilla para tostar, pero compruebe que esté fría antes
de quitarla de la tostadora.
Cuidado y limpieza
1 Antes de limpiar el tostador, desenchúfelo y deje que se
enfríe.
2 Deslice la bandeja de migas 4 hacia fuera. Límpiela y a con-
tinuación vuelva a colocarla en su sitio. Haga esto con frecuencia, ya que las migas pueden crear humo e incluso
quemarse.
3 Limpie el exterior de la tostadora y la rejilla de calen-
tamiento con un trapo húmedo y, a continuación, séquelos. No utilice abrasivos.
13

14
Garantía limitada
Esta garantía cubre todos los productos con las marcas De'Longhi o Kenwood.
Alcance de la garantía
Cada artefacto tiene garantía por defectos de materiales y de fabricación. Bajo los términos de esta garantía limitada, nuestra
obligación se limita a la reparación de partes o componentes (a excepción de partes dañadas durante el transporte) en nuestra fábrica o en un centro autorizado de servicio. Al devolver un producto para cambio o reparación, todos los costos de
envío deben ser pagados por el propietario del mismo. El producto nuevo o reparado será devuelto con los gastos de envío
pagados por la compañía.
Esta garantía es válida únicamente si el artefacto se utiliza de acuerdo con las instrucciones del fabricante (incluidas con el
artefacto) y alimentada eléctricamente con corriente alterna (CA).
Duración de la garantía
Esta garantía es válida por un (1) año a partir de la fecha de compra que figura en el recibo o factura de venta de la unidad, y
sólo el comprador original tiene derecho a hacer uso de la garantía.
Exclusiones de la garantía
La garantía no cubre defectos ni daños que fueran consecuencia de reparaciones o modificaciones efectuadas al artefacto por
personal ajeno a nuestra fábrica o a centros autorizados de servicio, ni cubre fallas o daños causados por maltrato, uso indebido, negligencia o accidentes. Esta garantía tampoco reconocerá reclamos efectuados por perjuicios directos ni indirectos
emergentes del uso del producto, ni perjuicios o daños resultantes del uso del producto en incumplimiento de los términos y
condiciones que hacen válida la garantía. En algunos estados no se permiten exclusiones ni limitaciones de los perjuicios
reconocidos por una garantía, por lo cual las limitaciones mencionadas podrían ser no válidas en su caso particular.
Obtención de servicios de garantía
Si las reparaciones son necesarias, vea la información de contacto que aparece a continuación:
Residentes de los Estados Unidos: Por favor contactar a nuestra línea telefónica gratuita, al 1-800-322-3848 o ingrese a
nuestro sitio en el Internet www.delonghi.com
Residentes de Canadá: Por favor contactar a nuestra línea telefónica gratuita, al 1-888-335-6644 o ingrese a nuestro sitio
en el Internet www.delonghi.com
Residentes de México: Por favor contactar 01-800-711-88-05 o ingrese a nuestro sitio en el Internet www.delonghi.com
La garantía explicada anteriormente se ofrece en reemplazo de cualquier otra garantía, sea expresa u ofrecida de cualquier
otra manera, y toda garantía implícita del producto estará limitada al período de duración mencionado anteriormente. Esta
limitación queda anulada y es reemplazada por otros términos si el usuario decide obtener una garantía prolongada de
De’Longhi. En algunos estados/paises no se permiten limitaciones del período de garantía implícita, por lo cual las limitaciones mencionadas anteriormente podrían no ser válidas en su caso particular. De’Longhi no autoriza a ninguna otra persona ni
compañía a ofrecer ningún tipo de garantía ni responsabilidad con respecto al uso o a los términos de venta de sus artefactos.
Leyes del país
Esta garantía le confiere derechos establecidos por ley, pero usted también podría tener otros derechos que varían de un
estado/país a otro.

40876/2
Printed in China
www.delonghi.com
 Loading...