

Page 1
Features
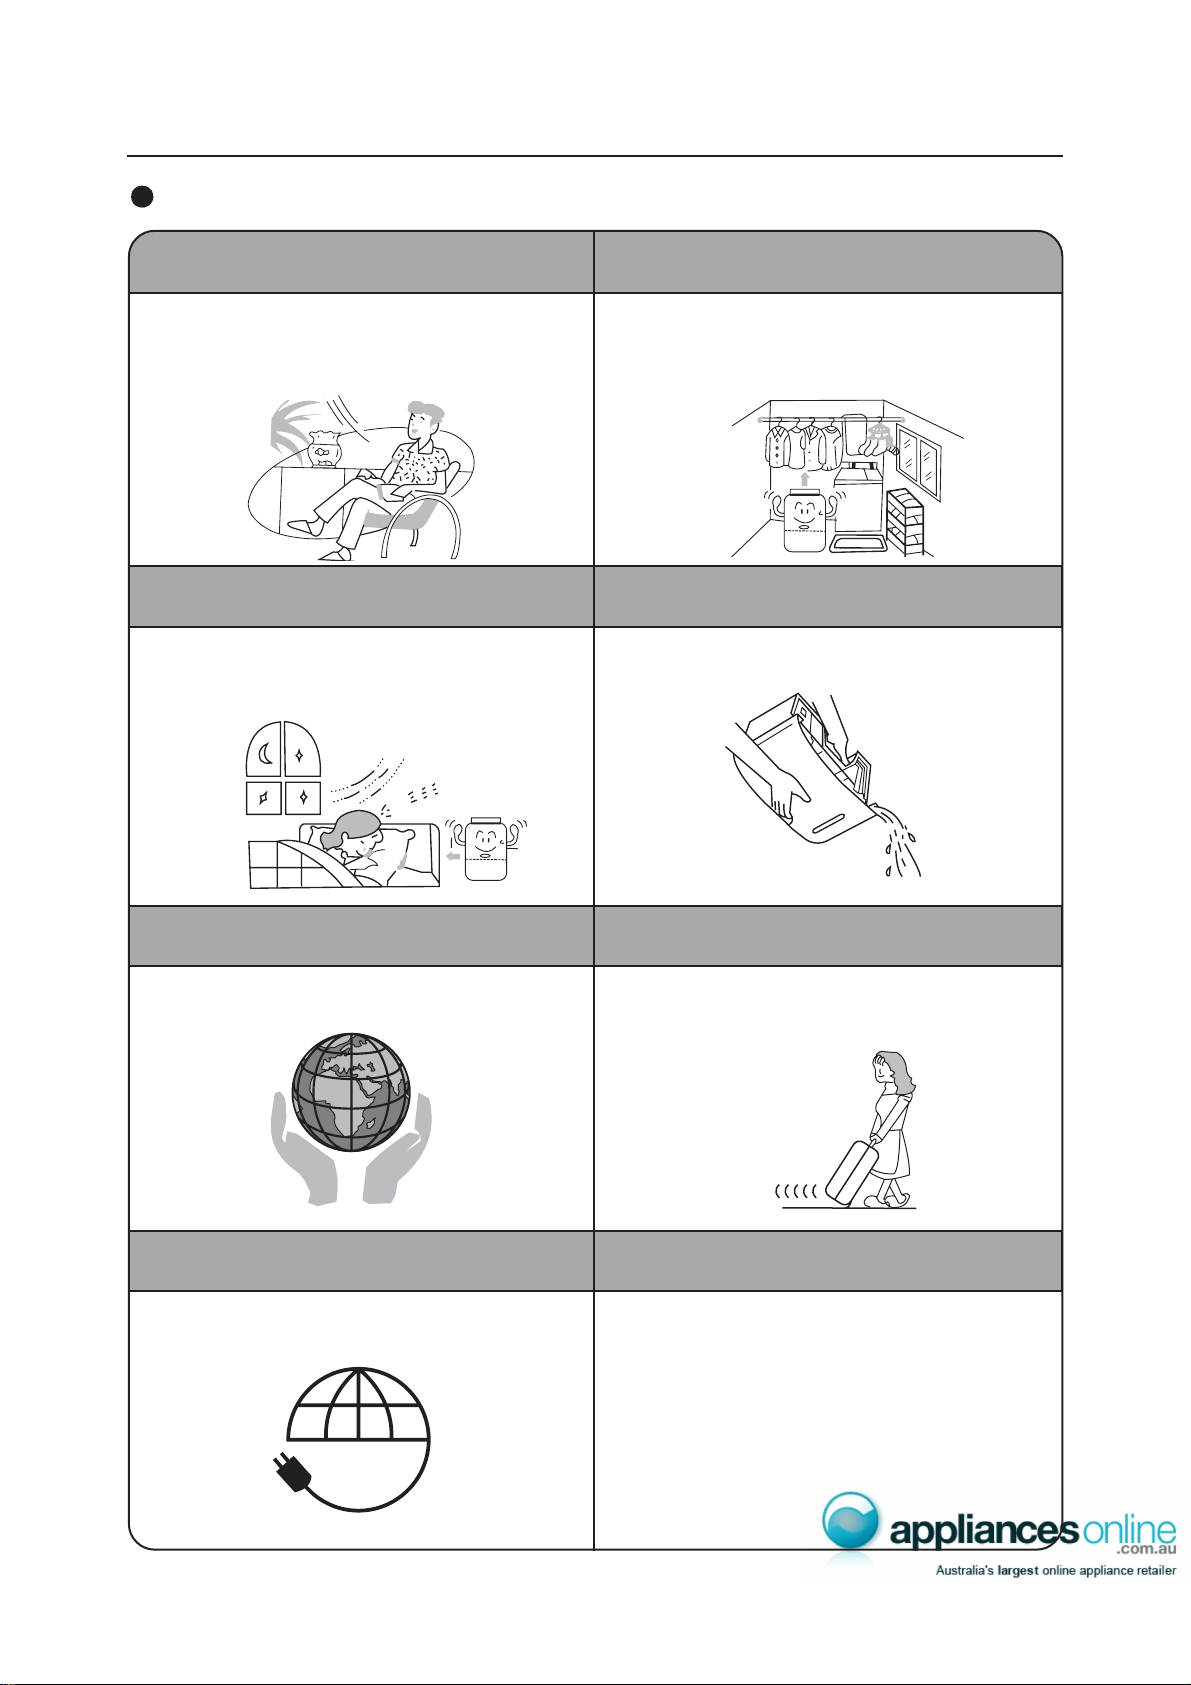
Powerful dehumidifying capability
The dehumidifier powerfully removes excess
moisture from the air creating a drier,healthier
home environment.
Quiet operation
For overnight operation,the QUIET mode may
be selected.
Excellent drying laundry function
The dehumidifier dries laundry quickly. This can
prevent laundry and furniture from becoming damp
and musty in a rainy season.
Drainage tank with a large capacity
Large 6 litre capacity water tank means the
dehumidifier requires emptying less often.
Using refrigerant for protecting environment
The dehumidifier uses no CFC refrigerant
therefore protecting the environment.
Saving energy
The power consumption is low.
SAVE
Modern Design
The dehumidifier is compact with a streamlined
appearance and modern design.
The castors at the bottom allow easy mobility.
- 1 -
Page 2
Specifications
Model CF08M
Power Supply
Dehumidifying Capacity
Power Consumption
Drainage T ank Capacity
Weight
Dimension(height
The dehumidification capacity is the value obtained after the dehumidifier was continuously run in the
room temperature of 30
The amount of dehumidification is the amount per day(24 hours).
The manufacturer reserves the right to change specifications without prior notification.
The work temperature is in the range 2 to 38 . If the room temperature is beyond the range, the unit
can not operate normally.
width depth)
with the relative humidity 80%.
0.8L/h
360W
14kg
380mm
220 ~240V ~ 50Hz
6.0L
545mm 261.5mm
CF05M
0.5L/h
200W
12.5kg
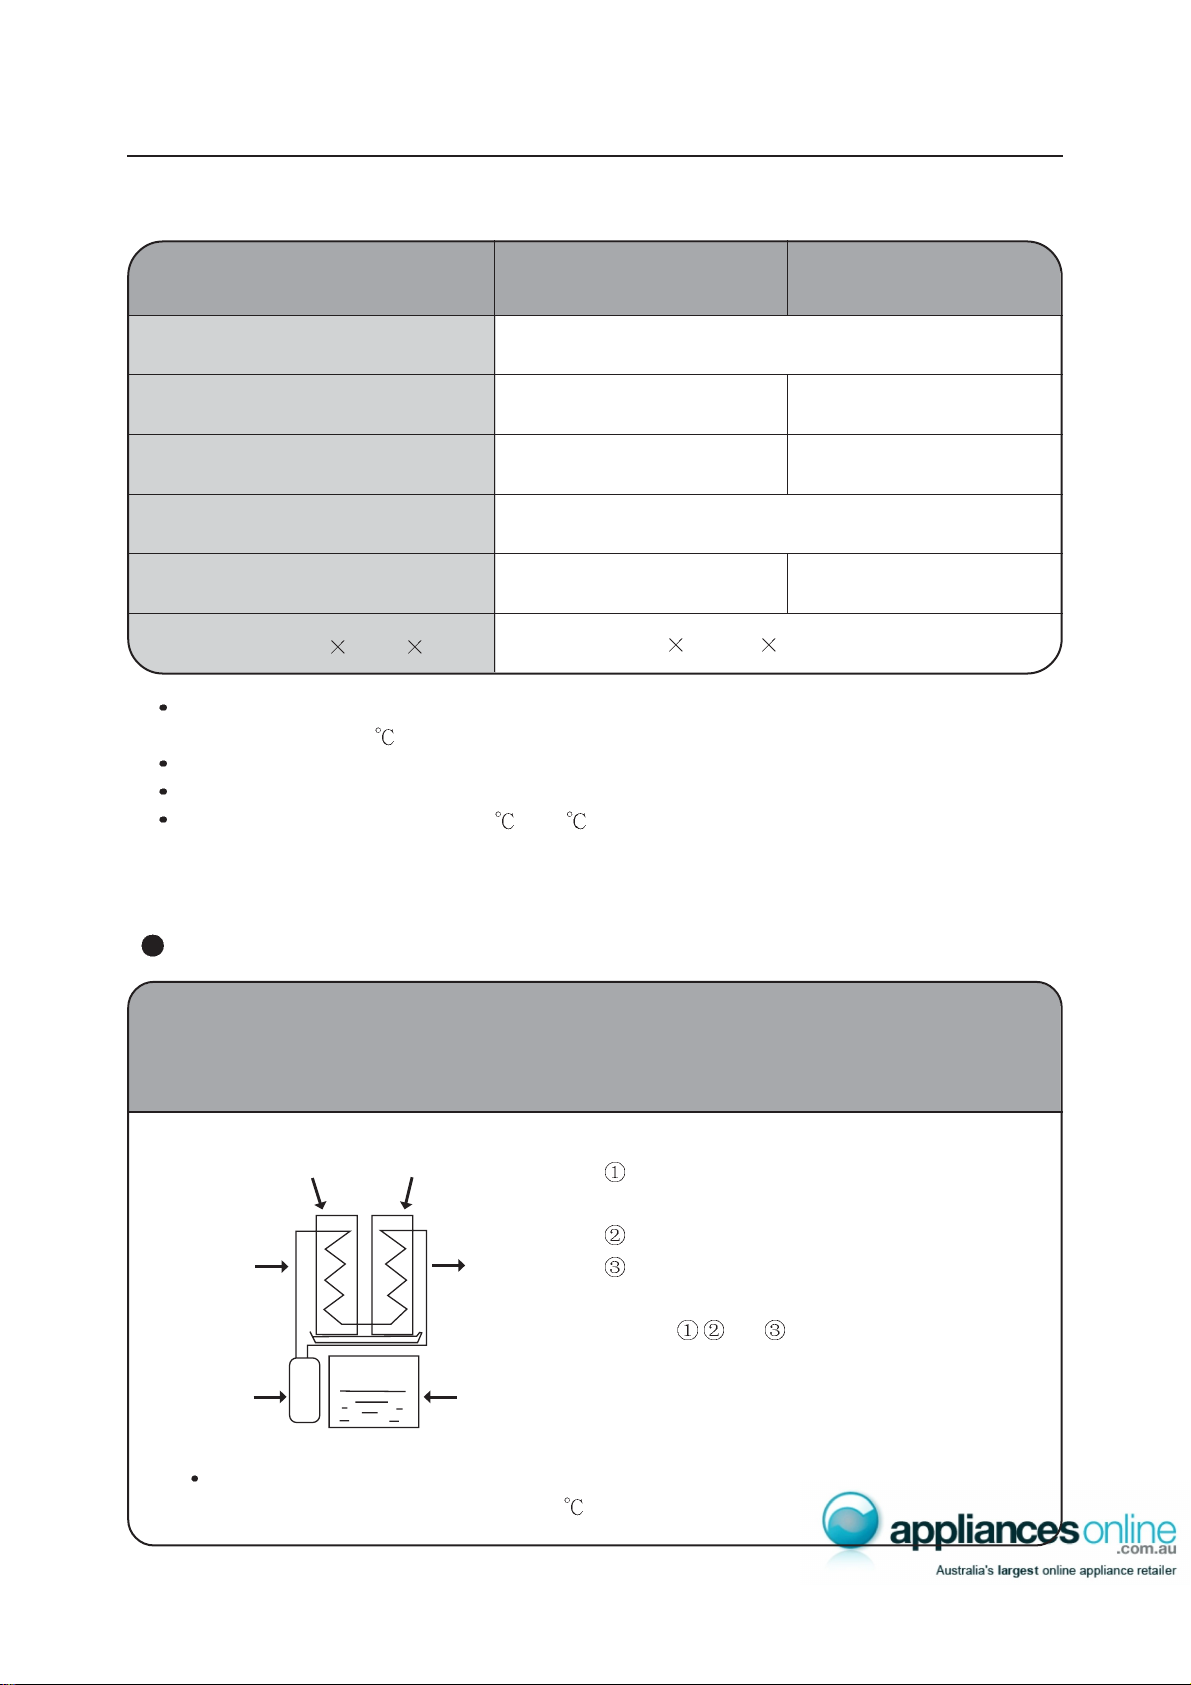
How dehumidifying works
If you pour cold water into a cup, the air around the cup is cooled, and drops of water
form on the surface of the cup. The dehumidifier takes advantage of this phenomenon to
remove moisture.
Cooling unit
Moist air
Compressor
After the air passes through the re-heating unit, its temperature will rise a little, so that the
temperature of the room will rise by 2 to 4
Re-heating unit
Dried air
Drainage tank
It draws in room air, cools it with a cooling unit,
and changes the humidity to drops of water.
The drops of water fall into a drainage tank.
The dehumidified air is re-heated by a heating
unit and discharged.
Steps
humidity from the room.
. This is normal operation.
, ,and are repeated to remove
- 2 -
Page 3

Description
Front panel
Air Outlet
Sensor
Do not obstruct!
Handle
Float
Louvre
Control Panel
Refer to next page
Guard
Water Level
Gauge
Drainage T ank
When the unit is purchased,
there may be some water left in
the drainage tank. This is from
the dehumidifying test
conducted at the factory, and
does not indicate a problem.
Back panel
Continuous
Drainage Port
Refer to page 7
Air Filter
(Back panel air inlet)
do not obstruct!
Refer to page 8
Cord Hook
Cord Band
(undo on operation)
Power Supply Plug
Castors
Refer to page 7
- 3 -
Page 4
Operation
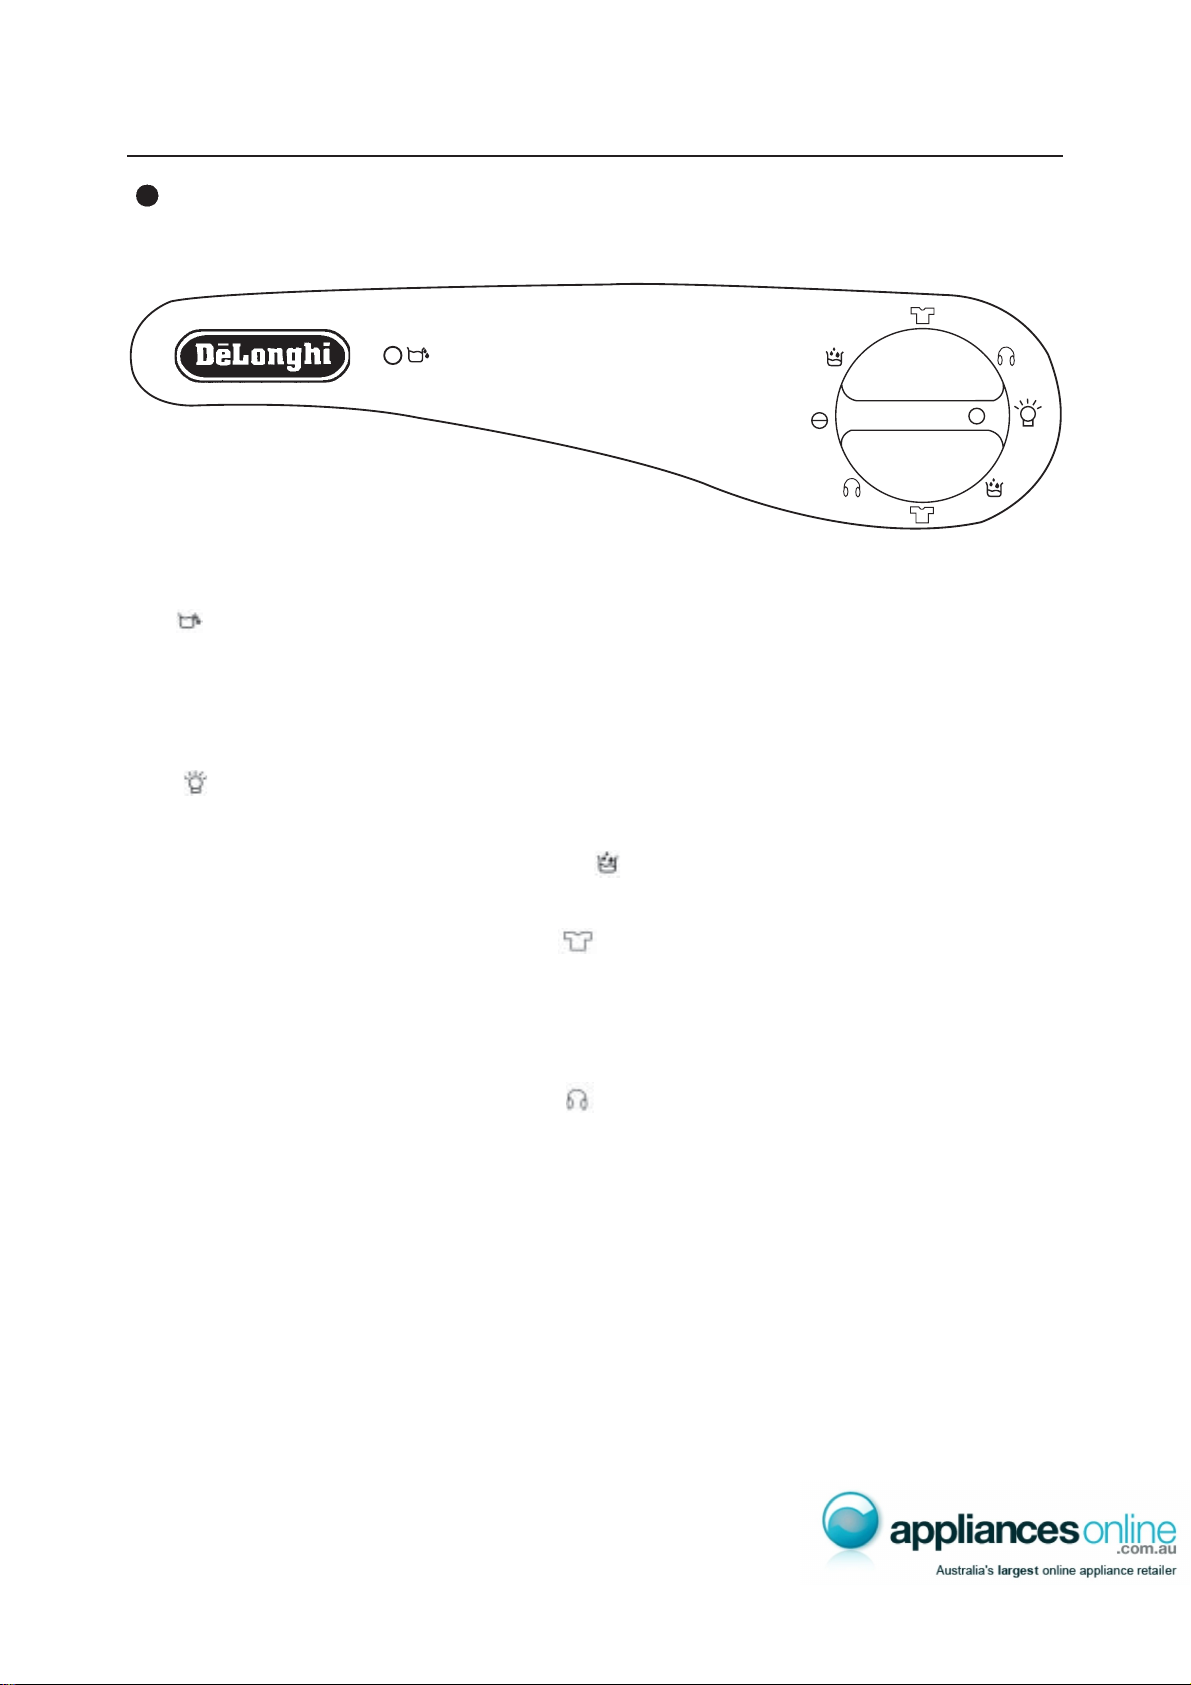
Operation panel
Indicator lamp
1.“ ” (Tank full indicator lamp):
It will light when the drainage tank is full or positioned incorrectly.
Empty the water out of the drainage tank, and make sure the tank is
positioned properly.
2. “ ” (Power indicator lamp):
It will light when the unit is plugged in.
3.DEHUMIDIFY mode: Turn the control switch to “ ”. Operation
is continuous ,with the amount of discharged air at the middle level.
4.LAUNDRY mode: Turn the control switch to “ ”. Operation is
continuous,with the amount of discharged air at the high level.This is
appropriate for enhanced dehumidifying,drying clothes or other
items.
5.QUIET mode: Turn the control switch to “ ”. Operation is
continuous,with the amount of discharged air at the low level.This suppresses operation noise when dehumidifying ( Under the condition
of high temperature and high humidity,please avoid operating the
unit in QUIET mode,as this can decrease the life of the unit.)
- 4 -
Page 5
Operation
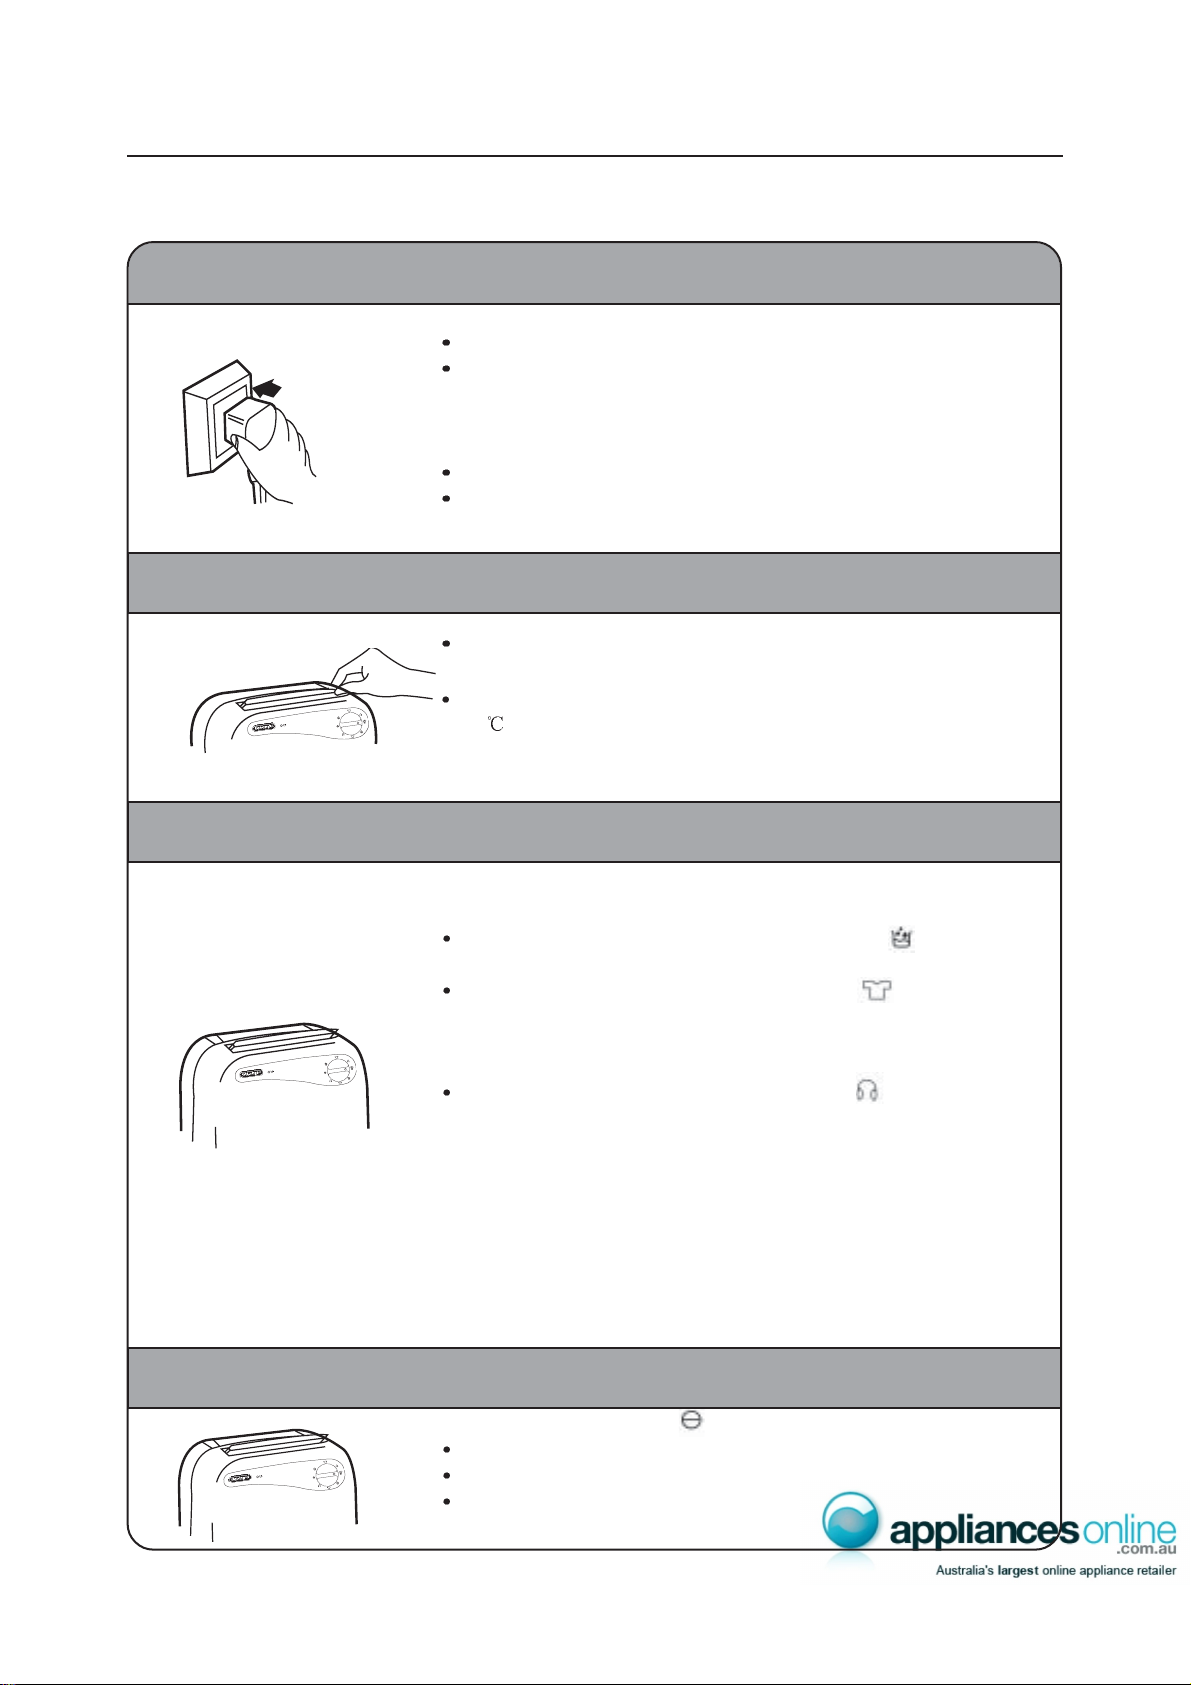
1.Plug the power supply plug into the outlet
230-240V AC
2.Open the louver by hand
3.Switch the operation mode
Use single phase 220V ~ 240V AC power supply.
Wipe dust off of the power supply plug and insert the plug firmly,
all the way to the rubber section, if there is a dust on the plug, or
the plug is not fully inserted in the outlet, electrical shock and/or
fire may result.
Never scratch, cut, or damage the power supply cord.
Power indicator lamp lights to indicate that power is on.
Before operation please check and make sure the louver has been
opened to ensure adequate air flow.
Set louvre to desired angle (when room temperature is above
set louvre to vertical position to allow maximum air flow.)
32
4.Stop operation
DEHUMIDIFY mode: Turn the control switch to “ ” . Operation
is continu
LAUNDRY mode: Turn the control switch to “ ” . Operation is
continu
is appropriate for enhanced dehumidifying,drying clothes or other
items.
QUIET mode: Turn the control switch to “ ”. Operation is
continu
suppresses operation noise when dehumidifying ( Under the
condition of high temperature and high humidity,please avoid
operating the unit in QUIET mode,as this can decrease the life of
the unit.)
Turn the control switch to “ ”
Dehumidifying stops.
Never stop the unit by unplugging the power supply cord.
Be sure after 3~ 5 minutes to restart the unit again when the unit
is stopped or power supply is cut.
ous ,with the amount of discharged air at the middle level.
ous,with the amount of discharged air at the high level.This
ous,with the amount of discharged air at the low level.This
- 5 -
Page 6

Abstergent
Gasoline
Thinner
Operation
Draining the water
The drainage tank is full
When the drainage tank becomes full (approx, 6 Litres), the full indicator lights to alert the user, and the
unit turns off automatically. Empty the water from the tank and discard it.
Drainage steps Notation for drainage
1. Remove the drainage tank
Lightly pressing on the sides of the tank with
both hands, pull it gently out.
T ake hold of the handle, and then remove the tank.
2. Discard the water
Guard
Drain water
from this point
Do not remove the bubble packing from the float
on the unit. The float on the unit will no longer be
able to detect without the bubble packing when the
water level is full, and water may leak from the
tank.
If the drainage tank is dirty, wash it with cold or
lukewarm water. Do not use detergent, scouring
pads, chemically treated cloths, or other cleaning
solutions as it may damage the drainage tank.
When replacing the drainage tank, press the tank
firmly into place with both hands. If the tank is not
positioned properly, the “ Tank Full” sensor will
activate, and the dehumidifier will not operate.
Check to make sure the guards are firmly attached
to the tank. If they are not, the drainage tank will
be harder to remove.
3. Place the drainage tank back in it’s
compartment.
If the drainage tank is removed while the unit is in
operation, or immediately after operation has
stopped, water which is still in the cooling unit may
drip out on the base plate. Wait at least 30 minutes
before removing the drainage tank.(If water has
dripped, wipe it up.)
- 6 -
Page 7

Operation
At least 50 cm
At least 20 cm
At least 20 cm
At least 20 cm
At least 20 cm
Draining the water
Continuous drainage of water
The unit has an optional continuous drainage port. Water can be continually drained by connecting a rubber
hose (15mm I.D), to this drainage port.When setting up the dehumidifier for continuous drainage, always
turn the unit off and unplug the supply plug.
1. Disconnect the drainage tank and open the
continuous drainage port.
Use sidecutters or similar tool to cut away the continuous
drainage port in the side of the main unit.
2. Push the hose into the continuous drainage port
Pass a rubber hose (15mm I.D) through the continuous
drainage port, and press it firmly into the drainage port
in the main unit, making sure water does not leak.
The height of drain piping should always be lower than the
height of the drainage port.
Make sure there are no kinks or obstructions in the rubber
hose which may prevent the water draining out.
3.Return the drainage tank to its original position
Check the hose periodically to make sure it is still connected
and has not been obstructed.
Moving the dehumidifier (using castors)
1.Drain the water.
2.Lift up the handle.
3.Move the unit.
Ensure the dehumidifier has adequate clearance
between the unit and nearby walls as shown
below.
Note:
1.If the floor is made of a material that scratches easily, or if the floor is uneven, lift up the unit and move
it. Also avoid rolling the unit on castors if the floor has shagpile carpet.
2.Tilt it within range of 20 to 30 degrees, as a rule (if you tip it too far, you may scratch the floor or water
may leak.)
3.Be careful that the power supply cord doesn't get pinched under the unit.
- 7 -
Page 8

Maintenance
Caring for the dehumidifier
Cleaning the Unit
Cleaning the air filter
Wipe it with a soft cloth
Use a soft,clean cloth to wipe the surface.
(Do not use volatile chemicals detergents,chemically treated cloths
or other cleaning solutions.These could possibly damage the unit.)
The air filter should be cleaned approximately once every two
weeks.
1.Remove the air filter
Press downward on the tabs on the air filter to remove it.
2.Clean the air filter
Run a vacuum cleaner lightly over the surface of the air
filter to remove dirt. If the air filter is very dirty, wash it
with warm water and a neutral cleaning solvent and dry
it throughly.
weeks.
3.Attach the air filter
Insert the lower tabs of the air filter into the main unit and
press the air filter until you hear the tabs click into place.
- 8 -
Page 9

Maintenance
Storing the dehumidifier
When the unit is not to be used for a long period of time
1. Fold up the power supply cord.
2. Discard any water left in the drainage tank and wipe away any remaining drops with a cloth.
3. Clean the air filter.
4. Store the unit
Package the unit to keep it free of dust, and keep it upright and store in a cool, dry place.
Important Safeguards
Please note the following safety precautions when using the unit:
1.When the dehumidifier is used in the laundry,ensure there is adequate clearnce between the clothes and
the unit as described on page 7,and prevent water dripping on the unit.
2.Before cleaning the unit or when it is not in use for a long period of time, unplug the power supply cord.
3.Do not use the dehumidifier in the immediate surroundings of a bath, shower, or swimming pool.
4.Do not place the unit close to a heater, or any appliance which will have a high temperature.
5.Do not place any objects into the Air Inlet or Outlet.
6.Do not sit or stand on the unit.
7.Discard water that has collected in the tank regularly.
8.Do not place the dehumidifier in an enclosed area i
Do not use the dehumidifier for any purpose other than for which it was originally intended.
9.
e closets, which will prevent air circulation.
10.
Install the external drain piping on a downhill gradient to ensure that condensed water can be drained
continuously.
11.
If the supply cord is damaged, it must be replaced by the manufacture or its service agent or a similarly
qualified person in order to avoid a hazard.
12.The appliance is not intended for use by young children and the infirm without supervision.
13.Young children should be supervised to ensure they do not play with the appliance.
- 9 -
Page 10

Maintenance
Troubleshooting
If a condition listed below occurs, please check the following items before seeking advice.
e
s
Condition
Th e unit does not
operate.
Ha
s the power supply cord been
disconnected?
Is the “Full” light blinking?(The
t ank i s f ull o r i ncorrec t l y
positioned.)
Is the temperature of the room
above 38
Cau
or below 2 .
What to do
g
Plu
the power supply cord into the
outlet.
Refer to page 5
the water in the drainage
d
Discar
tank, and then reposition the tank.
Refer to page 6.
The protection device has activated.
Please
wait for the room temperature
to
be with in these limits.
e dehumidifying
Th
functio
work
No air is discha
Operation
n does not
is noisy.
rged
Is the air filter clogged?
Is
the air inlet or outlet obstructed?
Is the air filter clogged?
Is the louver open?
Is the unit sitting on an angle or
unsteady?
Is the air filter clogged?
Clea
n the air filter as instructed
“Caring for the dehumidifier”.
under
Refer to page 8.
Remove
air inlet or outlet.
Clea
under
Mo
location.
Clea
under
what ever is obstructing the
n the air filter as instructed
“Caring for the dehumidifier”.
Refer to page 8.
Check to see if opened
ve th e un it to a mo re st ab le
n
the air filter as instructed
“Caring for the dehumidifier”.
Refer to page 8.
After following the steps above ,and the fault persists,please contact De’Longhi Ltd for service:
Australia: 1800 126 659
New
Zealand:0508 200 300
- 10 -
Page 11

Maintenance
Troubleshooting
The following symptoms do not indicate a breakdown
Symptom
Noise level increases during use.
The humidity does not drop.
Very little dehumidifying takes place, or
none at all.
When the unit is first used, the
discharged air smells musty.
The unit echoes.
Reason
The sound level increases when the compressor
turns on.
Is the room too big for the unit?
Are windows or doors opened and closed frequently? Is
there any item in the room which produces steam?
This happens if the temperature and/or humidity of the room
is low.
Because the temperature of the heat exchanger rises
abruptly, an unusual or musty odor may be produced for a
moment.
If the unit is used in a room with wood flooring or in a
small room, it may echo.
When the unit is turned on,or a different
mode is selected a strange noise is heard
from the main unit.
Fluid or a white film is left in the
drainage tank.
The unit will only run in
regardlless of any other mode being
selected.
The fan is running and the compressor
does not work.
Hi”mode,
The refrigerant may make some noise until circulation
stabilizes.
This is water or steam residue left from dehumification
testing at the factory.This does not indicate a problem.
When the temperature of the room is above 35
protection device is activated ,which will only allow the unit
to run in
15
and 10 minutes off, or the automatic defrost function had
been initiated and the compressor will turn off temporarily.
If the unit is started with in 3 minutes of the unit turning off,
the protectection device is activated, which will initiate
a 3 minutes delay on the compressor turning on,or the
automatic defrost function has activated turning the
compressor off temporarily .
Hi”mode.When the room temperature is below
, the compressor operates at intervals of 40 minutes on
the
- 11 -
Page 12

Contents
Features
Specifications
How dehumidifying works
Structure and principle
OperationMaintenance
Description
Control panel
Operation
Draining the water
Moving the dehumidifier
Caring for the dehumidifier
Storing the dehumidifier
Important Safeguards
1
2
2
3
4
5
6
7
8
9
9
Troubleshooting
Before using your dehumidifier, please read this user’s manual
carefully , in order to ensure correct and safe use. After reading the
manual, make sure it is stored in a safe place for future reference
if necessary.
10
Page 13

Page 14

66126662
 Loading...