


5732103000 bar 4usa 26-06-2000 15:48 Pagina 1
COFFEE MACHINE MACHINE A CAFE CAFETERA ELÉCTRICA CAFETEIRA ELÉTRICA
Owner’s instructions
Mode d’emploi
Instrucciones para el uso
Instruções
READ AND SAVE THESE INSTRUCTIONS
LISEZ ET GARDEZ CES INSTRUCTIONS
REPASE Y GUARDE ESTAS INSTRUCCIONES
GUARDE ESTAS INSTRUÇÕES

5732103000 bar 4usa 26-06-2000 15:48 Pagina 2
2
5732103000 bar 4usa 26-06-2000 15:48 Pagina 3
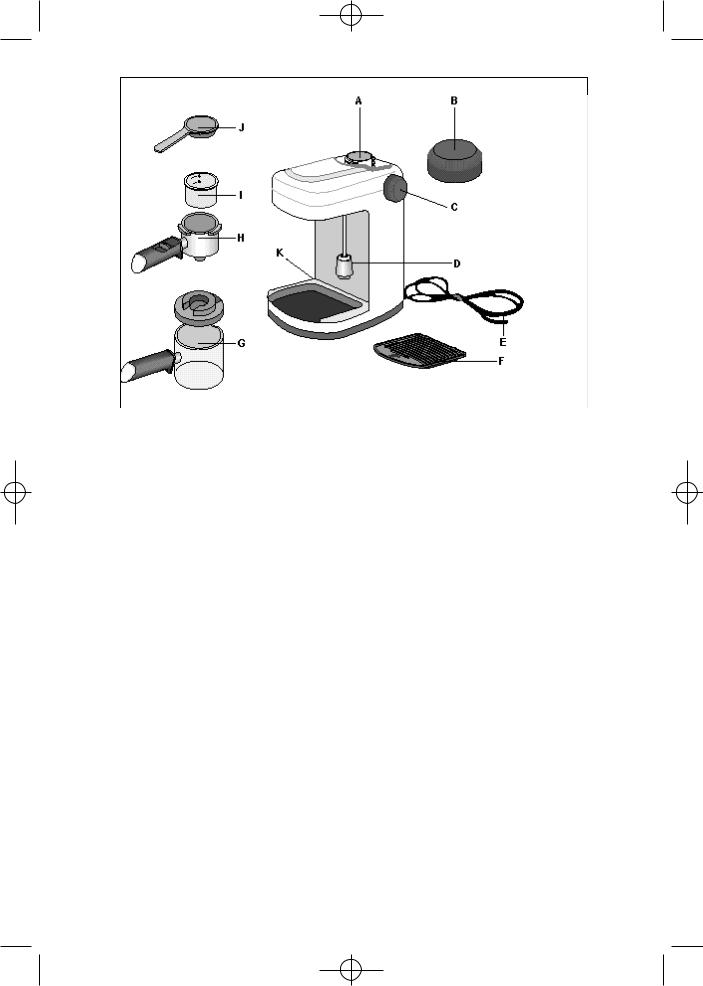
DESCRIPTION OF THE APPLIANCE
(the following terminology and letters of reference will be used continuosely in the following pages:)
A. |
Boiler |
G. |
Carafe with lid |
B. |
Boiler cap |
H. |
Filter holder |
C. |
Steam knob |
I. |
Filter |
D. |
Steam tube with cappuccino nozzle |
J. |
Measuring spoon |
E. |
Power cable |
K. |
ON/OFF Switch |
F.Drip tray
DESCRIPTION DE L'APPAREIL
Les termes repris ci-après, ainsi que les lettres de référence correspondantes, seront utilisés dans les instructions fournies aux pages suivantes.
A. |
Réservoir de l'eau |
F. |
Cuvette recueille-gouttes |
B. |
Bouchon du réservoir |
G. |
Verseuse avec couvercle |
C. |
Manette de la vapeur |
H. |
Coupelle porte-filtre |
D. |
Buse de la vapeur avec bec pour le cappuccino |
I. |
Filtre |
E. |
Cordon d'alimentation |
J. |
Cuillère doseuse |
|
|
K. |
Interrupteur ON/OFF |
DESCRIPCIÓN DEL APARATO
La siguiente terminología y las letras de referencia serán utilizadas continuamente en las páginas sucesivas.
A. |
Depósito de agua |
G. |
Jarra con tapadera |
B. |
Tapón del depósito |
H. |
Copita portafiltro |
C. |
Selector del vapor |
I. |
Filtro |
D. |
Tubo del vapor con pico para capuchino |
J. |
Cuchara medidor |
E. |
Cable de corriente |
K. |
Interruptor ON/OFF |
F.Recipiente recolector de gotas
DESCRIÇÃO DO APARELHO
A seguiente terminologia letras de referéncia são usadas em todas as páginas a seguir.
A. |
Caldeira |
G. |
Vidro com tampa |
B. |
Tampa |
H. |
Suporte portafiltro |
C. |
Botão de vapor |
I. |
Filtro |
D. |
Tampa do tanque de leite |
J. |
Colher medida |
E. |
Cabo de alimentação |
K. |
Seletor ON/OFF |
F.Tanque de gotejamento
3

5732103000 bar 4usa 26-06-2000 15:48 Pagina 4
4
5732103000 bar 4usa 26-06-2000 15:48 Pagina 5
5
5732103000 bar 4usa 26-06-2000 15:48 Pagina 6
IMPORTANT SAFEGUARDS
When using electrical appliances, basic safety precautions should always be followed, including the following:
•Read all instructions.
•Do not touch hot surfaces. Use handles and knobs.
•To protect against fire, electrical shock and personal injury, do not immerse cord, plug or appliance in water or other liquid.
•Close supervision is necessary when any appliance is used by or near children.
•Unplug from the outlet when not in use and before cleaning. Allow to cool before fitting or taking off parts, and before cleaning the appliance.
•Do not operate with a damaged cord or plug, or after the appliance malfunctions, or has been damaged in any manner. Return the appliance to the nearest authorized service facility for examination, repair or adjustment.
•The use of accessory attachments or spare parts not recommended by the appliance manufacturer may result in fire, electrical shock or personal injury.
•Do not use outdoors.
•Do not let the cord hang over the edge of the table or counter, or touch hot surfaces.
•Do not place on or near a hot gas or electrical burner, or in a heated oven.
•To disconnect the appliance, turn any control to “off”, then remove plug from wall outlet.
•Do not use the appliance for other than the intended use.
•This appliance is for household use only.
SAVE THESE INSTRUCTIONS
SHORT CORD INSTRUCTIONS
-A short power cord is provided to reduce risks resulting from becoming entangled in or tripping over a longer cord.
-Longer, detachable power supply cords or extension cords are available and may be used if care is exercised in their use.
-If an extension cord is used, the marked electrical rating should be at least as great as the electrical rating of the appliance. The longer cord should be arranged so that it will not drape over the counter-top or table top where it can be pulled on by children or tripped over.
-Your product is equipped with a polarized alternating current line plug (a plug having one blade wider than the other). This plug will fit into the power outlet only one way. This is a safety feature. If you are unable to insert the plug fully into the outlet, try reversing the plug. If the plug should still fail to fit, contact your electrician to replace your obsolete outlet. Do not defeat the safety purpose of the polarized plug.
6
5732103000 bar 4usa 26-06-2000 15:48 Pagina 7
PREPARING EXPRESS COFFEE
1Remove boiler cap by turning it counterclockwise.
2Using the carafe supplied (fig. 1) pour water in the boiler (fig. 2) according to the quantities shown in the table at the end of the text. Do not exceed the quantities shown as this could cause malfunctioning of the appliance.
While filling the boiler make sure switch is in the OFF position.
3Carefully close the boiler cap by turning it clockwise.
4Insert filter into the filter-holder. (fig. 3).
5Place coffee evenly into the filter according to the quantities shown in the table at the end of the text (fig. 4). It is important to use middle grounded coffee. (Avoid using too fine grounded coffee otherwise the filter could be obstructed, MOKA coffee is suitable).
6Remove excess coffee from filter-rim (fig. 5).
7To attach filter holder to machine place to filter holder under the heater-faucet (fig. 6) and line up with the arrow marked on the machine’s cover (fig. 7). At this point press filter-holder upwards and at the same time rotate clockwise all the way. It does not matter if the filter holder’s handle is not centrally aligned with the machine. It is important that the filter holder be firmly set in its housing.
8The carafe with the lid must be positioned under the filter holder so that the sprout is inside the opening on the pot’s lid (fig. 8).
Make sure that the steam knob is closed.
9Insert the plug and press the power switch.The red indicator will come on (fig. 9).
10About three minutes are required before the coffee begins to be discharged. Turn off power switch after coffee has been discharged.
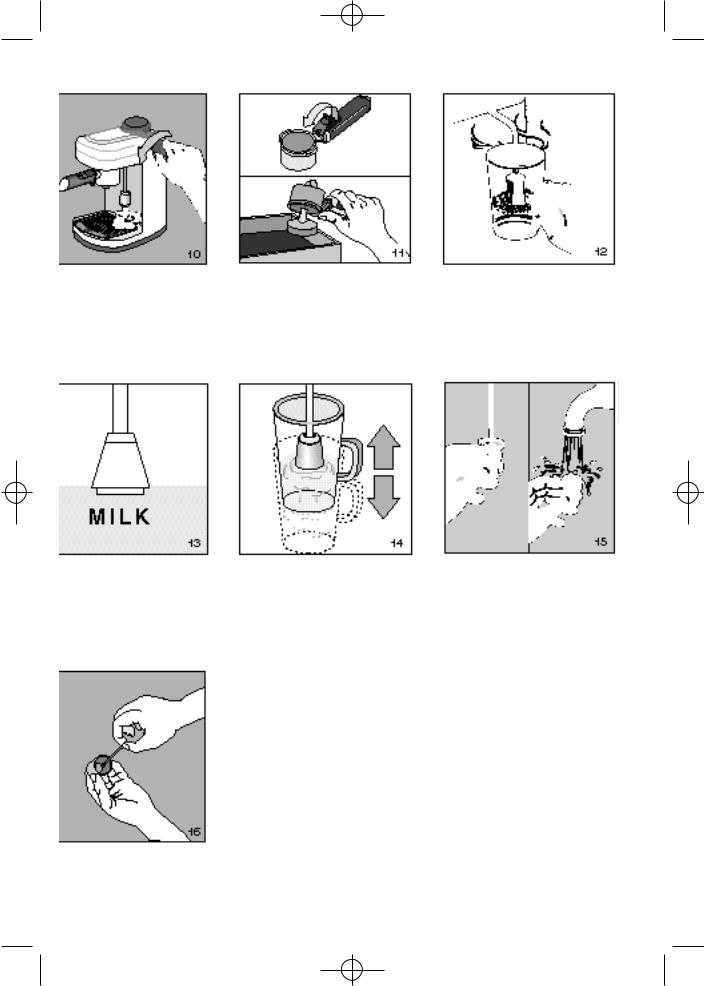
11Before unscrewing the boiler cap or removing the filter holder, residual
pressure must be released by slowly turning the steam knob (fig. 10). So that the residual steam can escape.
•To remove coffee grounds from the filter holder, turn up-side-down and knock it repeatedly until all grounds have been removed (fig. 11), or rinse the filter holder group under running water and let drip-tray.
NOTE To eliminate the “new” smell, the first time you use the coffee machine, carry out a number of coffee cycles without using coffee.
MAKING CAPPUCCINO
A cappuccino is an espresso coffee with a froth topping made by heating milk.
1Using the table following as a guide pour the required amount of milk into carafe. The best results will be achieved using fresh milk, not boiled or warm.
2Transfer the milk into a jug. The jug should be large enough to allow the milk to expand to around treble its volume.
3Then follow steps 1-9 in the section "Making Espresso Coffee".
Note that the amount of water needed to make 2 cups of cappuccino is greater than that required for 2 cups of normal coffee as it also necessary to produce the steam to emulsify the milk.
4When the coffee starts to drip from the filter holder, place the steam nozzle in the milk (fig. 12) ensuring that the nozzle opening is just under the surface of the milk, as shown in fig. 13 and open the steam valve by turning the steam knob counter clockwise.
5Move the jug up and down under the steam nozzle fig. 14 (this will give maximum froth). When sufficient milk froth has been produced, turn the steam knob clockwise to close the steam valve.
6Allow the remaining coffee to drip through the filter holder into the carafe, it takes about 3 minutes,then switch the appliance OFF.
Remember: Before unscrewing the boiler cap or removing the filter holder, residual pressure must be
7

5732103000 bar 4usa 26-06-2000 15:48 Pagina 8
released by slowly turning the steam knob so that the residual steam can escape.
7Pour the coffee into cups, gently pour, or preferably spoon the frothy milk onto the coffee, then sprinkle on a little chocolate powder for perfect cappuccino coffee.
8Clear the steam tube (with the cappuccino nozzle) of milk immediately after use, as dried milk can be difficult to remove.
Remember: You do this by turning the steam knob counter clockwise.
Than making care as the steam tube may be hot:
•unscrew the cappuccino nozzle by turning gently to the left (fig. 15) and wash it carefully in hot water.
•clean the steam tube and replace the cappuccino nozzle.
(from time to time, use a pin to clean the holes in the cappuccino nozzle (fig. 16).
HINTS
Making good espresso and cappuccino is not difficult however it does require practice. The following tips will help you get the best results from your machine:
•Warm the cups before filling with coffee.
•Use a dedicated espresso coffee for best results they are now widely available from supermarkets.
•Freshly ground coffee provides the best flavour. To maintain flavour, fresh coffee is best stored in an airtight container in a cool place, even in the fridge.
CLEANING AND MAINTENANCE
•Before carrying out any cleaning or maintenance operations, switch the machine off, remove the plug from the socket and leave the machine to cool.
•Do not use solvents, detergents or abrasive products to clean the machine. A soft damp cloth is sufficient.
•Clean the filter-holder, filter and drip tray regularly.
•Do not wash the machine - remember that it is
an electrical appliance.
•Never wash components or accessories in a dishwasher.
DESCALING
If you live in a hard-water area, minerals and calcium found in the water will accumulate and affect the operation of the machine.
Approximately every six months (depending on the hardness of the water), your espresso maker should be cleaned with vinegar as follows:
1.Before cleaning your Espresso maker, turn the switch to OFF and remove the plug from the wall socket.
2.Fill the carafe with vinegar and pour into the water tank.
3.Replace the boiler cap.
4.Fit the filter and filter-holder (without any coffee).
5.Place the carafe on the drip tray.
6.Insert the plug into the wall socket.
7.Turn the switch to ON. After a few minutes, the hot vinegar will begin to flow through the filter-holder into the carafe.
8.Place the steam tube in a glass or mug. Open the steam knob for a few seconds while the vinegar flows through the filter-holder. This will clear any milk residue from the inside of the tube.
9.Close the steam knob (the vinegar will continue to flow into the carafe).
10.When no more vinegar flows into the carafe, turn the switch to OFF and allow the machine to cool. Remove the filter-holder, the filter and the carafe and rinse with hot water.
12.Repeat the last two steps using cold water in order to remove any residual vinegar. Repeat twice.
8
 Loading...