

Page 1
TM1745
Y56X4
START GUIDE
Page 2

OVERVIEW
This guide helps you get started, but
if you need more information:
n
For software, hardware, troubleshooting, warranty
questions, please go to www.support.dell.com or
call 1-800-308-3355. For Dell hearing and speech
impaired support, call via TTY at 1-877-DELLTTY.
n
For billing, coverage, and connectivity questions,
please go to www.support.t-mobile.com or call
1-800-937-8997. For T-Mobile hearing and speech
impaired support, call via TTY at 1-877-296-1018.
n
For T-Mobile HotSpot or Wi-Fi questions,
please call 1-877-822-SPOT.
You can also access Help information on your device:
1. From any Home screen, tap the Applications icon.
2. Tap My Device.
Page 3

TABLE OF CONTENTS
Service Activation ...................................................... 1
Introducing Your Device ............................................2
Cool Apps .................................................................3
SIM Card ...................................................................4
Memory Card ............................................................5
Battery .......................................................................6
Power ........................................................................7
Google™ Account ......................................................7
Home Screens ..........................................................8
Application Menu .................................................... 10
Notication Screen ..................................................10
Contacts ..................................................................11
Volume & Tones ......................................................12
Typing ......................................................................13
E-mail Setup ............................................................14
Bluetooth® ...............................................................18
Wi-Fi ........................................................................19
Caring for Your Device ............................................20
Tips for Safety .........................................................21
Additional Information .............................................22
Page 4
SERVICE ACTIVATION
You have choices when activating your device with
T-Mobile. For more information on which is the right
plan for you, please go to www.t-mobile.com.
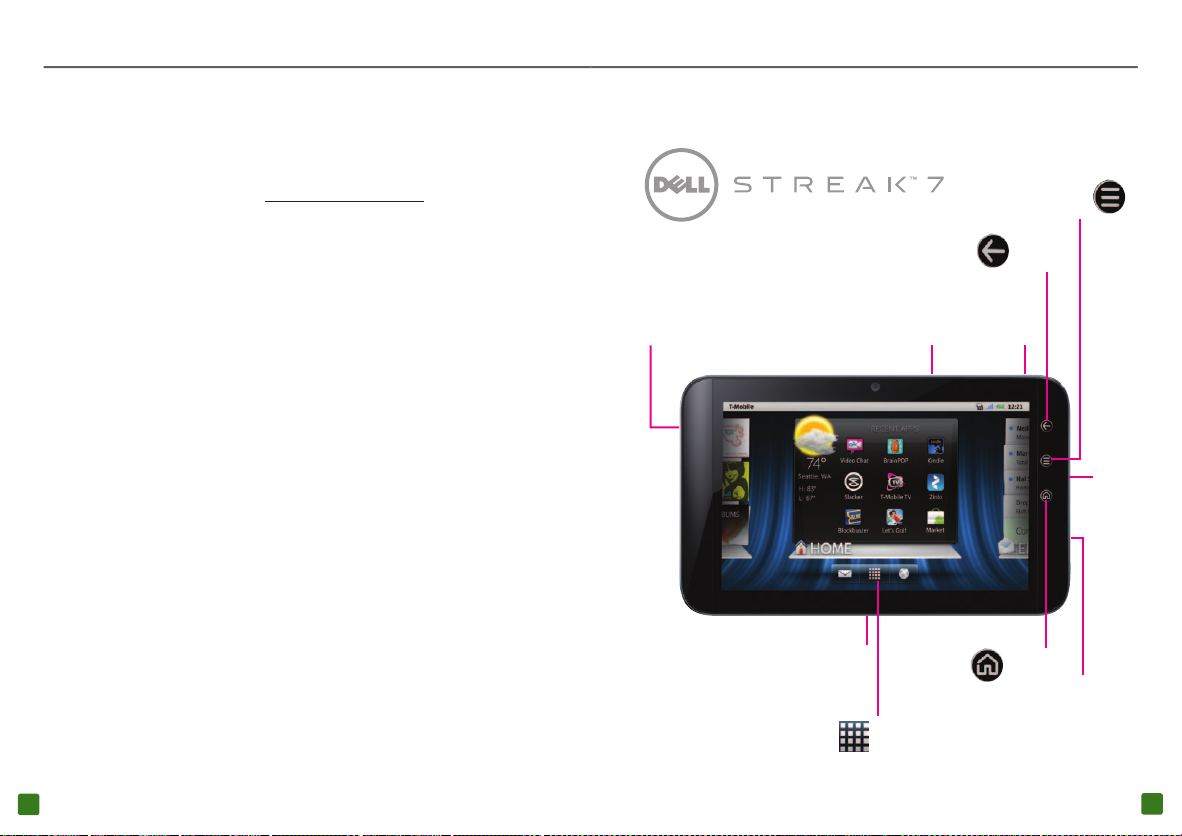
INTRODUCING YOUR DEVICE
Menu
Key
Prepaid Mobile Broadband
If you choose to sign up for Prepaid Mobile Broadband
service, you will be directed to a Web page where
you can activate your device for use on the T-Mobile
network. After setup, you will be automatically directed
to select and purchase a Mobile Broadband Data Pass,
which will allow you to browse on T-Mobile’s network
on the go without connecting to a Wi-Fi network!
By activating service, you acknowledge that you have read,
understand, and agree to be bound by each of T-Mobile’s Terms and
Conditions and your Service Agreement.
1
Headset
Jack
Charger
Port
Volume
Keys
Applications
Icon
Power/
Lock Key
Home
Key
Back
Key
SIM
Card
Slot
Memory
Card
Slot
2
Page 5
COOL APPS
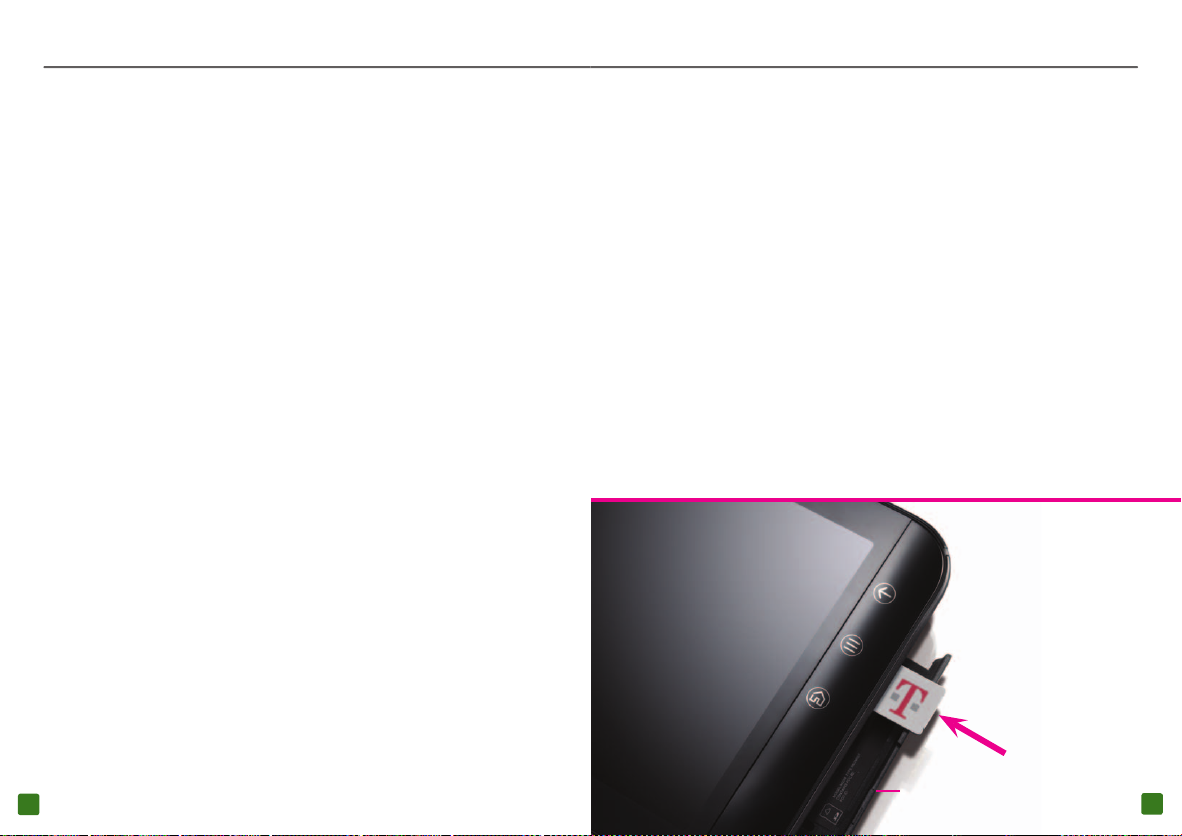
SIM CARD
Your device comes with the following cool apps:
n
T-Mobile TV brings you a selection of
on-demand
TV, including news, sports,
and full episodes of kids’ programming.
n
T-Mobile Video Chat powered by Qik will
keep you close to friends and family through
two-way live Video Chat and Video Mail.
Other apps include:
n
Educational content and games that engage
kids both at home and at school.
n
Thousands of books and full color
magazines on the go.
n
Watch the newest movies, play your favorite games,
and listen to free personalized radio on the go.
Your Subscriber Identity Module (SIM) card
identies you to the wireless network. Your
device will not work without the SIM card.
Your SIM card is already in your device:
If you need to remove the SIM card:
1. Open the SIM and memory card slot cover.
2. Gently press the SIM card in and then
release. The card will pop out of the slot.
To insert the SIM card:
1. Open the SIM and memory card slot cover.
2. Insert the SIM card as shown. Gently press the card
in until it is fully inserted and then close the cover.
3
SIM / Memory Card Slot Cover
4
Page 6

MEMORY CARD
BATTERY
Your device has 16 GB of built in memory and an
extendable memory card slot, but does not come
with a removable SD memory card. You can purchase
a card separately to store multimedia les, such as
video clips, music tracks, sound les, and images.
Insert the memory card
1. Open the SIM and memory card slot cover.
2. Insert the memory card as shown. Press the
memory card in until it is fully inserted.
3. Close the SIM and memory card slot cover.
SIM / Memory Card Slot Cover
Remove the memory card
1. Open the SIM and
memory card slot cover.
2. Press the memory card
in and release. The card
will pop out of the slot.
5
Note: You cannot remove your device’s back cover and battery.
1. Attach the plug onto the charger, and connect
the USB end of the cable to the charger.
2.
Insert the
other end of the cable into the charger
port on the bottom of your device as shown, and
then plug the charger into an electrical wall outlet.
6
Page 7

POWER
HOME SCREENS
To turn on your device, press and hold the
Power key on the top of your device.
To turn it off, press and hold the Power key.
Tap Power Off and tap OK.
GOOGLE™ ACCOUNT
The rst time that you power on your device,
you can go through the tutorial.
You will need to either create a new Google
account or to sign in using an existing one. Follow
instructions on the screen to create or to sign in.
Note: You can skip signing into a Google account, but
you will not be able to take advantage of all your device’s
functionalities.
Your device has seven Home screens. Swipe left and right
to view all the screens. You can customize each screen
with widgets and shortcuts to your favorite applications.
Swipe from
right to left to see
Home screens
to the left.
Swipe from
left to right to see
Home screens
to the right.
7
8
Page 8

Dell Stage
The Dell Stage widgets appear on the Home
screen and provide quick access to recently used
applications, contacts, music, pictures, and more.
The Dell Stage Home widget displays the current
weather and your most recent applications. Tap the
Home key to go to Stage Home from anywhere.
5. If necessary, touch within the frame to move
the crop box, or touch and drag the frame
edge to adjust the crop boundary.
6. Tap Save or Set wallpaper.
APPLICATIONS MENU
Add widgets, shortcuts, and folders to your Home
screen
1. Navigate to the Home screen panel
where you want to add the item.
2. Touch and hold an empty spot on your Home screen.
3. Tap Shortcuts, Widgets, Stage Widgets, or Folders.
4. Tap the item you want to add.
Remove items from your Home screen
1. Touch and hold the item you want to
delete from your Home screen.
2. Drag and drop it onto the Trash icon.
Change your wallpaper
1. Touch and hold an empty spot on your Home screen.
2. Tap Wallpapers.
3. Tap Gallery, Live wallpapers, or Wallpapers.
4. Tap the desired wallpaper.
9
From any Home screen, tap the Applications icon
to open the Applications menu. Touch and slide your
nger left or right on the screen to scroll through your
applications. Applications are in alphabetical order.
NOTIFICATION SCREEN
To view your notications, touch and drag the Status
Bar down to open the Notication screen.
Touch and
drag the
Status
Bar down
10
Page 9

CONTACTS
VOLUME & TONES
Add new contact
1. From any Home screen, tap the Applications icon.
2. Tap Contacts.
3. Tap the
4. Tap New contact.
5. Tap the First name eld and enter
the contact’s rst name.
6. Tap the Enter key or Next.
7. Enter the contact’s last name.
8. Tap the Enter key or Next.
9. Tap the green Plus icon next to Phone.
10. Tap the Phone eld and enter the phone number.
11. Continue on to enter more contact information.
12. Tap Done when nished.
11
Menu
key.
Adjust media volume
While watching a video or listening to music, press the
Volume key up or down to the desired volume setting.
Adjust touch tone volume
1. From any Home screen, tap the Menu key.
2. Tap Settings.
3. Tap Sound.
4. Tap to select or clear the Audible Selection check box.
Silence volume
1. From any Home screen, tap the Menu key.
2. Tap Settings.
3. Tap Sound.
4. Tap to select the Silent mode check box to
silence all sounds except media and alarms.
Set notification ringtone
1. From any Home screen, tap the Menu key.
2. Tap Settings.
3. Tap Sound.
4. Tap Notication ringtone.
5. Tap the desired tone.
6. Tap OK.
12
Page 10

TYPING
E-MAIL SETUP
Use the on-screen keyboard
You can enter text using your on-screen keyboard
in either portrait or landscape view.
n
To open the on-screen keyboard, tap a text entry eld.
n
To close the on-screen keyboard, tap the Back key.
Use Swype® text entry mode
Swype text entry mode is a fast and easy way to enter
text. Input any word with a continuous nger motion
across the on-screen keyboard. For example, to enter the
word CAT, touch the letter C and slide your nger to A
and then to T and then lift your nger from the screen.
Change keyboard input mode
1. Touch and hold an active text eld.
2. Tap Input method.
3. Tap Swype or Android keyboard.
Set up Internet e-mail
If you have already signed in to your Google account when
you rst power on, then you will be directed to your account
e-mail inbox when you tap the Envelope icon on the
Home screen. See the Add more Internet e-mail accounts
section for information on how to add more accounts.
If you have skipped signing in to your Google account
when you rst power on, then you will see the screen to add
a new e-mail account. Follow instructions below to add:
1. From any Home screen, tap the Envelope icon.
2. Tap the Email address eld and
enter your e-mail address.
3. Tap Next.
4. Enter your password.
5. Tap Done.
6. Tap Next.
7. Tap OK.
8. Enter a name for the account (optional).
9. Enter how you want your name
displayed on outgoing e-mails.
10. Tap Done.
13
14
Page 11

Set up Exchange e-mail
Contact your company’s IT department if
you need more help. This feature works with
Microsoft® Exchange e-mail servers only.
1. From any Home screen, tap the Envelope icon.
Note: If you already have an e-mail account set up, you will
be directed to your mailbox. To add a new account, from
your mailbox, tap the Menu key. Tap Accounts. Tap
the Menu key again adn then tap Add account.
2. Tap the Email address eld and
enter your e-mail address.
3. Tap Next.
4. Enter your password.
5. Tap Done.
6. Tap Manual setup.
7. Tap Exchange.
8. At the Domain\Username eld,
enter your domain and username.
9. Tap the Server eld and enter
the Exchange server address.
10. Tap Next.
11. Tap OK.
12. Set your account options and tap Next.
13. Enter a name for the account (optional).
14. Tap Done.
15
Create a Gmail™ account
1. From any Home screen, tap the Applications
icon.
2. Tap Gmail.
3. Tap Next.
4. Tap Create.
5. Tap the First name eld and enter your rst name.
6. Tap Next.
7. Enter your last name.
8. Tap Next.
9. Enter your username.
10. Tap Done.
11. Tap Next.
Add more e-mail accounts
1.
While in your mailbox, tap
the Menu key.
2. Tap Accounts.
3. Tap the Menu key.
4. Tap Add account.
5. Tap the Email address eld and
enter your e-mail address.
6. Tap Next.
7. Enter your password.
8. Tap Next.
9. Enter a name for the account (optional).
16
Page 12

10. Enter how you want your name
displayed on outgoing e-mails.
11. Tap Done.
Delete e-mail accounts
1.
While in your mailbox, tap
the Menu key.
2. Tap Accounts.
3. Touch and hold the account you want to delete.
4. Tap Remove account.
5. Tap OK.
Access your mailbox
1. From any Home screen, tap the Envelope icon.
2. Tap the desired e-mail account.
Note: If you are in the inbox for a different
account, tap the Back key.
3. Tap the message you want to view.
Adjust account sync settings
1. From any Home screen, tap the Menu key.
2. Tap Settings.
3. Tap Accounts & sync.
4. Tap to select or clear the Background
data and Auto-sync check boxes.
BLUETOOTH®
Your device comes with Bluetooth technology, a
wireless technology that enables data connection
between your device and other Bluetooth devices.
Turn on Bluetooth and pair
1. From any Home screen, tap the Menu key.
2. Tap Settings.
3. Tap Wireless & networks.
4. Tap Bluetooth settings.
5. Tap to select the Bluetooth check box to turn it on.
A list of available Bluetooth devices displays.
6. Tap the device that you want to pair with.
7. Enter the PIN or passcode if requested.
8. Tap OK or Pair.
17
18
Page 13

WI-FI
CARING FOR YOUR DEVICE
Turn on Wi-Fi
1. From any Home screen, tap the Menu key.
2. Tap Settings.
3. Tap Wireless & networks.
4. Tap Wi-Fi settings.
5. Tap to select the Wi-Fi check box to turn it on.
A list of available Wi-Fi networks displays.
6. Tap the network to which you want to connect.
7. Enter the password for the network, if required.
8. Tap Connect.
MAKING IT LAST
Your device is a complex electronic device.
Here are some hints that should help you
extend the life of your new device.
Store your device in a protective case.
The touch screen of your device is delicate
and should be protected from scratches.
Keep your device in a safe place—away from children
who may nd it fun to see if it sinks or oats, and away
from dogs that nd it to be an irresistible chew toy.
Water will damage your device and accessories—
even a small amount such as water droplets from
a soda in your car cup-holder, melting snowakes,
tears of joy, squirt-gun crossre or steam from
hot water in the kitchen or bathroom.
If your charger or any other accessory is damaged,
replace it or take it to a qualied service dealer—Do not
attempt to operate your charger if it has received a sharp
blow, been dropped, thrown from a speeding motorcycle or
is otherwise damaged; doing so may damage your device.
19
20
Page 14

TIPS FOR SAFETY
ADDITIONAL INFORMATION
Check with your doctor if you have a pacemaker or a
hearing aid to ensure that it is safe for you to use this
device. If you have questions about the interaction of
cellular radio frequency and any other electronic
equipment, ask the manufacturer of the
equipment if cellular radio frequencies will
disrupt the equipment’s performance.
T-Mobile encourages you to use your device in a safe
and sensible manner when driving. Remember that
laws prohibiting or restricting the use of a mobile
device while driving may apply in your area.
Use of some features or services may incur separate,
additional charges and/or require a qualifying data plan.
Wi-Fi: Devices using wireless connections
may be vulnerable to unauthorized attempts
to access data and software stored on the
device. Wi-Fi available for data usage.
Messaging/Data: You will be charged for all data sent
by or to you through the network, regardless of whether
received. Character length/le size of messages/
attachments may be limited. T-Mobile is not liable for
content of messages/attachments or for any failures, delays
or errors in any T-Mobile generated alerts or notications.
T-Mobile is not responsible for any third party content or
Web site you may be able to access using your device.
Downloads/Applications: Additional charges may apply;
not all downloads available on all devices. Duration of
use may be limited and downloads may be stored solely
for use with your device. T-Mobile is not responsible
for any download lost due to your error. T-Mobile is not
responsible for Apps, including download, installation,
use, transmission failure, interruption or delay, third party
advertisements you may encounter while using an App,
alterations any App may make to the functionality of your
device, including any changes that may affect your
T-Mobile plan, service, or billing, or any content or
Web site you may be able to access through an App.
Coverage: Service not available everywhere.
21
22
Page 15

See brochures and Terms and Conditions (including
arbitration provision) at www.t-mobile.com, for additional
information.
The Bluetooth® word mark and logo are owned by the
Bluetooth SIG, Inc. and are used by T-Mobile under license.
Google and Gmail are trademarks of Google Inc. T-Mobile
and the magenta color are registered trademarks of
Deutsche Telekom AG. All other brands, product names,
company names, trademarks and servicemarks are the
property of their respective owners. ©2011 T-Mobile USA,
Inc.
23
Page 16

 Loading...