

Dell PowerVault TL2000, TL24iSCSIxSAS User Manual
Dell
TM
Model TL24iSCSIxSAS
1Gb iSCSI to SAS
TM
Model TL24iSCSIxSAS 1GBb iSCSI to SAS
www.dell.com| support.dell.com


Information in this document is subject to change without notice.
© 2008 Dell Inc. All rights reserved.
Reproduction in any manner whatsoever without the written permission of Dell Inc. is strictly forbidden.
Trademarks used in this text: Dell, the DELL logo are trademarks of Dell Inc.
Other trademarks and trade names may be used in this document to refer to either the entities claiming
the marks and names or their products. Dell inc. disclaims any proprietary interest in trademarks and trade
names other than its own.
For latest revision of this guide, please go to www.support.dell.com.
Model TL24iSCSIxSAS 1Gb iSCSI to SAS

Read this first
Page 2 Dell Model TL24iSCSIxSAS 1Gb iSCSI to SAS User’s Guide Rev.C
1. Read this first
Contacting Dell
Note:
If you do not have an active Internet connection, you can find contact
information on your purchase invoice, packing slip, bill, or Dell product
catalog.
Dell provides several online and telephone-based support and service options.
Availability varies by country and product, and some service may not be available in
your area. To contact Dell for sales, technical support, or customer service issues:
1. Visit http://support.dell.com
2. Verify your country or region in the Choose A Country/Region drop-down menu at
the bottom of the page.
3. Click Contact Us on the left side of the page.
Note:
Toll-free numbers are for use within the country for which they are listed.
4. Select the appropriate service or support link based on your needs.
5. Choose the method of contacting Dell that is convenient for you.
Before you start
There are a number of additional pieces of equipment you will require for the successful installation of your
bridge.
Ethernet Cable
You will require a good quality cable of suitable length to go between your network access point and the
iSCSI bridge. This should be marked as certified to Cat 5e and have a RJ45 style connector at the bridge
end.
SAS Cable
The TL24iSCSIxSAS 1 Gb iSCSI bridge uses a “Mini SAS” style connector, or more commonly known as
iPASS connector, with 2 SAS connections per Port. You will require a SAS cable that supports this
connector at the bridge end and the type of connect your peripheral device supports at the other.
If you are in any doubt, please contact your reseller for assistance.

Contents
Dell Model TL24iSCSIxSAS 1Gb iSCSI to SAS User’s Guide Rev.C Page 3
2. Contents
1. Read this first .......................................................................................................................................... 2
2. Contents .................................................................................................................................................. 3
3. Figures ..................................................................................................................................................... 5
4. Safety and Environmental Notices ....................................................................................................... 7
5. Preface ..................................................................................................................................................... 8
5.1 Product Description ........................................................................................................................... 8
6. Installing the iSCSI bridge ................................................................................................................... 10
6.1 SAS Bus Connections ..................................................................................................................... 15
7. Configuring the iSCSI bridge .............................................................................................................. 17
7.1 Initial set up ...................................................................................................................................... 17
7.2 Network Connections ....................................................................................................................... 20
7.2.1 Setting the Hostname .......................................................................................................... ........ 20
7.2.2 Setting up the Gateway ........................................................................................................ ....... 20
7.2.3 Setting up the DNS Server .......................................................................................................... 20
7.2.4 Setting the IP-address ........................................................................................................ ......... 21
7.2.5 Setting the Subnet-Mask ....................................................................................................... ...... 21
7.2.6 Setting the Broad cast-Address .................................................................................................... 21
7.2.7 Committing the changes .............................................................................................................. 21
7.2.8 Re connect to the bridge ............................................................................................................... 21
7.3 Network Ping ................................................................................................................................... 22
7.3.1 Ping a Ne work address ................................................................................................................ 23
7.4 Setting the Password ....................................................................................................................... 25
7.5 Network Services ............................................................................................................................. 26
7.6 iSCSI Target .................................................................................................................................... 27
7.6.1 CHAP Settings ............................................................................................................................. 27
7.7 Multipath Settings ............................................................................................................................ 28
8. iSCSI Sessions ..................................................................................................................................... 29
8.1 Device Management ........................................................................................................................ 30
8.1.1 Global Settings ............................................................................................................... ............. 30
8.1.2 Individual De vice Info ................................................................................................................... 31
9. Maintenance .......................................................................................................................................... 32
9.1 System Information .......................................................................................................................... 32
9.2 System Log ...................................................................................................................................... 33
9.3 Load/Save Configuration ................................................................................................................. 34
9.3.1 Import Configuration .......................................................................................................... .......... 34
9.3.2 Export Configuration .......................................................................................................... .......... 35
9.3.3 Restore Defaults .............................................................................................................. ............ 35
9.4 Firmware Updates ........................................................................................................................... 36
10. Troubleshooting ................................................................................................................................... 38
10.1 Network Problems ........................................................................................................................... 38
10.2 Device related Problems .................................................................................................................. 38
10.3 Poor Performance ............................................................................................................................ 39

Contents
Page 4 Dell Model TL24iSCSIxSAS 1Gb iSCSI to SAS User’s Guide Rev.C
11. Appendix A ............................................................................................................................................ 41
11.1 Setting up your computer for initial set up ....................................................................................... 41
12. Appendix B ............................................................................................................................................ 43
12.1 Setting up your computer for initial set up ....................................................................................... 43
13. Appendix C ............................................................................................................................................ 46
13.1 Connecting to an iSCSI Device using the Microsoft iSCSI Initiator ................................................. 46
13.2 Step 1 – General Set up .................................................................................................................. 46
13.3 Step 2 - Discovery of Devices.......................................................................................................... 47
13.4 Step 3 – Targets .............................................................................................................................. 51
13.5 Step 4 – Viewing iSCSI Session Details .......................................................................................... 55
13.6 Step 5 – Creating multiple connections (Optional) .......................................................................... 56
13.7 Step 6 – Logging off an iSCSI Session ........................................................................................... 61
14. Glossary ................................................................................................................................................ 62
15. Index ...................................................................................................................................................... 64

Figures
Dell Model TL24iSCSIxSAS 1Gb iSCSI to SAS User’s Guide Rev.C Page 5
3. Figures
Figure 1 iSCSI Topology.................................................................................................................................... 8
Figure 2 Product view ........................................................................................................................................ 9
Figure 3 Remove the shipping lock ................................................................................................................. 10
Figure 4 Store the label of the library .............................................................................................................. 11
Figure 5 Remove the blank plate ..................................................................................................................... 11
Figure 6 Installing the bridge and store the shipping lock ............................................................................... 12
Figure 7 Remove the blank plate on the PowerVault TL4000 ......................................................................... 12
Figure 8 Installing the bridge in the PowerVault TL4000 ................................................................................. 13
Figure 9 Remove the second blank plate on the PowerVault TL4000 ............................................................ 13
Figure 10 Installing the second bridge in the PowerVault TL4000 .................................................................. 14
Figure 11 Connect the SAS and network cables in the PowerVault TL2000 .................................................. 15
Figure 12 Connect the SAS and network cables in the PowerVault TL4000 .................................................. 16
Figure 13 Login page ....................................................................................................................................... 17
Figure 14 Invalid Login page ........................................................................................................................... 18
Figure 15 Main GUI page ................................................................................................................................ 19
Figure 16 Network configuration page ............................................................................................................. 20
Figure 17 Network Ping page .......................................................................................................................... 22
Figure 18 A successful ping ............................................................................................................................ 23
Figure 19 Failed Ping ....................................................................................................................................... 24
Figure 20 Network configuration, password page ........................................................................................... 25
Figure 21 Network service page ...................................................................................................................... 26
Figure 22 iSCSI Target configuration page ..................................................................................................... 27
Figure 23 iSCSI Session page ........................................................................................................................ 29
Figure 24 Device Management Page .............................................................................................................. 30
Figure 25 System information page ................................................................................................................. 32
Figure 26 System information, log page .......................................................................................................... 33
Figure 27 Saving the configuration page ......................................................................................................... 34
Figure 28 Firmware Update page .................................................................................................................... 36
Figure 29 Firmware update progress page ..................................................................................................... 37
Figure 30 Microsoft iSCSI Initiator general tab ................................................................................................ 46
Figure 31 Entering the Initiator CHAP Secret .................................................................................................. 47
Figure 32 Discovery Tab.................................................................................................................................. 47
Figure 33 Adding a Target portal ..................................................................................................................... 48
Figure 34 Advanced Discovery Settings .......................................................................................................... 48
Figure 35 Adding an iSCSI Target ................................................................................................................... 49
Figure 36 Discovery complete ......................................................................................................................... 50
Figure 37 Entering the address of the iSNS-Server ........................................................................................ 50
Figure 38 Targets Tab ..................................................................................................................................... 51
Figure 39 Connecting to an iSCSI Target ........................................................................................................ 51
Figure 40 Advanced Connection settings. ....................................................................................................... 52
Figure 41 iSCSI bridge Network Configuration Page ...................................................................................... 53
Figure 42 iSCSI Target Connected ................................................................................................................. 54
Figure 43 iSCSI Session Properties ................................................................................................................ 55
Figure 44 iSCSI Target Device ........................................................................................................................ 56

Figures
Page 6 Dell Model TL24iSCSIxSAS 1Gb iSCSI to SAS User’s Guide Rev.C
Figure 45 Session Connections Page ............................................................................................................. 56
Figure 46 Adding a new connection ................................................................................................................ 58
Figure 47 Advanced Connections Session...................................................................................................... 58
Figure 48 iSCSI bridge Network Configuration Page ...................................................................................... 59
Figure 49 Showing multiple connections ......................................................................................................... 60
Figure 50 iSCSI Session with Multiple Connections ....................................................................................... 61
Safety and Environmental Notices
Dell Model TL24iSCSIxSAS 1Gb iSCSI to SAS User’s Guide Rev.C Page 7
4. Safety and Environmental Notices
When using this product, observe the danger, caution, and attention notices that are contained in this guide.
The notices are accompanied by symbols that represent the severity of the safety condition. The sections
that follow define each type of safety notice and give examples.
DANGER
High voltage!
Risk of electric shock.
Do not remove cover (or back). No user-serviceable parts
inside.
Refer servicing to qualified service personnel.
CAUTION
Static sensitive!
A discharge of static electricity can damage static-sensitive devices or
micro circuitry. Proper packaging and grounding techniques are
necessary precautions to prevent damage.
Product warranty caution
The iSCSI bridge contains no user-serviceable components. Only an Authorized Service Center should carry
out any servicing or repairs. Unauthorized repairs or modifications will immediately void your warranty.
Preface
Page 8 Dell Model TL24iSCSIxSAS 1Gb iSCSI to SAS User’s Guide Rev.C
5. Preface
Thank you for purchasing the DELL Model TL24iSCSIxSAS 1Gb iSCSI to SAS bridge.
The bridge is designed to ensure connectivity between LTO SAS drives installed in a Dell PowerVault
TL24iSCSIxSAS and the network.
The bridge has been designed to ensure that the majority of installations will require the minimum of set up
before use. However, we suggest you read the following as it will guide you through setting up both the
Network and SAS aspects of the iSCSI bridge.
The GUI Management section will guide you through the initial set up required to install the bridge on to your
network.
5.1 Product Description
The iSCSI bridge creates an interface between a network, which utilizes the Ethernet protocol, and
peripherals that use a SAS bus architecture. The internal circuitry of the bridge acts as a two-way interface
converting the data packets that are received from the network into data transfers and electrical signals that
storage devices such as tape drives understand on the SAS bus.
Figure 1 iSCSI Topology
Preface
Dell Model TL24iSCSIxSAS 1Gb iSCSI to SAS User’s Guide Rev.C Page 9
Figure 2 Product view
Number Description
1
LED iSCSI bridge ready (Green).
Should be blinking when the bridge is ready.
2 - 5
LED SAS ports 1, 2, 3 and 4 (Green).
Should be blinking when there is port activity.
6
Ethernet port.
7
Air vents.
8
Shipping lock (storage location).
9
SAS port.
Installing the iSCSI bridge
Page 10 Dell Model TL24iSCSIxSAS 1Gb iSCSI to SAS User’s Guide Rev.C
6. Installing the iSCSI bridge
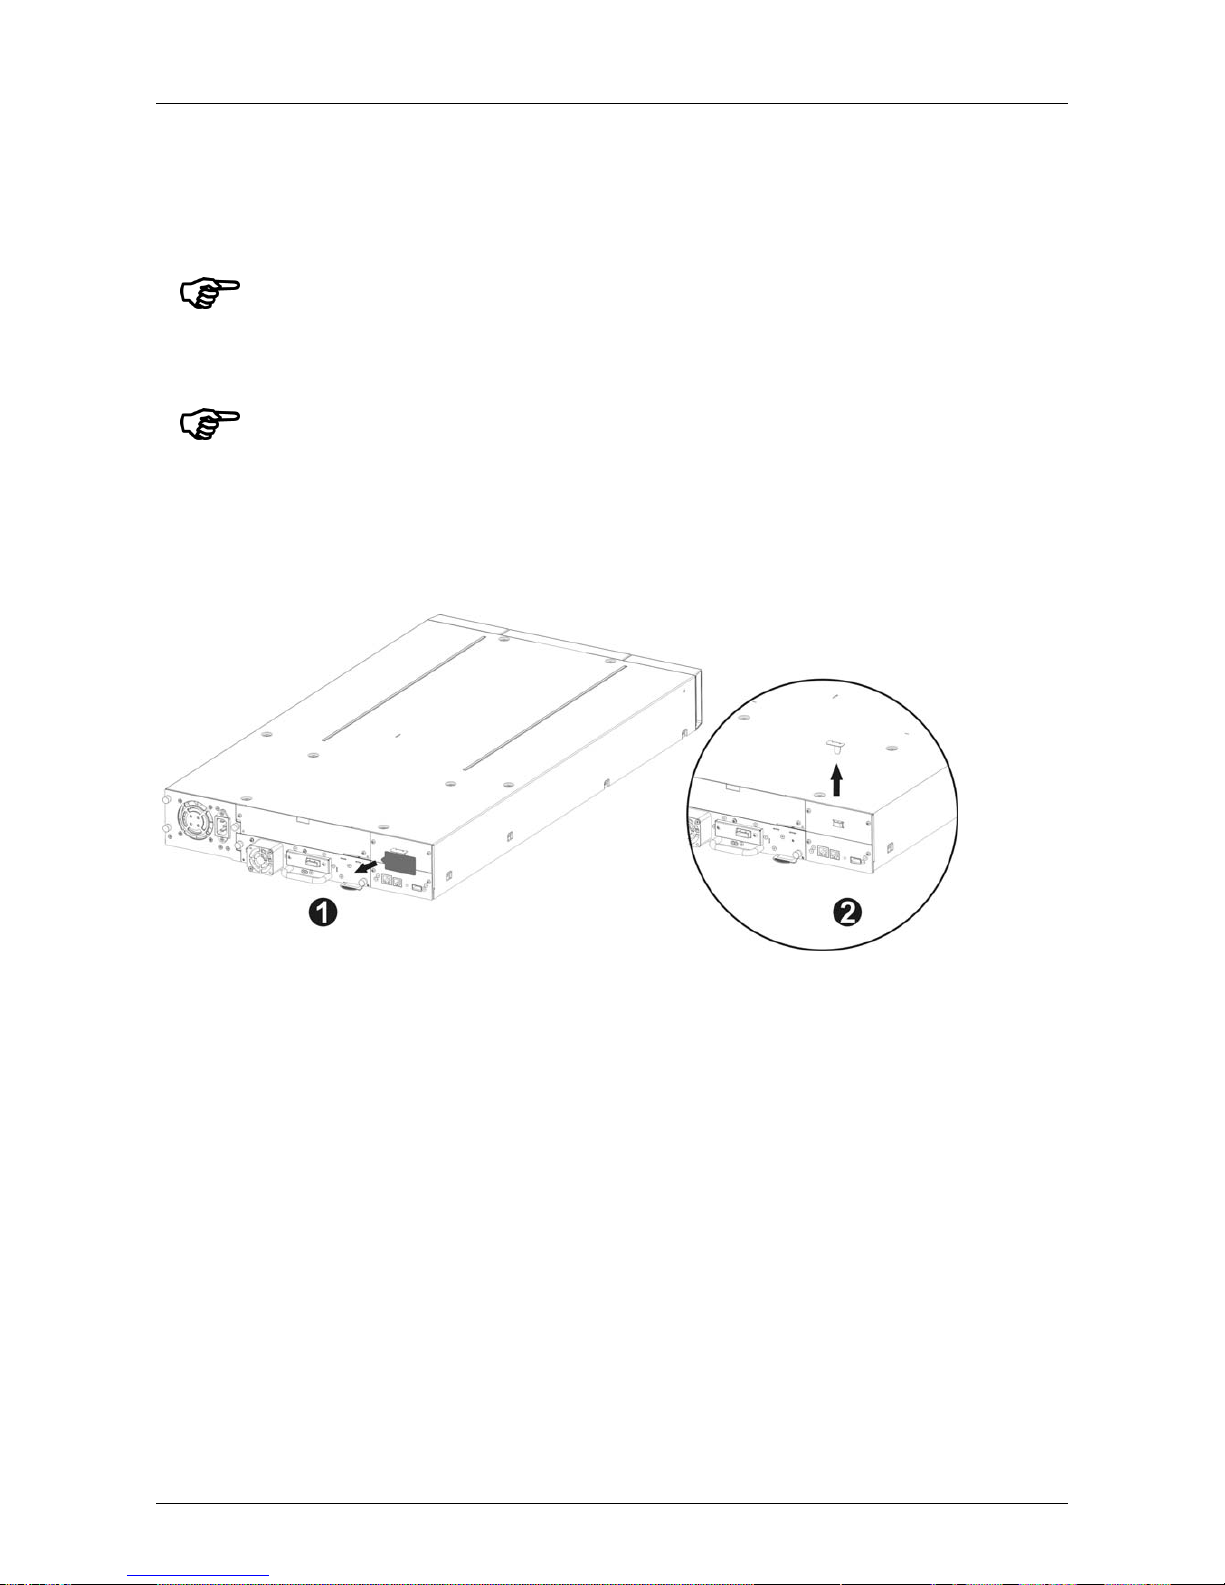
There are ten basic steps to install the iSCSI bridge on the Dell PowerVault TL2000:
• Remove the blue lab el that is securing the lock to the blank plate (on the rear panel of the library),
and then remove the shipping lock (see Figure 3).
Figure 3 Remove the shipping lock
• Store the blue label to the top of the library (see Figure 4) and store the shipping lock (see Figure 6).
Important:
Before you undertake any work on the library, switch off the library and
remove the AC connector from the library.
Important:
Hot plugging is not supported, the unit must be powered off for
installation of the iSCSI bridge card.
Installing the iSCSI bridge
Dell Model TL24iSCSIxSAS 1Gb iSCSI to SAS User’s Guide Rev.C Page 11
Figure 4 Store the label of the library
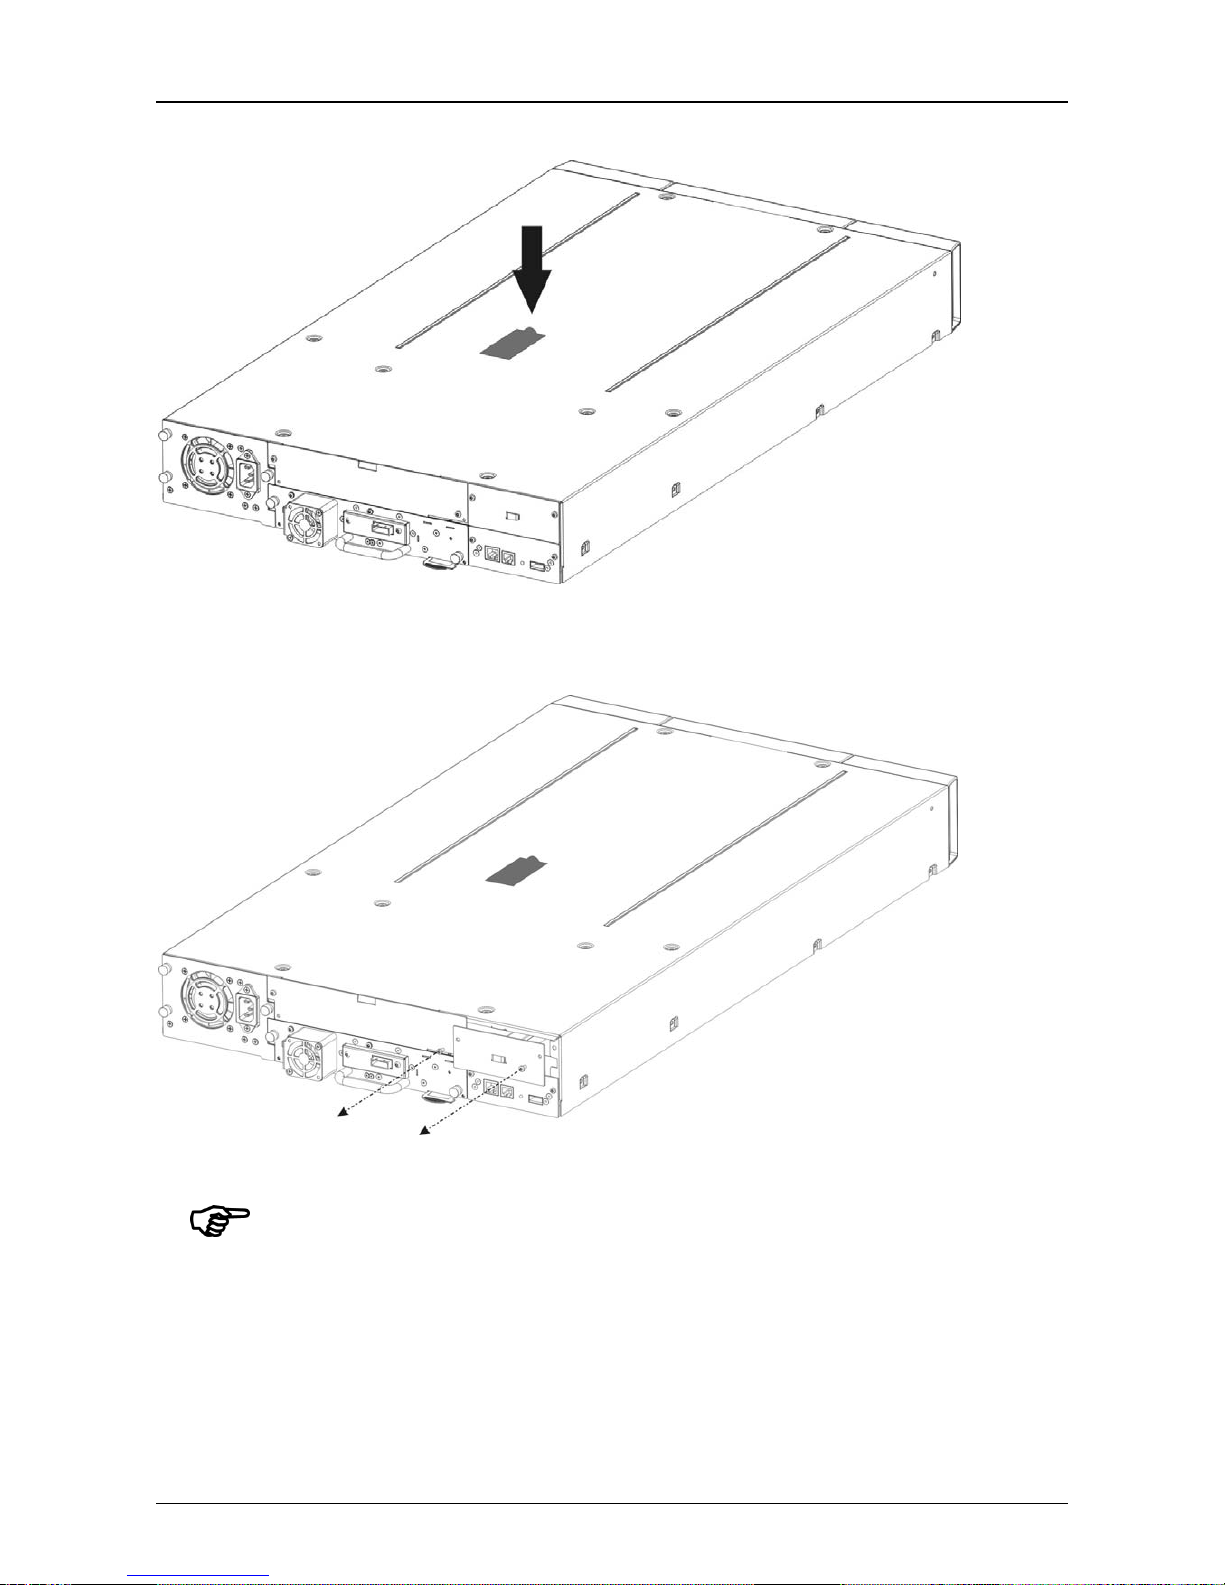
• Remove the blank plate (see Figure 5) on the rear of the library (you need a #3 Phillips screwdriver).
Figure 5 Remove the blank plate
Important:
If your TL2000 library is without card guide rails for the bridge, please
install the card guide rails (reference the Getting Started Guide).
• Before open the shipping packaging, inspect the box for shipping damage. If you notice any damage,
report it to the shipping company.
• Unpack carefully the iSCSI board and install it into the library.
• It is advisable to retain all your o rigin al packaging material in the event you need to ship the bridge.
To prevent damage the bridge must be shipped in the original packaging material.
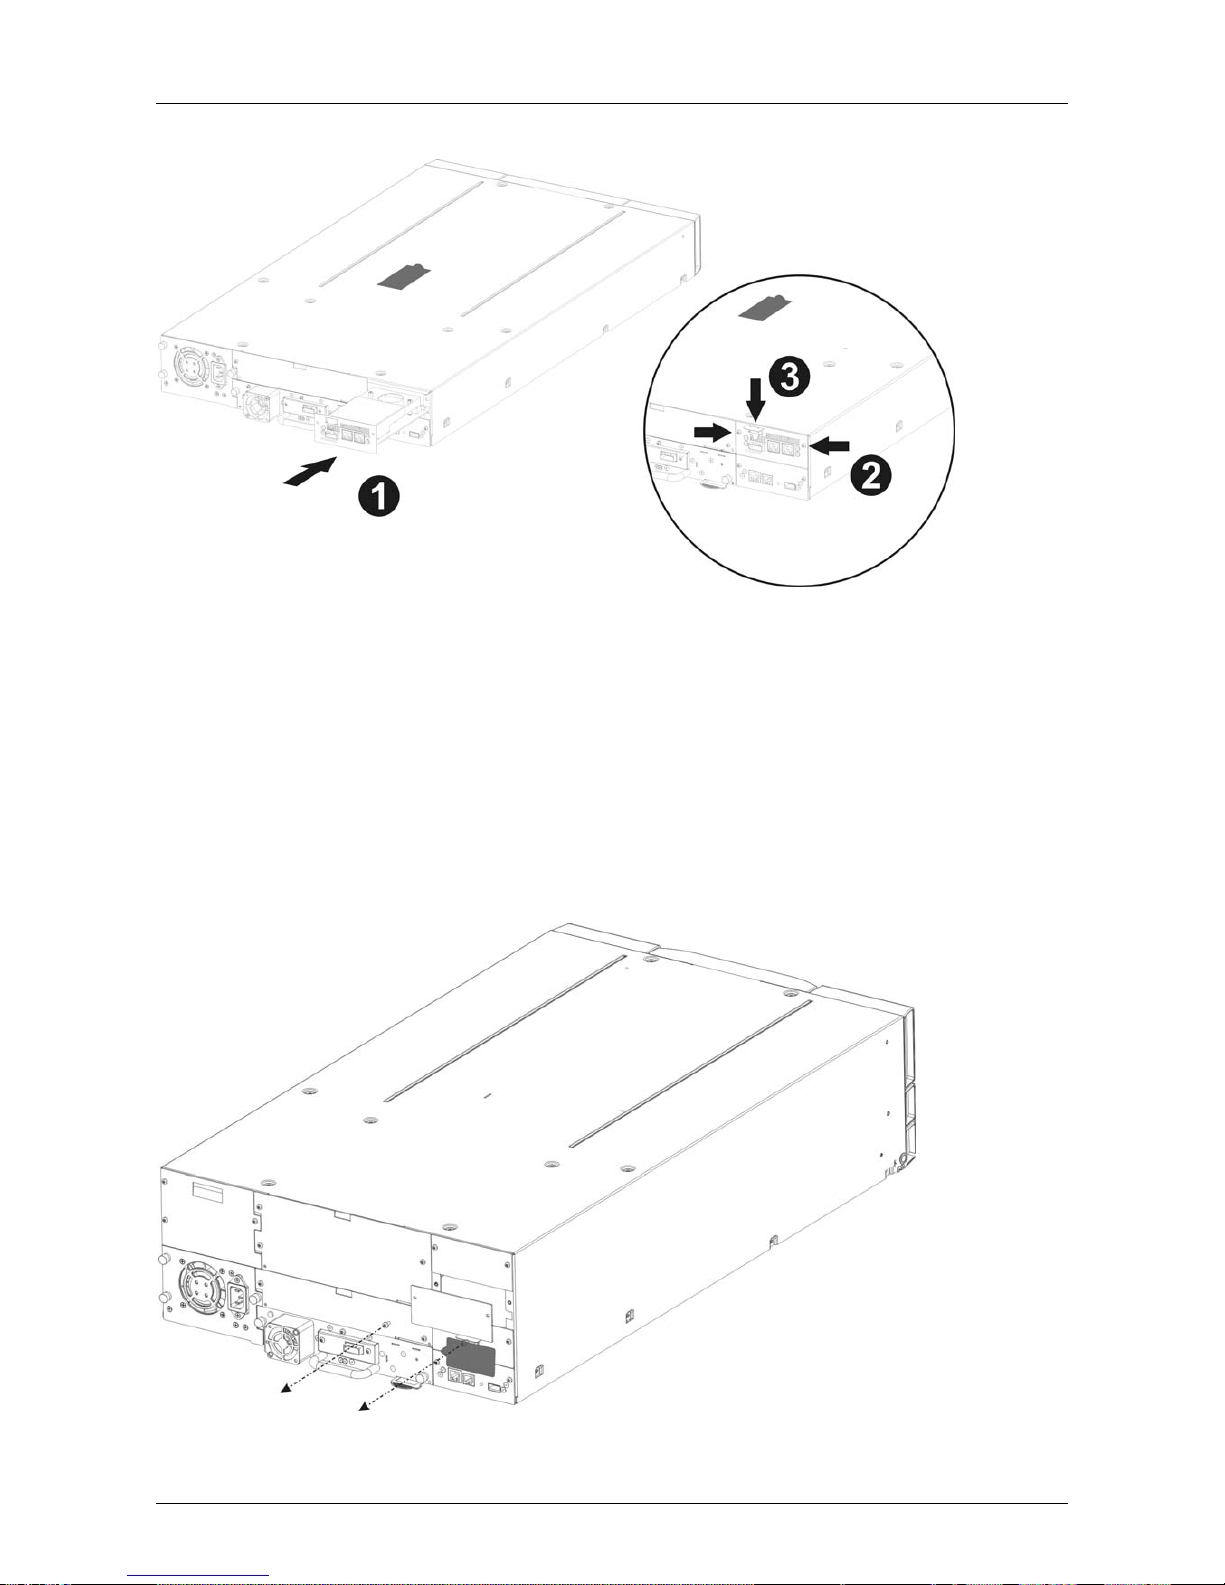
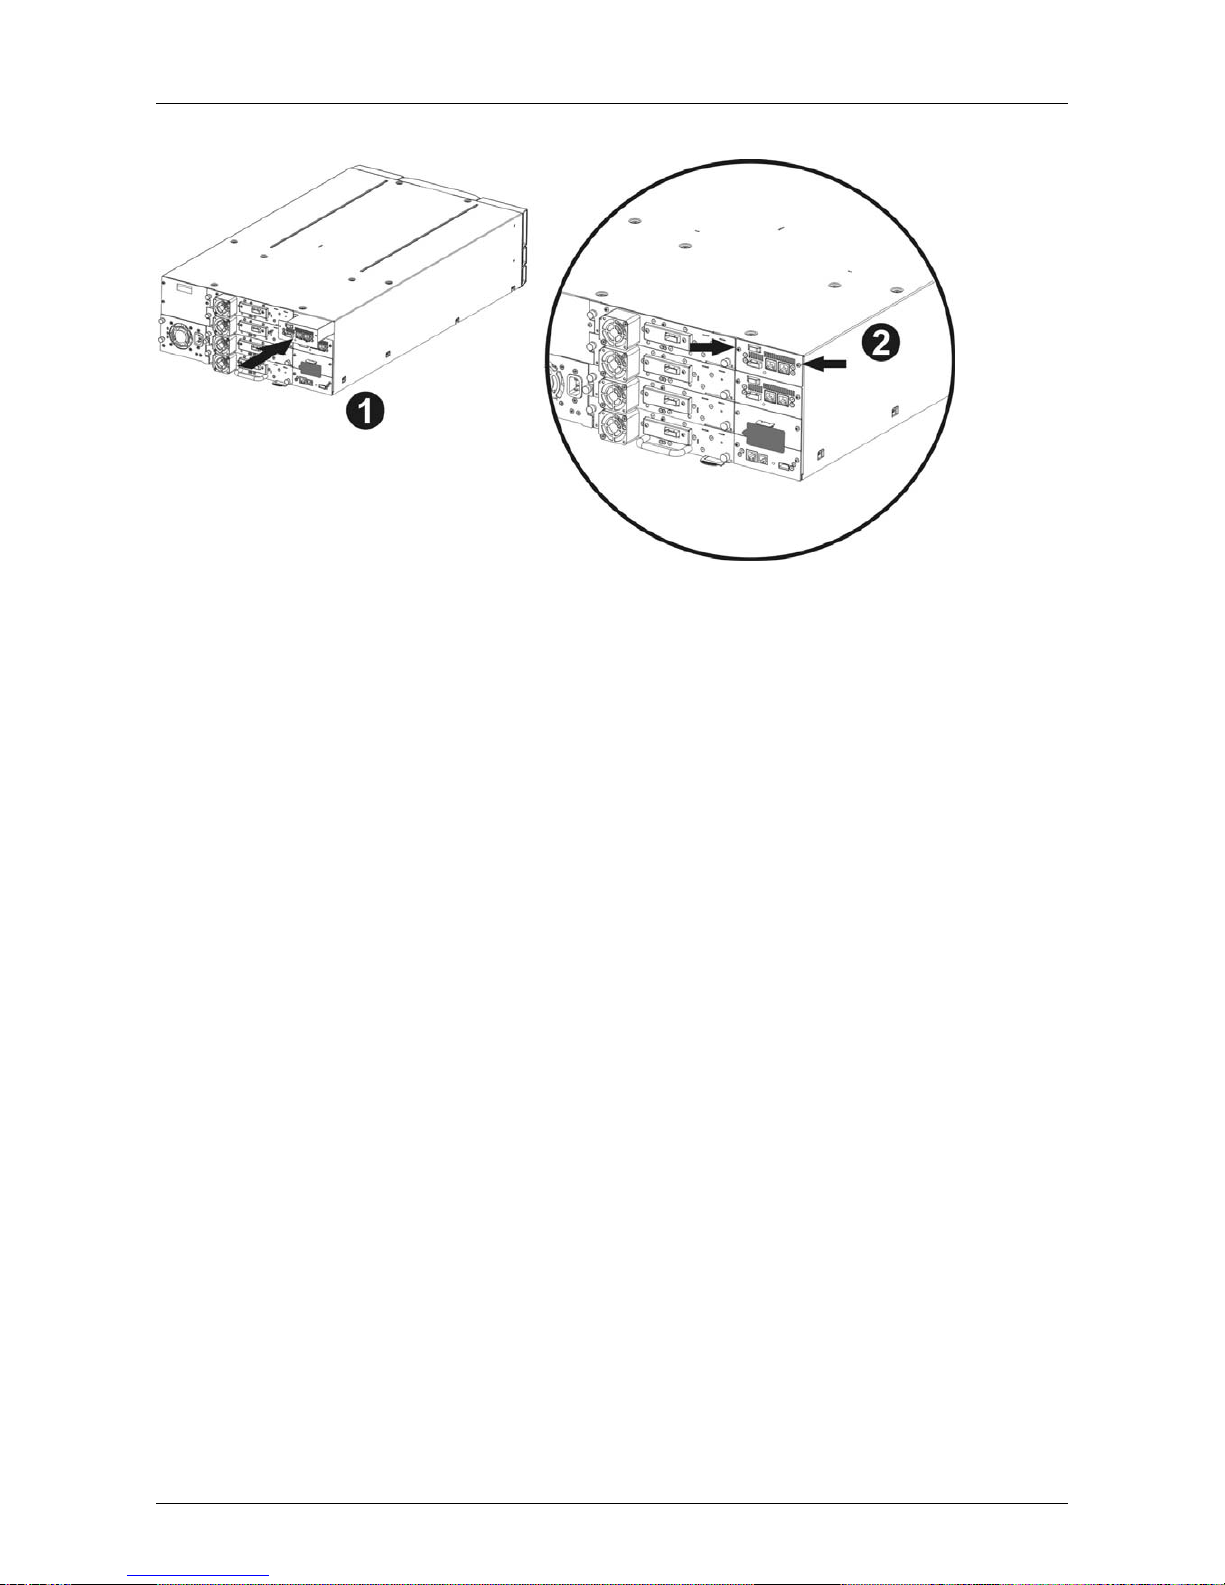
• Lock the bridge in pla ce with two Thumb Screws (see Figure 6 steps 1, 2).
Installing the iSCSI bridge
Page 12 Dell Model TL24iSCSIxSAS 1Gb iSCSI to SAS User’s Guide Rev.C
Figure 6 Installing the bridge and store the shipping lock
• Store the shipping lock on the iSCSI board (see Figure 6, step 3).
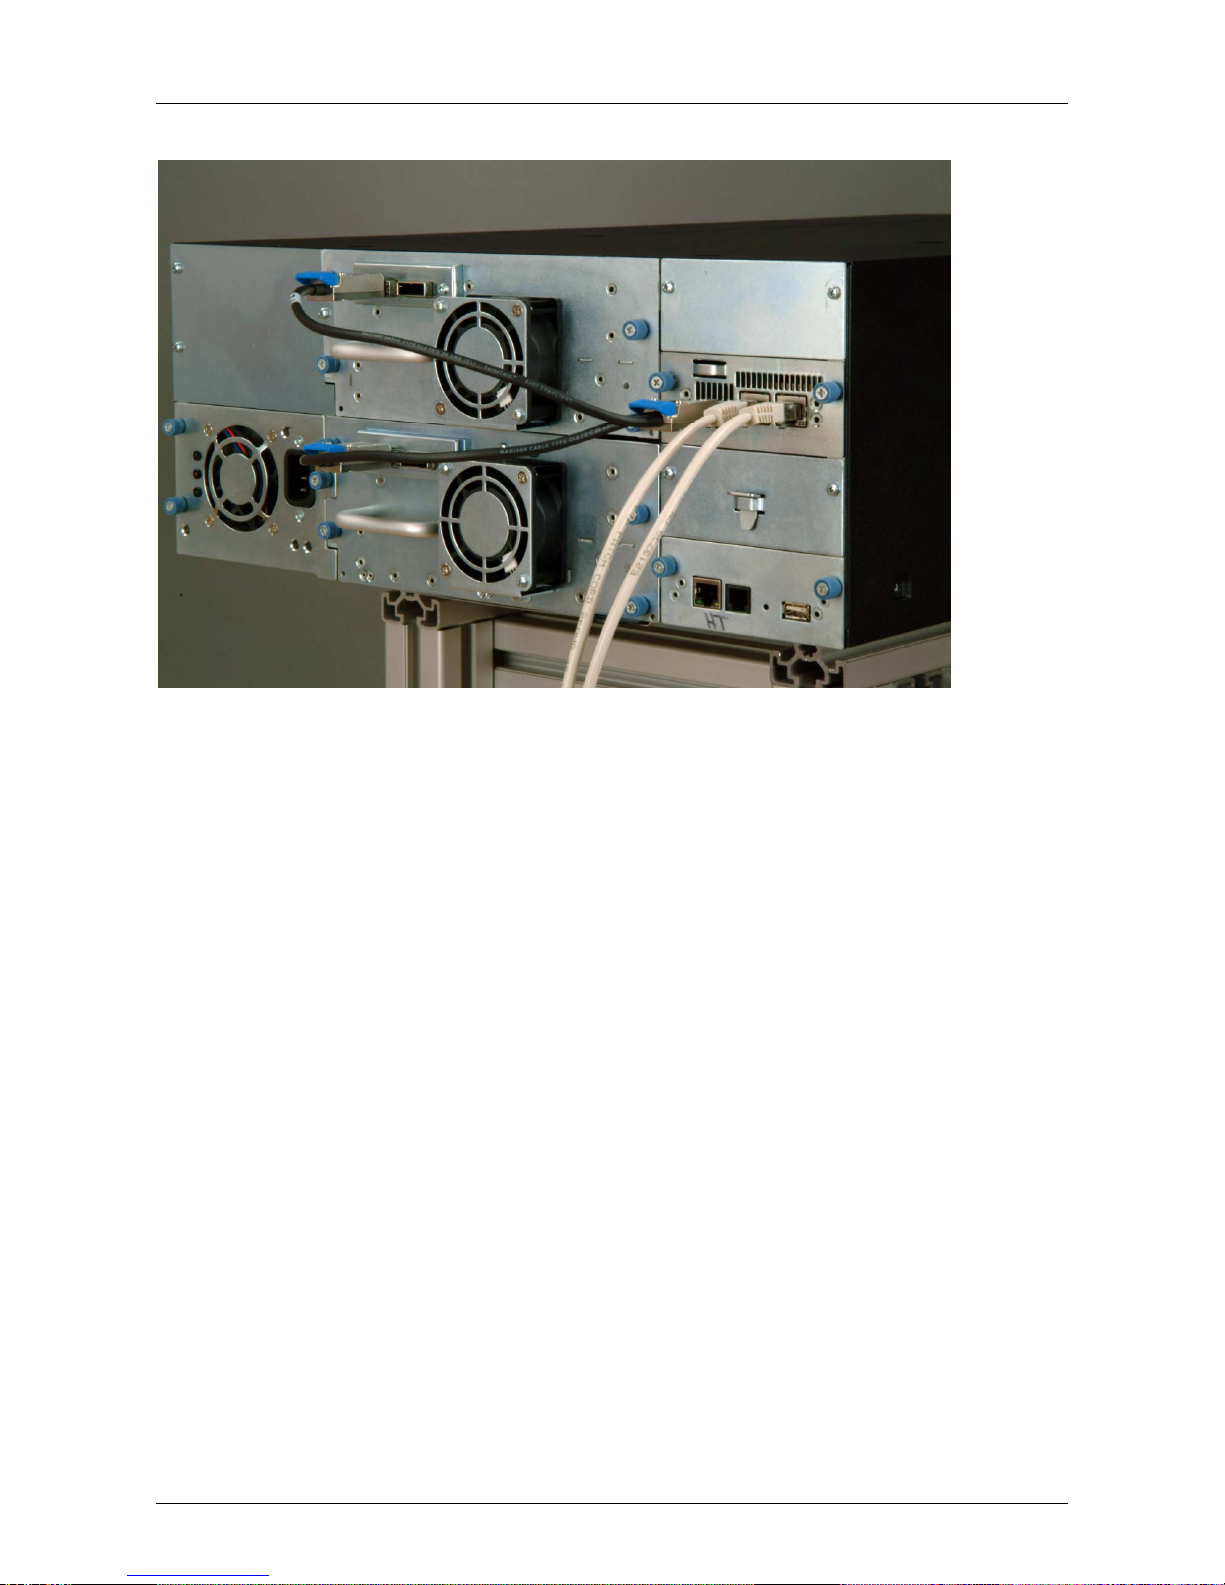
• Conne ct the Ethernet cabl es.
• Connect the SAS cables and peripherals.
• Conne ct the libra ry power cord.
• Configure the bridge’s host name and IP-address.
There are seven basic steps to installing the iSCSI bridge on the Dell PowerVault TL4000:
• Remove the blank plate (see Figure 7) on the rear of the library (you need a #3 Phillips screwdriver).
Figure 7 Remove the blank plate on the PowerVault TL4000
Installing the iSCSI bridge
Dell Model TL24iSCSIxSAS 1Gb iSCSI to SAS User’s Guide Rev.C Page 13
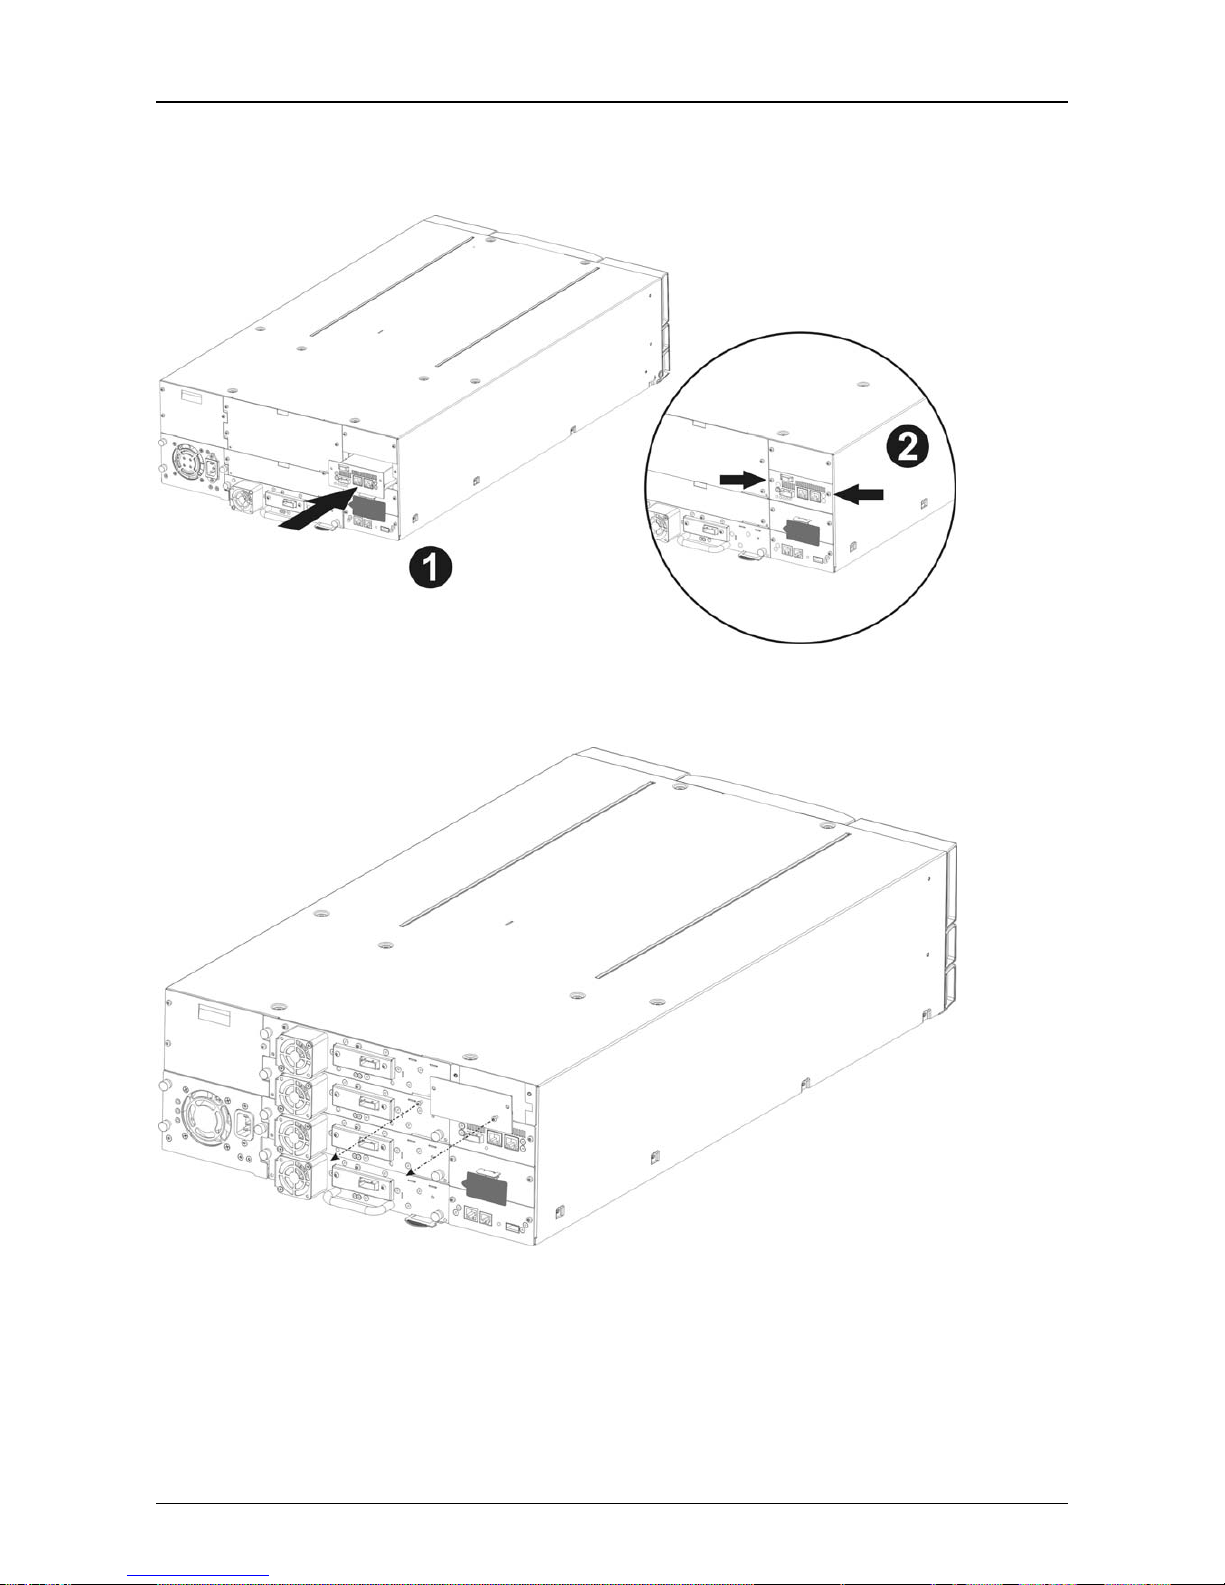
• Unpack the i S CSI board and install it into the Library (see Figure 8, and Figure 10 step1).
Figure 8 Installing the bridge in the PowerVault TL4000
Installing a second bridge in the PowerVault TL4000 with e.g. (four HH SAS Drives).
Figure 9 Remove the second blank plate on the PowerVault TL4000
Installing the iSCSI bridge
Page 14 Dell Model TL24iSCSIxSAS 1Gb iSCSI to SAS User’s Guide Rev.C
Figure 10 Installing the second bridge in the PowerVault TL4000
• Lock the bridge in place with two screws (see Figure 8 and Figure 10 step 2).
• Conne ct the Ethernet cabl es.
• Connect the SAS cables and peripherals.
• Conne ct the libra ry power cord.
• Configure the bridge’s host name and IP-address.
The iSCSI bridge can be used on the following network configurations:
• 1000BaseT (Gigabit)
It is not necessary to specify which network type you are connected to as the iSCSI bridge will automatically
select the correct network speed upon power up.
The connection to the Ethernet network is via an industry standard RJ45 copper interface on the rear plate of
the unit.
To connect the iSCSI bridge to the Ethernet network, insert the two Cat 5E cables into the connectors on the
unit as shown below. When the plugs are in the correct position a “click” should be heard.

Installing the iSCSI bridge
Dell Model TL24iSCSIxSAS 1Gb iSCSI to SAS User’s Guide Rev.C Page 15
6.1 SAS Bus Connections
The SAS bus on the iSCSI bridge is capable of running at high data transfer speeds, however, devices that
operate at slower speeds can still be connected to this SAS bus. In a manner similar to the Ethernet
connection, the iSCSI bridge will automatically negotiate with these devices to obtain their optimal operating
speed upon power up. Each SAS port will support up to 2 SAS connections.
Connect the SAS cable to the rear of the iSCSI bridge as shown below, ensuring that connector is oriented
correctly.
Figure 11 Connect the SAS and network cables in the PowerVault TL2000
Installing the iSCSI bridge
Page 16 Dell Model TL24iSCSIxSAS 1Gb iSCSI to SAS User’s Guide Rev.C
Figure 12 Connect the SAS and network cables in the PowerVault TL4000
Configuring the iSCSI bridge
Dell Model TL24iSCSIxSAS 1Gb iSCSI to SAS User’s Guide Rev.C Page 17
7. Configuring the iSCSI bridge
Before the iSCSI bridge can be used on the network for the first time, it is necessary to configure a number
of IP parameters. To make this as easy as possible, the iSCSI bridge has a Graphical User Interface (GUI)
that can be accessed via any web browser.
7.1 Initial set up
Connect the iSCSI bridge to the Dell PowerVault drives and the network as described in the previous
sections and power up the unit.
From your web browser, connect to the iSCSI bridge using the IP-address 10.10.10.10
Depending on how the network parameters are set on the machine you are using to access the iSCSI
bridge, it may be necessary to change your network setting on your computer for the initial set up (see
Appendix A and B for further help).
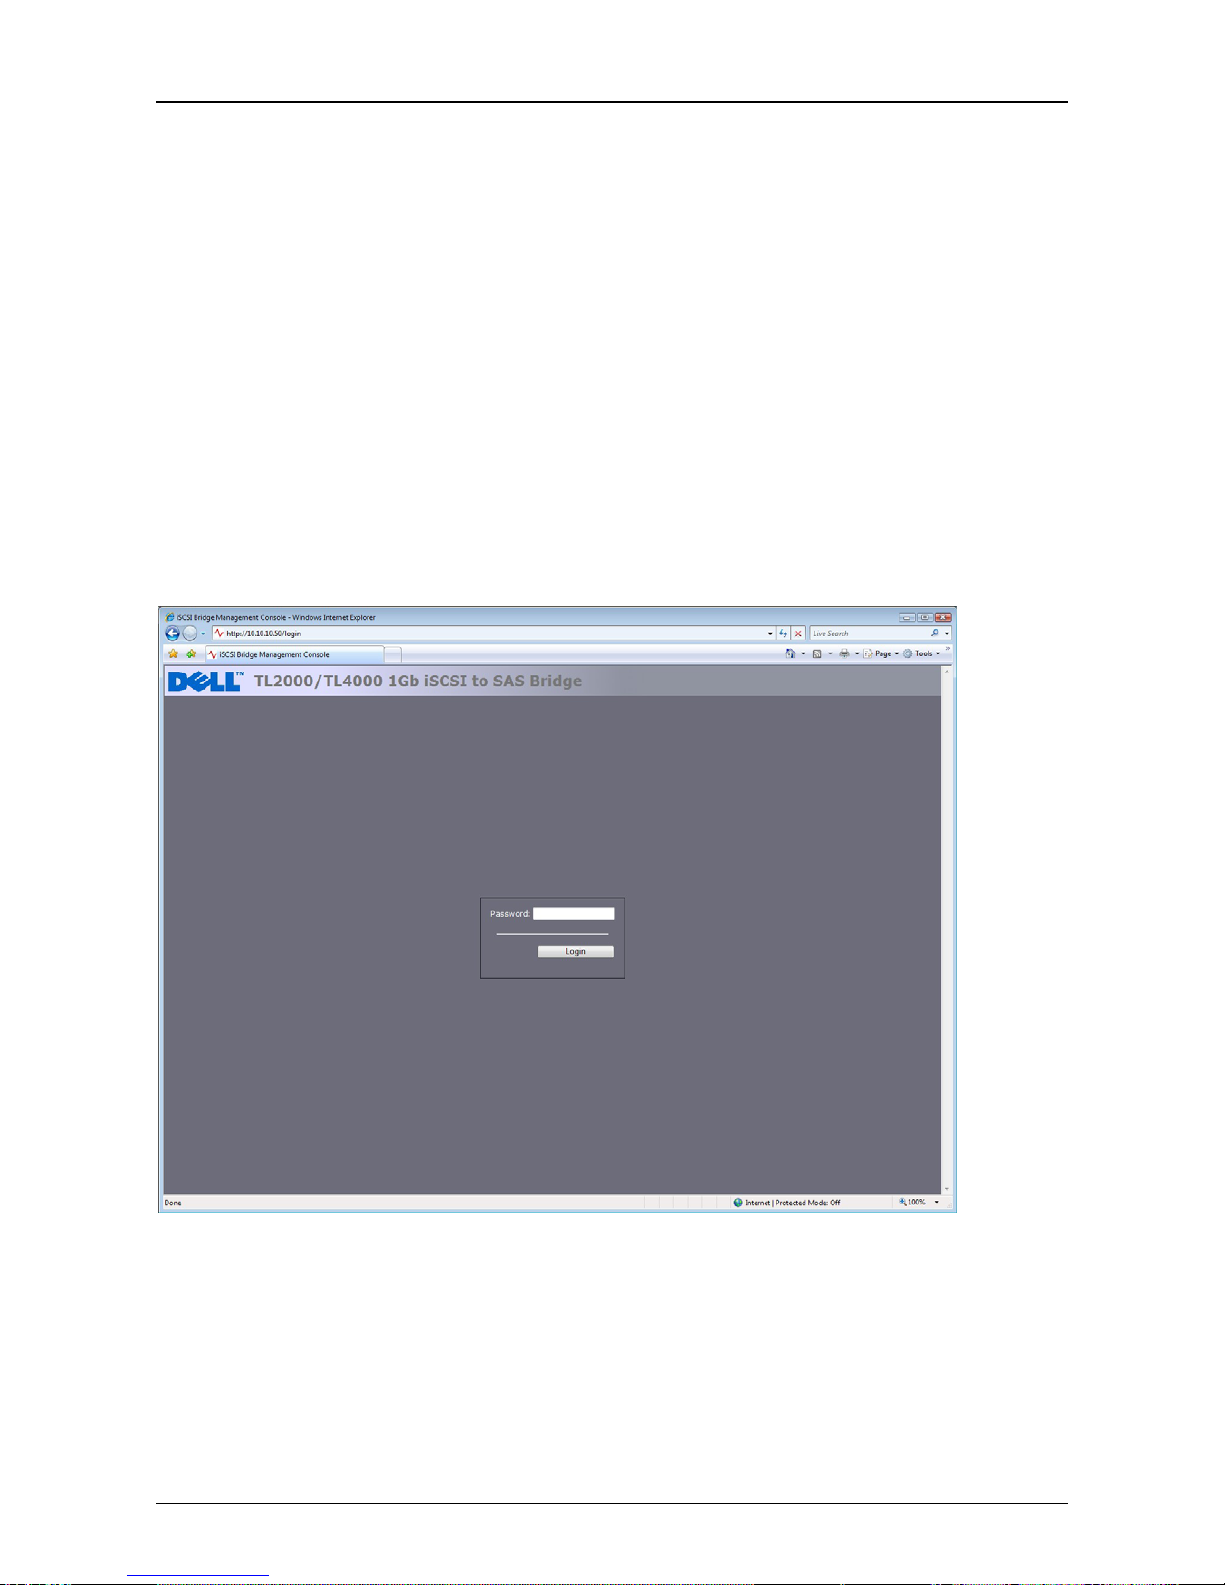
Once you have connected to the GUI you will see the entry page shown below.
Figure 13 Login page
Enter the default password – admin. If the password is entered incorrectly, the following screen will be
displayed.

Configuring the iSCSI bridge
Page 18 Dell Model TL24iSCSIxSAS 1Gb iSCSI to SAS User’s Guide Rev.C
Figure 14 Invalid Login page
Note:
We suggest that you change your password at the next possible
opportunity – see section 7.4
 Loading...