

Page 1

www.dell.com | support.dell.com
Dell Precision™ Workstation T3400
Quick Reference Guide
Model DCTA
Page 2

Notes, Notices, and Cautions
NOTE: A NOTE indicates important information that helps you make better use of
your computer.
NOTICE: A NOTICE indicates either potential damage to hardware or loss of data
and tells you how to avoid the problem.
CAUTION: A CAUTION indicates a potential for property damage, personal injury,
or death.
____________________
Information in this document is subject to change without notice.
© 2007 Dell Inc. All rights reserved.
Reproduction in any manner whatsoever without the written permission of Dell Inc. is strictly
forbidden.
Trademarks used in this text: Dell, the DELL logo, and Dell Precision are trademarks of Dell Inc.;
Microsoft, Windows, and Windows Vista are either trademarks or registered trademarks of Microsoft
Corporation in the United States and/or other countries.
Other trademarks and trade names may be used in this document to refer to either the entities claiming
the marks and names or their products. Dell Inc. disclaims any proprietary interest in trademarks and
trade names other than its own.
Model DCTA
August 2007 P/N JY487 Rev. A00
Page 3

Contents 3
Contents
Finding Information . . . . . . . . . . . . . . . . . . . . 5
About Your Computer
. . . . . . . . . . . . . . . . . . 11
Front View (Tower Orientation)
. . . . . . . . . . 11
Back View (Tower Orientation)
. . . . . . . . . . 14
Front View (Desktop Orientation)
. . . . . . . . . 15
Back View (Desktop Orientation)
. . . . . . . . . 18
Back Panel Connectors
. . . . . . . . . . . . . . 19
Setting Up Your Computer
. . . . . . . . . . . . . . . . 21
Changing Between Tower and
Desktop Orientations
. . . . . . . . . . . . . . . . 21
Installing Your Computer in an Enclosure
. . . . . 22
Transferring Information to a New Computer
. . . 25
Power Protection Devices
. . . . . . . . . . . . . 28
Cleaning Your Computer
. . . . . . . . . . . . . . . . 30
Computer, Keyboard, and Monitor
. . . . . . . . . 30
Mouse (Non-Optical)
. . . . . . . . . . . . . . . . 30
Floppy Drive
. . . . . . . . . . . . . . . . . . . . 31
CDs and DVDs
. . . . . . . . . . . . . . . . . . . 31
Troubleshooting Tools
. . . . . . . . . . . . . . . . . . 31
Power Lights
. . . . . . . . . . . . . . . . . . . . 31
Diagnostic Lights
. . . . . . . . . . . . . . . . . . 33
Beep Codes
. . . . . . . . . . . . . . . . . . . . 37
System Messages
. . . . . . . . . . . . . . . . . 39
Hardware Troubleshooter
. . . . . . . . . . . . . 41
Dell Diagnostics
. . . . . . . . . . . . . . . . . . 41
Page 4

4 Contents
Troubleshooting . . . . . . . . . . . . . . . . . . . . . 45
Battery Problems
. . . . . . . . . . . . . . . . . . 46
Drive Problems
. . . . . . . . . . . . . . . . . . . 46
E-Mail, Modem, and Internet Problems
. . . . . . 48
Error Messages
. . . . . . . . . . . . . . . . . . 49
IEEE 1394 Device Problems
. . . . . . . . . . . . . 50
Keyboard Problems
. . . . . . . . . . . . . . . . . 51
Lockups and Software Problems
. . . . . . . . . . 51
Memory Problems
. . . . . . . . . . . . . . . . . 53
Mouse Problems
. . . . . . . . . . . . . . . . . . 54
Network Problems
. . . . . . . . . . . . . . . . . 55
Power Problems
. . . . . . . . . . . . . . . . . . 55
Printer Problems
. . . . . . . . . . . . . . . . . . 56
Scanner Problems
. . . . . . . . . . . . . . . . . 57
Sound and Speaker Problems
. . . . . . . . . . . 58
Video and Monitor Problems
. . . . . . . . . . . . 59
Index . . . . . . . . . . . . . . . . . . . . . . . . . . . . . . . 61
Page 5
Quick Reference Guide 5
Finding Information
NOTE: Some features or media may be optional and may not ship with your
computer. Some features or media may not be available in certain countries.
NOTE: Additional information may ship with your computer.
What Are You Looking For? Find It Here
• A diagnostic program for my computer
• Drivers for my computer
• Desktop System Software (DSS)
Drivers and Utilities Disc
NOTE: The Drivers and Utilities disc may
be optional and may not ship with your
computer.
Documentation and drivers are already
installed on your computer. You can use
the Drivers and Utilities disc to reinstall
drivers (see "Reinstalling Drivers and
Utilities" in your User’s Guide), or to run
the Dell Diagnostics (see "Dell Diagnostics"
on page 41).
Readme files may be included on your
disc to provide last-minute updates about
technical changes to your computer or
advanced technical-reference material for
technicians or experienced users.
Drivers and documentation updates can be
found at support.dell.com.
Page 6

6 Quick Reference Guide
• Warranty information
• Terms and Conditions (U.S. only)
• Safety instructions
• Regulatory information
• Ergonomics information
• End User License Agreement
Dell™ Product Information Guide
• How to remove and replace parts
• Specifications
• How to configure system settings
• How to troubleshoot and solve problems
Dell Precision™ User’s Guide
Microsoft
®
Windows® XP and Windows
Vista
™
Help and Support Center
1
Click
Start→
Help and Support→
Dell User and System Guides
→
System Guides
.
2
Click the
User’s Guide
for your
computer.
What Are You Looking For? Find It Here
Page 7
Quick Reference Guide 7
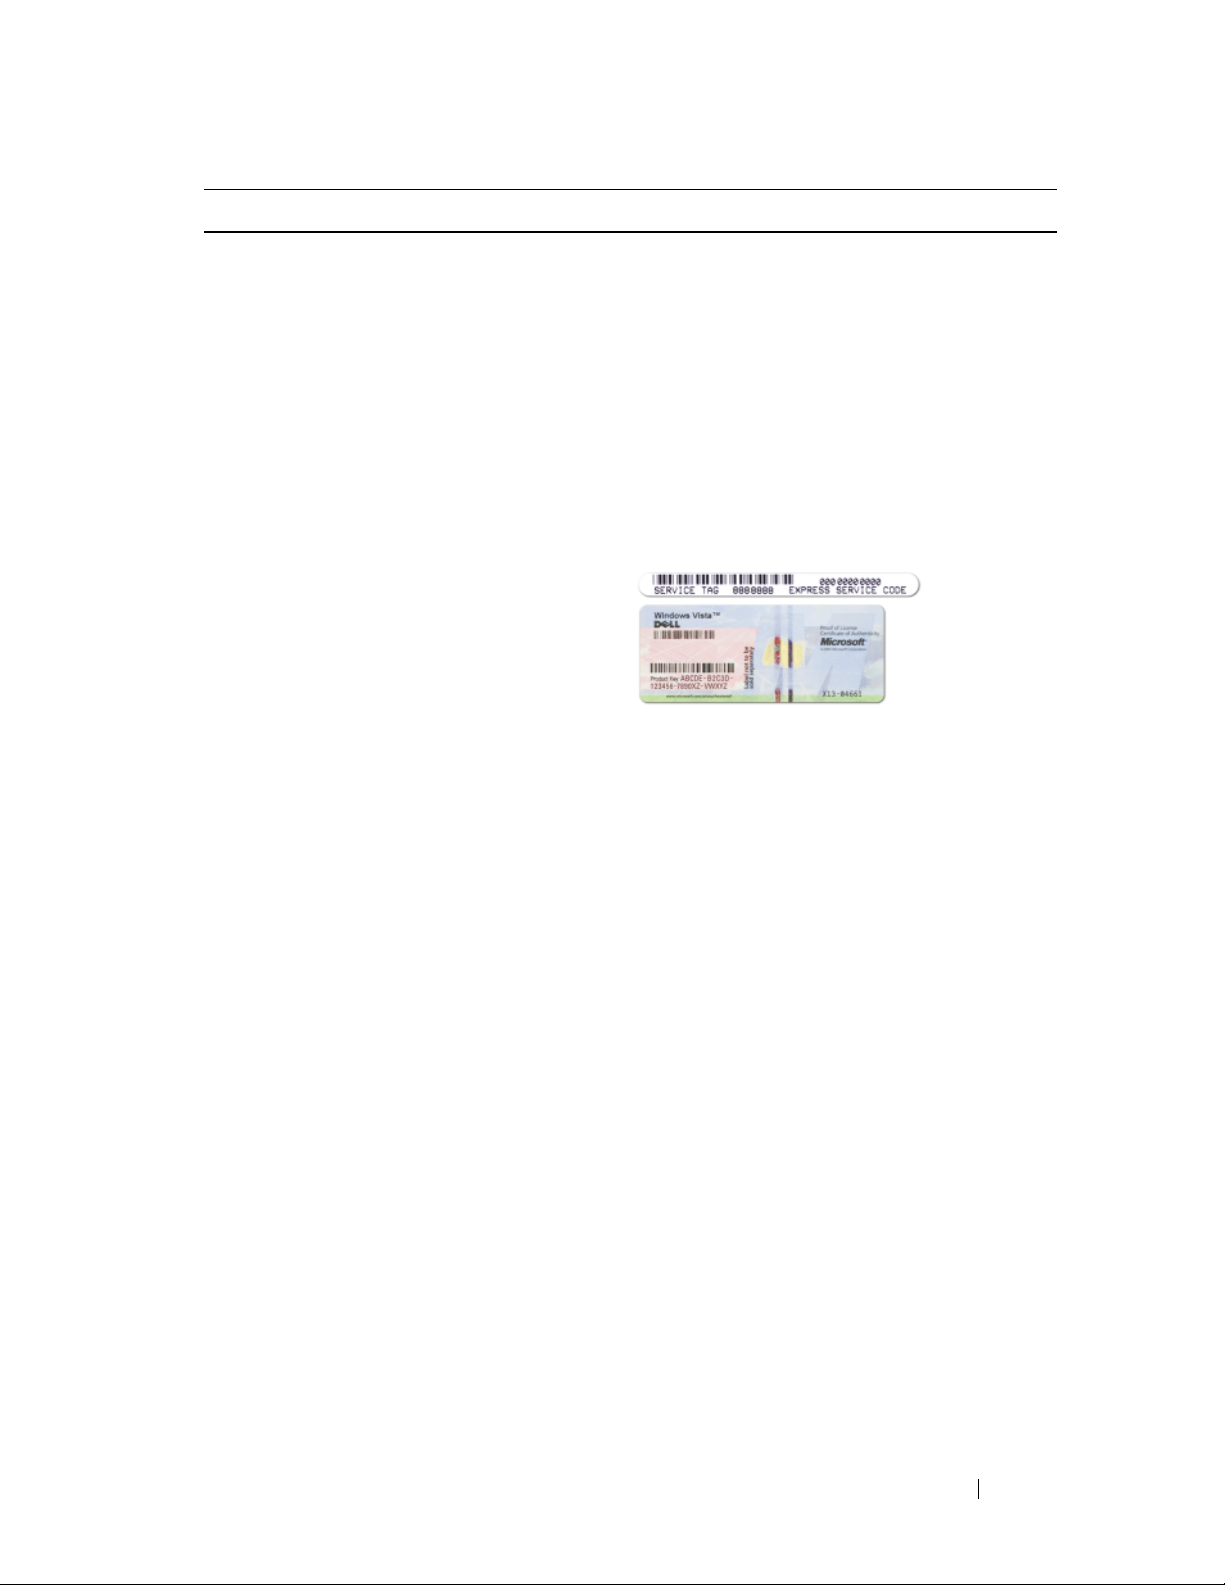
• Service Tag and Express Service Code
• Microsoft Windows Product Key
Service Tag and Microsoft Windows
Product Key
These labels are located on your
computer.
• Use the Service Tag to identify your
computer when you use
support.dell.com
or contact support.
• Enter the Express Service Code to
direct your call when contacting
support.
NOTE: As an increased security measure,
the newly designed Microsoft Windows
license label incorporates a missing
portion, or hole, to discourage removal of
the label.
What Are You Looking For? Find It Here
Page 8

8 Quick Reference Guide
• Solutions — Troubleshooting hints and
tips, articles from technicians, online
courses, and frequently asked questions
• Community — Online discussion with
other Dell customers
• Upgrades — Upgrade information for
components, such as the memory, hard
drive, and operating system
• Customer Care — Contact information,
service call and order status, and
warranty and repair information
• Service and support — Service call
status, support history, service contract,
and online discussions with support
• Dell Technical Update Service —
Proactive e-mail notification of software
and hardware updates for your computer
• Reference — Computer documentation,
details on my computer configuration,
product specifications, and white papers
• Downloads — Certified drivers, patches,
and software updates
Dell Support Website — support.dell.com
NOTE: Select your region or business
segment to view the appropriate support
site.
What Are You Looking For? Find It Here
Page 9

Quick Reference Guide 9
• Desktop System Software (DSS)— If
you reinstall the operating system for
your computer, you should also reinstall
the DSS utility. DSS automatically
detects your computer and operating
system and installs the updates
appropriate for your configuration,
providing critical updates for your
operating system and support for
processors, optical drives, USB devices,
etc. DSS is necessary for correct
operation of your Dell computer.
To download Desktop System Software:
1
Go to
support.dell.com
, select your
country/region, and then click
Drivers
& Downloads
.
2
Click
Select Model
or
Enter a Tag
,
make the appropriate selections or enter
the appropriate information for your
computer, and then click
Confirm
.
3
Scroll down to
System and
Configuration Utilities
→
Desktop
System Software
, and then click
Download Now.
NOTE: The support.dell.com user
interface may vary depending on your
selections.
• How to use Windows XP
• How to use Windows Vista
• How to work with programs and files
• How to personalize my desktop
Windows Help and Support Center
1
Click
Start→
Help and Support
.
2
Type a word or phrase that describes
your problem and click the arrow icon.
3
Click the topic that describes your
problem.
4
Follow the instructions on the screen.
What Are You Looking For? Find It Here
Page 10
10 Quick Reference Guide
• How to reinstall my operating system
Operating System Media
The operating system is already installed
on your computer. To reinstall your
operating system, use the Operating
System reinstallation media that came
with your computer (see "Restoring Your
Operating System" in your User’s Guide).
After you reinstall your operating system,
use the optional Drivers and Utilities disc
to reinstall drivers for the devices that
came with your computer
Your operating system product key label is
located on your computer.
NOTE: The color of your operating system
installation media varies according to the
operating system you ordered.
• How to use Linux
• E-mail discussions with users of Dell
Precision products and the Linux
operating system
• Additional information regarding Linux
and my Dell Precision computer
Dell Supported Linux Sites
• linux.dell.com
• lists.us.dell.com/mailman/listinfo/linuxprecision
What Are You Looking For? Find It Here
Page 11
Quick Reference Guide 11
About Your Computer
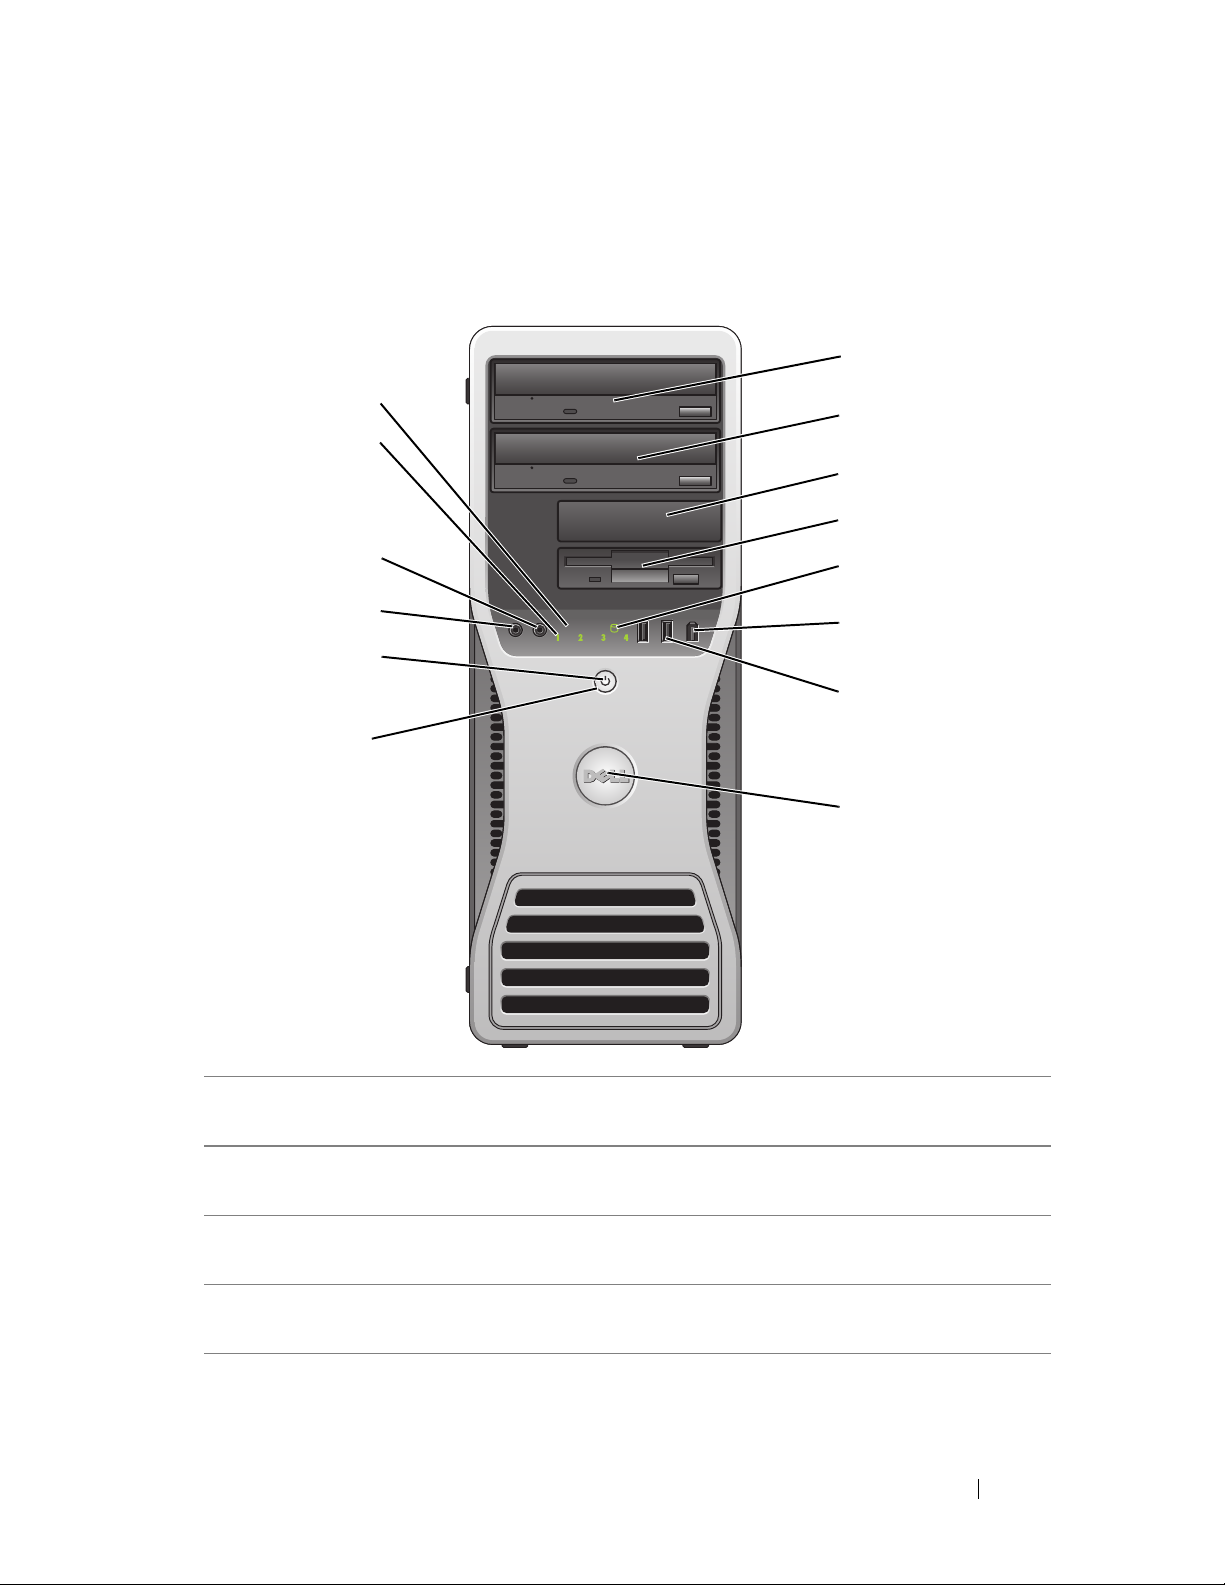
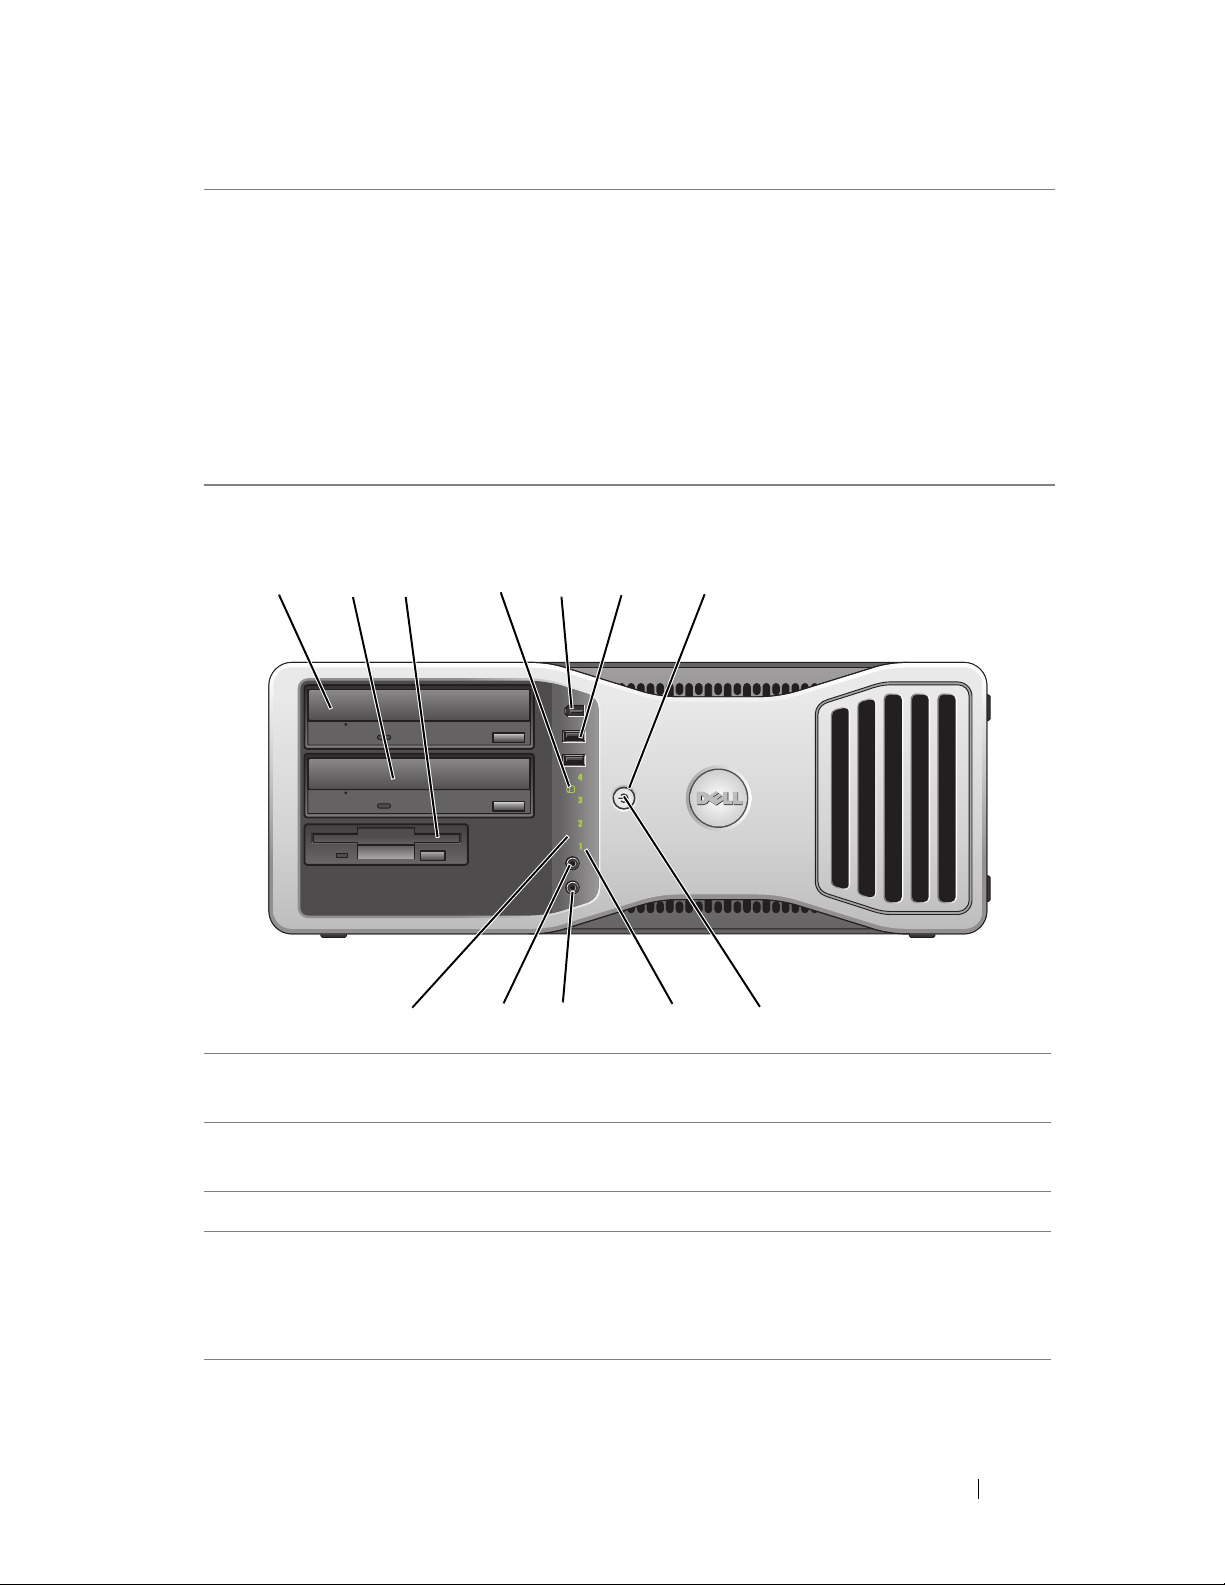
Front View (Tower Orientation)
1 upper 5.25-inch drive
bay
Supports an optical drive.
2 lower 5.25-inch drive
bay
Supports an optical drive or an additional hard drive
(SATA only).
3 upper 3.5-inch drive
bay
Supports a floppy drive, a Media Card Reader, or an
additional hard drive (SATA or SAS).
4 lower 3.5-inch drive
bay
Supports a floppy drive or a Media Card Reader.
1
9
10
11
12
13
14
4
5
6
7
8
3
2
Page 12

12 Quick Reference Guide
5 hard drive activity
light
The hard drive activity light is on when the computer
reads data from or writes data to the hard drive. The
light may also be on when a device such as an optical
drive is in operation.
6 IEEE 1394 connector
(optional)
Use the optional IEEE 1394 connector for high-speed
data devices such as digital video cameras and external
storage devices.
7 USB 2.0 connectors
(2)
Use the front USB connectors for devices that you
connect occasionally, such as flash memory keys or
cameras, or for bootable USB devices (see "System
Setup" in your User’s Guide for more information on
booting to a USB device).
NOTE: It is recommended that you use the back USB
connectors for devices that typically remain connected,
such as printers and keyboards.
8 Dell badge (rotatable) Use the plastic handle on the back of the Dell badge to
rotate the badge for tower-to-desktop or desktop-totower conversion.
9 power button Press to turn on the computer.
NOTICE: To avoid losing data, do not use the
power button to turn off the computer. Instead,
perform an operating system shutdown.
NOTICE: If your operating system has ACPI
enabled, when you press the power button the
computer will perform an operating system
shutdown.
NOTE: The power button can also be used to wake the
system or to place it into a power-saving state (see
"Power Management" in your User’s Guide).
Page 13

Quick Reference Guide 13
10 power light The power light illuminates and blinks or remains solid
to indicate different states:
• No light — The computer is turned off (S4, S5, or
mechanical OFF).
• Steady green — The computer is in a normal
operating state.
• Blinking green — The computer is in a powersaving state (S1 or S3).
• Blinking or solid amber — See "Power Problems" in
your
User’s Guide
.
To exit from a power-saving state, press the power
button or use the keyboard or mouse if it is configured
as a wake device in the Windows Device Manager. For
more information about sleep states and exiting from
a power-saving state, see "Power Management" in your
User’s Guide
.
For a description of diagnostic light codes for
troubleshooting problems with your computer, see
"Diagnostic Lights" on page 33.
11 microphone
connector
Use the microphone connector to attach a personal
computer microphone for voice or musical input into
a sound or telephony program.
12 headphone connector Use the headphone connector to attach headphones.
13 diagnostic lights (4) Use the diagnostic lights to help you troubleshoot
a problem with your computer (see "Diagnostic Lights"
on page 33).
14 network link light The network link light is on when a good connection
exists between a 10-Mbps, 100-Mbps, or 1000-Mbps
(1-Gbps) network and the computer.
Page 14
14 Quick Reference Guide
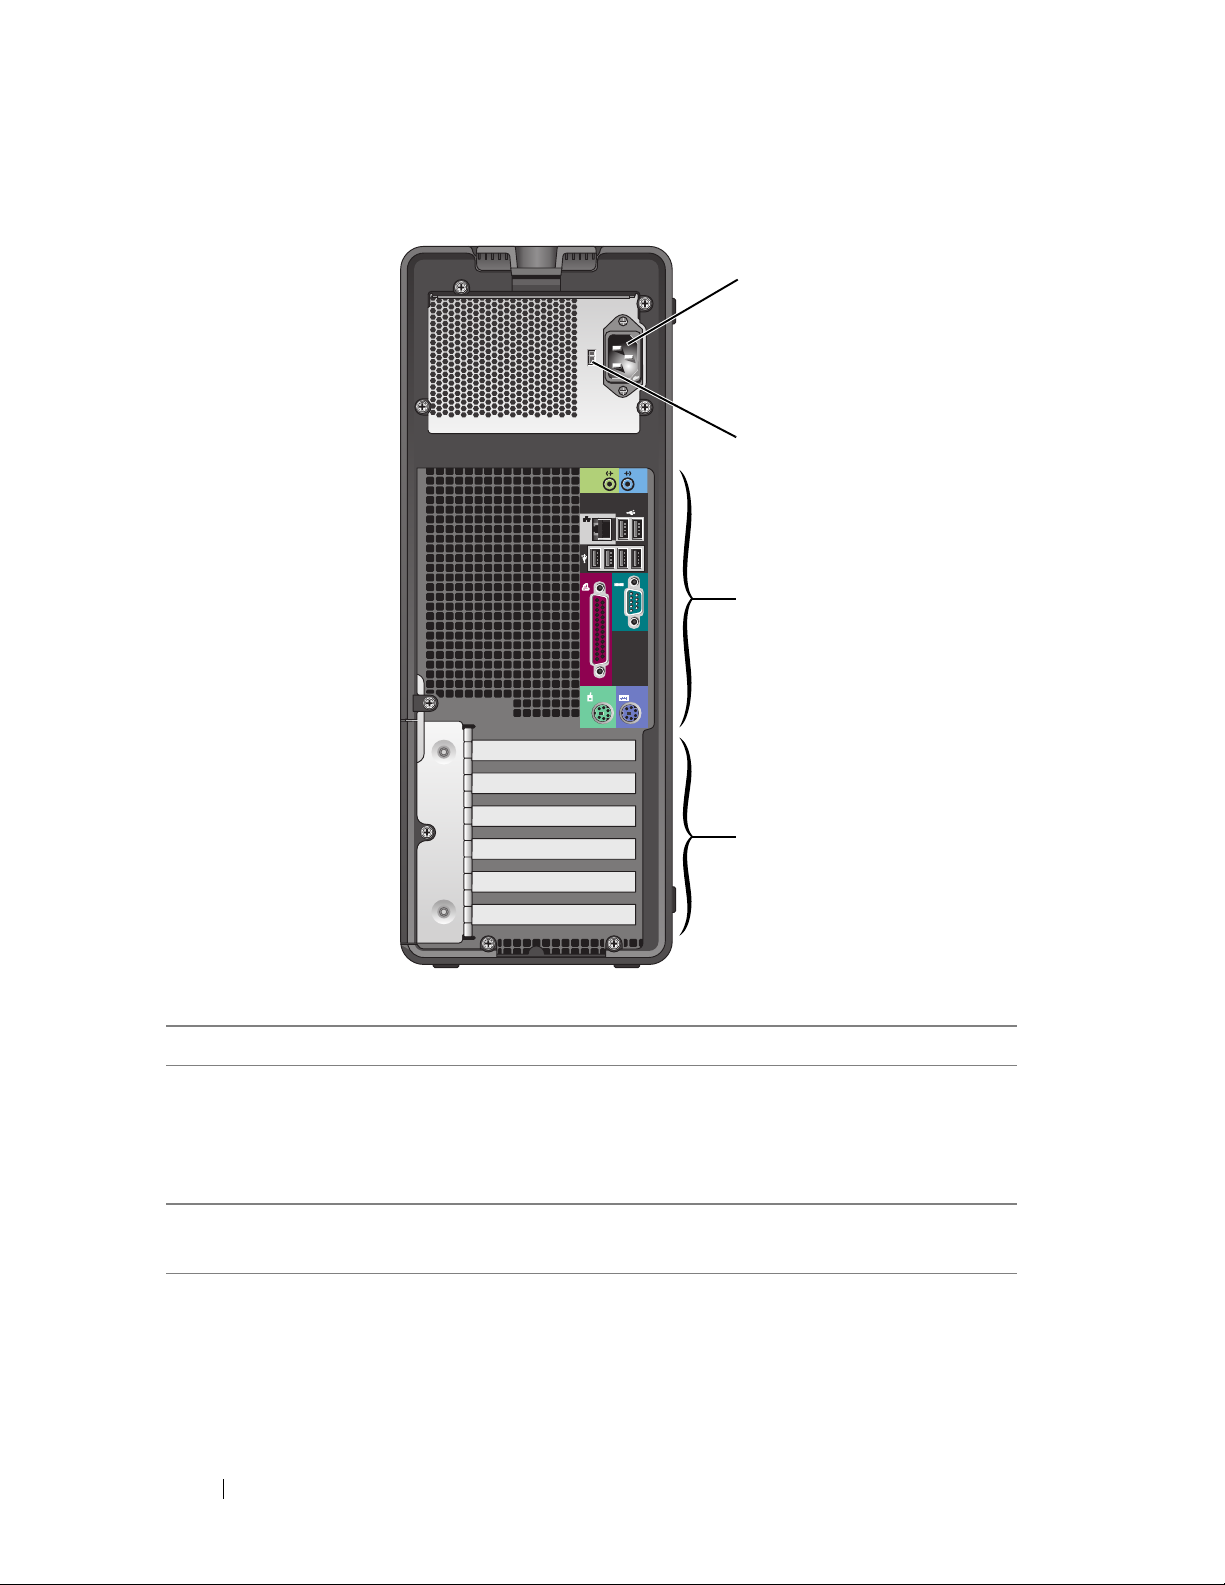
Back View (Tower Orientation)
1 power connector Insert the power cable.
2 voltage selection
switch
See the safety instructions in the Product Information
Guide for more information.
NOTE: The voltage selection switch is available on the 375-W
PSU only.
3 back panel
connectors
Plug serial, USB, and other devices into the appropriate
connector.
1
2
3
4
Page 15
Quick Reference Guide 15
Front View (Desktop Orientation)
4 card slots Access connectors for any installed PCI or PCI Express
cards.
NOTE: The upper five connector slots support full-length
cards; the connector slot at the bottom supports a half-length
card.
NOTE: Check the documentation for cards to ensure that you
can accommodate them in your configuration. Some cards
that require more physical space and power (such as PCI
Express graphics cards) may restrict the use of other cards.
1 upper 5.25-inch drive
bay
Supports an optical drive.
2 lower 5.25-inch drive
bay
Supports an optical drive or an additional hard drive
(SATA only).
3 3.5-inch drive bay Supports a floppy drive or a Media Card Reader.
4 hard drive activity
light
The hard drive activity light is on when the computer
reads data from or writes data to the hard drive. The
light may also be on when a device such as an optical
drive is in operation.
1 2 7
8
9101112
3
4
5 6
Page 16

16 Quick Reference Guide
5 IEEE 1394 connector
(optional)
Use the optional IEEE 1394 connector for high-speed
data devices such as digital video cameras and external
storage devices.
6 USB 2.0 connectors
(2)
Use the front USB connectors for devices that you
connect occasionally, such as flash memory keys or
cameras, or for bootable USB devices (see "System
Setup" in your User’s Guide for more information on
booting to a USB device).
NOTE: It is recommended that you use the back USB
connectors for devices that typically remain connected,
such as printers and keyboards.
7 power button Press to turn on the computer.
NOTICE: To avoid losing data, do not use the
power button to turn off the computer. Instead,
perform an operating system shutdown.
NOTICE: If your operating system has ACPI
enabled, when you press the power button the
computer will perform an operating system
shutdown.
NOTE: The power button can also be used to wake the
system or to place it into a power-saving state (see
"Power Management" in your User’s Guide).
Page 17

Quick Reference Guide 17
8 power light The power light illuminates and blinks or remains solid
to indicate different states:
• No light — The computer is turned off (S4, S5, or
mechanical OFF).
• Steady green — The computer is in a normal
operating state.
• Blinking green — The computer is in a powersaving state (S1 or S3).
• Blinking or solid amber — See "Power Problems"
in
your User’s Guide
.
To exit from a power-saving state, press the power
button or use the keyboard or mouse if it is configured
as a wake device in the Windows Device Manager. For
more information about sleep states and exiting from
a power-saving state, see "Power Management" in your
User’s Guide.
For a description of diagnostic light codes for
troubleshooting problems with your computer, see
"Diagnostic Lights" on page 33.
9 diagnostic lights (4) Use the diagnostic lights to help you troubleshoot
a problem with your computer (see "Diagnostic Lights"
on page 33).
10 microphone
connector
Use the microphone connector to attach a personal
computer microphone for voice or musical input into
a sound or telephony program.
11 headphone connector Use the headphone connector to attach headphones.
12 network link light The network link light is on when a good connection
exists between a 10-Mbps, 100-Mbps, or 1000-Mbps
(or 1-Gbps) network and the computer.
Page 18
18 Quick Reference Guide
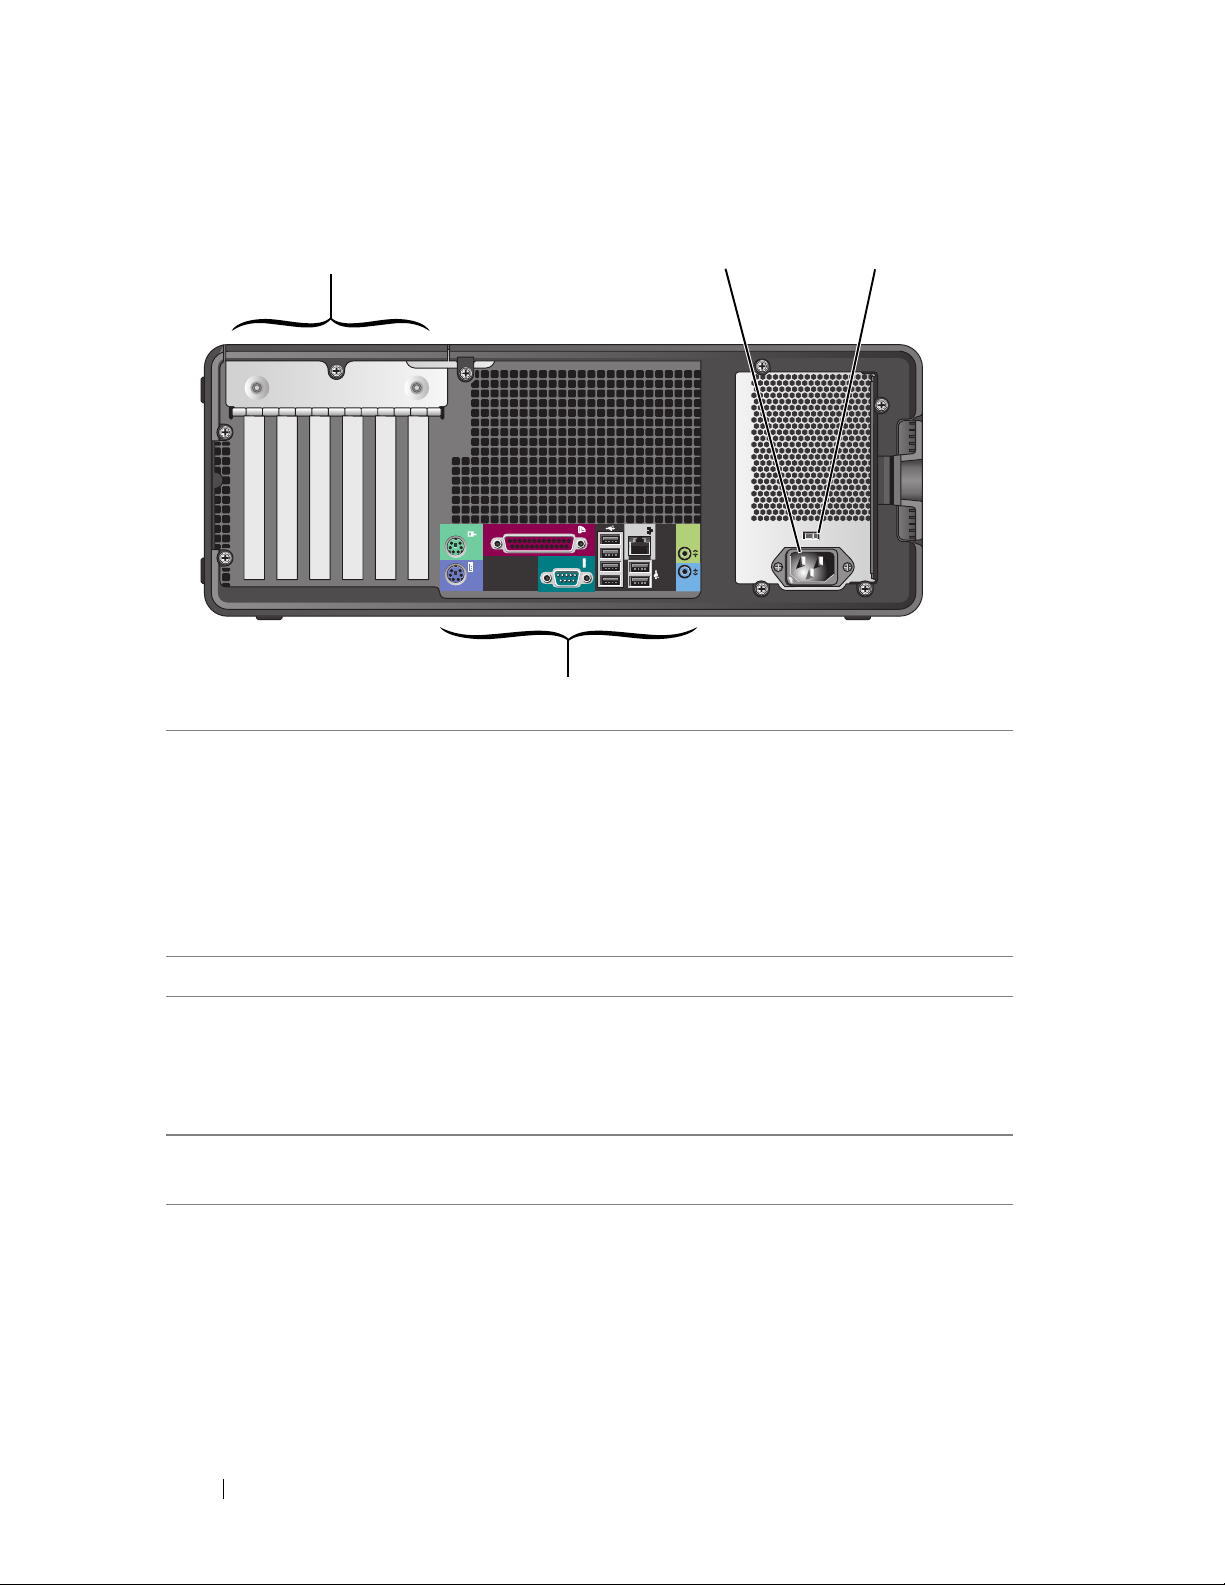
Back View (Desktop Orientation)
1 card slots Access connectors for any installed PCI or PCI Express
cards.
NOTE: Check the documentation for cards to ensure that
you can accommodate them in your configuration. Some
cards that require more physical space and power (such
as PCI Express graphics cards) may restrict the use of
other cards.
2 power connector Insert the power cable.
3 voltage selection
switch
See the safety instructions in the Product Information
Guide for more information.
NOTE: The voltage selection switch is available on the
375-W PSU only.
4 back panel connectors Plug serial, USB, and other devices into the
appropriate connector.
32
4
1
Page 19
Quick Reference Guide 19
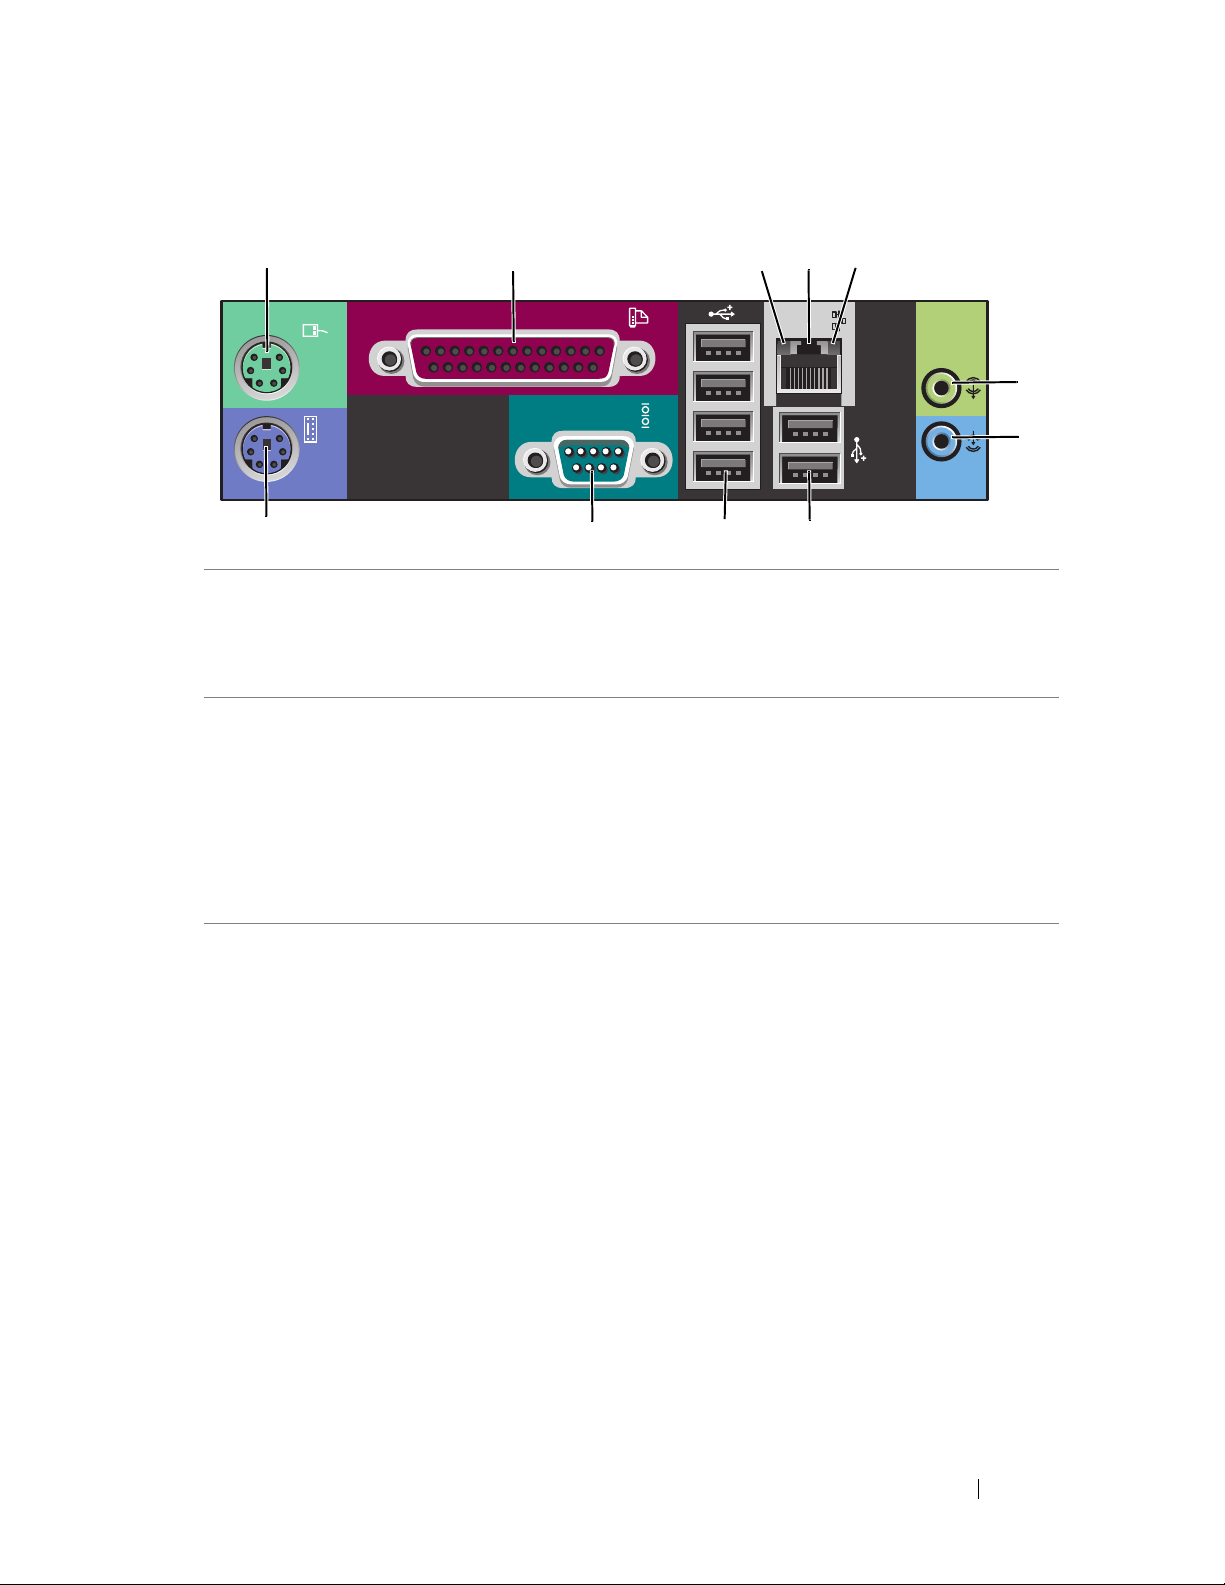
Back Panel Connectors
1 mouse connector Plug a PS/2 mouse into the green mouse connector. Turn off
the computer and any attached devices before you connect
a mouse to the computer. If you have a USB mouse, plug it
into a USB connector.
2 parallel
connector
Connect a parallel device, such as a printer, to the parallel
connector. If you have a USB printer, plug it into a USB
connector.
NOTE: The integrated parallel connector is automatically
disabled if the computer detects an installed card containing
a parallel connector configured to the same address. For more
information, see "System Setup Options" in your User’s Guide.
3 link integrity
light
• Green — A good connection exists between a 10-Mbps
network and the computer.
• Orange — A good connection exists between a 100-Mbps
network and the computer.
• Yellow — A good connection exists between a 1000-Mbps
(1-Gbps) network and the computer.
• Off — The computer is not detecting a physical
connection to the network.
1
2 345
891011
6
7
Page 20

20 Quick Reference Guide
4 network adapter
connector
To attach your computer to a network or broadband device,
connect one end of a network cable to either a network jack
or your network or broadband device. Connect the other
end of the network cable to the network adapter connector
on your computer. A click indicates that the network cable
has been securely attached.
NOTICE: Do not plug a telephone cable into the network
connector.
On computers with an additional network connector card,
use the connectors on the card and on the back of the
computer when setting up multiple network connections
(such as a separate intra- and extranet).
It is recommended that you use Category 5 wiring and
connectors for your network. If you must use Category
3 wiring, force the network speed to 10 Mbps to ensure
reliable operation.
5 network activity
light
The network activity light is on (flashing) when the
computer is transmitting or receiving network data. A high
volume of network traffic may make this light appear to be
in a steady on state.
6 line-out
connector
Use the green line-out connector to attach headphones and
most speakers with integrated amplifiers.
On computers with a sound card, use the connector on the
card.
7 line-in connector Use the blue line-in connector to attach a record/playback
device such as a microphone, cassette player, CD player,
or VCR.
On computers with a sound card, use the connector on the
card.
8 Rear Dual USB
2.0 connectors
(2)
Use the back USB connectors for devices that typically
remain connected, such as printers and keyboards.
NOTE: It is recommended that you use the front USB
connectors for devices that you connect occasionally, such as
flash memory keys or cameras, or for bootable USB devices.
Page 21

Quick Reference Guide 21
Setting Up Your Computer
Changing Between Tower and Desktop Orientations
CAUTION: Before you begin any of the procedures in this section, follow the
safety instructions in the
Product Information Guide
.
NOTE: To change your computer to either the tower or the desktop orientation, you
must use an optional kit available from Dell. See "Product Information" in your User’s
Guide for more details on ordering from Dell.
NOTE: The tower computer supports one more 3.5-inch drive in the front than does
the desktop computer.
1
Follow the procedures in "Before You Begin" in your
User’s Guide
.
2
Remove the computer cover (see "Removing the Computer Cover" in your
User’s Guide
).
3
Remove the front panel (see "Removing the Front Panel" in your
User’s
Guide
).
4
Remove the drive panel and prepare the drive panel by adding or removing
inserts, as needed (see "Drive Panel" in your
User’s Guide
).
9 Rear Quad USB
2.0 connectors
(4)
Use the back USB connectors for devices that typically
remain connected, such as printers and keyboards.
NOTE: It is recommended that you use the front USB
connectors for devices that you connect occasionally, such as
flash memory keys or cameras, or for bootable USB devices.
10 serial connector Connect a serial device, such as a handheld device, to the
serial port. The default designations are COM1 for serial
connector 1 and COM2 for the optional serial connector 2.
For more information, see "System Setup Options" in your
User’s Guide.
11 keyboard
connector
If you have a PS/2 keyboard, plug it into the purple keyboard
connector. If you have a USB keyboard, plug it into a USB
connector.
Page 22

22 Quick Reference Guide
Switching From Tower to Desktop Orientation
1
Remove all installed floppy drives or media card readers by following the
steps in "Removing a Floppy Drive or Media Card Reader (Tower
Computer)" in your
User’s Guide
, and then reinstall a single floppy drive or
media card reader by following the steps in "Installing a Floppy Drive or
Media Card Reader (Desktop Computer)" in your
User’s Guide
.
2
Remove all installed optical drives by following the steps in "Removing an
Optical Drive (Tower Computer)" in your
User’s Guide
, and then reinstall
the drives by following the steps in "Installing an Optical Drive (Desktop
Computer)" in your
User’s Guide
.
Switching From Desktop to Tower Orientation
1
Remove the floppy drive or media card reader (if installed) by following
the steps in "Removing a Floppy Drive or a Media Card Reader (Desktop
Computer)" in your
User’s Guide
, and then reinstall the floppy drive or
media card reader by following the steps in "Installing a Floppy Drive or
Media Card Reader (Tower Computer)" in your
User’s Guide
.
2
Remove all installed optical drives by following the steps in "Removing an
Optical Drive (Desktop Computer)" in your
User’s Guide
, and reinstall the
drives by following the steps in "Installing an Optical Drive (Tower
Computer)" in your
User’s Guide
.
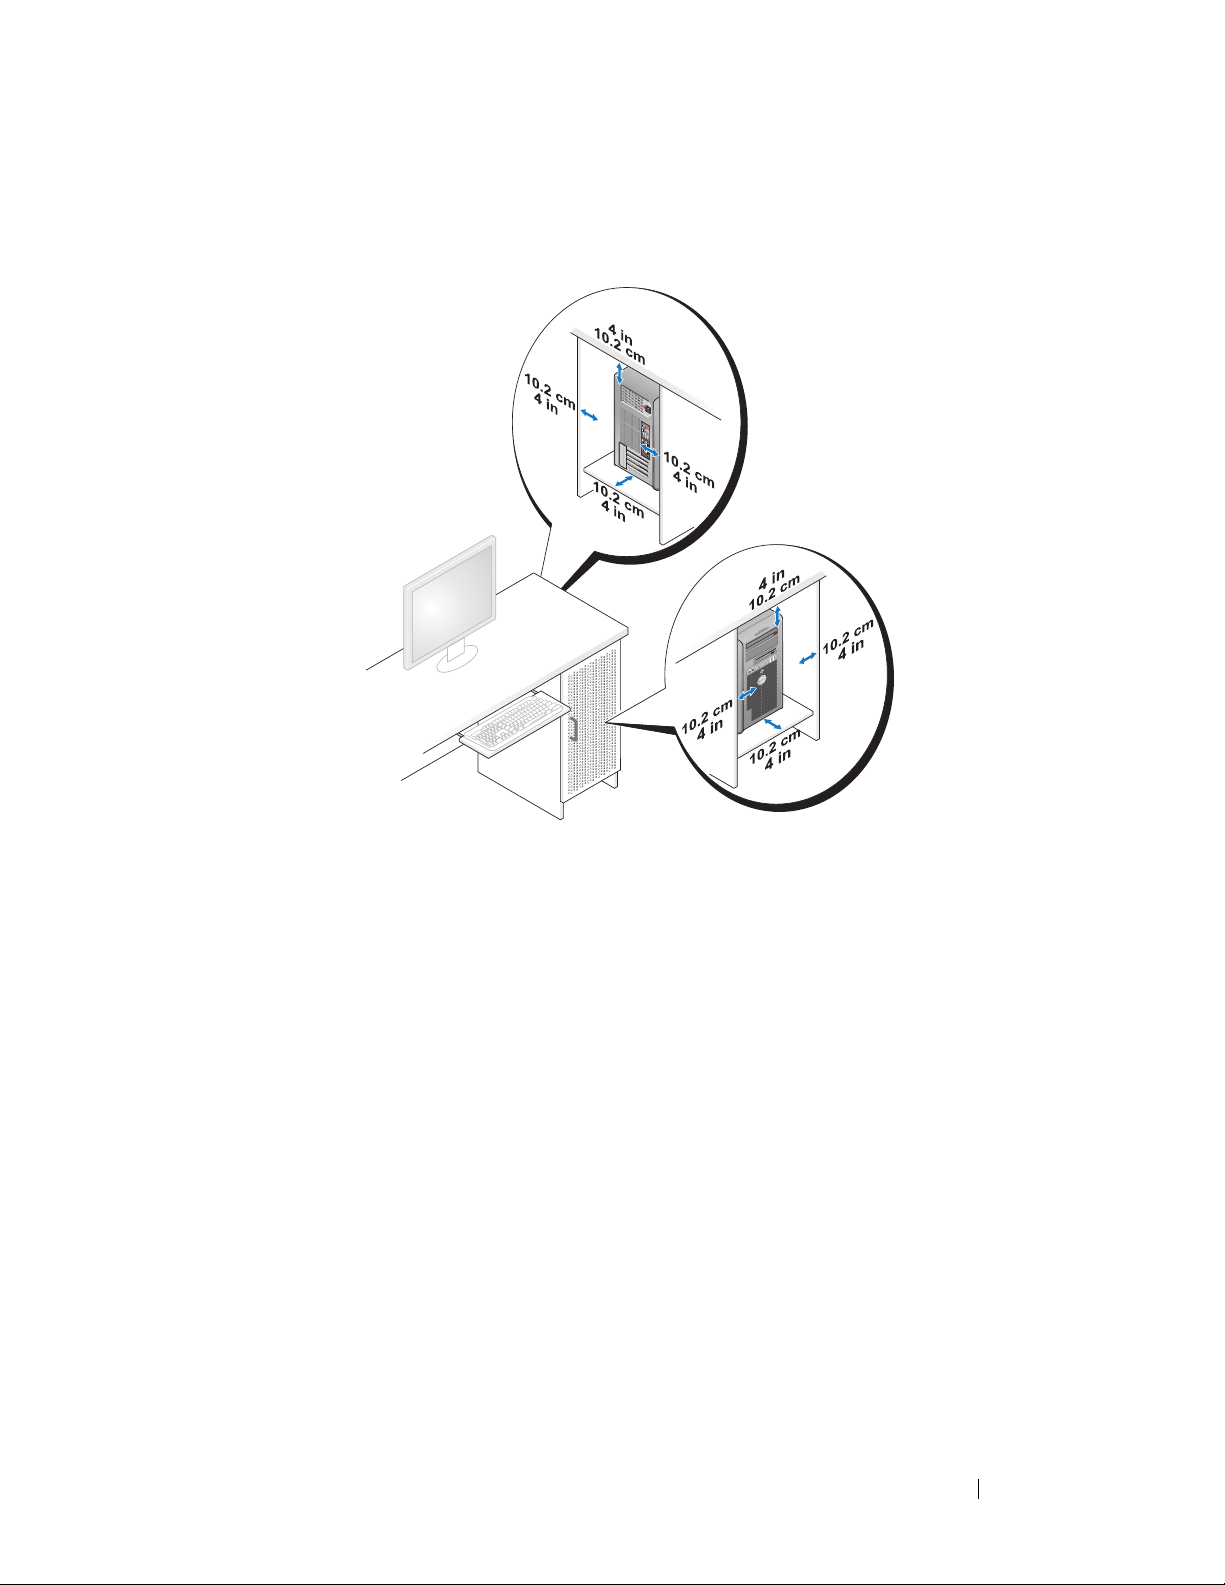
Installing Your Computer in an Enclosure
Installing your computer in an enclosure can restrict airflow, can cause your
computer to overheat, and may impact your computer’s performance. Follow
the guidelines below when installing your computer in an enclosure:
NOTICE: The operating temperature specified in this manual reflects the maximum
ambient operating temperature. The ambient room temperature must be a
consideration when installing your computer in an enclosure. For details about your
computer’s specifications, see "
Specifications" in your User’s Guide.
Page 23
Quick Reference Guide 23
• Leave 10.2 cm (4 in) minimum clearance on all vented sides of the
computer to permit the airflow required for proper ventilation.
• If your computer is installed in a corner on or under a desk, leave 5.1 cm
(2 in) minimum clearance from the back of the computer to the wall to
permit the airflow required for proper ventilation.
• If your enclosure has doors, ensure that they allow at least thirty percent
airflow through the enclosure (front and back).
Page 24
24 Quick Reference Guide
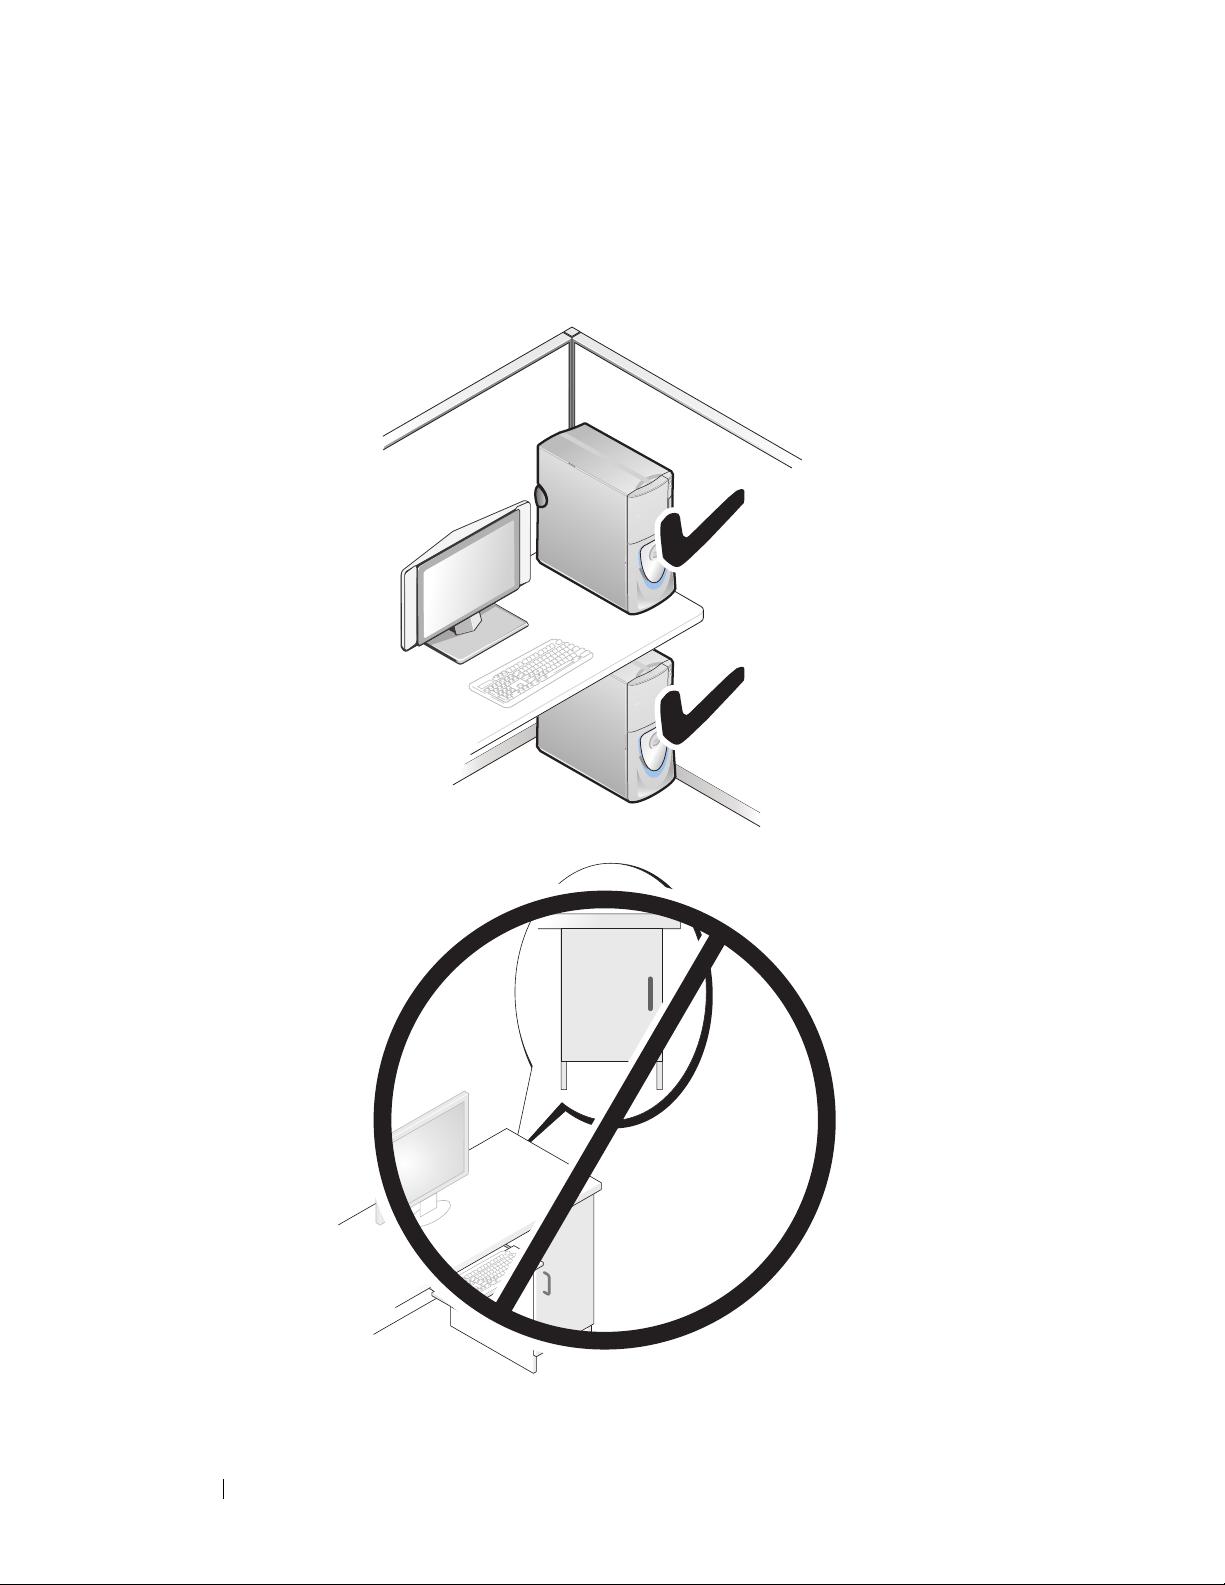
• Do not install your computer in an enclosure that does not allow airflow.
Restricting the airflow
can cause your computer to overheat, and may
impact your computer’s performance
.
Page 25

Quick Reference Guide 25
Transferring Information to a New Computer
You can use your operating system wizards to help you transfer files and other
data from one computer to another computer.
Microsoft Windows XP
The Microsoft Windows XP operating system provides the Files and Settings
Transfer Wizard to transfer data, such as:
• E-mail messages
• Toolbar settings
•Window sizes
• Internet bookmarks
You can transfer data from one computer to another computer over a network
or serial connection, or by storing the data on removable media, such as
a writable CD or DVD.
NOTE: You can transfer information from one computer to another computer by
directly connecting a serial cable to the input/output (I/O) ports of the two
computers. To transfer data over a serial connection, you must use the Network
Connections utility in the Control Panel to perform additional configuration steps,
such as setting up an advanced connection and designating the host computer and
the guest computer.
For instructions on setting up a direct cable connection between two computers,
see Microsoft Knowledge Base Article #305621, (How to Set Up a Direct Cable
Connection Between Two Computers in Windows XP). This information may not be
available in certain countries.
Using the Files and Settings Transfer Wizard requires the Operating System
installation media that came with your computer or a wizard disk, which the
wizard can create for you.
NOTE: For more information about transferring data, search support.dell.com for
document #154781 (What Are The Different Methods To Transfer Files From My Old
Computer To My New Dell™ Computer Using the Microsoft
®
Windows® XP
Operating System?).
NOTE: Access to the Dell Knowledge Base document may not be available in
certain countries.
Page 26

26 Quick Reference Guide
Files and Settings Transfer Wizard (With the Operating System Media)
NOTE: The Files and Settings Transfer Wizard designates the source computer
from which data is to be transferred as the old computer, and designates the
destination computer to which the data is going to be transferred as the new
computer.
PREPARE THE DESTINATION COMPUTER FOR THE FILE TRANSFER:
1
Click
Start→ All Programs→ Accessories→ System Tools→ Files and
Settings Transfer Wizard
.
2
Under
Which computer is this?
, click
New computer
, then click
Next
.
3
Under
Do you have a Windows XP CD?
, click
I will use the wizard from
the Windows XP CD
, then click
Next
.
4
Review the information under
Now go to your old computer
, and then go
to the source computer. Do
not
click
Next
.
COPY DATA FROM THE SOURCE COMPUTER:
1
Insert the Windows XP
Operating System
installation media into the
source computer.
The
Welcome to Microsoft Windows XP
screen appears.
2
Click
Perform additional tasks
.
3
Under
What do you want to do?
, click
Transfer files and settings
.
The
Files and Settings Transfer Wizard
window appears.
4
Click
Next
.
5
Under
Which computer is this?
, click
Old Computer
, then click
Next
.
6
Under
Select a transfer method
, click the transfer method of your choice,
then click
Next
.
7
Under
What do you want to transfer?
, click to select the data you want to
transfer, then click
Next
.
The selected data is copied and the
Completing the Collection Phase
screen appears.
8
Click
Finish
.
TRANSFER DATA TO THE DESTINATION COMPUTER:
1
Go to the destination computer.
2
Under
Now go to your old computer
, click
Next
.
Page 27

Quick Reference Guide 27
3
Under
Where are the files and settings?
, click to select the method you
chose for transferring your settings and files, then click
Next
.
The wizard reads the collected files and settings and applies them to the
destination computer. When the transfer is complete, the
Finished
screen
appears.
4
Click
Finished
, and then restart the computer.
Files and Settings Transfer Wizard (Without the Operating System Media)
To run the Files and Settings Transfer Wizard without the Operating System
installation media, you must create a wizard disk. The wizard disk allows you
to create a backup image file on removable media.
NOTE: The Files and Settings Transfer Wizard designates the source computer
from which data is to be transferred as the old computer, and designates the
destination computer to which the data is going to be transferred as the new
computer.
CREATE A WIZARD DISK:
1
On the destination computer, click
Start→
All Programs→
Accessories→
System Tools
→ Files and Settings Transfer Wizard
.
2
Under
Which computer is this?
, click
New computer
, then click
Next
.
3
Under
Do you have a Windows XP CD?
, click
I want to create a Wizard
Disk in the following drive
, then click
Next.
4
Insert removable media, such as a writable CD or DVD, then click OK.
5
Review the information under
Now go to your old computer
, and then go
to the source computer. Do
not
click
Next
.
COPY DATA FROM THE SOURCE COMPUTER:
1
Insert the wizard disk into the source computer.
2
Click
Start→
Run
.
3
Click
Browse...
and navigate to
fastwiz
on the wizard disk, then click OK.
4
Under
Which computer is this?
, click
Old Computer
, then click
Next
.
5
Under
Select a transfer method
, click the transfer method of your choice,
then click
Next
.
Page 28

28 Quick Reference Guide
6
Under
What do you want to transfer?
, click to select the data you want to
transfer, then click
Next
.
The selected data is copied and the
Completing the Collection Phase
screen appears.
7
Click
Finish
.
TRANSFER DATA TO THE DESTINATION COMPUTER:
1
Go to the destination computer.
2
Under
Now go to your old computer
, click
Next
.
3
Under
Where are the files and settings?
, click to select the method you
chose for transferring your settings and files, then click
Next
.
The wizard reads the collected files and settings and applies them to the
destination computer. When the transfer is complete, the
Finished
screen
appears.
4
Click
Finished
, and then restart the computer.
Microsoft Windows Vista
1
Click the Windows Vista Start button , and then click
Tra nsfe r file s
and settings
→ Start Windows Easy Transfer.
2
In the
User Account Control
dialog box, click
Continue
.
3
Click
Start a new transfer
or
Continue a transfer in progress
.
Follow the instructions provided on the screen by the Windows Easy Transfer
wizard.
Power Protection Devices
Several devices are available to protect against power fluctuations and
failures:
• Surge protectors
• Line conditioners
• Uninterruptible power supplies (UPS)
Page 29

Quick Reference Guide 29
Surge Protectors
Surge protectors and power strips equipped with surge protection help
prevent damage to your computer from voltage spikes that can occur during
electrical storms or after power interruptions. Some surge protector
manufacturers include warranty coverage for certain types of damage.
Carefully read the device warranty when choosing a surge protector and
compare joule ratings to determine the relative effectiveness of different
devices. A device with a higher joule rating offers more protection.
NOTICE: Most surge protectors do not protect against power fluctuations or
power interruptions caused by nearby lightning strikes. When lightning occurs in
your area, disconnect the telephone line from the telephone wall jack and
disconnect your computer from the electrical outlet.
Many surge protectors have a telephone jack for modem protection. See the
surge protector documentation for modem connection instructions.
NOTICE: Not all surge protectors offer network adapter protection. Disconnect the
network cable from the network wall jack during electrical storms.
Line Conditioners
NOTICE: Line conditioners do not protect against power interruptions.
Line conditioners are designed to maintain AC voltage at a fairly constant
level.
Uninterruptible Power Supplies (UPS)
NOTICE: Loss of power while data is being saved to the hard drive may result in
data loss or file damage.
NOTE: To ensure maximum battery operating time, connect only your computer to
a UPS. Connect other devices, such as a printer, to a separate power strip that
provides surge protection.
A UPS protects against power fluctuations and interruptions. UPS devices
contain a battery that provides temporary power to connected devices when AC
power is interrupted. The battery charges while AC power is available. See the
UPS manufacturer documentation for information on battery operating time
and to ensure that the device is approved by Underwriters Laboratories (UL).
Page 30

30 Quick Reference Guide
Cleaning Your Computer
CAUTION: Before you begin any of the procedures in this section, follow the
safety instructions in the
Product Information Guide
.
Computer, Keyboard, and Monitor
CAUTION: Before you clean your computer, disconnect the computer from the
electrical outlet. Clean your computer with a soft cloth dampened with water. Do
not use liquid or aerosol cleaners, which may contain flammable substances.
• Use a vacuum cleaner with a brush attachment to gently remove dust from
the slots and holes on your computer and from between the keys on the
keyboard.
NOTICE: Do not wipe the display screen with a soap or alcohol solution. Doing so
may damage the antiglare coating.
• To clean your monitor screen, lightly dampen a soft, clean cloth with water.
If possible, use a special screen-cleaning tissue or solution suitable for the
monitor’s antistatic coating.
• Wipe the keyboard, computer, and plastic part of the monitor with a soft
cleaning cloth moistened with water.
Do not soak the cloth or let water drip inside your computer or keyboard.
Mouse (Non-Optical)
1
Turn the retainer ring on the underside of your mouse counterclockwise,
and then remove the ball.
2
Wipe the ball with a clean, lint-free cloth.
3
Blow carefully into the ball cage to dislodge dust and lint.
4
Clean the rollers inside the ball cage with a cotton swab moistened lightly
with isopropyl alcohol.
5
Recenter the rollers in their channels, as needed. Ensure that fluff from
the swab is not left on the rollers.
6
Replace the ball and retainer ring, and then turn the retainer ring clockwise
until it clicks into place.
Page 31

Quick Reference Guide 31
Floppy Drive
NOTICE: Do not attempt to clean drive heads with a swab. The heads may become
misaligned and prevent the drive from operating.
Clean your floppy drive using a commercially available cleaning kit. These
kits contain pretreated floppy disks to remove contaminants that accumulate
during normal operation.
CDs and DVDs
NOTICE: Always use compressed air to clean the lens in the CD/DVD drive, and
follow the instructions that come with the compressed air. Never touch the lens in
the drive.
1
Hold the disc by its outer edge. You can also touch the inside edge of the
center hole.
NOTICE: To prevent damaging the surface, do not wipe in a circular motion around
the disc.
2
With a soft, lint-free cloth, gently wipe the bottom of the disc (the
unlabeled side) in a straight line from the center to the outer edge of the
disc.
For stubborn dirt, try using water or a diluted solution of water and mild
soap. You can also purchase commercial products that clean discs and
provide some protection from dust, fingerprints, and scratches. Cleaning
products for CDs are safe to use on DVDs.
Troubleshooting Tools
Power Lights
CAUTION: Before you begin any of the procedures in this section, follow the
safety instructions in the
Product Information Guide
.
The power button light located on the front of the computer illuminates and
blinks or remains solid to indicate different states:
• If the power light is green and the computer is not responding, see
"Diagnostic Lights" on page 33
Page 32

32 Quick Reference Guide
• If the power light is blinking green, the computer is in standby mode. Press
a key on the keyboard, move the mouse, or press the power button to
resume normal operation.
• If the power light is off, the computer is either turned off or is not
receiving power.
– Reseat the power cable into both the power connector on the back of
the computer and the electrical outlet.
– If the computer is plugged into a power strip, ensure that the power
strip is plugged into an electrical outlet and that the power strip is
turned on.
– Bypass power protection devices, power strips, and power extension
cables to verify that the computer turns on properly.
– Ensure that the electrical outlet is working by testing it with another
device, such as a lamp.
– Ensure that the main power cable and front panel cable are securely
connected to the system board (see "System Board Components" in
your
User’s Guide
).
• If the power light is blinking amber, the computer is receiving electrical
power, but an internal power problem might exist.
– Ensure that the voltage selection switch is set to match the AC power
at your location, if applicable.
– Ensure that the processor power cable is securely connected to the
system board (see "System Board Components" in your
User’s Guide
).
• If the power light is steady amber, a device may be malfunctioning or
incorrectly installed.
– Remove and then reinstall the memory modules (see "Memory" in
your
User’s Guide
).
– Remove and then reinstall any cards (see "Cards" in your
User’s
Guide
).
• Eliminate interference. Some possible causes of interference are:
– Power, keyboard, and mouse extension cables
– Too many devices on a power strip
– Multiple power strips connected to the same electrical outlet
Page 33

Quick Reference Guide 33
Diagnostic Lights
CAUTION: Before you begin any of the procedures in this section, follow the
safety instructions in the
Product Information Guide
.
To help troubleshoot a problem, your computer has four lights labeled 1, 2, 3,
and 4 on the front panel (see "Front View (Tower Orientation)" on page 11 or
"Front View (Desktop Orientation)" on page 15). When the computer starts
normally, the lights flash, and then turn off. If the computer malfunctions,
use the sequence of the lights to help identify the problem.
NOTE: After the computer completes POST, all four lights turn off before booting to
the operating system.
Diagnostic Light Codes During POST
Light Pattern Problem Description Suggested Resolution
The computer is in a
normal off condition
or a possible pre-BIOS
failure has occurred.
Plug the computer into a working
electrical outlet and press the power
button.
A possible BIOS
failure has occurred;
the computer is in the
recovery mode.
• Run the BIOS Recovery utility, wait
for recovery completion, and then
restart the computer.
• If the problem persists, contact Dell
(see
"Contacting Dell" in your User’s
Guide
).
A possible processor
failure has occurred.
• Reseat the processor (see "Processor"
in your User’s Guide
).
• If the problem persists, contact Dell
(see
"Contacting Dell" in your User’s
Guide
).
Page 34

34 Quick Reference Guide
Memory modules are
detected, but a
memory failure has
occurred.
• If two or more memory modules are
installed, remove the modules (see
"Removing a Memory Module" in your
User’s Guide
), then reinstall one
module (see "Installing a Memory
Module" in your
User’s Guide
) and
restart the computer. If the computer
starts normally, continue to install
additional memory modules (one at a
time) until you have identified a
faulty module or reinstalled all
modules without error.
• If available, install working memory of
the same type into your computer (see
"Memory" in your
User’s Guide
).
• If the problem persists, contact Dell
(see "Contacting Dell" in your
User’s
Guide
).
A possible graphics
card failure has
occurred.
• Reseat any installed graphics cards
(see "Cards" in your
User’s Guide
).
• If available, install a working graphics
card into your computer.
• If the problem persists, contact Dell
(see "Contacting Dell" in your
User’s
Guide
).
A possible floppy or
hard drive failure has
occurred.
• Reseat all power and data cables and
restart the computer.
• If the problem persists, contact Dell
(see "Contacting Dell" in your
User’s
Guide
).
A possible USB failure
has occurred.
• Reinstall all USB devices, check cable
connections, and then restart the
computer.
• If the problem persists, contact Dell
(see
"Contacting Dell" in your User’s
Guide
).
Light Pattern Problem Description Suggested Resolution
Page 35

Quick Reference Guide 35
No memory modules
are detected.
• If two or more memory modules are
installed, remove the modules (see
"Removing a Memory Module" in your
User’s Guide
), then reinstall one
module (see "Installing a Memory
Module" in your
User’s Guide
) and
restart the computer. If the computer
starts normally, continue to install
additional memory modules (one at a
time) until you have identified a
faulty module or reinstalled all
modules without error.
• If available, install working memory of
the same type into your computer (see
"Memory" in your
User’s Guide
).
• If the problem persists, contact Dell
(see "Contacting Dell" in your
User’s
Guide
).
System board failure
has occurred.
Contact Dell (see "Contacting Dell" in
your User’s Guide).
Memory modules are
detected, but a
memory
configuration or
compatibility error
exists.
• Ensure that no special requirements
for memory module/connector
placement exist (see "Memory" in your
User’s Guide
).
• Ensure that the memory you are using
is supported by your computer (see
"Memory" in your
User’s Guide
).
• If the problem persists, contact Dell
(see "Contacting Dell" in your
User’s
Guide
).
A possible system
board resource and/or
hardware failure has
occurred.
• Perform the procedures in "Restoring
Your Operating System" in your
User’s
Guide
.
• If the problem persists, contact Dell
(see "Contacting Dell" in your
User’s
Guide
).
Light Pattern Problem Description Suggested Resolution
Page 36

36 Quick Reference Guide
A possible expansion
card failure has
occurred.
1
Determine if a conflict exists by
removing an expansion card (not a
graphics card) and restarting the
computer (see "Cards" in your
User’s
Guide
).
2
If the problem persists, reinstall the
card you removed, then remove a
different card and restart the
computer.
3
Repeat this process for each expansion
card installed. If the computer starts
normally, troubleshoot the last card
removed from the computer for
resource conflicts (see "Restoring Your
Operating System" in your
User’s
Guide
).
4
If the problem persists, contact Dell
(see "Contacting Dell" in your
User’s
Guide
).
Light Pattern Problem Description Suggested Resolution
Page 37

Quick Reference Guide 37
Beep Codes
Your computer may emit a series of beeps during start up. The series of beeps
is called a beep code and can be used to help identify a problem with your
computer.
If your computer emits a series of beeps during start-up:
1
Write down the beep code.
2
Run the Dell Diagnostics to identify the cause (see "Dell Diagnostics" on
page 41).
Another failure has
occurred.
• Ensure that all hard drive and
CD/DVD drive cables are properly
connected to the system board (see
"System Board Components" in your
User’s Guide
).
• If there is an error message on the
screen identifying a problem with a
device (such as the floppy drive or
hard drive), check the device to make
sure it is functioning properly.
• If the operating system is attempting
to boot from a device (such as the
floppy drive or CD/DVD drive), check
system setup (see "System Setup" in
your
User’s Guide
) to ensure the boot
sequence is correct for the devices
installed on your computer.
• If the problem persists, contact Dell
(see "Contacting Dell" in your
User’s
Guide
).
Code Cause
2 short, 1 long BIOS checksum error
1 long, 3 short, 2 short Memory error
1 short F12 key pressed
Light Pattern Problem Description Suggested Resolution
Page 38

38 Quick Reference Guide
Code
(repetitive
short beeps)
Description Suggested Remedy
1BIOS checksum
failure. Possible
motherboard failure.
Contact Dell (see "Contacting Dell" in
your User’s Guide).
2 No memory modules
are detected.
• If two or more memory modules are
installed, remove the modules (see
"Removing a Memory Module" in your
User’s Guide
), then reinstall one module
(see "Installing a Memory Module" in
your
User’s Guide
) and restart the
computer. If the computer starts
normally, continue to install additional
memory modules (one at a time) until
you have identified a faulty module or
reinstalled all modules without error.
• If available, install working memory of
the same type into your computer (see
"Memory" in your
User’s Guide
).
• If the problem persists, contact Dell (see
"Contacting Dell" in your
User’s Guide
).
3
Possible motherboard
failure.
Contact Dell (see "Contacting Dell" in
your User’s Guide).
4 RAM Read/Write
failure.
• Ensure that no special requirements for
memory module/connector placement
exist (see "Memory" in your
User’s
Guide
).
• Ensure that the memory you are using is
supported by your computer (see
"Memory"
in your User’s Guide
).
• If the problem persists, contact Dell (see
"Contacting Dell" in your User’s
Guide).
Page 39

Quick Reference Guide 39
System Messages
NOTE: If the message you received is not listed in the table, see the documentation
for either the operating system or the program that was running when the message
appeared.
5 Real time clock failure.
Possible battery failure
or motherboard failure.
• Replace the battery (see "Replacing the
Battery" in your
User’s Guide
).
• If the problem persists, contact Dell (see
"Contacting Dell" in your
User’s Guide
).
6 Video BIOS Test
Failure.
Contact Dell (see "Contacting Dell" in
your User’s Guide).
ALERT! PREVIOUS ATTEMPTS AT BOOTING THIS SYSTEM HAVE FAILED AT
CHECKPOINT [NNNN]. FOR HELP IN RESOLVING THIS PROBLEM, PLEASE NOTE
THIS CHECKPOINT AND CONTACT DELL TECHNICAL SUPPORT — The computer
failed to complete the boot routine three consecutive times for the same error (see
"Contacting Dell" in your User’s Guide for assistance).
CMOS CHECKSUM ERROR — Possible motherboard failure or RTC battery low.
Replace the battery (see "Replacing the Battery" or see "Contacting Dell" in your
User’s Guide for assistance).
CPU FAN FAILURE — CPU fan failure. Replace the CPU fan (see "Removing the
Processor" in your User’s Guide).
FLOPPY DISKETTE SEEK FAILURE — A cable may be loose, or the computer
configuration information may not match the hardware configuration. Check cable
connections (see "Contacting Dell" in your User’s Guide for assistance).
DISKETTE READ FAILURE — The floppy disk may be defective or a cable may be
loose. Replace the floppy disk/check for a loose cable connection.
Code
(repetitive
short beeps)
Description Suggested Remedy
Page 40

40 Quick Reference Guide
HARD- DISK READ FAILURE — Possible HDD failure during HDD boot test (see
"Contacting Dell" in your User’s Guide for assistance).
KEYBOARD FAILURE — Keyboard failure or keyboard cable loose (see "Keyboard
Problems" in your User’s Guide).
NO BOOT DEVICE AVAILABLE — The system cannot detect a bootable device or
partition.
• If the floppy drive is your boot device, ensure that the cables are connected and
that a bootable floppy disk is in the drive.
• If the hard drive is your boot device, ensure that the cables are connected and
that the drive is installed properly and partitioned as a boot device.
• Enter System Setup and ensure that the boot sequence information is correct
(see "Entering System Setup"
in your User’s Guide
).
NO TIMER TICK INTERRUPT — A chip on the system board might be
malfunctioning or motherboard failure (see "Contacting Dell" in your User’s Guide
for assistance).
NON- SYSTEM DISK OR DISK ERROR —Replace the floppy disk with one that
has a bootable operating system or remove the floppy disk from drive A and restart
the computer.
NOT A BOOT DISKETTE —Insert a bootable floppy disk and restart your
computer.
NOTICE - HARD DRIVE SELF MONITORING SYSTEM HAS REPORTED THAT A
PARAMETER HAS EXCEEDED ITS NORMAL OPERATING RANGE. DELL
RECOMMENDS THAT YOU BACK UP YOUR DATA REGULARLY. A PARAMETER OUT
OF RANGE MAY OR MAY NOT INDICATE A POTENTIAL HARD DRIVE PROBLEM.—
S.M.A.R.T error, possible HDD failure. This feature can be enabled or disabled in
BIOS setup.
Page 41

Quick Reference Guide 41
Hardware Troubleshooter
If a device is either not detected during the operating system setup or is
detected, but incorrectly configured, you can use the Hardware Troubleshooter
to resolve the incompatibility.
Windows XP:
1
Click
Start→
Help and Support
.
2
Ty p e
hardware troubleshooter
in the search field and press
<Enter> to start the search.
3
In the
Fix a Problem
section, click
Hardware Troubleshooter
.
4
In the
Hardware Troubleshooter
list, select the option that best describes
the problem and click
Next
to follow the remaining troubleshooting steps.
Windows Vista:
1
Click the Windows Vista Start button
,
and click
Help and Support.
2
Ty p e
hardware troubleshooter
in the search field and press
<Enter> to start the search.
3
In the search results, select the option that best describes the problem and
follow the remaining troubleshooting steps.
Dell Diagnostics
CAUTION: Before you begin any of the procedures in this section, follow the
safety instructions in the
Product Information Guide
.
When to Use the Dell Diagnostics
If you experience a problem with your computer, perform the checks in
Lockups and Software Problems (see "Troubleshooting" in your User’s Guide)
and run the Dell Diagnostics before you contact Dell for assistance.
You can run the Dell Diagnostics from your hard drive or from the Drivers and
Utilities disc.
Page 42

42 Quick Reference Guide
See "System Setup" in your User’s Guide to review your computer’s
configuration information, and ensure that the device that you want to test
displays in System Setup and is active.
NOTE: The Dell Diagnostics works only on Dell computers.
NOTE: Print the following procedures before you run the Dell diagnostics.
Starting the Dell Diagnostics From Your Hard Drive
The Dell Diagnostics is located on a separate diagnostic utility partition on
your hard drive.
NOTE: If your computer cannot display a screen image, see "Contacting Dell" in
your User’s Guide.
1
Turn on (or restart) your computer.
2
When the DELL logo appears, press <F12> immediately.
NOTE: Keyboard failure may result when a key is held down for extended
periods of time. To avoid possible keyboard failure, press and release <F12> in
even intervals to open the Boot Device Menu.
NOTE: If at any time a message appears stating that no diagnostics utility
partition has been found, run the Dell Diagnostics from your Drivers and
Utilities disc
(see "Starting the Dell Diagnostics From the Drivers and
Utilities Disc" on page 43).
If you wait too long and the operating system logo appears, continue to
wait until you see the Microsoft Windows desktop, then shut down your
computer and try again.
3
At the
Boot Device Menu
, use the up- and down-arrow keys or press the
appropriate number on the keyboard to highlight
Boot to Utility Partition
,
and then press <Enter>.
NOTE: The Quickboot feature changes the boot sequence for the current
boot only. Upon restart, the computer boots according to the boot sequence
specified in System Setup.
4
At the Dell Diagnostics
Main Menu
, left-click with the mouse, or press
<Tab> and then <Enter>, to select the test you want to run (see "Dell
Diagnostics Main Menu" on page 44).
NOTE: Write down any error codes and problem descriptions exactly as they
appear and follow the instructions on the screen.
Page 43

Quick Reference Guide 43
5
After all tests have completed, close the test window to return to the Dell
Diagnostics
Main Menu
.
6
Close the
Main Menu
window to exit the Dell Diagnostics and restart the
computer.
Starting the Dell Diagnostics From the Drivers and Utilities Disc
1
Turn on your computer.
2
Press the eject button on the front of the optical drive to open the drive
tray.
3
Place the
Drivers and Utilities
disc in the center of the drive tray, then
press the eject button or gently push on the tray to close it.
4
Restart the computer.
5
When the DELL logo appears, press <F12> immediately.
NOTE: Keyboard failure may result when a key on the keyboard is held down
for extended periods of time. To avoid possible keyboard failure, press and
release <F12> in even intervals until the Boot Device Menu appears.
If you wait too long and the operating system logo appears, continue to
wait until you see the Microsoft Windows desktop, then shut down your
computer and try again.
6
At the
Boot Device Menu
, use the up- and down-arrow keys or press the
appropriate number on the keyboard to highlight
Onboard or USB
CD-ROM
, and then press <Enter>.
NOTE: The Quickboot feature changes the boot sequence for the current
boot only. Upon restart, the computer boots according to the boot sequence
specified in System Setup.
7
Press <1> to select the Dell Diagnostics.
8
At the
Dell Diagnostics Menu
press <1> to select the Dell Diagnostics
for ResourceCD (graphical user interface).
9
At the Dell Diagnostics
Main Menu
, left-click with the mouse, or press
<Tab> and then <Enter>, to select the test you want to run (see "Dell
Diagnostics Main Menu" on page 44).
NOTE: Write down any error codes and problem descriptions exactly as they
appear and follow the instructions on the screen.
Page 44

44 Quick Reference Guide
10
After all tests have completed, close the test window to return to the Dell
Diagnostics
Main Menu
.
11
Remove the
Drivers and Utilities
disc, then close the
Main Menu
window
to exit the Dell Diagnostics and restart the computer.
Dell Diagnostics Main Menu
The following tests can be run from the Dell Diagnostics Main Menu:
For any problem encountered during a test, a message appears with an error
code and a description of the problem. Write down the error code and
problem description exactly as it appears and follow the instructions on the
screen. If you cannot resolve the problem, contact Dell (see "Contacting Dell"
in your User’s Guide).
NOTE: The Service Tag for your computer is located at the top of each test screen.
When contacting Dell support, have your Service Tag ready.
Option Function
Express Test Performs a quick test of system devices. The test typically
takes 10 to 20 minutes and requires no interaction on your
part. Run Express Test first to increase the possibility of
tracing the problem quickly.
Extended Test Performs a thorough check of system devices. The test
typically takes an hour or more and periodically requires
your input to answer specific questions.
Custom Test Tests a specific device in the system and can be used to
customize the tests you want to run.
Symptom Tree Lists a number of common symptoms and allows you to
select a test based on the symptom of the problem you are
having.
Page 45

Quick Reference Guide 45
The following tabs provide additional information for tests run from the
Custom Test or Symptom Tree option:
Troubleshooting
Follow these tips when you troubleshoot your computer:
• If you added or removed a part before the problem started, review the
installation procedures and ensure that the part is correctly installed.
• If a peripheral device does not work, ensure that the device is properly
connected.
• If an error message appears on the screen, write down the exact message.
This message may help support personnel diagnose and fix the problem(s).
• If an error message occurs in a program, see the program’s documentation.
NOTE: The procedures in this document were written for the Windows default
view, and may not apply if you set your Dell computer to the Windows Classic view.
Tab Function
Results Displays the results of the test and any error conditions
encountered.
Errors Displays error conditions encountered, error codes, and the
problem description.
Help Describes the test and any requirements for running the
test.
Configuration
(Custom Test only)
Displays the hardware configuration for the selected device.
The Dell Diagnostics obtains configuration information for
all devices from System Setup, memory, and various
internal tests, and it displays the information in the device
list in the left pane of the screen.
NOTE: The device list may not display the names of all the
components installed on your computer or all devices
attached to your computer.
Parameters
(Custom Test only)
Allows you to customize the test, if applicable, by changing
the test settings.
Page 46

46 Quick Reference Guide
Battery Problems
CAUTION: There is a danger of a new battery exploding if it is incorrectly
installed. Replace the battery only with the same or equivalent type recommended
by the manufacturer. Discard used batteries according to the manufacturer's
instructions.
CAUTION: Before you begin any of the procedures in this section, follow the
safety instructions in the
Product Information Guide
.
R
EPLACE THE BATTERY — If you have to repeatedly reset time and date information
after turning on the computer, or if an incorrect time or date displays during start-up,
replace the battery (see "Replacing the Battery" in your User’s Guide). If the battery still
does not work properly, contact Dell (see "Contacting Dell" in your User’s Guide).
Drive Problems
CAUTION: Before you begin any of the procedures in this section, follow the
safety instructions in the
Product Information Guide
.
E
NSURE THAT MICROSOFT WINDOWS RECOGNIZES THE DRIVE —
Windows XP:
•Click
Start
and click
My Computer
.
Windows Vista:
• Click the Windows Vista Start button and click
Computer
.
If the drive is not listed, perform a full scan with your antivirus software to check for
and remove viruses. Viruses can sometimes prevent Windows from recognizing the
drive.
T
EST THE DRIVE —
• Insert another disc to eliminate the possibility that the original drive is defective.
• Insert a bootable floppy disk and restart the computer.
CLEAN THE DRIVE OR DISK — See
"Cleaning Your Computer" on page 30
.
C
HECK THE CABLE CONNECTIONS
RUN THE HARDWARE TROUBLESHOOTER — See "Hardware Troubleshooter" on
page 41.
R
UN THE DELL DIAGNOSTICS —
See "Dell Diagnostics" on page 41
.
Page 47

Quick Reference Guide 47
Optical drive problems
NOTE: High-speed optical drive vibration is normal and may cause noise, which
does not indicate a defect in the drive or the media.
NOTE: Because of different regions worldwide and different disc formats, not all
DVD titles work in all DVD drives.
A
DJUST THE WINDOWS VOLUME CONTROL —
• Click the speaker icon in the lower-right corner of your screen.
• Ensure that the volume is turned up by clicking the slidebar and dragging it up.
• Ensure that the sound is not muted by clicking any boxes that are checked.
CHECK THE SPEAKERS AND SUBWOOFER — See "Sound and Speaker Problems" on
page 58.
Problems writing to an optical drive
CLOSE OTHER PROGRAMS — The optical drive must receive a steady stream of data
during the writing process. If the stream is interrupted, an error occurs. Try closing all
programs before you write to the optical drive.
T
URN OFF STANDBY MODE IN WINDOWS BEFORE WRITING TO A DISC — Search for
the keyword standby in Windows Help and Support for information on power
management modes.
Hard drive problems
RUN CHECK DISK —
Windows XP:
1
Click
Start and click My Computer
.
2
Right-click
Local Disk C:
.
3
Click
Properties→ Tools→
Check Now
.
4
Click
Scan for and attempt recovery of bad sectors and click Start
.
Windows Vista:
1
Click
Start
and click
Computer
.
2
Right-click
Local Disk C:
.
3
Click
Properties→ Tools→
Check Now
.
The
User Account Control
window may appear. If you are an administrator on the
computer, click
Continue
; otherwise, contact your administrator to continue the
desired action.
4
Follow the instructions on the screen.
Page 48

48 Quick Reference Guide
E-Mail, Modem, and Internet Problems
CAUTION: Before you begin any of the procedures in this section, follow the
safety instructions in the
Product Information Guide
.
NOTE: Connect the modem to an analog telephone jack only. The modem does not
operate while it is connected to a digital telephone network.
NOTE: Do not plug a telephone cable into the network adapter connector (see
"Back Panel Connectors" in your User’s Guide).
C
HECK THE MICROSOFT OUTLOOK
®
EXPRESS SECURITY SETTINGS — If you cannot
open your e-mail attachments:
1
In Outlook Express, click
Tools→
Options→
Security
.
2
Click
Do not allow attachments
to remove the checkmark, as needed.
CHECK THE TELEPHONE LINE CONNECTION
CHECK THE TELEPHONE JACK
CONNECT THE MODEM DIRECTLY TO THE TELEPHONE WALL JACK
USE A DIFFERENT TELEPHONE LINE —
• Verify that the telephone line is connected to the jack on the modem (the jack has
either a green label or a connector-shaped icon next to it).
• Ensure that you hear a click when you insert the telephone line connector into the
modem.
• Disconnect the telephone line from the modem and connect it to a telephone, then
listen for a dial tone.
• If you have other telephone devices sharing the line, such as an answering machine,
fax machine, surge protector, or line splitter, bypass them and use the telephone to
connect the modem directly to the telephone wall jack. If you are using a line that is
3 meters (10 feet) or more in length, try a shorter one.
RUN THE MODEM DIAGNOSTIC TOOL —
Windows XP:
1
Click
Start→
All Programs→
Modem Helper
.
2
Follow the instructions on the screen to identify and resolve modem problems.
Modem Helper is not available on certain computers.
Windows Vista:
1
Click
Start
→
All Programs→ Modem Diagnostic Tool
.
2
Follow the instructions on the screen to identify and resolve modem problems.
Modem diagnostics are not available on all computers.
VERIFY THAT THE MODEM IS COMMUNICATING WITH WINDOWS —
Page 49

Quick Reference Guide 49
Windows XP:
1
Click
Start→
Control Panel→
Printers and Other Hardware→ Phone and Modem
Options
→
Modems
.
2
Click the COM port for your modem→ Properties→ Diagnostics→
Query Modem
to
verify that the modem is communicating with Windows.
If all commands receive responses, the modem is operating properly.
Windows Vista:
1
Click
Start
→
Control Panel→
Hardware and Sound→
Phone and Modem
Options
→
Modems
.
2
Click the COM port for your modem→
Properties → Diagnostics→
Query Modem
to verify that the modem is communicating with Windows.
If all commands receive responses, the modem is operating properly.
ENSURE THAT YOU ARE CONNECTED TO THE INTERNET — Ensure that you have
subscribed to an Internet provider. With the Outlook Express e-mail program open,
click File. If Work Offline has a checkmark next to it, click the checkmark to remove it
and connect to the Internet. For help, contact your Internet service provider.
Error Messages
CAUTION: Before you begin any of the procedures in this section, follow the
safety instructions in the
Product Information Guide
.
If the error message is not listed, see the documentation for the operating
system or the program that was running when the message appeared.
A FILENAME CANNOT CONTAIN ANY OF THE FOLLOWING CHARACTERS: \ / : * ? “ <
> | — Do not use these characters in filenames.
A
REQUIRED .DLL FILE WAS NOT FOUND — The program that you are trying to open
is missing an essential file. To remove and then reinstall the program:
Windows XP:
1
Click
Start→
Control Panel→ Add or Remove Programs→ Programs and Features
.
2
Select the program you want to remove.
3
Click
Uninstall
.
4
See the program documentation for installation instructions.
Windows Vista:
1
Click
Start
→
Control Panel→ Programs→ Programs and Features
.
2
Select the program you want to remove.
3
Click
Uninstall
.
4
See the program documentation for installation instructions.
Page 50

50 Quick Reference Guide
drive letter
:\ IS NOT ACCESSIBLE. THE DEVICE IS NOT READY — The drive
cannot read the disk. Insert a disk into the drive and try again.
I
NSERT BOOTABLE MEDIA — Insert a bootable floppy disk, CD, or DVD.
N
ON-SYSTEM DISK ERROR — Remove the floppy disk from the floppy drive and
restart your computer.
N
OT ENOUGH MEMORY OR RESOURCES. CLOSE SOME PROGRAMS AND TRY
AGAIN — Close all windows and open the program that you want to use. In some
cases, you may have to restart your computer to restore computer resources. If so, run
the program that you want to use first.
O
PERATING SYSTEM NOT FOUND — Contact Dell (see "Contacting Dell" in your
User’s Guide).
IEEE 1394 Device Problems
CAUTION: Before you begin any of the procedures in this section, follow the
safety instructions in the
Product Information Guide
.
E
NSURE THAT THE CABLE FOR THE IEEE 1394 DEVICE IS PROPERLY INSERTED INTO
THE DEVICE AND INTO THE CONNECTOR ON THE COMPUTER
ENSURE THAT THE IEEE 1394 DEVICE IS ENABLED IN SYSTEM SETUP — See
"System Setup Options" in your User’s Guide.
E
NSURE THAT THE IEEE 1394 DEVICE IS RECOGNIZED BY WINDOWS —
Windows XP:
1
Click
Start and click Control Panel
.
2
Under
Pick a Category
, click
Performance and Maintenance→
System→
System
Properties
→
Hardware→
Device Manager
.
Windows Vista:
1
Click
Start
→
Control Panel→ Hardware and Sound
.
2
Click
Device Manager.
If your IEEE 1394 device is listed, Windows recognizes the device.
E
NSURE THAT THE IEEE 1394 CARD IS PROPERLY SEATED
ENSURE THAT THE IEEE 1394 CABLE IS CONNECTED SECURELY TO THE SYSTEM
BOARD CONNECTOR AND THE CONNECTOR ON THE FRONT I /O PANEL
IF YOU HAVE PROBLEMS WITH A DELL IEEE 1394 DEVICE — Contact Dell (see
"Contacting Dell" in your User’s Guide).
I
F YOU HAVE PROBLEMS WITH AN IEEE 1394 DEVICE NOT PROVIDED BY DELL —
Contact the IEEE 1394 device manufacturer.
Page 51

Quick Reference Guide 51
Keyboard Problems
CAUTION: Before you begin any of the procedures in this section, follow the
safety instructions in the
Product Information Guide
.
C
HECK THE KEYBOARD CABLE —
• Ensure that the keyboard cable is firmly connected to the computer.
• Shut down the computer (see "Turning Off Your Computer"
in your User’s Guide
),
reconnect the keyboard cable as shown on the setup diagram for your computer, and
then restart the computer.
• Ensure that the cable is not damaged or frayed and check cable connectors for bent or
broken pins. Straighten any bent pins.
• Remove any keyboard extension cables and connect the keyboard directly to the
computer.
TEST THE KEYBOARD — Connect a properly working keyboard to the computer, then
try using the keyboard.
R
UN THE HARDWARE TROUBLESHOOTER — See "Hardware Troubleshooter" on page 41.
Lockups and Software Problems
CAUTION: Before you begin any of the procedures in this section, follow the
safety instructions in the
Product Information Guide
.
The computer does not start up
CHECK THE DIAGNOSTIC LIGHTS — See "Diagnostic Lights" on page 33.
E
NSURE THAT THE POWER CABLE IS FIRMLY CONNECTED TO THE COMPUTER AND TO
THE ELECTRICAL OUTLET
The computer stops responding
NOTICE: You may lose data if you are unable to perform an operating system
shutdown.
T
URN THE COMPUTER OFF — If you are unable to get a response by pressing a key on
your keyboard or moving your mouse, press and hold the power button for at least 8 to
10 seconds (until the computer turns off), and then restart your computer.
Page 52

52 Quick Reference Guide
A program stops responding
END THE PROGRAM —
1
Press <Ctrl><Shift><Esc> simultaneously to access the Task Manager.
2
Click the
Applications
tab.
3
Click to select the program that is no longer responding.
4
Click
End Task
.
A program crashes repeatedly
NOTE: Most software includes installation instructions in its documentation or on
a floppy disk, CD, or DVD.
C
HECK THE SOFTWARE DOCUMENTATION — If necessary, uninstall and then reinstall
the program.
A program is designed for an earlier Windows operating system
RUN THE PROGRAM COMPATIBILITY WIZARD —
Windows XP:
The Program Compatibility Wizard configures a program so that it runs in an
environment similar to non-XP operating system environments.
1
Click
Start→
All Programs→ Accessories→ Program Compatibility Wizard→ Next
.
2
Follow the instructions on the screen.
Windows Vista:
The Program Compatibility Wizard configures a program so that it runs in an
environment similar to non-Windows Vista operating system environments.
1
Click
Start
→
Control Panel→ Programs→ Use an older program with this
version of Windows.
2
In the welcome screen, click
Next
.
3
Follow the instructions on the screen.
A solid blue screen appears
TURN THE COMPUTER OFF — If you are unable to get a response by pressing
a key on your keyboard or moving your mouse, press and hold the power
button for at least 8 to 10 seconds (until the computer turns off), and then
restart your computer.
Page 53

Quick Reference Guide 53
Other software problems
CHECK THE SOFTWARE DOCUMENTATION OR CONTACT THE SOFTWARE
MANUFACTURER FOR TROUBLESHOOTING INFORMATION —
• Ensure that the program is compatible with the operating system installed on your
computer.
• Ensure that your computer meets the minimum hardware requirements needed to run
the software. See the software documentation for information.
• Ensure that the program is installed and configured properly.
• Verify that the device drivers do not conflict with the program.
• If necessary, uninstall and then reinstall the program.
BACK UP YOUR FILES IMMEDIATELY
USE A VIRUS- SCANNING PROGRAM TO CHECK THE HARD DRIVE, FLOPPY DISKS,
CD
S, OR DVDS
SAVE AND CLOSE ANY OPEN FILES OR PROGRAMS AND SHUT DOWN YOUR
COMPUTER THROUGH THE START MENU
Memory Problems
CAUTION: Before you begin any of the procedures in this section, follow the
safety instructions in the
Product Information Guide
.
I
F YOU RECEIVE AN INSUFFICIENT MEMORY MESSAGE —
• Save and close any open files and exit any open programs you are not using to see if
that resolves the problem.
• See the software documentation for minimum memory requirements. If necessary,
install additional memory (see "Installing a Memory Module"
in your User’s Guide
).
• Reseat the memory modules (see "Memory"
in your User’s Guide
) to ensure that your
computer is successfully communicating with the memory.
• Run the Dell Diagnostics (See "Dell Diagnostics" on page 41).
IF YOU EXPERIENCE OTHER MEMORY PROBLEMS —
• Reseat the memory modules (see "Memory"
in your User’s Guide
) to ensure that your
computer is successfully communicating with the memory.
• Ensure that you are following the memory installation guidelines (see "Installing a
Memory Module"
in your User’s Guide
).
Page 54

54 Quick Reference Guide
• Ensure that the memory you are using is supported by your computer. For more
information about the type of memory supported by your computer, see "Memory"
in
your User’s Guide
.
• Run the Dell Diagnostics (See "Dell Diagnostics" on page 41).
Mouse Problems
CAUTION: Before you begin any of the procedures in this section, follow the
safety instructions in the
Product Information Guide
.
C
HECK THE MOUSE CABLE —
• Ensure that the cable is not damaged or frayed and check cable connectors for bent or
broken pins. Straighten any bent pins.
• Remove any mouse extension cables, and connect the mouse directly to the computer.
• Verify that the mouse cable is connected as shown on the setup diagram for your
computer.
RESTART THE COMPUTER —
1
Simultaneously press <Ctrl><Esc> to display the
Start
menu.
2
Press <u>,
press the up- and down-arrow keys
to highlight
Shut down
or
Tu r n
Off
, and then press <Enter>.
3
After the computer turns off, reconnect the mouse cable as shown on the setup
diagram.
4
Turn on the computer.
TEST THE MOUSE — Connect a properly working mouse to the computer, then try
using the mouse.
C
HECK THE MOUSE SETTINGS —
Windows XP:
1
Click
Start→ Control Panel→
Mouse
.
2
Adjust the settings as needed.
Windows Vista:
1
Click
Start
→ Control Panel→ Hardware and Sound→ Mouse
.
2
Adjust the settings as needed.
REINSTALL THE MOUSE DRIVER — See "Drivers" in your User’s Guide.
R
UN THE HARDWARE TROUBLESHOOTER — See "Hardware Troubleshooter" on
page 41.
Page 55

Quick Reference Guide 55
Network Problems
CAUTION: Before you begin any of the procedures in this section, follow the
safety instructions in the
Product Information Guide
.
C
HECK THE NETWORK LIGHT ON THE FRONT OF THE COMPUTER — If the link
integrity light is off (see "Controls and Lights" in your User’s Guide), no network
communication is occurring. Replace the network cable.
C
HECK THE NETWORK CABLE CONNECTOR — Ensure that the network cable is firmly
inserted into the network connector on the back of the computer and the network jack.
R
ESTART THE COMPUTER AND ATTEMPT TO LOG ON TO THE NETWORK AGAIN
CHECK YOUR NETWORK SETTINGS — Contact your network administrator or the
person who set up your network to verify that your network settings are correct and
that the network is functioning.
R
UN THE HARDWARE TROUBLESHOOTER — See "Hardware Troubleshooter" on page 41.
Power Problems
CAUTION: Before you begin any of the procedures in this section, follow the
safety instructions in the
Product Information Guide
.
I
F THE POWER LIGHT IS GREEN AND THE COMPUTER IS NOT RESPONDING — See
"Diagnostic Lights" on page 33.
I
F THE POWER LIGHT IS BLINKING GREEN — The computer is in standby mode.
Press a key on the keyboard, move the mouse, or press the power button to resume
normal operation.
I
F THE POWER LIGHT IS OFF — The computer is either turned off or is not receiving
power.
• Reseat the power cable in the power connector on the back of the computer and the
electrical outlet.
• Bypass power strips, power extension cables, and other power protection devices to
verify that the computer turns on properly.
• Ensure that any power strips being used are plugged into an electrical outlet and are
turned on.
• Ensure that the electrical outlet is working by testing it with another device, such as a
lamp.
• Ensure that the main power cable and front panel cable are securely connected to the
system board (see "System Board Components"
in your User’s Guide
).
Page 56

56 Quick Reference Guide
IF THE POWER LIGHT IS BLINKING AMBER — The computer is receiving electrical
power, but an internal power problem may exist.
• Ensure that the voltage selection switch is set to match the AC power at your location
(if applicable).
• Ensure that all components and cables are properly installed and securely connected
to the system board (see "System Board Components"
in your User’s Guide
).
IF THE POWER LIGHT IS STEADY AMBER — A device may be malfunctioning or
incorrectly installed.
• Remove and then reinstall all memory modules (see "Memory"
in your User’s Guide
).
• Remove and then reinstall any expansion cards, including graphics cards (see "Cards"
in your
User’s Guide
).
ELIMINATE INTERFERENCE — Some possible causes of interference are:
• Power, keyboard, and mouse extension cables.
• Too many devices connected to the same power strip.
• Multiple power strips connected to the same electrical outlet.
Printer Problems
CAUTION: Before you begin any of the procedures in this section, follow the
safety instructions in the
Product Information Guide
.
NOTE: If you need technical assistance for your printer, contact the printer’s
manufacturer.
C
HECK THE PRINTER DOCUMENTATION — See the printer documentation for setup
and troubleshooting information.
E
NSURE THAT THE PRINTER IS TURNED ON
CHECK THE PRINTER CABLE CONNECTIONS —
• See the printer documentation for cable connection information.
• Ensure that the printer cables are securely connected to the printer and the computer.
TEST THE ELECTRICAL OUTLET — Ensure that the electrical outlet is working by
testing it with another device, such as a lamp.
V
ERIFY THAT THE PRINTER IS RECOGNIZED BY WINDOWS —
Windows XP:
1
Click
Start→
Control Panel→
Printers and Other Hardware→
View installed
printers or fax printers
.
2
If the printer is listed, right-click the printer icon.
Page 57

Quick Reference Guide 57
3
Click
Properties→
Ports
. For a parallel printer, ensure that the
Print to the following
port(s):
setting is
LPT1 (Printer Port)
. For a USB printer, ensure that the
Print to the
following port(s):
setting is
USB
.
Windows Vista:
1
Click
Start
→ Control Panel→ Hardware and Sound→ Printer
.
2
If the printer is listed, right-click the printer icon.
3
Click
Properties,
and then click
Ports
.
4
Adjust the settings, as needed.
REINSTALL THE PRINTER DRIVER — See the printer documentation for information
on reinstalling the printer driver.
Scanner Problems
CAUTION: Before you begin any of the procedures in this section, follow the
safety instructions in the
Product Information Guide
.
NOTE: If you need technical assistance for your scanner, contact the scanner’s
manufacturer.
C
HECK THE SCANNER DOCUMENTATION — See the scanner documentation for setup
and troubleshooting information.
U
NLOCK THE SCANNER — Ensure that your scanner is unlocked (if the scanner has a
locking tab or button).
R
ESTART THE COMPUTER AND TRY THE SCANNER AGAIN
CHECK THE CABLE CONNECTIONS —
• See the scanner documentation for information on cable connections.
• Ensure that the scanner cables are securely connected to the scanner and the
computer.
VERIFY THAT THE SCANNER IS RECOGNIZED BY MICROSOFT WINDOWS —
Windows XP:
1
Click
Start→
Control Panel→
Printers and Other Hardware→
Scanners and
Cameras
.
2
If your scanner is listed, Windows recognizes the scanner.
Windows Vista:
1
Click
Start
→ Control Panel→ Hardware and Sound→ Scanners and Cameras
.
2
If the scanner is listed, Windows recognizes the scanner.
REINSTALL THE SCANNER DRIVER — See the scanner documentation for
instructions.
Page 58

58 Quick Reference Guide
Sound and Speaker Problems
CAUTION: Before you begin any of the procedures in this section, follow the
safety instructions in the
Product Information Guide
.
No sound from speakers
NOTE: The volume control in MP3 and other media players may override the
Windows volume setting. Always check to ensure that the volume on the media
player(s) has not been turned down or off.
C
HECK THE SPEAKER CABLE CONNECTIONS — Ensure that the speakers are
connected as shown on the setup diagram supplied with the speakers. If you purchased
a sound card, ensure that the speakers are connected to the card.
E
NSURE THAT THE SUBWOOFER AND THE SPEAKERS ARE TURNED ON — See the
setup diagram supplied with the speakers. If your speakers have volume controls,
adjust the volume, bass, or treble to eliminate distortion.
A
DJUST THE WINDOWS VOLUME CONTROL — Click or double-click the speaker icon
in the lower-right corner of your screen. Ensure that the volume is turned up and that
the sound is not muted.
D
ISCONNECT HEADPHONES FROM THE HEADPHONE CONNECTOR — Sound from the
speakers is automatically disabled when headphones are connected to the computer’s
front-panel headphone connector.
T
EST THE ELECTRICAL OUTLET — Ensure that the electrical outlet is working by
testing it with another device, such as a lamp.
E
LIMINATE POSSIBLE INTERFERENCE — Turn off nearby fans, fluorescent lights, or
halogen lamps to check for interference.
R
UN THE SPEAKER DIAGNOSTICS
REINSTALL THE SOUND DRIVER — See "Drivers" in your User’s Guide.
R
UN THE HARDWARE TROUBLESHOOTER — See "Hardware Troubleshooter" on
page 41.
No sound from headphones
CHECK THE HEADPHONE CABLE CONNECTION — Ensure that the headphone cable is
securely inserted into the headphone connector (see "About Your Computer" on
page 11).
A
DJUST THE WINDOWS VOLUME CONTROL — Click or double-click the speaker icon
in the lower-right corner of your screen. Ensure that the volume is turned up and that
the sound is not muted.
Page 59

Quick Reference Guide 59
Video and Monitor Problems
CAUTION: Before you begin any of the procedures in this section, follow the
safety instructions in the
Product Information Guide
.
NOTICE: If your computer came with a PCI Express graphics card installed,
removal of the card is not necessary when installing additional graphics cards;
however, the card is required for troubleshooting purposes. If you remove the card,
store it in a safe and secure location. For information about your graphics card, go
to support.dell.com.
The screen is blank
NOTE: For troubleshooting procedures, see the monitor’s documentation.
C
HECK THE MONITOR CABLE CONNECTION —
• Ensure that the monitor cable is connected to the correct graphics card (for dual
graphics card configurations).
• If you are using a DVI-to-VGA adapter, ensure that the adapter is correctly attached to
the graphics card and monitor.
• Ensure that the monitor cable is connected as shown on the setup diagram for your
computer.
• Remove any video extension cables and connect the monitor directly to the computer.
• Swap the computer and monitor power cables to determine if the monitor’s power
cable is defective.
• Check the connectors for bent or broken pins (it is normal for monitor cable
connectors to have missing pins).
CHECK THE MONITOR POWER LIGHT —
• If the power light is lit or blinking, the monitor has power.
• If the power light is off, firmly press the button to ensure that the monitor is
turned on.
• If the power light is blinking, press a key on the keyboard or move the mouse to
resume normal operation.
TEST THE ELECTRICAL OUTLET — Ensure that the electrical outlet is working by
testing it with another device, such as a lamp.
C
HECK THE DIAGNOSTIC LIGHTS — See "Diagnostic Lights" on page 33.
Page 60

60 Quick Reference Guide
The screen is difficult to read
CHECK THE MONITOR SETTINGS — See the monitor documentation for instructions
on adjusting the contrast and brightness, demagnetizing (degaussing) the monitor,
and running the monitor self-test.
M
OVE THE SUBWOOFER AWAY FROM THE MONITOR — If your speaker system
includes a subwoofer, ensure that the subwoofer is positioned at least 60 centimeters
(2 feet) away from the monitor.
M
OVE THE MONITOR AWAY FROM EXTERNAL POWER SOURCES — Fans, fluorescent
lights, halogen lamps, and other electrical devices can cause the screen image to
appear shaky. Turn off nearby devices to check for interference.
R
OTATE THE MONITOR TO ELIMINATE SUNLIGHT GLARE AND POSSIBLE
INTERFERENCE
ADJUST THE WINDOWS DISPLAY SETTINGS —
Windows XP:
1
Click
Start→
Control Panel→
Appearance and Themes
.
2
Click the area you want to change or click the
Display
icon.
3
Try different settings for
Color quality
and
Screen resolution
.
Windows Vista:
1
Click
Start
→ Control Panel→ Hardware and Sound→ Personalization
→
Display Settings
.
2
Adjust
Resolution
and
Colors settings,
as needed.
3D image quality is poor
CHECK THE GRAPHICS CARD POWER CABLE CONNECTION — Ensure that the power
cable for the graphics card(s) is correctly attached to the card.
C
HECK THE MONITOR SETTINGS — See the monitor documentation for instructions
on adjusting the contrast and brightness, demagnetizing (degaussing) the monitor,
and running the monitor self-test.
Only part of the screen is readable
TURN ON THE COMPUTER AND THE MONITOR AND ADJUST THE MONITOR
BRIGHTNESS AND CONTRAST CONTROLS — If the monitor works, the graphics
card(s) may be defective.
Contact Dell (see "Contacting Dell"
in your User’s Guide
).
Page 61

Index 61
Index
B
battery
problems, 46
beep codes, 37
C
cards
slots, 15, 18
CD-RW drive
problems, 47
CDs
operating system, 10
Check Disk, 47
computer
beep codes, 37
crashes, 51-52
stops responding, 51
conflicts
software and hardware
incompatibilities, 41
connectors
headphone, 13, 17
IEEE, 12, 16
keyboard, 21
line-in, 20
line-out, 20
mouse, 19
connectors (continued)
network adapter, 20
parallel, 19
power, 14, 18
serial, 21
sound, 20
USB, 12, 16, 20-21
D
Dell Diagnostics, 41
Dell support site, 8
diagnostic lights, 33
diagnostics
beep codes, 37
Dell, 41
lights, 13, 17, 33
display. See monitor
documentation
End User License Agreement, 6
ergonomics, 6
online, 8
Product Information Guide, 6
regulatory, 6
safety, 6
User’s Guide, 6
warranty, 6
drives
problems, 46
Page 62

62 Index
E
e-mail
problems, 48
End User License Agreement, 6
ergonomics information, 6
error messages
beep codes, 37
diagnostic lights, 33
problems, 49
F
Files and Settings Transfer
Wizard, 25
H
hard drive
activity light, 12-13, 15, 17
problems, 47
hardware
beep codes, 37
conflicts, 41
Dell Diagnostics, 41
Hardware Troubleshooter, 41
headphone
connector, 13, 17
Help and Support Center, 9
help file
Windows Help and Support
Center, 9
I
IEEE
connectors, 12, 16
IEEE 1394
problems, 50
Internet
problems, 48
IRQ conflicts, 41
K
keyboard
connector, 21
problems, 51
L
labels
Microsoft Windows, 7
Service Tag, 7
lights
back of computer, 33
diagnostic, 13, 17, 33
hard drive activity, 12-13, 15, 17
link integrity, 19
network, 19-20
network activity, 20
power, 13, 17
Page 63

Index 63
M
memory
problems, 53
messages
error, 49
modem
problems, 48
monitor
blank, 59
hard to read, 60
problems, 59
mouse
connector, 19
problems, 54
N
network
connector, 20
problems, 55
O
operating system
reinstalling, 10
Operating System CD, 10
optical drive
problems, 46-47
P
power
button, 12, 16
connector, 14, 18
light, 13, 17
line conditioners, 28
problems, 55
protection devices, 28
surge protectors, 28
UPS, 28
power light
conditions, 55
printer
connecting, 25
problems, 56
setting up, 25
problems
battery, 46
beep codes, 37
blue screen, 52
CD-RW drive, 47
computer crashes, 51-52
computer stops responding, 51
conflicts, 41
Dell Diagnostics, 41
diagnostic lights, 33
drives, 46
e-mail, 48
error messages, 49
general, 51
hard drive, 47
IEEE 1394, 50
Internet, 48
keyboard, 51
Page 64

64 Index
problems (continued)
memory, 53
modem, 48
monitor hard to read, 60
monitor is blank, 59
mouse, 54
network, 55
optical drive, 46-47
power, 55
power light conditions, 55
printer, 56
program crashes, 52
program stops responding, 52
scanner, 57
screen hard to read, 60
screen is blank, 59
software, 52-53
video and monitor, 59
volume adjusting, 58
Product Information Guide, 6
R
regulatory information, 6
ResourceCD
Dell Diagnostics, 41
S
S.M.A.R.T, 40
safety instructions, 6
scanner
problems, 57
screen. See monitor
Service Tag, 7
software
conflicts, 41
problems, 52-53
sound connectors
line-in, 20
line-out, 20
Starting the Dell Diagnostics
From the Drivers and
Utilities CD, 43
Starting the Dell Diagnostics
From Your Hard Drive, 42
support website, 8
T
transferring information to a new
computer, 25
troubleshooting
conflicts, 41
Dell Diagnostics, 41
diagnostic lights, 33
Hardware Troubleshooter, 41
Help and Support Center, 9
U
uninterruptible power supply.
See UPS,28
UPS, 28
Page 65

Index 65
USB
connector, 20-21
connectors, 12, 16
User’s Guide, 6
V
video
problems, 59
voltage selection switch, 14, 18
volume
adjusting, 58
W
warranty information, 6
Windows XP
Files and Settings Transfer
Wizard, 2 5
Hardware Troubleshooter, 41
Help and Support Center, 9
reinstalling, 10
wizards
Files and Settings Transfer
Wizard, 2 5
Page 66

66 Index
Page 67

Dell Precision™ Workstation T3400
快速参考指南
型号:DCTA
www.dell.com | support.dell.com
Page 68

注、注意和警告
注: 注表示可以帮助您更好地使用计算机的重要信息。
注意: 注意表示硬件的潜在损坏或数据丢失,并且告诉您如何避免此类问题。
警告: 警告表示可能导致财产损失、人身伤害或死亡的潜在危险。
____________________
本说明文件中的信息如有更改,恕不另行通知。
© 2007 Dell Inc. 版权所有,翻印必究。
未经 Dell Inc. 书面许可,严禁以任何方式进行复制。
本文件中使用的商标 :Dell、DELL 徽标和 Dell Precision 是 Dell Inc. 的商标; Microsoft、Windows
和 Windows Vista 是 Microsoft Corporation 在美国和 / 其他国家和地区的商标或注册商标。
本说明文件中述及的其他商标和商品名称是指拥有相应标记和名称的公司或其制造的产品。
Dell Inc. 对不属于自己的商标和商品名称不拥有任何所有权。
型号:DCTA
2007 年 8 月 P/N JY487 Rev. A00
Page 69

目录
查找信息 . . . . . . . . . . . . . . . . . . . . . . . . 71
计算机概览
. . . . . . . . . . . . . . . . . . . . . . . 75
正面视图 (塔式放置方式)
背面视图 (塔式放置方式)
正面视图 (台式放置方式)
背面视图 (台式放置方式)
背面板连接器
安装计算机
. . . . . . . . . . . . . . . . . . . . . . . 82
. . . . . . . . . . . . . . . . . . . 81
在塔式和台式放置方式之间转换
将计算机安装到屏蔽罩中
将信息转移到新计算机
电源保护设备
清洁计算机
. . . . . . . . . . . . . . . . . . . . . . . 91
. . . . . . . . . . . . . . . . . . . 90
计算机、键盘和显示器
鼠标 (非光电)
软盘驱动器
. . . . . . . . . . . . . . . . . 91
. . . . . . . . . . . . . . . . . . . . 91
. . . . . . . . . . . 75
. . . . . . . . . . . 77
. . . . . . . . . . . 78
. . . . . . . . . . . 80
. . . . . . . . 82
. . . . . . . . . . . . 83
. . . . . . . . . . . . . 86
. . . . . . . . . . . . . 91
CD 和 DVD
故障排除工具
电源指示灯
诊断指示灯
哔声代码
系统信息
硬件疑难解答
Dell 诊断程序
. . . . . . . . . . . . . . . . . . . . . 92
. . . . . . . . . . . . . . . . . . . . . . 92
. . . . . . . . . . . . . . . . . . . . 92
. . . . . . . . . . . . . . . . . . . . 93
. . . . . . . . . . . . . . . . . . . . . . 96
. . . . . . . . . . . . . . . . . . . . . . 98
. . . . . . . . . . . . . . . . . . 100
. . . . . . . . . . . . . . . . . . 100
目录 69
Page 70

故障排除 . . . . . . . . . . . . . . . . . . . . . . . 104
电池问题
驱动器问题
. . . . . . . . . . . . . . . . . . . . . 104
. . . . . . . . . . . . . . . . . . . 104
电子邮件、调制解调器和 Internet 问题
错误信息
IEEE 1394 设备问题
键盘问题
锁定和软件问题
内存问题
鼠标问题
网络问题
电源问题
打印机问题
扫描仪问题
声音和扬声器问题
视频和显示器问题
. . . . . . . . . . . . . . . . . . . . . 107
. . . . . . . . . . . . . . 108
. . . . . . . . . . . . . . . . . . . . . 109
. . . . . . . . . . . . . . . . . 109
. . . . . . . . . . . . . . . . . . . . . 111
. . . . . . . . . . . . . . . . . . . . . 112
. . . . . . . . . . . . . . . . . . . . . 112
. . . . . . . . . . . . . . . . . . . . . 113
. . . . . . . . . . . . . . . . . . . 114
. . . . . . . . . . . . . . . . . . . 114
. . . . . . . . . . . . . . . 115
. . . . . . . . . . . . . . . 116
. . . . 106
索引 . . . . . . . . . . . . . . . . . . . . . . . . . . . . . . 119
70 目录
Page 71

查找信息
注:某些功能或介质是可选的,您的计算机可能未附带这些功能或介质。
某些功能或介质可能在某些国家和地区不可用。
注:您的计算机可能附带有其他信息。
要查找的内容 在此处查找
•
适用于计算机的诊断程序
•
适用于计算机的驱动程序
•
台式机系统软件
(DSS)
Drivers and Utilities (驱动及应用程
序)光盘
注: Drivers and Utilities (驱动及应用
程序)光盘是可选的,您的计算机可能未
附带此光盘。
您的计算机已经安装了说明文件和驱动
程序。您可以使用 Drivers and Utilities
(驱动及应用程序)光盘重新安装驱动
程序 (请参阅 《用户指南》中的 “重
新安装驱动程序和公用程序” )或运行
Dell 诊断程序 (请参阅第 100 页上的
“Dell 诊断程序”)。
光盘中可能包含自述文件,它们提供有
关计算机技术更改的最新更新信息,或
为技术人员或有经验的用户提供高级技
术参考资料。
驱动程序和说明文件更新可在
support.dell.com 上找到。
71快速参考指南
Page 72

要查找的内容 在此处查找
•
保修信息
•
条款和条件 (仅限于 美国)
•
安全说明
•
管制信息
•
人机工程学信息
•
最终用户许可协议
•
如何卸下和装回部件
•
规格
•
如何配置系统设置
•
如何排除故障并解决问题
Dell™ 产品信息指南
Dell Precision™ 用户指南
Microsoft
Vista
1
单击 “
®
™
帮助和支持中心
Start
Support
User and System Guides
和系统指南)
(系统指南)。
Windows® XP 和 Windows
”(开始)→“
Help and
”(帮助和支持)→“
”(
Dell
用户
→
“
System Guides
Dell
”
•
服务标签和快速服务代码
• Microsoft Windows
产品密钥
2
单击适用于您计算机的《用户指南》。
服务标签和 Microsoft Windows 产品密钥
这些标签均位于您的计算机上。
•
当您访问 support.dell.com 或与支持
人员联络时,此服务标签用于识别您
的计算机。
•
与支持人员联络时,请输入快速服务
代码以转接您的电话。
注: 作为一项提高安全性的措施,新设
计的 Microsoft Windows 许可证标签故
意缺失了一部分或特地留了一个孔,以
防标签被撕。
72 快速参考指南
Page 73

要查找的内容 在此处查找
•
解决方案
术人员发表的文章、在线课程以及常见
问题
•
团体
•
升级
和操作系统)升级信息
•
客户服务
单状态、保修和维修信息
•
服务和支持
史记录、服务合同、与支持人员进行在
线讨论
—
故障排除提示和技巧、技
—
与其他
—
组件 (例如内存、硬盘驱动器
Dell
客户进行在线讨论
—
联络信息、服务电话和订
—
服务电话状态、支持历
Dell 支持 Web 站点 — support.dell.com
注: 选择您所在的地区分部或业务分部
以查看相应的支持站点。
•Dell
•
•
•
技术更新服务
供有关软件和硬件更新的前瞻性电子
邮件通知
参考资料
机配置的详细信息、产品规格和白皮书
下载
件和软件更新
台式机系统软件
机重新安装操作系统,您还应该重新安
DSS
装
算机和操作系统,并安装适用于您的配
置的更新,同时为您的操作系统提供关
键更新,并为处理器、光盘驱动器、
USB
机能够正常运行,
—
计算机说明文件、有关计算
—
经过认证的驱动程序、增补软
公用程序。
设备等提供支持。要使
—
为您的计算机提
(DSS) —
DSS
将自动检测计
DSS
必不可少。
如果为计算
Dell
要下载台式机系统软件,请:
1
访问 support.dell.com
/
地区,然后单击 Drivers & Downloads
家
(驱动程序和下载)。
2
单击 Select Model
(输入编号),进行相应的选择或
计算
a Tag
输入适用于您计算机的相应信息,然后
Confirm
单击
3
向下滚动到 System and Configuration
Utilities
Desktop System Software
软件),然后单击
即下载)。
(确认)。
(系统和配置公用程序)
,选择您所在的国
(选择型号)或 Enter
→
(台式机系统
Download Now
(立
注: support.dell.com 用户界面可能因
您所做选择的不同而不同。
73快速参考指南
Page 74

要查找的内容 在此处查找
•
如何使用
如何使用
•
如何使用程序和文件
•
•
如何个性化我的桌面
•
如何重新安装操作系统
Windows XP
Windows Vista
Windows 帮助和支持中心
1
单击 “
Start
Support
2
键入说明问题的字或短语,然后单击
箭头图标。
3
单击说明问题的主题。
4
请遵循屏幕上的说明操作。
操作系统介质
您的计算机已经安装了操作系统。要重
新安装操作系统,请使用随您的计算机
提供的 Operating System (操作系统)
重新安装介质 (请参阅 《用户指南》中
的 “还原操作系统”)。
”(开始)→“
”(帮助和支持)。
Help and
•
如何使用
与
Dell Precision
•
Linux
产品和
统用户通过电子邮件进行讨论
•
有关
Linux
和我的
Dell Precision
机的其他信息
74 快速参考指南
Linux
操作系
计算
重新安装操作系统之后,请使用可选的
Drivers and Utilities(驱动及应用程序)
光盘为计算机附带的设备重新安装驱动
程序。
您的操作系统产品密钥标签位于您的计
算机上。
注: 操作系统安装介质的颜色会因您订
购的操作系统的不同而有所不同。
Dell 支持的 Linux 站点
• linux.dell.com
• lists.us.dell.com/mailman/listinfo/linuxprecision
Page 75

计算机概览
正面视图 (塔式放置方式)
1
14
13
12
11
10
9
2
3
4
5
6
7
8
1
上部 5.25 英寸驱动
器托架
2
下部 5.25 英寸驱动
器托架
3
上部 3.5 英寸驱动器
托架
4
下部 3.5 英寸驱动器
托架
5
硬盘驱动器活动指
示灯
支承光盘驱动器。
支承光盘驱动器或附加硬盘驱动器(仅限于 SATA 型
硬盘)。
支承软盘驱动器、介质卡读取器或附加硬盘驱动器
(SATA 或 SAS)。
支承软盘驱动器或介质卡读取器。
硬盘驱动器活动指示灯在计算机从硬盘驱动器读取
数据或向其写入数据时亮起。当光盘驱动器这样的
设备在运行时,该指示灯也可能亮起。
75快速参考指南
Page 76

6
IEEE 1394 连接器
(可选)
7
USB 2.0 连接器 (2) 正面的 USB 连接器用于不经常连接的设备 (例如闪
可选的 IEEE 1394 连接器用于连接高速数据设备,
例如数码摄像机和外部存储设备。
存钥匙或照相机)或可引导的 USB 设备 (有关引导
至 USB 设备的详情,请参阅 《用户指南》中的 “系
统设置程序”)。
注: 对于经常保持连接的设备,如打印机和键盘,建
议使用背面的 USB 连接器。
8
Dell 徽章 (可旋转) 使用 Dell 徽标背面的塑料手柄可转动徽标以从塔式
转换为台式或从台式转换为塔式。
9
电源按钮 按下此按钮可以打开计算机电源。
注意: 为避免丢失数据,请勿使用电源按钮关
闭计算机。而应执行操作系统的关闭操作。
注意: 如果操作系统已启用 ACPI,当按电源
按钮时,计算机将执行操作系统的关闭操作。
注: 电源按钮还可以用于唤醒系统或使系统转入节
能状态 (请参阅 《用户指南》中的“电源管理”)。
10
电源指示灯 电源指示灯通过亮起、闪烁或稳定不变来表示不同
的状态:
•
不亮
—
计算机已关闭 (S4、
•
呈绿色稳定亮起
•
呈绿色闪烁
•
闪烁或稳定琥珀色光
“电源问题”。
要退出节能状态,请按电源按钮,或者使用键盘或鼠
标 (如果该设备已在 Windows 设备管理器中配置为
唤醒设备) 。
请参阅 《用户指南
有关用于排除计算机故障的诊断指示灯代码的说
明,请参阅第 93 页上的 “诊断指示灯”。
11
麦克风连接器 此麦克风连接器用于连接个人计算机麦克风,以将
语音或音乐输入至声音或电话程序。
12
耳机连接器 耳机连接器用于连接耳机。
13
诊断指示灯 (4) 使用诊断指示灯可帮助您排除计算机的故障 (请参
阅第 93 页上的 “诊断指示灯”)。
14
网络链路指示灯 当计算机与 10 Mbps、 100 Mbps 或 1000 Mbps (即
1 Gbps)网络连接良好时,网络链路指示灯会亮起。
有关休眠状态和退出省电状态的详情,
—
计算机处于正常运行状态。
—
计算机处于节能状态(
—
》中的 “电源管理”
S5
或机械关闭)。
S1 或 S3
请参阅《用户指南》中的
。
)。
76 快速参考指南
Page 77

背面视图 (塔式放置方式)
1
2
3
4
1
电源连接器 用于连接电源电缆。
2
电压选择开关 有关详情,请参阅 《产品信息指南》中的安全说明。
注: 仅 375-W PSU 上有电压选择开关。
3
背面板连接器 将串行、 USB 和其他设备插入相应的连接器。
4
卡插槽 用于访问所有已安装的 PCI 卡或 PCI Express 卡的连接器。
注: 上部的五个连接器插槽支持全长插卡,底部的那个
连接器插槽支持半长插卡。
注: 查看有关卡的说明文件,以确保您的配置中可以容纳
这些卡。某些卡 (如 PCI Express 图形卡)需要占用更多
物理空间和耗费更多能量,这可能会限制其他卡的使用。
77快速参考指南
Page 78

正面视图 (台式放置方式)
1 2 7
1
上部 5.25 英寸驱动
器托架
2
下部 5.25 英寸驱动
器托架
3
4
5 6
支承光盘驱动器。
支承光盘驱动器或附加硬盘驱动器(仅限于 SATA 型
硬盘)。
9101112
8
3
3.5 英寸驱动器托架 支承软盘驱动器或介质卡读取器。
4
硬盘驱动器活动指
示灯
5
IEEE 1394 连接器
(可选)
6
USB 2.0 连接器 (2) 正面的 USB 连接器用于不经常连接的设备 (例如闪
硬盘驱动器活动指示灯在计算机从硬盘驱动器读取
数据或向其写入数据时亮起。当光盘驱动器这样的
设备在运行时,该指示灯也可能亮起。
可选的 IEEE 1394 连接器用于连接高速数据设备,
例如数码摄像机和外部存储设备。
存钥匙或照相机)或可引导的 USB 设备 (有关引导
至 USB 设备的详情,请参阅 《用户指南》中的 “系
统设置程序”)。
注: 对于经常保持连接的设备,如打印机和键盘,建
议使用背面的 USB 连接器。
78 快速参考指南
Page 79

7
电源按钮 按下此按钮可以打开计算机电源。
注意: 为避免丢失数据,请勿使用电源按钮关
闭计算机。而应执行操作系统的关闭操作。
注意: 如果操作系统已启用 ACPI,当按电源
按钮时,计算机将执行操作系统的关闭操作。
注: 电源按钮还可以用于唤醒系统或使系统转入节
能状态 (请参阅 《用户指南》中的“电源管理”)。
8
电源指示灯 电源指示灯通过亮起、闪烁或稳定不变来表示不同
的状态:
•
不亮
—
计算机已关闭 (S4、
•
呈绿色稳定亮起
•
呈绿色闪烁
•
闪烁或稳定琥珀色光
的 “电源问题”。
要退出节能状态,请按电源按钮,或者使用键盘或鼠
标 (如果该设备已在 Windows 设备管理器中配置为
唤醒设备)。有关休眠状态和退出省电状态的详情,
请参阅 《用户指南》中的 “电源管理”。
—
计算机处于正常运行状态。
—
计算机处于节能状态(
—
S5
或机械关闭)。
请参阅 《
S1 或 S3
用户指南
)。
》中
有关用于排除计算机故障的诊断指示灯代码的说
明,请参阅第 93 页上的 “诊断指示灯”。
9
诊断指示灯 (4) 使用诊断指示灯可帮助您排除计算机的故障 (请参
阅第 93 页上的 “诊断指示灯”)。
10
麦克风连接器 此麦克风连接器用于连接个人计算机麦克风,以将
语音或音乐输入至声音或电话程序。
11
耳机连接器 耳机连接器用于连接耳机。
12
网络链路指示灯 当计算机与 10 Mbps、 100 Mbps 或 1000 Mbps (即
1 Gbps)网络连接良好时,网络链路指示灯会亮起。
79快速参考指南
Page 80

背面视图 (台式放置方式)
1
4
1
卡插槽 用于访问所有已安装的 PCI 卡或 PCI Express 卡的连
接器。
32
注: 查看有关卡的说明文件,以确保您的配置中可
以容纳这些卡。某些卡(如 PCI Express 图形卡)需
要占用更多物理空间和耗费更多能量,这可能会限
制其他卡的使用。
2
电源连接器 用于连接电源电缆。
3
电压选择开关 有关详情,请参阅 《产品信息指南》中的安全说明。
注: 仅 375-W PSU 上有电压选择开关。
4
背面板连接器 将串行、 USB 和其他设备插入相应的连接器。
80 快速参考指南
Page 81

背面板连接器
1
1
鼠标连接器 此绿色鼠标连接器用于连接 PS/2 鼠标。将鼠标连接至计
2
并行连接器 将打印机等并行设备连接至并行连接器。如果您有 USB 打
2 345
891011
算机之前,请先关闭计算机和所有连接的设备。如果您使
用的是 USB 鼠标,请将其插入 USB 连接器。
印机,请将其连接至 USB 连接器。
注: 如果计算机检测到包含并行连接器的已安装卡,并且
此连接器被配置为同一地址,则会自动禁用集成并行连接
器。有关详情,请参阅 《用户指南》中的 “系统设置程
序选项”。
6
7
3
链路完整性指
示灯
4
网络适 配器连
接器
•
绿色
—
计算机与
•
橙色
—
计算机与
•
黄色
—
计算机与
•
不亮
—
计算机未检测到与网络的物理连接。
要将计算机连接到某一网络或宽带设备,请将网络电缆的
一端连接到网络插孔或您的网络或宽带设备。将网络电缆
的另一端连接至计算机上的网络适配器连接器。卡嗒声表
示网络电缆已稳固连接。
注意: 切勿将电话线插入网络连接器。
对于配有其他网络连接器卡的计算机,在设置多个网络连
接(例如单独的内部网和外部网)时,请使用该卡上的连
接器和计算机背面的连接器。
建议在网络中使用类别 5 配线和连接器。如果必须使用类
别 3 配线,则应将网络速度强行控制在 10 Mbps 以确保可
靠运行。
10 Mbps
100 Mbps
1000 Mbps (1 Gbps)
网络连接良好。
网络连接良好。
网络连接良好。
81快速参考指南
Page 82

5
网络活动指示灯 当计算机正在传输或接收网络数据时,网络活动指示灯会
亮起 (不停闪烁)。如果网络通信量很大,此指示灯好像
是持续稳定亮起一样。
6
输出连接器 此绿色输出连接器用于连接耳机和大多数带有集成放大
器的扬声器。
对于配有声卡的计算机,请使用声卡上的连接器。
7
输入连接器 此蓝色输入连接器用于连接录音 / 播放设备,如麦克风、
磁带播放机、 CD 播放器或录影机。
对于配有声卡的计算机,请使用声卡上的连接器。
8
背面双 USB 2.0
连接器 (2)
背面的 USB 连接器用于经常保持连接的设备 (例如打印
机和键盘)。
注: 对于不经常连接的设备 (例如闪存或照相机)或可
引导的 USB 设备,建议您使用正面的 USB 连接器。
9
背面双 USB 2.0
连接器 (4)
背面的 USB 连接器用于经常保持连接的设备 (例如打印
机和键盘)。
注: 对于不经常连接的设备 (例如闪存或照相机)或可
引导的 USB 设备,建议您使用正面的 USB 连接器。
10
串行连接器 将掌上设备等串行设备连接至串行端口。默认指定值为
COM1 (用于串行连接器 1)和 COM2 (用于可选的串
行连接器 2)。
有关详情,请参阅《用户指南》中的“系统设置程序选项”。
11
键盘连接器 如果使用的是 PS/2 键盘,请将其连接至紫色的键盘连接
器。如果使用的是 USB 键盘,请将其连接至 USB 连接器。
安装计算机
在塔式和台式放置方式之间转换
警告: 开始执行本节中的任何步骤之前,请阅读并遵循《产品信息指南》中
的安全说明。
注:要将计算机转换为塔式放置方式或台式放置方式,您必须使用可选的套
件,该套件可从 Dell 获得。有关从 Dell 进行订购的更多详细信息,请参阅
《用户指南》中的 “产品信息”。
注:塔式计算机在正面支持的 3.5 英寸驱动器比台式计算机多一个。
1
按照 《用户指南》中 “开始之前”部分所述的步骤操作。
2
卸下主机盖 (请参阅 《用户指南》中的 “卸下主机盖”)。
82 快速参考指南
Page 83

3
卸下前面板 (请参阅 《用户指南》中的 “卸下前面板”)。
4
根据需要添加或卸下插件以卸下并准备好驱动器面板 (请参阅 《用户
指南》中的 “驱动器面板”)。
从塔式机箱转换到台式机箱
1
按照 《用户指南》中 “卸下软盘驱动器或介质卡读取器 (塔式计算
机)”部分所述步骤卸下所有已安装的软盘驱动器或介质卡读取器,然
后按照 《用户指南》中 “安装软盘驱动器或介质卡读取器 (台式计算
机)”部分所述步骤重新安装一个软盘驱动器或介质卡读取器。
2
按照 《用户指南》中 “卸下光盘驱动器 (塔式计算机)”部分所述步
骤卸下所有已安装的光盘驱动器,然后按照 《用户指南》中 “安装光
盘驱动器 (台式计算机)”部分所述步骤重新安装这些驱动器。
从台式机箱转换到塔式机箱
1
按照 《用户指南》中 “卸下软盘驱动器或介质卡读取器 (台式计算
机)”部分所述步骤卸下软盘驱动器或介质卡读取器 (如果已安装),
然后按照 《用户指南》中 “安装软盘驱动器或介质卡读取器 (塔式计
算机)”部分所述步骤重新安装软盘驱动器或介质卡读取器。
2
按照 《用户指南》中 “卸下光盘驱动器 (塔式计算机)”部分所述步
骤卸下所有已安装的光盘驱动器,然后按照 《用户指南》中 “安装光
盘驱动器 (台式计算机)”部分所述步骤重新安装这些驱动器。
将计算机安装到屏蔽罩中
将计算机安装在屏蔽罩中会使气流受限,从而导致计算机过热,进而影响到
计算机的性能。将计算机安装在屏蔽罩中时,请遵循以下原则:
注意: 本手册中指定的运行温度是指最大环境温度。将计算机安装在屏蔽罩
中时,必须考虑所在房间的环境温度。有关计算机规格的详细信息,请参阅
用户指南
《
》中的 “
规格”。
83快速参考指南
Page 84

•
在计算机的所有通风侧最少保留
良好。
10.2
厘米(4 英寸)的空隙以保证通风
•
如果您的计算机安装在屋角或书桌底下,计算机背面与墙壁之间至少留
5.1
出
•
如果屏蔽罩设计有门,确保经过屏蔽罩的气流 (前面和后面)至少有
30%
厘米 (2 英寸)的空隙,以保证通风良好。
是通过这些门实现的。
84 快速参考指南
Page 85

•
请不要将计算机安装在空气无法流动的屏蔽罩中。气流受限
算机过热,这可能影响计算机的性能
。
会导致计
85快速参考指南
Page 86

将信息转移到新计算机
您可以使用操作系统向导帮助您将文件和其他数据从一台计算机转移到另一
台计算机。
Microsoft Windows XP
Microsoft Windows XP
操作系统提供了“
Files and Settings Transfer Wizard
”
(文件和设置转移向导)来转移下面这样的数据:
•
电子邮件
•
工具栏设置
•
窗口大小
• Internet
书签
您可以通过网络或串行连接将数据从一台计算机转移到另一台计算机,也可
以通过将数据存储在可移动介质(如可写
注:通过用串行电缆直接将两台计算机的输入 / 输出 (I/O) 端口连接起来,可
以实现从一台计算机到另一台新计算机的信息转移。要通过串行连接转移数
据,您必须使用 “Control Panel”(控制面板)中的 “Network Connections”
(网络连接)公用程序执行其他配置步骤 (例如,设置高级连接并指定主机
计算机和客户机计算机)。
有关在两台计算机之间设置直接电缆连接的说明,请参阅 Microsoft 知识库
#305621 号文章 (标题为 《如何在两台 Windows XP 计算机之间设置直接
电缆连接》 (How to Set Up a Direct Cable Connection Between Two Computers
in Windows XP))。 该信息并非在所有国家和地区都可获得。
CD 或 DVD
)上来实现数据转移。
使用“
算机提供的
Files and Settings Transfer Wizard
Operating System
(操作系统)安装介质或该向导可以为您创建
”(文件和设置转移向导)需要随计
的向导磁盘。
注:有关转移数据的详细信息,请在 support.dell.com 上搜索文档 #154781
(What Are The Different Methods To Transfer Files From My Old Computer
To My New Dell™ Computer Using the Microsoft
System?)。
注:在某些国家和地区可能无法查看 Dell 知识库文档。
文件和设置转移向导 (使用操作系统介质)
注:“Files and Settings Transfer Wizard”(文件和设置转移向导)将要从其
上转移数据的源计算机指定为旧计算机,而将数据将转移到其上的目标计算
机指定为新计算机。
®
Windows® XP Operating
86 快速参考指南
Page 87

准备目标计算机以进行文件转移:
1
单击“
(附件)
Wizard
2
在 “
computer
3
在 “
下,单击 “
Windows XP CD
4
检查 “
Start
”(开始)→“
→“System Tools
All Programs
”(系统工具)→“
”(文件和设置转移向导)。
Which computer is this?
”(新计算机),然后单击 “
Do you have a Windows XP CD?
I will use the wizard from the Windows XP CD
中的向导),然后单击 “
Now go to your old computer
息,然后转到源计算机。请不要单击 “
从源计算机复制数据:
1
将
Windows XP
Operating System
”(所有程序)→“
Accessories
Files and Settings Transfer
”(这是哪台计算机?)下,单击 “
Next
”(下一步)。
”(您有
Windows XP CD
吗?)
”(我将使用
Next
”(下一步)。
”(请转到您的旧计算机)下的信
Next
”(下一步)。
(操作系统)介质插入源计算机。
”
New
系统将显示“
Windows XP
2
3
单击 “
在 “
Perform additional tasks
What do you want to do?
files and settings
系统将显示 “
Welcome to Microsoft Windows XP
)屏幕。
”(传送文件和设置)。
Files and Settings Transfer Wizard
导)窗口。
4
单击 “
5
在 “
computer
6
在“
方法,然后单击 “
7
在 “
Next
”(下一步)。
Which computer is this?
”(旧计算机),然后单击 “
Select a transfer method
Next
What do you want to transfer?
转移的数据,然后单击 “
复制数据后,系统将显示“
成收集阶段)屏幕。
”(欢迎使用
”(执行其他任务)。
”(您希望做什么?)下,单击“
”(文件和设置转移向
”(这是哪台计算机?)下,单击 “
Next
”(下一步)。
”(选择转移方法)下,单击您选择的转移
”(下一步)。
”(要转移哪些项目?)下,选择要
Next
”(下一步)。
Completing the Collection Phase
”(正在完
Microsoft
Tra ns fe r
Old
8
单击 “
Finish
”(完成)。
87快速参考指南
Page 88

将数据转移到目标计算机:
1
请转至目标计算机。
2
在 “
Now go to your old computer
Next
”(下一步)。
Where are the files and settings?
3
“
在 “
择您先前选择的设置和文件转移方法,然后单击 “
”(请转到您的旧计算机)下,单击
”(文件和设置在哪儿?)下,选
Next
”(下一步)。
该向导将读取所收集的文件和设置,并将它们应用到目标计算机。转移
完成后,系统会显示 “
4
单击 “
文件和设置转移向导 (使用操作系统介质)
Finished
”(完成),然后重新启动计算机。
Finished
”(完成)屏幕。
要在没有 Operating System
Settings Transfer Wizard
(操作系统)安装介质的情况下运行“
”(文件和设置转移向导),必须创建向导磁盘。您
可以使用向导磁盘在可移动介质上创建备份映像文件。
注:“Files and Settings Transfer Wizard”(文件和设置转移向导)将要从其
上转移数据的源计算机指定为旧计算机,而将数据将转移到其上的目标计算
机指定为新计算机。
创建向导磁盘:
1
在目标计算机上,单击 “
→“Accessories
序)
”(附件)→“
and Settings Transfer Wizard
2
在 “
Which computer is this?
computer
3
在 “
下,单击“
”(新计算机),然后单击 “
Do you have a Windows XP CD?
I want to create a Wizard Disk in the following drive
在以下驱动器中创建向导磁盘),然后单击 “
4
插入可移动介质 (如可写
5
检查 “
Now go to your old computer
息,然后转到源计算机。请不要单击 “
Start
”(开始)→“
System Tools
All Programs
”(系统工具)→“
”(文件和设置转移向导)。
”(这是哪台计算机?)下,单击 “
Next
”(下一步)。
CD 或DVD
”(您有
),然后单击 “OK”(确定)。
Windows XP CD
Next
”(下一步)。
”(请转到您的旧计算机)下的信
Next
”(下一步)。
”(所有程
Files and
Files
New
吗?)
”(我要
从源计算机复制数据:
1
将向导磁盘插入源计算机。
2
单击 “
Start
”(开始)→“
88 快速参考指南
Run
”(运行)。
Page 89

3
单击 “
“
4
在 “
computer
5
在“
OK
Browse...
”(浏览
”(确定)。
Which computer is this?
”(旧计算机),然后单击 “
Select a transfer method
方法,然后单击 “
6
在 “
What do you want to transfer?
转移的数据,然后单击 “
...
)并导航到向导磁盘上的 fastwiz
Next
”(下一步)。
Next
,然后单击
”(这是哪台计算机?)下,单击 “
Next
”(下一步)。
Old
”(选择转移方法)下,单击您选择的转移
”(要转移哪些项目?)下,选择要
”(下一步)。
复制数据后,系统将显示“
Completing the Collection Phase
成收集阶段)屏幕。
7
单击 “
将数据转移到目标计算机:
1
请转至目标计算机。
2
在 “
Next
“
3
在 “
择您先前选择的设置和文件转移方法,然后单击 “
Finish
Now go to your old computer
”(完成)。
”(请转到您的旧计算机)下,单击
”(下一步)。
Where are the files and settings?
”(文件和设置在哪儿?)下,选
Next
”(下一步)。
该向导将读取所收集的文件和设置,并将它们应用到目标计算机。转移
完成后,系统会显示 “
4
单击 “
Microsoft Windows Vista
1
单击
and settings
(开始
Finished
”(完成),然后重新启动计算机。
Windows Vista“Start
”(传送文件和设置)→“
Windows
轻松传送)。
Finished
”(开始)按钮
”(完成)屏幕。
,然后单击“
Start Windows Easy Transfer
Tra n sfer fi l es
”(正在完
”
2
在“
User Account Control
(继续)。
3
单击 “
in progress
按照 “
Windows Easy Transfer
说明操作。
”(用户帐户控制)对话框中,单击“
Start a new transfer
”(启动新的传送)或 “
”(继续正在进行的传送)。
”(
Windows
Continue
”
Continue a transfer
轻松传送)向导在屏幕上提供的
89快速参考指南
Page 90

电源保护设备
防止电压波动和电源故障的设备有若干种:
•
电涌保护器
•
线路调节器
•
不间断电源设备
电涌保护器
电涌保护器以及配备电涌保护的配电盘有助于防止雷暴天气或电源中断后可
能出现的电压峰信号对计算机的损害。有些电涌保护器制造商为某些类型的
损坏提供保修。选择电涌保护器时,请仔细阅读设备的保修说明,并比较额
定焦耳值,以确定不同设备的相关性能。具有较高额定焦耳值的设备可以提
供更多保护。
注意: 大多数电涌保护器都不能对因附近雷电而引起的电压波动或电源中断
提供保护。当您所在地区出现闪电时,请断开电话线与墙上电话插孔的连
接,并断开计算机与电源插座的连接。
许多电涌保护器都有一个电话插孔用于保护调制解调器。有关连接调制解调
器的说明,请参阅电涌保护器说明文件。
(UPS)
注意: 并非所有电涌保护器都能为网络适配器提供保护。在雷暴期间,请断
开网络电缆与墙上网络插孔的连接。
线路调节器
注意: 在电源中断时,线路调节器无法起到保护作用。
线路调节器用于使交流电压保持在相对稳定的水平。
不间断电源设备 (UPS)
注意: 如果在将数据保存到硬盘驱动器期间发生断电,则可能会导致数据丢
失或文件损坏。
注:为确保电池的使用时间达到最长,请仅将计算机连接至 UPS。将其他设
备(例如打印机)连接至能提供电涌保护的单独配电盘。
UPS
可防止电压波动和电源中断。
断时为连接的设备临时供电。交流电源恢复时将为电池充电。请参阅
UPS
设备包括一个电池,可 在 交流电源中
UPS
制
造商说明文件,以获取有关 电池 使用时间的信息,并确保该设备已经过
Underwriters Laboratories (UL)
认证。
90 快速参考指南
Page 91

清洁计算机
警告: 开始执行本节中的任何步骤之前,请阅读并遵循《产品信息指南》中
的安全说明。
计算机、键盘和显示器
警告: 清洁计算机之前,请先断开计算机与电源插座的连接。使用蘸水的软
布擦拭计算机。请勿使用液体或喷雾清洁剂,因为其中可能含有易燃物质。
•
使用带刷子的真空吸尘器轻轻地清除计算机插槽和孔中的灰尘,以 及键
盘按键之间的灰尘。
注意: 请勿使用皂液或酒精溶液擦拭显示器屏幕, 否则可能会损坏防反光
涂层。
•
要清洁显示器屏幕,请用水蘸湿干净的软布进行擦拭。如果可能,请使
用适用于显示器防静电涂层的专用屏幕清洁纸巾或溶液。
•
用蘸水的干净软布擦拭键盘、计算机和显示器的塑料部分。
请勿浸泡软布或将水滴入计算机或键盘内部。
鼠标 (非光电)
1
逆时针旋转鼠标底部的环形定位护盖,然后取出圆球。
2
使用不起毛的干净软布擦拭圆球。
3
向圆球固定框架内轻轻吹气,清除灰尘和毛絮。
4
请用蘸有异丙醇的棉签清洁圆球固定框架中的滚轮。
5
根据需要重新对准滚轴中央。确保棉签上的绒毛没有遗留在滚轮上。
6
装回圆球和环形定位护盖,然后顺时针旋转环形定位护盖,直至将其卡
入到位。
软盘驱动器
注意: 请勿尝试用棉签清洁驱动器磁头, 磁头可能未对准,导致驱动器无法
工作。
请使用从市面上购买的清洁套件来清洁软盘驱动器。此类套件包括预处理过
的软盘,用以清除正常操作过程中积聚的污物。
91快速参考指南
Page 92

CD 和 DVD
注意: 请始终使用压缩空气清洁 CD/DVD 驱动器中的透镜,并 按 照压缩空气
附带的说明进行操作。切勿触摸驱动器中的透镜。
1
拿住光盘的外边缘, 也可以触摸光盘中心孔的内边缘。
注意: 为避免损伤表面,请勿沿光盘的圆周方向擦拭。
2
使用不起毛的软布沿着光盘中心向外边缘的直线方向轻轻擦拭光盘底
面 (无标签的一面)。
对于难以去除的污物,请尝试使用水或用水稀释的中性皂液。您也可以
从市面上购买清洁光盘的产品,它们提供了某些保护来防止灰尘、指印
和划伤。用于清洁
CD
的产品也可以用于清洁
DVD
。
故障排除工具
电源指示灯
警告: 开始执行本节中的任何步骤之前,请阅读并遵循《产品信息指南》中
的安全说明。
位于计算机正面的电源按钮指示灯通过亮起、闪烁或稳定不变来表示不同的
状态:
•
如果电源指示灯呈绿色并且计算机无响应,请参阅第
指示灯”。
•
如果电源指示灯呈绿色闪烁,表明计算机处于待机模式。按键盘上的任
意键或移动鼠标,或者按电源按钮可以恢复正常运行状态。
•
如果电源指示灯不亮,表示计算机已关闭或未接通电源。
–
在计算机背面的电源连接器和电源插座中重置电源电缆。
–
如果计算机已连接至配电盘,请确保配电盘已连接至电源插座并且
配电盘已打开。
–
不使用电源保护设备、配电盘和电源延长电缆,以验证计算机电源
可以正常打开。
–
使用其他设备 (例如台灯)检测电源插座,确保电源插座能够正常
工作。
–
确保主电源电缆和前面板电缆已稳固地连接到系统板(请参阅《用
户指南》中的 “系统板组件”)。
93
页上的 “诊断
92 快速参考指南
Page 93

•
如果电源指示灯呈琥珀色闪烁,表示计算机已接通电源,但是可能存在
内部电源问题。
–
确保电压选择开关的设置与您所在地区的交流电源相匹配(如果有)。
–
确保处理器电源电缆已稳固地连接到系统板 (请参阅 《用户指南》
中的 “系统板组件”)。
•
如果电源指示灯呈琥珀色稳定亮起,表示某个设备可能出现故障或者未
正确安装。
–
卸下并重新安装内存模块 (请参阅 《用户指南 》中的 “内存”)。
–
卸下并重新安装所有插卡 (请参阅 《用户指南》中的 “插卡”)。
•
消除干扰。其他可能的干扰因素包括:
–
电源、键盘和鼠标延长电缆。
–
配电盘上设备过多。
–
多个配电盘连接至同一个电源插座。
诊断指示灯
警告: 开始执行本节中的任何步骤之前,请阅读并遵循《产品信息指南》中
的安全说明。
为了帮助您排除故障,计算机前面板上有四个指示灯,分 别标有“1”、“2”、
“
3
”和 “4”(请参阅第
75
页上的 “正面视图 (塔式放置方式)”或第
78
页上的 “正面视图 (台式放置方式)”)。计算机正常启动时,这些指示灯
将在闪烁一下后熄灭。如果计算机出现故障,指示灯亮起的顺序可帮助您识
别问题。
注:计算机完成开机自测后,在引导至操作系统之前,所有四个指示灯均会
熄灭。
开机自测期间诊断指示灯代码
指示灯模式 问题说明 建议的解决方案
计算机处于正常关
闭状态或可能出现
前 BIOS 故障。
将计算机连接至正常工作的电源插座,
然后按电源按钮。
93快速参考指南
Page 94

指示灯模式 问题说明 建议的解决方案
可能出现 BIOS 故
障,计算机进入恢
复模式。
可能是处理器出现
故障。
检测到内存模块,但
是出现内存故障。
•
运行
BIOS Recovery
复完成,然后重新启动计算机。
•
如果问题仍然存在,请与
(请参阅 《
联络”
•
重置处理器(请参阅 《用户指南
的 “处理器”)。
如果问题仍然存在,请与
•
(请参阅 《
联络”
•
如果安装了两个或多个内存模块,请卸
下这些模块 (请参阅 《用户指南》中
的 “卸下内存模块”),然后重新安装
一个内存模块 (请参阅 《用户指南》
中的“安装内存模块”)并重新启动计
算机。如果计算机启动正常,请继续安
装其他内存模块(每次安装一个),直
至您找到出现故障的模块,或者正确地
重新安装所有模块。
用户指南
)。
用户指南
)。
公用程序,等待恢
Dell
》中的
》中的
“与 Dell
Dell
“与 Dell
联络
》中
联络
可能出现图形卡
故障。
可能出现软盘驱动器
或硬盘驱动器故障。
•
在计算机中安装类型相同且能够正常
工作的内存 (如果有)(请参阅 《用
户指南》中的 “内存”)。
•
如果问题仍然存在,请与
(请参阅 《
联络”
•
重置所有已安装的图形卡(请参阅《用
户指南》中的 “插卡”)。
•
请在计算机中安装能够正常工作的图
形卡 (如果有)。
•
如果问题仍然存在,请与
(请参阅 《
联络”
•
重新插入所有电源电缆和数据电缆,
然后重新启动计算机。
•
如果问题仍然存在,请与
(请参阅 《
联络”
用户指南
)。
用户指南
)。
用户指南
)。
Dell
》中的
Dell
》中的
Dell
》中的
“与 Dell
“与 Dell
“与 Dell
联络
联络
联络
94 快速参考指南
Page 95

指示灯模式 问题说明 建议的解决方案
可能出现 USB 故障。•重新安装所有
接,然后重新启动计算机。
•
如果问题仍然存在,请与
(请参阅 《
联络”
未检测到内存模块。•如果安装了两个或多个内存模块,请
卸下这些模块 (请参阅 《用户指南》
中的 “卸下内存模块”),然后重新安
装一个内存模块(请参阅《用户指南》
中的“安装内存模块”)并重新启动计
算机。如果计算机启动正常,请继续安
装其他内存模块(每次安装一个),直
至您找到出现故障的模块,或者正确
地重新安装所有模块。
•
在计算机中安装类型相同且能够正常
工作的内存 (如果有)(请参阅 《用
户指南》中的 “内存”)。
•
如果问题仍然存在,请与
(请参阅 《
联络”
)。
)。
USB
用户指南
用户指南
设备,检查电缆连
Dell
》中的
Dell
》中的
联络
“与 Dell
联络
“与 Dell
系统板出现故障。 请与 Dell 联络(请参阅《用户指南》中
的“与 Dell 联络”)。
•
检测到内存模块,
但是存在内存配置
或兼容性错误。
系统板资源和 / 或硬
件可能出现故障。
确保对内存模块/内在插槽没有特殊要求
(请参阅 《用户指南》中的 “内存”)。
•
确保计算机支持您所使用的内存 (请
参阅 《用户指南》中的 “内存”)。
•
如果问题仍然存在,请与
(请参阅 《
联络”
•
执行《用户指南》中“还原操作系统”
部分所述的步骤。
•
如果问题仍然存在,请与
(请参阅 《
联络”
用户指南
)。
用户指南
)。
Dell
》中的
Dell
》中的
联络
“与 Dell
联络
“与 Dell
95快速参考指南
Page 96

指示灯模式 问题说明 建议的解决方案
可能是扩充卡出现
故障。
出现其他故障。
1
通过卸下扩充卡 (而非图形卡)并重
新启动计算机来确定是否存在冲突
(请参阅《用户指南》中 的“ 插 卡 ”)。
2
如果问题仍然存在,请重新安装卸下
的扩充卡,然后卸下另一个扩充卡并
重新启动计算机。
3
对每个已安装的扩充卡重复此过程。
如果计算机启动正常,请对最后从计
算机中卸下的插卡进行故障排除,以
解决资源冲突 (请参阅 《用户指南》
中的 “还原操作系统”)。
4
如果问题仍然存在,请与
(请参阅 《
联络”
•
确保所有硬盘驱动器和
器的电缆已正确连接到系统板 (请参
阅《 用户指南》中的“系统板组件”)。
•
如果屏幕上显示表明设备 (例如软盘
驱动器或硬盘驱动器)出现问题的错
误信息,请检查该设备以确保其工作
正常。
用户指南
)。
Dell
》中的
CD/DVD
联络
“与 Dell
驱动
•
如果操作系统尝试从设备(例如软盘驱
动器或
请检查系统设置程序 (请参阅 《用户
指南》中的 “系统设置程序”)以确保
计算机中安装的设备的引导顺序正确。
•
如果问题仍然存在,请与
(请参阅 《
联络”
CD/DVD
)。
驱动器)进行引导,
Dell
用户指南
》中的
联络
“与 Dell
哔声代码
您的计算机在启动过程中可能会发出一系列哔声。我们将这一系列的哔声称
作哔声代码,它们可用来帮助识别计算机存在的问题。
您的计算机在启动过程中可能会发出一系列哔声。
1
请记下其哔声代码。
96 快速参考指南
Page 97

2
运行
Dell
诊断程序以找出其中的原因 (请参阅第
程 序 ”)。
代码 原因
2 声短鸣后 1 声长鸣 BIOS 校验和错误
34
页的“
Dell
诊断
1 声长鸣后 3 声短鸣,
然后再 2 声短鸣
1 声短鸣 F12 键被压
代码
(重复的短哔声)
1
2
说明 建议的补救措施
BIOS 校验和故障可能
的母板故障。
未检测到内存模块。
内存错误
请与 Dell 联络 (请参阅 《用户指南》中
的“与 Dell 联络”)。
•
如果安装了两个或多个内存模块,请卸
下这些模块 (请参阅 《用户指南》中
的 “卸下内存模块”),然后重新安装
一个内存模块(请参阅《用户指南》中
的 “安装内存模块”)并重新启动计算
机。如果计算机启动正常,请继续安装
其他内存模块 (每次安装一个),直至
您找到出现故障的模块,或者正确地重
新安装所有模块。
•
在计算机中安装类型相同且能够正常
工作的内存(如果有)(请参阅《用户
指南》中的 “内存”)。
•
如果问题仍然存在,请与
参阅《用户指南》中 的“ 与
3
4
可能的母板故障。 请与 Dell 联络 (请参阅 《用户指南》中
的“与 Dell 联络”)。
•
RAM 读 / 写失败。
确保对内存模块/内在插槽没有特殊要求
(请参阅 《用户指南》中的 “内存”)。
•
确保计算机支持您所使用的内存(请参
阅《用户指南》中的 “内存”)。
•
如果问题仍然存在,请与
阅《
用户指南
》中的
Dell
联络 (请
Dell
联络”)。
Dell
联络(请参
“与 Dell 联络”)。
97快速参考指南
Page 98

代码
(重复的短哔声)
说明 建议的补救措施
5
实时时钟故障。可能的
电池故障或母板故障。
6
视频 BIOS 检测失败。 请与 Dell 联络 (请参阅 《用户指南》中
•
更换电池 (请参阅 《用户指南》中的
“更换电池”)。
•
如果问题仍然存在,请与
参阅《用户指南》中的“与
Dell
Dell
联络 (请
联络”)。
的“与 Dell 联络”)。
系统信息
注:如果表中未列出您收到的信息,请参阅显示该信息时所运行操作系统或
程序的说明文件。
ALERT!PREVIOUS ATTEMPTS AT BOOTING THIS SYSTEM HAVE FAILED AT
CHECKPOINT
THIS CHECKPOINT AND CONTACT DELL TECHNICAL SUPPORT (警
NOTE
告!引导本系统时,先前的尝试已在检验点 [
题,请记下此检验点,然后与 D
因为同一错误无法完成引导例程 (请参阅 《用户指南》中的 “与 Dell 联络”
以获取帮助)。
[NNNN].FOR HELP IN RESOLVING THIS PROBLEM, PLEASE
NNNN] 处失败。要解决此问
ELL 技术支持联络) — 计算机连续三次
CMOS CHECKSUM ERROR (CMOS 校验和错误)校验和错误 — 可能
的母板故障或 RTC 电池电量不足。更换电池 (请参阅 《用户指南》中的 “更
换电池”或参阅 “与 Dell 联络”以获取帮助)。
CPU FAN FAILURE (CPU 风扇故障) — CPU 风扇故障,请更换 CPU 风
扇(请参阅《用户指南》中的 “卸下处理器”)。
FLOPPY DISKETTE SEEK FAILURE (软盘寻道失败) — 电缆可能已松
动,或计算机配置信息可能与硬件配置不匹配。检查电缆连接 (请参阅 《用户
指南》中的 “与 Dell 联络”以获取帮助)。
DISKETTE READ FAILURE (读取软盘失败) — 软盘可能有缺陷或电缆可
能已松动。更换软盘并 / 或检查电缆连接是否松动。
98 快速参考指南
Page 99

HARD- DISK READ FAILURE (硬盘读取失败) — 在 HDD 引导检测过程中
可能发生 HDD 故障(请参阅《用户指南》中 的 “ 与 Dell 联络”以获取帮助)。
KEYBOARD FAILURE (键盘故障) — 键盘出现故障或键盘电缆已松动(请
参阅 《用户指南》中的 “键盘问题”)。
NO BOOT DEVICE AVAILABLE (无可用的引导设备) — 系统无法检测到
可引导设备或分区。
•
如果软盘驱动器是您的引导设备,请确保电缆已连接且可引导软盘已插入软
盘驱动器中。
•
如果将硬盘驱动器用作引导设备,请确保电缆已连接,并且驱动器已正确安
装并已分区,可以用作引导设备。
•
进入 “
《
System Setup
用户指南
”(系统设置程序)并确保引导顺序信息正确 (请参阅
》中的 “进入系统设置程序”)。
NO TIMER TICK INTERRUPT (无计时器嘀嗒信号中断) — 可能是系统
板上的芯片出现故障或母板出现故障 (请参阅 《用户指南》中的 “与 Dell 联
络”以获取帮助)。
NON- SYSTEM DISK OR DISK ERROR (非系统磁盘或磁盘错误) — 请将
其更换为具有可引导操作系统的软盘,或从 A 驱动器中取出软盘并重新启动计
算机。
NOT A BOOT DISKETTE (不是引导软盘) — 插入可引导软盘并重新启动
计算机。
NOTICE - HARD DRIVE SELF MONITORING SYSTEM HAS REPORTED
A PARAMETER HAS EXCEEDED ITS NORMAL OPERATING RANGE.DELL
THAT
RECOMMENDS
OF RANGE MAY OR MAY NOT INDICATE A POTENTIAL HARD DRIVE
OUT
PROBLEM
运行范围。 D
THAT YOU BACK UP YOUR DATA REGULARLY.A PARAMETER
(注意:硬盘驱动器自我监测系统报告某个参数已超出其正常
ELL 建议您定期备份数据。超出范围的参数可能表示潜在的
硬盘驱动器问题,也可能不表示) — S.M.A.R.T 错误,可能的 HDD 故障。
可以在 BIOS 设置中启用或禁用此功能。
99快速参考指南
Page 100

硬件疑难解答
如果某个设备在操作系统安装时未检测到,或虽然检测到了但配置不正确,则
可以使用 “
Windows XP:
1
单击 “
2
在搜索字段中键入 “
答)并按
3
在“
Hardware Troubleshooter
Start
”(开始)→“
<Enter>
Fix a Problem
”(修复问题)部 分 ,单击“
(硬件疑难解答)。
4
在 “
Hardware Troubleshooter
明该问题的选项,然后单击“
步骤操作。
Windows Vista:
1
单击
Windows Vista“Start
Support
”(帮助和支持)。
hardware troubleshooter
键开始搜索。
”(硬件疑难解答)来解决不兼容问题。
Help and Support
”(帮助和支持)。
”(硬件疑难解
Hardware Troubleshooter
”(硬件疑难解答)列表中,选择最能说
Next
”(下一步)以按照余下的故障排除
”(开始)按钮
,然后单击 “
Help and
”
2
在搜索字段中键入“
<Enter>
并按
3
在搜索结果中,选择最能说明该问题的选项,然后按照余下的故障排除
键开始搜索。
hardware troubleshooter
”(硬件疑难解答)
步骤操作。
Dell 诊断程序
警告: 开始执行本节中的任何步骤之前,请阅读并遵循《产品信息指南》中
的安全说明。
何时使用 Dell 诊断程序
如果您遇到计算机问题,请执行 “锁定和软件问题”(请参阅 《用户指南》
中的“故障排除”)中所述的检查并运行
获得帮助。
您可以通过硬盘驱动器或
Dell
诊断程序。
Drivers and Utilities
参阅 《用户指南》中的 “系统设置程序”检查您计算机的配置信息,确保您
要检测的设备显示在“
System Setup
”(系统设置程序)中并且处于活动状态。
Dell
诊断程序,然后再与
Dell
(驱动及应用程序)光盘来运行
联络
注:Dell 诊断程序只能在 Dell 计算机上使用。
注:运行 Dell 诊断程序之前请打印下列操作步骤。
100 快速参考指南
 Loading...