

Dell S6000 ON Quick Start Manual

Dell Networking S6000-Open
Networking (ON) Installation
Guide
Publication Date: April 2014
Notes, Cautions, and Warnings
NOTE: A NOTE indicates important information that helps you make better use of your computer.
CAUTION: A CAUTION indicates either potential damage to hardware or loss of data and tells you how to
avoid the problem.
WARNING: A WARNING indicates a potential for property damage, personal injury, or death.
Information in this publication is subject to change without notice.
Copyright © 2014 Dell Inc. All rights reserved. This product is protected by U.S. and international copyright and intellectOctober
2014ual property laws. Dell and the Dell logo are trademarks of Dell Inc. in the United States and/or other jurisdictions. All other
marks and names mentioned herein may be trademarks of their respective companies.
April 2014

Contents
1 About this Guide
Related Publications . . . . . . . . . . . . . . . . . . . . . . . . . . . . . . . . . . . . . . . . . . . . . . . . . . 7
2 The S6000-Open Networking (ON) System
Introduction . . . . . . . . . . . . . . . . . . . . . . . . . . . . . . . . . . . . . . . . . . . . . . . . . . . . . . . . . 9
Features . . . . . . . . . . . . . . . . . . . . . . . . . . . . . . . . . . . . . . . . . . . . . . . . . . . . . . . . . . 10
Physical Dimensions. . . . . . . . . . . . . . . . . . . . . . . . . . . . . . . . . . . . . . . . . . . . . . . . . 11
Chassis Ports . . . . . . . . . . . . . . . . . . . . . . . . . . . . . . . . . . . . . . . . . . . . . . . . . . . . . . 11
Determine System Status . . . . . . . . . . . . . . . . . . . . . . . . . . . . . . . . . . . . . . . . . . . . . 11
LED Displays. . . . . . . . . . . . . . . . . . . . . . . . . . . . . . . . . . . . . . . . . . . . . . . . . . . . . . . 11
Basic Installation Requirements . . . . . . . . . . . . . . . . . . . . . . . . . . . . . . . . . . . . . . . . 12
Orderable S6000-ON Components. . . . . . . . . . . . . . . . . . . . . . . . . . . . . . . . . . . . . . 13
3 Site Location and Preparation
Site Selection . . . . . . . . . . . . . . . . . . . . . . . . . . . . . . . . . . . . . . . . . . . . . . . . . . . . . . 15
Cabinet Placement . . . . . . . . . . . . . . . . . . . . . . . . . . . . . . . . . . . . . . . . . . . . . . . . . . 16
Rack Mount. . . . . . . . . . . . . . . . . . . . . . . . . . . . . . . . . . . . . . . . . . . . . . . . . . . . . . . . 16
Ground . . . . . . . . . . . . . . . . . . . . . . . . . . . . . . . . . . . . . . . . . . . . . . . . . . . . . . . . . . . 16
Fans and Airflow . . . . . . . . . . . . . . . . . . . . . . . . . . . . . . . . . . . . . . . . . . . . . . . . . . . . 16
Fan Combinations . . . . . . . . . . . . . . . . . . . . . . . . . . . . . . . . . . . . . . . . . . . . . . . 16
Power . . . . . . . . . . . . . . . . . . . . . . . . . . . . . . . . . . . . . . . . . . . . . . . . . . . . . . . . . . . . 17
Storing Components . . . . . . . . . . . . . . . . . . . . . . . . . . . . . . . . . . . . . . . . . . . . . . . . . 17
4 Install the S6000-ON
Unpack the S6000-ON System. . . . . . . . . . . . . . . . . . . . . . . . . . . . . . . . . . . . . . . . . 19
Package Contents . . . . . . . . . . . . . . . . . . . . . . . . . . . . . . . . . . . . . . . . . . . . . . . 19
Unpacking Steps . . . . . . . . . . . . . . . . . . . . . . . . . . . . . . . . . . . . . . . . . . . . . . . . 20
Install Rack or Cabinet Hardware . . . . . . . . . . . . . . . . . . . . . . . . . . . . . . . . . . . . . . . 20
Rack Mount Safety Considerations . . . . . . . . . . . . . . . . . . . . . . . . . . . . . . . . . . 20
Installing the Dell ReadyRails System. . . . . . . . . . . . . . . . . . . . . . . . . . . . . . . . 21
Configuring a Two-Post Flush-Mount . . . . . . . . . . . . . . . . . . . . . . . . . . . . . . . . 22
Configuring a Two-Post Center-Mount . . . . . . . . . . . . . . . . . . . . . . . . . . . . . . . 23
Configure a Four-Post Thread. . . . . . . . . . . . . . . . . . . . . . . . . . . . . . . . . . . . . . 24
Installing the S6000-ON System. . . . . . . . . . . . . . . . . . . . . . . . . . . . . . . . . . . . . . . . 25
Installing a 1U Front-Rack . . . . . . . . . . . . . . . . . . . . . . . . . . . . . . . . . . . . . . . . . 25
Attaching the Ground Cable . . . . . . . . . . . . . . . . . . . . . . . . . . . . . . . . . . . . . . . . . . . 26
Installing an AC Power Supply. . . . . . . . . . . . . . . . . . . . . . . . . . . . . . . . . . . . . . 27
Installing QSFP+ Optics . . . . . . . . . . . . . . . . . . . . . . . . . . . . . . . . . . . . . . . . . . . . . . 29
Removing QSFP+ Optics. . . . . . . . . . . . . . . . . . . . . . . . . . . . . . . . . . . . . . . . . . 29
| 3

Power Up the S6000-ON System . . . . . . . . . . . . . . . . . . . . . . . . . . . . . . . . . . . . . . . 29
Power Up Sequence . . . . . . . . . . . . . . . . . . . . . . . . . . . . . . . . . . . . . . . . . . . . . 30
5 Power Supplies
Components . . . . . . . . . . . . . . . . . . . . . . . . . . . . . . . . . . . . . . . . . . . . . . . . . . . . . . . 31
Installing an AC Power Supply . . . . . . . . . . . . . . . . . . . . . . . . . . . . . . . . . . . . . . . . . 32
Replacing an AC Power Supply . . . . . . . . . . . . . . . . . . . . . . . . . . . . . . . . . . . . . . . . 33
After Installing the S6000-ON . . . . . . . . . . . . . . . . . . . . . . . . . . . . . . . . . . . . . . . . . . 33
6 Fans
www.dell.com | support.dell.com
Components . . . . . . . . . . . . . . . . . . . . . . . . . . . . . . . . . . . . . . . . . . . . . . . . . . . . . . . 35
Installing a Fan Module. . . . . . . . . . . . . . . . . . . . . . . . . . . . . . . . . . . . . . . . . . . . . . . 36
Replacing a Fan Module. . . . . . . . . . . . . . . . . . . . . . . . . . . . . . . . . . . . . . . . . . . . . . 36
7 Management Ports
Accessing the RS-232 Console Port. . . . . . . . . . . . . . . . . . . . . . . . . . . . . . . . . . . . . 37
Accessing the Console Port. . . . . . . . . . . . . . . . . . . . . . . . . . . . . . . . . . . . . . . . 38
Accessing the USB-B Console Port . . . . . . . . . . . . . . . . . . . . . . . . . . . . . . . . . . . . . 38
8 Specifications
Chassis Physical Design. . . . . . . . . . . . . . . . . . . . . . . . . . . . . . . . . . . . . . . . . . . . . . 41
Environmental Parameters . . . . . . . . . . . . . . . . . . . . . . . . . . . . . . . . . . . . . . . . . . . . 41
Power Requirements. . . . . . . . . . . . . . . . . . . . . . . . . . . . . . . . . . . . . . . . . . . . . . . . . 42
AC Input Specification . . . . . . . . . . . . . . . . . . . . . . . . . . . . . . . . . . . . . . . . . . . . 42
IEEE Standards. . . . . . . . . . . . . . . . . . . . . . . . . . . . . . . . . . . . . . . . . . . . . . . . . . . . . 42
Agency Compliance . . . . . . . . . . . . . . . . . . . . . . . . . . . . . . . . . . . . . . . . . . . . . . . . . 42
Network Equipment Building Systems (NEBS) Compliance . . . . . . . . . . . . . . . 42
USA Federal Communications Commission (FCC) Statement . . . . . . . . . . . . . 43
Canadian Department of Communication Statement . . . . . . . . . . . . . . . . . . . . 43
European Union EMC Directive Conformance Statement. . . . . . . . . . . . . . . . . 43
Japan: VCCI Compliance for Class A Equipment . . . . . . . . . . . . . . . . . . . . . . . 44
Korean Certification of Compliance . . . . . . . . . . . . . . . . . . . . . . . . . . . . . . . . . . 44
Safety Standards and Compliance Agency Certifications . . . . . . . . . . . . . . . . . 45
Electromagnetic Compatibility (EMC) . . . . . . . . . . . . . . . . . . . . . . . . . . . . . . . . 45
Product Recycling and Disposal . . . . . . . . . . . . . . . . . . . . . . . . . . . . . . . . . . . . 46
4 |
9 Technical Support
The iSupport Website . . . . . . . . . . . . . . . . . . . . . . . . . . . . . . . . . . . . . . . . . . . . . . . . 47
Accessing iSupport Services . . . . . . . . . . . . . . . . . . . . . . . . . . . . . . . . . . . . . . . 47
Contacting the Technical Assistance Center . . . . . . . . . . . . . . . . . . . . . . . . . . . . . . 48

Requesting a Hardware Replacement . . . . . . . . . . . . . . . . . . . . . . . . . . . . . . . . . . . 48
| 5

www.dell.com | support.dell.com
6 |

1
About this Guide
This guide provides site preparation recommendations, step-by-step procedures for rack mounting and
desk mounting, and connecting to a power source.
CAUTION: To avoid electrostatic discharge (ESD) damage, wear grounding wrist straps when handling this
equipment.
WARNING: Only trained and qualified personnel can install this equipment. Read this guide before you install
and power up this equipment. This equipment contains two power cords. Disconnect both power cords before
servicing.
WARNING: This equipment contains optical transceivers, which comply with the limits of Class 1 laser
radiation.
WARNING: When no cable is connected, visible and invisible laser radiation may be emitted from the
aperture of the optical transceiver ports. Avoid exposure to laser radiation and do not stare into open
apertures.
Related Publications
For more information about the S6000-ON system, refer to the S6000-Open Networking (ON) Getting
Started Guide.
NOTE: For the most recent documentation and software, visit iSupport at
http://www.dell.com/support
.
About this Guide | 7

www.dell.com | support.dell.com
8 | About this Guide
2
The S6000-Open Networking (ON) System
This chapter contains general features, capabilities, and physical configurations the S6000-ON supports.
Introduction
The S6000-ON is a fully featured switch/router one rack unit (RU) system where you require 10Gb and/
or 40Gb connections. It contains 32 ports of 40G that you can use to create a configuration of 96 ports of
10G small form-factor pluggable plus (SFP+) (using breakout cables) and eight ports of 40G quad small
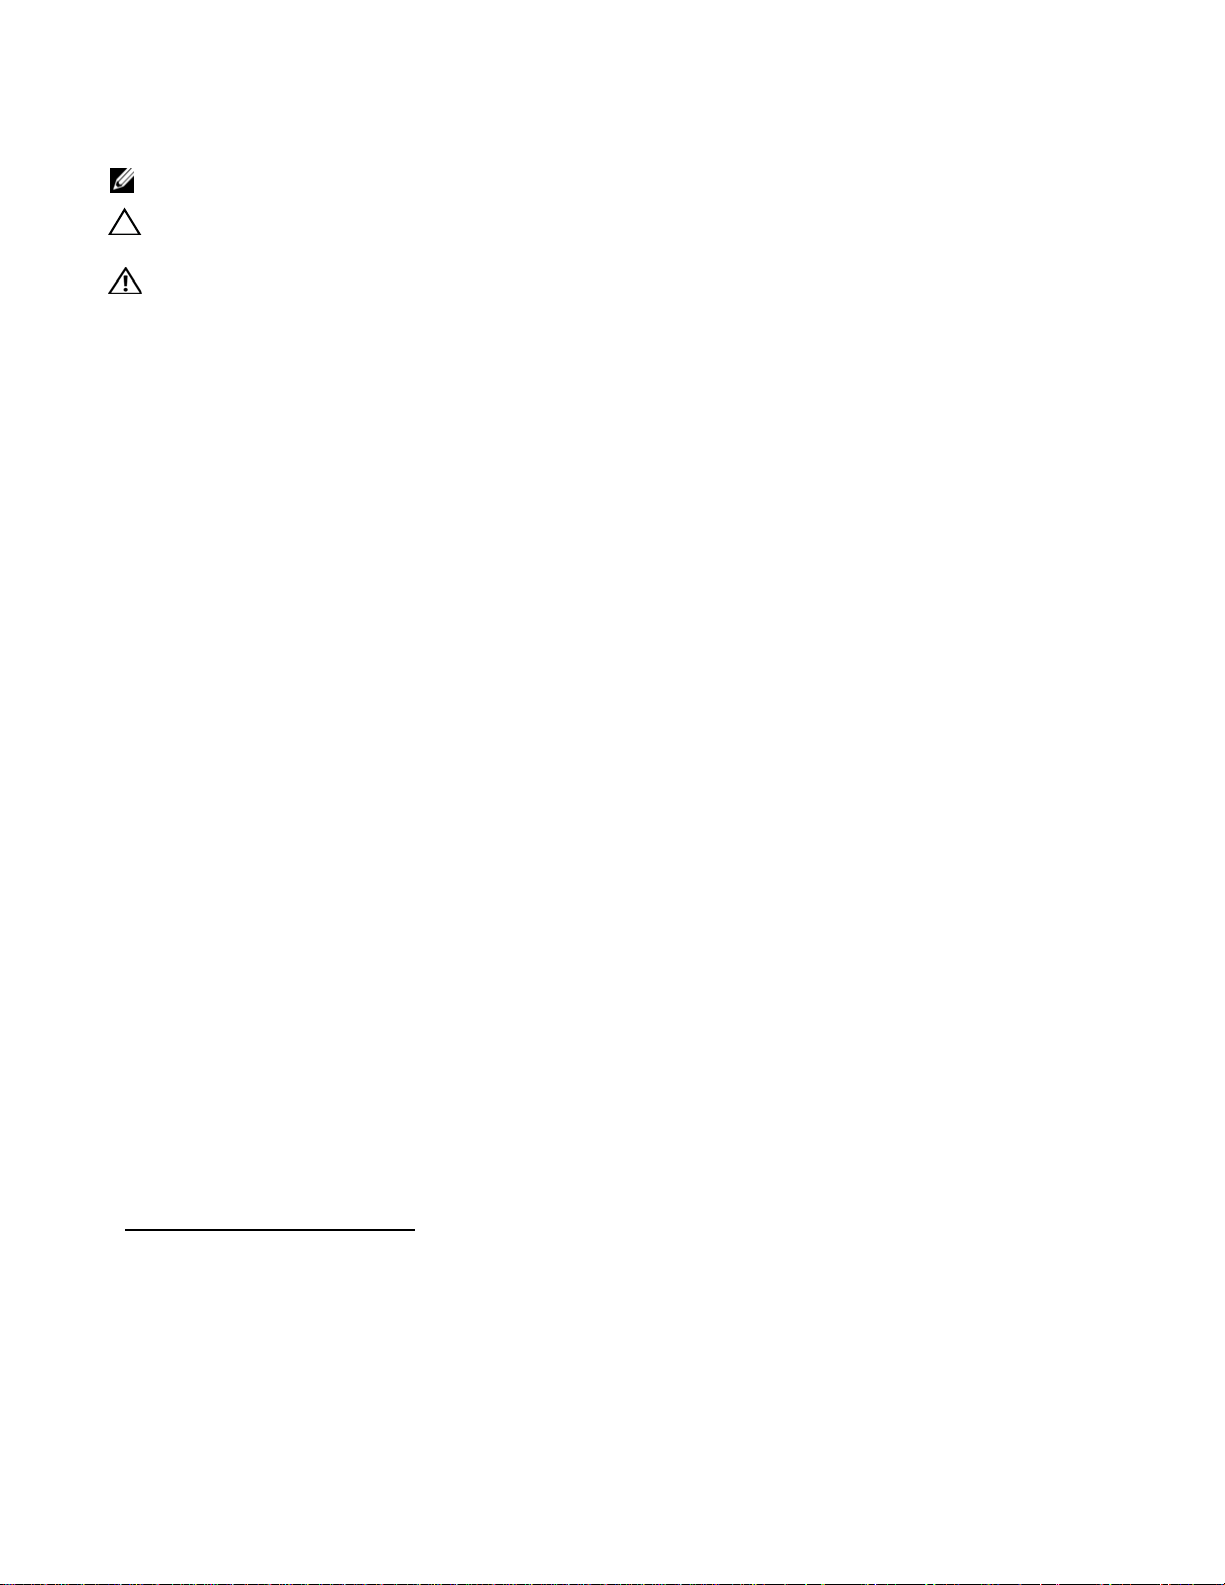
form-factor pluggable plus (QSFP+). The S6000-ON power supply unit (PSU) side (
the PSU and fan modules.
Figure 2-1. S6000-ON PSU-Side View
Figure 2-1
) contains
1 - PSU 1
2 - Fan Modules 1-3
3 - PSU 2
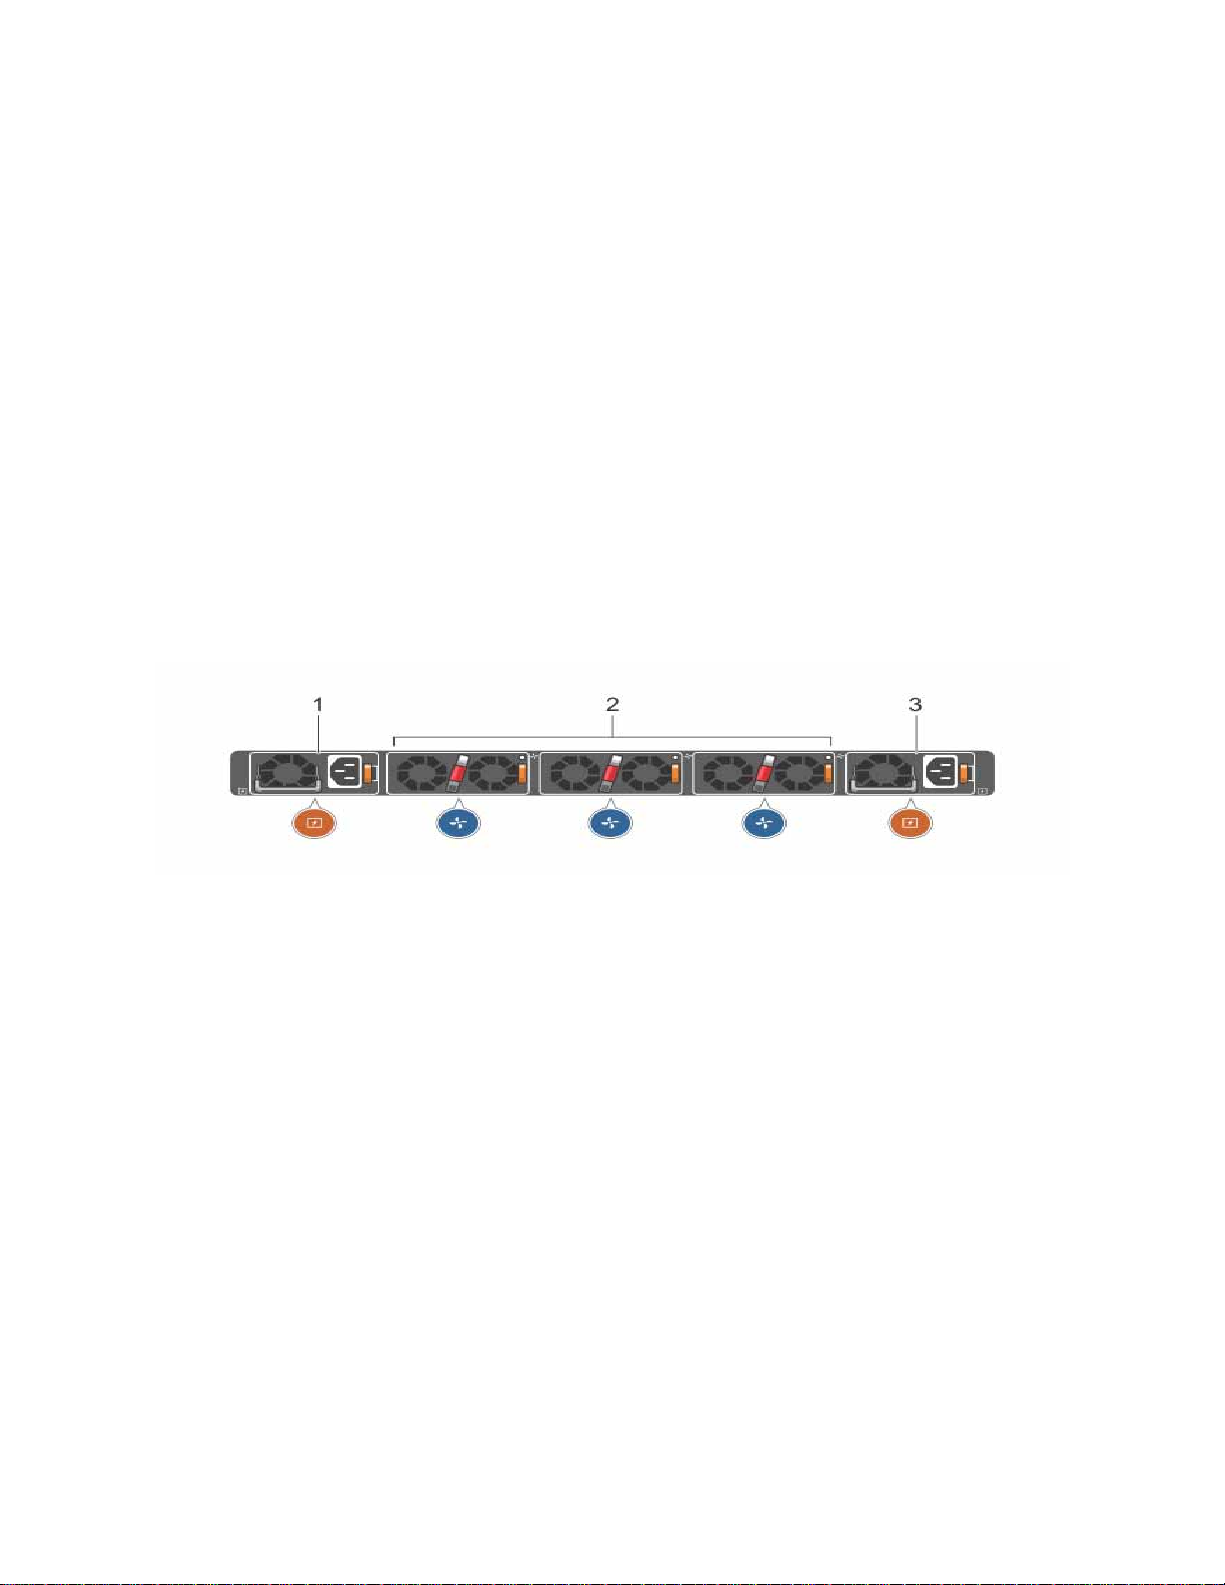
The S6000-ON input/output (I/O) side (
• Thirty-two fixed QSFP+ ports
• One USB 2.0 port
• One USB-B serial console port
• One RS-232 serial console port
• One 10/100/1000BaseT (RJ-45) Ethernet management port
Figure 2-2
) includes:
The S6000-Open Networking (ON) System | 9
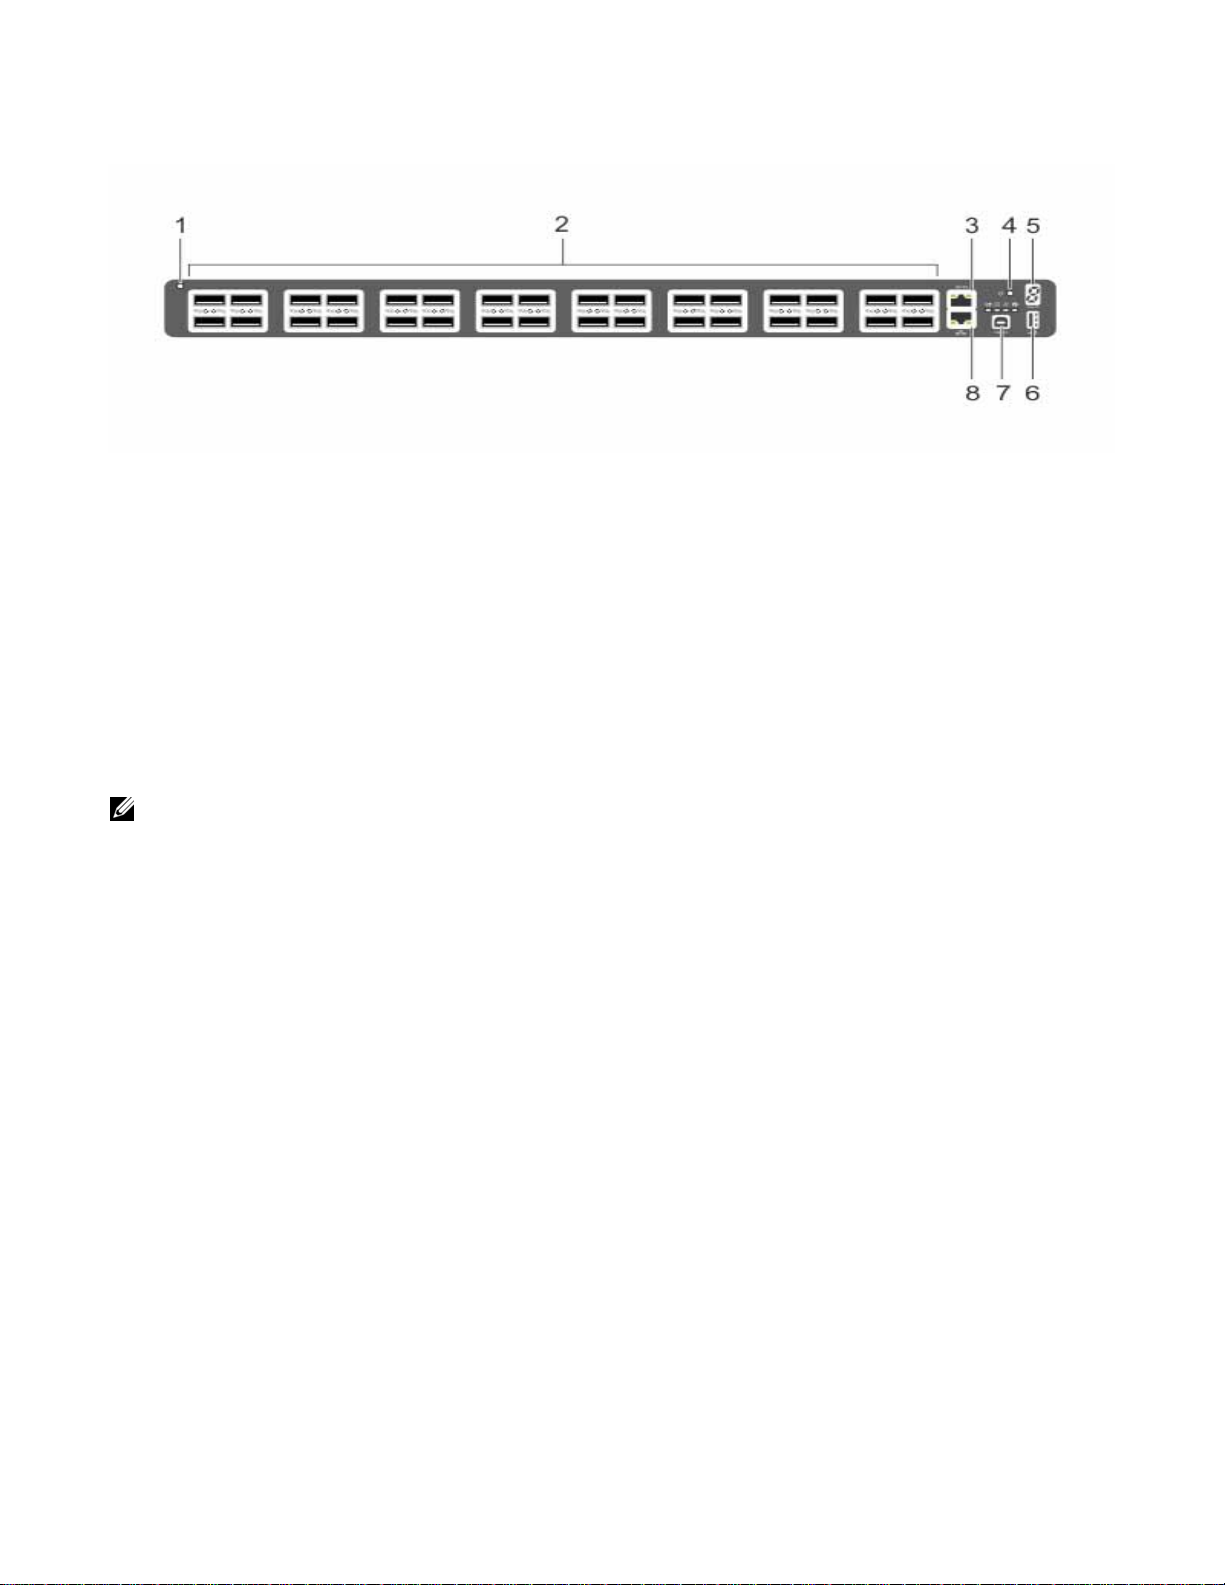
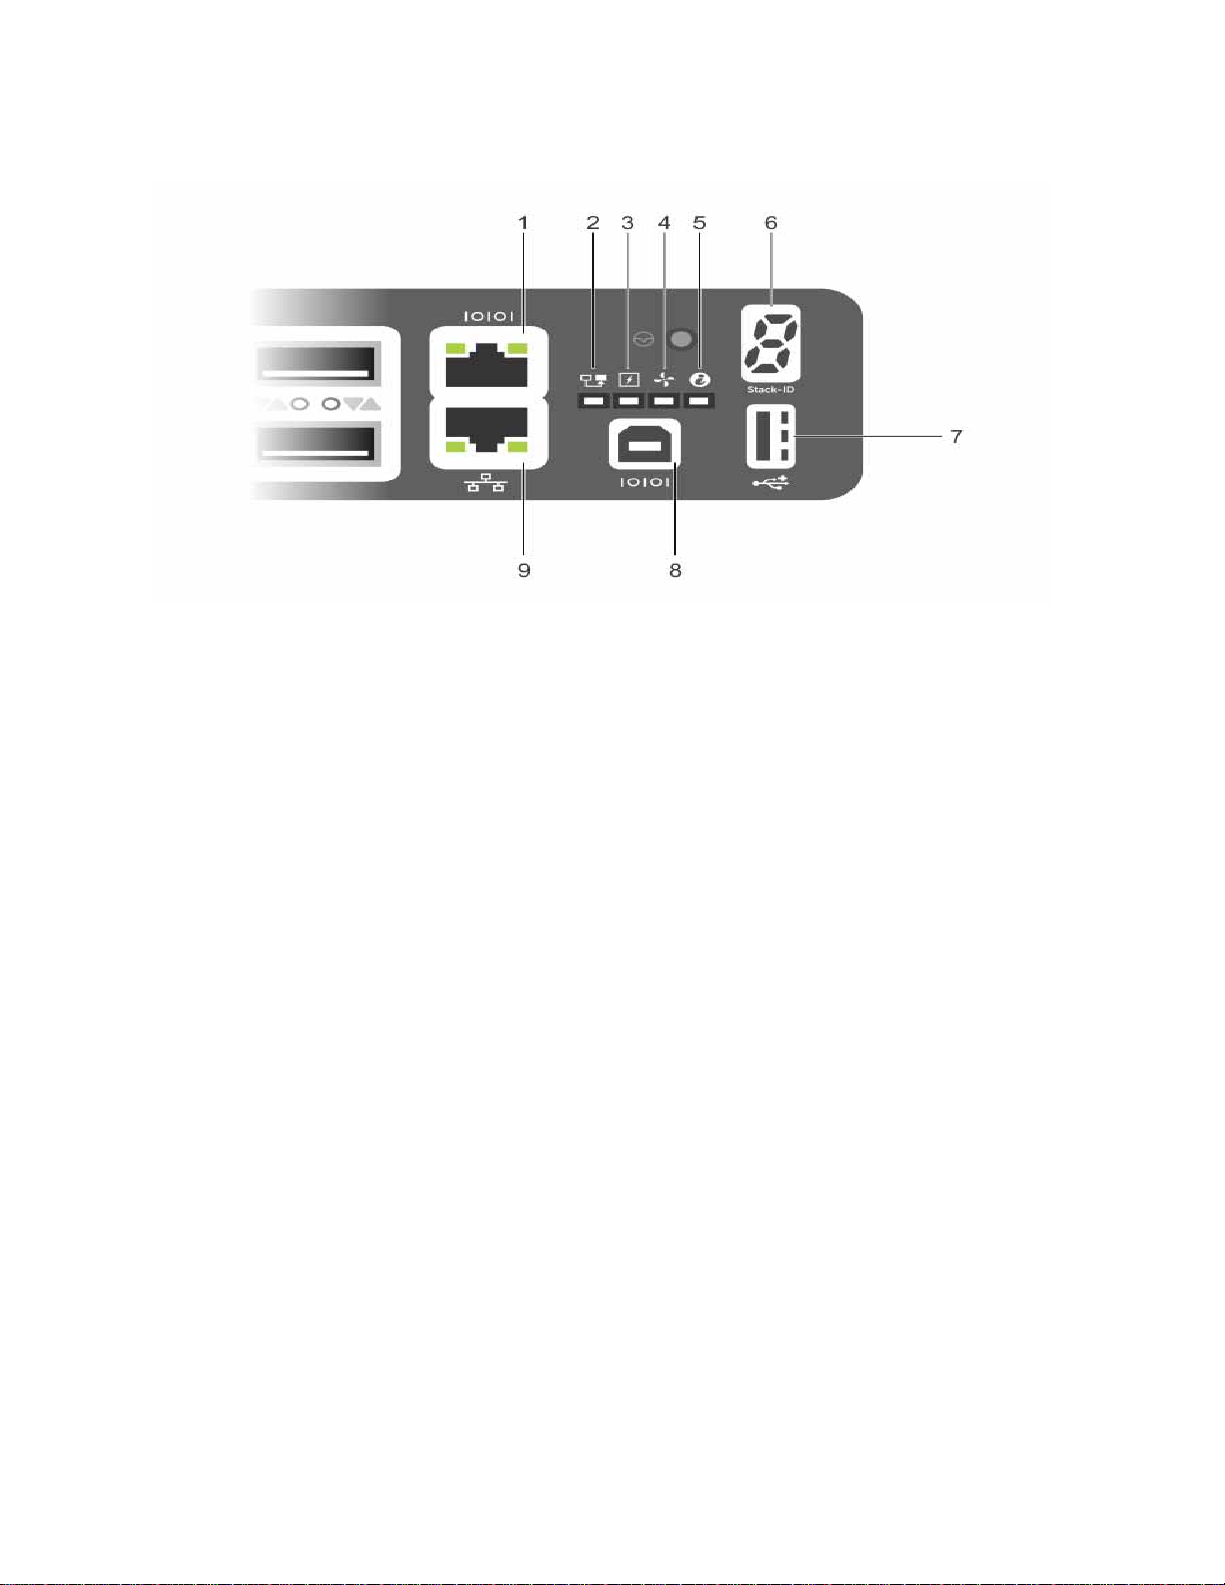
Figure 2-2. S6000-ON I/O-Side View
1 - System LED
www.dell.com | support.dell.com
2 - Thirty-two QSFP+ Ports
3 - Serial Console
4 - Reset
5 - Stack ID
6 - USB-A
7 - USB-B Console
8 - Management
NOTE: The system light emitting diodes (LEDs) are on the I/O side. The fan tray power indicators are on the
PSU side.
Features
The S6000-ON has the following features:
• One universal serial bus (USB-A) port
• One USB-B console port
• Thirty-two 40Gbps QSFP+ ports
• On-board central processing unit (CPU) system
• Temperature monitoring
• Software-readable thermal monitor
• Real time clock (RTC) support
• Hot-plugging redundant power supply
• Current monitoring for power management
• Removable fan
• Standard 1U chassis high
10 | The S6000-Open Networking (ON) System
Physical Dimensions
The S6000-ON has the following physical dimensions:
• 434 x 460 x 43.5 mm (W x D x H)
• 17.09 x 18.11 x 1.71 inches (W x D x H)
Chassis Ports
The following is a list of the standard ports located on each S6000-ON chassis:
• Serial RS-232 port (RJ-45 type)
• Out of band (OOB) Ethernet management port (RJ-45 type)
• Thirty-two 40Gbps QSFP+ ports
• One universal serial bus port (USB Type-A)
Determine System Status
You can view S6000-ON status information with the system LEDs.
LED Displays
As shown in
chassis. For LED information, refer to your third-party operating software documentation.
Figure 2-3. PSU and Fan Tray LEDs
1- Fan Tray 1-3 LEDs
2 - PSU 1-2 LEDs
Figure 2-3
, the S6000-ON includes LED displays on both the I/O and PSU side of the
The S6000-Open Networking (ON) System | 11
www.dell.com | support.dell.com
1 - Serial Console
2 - Master LED
3 - Power LED
4 - Fan Status LED
5 - Locator LED
6 - Stack ID
7 - USB-A
8 - USB-B Console
9 - Management
Basic Installation Requirements
Detailed installation instructions for the S6000-ON are provided in
Install the S6000-ON
of the S6000-ON:
• S6000-ON chassis
• AC cables to connect the AC power source to each of the chassis’ AC power supplies (country/regional
configured)
• Mounting brackets for rack installation (included)
• Screws for rack installation and #1 and #2 Phillips screwdrivers (not included)
• Ground cable (not included, optional)
• Ground cable screws (included)
• Copper/fiber cables
12 | The S6000-Open Networking (ON) System
. However, here is an initial list of components required for a successful installation
Site Location and Preparation
and

Optional components for installation:
• Additional power supply units
• Additional fan modules
• Additional mounting brackets (if installing in a 4-post rack or cabinet)
Orderable S6000-ON Components
You can order the S6000-ON system in several different configurations. Also, you can order optional
modules and optics separately.
The following is a list of different configurations and modules:
• S6000-ON AC Normal Airflow: thirty-two 40Gbps QSFP+ ports, two AC power supplies, and three fan
subsystems (airflow from the I/O side to the PSU side)
• S6000-ON AC Reverse Airflow: thirty-two 40Gbps QSFP+ ports, two AC power supplies, and three fan
subsystems Fan with airflow from the I/O side to the PSU side
• Fan with airflow from the PSU side to the I/O side
• AC Power supply with airflow from the I/O side to the PSU side
• AC Power supply with airflow from the PSU side to the I/O side
The S6000-Open Networking (ON) System | 13

www.dell.com | support.dell.com
14 | The S6000-Open Networking (ON) System

3
Site Location and Preparation
The S6000-ON is suitable for installation as part of a common bond network (CBN). It can be installed
in:
• Network telecommunication facilities
• Data centers
• Other locations where the national electric code (NEC) applies
This chapter contains the following sections:
• Site Selection
• Cabinet Placement
• Rack Mount (Optional)
• Ground (Optional)
• Fans and Airflow
• Power
• Storing Components
NOTE: Install the S6000-ON system into a rack or cabinet before installing any optional components.
Site Selection
Install the S6000-ON in an restricted access area. A restricted access area is one in which service
personnel can only gain access using a special tool, lock, key, or other means of security and access is
controlled by the authority responsible for the location.
Ensure that the area where the S6000-ON system is installed meets the following safety requirements:
• Near an adequate power source. Connect the system to the appropriate branch circuit protection as
defined by your local electrical codes.
• Environmental temperature between 32° to 113°F (0° to 45°C).
• Relative humidity that does not exceed 90 percent non-condensing.
• In a dry, clean, well-ventilated and temperature-controlled room, away from heat sources such as hot air
vents or direct sunlight.
• Away from sources of severe electromagnetic noise.
• Positioned in a rack or cabinet, or on a desktop with adequate space in the front, rear, and sides of the
S6000-ON for proper ventilation and access.
Site Location and Preparation | 15
 Loading...