

Dell PowerConnect B-DCX-4s Port Side Exhaust Kit Installation Manual

53-1001802-01
January 31, 2010
Port Side Exhaust Kit
Installation Procedure
Supporting PowerConnect B-DCX-4S Backbone
53-1001802-01
*53-1001802-01*
Notes, Cautions, and Warnings
NOTE
CAUTION
CAUTION
DANGER
A NOTE indicates important information that helps you make better use of your computer.
See the safety and regulatory information that shipped with your system. For additional regulatory
information, see the Regulatory Compliance Homepage on www.dell.com at the following location:
www.dell.com/regulatory_compliance.
A CAUTION indicates potential damage to hardware or loss of data if instructions are not followed.
A DANGER indicates a potential for property damage, personal injury, or death.
____________________
Information in this document is subject to change without notice.
© 2009 Dell Inc. All rights reserved.
Reproduction of these materials in any manner whatsoever without the written permission of Dell Inc. is strictly forbidden.
Trademarks used in this text: Dell, the DELL logo, Inspiron, Dell Precision, Dimension, OptiPlex, Latitude, PowerEdge, PowerVault, PowerApp, Dell
OpenManage and the YOURS IS HERE
in the U.S. and other countries; Microsoft, Windows, Windows Server, MS-DOS and Windows Vista are either trademarks or registered trademarks
of Microsoft Corporation in the United States and/or other countries.
Other trademarks and trade names may be used in this document to refer to either the entities claiming the marks and names or their products.
Dell Inc. disclaims any proprietary interest in trademarks and trade names other than its own.
Regulatory Model Codes: Brocade DCX-4S, Brocade DCX
2 Port-Side Exhaust Kit Installation Procedure
logo are trademarks of Dell Inc.; Intel, Pentium, and Celeron are registered trademarks of Intel Corporation
53-1001802-01
In this guide
CAUTION
NOTE
ATTENTION
•Introduction. . . . . . . . . . . . . . . . . . . . . . . . . . . . . . . . . . . . . . . . . . . . . . . . . . . . 3
•Safety . . . . . . . . . . . . . . . . . . . . . . . . . . . . . . . . . . . . . . . . . . . . . . . . . . . . . . . . 3
•Installation guidelines . . . . . . . . . . . . . . . . . . . . . . . . . . . . . . . . . . . . . . . . . . . 3
•Installing the DCX-4S in equipment cabinet. . . . . . . . . . . . . . . . . . . . . . . . . . 4
Introduction
Air flows into the PowerConnect B-DCX-4S Backbone through its non-port side and out through the exhaust vent on
the side of the unit, The Port-Side Exhaust Mount Kit is designed to route this airflow out the exhaust vents on the
port side of the unit while mounted in the equipment cabinet. This document provides instructions to install a
PowerConnect B-DCX-4S Backbone in a 19 in. (48.26 cm) Electronic Industries Association (EIA) cabinet using the
following Brocade Port-Side Exhaust Mount Kits:
• Kit for cabinet rail-to-rail depth of 27 to 31 in. (68.58 to 78.74 cm).
• Kit for cabinet rail-to-rail depth of 18 to 24 in. (45.72 to 60.96 cm).
Safety
Observe the caution notice in this manual. The caution notice has an ID, which is displayed in parentheses (C015).
Use this ID to locate the translation of this caution notice in the Brocade Product Safety Notices.
Use safe lifting practices when moving the product. (C015)
A fully populated PowerConnect B-DCX-4S weighs 103.50 kg (228.20 lb) with four FC8-48 port cards installed (192
ports) and requires a hydraulic or assisted lift to install it.
Installation guidelines
To ensure adequate cooling, install the chassis with the air intake (nonport side) facing the cool-air aisle.
Follow these general installation guidelines:
• The shelf in the kit is 1 U high, so you need a total of 9 U of cabinet space to install the shelf and the
PowerConnect B-DCX-4S Backbone. 1U is equal to 4.45 cm (1.75 in.).
• To allow the quick removal of all power from the chassis, use AC power sources that are easily accessible and
located near the chassis.
• Verify that the additional weight of the chassis does not exceed the weight limits of the cabinet.
Port-Side Exhaust Kit Installation Procedure 3
53-1001802-01

• Plan for cable management before installing the chassis. Cables can be managed in a variety of ways, such as
CAUTION
by routing cables below the chassis, to either side of the chassis, through cable channels on the sides of the
cabinet, or using patch panels. Refer to the product’s DCX-4S Backbone Hardware Reference Manual for
specific information.
• Ensure that one or two dedicated electrical branch circuits with the following characteristics are available:
- 200-240 VAC, 50-60 Hz (refer to the corresponding Hardware Reference Manual for additional electrical
specifications)
- Protected by a circuit breaker in accordance with local electrical codes
- Supply circuit, line fusing, and wire size are adequate, according to the electrical rating on the chassis
nameplate
- Grounded outlets are installed by a licensed electrician and compatible with the power cords
- Located close to the enterprise-class platform chassis and easily accessible
• To maximize fault tolerance, connect each power cord to a separate power source.
• Ensure that all equipment installed in the cabinet is grounded through a reliable branch circuit connection. Do
not rely on a secondary connection to a branch circuit, such as a power strip.
• Ensure that the product fans have access to a total minimum airflow of 350 cubic ft (9.91 cubic meters) per
minute. Do not block intake vents. Allow for a minimum of 14 in. (35.66 cm) clearance.
• Ensure that the air temperature on the air intake side is less than 104
operation.
o
Fahrenheit (40o Celsius) during
Installing the DCX-4S in equipment cabinet
Use the following instructions to install the DCX-4S in an equipment cabinet using the Port-Side Exhaust Kit.
Time required
Allow approximately one hour to unpack and install a chassis in a cabinet.
Tools required
The following tools are required when installing the rack mount kit:
• Torque wrench with #2 Phillips screwdriver tip
• Flathead screwdriver
• Hydraulic or assisted lift with a minimum raise of 55 in. (140 cm) and a minimum capacity of 250 lbs (113 kg).
Unpacking the PowerConnect B-DCX-4S
Use the following procedure to unpack the PowerConnect B-DCX-4S.
Use safe lifting practices when moving the product. (C015)
4 Port-Side Exhaust Kit Installation Procedure
53-1001802-01

NOTE
A fully populated PowerConnect B-DCX-4S weighs 103.50 kg (228.20 lb) with four FC8-48 port cards installed (192
ports) and requires a hydraulic or assisted lift to install it.
1. Unpack the PowerConnect B-DCX-4S.
a. Cut the bands that encircle the packaging.
b. Remove the lid and the kits and foam from the top of the chassis.
c. Lift the cardboard box off the chassis and remove the plastic bag from around the chassis.
Save the packing materials for use when returning the old chassis.
d. Leave the chassis on top of the plastic shipping tray if the chassis must be transported to the installation
location.
2. Use a pallet jack or other assisted lift to transport the new chassis to the installation area. Doorways must be
wider than 36 in. (91 cm) to accommodate the chassis on the pallet.
3. Remove the Port-Side Exhaust kit, accessory kit, packing foam, and antistatic plastic from the chassis and set
aside.
Installing with 27 to 31 in. (68.58 to 78.74 cm) kit
Use the following procedures to install the DCX-4S Backbone in a cabinet with rail-to-rail depth of 27 to 31 in.(68.58
to 78.74 cm). Be sure to use the 27-31 in. Port-Side Exhaust Kit for this installation.
Parts list
The following parts list refers to items illustrated in Figure 1 on page 6.
TABLE 1 Hardware for Port-Side Exhaust Kit for 27 to 31 in. (68.58 to 78.74 cm) cabinets
Item Description Quantity
ATop rail 1
BDuct 1
CShelf 1
D 10-32 x .5 in. (1.27 cm) Phillips screw (blue Loctite on threads) 12
E 10-32 x .63 in.(1.60 cm) Phillips screw with square cone washer 12
F 10-32 clip nut for cabinets that have rails with round holes 8
G 10-32 retainer nut for cabinets that have rails with square holes 8
H Alignment washer for cabinets that have rails with square holes 12
I 6-32 x .25 in. (.635 cm) Phillips screw 2
Port-Side Exhaust Kit Installation Procedure 5
53-1001802-01
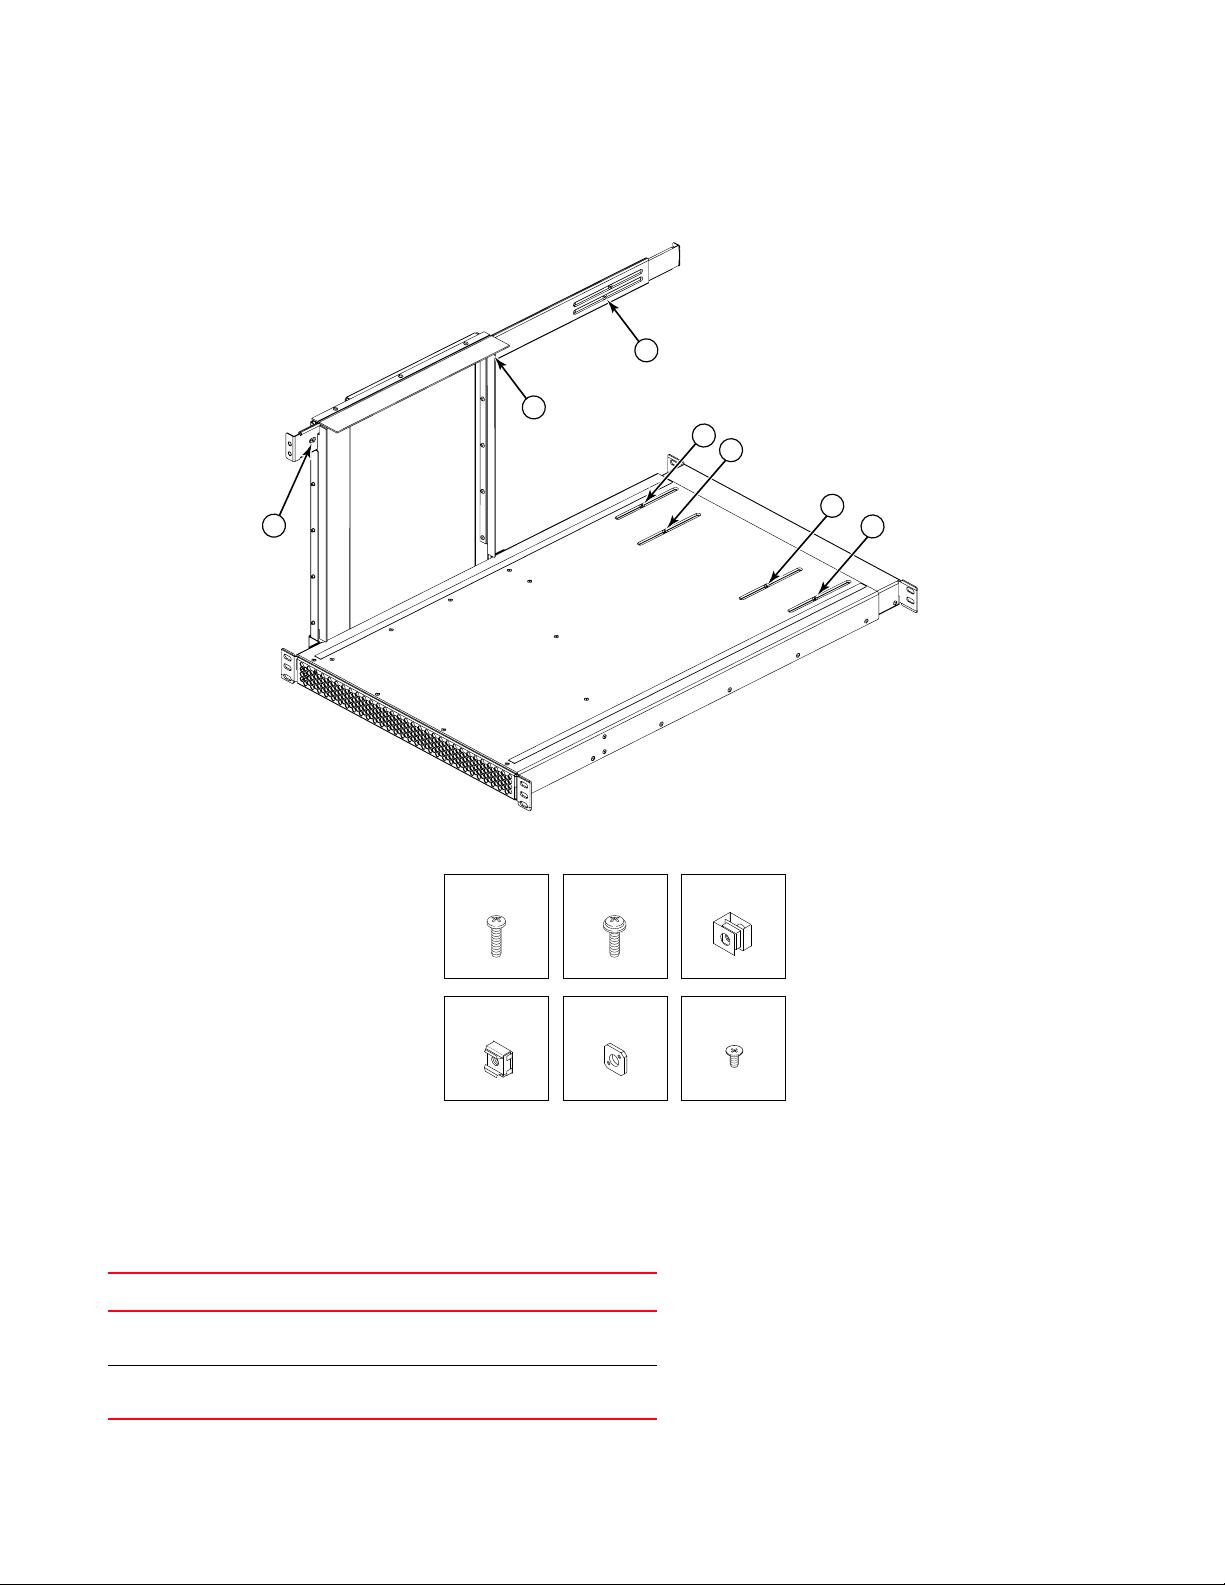
FIGURE 1 Port-Side Exhaust Kit assembly for 27 to 31 in. (68.58 to 78.74 cm) cabinets
10-32 Clip Nut
D
B
C
A
10-32 x .5"
H
G
10-32 Retainer Nut Alignment Washer
I
E
Port Side
(Exhaust)
F
10-32 x .63"
6-32 x .25"
I-1
I-2
I-3
I-4
I-5
I-6
I-7
Torque requirements
Use the following torque settings when tightening screws that secure the rack mount kit and DCX-4S to the
equipment cabinet.
TABLE 2 Torque requirements for mounting screws
Screw size Torque
6-32 x .25 in. (.635 cm)
Phillips screw
10-32 x .63 in.(1.60 cm)
Phillips screw
8.75 in.-lbs (10 cm-kg)
32 in.-lbs (36.86 cm-kg)
6 Port-Side Exhaust Kit Installation Procedure
53-1001802-01
 Loading...