

Dell PN557W User Manual

Dell Active Pen
PN557W
User’s Guide
Regulatory Model: PN556W
June 2020
Rev. A02

Notes, cautions, and warnings
NOTE: A NOTE indicates important information that helps you make better use of your product.
CAUTION: A CAUTION indicates either potential damage to hardware or loss of data and tells you how to avoid the
problem.
WARNING: A WARNING indicates a potential for property damage, personal injury, or death.
© 2018-2020 Dell Inc. or its subsidiaries. All rights reserved. Dell, EMC, and other trademarks are trademarks of Dell Inc. or its subsidiaries. Other
trademarks may be trademarks of their respective owners.

Contents
Chapter 1: What’s in the box............................................................................................................ 4
Chapter 2: Features........................................................................................................................ 5
Chapter 3: Setting up your Dell Active Pen........................................................................................6
Installing batteries..................................................................................................................................................................6
Installing the AAAA battery.............................................................................................................................................6
Removing the AAAA battery.......................................................................................................................................... 6
Installing the coin-cell batteries......................................................................................................................................7
Removing the coin-cell battery holder.......................................................................................................................... 8
Pairing with a Bluetooth device........................................................................................................................................... 8
Chapter 4: Active Pen Control Panel............................................................................................... 10
Installing Active Pen Control Panel.................................................................................................................................... 10
Using Active Pen Control Panel.......................................................................................................................................... 11
Chapter 5: Holding the Dell Active Pen............................................................................................ 13
Chapter 6: Specifications............................................................................................................... 14
Chapter 7: Troubleshooting............................................................................................................ 15
Chapter 8: Statutory information.................................................................................................... 17
Chapter 9: Regulatory statement....................................................................................................18
Chapter 10: Getting help and contacting Dell................................................................................... 19
Contents 3

1
What’s in the box
Figure 1. Contents in the box
Dell Active Pen 2. lanyard
1.
3. coin-cell batteries (2) 4. AAAA battery
5. manuals
NOTE: For warranty purpose, note down the PPID number on the box or retain the box.
Figure 2. Noting down the PPID number
4 What’s in the box

Features
Table 1. Features and functionality of the product
Feature Functionality
1 Tip Move the tip over a touch screen to move the pointer. Enables you to write,
draw, and select objects.
2 Bottom barrel button Press and hold this button and move the tip over the area you want to erase.
To change the functionality of this button, see Active Pen Control Panel.
3 Top barrel button Press this button to open the context menu or perform a right-click. To change
the functionality of this button, see Active Pen Control Panel.
4 Bluetooth-pairing light Blinking white light indicates the pairing mode is enabled. A solid white light
indicates the pairing is complete. For information on pairing the pen with a
Bluetooth device, see Pairing with a Bluetooth device.
2
5 Top button
• Press and hold for 3.5 seconds to enable pairing mode.
• Press and release to open OneNote.
NOTE: This feature works even when your device screen is
locked.
• Press twice in succession to capture a screenshot.
• Press and hold or press twice in succession to wake up your computer or
tablet from connected standby mode.
NOTE: This feature is only available on devices that support
connected standby feature.
• In presentation mode, press and hold to go to the next slide and press
twice at short intervals to go to the previous slide.
NOTE: This feature is only available after installing the Active
Pen Control Panel. For instructions on installing the Active Pen
Control Panel, see Installing Active Pen Control Panel.
The new Active Pen Control Panel enables the top button to be programmed
to launch specific applications listed in the content menu, the default
applications launched from the top button are:
• Single Press — Launch OneNote
• Double Press — Screen Sketch
• Long Press — Launch Cortana
NOTE: These functions are available only in Windows 10 and
Windows 10 Anniversary.
NOTE: These functions are available only after installing the Active
Pen Control Panel. For instructions on installing the Active Pen
Control Panel, see Installing Active Pen Control Panel.
Features 5
3
Setting up your Dell Active Pen
Installing batteries
Dell Active Pen uses one AAAA battery and two coin-cell batteries.
The AAAA battery provides power for the tip and the barrel buttons. The coin-cell batteries provide power for Bluetooth functionality and
top button quick-launch features.
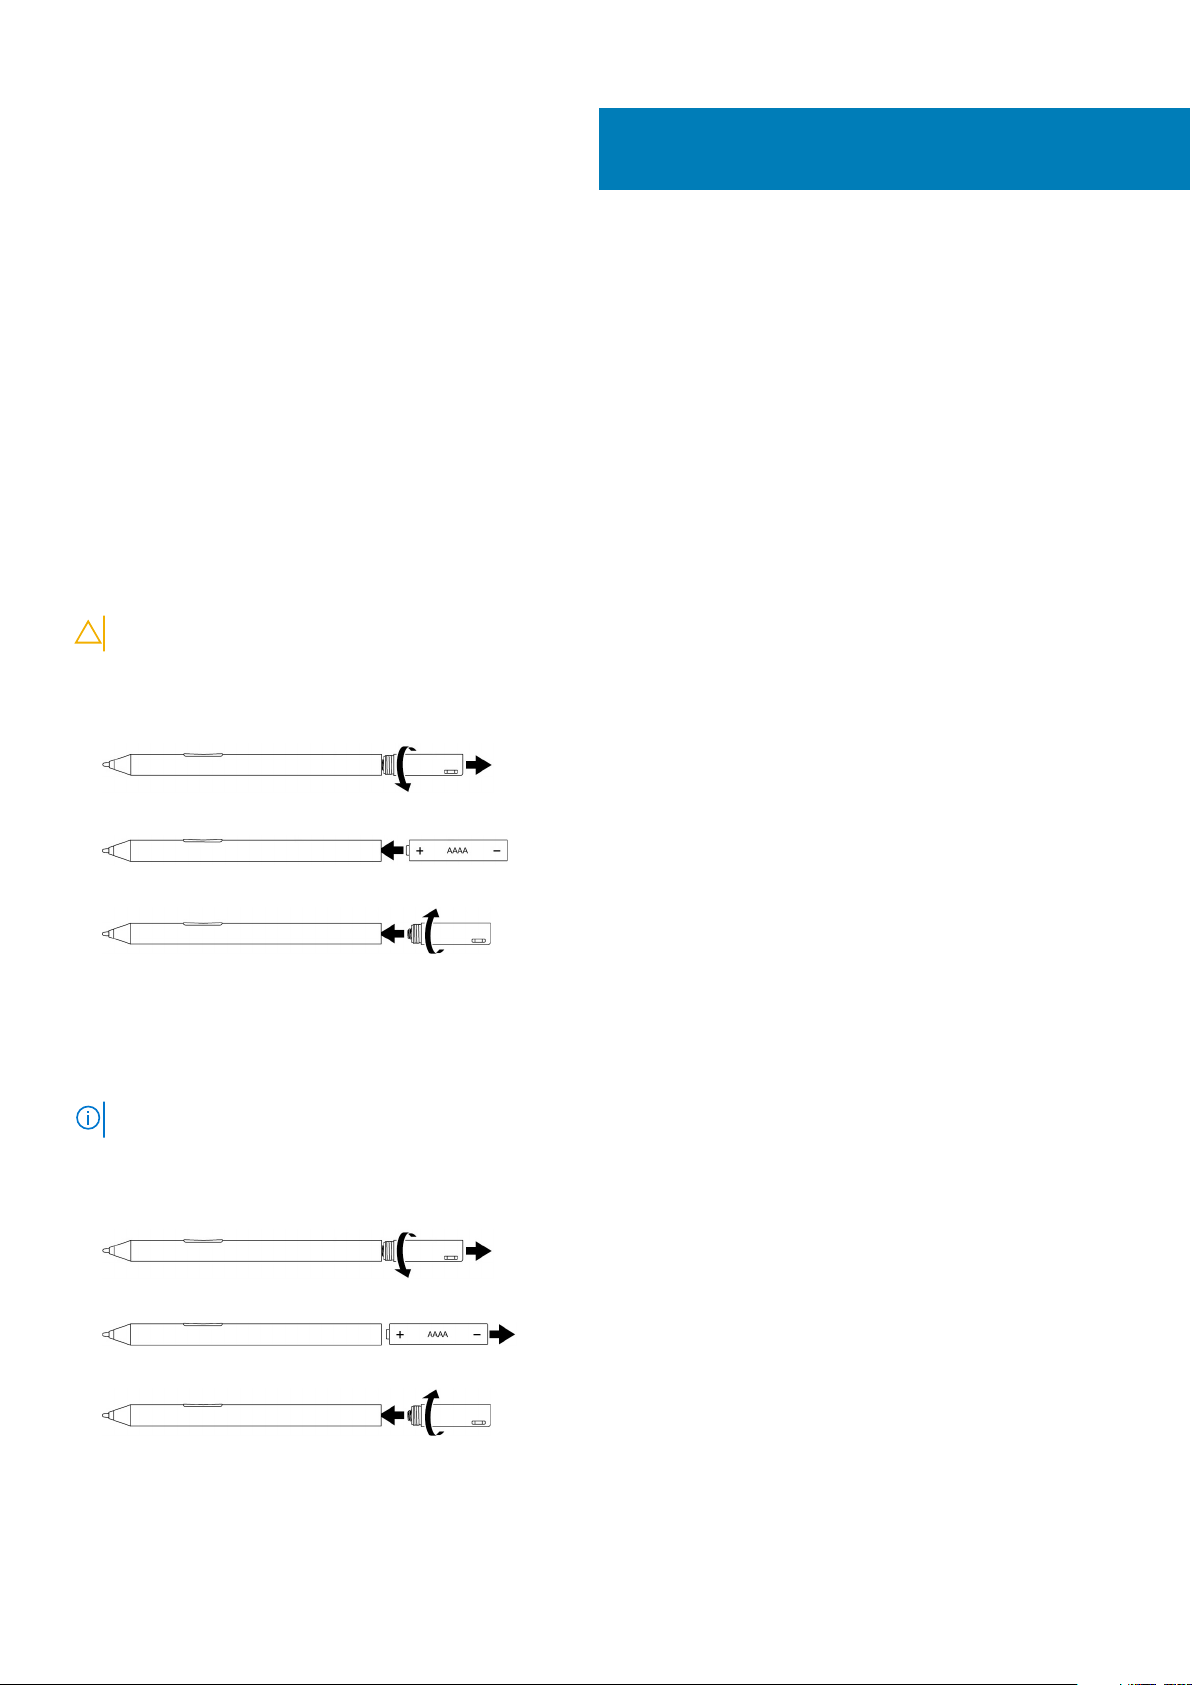
Installing the AAAA battery
About this task
CAUTION: Incorrectly installing the AAAA battery may damage the pen.
Steps
1. Remove the top cover from the pen.
2. Insert the AAAA battery into the pen with the positive side facing in.
3. Replace the top cover.
Removing the AAAA battery
About this task
NOTE: Perform the following procedure if there was an AAAA battery installed in the product.
Steps
1. Remove the top cover from the pen.
2. Remove the AAAA battery.
3. Replace the top cover.
6 Setting up your Dell Active Pen
 Loading...