

Page 1

Dell PH45W17-CA
Hybrid Adapter + Power Bank
USB-C
User’s Guide
Regulatory model: PHA45W17-CA
Page 2

Notes, Cautions, and Warnings
NOTE: A NOTE indicates important information that helps you make
better use of your power hub.
CAUTION: A CAUTION indicates potential damage to hardware or loss
of data if instructions are not followed.
WARNING: A WARNING indicates a potential for property damage,
personal injury, or death.
Copyright © 2017 Dell Inc. All rights reserved. This product is protected by U.S. and
international copyright and intellectual property laws.
Dell™ and the Dell logo are trademarks of Dell Inc. in the United States and/or other
jurisdictions. All other marks and names mentioned herein may be trademarks of their
respective companies.
2017 – 01 Rev. A00
Page 3

Contents
About your power hub ...........................5
Product features . . . . . . . . . . . . . . . . . . . . . . . . . 5
What’s in the box ................................6
Features ........................................7
Power adapter . . . . . . . . . . . . . . . . . . . . . . . . . . . 7
Power bank . . . . . . . . . . . . . . . . . . . . . . . . . . . . 7
Charging your power hub ........................8
Charging your device ............................9
Charging your laptop . . . . . . . . . . . . . . . . . . . . . . 9
Charging your mobile devices . . . . . . . . . . . . . . . . 10
Disconnecting the power adapter from your power
hub ........................................... 11
Alternative charging methods ...................12
Charging your laptop using the power adapter . . . . . . 12
Charging your laptop using the power bank . . . . . . . 13
Charging your devices using the power hub. . . . . . . . 14
Cable management.............................15
Cable management on Power Bank . . . . . . . . . . . . . 15
Cable management on Power Adapter . . . . . . . . . . . 15
│ 3
Page 4

Checking the battery ...........................16
Checking battery charge status . . . . . . . . . . . . . . . 16
Checking battery health . . . . . . . . . . . . . . . . . . . . .17
Error status. . . . . . . . . . . . . . . . . . . . . . . . . . . . .17
Attaching the Ferrite Core.......................18
Troubleshooting ...............................19
Common symptoms . . . . . . . . . . . . . . . . . . . . . . 19
Specifications ..................................20
General . . . . . . . . . . . . . . . . . . . . . . . . . . . . . . 20
Physical characteristics . . . . . . . . . . . . . . . . . . . . 20
Interfaces/Ports . . . . . . . . . . . . . . . . . . . . . . . . . 20
Environmental. . . . . . . . . . . . . . . . . . . . . . . . . . 20
Statutory information...........................21
Warranty . . . . . . . . . . . . . . . . . . . . . . . . . . . . . 21
Limited warranty and return policies . . . . . . . . . . . . . . . . . 21
4 │
For U.S. customers: . . . . . . . . . . . . . . . . . . . . . . . . . . . . 21
For European, Middle Eastern and African customers: . . . . . . . 21
For non-U.S. customers: . . . . . . . . . . . . . . . . . . . . . . . . . 22
Page 5

About your power hub
Product features
The features of the Dell Power Hub PHA45W17-CA include:
Portability
You could use your power hub to charge your Dell laptop or mobile devices
while on-the-go.
Compliance
Suitable for devices compliant with USB battery charging specification,
Revision 1.2 (BC1.2).
Compact design
Small in size and ideal to be placed in pockets/bags.
About your power hub │ 5
Page 6
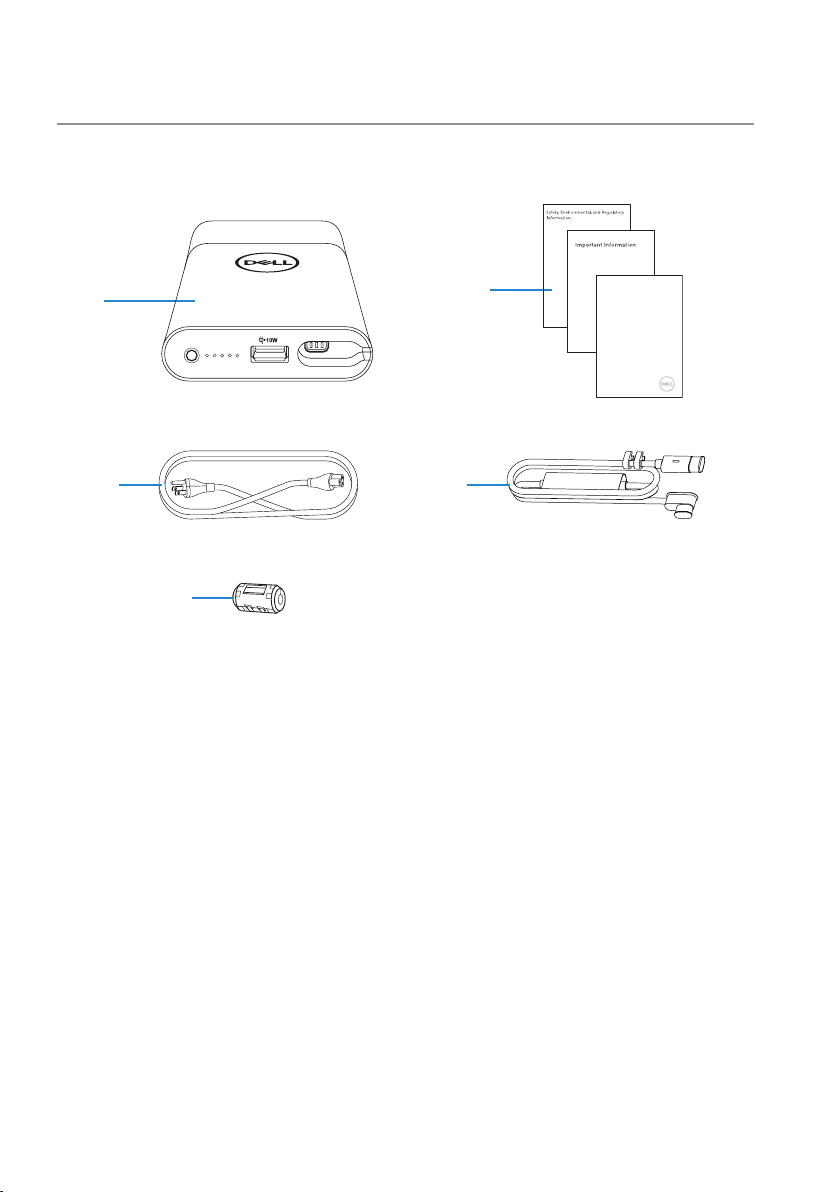
What’s in the box
1
3
2
4
5
1 Power hub 2 Documents
3 Power cord 4 Power-out cable
5 Ferrite core
Dell PH45W17-CA
Hybrid Adapter + Power Bank
USB-C
Quick Start Guide
6 │ What’s in the box
Page 7
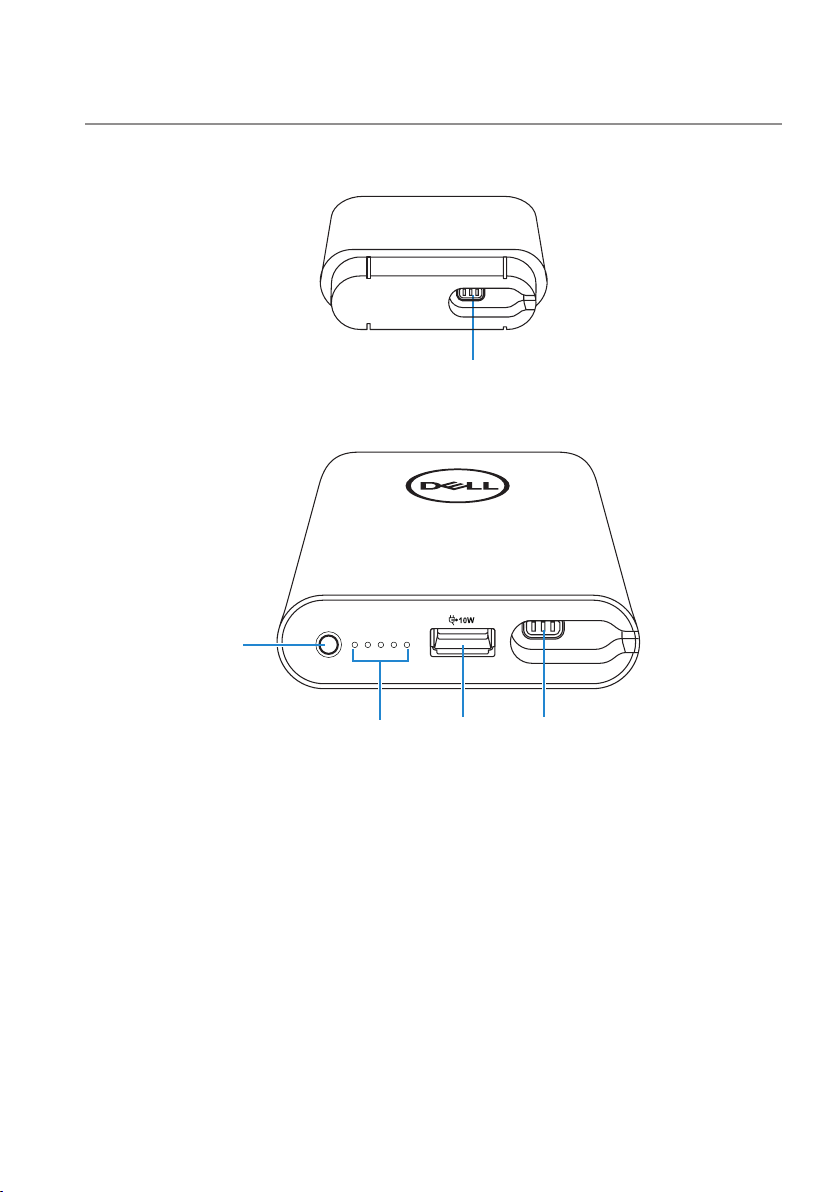
Features
Power adapter
Power bank
2
1
3
1 Power-out port (to power
bank)
3 Battery-status lights (5) 4 USB-out port
5 Power-out port (to laptop)
2 Power button/Battery-status
54
button
Features │ 7
Page 8
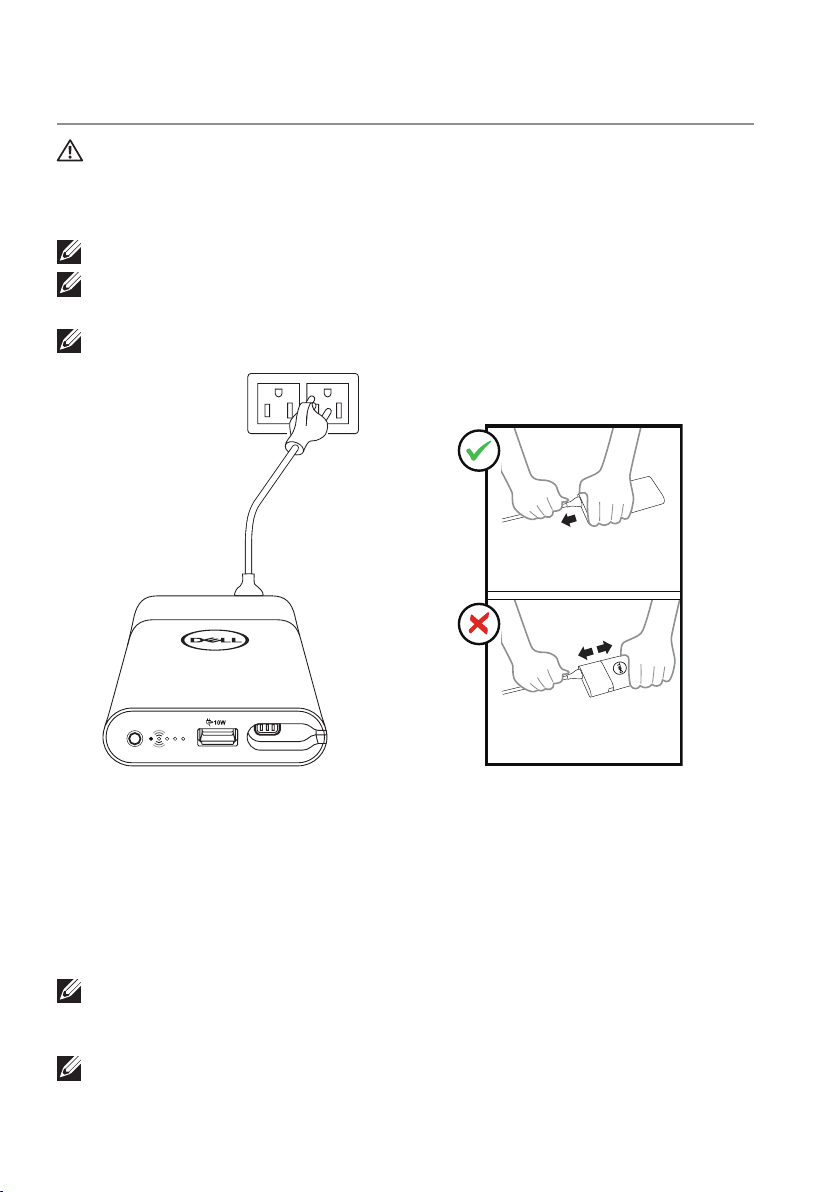
Charging your power hub
WARNING: To avoid injury and damaging your device, only use the
power adapter shipped with your power bank.
Before first use, charge the power hub using the power cord.
NOTE: It takes approximately 3 hours to fully charge the power hub.
NOTE: You can charge your devices through the power hub while the
power hub is getting charged.
NOTE: The power adapter is shipped with the power bank.
Holding onto Adapter while
removing Power Supply Cable
1. Ensure the power adapter is fully attached to your power bank.
2. Connect the power adapter to an electrical outlet.
• The battery-status light turns on (flashing white) indicating the battery
is getting charged. Refer to “Checking battery charge status” section
for details.
• The battery-status lights turn off when the battery is fully charged or
when the power adapter is disconnected.
NOTE: If the amber battery-status light lights up and flashes while the
battery is charging, this indicates a charging error. Check if you have
firmly attached the power adapter with power bank.
NOTE: For more information on battery-status lights, see “Checking
battery charge status”.
8 │ Charging your power hub
Page 9
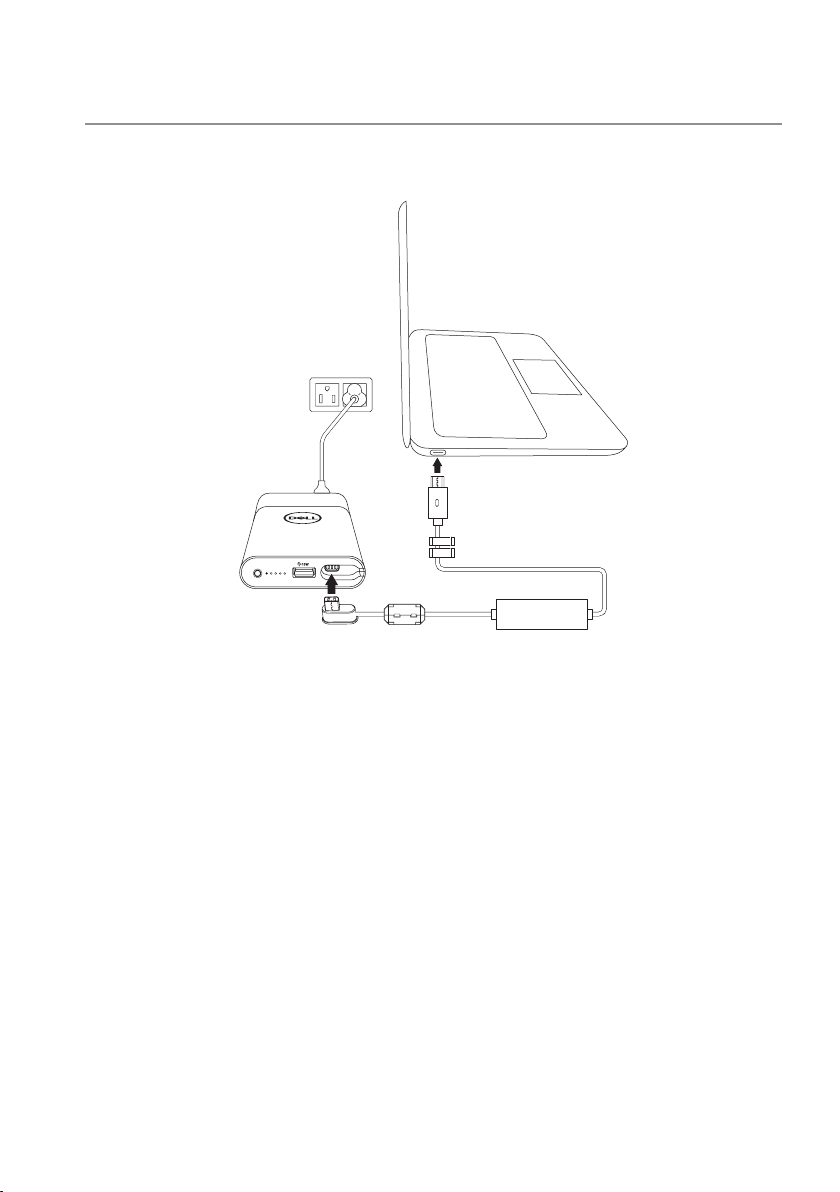
Charging your device
Charging your laptop
1. Connect the power adapter to an electrical outlet.
2. Connect one end of the power-out cable to the power-out port on the
power hub.
3. Connect the other end of the power-out cable to the power-adapter port
on your laptop.
Charging your device │ 9
Page 10
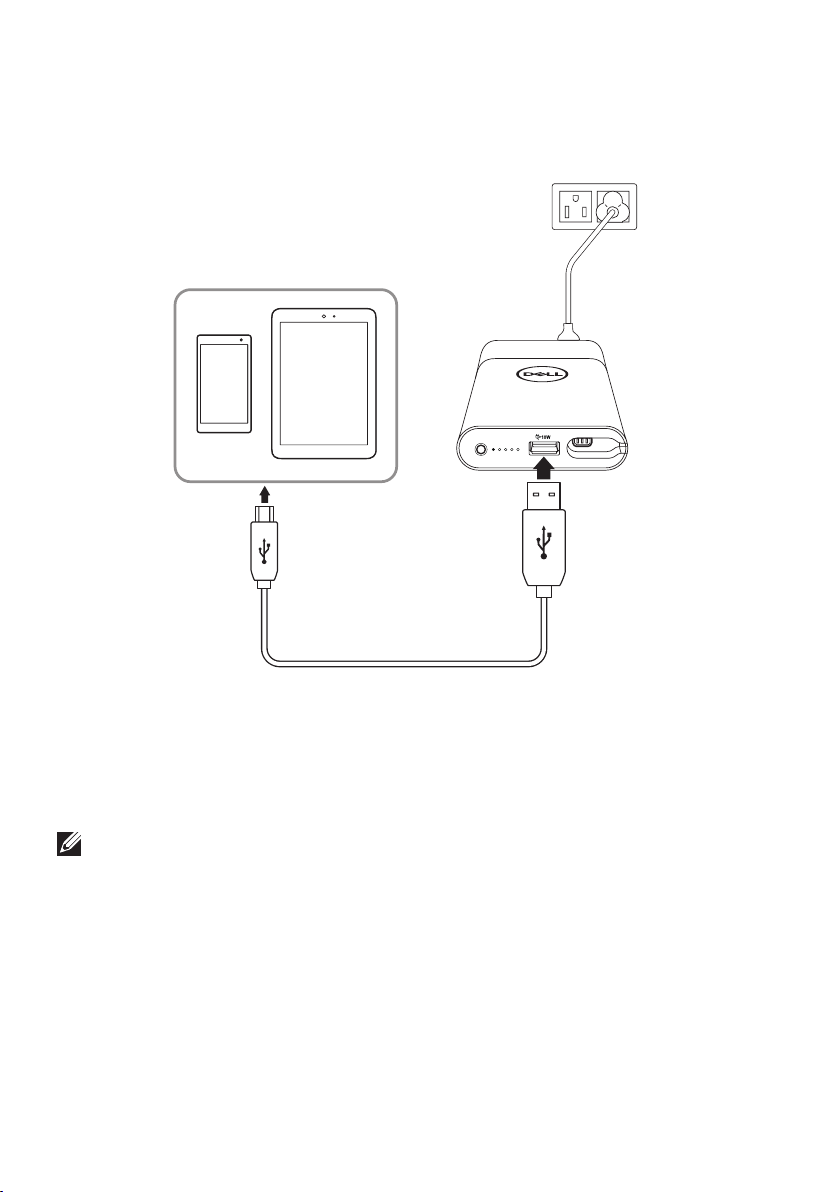
Charging your mobile devices
Using the power hub, you can charge up to two portable devices
simultaneously.
1. Connect the power adapter to an electrical outlet.
2. Connect one end of the USB cable to the USB port on the power hub.
3. Connect the other end of the USB cable to the charging port on your
mobile device.
NOTE: The USB cable is not shipped with the power hub.
10 │ Charging your device
Page 11
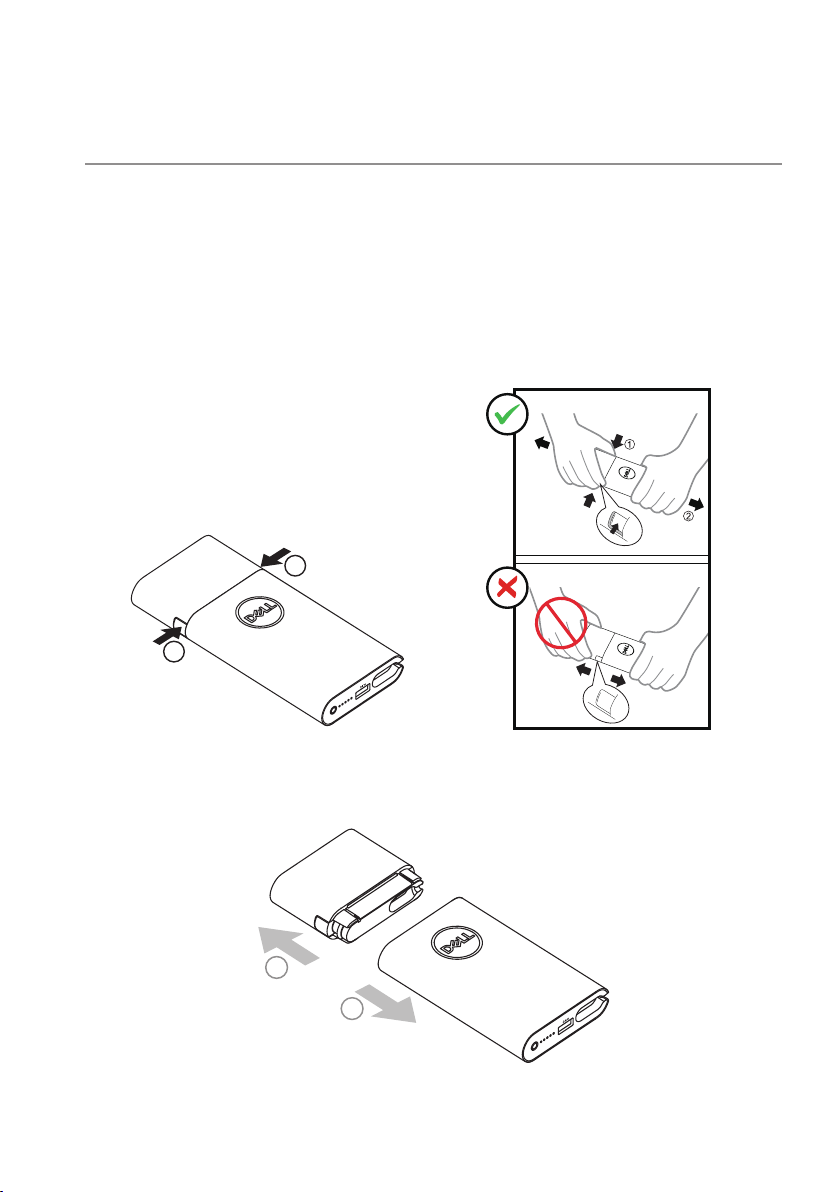
Disconnecting the power adapter from your power hub
The power bank and power adapter of your power hub can work
independently to charge your device.
To disconnect the power adapter from your power hub, perform the
following:
1. Press firmly both latches on the power adapter.
Power Adapter Pressing before
Adapter Removal
1
1
2. While holding onto the latches, pull the power adapter away from the
power bank. The power bank and power adapter are now ready to be
used separately.
2
2
Disconnecting the power adapter from your power hub │ 11
Page 12
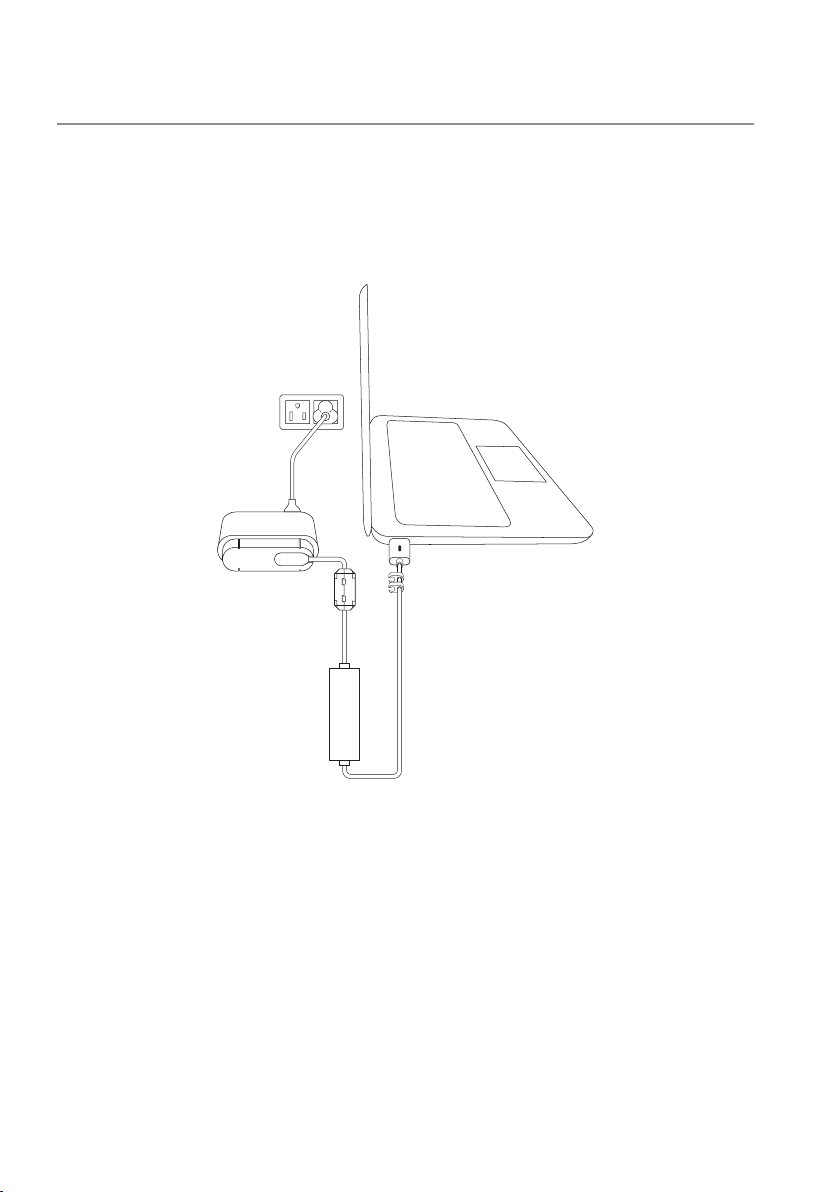
Alternative charging methods
You can also charge your device either using the power bank or power
adapter independently. Using the power hub, you can charge up to two
devices simultaneously.
Charging your laptop using the power adapter
1. Connect the power adapter to an electrical outlet.
2. Connect one end of the power-out cable to the power-out port on the
power adapter.
3. Connect the other end of the power-out cable to the power-adapter port
on your laptop.
12 │ Alternative charging methods
Page 13
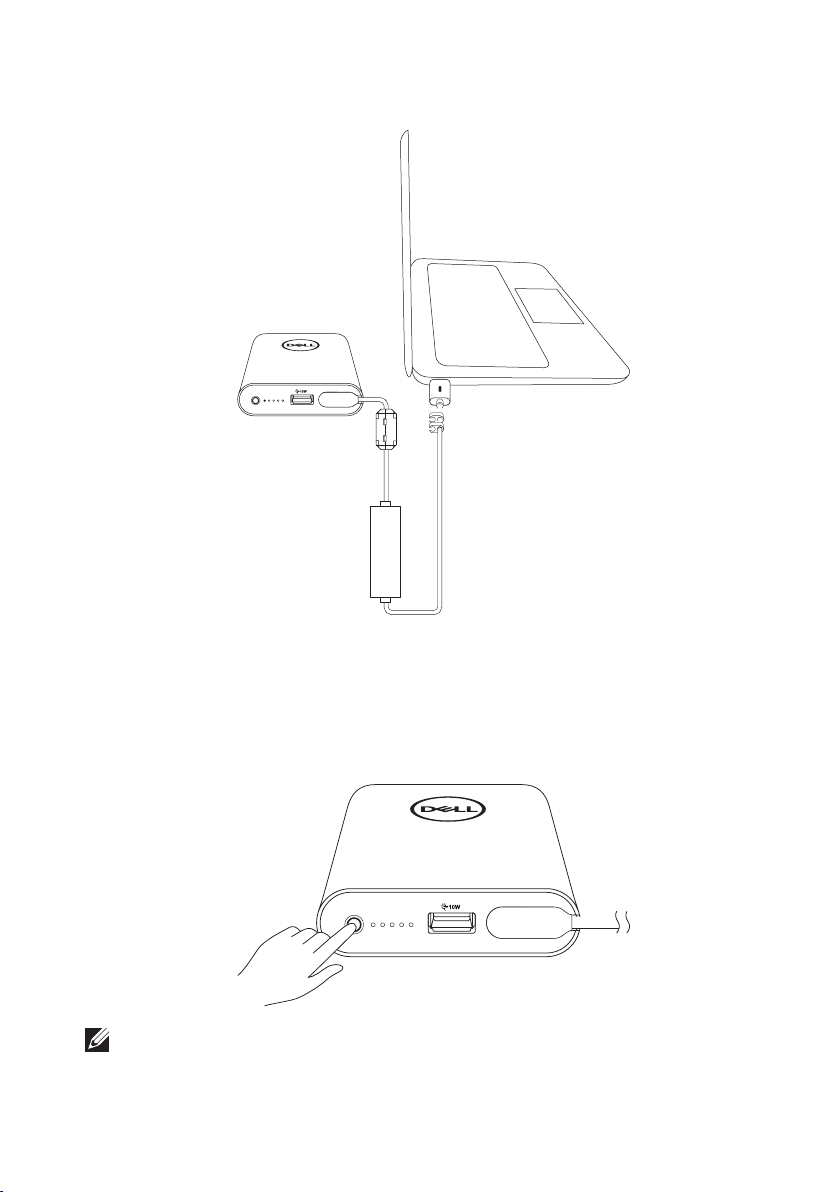
Charging your laptop using the power bank
1. Connect one end of the power-out cable to the power-out port on the
power bank.
2. Connect the other end of the power-out cable to the power-adapter port
on your laptop.
3. Press the power button to start charging your laptop.
NOTE: The battery-status light lights up amber when the power bank
battery is low.
Alternative charging methods │ 13
Page 14
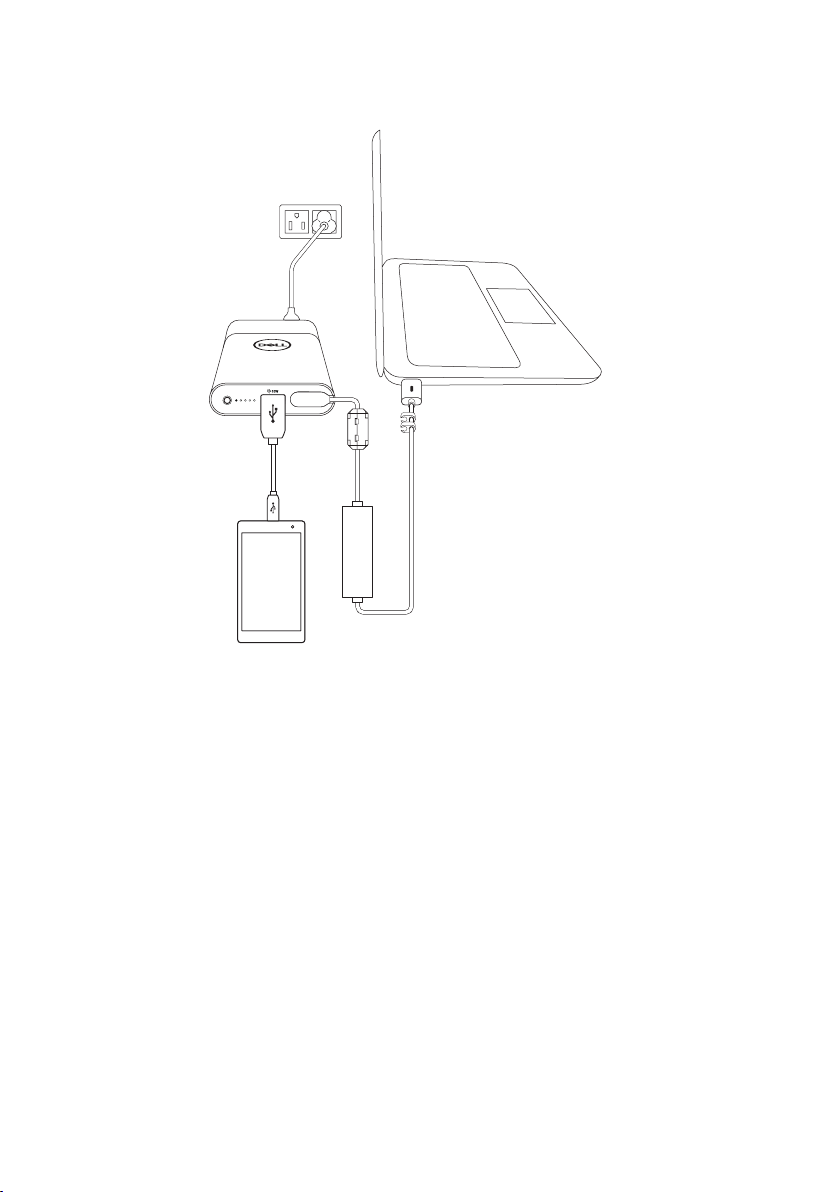
Charging your devices using the power hub
1. Connect the power adapter to an electrical outlet.
2. Connect one end of the power-out cable to the power-out port on the
power hub.
3. Connect the other end of the power-out cable to the power-adapter port
on your laptop.
4. Connect one end of the USB cable to the USB port on the power hub.
5. Connect the other end of the USB cable to the charging port on your
mobile device.
14 │ Alternative charging methods
Page 15
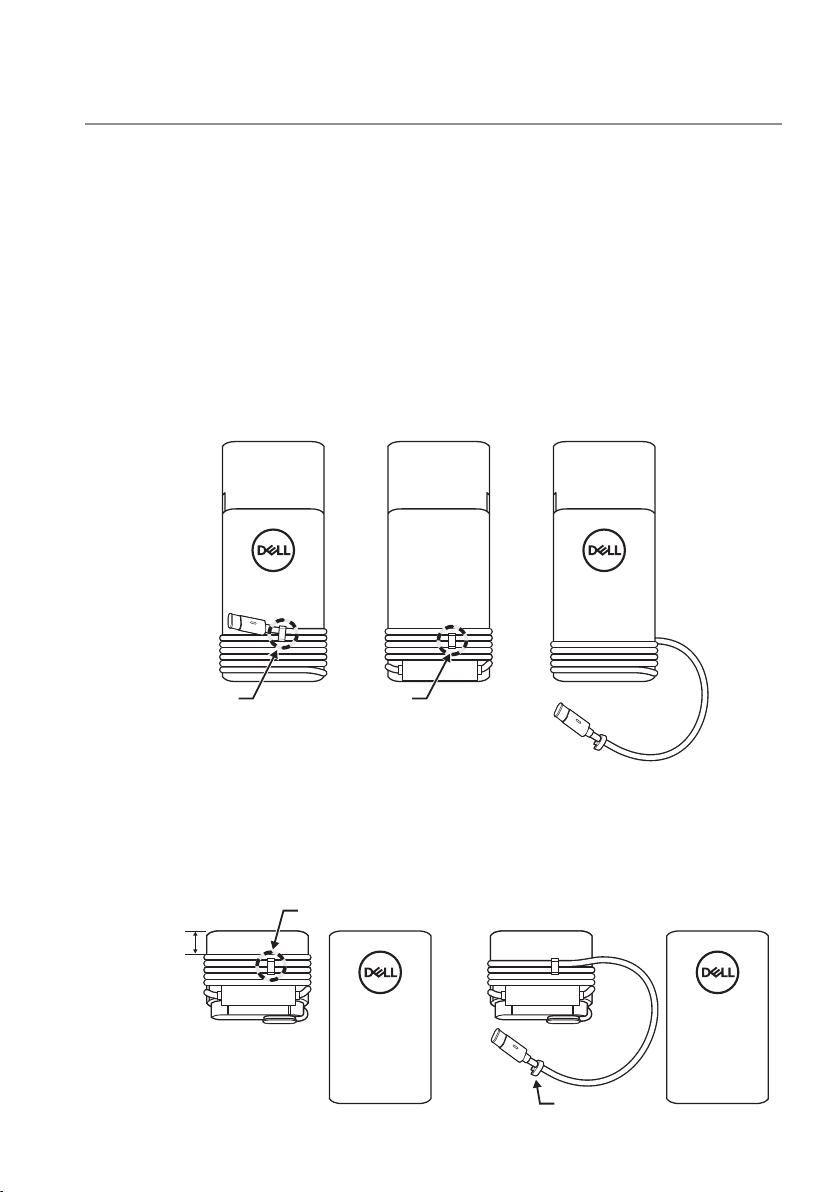
Cable management
Cable clip
Risk of cable
Cable clip 2
Cable clip 1
The power hub has two cable clips:
• Cable clip 1 is adjacent on the plug.
• Cable clip 2 is 300mm apart.
When cable is routed on the body, the USB cable (USB Type-C capsule) will
stay within the power adapter and power bank body.
Cable management on Power Bank
By uncoupling cable clip 1, users have a cleaner on-desk charging solution
by using only a fraction of the cable. The rest of the cable and USB-C
capsule are held by the cable clip 2.
1 Cable clip 2
Cable management on Power Adapter
Since the power adapter has a smaller body, the cable clip 2 will be hold the
cable and USB-C capsule in cases that the cable is detached accidentally.
coming off
Cable management │ 15
Page 16
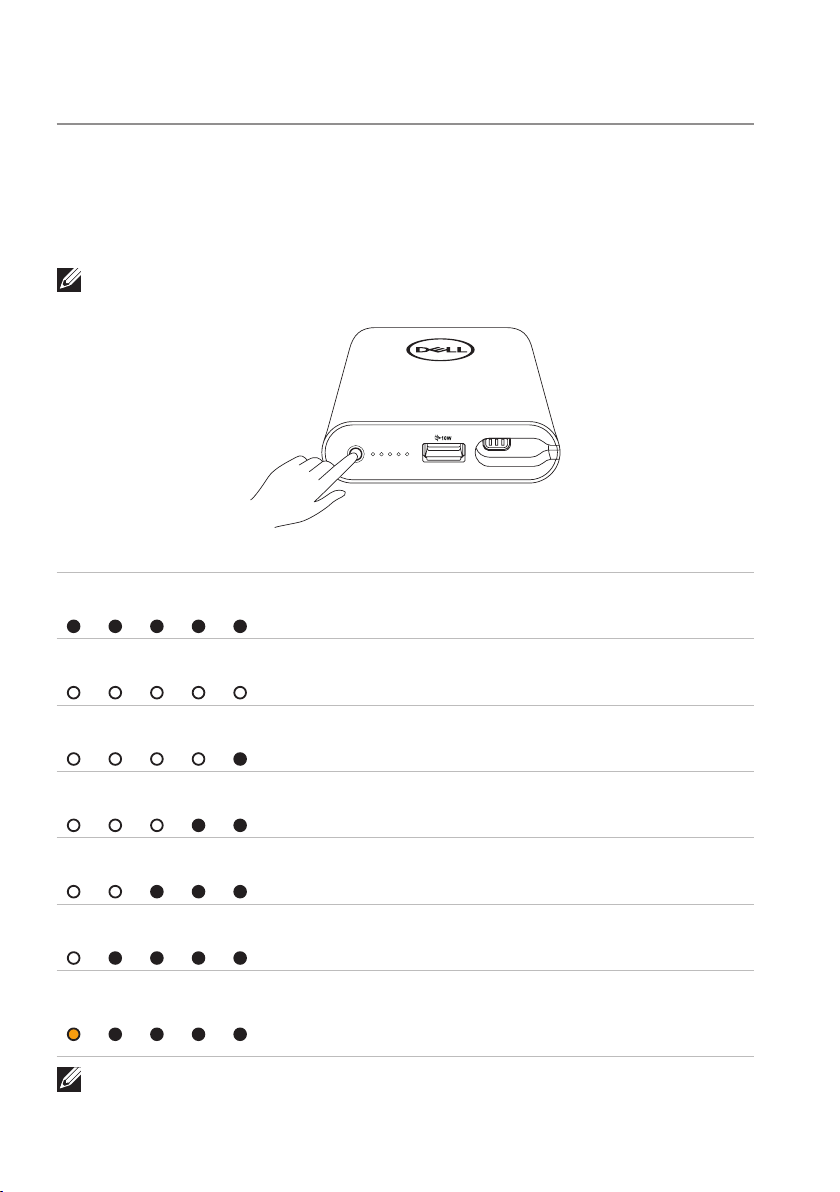
Checking the battery
Checking battery charge status
You can check the battery-charge status by pressing the power button.
The battery-status lights turn on indicating the battery-charge status of the
power hub.
NOTE: The battery-status lights remain illuminated for 5 seconds after
you release the power button.
Battery-status light LED color & behavior Battery capacity status
All 5 battery-status
lights are off Off 100%
All 5 battery-status
lights are on White (solid) 81% – 99%
1st-4th battery-status
lights are on White (solid) 61% – 80%
1st-3rd battery-status
lights are on White (solid) 41% – 60%
1st-2nd battery-status
lights are on White (solid) 21% – 40%
1st battery-status light
is on White (solid) 11% – 20%
1st battery-status light
is on Amber (solid)
NOTE: All five battery-status lights turn off when the battery is fully
charged.
16 │ Checking the battery
1-10%
(battery low state)
Page 17
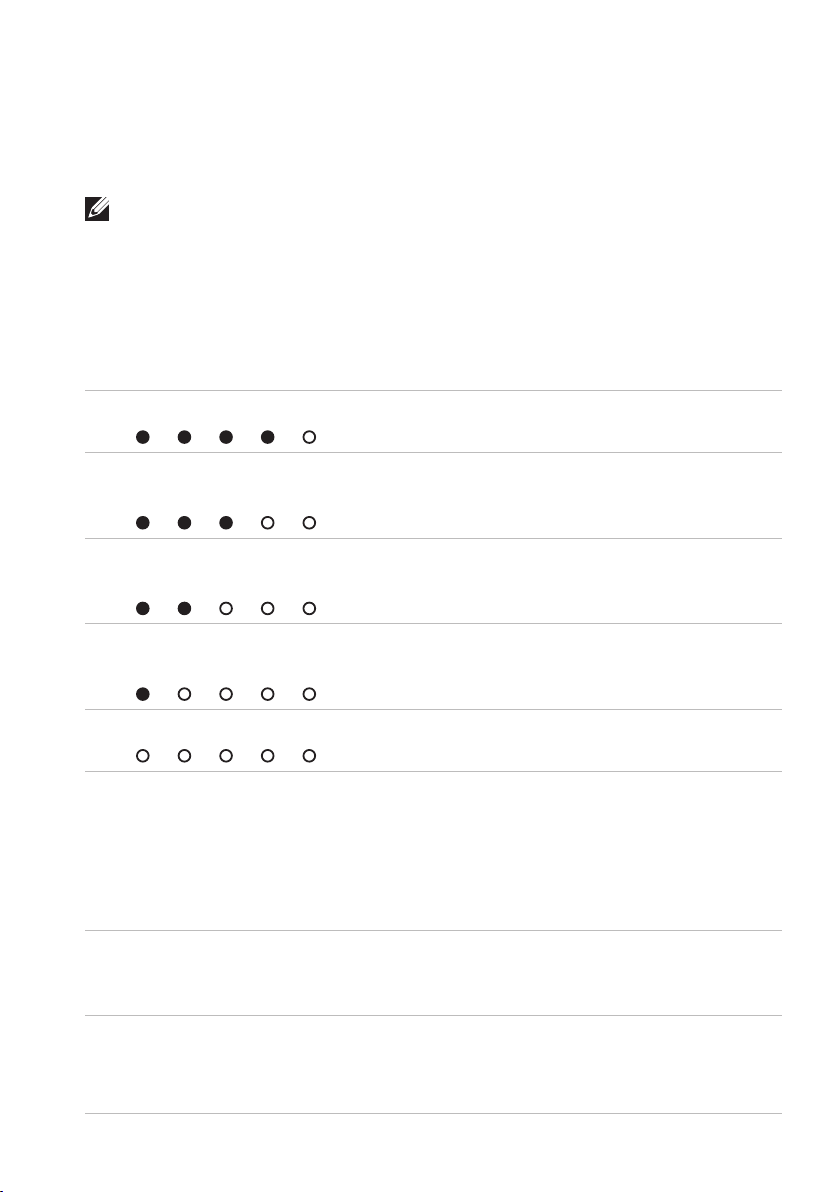
Checking battery health
Battery health is a measurement reflecting the general condition of the
battery. It indicates how much battery life remains before the power hub
must be replaced.
NOTE: The units of SOH (State Of Health) are percentage (%) points.
A battery’s SOH is 100% at the time of manufacture and will deteriorate
gradually with usage.
Press and hold the power button for 5 seconds to turn on the power hub
and check the battery health status.
Battery-status light Battery health status
5th battery-status light is on
th
4th & 5
battery-status lights are
on
3rd~5th battery-status lights are
on
2nd~5th battery-status lights are
on
81% – 100%
61% – 80%
41% – 60%
21% – 40%
All 5 battery-status lights are on
1% – 20%
Error status
The type of error condition table is shown below.
Event Battery-status light color & behavior Status
All modes One second flash ON/OFF interchangably
on the 1st battery-status light (amber) and
2nd battery-status light (white)
PSID Fail
Flashing amber Error caused by
or Daisy
Chain
Checking the battery │ 17
Over temperature
improper connection
or damage of power
adapter.
Page 18
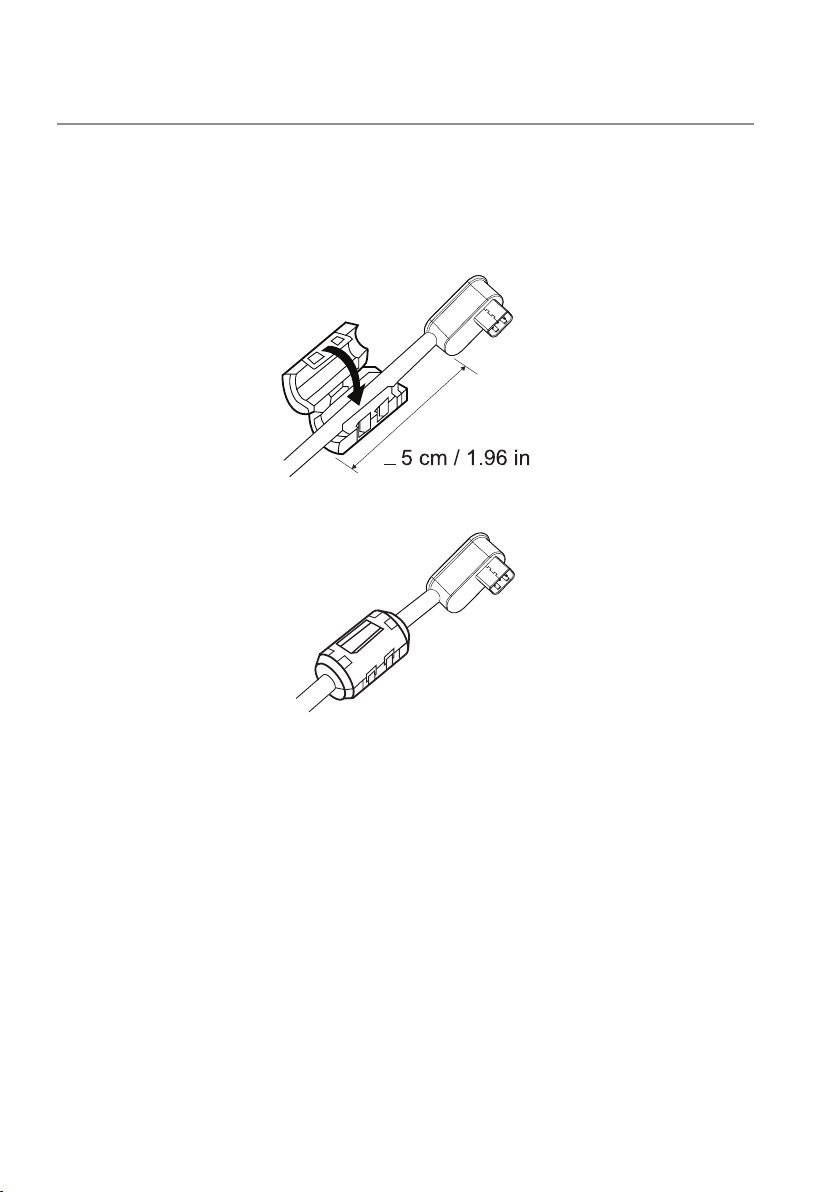
Attaching the Ferrite Core
In order to reduce electromagnetic interference, attach the supplied ferrite
core on the power-output cable connected to your laptop.
1. Open the two halves of the ferrite core.
2. Clamp the core around the power-output cable as shown in the
illustration.
<
3. Fold over the ferrite core, snapping the small latches back together.
18 │ Attaching the Ferrite Core
Page 19

Troubleshooting
Common symptoms
The following table contains information about common issues you might
encounter and the possible solutions.
Common symptoms Possible solutions
The power hub gets unusually
hot when placed inside the
pocket/bag.
The power hub battery power
gets drained too fast.
The battery-status light does
not turn on.
• Unplug the power output cable
immediately.
• Take the power hub out of your pocket/
bag immediately. Then let it cool down.
When connecting to a mobile device,
close applications you are not using or set
the device to airplane mode.
• Check if the power hub is out of battery
power. Charge the power hub.
• If the problem persists, contact Dell or
your dealer for technical assistance.
Troubleshooting │ 19
Page 20

Specifications
General
Model number PHA45W17-CA (4-cell, 43Wh)
Supported output 19.5 V; 2.3 A
5 V, 1.5 A
USB output 5 V, up to 2.1 A
LED 5 battery-status lights
Physical characteristics
Weight 425g (0.93lb)
Dimension (L x W x H) 173 x 78 x 22.5 mm
(6.81 x 3.07 x 0.88in)
Cord length 914 mm (35.98in) (Power cord)
1250 mm (49.21in) (Power-out cable)
Interfaces/Ports
Input One Power-in port (male)
Output One Dell proprietary connector (female)
One USB port (battery charging 1.2 compliant)
Environmental
Temperature Operating: 0°C to 40°C (32°F to 104°F)
Storage:–20°C to 60°C (-4°F to 140°F)
Humidity 90% maximum relative humidity;
non-condensing
20 │ Specifications
Page 21

Statutory information
Warranty
Limited warranty and return policies
Dell-branded products carry a 1-year limited hardware warranty.
WARNING
IMPORTANT SAFETY INSTRUCTIONS
INSTRUCTIONS PERTAINING TO RISK OF FIRE OR INJURY TO PERSONS
• Do not expose to moisture or hot climates for extended periods or time.
• Do not operate in an enclosed environment (e.g. bag or area with poor
ventilation).
• Do not dissamble, puncture, drop or submerge in liquids.
• If bulging or bubbling develops, discountinue use immediately.
• Not for children under 3 years old.
FOLLOW AND SAVE THE INSTRUCTIONS!
For U.S. customers:
This purchase and your use of this product are subject to Dell’s end
user agreement, which you can find at http://www.dell.com/terms. This
document contains a binding arbitration clause.
For European, Middle Eastern and African customers:
Dell-branded products that are sold and used are subject to applicable
national consumer legal rights, the terms of any retailer sale agreement that
you have entered into (which will apply between you and the retailer) and
Dell’s end user contract terms.
Dell may also provide an additional hardware warranty – full details of the
Dell end user contract and warranty terms can be found by going to
http://www.dell.com, selecting your country from the list at the bottom of
the “home” page and then clicking the “terms and conditions” link for the
end user terms or the “support” link for the warranty terms.
Statutory information │ 21
Page 22

For non-U.S. customers:
Dell-branded products that are sold and used are subject to applicable
national consumer legal rights, the terms of any retailer sale agreement that
you have entered into (which will apply between you and the retailer) and
Dell’s warranty terms. Dell may also provide an additional hardware warranty
– full details of Dell’s warranty terms can be found by going to
http://www.dell.com, selecting your country from the list at the bottom of
the “home” page and then clicking the “terms and conditions” link or the
“support” link for the warranty terms.
22 │ Statutory information
 Loading...