

Page 1

Dell™ OptiPlex™ 745c
Quick Reference Guide
Model DCSM
www.dell.com | support.dell.com
Page 2

Notes, Notices, and Cautions
NOTE: A NOTE indicates important information that helps you make better use of your computer.
NOTICE: A NOTICE indicates potential damage to hardware or loss of data and tells you how to avoid the problem.
CAUTION: A CAUTION indicates a potential for property damage, personal injury, or death.
If you purchased a Dell™ n Series computer, any references in this document to Microsoft® Windows®
operating systems are not applicable.
____________________
Information in this document is subject to change without notice.
© 2007 Dell Inc. All rights reserved.
Reproduction in any manner whatsoever without the written permission of Dell Inc. is strictly forbidden.
Trademarks used in this text: Dell, the DELL logo, and OptiPlex are trademarks of Dell Inc.; Intel is registered trademarks of Intel Corporation;
Microsoft, Windows, and Vist a are registered trademarks of Microsoft Corporation.
Other trademarks and trade names may be used in this document to refer to either the entities claiming the marks and names or their products.
Dell Inc. disclaims any proprietary interest in trademarks and trade names other than its own.
Model DCSM
February 2007 P/N NJ423 Rev. A00
Page 3

Contents
Finding Information . . . . . . . . . . . . . . . . . . . . . . . . . . . . . . . . 5
System Views
Mini Tower Computer — Front View
Mini Tower Computer — Back View
. . . . . . . . . . . . . . . . . . . . . . . . . . . . . . . . . . . 8
. . . . . . . . . . . . . . . . . . . . . 8
. . . . . . . . . . . . . . . . . . . . 10
Mini Tower Computer — Back-Panel Connectors
Removing the Computer Cover
Before You Begin
Mini Tower Computer
Inside Your Computer
Mini Tower Computer
Setting Up Your Computer
Set Up Your Keyboard and Mouse
Set Up Your Monitor
Power Connections
Solving Problems
Dell Diagnostics
System Lights
. . . . . . . . . . . . . . . . . . . . . . . . . . . . . . . . 21
. . . . . . . . . . . . . . . . . . . . . . . . . . . . . . . 21
. . . . . . . . . . . . . . . . . . . . . . . . . . . . . . . . 24
Diagnostic Lights
Beep Codes
. . . . . . . . . . . . . . . . . . . . . . . . . . . . . . . . . 27
. . . . . . . . . . . . . . . . . . . . . . . . . . 13
. . . . . . . . . . . . . . . . . . . . . . . . . . . . . . 13
. . . . . . . . . . . . . . . . . . . . . . . . . . . . 14
. . . . . . . . . . . . . . . . . . . . . . . . . . . . . . 16
. . . . . . . . . . . . . . . . . . . . . . . . . . . . 16
. . . . . . . . . . . . . . . . . . . . . . . . . . . . 19
. . . . . . . . . . . . . . . . . . . . . 20
. . . . . . . . . . . . . . . . . . . . . . . . . . . . 20
. . . . . . . . . . . . . . . . . . . . . . . . . . . . . 21
. . . . . . . . . . . . . . . . . . . . . . . . . . . . . . 25
Resolving Software and Hardware Incompatibilities
Using Microsoft Windows XP System Restore
Reinstalling Microsoft Windows XP
Microsoft
®
Windows Vista™ . . . . . . . . . . . . . . . . . . . . . . . . 32
. . . . . . . . . . . . . . . . . . . . 30
. . . . . . . . . . . . . 11
. . . . . . . . . . . 28
. . . . . . . . . . . . . . . 28
The support.dell.com user interface may vary depending
on your selections.
Using the Drivers and Utilities CD
Drivers for Your Computer
. . . . . . . . . . . . . . . . . . . . . . . . . . . . . . . . 34
. . . . . . . . . . . . . . . . . . . . . . . . 34
. . . . . . . . . . . . . . . . . . . . . . . . . 34
Index . . . . . . . . . . . . . . . . . . . . . . . . . . . . . . . . . . . . . . . . . 35
Contents 3
Page 4

4 Contents
Page 5

Finding Information
NOTE: Some features or media may be optional and may not ship with your computer. Some features or media may
not be available in certain countries.
NOTE: Additional information may ship with your computer.
What Are You Looking For? Find It Here
• A diagnostic program for my computer
• Drivers for my computer
• My computer documentation
• My device documentation
• Desktop System Software (DSS)
• How to remove and replace parts
• Specifications
• How to configure system settings
• How to troubleshoot and solve problems
Drivers and Utilities CD (ResourceCD)
NOTE: The Drivers and Utilities CD may be optional
and may not ship with your computer.
Documentation and drivers are already installed on
your computer. You can use the CD to reinstall
drivers (see "Using the Drivers and Utilities CD" on
page 34), run the Dell Diagnostics (see "Dell
Diagnostics" on page 21), or access your
documentation.
Readme files may
be included on your
CD to provide lastminute updates
about technical
changes to your
computer or
advanced technical
reference material
for technicians or
experienced users.
NOTE: Drivers and documentation updates can be
found at support.dell.com.
Dell™ OptiPlex™ User’s Guide
Microsoft Windows XP Help and Support Center
1
Click
Start→
Help and Support→ Dell User and
→
System Guides
2
Click the
The User’s Guide is also available on the optional
Drivers and Utilities CD.
User’s Guide
System Guides
for your computer.
.
Quick Reference Guide 5
Page 6
What Are You Looking For? Find It Here
• Warranty information
Dell™ Product Information Guide
• Terms and Conditions (U.S. only)
• Safety instructions
• Regulatory information
• Ergonomics information
• End User License Agreement
• How to reinstall my operating system
• How to use Windows XP
• How to work with programs and files
• How to personalize my desktop
Operating System CD
NOTE: The Operating System CD may be optional and
may not ship with your computer.
The operating system is already installed on your
computer. To reinstall your operating system, use
the Operating System CD (see "Reinstalling
Microsoft Windows XP" on page 30).
After you reinstall
your operating
system, use the
optional Drivers and
Utilities CD
(ResourceCD) to
reinstall drivers for
the devices that
came with your
computer. For more
information, see
"Drivers and Utilities CD (ResourceCD)" on page 5.
Your operating system product key label is located
on your computer (see "Service Tag and Microsoft
Windows
®
Product Key" on page 7).
®
NOTE: The color of your Operating System CD varies
according to the operating system you ordered.
Windows Help and Support Center
1
Click
Start→
Help and Support
2
Type a word or phrase that describes your problem
and click the arrow icon.
3
Click the topic that describes your problem.
4
Follow the instructions on the screen.
.
6 Quick Reference Guide
Page 7

What Are You Looking For? Find It Here
• Service Tag and Express Service Code
• Microsoft Windows Product Key Label
Service Tag and Microsoft® Windows® Product Key
These labels are located on your computer.
• Use the Service
Tag to identify
your computer
when you use
support.dell.co
or contact
m
support.
• Enter the Express Service Code to direct your call
when contacting support.
• Solutions — Troubleshooting hints and tips, articles
from technicians, online courses, and frequently asked
questions
Dell Support Website — support.dell.com
NOTE: Select your region or business segment to
view the appropriate support site.
• Community — Online discussion with other Dell
customers
• Upgrades — Upgrade information for components, such
as the memory, hard drive, and operating system
• Customer Care — Contact information, service call and
order status, and warranty and repair information
• Service and support — Service call status, support
history, service contract, and online discussions with
support
• Reference — Computer documentation, details on my
computer configuration, product specifications, and
white papers
• Downloads — Certified drivers, patches, and software
updates
• Desktop System Software (DSS)— If you reinstall the
operating system on your computer, you should also
reinstall the DSS utility. DSS automatically detects your
computer and operating system and installs the updates
appropriate for your configuration, providing critical
updates for your operating system and support for Dell™
3.5-inch USB floppy drives, Intel
®
processors, optical
drives, and USB devices. DSS is necessary for correct
operation of your Dell computer.
To download Desktop System Software:
1
Go to
support.dell.com
business segment, then enter your Service Tag.
2
Select
3
Click your operating system, and then search for
the keyword
NOTE: The support.dell.com user interface may vary
depending on your selections.
, select your region or
Drivers & Downloads
Desktop System Software
, then click Go.
.
Quick Reference Guide 7
Page 8
System Views
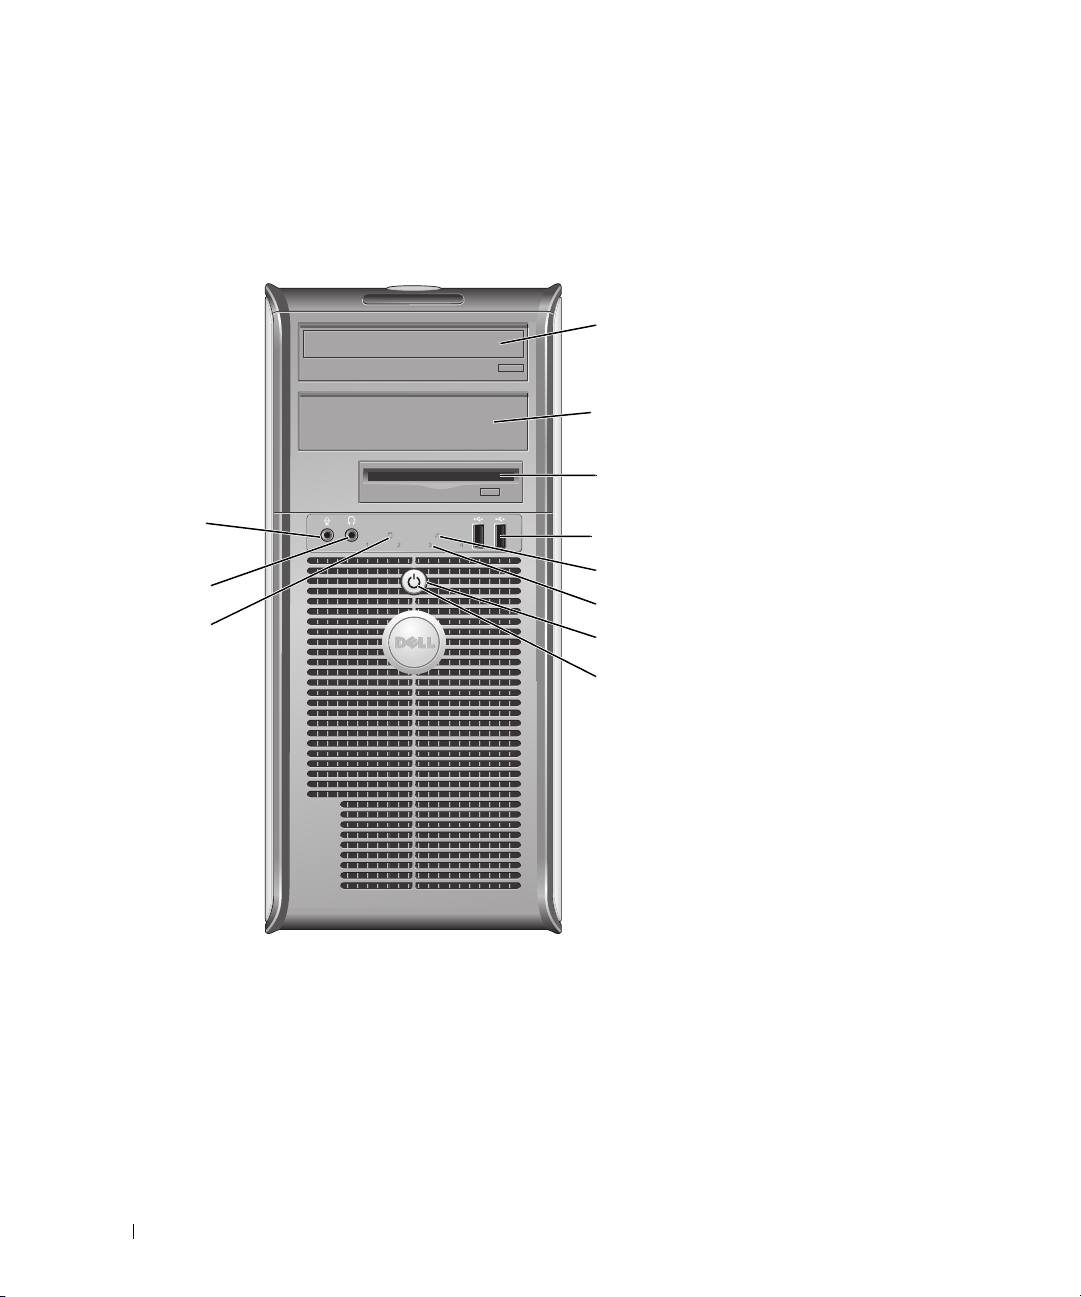
Mini Tower Computer — Front View
1
2
3
11
10
9
4
5
6
7
8
8 Quick Reference Guide
Page 9

1 5.25-inch drive bay Can contain an optical drive. Insert a CD or DVD (if supported) into this drive.
2 5.25-inch drive bay Can contain an optical drive. Insert a CD or DVD (if supported) into this drive.
3 3.5-inch drive bay Can contain an optional floppy drive or optional media card reader.
4 USB 2.0 connectors (2) Use the front USB connectors for devices that you connect occasionally, such as
joysticks or cameras, or for bootable USB devices (see your online User’s Guide
for more information on booting to a USB device).
It is recommended that you use the back USB connectors for devices that
typically remain connected, such as printers and keyboards.
5 LAN indicator light This light indicates that a LAN (local area network) connection is established.
6 diagnostic lights Use the lights to help you troubleshoot a computer problem based on the
diagnostic code. For more information, see "Diagnostic Lights" on page 25.
7 power button Press this button to turn on the computer.
NOTICE: To avoid losing data, do not turn off the computer by pressing the
power button. Instead, perform an operating system shutdown. See "Before
You Begin" on page 13 for more information.
NOTICE: If your operating system has ACPI enabled, when you press the
power button the computer will perform an operating system shutdown.
8 power light The power light illuminates and blinks or remains solid to indicate different
operating modes:
• No light — The computer is turned off.
• Steady green — The computer is in a normal operating state.
• Blinking green — The computer is in a power-saving mode.
• Blinking or solid amber — See
To exit from a power-saving mode, press the power button or use the keyboard or
the mouse if it is configured as a wake device in the Windows Device Manager.
For more information about sleep modes and exiting from a power-saving mode,
see your online User’s Guide.
See "System Lights" on page 24 for a description of light codes that can help you
troubleshoot problems with your computer.
9 hard-drive activity light This light flickers when the hard drive is being accessed.
10 headphone connector Use the headphone connector to attach headphones and most kinds of speakers.
11 microphone connector Use the microphone connector to attach a microphone.
your online User’s Guide
.
Quick Reference Guide 9
Page 10

Mini Tower Computer — Back View
1
2
3
4
5
10 Quick Reference Guide
6
Page 11

1 cover-release latch This latch allows you to open the computer cover.
2 padlock ring Insert a padlock to lock the computer cover.
3 voltage selection switch Your computer is equipped with a manual voltage-selection switch.
To help avoid damaging a computer with a manual voltage-selection switch, set
the switch for the voltage that most closely matches the AC power available in
your location.
NOTICE: The voltage selection switch must be set to the 115-V position even
though the AC power available in Japan is 100 V.
Also, ensure that your monitor and attached devices are electrically rated to
operate with the AC power available in your location.
4 power connector Insert the power cable.
5 back-panel connectors Plug serial, USB, and other devices into the appropriate connectors (see "Mini
Tower Computer — Back-Panel Connectors" on page 11).
6 card slots Access connectors for any installed PCI and PCI Express cards.
Mini Tower Computer — Back-Panel Connectors
13
98 7
24
5
6
Quick Reference Guide 11
Page 12

1 parallel connector Connect a parallel device, such as a printer, to the parallel connector. If you have a
USB printer, plug it into a USB connector.
NOTE: The integrated parallel connector is automatically disabled if the computer
detects an installed card containing a parallel connector configured to the same
address. For more information, see your online User’s Guide.
2 link integrity light
3 network adapter
connector
• Green — A good connection exists between a 10-Mbps network and the
computer.
• Orange — A good connection exists between a 100-Mbps network and the
computer.
• Yellow — A good connection exists between a 1-Gbps (or 1000-Mbps) network
and the computer.
• Off — The computer is not detecting a physical connection to the network.
To attach your computer to a network or broadband device, connect one end of a
network cable to either a network jack or your network or broadband device.
Connect the other end of the network cable to the network adapter connector on
the back panel of your computer. A click indicates that the network cable has been
securely attached.
NOTE: Do not plug a telephone cable into the network connector.
On computers with a network connector card, use the connector on the card.
It is recommended that you use Category 5 wiring and connectors for your
network. If you must use Category 3 wiring, force the network speed to 10 Mbps to
ensure reliable operation.
4 network activity light Flashes a yellow light when the computer is transmitting or receiving network
data. A high volume of network traffic may make this light appear to be in a steady
"on" state.
5 line-out connector Use the green line-out connector to attach most speakers with integrated
amplifiers.
6 line-in/microphone
connector
7 USB 2.0 connectors (6) Use the back USB connectors for devices that typically remain connected, such as
8 video connector Plug the cable from your VGA-compatible monitor into the blue connector.
Use the blue and pink line-in/microphone connector to attach a record/playback
device such as a cassette player, CD player, or VCR.; or a personal computer
microphone for voice or musical input into a sound or telephony program.
printers and keyboards.
NOTE: If you purchased an optional graphics card, this connector will be covered by
a cap. Connect your monitor to the connector on the graphics card. Do not remove
the cap.
NOTE: If you are using a graphics card that supports dual monitors, use the y-cable
that came with your computer.
9 serial connector Connect a serial device, such as a handheld device, to the serial port. The default
designations are COM1 for serial connector 1 and COM2 for serial connector 2.
For more information, see your online User’s Guide.
12 Quick Reference Guide
Page 13

Removing the Computer Cover
CAUTION: Before you begin any of the procedures in this section, follow the safety instructions in the
Product Information Guide.
CAUTION: To guard against electrical shock, always unplug your computer from the electrical outlet before
removing the cover.
Before You Begin
NOTICE: To avoid losing data, save and close any open files and exit any open programs before you turn off
your computer.
1
Shut down the operating system:
a
Save and close any open files, exit any open programs, click the
Turn Off Computer
b
In the
Turn off computer
.
window, click
Tur n o ff
.
The computer turns off after the operating system shutdown process finishes.
2
Ensure that the computer and any attached devices are turned off. If your computer and attached
devices did not automatically turn off when you shut down your operating system, turn them off now.
Before Working Inside Your Computer
Use the following safety guidelines to help protect your computer from potential damage and to help
ensure your own personal safety.
CAUTION: Before you begin any of the procedures in this section, follow the safety instructions in the
Product Information Guide.
Start
button, and then click
CAUTION: Handle components and cards with care. Do not touch the components or contacts on a card. Hold a
card by its edges or by its metal mounting bracket. Hold a component such as a processor by its edges, not by
its pins.
NOTICE: Only a certified service technician should perform repairs on your computer. Damage due to servicing
that is not authorized by Dell is not covered by your warranty.
NOTICE: When you disconnect a cable, pull on its connector or on its strain-relief loop, not on the cable itself.
Some cables have a connector with locking tabs; if you are disconnecting this type of cable, press in on the locking
tabs before you disconnect the cable. As you pull connectors apart, keep them evenly aligned to avoid bending any
connector pins. Also, before you connect a cable, ensure that both connectors are correctly oriented and aligned.
To avoid damaging the computer, perform the following steps before you begin working inside the
computer.
1
Turn off your computer.
NOTICE: To disconnect a network cable, first unplug the cable from your computer and then unplug it from the
network wall jack.
2
Disconnect any telephone or telecommunication lines from the computer.
Quick Reference Guide 13
Page 14

3
Disconnect your computer and all attached devices from their electrical outlets, and then press the
power button to ground the system board.
4
If applicable, remove the computer stand (for instructions, see the documentation that came with the
stand).
CAUTION: To guard against electrical shock, always unplug your computer from the electrical outlet before
removing the cover.
5
Remove the computer cover. See "Mini Tower Computer" on page 14.
NOTICE: Before touching anything inside your computer, ground yourself by touching an unpainted metal surface,
such as the metal at the back of the computer. While you work, periodically touch an unpainted metal surface to
dissipate any static electricity that could harm internal components.
Mini Tower Computer
CAUTION: Before you begin any of the procedures in this section, follow the safety instructions in the
Product Information Guide.
CAUTION: To guard against electrical shock, always unplug your computer from the electrical outlet before
removing the computer cover.
1
Follow the procedures in "Before You Begin" on page 13.
2
Lay the computer on its side as shown in the illustration.
3
Locate the cover release latch shown in the illustration. Then, slide the release latch back as you lift the
cover.
4
Grip the sides of the computer cover and pivot the cover up using the hinge tabs as leverage points.
5
Remove the cover from the hinge tabs and set it aside on a soft nonabrasive surface.
CAUTION: Graphic card heatsinks may become very hot during normal operation. Ensure that a graphic card
heatsink has had sufficient time to cool before you touch it.
14 Quick Reference Guide
Page 15

1
2
3
1 security cable slot 2 cover release latch 3 padlock ring
Quick Reference Guide 15
Page 16
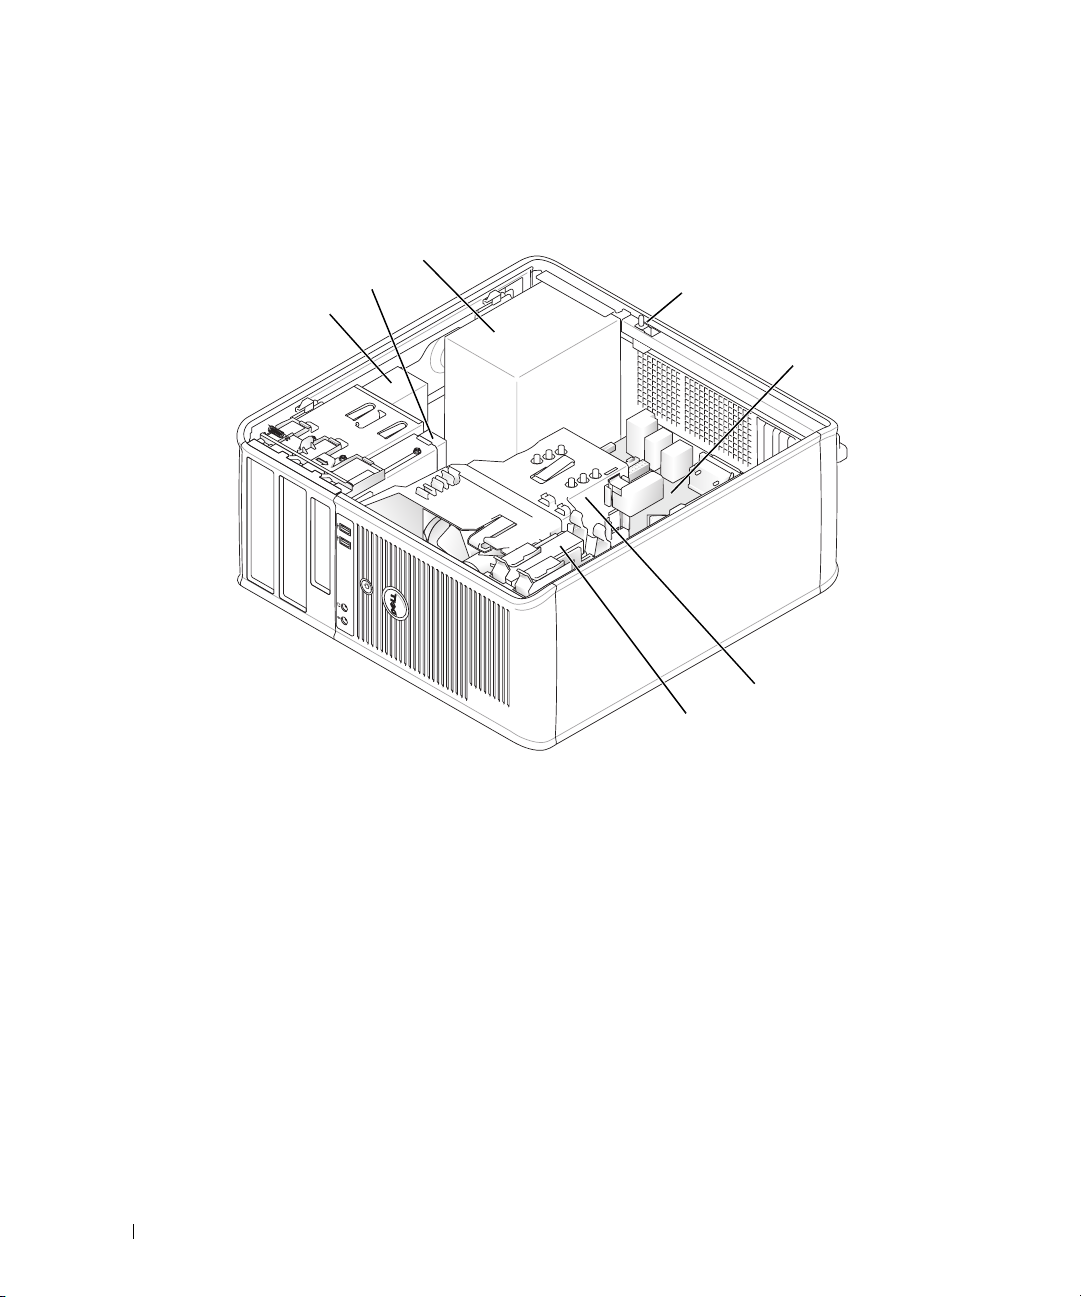
Inside Your Computer
Mini Tower Computer
2
1
3
4
5
6
7
1 optical drive 2 floppy drive 3 power supply
4 chassis-intrusion switch 5 system board 6 heat-sink assembly
7 hard drive
16 Quick Reference Guide
Page 17

System Board Components
21
1
2
3
20
4
19
18
5
6
17
7
16
MFG_MODE
15
14
8
9
13
12
11
10
Quick Reference Guide 17
Page 18
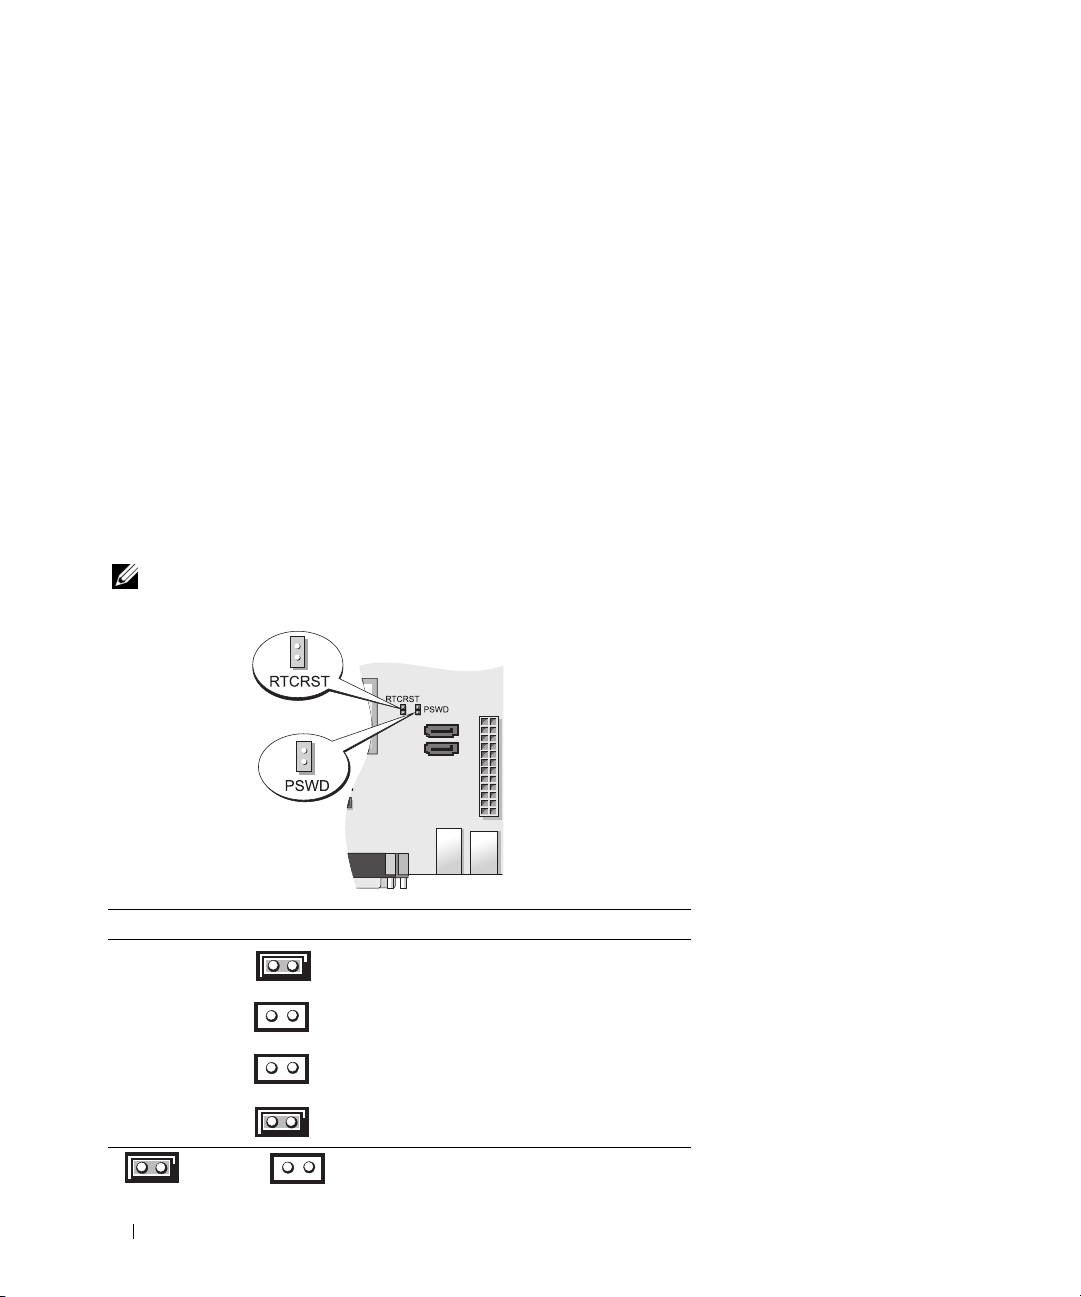
1 fan connector (FAN) 12 internal USB (INTERNAL_USB)
2 processor connector (CPU) 13 battery socket (BATT)
3 processor power connector (12VPOWER) 14 PCI Express x16 connector (SLOT1)
4 memory module connectors (DIMM_1, DIMM_2,
DIMM_3, DIMM_4)
5 RTC reset jumper (RTCRST) 16 PCI connector (SLOT2)
6 password jumper (PSWD) 17 PCI connector (SLOT3)
7 SATA drive connectors (SATA0, SATA1, SATA4, SATA5) 18 serial connector (SER2)
8 manufacturing mode jumper (MFG_MODE) 19 floppy drive connector (DSKT)
9 front-panel connector (FNT_PANEL) 20 system board speaker (BEEP)
10 power connector (POWER) 21 speaker connector (INT_SPKR)
11 intrusion switch connector (INTRUDER)
15 PCI Express x1 connector (SLOT4)
Jumper Settings
NOTE: Do not populate the MFG_MODE jumper. Active Management technology will not function properly. Only
manufacturing uses this jumper.
Jumper Setting Description
PSWD Password features are enabled
(default setting).
Password features are
disabled.
RTCRST The real-time clock has
not been reset.
jumpered unjumpered
The real-time clock is being reset
(jumpered temporarily).
18 Quick Reference Guide
Page 19

Setting Up Your Computer
CAUTION: Before performing any of the procedures in this section, follow the safety instructions in
Product Information Guide.
NOTICE: If your computer has an expansion card installed (such as a modem card), connect the appropriate cable
to the card, not to the connector on the back panel.
NOTICE: To help allow the computer to maintain proper operating temperature, ensure that you do not place the
computer too close to a wall or other storage compartment that might prevent air circulation around the chassis.
See your Product Information Guide for more information.
NOTE: Before you install any devices or software that did not ship with your computer, read the documentation
that came with the device or software, or contact the vendor to verify that the device or software is compatible
with your computer and operating system.
You must complete all the steps to properly set up your computer. See the appropriate figures that follow
the instructions.
NOTICE: Do not attempt to operate a PS/2 mouse and a USB mouse simultaneously.
1
Connect the keyboard and mouse.
NOTICE: Do not connect a modem cable to the network adapter connector. Voltage from telephone
communications can cause damage to the network adapter
2
Connect the modem or network cable.
Insert the network cable, not the telephone line, into the network connector. If you have an optional
modem, connect the telephone line to the modem.
3
Connect the monitor.
Align and gently insert the monitor cable to avoid bending connector pins. Tighten the thumbscrews
on the cable connectors.
NOTE: Some monitors have the video connector underneath the back of the screen. See the documentation
that came with your monitor for its connector locations.
4
Connect the speakers.
5
Connect power cables to the computer, monitor, and devices and connect the other ends of the power
cables to electrical outlets.
NOTICE: To avoid damaging a computer with a manual voltage-selection switch, set the switch for the voltage that
most closely matches the AC power available in your location.
NOTICE: In Japan, the voltage selection switch must be set to the 115-V position even though the AC power
available in Japan is 100 V.
6
Verify that the voltage selection switch is set correctly for your location.
Your computer has a manual voltage-selection switch. Computers with a voltage selection switch on
the back panel must be manually set to operate at the correct operating voltage.
Quick Reference Guide 19
Page 20
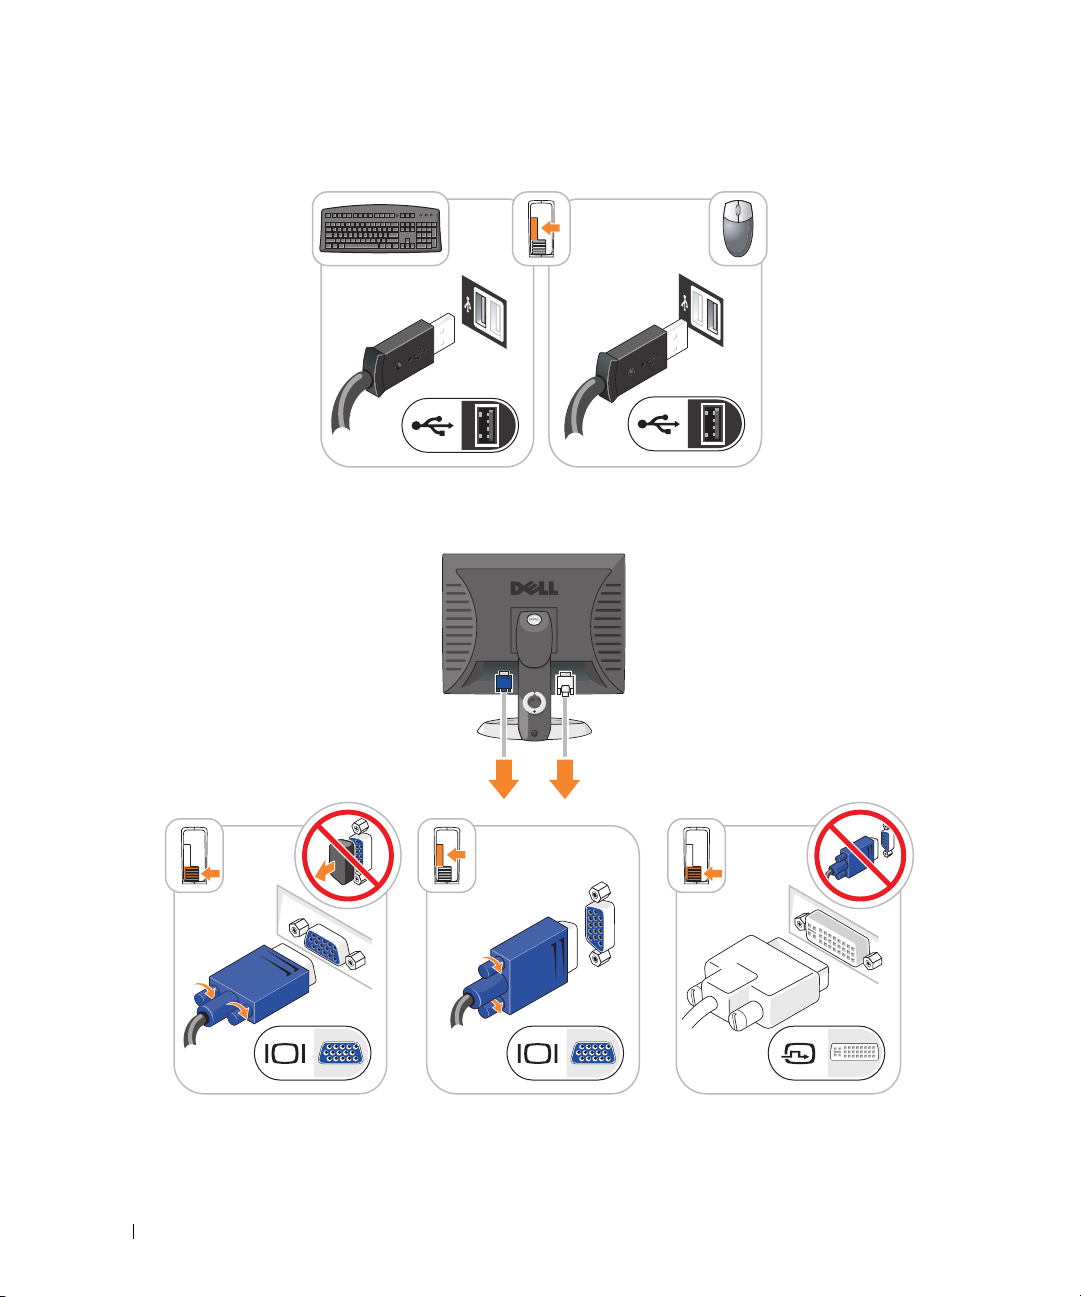
Set Up Your Keyboard and Mouse
Set Up Your Monitor
20 Quick Reference Guide
Page 21

Power Connections
Solving Problems
Dell provides a number of tools to help you if your computer does not perform as expected. For the latest
troubleshooting information available for your computer, see the Dell Support website at
support.dell.com.
If computer problems occur that require help from Dell, write a detailed description of the error, beep
codes, or diagnostics light patterns, record your Express Service Code and Service Tag below, and then
contact Dell from the same location as your computer. For information on contacting Dell, see your
online User’s Guide.
For an example of the Express Service Code and Service Tag, see "Finding Information" in your computer
User’s Guide.
Express Service Code: ___________________________
Service Tag: ___________________________
Dell Diagnostics
CAUTION: Before you begin any of the procedures in this section, follow the safety instructions in the
Product Information Guide.
When to Use the Dell Diagnostics
If you experience a problem with your computer, perform the checks in "Solving Problems" in your online
User’s Guide and run the Dell Diagnostics before you contact Dell for technical assistance. For
information on contacting Dell, see your online User’s Guide.
NOTICE: The Dell Diagnostics works only on Dell™ computers.
Quick Reference Guide 21
Page 22

Enter system setup (see "System Setup" in your online User’s Guide for instructions), review your
computer’s configuration information, and ensure that the device you want to test displays in system
setup and is active.
Start the Dell Diagnostics from either your hard drive or from the optional Drivers and Utilities CD
(ResourceCD).
Starting the Dell Diagnostics From Your Hard Drive
1
Turn on (or restart) your computer.
2
When the DELL logo appears, press <F12> immediately.
NOTE: If you see a message stating that no diagnostics utility partition has been found, run the Dell
Diagnostics from the optional Drivers and Utilities CD (see "Starting the Dell Diagnostics From the Drivers and
Utilities CD" on page 22).
If you wait too long and the operating system logo appears, continue to wait until you see the
Microsoft
®
Windows® desktop. Then shut down your computer and try again.
When the boot device list appears, highlight
3
When the Dell Diagnostics
Starting the Dell Diagnostics From the Drivers and Utilities CD
1
Insert the
2
Shut down and restart the computer.
Drivers and Utilities
Main Menu
CD.
Boot to Utility Partition
appears, select the test you want to run.
and press <Enter>.
When the DELL logo appears, press <F12> immediately.
If you wait too long and the operating system logo appears, continue to wait until you see the
Microsoft Windows desktop. Then shut down your computer and try again.
NOTE: The next steps change the boot sequence for one time only. On the next start-up, the computer boots
according to the devices specified in system setup.
3
When the boot device list appears, highlight the listing for the CD/DVD drive and press <Enter>.
4
Select the listing for the CD/DVD drive option from the CD boot menu.
5
Select the option to boot from the CD/DVD drive from the menu that appears.
6
Ty p e 1 to start the
7
Ty p e 2 to start the Dell Diagnostics.
8
Select
Run the 32 Bit Dell Diagnostics
Drivers and Utilities
CD menu.
from the numbered list. If multiple versions are listed, select
the version appropriate for your computer.
9
When the Dell Diagnostics
Main Menu
appears, select the test you want to run.
22 Quick Reference Guide
Page 23

Dell Diagnostics Main Menu
1
After the Dell Diagnostics loads and the
Main Menu
screen appears, click the button for the option
you want.
Option Function
Express Test Performs a quick test of devices. This test typically takes 10 to 20 minutes and
requires no interaction on your part. Run Express Test first to increase the
possibility of tracing the problem quickly.
Extended Test Performs a thorough check of devices. This test typically takes an hour or more
and requires you to answer questions periodically.
Custom Test Tests a specific device. You can customize the tests you want to run.
Symptom Tree Lists the most common symptoms encountered and allows you to select a test
based on the symptom of the problem you are having.
2
If a problem is encountered during a test, a message appears with an error code and a description of the
problem. Write down the error code and problem description and follow the instructions on the
screen.
If you cannot resolve the error condition, contact Dell. For information on contacting Dell, see your
online
User’s Guide
NOTE: The Service Tag for your computer is located at the top of each test screen. If you contact Dell,
technical support will ask for your Service Tag.
3
If you run a test from the
.
Custom Test
or
Symptom Tree
option, click the applicable tab described in
the following table for more information.
Tab Function
Results Displays the results of the test and any error conditions encountered.
Errors Displays error conditions encountered, error codes, and the problem
description.
Help Describes the test and may indicate requirements for running the test.
Configuration Displays your hardware configuration for the selected device.
The Dell Diagnostics obtains configuration information for all devices from
system setup, memory, and various internal tests, and it displays the
information in the device list in the left pane of the screen. The device list may
not display the names of all the components installed on your computer or all
devices attached to your computer.
Parameters You can customize the test by changing the test settings.
Quick Reference Guide 23
Page 24

4
When the tests are completed, if you are running the Dell Diagnostics from the
CD (optional), remove the CD.
5
Close the test screen to return to the
computer, close the
Main Menu
Main Menu
screen.
screen. To exit the Dell Diagnostics and restart the
System Lights
Your power light may indicate a computer problem.
Power Light Problem Description Suggested Resolution
Solid green Power is on, and the computer is
operating normally.
Blinking green The computer is in a power-saving
mode.
Blinks green several
times and then
turns off
Solid yellow A device on the system board may be
Blinking yellow A power supply or system board
Solid green and a
beep code during
POST
Solid green power
light, no beep code
and no video during
POST
Solid green power
light and no beep
code, but the
computer locks up
during POST
A configuration error exists. Check Diagnostic Lights to see if the specific problem
faulty or incorrectly installed or the
voltage selection switch on the power
supply may be set incorrectly.
failure has occurred.
A problem was detected while the
BIOS was executing.
The monitor or the graphics card may
be faulty or incorrectly installed.
An integrated system board device
may be faulty.
No corrective action is required.
Press the power button, move the mouse, or press a
key on the keyboard to wake the computer.
is identified (see "Diagnostic Lights" on page 25).
Check Diagnostic Lights to see if the specific problem
is identified (see "Diagnostic Lights" on page 25).
See "Power Problems" in your online User’s Guide.
If the computer does not boot, contact Dell for
technical assistance.
Dell, see your online
Check Diagnostic Lights to see if the specific problem
is identified (see "Diagnostic Lights" on page 25).
See "Power Problems" in your online User’s Guide.
If the computer does not boot, contact Dell for
technical assistance.
Dell, see your online
For instructions on diagnosing the beep code see
"Beep Codes" on page 27. Also, check Diagnostic
Lights to see if the specific problem is identified.
Check Diagnostic Lights to see if the specific problem
is identified.
Check Diagnostic Lights to see if the specific problem
is identified. If the problem is not identified, contact
Dell for technical assistance.
contacting Dell, see your online
Drivers and Utilities
For information on contacting
User’s Guide
For information on contacting
User’s Guide
.
.
For information on
User’s Guide
.
24 Quick Reference Guide
Page 25

Diagnostic Lights
CAUTION: Before you begin any of the procedures in this section, follow the safety instructions in the
Product Information Guide.
To help you troubleshoot a problem, your computer has four lights labeled "1," "2," "3," and "4" on the
front or back panel. The lights can be "off" or green. When the computer starts normally, the patterns or
codes on the lights change as the boot process completes. If the POST portion of system boot completes
successfully, all four lights display solid green for a short time, and then turn off.
If the computer malfunctions during the POST process, the pattern displayed on the LEDs may help
identify where in the process the computer halted. If the computer malfunctions after a successful
POST, the diagnostic lights do not indicate the cause of the problem.
NOTE: The orientation of the diagnostic lights may vary depending on the system type. The diagnostic lights can be
either vertically or horizontally oriented.
Light Pattern Problem Description Suggested Resolution
The computer is in a normal "off" condition, or a
possible pre-BIOS failure has occurred.
The diagnostic lights are not lit after the computer
successfully boots to the operating system.
A possible BIOS failure has occurred; the
computer is in recovery mode.
A possible processor failure has occurred. Reinstall the processor and restart the
Memory modules are detected, but a memory
failure has occurred.
Plug the computer into a working
electrical outlet and press the power
button.
Run the BIOS Recovery utility, wait for
recovery completion, and then restart the
computer.
computer.
the processor, see your online
• If you have one memory module installed,
• If you have two or more memory modules
• If available, install properly working
• If the problem persists,
For information on reinstalling
User’s Guide
reinstall it and restart the computer. For
information on reinstalling memory
modules, see your online
installed, remove the modules, reinstall
one module, and then restart the computer.
If the computer starts normally, reinstall
an additional module. Continue until
you have identified a faulty module or
reinstalled all modules without error.
memory of the same type into your
computer.
For information on contacting Dell, see
your online
User’s Guide
User’s Guide
contact Dell
.
.
.
.
Quick Reference Guide 25
Page 26
Light Pattern Problem Description Suggested Resolution
A possible graphics card failure has occurred.
A possible floppy or hard drive failure has
occurred.
A possible USB failure has occurred. Reinstall all USB devices, check cable
No memory modules are detected.
• If the computer has a graphics card,
remove the card, reinstall it, and then
restart the computer.
• If the problem still exists, install a
graphics card that you know works and
restart the computer.
• If the problem persists or the computer
has integrated graphics,
For information on contacting Dell, see
your online
Reseat all power and data cables and
restart the computer.
connections, and then restart the
computer.
• If you have one memory module
installed, reinstall it and restart the
computer. For information on
reinstalling memory modules, see your
online
• If you have two or more memory
modules installed, remove the modules,
reinstall one module, and then restart
the computer. If the computer starts
normally, reinstall an additional module.
Continue until you have identified a
faulty module or reinstalled all modules
without error.
• If available, install properly working
memory of the same type into your
computer.
• If the problem persists,
information on contacting Dell, see your
online
User’s Guide
User’s Guide
User’s Guide
contact Dell
.
.
contact Dell
.
.
. For
26 Quick Reference Guide
Page 27

Light Pattern Problem Description Suggested Resolution
Memory modules are detected, but a memory
configuration or compatibility error exists.
A failure has occurred.
This pattern also displays when you enter system
setup and may not indicate a problem.
• Ensure that no
module/memory connector placement
requirements
• Verify that the
you are installing are compatible with
your computer.
• If the problem persists,
information on contacting Dell, see your
User’s Guide
online
• Ensure that the cables are properly
connected to the system board from the
hard drive, CD drive, and DVD drive.
• Check the computer message that
appears on your monitor screen.
• If the problem persists,
information on contacting Dell, see your
User’s Guide
online
special memory
exist.
memory modules
contact Dell
.
contact Dell
.
that
. For
. For
Beep Codes
Your computer might emit a series of beeps during start-up if the monitor cannot display errors or problems.
This series of beeps, called a beep code, identifies a problem. One possible beep code (code 1 3-1)
consists of one beep, a burst of three beeps, and then one beep. This beep code tells you that the
computer encountered a memory problem.
If your computer beeps during start-up:
1
Write down the beep code.
2
See "Dell Diagnostics" on page 21 to identify a more serious cause.
3
Contact Dell for technical assistance. For information on contacting Dell, see your online
User’s Guide
.
Code Cause Code Cause
1-1-2 Microprocessor register failure 3-1-4 Slave interrupt mask register failure
1-1-3 NVRAM read/write failure 3-2-2 Interrupt vector loading failure
1-1-4 ROM BIOS checksum failure 3-2-4 Keyboard Controller test failure
1-2-1 Programmable interval timer failure 3-3-1 NVRAM power loss
1-2-2 DMA initialization failure 3-3-2 Invalid NVRAM configuration
1-2-3 DMA page register read/write failure 3-3-4 Video Memory test failure
1-3 Video Memory test failure 3-4-1 Screen initialization failure
Quick Reference Guide 27
Page 28

Code Cause Code Cause
1-3-1 through
2-4-4
3-1-1 Slave DMA register failure 3-4-3 Search for video ROM failure
3-1-2 Master DMA register failure 4-2-1 No timer tick
3-1-3 Master interrupt mask register failure 4-2-2 Shutdown failure
4-2-3 Gate A20 failure 4-4-1 Serial or parallel port test failure
4-2-4 Unexpected interrupt in protected mode 4-4-2 Failure to decompress code to
4-3-1 Memory failure above address 0FFFFh 4-4-3 Math-coprocessor test failure
4-3-3 Timer-chip counter 2 failure 4-4-4 Cache test failure
4-3-4 Time-of-day clock stopped
Memory not being properly
identified or used
3-4-2 Screen retrace failure
shadowed memory
Resolving Software and Hardware Incompatibilities
If a device is either not detected during the operating system setup or is detected but incorrectly
configured, you can use the Hardware Troubleshooter to resolve the incompatibility.
1
Click the
2
Ty p e
3
Click
4
In the
click
Start
button and click
Help and Support
hardware troubleshooter
Hardware Troubleshooter
Hardware Troubleshooter
Next
.
in the
list, click
.
in the
Search
field and click the arrow to start the search.
Search Results
list.
I need to resolve a hardware conflict on my computer
, and
Using Microsoft Windows XP System Restore
The Microsoft Windows XP operating system provides System Restore to allow you to return your
computer to an earlier operating state (without affecting data files) if changes to the hardware, software,
or other system settings have left the computer in an undesirable operating state. See the Windows Help
and Support Center for information on using System Restore. To access the Windows Help and Support
Center, see "Windows Help and Support Center" on page 6.
NOTICE: Make regular backups of your data files. System Restore does not monitor your data files or recover them.
Creating a Restore Point
1
Click the
2
Click
3
Follow the instructions on the screen.
28 Quick Reference Guide
Start
button and click
System Restore
Help and Support
.
.
Page 29

Restoring the Computer to an Earlier Operating State
NOTICE: Before you restore the computer to an earlier operating state, save and close any open files and exit any
open programs. Do not alter, open, or delete any files or programs until the system restoration is complete.
1
Click the
2
Ensure that
3
Click a calendar date to which you want to restore your computer.
The
Start
button, point to
Restore my computer to an earlier time
Select a Restore Point
All Programs→
Accessories→
is selected, and click
System Tools
, and then click
Next
.
System Restore
screen provides a calendar that allows you to see and select restore points.
All calendar dates with available restore points appear in boldface type.
4
Select a restore point and click
Next
.
If a calendar date has only one restore point, then that restore point is automatically selected. If two or
more restore points are available, click the restore point that you prefer.
5
Click
Next
.
The
Restoration Complete
screen appears after System Restore finishes collecting data and then the
computer restarts.
6
After the computer restarts, click OK.
To change the restore point, you can either repeat the steps using a different restore point, or you can
undo the restoration.
Undoing the Last System Restore
NOTICE: Before you undo the last system restore, save and close all open files and exit any open programs. Do not
alter, open, or delete any files or programs until the system restoration is complete.
1
Click the
2
Click
3
Click
The
Start
button, point to
Undo my last restoration
Next
.
System Restore
screen appears and the computer restarts.
All Programs→ Accessories→ System Tools
and click
Next
.
, and then click
System Restore
.
.
4
After the computer restarts, click OK.
Enabling System Restore
If you reinstall Windows XP with less than 200 MB of free hard-disk space available, System Restore is
automatically disabled. To verify that System Restore is enabled:
1
Click the
2
Click
3
Click
4
Click the
5
Ensure that
Start
button and click
Control Panel
Performance and Maintenance
System
.
System Restore
tab.
Turn off System Restore
.
.
is unchecked.
Quick Reference Guide 29
Page 30

Reinstalling Microsoft Windows XP
Getting Started
NOTE: The procedures in this document were written for the Windows default view in Windows XP Home Edition, so
the steps will differ if you set your Dell computer to the Windows Classic view or are using Windows XP Professional.
If you are considering reinstalling the Windows XP operating system to correct a problem with a newly
installed driver, first try using Windows XP Device Driver Rollback.
1
Click the
2
Under
3
Click
4
In the
5
Click
6
Right-click the device for which the new driver was installed and click
7
Click the
8
Click
If Device Driver Rollback does not resolve the problem, then use System Restore to return your operating
system to the operating state it was in before you installed the new device driver (see "Using Microsoft
Windows XP System Restore" on page 28).
NOTE: The Drivers and Utilities CD contains drivers that were installed during assembly of the computer. Use the
Drivers Utilities CD to load any required drivers, including the drivers required if your computer has a RAID controller.
Start
button and click
Pick a Category
System
.
System Properties
Device Manager
Drivers
tab.
Roll Back Driver
Control Pane
, click
Performance and Maintenance
window, click the
l.
Hardware
.
.
tab.
.
Properties
.
Reinstalling Windows XP
NOTICE: You must use Windows XP Service Pack 1 or later when you reinstall Windows XP.
NOTICE: Before performing the installation, back up all data files on your primary hard drive. For conventional
hard drive configurations, the primary hard drive is the first drive detected by the computer.
To reinstall Windows XP, you need the following items:
•Dell
•Dell
Operating System
CD
Drivers and Utilities
CD
To reinstall Windows XP, perform all the steps in the following sections in the order in which they are listed.
The reinstallation process can take 1 to 2 hours to complete. After you reinstall the operating system, you
must also reinstall the device drivers, virus protection program, and other software.
NOTICE: The Operating System CD provides options for reinstalling Windows XP. The options can overwrite files
and possibly affect programs installed on your hard drive. Therefore, do not reinstall Windows XP unless a Dell
technical support representative instructs you to do so.
NOTICE: To prevent conflicts with Windows XP, disable any virus protection software installed on your computer
before you reinstall Windows XP. See the documentation that came with the software for instructions.
30 Quick Reference Guide
Page 31

Booting From the Operating System CD
1
Save and close any open files and exit any open programs.
2
Insert the
3
Restart the computer.
4
Press <F12> immediately after the DELL logo appears.
Operating System
CD. Click
Exit
if the
Install Windows XP
message appears.
If the operating system logo appears, wait until you see the Windows desktop, and then shut down the
computer and try again.
5
Press the arrow keys to select
6
When the
Windows XP Setup
1
When the
2
Read the information on the
Press any key to boot from CD
Windows XP Setup
CD-ROM
, and press <Enter>.
message appears, press any key.
screen appears, press <Enter> to select
Microsoft Windows Licensing Agreement
To set up Windows now
screen, and press <F8> to
accept the license agreement.
3
If your computer already has Windows XP installed and you want to recover your current Windows XP
r
data, type
4
If you want to install a new copy of Windows XP, press <Esc> to select that option.
5
Press <Enter> to select the highlighted partition (recommended), and follow the instructions on the
to select the repair option, and remove the CD.
screen.
The
Windows XP Setup
screen appears, and the operating system begins to copy files and install the
devices. The computer automatically restarts multiple times.
.
NOTE: The time required to complete the setup depends on the size of the hard drive and the speed of your
computer.
NOTICE: Do not press any key when the following message appears: Press any key to boot from
the CD
6
When the
click
7
Enter your name and organization (optional) in the
8
At the
accept the one provided) and a password, and click
9
If the
10
Enter the date, time, and time zone in the
11
If the
.
Regional and Language Options
Next
.
screen appears, select the settings for your location and
Computer Name and Administrator Password
Modem Dialing Information
screen appears, enter the requested information and click
Date and Time Settings
Networking Settings
screen appears, click
Personalize Your Software
screen, and click
window, enter a name for your computer (or
Next
.
Typical
and click
window, and click
Next
.
Quick Reference Guide 31
Next
Next
.
Next
.
.
Page 32

12
If you are reinstalling Windows XP Professional and you are prompted to provide further information
regarding your network configuration, enter your selections. If you are unsure of your settings, accept
the default selections.
Windows XP installs the operating system components and configures the computer. The computer
automatically restarts.
NOTICE: Do not press any key when the following message appears: Press any key to boot from
the CD.
When the
13
14
When the
click
15
When the
16
When the
17
Click
18
Click
19
Reinstall the appropriate drivers with the
20
Reinstall your virus protection software.
21
Reinstall your programs.
NOTE: To reinstall and activate your Microsoft Office or Microsoft Works Suite programs, you need the Product
Key number located on the back of the Microsoft Office or Microsoft Works Suite CD sleeve.
Welcome to Microsoft
screen appears, click
Next
.
How will this computer connect to the Internet?
Skip
.
Ready to register with Microsoft?
Who will use this computer?
Next
.
Finish
to complete the setup, and remove the CD.
screen appears, select
No, not at this time
screen appears, you can enter up to five users.
Drivers and Utilities
CD.
message appears,
and click
Microsoft® Windows Vista™
Users familiar with previous versions of Microsoft® Windows® will notice some differences in the
Microsoft Windows Vista features and user interface.
Next
.
NOTE: For complete documentation of Windows Vista, refer to the Microsoft Windows Vista documentation.
The Windows Vista Help and Support provides online documentation. Click the Start button and select
Help and Support to access this information. Use the Search text box to search for a topic.
NOTE: Different versions of the Microsoft Windows Vista operating system provide different features and have
different system requirements. Your hardware configuration may also determine the Windows Vista features
available to you. For more information, see the Microsoft Windows Vista documentation for specific details and
system requirements.
NOTE: A variety of documentation is provided with your computer system. You may notice that some
documentation references Windows XP. In general, documentation referencing Windows XP is applicable to your
Windows Vista system. In some cases, the names of menu options or other screen elements are different in
Windows Vista. For more information, see Getting Started Guide for Microsoft® Windows Vista™ on
support.dell.com.
32 Quick Reference Guide
Page 33

Upgrading to Microsoft Windows Vista
NOTE: The version of Microsoft Windows Vista installed on your computer is determined by the product key
associated with the upgrade. Your product key is located on the back of the Windows Vista Install DVD package.
During the Windows Vista upgrade process, you will:
• Use the Dell Windows Vista Upgrade Assistant DVD to check your system for compatibility and
perform any required updates to your Dell-installed applications and drivers.
• Use the Windows Vista Install DVD to upgrade to Windows Vista.
NOTE: The upgrade procedures in this booklet do not apply to the Windows Vista 64-bit operating system. If you
are upgrading to the Windows Vista 64-bit operating system, a clean install is required.
Before You Begin
NOTICE: Ensure that you have backed up any important data before performing the Windows Vista upgrade procedure.
Before setting up Windows Vista on your Dell computer, ensure that you have the following:
• Dell Windows Vista Upgrade Assistant DVD
• Microsoft Windows Vista Install DVD
• Windows Vista Certificate of Authenticity (COA)
• DVD drive
• At least 512 MB of RAM (system memory)
• 15 GB of free hard drive space
• An active Internet connection
• A copy of the
Dell™ Systems Express Upgrade to Windows® Vista™
document
NOTE: An active Internet connection is required in order to perform updates, but is not required in order to
complete the upgrade to Windows Vista.
The
Dell Windows Vista Upgrade Assistant
checks Dell factory-installed software for Windows Vista
compatibility. If you have installed any additional third-party software, it is recommended that you contact
the software manufacturer for Windows Vista compatibility questions and updates before you begin the
Windows Vista upgrade.
NOTE: Third-party software that is not compatible with Windows Vista may have to be removed prior to upgrading
to the Windows Vista operating system. Ensure that you have a backup copy of your third-party software before
you begin the Windows Vista upgrade.
Quick Reference Guide 33
Page 34

For information on how to back up your data, or to find Windows Vista compatible drivers/updates for your
Dell-installed applications:
1
Go to
support.dell.com
2
Enter your Service Tag or product model, and then click
3
Select your operating system and language, and then click
topics relevant to the information you are looking for
The support.dell.com user interface may vary depending on your selections.
, select your country/region, and then click
Go.
Find Downloads
.
Drivers and Downloads
, or search by keyword for
.
Using the Drivers and Utilities CD
To use the Drivers and Utilities CD (ResourceCD) while you are running the Windows operating system.
NOTE: To access device drivers and user documentation, you must use the Drivers and Utilities CD while you are
running Windows.
1
Turn on the computer and allow it to boot to the Windows desktop.
2
Insert the
If you are using the
Installation
installation.
3
Click OK to continue.
To complete the installation, respond to the prompts offered by the installation program.
Drivers and Utilities
Drivers and Utilities
window opens to inform you that the
CD into the CD drive.
CD for the first time on this computer, the
Drivers and Utilities
ResourceCD
CD is about to begin
4
Click
Next
at the
Select the appropriate
Welcome Dell System Owner
System Model, Operating System, Device Type,
screen.
and
To pi c
.
Drivers for Your Computer
To display a list of device drivers for your computer:
1
Click
My Drivers
Drivers and Utilities
The
then a list of device drivers for your system configuration is displayed on the screen.
2
Click the appropriate driver and follow the instructions to download the driver to your computer.
To view all available drivers for your computer, click Drivers from the Topic drop-down menu.
34 Quick Reference Guide
in the
To pi c
drop-down menu.
CD (optional) scans your computer’s hardware and operating system, and
Page 35

Index
B
beep codes, 27
C
CDs
operating system, 6
conflicts
software and hardware
incompatibilities, 28
cover
removing, 13
D
Dell Diagnostics, 21
Dell support site, 7
diagnostics
beep codes, 27
Dell Diagnostics, 21
documentation
End User License
Agreement, 6
ergonomics, 6
online, 7
Product Information Guide, 6
regulatory, 6
safety, 6
User’s Guide, 5
warranty, 6
drivers
list of, 34
Drivers and Utilities CD, 5
E
End User License
Agreement, 6
ergonomics information, 6
error messages
beep codes, 27
diagnostic lights, 25
system lights, 24
H
hardware
beep codes, 27
conflicts, 28
Dell Diagnostics, 21
Hardware Troubleshooter, 28
Help and Support Center, 6
help file
Windows Help and Support
Center, 6
I
installing parts
before you begin, 13
L
labels
Microsoft Windows, 7
Service Tag, 7
lights
diagnostic, 25
system, 24
M
motherboard. See system
board
O
operating system
reinstalling, 6
reinstalling Windows XP, 30
Operating System CD, 6
P
power light
diagnosing problems with, 24
problems. See troubleshooting
Product Information Guide, 6
IRQ conflicts, 28
Index 35
Page 36

R
U
regulatory information, 6
reinstalling
Windows XP, 30
S
safety instructions, 6
Service Tag, 7
software
conflicts, 28
support website, 7
system board, 17
System Restore, 28
T
troubleshooting
beep codes, 27
conflicts, 28
Dell Diagnostics, 21
diagnostic lights, 25
Hardware Troubleshooter, 28
Help and Support Center, 6
restore computer to previous
operating state, 28
system lights, 24
User’s Guide, 5
W
warranty information, 6
Windows XP
Hardware Troubleshooter, 28
Help and Support Center, 6
reinstalling, 6, 30
setup, 31
System Restore, 28
36 Index
Page 37

Dell™ OptiPlex™ 745c
Stručná referenční příručka
Model DCSM
www.dell.com | support.dell.com
Page 38

Poznámky, upozornění a varování
POZNÁMKA:
UPOZORNĚNÍ:
POZNÁMKA označuje důležité informace, které pomáhají lepšímu využití počítače.
UPOZORNĚNÍ poukazuje na možnost poškození hardwaru nebo ztráty dat a poskytuje návod, jak se danému
problému vyhnout.
VÝSTRAHA: VAROVÁNÍ upozorňuje na potenciální nebezpečí poškození majetku, úrazu nebo smrti.
Pokud jste si zakoupili počítač Dell™ řady n, odkazy na operační systémy Microsoft® Windows® nacházející se v
tomto dokumentu nejsou platné.
____________________
Změna informací v tomto dokumentu vyhrazena.
© 2007 Dell Inc. Všechna práva vyhrazena.
Jakákoli reprodukce bez písemného souhlasu společnosti Dell Inc. je přísně zakázána.
Informace o ochranných známkách citovaných v tomto dokumentu: Dell, logo DELL a OptiPlex jsou ochranné známky společnosti Dell Inc.;
Intel je registrovaná ochranná známka společnosti Intel Corporation; Microsoft, Windows a Vi st a jsou registrované ochranné známky společnosti
Microsoft Corporation.
Ostatní obchodní značky a názvy mohou být v tomto dokumentu použity bud’ v souvislosti s organizacemi, které si na tyto značky a názvy
činí nárok, nebo s jejich produkty. Společnost Dell Inc. si nečiní nárok na jiné obchodní značky a názvy, než své vlastní.
Model DCSM
Únor 2007 Č. dílu NJ423 Rev. A00
Page 39

Obsah
Kde hledat informace
Pohledy na počítač
Počítač typu minivěž - pohled zepředu
Počítač typu minivěž - pohled zezadu
. . . . . . . . . . . . . . . . . . . . . . . . . . . . . .
. . . . . . . . . . . . . . . . . . . . . . . . . . . . . . .
. . . . . . . . . . . . . . . . . . . .
. . . . . . . . . . . . . . . . . . . .
Počítač typu minivěž - konektory na zadním panelu
Demontáž krytu počítače
Než začnete
. . . . . . . . . . . . . . . . . . . . . . . . . . . . . . . .
Počítač typu minivěž
Uvnitř počítače
. . . . . . . . . . . . . . . . . . . . . . . . . . . . . . . . .
Počítač typu minivěž
Instalace počítače
Instalace klávesnice a myši
Instalace monitoru
Připojení napájení
Řešení problémů
Diagnostický nástroj Dell Diagnostics
Systémové indikátory
Diagnostické indikátory
Zvukové signály
. . . . . . . . . . . . . . . . . . . . . . . . . . . .
. . . . . . . . . . . . . . . . . . . . . . . . . . . .
. . . . . . . . . . . . . . . . . . . . . . . . . . . .
. . . . . . . . . . . . . . . . . . . . . . . . . . . . . . .
. . . . . . . . . . . . . . . . . . . . . . . . .
. . . . . . . . . . . . . . . . . . . . . . . . . . . . .
. . . . . . . . . . . . . . . . . . . . . . . . . . . . . .
. . . . . . . . . . . . . . . . . . . . . . . . . . . . . . . .
. . . . . . . . . . . . . . . . . . . .
. . . . . . . . . . . . . . . . . . . . . . . . . . . .
. . . . . . . . . . . . . . . . . . . . . . . . . . .
. . . . . . . . . . . . . . . . . . . . . . . . . . . . . .
Odstraňování nekompatibility softwaru a hardwaru
Používání funkce Obnovení systému operačního systému
Microsoft Windows XP
. . . . . . . . . . . . . . . . . . . . . . . . . . .
Nová instalace operačního systému Windows XP
Microsoft
®
Windows Vista™
. . . . . . . . . . . . . . . . . . . . . . . .
. . . . . . . . . . . . .
. . . . . . . . . . . . .
. . . . . . . . . . . . . .
41
44
44
46
47
49
49
50
52
52
55
56
56
57
57
57
60
61
63
64
64
66
68
Používání disku CD s ovladači a nástroji
Rejstřík
Ovladače pro počítač
. . . . . . . . . . . . . . . . . . . . . . . . . . . . . . . . . . . . . .
. . . . . . . . . . . . . . . . . . . . . . . . . . . .
. . . . . . . . . . . . . . . . . . . .
70
70
71
Obsah
39
Page 40

40
Obsah
Page 41

Kde hledat informace
POZNÁMKA:
nebo média pravděpodobně nebudou v některých zemích k dispozici.
POZNÁMKA:
Hledané informace Kde je naleznete
• Diagnostický program pro počítač
• Ovladače pro počítač
• Dokumentace k počítači
• Dokumentace k zařízení
• Software DSS (Desktop System Software)
Některé funkce nebo média jsou doplňková a nemusela být s tímto počítačem dodána. Některé funkce
Dodatečné informace byly pravděpodobně dodány s počítačem.
Disk CD s ovladači a nástroji (zdrojový disk CD)
POZNÁMKA:
nemusel být s tímto počítačem dodán.
Dokumentace a ovladače jsou již v počítači
nainstalovány. Ovladače můžete znovu nainstalovat z
disku CD (viz „Používání disku CD s ovladači a
nástroji“ Na straně 70), spust’te diagnostický nástroj
Dell Diagnostics (viz „Diagnostický nástroj Dell
Diagnostics“ Na straně 57) nebo přejděte na
dokumentaci.
POZNÁMKA:
dispozici na webu
• Odstraňování a výměna součástí
• Technické údaje
• Konfigurace systému
• Odstraňování a řešení problémů
Uživatelská příručka Dell™ OptiPlex™
Nápověda a odborná pomoc pro operační systém
Microsoft Windows XP
1
Klepněte na tlačítko
→
pomoc
Systémové příručky
2
Klepněte na
Na doplňkovém disku CD s ovladači a nástroji je rovněž
k dispozici uživatelská příručka.
Uživatelské a systémové příručky Dell→
Disk CD s
Ovladače a aktualizace dokumentace jsou k
uživatelskou příručku
ovladači a nástroji
support.dell.com
Start→
.
je doplňkový a
Disk CD může
obsahovat soubory
Readme, které
poskytují nejaktuálnější
informace o
technických změnách
počítače nebo rozšířené
technické referenční
materiály pro technické
pracovníky a pokročilé
uživatele.
.
Nápověda a odborná
pro váš počítač.
Stručná referenční příručka
41
Page 42

Hledané informace Kde je naleznete
• Informace o záruce
Informační příručka k produktu Dell™
• Podmínky (jen USA)
•Bezpečnostní pokyny
• Informace o předpisech
• Informace o ergonomii
• Licenční smlouva s koncovým uživatelem
• Nová instalace operačního systému
• Práce se systémem Windows XP
• Jak pracovat s programy a soubory
• Jak přizpůsobit pracovní plochu
Disk CD s operačním systémem
POZNÁMKA:
Disk CD s
operačním systémem
je volitelný a
nemusel být s tímto počítačem dodán.
Operační systém je již v počítači nainstalován. Chcete-li
znovu nainstalovat operační systém, použijte disk CD s
operačním systémem (viz „Nová instalace operačního
systému Windows XP“ Na straně 66).
Po nové instalaci
operačního systému
použijte volitelný disk
CD s ovladači a nástroji
(zdrojový CD) pro
novou instalaci
ovladačů zařízení
dodaných s počítačem.
Více informací najdete
v části „Disk CD s
ovladači a nástroji
(zdrojový disk CD)“ Na straně 41.
Kód Product Key operačního systému je umístěn na
počítači (viz „Servisní štítek a kod Product Key
Microsoft
POZNÁMKA:
®
Windows®“ Na straně 43).
Barva disku CD s
operačním systémem
se liší
podle objednaného operačního systému.
Centrum pro nápovědu a odbornou pomoc Windows
1
Klepněte na tlačítko
.
pomoc
2
Napište slovo nebo frázi popisující vzniklé potíže a
Start→
Nápověda a odborná
klepněte na ikonu se šipkou.
3
Klepněte na téma popisující vaše potíže.
4
Postupujte podle pokynů na obrazovce.
42
Stručná referenční příručka
Page 43

Hledané informace Kde je naleznete
• Servisní štítek a kód expresní služby
• Štítek s kódem Product Key Microsoft Windows
Servisní štítek a kod Product Key Microsoft® Windows
Štítky jsou umístěny na vašem počítači.
• Při používání webu
support.dell.com
nebo kontaktování
podpory použijte
servisní štítek k
identifikaci
počítače.
• Zadejte heslo expresní služby, aby vaše volání mohlo
být při kontaktování podpory přesměrováno.
• Řešení - tipy a rady pro odstraňování problémů, články
odborníků, školení online a časté dotazy
• Community (Veřejnost) — Diskuse online s ostatními
Web podpory Dell — support.dell.com
POZNÁMKA:
se zobrazí příslušná stránka odborné pomoci.
zákazníky společnosti Dell
• Upgrady - informace o upgradech komponent, například
paměti, pevného disku a operačního systému
• Péče o zákazníky - kontaktní informace, servisní volání a
stav objednávky, záruka a informace o opravách
• Servis a podpora - stav servisního požadavku a historie
odborné podpory, servisní kontrakt, diskuze online s
odbornou podporou
• Reference — dokumentace k počítači, podrobnosti o
individuální konfiguraci počítače, specifikace produktů a
oficiální dokumenty
• Soubory ke stažení — certifikované ovladače, opravy a
aktualizace softwaru
• Software DSS (Desktop System Software) — pokud
znovu nainstalujete operační systém v počítači, musíte
také znovu nainstalovat nástroj DSS. Software DSS
automaticky rozpozná počítač a operační systém a
nainstaluje aktualizace, které odpovídají individuální
konfiguraci, a zajišt’uje důležité aktualizace operačního
systému, podporu disketových jednotek 3,5” USB
Dell™, procesorů Intel
®
, optických jednotek a zařízení
USB. Software DSS je nezbytný pro správnou funkci
vašeho počítače Dell.
Stažení softwaru Desktop System Software:
1
Přejděte na web
obchodní segment a zadejte servisní štítek.
2
Vyberte položku
soubory ke stažení) a klepněte na tlačítko
3
Klepněte na váš operační systém a hledejte klíčové
slovo
Desktop System Software
POZNÁMKA:
se může lišit v závislosti na provedených výběrech.
Po vybrání oblasti nebo obchodního segmentu
support.dell.com
Drivers & Downloads
, vyberte region nebo
(Ovladače a
Go
(Přejít).
.
Uživatelské rozhraní webu
support.dell.com
®
Stručná referenční příručka
43
Page 44

Pohledy na počítač
Počítač typu minivěž - pohled zepředu
1
2
3
11
10
9
4
5
6
7
8
44
Stručná referenční příručka
Page 45

1 Pozice pro jednotku
5,25"
2 Pozice pro jednotku
5,25"
3 Pozice pro jednotku 3,5" Může obsahovat volitelnou disketovou jednotku nebo volitelnou čtečku
4 konektory USB 2.0 (2) Ke konektorům USB na přední straně počítače připojte zařízení, která používáte
5 Indikátor místní sítě
LAN
6 diagnostické indikátory Pomocí diagnostických kódů těchto indikátorů můžete odstraňovat problémy s
7 tlačítko napájení Stisknutím tohoto tlačítka zapnete počítač.
Může obsahovat optickou jednotku. Vložte disk CD nebo DVD (je-li
podporován) do této jednotky.
Může obsahovat optickou jednotku. Vložte disk CD nebo DVD (je-li
podporován) do této jednotky.
pamět’ových karet.
občas, například pákové ovladače nebo fotoaparáty nebo pro spustitelná zařízení
USB (další informace o spuštění zařízení USB najdete v uživatelské příručce
online).
Zařízení, která běžně zůstávají připojená (například tiskárny nebo klávesnice),
doporučujeme připojit k zadním konektorům USB.
Tento indikátor ukazuje, že bylo navázáno připojení k místní síti LAN.
počítačem. Více informací najdete v části „Diagnostické indikátory“ Na straně 61.
UPOZORNĚNÍ:
vypínače. Místo toho řádně ukončete operační systém. Další informace naleznete v
části „Než začnete“ Na straně 49.
UPOZORNĚNÍ:
vypínače počítač provede řádné ukončení operačního systému.
8 indikátor napájení Blikáním a svícením signalizuje indikátor napájení různé provozní stavy:
• Nesvítí - počítač je vypnutý.
• Svítí zeleně - počítač je zapnutý a pracuje normálně.
• Bliká zeleně - počítač se nachází v úsporném režimu.
• Bliká nebo svítí oranžově - viz
Chcete-li ukončit úsporný režim, stiskněte vypínač nebo použijte klávesnici nebo
myš (pokud jsou tato zařízení ve Správci zařízení systému Windows
nakonfigurována pro buzení). Další informace o režimech spánku a ukončování
úsporného režimu najdete v části v uživatelské příručce online.
V části „Systémové indikátory“ Na straně 60 jsou popsány kódy indikátoru, které
vám mohou pomoci pri odstranování problému s pocítacem.
9 indikátor činnosti
pevného disku
10 konektor pro sluchátka Ke konektoru sluchátek můžete připojit sluchátka a většinu typů reproduktorů.
11 konektor pro mikrofon Ke konektoru mikrofonu můžete připojit mikrofon.
Tento indikátor bliká během přistupování k pevnému disku.
Aby se zabránilo ztrátě dat, nevypínejte počítač stisknutím
Pokud operační systém podporuje rozhraní ACPI, po stisknutím
uživatelská příručka
online.
Stručná referenční příručka
45
Page 46

Počítač typu minivěž - pohled zezadu
1
2
3
4
5
46
6
Stručná referenční příručka
Page 47

1 západka pro uvolnění
baterie
2 kroužek zámku Nasad’te kladku a zamkněte kryt počítače.
3 přepínač napětí Tento počítač je vybaven ručním přepínačem napětí.
4 konektor napájení Připojte napájecí kabel.
5 konektory na zadním
panelu
6 patice pro karty Můžete přistupovat ke konektorům všech nainstalovaných karet PCI a PCI
Tato západka slouží k otevření krytu počítače.
Aby se zabránilo poškození počítače ručním přepínačem napětí, nastavte jej na
napětí, které co nejvíce odpovídá střídavému proudu (AC), který je v místě k
dispozici.
UPOZORNĚNÍ:
ačkoli je v této zemi k dispozici střídavý proud o napětí 100 V.
Také zkontrolujte, zda jmenovité napětí monitoru a připojených zařízení odpovídá
napětí střídavého proudu, který je ve vaší oblasti k dispozici.
K příslušnému konektoru připojte sériová zařízení, zařízení USB a další zařízení
(viz „Počítač typu minivěž - konektory na zadním panelu“ Na straně 47).
Express.
V Japonsku musí být přepínač napětí nastaven v poloze 115-V,
Počítač typu minivěž - konektory na zadním panelu
13
98 7
24
Stručná referenční příručka
5
6
47
Page 48

1 paralelní konektor K paralelnímu portu počítače připojte paralelní zařízení, jako například tiskárnu.
Máte-li k dispozici tiskárnu USB, připojte ji ke konektoru USB.
POZNÁMKA:
který je nakonfigurován na stejnou adresu, bude integrovaný paralelní konektor automaticky
zakázán. Další informace najdete v části v Uživatelské příručce online.
2 indikátor integrity linky
3 konektor sít’ového
adaptéru
• Zelená - Mezi sítí 10 Mb/s a počítačem existuje dobré spojení.
• Oranžová - Mezi sítí 100 Mb/s a počítačem existuje dobré spojení.
• Žlutá - Mezi sítí 1000 Mb/s (1 Gb/s) a počítačem existuje dobré spojení.
• Nesvítí - Počítač nerozpoznal fyzické připojení k síti.
Chcete-li připojit počítač k sít’ovému nebo širokopásmovému zařízení, připojte
jeden konec sít’vého kabelu k sít’ové zásuvce nebo k sít’ovému nebo
širokopásmovému zařízení. Druhý konec sít’ového kabelu připojte ke konektoru
sít’ového adaptéru na zadním panelu počítače. Pro správné připojení je třeba
sít’ový kabel zacvaknout.
POZNÁMKA:
U počítačů s kartou se sít’ovým konektorem použijte konektor na kartě.
Pro sít’ovou kabeláž doporučujeme použít kabely a konektory kategorie 5. Pro
zajištění spolehlivého provozu 10 Mb/s musíte použít kabeláž kategorie 3.
4 indikátor aktivity sítě Bliká žlutě, když počítač přijímá nebo vysílá sít’ová data. Při intenzivním sít’ovém
provozu se může zdát, že tento indikátor takřka svítí.
5 konektor linkového
výstupu
6 konektor linkového
vstupu/mikrofonu
7 konektory USB 2.0 (6) Zařízení, která běžně zůstávají připojená (například tiskárny nebo klávesnice),
8 konektor zobrazovacího
zařízení
K zelenému výstupnímu linkovému konektoru můžete připojit většinu
reproduktorových soustav se zabudovaným zesilovačem.
K modrému vstupnímu linkovému konektoru připojte zařízení pro
nahrávání/přehrávání, například magnetofon, přehrávač CD nebo videorekordér.;
nebo počítačový mikrofon jako zdroj hlasu a hudby pro zvukový nebo telefonický
program.
doporučujeme připojit k zadním konektorům USB.
Připojte kabel od monitoru VGA k modrému konektoru.
POZNÁMKA:
chráničkou. Připojte monitor ke konektoru na grafické kartě. Neodstraňujte chráničku.
POZNÁMKA:
rozdvojku, která byla dodána s počítačem.
9 konektor sériového
rozhraní
K sériovému portu připojte některé sériové zařízení, například příruční počítač. Ve
výchozím nastavení je port COM1 přiřazen k sériovému konektoru 1 a port COM2
k sériovému konektoru 2.
Další informace najdete v uživatelské příručce online.
Jestliže počítač rozpozná nainstalovanou kartu s paralelním konektorem,
K sít’ovému konektoru nepřipojujte telefonní kabel.
Pokud jste zakoupili doplňkovou grafikou kartu, bude tento konektor opatřen
Používáte-li grafikou kartu, která podporuje duální monitory, použijte
48
Stručná referenční příručka
Page 49

Demontáž krytu počítače
VÝSTRAHA: Před prováděním některého z postupů uvedených v této části si přečtěte bezpečnostní pokyny v
Příručce s informacemi o produktu.
VÝSTRAHA: Zabraňte nebezpečí úrazu elektrickým proudem - před demontáží krytu počítače vždy odpojte
počítač z elektrické zásuvky.
Než začnete
UPOZORNĚNÍ:
všechny spuštěné programy.
1
Ukončete operační systém:
a
Uložte a zavřete všechny otevření soubory, ukončete všechny spuštěné programy, klepněte na
tlačítko
b
V okně
Aby nedošlo ke ztrátě dat, před vypnutím počítače uložte a zavřete všechny otevřené soubory a ukončete
Start
a potom na příkaz
Vypnout počítač
klepněte na tlačítko
Vypnout počítač
Vypn ou t
.
.
Po ukončení operačního systému se počítač vypne.
2
Zkontrolujte, zda jsou počítač a všechna připojená zařízení vypnutá. Pokud se po ukončení operačního
systému počítač a připojená zařízení automaticky nevypnou, nyní je vypněte.
Před manipulací uvnitř počítače
Dodržujte následující bezpečnostní zásady, abyste zabránili možnému poškození počítače nebo úrazu.
VÝSTRAHA: Před prováděním některého z postupů uvedených v této části si přečtěte bezpečnostní pokyny v
Příručce s informacemi o produktu.
VÝSTRAHA: Zacházejte s komponentami a deskami opatrně. Nedotýkejte se komponent nebo kontaktů na desce.
Držte desku za její hrany nebo kovový montážní držák. Součásti (například procesor) držte za hrany, nikoli za
kolíky (piny).
UPOZORNĚNÍ:
servisním zásahem se nevztahuje záruka.
UPOZORNĚNÍ:
jsou vybaveny konektory s pojistkami; pokud rozpojujete tento typ kabelu, před rozpojením kabelu pojistky stiskněte. Při
odtahování konektorů od sebe je udržujte rovnoměrně seřízené, abyste neohnuli některé kolíky konektorů. Také se před
zapojením kabelu ujistěte, že jsou oba konektory správně nasměrovány a zarovnány.
Opravy počítače smí provádět pouze kvalifikovaný servisní technik. Na škody způsobené neoprávněným
Při odpojování kabelu táhněte za konektor nebo pojistné šrouby, nikoli za samotný kabel. Některé kabely
Aby se zabránilo poškození, před manipulací uvnitř počítače proved’te následující kroky.
1
Vypněte počítač.
UPOZORNĚNÍ:
2
Odpojte od telefonu veškeré telefonní a telekomunikační přípojky.
3
Odpojte počítač a veškerá připojená zařízení z elektrických zásuvek a potom stisknutím vypínače
Při odpojování sít’ového kabelu nejprve odpojte kabel od počítače a potom se sít’ové zásuvky.
uzemněte systémovou desku.
Stručná referenční příručka
49
Page 50

4
V případě potřeby odmontujte podstavec počítače (pokyny jsou uvedeny v dokumentaci dodané s
podstavcem).
VÝSTRAHA: Zabraňte nebezpečí úrazu elektrickým proudem - před demontáží krytu počítače vždy odpojte
počítač z elektrické zásuvky.
Sejměte kryt skříně počítače.Viz „Počítač typu minivěž“ Na straně 50.
5
UPOZORNĚNÍ:
se dotknete kovového předmětu, například některé kovové části na zadní straně počítače. Během manipulace se
opakovaně dotýkejte nenatřeného kovového povrchu, abyste odvedli potencionální elektrostatický náboj, který může
poškodit vnitřní součásti.
Dříve, než se dotknete některé části uvnitř počítače, odved’te elektrostatický náboj z vašeho těla tím, že
Počítač typu minivěž
VÝSTRAHA: Před prováděním některého z postupů uvedených v této části si přečtěte bezpečnostní pokyny v
Příručce s informacemi o produktu.
VÝSTRAHA: Zabraňte nebezpečí úrazu elektrickým proudem - před demontáží krytu počítače vždy odpojte
počítač z elektrické zásuvky.
Postupujte podle pokynů v „Než začnete“ Na straně 49.
1
2
Položte počítač na bok podle obrázku.
3
Vyhledejte uvolňovací západku podle obrázku. Posuňte uvolňovací západku dozadu a zároveň zvedněte
skříň.
4
Uchopte boční strany krytu a vyklopte kryt vzhůru pomocí vodících čepů jako bodů otáčení.
5
Vyjměte kryt z vodících čepů a odložte na měkkou plochu s čistým neškrábavým povrchem.
VÝSTRAHA: Tepelné jímky grafických karet se mohou během normálního provozu zahřívat na velmi vysokou
teplotu. Než se tepelné jímky grafické karty dotknete, zkontrolujte, zda již dostatečně vychladla.
50
Stručná referenční příručka
Page 51

1
2
3
1 bezpečnostní oko 2 západka pro uvolnění
krytu počítače
3 kroužek zámku
Stručná referenční příručka
51
Page 52

Uvnitř počítače
Počítač typu minivěž
3
2
1
4
5
6
7
1 optická jednotka 2 disketová jednotka 3 zdroj napájení
4 spínač proti neoprávněnému
přístupu do skříně
7 pevný disk
52
Stručná referenční příručka
5 systémová deska 6 tepelná jímka
Page 53

Součásti základní desky
21
1
2
3
20
4
19
18
5
6
17
7
16
MFG_MODE
15
14
8
9
13
12
11
10
Stručná referenční příručka
53
Page 54

1 konektor ventilátoru (FAN) 12 vnitřní USB (INTERNAL_USB)
2 konektor procesoru (CPU) 13 zásuvka baterie (BATT)
3 konektor napájení procesoru (12VPOWER) 14 konektor PCI Express x16 (SLOT1)
4 konektory pamět’ových modulů (DIMM_1, DIMM_2,
DIMM_3, DIMM_4)
5 resetovaní propojka RTC (RTCRST) 16 konektor PCI (SLOT2)
6 propojka hesla (PSWD) 17 konektor PCI (SLOT3)
7 ko ne kt ory jednote k S ATA (SATA0, SATA1, SATA4, SATA5) 18 sériový konektor (SER2)
8 propojka výrobního režimu (MFG_MODE) 19 konektor disketové jednotky (DSKT)
9 konektor na předním panelu (FNT_PANEL) 20 reproduktor integrovaný na systémové
10 konektor napájení (POWER) 21 konektor reproduktoru (INT_SPKR)
11 konektor spínače proti neoprávněnému přístupu
(INTRUDER)
15 konektor PCI Express x1 (SLOT4)
desce (BEEP)
Nastavení propojek
POZNÁMKA:
propojka se používá pouze při výrobě.
Propojka Nastavení Popis
PSWD Funkce hesel jsou povoleny
RTCRST Hodiny reálného času byly
propojeno nepropojeno
Neobsazujte propojku MFG_MODE. Technologie Active Management nebude fungovat správně. Tato
(výchozí nastavení).
Funkce hesla jsou deaktivovány.
resetovány.
Přesný čas je resetován (dočasně
propojeno).
54
Stručná referenční příručka
Page 55

Instalace počítače
VÝSTRAHA: Před prováděním některého z postupů uvedených v této části si přečtěte bezpečnostní pokyny v
Příručce s informacemi o produktu.
UPOZORNĚNÍ:
kartě, nikoli ke konektoru na zadním panelu.
Pokud je v počítači nainstalována karta pro rozšíření (například karta modemu), připojte příslušný kabel ke
UPOZORNĚNÍ:
části nábytku, což by mohlo bránit cirkulaci vzduchu okolo skříně. Další informace získáte v Informační příručce k produktu.
POZNÁMKA:
dodanou se zařízením nebo softwarem nebo se obrat’te na výrobce a ověřte, zda dané zařízení nebo software jsou
kompatibilní s tímto počítačem a operačním systémem.
Aby si mohl počítač udržovat správnou provozní teplotu, neumíst’ujte jej příliš blízko ke zdi nebo některé
Před instalací zařízení nebo softwaru, které nebyly dodány společně s počítačem, si přečtěte dokumentaci
Aby byla zajištěna správná instalace počítače, musíte provést všechny kroky. Postupujte podle příslušných
obrázků, které doplňují pokyny.
UPOZORNĚNÍ:
1
Připojte klávesnici a myš.
UPOZORNĚNÍ:
poškodit.
2
Připojte modem nebo sít’ový kabel.
Nezkoušejte používat současně myš PS/2 a USB.
Nepřipojujte kabel modemu ke konektoru sít’ového adaptéru. Napětí telefonní linky může sít’ový adaptér
Připojte sít’ový kabel k sít’ovému konektoru (nikoli telefonní linku). Používáte-li doplňkový modem,
připojte telefonní linku k modemu.
3
Připojte monitor.
Nasad’te a opatrně připojte kabel monitoru - zabraňte ohnutí kolíků. Utáhněte ruční šrouby na
kabelových konektorech.
POZNÁMKA:
umístění konektorů najdete v dokumentaci dodané s monitorem.
4
Připojte reproduktory.
5
Připojte napájecí kabely k počítači, monitoru a k zařízením; opačné konce napájecích kabelů připojte
U některých monitorů se konektor videa nachází na spodní zadní straně obrazovky. Informace o
do elektrických zásuvek.
UPOZORNĚNÍ:
napětí, která co nejblíže odpovídá napájení střídavým proudem v síti v místě instalace systému.
UPOZORNĚNÍ:
proud o napětí 100 V.
6
Zkontrolujte, zda poloha přepínače napětí odpovídá napětí, které je k dispozici.
Aby se zabránilo poškození počítače ručním přepínačem napětí, nastavte přepínač na takovou hodnotu
V Japonsku musí být přepínač napětí nastaven v poloze 115-V, ačkoli je v této zemi k dispozici střídavý
Tento počítač je vybaven ručním přepínačem napětí. U počítačů, které jsou na zadním panelu
vybaveny přepínačem napětí, je třeba ručně nastavit správné provozní napětí.
Stručná referenční příručka
55
Page 56

Instalace klávesnice a myši
Instalace monitoru
56
Stručná referenční příručka
Page 57

Připojení napájení
Řešení problémů
Společnost Dell poskytuje řadu nástrojů, které pomohou uživateli v případě, že počítač nefunguje podle
očekávání. Nejnovější informace o odstraňování problémů, které jsou k dispozici pro tento počítač, najdete
na webu odborné pomoci společnosti Dell
Pokud dojde k problémům, které vyžadují pomoc společnosti Dell, zapište podrobný popis chyby, zvukových
signálů nebo signálů diagnostických indikátorů; uved’te níže vaše heslo expresní služby a servisní štítek;
bud’te v dosahu počítače a kontaktujte společnost Dell. Pokyny pro kontaktování společnosti Dell najdete v
Uživatelské příručce
Příklad hesla expresní služby a servisního štítku viz „Hledání informací“ v
Heslo expresní služby: ___________________________
Servisní štítek: ___________________________
online.
support.dell.com.
uživatelské příručce
k počítači.
Diagnostický nástroj Dell Diagnostics
VÝSTRAHA: Před prováděním některého z postupů uvedených v této části si přečtěte bezpečnostní pokyny v
Příručce s informacemi o produktu.
Kdy použít diagnostický program Dell Diagnostics
Dojde-li k problémům s počítačem, před kontaktováním odborné pomoci společnosti Dell proved’te
kontrolní kroky uvedené v části Odstraňování problémů v
nástroj Dell Diagnostics. Pokyny pro kontaktování společnosti Dell najdete v
UPOZORNĚNÍ:
Diagnostický program Dell Diagnostics lze použít pouze u počítačů společnosti Dell™.
Uživatelské příručce
online a spust’te diagnostický
Uživatelské příručce
Stručná referenční příručka
online.
57
Page 58

Přejděte do nastavení systému (pokyny najdete v části Nastavení systému v
Uživatelské příručce
online),
zkontrolujte konfiguraci počítače a přesvědčte se, zda je testované zařízení uvedeno v nastavení systému a
zda je aktivní.
Spust’te diagnostický nástroj Dell z pevného disku nebo z doplňkovéhodisku CD s
zdrojový disk
(
Spuštění diagnostického programu Dell Diagnostics z pevného disku
1
Zapněte (nebo restartujte) počítač.
2
Když se zobrazí logo DELL, stiskněte ihned <F12>.
CD).
ovladači a nástroji
POZNÁMKA:
nástroj Dell Diagnostics v doplňkového disku CD s
Diagnostics z disku CD s ovladači a nástroji“ Na straně 58).
Pokud čekáte příliš dlouho a objeví se logo operačního systému, počkejte, dokud se nezobrazí plocha
Microsoft
®
Když se zobrazí seznam spouštěcích zařízení, klepněte na položku
Pokud se zobrazí zpráva o tom, že nebyl nalezen žádný oddíl s diagnostickým nástrojem, spust’te
ovladači a nástroji
(viz „Spuštění diagnostického programu Dell
Windows®. Potom vypněte počítač a akci zopakujte.
Spustit oddíl utility
a stiskněte
<Enter>.
3
Když se zobrazí
Hlavní nabídka
diagnostického programu Dell Diagnostics, zvolte test, který chcete
spustit.
Spuštění diagnostického programu Dell Diagnostics z disku CD s ovladači a nástroji
1
Vložte disk CD s
2
Vypněte a restartujte počítač.
ovladači a nástroji
.
Když se zobrazí logo DELL, stiskněte ihned <F12>.
Pokud se zobrazí logo operačního systému, počkejte, až se zobrazí pracovní plocha systému Windows.
Potom vypněte počítač a akci zopakujte.
POZNÁMKA:
uvedených v systémovém nastavení.
3
Po zobrazení seznamu zařízení pro spuštění označte jednotku CD/DVD a stiskněte klávesu <Enter>.
4
V nabídce CD pro spuštění vyberte jednotku CD/DVD.
5
V zobrazené nabídce vyberte pro spuštění jednotku CD/DVD.
6
Zadáním čísla 1 spust’te nabídku disku CD s
7
Zadáním čísla 2 spustíte diagnostický program Dell Diagnostics.
8
Z očíslovaného seznamu zvolte položku
Další kroky změní spouštěcí sekvenci pouze jednou. Při příštím spuštění se počítač spustí podle zařízení
ovladači a nástroji
.
Spustit 32bitový diagnostický program Dell Diagnostics
v seznamu uvedeno několik verzí, zvolte verzi odpovídající vašemu počítači.
9
Když se zobrazí
Hlavní nabídka
diagnostického programu Dell Diagnostics, zvolte test, který chcete
spustit.
. Je-li
58
Stručná referenční příručka
Page 59

Hlavní nabídka diagnostického programu Dell Diagnostics
1
Po spuštění programu Dell Diagnostics a zobrazení
Hlavní nabídky
klepněte na tlačítko požadované
činnosti.
Možnost Funkce
Express Test
(Expresní test)
Extended Test
(Podrobný test)
Custom Test
(Vlastní test)
Symptom Tree
(Strom příznaků)
2
Pokud na problém narazíte během testu, zobrazí se hlášení s chybovým kódem a popisem daného
Provede rychlý test zařízení. Tento test obvykle trvá 10 až 20 minut a není nutné,
abyste do něj zasahovali. Expresní test, který zvyšuje pravděpodobnost rychlého
odstranění, je vhodné spustit nejdříve.
Provede důkladný test zařízení. Tento test obvykle trvá hodinu a je nutné, abyste
pravidelně odpovídali na dané otázky.
Testuje konkrétní zařízení. Testy, které chcete spustit, si můžete přizpůsobit.
Uvádí seznam nejběžnějších příznaků a umožňuje výběr testu na základě příznaku
problému, který máte.
problému. Kód chyby a popis problému si opište a poté postupujte podle pokynů na obrazovce.
Pokud chybu nedokážete napravit, obrat’te se na společnost Dell. Pokyny pro kontaktování společnosti
Dell najdete v Uživatelské příručce online.
POZNÁMKA:
na společnost Dell, pracovníci technické podpory budou servisní štítek požadovat.
3
Pokud spouštíte test
Servisní štítek vašeho počítače se nachází v horní části obrazovky při každém testu. Když se obrátíte
Custom Test
(Vlastní test) nebo
Symptom Tree
(Strom příznaků), klepnutím na
příslušnou kartu popsanou v následující tabulce získáte další informace.
Karta Funkce
Results (Výsledky) Zobrazuje výsledky testu a případně zjištěné chyby.
Errors (Chyby) Zobrazí chybové podmínky, chybové kódy a popis daného problému.
Help (Nápověda) Popisuje testy a může obsahovat požadavky pro spuštění testu.
Configuration
(Konfigurace)
Parameters (Parametry) Test můžete přizpůsobit změnou jeho nastavení.
4
Po dokončení testů a v případě, že jste diagnostický program Dell Diagnostics spustili z disku CD s
ovladači a nástroji
5
Zavřete obrazovku pro test a vrat’te se na obrazovku
Diagnostics ukončíte a počítač restartujete zavřením okna
Zobrazí konfiguraci hardwaru pro vybrané zařízení.
Diagnostický program Dell Diagnostics zjistí konfigurační údaje pro všechna
zařízení ze systémového nastavení, z paměti a z různých interních testů a zobrazí
dané údaje v seznamu zařízení v levé části obrazovky. V seznamu nemusí být
uvedeny všechny názvy součástí nainstalovaných v počítači nebo k němu
připojených.
(doplňkový), vyjměte disk CD.
Hlavní nabídky
Hlavní nabídky
. Diagnostický program Dell
.
Stručná referenční příručka
59
Page 60

Systémové indikátory
Indikátor napájení může signalizovat problém s počítačem.
Indikátor napájení Popis problému Doporučené řešení
Svítí zeleně Napájení je zapnuté a počítač
funguje normálně.
Bliká zeleně Počítač se nachází v úsporném
režimu.
Několikrát zabliká
zeleně a potom zhasne
Svítí žlutě Některé zařízení na systémové
Bliká žlutě Došlo k selhání zdroje napájení
Svítí zeleně a vysílá
zvukový signál během
testu POST
Svítí zelený indikátor
napájení, žádný
zvukový signál ani
obraz během testu
POST
Svítí zelený indikátor
napájení, žádný
zvukový signál, ale
počítač během testu
POST zatuhne
Vyskytla se chyba v konfiguraci. Podle stavu diagnostických indikátorů zkontrolujte,
desce závadné nebo nesprávně
nainstalované nebo přepínač napětí
na zdroji napájení není nastaven
správně.
nebo systémové desky.
Během spouštění systému BIOS
došlo k problému.
Monitor nebo grafická karta jsou
závadné nebo nesprávně
nainstalované.
Některé zařízení integrované v
systémové desce je pravděpodobně
závadné.
Není třeba provést žádné opatření.
Chcete-li počítač probudit, stiskněte vypínač, pohněte
s myší nebo stiskněte libovolnou klávesu na klávesnici.
zda byl identifikován specifický problém (viz
„Diagnostické indikátory“ Na straně 61).
Podle stavu diagnostických indikátorů zkontrolujte,
zda byl identifikován specifický problém (viz
„Diagnostické indikátory“ Na straně 61).
Viz část „Problémy s napájením“ v Uživatelské příručce
online.
Pokud počítač nelze spustit, požádejte společnost Dell
o odbornou pomoc.
společnosti Dell najdete v
Pokyny pro diagnostiku kódů signálu viz „Zvukové
signály“ Na straně 63. Rovněž podle stavu
diagnostických indikátorů zkontrolujte, zda byl
identifikován specifický problém.
Podle stavu diagnostických indikátorů zkontrolujte,
zda byl identifikován specifický problém.
Podle stavu diagnostických indikátorů zkontrolujte,
zda byl identifikován specifický problém. Pokud
problém není uveden, požádejte společnost Dell o
odbornou pomoc.
Dell najdete v
Uživatelské příručce
Pokyny pro kontaktování
Uživatelské příručce
Pokyny pro kontaktování
Uživatelské příručce
Pokyny pro kontaktování společnosti
online.
online.
online.
60
Stručná referenční příručka
Page 61

Diagnostické indikátory
VÝSTRAHA: Před prováděním některého z postupů uvedených v této části si přečtěte bezpečnostní pokyny v
Příručce s informacemi o produktu.
Pro snadnější odstraňování problémů je tento počítač vybaven na předním nebo zadním panelu čtyřmi
indikátory 1, 2, 3 a 4. Indikátory bud’ nesvítí nebo svítí zeleně. Během normálního spuštění počítače se
signály indikátorů mění. Po úspěšném dokončení testu POST během spouštění systému všechny čtyři
indikátory svítí krátce zeleně a potom zhasnou.
Pokud dojde k chybě počítače během testu POST, signalizace indikátorů umožňuje snadno zjistit, kde byl
proces zastaven. Pokud počítač nefunguje správně po úspěšném dokončení testu POST, diagnostické
indikátory nesignalizují příčinu problému.
POZNÁMKA:
mohou být uspořádány vodorovně nebo svisle.
Orientace diagnostických indikátorů se může lišit v závislosti na typu systému. Diagnostické indikátory
Signalizace
indikátorů
Popis problému Doporučené řešení
Počítač je normálně vypnutý nebo došlo k
selhání ještě před zavedením systému BIOS.
Po úspěšném zavedení operačního programu
nesvítí diagnostické indikátory.
Pravděpodobně došlo k selhání systému
BIOS; počítač se nachází v režimu obnovení.
Pravděpodobně došlo k selhání procesoru. Znovu nainstalujte procesor a restartujte
Byly rozpoznány pamět’ové moduly, ale došlo
k selhání některé paměti.
Připojte počítač do funkční elektrické zásuvky a
stiskněte vypínač.
Spust’te nástroj pro obnovení systému BIOS a
po jeho dokončení restartujte počítač.
počítač.
najdete v
Pokyny pro novou instalaci procesoru
Uživatelské příručce
• Pokud je v počítači nainstalován jeden
pamět’ový modul, nainstalujte jej znovu a
restartujte počítač. Pokyny pro novou instalaci
pamět’ových modulů najdete v
online.
příručce
• Pokud jsou v počítači nainstalovány dva nebo
více pamět’ových modulů, vyjměte je, znovu
nainstalujte jeden modul a restartujte
počítač. Pokud se počítač spustí normálně,
nainstalujte znovu další modul. Pokračujte,
dokud nezjistíte závadný modul, nebo dokud
nenainstalujete bez chyby všechny moduly.
• Pokud možno nainstalujte do počítače řádně
fungující pamět’ stejného typu.
• Jestliže problém přetrvává, kontaktujte
společnost Dell. Pokyny pro kontaktování
společnosti Dell najdete v
online.
online.
Uživatelské
Uživatelské příručce
Stručná referenční příručka
61
Page 62

Signalizace
indikátorů
Popis problému Doporučené řešení
Pravděpodobně došlo k selhání grafické karty.
Pravděpodobně došlo k selhání disketové
jednotky nebo pevného disku.
Pravděpodobně došlo k selhání rozhraní USB. Znovu nainstalujte všechny zařízení USB,
Nebyly zjištěny žádné pamět’ové moduly.
• Pokud je v počítači nainstalována grafická
karta, vyjměte ji, znovu nainstalujte a potom
restartujte počítač.
• Pokud problém přetrvává, nainstalujte
grafickou kartu, jejíž funkčnost je ověřena, a
restartujte počítač.
• Pokud problém přetrvává nebo pokud je
počítač vybaven integrovanou grafickou
kartou, obrat’te se na společnost Dell. Pokyny
pro kontaktování společnosti Dell najdete v
Uživatelské příručce
Odpojte a znovu připojte všechny napájecí a
datové kabely a restartujte počítač.
zkontrolujte zapojení kabelů a potom
restartujte počítač.
• Pokud je v počítači nainstalován jeden
pamět’ový modul, nainstalujte jej znovu a
restartujte počítač. Pokyny pro novou
instalaci pamět’ových modulů najdete v
Uživatelské příručce
• Pokud jsou v počítači nainstalovány dva nebo
více pamět’ových modulů, vyjměte je, znovu
nainstalujte jeden modul a restartujte
počítač. Pokud se počítač spustí normálně,
nainstalujte znovu další modul. Pokračujte,
dokud nezjistíte závadný modul, nebo dokud
nenainstalujete bez chyby všechny moduly.
• Pokud možno nainstalujte do počítače řádně
fungující pamět’ stejného typu.
• Jestliže problém přetrvává, kontaktujte
společnost Dell. Pokyny pro kontaktování
společnosti Dell najdete v
online.
online.
online.
Uživatelské příručce
62
Stručná referenční příručka
Page 63

Signalizace
indikátorů
Popis problému Doporučené řešení
Byly rozpoznány pamět’ové moduly, ale došlo
k chybě kompatibility nebo konfigurace
paměti.
Došlo k chybě.
Tato signalizace se rovněž zobrazí, když
vstoupíte do nastavení systému, a nemusí se
jednat o závadu.
• Zkontrolujte, zda neexistují žádné zvláštní
požadavky na umístění pamět’ových modulů
nebo konektorů.
• Zkontrolujte, zda jsou instalované pamět’ové
moduly kompatibilní s počítačem.
• Jestliže problém přetrvává, kontaktujte
společnost Dell. Pokyny pro kontaktování
společnosti Dell najdete v
online.
• Zkontrolujte, zda jsou kabely od pevného
disku, jednotky CD a jednotky DVD řádně
připojeny k systémové desce.
• Přečtěte si zprávu zobrazenou na monitoru.
• Jestliže problém přetrvává, kontaktujte
společnost Dell. Pokyny pro kontaktování
společnosti Dell najdete v
online.
Uživatelské příručce
Uživatelské příručce
Zvukové signály
Tento počítač může během spouštění vydávat série zvukových signálů, pokud nelze chyby nebo problémy zobrazit
na monitoru. Tyto série zvukových signálů identifikují problém. Například zvukový kód (1 3-1) se skládá z
jednoho delšího pípnutí, tří krátkých pípnutí a jednoho delšího pípnutí. Tento kód signalizuje, že došlo k
problému s pamětí počítače.
Pokud počítač vysílá zvukové signály během spouštění:
1
Zapište kód signálu.
2
Pokyny pro identifikaci vážnějších příčin najdete v části „Diagnostický nástroj Dell Diagnostics“ Na
straně 57.
3
Požádejte společnost Dell o odbornou pomoc. Pokyny pro kontaktování společnosti Dell najdete v
Uživatelské příručce
online.
Kód Příčina Kód Příčina
1-1-2 Chyba registrace mikroprocesoru. 3-1-4 Chyba registrace podřízené masky přerušení.
1-1-3 Chyba čtení/zápisu do paměti NVRAM. 3-2-2 Chyba zavádění vektoru přerušení.
1-1-4 Chyba v kontrolním součtu ROM BIOS. 3-2-4 Chyba testu řadiče klávesnice.
1-2-1 Chyba programovatelného časovače intervalu. 3-3-1 Ztráta napájení NVRAM.
1-2-2 Chyba inicializace DMA. 3-3-2 Neplatná konfigurace NVRAM.
1-2-3 Chyba čtení/zápisu do registru stránek DMA. 3-3-4 Chyba testu grafické paměti.
1-3 Chyba testu grafické paměti. 3-4-1 Chyba inicializace obrazovky.
Stručná referenční příručka
63
Page 64

Kód Příčina Kód Příčina
1-3-1 až
2-4-4
3-1-1 Chyba registru podřízené DMA. 3-4-3 Chyba hledání grafické paměti ROM.
3-1-2 Chyba registru hlavní DMA. 4-2-1 Žádný interval časovače.
3-1-3 Chyba registru hlavní masky přerušení. 4-2-2 Chyba při vypnutí.
4-2-3 Chyba brány A20. 4-4-1 Chyba testu sériového nebo paralelního portu.
4-2-4 Neočekávané přerušení v chráněném režimu. 4-4-2 Nepodařilo se dekomprimovat kód do stínové
4-3-1 Chyba paměti nad adresou 0FFFFh. 4-4-3 Chyba testu matematického koprocesoru.
4-3-3 Chyba čítače 2 čipu časovače. 4-4-4 Chyba testu mezipaměti.
4-3-4 Denní hodiny zastaveny.
Nesprávná identifikace nebo používání
paměti.
3-4-2 Chyba opakovaného sledování obrazovky.
paměti.
Odstraňování nekompatibility softwaru a hardwaru
Pokud některé zařízení není během spuštění operačního systému rozpoznáno nebo je rozpoznáno, ale není
správně nakonfigurováno, můžete k odstranění nekompatibility použít Průvodce při potížích s hardwarem.
1
Klepněte na tlačítko
2
Zadejte do pole Hledat položku
hardwarem) a klepnutím na šipku spust’te hledání.
3
V seznamu Výsledky hledání klepněte na položku
4
V seznamu
Průvodce při potížích s hardwarem
hardwaru v počítači a potom
Start
a
Nápověda a odborná pomoc
hardware troubleshooter
Průvodce při potížích s hardwarem
klepněte na položku
klepněte na tlačítko
Další
.
(Průvodce při potížích s
.
Potřebuji odstranit konflikt
.
Používání funkce Obnovení systému operačního systému Microsoft Windows XP
Operační systém Microsoft Windows XP je vybaven funkcí Obnovení systému, která umožňuje vrátit
počítač do předchozího funkčního stavu (bez ovlivnění datových soborů), pokud se vlivem změn nastavení
hardwaru, softwaru nebo jiných systémových nastavení počítač dostal do nežádoucího provozního stavu.
Informace o používání funkce Obnovení systému najdete v Nápovědě a odborné pomoci Windows. Pokyny
při přístup ke službě Nápověda a odborná pomoc systému Windows viz „Centrum pro nápovědu a odbornou
pomoc Windows“ Na straně 42.
UPOZORNĚNÍ:
Vytvoření bodu obnovení
1
Klepněte na tlačítko
2
Klepněte na položku
3
Postupujte podle pokynů na obrazovce.
64
Stručná referenční příručka
Pravidelně zálohujte datové soubory. Funkce Obnovení systému nesleduje ani neobnovuje datové soubory.
Start
a
Nápověda a odborná pomoc
Obnovení systému
.
.
Page 65

Obnovení počítače do dřívějšího funkčního stavu
UPOZORNĚNÍ:
programy. Dokud nebude obnovení dokončeno, neměňte, nespouštějte ani neodstraňujte žádné soubory nebo programy.
1
Klepněte na tlačítko
klepněte na ikonu
2
Zkontrolujte, zda je
3
Klepněte na datum v kalendáři, ke kterému chcete počítač obnovit.
Na obrazovce
Před obnovením počítače uložte a zavřete všechny otevřené soubory a ukončete všechny spuštěné
Start
, přejděte na
Obnovení systému
zaškrtnuta možnost Obnovit předchozí stav
Vyberte bod obnovení je
příkaz Programy→
Příslušenství→
Systémové nástroje
a potom
.
počítače a klepněte na tlačítko
k dispozici kalendář, na kterém můžete vyhledávat a vybírat
Další
body obnovení. Všechny datumy v kalendáři, pro které jsou k dispozici body obnovení, jsou uvedeny
tučným písmem.
4
Vyberte bod obnovení a klepněte na tlačítko
Další
.
Pokud je pro některý datum v kalendáři k dispozici pouze jeden bod obnovení, bude automaticky
vybrán. Pokud jsou k dispozici dva nebo více bodů obnovení, klepněte na bod, který chcete
upřednostnit.
5
Klepněte na tlačítko
Jakmile
funkce Obnovení systému
Další
.
dokončí shromažd’ování dat, zobrazí se obrazovka Dokončení
obnovení a počítač se restartuje.
6
Po restartování počítače klepněte na tlačítko OK.
Chcete-li změnit bod obnovení, můžete zopakovat postup s použitím jiného bodu nebo můžete obnovení
vrátit.
Vrácení posledního obnovení systému
.
UPOZORNĚNÍ:
všechny spuštěné programy. Dokud nebude obnovení dokončeno, neměňte, nespouštějte ani neodstraňujte žádné soubory
nebo programy.
1
Klepněte na tlačítko Start, přejděte na
klepněte na ikonu
2
Klepněte na tlačítko
3
Klepněte na tlačítko
Zobrazí se obrazovka
4
Po restartování počítače klepněte na tlačítko OK.
Povolení obnovení systému
Před vrácením posledního obnovení systému uložte a zavřete všechny otevřené soubory a ukončete
příkaz Programy→
Obnovení systému
.
Vzít poslední obnovení zpět
Další
.
Obnovení systému
a počítač se restartuje.
Příslušenství→
Systémové nástroje
a potom klepněte na tlačítko
Další
a potom
.
Pokud nainstalujete znovu operační systém Windows XP s méně než 200 MB volného místa na pevném
disku, bude funkce Obnovení systému automaticky zakázána. Chcete-li ověřit, zda je funkce Obnovení
systému povolena:
1
Klepněte na tlačítko
2
Klepněte na ikonu
Start
a vyberte příkaz
Výkon a údržba
Ovládací panely
.
.
Stručná referenční příručka
65
Page 66

3
Klepněte na položku
4
Klepněte na kartu
5
Zkontrolujte, zda políčko
Systém
.
Obnovení systému
Vypnout nástroj Obnovení systému
.
Nová instalace operačního systému Windows XP
Začínáme
není zaškrtnuté.
POZNÁMKA:
Home Edition; zvolíte-li klasické zobrazení nebo používáte-li operační systém Windows XP Professional, bude postup
nastavení počítače Dell lišit.
Postup uvedený v tomto dokumentu byl napsán pro výchozí zobrazení operačního systému Windows XP
Pokud chcete odstranit problém novou instalací operačního systému Windows XP, při které by se znovu
nainstaloval ovladač, zkuste nejprve nástroj Vrácení původního ovladače zařízení v systému Windows XP.
1
Klepněte na tlačítko
2
V části
Výběr kategorie
3
Klepněte na položku
4
V okně
5
Klepněte na tlačítko
6
Pravým tlačítkem myši klepněte na zařízení, pro které byl nainstalován nový ovladač, a klepněte na
tlačítko
7
Klepněte na kartu
8
Klepněte na tlačítko
Vlastnosti systému
Vlastnosti
Start
a vyberte příkaz
úkolů vyberte kategorii
Systém
.
klepněte na kartu
Správce zařízení
.
.
Ovladače
.
Vrátit změny ovladače
Ovládací panely
Výkon a údržba
hardware
.
.
.
.
Pokud nástroj Vrácení původního ovladače zařízení problém neodstraní, pomocí nástroje Obnovení systému
vrat’te operační systém do funkčního stavu před instalací ovladače nového zařízení (viz „Používání funkce
Obnovení systému operačního systému Microsoft Windows XP“ Na straně 64).
POZNÁMKA:
disku CD s
Nová instalace operačního systému Windows XP
UPOZORNĚNÍ:
Tento disk CD s
ovladači a nástroji
Při nové instalaci operačního systému Windows XP musíte použít aktualizaci Service Pack 1 nebo novější.
ovladači a nástroji
zaved’te požadované ovladače, včetně ovladačů, které jsou vyžadovány počítači s řadičem RAID
obsahuje ovladače, které byly nainstalovány během výroby počítače. Pomocí
.
UPOZORNĚNÍ:
disk je obvykle první disk rozpoznaný počítačem.
Než provedete instalaci, zazálohujte všechny datové soubory na primárním pevném disku. Primární pevný
Pro novou instalaci operačního systému Windows XP jsou zapotřebí následující položky:
• Disk CD Dell s
•Dell
Disk CD s ovladači a nástroji
operačním systémem
Chcete-li znovu nainstalovat operační systém Windows XP, proved’te všechny kroky v následujících částech v
pořadí, ve kterém jsou uvedeny.
Nová instalace může trvat 1 - 2 hodiny. Po dokončení nové instalace operačního systému bude třeba znovu
nainstalovat ovladače zařízení, antivirové programy a ostatní software.
66
Stručná referenční příručka
Page 67

UPOZORNĚNÍ:
možnosti mohou přepsat některé soubory a mohou ovlivnit programy nainstalované na pevném disku. Z tohoto důvodu
neprovádějte novou instalaci operačního systému Windows XP, pokud vám k tomu pracovník odborné pomoci společnosti
Dell nedá pokyn.
Na disku CD s
operačním systémem
jsou k dispozici možnosti nové instalace systému Windows XP. Tyto
UPOZORNĚNÍ:
programy nainstalované v počítači, aby se zabránilo konfliktům s tímto systémem. Příslušné pokyny najdete v dokumentaci
dodané se softwarem.
Zavedení systému z disku CD s operačním systémem
1
Uložte a zavřete všechny otevřené soubory a ukončete všechny spuštěné aplikace.
2
Vložte disk CD s
systému Windows XP), klepněte na tlačítko
3
Restartujte počítač.
4
Stiskněte tlačítko <F12> hned po zobrazení loga DELL.
Před zahájením nové instalace operačního systému Windows XP deaktivujte všechny antivirové
operačním systémem
. Pokud se zobrazí zpráva
Konec
.
Install Windows XP
Pokud se zobrazí logo operačního systému, počkejte, až se zobrazí pracovní plocha systému Windows;
potom počítač vypněte a akci opakujte.
5
Pomocí tlačítek se šipkami vyberte jednotku
6
Po zobrazení zprávy
Press any key to boot from CD
CD-ROM
a potom stiskněte klávesu <Enter>.
(Stisknutím libovolné klávesy zaved’te
systém z disku CD) stiskněte libovolnou klávesu.
Instalace operačního systému Windows XP
1
Po zobrazení obrazovky
<Enter> možnost
2
Přečtěte si informace na obrazovce
Instalace operačního systému Windows XP
Nainstalovat systém Windows.
Licenční smlouva Microsoft Windows
vyberte stisknutím klávesy
a stisknutím tlačítka
přijměte podmínky licenční smlouvy.
3
Pokud je operační systém Windows XP v počítači již nainstalován a chcete obnovit aktuální data
systému Windows XP, zadáním r vyberte možnost opravy a vyjměte disk CD.
4
Chcete-li nainstalovat novou kopii operačního systému Windows XP, stisknutím klávesy <Esc>
vyberte tuto možnost.
5
Stisknutím klávesy <Enter> vyberte zvýrazněný oddíl (doporučeno) a postupujte podle pokynů na
obrazovce.
Zobrazí se obrazovka
Instalace operačního systému Windows XP
a operační systém začne kopírovat
soubory a instalovat zařízení. Počítač se několikrát automaticky restartuje.
(Instalace
POZNÁMKA:
UPOZORNĚNÍ:
(Stisknutím libovolné klávesy zaved’te systém z disku CD).
CD
6
Po zobrazení obrazovky Místní a jazyková nastavení vyberte nastavení vhodná pro vaše umístění a
klepněte na tlačítko
Délka instalace závisí na velikosti pevného disku a rychlosti počítače.
Pokud se zobrazí následující zpráva, netiskněte žádnou klávesu:
Press any key to boot from
Další
.
Stručná referenční příručka
67
Page 68

7
Na obrazovce
Další
.
8
Na obrazovce Název pořítače a heslo správce zadejte název vašeho počítače (nebo přijměte nabídnutý
název) a heslo a klepněte na tlačítko
9
Pokud se zobrazí obrazovka Informace o vytáčení, zadejte požadované informace a klepněte na tlačítko
Další
.
10
V okně Nastavení data a času zadejte datum, čas a časovou zónu a klepněte na tlačítko
11
Pokud se zobrazí obrazovka Nastavení sítě, klepněte na možnost
Další
.
12
Pokud znovu instalujete operační systém Windows XP Professional a jste vyzváni, abyste zadali další
Přizpůsobit software
zadejte vaše jméno a organizaci (nepovinné) a klepněte na tlačítko
Další
.
Další
Ty p i c k á
a potom klepněte na tlačítko
informace o konfiguraci sítě, zadejte požadované výběry. Pokud si nejste jistí, jaká nastavení používáte,
použijte výchozí výběr.
Instalátor systému Windows XP nainstaluje součásti operačního systému a nakonfiguruje počítač.
Počítač se automaticky restartuje.
.
UPOZORNĚNÍ:
(Stisknutím libovolné klávesy zaved’te systém z disku CD).
CD
13
Po zobrazení obrazovky
14
Po zobrazení zprávy
způsobem bude tento počítač připojen k Internetu?) klepněte na tlačítko
15
Po zobrazení obrazovky
Nyní ne a potom
16
Po zobrazení obrazovky
17
Klepněte na tlačítko
18
Klepnutím na tlačítko
19
Znovu nainstalujte potřebné ovladače pomocídisku CD s o
20
Znovu nainstalujte antivirový software.
21
Znovu nainstalujte programy.
POZNÁMKA:
použijte kód Product Key, který se nachází na zadní straně obalu disku CD Microsoft Office nebo Microsoft Works Suite.
Pokud se zobrazí následující zpráva, netiskněte žádnou klávesu:
Vítejte v systému Microsoft
klepněte na tlačítko
How will this computer connect to the Internet?
Jste připraveni se zaregistrovat u společnosti Microsoft?
klepněte na tlačítko
Kdo bude používat tento počítač?
Další
.
Dokončit
Další
.
můžete zadat až pět uživatelů.
dokončete instalaci a vyjměte disk CD.
vladači a nástroji
Chcete-li znovu nainstalovat a aktivovat programy sady Microsoft Office nebo Microsoft Works Suite,
Press any key to boot from
Další
.
( Jakým
Přeskočit
.
vyberte možnost
.
Microsoft® Windows Vista™
Uživatelé, kteří znají předchozí verze systému Microsoft® Windows® si povšimnou některých rozdílů ve
funkcích a uživatelského rozhraní systému Microsoft Windows Vista.
POZNÁMKA:
podpora Windows Vista obsahuje online dokumentaci. Klepněte na tlačítko
mohli přistoupit k těmto informacím. Pomocí
Kompletní dokumentaci Windows Vista naleznete v dokumentaci Microsoft Windows Vista. Nápověda a
Start
vyhledávacího
a vyberte
textového pole můžete vyhledat určité téma.
Nápověda a podpora
, abyste
68
Stručná referenční příručka
Page 69

POZNÁMKA:
na systém. Konfigurace vašeho hardwaru může také určovat, jaké funkce Windows Vista budou pro vás k dispozici. Další
informace viz specifické podrobnosti a požadavky na systém naleznete v dokumentaci pro Microsoft Windows Vista.
Různé verze operačního systému Microsoft Windows Vista nabízejí různé funkce a mají různé požadavky
POZNÁMKA:
dokumentace se odvolává na systém Windows XP. Obecně platí, že dokumentace pro Windows XP platí také pro váš
systém Windows Vista. V některých případech se názvy možností menu nebo jiných prvků na obrazovce v systému
Windows Vista poněkud liší. Další
support.dell.com
K vašemu počítačovému systému se dodává nejrůznější dokumentace. Možná si povšimnete, že některá
informace viz Příručka pro začátečníky s Microsoft® Windows Vista™
.
na webu
Upgrade na operační systém Microsoft Windows Vista
POZNÁMKA:
produktu, který je přiřazen k upgradu. Výš kód produktu se nachází na zadní straně obalu instalačních disků Windows Vista
DVD.
Verzi operačního systému Microsoft Windows Vista nainstalovaného ve vašem počítači určuje kód
Během procesu upgradu na operační systém Windows Vista bude třeba:
• Použít disk DVD s pomocníkem upgradu Dell Windows Vista pro kontrolu kompatibility systému a
provést veškeré požadované aktualizace aplikací a ovladačů nainstalovaných společností Dell.
• Použít instalační disk Windows Vista DVD pro upgrade na operační systém Windows Vista.
POZNÁMKA:
upgrade na 64bitový operační systém Windows Vista, je třeba provést čistou instalaci.
Než začnete
UPOZORNĚNÍ:
Postupy upgradu v této brožuře se nevztahují na 64bitový operační systém Windows Vista. Provádíte-li
Před provedením upgradu na operační systém Windows Vista zazálohujte veškerá důležitá data.
Před instalací operačního systému Windows Vista do počítače Dell si připravte následující pomůcky:
• Disk DVD s pomocníkem upgradu Dell Windows Vista
• Disk DVD pro instalaci operačního systému Microsoft Windows Vista
• Certifikát pravosti operačního systému Windows Vista (COA)
•Jednotka DVD
• Alespoň 512 MB systémové paměti RAM
• 15 GB volného prostoru na pevném disku
• Aktivní připojení k Internetu
• Kopii dokumentu
Rychlý upgrade počítačů Dell™ na operační systém Windows® Vista™
POZNÁMKA:
upgradu na operační systém Windows Vista.
Pomocník
upgradu Dell Windows Vista
Aktivní připojení k Internetu je vyžadováno pro provádění aktualizací, ale není nezbytné pro dokončení
zkontroluje kompatibilitu softwaru nainstalovaného společností
Dell s operačním systémem Windows Vista. Pokud jste nainstalovali další software jiného výrobce,
doporučujeme vám před zahájení upgradu na operační systém Windows Vista kontaktovat výrobce tohoto
softwaru s dotazem ohledně kompatibility s operačním systémem Windows Vista a aktualizací.
Stručná referenční příručka
69
Page 70

POZNÁMKA:
pravděpodobně třeba před upgradováním na operační systém Windows Vista odebrat. Před zahájením upgradu na
operační systém Windows Vista zazálohujte veškerý software jiných výrobců.
Software jiných výrobců, který není kompatibilní s operačním systémem Windows Vista, bude
Pokyny pro zálohování dat nebo vyhledávání ovladačů/aktualizací aplikací nainstalovaných společností Dell,
které jsou kompatibilní s operačním systémem Windows Vista:
1
Přejděte na web
Downloads
2
Zadejte váš servisní štítek nebo model produktu a klepněte na tlačítko Go (Vyhledat).
3
Vyberte váš operační systém a jazyk a potom klepněte na tlačítko
support.dell.com
, vyberte vaši zemi/oblast a potom klepněte na tlačítko
(Ovladače a soubory ke stažení).
Find Downloads
Drivers and
(Najít soubory ke
stažení) nebo vyhledávejte podle klíčového slova témata, která odpovídají informacím, které hledáte.
POZNÁMKA:
Uživatelské rozhraní webu
support.dell.com
se může lišit v závislosti na provedených výběrech.
Používání disku CD s ovladači a nástroji
Používání disku CD s
POZNÁMKA:
při práci s operačním systémem Windows.
1
Zapněte počítač a nechte zavést operační systém Windows do zobrazení pracovní plochy.
2
Vložte disk CD s
Používáte-li disk CD s
zdrojového disku CD
3
Pokračujte klepnutím na tlačítko OK.
Chcete-li instalaci dokončit, odpovězte na dotazy instalačního programu.
4
Na uvítací obrazovce uživatele počítače Dell
Vyberte příslušný
Ovladače pro počítač
Zobrazení seznamu ovladačů zařízení pro počítač:
1
V rozevíracím seznamu
Disk CD s
seznam ovladačů pro konfiguraci systému.
ovladači a nástroji (zdrojový disk CD
Chcete-li používat ovladače zařízení a uživatelskou dokumentaci, musíte použít disk CD s
ovladači a nástroji
ovladači a nástroji
do jednotky CD.
v tomto počítači poprvé, zobrazí se
se zprávou, že disk CD s
model systému, operační systém, typ zařízení a téma
Téma
ovladači a nástroji
vyberte
(volitelný) prohledá hardware počítače a operační systém a zobrazí
položku Ovladače
) při práci s operačním systémem Windows.
ovladači a nástroji
klepněte na tlačítko
je připraven zahájit instalaci.
Další
.
.
.
ovladači a nástroji
instalační obrazovka
2
Klepněte na příslušný ovladač a postupujte podle pokynů pro stažení ovladače do počítače.
Chcete-li zobrazit ovladače dostupné pro váš počítač, v rozevíracím seznamu
Ovladače
70
.
Stručná referenční příručka
Téma
klepněte na
položku
Page 71

Rejstřík
Symboly
štítek
Microsoft Windows, 43
štítky
Servisní štítek, 43
B
bezpečnostní pokyny, 42
C
Centrum nápovědy a odborné
pomoci, 42
chybové zprávy
diagnostické indikátory, 61
systémové indikátory, 60
zvukové signály, 63
D
dokumentace
bezpečnost, 42
ergonomie, 42
Licenční smlouva s koncovým
uživatelem, 42
online, 43
Příručka informací o
systému, 42
regulatorní, 42
uživatelská příručka, 41
záruka, 42
E
ergonomické informace, 42
H
hardware
Dell Diagnostics, 57
k, 64
zvukové signály, 63
instalace částí
neű začnete, 49
K
konflikty
nekompatibilita softwaru a
hardwaru, 64
konflikty přerušení IRQ, 64
kryt
demontáű, 49
L
Licenční smlouva s koncovým
uűivatelem, 42
N
nová instalace
Windows XP, 66
Dell Diagnostics, 57
diagnostika
Dell Diagnostics, 57
zvukové signály, 63
Disk CD s operačním
systémem, 42
Disk CD s ovladači a
nástroji, 41
Disky CD
operační systém, 42
I
indikátor napájení
diagnostikování problémů, 60
indikátory
diagnostické, 61
systém, 60
informace o záruce, 42
O
obnovení systému, 64
odstraňování problémů
Centrum nápovědy a odborné
pomoci, 42
Dell Diagnostics, 57
diagnostické indikátory, 61
konflikty, 64
Rejstřík
71
Page 72

Průvodce při odstraňování
problémů, 64
systémové indikátory, 60
zvukové signály, 63
U
uživatelská příručka, 41
řešení potíűí
obnovení počítače do
předchozího funkčního
stavu, 64
operační systém
nová instalace operačního
systému Windows XP, 66
přeinstalování, 42
ovladače
seznam, 70
P
Příručka informací o
systému, 42
problémy. Viz odstraňování
problémů
Průvodce při potíűích s
hardwarem, 64
W
web podpory, 43
web podpory Dell, 43
Windows XP
Centrum nápovědy a odborné
pomoci, 42
instalace, 67
nová instalace, 66
obnovení systému, 64
přeinstalování, 42
Průvodce při odstraňování
problémů, 64
průvodce při potížích s
hardwarem, 64
Z
základní deska. Viz systémová
deska
zvukové signály, 63
R
regulatorní informace, 42
S
Servisní štítek, 43
soubor nápovědy
Centrum nápovědy a odborné
pomoci Windows, 42
systémová deska, 53
72
Rejstřík
Page 73

Dell™ OptiPlex™ 745c
Snelle Referentiegids
Model DCSM
www.dell.com | support.dell.com
Page 74

Opmerkingen, kennisgevingen en waarschuwingen
OPMERKING: Een OPMERKING duidt belangrijke informatie aan voor een beter gebruik van de computer.
KENNISGEVING: Een KENNISGEVING duidt de mogelijkheid aan van schade aan hardware of gegevensverlies en laat
u weten hoe u het probleem kunt voorkomen.
LET OP: Een WAARSCHUWING duidt het risico van schade aan eigendommen, lichamelijk letsel of overlijden.
Als u een Dell™ computer uit de n-serie hebt aangeschaft, zijn de verwijzingen naar de Microsoft® Windows®
besturingssystemen in dit document niet van toepassing.
____________________
De informatie in dit document kan zonder voorafgaande kennisgeving worden gewijzigd.
© 2007 Dell Inc. Alle rechten voorbehouden.
Verveelvoudiging, op welke wijze dan ook, is is strikt verboden zonder de schriftelijke toestemming van Dell Inc.
Merken in dit document: Dell, de DELL logo, en OptiPlex zijn handelsmerken van Dell Inc.; Intel is een gedeponeerde handelsmerk van Intel
Corporation; Microsoft, Windows, en Vis t a zijn gedeponeerde handelsmerken van Microsoft Corporation.
Andere merken en handelsnamen die mogelijk in dit document worden gebruikt, dienen ter aanduiding van de rechthebbenden met betrekking
tot de merken en namen of ter aanduiding van hun producten. Dell Inc. claimt op geen enkele wijze enig eigendomsrecht ten aanzien van andere
merken of handelsnamen dan haar eigen merken en handelsnamen.
Model DCSM
Februari 2007 P/N NJ423 Rev. A00
Page 75

Inhoud
Informatie zoeken . . . . . . . . . . . . . . . . . . . . . . . . . . . . . . . . 77
Systeemaanzichten
Mini Tower-computer — vooraanzicht
Mini Tower Computer — achteraanzicht
Mini Tower-computer — ingangen aan de achterzijde
De computerkap verwijderen
Voordat u begint
Mini Tower-computer
Binnenin uw computer
Mini Tower Computer
De computer instellen
Uw toetsenbord en muis instellen
Installatie van de monitor
Stroomverbindingen
Problemen oplossen
Dell Diagnostics
Systeemlampjes
Diagnostische lampjes
Piepcodes
Software en hardware conflicten oplossen
. . . . . . . . . . . . . . . . . . . . . . . . . . . . . . . . 81
. . . . . . . . . . . . . . . . . . . 81
. . . . . . . . . . . . . . . . . . 83
. . . . . . . . . . 84
. . . . . . . . . . . . . . . . . . . . . . . . . . 86
. . . . . . . . . . . . . . . . . . . . . . . . . . . . . . 86
. . . . . . . . . . . . . . . . . . . . . . . . . . . . 87
. . . . . . . . . . . . . . . . . . . . . . . . . . . . . . 89
. . . . . . . . . . . . . . . . . . . . . . . . . . . . 89
. . . . . . . . . . . . . . . . . . . . . . . . . . . . . . 92
. . . . . . . . . . . . . . . . . . . . . 93
. . . . . . . . . . . . . . . . . . . . . . . . . . 93
. . . . . . . . . . . . . . . . . . . . . . . . . . . . 94
. . . . . . . . . . . . . . . . . . . . . . . . . . . . . . . 94
. . . . . . . . . . . . . . . . . . . . . . . . . . . . . . . 94
. . . . . . . . . . . . . . . . . . . . . . . . . . . . . . . 97
. . . . . . . . . . . . . . . . . . . . . . . . . . . 98
. . . . . . . . . . . . . . . . . . . . . . . . . . . . . . . . . 100
. . . . . . . . . . . . . . . 101
Microsoft Windows XP System Restore (Systeemherstel) gebruiken
Microsoft Windows XP opnieuw installeren
Microsoft
®
Windows Vista™ . . . . . . . . . . . . . . . . . . . . . . . 106
. . . . . . . . . . . . . . . 103
. . 102
De Drivers and Utilities CD (Stuur- en hulpprogramma's-cd) gebruiken
Stuurprogramma's voor uw computer
. . . . . . . . . . . . . . . . . . 108
. . . 108
Register . . . . . . . . . . . . . . . . . . . . . . . . . . . . . . . . . . . . . . 109
Inhoud 75
Page 76

76 Inhoud
Page 77

Informatie zoeken
OPMERKING: Sommige kenmerken of media zijn optioneel en zijn misschien niet meegeleverd met deze
computer. Sommige kenmerken of media zijn niet beschikbaar in bepaalde landen.
OPMERKING: Mogelijk werd er bij uw computer bijkomende informatie geleverd.
Waar bent u naar op zoek? Hier kunt u het vinden
• Een diagnoseprogramma voor de computer
• Stuurprogramma's voor de computer
• Documentatie over de computer
• Documentatie over dit apparaat
• Desktop System Software (DSS,
desktopsysteemsoftware)
Drivers and Utilities CD (Stuur- en hulpprogramma's-cd) ofwel
ResourceCD (bron-cd)
OPMERKING: De Drivers and Utilities CD (Stuur- en
hulpprogramma's-cd) kan optioneel zijn en mogelijk niet
meegeleverd zijn met deze computer.
De documentatie en stuurprogramma's zijn reeds op de
computer geïnstalleerd. U kunt deze cd gebruiken om
stuurprogramma's opnieuw te installeren (zie "De Drivers and
Utilities CD (Stuur- en hulpprogramma's-cd) gebruiken" op
pagina 108), voer Dell Diagnostics uit (zie "Dell Diagnostics"
op pagina 94) of raadpleeg de documentatie.
Mogelijk bevat uw cd leesmijbestanden met het laatste
nieuws over technische
wijzigingen van uw computer
of geavanceerde technische
informatie voor ervaren
gebruikers.
OPMERKING: Updates van de
stuurprogramma's en
documentatie vindt u op
support.dell.com.
• Onderdelen verwijderen en vervangen
• Specificaties
• Systeeminstellingen configureren
• Problemen vaststellen en oplossen
Dell™ OptiPlex™-Handleiding
Microsoft Windows XP Help en Support Center
1
Klik op
Start→
Help and Support
→
ondersteuning)
Gebruikers- en systeeminformatiehandleiding)
(Systeeminformatiehandleiding).
Guides
2
Klik op de
De Handleiding is tevens aanwezig op de optionele Drivers and
Utilities (Stuur- en hulpprogramma's) cd.
Dell User and System Guides
Handleiding
voor deze computer.
(Hulp en
(Dell
→ System
Snelle referentiegids 77
Page 78

Waar bent u naar op zoek? Hier kunt u het vinden
• Garantie-informatie
Dell™ Productinformatiegids
• Algemene voorwaarden (alleen Verenigde Staten)
• Veiligheidsinstructies
• Informatie over regelgeving
• Ergonomische informatie
• Gebruiksrechtovereenkomst
• Het besturingssysteem opnieuw installeren
Besturingssysteem-cd
OPMERKING: De Operating System CD (Besturingssysteem-cd)
kan optioneel zijn en niet meegeleverd zijn met deze computer.
Het besturingssysteem is reeds op de computer geïnstalleerd.
Gebruik om uw besturingssysteem opnieuw te installeren de
Operating Stystem CD (Besturingssysteem-cd) (zie "Microsoft
Windows XP opnieuw installeren" op pagina 103).
Nadat u het besturingssysteem
opnieuw hebt geïnstalleerd,
kunt u de optionele Drivers and
Utilities CD (Stuur- en
hulpprogramma's-cd)
(ResourceCD)(bron-cd)
gebruiken om de
stuurprogramma’s voor de
hardware die met uw computer
werd meegeleverd, opnieuw te
installeren. Raadpleeg voor
meer informatie "Drivers and
Utilities CD (Stuur- en
hulpprogramma's-cd) ofwel
ResourceCD (bron-cd)" op
pagina 77.
Het etiket met de productsleutel voor uw besturingssysteem
bevindt zich op uw computer (zie "Servicelabel en Microsoft
Windows
®
-productsleutel" op pagina 79).
®
OPMERKING: De kleur van uw Besturingssysteem-cd varieert
met het besturingssysteem dat u hebt besteld.
78 Snelle referentiegids
Page 79

Waar bent u naar op zoek? Hier kunt u het vinden
• Met Windows XP werken
• Met programma's en bestanden werken
• Het bureaublad personaliseren
Windows Help en Support Center
1
Klik op
Start→
Help and Support
2
Geef met een of meer woorden een beschrijving van het
probleem en klik vervolgens op het pijlpictogram.
3
Klik op het onderwerp dat uw probleem beschrijft.
4
Volg de instructies op het scherm.
• Servicelabel en code voor express-service
• Etiket met productsleutel voor Microsoft
Windows
Servicelabel en Microsoft® Windows®-productsleutel
Deze labels bevinden zich op de computer.
• Gebruik het servicelabel
om uw computer te
identificeren wanneer u
support.dell.com
of contact opneemt met de
technische ondersteuning.
• Voer de code voor expressservice in om uw gesprek naar de juiste medewerker te leiden
wanneer u contact opneemt met de technische
ondersteuning.
(Help en ondersteuning).
gebruikt
Snelle referentiegids 79
Page 80

Waar bent u naar op zoek? Hier kunt u het vinden
• Solutions — Hints en tips op het gebied van
probleemoplossing, artikels van technici, online
trainingen en FAQ's
Dell Support Website — support.dell.com
OPMERKING: Selecteer uw regio of bedrijfssegment om de
juiste supportwebsite op te roepen.
• Community — online discussies met andere
gebruikers van Dell-producten
• Upgrades — upgrade informatie voor onderdelen,
zoals het geheugen, de vaste schijf en het
besturingssysteem
• Customer Care — Contactgegevens, de status
van problemen en bestellingen, en garantie- en
reparatiegegevens
• Service and support — De status van problemen,
een ondersteuningshistorie, servicecontracten en
online discussies met de technische
ondersteuning
• Referentiemateriaal — Computerdocumentatie,
details over mijn computerinstellingen,
productspecificaties en white papers
• Downloads — Geautoriseerde stuurprogramma's,
patches en software-updates
• Desktop System Software (DSS) — Als u het
besturingssysteem opnieuw installeert, moet u
ook het hulpprogramma DSS opnieuw
installeren. DSS detecteert automatisch uw
computer en besturingssysteem, installeert de
benodigde updates voor uw configuratie en
voorziet u van kritieke updates voor uw
besturingssysteem en ondersteuning voor Dell™
3,5-inch USB diskettestation, Intel
®
-processors,
optische stations en USB-apparaten. DSS is
noodzakelijk voor een goede werking van uw Dell-
Om Desktop System Software te downloaden:
1
Ga naar
support.dell.com
bedrijfssegment en voer uw servicelabel in.
2
Selecteer
3
Selecteer uw besturingssysteem en zoek op het trefwoord
Drivers & Downloads
Desktop System Software
OPMERKING: De gebruikersinterface van support.dell.com kan
er anders uitzien, afhankelijk van de keuzes die u hebt gemaakt.
computer.
, selecteer uw regio of
en klik vervolgens op Go.
.
80 Snelle referentiegids
Page 81

Systeemaanzichten
Mini Tower-computer — vooraanzicht
1
2
3
11
10
9
4
5
6
7
8
Snelle referentiegids 81
Page 82

1 5,25-inch-basisstation Kan een optisch station bevatten. Plaats een cd of dvd (indien ondersteund) in dit
station.
2 5,25-inch-basisstation Kan een optisch station bevatten. Plaats een cd of dvd (indien ondersteund) in dit
station.
3 3,5-inch basisstation Bevat mogelijk een optioneel diskettestation of een optionele mediakaartlezer.
4 USB 2.0-ingangen (2) Gebruik de USB-aansluitingen aan de voorzijde voor apparaten die u af en toe
aansluit, zoals joysticks en camera's, of voor opstartbare USB-apparaten (zie uw
online handleiding voor meer informatie over het opstarten vanaf een USBapparaat).
Het wordt aanbevolen om de USB-ingangen aan de achterzijde te gebruiken voor
apparaten die aangesloten blijven, zoals printers en toetsenborden.
5 LAN-indicatielampje Dit lampje geeft aan dat er een LAN (Local Area Network)-verbinding is gemaakt.
6 diagnostische lampjes Met behulp van deze lampjes kunt u een computerprobleem oplossen op basis van
de diagnostische code. Raadpleeg voor meer informatie "Diagnostische lampjes"
op pagina 98.
7 aan/uit-knop Druk op deze knop om de computer uit te zetten.
KENNISGEVING: Om gegevensverlies te voorkomen moet u de computer niet
uitschakelen door de aan/uit-knop in te drukken. U moet de computer
daarentegen uitschakelen via het besturingssysteem. Raadpleeg voor meer
informatie "Voordat u begint" op pagina 86.
KENNISGEVING: Als ACPI is geactiveerd voor uw besturingssysteem, zal de
computer worden uitgezet door het besturingssysteem als u op de aan/uit-knop
drukt.
8 lampje voeding Het stroomlampje licht op, knippert of blijft branden om de verschillende
werkstanden aan te geven:
• Geen lichtje — De computer staat uit.
• Aanhoudend groen — De computer bevindt zich in een normale werkstand.
• Groen knipperend — De computer bevindt zich in een energiebesparende stand.
• Knipperend of aanhoudend oranje — Zie
Om een energiebesparende stand te verlaten drukt u op de aan/uit-knop of
gebruikt u het toetsenbord of de muis als deze zijn ingesteld als wekapparaten in
Windows Hardwarebeheer. Raadpleeg voor meer informatie over de slaapstand en
het deactiveren van de energiebesparingsmodus de online handleiding.
Raadpleeg "Systeemlampjes" op pagina 97 voor een beschrijving van lichtcodes op
basis waarvan u computerproblemen kunt oplossen.
9 activiteitslampje vaste
schijf
10 connector koptelefoon Gebruik de ingang voor de koptelefoon om koptelefoons en de meeste typen
11 microfoonconnector Gebruik de microfooningang om een microfoon aan te sluiten.
Dit lampje licht op wanneer er toegang tot de harde schijf wordt gezocht.
speakers aan te sluiten.
uw online handleiding
.
82 Snelle referentiegids
Page 83

Mini Tower Computer — achteraanzicht
1
2
3
4
5
6
Snelle referentiegids 83
Page 84

1 ontgrendelingsmechanisme
voor computerkap
2 hangslotbeugel Breng een hangslot aan om de computerkap te vergrendelen.
3 voltagekeuzeschakelaar Uw computer is voorzien van een handmatige voltagekeuzeschakelaar.
4 stroomaansluiting Sluit de stroomkabel aan.
5 verbindingen op het
achterpaneel
6 kaartsleuven Toegangsaansluitingen voor geïnstalleerde PCI- en PCI Express-kaarten.
Met dit ontgrendelingsmechanisme kunt u de computerkap openen.
Om schade aan de computer door een handmatige voltagekeuzeschakelaar te
voorkomen, moet u de schakelaar instellen op het stroomniveau dat het beste
overeenkomt met de wisselstroom die voor uw locatie beschikbaar is.
KENNISGEVING: De voltagekeuzeschakelaar moet worden ingesteld op
de 115-V-stand, zelfs als de in Japan beschikbare netstroom 100 V is.
Ook moet u ervoor zorgen dat de stroomvereisten voor de monitor en
gekoppelde apparaten overeenkomen met de voor uw locatie beschikbare
wisselstroom.
Sluit de seriële, USB- en andere apparaten op de relevante ingangen aan (zie
"Mini Tower-computer — ingangen aan de achterzijde" op pagina 84).
Mini Tower-computer — ingangen aan de achterzijde
98 7
84 Snelle referentiegids
13
24
5
6
Page 85

1 parallelle ingang Sluit parallelle apparaten zoals een printer aan op de parallelle ingang. Als u over
een USB-printer beschikt, moet u deze aansluiten op een USB-ingang.
OPMERKING: De geïntegreerde parallelle ingang wordt automatisch gedeactiveerd
als de computer een geïnstalleerde kaart detecteert die een parallelle ingang bevat
die op hetzelfde adres is geconfigureerd. Raadpleeg voor meer informatie uw online
handleiding.
2 lampje
verbindingsintegriteit
3 ingang netwerkadapter Om de computer aan te sluiten op een netwerk of breedbandapparaat moet u een
• Groen — Er is een succesvolle verbinding tussen een 10 Mbps-netwerk en de
computer.
• Oranje — Er is een succesvolle verbinding tussen een 100 Mbps-netwerk en de
computer.
• Geel — Er is een succesvolle verbinding tussen een 1 Gbps-(of 1000 Mbps)netwerk en de computer.
• Uit — De computer detecteert geen fysieke verbinding met het netwerk.
uiteinde van de netwerkkabel aansluiten op een netwerkcontact of een netwerk- of
breedbandapparaat. Sluit het andere einde van de netwerkkabel aan op de
netwerkadapteringang op het achterpaneel van de computer. Een klikgeluid geeft
aan dat de netwerkkabel goed vastzit.
OPMERKING: Sluit geen telefoonkabel aan op de netwerkingang.
Bij computers met een netwerkkaart moet u de aansluiting op de kaart gebruiken.
Het wordt aangeraden om Categorie 5-bedrading en -ingangen voor uw netwerk te
gebruiken. Als u toch gebruikmaakt van Categorie 3-bedrading, moet u de
netwerksnelheid naar 10 Mbps forceren om een betrouwbare werking te
garanderen.
4 netwerkactiviteitslampje Licht geel op als de computer netwerkgegevens verzendt of ontvangt. Als gevolg
van een hoog netwerkvolume kan het lijken of dit lampje aanhoudend brandt.
5 lijn uit-ingang Gebruik de groene lijn uit-ingang om de meeste speakers met ingebouwde
versterkers aan te sluiten.
6 lijn in-/
microfooningang
7 USB 2.0-ingangen (6) Gebruik de USB-ingangen aan de achterzijde voor apparaten die normaliter
8 video-ingang Sluit de kabel van de VGA-compatibele monitor aan op de blauwe ingang.
Gebruik de blauwe en roze lijn in-/microfooningang om een apparaat voor
opnemen en afspelen zoals een cassettespeler, cd-speler of videorecorder aan te
sluiten, of een pc-microfoon voor spraak- of muziekinvoer naar een geluids- of
telefonieprogramma.
aangesloten blijven, zoals printers en toetsenborden.
OPMERKING: Als u een optionele grafische kaart hebt aangeschaft, zal deze ingang
zijn bedekt met een deksel. Sluit de monitor aan op de ingang van de grafische kaart.
Verwijder het deksel niet.
OPMERKING: Als u een grafische kaart gebruikt die ondersteuning biedt voor twee
monitors, moet u de y-kabel gebruiken die met uw computer werd meegeleverd.
9 seriële connector Sluit een serieel apparaat zoals een handheld apparaat op de seriële poort aan. De
standaardtoewijzingen zijn COM1 voor seriële ingang 1 en COM2 voor seriële
ingang 2.
Raadpleeg voor meer informatie de online handleiding.
Snelle referentiegids 85
Page 86

De computerkap verwijderen
LET OP: Voordat u met een van de procedures in deze sectie begint, dient u de veiligheidsinstructies in
de productinformatiegids op te volgen.
LET OP: Bescherm uzelf tegen elektrische schokken door altijd de computer van het stopcontact lost te
koppelen voordat u de kap opent.
Voordat u begint
KENNISGEVING: Om gegevensverlies te voorkomen, moet u open bestanden opslaan en sluiten en geopende
programma's afsluiten voordat u de computer uitzet.
1
Sluit het besturingssysteem af:
a
Sla de geopende bestanden op en sluit ze, sluit alle geopende programma's af en klik op de
knop. Klik vervolgens op
b
Klik in het venster
Computer afsluiten
Computer afsluiten
op
Afsluiten
.
.
De computer wordt uitgezet nadat het besturingssysteem is afgesloten.
2
Controleer of de computer en alle daaraan gekoppelde apparaten uit staan. Als de computer en
gekoppelde apparaten niet automatisch worden uitgeschakeld als u het besturingssysteem afsluit, moet
u deze nu uitschakelen.
Voordat u binnenin de computer gaat werken
Volg de onderstaande veiligheidsrichtlijnen om uw eigen veiligheid te garanderen en de computer en
werkomgeving te beschermen tegen mogelijke schade.
LET OP: Voordat u met een van de procedures in deze sectie begint, dient u de veiligheidsinstructies in
de productinformatiegids op te volgen.
Start
-
LET OP: Ga voorzichtig met componenten en kaarten om. Raak de componenten en de contacten op kaarten niet
aan. Pak kaarten bij de uiteinden vast of bij de metalen bevestigingsbeugel. Houd onderdelen zoals een
processor vast aan de zijkant, niet bij de contacten.
KENNISGEVING: Alleen een bevoegde onderhoudsmonteur mag reparaties aan uw computer uitvoeren. Schade
als gevolg van onderhoudswerkzaamheden die niet door Dell zijn goedgekeurd, valt niet onder de garantie.
KENNISGEVING: Maak een kabel los door aan de connector of aan de kabelontlastingslus te trekken en niet aan
de kabel zelf. Sommige kabels zijn voorzien van een connector met borglippen. Als u dit type kabel loskoppelt, moet
u de borglippen ingedrukt houden voordat u de kabel verwijdert. Als u de connectoren van elkaar los trekt, moet u
ze op evenwijdige wijze uit elkaar houden om te voorkomen dat een van de connectorpennen wordt verbogen. Ook
moet u voordat u een kabel verbindt, controleren of beide connectoren op de juiste wijze zijn opgesteld en
uitgelijnd.
Om schade aan de computer te voorkomen moet u de volgende instructies opvolgen voordat u binnenin
de computer gaat werken.
1
Zet de computer uit.
KENNISGEVING: Om een netwerkkabel te ontkoppelen moet u de kabel van de computer loskoppelen en deze
vervolgens van het netwerkcontact loskoppelen.
86 Snelle referentiegids
Page 87

2
Ontkoppel alle telefoon- of telecommunicatiekabels van de computer.
3
Ontkoppel de computer en alle daarop aangesloten apparaten van hun stopcontacten en druk op de
aan/uit-knop om het moederbord te aarden.
4
Verwijder de computerstandaard (indien van toepassing; zie voor aanwijzingen de documentatie die
met de standaard werd meegeleverd).
LET OP: Bescherm uzelf tegen elektrische schokken door altijd de computer van het stopcontact los te koppelen
voordat u de kap opent.
5
Verwijder de computerkap. Zie "Mini Tower-computer" op pagina 87.
KENNISGEVING: Raak een component pas aan nadat u zich hebt geaard door een ongeverfd metalen oppervlak
van het chassis aan te raken, zoals het metaal rondom de openingen voor de kaarten aan de achterkant van de
computer. Raak terwijl u bezig bent af en toe een ongeverfd metalen oppervlak van het chassis aan om statische
elektriciteit af te voeren die interne componenten kan beschadigen.
Mini Tower-computer
LET OP: Voordat u met een van de procedures in deze sectie begint, dient u de veiligheidsinstructies in
de productinformatiegids op te volgen.
LET OP: Om een elektrische schok te voorkomen, moet u alvorens de computerkap te verwijderen altijd de
stekker van de computer uit het stopcontact verwijderen.
1
Volg de instructies in "Voordat u begint" op pagina 86.
2
Zet de computer op zijn kant zoals in de afbeelding weergegeven.
3
Zoek naar het ontgrendelingsmechanisme voor de computerkap zoals in de afbeelding weergegeven.
Schuif het ontgrendelingsmechanisme vervolgens naar achteren terwijl u de kap omhoog tilt.
4
Houd de uiteinden van de computerkap vast en draai de kap naar boven door de onderste scharnieren
als steunpunten te gebruiken.
5
Verwijder de computerkap van de scharnieren en plaats deze op een zacht, niet-schurend oppervlak.
LET OP: De warmteputjes van de grafische kaart kunnen zeer heet worden tijdens een normale werking van de
computer. Zorg ervoor dat de warmteputjes van de grafische kaart voldoende tijd hebben gehad om af te koelen
voordat u deze aanraakt.
Snelle referentiegids 87
Page 88

1
2
3
1 sleuf voor
beveiligingskabel
88 Snelle referentiegids
2 kapontgrendelingsmechanisme 3 hangslotbeugel
Page 89

Binnenin uw computer
Mini Tower Computer
2
1
3
4
5
6
7
1 optisch station 2 diskettestation 3 voeding
4 chassis-intrusieschakelaar 5 moederbord 6 warmteputjes
7 vaste schijf
Snelle referentiegids 89
Page 90

Componenten van het moederbord
21
1
2
3
20
4
19
18
5
6
17
7
16
MFG_MODE
15
14
90 Snelle referentiegids
8
9
13
12
11
10
Page 91

1 ventilatoringang (FAN) 12 interne USB (INTERNAL_USB)
2 processoringang (CPU) 13 batterijcompartiment (BATT)
3 stroomaansluiting processor (12VPOWER) 14 PCI Express x16-ingang (SLOT1)
4 geheugenmodule-ingangen (DIMM_1, DIMM_2,
15 PCI Express x1-ingang (SLOT4)
DIMM_3, DIMM_4)
5 RTC reset jumperswitch (RTCRST) 16 PCI-ingang (SLOT2)
6 wachtwoord-jumperswitch (PSWD) 17 PCI-ingang (SLOT3)
7 SATA-stationsingangen (SATA0, SATA1, SATA4, SATA5) 18 seriële ingang (SER2)
8 productiemodus jumperswitch (MFG_MODE) 19 ingang diskettestation (DSKT)
9 ingang voorzijde (FNT_PANEL) 20 luidspreker moederbord (BEEP)
10 stroomingang (POWER) 21 luidsprekeringang (INT_SPKR)
11 ingang intrusieschakelaar (INTRUDER)
Jumperswitch-instellingen
OPMERKING: Gebruik niet de MFG_MODE jumperswitch. Actieve Management technologie werkt dan niet
correct. Deze jumperswitch wordt alleen tijdens de productie gebruikt.
Jumperswitch Instelling Beschrijving
PSWD Wachtwoordfuncties zijn geactiveerd
(standaardinstelling)
Wachtwoordfuncties zijn
uitgeschakeld.
RTCRST De real-time klok is
niet gereset.
De real-time klok wordt gereset
(tijdelijk gejumpered)
gejumpered niet gejumpered
Snelle referentiegids 91
Page 92

De computer instellen
LET OP: Voordat u de procedures uitvoert die in dit gedeelte worden beschreven, moet u de
veiligheidsinstructies in de productinformatiegids opvolgen.
KENNISGEVING: Als in uw computer een uitbreidingskaart is geïnstalleerd (bijvoorbeeld een modemkaart), dient
u de juiste kabel op de kaart zelf aan te sluiten, niet op de ingang op het achterpaneel.
KENNISGEVING: Om de bedrijfstemperatuur van de computer op peil te houden, moet u ervoor zorgen dat u de
computer niet te dicht bij een muur of ander opslagcompartiment plaatst dat de luchtcirculatie rond het chassis
kan hinderen. Raadpleeg voor meer informatie de productinformatiegids.
OPMERKING: Voordat u apparaten of software installeert die niet met uw computer werden meegeleverd, moet u
de documentatie raadplegen die met het apparaat of de software werd meegeleverd of contact op te nemen met
de leverancier om te controleren of het apparaat of de software compatibel is met uw computer en
besturingssysteem.
U dient alle stappen uit te voeren om de computer goed te installeren. Zie de bijbehorende afbeeldingen
achter de instructies.
KENNISGEVING: Probeer in geen geval tegelijkertijd een PC/2-muis en een USB-muis te gebruiken.
1
Sluit het toetsenbord en de muis aan.
KENNISGEVING: Sluit geen modemkabel op de verbinding voor de netwerkadapter aan. De stroom van
commmunicatie via de telefoon kan schade aan de netwerkadapter veroorzaken
2
Sluit de modem of de netwerkkabel aan.
Sluit de netwerkkabel, niet de telefoonlijn, aan op de netwerkingang. Als u over een optionele modem
beschikt, moet u de telefoonlijn op de modem aansluiten.
3
Sluit de monitor aan.
Lijn de monitorkabel zorgvuldig uit en breng deze voorzichtig aan om te voorkomen dat
connectorpinnen verbogen worden. Draai de schroefjes op de kabelconnectoren vast.
OPMERKING: Bij sommige monitoren bevindt de videoingang zich onder aan de achterzijde van het
beeldscherm. Zie de documentatie die bij de monitor is meegeleverd voor de locaties van de aansluitpunten.
4
Sluit de speakers aan.
5
Sluit de stroomkabels aan op de computer, monitor en apparaten en sluit de andere einden van de
stroomkabels aan op de stopcontacten.
KENNISGEVING: Om schade aan een computer met handmatige stroomselectieschakelaar te voorkomen moet u
de stroomschakelaar instellen op het voltage dat het beste overeenkomt met de wisselstroom die op uw locatie
beschikbaar is.
KENNISGEVING: In Japan moet de voltagekeuzeschakelaar zijn ingesteld op de 115 V-positie, ook al bedraagt de
beschikbare wisselstroom in Japan 100 V.
6
Controleer of de voltagekeuzeschakelaar is ingesteld op het juiste voltage voor uw locatie.
Uw computer is voorzien van een handmatige voltageselectieschakelaar. Computers waarbij zich op
het achterpaneel een voltagekeuzeschakelaar bevindt, moeten handmatig op het juiste werkingsvoltage
worden ingesteld.
92 Snelle referentiegids
Page 93

Uw toetsenbord en muis instellen
Installatie van de monitor
Snelle referentiegids 93
Page 94

Stroomverbindingen
Problemen oplossen
Dell biedt een aantal hulpmiddelen die u kunnen helpen als de computer niet naar verwachting
presteert. Voor de laatste probleemoplossingsinformatie die voor uw computer beschikbaar is, kunt u de
website van Dell Support raadplegen op support.dell.com.
Als er computerproblemen optreden waarvoor hulp van Dell vereist is, moet u een gedetailleerde
beschrijving van de fout, geluidscodes of diagnostiche patronen van de lampjes geven, de onderstaande
servicecode en het nummer van de servicelabel noteren en vervolgens contact opnemen met Dell vanaf
de locatie waar uw computer staat opgesteld. Zie de online handleiding voor meer informatie over
contact opnemen met Dell.
Raadpleeg voor een voorbeeld van de expresse servicecode en het servicelabel het gedeelte "Informatie
zoeken" in de handleiding van uw computer.
Code expresse-service: ___________________________
Serviceplaatje: ___________________________
Dell Diagnostics
LET OP: Voordat u met een van de procedures in deze sectie begint, dient u de veiligheidsinstructies in
de productinformatiegids op te volgen.
Wanneer het Dell-diagnoseprogramma te gebruiken
Als u een probleem met uw computer ondervindt, moet u de controles uitvoeren die zijn beschreven in
het gedeelte "Problemen oplossen" in uw online handleiding en Dell Diagnostics (Dell-diagnostiek)
uitvoeren voordat u contact met Dell opneemt voor technische ondersteuning. Zie de online handleiding
voor meer informatie over contact opnemen met Dell.
KENNISGEVING: Dell Diagnostics (Dell-diagnostiek) werkt alleen op Dell™-computers.
94 Snelle referentiegids
Page 95

Start de Systeem-setup (zie "Systeem-setup" in de online handleiding voor aanwijzingen), raadpleeg de
configuratiegegevens voor de computer en controleer of het apparaat dat u wilt testen in de Systeemsetup wordt weergegeven en actief is.
Start Dell Diagnostics (Dell-diagnostiek) vanaf de vaste schijf of vanaf de optionele Drivers and Utilities
CD (of Resource-cd).
Dell Diagnostics (Dell-diagnostiek) starten vanaf de harde schijf
1
Start of herstart de computer.
2
Zodra het DELL-logo verschijnt, drukt u meteen op <F12>.
OPMERKING: Als er een melding verschijnt dat er geen partitie met een diagnostisch hulpprogramma is
gevonden moet u Dell Diagnostics uitvoeren vanaf de optionele Drivers and Utilities CD (zie "Delldiagnoseprogramma starten vanaf de Drivers and Utilities CD (stuur- en hulpprogramma's-cd)" op pagina 95).
Als u te lang wacht en het logo van het besturingssysteem verschijnt, moet u blijven wachten tot u het
bureaublad van Microsoft
®
Windows® ziet. Sluit vervolgens de computer af en probeer het opnieuw.
Als de opstartbronlijst wordt weergegeven, markeert u
Boot to Utility Partition
(Opstarten naar
hulpprogramma partitie) en drukt u op <Enter>.
3
Als het
Main Menu
(Hoofdmenu) van het Dell Diagnostics (Dell-diagnostiek) wordt weergegeven,
selecteert u de test die u wilt uitvoeren.
Dell-diagnoseprogramma starten vanaf de Drivers and Utilities CD (stuur- en hulpprogramma's-cd)
1
Voer de
2
Zet de computer uit en start deze opnieuw.
Drivers and Utilities CD
in.
Zodra het DELL-logo verschijnt, drukt u meteen op <F12>.
Als u te lang wacht en het logo van het besturingssysteem verschijnt, moet u blijven wachten totdat u
het bureaublad van Microsoft Windows ziet. Sluit vervolgens de computer af en probeer het opnieuw.
OPMERKING: Met de volgende stappen wordt de opstartvolgorde slechts één keer gewijzigd. Tijdens een
volgende opstartprocedure, zal de computer opstarten volgens de volgorde van apparaten die in de
systeeminstellingen is aangegeven.
3
Als de lijst met opstartbronnen verschijnt, markeert u het cd/dvd-station en drukt u op <Enter>.
4
Selecteer de cd/dvd-schijfoptie in het cd-opstartmenu.
5
Selecteer in het menu dat wordt weergegeven de optie om op te starten vanaf de cd/dvd-schijf.
6
Ty p e 1 om het menu
7
Ty p e 2 om Dell Diagnostics te starten.
8
Selecteer
Run the 32 Bit Dell Diagnostics
Drivers and Utilities
CD te starten.
(Dell-diagnostiek uitvoeren) uit de genummerde lijst. Als er
meerdere versies worden aangegeven, moet u de versie selecteren die voor uw computer van toepassing
is.
9
Als het
Main Menu
(Hoofdmenu) van het Dell Diagnostics wordt weergegeven, selecteert u de test die
u wilt uitvoeren.
Snelle referentiegids 95
Page 96

Hoofdmenu Dell Diagnostics
1
Nadat het Dell-diagnoseprogramma is geladen en het scherm met het
Main Menu
(Hoofdmenu)
wordt weergegeven, klikt u op de knop voor de gewenste optie.
Optie Functie
Express Test (Snelle
test)
Extended Test
(Uitgebreide test)
Custom Test
(Aangepaste test)
Symptom Tree
(Symptomenstructuur)
2
Als er tijdens een test een probleem wordt gedetecteerd, wordt er een bericht weergegeven met de
Hiermee wordt een snelle test uitgevoerd van apparaten. Deze test neemt normaliter
10 tot 20 minuten in beslag en vereist geen interactie van uw kant. Als u de Express
Te st (Snelle test) eerst uitvoert, vergroot u de kans om het probleem snel op te
sporen.
Hiermee wordt een grondige controle van apparaten uitgevoerd. Deze test neemt
doorgaans een uur of langer in beslag. U moet af en toe vragen beantwoorden.
Hiermee kunt u een bepaald apparaat testen. U kunt de tests die u wilt uitvoeren, zelf
aanpassen.
Geeft een overzicht van de problemen die het vaakst optreden en stelt u in staat om
een test te selecteren op basis van de symptomen van het probleem dat u ondervindt.
foutcode en een beschrijving van het probleem. Noteer de foutcode en de beschrijving van het
probleem en volg de instructies op het scherm.
Neem contact op met Dell, als u de fout niet kunt oplossen. Zie de online
handleiding
voor meer
informatie over contact opnemen met Dell.
OPMERKING: Het servicelabel voor de computer bevindt zich bovenaan elk testvenster. Als u contact
opneemt met Dell, zullen de medewerkers van de technische ondersteuning naar het servicelabel vragen.
3
Wanneer u een test uitvoert van de optie
Custom Test
(Aangepaste test) of
Symptom Tree
(Symptomenstructuur), kunt u voor meer informatie over de test op een van de tabbladen klikken die
in de volgende tabel worden beschreven.
Tabblad Functie
Results (Resultaten) Hier worden de resultaten van de test weergegeven, samen met eventuele
Errors (Fouten) Geeft de aangetroffen foutcondities en de foutcodes weer, en een beschrijving van het
Help Hier wordt de test beschreven en worden eventuele vereisten voor het uitvoeren van de
Configuration
(Configuratie)
Parameters U kunt de test aanpassen door de testinstellingen te wijzigen.
96 Snelle referentiegids
omstandigheden waarin de fout zich heeft voorgedaan.
probleem.
test vermeld.
Hier wordt de hardwareconfiguratie beschreven voor het geselecteerde apparaat.
Het Dell-diagnoseprogramma haalt configuratiegegevens op voor alle apparaten uit de
systeeminstellingen, het geheugen, verschillende interne tests en geeft de informatie
weer in de lijst met apparaten in het linkervenster van het scherm. De lijst met
apparaten geeft mogelijk niet alle namen weer van apparaten die op de computer zijn
geïnstalleerd of alle apparaten die met de computer zijn verbonden.
Page 97

4
Wanneer de tests zijn voltooid, als u Dell Diagnostics uitvoert vanaf de Drivers and Utilities CD
,
(optioneel)
5
Sluit het testscherm om terug te keren naar het scherm met het
verwijder de cd.
Main Menu
(Hoofdmenu). Als u het
Dell-diagnoseprogramma wilt afsluiten en de computer opnieuw wilt opstarten, sluit u het scherm met
het
Main Menu
(Hoofdmenu).
Systeemlampjes
Uw stroomlampje kan aangeven dat er een computerprobleem is.
Stroomlampje Probleembeschrijving Gesuggereerde oplossing
Stabiel groen Stroom is aan en de computer werkt
normaal.
Knipperend groen De computer bevindt zich in een
energiebesparende modus.
Knippert een paar keer
groen en wordt dan
uitgeschakeld
Stabiel geel Een apparaat op het moederbord
Knipperend geel Er heeft zich een storing voorgedaan
Stabiel groen en een
piepcode tijdens POST
Er is een configuratiefout. Controleer de diagnostische lampjes om te zien of
vertoont mogelijk een storing of is
op onjuiste wijze geïnstalleerd.
Daarnaast is het mogelijk dat de
voltagekeuzeschakelaar op de
stroomtoevoer op onjuiste wijze is
ingesteld.
in de stroomvoorziening of het
moederbord.
Er is een probleem aangetroffen
tijdens het uitvoeren van de BIOS.
Er hoeft niets te worden gecorrigeerd.
Druk op de aan/uit-knop, beweeg de muis of druk op
een toets van het toetsenbord om de computer
'wakker' te maken.
het probleem in kwestie is geïdentificeerd (zie
"Diagnostische lampjes" op pagina 98).
Controleer de diagnostische lampjes om te zien of
het probleem in kwestie is geïdentificeerd (zie
"Diagnostische lampjes" op pagina 98).
Zie "Problemen met de stroomvoorziening" in de
online handleiding.
Als de computer niet kan worden opgestart, dient u
Dell te bellen voor technische ondersteuning.
informatie over contact opnemen met Dell is te
vinden in de online
Raadpleeg "Piepcodes" op pagina 100 voor
aanwijzingen met betrekking tot geluidscodes.
Raadpleeg Diagnostische lampjes om te zien of het
probleem in kwestie is geïdentificeerd.
handleiding
handleiding
.
.
Meer
Meer
Snelle referentiegids 97
Page 98

Stroomlampje Probleembeschrijving Gesuggereerde oplossing
Stabiel groen
stroomlampje, geen
piepcode en geen video
tijdens POST
Stabiel groen
stroomlichtje en geen
piepcode, maar de
computer loopt vast
tijdens POST
De monitor of de grafische kaart is
mogelijk kapot of onjuist
geïnstalleerd.
Het is mogelijk dat een ingebouwd
moederbordapparaat defect is.
Controleer Diagnostische lampjes om te zien of het
probleem in kwestie is geïdentificeerd.
Controleer Diagnostische lampjes om te zien of het
probleem in kwestie is geïdentificeerd. Als het
probleem niet kan worden geïdentificeerd, dient u
Dell te bellen voor technische ondersteuning.
informatie over contact opnemen met Dell is te
vinden in de online
handleiding
.
Meer
Diagnostische lampjes
LET OP: Voordat u met een van de procedures in deze sectie begint, dient u de veiligheidsinstructies in
de productinformatiegids op te volgen.
Ter ondersteuning bij het oplossen van problemen is het voor- of achterpaneel van de computer uitgerust
met vier lampjes genaamd "1," "2," "3," en "4". De lampjes kunnen uitstaan of groen zijn opgelicht.
Wanneer de computer normaal opstart, veranderen de patronen of codes van de lampjes al naar gelang
het verloop van het opstartproces. Als het POST-gedeelte van een systeemstart met succes is voltooid,
zullen alle vier lampjes eventjes kort groen oplichten en weer uitgaan.
Als de computer tijdens het POST-proces een storing ondervindt, kan het patroon dat op de LED's wordt
weergegeven helpen identificeren waar in het proces de computer is vastgelopen. Als de computer
storingen vertoont na een succesvol POST-proces, zullen de diagnostische lampjes de oorzaak van het
probleem niet aangeven.
OPMERKING: De plaatsing van de diagnostische lampjes kan variëren, afhankelijk van het type systeem. De
diagnostische lampjes kunnen verticaal of horizontaal zijn geplaatst.
Lichtpatroon Probleembeschrijving Gesuggereerde oplossing
De computer bevindt zich in een
normale "uit"-toestand, of er is een
mogelijke pre-BIOS-fout opgetreden.
De diagnostische lichtjes branden niet
nadat de computer met succes tot aan het
besturingssysteem opstart.
Er is mogelijk een BIOS-storing
opgetreden. De computer bevindt zich
in de herstelmodus.
Er heeft zich mogelijk een fout in de
processor voorgedaan.
Sluit de computer aan op een werkend stopcontact
en druk op de aan/uit-knop.
Voer het hulpprogramma BIOS Recovery (BIOSherstel) uit, wacht tot het herstel voltooid is, en
start de computer dan opnieuw op.
Installeer de processor opnieuw en start de
computer opnieuw op.
voor informatie over het opnieuw installeren van de
processor.
Zie de online
98 Snelle referentiegids
handleiding
Page 99

Lichtpatroon Probleembeschrijving Gesuggereerde oplossing
Er zijn geheugenmodules gedetecteerd,
maar er heeft zich een geheugenfout
voorgedaan.
Er heeft zich mogelijk een fout
voorgedaan in de videokaart.
Er heeft zich mogelijk een fout
voorgedaan in een diskettestation of een
vaste schijfstation.
Er heeft zich mogelijk een USB-fout
voorgedaan.
• Als u één geheugenmodule hebt geïnstalleerd, dient
u deze opnieuw te installeren en de computer
opnieuw te starten. Voor informatie over het
opnieuw installeren van geheugenmodules kunt u
de online
• Als u twee of meer geheugenmodules geïnstalleerd
hebt, dient u de modules te verwijderen. Installeer
één module opnieuw en start de computer opnieuw
op. Als de computer normaal start, dient u een
volgende module opnieuw te installeren. Ga door
tot u een defecte module hebt geïdentificeerd of
tot u alle modules foutvrij opnieuw hebt
geïnstalleerd.
• Installeer indien beschikbaar een goed werkend
geheugen van hetzelfde type in de computer.
Neem contact op met Dell
•
nog steeds voordoet. Meer informatie over
contact opnemen met Dell is te vinden in de
online
• Als de computer een videokaart bevat, dient u
deze te verwijderen en opnieuw te installeren.
Start de computer vervolgens opnieuw.
• Als het probleem zich nog steeds voordoet, dient u
een videokaart te installeren waarvan u weet dat
deze werkt en dient u de computer opnieuw te
starten.
Neem contact op met Dell
•
nog steeds voordoet of als de computer een
geïntegreerde grafische kaart bevat. Zie de online
handleiding
opnemen met Dell.
Plaats alle stroom- en gegevenskabels opnieuw en
start de computer opnieuw op.
Installeer alle USB-apparaten opnieuw, controleer
de kabelverbindingen en start de computer dan
opnieuw op.
handleiding
handleiding
.
voor meer informatie over contact
raadplegen.
als het probleem zich
als het probleem zich
Snelle referentiegids 99
Page 100

Lichtpatroon Probleembeschrijving Gesuggereerde oplossing
Er zijn geen geheugenmodules
aangetroffen.
Er zijn geheugenmodules aangetroffen,
maar er is een fout in de
geheugenconfiguratie of de
geheugencompatibiliteit.
Er is een fout opgetreden.
Dit patroon vertoont zich ook als
Systeem-setup start en duidt niet
noodzakelijkerwijze op een fout.
• Als u één geheugenmodule hebt geïnstalleerd,
dient u deze opnieuw te installeren en de
computer opnieuw te starten. Voor informatie
over het opnieuw installeren van
geheugenmodules kunt u de online
raadplegen.
• Als u twee of meer geheugenmodules geïnstalleerd
hebt, dient u de modules te verwijderen. Installeer
één module opnieuw en start de computer
opnieuw op. Als de computer normaal start, dient
u een volgende module opnieuw te installeren. Ga
door tot u een defecte module hebt
geïdentificeerd of tot u alle modules foutvrij
opnieuw hebt geïnstalleerd.
• Installeer indien beschikbaar een goed werkend
geheugen van hetzelfde type in de computer.
Neem contact op met Dell
•
nog steeds voordoet. Zie de online
voor meer informatie over contact opnemen met
Dell.
• Controleer of er geen
de plaatsing van
geheugenmodules/geheugenconnectoren.
• Controleer of de
installeert compatibel zijn met uw computer.
•
Neem contact op met Dell
nog steeds voordoet. Zie de online
voor meer informatie over contact opnemen met
Dell.
• Zorg ervoor dat alle kabels goed op het
moederbord zijn aangesloten vanaf de vaste schijf,
het cd-station en het dvd-station.
• Controleer het computerbericht dat op het
scherm van uw monitor wordt weergegeven.
•
Neem contact op met Dell
nog steeds voordoet. Zie de online
voor meer informatie over contact opnemen met
Dell.
geheugenmodules
handleiding
als het probleem zich
handleiding
speciale vereisten
die u
als het probleem zich
handleiding
als het probleem zich
handleiding
zijn voor
Piepcodes
Het is mogelijk dat tijdens het opstarten van de computer een aantal piepcodes te horen zijn als de monitor
niet in staat is om fouten of problemen weer te geven. Deze reeks piepjes, ook wel piepcodes genaamd,
identificeert een probleem. Een mogelijke piepcode (code 1 3-1) bestaat uit een piepje, een snelle
opeenvolging van drie piepjes en vervolgens een piepje. Deze piepcode vertelt u dat er de computer een
geheugenprobleem heeft.
100 Snelle referentiegids
 Loading...