

Page 1

Dell OptiPlex 7070 Ultra
Setup and Specifications
Page 2

Notes, cautions, and warnings
NOTE: A NOTE indicates important information that helps you make better use of your product.
CAUTION: A CAUTION indicates either potential damage to hardware or loss of data and tells you how to avoid the
problem.
WARNING: A WARNING indicates a potential for property damage, personal injury, or death.
© 2019 Dell Inc. or its subsidiaries. All rights reserved. Dell, EMC, and other trademarks are trademarks of Dell Inc. or its subsidiaries.
Other trademarks may be trademarks of their respective owners.
2019 - 09
Rev. A00
Page 3

Contents
1 Views...........................................................................................................................................4
Exploded view........................................................................................................................................................................ 4
Top view................................................................................................................................................................................. 4
Bottom view...........................................................................................................................................................................5
Left and right view................................................................................................................................................................ 5
2 Set up your OptiPlex 7070 Ultra.....................................................................................................7
Installing the device on a fixed stand.................................................................................................................................. 7
Monitor tilt angle............................................................................................................................................................ 15
Installing the device on a height-adjustable stand........................................................................................................... 15
Stand tilt, pivot, and swivel images............................................................................................................................. 22
Installing device on offset VESA mount........................................................................................................................... 22
3 Powering the system.................................................................................................................. 27
Type-C display settings.......................................................................................................................................................27
4 Smart power enablement............................................................................................................ 28
5 Specifications of OptiPlex 7070 Ultra...........................................................................................29
Processors............................................................................................................................................................................29
Chipset..................................................................................................................................................................................29
Operating system................................................................................................................................................................ 29
Memory.................................................................................................................................................................................29
Storage................................................................................................................................................................................. 30
Ports and connectors......................................................................................................................................................... 30
Audio...................................................................................................................................................................................... 31
Video...................................................................................................................................................................................... 31
Communications...................................................................................................................................................................31
Power adapter..................................................................................................................................................................... 32
Dimensions and weight....................................................................................................................................................... 32
Accessories...........................................................................................................................................................................33
Energy Star and Trusted Platform Module (TPM)......................................................................................................... 34
Computer environment.......................................................................................................................................................34
Contents 3
Page 4
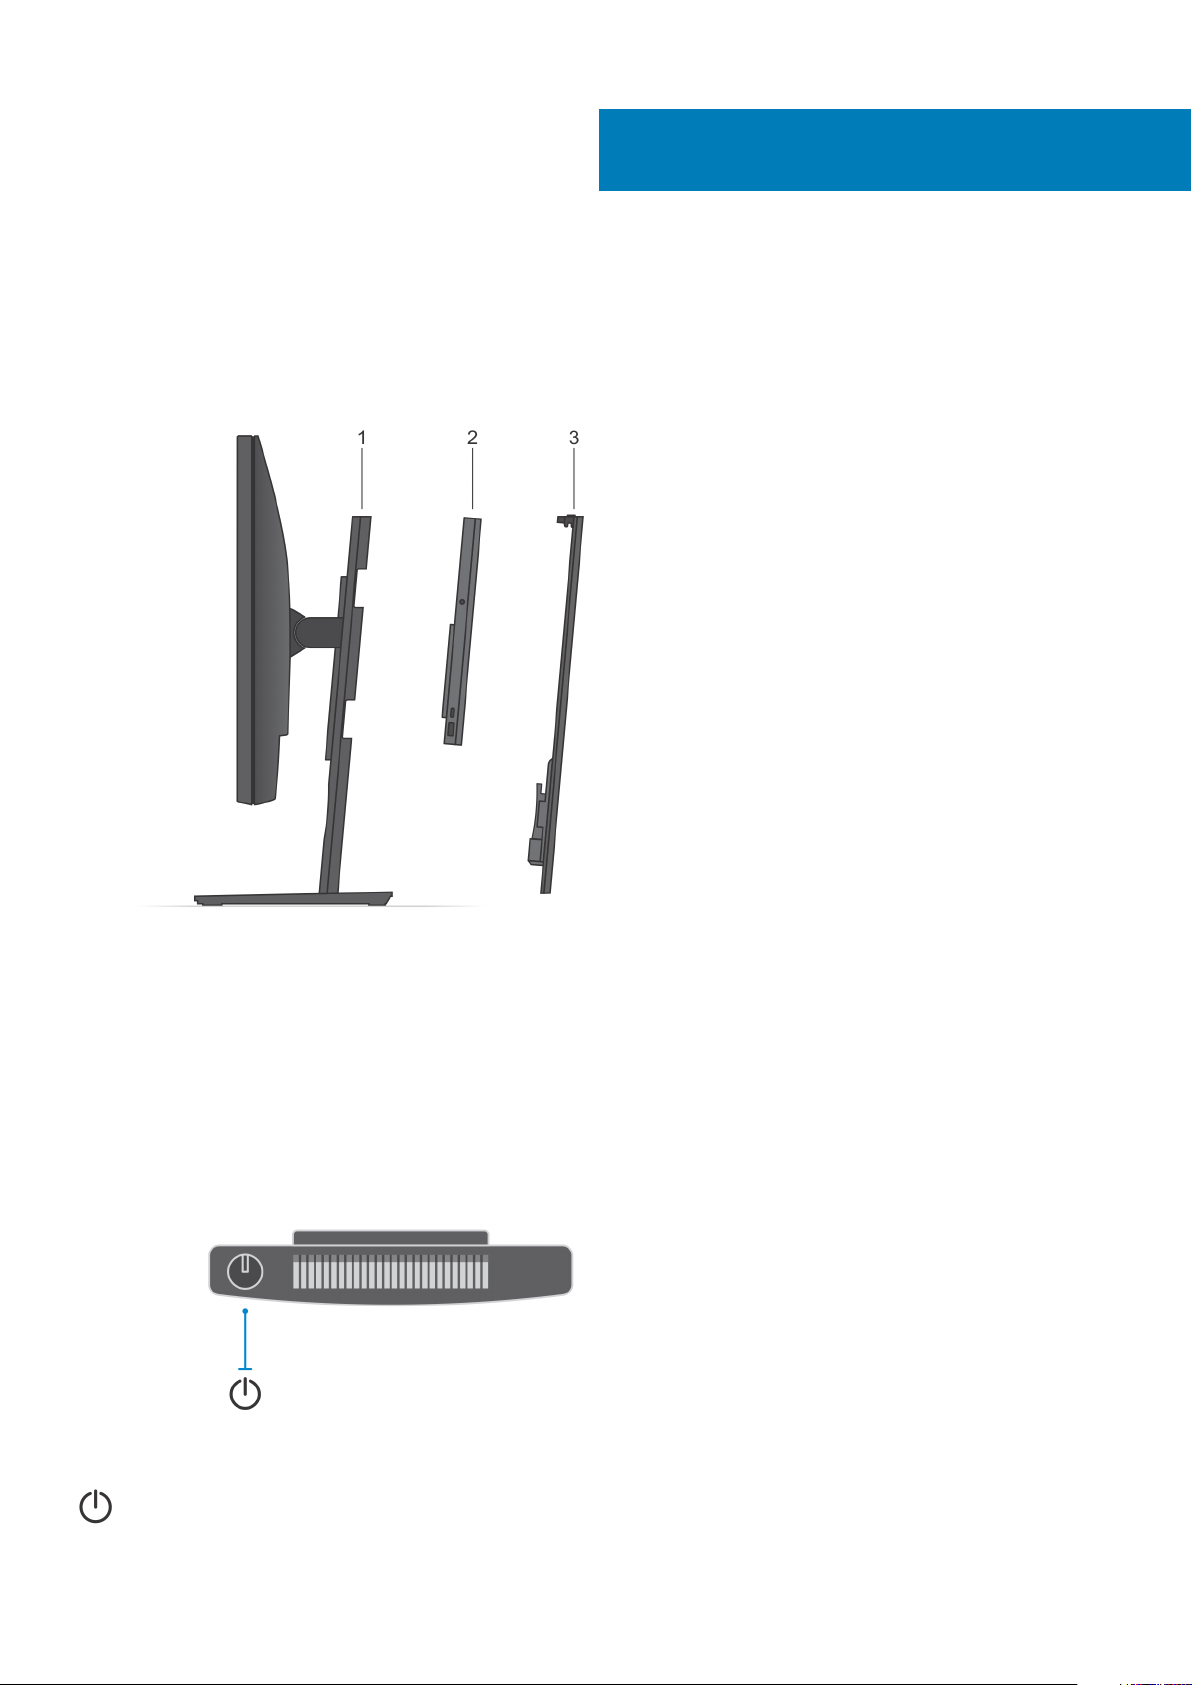
Exploded view
1
Views
1. Stand
2. OptiPlex 7070 Ultra
3. Stand cover
Top view
: Power button
4 Views
Page 5
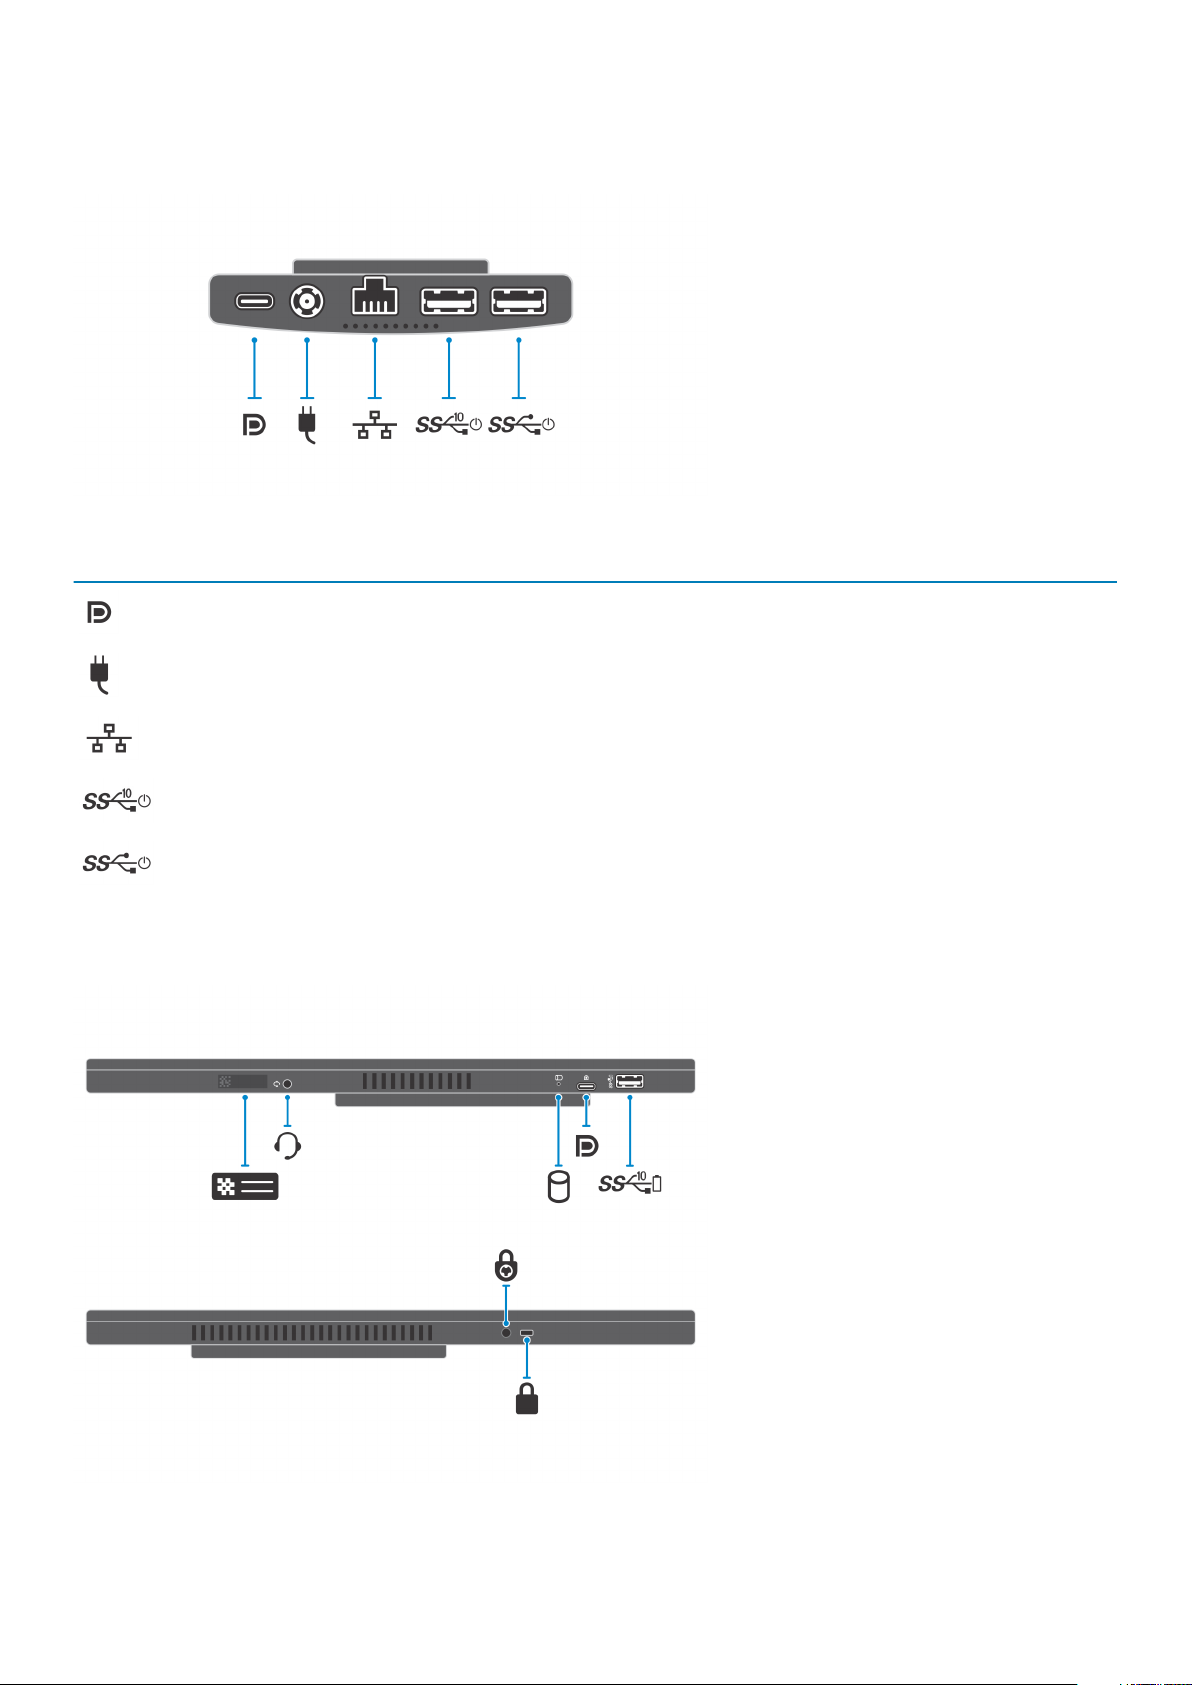
Bottom view
Table 1. Bottom view
Callout Description
USB 3.1 Gen 2 Type-C port with DisplayPort Alt Mode/Power
Delivery
Power-adapter port
Network RJ-45 port
Left and right view
USB 3.1 Gen 2 Type-A port with SmartPower
USB 3.1 Gen 1 Type-A port with SmartPower
Views
5
Page 6
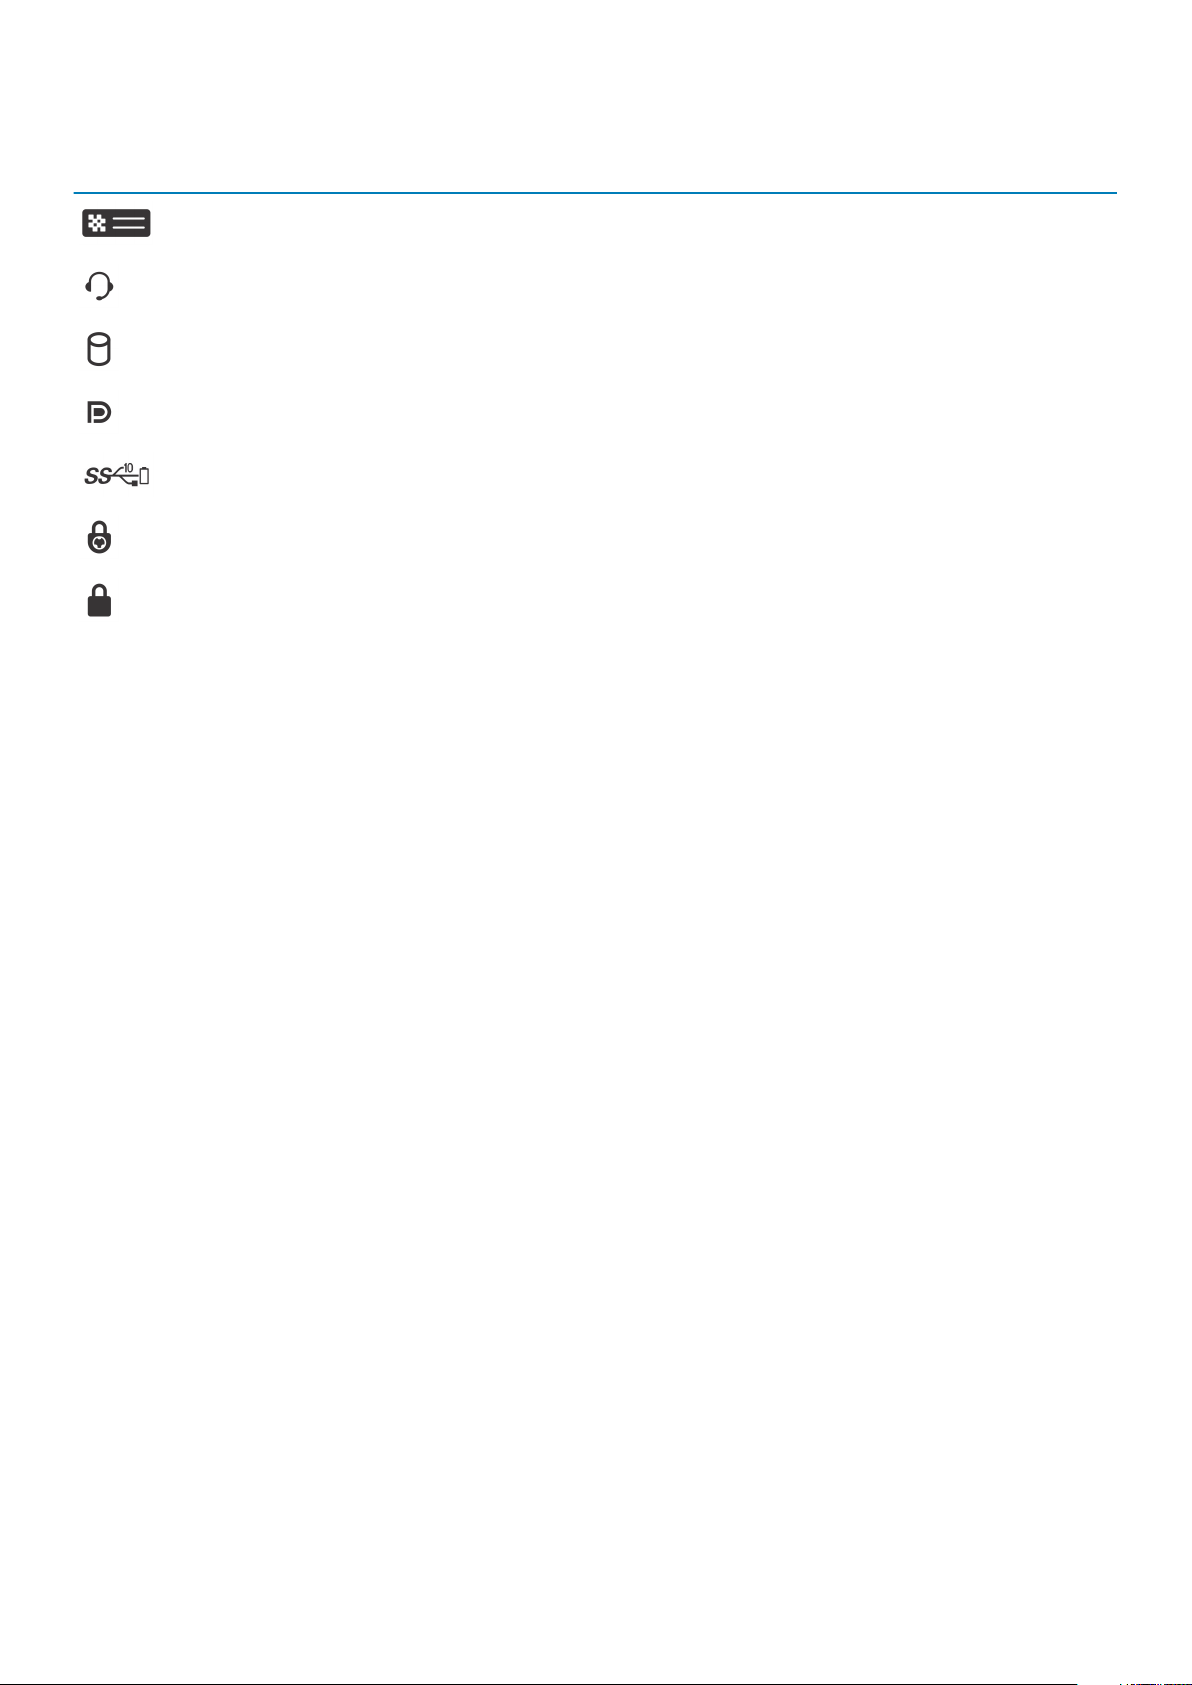
Table 2. Left and right view
Callout Description
Service tag location
Universal audio jack
Hard-drive status LED
USB 3.1 Gen 2 Type-C port with DisplayPort Alt Mode
USB 3.1 Gen 2 Type-A port with PowerShare
Security screw hole
Security lock slot
6 Views
Page 7
Set up your OptiPlex 7070 Ultra
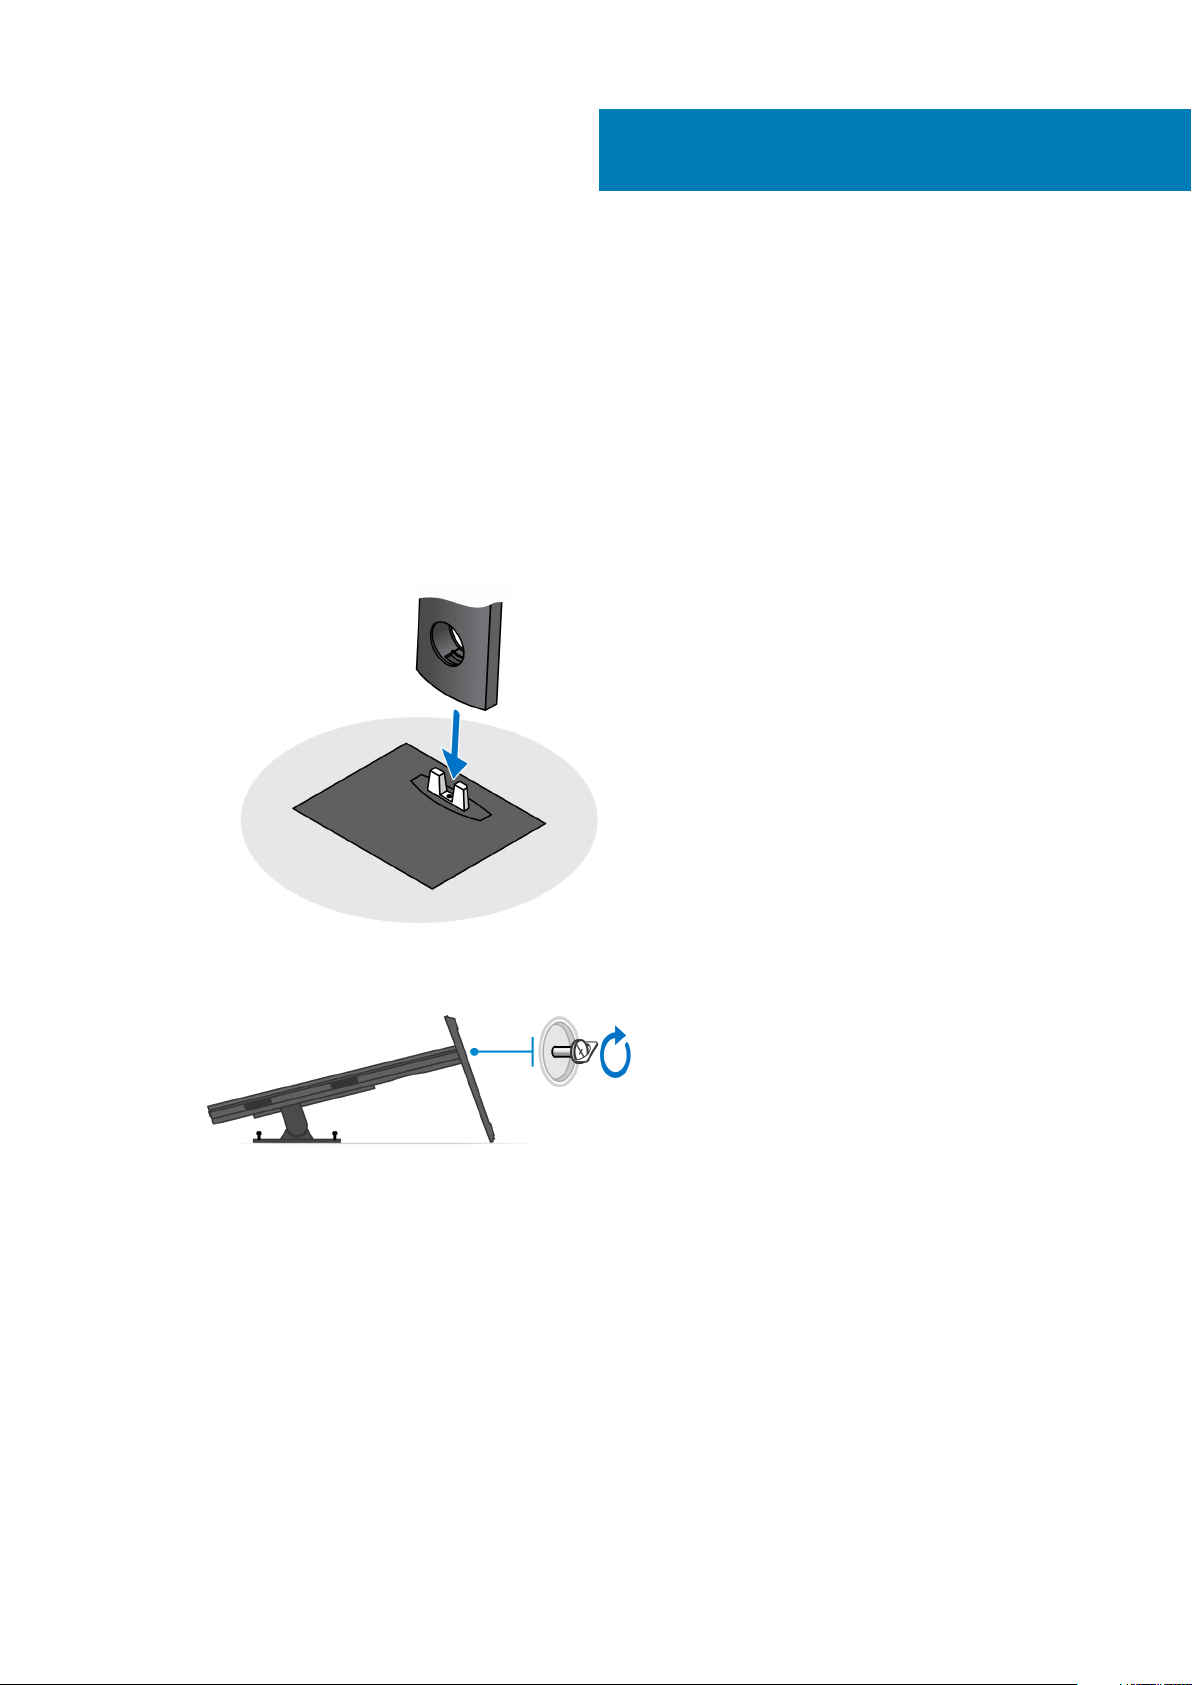
Installing the device on a fixed stand
Steps
1. Align and insert the slots on the fixed stand into the tab on the stand base.
2. Lift and tilt the stand base.
3. Tighten the captive screw to secure the stand to the base.
2
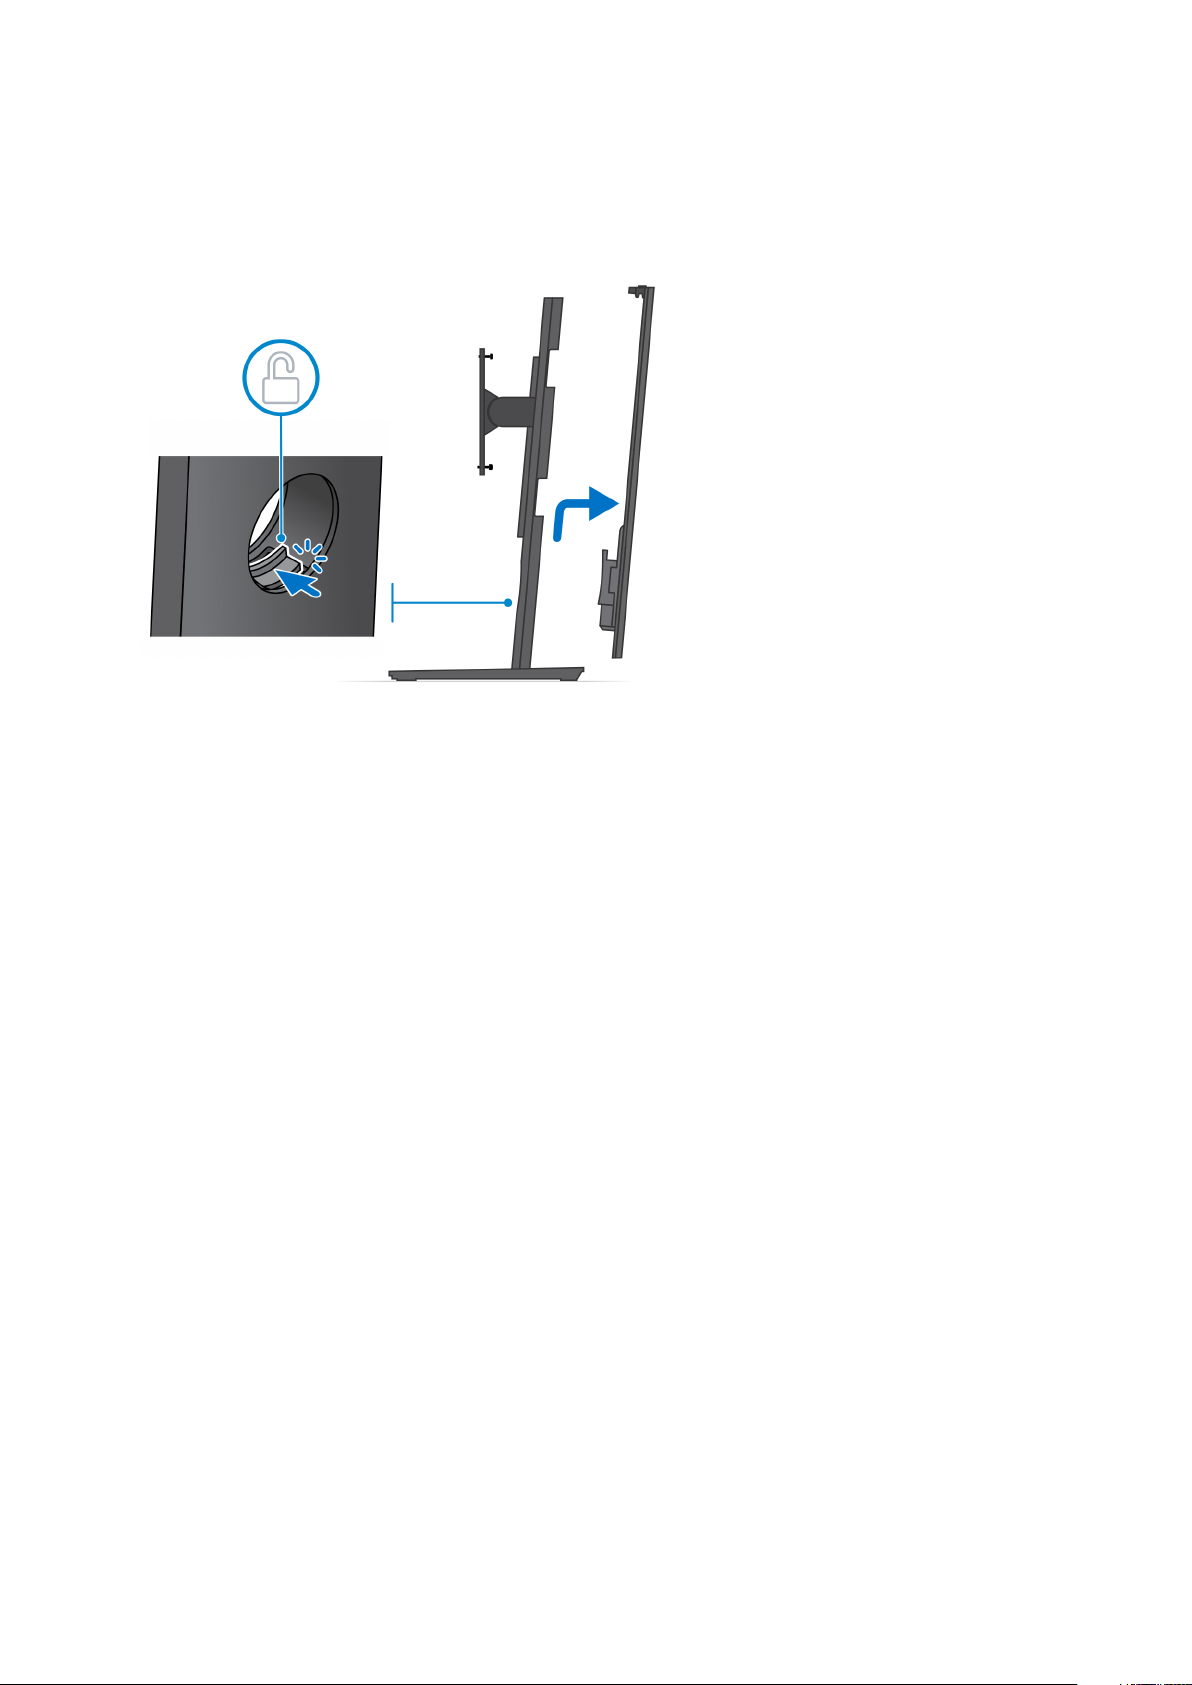
4. Slide the release latch on the stand, until you hear a click, to release the stand cover.
5. Slide and lift the cover to release it from the stand.
Set up your OptiPlex 7070 Ultra 7
Page 8
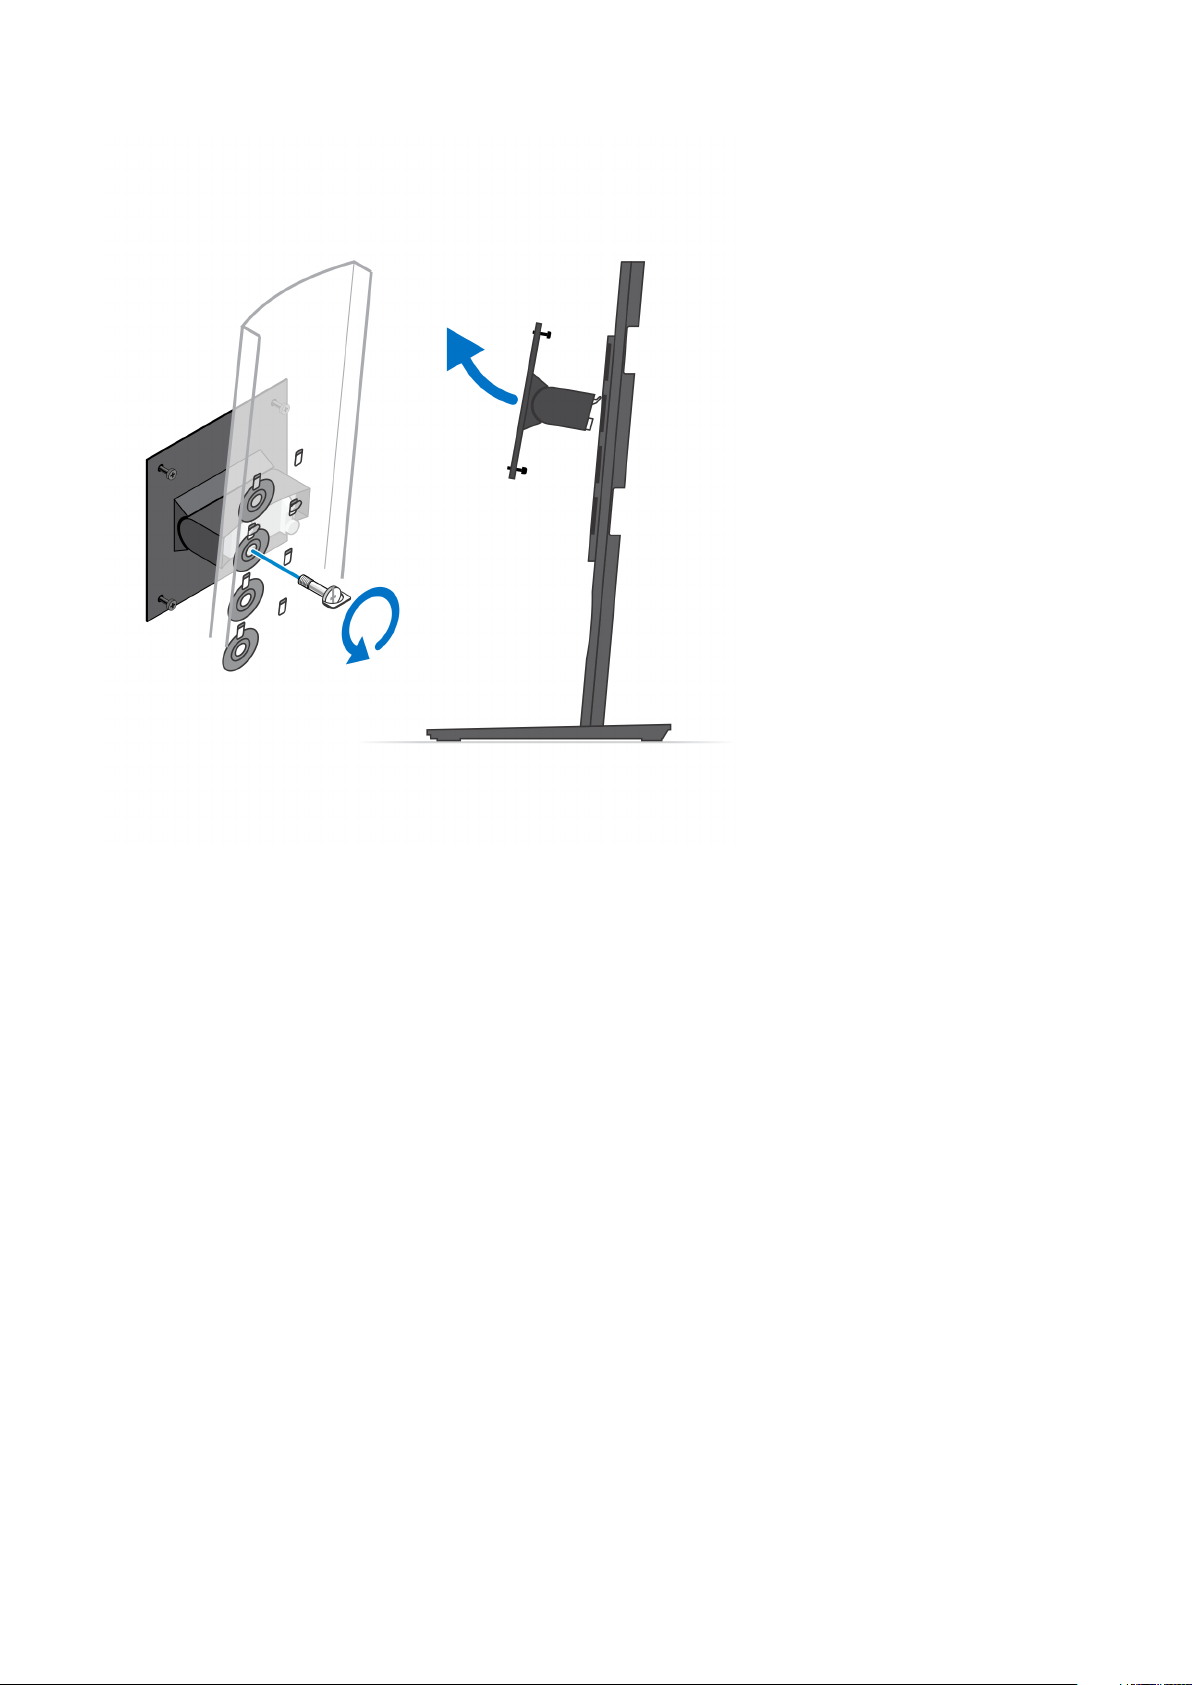
6. Remove the screw that secures the stand mounting bracket to the stand.
7. Lift the mounting bracket to release the hooks on the bracket from the slots on the stand.
8
Set up your OptiPlex 7070 Ultra
Page 9
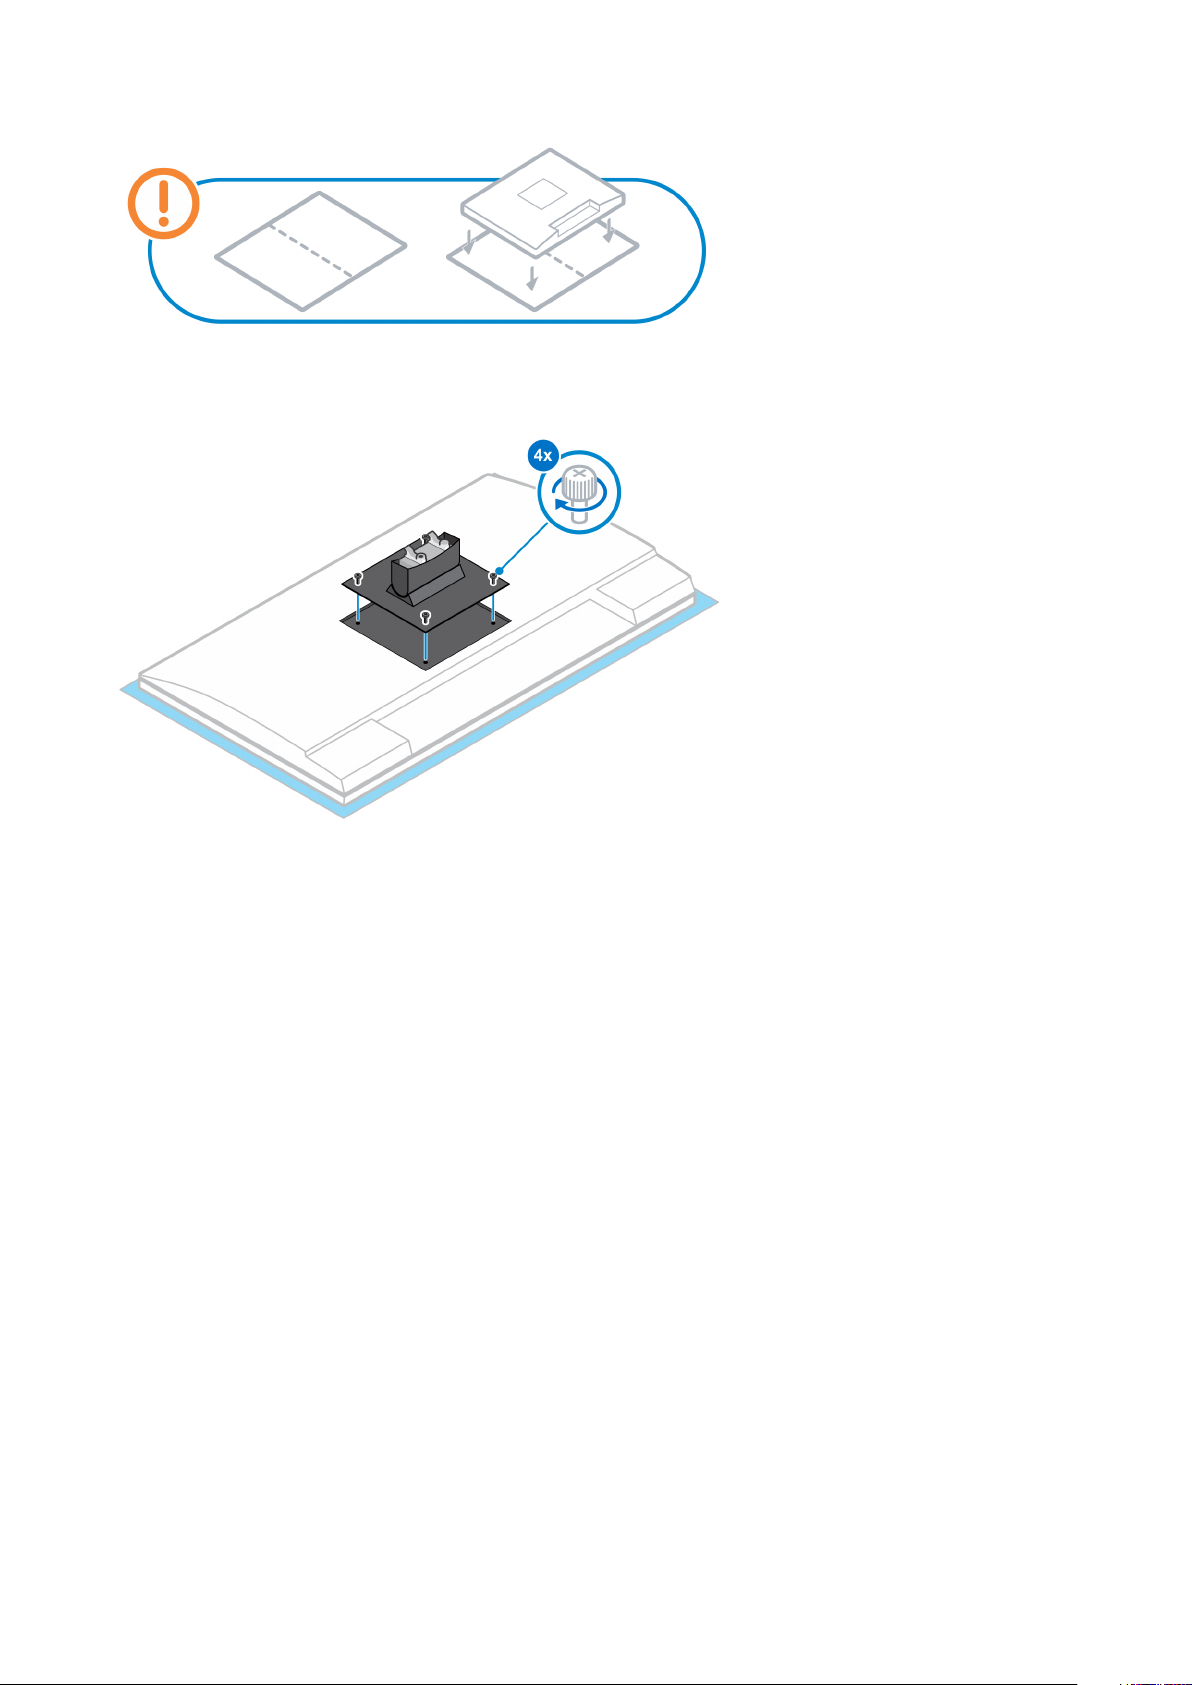
8. To avoid any damage to the monitor, ensure that you place the monitor on a protective sheet.
9. Align the screws on the mounting bracket with the screw holes on the monitor.
10. Tighten the four captive screws to secure the mounting bracket to the monitor.
Set up your OptiPlex 7070 Ultra
9
Page 10
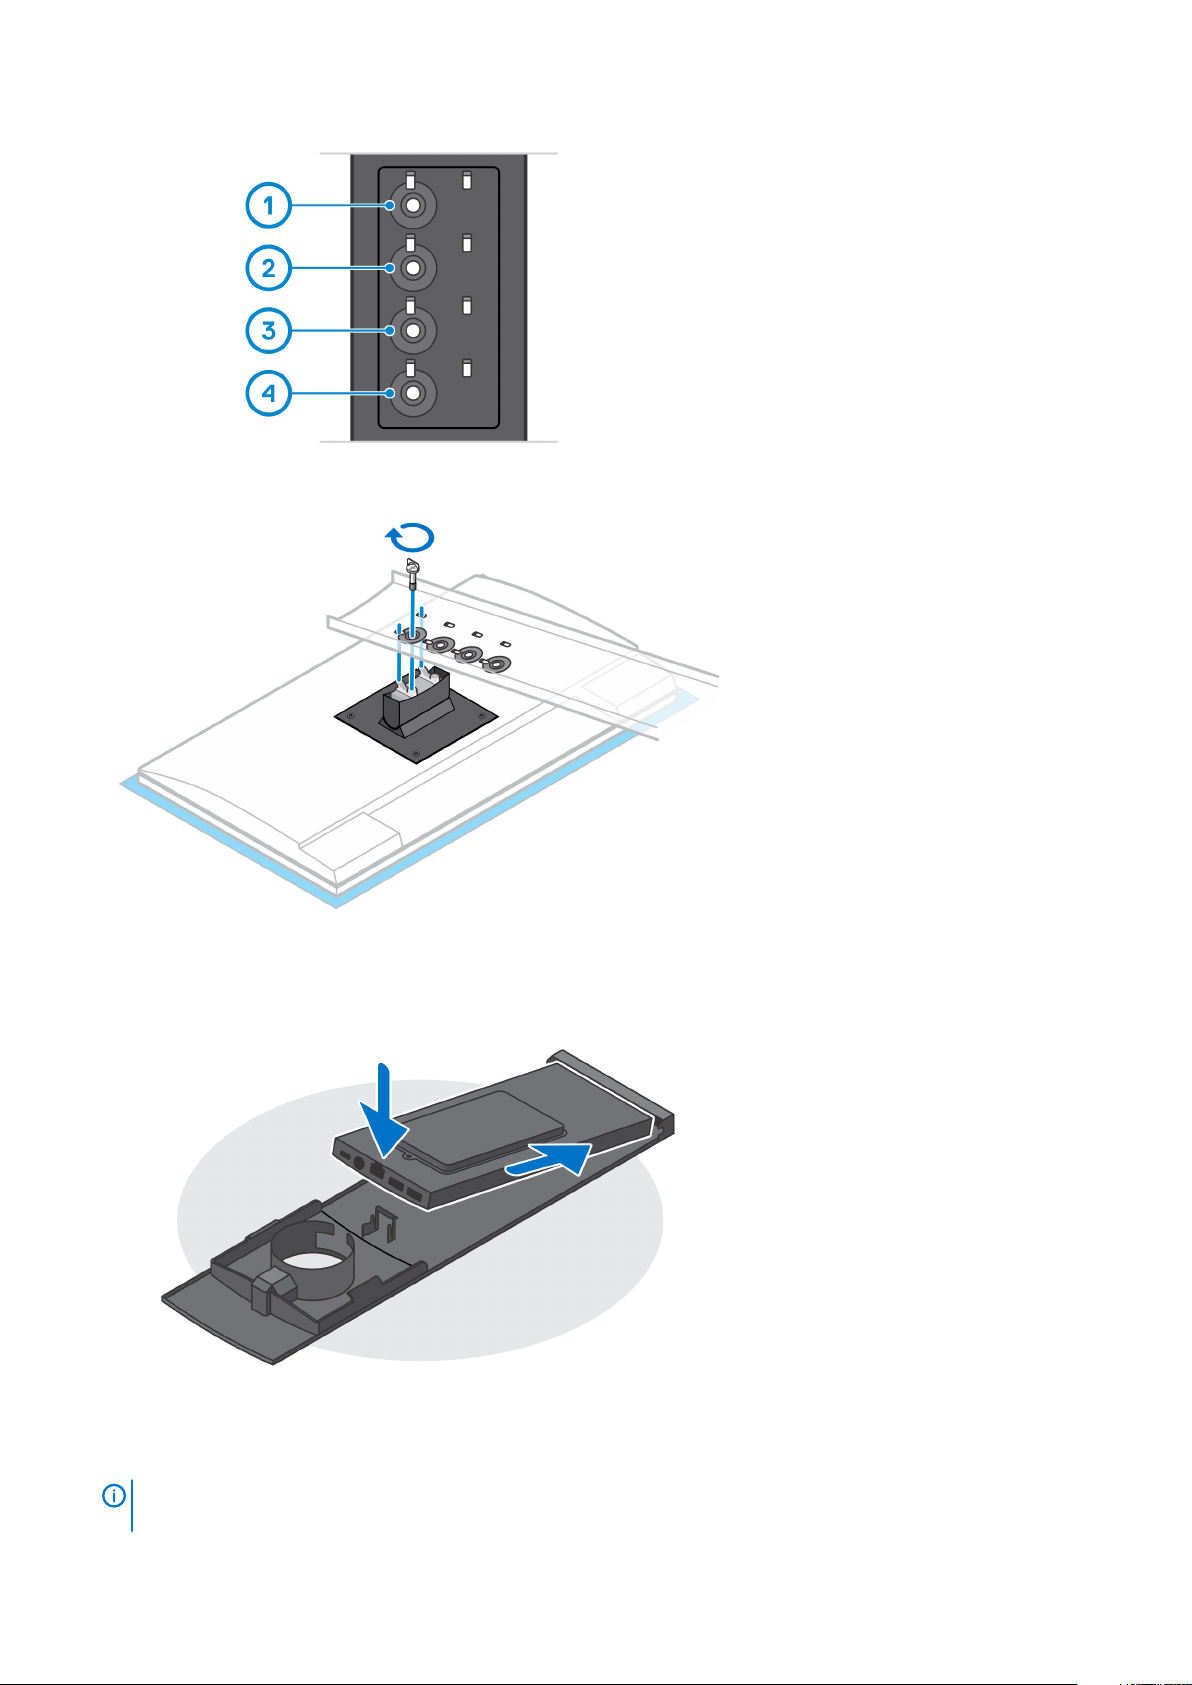
11. Select the height at which you want to mount the monitor and align the hooks on the mounting bracket with the slots on the stand.
12. Replace the screw to secure the fixed stand to the monitor.
10
Set up your OptiPlex 7070 Ultra
Page 11
13. Align the vents on the device with the vents on the stand cover.
14. Lower the device in the stand until you hear a click.
15. Connect the power, network, keyboard, mouse, and display cables to the device and to the power outlet.
NOTE:
route the cables as indicated in the image.
To avoid any pinching or crimping of the cables while closing the stand cover, it is recommended that you
Set up your OptiPlex 7070 Ultra 11
Page 12

16. Slide the back cover, along with the device, into the stand until you hear a click.
17. Lock the device and the stand cover.
12
Set up your OptiPlex 7070 Ultra
Page 13

18. Press the power button to turn on the device.
Set up your OptiPlex 7070 Ultra
13
Page 14

14 Set up your OptiPlex 7070 Ultra
Page 15
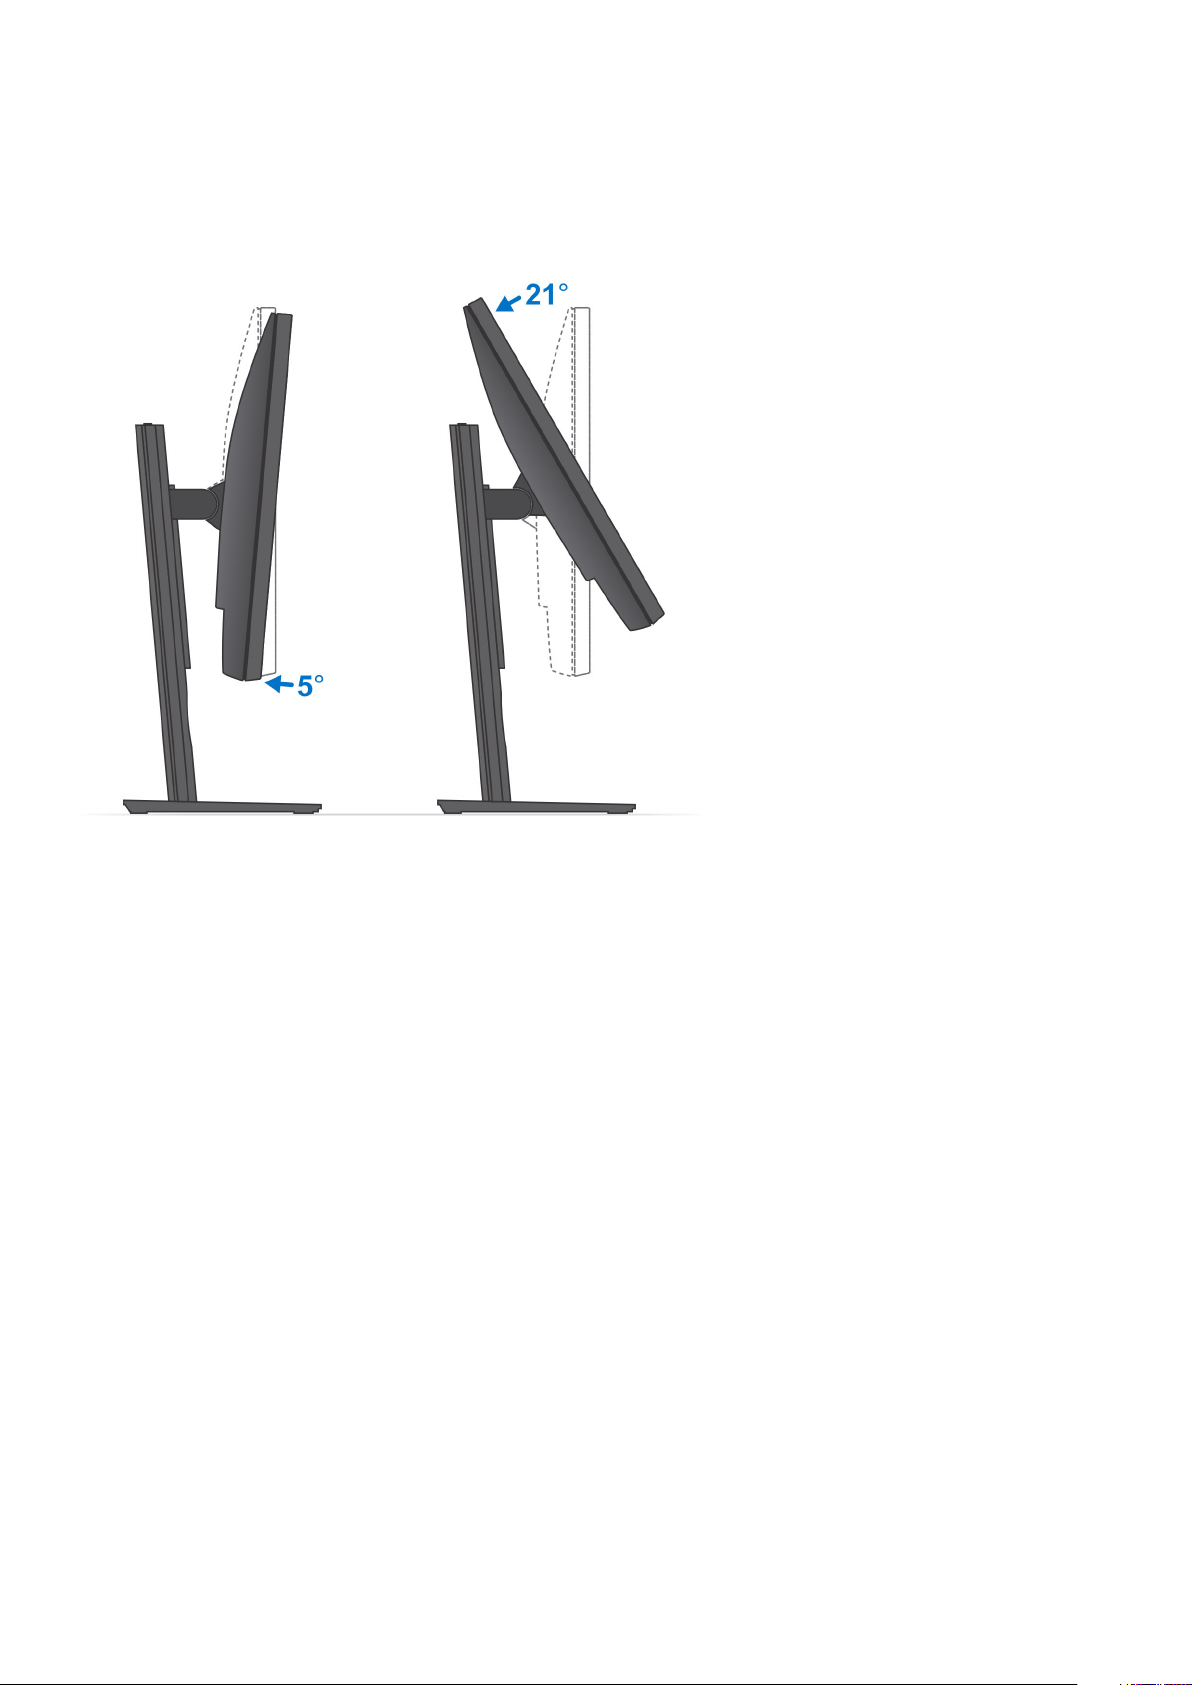
Monitor tilt angle
Installing the device on a height-adjustable stand
Steps
1. Align and insert the slots on the height-adjustable stand into the tab on the stand base.
2. Lift and tilt the stand base.
3. Tighten the captive screw to secure the stand to the base.
Set up your OptiPlex 7070 Ultra
15
Page 16

4. To avoid any damage to the monitor, ensure that you place the monitor on a protective sheet.
5. For installing the height-adjustable stand to the monitor:
a) Align and insert the hooks on the mounting bracket on the stand into the slots on the monitor, until you hear a click.
16
Set up your OptiPlex 7070 Ultra
Page 17

6. For installing QR to VESA bracket for E-Series monitor:
a) Align the screw holes on the QR to VESA bracket with the screw holes on the monitor.
b) Install the four screw spacers and the screws to secure the QR to VESA bracket to the monitor.
c) Align and insert the QR tabs on the stand into the slots on the QR to VESA bracket on the monitor.
d) Tighten the thumb screw to secure the stand to the QR to VESA bracket.
Set up your OptiPlex 7070 Ultra
17
Page 18

7. To release the stand cover, slide the release latch until you hear a click.
8. Slide and lift the cover to release it from the stand.
9. Align the vents on the device with the vents on the stand cover.
10. Lower the device in the stand until you hear a click.
18
Set up your OptiPlex 7070 Ultra
Page 19

11. Connect the power, network, keyboard, mouse, and display cables to the device and to the power outlet.
NOTE:
route the cables as indicated in the image.
To avoid any pinching or crimping of the cables while closing the stand cover, it is recommended that you
12. Slide the back cover, along with the device, into the stand until you hear a click.
Set up your OptiPlex 7070 Ultra
19
Page 20

13. Lock the device and the stand cover.
14. Press the power button to turn on the device.
20
Set up your OptiPlex 7070 Ultra
Page 21

Set up your OptiPlex 7070 Ultra 21
Page 22

Stand tilt, pivot, and swivel images
Installing device on offset VESA mount
Steps
1. Align the screw holes on the device with the screw holes on the offset VESA mount.
2. Install the four screws to secure the device to the offset VESA mount.
22
Set up your OptiPlex 7070 Ultra
Page 23

3. To avoid any damage to the monitor, ensure that you place the monitor on a protective sheet.
4. Align the screw holes on the offset VESA mount with the screw holes on the monitor.
5. Install the four screw spacers and the screws to secure the offset VESA mount to the monitor.
Set up your OptiPlex 7070 Ultra
23
Page 24

6. Insert the hooks on the mounting bracket of the monitor arm stand into the slots on the offset VESA mount on the monitor.
7. Lower the monitor on the monitor arm stand until you hear a click.
24
Set up your OptiPlex 7070 Ultra
Page 25

NOTE: To install the offset VESA mount on a Dell E-Series monitor, remove the VESA cover from the back of the
monitor and secure the offset VESA mount along with the device to the monitor.
Set up your OptiPlex 7070 Ultra 25
Page 26
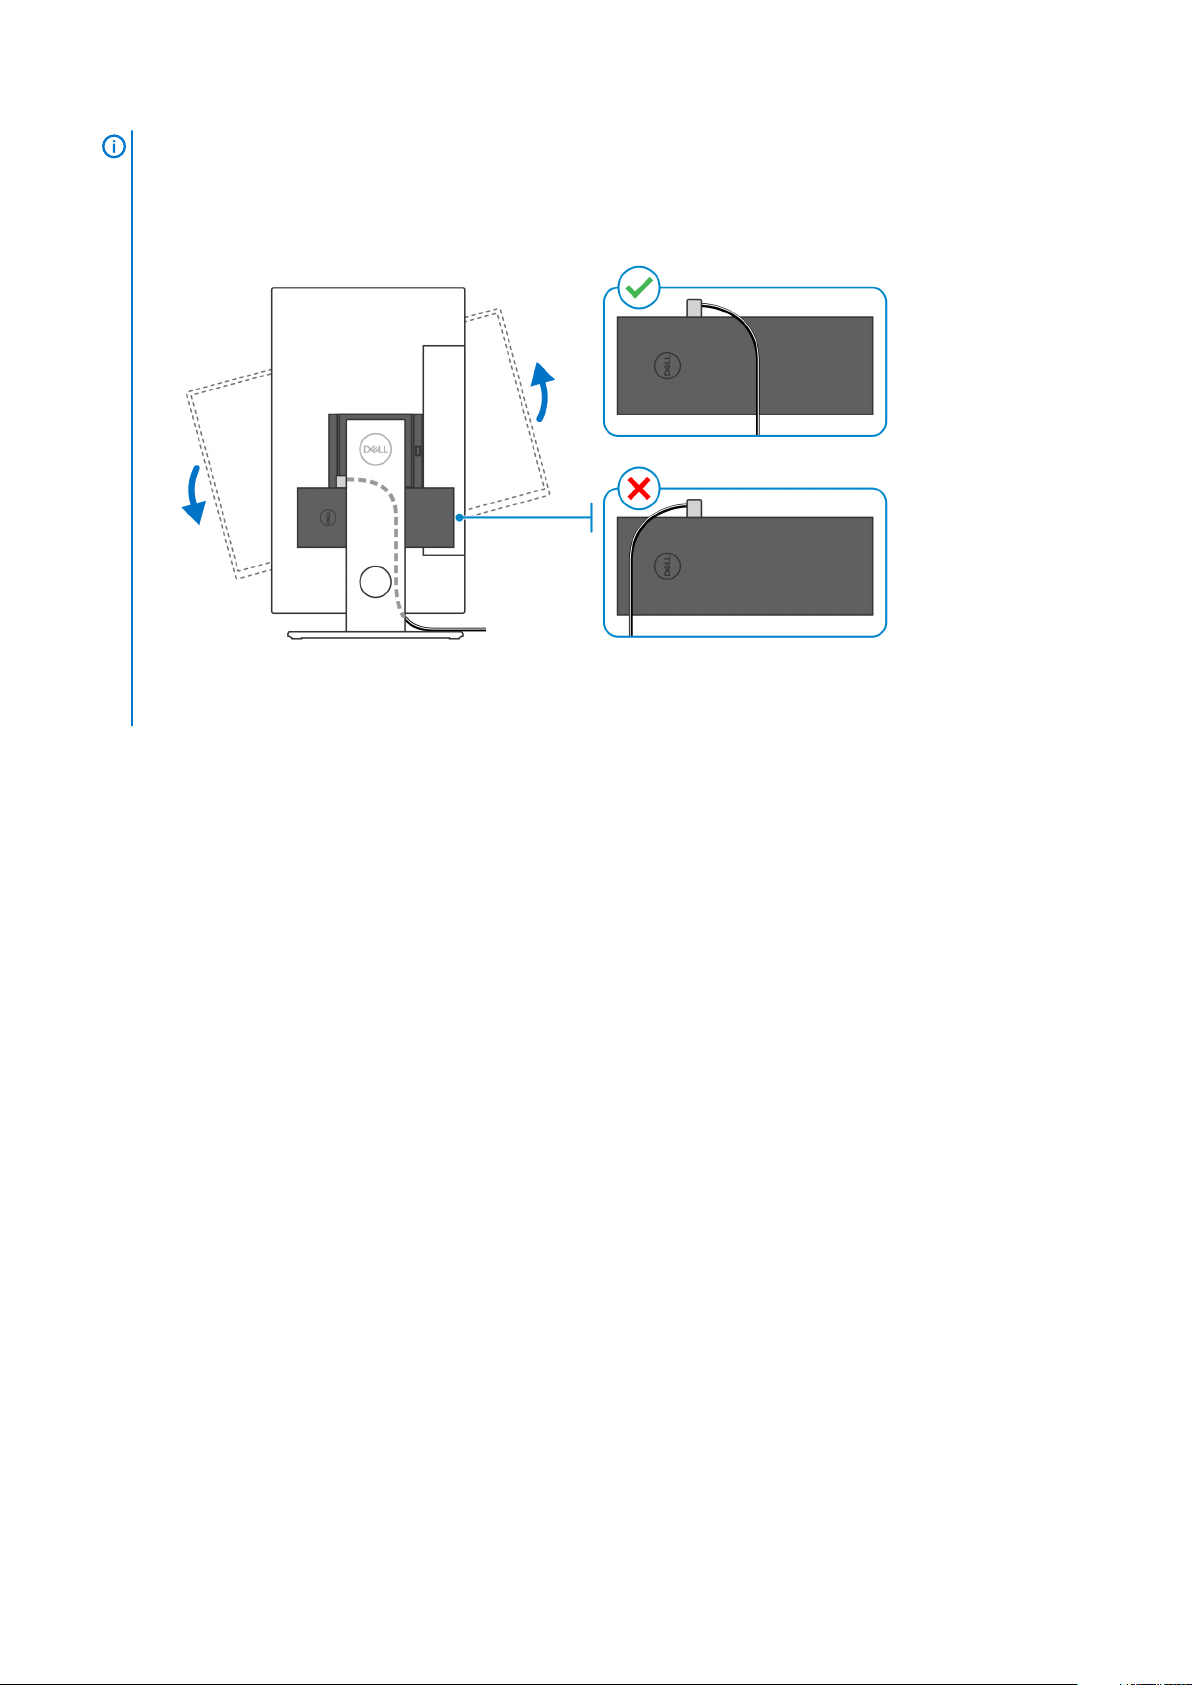
NOTE: While orienting the monitor horizontally, route the security lock cable to the right side of the device to avoid
any impact to WLAN performance.
26 Set up your OptiPlex 7070 Ultra
Page 27

3
Powering the system
OptiPlex 7070 Ultra can be powered using a AC adapter (4.5 mm input power source) or through the USB Type-C cable connected to
your display. During normal operation, when the device is connected with a single power source (primary power source), connecting a
second power source and disconnecting the primary power source will shut down the device. However, if the secondary power source is
disconnected while the primary power source is connected, the system continues to operate normally.
When the device is powered with both the power sources—AC adapter and USB Type-C cable, the AC adapter is the primary power
source and USB Type-C is the secondary power source. Disconnecting the AC adapter will shut down the system. If the secondary power
source is disconnected, the system continues to operate normally.
NOTE:
Table 3. Powering the system
Primary Power Source Secondary power source connected Power source disconnected Operation
AC Adapter Rear Type-C AC Adapter Shut down
AC Adapter Rear Type-C Rear Type-C Normal
Rear Type-C AC Adapter AC Adapter Normal
Rear Type-C AC Adapter Rear Type-C Shut down
Topics:
• Type-C display settings
Hotswap between the AC adapter and USB Type-C power source is not supported.
Type-C display settings
When using a Dell USB Type-C display to power on your OptiPlex 7070 Ultra, to avoid any power loss to the device when the display is
turned off or on Standby mode, ensure that the Always on USB-C Charging setting on the display is enabled.
On turning on the Dell USB Type-C display for the first time, the Easy initial setup is displayed. Click Yes, to enable the Always on
USB-C charging option.
If you miss enabling the option on Easy Initial setup window, then you can enable the setting using the on-screen display menu available on
the display. For more information on enabling the option, see the documentation that is shipped with your display.
NOTE:
enable the USB-C Always On charging feature only after you update the firmware. Download the Dell display firmware,
at Dell.com/support.
The "USB-C Always On Charging" firmware option may not be present on all Dell USB Type-C displays. You can
Powering the system 27
Page 28

Smart power enablement
Deep sleep is disabled in the BIOS by default. If the system is connected to a USB keyboard and Deep sleep is enabled in the BIOS, the
system will not power on or wake from hibernation when a key is pressed on the USB keyboard.
Enable USB Wake support:
1. Press <F12> when the Dell logo appears to initiate a one-time boot menu. Go to BIOS Setup.
2. Select Power Management.
3. Navigate to USB Wake Support
4. Turn on Enable USB Wake Support
5. Navigate to Deep Sleep control
6. Disable Deep Sleep
4
28 Smart power enablement
Page 29

Specifications of OptiPlex 7070 Ultra
Processors
Table 4. Processors
Processors Wattage Core count Thread count Speed Cache Integrated graphics
8th Generation Intel Core
i3-8145U
25 W 2 4 2.10 GHz to
3.90 GHz
4 MB Intel UHD Graphics 620
5
8th Generation Intel Core
i5-8265U
8th Generation Intel Core
i5-8365U
8th Generation Intel Core
i7-8565U
8th Generation Intel Core
i7-8665U
25 W 4 8 1.60 GHz to
25 W 4 8 1.60 GHz to
25 W 4 8 1.80 GHz to
25 W 4 8 1.90 GHz to
Chipset
Table 5. Chipset
Description Values
Chipset
Processor
DRAM bus width
Flash EPROM
PCIe bus
Integrated with the processor
8th Generation Intel Core i3/i5/i7
64 bit
32 MB
Up to Gen 3.0
6 MB Intel UHD Graphics 620
3.90 GHz
6 MB Intel UHD Graphics 620
4.10 GHz
8 MB Intel UHD Graphics 620
4.60 GHz
8 MB Intel UHD Graphics 620
4.80 GHz
Operating system
• Windows 10 Home (64-bit)
• Windows 10 Professional (64-bit)
• Windows 10 Pro National Academic (64-bit)
• Ubuntu 18.04 LTS
Memory
Table 6. Memory specifications
Description Values
Slots
Type
Two SO-DIMM slots
Dual-channel DDR4
Specifications of OptiPlex 7070 Ultra 29
Page 30

Description Values
Speed
2400 MHz
Maximum memory
Minimum memory
Memory size per slot
Configurations supported
64 GB
4 GB
4 GB, 8 GB, 16 GB, 32 GB
• 4 GB (1 x 4 GB)
• 8 GB (1 x 8 GB, 2 x 4 GB)
• 16 GB (1 x 16 GB, 2 x 8 GB)
• 32 GB (1 x 32 GB, 2 x 16 GB)
• 64 GB (2 x 32 GB)
Storage
Your computer supports the following configuration:
• One 2.5 inch, 7 mm hard drive and One M.2 2230 solid-state drive
Table 7. Storage specifications
Storage type Interface type Capacity
2.5-inch 5400 rpm hard drive SATA AHCI Up to 2 TB
2.5-inch 7200 rpm hard drive SATA AHCI Up to 1 TB
2.5 inch 7200 rpm FIPS Self Encrypting Opal 2.0 hard drive FIPS Up to 500 GB
M.2 PCIe NVMe Class 35 solid-state drive PCIe x2 Gen 3 NVMe Up to 1 TB
M.2 PCIe NVMe Class 35 Self Encrypting Opal 2.0 solidstate drive
PCIe x4 Gen 3 NVMe Up to 256 GB
Ports and connectors
Table 8. External ports and connectors
Description Values
External:
Network
USB
Audio
1 RJ-45 port 10/100/1000 Mbps
• 1 USB 3.1 Gen 2 Type-C port with DisplayPort Alt Mode (side)
• 1 USB 3.1 Gen 2 Type-A port with PowerShare (side)
• 1 USB 3.1 Gen 2 Type-C port with DisplayPort Alt Mode/Power
Delivery (rear)
• 1 USB 3.1 Gen1 Type-A port with SmartPower (rear)
• 1 USB 3.1 Gen 2 type-A port with SmartPower (rear)
Universal Audio Jack
Video
Power adapter port
Security
30 Specifications of OptiPlex 7070 Ultra
DisplayPort over USB Type-C port
4.50 mm x 2.90 mm DC-in
• 1 Kensington lock slot
• 1 Security screw hole to secure cover
Page 31

Table 9. Internal ports and connectors
Description Values
Internal:
M.2
• 1 M.2 slot for 2230 M.2 WiFi and Bluetooth card
• 1 M.2 slot for 2230 M.2 PCIe solid-state drive
NOTE: To learn more about the features of different
types of M.2 cards, see the knowledge base article
SLN301626.
SATA
1 SATA 3.0 FFC connector for hard drive
Audio
Table 10. Audio specifications
Description Values
Controller
Stereo conversion
Internal interface
External interface
Speakers
Realtek ALC3204-CG 4 channel high definition audio
Supported
High definition audio interface
Universal Audio Jack
Not applicable
Video
Table 11.
Integrated graphics
Controller External display support Memory size Processor
Integrated graphics specifications
Intel UHD Graphics 620 • Up to three displays supported via
DisplayPort Multi-Streaming Technology
(MST)
• Two DisplayPort 1.2 support over USB 3.1
Type-C port
Communications
Ethernet
Table 12. Ethernet specifications
Description Values
Model number
Transfer rate
Intel i219V (non-vPro) or Intel i219LM (vPro)
10/100/1000 Mbps
Shared system memory 8th Generation Intel
Core i3/i5/i7
Specifications of OptiPlex 7070 Ultra 31
Page 32

Wireless module
Table 13. Wireless module specifications
Description Values
Model number
Qualcomm QCA61x4A Intel Wi-Fi 6 AX200
Transfer rate
Frequency bands supported
Wireless standards
Encryption
Bluetooth
Up to 867 Mbps Up to 2.4 Gbps
2.4 GHz, 5 GHz 2.4 GHz, 5 GHz
• Wi-Fi 802.11 a/b/g
• Wi-Fi 4 (WiFi 802.11n)
• Wi-Fi 5 (WiFi 802.11ac)
• 64-bit/128-bit WEP
• AES-CCMP
• TKIP
Bluetooth 4.2 Bluetooth 5.0
Power adapter
Table 14. Power adapter specifications
Description Values
Type
Diameter (connector)
65 W
4.50 mm x 2.90 mm
• Wi-Fi 802.11 a/b/g
• Wi-Fi 4 (Wi-Fi 802.11n)
• Wi-Fi 5 (Wi-Fi 802.11ac)
• Wi-Fi 6 (Wi-Fi 802.11ax)
• 64-bit/128-bit WEP
• AES-CCMP
• TKIP
Input voltage
Input frequency
Input current (maximum)
Output current (continuous)
Rated output voltage
Temperature range:
Operating
Storage
Dimensions and weight
Table 15. Dimensions and weight
Description Values
Height:
Front
Rear
19.70 mm (0.78 in.)
• Without HDD: 19.70 mm (0.78 in.)
• With HDD: 27.74 mm (1.09 in.)
100 VAC-240 VAC
50 Hz-60 Hz
1.60 A
3.34 A
19.50 VDC
0°C to 40°C (32°F to 104°F)
-40°C to 70°C (-40°F to 158°F)
32 Specifications of OptiPlex 7070 Ultra
Page 33

Description Values
Width
96.10 mm (3.78 in.)
Depth
Weight (maximum)
256.20 mm (10.09 in.)
maximum 0.65 kg (1.43 lb)
NOTE: The weight of your computer depends on the configuration
ordered and the manufacturing variability.
Accessories
Table 16. Accessories
Accessories
Stands and Mounts OptiPlex Ultra Fixed Stand
OptiPlex Ultra Height Adjustable Stand
OptiPlex Ultra Offset VESA Mount
Cables OptiPlex Ultra USB C to USB C cable, 0.6 meter
OptiPlex Ultra USB-A to USB-B 3.0 cable, 0.6 meter
OptiPlex Ultra USB C to DisplayPort cable, 0.6 meter
OptiPlex Ultra USB-C to DisplayPort cable, 1.0 meter
OptiPlex Ultra USB-C to HDMI cable, 1.0 meter
OptiPlex Ultra USB-C to DVI cable, 1.0 meter
OptiPlex Ultra USB-C to VGA cable, 1.0 meter
Keyboards and Mice Dell KB216 Multimedia Keyboard
Dell KB813 Smartcard Keyboard
Dell KM636 Wireless Keyboard and Mouse Combo
Dell KM717 Premium Wireless Keyboard and Mouse Combo
Dell KB522 Multimedia Wired Keyboard
Dell MS116 Wired Mouse
Dell Laser Scroll USB 6-Buttons Silver and Black Mouse
Dell MS819 Wired Mouse with Fingerprint Reader
Dell WM326 Wireless Mouse
Dell WM527 Wireless Mouse
Monitors Qualified with select Dell Professional, UltraSharp, and E series
monitors
Audio External speakers, Dell Pro Stereo Headsets
Locks Kensington Desktop and Peripheral Locking Kit
Kensington MicroSaver 2.0 Keyed Laptop Lock
Kensington MicroSaver Twin Laptop Lock
External Optical Disk Drive Dell USB Slim DVD/RW Drive - DW316
Specifications of OptiPlex 7070 Ultra 33
Page 34

Energy Star and Trusted Platform Module (TPM)
Table 17. Energy star and TPM
Features Specifications
Energy Star Energy Star 7 compliant
TPM
Environmental, Ergonomic and Regulatory standards Environmental Standards (eco-labels): ENERGY STAR, EPEAT
• Hardware trusted Platform Module (Discrete TPM Enabled)
• Firmware Trusted Platform Module only (Discrete TPM
Disabled)
Registered, TCO Certified, CEL, WEEE, Japan Energy Law, South
Korea E-standby, South Korea Eco-label, EU RoHS, China RoHS.
Please see your local representative or www.dell.com for specific
details.
Computer environment
Airborne contaminant level: G1 as defined by ISA-S71.04-1985
Table 18. Computer environment
Description Operating Storage
Temperature range
0°C to 35°C (32°F to 95°F) -40°C to 65°C (-40°F to 149°F)
Relative humidity (maximum)
Vibration (maximum)
Shock (maximum)
Altitude (maximum)
* Measured using a random vibration spectrum that simulates user environment.
† Measured using a 2 ms half-sine pulse when the hard drive is in use.
*
10% to 90% (non-condensing) 0% to 95% (non-condensing)
0.66 GRMS 1.30 GRMS
110 G† 160 G†
-15.2 m to 3048 m (4.64 ft to 10000 ft) -15.2 m to 10668 m (4.64 ft to 35065.61 ft)
34
Specifications of OptiPlex 7070 Ultra
 Loading...