

Page 1

Dell™ Latitude™ D820
Quick Reference Guide
Model PP04X
www.dell.com | support.dell.com
Page 2

Notes, Notices, and Cautions
NOTE: A NOTE indicates important information that helps you make better use of your computer.
NOTICE: A NOTICE indicates either potential damage to hardware or loss of data and tells you how to avoid the
problem.
CAUTION: A CAUTION indicates a potential for property damage, personal injury, or death.
Abbreviations and Acronyms
If you purchased a Dell™ n Series computer, any references in this document to Microsoft® Windows®
operating systems are not applicable.
____________________
Information in this document is subject to change without notice.
© 2005 Dell Inc. All rights reserved.
Reproduction in any manner whatsoever without the written permission of Dell Inc. is strictly forbidden.
Trademarks used in this text: Dell, the DELL logo, Latitude, and ExpressCharge are trademarks of Dell Inc.; Intel is a registered trademark of
Intel Corporation; Microsoft, Outlook, and Windows are registered trademarks of Microsoft Corporation.
Other trademarks and trade names may be used in this document to refer to either the entities claiming the marks and names or their products.
Dell Inc. disclaims any proprietary interest in trademarks and trade names other than its own.
Model PP04X
December 2005 P/N MD991 Rev. A00
Page 3

Contents
Finding Information . . . . . . . . . . . . . . . . . . . . . . . . . . . . . . . . 5
Setting Up Your Computer
About Your Computer
Front View
. . . . . . . . . . . . . . . . . . . . . . . . . . . . . . . . . . . 9
Left Side View
Right Side View
Back View
. . . . . . . . . . . . . . . . . . . . . . . . . . . . . . . . . . 11
Bottom View
Using a Battery
. . . . . . . . . . . . . . . . . . . . . . . . . . . . . . . . . . 12
Battery Performance
Checking the Battery Charge
Charging the Battery
Replacing the Battery
Storing a Battery
Troubleshooting
. . . . . . . . . . . . . . . . . . . . . . . . . . . . . . . . . 15
Dell Technical Update Service
Dell Diagnostics
Lockups and Software Problems
. . . . . . . . . . . . . . . . . . . . . . . . . . . . . 7
. . . . . . . . . . . . . . . . . . . . . . . . . . . . . . . . 9
. . . . . . . . . . . . . . . . . . . . . . . . . . . . . . . . 10
. . . . . . . . . . . . . . . . . . . . . . . . . . . . . . . 10
. . . . . . . . . . . . . . . . . . . . . . . . . . . . . . . . 11
. . . . . . . . . . . . . . . . . . . . . . . . . . . . 12
. . . . . . . . . . . . . . . . . . . . . . . . 13
. . . . . . . . . . . . . . . . . . . . . . . . . . . . 14
. . . . . . . . . . . . . . . . . . . . . . . . . . . . 14
. . . . . . . . . . . . . . . . . . . . . . . . . . . . . . 15
. . . . . . . . . . . . . . . . . . . . . . . 15
. . . . . . . . . . . . . . . . . . . . . . . . . . . . . . . 16
. . . . . . . . . . . . . . . . . . . . . . 18
Index . . . . . . . . . . . . . . . . . . . . . . . . . . . . . . . . . . . . . . . . . 21
Contents 3
Page 4

4 Contents
Page 5

Finding Information
NOTE: Some features or media may be optional and may not ship with your computer. Some features or media may
not be available in certain countries.
NOTE: Additional information may ship with your computer.
What Are You Looking For? Find It Here
• A diagnostic program for my computer
• Drivers for my computer
• My device documentation
• Notebook System Software (NSS)
• How to remove and replace parts
• Specifications
• How to configure system settings
• How to troubleshoot and solve problems
Drivers and Utilities CD (also known as ResourceCD)
NOTE: The Drivers and Utilities CD may be optional and may
not ship with your computer.
Documentation and drivers are already installed on your
computer. You can use the CD to reinstall drivers.
Readme files may be
included on your CD to
provide last-minute
updates about technical
changes to your computer
or advanced technicalreference material for
technicians or experienced
users.
NOTE: Drivers and documentation updates can be found at
support.dell.com.
Dell Latitude™ User’s Guide
1
Click
Start→
Help and Support→ Dell User and System
Guides
→
2
Click the
System Guides
User’s Guide
.
for your computer.
• Warranty information
• Terms and Conditions (U.S. only)
• Safety instructions
• Regulatory information
• Ergonomics information
• End User License Agreement
Dell™ Product Information Guide
Quick Reference Guide 5
Page 6

What Are You Looking For? Find It Here
• Service Tag and Express Service Code
• Microsoft Windows License Label
Service Tag and Microsoft® Windows® License
These labels are located on
• Use the Service Tag to identify your computer when you
support.dell.com
use
• Enter the Express
Service Code to direct
your call when
contacting technical
support.
the bottom of
your computer.
or contact technical support.
• Solutions — Troubleshooting hints and tips, articles
from technicians, and online courses, frequently asked
questions
• Community — Online discussion with other Dell
customers
• Upgrades — Upgrade information for components, such
as memory, the hard drive, and the operating system
• Customer Care — Contact information, service call and
order status, warranty, and repair information
• Service and support — Service call status and support
history, service contract, online discussions with
technical support
• Reference — Computer documentation, details on my
computer configuration, product specifications, and
white papers
• Downloads — Certified drivers, patches, and software
updates
• Notebook System Software (NSS)— If you reinstall the
operating system for your computer, you should also
reinstall the NSS utility. NSS provides critical updates
for your operating system and support for Dell™
3.5-inch USB floppy drives, Intel
®
processors, optical
drives, and USB devices. NSS is necessary for correct
operation of your Dell computer. The software
automatically detects your computer and operating
system and installs the updates appropriate for your
configuration.
Dell Support Website — support.dell.com
NOTE: Select your region to view the appropriate support
site.
NOTE: Corporate, government, and education customers
can also use the customized Dell Premier Support website at
premier.support.dell.com.
To download Notebook System Software:
1
Go to
support.dell.com→
2
Enter your Service Tag or product model.
3
In the
Download Category
4
Select the operating system and operating system
language for your computer, and click
5
Under
Select a Device
Configuration Utilities
Software
.
Downloads
.
drop-down menu, click
Submit.
, scroll to
, and click
System and
Dell Notebook System
All
.
6 Quick Reference Guide
Page 7

What Are You Looking For? Find It Here
• How to use Windows XP
• How to work with programs and files
• How to personalize my desktop
• Information on network activity, the Power Management
Wizard, hotkeys, and other items controlled by Dell
QuickSet
• How to reinstall my operating system
Windows Help and Support Center
1
Click
Start→
2
Type a word or phrase that describes your problem and
click the arrow icon.
3
Click the topic that describes your problem.
4
Follow the instructions on the screen.
Dell QuickSet Help
To view
Dell QuickSet Help, right-click the icon
in the Microsoft
Operating System CD
NOTE: The Operating System CD may be optional and may
not ship with your computer.
The operating system is already installed on your computer.
To reinstall your operating system, use the optional
Operating System CD.
Help and Support
®
Windows® taskbar.
After you reinstall your
operating system, use the
Drivers and Utilities CD
(ResourceCD) to reinstall
drivers for the devices that
came with your computer.
NOTE: The color of your CD
varies based on the
operating system you
ordered.
.
Setting Up Your Computer
CAUTION: Before you begin any of the procedures in this section, follow the safety instructions in the Product
Information Guide.
1
Unpack the accessories box.
2
Set aside the contents of the accessories box, which you will need to complete the setup of your
computer.
The accessories box also contains user documentation and any software or additional hardware (such
as PC Cards, drives, or batteries) that you have ordered.
Quick Reference Guide 7
Page 8

3
Connect the AC adapter to the AC adapter connector on the computer and to the electrical outlet.
4
Open the computer display and press the power button to turn on the computer (see Front View).
NOTE: Do not connect the computer to the docking device until the computer has been turned on and shut down at
least once.
8 Quick Reference Guide
Page 9

About Your Computer
Front View
13
12
11
10
9
1
2
3
4
5
6
8
7
1 display latch 8 touch pad/track stick buttons
2 display 9 track stick
3 power button 10 keyboard status lights
4 device status lights 11 volume control buttons
5 speakers (2) 12 mute button
6 keyboard 13 ambient light sensor
7 touch pad
Quick Reference Guide 9
Page 10

Left Side View
Right Side View
1 2 63 4 75 8 9
1 security cable slot 6 infrared sensor
2 air vents 7 wireless switch
3 1394 connector 8 wireless activity light
4 audio connectors 9 PC Card slot
5 ExpressCard slot 10 smart card slot
1
1 media bay 2 USB connectors (2)
10
2
10 Quick Reference Guide
Page 11
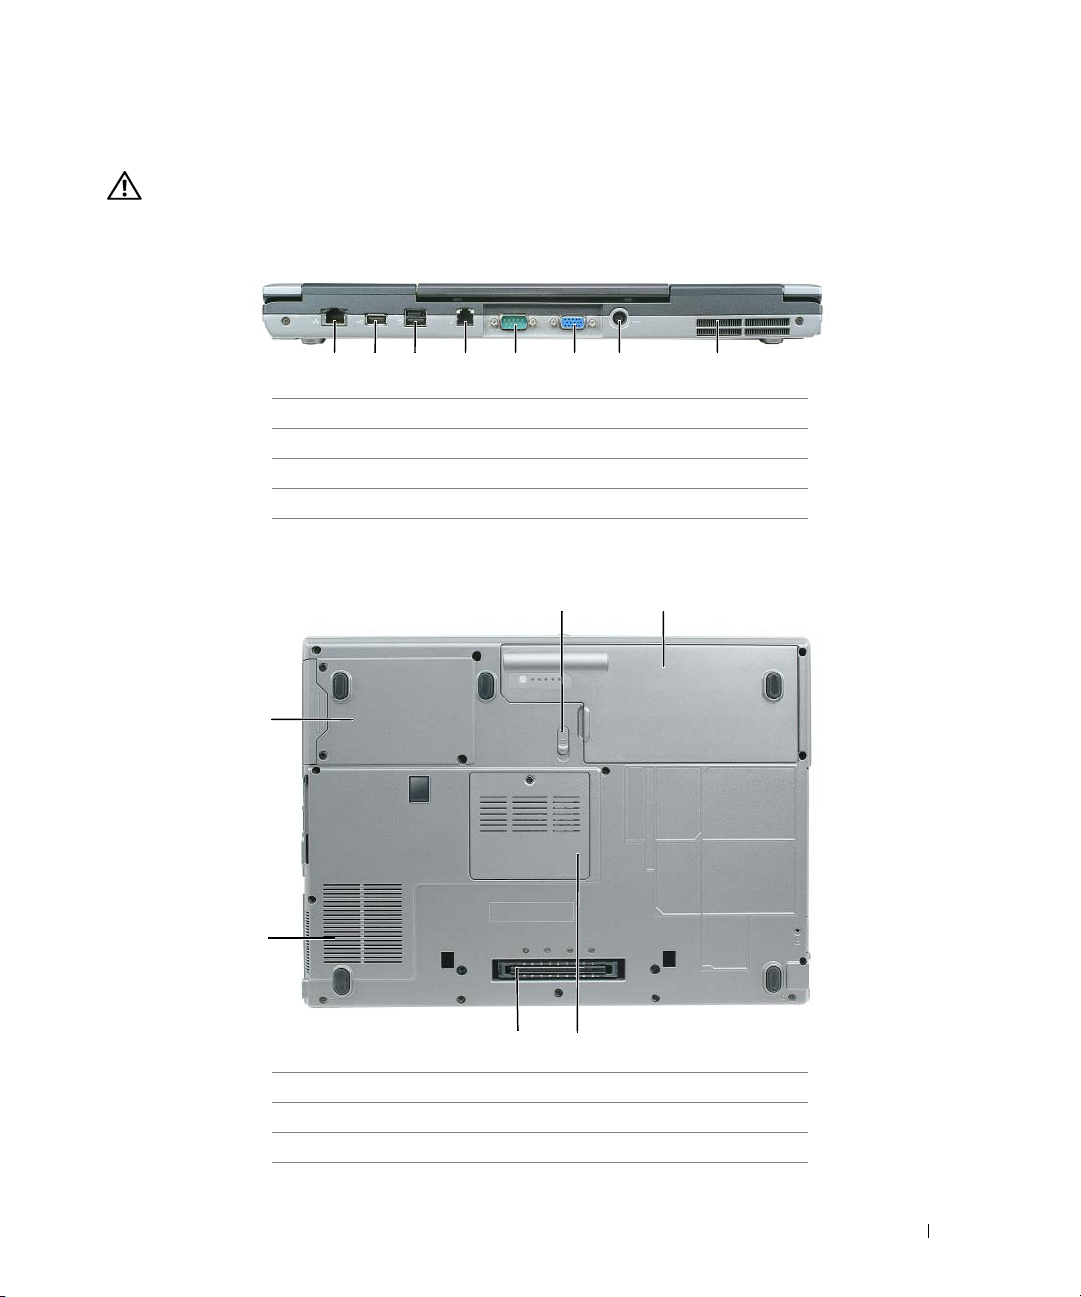
Back View
CAUTION: Do not block, push objects into, or allow dust to accumulate in the air vents. Do not store your
computer in a low-airflow environment, such as a closed briefcase, while it is running. Restricting the airflow
can damage the computer or cause a fire.
1 2 63 4 75 8
1 network connector (RJ-45) 5 serial connector
2 USB connector 6 video connector
3 powered USB connector 7 AC adapter connector
4 modem connector (RJ-11) 8 air vents
Bottom View
1
6
5
4
1 battery-bay latch release 4 docking-device connector
2 battery 5 fan air vents
3 memory module cover 6 hard drive
3
2
Quick Reference Guide 11
Page 12
Using a Battery
Battery Performance
NOTE: For information about the Dell warranty for your computer, see the Product Information Guide or separate
paper warranty document that shipped with your computer.
For optimal computer performance and to help preserve BIOS settings, operate your Dell™ portable
computer with the main battery installed at all times. One battery is supplied as standard equipment in
the battery bay.
NOTE: Because the battery may not be fully charged, use the AC adapter to connect your new computer to an
electrical outlet the first time you use the computer. For best results, operate the computer with the AC adapter
until the battery is fully charged. To view battery charge status, access the Control Panel→ Power Options, and
then click the Power Meter tab.
NOTE: Battery operating time (the time the battery can hold a charge) decreases over time. Depending on how
often the battery is used and the conditions under which it is used, you may need to purchase a new battery during
the life of your computer.
Battery operating time varies depending on operating conditions. You can install an optional second
battery in the media bay to significantly increase operating time.
Operating time is significantly reduced when you perform operations including, but not limited to, the
following:
• Using optical drives
• Using wireless communications devices, PC Cards, ExpressCards, media memory cards, or USB
devices
• Using high-brightness display settings, 3D screen savers, or other power-intensive programs such as 3D
games
• Running the computer in maximum performance mode
NOTE: It is recommended that you connect your computer to an electrical outlet when writing to a CD or DVD.
You can check the battery charge before you insert the battery into the computer (see "Checking the
Battery Charge" on page 13). You can also set power management options to alert you when the battery
charge is low.
CAUTION: Using an incompatible battery may increase the risk of fire or explosion. Replace the battery only
with a compatible battery purchased from Dell. The lithium ion battery is designed to work with your Dell
computer. Do not use a battery from other computers with your computer.
CAUTION: Do not dispose of batteries with household waste. When your battery no longer holds a charge, call
your local waste disposal or environmental agency for advice on disposing of a lithium-ion battery. See "Battery
Disposal" in the Product Information Guide.
12 Quick Reference Guide
Page 13

CAUTION: Misuse of the battery may increase the risk of fire or chemical burn. Do not puncture, incinerate,
disassemble, or expose the battery to temperatures above 65°C (149°F). Keep the battery away from children.
Handle damaged or leaking batteries with extreme care. Damaged batteries may leak and cause personal injury
or equipment damage.
Checking the Battery Charge
The Dell QuickSet Battery Meter, the Microsoft Windows Power Meter window and icon, the
battery charge gauge and health gauge, and the low-battery warning provide information on the battery
charge.
Dell™ QuickSet Battery Meter
If Dell QuickSet is installed, press <Fn><F3> to display the QuickSet Battery Meter. The Battery
Meter displays status, battery health, charge level, and charge completion time for the battery in your
computer.
For more information about QuickSet, right-click the icon in the taskbar, and click Help.
Microsoft® Windows® Power Meter
The Windows Power Meter indicates the remaining battery charge. To check the Power Meter, doubleclick the icon on the taskbar.
If the computer is connected to an electrical outlet, a icon appears.
Charge Gauge
By either pressing once or pressing and holding the status button on the charge gauge on the battery, you
can check:
• Battery charge (check by pressing and
• Battery health (check by pressing and
The battery operating time is largely determined by the number of times it is charged. After hundreds of
charge and discharge cycles, batteries lose some charge capacity—or battery health. That is, a battery can
show a status of "charged" but maintain a reduced charge capacity (health).
releasing
holding
the status button)
the status button)
Check the Battery Charge
To check the battery charge, press and release the status button on the battery charge gauge to illuminate
the charge-level lights. Each light represents approximately 20 percent of the total battery charge. For
example, if the battery has 80 percent of its charge remaining, four of the lights are on. If no lights
appear, the battery has no charge.
Check the Battery Health
NOTE: You can check battery health in one of two ways: by using the charge gauge on the battery as described
below and by using the Battery Meter in Dell QuickSet. For information about QuickSet, right-click the icon in
the taskbar, and click Help.
Quick Reference Guide 13
Page 14

To check the battery health using the charge gauge, press and hold the status button on the battery
charge gauge for at least 3 seconds. If no lights appear, the battery is in good condition, and more than
80 percent of its original charge capacity remains. Each light represents incremental degradation. If five
lights appear, less than 60 percent of the charge capacity remains, and you should consider replacing the
battery. See the specifications in your User’s Guide.
Low-Battery Warning
NOTICE: To avoid losing or corrupting data, save your work immediately after a low-battery warning. Then
connect the computer to an electrical outlet. If the battery runs completely out of power, hibernate mode begins
automatically.
By default, a pop-up window warns you when the battery charge is approximately 90 percent depleted.
You can change the settings for the battery alarms in QuickSet or the Power Options Properties window.
Charging the Battery
NOTE: With Dell™ ExpressCharge™, when the computer is turned off, the AC adapter charges a completely
discharged battery to 80 percent in about 1 hour and to 100 percent in approximately 2 hours. Charge time is longer
with the computer turned on. You can leave the battery in the computer for as long as you like. The battery’s internal
circuitry prevents the battery from overcharging.
When you connect the computer to an electrical outlet or install a battery while the computer is
connected to an electrical outlet, the computer checks the battery charge and temperature. If necessary,
the AC adapter then charges the battery and maintains the battery charge.
If the battery is hot from being used in your computer or being in a hot environment, the battery may
not charge when you connect the computer to an electrical outlet.
The battery is too hot to start charging if the light flashes alternately green and orange. Disconnect
the computer from the electrical outlet and allow the computer and the battery to cool to room
temperature. Then connect the computer to an electrical outlet to continue charging the battery.
Replacing the Battery
CAUTION: Before performing these procedures, turn off the computer, disconnect the AC adapter from the
electrical outlet and the computer, disconnect the modem from the wall connector and computer, and remove any
other external cables from the computer.
NOTICE: You must remove all external cables from the computer to avoid possible connector damage.
CAUTION: Using an incompatible battery may increase the risk of fire or explosion. Replace the battery only
with a compatible battery purchased from Dell. The battery is designed to work with your Dell™ computer. Do not
use a battery from other computers with your computer.
To remove the battery:
If the computer is connected to a docking device (docked), undock it. See the documentation that
1
came with your docking device for instructions.
2
Ensure that the computer is turned off.
14 Quick Reference Guide
Page 15

3
Slide the battery-bay latch release on the bottom of the computer until the release clicks.
4
Using the tab on the battery, lift the battery out of the computer.
1
1 battery 2 battery tab 3 battery-bay latch release
To replace the battery, place the battery in the bay and press down until the battery-bay latch release
clicks.
2
3
Storing a Battery
Remove the battery when you store your computer for an extended period of time. A battery discharges
during prolonged storage. After a long storage period, recharge the battery fully before you use it (see
"Charging the Battery" on page 14).
Troubleshooting
Dell Technical Update Service
The Dell Technical Update service provides proactive e-mail notification of software and hardware
updates for your computer. The service is free and can be customized for content, format, and how
frequently you receive notifications.
To enroll for the Dell Technical Update service, go to support.dell.com/technicalupdate.
Quick Reference Guide 15
Page 16

Dell Diagnostics
CAUTION: Before you begin any of the procedures in this section, follow the safety instructions in the Product
Information Guide.
When to Use the Dell Diagnostics
If you experience a problem with your computer, perform the checks in "Lockups and Software
Problems" on page 18 and run the Dell Diagnostics before you contact Dell for technical assistance.
It is recommended that you print these procedures before you begin.
NOTICE: The Dell Diagnostics works only on Dell™ computers.
NOTE: The Drivers and Utilities CD is optional and may not ship with your computer.
Start the Dell Diagnostics from either your hard drive or from the Drivers and Utilities CD (also known
as the ResourceCD).
Starting the Dell Diagnostics From Your Hard Drive
The Dell Diagnostics is located on a hidden diagnostic utility partition on your hard drive.
Shut down the computer.
1
2
If the computer is connected to a docking device (docked), undock it. See the documentation that
came with your docking device for instructions.
3
Connect the computer to an electrical outlet.
4
The Dell Diagnostics can be invoked in one of two ways:
• Turn on the computer. When the DELL™ logo appears, press <F12> immediately. Select
Diagnostics
from the boot menu and press <Enter>.
NOTE: If you wait too long and the operating system logo appears, continue to wait until you see the
Microsoft
®
Windows® desktop. Then shut down your computer and try again.
• Press and hold the <Fn> key while powering the computer on.
NOTE: If you see a message stating that no diagnostics utility partition has been found, run the Dell
Diagnostics from the optional Drivers and Utilities CD.
The computer runs the Pre-boot System Assessment, a series of initial tests of your system board,
keyboard, hard drive, and display.
• During the assessment, answer any questions that appear.
• If a failure is detected, the computer stops and beeps. To stop the assessment and restart the
computer, press <Esc>; to continue to the next test, press <y>; to retest the component that
failed, press <r>.
• If the Pre-boot System Assessment completes successfully, you receive the message
Dell Diagnostic Utility Partition. Press any key to continue
5
Press any key to start the Dell Diagnostics from the diagnostics utility partition on your hard drive.
16 Quick Reference Guide
Booting
.
Page 17

Starting the Dell Diagnostics From the Drivers and Utilities CD
1
Insert the
2
Shut down and restart the computer.
Drivers and Utilities
CD.
When the DELL logo appears, press <F12> immediately.
If you wait too long and the Windows logo appears, continue to wait until you see the Windows
desktop. Then shut down your computer and try again.
NOTE: The next steps change the boot sequence for one time only. On the next start-up, the computer boots
according to the devices specified in the system setup program.
3
When the boot device list appears, highlight
4
Select the
5
Ty p e 1 to start the menu and press <Enter> to proceed.
6
Select
Boot from CD-ROM
option from the menu that appears and press <Enter>.
Run the 32 Bit Dell Diagnostics
CD/DVD/CD-RW Drive
and press <Enter>.
from the numbered list. If multiple versions are listed, select
the version appropriate for your computer.
7
When the Dell Diagnostics
Dell Diagnostics Main Menu
1
After the Dell Diagnostics loads and the
Main Menu
appears, select the test that you want to run.
Main Menu
screen appears, click the button for the option
you want.
Option Function
Express Test Performs a quick test of devices. The test typically takes
10 to 20 minutes and requires no interaction on your
part. Run Express Test first to increase the possibility of
tracing the problem quickly.
Extended Test Performs a thorough check of devices. The test typically
takes 1 hour or more and requires you to answer
questions periodically
Custom Test Tests a specific device. You can customize the tests you
want to run.
Symptom Tree Lists the most common symptoms encountered and
allows you to select a test based on the symptom of the
problem you are having.
2
If a problem is encountered during a test, a message appears with an error code and a description of the
problem. Write down the error code and problem description and follow the instructions on the
screen.
NOTE: The Service Tag for your computer is located at the top of each test screen. If you contact Dell,
technical support will ask for your Service Tag.
Quick Reference Guide 17
Page 18

3
If you run a test from the
Custom Test
or
Symptom Tree
option, click the applicable tab described in
the following table for more information.
Tab Function
Results Displays the results of the test and any error conditions
encountered.
Errors Displays error conditions encountered, error codes, and
the problem description.
Help Describes the test and may indicate requirements for
running the test.
Configuration Displays your hardware configuration for the selected
device.
The Dell Diagnostics obtains configuration information
for all devices from system setup, memory, and various
internal tests, and it displays the information in the
device list in the left pane of the screen. The device list
may not display the names of all the components
installed on your computer or all devices attached to your
computer.
Parameters Allows you to customize the test by changing the test
settings.
4
When the tests are completed, if you are running the Dell Diagnostics from the
CD, remove the CD.
When the tests are complete, close the test screen to return to the
Diagnostics and restart the computer, close the
Main Menu
Main Menu
screen.
Drivers and Utilities
screen. To exit the Dell
Lockups and Software Problems
CAUTION: Before you begin any of the procedures in this section, follow the safety instructions in the Product
Information Guide.
The computer does not start up
ENSURE THAT THE AC ADAPTER IS FIRMLY CONNECTED TO THE COMPUTER AND TO THE ELECTRICAL OUTLET
The computer stops responding
NOTICE: You might lose data if you are unable to perform an operating system shutdown.
T
URN THE COMPUTER OFF — If you are unable to get a response by pressing a key on your keyboard or moving your
mouse, press and hold the power button for at least 8 to 10 seconds until the computer turns off. Then restart your
computer.
18 Quick Reference Guide
Page 19

A program stops responding or crashes repeatedly
NOTE: Software usually includes installation instructions in its documentation or on a floppy disk or CD.
ND THE PROGRAM —
E
1
Press <Ctrl><Shift><Esc> simultaneously.
2
Click
Task Manager
3
Click
Applications
4
Click the program that is no longer responding.
5
Click
End Task
CHECK THE SOFTWARE DOCUMENTATION — If necessary, uninstall and then reinstall the program.
A program is designed for an earlier Microsoft® Windows® operating system
RUN THE PROGRAM COMPATIBILITY WIZARD — The Program Compatibility Wizard configures a program so it
runs in an environment similar to non-Windows XP operating system environments.
1
Click
Start→
2
Follow the instructions on the screen.
A solid blue screen appears
TURN THE COMPUTER OFF — If you are unable to get a response by pressing a key on your keyboard or moving your
mouse, press and hold the power button for at least 8 to 10 seconds until the computer turns off. Then restart your
computer.
.
.
.
All Programs→ Accessories→ Program Compatibility Wizard→ Next
.
Other software problems
CHECK THE SOFTWARE DOCUMENTATION OR CONTACT THE SOFTWARE MANUFACTURER FOR TROUBLESHOOTING
INFORMATION —
• Ensure that the program is compatible with the operating system installed on your computer.
• Ensure that your computer meets the minimum hardware requirements needed to run the software.
See the software documentation for information.
• Ensure that the program is installed and configured properly.
• Verify that the device drivers do not conflict with the program.
• If necessary, uninstall and then reinstall the program.
BACK UP YOUR FILES IMMEDIATELY
USE A VIRUS- SCANNING PROGRAM TO CHECK THE HARD DRIVE, FLOPPY DISKS, OR CDS
SAVE AND CLOSE ANY OPEN FILES OR PROGRAMS AND SHUT DOWN YOUR COMPUTER THROUGH THE Start MENU
Quick Reference Guide 19
Page 20

SCAN THE COMPUTER FOR SPYWARE — If you are experiencing slow computer performance, you frequently receive
pop-up advertisements, or you are having problems connecting to the Internet, your computer might be infected
with spyware. Use an anti-virus program that includes anti-spyware protection (your program may require an
upgrade) to scan the computer and remove spyware. For more information, go to support.dell.com and search for
the keyword spyware.
UN THE DELL DIAGNOSTICS — See "Dell Diagnostics" on page 16. If all tests run successfully, the error condition
R
is related to a software problem.
20 Quick Reference Guide
Page 21

Index
B
battery
charge gauge, 13
charging, 14
checking the charge, 13
performance, 12
power meter, 13
removing, 14
storing, 15
C
CDs
operating system, 7
computer
crashes, 18-19
slow performance, 20
stops responding, 18
D
Dell
support site, 6
Dell Diagnostics, 16
Dell Premier Support
website, 5
diagnostics
Dell, 16
documentation
End User License
Agreement, 5
ergonomics, 5
online, 6
Product Information Guide, 5
regulatory, 5
safety, 5
User’s Guide, 5
warranty, 5
E
End User License
Agreement, 5
ergonomics information, 5
H
hardware
Dell Diagnostics, 16
Help and Support Center, 7
help file
Windows Help and Support
Center, 7
L
labels
Microsoft Windows, 6
Service Tag, 6
M
Microsoft Windows label, 6
O
operating system
CD, 7
reinstalling, 7
Operating System CD, 7
P
problems
blue screen, 19
computer crashes, 18-19
computer does not start up, 18
computer stops responding, 18
Dell Diagnostics, 16
lockups, 18
program crashes, 19
program stops responding, 19
programs and Windows
compatibility, 19
slow computer
performance, 20
software, 18-19
spyware, 20
Product Information Guide, 5
Q
QuickSet Help, 7
Index 21
Page 22

R
T
regulatory information, 5
ResourceCD
Dell Diagnostics, 16
S
safety instructions, 5
serial connector
description, 11
system view, 11
Service Tag, 6
software
problems, 19
spyware, 20
Starting the Dell Diagnostics
From the Drivers and
Utilities CD, 17
Starting the Dell Diagnostics
From Your Hard Drive, 16
support website, 6
troubleshooting
Dell Diagnostics, 16
Help and Support Center, 7
U
User’s Guide, 5
W
warranty information, 5
Windows XP
Help and Support Center, 7
Program Compatibility
Wizard, 19
reinstalling, 7
wizards
Program Compatibility
Wizard, 19
system views
back, 11
bottom, 11
front, 9
left side, 10
right side, 10
22 Index
Page 23

Dell™ Latitude™ D820
快速参考指南
型号 PP04X
www.dell.com | support.dell.com
Page 24

注、注意和警告
注 : 注表示可以帮助您更好地使用计算机的重要信息。
注意 : 注意表示硬件的潜在损坏或数据丢失,并且告诉您如何避免此类问题。
警告 : 警告表示可能导致财产损失、人身伤害或死亡的潜在危险。
缩写和缩写词
如果您购买了
Dell™ n
系列计算机,本说明文件中的任何有关
Microsoft® Windows®
操作系统的参考都将
不适用。
____________________
本说明文件中的信息如有更改,恕不另行通知。
© 2005 Dell Inc. 版权所有,翻印必究。
未经 Dell Inc. 书面许可,严禁以任何方式进行复制。
本文件中使用的商标: Dell、 DELL 徽标、 Latitude 和 ExpressCharge 是 Dell Inc. 的商标; Intel 是 Intel Corporation 的注册商标;
Microsoft、 Outlook 和 Windows 是 Microsoft Corporation 的注册商标。
本说明文件中述及的其它商标和商品名称是指拥有相应标记和名称的公司或其制造的产品。 Dell Inc. 对不属于自己的商标和商品
名称不拥有任何所有权。
型号 PP04X
2005 年 12 月 P/N MD991 修订版 A00
Page 25

目录
查找信息 . . . . . . . . . . . . . . . . . . . . . . . . . . . . . . . . . . . . . 27
安装计算机
关于您的计算机
使用电池
故障排除
. . . . . . . . . . . . . . . . . . . . . . . . . . . . . . . . . . . 30
. . . . . . . . . . . . . . . . . . . . . . . . . . . . . . . . . 31
正面视图
左侧视图
右侧视图
背面视图
底部视图
电池性能
检查电池电量
为电池充电
更换电池
储存电池
Dell 技术更新服务
Dell 诊断程序
锁定和软件问题
. . . . . . . . . . . . . . . . . . . . . . . . . . . . . . . . . . 31
. . . . . . . . . . . . . . . . . . . . . . . . . . . . . . . . . . 32
. . . . . . . . . . . . . . . . . . . . . . . . . . . . . . . . . . 32
. . . . . . . . . . . . . . . . . . . . . . . . . . . . . . . . . . 33
. . . . . . . . . . . . . . . . . . . . . . . . . . . . . . . . . . 33
. . . . . . . . . . . . . . . . . . . . . . . . . . . . . . . . . . . . . 34
. . . . . . . . . . . . . . . . . . . . . . . . . . . . . . . . . . 34
. . . . . . . . . . . . . . . . . . . . . . . . . . . . . . . 34
. . . . . . . . . . . . . . . . . . . . . . . . . . . . . . . . . 35
. . . . . . . . . . . . . . . . . . . . . . . . . . . . . . . . . . 36
. . . . . . . . . . . . . . . . . . . . . . . . . . . . . . . . . . 36
. . . . . . . . . . . . . . . . . . . . . . . . . . . . . . . . . . . . . 37
. . . . . . . . . . . . . . . . . . . . . . . . . . . . . 37
. . . . . . . . . . . . . . . . . . . . . . . . . . . . . . . . 37
. . . . . . . . . . . . . . . . . . . . . . . . . . . . . . 39
索引 . . . . . . . . . . . . . . . . . . . . . . . . . . . . . . . . . . . . . . . . . 41
目录 25
Page 26

26 目录
Page 27

查找信息
注 : 一些功能或介质可能为可选项,并且可能不会随您的计算机提供。一些功能或介质在某些国家或地
区可能不适用。
注 : 其它信息可能随计算机提供。
要查找的内容 在此处查找
•
适用于我的计算机的诊断程序
•
适用于我的计算机的驱动程序
•
我的设备说明文件
•
笔记本电脑系统软件
•
如何卸下和装回部件
•
规格
•
如何配置系统设置
•
如何查找及排除故障并解决问题
(NSS)
Drivers and Utilities CD ( 也称为 ResourceCD)
注 : Drivers and Utilities CD 可能为可选项,并且可能不会
随您的计算机提供。
您的计算机已经安装了说明文件和驱动程序。 您可以使
用 CD 来重新安装驱动程序。
您的 CD 可能包含自述文
件,这些文件提供有关计
算机技术更改的最新更新,
或为技术人员或有经验的
用户提供高级技术参考资
料。
注 : 驱动程序和说明文件更
新位于 support.dell.com。
Dell Latitude™ 《用户指南》
1
单击 Start
持)
指南)
2
单击适用于您的计算机的 《用户指南》。
(开始)→
→
Dell User and System Guides(Dell
→ System Guides
Help and Support
(系统指南)。
(帮助和支
用户和系统
•
保修信息
•
条款和条件 (仅限于美国)
•
安全说明
•
管制信息
•
人机工程学信息
•
最终用户许可协议
Dell™ 《产品信息指南》
快速参考指南 27
Page 28

要查找的内容 在此处查找
•
服务标签和快速服务代码
• Microsoft Windows
许可证标签
服务标签和 Microsoft® Windows® 许可证
这些标签位于
•
当您使用 support.dell.com 或联系技术支持部门时,
请使用 “服务标签”来标识您的计算机。
•
当联系技术支持部门
时,请输入 “快速服
务代码”来导向您的呼
叫。
您的计算机的
底部。
解决方案
•
—
故障排除的提示和技巧、技术人员的
文章、在线课程和常见问题
•
团体
—
与其他
Dell
客户进行在线讨论
•
升级
—
组件如内存、硬盘驱动器和操作系统的升
级信息
•
客户服务中心
—
联系人信息、服务电话和订购状
态、担保和修复信息
•
服务和支持
—
服务通话状态和支持历史、服务合
同、与技术支持部门的在线讨论
•
参考
—
计算机说明文件、有关计算机配置的详
情、产品规格和白皮书
•
下载
—
经过认证的驱动程序、增补软件和软件更
新
•
笔记本电脑系统软件
安装了操作系统,则还应该重新安装
NSS
序。
Dell™ 3.5
为您的操作系统提供重要更新,并为
英寸
光盘驱动器和
Dell
作您的
计算机所必需的。 该软件将自动检测
(NSS—
USB
软盘驱动器、
USB
设备提供支持。
如果您的计算机重新
NSS
公用程
Intel®
处理器、
NSS
是正确操
您的计算机和操作系统,并安装适合于您的配置的
更新。
•
如何使用
如何使用程序和文件
•
•
如何使我的桌面个性化
Windows XP
Dell 支持 Web 站点 — support.dell.com
注 : 选择您所处区域以查看相应的支持站点。
注 : 公司、政府和教育客户也可使用自定义的 “Dell 高
级技术支持” Web 站点 premier.support.dell.com。
要下载笔记本电脑系统软件:
1
访问 support.dell.com→
2
输入您的 “服务标签”或产品型号。
3
在
Download Category
All
(所有)。
击
4
为您的计算机选择操作系统和操作系统语言,并单击
Submit
(提交)。
5
在
Select a Device
and Configuration Utilities
然后单击
Dell Notebook System Software(Dell
电脑系统软件)。
Windows 帮助和支持中心
1
单击 Start
持)。
2
键入说明问题的字或短语, 然后单击箭头图标。
3
单击说明问题的主题。
4
遵循屏幕上的说明操作。
(开始)→
Downloads
(下载)。
(下载类别)下拉式菜单中,单
(选择设备)下面,滚动到 System
(系统和配置公用程序),
Help and Support
笔记本
(帮助和支
28 快速参考指南
Page 29

要查找的内容 在此处查找
•
有关由
Dell QuickSet
向导、热键及其它项目的信息
控制的网络活动、电源管理
Dell QuickSet 帮助
要查看 Dell QuickSet Help(Dell QuickSet
在
Microsoft® Windows
击鼠标右键。
•
如何重新安装操作系统
操作系统 CD
注 : 操作系统 CD 可能为可选项, 并且可能不会随您的计
算机提供。
您的计算机上已经安装了操作系统。 要重新安装操作系
统,请使用可选的操作系统 CD。
®
任务栏中的
在重新安装了操作系统之
后,请使用 Drivers and
Utilities CD (ResourceCD)
为计算机随附的设备重新
安装驱动程序。
注 : 您的 CD 的颜色取决
于您所订购的操作系统。
帮助),
图标上单
快速参考指南 29
Page 30

安装计算机
警告 : 在开始执行本节中的任何步骤之前,请遵循 《产品信息指南》中的安全说明。
1
打开附件箱。
2
将附件箱中的物品放在一边,您将需要使用它们来完成计算机的安装。
附件箱中还包含用户说明文件以及您所订购的任何软件或附加硬件 (如
3
将交流适配器分别连接到计算机上的交流适配器连接器和电源插座上。
4
打开计算机的显示屏,然后按电源按钮开启计算机 (请参阅 “正面视图”)。
注 : 请在计算机开启并关闭至少一次之后,再将其连接到对接设备上。
PC
卡、驱动器或电池)。
30 快速参考指南
Page 31

关于您的计算机
正面视图
13
12
11
10
9
1
2
3
4
5
6
8
7
1
显示屏闩锁
2
显示屏
3
电源按钮
4
设备状态指示灯
5
扬声器 (2 个)
6
键盘
7
触摸板
8
触摸板 / 定点杆按钮
9
定点杆
10
键盘状态指示灯
11
音量控制按钮
12
静音按钮
13
环境光传感器
快速参考指南 31
Page 32

左侧视图
右侧视图
1 2 63 4 75 8 9
1
安全缆线插槽
2
通风孔
3
1394 连接器
4
音频连接器
5
ExpressCard 插槽
1
介质托架
6
红外线传感器
7
无线开关
8
无线活动指示灯
9
PC 卡插槽
10
智能卡插槽
1
2
USB 连接器 (2 个)
10
2
32 快速参考指南
Page 33

背面视图
警告 : 请勿堵塞通风孔或将物体塞入通风孔,也不要让灰尘积聚在通风孔内。 当计算机正在运行时,
请勿将其存放在通风较差的环境例如封闭的公文包中。 通风不畅会损坏计算机或导致起火。
1 2 63 4 75 8
底部视图
1
网络连接器 (RJ-45)
2
USB 连接器
3
有源 USB 连接器
4
调制解调器连接器 (RJ-11)
6
5
5
串行连接器
6
视频连接器
7
交流适配器连接器
8
通风孔
1
2
1
电池槽释放闩锁
2
电池
3
内存模块盖板
4
3
4
对接设备连接器
5
风扇通风孔
6
硬盘驱动器
快速参考指南 33
Page 34

使用电池
电池性能
注 : 有关 Dell 对您的计算机的担保的信息,请参阅 《产品信息指南》或计算机附带的单独的书面担保文
档。
为了获得最佳的计算机性能并帮助保存 BIOS 设置,请始终在装有主电池的情况下操作 Dell™ 便携
式计算机。 在电池槽中提供了作为标准设备的一块电池。
注 : 由于电池可能没有完全充电,因此在第一次使用计算机时请使用交流适配器将您的新计算机和电源
插座相连接。 为获得最佳结果,请在电池完全充电之前使用交流适配器。要查看电池充电状态,请访问
Control Panel (控制面板) → Power Options (电源选项),然后单击 Power Meter (电源表)选项卡。
注 : 电池使用时间 (电池存有电量的时间)将随时间的延长而减少。 根据电池的使用频率和使用条件,
在计算机的使用寿命内您可能需要购买新的电池。
电池使用时间会随操作条件的不同而有所不同。 可将可选的备用电池安装在介质托架中,以显著增
加使用时间。
如果执行某些操作,包括但不限于以下操作,则使用时间将大大减少 :
•
使用光盘驱动器
•
使用无线通信设备、
•
使用高亮度显示设置、
•
在最高性能模式下运行计算机
注 : 当写入 CD 或 DVD 时,建议您将计算机连接到电源插座上。
在将电池插入计算机中之前,您可以检查电池的电量 ( 请参阅第 34 页上的 “检查电池电量” )。您
还可以将电源管理选项设置为在电池电量不足时向您发出警报。
警告 : 使用不兼容的电池可能会增加起火或爆炸的危险。 请仅使用从 Dell 购买的兼容电池来更换旧电
池。 您的 Dell 计算机可以使用锂离子电池。 请勿将其它计算机的电池用于您的计算机。
警告 : 请勿将电池与生活垃圾一起处理。 如果电池无法再充电,请致电本地废品处理机构或环保机构,
以获得有关如何处理锂离子电池的建议。 请参阅 《产品信息指南》中的 “电池处理”。
警告 : 不正确地使用电池可能会增加起火或被化学品灼伤的危险。 请勿刺穿、焚烧、分解电池或使其暴
露于 65°C (149°F) 以上的高温。 请将电池放置在远离儿童的地方。 小心谨慎地处理损坏或发生泄漏的电
池。 损坏的电池可能会发生泄漏,并导致人身伤害或设备损坏。
PC
卡、
ExpressCards
3D
屏幕保护程序或其它电源密集型程序如
、介质存储器卡或
USB
设备
3D
游戏
检查电池电量
Dell QuickSet 电池表、 Microsoft Windows Power Meter ( 电源表 ) 窗口和 图标、电池电量表和
性能状态表,以及电池低电量警告提供有关电池电量的信息。
Dell™ QuickSet 电池表
如果安装了 Dell QuickSet,则按 <Fn><F3> 组合键可显示 “QuickSet 电池表”。 Battery Meter
(电池表)显示计算机中电池的状态、充电级别和充电完成时间。
有关 QuickSet 的详情,请在任务栏中的 图标上单击鼠标右键,然后单击 Help (帮助)。
34 快速参考指南
Page 35

Microsoft® Windows® 电源表
“Windows 电源表”指示剩余的电池电量。 要检查 “电源表”,请双击任务栏上的 图标。
如果计算机连接到电源插座上,将出现 图标。
电量表
通过按一次或按住 电池上的电量表上的状态按钮,可检查:
•
电池电量 (通过按压然后释放 状态按钮来检查)
•
电池性能状态 (通过按压并按住 状态按钮来检查)
电池使用时间在很大程度上取决于充电次数。 在经过数百次的反复充电和放电之后,电池的蓄电量
或电池的性能状态会有所下降。 即,电池可显示 “已充电”的状态并维持降低的充电容量 (性
能)。
检查电池电量
要检查电池电量,按压然后释放 电池电量表上的状态按钮以点亮充电级别指示灯。每个指示灯代
表约百分之二十的电池总电量。 例如,如果电池剩余百分之八十的电量,则会亮起四个指示灯。 如
果没有指示灯亮起,则表示电池电量已耗尽。
检查电池性能状态
注 : 您可以下列两种方式之一来检查电池性能状态:使用如下文描述的电池上的电量表,或使用 Dell
QuickSet 中的电量表。有关 QuickSet 的信息,请在任务栏中的 图标上单击鼠标右键,然后单击 Help
(帮助)。
要使用电量表检查电池的性能状态,请按住 电池电量表上的状态按钮至少 3 秒钟。 如果未出现任
何指示灯,则表明电池状况良好,并且其原始蓄电量仍保持在百分之八十以上。 每个指示灯均代表
电量的递减。 如果显示五个指示灯,则表明电池的蓄电量剩下不足百分之六十,此时应考虑更换电
池。请参阅您的 《用户指南》中的说明。
电池低电量警告
注意 : 为避免丢失或损坏数据,请在出现电池低电量警告后立即保存您的工作, 将计算机连接到电源插
座上。 如果电池的电量耗尽,计算机则会自动进入 休眠模式。
默认设置是,当电池电量消耗达到约百分之九十时,屏幕将显示弹出式窗口警告。 您可以在
QuickSet 或 Power Options Properties (电源选项属性)窗口中更改用于电池警报的设置。
为电池充电
注 : 使用 Dell™ ExpressCharge™ ,当计算机被关闭时,交流适配器将一个电量完全消耗的电池在大约 1
个小时内充到 80% 电量,在大约 2 个小时内充到 100% 电量。在开启计算机的情况下,充电时间会较长。
将电池留在计算机中的时间可以随意而定。 电池的内部电路可防止电池过量充电。
当将计算机连接到电源插座或者在计算机已连接到电源插座的情况下安装电池时,计算机会检查电
池的电量和温度。 如有必要,交流适配器将为电池充电并维持电池电量。
如果电池因正由计算机使用而变得烫或者正处于高温环境中,则当您将计算机连接到电源插座时电
池可能不会充电。
快速参考指南 35
Page 36

如果 指示灯以绿色和橙色交替闪烁,则表示电池过热而无法开始充电。 将计算机与电源插座断
开并使计算机和电池冷却到室温。 然后,再将计算机连接到电源插座继续为电池充电
。
更换电池
警告 : 在执行这些程序之前,关闭计算机,断开交流适配器与电源插座和计算机的连接,断开调制解调
器与壁装连接器和计算机的连接,然后将任何其它外部电缆从计算机上卸下。
注意 : 您必须将所有外部电缆从计算机上卸下以避免对连接器造成可能的损坏。
警告 : 使用不兼容的电池可能会增加起火或爆炸的危险。 请仅使用从 Dell 购买的兼容电池来更换旧电
池。
电池设计用于您的 Dell™ 计算机。 请勿将其它计算机的电池用于您的计算机。
卸下电池:
1
如果计算机已连接至对接设备 (已对接),请断开对接。 有关说明,请参阅您的对接设备随附的
说明文件。
2
请确保已关闭计算机。
3
滑动计算机底部的电池槽释放闩锁直到释放闩锁发出咔哒一声。
4
使用电池上的卡舌,将电池从计算机中提出。
1
1
电池
2
电池卡舌
2
3
3
电池槽释放闩锁
要装回电池,将电池置于电池槽中,向下按压直到电池槽释放闩锁发出咔哒一声。
储存电池
如果您准备长期储存计算机,请将电池卸下。 电池在长时间的储存过程中会释放电量。 电池在经过
长时间的储存之后,应先将其充满电,然后再使用 ( 请参阅第 35 页上的 “为电池充电” )。
36 快速参考指南
Page 37

故障排除
Dell 技术更新服务
Dell 技术更新服务使用电子邮件形式提供有关您的计算机的软件和硬件更新的通知。该服务是免费
的并且可定制内容、格式以及接收通知的频率。
要加入 Dell 技术更新服务,请访问 support.dell.com/technicalupdate。
Dell 诊断程序
警告 : 在开始执行本节中的任何步骤之前,请遵循 《产品信息指南》中的安全说明。
何时使用 Dell 诊断程序
如果在使用计算机时遇到问题,请在联系 Dell 以获得技术帮助之前,先执行第 39 页上的 “锁定和
软件问题”中的检查并运行“Dell 诊断程序”。
建议您在开始之前先打印这些步骤。
注意 : Dell 诊断程序只能在 Dell™ 计算机上运行。
注 : Drivers and Utilities CD 为可选项,可能不会随您的计算机提供。
从硬盘驱动器或 Drivers and Utilities CD (也称为 ResourceCD)中启动 “Dell 诊断程序”。
从硬盘驱动器启动 Dell 诊断程序
“Dell 诊断程序”位于硬盘驱动器上的一个隐藏的诊断公用程序分区中。
1
关闭计算机。
2
如果计算机已连接至对接设备 (已对接),请断开对接。 有关说明,请参阅您的对接设备随附的
说明文件。
3
将计算机连接至电源插座。
4
Dell
诊断程序
•
开启计算机。 当出现
(诊断程序),然后按
注 : 如果等待时间过长,并且出现了操作系统徽标,请继续等待,直到看见 Microsoft® Windows®
桌面。 然后关闭计算机,并且再试一次。
•
在给计算机加电启动过程中,请按住
注 : 如果显示一条信息说明未找到任何诊断公用程序分区,则从可选的 Drivers and Utilities CD 运行
“Dell 诊断程序”。
计算机将运行 “预先引导系统评估”,即对系统板、键盘、硬盘驱动器和显示屏进行的一系列初
始测试。
可以下列两种方式之一调用:
DELL™
<Enter>
徽标时,立即按
键。
<Fn>
<F12>
键。
键。 从引导菜单中选择
Diagnostics
•
在评估期间,请回答所出现的任何问题。
•
如果检测到故障,则计算机将停止并发出哔声。 要停止评估并重新启动计算机,请按
键; 要继续执行下一步测试,请按
<y> 键;
要重新测试发生故障的组件,请按
快速参考指南 37
<Esc>
<r> 键。
Page 38

•
如果“预先引导系统评估”成功完成,您将收到如下信息:
Utility Partition. Press any key to continue.(引导 Dell 诊断公用程序分区。请按任
意键继续。)
5
按任意键从硬盘驱动器上的诊断公用程序分区启动 “
从 Drivers and Utilities CD 启动 Dell 诊断程序
1
插入
Drivers and Utilities CD。
2
关闭并重新启动计算机。
当出现
DELL
徽标时,立即按
<F12>
键。
Dell
诊断程序”。
Booting Dell Diagnostic
如果等待时间过长,并且屏幕上出现了
Windows
徽标,请继续等待,直到看见
然后关闭计算机,并且再试一次。
注 : 后面的步骤只会更改一次引导顺序。 当下一次启动时,计算机将根据系统设置程序中指定的设
备进行引导。
当引导设备列表出现之后,高亮度显示
3
然后按
<Enter>
4
从显示的菜单中选择
5
键入 1 来启动菜单,然后按
6
从编号列表中选择 Run the 32 Bit Dell Diagnostics
键。
Boot from CD-ROM
<Enter>
CD/DVD/CD-RW Drive(CD/DVD/CD-RW
(从
CD-ROM
引导)选项,然后按
键继续。
(运行
32 位 Dell
诊断程序)。 如果列出了多
个版本,请选择适用于您的计算机的版本。
7
当
Dell
诊断程序 Main Menu
Dell 诊断程序主菜单
1
在“
Dell
诊断程序”载入并且 MainMenu
选项 功能
Express Test (快速测试) 对设备执行快速测试。 测试通常需要 10 到 20 分钟,
Extended Test (扩展测试) 对设备执行全面检查。 测试通常需要 1 小时或更长时
Custom Test (自定义测试) 测试特定设备。 您可以自定义要运行的测试。
Symptom Tree (症状树) 列出了最常遇到的一些症状,并使您可以根据所遇到
(主菜单)出现时,请选择想要运行的测试。
(主菜单)屏幕出现之后,请单击所需选项的按钮。
并且不需要人工介入。 先运行 Express Test (快速检
测)可增大快速追踪问题的可能性。
间,并且需要您不时地回答问题。
的问题的症状选择不同的测试。
Windows
桌面。
驱动器)
<Enter>键。
,
2
如果在测试过程中遇到了问题,将显示一条包含错误代码和问题说明的信息。 请记下错误代码和
问题说明,然后遵循屏幕上的说明操作。
38 快速参考指南
Page 39

注 : 您的计算机的 “服务标签”位于每个测试屏幕的顶部。 当您联系 Dell 时,技术支持部门人员会
要求您提供 “服务标签”。
如果您从 Custom Test
3
(自定义测试)或 Symptom Tree
(症状树)选项运行测试,请单击下表
中说明的合适的选项卡来了解详情。
选项卡 功能
Results (结果) 显示测试结果和遇到的所有错误状态。
Errors (错误) 显示遇到的错误状态、错误代码和问题说明。
Help (帮助) 对测试进行说明,并可能会指出运行测试的要求。
Configuration (配置) 显示选定设备的硬件配置。
“Dell 诊断程序”从系统设置、内存和各种内部测试获
得所有设备的配置信息,并在屏幕左窗格的设备列表中
显示这些信息。 设备列表可能不会显示计算机中安装的
所有组件或与计算机连接的所有设备的名称。
Parameters (参数) 使您可以通过更改测试设置来自定义测试。
4
当测试完成之后,如果您是从
当测试完成之后,
请关闭测试屏幕以返回到
并重新启动计算机,请关闭
Drivers and Utilities CD
Main Menu
(主菜单)屏幕。
Main Menu
运行的 “
Dell
诊断程序”,请取出该
(主菜单)屏幕。 要退出 “
锁定和软件问题
警告 : 在开始执行本节中的任何步骤之前,请遵循 《产品信息指南》中的安全说明。
Dell
诊断程序”
CD
。
计算机无法启动
请确保交流适配器已牢固地连接到计算机和电源插座中。
计算机停止响应
注意 : 如果您无法执行操作系统关闭,则可能会丢失数据。
关闭计算机 — 如果您在按键盘上的键或移动鼠标时无法获得响应,请按住电源按钮至少 8 至 10 秒钟直到
计算机关闭为止。 然后重新启动计算机。
程序停止响应或反复崩溃
注 : 软件通常会在其说明文件或者在软盘或 CD 中包括安装说明。
结束该程序 —
1
同时按
<Ctrl><Shift><Esc>
2
单击 Task Manager
3
单击
Applications
4
单击不再响应的程序。
(任务管理器)。
(应用程序)。
组合键。
快速参考指南 39
Page 40

5
单击
End Task
检查软件说明文件 — 如有必要,请卸载该程序,然后重新安装该程序。
程序设计用于较早的 Microsoft® Windows® 操作系统
运行程序兼容性向导 — “程序兼容性向导”将配置一个程序,使其在类似于非 Windows XP 操作系统环境
中运行。
单击 Start
1
Compatibility Wizard
2
遵循屏幕上的说明操作。
出现蓝屏
关闭计算机 — 如果您在按键盘上的键或移动鼠标时无法获得响应,请按住电源按钮至少 8 至 10 秒钟直到
计算机关闭为止。 然后重新启动计算机。
其它软件问题
检查软件说明文件或联系软件制造商以获得故障排除信息 —
•
确保程序与您计算机上所安装的操作系统兼容。
•
确保您的计算机满足运行本软件所需的最低硬件要求。 有关信息,请参阅软件说明文件。
•
确保程序安装和配置正确。
•
确认设备驱动程序与程序不冲突。
•
如有必要,请卸载该程序,然后重新安装该程序。
立即备份文件
使用病毒扫描程序来检查硬盘驱动器、软盘或 CD
保存并关闭任何打开的文件或程序,然后通过 Start (开始)菜单关闭计算机。
在计算机中扫描间谍软件 — 如果您的计算机性能缓慢、频繁地接收弹出式广告或者在与 Internet 连接时
出现问题,则表明您的计算机可能受到间谍软件的干扰。 请使用包括反间谍软件保护的抗病毒程序 (您的程
序可能需要升级)来扫描计算机并移除间谍软件。 有关详情,请转至 support.dell.com 并搜索关键字 spyware。
ELL 诊断程序 — 请参阅第 37 页上的 “Dell 诊断程序” 。如果所有测试成功运行,则错误状态与软
运行 D
件问题有关。
(结束任务)。
(开始)
→ All Programs
(所有程序)→ Accessories
(程序兼容性向导)→ Next
(附件)→ Program
(下一步)。
40 快速参考指南
Page 41

索引
A
安全说明 ,27
B
帮助和支持中心 ,28
帮助文件
Windows 帮助和支持
中心 ,28
标签
Microsoft Windows, 28
服务标签 ,28
C
CD
操作系统 ,29
操作系统
CD, 29
重新安装 ,29
操作系统 CD, 29
产品信息指南 ,27
串行连接器
说明 ,33
系统视图 ,33
从 Drivers and Utilities CD 启
动 Dell 诊断程序 ,38
从硬盘驱动器启动 Dell 诊断
程序 ,37
D
Dell
支持站点 ,28
Dell 高级技术支持 Web
站点 ,27
Dell 诊断程序 ,37
担保信息 ,27
电池
充电 ,35
储存 ,36
电量表 ,35
功率表 ,35
检查电量 ,34
卸下 ,36
性能 ,34
F
服务标签 ,28
G
故障排除
Dell 诊断程序 ,37
帮助和支持中心 ,28
管制信息 ,27
J
计算机
崩溃 , 39, 40
缓慢的性能 ,40
停止响应 ,39
间谍软件 ,40
M
Microsoft Windows 标签 ,28
Q
QuickSet 帮助 ,29
R
ResourceCD
Dell 诊断程序 ,37
人机工程学信息 ,27
软件
问题 ,40
S
说明文件
安全 ,27
产品信息指南 ,27
担保 ,27
管制 ,27
人机工程学 ,27
用户指南 ,27
在线 ,28
终端用户许可协议 ,27
索引 41
Page 42

W
Z
Windows XP
帮助和支持中心 ,28
程序兼容性向导 ,40
重新安装 ,29
问题
Dell 诊断程序 ,37
程序崩溃 ,39
程序和 Windows 兼容性 ,40
程序停止响应 ,39
缓慢的计算机性能 ,40
计算机崩溃 , 39, 40
计算机停止响应 ,39
计算机无法启动 ,39
间谍软件 ,40
蓝屏 ,40
软件 , 39, 40
锁定 ,39
X
系统视图
背面 ,33
底部 ,33
右侧 ,32
正面 ,31
左侧 ,32
诊断程序
Dell, 37
支持 We b 站点 ,28
终端用户许可协议 ,27
向导
程序兼容性向导 ,40
Y
硬件
Dell 诊断程序 ,37
用户指南 ,27
42 索引
Page 43

Dell™ Latitude™ D820
快速參考指南
型號 PP04X
www.dell.com | support.dell.com
Page 44

註、注意與警告
註 : 註表示可以幫助您更有效地使用電腦的重要資訊。
注意 : 注意表示可能的硬體損壞或資料遺失,並告訴您如何避免這些問題。
警示 : 警告表示可能的財產損失、人身傷害或死亡。
縮寫與首字母縮略詞
如果您購買了
Dell™ n
系列電腦,則本文件中任何有關
Microsoft® Windows®
作業系統的參考資料皆不適
用。
____________________
本文件中的資訊如有變更,恕不另行通知。
© 2005 Dell Inc. 版權所有,翻印必究。
未經 Dell Inc. 的書面許可,不得以任何形式進行複製。
本文件中使用的商標: Dell,此 DELL 徽標,Latitude 和 ExpressCharge 是 Dell Inc. 商標 ; Intel 是一個由 Intel Corporation 以註冊的
商標 ; Microsoft, Outlook, 和 Windows 是 Microsoft Corporation 註冊商標。
本文件中使用的其他商標與商品名稱是指擁有這些標誌及名稱的公司或其產品。 Dell Inc. 對不屬於自己的商標與商品名稱不擁有
任何專有權益。
型號 PP04X
12 月 2005 P/N MD991 修訂版 A00
Page 45

目錄
尋找相關資訊 . . . . . . . . . . . . . . . . . . . . . . . . . . . . . . . . . . 47
安裝電腦
關於您的電腦
使用電池
故障排除
. . . . . . . . . . . . . . . . . . . . . . . . . . . . . . . . . . . . . 50
. . . . . . . . . . . . . . . . . . . . . . . . . . . . . . . . . . 51
. . . . . . . . . . . . . . . . . . . . . . . . . . . . . . . . . . . 51
前視圖
左側視圖
右側視圖
後視圖
底部視圖
電池效能
檢查電池電量
為電池充電
更換電池
儲存電池
Dell Technical Update Service (Dell 技術更新服務 )
Dell 診斷程式
鎖定與軟體問題
. . . . . . . . . . . . . . . . . . . . . . . . . . . . . . . . . . 52
. . . . . . . . . . . . . . . . . . . . . . . . . . . . . . . . . . 52
. . . . . . . . . . . . . . . . . . . . . . . . . . . . . . . . . . . 53
. . . . . . . . . . . . . . . . . . . . . . . . . . . . . . . . . . 53
. . . . . . . . . . . . . . . . . . . . . . . . . . . . . . . . . . . . . 54
. . . . . . . . . . . . . . . . . . . . . . . . . . . . . . . . . . 54
. . . . . . . . . . . . . . . . . . . . . . . . . . . . . . . 54
. . . . . . . . . . . . . . . . . . . . . . . . . . . . . . . . . 56
. . . . . . . . . . . . . . . . . . . . . . . . . . . . . . . . . . 56
. . . . . . . . . . . . . . . . . . . . . . . . . . . . . . . . . . 57
. . . . . . . . . . . . . . . . . . . . . . . . . . . . . . . . . . . . . 57
. . . . . . . . . . . 57
. . . . . . . . . . . . . . . . . . . . . . . . . . . . . . . . 57
. . . . . . . . . . . . . . . . . . . . . . . . . . . . . . 59
索引 . . . . . . . . . . . . . . . . . . . . . . . . . . . . . . . . . . . . . . . . . 61
目錄 45
Page 46

46 目錄
Page 47

尋找相關資訊
註 : 一部份功能或媒體可能另選的和可能不會隨您的電腦一起提供。 一部份功能或媒體可能不會在特定
國家提供。
註 : 其他資訊可能會隨附於您的電腦。
您在尋找什麼? 在此查找
•
我的電腦的診斷程式
•
我的電腦的驅動程式
•
我的裝置說明文件
•
手提電腦系統軟體
•
如何卸下與更換部件
•
規格
•
如何組態系統設定
•
如何故障排除與解決問題
(NSS)
Drivers and Utilities CD ( 如 ResourceCD 一般 )
註 : 此 CD 可能另選的和可能不會隨您的電腦一起提供。
說明文件與驅動程式已安裝於您的電腦上。 您可以使用此
光碟來重新安裝驅動程式。
CD 中可能包含 Readme 檔
案,以便提供有關您電腦
的技術變更之最新更新,
或為技術人員或有經驗的
使用者提供進階技術參考
資料。
註 : 驅動程式和說明文件
更新可以在
support.dell.com 中找到。
Dell Latitude™ 使用者指南
1
單按 Start (開始
Dell User and System Guides
System Guides (系統指南)。
2
為您的電腦單按此
)→
Help and Support (說明與支援
(Dell
使用者與系統指南
User's Guides (
使用者指南)。
)
→
)→
•
保固資訊
•
條款與條件 (僅限美國
•
安全說明
•
管制資訊
•
人體工學資訊
•
一般使用者授權合約
Dell™ 產品資訊指南
)
快速參考指南 47
Page 48

您在尋找什麼? 在此查找
•
服務標籤與快速服務代碼
• Microsoft Windows
授權標籤
Service Tag and Microsoft® Windows® License
這些標簽位於
•
當您使用
務標籤以識別您的電腦。
•
當您聯絡技術支援部門
時,請輸入快速服務代
碼以指定電話。
•
解決方案注意事項— 和故障排除提示,從技術人員的
條文,和線上課程,常問問題。
•
與其他
•
升級
— Dell
— 元件 (
顧客進行線上社群討論
例如記憶體、硬碟機與作業系統) 的升
Dell 支援網站 — support.dell.com
註 : 選取您的地區以檢視適當的支援網站。
註 : 企業、政府和教育客戶也可以使用自訂的 Dell Premier
支援網站,網址為 premier.support.dell.com。
級資訊
•
客戶關懷中心
—
聯絡資訊、服務呼叫與訂購狀態、
保固和維修資訊
•
服務與支援
—
服務呼叫狀態與支援記錄、服務合約、
與技術支援人員的線上討論
•
參考
—
電腦說明文件、電腦組態的詳細資料、產品
規格和白皮書
•
下載
—
認可的驅動程式、修補程式和軟體更新
•
手提電腦系統軟體
裝作業系統,您應該也重新安裝
為您的作業系統提供重要的更新和支援
3.5-inch USB
裝置。
USB
軟體會自動偵測您的電腦和作業系統,並安裝適合於
您的組態的更新。
軟碟機,
NSS
(NSS) —
如果您為您的電腦重新安
NSS
Intel® 處理器,光碟機,和
是您的
Dell
電腦正確作業所必需的。
公用程式。
Dell™
NSS
下載筆記型電腦系統軟體 :
1
跳至 support.dell.com→
2
輸入您的服務標籤或產品型號。
3
在
Download Category (下載類別)下拉選單中,單按
全部)。
4
選取您的電腦所使用的作業系統以及作業系統語言,然
後單按
5
在
Select a Device (選取一個裝置之下),捲動至
and Configuration Utilities
單按
統軟體
電腦
的底部。
support.dell.com
或聯絡技術支援時,請使用服
Downloads (下載)。
Submit (提交)。
(
系統和組態公用程式), 和
Dell Notebook System Software (
)
。
Dell
筆記型電腦系
All (
System
48 快速參考指南
Page 49

您在尋找什麼? 在此查找
•
如何使用
如何使用程式和檔案
•
•
如何將我的桌上型電腦個人化
•
在網路活動的資訊,電源管理精靈,熱鍵,和
QuickSet
Windows XP
的其它控制項目
Windows 說明與支援中心
1
單按 Start (開始
2
鍵入可描述您的問題的字詞或片語,然後單按箭號圖
示。
3
單按可描述您問題的主題。
4
根據螢幕上的說明操作。
Dell
Dell QuickSet 說明
檢視 Dell QuickSet Help,
在 Microsoft
•
如何重新安裝我的作業系統
作業系統光碟
註 : Operating System ( 作業系統 ) 光碟可能另選的和可能
不會隨您的電腦一起提供。
作業系統已安裝於您的電腦中。 來重新安裝您的作業系
統,使用可選性質的 Operating System ( 作業系統 ) 光碟。
)→
Help and Support (說明與支援)。
®
Windows® 工作列。
單按滑鼠右鍵此 圖示
在您重新安裝作業系統之
後,請使用 Drivers and
Utilities CD (ResourceCD)
重新安裝電腦隨附之裝置
的驅動程式。
註 : CD 的顏色會因您訂購
的作業系統而有所不同。
快速參考指南 49
Page 50

安裝電腦
警示 : 在您開始本章節中的任何程序之前,請遵循產品資訊指南 中的安全說明。
1
打開附件箱。
2
將附件箱中的物品置於一旁,您在完成電腦的安裝時會需要這些物品。
(
附件箱也包含使用者說明文件,以及您訂購的任何軟體或其他硬體
磁碟機或電池
3
將交流電變壓器一端連接到電腦的交流電變壓器連接器,另一端連接至電源插座。
4
打開電腦顯示器和按下此電源按鈕來打開電腦 (參閱前視圖)。
註 : 請至少開啟並關閉電腦一次後,再將電腦接到連線裝置上。
)
。
例如
PC
卡、
50 快速參考指南
Page 51

關於您的電腦
前視圖
13
12
11
10
9
1
2
3
4
5
6
8
7
1
顯示幕閂鎖
2
螢幕
3
電源按鈕
4
裝置狀態指示燈
5
喇叭 (2)
6
鍵盤
7
觸控墊
8
觸碰按鈕墊 / 追蹤棒按鈕
9
音軌桿
10
鍵盤狀態指示燈
11
音量控制按鈕
12
靜音按鈕
13
環繞指示燈感應器
快速參考指南 51
Page 52

左側視圖
右側視圖
1 2 63 4 75 8 9
1
安全保護纜線插槽
2
通風口
3
1394 連接器
4
音效連接器
5
ExpressCard 插槽
1
媒體凹槽
6
紅外線感應器
7
無線切換
8
無線活動指示燈
9
PC 卡插槽
10
智慧卡插槽
1
2
USB 連接器 (2 個 )
10
2
52 快速參考指南
Page 53

後視圖
警示 : 請勿擋住排氣孔,將物件放入排氣孔,或讓灰塵堆積在通風口中。 在電腦執行時,請勿將其存放
在空氣流通不良的環境中,例如封閉的公事包內。 空氣流通不良可能會損壞電腦或造成火災。
1 2 63 4 75 8
底部視圖
1
網路連接器 (RJ-45)
2
USB 連接器
3
連接電源的 USB 連接器
4
數據機連接器 (RJ-11)
6
5
5
序列連接器
6
影像連接器
7
交流電變壓器連接器
8
通風口
1
2
1
電池凹槽釋放閂鎖
2
電池
3
記憶體模組蓋板
3
4
4
連線裝置連接器
5
風扇通風口
6
硬碟機
快速參考指南 53
Page 54

使用電池
電池效能
註 : 如需有關 Dell 對您的電腦的保固期的資訊,請參閱 Product Information Guide ( 產品資訊指南 ) 或電腦
隨附的單獨的書面保固文件。
為了獲得最佳的電腦效能並且有助於保留 BIOS 設定,請始終在安裝主電池時操作 Dell™ 便攜式電
腦。 在電池凹槽中會提供一個電池作為標準設備。
註 : 由於電池可能尚未完全充電,當您第一次使用電腦時,請使用交流電變壓器將新的電腦與電源插座
連接。 為求最理想的效果,請將交流電變壓器充電直到充滿來操作此電腦。檢視電池充電狀態,存取此
Control Panel ( 控制台 )→ Power Options ( 電源選項 ), 和單按此 Power Meter ( 電能計量器 ) 卡舌。
註 : 電池的使用時間 ( 電池的儲電時間 ) 會隨著時間而減少。 視電池使用的頻率以及使用的狀況,在電腦
的使用壽命期間,您可能需要購買新的電池。
電池的使用時間會因為操作的狀況而有所不同。 您可以安裝一個可選的備用電池在媒體凹槽來增加
操作時間。
當您執行包括但不限於下列操作時,電池的使用時間會明顯減少:
•
使用光碟機
•
使用無線通訊裝置,
•
使用高亮度的顯示設定、使用
•
在最大效能模式下執行電腦
註 : 在寫入 CD 或 DVD 時,建議您將電腦連接至電源。
在您插入電池至電腦前,您可以檢查此電池充電狀況 ( 參閱 第 54 頁的 「檢查電池電量」 )。 您也可
以設定電源管理選項,以便在電池電量不足時警告您。
警示 : 使用不相容的電池可能會增加引發火災或爆炸的風險。 您只可以更換自 Dell 購得的相容電池。 您
的 Dell 電腦是設計使用鋰電池的。請勿將來自其他電腦的電池用於本電腦。
警示 : 請勿將不用的電池與家庭廢棄物一起處理。 當您的電池已經無法繼續充電,請與當地的廢棄物處
理或環境機構聯絡,以瞭解有關處理鋰離子電池的相關建議。 請參閱 產品資訊指南 中的 「電池處理」。
警示 : 不正確地使用電池可能會增加引發火災或化學物質燃燒的風險。 請勿刺穿、燃燒、分解或是使電
池曝露於攝氏 65 度 ( 華氏 149 度 ) 的高溫。 請勿讓兒童接觸電池。 在處理已損壞或洩露的電池時必須特別
小心。 損壞的電池可能會洩漏,造成人員受傷或設備損壞。
PC
卡,
ExpressCards
3D
,媒體記憶體插卡,或
USB
裝置
螢幕保護程式或是其他耗電的程式,例如
3D
遊戲
檢查電池電量
Dell QuickSet 電池計量器,Microsoft Windows Power Meter ( 電能計量器 ) 視窗和 圖示,在電
池充電上提供此電池充電電量計量器,性能狀態計量器,和電池電能不足警告相關資訊。
54 快速參考指南
Page 55

Dell™ QuickSet 電池計量器
如果已安裝 Dell QuickSet,按下 <Fn><F3> 以顯示 QuickSet 電池計量器。 電池計量器顯示狀
態,顯示您的電腦中電池的電池健康度,充電層級,和充電完成時間。
有關 QuickSet 的詳細資訊,請在工作列的 圖示上單按滑鼠右鍵,然後單按 Help ( 說明 )。
Microsoft® Windows® Power Meter ( 電能計量器 )
Windows 電能計量器指示剩餘的電池電量。 若要檢查電能計量器,請連按兩下工作列上的 圖
示。
如果將電腦連接至電源插座,會出現一個 圖示。
充電電量計量器
您可以按下一次或 pressing and holding( 按住 ) 在電池充電電量計量器上的狀態按鈕來檢視 :
•
電池充電(按下和
•
電池健康度(按下且
releasing (釋放)狀態按鈕來檢查
holding (按住)狀態按鈕來檢查
)
)
電池的使用時間主要由其充電次數所決定。 在多次的充電和釋放輪換,電池將損失一部份的充電容
量 — 或電池健康度。一個電池可以顯示一個 「 充電」狀態,但保持一個減少中的充電容量
( 健康度 )。
檢查此電池充電
檢查此電池充電,按下和釋放在電池充電電量計量器上的狀態按鈕來顯示充電層級指示燈。每個指
示燈都代表大約總電池電量的百分之二十。 例如,如果電池還剩餘電量的百分之八十,則會有四個
指示燈亮起。 如果沒有指示燈出現,則表示電池已無電量。
檢查電池健康度
註 : 您可以使用兩個其中之一的方法來檢查電池健康度 : 使用 Dell QuickSet 的電池計量器和使用如下所描
述電池上的充電電量計量器。更多資訊關於 QuickSet,單按滑鼠右鍵 在工作列的圖示,和單按 Help (
說明 )。
使用充電電量計量器來檢查此電池健康度,按住在電池充電電量計量器上的狀態按鈕至少 3 秒鍾 。
如果沒有指示燈出現,則表示電池是處於良好的狀態,而且還剩餘百分之八十以上的原始電量。
每個指示燈都代表電量的遞減。 如果出現五個指示燈,則表示剩下不到百分之六十的電量,您應該
考慮更換電池。參閱規格相關資訊在您的 User's Guide ( 使用者指南 )。
電池電能不足警告
注意 : 若要避免資料遺失或損毀,請在收到電池電量不足警告之後立即儲存您的工作。然後將電腦與電
源插座連接。如果電池電力完全用完,電腦將會自動進入休眠模式。
當您的電池有將近百分之九十電量耗盡,依據已設定的預設值,將有一個跳出的視窗警告您。您可
以在 QuickSet 或 Power Options Properties ( 電源選項屬性 ) 視窗,來變更設定電池警報。
快速參考指南 55
Page 56

為電池充電
註 : Dell™ ExpressCharge™,當電腦是關掉的,此交流電變壓器 充一個為充電的電池至百分之八十需要一
小時而充電至百分之一百需要兩小時。開啟電腦時充電會需要較長的充電時間。 您可以不考慮時間長短
隨意將電池裝置在電腦裡。電池內部的電路會避免電池過度充電。
當您將電腦連接至電源插座或是在電腦連接至電源插座時安裝電池,電腦會檢查電池的電量與溫
度。 如有必要,交流電變壓器會為電池充電,並維持電池的電量。
如果電池因在電腦中使用而過熱或是處於過熱的環境中,當您將電腦連接至電源插座時,電池可能
無法進行充電。
如果 指示燈以綠色和橘色交替閃爍,則表示電池過熱而無法進行充電。 請斷開電腦與電源插座
的連接,並讓電腦和電池冷卻至室溫。 然後再將電腦連接至電源插座繼續為電池充電。
更換電池
警示 : 在執行這些程序之前,關閉電腦,從電源插座和電腦中斷交流電變壓器,從牆上連接器和電腦中
斷數據機,和從電腦卸下任何其它外接式纜線。
注意 : 您必須從電腦卸下全部外接式纜線以避免連接器損壞的可能性。
警示 : 使用不相容的電池可能會增加引發火災或爆炸的風險。 您只可以更換自 Dell 購得的相容電池。 此
電池是專為您的 Dell™ 電腦所設計的。請勿將來自其他電腦的電池用於本電腦。
卸下電池:
1
若電腦與連線裝置連接(已連接),請將其連線切斷。 請參閱連線裝置隨附的文件說明。
2
請確定電腦的電源已經關閉。
3
在電腦底部滑動電池凹槽釋放閂鎖直到閂鎖釋放。
4
使用電池上的卡舌,將電池由電腦中取出。
1
電池
56 快速參考指南
1
2
電池卡舌
2
3
3
電池凹槽釋放閂鎖
Page 57

裝回電池至電池支架和按下電池直到電池凹槽釋放閂鎖卡搭地響。
儲存電池
如果電腦需要長時間儲存,請將電池取出。 在長時間的儲存過程中,電池會放電。 在一個儲存周期
之後,在您使用之前請充分更換電池 ( 參閱 第 56 頁的 「為電池充電」 )。
故障排除
Dell Technical Update Service (Dell 技術更新服務 )
Dell Technical Update Service (Dell 技術更新服務 ) 提供對您的電腦軟體和硬體更新的預先電子郵件
通知。此服務是免費和可以設定內容,格式,和如何定期地讓您接收通知。
登記 Dell Technical Update service (Dell 技術更新服務 ),請至 support.dell.com/technicalupdate。
Dell 診斷程式
警示 : 在您開始本章節中的任何程序之前,請遵循 Product Information Guide ( 產品資訊指南 ) 中的安全說
明 )。
何時使用 Dell 診斷程式
如果您的電腦經歷一個問題,在您聯絡 Dell 的技術援助之前,執行此檢查在第 18 分頁上之第 59 頁
的「鎖定與軟體問題」且執行此 Dell 診斷程式。
建議您在開始前先列印這些程序。
注意 : Dell 診斷程式只適用於 Dell™ 電腦上。
註 : Drivers and Utilities CD 為可選性質,您的電腦可能未隨附此 CD。
從您的硬碟機或是從 Drivers and Utilities CD (也稱為 ResourceCD)上啟動 Dell 診斷程式 .
從您的硬碟機上啟動 Dell 診斷程式
Dell 診斷程式位於硬碟機中隱藏的診斷公用程式分割區中。
1
關閉電腦。
2
若電腦與連線裝置連接(已連接),請將其連線切斷。 請參閱連線裝置隨附的文件說明。
3
將電腦連接至電源插座。
4
Dell
•
註 : 如果等待過長時間而出現 Windows 作業系統徽標,請繼續等待直到看見 Microsoft® Windows®
•
註 : 如果您看到一個沒有找到診斷程式公用程式分割區的訊息,從可選的 Drivers and Utilities CD,執
診斷程式可以由這兩個方式其一開啟
開啟電腦。 當出現
<Enter>
桌面。 然後關閉電腦並再試一次。
。
當電腦電源開啟中按住
行 Dell 診斷程式。
Dell™
徽標時,立即按下
<Fn>
按鍵。
:
<F12>。
從啟動選單上選取診斷程式,然後單按
快速參考指南 57
Page 58

電腦會執行預啟動系統評估,它是一系列針對主機板、鍵盤、硬碟機和顯示器所進行的初始測
試。
•
在評估期間,請回答出現的任何問題。
•
如果偵測到故障,電腦會停止並發出嗶聲。 若要停止評估並重新啟動電腦,請按;若要繼續
下一項測試,請按
如果預啟動系統評估順利完成,您會收到下列訊息
•
Utility Partition. Press any key to continue.
式分割區。請按任何鍵繼續。〕
5
請按任何鍵以從硬碟機中的診斷公用程式分割區啟動
從 Drivers and Utilities CD 啟動 Dell 診斷程式
1
插入
Drivers and Utilities
2
關閉並重新啟動電腦。
當出現
DELL
徽標時,立即按下
<Esc><y>
CD 執行 Dell
<F12>
;若要重新測試失敗的元件,請按
Booting Dell Diagnostic
〔正在啟動
Dell
診斷程式。
診斷程式。
。
<r>。
Dell
診斷公用程
如果等待過長時間而
Windows
作業系統徽標出現,請繼續等待直到看見
Windows
閉電腦並再試一次。
註 : 以下步驟僅變更啟動順序一次。 在下一次啟動,電腦將依據裝置指定在系統設定程式來啟動。
3
當啟動裝置清單出現時,請反白顯示
4
從此選單出現,選取 Boot from CD-ROM
5
鍵入1來啟動 選單和按下
6
從編號清單中選取
Run the 32 Bit Dell Diagnostics (
<Enter>
CD/DVD/CD-RW 磁碟機,然後按
的選項和按下
<Enter>
。
來執行。
執行
32
位元
Dell
診斷程式)。 如果列出了多種
<Enter>
版本,請為您的電腦選取適當的版本。
7
當
Dell
診斷程式
Dell 診斷程式主選單
1
在載入
Dell
選項 功能
快速測試 執行裝置的快速測試。 此測試程式通常將花 10 至 20 分鐘,且過
延伸測試 執行徹底的裝置檢查。 此測試程式通常花 1 小時或更多也要求您
自訂測試 測試特定裝置。 您可以自訂想要執行的測試。
徵兆樹 列出最常遇到的徵兆,並且讓您根據目前所面臨問題的徵兆選取
Main Menu (主選單)出現,選取您想要執行測試程式。
診斷程式而且
程中將不要求您與電腦互動。請先執行 Express Test( 快速測試 )
以增加快速追蹤問題的可能性。
定期地回答一些問題。
測試。
Main Menu (主選單)螢幕出現之後,單按您想要的選項按鈕。
桌面。 然後關
。
58 快速參考指南
Page 59

2
如果在測試期間發生問題,會出現一個包含錯誤代碼與問題說明的訊息。 請記錄錯誤代碼與問題
說明,然後遵循螢幕的指示進行操作。
註 : 您電腦的服務標籤是位於每個測試螢幕的頂端。 如果您與 Dell 聯絡,技術支援人員會詢問您的
服務標籤。
如果您是從
3
Custom Test (自訂測試)或
Symptom Tree (徵兆樹)選項執行測試,單按下表中所描述
的適用標籤以獲得更多資訊。
標籤 功能
結果 顯示測試結果以及遇到的任何錯誤情況。
錯誤 顯示遇到的錯誤情況、錯誤代碼和問題說明。
說明 說明測試並且可能會指出執行測試的要求。
組態 顯示選定裝置的硬體組態。
Dell 診斷程式自系統設定、記憶體和各種內部測試獲取所有裝置
的組態資訊,並將資訊顯示在螢幕左窗格的裝置清單中。 裝置清
單並不一定會顯示安裝在您電腦中的所有元件名稱,或是與電腦
連接的所有裝置的名稱。
參數 允許您通過變更測試設定來自訂測試。
4
當測試完成時,如果您是從
當測試完成後,請關閉
動電腦,請關閉
Main Menu (主選單)螢幕。
測試螢幕以回到
Drivers and Utilities
CD 執行 Dell
Main Menu (主選單)螢幕。 若要結束
診斷程式, 請取出光碟。
Dell
診斷程式並重新啟
鎖定與軟體問題
警示 : 在您開始本章節中的任何程序之前,請遵循 Product Information Guide ( 產品資訊指南 ) 中的安全說
明。
電腦無法啟動
請確定交流電變壓器已牢固地連接至電腦以及電源插座。
電腦停止回應
注意 : 如果您無法執行作業系統關閉操作,可能會遺失資料。
關閉電腦 — 如果您無法通過按下鍵盤上的鍵或移動滑鼠獲得回應,請按住電源按鈕至少八到十秒鐘的時
間,直到電腦關閉為止。 然後重新啟動您的電腦。
快速參考指南 59
Page 60

一個程式停止回應或再三當機
註 : 軟體通常會在其說明文件或在其軟碟或 CD 中包括安裝說明。
結束程式 —
1
同時按下
2
單按
3
單按
4
單按不再回應的程式。
5
單按
檢查軟體說明文件 — 如有必要,請解除安裝然後重新安裝程式。
設計用於較早 Microsoft® Windows® 作業系統的程式
請執行程式相容性精靈 — 程式相容性精靈會組態程式,使其在類似非 Windows XP 作業系統的環境中執
行。
單按
1
Compatibility Wizard
2
根據螢幕上的說明操作。
出現全藍色的螢幕
關閉電腦 — 如果您無法通過按下鍵盤上的鍵或移動滑鼠獲得回應,請按住電源按鈕至少八到十秒鐘的時
間,直到電腦關閉為止。 然後重新啟動您的電腦。
<Ctrl><Shift><Esc>
Task Manager (
Application(
End Task(
工作管理員)。
應用程式)。
結束工作)。
。
Start (開始)→ All Programs (全部程式)→
(
程式相容精靈
)→ Next (
Accessories (附屬應用程式)→
下一步)。
Program
其他軟體問題
檢查軟體說明文件或連絡軟體製造商以獲得疑難排解資訊 —
•
請確定程式與電腦上安裝的作業系統相容。
•
請確定您的電腦符合執行軟體所需的最低硬體需求。 有關資訊,請參閱相關軟體文件。
•
請確定程式已經安裝並且正確組態。
•
確認裝置驅動程式不會與程式發生衝突。
•
如有必要,請解除安裝然後重新安裝程式。
請立刻備份您的檔案
使用病毒掃描程式來檢查硬碟、軟碟或 CD
儲存並關閉任何開啟的檔案或程式,並使用開始選單關閉電腦
掃描電腦以查找間諜軟體 — 如果您遇到電腦效能緩慢的問題,電腦經常出現蹦現廣告或者是在連接至
Internet 時遇到問題,則表明您的電腦可能已受到間諜軟體的感染。 請使用包括有反間諜軟體保護功能的防毒
程式 ( 您的程式可能需要升級 ) 以掃描電腦並取出間諜軟體。 如需更多資訊,請至 support.dell.com 並搜尋關
鍵字 spyware。
ELL 診斷程式 — 請參閱。第 57 頁的 「Dell 診斷程式」 如果所有測試都能夠順利執行,則表明錯誤
執行 D
情況與軟體問題有關。
60 快速參考指南
Page 61

索引
B
battery( 電池 )
charge gauge( 充電標準 ), 55
removing( 移動 ), 56
C
CDs
作業系統 ,49
D
Dell
支援站台 ,48
Dell Premier 支援網站 ,47
Dell 診斷程式 ,57
M
Microsoft Windows 標簽 ,48
Q
QuickSet Help, 49
R
ResourceCD
Dell 診斷程式 ,57
S
Service Tag( 服務標籤 ), 48
W
Windows XP
重新安裝 ,49
說明與支援中心 ,49
二劃
人體工學 資訊 ,47
四劃
支援網站 ,48
六劃
安全說明 ,47
七劃
作業系統
光碟 ,49
重新安裝 ,49
作業系統 光碟 ,49
序列連接器
系統視圖 ,53
說明 ,53
系統視圖
右側 ,52
左側 ,52
底部 ,53
前 ,51
後面 ,53
八劃
使用者指南 ,47
九劃
保固資訊 ,47
故障排除
Dell 診斷程式 ,57
說明與支援中心 ,49
十一劃
問題
Dell 診斷程式 ,57
軟體 , 59-60
程式停止回應 ,60
程式損壞 ,60
電腦停止回應 ,59
電腦無法啟動 ,59
電腦當機 , 59-60
藍色螢幕 ,60
鎖定 ,59
程式和 Windows 相容性 ,60
索引 61
Page 62

軟體 ,60
Windows XP:程式相容
性精靈 ,60
精靈
程式相容性 ,60
軟體:問題 ,60
從 Drivers and Utilities CD 上
啟動 Dell 診斷程式 ,58
從您的硬碟機上啟動 Dell 診
斷程式 ,57
產品資訊指南 ,47
終端用戶軟體授權協議書 ,47
軟體
問題 ,60
十二劃
硬體
Dell 診斷程式 ,57
診斷程式
Dell, 57
電腦
停止回應 ,59
當機 , 59-60
十四劃
管制資訊 ,47
說明文件
人體工學 ,47
安全 ,47
使用者指南 ,47
保固 ,47
產品資訊指南 ,47
終端用戶軟體授權協議書 ,
47
管制 ,47
線上 ,48
說明與支援中心 ,49
說明檔
Windows 說明與支援中心 ,
49
間諜軟體 ,60
效能低 ,60
電腦執行效能低 , 60
間諜軟體 ,60
十三劃
電池
充電 ,56
效能 ,54
電能計量器 ,55
檢查電量 ,54
電池
儲放 ,57
62 索引
十五劃
標簽
Microsoft Windows, 48
服務標籤 ,48
Page 63

Dell™ Latitude™ D820
クイックリファレンス
ガイド
モデル PP04X
www.dell.com | support.dell.com
Page 64

メモ、注意、警告
メモ : コンピュータを使いやすくするための重要な情報を説明しています。
注意 : ハードウェアの損傷やデータの損失の可能性を示し、その危険を回避するための方法を説明しています。
警告 : 物的損害、けが、または死亡の原因となる可能性があることを示します。
Dell™ n
シリーズコンピュータをご購入いただいた場合は、このマニュアルの
Microsoft® Windows®
ティングシステムについての説明は適用されません。
____________________
この文書の情報は事前の通知なく変更されることがあります。
©2005すべての著作権は Dell Inc. にあります。
Dell Inc. の書面による許可のない複写は、いかなる形態においても厳重に禁じられています。
本書に使用されている商標:
標です。Microsoft、 Outlook、および Windows は Microsoft Corporation の登録商標です。
本書では、上記記載以外の商標や会社名が使用されている場合があります。これらの商標や会社名は、一切
せん。
モデル PP04X
Dell、DELL のロゴ、Latitude、および ExpressCharge は Dell Inc. の商標です。Intel は Intel Corporation の登録商
オペレー
Dell Inc. に帰属するものではありま
2005 年 12 月 P/N MD991 Rev. A00
Page 65

目次
情報の検索方法 . . . . . . . . . . . . . . . . . . . . . . . . . . . . . . . . . . 67
コンピュータのセットアップ . . . . . . . . . . . . . . . . . . . . . . . . . . 69
お使いのコンピュータについて . . . . . . . . . . . . . . . . . . . . . . . . . 70
正面図 . . . . . . . . . . . . . . . . . . . . . . . . . . . . . . . . . . . . 70
左側面図. . . . . . . . . . . . . . . . . . . . . . . . . . . . . . . . . . . 71
右側面図. . . . . . . . . . . . . . . . . . . . . . . . . . . . . . . . . . . 71
背面図 . . . . . . . . . . . . . . . . . . . . . . . . . . . . . . . . . . . . 72
底面図 . . . . . . . . . . . . . . . . . . . . . . . . . . . . . . . . . . . . 72
バッテリーの使い方 . . . . . . . . . . . . . . . . . . . . . . . . . . . . . . . 73
バッテリーの性能 . . . . . . . . . . . . . . . . . . . . . . . . . . . . . . 73
バッテリーの充電チェック . . . . . . . . . . . . . . . . . . . . . . . . . 73
バッテリーの充電 . . . . . . . . . . . . . . . . . . . . . . . . . . . . . . 75
バッテリーの交換 . . . . . . . . . . . . . . . . . . . . . . . . . . . . . . 75
バッテリーの保管 . . . . . . . . . . . . . . . . . . . . . . . . . . . . . . 76
トラブルシューティング . . . . . . . . . . . . . . . . . . . . . . . . . . . . . 76
Dell
テクニカル Update Service . . . . . . . . . . . . . . . . . . . . . . 76
Dell Diagnostics
フリーズおよびソフトウェアの問題 . . . . . . . . . . . . . . . . . . . . 79
(診断)プログラム. . . . . . . . . . . . . . . . . . . . 77
索引 . . . . . . . . . . . . . . . . . . . . . . . . . . . . . . . . . . . . . . . . . 81
目次 65
Page 66

66 目次
Page 67

情報の検索方法
メモ : 一部の機能やメディアはオプションなので、出荷時にコンピュータに搭載されていない場合があります。 特
定の国では使用できない機能やメディアもあります。
メモ : 追加の情報がコンピュータに同梱されている場合があります。
何をお探しですか? こちらをご覧ください
•
コンピュータの診断プログラム
•
コンピュータのドライバ
•
デバイスのマニュアル
•
ノートブックシステムソフトウェア(
•
部品の取り外しおよび交換方法
•
仕様
•
システムの設定方法
•
トラブルシューティングおよび問題解決の方法
NSS
)
Drivers and Utilities CD(ResourceCD とも呼ばれます)
: 『Drivers and Utilities CD』はオプションなので、出荷
メモ
時にすべてのコンピュータに付属しているわけではありません。
マニュアルおよびドライバは、本コンピュータにすでにインス
トールされています。
ルできます。
CD を使用してドライバを再インストー
CD に収録されている
Readme
コンピュータの技術的変更
に関する最新のアップデー
トや、技術者または専門知
識をお持ちのユーザーを対
象とした高度な技術資料を
参照できます。
ファイルでは、
メモ : ドライバおよびマニュアルのアップデート版は、
support.jp.dell.com で入手できます。
Dell Latitude™ ユーザーズガイド
1
スタート
ステムガイド
2
お使いのコンピュータの 『
ます。
→
ヘルプとサポート
→
システムガイド をクリックします。
→
ユーザーズガイドおよびシ
ユーザーズガイド
』 をクリックし
•
安全にお使いいただくための注意
•
認可機関の情報
•
作業姿勢に関する情報
•
エンドユーザーライセンス契約
Dell™ 製品情報ガイド
クイックリファレンスガイド 67
Page 68

何をお探しですか? こちらをご覧ください
•
サービスタグとエクスプレスサービスコード
• Microsoft Windows
•
技術情報 —トラブル解決ナビ、
•
サービスと保証
する情報
•
サービスおよびサポート
•
参照資料
設定の詳細、製品の仕様、およびホワイトペーパー
•
ダウンロード
フトウェアのアップデート
•
ノートブック システムソフトウェア(
ティングシステムをコンピュータに再インストールする場
合は、
ります。
めの重要な更新を提供し、
ピードライブ、
ブ、および
Dell
フトウェアはお使いのコンピュータおよびオペレーティン
グシステムを自動的に検知して、設定に適した更新をイン
ストールします。
—
コンピュータのマニュアル、コンピュータの
—
NSS
ユーティリティも再インストールする必要があ
NSS
は、お使いのオペレーティングシステムのた
USB
コンピュータを正しく動作させるために必要です。 ソ
• Windows XP
•
プログラムとファイルの操作方法
•
デスクトップのカスタマイズ方法
•
ネットワークアクティビティ、電力の管理ウィザード、
ホットキー、および
のアイテムに関する詳細情報
ライセンスラベル
Q&A
—
問い合わせ先、保証、および修理に関
—
サービス契約
認定されたドライバ、パッチ、およびソ
Dell™ 3.5
Intel®
プロセッサ、オプティカルドライ
デバイスをサポートします。
の基本情報
Dell QuickSet
NSS)—
インチ
で制御されるその他
オペレー
USB
NSS
フロッ
は、
サービスタグおよび Microsoft
ラベルはお使いのコンピュータ
•
サービスタグは、
たはテクニカルサポートへのお問い合わせの際に、コン
ピュータの識別に使用します。
•
エクスプレスサービスコー
ドを利用すると、テクニカ
ルサポートに直接電話で問
い合わせることができます。
デルサポートサイト — support.jp.dell.com
メモ : 企業、自治体、および教育機関のお客様向けにカスタマ
イズされた、デルプレミアサポートウェブサイト
premier.dell.co.jp/premier/) もご利用いただけます。
(
デスクトップシステムソフトウェアは、
support.jp.dell.com にてダウンロードできます。
Windows ヘルプとサポートセンター
1
スタート
2
問題に関連する用語や文節をボックスに入力して、矢印アイ
コンをクリックします。
3
問題に関連するトピックをクリックします。
4
画面の指示に従います。
→
ヘルプとサポート をクリックします。
Dell QuickSet ヘルプ
Dell QuickSet
Windows
ヘルプを表示するには、
®
のタスクバーにある
クします。
®
Windows® ライセンス
の底面
に貼られています。
support.jp.dell.com
アイコンを右クリッ
をご参照の際、ま
Microsoft®
68 クイックリファレンスガイド
Page 69

何をお探しですか? こちらをご覧ください
•
オペレーティングシステムの再インストール方法
オペレーティングシステム CD
メモ : 『オペレーティングシステム CD』はオプションなので、
出荷時にお使いのコンピュータに必ずしも付属しているわけで
はありません。
オペレーティングシステムは、本コンピュータにすでにインス
トールされています。
トールするには、オプションの『オペレーティングシステム
』を使用します。
CD
オペレーティングシステムを再インス
オペレーティングシステムを
再インストールしたら、
Drivers and Utilities CD』
『
(『
Resource CD』) を使用し
て、コンピュータに付属して
いるデバイス用のドライバを
再インストールします。
メモ : 注文されたオペレー
ティングシステムによって、
CD の色が違います。
コンピュータのセットアップ
警告 : 本項の手順を開始する前に、『製品情報ガイド』の安全手順に従ってください。
1
アクセサリボックスの梱包を開きます。
2
アクセサリボックスの中から、コンピュータのセットアップを完了するのに必要となるものを別に取って
おきます。
アクセサリボックスには、この他にユーザーマニュアルが入っています。また、ご注文された場合には、
ソフトウェアやオプションのハードウェア(
3
AC
アダプタをコンピュータの
AC
アダプタコネクタに接続し、電源コンセントに差し込みます。
PC
カード、ドライブ、バッテリーなど)が入っています。
4
コンピュータのディスプレイを開いて電源ボタンを押し、コンピュータの電源を入れます(正面図を参照)。
クイックリファレンスガイド 69
Page 70

メモ : ドッキングデバイスにコンピュータを接続する前に、最低 1 回はコンピュータの電源を入れて、シャットダ
ウンする操作を行ってください。
お使いのコンピュータについて
正面図
1
2
3
13
12
11
10
4
5
9
8
1
ディスプレイラッチ
2
ディスプレイ
3
電源ボタン
4
デバイスステータスライト
5
スピーカー(2)
6
キーボード
7
タッチパッド
70 クイックリファレンスガイド
7
8
タッチパッドボタン / トラックスティックボタン
9
トラックスティック
10
キーボードステータスライト
11
ボリュームコントロールボタン
12
ミュートボタン
13
環境照明センサー
6
Page 71

左側面図
右側面図
1 2 63 4 75 8 9
1
セキュリティケーブルスロット
2
通気孔
3
IEEE 1394
4
オーディオコネクタ
5
ExpressCard
コネクタ
スロット
6
赤外線センサー
7
ワイヤレススイッチ
8
ワイヤレスアクティビティライト
9
PC
10
スマートカードスロット
1
1
メディアベイ
2
USB
10
カードスロット
2
コネクタ(2)
クイックリファレンスガイド 71
Page 72

背面図
警告 : 通気孔を塞いだり、物を押し込んだり、埃や異物が入ったりすることがないようにしてください。 コン
ピュータの稼動中は、ブリーフケースの中など空気の流れの悪い環境にコンピュータを置かないでください。
の流れを妨げると、火災の原因になったり、コンピュータに損傷を与えたりする恐れがあります。
1 2 63 4 75 8
空気
底面図
1
ネットワークコネクタ(RJ-45)
2
3
4
コネクタ
USB
パワード USB コネクタ
モデムコネクタ(RJ-11)
6
5
5
シリアルコネクタ
6
ビデオコネクタ
7
アダプタコネクタ
AC
8
通気孔
1
2
1
バッテリーベイリリースラッチ
2
バッテリー
3
メモリモジュールカバー
72 クイックリファレンスガイド
3
4
4
ドッキングデバイスコネクタ
5
ファン通気孔
6
ハードドライブ
Page 73

バッテリーの使い方
バッテリーの性能
メモ : デルの保証情報に関しては、『サービス & サポートのご案内』を参照してください。
コンピュータの性能を最大に保ち
インバッテリーを搭載した状態でお使いください。
います。
メモ : バッテリーはフル充電されていない場合がありますので、コンピュータを初めて使用するときは、AC アダ
プタを使って新しいコンピュータをコンセントに接続してください。
電されるまで、
コントロールパネル →
メモ : バッテリー駆動時間(バッテリーが電力を蓄える能力のある期間)は、時間の経過に従って短くなります。
バッテリーの使用頻度および使用状況によって駆動時間が変わるので、コンピュータの寿命がある間でも新しく
バッテリーを購入する必要がある場合もあります。
バッテリーの動作時間は、使用状況によって異なります。 オプションのセカンドバッテリーをメディアベイに
取り付けると、動作時間を大幅に長くすることができます。
次のような場合、バッテリーの持続時間は著しく短くなりますが、これらの場合に限定されません。
•
オプティカルドライブを使用している場合
•
ワイヤレス通信デバイス、
使用している場合
•
ディスプレイの輝度を高く設定したり、
に使用するプログラムを使用したりしている場合
•
コンピュータを最大性能の状態で実行している場合
メモ : CD または DVD に書き込みをする際は、コンピュータをコンセントに接続することをお勧めします。
コンピュータにバッテリーを挿入する前に、バッテリーの充電チェックができます(73ページの「バッテリー
の充電チェック」
設定することもできます。
警告 : 適切でないバッテリーを使用すると、火災または爆発を引き起こす可能性があります。 交換するバッテリー
は、必ずデルが販売している専用のものをお使いください。
ピュータで動作するように設計されています。
いでください。
警告 : バッテリーを家庭用のごみと一緒に捨てないでください。 不要になったバッテリーは、貴重な資源を守るた
めに廃棄しないで、デル担当窓口:デル
556-3481
警告 : バッテリーの取り扱いを誤ると、火災や化学燃焼を引き起こす可能性があります。 バッテリーに穴をあけた
り、燃やしたり、分解したり、または温度が
様の手の届かないところに保管してください。
は、特に気を付けてください。
傷したりする恐れがあります。
AC アダプタを使ってコンピュータを動作させます。 バッテリー充電ステータスを表示するには、
を参照)。バッテリーの充電量が少なくなると警告を発するように、電源管理のオプションを
)へお問い合わせください。『製品情報ガイド』にある「バッテリーの廃棄」を参照してください。
BIOS
の設定を保持するため、
バッテリーベイにはバッテリーが
電源オプション にアクセスし、電源メーター タブをクリックします。
PC
カード、
バッテリーが損傷していると、セルから電解液が漏れ出し、けがをしたり装置を損
ExpressCard
3D
スクリーンセーバー、または
お使いのコンピュータに別のコンピュータのバッテリーを使用しな
PC リサイクルデスク(個人のお客様:044-556-4298、企業のお客様:044-
65 ℃ を超える場所に置いたりしないでください。 バッテリーはお子
損傷のあるバッテリー、または漏れているバッテリーの取り扱いに
Dell™
ノートブックコンピュータは、常にメ
1
つ、標準で搭載されて
最良の結果を得るには、バッテリーがフル充
、メディアメモリカード、または
3D
ゲームなどの電力を集中的
リチウムイオンバッテリーは、お使いの Dell コン
USB
デバイスを
バッテリーの充電チェック
Dell QuickSet
リー充電ゲージと機能ゲージ、およびバッテリーの低下を知らせる警告は、バッテリーの情報を提供します。
バッテリメーター、
Microsoft Windows
電源メーター ウィンドウと
クイックリファレンスガイド 73
アイコン、バッテ
Page 74

Dell™ QuickSet バッテリメーター
Dell QuickSet
ます。
バッテリメーターには、お使いのコンピュータのバッテリーの状況、性能、充電レベル、および充電完
了時間が表示されます。
QuickSet
がインストールされている場合は、
の詳細に関しては、タスクバーにある
<Fn><F3>
アイコンを右クリックして、
を押して
QuickSet
バッテリメーターを表示し
ヘルプ をクリックします。
Microsoft® Windows® 電源メーター
Windows
の
コンピュータがコンセントに接続されている場合、 アイコンが表示されます。
充電ゲージ
バッテリーの充電ゲージのステータスボタンを
•
•
バッテリーの動作時間は、充電される回数によって大きく左右されます。
テリーの充電機能またはバッテリー性能は次第に低下します。つまり、バッテリーに「充電済み」のステータ
スが表示されても、充電容量(性能)は低下したままの場合があります。
バッテリーの充電チェック
バッテリーの充電をチェックするには、バッテリー充電ゲージにあるステータスボタンを短く押して、充電レ
ベルライトを点灯させます。
リーの充電残量が
電残量が残っていないことになります。
バッテリー性能のチェック
充電ゲージを使用してバッテリー機能を確認するには、バッテリー充電ゲージのステータスボタンを
押し続けます
持しています。
60 %
参照してください。
の電源メーターは、バッテリーの充電残量を示します。 電源メーターを確認するには、タスクバー
アイコンをダブルクリックします。
バッテリーの充電量(ステータスボタンを短く押して確認します)
バッテリー性能(ステータスボタンを押し続けて確認します)
1
回押すか押し続けると、次の項目をチェックできます。
充放電を何百回も繰り返すと、バッ
各々のライトはバッテリーの総充電量の約
80 %なら 4
メモ : バッテリー性能は、 以下に記載するバッテリーの充電ゲージを使用するか、Dell QuickSet のバッテリメー
ターを使用してチェックすることができます。
クリックして、ヘルプ
。 どのライトも点灯しない場合、バッテリーの機能は良好で、初期の充電容量の
各ライトは機能低下の割合を示します。 ライトが
以下になっていますので、バッテリーを交換することをお勧めします。 『ユーザーズガイド』の仕様を
つのライトが点灯します。 どのライトも点灯していない場合、バッテリーの充
QuickSet の詳細に関しては、タスクバーにある アイコンを右
をクリックします。
20 %
を表します。 たとえば、バッテ
3
80 %
以上を維
5
つ点灯した場合、バッテリーの充電容量は
秒以上
74 クイックリファレンスガイド
Page 75

バッテリーの低下を知らせる警告
注意 : データの損失またはデータの破損を防ぐため、バッテリーの低下を知らせる警告音が鳴ったら、すぐに作業
中のファイルを保存してください。
になくなると、自動的に休止状態
デフォルトでは、ポップアップウィンドウの警告は、バッテリーの全充電量の約
られます。
きます。
バッテリーアラームの設定は、
次に、コンピュータをコンセントに接続します。 バッテリーの充電残量が完全
モードに入ります。
90 %
を消費した時点で発せ
QuickSet
または 電源オプションのプロパティ ウィンドウで変更で
バッテリーの充電
メモ : Dell™ ExpressCharge™ を使用して、完全に切れてしまったバッテリーを充電するには、コンピュータの電
源が切れている場合で
入っている場合は、充電時間は長くなります。
も問題ありません。
80 % の充電に約 1 時間、100 % の充電に約 2 時間かかります。 コンピュータの電源が
バッテリーを充電したまま、コンピュータをそのままにしておいて
バッテリーの内部回路によって過剰充電が防止されます。
コンピュータをコンセントに接続したり、コンセントに接続されているコンピュータにバッテリーを取り付け
たりすると、コンピュータはバッテリーの充電状態と温度をチェックします。
その後、
AC
アダプタは必要に
応じてバッテリーを充電し、その充電量を保持します。
バッテリーがコンピュータの使用中に高温になったり高温の環境に置かれたりすると、コンピュータをコンセン
トに接続してもバッテリーが充電されない場合があります。
のライトが緑色と橙色を交互に繰り返して点滅する場合、バッテリーが高温すぎて充電が開始できない状
態です。
コンピュータをコンセントから抜き、コンピュータとバッテリーを室温に戻します。 次に、コン
ピュータをコンセントに接続し、充電を継続します。
バッテリーの交換
警告 : この手順を開始する前に、コンピュータの電源を切り、AC アダプタを電源コンセントおよびコンピュータ
から取り外して、モデムを壁のコネクタおよびコンピュータから取り外し、コンピュータからその他のすべての外
付けケーブルを外します。
注意 : 起こり得るコネクタの損傷を防ぐため、すべての外付けケーブルをコンピュータから取り外してください。
警告 : 適切でないバッテリーを使用すると、火災または爆発を引き起こす可能性があります。 交換するバッテリー
は、必ずデルが販売している専用のものをお使いください。
るように設計されています。
お使いのコンピュータに別のコンピュータのバッテリーを使用しないでください。
バッテリーを取り外すには次の手順を実行します。
1
コンピュータがドッキングデバイスに接続されている場合、ドッキングを解除します。 ドッキングデバイ
スの手順については、付属のマニュアルを参照してください。
2
コンピュータの電源が切れていることを確認します。
3
コンピュータ底部のバッテリーベイリリースラッチのロックを、カチッという感触が得られるまでスライ
ドさせます。
4
バッテリーのタブを使って、コンピュータからバッテリーを持ち上げます。
バッテリーは、お使いの Dell ™ コンピュータで動作す
クイックリファレンスガイド 75
Page 76

1
2
3
1
バッテリー
交換用のバッテリーを取り付ける場合は、バッテリーをベイに置き、バッテリーベイリリースラッチ部でカ
チッという感触が得られるまでバッテリーを押し下げます。
2
バッテリータブ
3
バッテリーベイリリースラッチ
バッテリーの保管
長期間コンピュータを保管する場合は、バッテリーを取り外してください。 バッテリーは、長期間保管してい
ると放電してしまいます。
らお使いください(
長期保管後にコンピュータをお使いになる際は、完全にバッテリーを再充電してか
75
ページの「バッテリーの充電」を参照)。
トラブルシューティング
Dell テクニカル Update Service
Dell
テクニカル
トについて、
よび通知を受け取る頻度をカスタマイズすることができます。
Dell
テクニカル
クセスしてください。
Update Service
E-
メールで事前に通知します。 このサービスは無償で提供され、コンテンツ、フォーマット、お
Update Service
は、お使いのコンピュータのソフトウェアおよびハードウェアのアップデー
に登録するには、
support.dell.com/technicalupdate
(英語)にア
76 クイックリファレンスガイド
Page 77

Dell Diagnostics(診断)プログラム
警告 : 本項の手順を開始する前に、『製品情報ガイド』の安全手順に従ってください。
Dell Diagnostics(診断)プログラムを使用する場合
コンピュータに問題が発生した場合、デルテクニカルサポートに問い合わせる前に、79ページの「フリーズ
およびソフトウェアの問題」にあるチェック事項を実行してから、
行してください。
作業を始める前に、これらの手順を印刷しておくことをお勧めします。
注意 : Dell Diagnostics(診断)プログラムは、Dell™ コンピュータ上でのみ機能します。
メモ : 『Drivers and Utilities CD』はオプションなので、出荷時にすべてのコンピュータに付属しているわけでは
ありません。
Dell Diagnostics
とも呼ばれます)から起動します。
(診断)プログラムをハードドライブまたは『
Dell Diagnostics
Drivers and Utilities CD
Dell Diagnostics(診断)プログラムをハードドライブから起動する場合
Dell Diagnostics
されています。
1
コンピュータをシャットダウンします。
2
コンピュータがドッキングデバイスに接続されている場合、ドッキングを解除します。 ドッキングデバイ
スの手順については、付属のマニュアルを参照してください。
3
コンピュータをコンセントに接続します。
4
Dell Diagnostics
•
コンピュータの電源を入れます。
ニューから
メモ : ここで時間をおきすぎてオペレーティングシステムのロゴが表示された場合、Microsoft® Windows®
•
コンピュータが起動する間、
メモ : 診断ユーティリィティパーティションが見つからないことを知らせるメッセージが表示された場合は、
起動前システムアセスメントが実行され、システム基板、キーボード、ハードドライブ、ディスプレイの
初期テストが続けて実行されます。
•
このシステムの評価中に、表示される質問に答えます。
•
問題が検出された場合は、コンピュータはビープ音を出して停止します。 システムの評価を止めてオ
ペレーティングシステムを再起動するには、
します。障害のあるコンポーネントを再テストするには、
起動前システムアセスメントが無事に終了した場合、
•
Partition. Press any key to continue.
パーティションの起動中。続けるには任意のキーを押します。)というメッセージが表示されます。
5
任意のキーを押すと、ハードドライブ上の診断プログラムユーティリィティパーティションから
Diagnostics
(診断)プログラムは、ハードドライブの診断ユーティリティ用隠しパーティションに格納
(診断)プログラムは、以下のいずれかの方法で起動できます。
DELL™
Diagnostics
デスクトップが表示されるまで待ちます。 次に、コンピュータをシャットダウンして、もう一度やりなおし
ます。
(診断)を選択し、
<Fn>
オプションの『
Drivers and Utilities CD』から Dell Diagnostics(診断)プログラムを実行してください。
(診断)プログラムが起動します。
のロゴが表示されたらすぐに
<Enter>
キーを押し続けます。
<Esc>
を押します。次のテストを続けるには
Booting Dell Diagnostic Utility
(
Dell Diagnostics
を押します。
<r>
を押します。
(診断)プログラムを実
』(『
ResourceCD
<F12>
を押します。 起動メ
<y>
(診断)ユーティリティ
Dell
を押
』
クイックリファレンスガイド 77
Page 78

Dell Diagnostics(診断)プログラムを 『Drivers and Utilities CD』から起動する場合
1
『
Drivers and Utilities CD
2
コンピュータをシャットダウンして、再起動します。
DELL
のロゴが表示されたらすぐに
ここで時間をおきすぎて
まで待ちます。
メモ : 次の手順は、起動順序を一回だけ変更します。 次回の起動時には、コンピュータはセットアップユー
ティリティで指定したデバイスに従って起動します。
3
起動デバイス一覧が表示されたら、
します。
4
表示されたメニューから
5 1
を入力して、 メニューを開始し、
6
番号の付いた一覧から
にある場合は、コンピュータに適切なバージョンを選択します。
7
Diagnostics
次に、コンピュータをシャットダウンして、もう一度やりなおします。
(診断)プログラム
』を挿入します。
<F12>
Windows
CD/DVD/CD-RW
Boot from CD-ROM
<Enter>
Run the 32 Bit Dell Diagnostics
Main Menu
を押します。
のロゴが表示された場合、
ドライブ をハイライト表示して、
オプションを選択し、
を押して続行します。
が表示されたら、実行するテストの種類を選択します。
Windows
のデスクトップが表示される
<Enter>
を選択します。 複数のバージョンがリスト
Dell Diagnostics(診断)プログラムのメインメニュー
1
Dell Diagnostics
要なオプションのボタンをクリックします。
オプション 機能
Express Test
Extended Test
Custom Test
Symptom Tree
(診断)プログラムのロードが終了すると、
デバイスのクイックテストを実行します。 通常このテストは 10 ~ 20 分かかり、お客
様の操作は必要ありません。
きる可能性が増します。
デバイスの全体チェックを実行します。 通常このテストは 1 時間以上かかり、質問に定
期的に応答する必要があります。
特定のデバイスをテストします。 実行するテストをカスタマイズできます。
検出した最も一般的な症状を一覧表示し、問題の症状に基づいたテストを選択すること
ができます。
最初に Express Test を実行すると、問題を素早く特定で
Main Menu
<Enter>
を押します。
画面が表示されるので、必
を押
2
テスト実行中に問題が検出されると、エラーコードと問題の説明を示したメッセージが表示されます。 エ
ラーコードと問題の説明を記録し、画面の指示に従います。
メモ : 各テスト画面の上部には、コンピュータのサービスタグが表示されます。 デルにお問い合わせになっ
た際に、テクニカルサポート担当者がサービスタグをお伺いいたします。
78 クイックリファレンスガイド
Page 79

3
Custom Test
または
Symptom Tree
オプションからテストを実行する場合、該当するタブをクリッ
クします(詳細については、以下の表を参照)。
タブ 機能
Results
Errors
Help
Configuration
Parameters
4
テストが完了し、
CD
合、
を取り出します。
テストが完了したら、
ラムを終了しコンピュータを再起動するには、
テストの結果、および発生したすべてのエラーの状態を表示します。
検出されたエラー状態、エラーコード、問題の説明が表示されます。
テストについて説明します。また、テストを実行するための要件を示す場合もあります。
選択したデバイスのハードウェア構成を表示します。
Dell Diagnostics(診断)プログラムは、セットアップユーティリティ、メモリ、およ
び様々な内部テストからすべてのデバイスの設定情報を入手し、画面の左側ペインのデ
バイス一覧に表示します。
コンポーネント名、またはコンピュータに接続されたすべてのデバイス名が表示される
とは限りません。
テストの設定を変更して、テストをカスタマイズすることができます。
Dell Diagnostics
テスト画面を閉じて
デバイス一覧には、コンピュータに取り付けられたすべての
(診断)プログラムを『
Main Menu
画面に戻ります。
Main Menu
Drivers and Utilities CD
Dell Diagnostics
画面を閉じます。
フリーズおよびソフトウェアの問題
警告 : 本項の手順を開始する前に、『製品情報ガイド』の安全手順に従ってください。
コンピュータが起動しない
AC アダプタがコンピュータとコンセントにきちんと接続されていることを確認します。
』から実行中の場
(診断)プログ
コンピュータの応答が停止した
注意 : オペレーティングシステムのシャットダウンが実行できない場合、データを消失する恐れがあります。
コンピュータの電源を切ります
合、コンピュータの電源が切れるまで、電源ボタンを
プログラムの応答が停止するか、プログラムがクラッシュを繰り返す、またはプログラムがクラッシュを繰り返
す場合
メモ : 通常、ソフトウェアのインストール手順は、そのマニュアルまたはフロッピーディスクか CD に収録されて
います。
プログラムを終了します
1
<Ctrl><Shift><Esc>
2
タスクマネージャ をクリックします。
3
アプリケーション をクリックします。
4
反応がなくなったプログラムを選択します。
5
タスクの終了
プログラムのマニュアルを参照します — 必要に応じて、プログラムをアンインストールしてから再インストールします。
をクリックします。
— キーボードのキーを押したり、マウスを動かしてもコンピュータから応答がない場
8 ~ 10 秒以上押します。 その後、コンピュータを再起動します。
—
を同時に押します。
クイックリファレンスガイド 79
Page 80

プログラムが以前の Microsoft
プログラム互換性ウィザードを実行します — Windows XP には、Windows XP オペレーティングシステムとは異な
るオペレーティングシステムに近い環境で、プログラムが動作するよう設定できるプログラム互換性ウィザードがあり
ます。
1
スタート
2
画面の指示に従います。
画面が青色(ブルースクリーン)になった
コンピュータの電源を切ります — キーボードのキーを押したり、マウスを動かしてもコンピュータから応答がない場
合、コンピュータの電源が切れるまで、電源ボタンを
その他のソフトウェアの問題
トラブルシューティング情報については、ソフトウェアのマニュアルを確認するかソフトウェアの製造元に問い合わせ
ます
—
•
コンピュータにインストールされているオペレーティングシステムと互換性があるか確認します。
•
コンピュータがソフトウェアを実行するのに必要な最小ハードウェア要件を満たしているか確認します。
→
すべてのプログラム
®
Windows® オペレーティングシステム向けに設計されている
→
アクセサリ→ プログラム互換性ウィザード→ 次へ とクリックします。
8 ~ 10 秒以上押します。 その後、コンピュータを再起動します。
詳細については、ソフトウェアのマニュアルを参照してください。
•
プログラムが正しくインストールおよび設定されているか確認します。
•
デバイスドライバがプログラムと対立していないか確認します。
•
必要に応じて、プログラムをアンインストールしてから再インストールします。
すぐにお使いのファイルのバックアップを作成します
ウイルススキャンプログラムを使って、ハードドライブ、フロッピーディスク、または
開いているファイルをすべて保存してから閉じ、実行中のプログラムをすべて終了して、
ピュータをシャットダウンします
コンピュータでスパイウェアをスキャンします
を受信したり、インターネットとの接続に問題がある場合は、スパイウェアに感染している恐れがあります。
イウェア保護を含むアンチウィルスプログラムを使用して(ご使用のプログラムをアップグレードする必要があるかもし
れません)、コンピュータのスキャンを行い、スパイウェアを取り除いてください。
D
ELL DIAGNOSTICS(診断)プログラムを実行します —
すべてのテストが正常に終了したら、不具合はソフトウェアの問題に関連しています。
ださい。
— コンピュータのパフォーマンスが遅いと感じたり、ポップアップ広告
77
ページの「
Dell Diagnostics
CD を調べます
[ スタート ] メニューからコン
アンチスパ
(診断)プログラム」 を参照してく
80 クイックリファレンスガイド
Page 81

索引
C
CD
オペレーティングシステム
CD
,69
D
Dell
サポートサイト ,68
Dell Diagnostics(診断)
プログラムをハードドライ
ブから起動する
,77
Dell Diagnostics(診断)
プログラムを『
and Utilities CD
起動する
Drivers
』から
,78
Dell Diagnostics(診断)
プログラム
,77
M
Microsoft Windows ラベル ,
68
Q
QuickSet ヘルプ ,68
R
ResourceCD
Dell Diagnostics
プログラム
(診断)
,77
W
Windows XP
プログラム互換性ウィザード ,
80
ヘルプとサポートセンター ,68
再インストール ,69
あ
安全にお使いいただくための
,67
注意
う
ウィザード
プログラム互換性ウィザード
80
え
エンドユーザーライセンス
同意書
お
オペレーティングシステム
CD,69
再インストール ,69
オペレーティングシステム
CD
,67
,69
こ
コンピュータ
応答が停止した
クラッシュ , 79-80
パフォーマンスの低下 ,80
さ
サービスタグ ,68
作業姿勢に関する情報 ,67
サポートウェブサイト ,68
し
システム表示
,
シリアルコネクタ
診断
,71
左側面
右側面 ,71
正面 ,70
底面 ,72
背面 ,72
システム表示
説明 ,72
Dell Diagnostics(診断)
プログラム
す
スパイウェア ,80
せ
製品情報ガイド ,67
,79
,72
,77
索引 81
Page 82

そ
ソフトウェア
,80
問題
て
デルプレミアサポートウェブ
サイト
,68
と
トラブルシューティング
Dell Diagnostics(診断)
プログラム
ヘルプとサポートセンター ,68
,77
に
認可機関の情報 ,67
は
ハードウェア
Dell Diagnostics(診断)
プログラム
バッテリー
,75
充電
充電ゲージ ,74
充電チェック ,73
性能 ,73
電源メーター ,74
取り外し ,75
保管 ,76
,77
へ
ヘルプとサポートセンター ,68
ヘルプファイル
Windows ヘルプとサポート
センター
,68
ま
マニュアル
安全性
エンドユーザーライセンス
オンライン ,68
作業姿勢 ,67
ユーザーズガイド ,67
製品情報ガイド ,67
,67
同意書
,67
も
問題
コンピュータが起動しない
コンピュータの応答が停止
した
,79
コンピュータのクラッシュ ,
,79
79-80
コンピュータパフォーマンスの
,80
低下
スパイウェア ,80
ソフトウェア , 79-80
フリーズ ,79
ブルースクリーン ,80
プログラムと Windows の
,80
互換性
プログラムの応答が停止する
,79
場合
ゆ
ユーザーズガイド ,67
ら
ラベル
Microsoft Windows,68
サービスタグ ,68
82 索引
Page 83

Dell™ Latitude™ D820
빠른 참조 안내서
모델 PP04X
www.dell.com | support.dell.com
Page 84

주 , 주의사항 및 주의
주 : 주는 컴퓨터의 활용도를 높이는 데 도움이 되는 중요한 정보입니다 .
주의사항 : 주의사항은 하드웨어 손상이나 데이터 손실의 가능성을 알리고 이러한 문제를 방지하는 방법을 알
려줍니다 .
주의 : 주의는 잠재적으로 물건의 손상 , 신체적 부상 또는 사망 등과 같은 결과를 초래 할 수 있음을 뜻합니다 .
약어 및 머리글자
Dell™ n
니다
시리즈 컴퓨터를 구입한 경우
.
, Microsoft® Windows® 운영
체제에 관련된 사항들은 적용되지 않습
____________________
이 문서의 정보는 사전 통보 없이 변경될 수 있습니다 .
© 2005 Dell Inc. 저작권 본사 소유 .
Dell Inc. 의 서면 허가를 받지 않은 일체의 모든 재생산은 엄격하게 금지됩니다 .
본 설명서에 사용된 상표 : Dell, DELL 로고 , Latitude, 및 ExpressCharge 는 Dell Inc. 의 상표입니다 ; Intel 은 Intel Corporation 의 등록
상표입니다 ; Microsoft, Outlook, 및 Windows 는 Microsoft Corporation 의 등록상표입니다 .
본 설명서에서는 특정 회사의 마크나 제품
자사가 소유하고 있는 것 이외의 타사 소유 상표 및 상표명에 대한 어떠한 소유권도 가지고 있지 않습니다 .
이름의 사실성을 입증하기 위해 기타 상표나 상호를 사용할 수도 있습니다 . Dell Inc. 는
모델 PP04X
2005 년 12 월 P/N MD991 Rev. A00
Page 85

목차
정보 찾기 . . . . . . . . . . . . . . . . . . . . . . . . . . . . . . . . . . . . 87
컴퓨터 설치
컴퓨터 정보
전지 사용
문제 해결
. . . . . . . . . . . . . . . . . . . . . . . . . . . . . . . . . . . 90
. . . . . . . . . . . . . . . . . . . . . . . . . . . . . . . . . . . 91
전면 보기
좌측 모습
우측 모습
후면 모습
밑면 모습
전지 성능
전지 충전 상태 확인
전지 충전
전지 교체
전지 보관
Dell 기술 업데이트 서비스
Dell 진단 프로그램
잠금 및 소프트웨어 문제
. . . . . . . . . . . . . . . . . . . . . . . . . . . . . . . . . . 91
. . . . . . . . . . . . . . . . . . . . . . . . . . . . . . . . . . 92
. . . . . . . . . . . . . . . . . . . . . . . . . . . . . . . . . . 92
. . . . . . . . . . . . . . . . . . . . . . . . . . . . . . . . . . 93
. . . . . . . . . . . . . . . . . . . . . . . . . . . . . . . . . . 93
. . . . . . . . . . . . . . . . . . . . . . . . . . . . . . . . . . . . 94
. . . . . . . . . . . . . . . . . . . . . . . . . . . . . . . . . . 94
. . . . . . . . . . . . . . . . . . . . . . . . . . . . 95
. . . . . . . . . . . . . . . . . . . . . . . . . . . . . . . . . . 96
. . . . . . . . . . . . . . . . . . . . . . . . . . . . . . . . . . 96
. . . . . . . . . . . . . . . . . . . . . . . . . . . . . . . . . . 97
. . . . . . . . . . . . . . . . . . . . . . . . . . . . . . . . . . . . 97
. . . . . . . . . . . . . . . . . . . . . . . . 97
. . . . . . . . . . . . . . . . . . . . . . . . . . . . . 98
. . . . . . . . . . . . . . . . . . . . . . . . 100
색인 . . . . . . . . . . . . . . . . . . . . . . . . . . . . . . . . . . . . . . . . 103
목차 85
Page 86

86 목차
Page 87

정보 찾기
주 : 몇가지 기능이나 매체는 옵션이며 컴퓨터와 함께 제공되지 않을 수 있습니다 . 몇가지 기능이나 매체
는 특정 국가에서 사용할 수 없습니다 .
주 : 그밖의 다른 정보가 컴퓨터와 함께 제공되기도 합니다 .
찾는 정보 찾을 위치
•내
컴퓨터 진단 프로그램
•내
컴퓨터 드라이버
•
내 장치 설명서
•
노트북 시스템 소프트웨어
•
부품 분리 및 교체 방법
•
사양
•
시스템 설정 구성 방법
•
문제 해결 방법
(NSS)
Drivers and Utilities CD (ResourceCD 라고도 함 )
주 : Drivers and Utilities CD 는 선택사양이며 일부 컴퓨터
에 제공됩니다 .
설명서와 드라이버는 이미 컴퓨터에 설치되어 있습니다.
CD 를 사용하여 드라이버를 재설치 할 수 있습니다 .
CD 에 포함된 readme 파
일은 컴퓨터의 기술 변경
사항과 관련된 최신 정보
가 수록되어 있으며 , 전
문가와 숙련가를 대상으
로 한 고급 기술 참조 자
료입니다 .
주 : 드라이버 및 설명서
업데이트는 support.dell.com 에서 찾을 수 있습니다 .
Dell Latitude™ 사용 설명서
1
Start(시작
Dell User and System Guides
명서
.
다
2
컴퓨터에 대한 사용 설명서를 클릭합니다
)→
Help and Support(도움말 및 지원
(Dell
사용자 및 시스템 설
)→
System Guides(시스템 설명서)를 클릭합니
)→
.
•
보증 정보
•
조건 및 조항 (미국에 한함
안전 지침
•
•
규정사항
•
인체공학적 정보
•
최종 사용자 사용권 계약서
Dell™ 제품 정보 안내
)
빠른 참조 안내서 87
Page 88

찾는 정보 찾을 위치
•
서비스 태그 및 특급 서비스 코드
• Microsoft Windows
라이센스 레이블
서비스 태그 및 Microsoft® Windows® 사용권
이 레이블은 컴퓨터의 밑면에 위치해 있습니다 .
•
support.dell.com에
때 서비스 태그를 사용하여 컴퓨터를 확인하십시오
•
기술 지원을 문의할 경
특급
우
입력하면 빠르게 처리
됩니다
서비스 코드를
.
액세스하거나 기술 지원을 문의할
.
• Solutions —
터의
문제해결 힌트와 추가 정보, 기술자로부
참고 자료, 및
온라인 코스, 자주 묻는 질문
(FAQ)
• Community —
•Upgrades —
다른
Dell
고객과 온라인 토론
메모리, 하드 드라이브, 운영 체제와 같은
구성요소 업그레이드 정보
• Customer Care —
, 보증, 수리
태
• Service and support —
연락처, 기술 지원이 제공되는 온라인 토론
비스
• Reference —
, 제품 사양 및
부사항
• Downloads —
연락처 정보, 서비스 콜 및 주문 상
정보
서비스 콜 상태 및 지원 기록, 서
컴퓨터 설명서, 내 컴퓨터 구성에 관한 세
백서
보증된 드라이버, 패치, 소프트웨어 업
데이트
• Notebook System Software (NSS) —
재설치하는 경우, 또한
제를
합니다
해야
하고 Dell™ 3.5-인치 USB
를
. NSS는
프로세서, 광 드라이브 및
는
Dell
NSS
컴퓨터가 올바로 작동하는 데
운영체제에 대한 주요 업데이트
USB
컴퓨터에 운영 체
NSS
유틸리티도 재설치
플로피 드라이브
장치를 지원합니다
필요합니다. 소프트웨어가 컴퓨터와 운영체제를 자
검색하여 구성에 적합한 업데이트를 설치합니
동으로
.
다
• Windows XP
•
프로그램과 파일로 작업하는 방법
•
데스크탑을 개인화하는 방법
사용 방법
, Intel
Dell 지원 웹 사이트 — support.dell.com
주 : 해당 지원 사이트를 볼 지역을 선택하십시오 .
주 : 회사 , 정부 및 교육 분야 고객이 또한 Dell 전문 지원
웹 사이트 (premier.support.dell.com) 를 이용할 수 있습니
다 .
노트북 시스템 소프트웨어를
1
support.dell.com→
2
서비스 태그 또는 제품 모델을 입력합니다
3
Download Category(다운로드 분류) 드롭다운
메뉴에서, All(모두)을 클릭합니다
®
4
컴퓨터의 운영 체제 및 운영 체제 언어를 선택하고
.
Submit(제출)를 클릭합니다
5
Select a Device(장치 선택) 아래에서, System and
Configuration Utilities
스크롤하여, Dell Notebook System Software
시스템 소프트웨어)를 클릭합니다
북
Windows 도움말 및 지원 센터
1
Start(시작
릭합니다
2
문제를 설명해주는 단어나 문장을 입력한 다음, 화살표
)→
Help and Support(도움말 및 지원)을 클
.
아이콘을 클릭하십시오
3
문제를 설명해주는 항목을 클릭하십시오
4
화면의 지시사항을 따르십시오
다운로드 하려면 :
Downloads(다운로드)로 갑니다
.
.
.
(
시스템 및 구성 유틸리티)로
(Dell
.
.
.
.
.
노트
88 빠른 참조 가이드
Page 89

찾는 정보 찾을 위치
• Dell QuickSet으로
마법사, 단축키 및 기타 항목에 대한 정보
•내 운영 체제
제어하는 네트워크 작동, 전원 관리
재설치 방법
Dell QuickSet 도움말
Dell QuickSet 도움말
작업 표시줄에 있는 아이콘을 마우스 오른쪽 클릭하
십시오 .
운영 체제 CD
주 : 운영 체제 CD 는 선택사양이며 일부 컴퓨터에 제공
됩니다 .
운영 체제는 이미 시스템에 설치되어 있습니다 . 운영 체
제를 다시 설치하려면 옵션의 운영 체제 CD 를 사용하십
시오 .
을 보려면, Microsoft® Windows®
운영체제를 재설치한 뒤
에는 Drivers and Utilities
CD (ResourceCD) 를 사용
하여 컴퓨터와 함께 제공
된 장치의 드라이버를 재
설치하십시오 .
주 : CD 의 색상은 주문한
운영 체제에 따라 다릅니
다 .
빠른 참조 안내서 89
Page 90

컴퓨터 설치
주의 : 이 항목의 절차를 수행하기 전에 제품 정보 안내에 있는 안전 지침을 따르십시오 .
1
부속품 상자의 포장을 벗기십시오
2
부속품 상자의 내용물을 준비하십시오. 컴퓨터 설치 과정에 필요할 수 있습니다
부속품 상자에는 사용 설명서와 주문한 모든 소프트웨어 또는 추가 하드웨어(예를 들어
드
,
드라이브, 전지)가 포함되어 있습니다
3
AC
어댑터를 컴퓨터에 있는
4
컴퓨터 디스플레이를 열고 전원 버튼을 눌러 컴퓨터를 켜십시오(전면 모습 참조
주 : 컴퓨터의 전원을 켜고 적어도 한 번 이상 시스템을 종료한 이후에 컴퓨터를 도킹 장치에 연결하십시오
.
.
.
AC
어댑터 커넥터와 전원 콘센트에 연결하십시오
.
.
).
, PC
카
90 빠른 참조 가이드
Page 91

컴퓨터 정보
전면 보기
13
12
11
10
9
1
2
3
4
5
6
8
7
1
디스플레이 래치
2
디스플레이
3
전원 단추
4
장치 상태 표시등
5
스피커 (2)
6
키보드
7
터치패드
8
터치패드 / 트랙 스틱 버튼
9
트랙 스틱
10
키보드 상태 표시등
11
볼륨 조정 단추
12
음소거 단추
13
주변광 센서
빠른 참조 안내서 91
Page 92

좌측 모습
우측 모습
1 2 63 4 75 8 9
1
보안 케이블 슬롯
2
공기 환풍구
3
1394 커넥터
4
오디오 커넥터
5
ExpressCard 슬롯
1
매체 베이
6
적외선 센서
7
무선 스위치
8
무선 작동 표시등
9
PC 카드 슬롯
10
스마트 카드 슬롯
1
2
USB 커넥터 (2)
10
2
92 빠른 참조 가이드
Page 93

후면 모습
주의 : 공기 환풍구를 막거나 , 물체를 넣거나 , 먼지가 들어가지 않도록 하십시오 . 컴퓨터를 작동시킨 상태
에서 가방과 같은 밀폐된 공간에 넣지 마십시오 . 공기 순환을 막으면 , 컴퓨터가 손상되거나 화재가 발생
할 수 있습니다 .
1 2 63 4 75 8
밑면 모습
1
네트워크 커넥터 (RJ-45)
2
USB 커넥터
3
기능을 갖춘 USB 커넥터
4
모뎀 커넥터 (RJ-11)
6
5
5
직렬 커넥터
6
비디오 커넥터
7
AC 어댑터 커넥터
8
공기 환풍구
1
2
1
전지 베이 분리 래치
2
전지
3
메모리 모듈 커버
3
4
4
도킹 장치 커넥터
5
팬 공기 환풍구
6
하드 드라이브
빠른 참조 안내서 93
Page 94

전지 사용
전지 성능
주 : 컴퓨터에 대한 Dell 보증에 대한 자세한 내용은 제품 정보 안내 또는 컴퓨터와 함께 별지로 제공되는 보
증 문서를 참조하십시오 .
컴퓨터를 최적의 성능으로 작동하고 BIOS 설정을 유지하려면 항상 Dell™ 휴대용 컴퓨터에 주 전지
를 설치하여 사용하십시오 . 컴퓨터의 전지 베이에는 전지 한 개가 기본으로 제공됩니다 .
주 : 전지가 완전히 충전되지 않을 수 있으므로 컴퓨터를 처음 사용시 AC 어댑터를 사용하여 새 컴퓨터에
전원을 연결하십시오 . 최상의 결과를 위해서 , 전지가 완전히 충전될때까지 AC 어댑터로 컴퓨터를 작동시
키십시오 . 전지 충전 상태를 보려면 , Control Panel( 제어판 )→ Power Options( 전원 옵션 ) 을 선택하고
Power Meter( 전원 측정기 ) 탭을 클릭하십시오 .
주 : 전지 작동 시간 ( 전지가 충전된 만큼의 시간 ) 이 점차적으로 감소합니다 . 전지를 얼마나 자주 , 어떤
조건하에서 사용하느냐에 따라 컴퓨터 사용기간 동안 새로운 전지를 구입해야할 수도 있습니다 .
전지의 작동 시간은 작동 여건에 따라 달라집니다 . 매체 베이에 보조 전지 옵션을 설치하여 작동 시
간을 연장할 수 있습니다 .
다음과 같은 경우에 작동 시간이 현저히 줄어듭니다 :
•
광 드라이브를 사용할 경우
•
무선 통신 장치
•
디스플레이 밝기를 높게 설정하고
로그램을
•
최대 성능 모드로 컴퓨터를 실행할 경우
주 : CD 나 DVD 에 데이터를 기록할 경우 , 컴퓨터를 전원 콘센트에 연결하여 사용하는 것이 좋습니다 .
컴퓨터에 전지를 설치하기 전에 전지 충전 상태를 확인 하십시오 (95 페이지의 " 전지 충전 상태 확
인 " 참조 ). 전지 충전 상태가 낮은 경우 , 이를 알려주도록 전원 관리 옵션을 설정할 수도 있습니다 .
주의 : 부적합한 전지를 사용하면 화재나 파열될 위험이 높습니다 . Dell 에서 구입한 호환 전지만 사용하십
시오 . 리튬 이온 전지는 Dell 컴퓨터에서 작동하도록 제작되었습니다 . 다른 컴퓨터의 전지를 본 컴퓨터에
사용하지 마십시오 .
주의 : 전지를 일반 가정용 쓰레기와 함께 버리지 마십시오 . 전지를 더 이상 충전하여 사용할 수 없는 경우
해당 폐기물 또는 환경 기관에 리튬 이온 전지의 폐기 방법을 문의하십시오 . 제품 정보 안내의 " 전지 폐기
" 를 참조하십시오 .
주의 : 전지를 잘못 사용하면 화재 또는 화상을 입을 수 있는 위험이 높아집니다 . 전지에 구멍을 뚫거나 태
우거나 분해하지 말고 65°C (149°F) 이상 되는 곳에 두지 마십시오 . 아이들의 손이 닿지 않는 곳에 전지를 보
관하십시오 . 손상되었거나 전해액이 새는 전지는 조심스럽게 다루어야 합니다 . 손상된 전지를 사용하는
경우 부상을 입거나 장치가 손상될 수 있습니다 .
, PC
사용할 경우
카드
, ExpressCards,
매체 메모리 카드 또는
, 3D 화면
보호기 또는
USB
장치를 사용할 경우
3D
게임과 같이 전력이 많이 소모되는 프
94 빠른 참조 가이드
Page 95

전지 충전 상태 확인
Dell QuickSet 전지 측정기 , Microsoft Windows Power Meter( 전원 측정기 ) 창 및 아이콘 , 전지
충전 상태 표시기 및 전지 상태 표시기 , 전지 부족 경고 등은 전지의 상태에 대한 정보를
제공합니다 .
Dell™ QuickSet 전지 측정기
Dell QuickSet 가 설치된 경우 QuickSet 전지 측정기를 표시하려면 <Fn><F3> 을 누르십시오 . 전
지 측정기는 컴퓨터의 전지 상태 , 수명 , 충전 레벨 및 충전 완료 시간이 표시됩니다 .
QuickSet 에 관한 자세한 내용은 작업 표시줄에 있는 아이콘을 마우스 오른쪽 단추로 클릭한 다
음 Help( 도움말 ) 을 클릭하십시오 .
Microsoft® Windows® 전원 측정기
Windows 전원 측정기를 통해 남아 있는 전지 충전량을 알 수 있습니다 . 전원 측정기를 확인하려면
작업 표시줄에 있는 아이콘을 더블 클릭하십시오 .
컴퓨터를 전원 콘센트에 연결하면 , 아이콘이 나타납니다 .
충전 상태 표시기
전지의 충전 상태 표시기의 상태 버튼을 한번 누르거나 누른 상태를 유지 하면서 , 다음의 점검을 할
수 있습니다 :
•
전지 충전 (상태 버튼을 누르고 해제함으로써 점검
전지 수명 (상태 버튼을 누른 상태로 유지함으로써 점검
•
전지 수명은 전지의 충전 횟수에 따라 좌우됩니다 . 100 번 이상 전지를 충전하고 방전하면 전지가 완
전히 충전되지 않거나 전지 상태가 나빠집니다 . 즉 , 전지가 " 충전 완료 " 표시를 하지만 감소된 충전
용량 ( 수명 ) 을 갖게 됩니다 .
)
)
전지 충전 상태 점검
전지 충전 상태를 점검하려면 , 전지 충전 표시기에 있는 상태 단추를 누르고 해제하여 충전 단계 표
시등을 점검하십시오 . 각 표시등은 전체 전지 충전량의 약 20% 를 나타냅니다 . 예를 들어 , 전지 충
전량이 80% 정도 남아 있는 경우 4 개의 표시등이 켜집니다 . 아무 표시등도 켜지지 않으면 전지가 충
전되어 있지 않은 것입니다 .
전지 수명 점검
주 : 전지 수명을 점검하려면 , 둘중 한 방법 ( 아래에 설명된대로 전지 충전 상태 표시기 사용 또는 Dell
QuickSet 에 있는 전지 측정기 사용 ) 을 이용할 수 있습니다 . QuickSet 에 관한 자세한 내용은 , 작업 표시줄
에 있는 아이콘을 마우스 오른쪽 버튼 클릭하고 Help( 도움말 ) 을 클릭하십시오 .
충전 상태 표시기로 전지 수명을 점검하려면 , 전지 충전 상태 표시기에 있는 상태 버튼을 3 초 이상
누른 상태를 유지하십시오 . 표시등이 켜지지 않으면 전지 상태가 좋은 것이며 총충전 용량이 80 %
를 넘고 있음을 의미합니다 . 각 표시등을 통해 전지 상태의 변화를 알 수 있습니다 . 5 개의 표시등이
켜지는 경우 , 충전 용량이 60 % 가 못됨을 뜻하며 전지를
교체하는 것이 좋습니다 . 사용 설명서의 사
양을 참조하십시오 .
빠른 참조 안내서 95
Page 96

전지 부족 경고
주의사항 : 데이터가 손상되지 않도록 방지하려면 전지 부족 경고가 표시된 후 즉시 작업을 저장하십시오
. 그런 다음 전원 콘센트에 컴퓨터를 연결하십시오 . 전지가 완전히 방전되면 자동으로 최대 절전 모드가 시
작됩니다 .
기본값으로 , 전지 충전량이 약 90% 정도 소모되면 이를 알려주는 메시지 창이 나타납니다 .
QuickSet 또는 Power Options Properties( 전원 옵션 등록정보 ) 창에서 전지 알람 설정을 변경할 수
있습니다 .
전지 충전
주 : 컴퓨터 전원이 꺼져있을때 , Dell™ ExpressCharge™ 으로 완전히 충전되지않은 전지를 AC 어댑터로 약
한시간 안에 80%, 대략 2 시간 안에 100% 를 충전합니다 . 컴퓨터의 전원이 켜져 있을 때 충전하면 시간이 더
오래 걸립니다 . 원하는 만큼 전지를 컴퓨터에 둘 수 있습니다 . 전지 내부의 회로는 전지가 과열되는 것을
방지해줍니다 .
컴퓨터를 전원 콘센트에 연결하거나 컴퓨터가 전원 콘센트에 연결되어 있는 상태에서 전지를 설치
하는 경우 , 컴퓨터에서 전지 충전 및 온도를 점검합니다 . 필요에 따라 AC 어댑터로 전지를 충전해
둡니다 .
컴퓨터에서 사용하거나 온도가 높은 환경에서 사용하다 전지가 과열된 경우 , 전원 콘센트에 컴퓨터
를 연결하면 전지가 충전되지 않을 수도 있습니다 .
표시등이 녹색과 주황색으로 번갈아 깜박거리는 것은
전지가 과열되어 충전할 수 없다는 의미
입니다 . 컴퓨터를 전원 콘센트에서 분리하고 컴퓨터와 전지가 실내 온도에 맞게 식을 때까지 기다리
십시오 . 그런 다음 , 컴퓨터를 전원 콘센트에 연결하고 전지를 계속 충전하십시오 .
전지 교체
주의 : 이러한 절차를 행하기 전에 , 컴퓨터를 끄고 전원 콘센트와 컴퓨터에서 AC 어댑터를 분리하고 , 벽면
커넥터와 컴퓨터에서 모뎀을 분리하고 , 컴퓨터로 부터 기타 모든 외부 케이블을 분리하십시오 .
주의사항 : 가능한 커넥터 손상을 피하기위해서 컴퓨터로 부터 모든 외부 케이블을 분리해야합니다 .
주의 : 부적합한 전지를 사용하면 화재나 파열될 위험이 높습니다 . Dell 에서 구입한 호환 전지만 사용하십
시오 . 전지는 Dell 컴퓨터에서 작동하도록 제작되었습니다 . 다른 컴퓨터의 전지를 본 컴퓨터에 사용하지
마십시오 .
전지를 분리하려면 :
1
컴퓨터가 도킹 장치에 연결되어 있는 경우(도킹된 경우) 도킹을 해제합니다. 도킹 장치와 함께 제
지시사항 문서를 참조하십시오
공된
2
컴퓨터가 꺼져 있는지 확인하십시오
3
분리 래치가 딸깍 소리가 날때까지 컴퓨터 밑면의 전지 베이 분리 래치를 미십시오
4
전지의 탭을 사용하여 컴퓨터에서 전지를 들어 올립니다
.
.
.
.
96 빠른 참조 가이드
Page 97

1
2
3
1
전지
2
전지 탭
3
전지 베이 분리 래치
전지를 다시 끼우려면 , 베이에 전지를 두고 전지 베이 분리 래치가 딸깍소리가 날때까지 밑으로 누
르십시오 .
전지 보관
컴퓨터를 장기간 사용하지 않을 경우에는 컴퓨터에서 전지를 분리하십시오 . 전지를 장기간 보관하
면 전지가 방전됩니다 . 전지를 장기간 보관했을 경우 , 사용 전에 전지를 완전히 재충전시키십시오
(96 페이지의 " 전지 충전 " 참조 ).
문제 해결
Dell 기술 업데이트 서비스
Dell 기술 업데이트 서비스는 컴퓨터에 대한 소프트웨어 및 하드웨의 업데이트에 대해 사전 이메일
알림 서비스를 제공합니다 . 이 서비스는 무상으로 제공되며 내용 , 포맷 및 알림 서비스를 받는 주기
에 대해 사용자 정의 할 수 있습니다 .
Dell 기술 업데이트 서비스에 등록하려면 , support.dell.com/technicalupdate 로 가십시오 .
빠른 참조 안내서 97
Page 98

Dell 진단 프로그램
주의 : 이 항목의 절차를 수행하기 전에 제품 정보 안내에 있는 안전 지침을 따르십시오 .
Dell 진단 프로그램 사용 시기
컴퓨터에 문제가 생긴 경우 , Dell 에 기술 지원을 문의하기 전에 100 페이지의 " 잠금 및 소프트웨어
문제 " 의 점검사항을 수행하고 Dell 진단 프로그램을 실행하십시오 .
작업을 시작하기 전에 본 설치 과정을 인쇄하는 것이 좋습니다 .
주의사항 : Dell 진단 프로그램은 Dell™ 컴퓨터에서만 작동합니다 .
주 : Drivers and Utilities CD 는 선택사양이며 일부 컴퓨터에 제공됩니다 .
Dell 진단 프로그램을 하드 드라이브 또는 Drivers and Utilities CD(ResourceCD 라고도 함 ) 에서 시작
하십시오 .
하드 드라이브에서 Dell 진단 프로그램 시작
Dell 진단 프로그램은 하드 드라이브의 숨겨진 진단 프로그램 유틸리티 파티션에 있습니다 .
1
컴퓨터를 종료하십시오
2
컴퓨터가 도킹 장치에 연결되어 있는 경우(도킹된 경우) 도킹을 해제합니다. 도킹 장치와 함께 제
지시사항 문서를 참조하십시오
공된
3
컴퓨터를 전원 콘센트에 연결하십시오
4
Dell 진단
•
프로그램은 다음 두가지중 한가지 방법으로 실행할 수 있습니다
컴퓨터를 켜십시오
프로그램)을 부팅 메뉴에서 선택하여
주 : 운영 체제 로고가 나타나는 시간이 오래 걸리면 Microsoft® Windows® 바탕 화면이 표시될 때까지
기다린 다음 컴퓨터를 종료했다가 다시 시작해보십시오 .
•
컴퓨터가 켜지는 동안
주 : Diagnostics 유틸리티 파티션을 찾을 수 없다는 메시지가 나타나면 옵션의 Drivers and Utilities CD
에서 Dell 진단 프로그램을 실행하십시오 .
컴퓨터는 사전 부팅 시스템 평가를 실행합니다. 이 평가는 시스템 보드, 키보드, 하드 드라이브
및 디스플레이를 대상으로 수행하는 일련의 초기 검사입니다
.
. DELL™
<Fn>
.
.
로고가 나타나면 즉시
<Enter>를
<F12>를
누르십시오
키를 누른 상태로 있습니다
:
누르십시오. Diagnostics(진단
.
.
.
검사하는 동안 요청된 질문에 응답하십시오
•
•
오류가 감지되면 컴퓨터는 실행을 중단하고 경고음을 냅니다. 평가를 중단하고 컴퓨터를 재시
작하려면
요소를
•
사전 부팅 시스템 평가가 성공적으로 완료되면 Booting Dell Diagnostic Utility
<Esc>을
다시
Partition. Press any key to continue
부팅. 아무키나 눌러 계속하십시오) 라는 메시지가 나타납니다
5
아무 키나 눌러 하드 드라이브에 있는 진단 프로그램 유틸리티 파티션에서
시작하십시오
.
98 빠른 참조 가이드
누르고, 다음 검사를 계속 실행하려면
검사하려면
<r>을
누르십시오
.
.
<y>를
(Dell 진단
누르고, 오류가 있는 구성
프로그램 유틸리티 파티션
.
Dell
진단 프로그램을
Page 99

Drivers and Utilities CD 에서 Dell 진단 프로그램 시작
1
Drivers and Utilities CD를 삽입하십시오
2
컴퓨터를 종료하고 재시작하십시오
DELL
로고가 나타나면 즉시
<F12>를
.
.
누르십시오
.
시간이 초과되어
컴퓨터를 종료했다가 다시 시작해보십시오
주 : 다음 절차는 부팅 순서가 한 번만 변경됩니다 . 이후에 컴퓨터를 부팅하면 시스템 설치 프로그램
에 지정된 장치 순서대로 부팅됩니다 .
3
부팅 장치 목록이 나타나면 CD/DVD/CD-RW Drive
<Enter>
4
보이는 메뉴에서 Boot from CD-ROM
오
.
5 1
을 입력하여 메뉴를 시작하고
6
번호가 지정된 목록에서 Run the 32 Bit Dell Diagnostics
하십시오
7
Dell 진단
Dell 진단 프로그램 기본 메뉴
1
Dell
진단 프로그램이 로드되고 Main Menu(기본 메뉴) 화면이 나타나면 원하는 옵션 단추를 클릭
하십시오
옵션 기능
Express Test( 고속 테스트 ) 장치를 빠르게 검사합니다 . 이 검사는 일반적으로 10 분에서
Extended Test( 확장 테스트 ) 장치를 전체적으로 검사합니다 . 이 검사는 일반적으로 1 시간
Custom Test( 사용자 정의 테스트 ) 특정 장치를 검사합니다 . 실행할 검사를 사용자가 지정할 수
Symptom Tree( 증상 트리 ) 가장 일반적으로 발생하는 증상을 나열하며 문제의 증상에 따
Windows
로고가 나타나면
Windows 바탕
화면이 표시될 때까지 기다리십시오
.
(CD/DVD/CD-RW
를 누르십시오
.
<Enter>를 눌러
(CD-ROM에서
계속하십시오
부팅) 옵션을 선택하고
(32 비트 Dell
.
목록에 여러 버전이 있는 경우 사용자의 컴퓨터에 알맞은 버전을 선택하십시오
드라이브)를 선택한 다음
<Enter>를
.
진단 프로그램 실행)을 선택
프로그램 Main Menu(기본 메뉴)가 나타나면, 실행할 검사를 선택하십시오
.
20 분 소요되며 사용자가 개입하지 않아도 됩니다 . 문제를 신
속하게 추적하려면 Express Test 를 실행하십시오 .
이상 소요되며 사용자는
있습니다 .
라 검사를 선택할 수 있습니다 .
주기적으로 질문에 응답해야 합니다 .
.
누르십시
.
.
2
검사 도중 문제가 발견되면 오류 코드와 문제 설명이 함께 표시된 메시지가 나타납니다. 오류 코드
문제
와
설명을 기록해 두고 화면의 지시사항을 따르십시오
주 : 컴퓨터의 서비스 태그는 각 검사 화면 상단에 표시됩니다 . Dell 에 문의할 경우 기술 지원부에서
서비스 태그를 묻습니다 .
.
빠른 참조 안내서 99
Page 100

3
Custom Test 또는
탭을 클릭하여 추가 정보를 얻으십시오
탭기능
Results
Errors
Help
Configuration
Parameters
4
테스트가 완료되고, Drivers and Utilities CD에서
리하십시오
Symptom Tree 옵션에서 검사를 실행할 경우 다음 표에서 설명하는 적용 가능한
.
검사 결과 및 발견된 오류 상태를 표시합니다 .
발견된 오류 상태 , 오류 코드 및 문제 설명을 표시합니다 .
검사를 설명하고 검사 실행에 필요한 요구사항을 표시할 수 있
습니다 .
선택한 장치에 대한 하드웨어 구성을 나타냅니다 .
Dell 진단 프로그램은 시스템 설치 프로그램 , 메모리 및 각종
내부 검사를 통해 구성 정보를 수집하고 이를 화면의
있는 장치 목록에 표시합니다 . 장치 목록에는 컴퓨터에 설치된
일부 구성요소 이름이나 컴퓨터에 장착된 일부 장치가 표시되
지 않을 수 있습니다 .
검사 설정을 변경하여 사용자가 검사를 지정할 수 있습니다 .
Dell 진단
프로그램을 실행하고 있으면
왼쪽 창에
.
, CD를
분
진단 프로그램이 실행 완료되면, 테스트 화면을 종료하고 Main Menu(기본 메뉴) 화면으로 돌아갑니
. Dell
다
진단 프로그램을 종료하고 컴퓨터를 재시작하려면, Main Menu 화면을 닫으십시오
.
잠금 및 소프트웨어 문제
주의 : 이 항목의 절차를 수행하기 전에 제품 정보 안내에 있는 안전 지침을 따르십시오 .
컴퓨터가 시작되지 않음
AC 어댑터가 컴퓨터와 전원 콘센트에 확실히 연결되었는지 확인하십시오 .
컴퓨터가 응답을 중지함
주의사항 : 운영 체제 종료를 실행하지 않으면 데이터가 손실될 수 있습니다 .
컴퓨터 끄기 — 컴퓨터가 키보드 키를 누르거나 마우스를 움직여도 응답하지 않는 경우 , 컴퓨터가 꺼질 때까
지 8~10 초 정도 손을 떼지 말고 전원 단추를 누르십시오 . 그런 다음 컴퓨터를 재시작하십시오 .
프로그램이 응답하지 않거나 반복적으로 충돌합니다
주 : 소프트웨어에는 일반적으로 플로피 디스크나 CD 또는 설명서에 설치 지침이 수록되어 있습니다 .
프로그램 종료 —
1
<Ctrl><Shift><Esc>를
2
Tas k M a nage r(작업 관리자)를 클릭하십시오
3
Applications(응용 프로그램)을 클릭하십시오
동시에 누르십시오
.
.
.
100 빠른 참조 가이드
 Loading...