

Page 1

75N55
15 October 2010
Dell M8428-k
Getting Started Guide
53-1002029-01 Rev. B
*53-1002029-01*
Page 2

Information in this document is subject to change without notice.
© 2010 Dell Inc. All rights reserved.
Reproduction of these materials in any manner whatsoever without the written permission of Dell Inc. is strictly forbidden.
Trademarks used in this text: Dell, the DELL logo, Inspiron, Dell Precision, Dimension, OptiPlex, Latitude, PowerEdge, PowerVault, PowerApp,
PowerConnect, and Dell OpenManage are trademarks of Dell Inc.; Intel, Pentium, and Celeron are registered trademarks of Intel Corporation in
the U.S. and other countries; Microsoft, Windows, Windows Server, MS-DOS and Windows Vista are either trademarks or registered trademarks of
Microsoft Corporation in the United States and/or other countries.
Other trademarks and trade names may be used in this document to refer to either the entities claiming the marks and names or their products.
Dell Inc. disclaims any proprietary interest in trademarks and trade names other than its own.
Regulatory Model Codes: M8428-k
2 of 16 Dell M8428-k Getting Started Guide
75N55
Page 3

Overview
NOTE
This Getting Started Guide is intended as an overview to help experienced installers unpack, install, and configure
the Dell M8428-k quickly. For detailed installation and configuration instructions, see the Dell M8424-k Hardware
Reference Manual.
Throughout this document, the Dell M8428-k is referred to as the converged network switch or the switch module.
FIGURE 1 Port Side of M8428-k
Unpacking and installing the converged network switch
If the converged network switch is installed in the blade server enclosure that is shipped to you, skip this section.
This section applies when installing a new module in an empty I/O module slot or when replacing an existing
converged network switch.
Perform the following steps to remove the switch module from its shipping package.
1. Open the shipping box and inspect the contents, making sure that nothing is missing or damaged.
Do not insert a damaged converged network switch into the blade server enclosure. If the switch module
appears to be damaged, contact your sales representative before proceeding.
2. Remove the Getting Started Guide containing regulatory statements from on top of the switch module.
3. Remove the switch module from the box.
4. Be sure that you have taken the necessary precautions for electrostatic sensitivity; then break the warning seal.
5. Slide the switch module out of the antistatic sleeve and inspect it carefully for any obvious defects or shipping
damage.
6. Remove the orange colored protective connector cover from the back of the switch module (pull).
7. Install the I/O module in the M1000e enclosure.
a. Lift the handle release latch and open the I/O module handle.
b. Slide the module into the appropriate I/O slot of the M1000e enclosure.
c. Close the handle until it snaps securely into place and the module is fully seated.
Dell M8428-k Getting Started Guide 3 of 16
75N55
Page 4
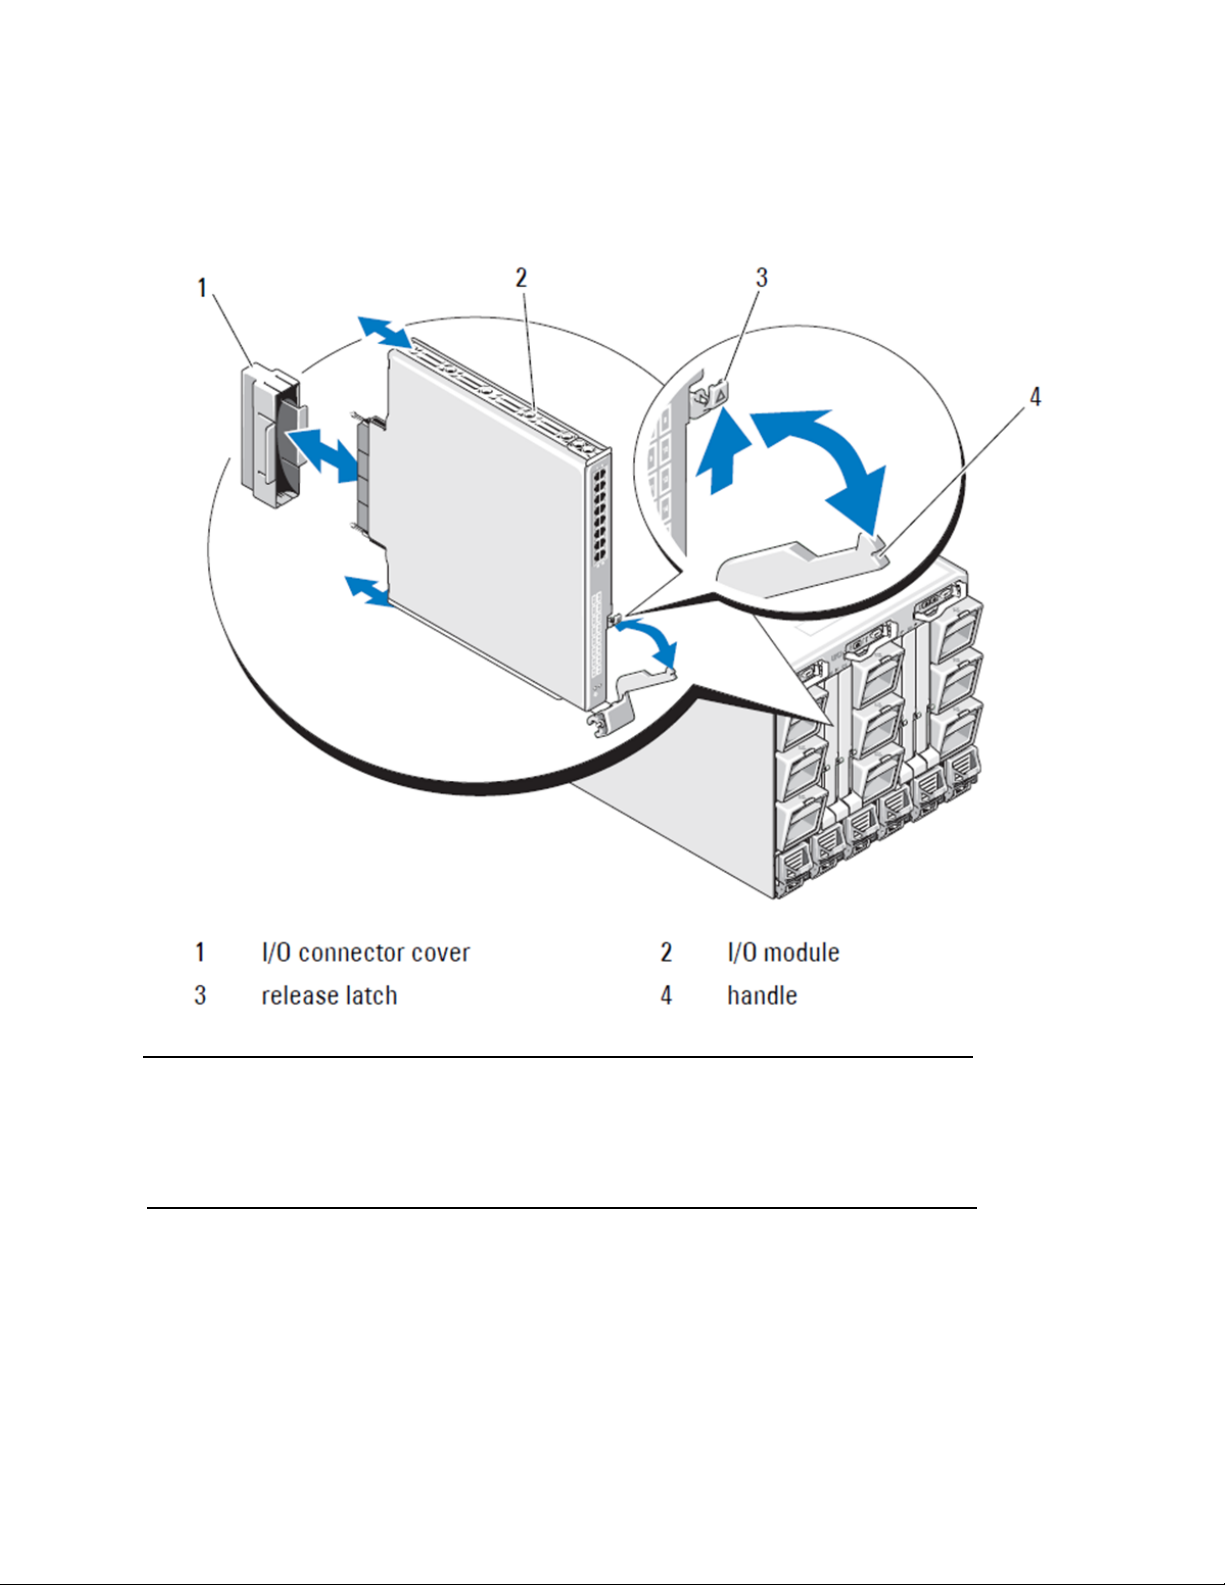
FIGURE 2 Installing an I/O module into a Dell PowerEdge M1000e enclosure
NOTE
The switch module should be installed into the I/O slot that corresponds to the I/O fabric (A, B, or C) that the
10GE Converged Network Adapter (CNA), within the blade server, is appropriately installed. The Chassis
Management Controller (CMC) GUI can be used to view the location of network adapters installed in the Blade
servers. Browse to the CMC IP address and login, then under "Server Overview" click on the servers (under
Server Overview) to determine which I/O slots contain the 10GE CNA's.
8. For complete instructions for installing a switch module into the blade server enclosure, refer to the section on
installing an I/O module in the Dell PowerEdge Modular Systems Hardware Owner’s Manual.
4 of 16 Dell M8428-k Getting Started Guide
75N55
Page 5

Configuring the converged network switch
NOTE
NOTE
Use procedures in this section to configure the converged network switch to operate on a network and fabric.
Provided are steps to assign an IP address for the Ethnert Management Network, and how to change the module’s
Fiber Channel operating mode.
Although the converged network switch is configured at the factory for NPIV mode, NPIV mode can be disabled to use
full fabric mode as needed. Refer to procedures under the section titled “” on page 16.
This publication provides procedures that use the Chassis Management Controller (CMC) browser-based GUI
application and the switch Command Line Interface (CLI) to configure the switch module. Other methods exist for
managing I/O modules and can also be used.
Items required
The following items are required for configuring and connecting the converged network switch for use in a network
and fabric:
• The converged network switch installed in a blade server enclosure.
• A management workstation (computer) that has a terminal emulator (such as HyperTerminal) connected to the
Chassis Management Controller (CMC) GUI or CLI via Ethernet or Seial port, or connected to the CMC or
converged network switch CLI through the keyboard, video, and mouse (KVM) device of the blade server
enclosure.
• An unused IP address and corresponding subnet mask and gateway address unless DHCP is used.
• If required, a serial cable to connect to the switch module serial console port. Note that this is not required if
changing the converged network switch IP address through the Chassis Management Controller (CMC) or KVM
of the blade server enclosure using the CMC GUI or CLI.
• SFP transceivers and compatible fibre cables, as required. The switch module can also use active twin-ax
copper cables on the 10G Enhanced Ethernet ports.
Use only Dell-approved SFPs or active twin-ax copper cables on the external ports of this module.
TABLE 1 10GbE Optical Transceivers & TWINAZ Connectors+Cables
330-7596 (FI) 7YMX4 PCT B-8000 10GbE TWINAX 3 METER 8PACK
330-7611 (APOS) Y938W
330-7595 (FI) M7W74 PCT B-8000 10GbE TWINAX 5 METER 1PACK
330-7609 (APOS) 1GH9D
330-7597 (FI) P4G6K PCT B-8000 10GbE TWINAX 5 METER 8PACK
330-7614 (APOS) 8Y9H3
330-7593 (FI) 13HFP PCT B-8000 10GbE TWINAX 1 METER 1PACK
330-7610 (APOS) FDPWD
330-7594 (FI) KRDN3 PCT B-8000 10GbE TWINAX 1 METER 8PACK
330-7615 (APOS) YFCMW
Dell M8428-k Getting Started Guide 5 of 16
75N55
Page 6

NOTE
TABLE 1 10GbE Optical Transceivers & TWINAZ Connectors+Cables
330-7598 (FI) Y4NV0 PCT B-8000 10GbE TWINAX 3 METER 1PACK
330-7612 (APOS) T40FD
430-3684 (FI) TNCYY PCT B-8000 10GbE, SFP+, LW, 10KM
330-7603 (APOS) G3C42
430-3685 (FI) DW85K PCT B-8000 10GbE SFP+, LW, 10KM, 8PACK
330-7606 (APOS) MYNX0
430-3686 (FI) SHPYV PCT B-8000 10GbE, SFP+, SW, 2KM
330-7605 (APOS) TGNV7
430-3687 (FI) K0FP0 PCT B-8000 10GbE, SFP+, SW, 8PACK
330-7608 (APOS) 3RX9C
TABLE 2 FC 8Gbps SFP+ Optical Transceivers (spares/replacements for factory installed SWL Optics)
330-7602 (APOS) 54HC1 PCT B-8000 8GB 10KM LW SFP
330-7604 (APOS) 3D1YG PCT B-8000 8GB SFP+, SW, 2KM
330-7607 (APOS) 2F2KF PCT B-8000 8GB SFP+, SW, 2KM, 8PACK
• Access to an FTP server on the Ethernet management network, for backing up the converged network switch
configuration.
• Access to these publications:
• Dell PowerEdge Modular Systems Hardware Blade Server Enclosure Hardware Owner's Manual
• Dell PowerEdge M1000e Blade Server Enclosure Configuration Guide
• 53-1001980 Dell M8428-k Hardware Reference Manual
• 53-1002116 Dell Converged Enhanced Ethernet Administrators Guide
• 53-1002115 Dell Converged Enhanced Ethernet Command Reference
• 53-1001345 Access Gateway Administrators Guide
• 53-1001343 Web Tools Administrators Guide
• 53-1001336 Fabric OS Administrators Guide
• 53-1001754 Fabric OS Command Reference Manual
• Dell Chassis Management Controller (CMC) Users Guide
These guides can be found at support.dell.com/support under PowerEdge M1000E, manuals and documentation.
6 of 16 Dell M8428-k Getting Started Guide
75N55
Page 7

FIGURE 3 Description of the M8428-k external ports, status LED’s and release latch.
NOTE
Modify the converged network switch Ethernet management IP address
By default, the Ethernet management IP address for the converged network switch is configured as 10.77.77.77 with
a default Ethernet subnet mask of 255.255.255.0. The default gateway is 0.0.0.0.
Reset the IP address using one of the available methods, which store the IP address values on the switch module:
• Blade server enclosure CMC graphical user interface (GUI).
• Blade server enclosure CMC CLI.
• Dell M8428-k command line interface (CLI).
After modifying the switch module’s IP address and domain name (if the switch module is in full fabric mode), we
recommend that you cable all external ports to fabric connections before bringing the switch module online.
It is recommended that you set the IP address using the blade server enclosure CMC GUI application because this
enables centralized management of the converged network switch.
Using the CMC GUI to set the IP address
Browse to the Chassis Management Controller (CMSC) IP address and login.
To change the IP address, use the following steps:
Dell M8428-k Getting Started Guide 7 of 16
75N55
Page 8

1. Click the I/O Module Overview in the navigation panel of the CMC menu.
ATTENTION
NOTE
2. Open the CMC application’s Setup tab.
FIGURE 4 CMC Setup Tab
3. Enter the new information in the IP Address for the correct I/O slot, Subnet Mask, and Gateway fields, or enable
DHCP, as appropriate and click Apply.
In order to see the applied settings click the “Refresh” icon.
TRefer to the documentation for the Dell Chassis Management Controller (CMC) for additional GUI detail.
Using the CMC CLI to set the IP address
Use the following steps to connect and modify the converged network switch IP address through the CMC CLI.
1. Establish a Telnet session to the CMC CLI.
• At the CMC login prompt, enter the CMC username and password.
2. At the command prompt, type the setniccfg command with the correct IP information as shown in the following
example:
• $ racadm setniccfg -m switch-x -s 10.32.53.47 255.255.240.0 10.32.48.1
Static IP address modified succesfully
3. Substitute the correct value for switch-x where x is the bay where the switch module is installed. For example,
switch-x can be:
8 of 16 Dell M8428-k Getting Started Guide
75N55
Page 9

• switch-1 for switch module installed in bay A1.
NOTE
NOTE
• switch-2 for switch module installed in bay A2.
• switch-3 for switch module installed in bay B1.
• switch-4 for switch module installed in bay B2.
• switch-5 for switch module installed in bay C1.
• switch-6 for switch module installed in bay C2.
4. Enter racadm getniccfg -m switch-x at the prompt to verify that the address was correctly set.
Refer to the documentation for the Dell Chassis Management Controller (CMC) for additional racadm command
details.
Using the Dell M8428-k CLI to set the IP address
To set the IP address of the switch module using the switch CLI via Serial port (rather than through the CMC), refer to
the Dell M8428-k Hardware Reference Manual under the section with this same section name.
Connecting to the converged network switch management interface
After succesfully setting the IP address of the switch module, a terminal emulator (Telnet, SSH) CLI connection can
be established to the converged switch module, from a remote management workstation, through the Chassis
Management Controller (CMC) Ethernet port. The management interface can be used for any additional
configuration of the switch module.
The default switch module login/password the Admin account is: admin/password
Dell M8428-k Getting Started Guide 9 of 16
75N55
Page 10

The diagram below shows the separation spaces for common FOS commands and CEE commands which are
navigated using the CLI mode commands (cmsh, enable, configure, and interface). Within the CEE CLI use "?" for
help with commands and tab for auto complete. Within the FOS CLI use help for command syntax.
FIGURE 5 Converged switch module CLI mode hierarchy for FOS and CEE commands
Additionally, a browser based GUI connection to the switch module is available (WebTools - requires JRE) which can
be used for the common commands needed to configure the switch module. See the Fabric OS Administrators
Guide for details on GUI interface use.
Configuring internal ports for FCoE
The internal midplane ports of the converged switch module need to be configured for use with the Converged
Network Adapter (CNA), in the blade servers, in order for FCoE connectivity to occur.
Once you have logged into the switch, use the cmsh command to access the CEE command shell. Use the following
steps to configure the CEE ports.
1. Login to the switch. with the Admin account. Default Admin password = password.
2. Enter the following command:
10 of 16 Dell M8428-k Getting Started Guide
75N55
Page 11

M8428-k:Admin> cmsh
NOTE
NOTE
NOTE
M8428-k#
3. Once in the command shell, enter the following command:
enable
4. Then Enter the following command to enter configure mode:
configure terminal
5. Enter the following commands:
a.
interface intengigabitethernet 0/x, where x is the internal port you wish to change, which is the Slot
position of the server blade with the Converged Network Adapter being connected to.
The internal ports are numbered 1 through 16 corresponding to the server blade slot positions. The external
ports would be configured with the command interface exttengigabitethernet 0/x, but the external ports would
only be set to FCoE mode when connected to an external Host Server with a CNA. The external ports should not
be connected to another FCoE Switch.
6. Once in the interface for the port, enter the following commands in the order shown:
fcoeport
exit
The interface command fcoeport applies the following to the interface to enable FCoE traffic:
The corresponding FCoE VLAN is applied to the interface (VLAN 1002)
The corresponding CEE map is applied to the interface (“default”)
The FCoE/FIP VLAN classifiers are applied to the interface
See the Dell Converged Enhanced Ethernet administrators guide for more details of this command.
7. Repeat steps 5-6 for any other ports for additional server blade slots you wish to configure. Additionally as
needed, configure the internal ports for converged mode with a VLAN for untagged frames for non FC traffic, and
configure FC trunks or LACP LAG’s on external ports.
To view the CEE port configuration type: do show running-config
To view FCoE device connectivity type: do fos switchshow and do fos fcoe --loginshow
8. Once finished with all of the blade ports, type exit and press Enter (you should still be in the CMSH at this point).
9. Enter the following command to save the running config as the startup config:
write memory
Answer yes to overwrite the startup file.
See the Converged Enhanced Ethernet Administrator’s Guide for information about CEE CLI interface and
configuring switches for FCoE operation and the Converged Enhanced Ethernet Command Reference for more
details on the commands.
Dell M8428-k Getting Started Guide 11 of 16
75N55
Page 12

Connecting the converged network switch to the fabric
NOTE
ATTENTION
NOTE
1. The switch module is delivered with FC 8G SFP transceivers installed in the four fibre channel ports.
2. If you need to connect the Ethernet ports, install 10GE SFP+ transceivers or twin-ax cables in the external ports
as required. Be sure you have all the necessary SFP transceivers as well as either optical or active twin-ax
copper cables.
a. If necessary, remove the end caps from the SFP.
b. Orient the transceiver correctly and insert it into a port until it is firmly seated and the latching mechanism
clicks.
For instructions specific to the type of transceiver, refer to the transceiver manufacturer’s documentation.
c. Repeat substeps a, b, and c for the remaining ports, as required.
Use only Dell-approved SFPs or active twin-ax copper cables in the appropriate external optical ports of this
module. The FC 8G SFP transceivers included in the 4 Fibre Channel ports (25, 26, 27, and 0) of the switch
module are not compatible with the Ethernet ports (17 through 24). The Ethernet ports should be populated
with Dell-Approved 10GE SFP+ transceivers, or active twin-ax copper cables (not included).
A cable should not be bent to a radius less than 5.08 cm (2 inches) under full tensile load and 3.048 cm (1.2
inches) with no tensile load. Tie wraps are not recommended for optical cables because they are easily over
tightened.
d. Orient a cable connector so that the key (the ridge on one side of connector) aligns with the slot in the
transceiver
e. Insert the cable into the transceiver until the latching mechanism clicks. For instructions specific to cable
type, refer to the cable manufacturer's documentation.
f. Repeat for the remaining transceivers as required.
3. Connect the cables to the transceivers.
The transceivers are keyed to ensure correct orientation. If a transceiver does not install easily, ensure that it is
correctly oriented and that the end caps have been removed.
4. Check the LEDs to verify that all components are functional.
For information about LED patterns, see the “Operating the converged network switch” chapter in the Dell
M8428-k Hardware Reference Manual.
Commands below are run from the FOS CLI, as needed exit the CEE CLI, or login to the Switch with a terminal
emulator session and gain access the FOS prompt M8428-k:Admin>
5. Once the switch module FC port is connected to an FC SAN switch, the ports need to be enabled. From the
switch module FOS CLI enter the following command for the ports being used (this can also be enabled from the
switch GUI):
M8428-k:admin> portcfgpersistentenable <port#>, where the port# is 25, 26, 27 or 0.
6. Verify the correct operation of the converged network switch by typing the switchShow command from the
workstation. This command provides information about the switch module and port status.
12 of 16 Dell M8428-k Getting Started Guide
75N55
Page 13

7. Verify the correct operation of the converged network switch in the fabric by typing the fabricShow command
NOTE
from the workstation.
8. Back up the switch module configuration to an FTP server by typing the configUpload command and following
the prompts.
These commands upload the converged network switch configuration to the server, making it available for
downloading to a replacement converged network switch if necessary. Additionally the CEE configuration should
be backed up on a regular basis to ensure that a complete configuration is available for downloading to a
replacement switch module. See “Backing up the configuration” on page 15 for complete details.
Fibre Channel SwitchMode (NPIV aggregator vs. full fabric)
The following points summarize the differences between a Fabric OS switch functioning in Native Operating mode
(full fabric mode) and a Fabric OS switch functioning in AG operating mode (NPIV aggregator):
• The Fabric OS switch in Native mode is a part of the fabric; it requires two to four times as many physical
ports, consumes fabric resources, and can connect to a Fabric OS fabric only.
• A switch in AG mode is outside of the fabric; it reduces the number of switches in the fabric and the number
of required physical ports. You can connect an AG switch to either a Fabric OS, M-EOS, or Cisco-based fabric.
Determine whether the Fibre Channel portion of the switch module is in NPIV or full fabric mode. This setting affects
the configuration process for the FOS portion of the switch module.
In NPIV aggregator mode, only a limited subset of the fabric operating system commands are available and all
fabric-related service requests are forwarded to the fabric switches.
When the switch mode is set to Access Gateway mode enabled, the F_Ports connect to the Enterprise fabric as
N_Ports rather than as E_Ports. Therefore at least one of the external FC ports must be connected to an external
FC switch fabric in order for the internal ports connected to Converged Network Adapter’s (CNA’s) to be able to
login to the FCoE ports on the switch
Using the converged network switch CLI, verify the desired switch operating mode (The switch module is shipped
with Access Gateway Mode enabled):
Log onto the switch module through an SSH or Telnet connection, using the admin account (default password:
password).
You can enter the ag ––modeShow command to ensure that the module is in NPIV mode.
ag --modeShow
The factory default response will say:
Access Gateway mode is enabled.
module.
Changing from NPIV aggregator mode to full fabric mode
If your converged network switch is currently configured in NPIV mode (the factory default setting), you can enable
the module for full fabric mode by disabling Access Gateway mode. When you do this, the module automatically
reboots in full fabric mode.
Disabling NPIV mode is disruptive because the switch is disabled and rebooted. Always back up the current
configuration before enabling or disabling NPIV mode. Enabling NPIV mode clears the security and zone databases.
Disabling NPIV mode clears the F_Port to N_Port mapping.
Dell M8428-k Getting Started Guide 13 of 16
75N55
Page 14

Changing to full fabric mode using the Command Line Interface
Complete the following steps to enable NPIV mode using the CLI (The switch GUI also provides a method to change
NPIV mode in the advanced menu, see the Dell M8428-k hardware Reference Manual for details).
1. Log in using the default administrative account.
Login: admin
Password: password
2. Enter the following command to disable the switch.
switchDisable
3. Back up the switch configurations. See “Backing up the configuration” on page 15 for specifics.
4. Enter the following command to enable full fabric mode:
ag ––modeDisable
The switch module automatically reboots and comes back online in full fabric mode. The NPIV parameters, such
as port mapping and failover and failback, are automatically removed.
You can enter the ag ––modeShow command to ensure that the module is in NPIV mode.
ag ––modeShow
The response should be:
Access Gateway mode is NOT enabled.
Changing to NPIV mode using the Command Line Interface
If your converged network switch is currently configured in full fabric mode you canenable NPIV mode using the
following instructions (The switch GUI also provides a method to change NPIV mode in the advanced menu, see the
Dell M8428-k Hardware Reference Manual for details):
1. Log in using the default administrative account.
Login: admin
Password: password
2. Enter the following command to disable full fabric mode.
switchDisable
3. Back up the switch configurations. See “Backing up the configuration” on page 15 for specifics.
4. Enter the following command to enable NPIV mode:
ag ––modeEnable
The switch module automatically reboots and comes back online in NPIV mode using a factory default F_Port to
N_Port mapping.
5. You can enter the ag ––modeShow command to ensure that the module is in NPIV mode.
ag --modeShow
The response should be:
Access Gateway mode is enabled.
14 of 16 Dell M8428-k Getting Started Guide
75N55
Page 15

You can also enter the ag ––mapshow command to display the F_Port to N_Port mapping. Enter ag ––help
command to display a list of all NPIV actions.
Verify FCOE connectivity in NPIV aggregator mode
When the switch mode is set to Access Gateway mode enabled, the F_Ports connect to the Enterprise fabric as
N_Ports rather than as E_Ports. Therefore at least one of the external FC ports must be connected to an external FC
switch fabric in order for the internal ports connected to Converged Network Adapter's (CNA's) to be able to login to
the FCoE ports on the switch module.
The connectivity of the switch module with the CNA's can be verified using the FOS commands switchshow and fcoe
--loginshow. The internal ports should show "online" State, with connectivity of internal FCoE VF-ports to the CNA
VN-ports shown by the session MAC address. See "AccessGateway_AG_v630" admin guide for details on the NPIV
aggregator mode.
Once the switch module FC port is connected to an FC SAN switch, the ports may need to be enabled. From the
switch module FOS CLI enter the following command for the ports being used (this can also be enabled from the
switch GUI):
M8428-k:admin> portcfgpersistentenable <port#>, where the port# is 25, 26, 27 or 0.
Backing up the configuration
Perform these steps to back up the switch module configuration to an FTP server.
1. Open a Telnet or SSH session to the switch module.
2. Enter the following command to upload the basic configuration of the switch module:
configUpload
You are then presented with a series of prompts.
3. Follow the prompts to upload the configuration.
4. When the upload completes, enter the following command to access the CEE CLI:
cmsh
5. Enter the following command to upload the current CEE configuration:
copy running-config ftp://[username@server/path]
You are then prompted for a password. When you enter the ftp password, the copy procedure begins.
These commands upload the switch module configurations to the server, making it available for downloading to a
replacement switch module if necessary. Dell recommends backing up the configuration on a regular basis to
ensure that a complete configuration is available for downloading to a replacement switch module.
Dell M8428-k Getting Started Guide 15 of 16
75N55
Page 16

16 of 16 Dell M8428-k Getting Started Guide
75N55
 Loading...