

Page 1
Dell Latitude E6430s
Setup and Features Information
About Warnings
WARNING: A WARNING indicates a potential for property damage, personal injury,
or death.
Front and Back View
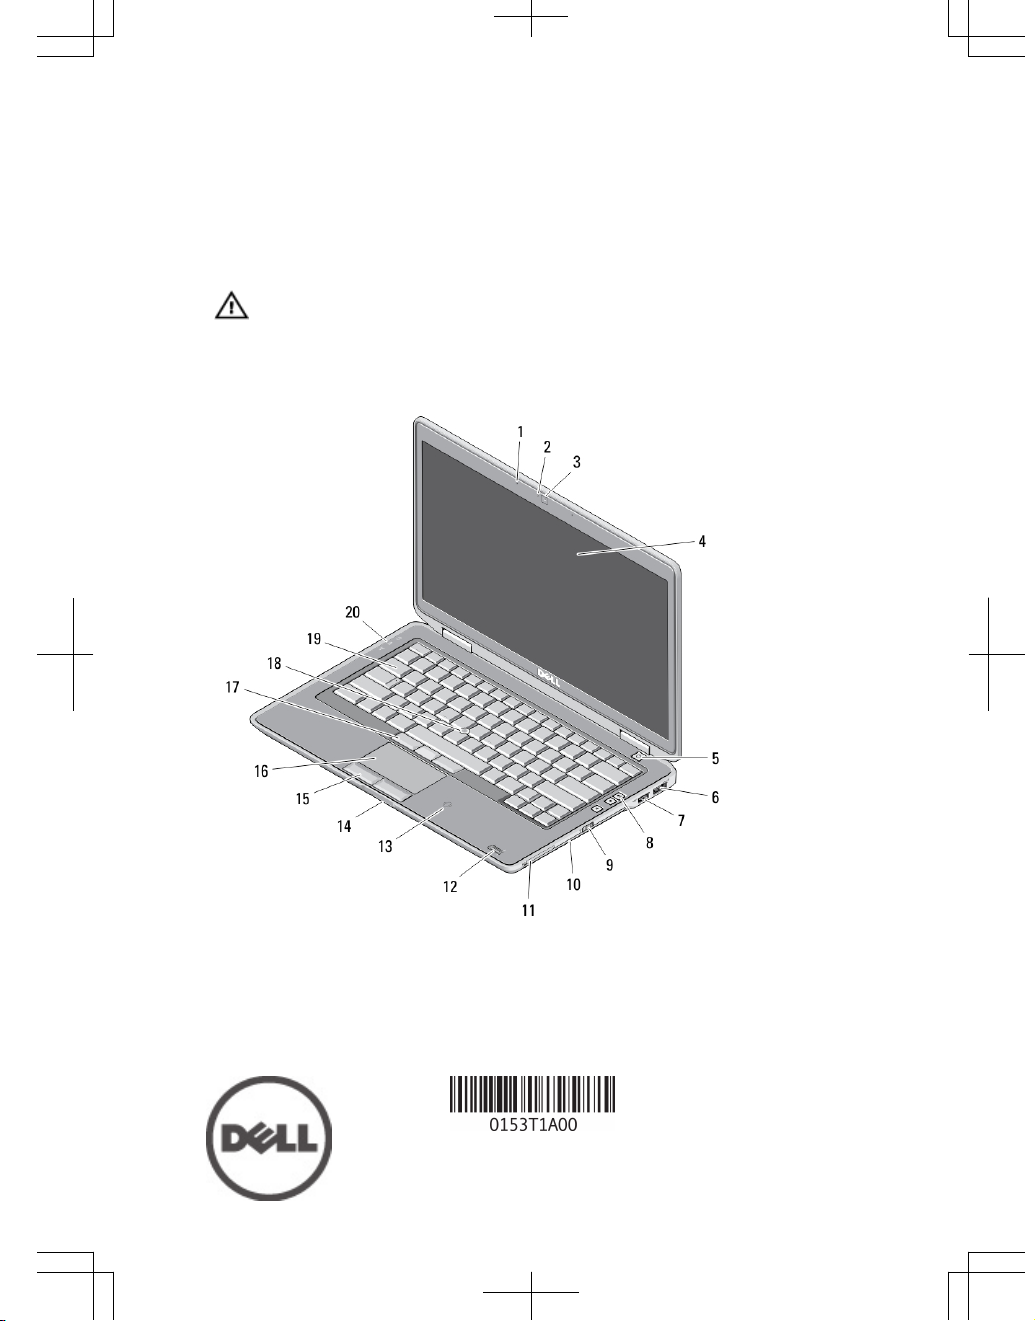
Figure 1. Front view
1. microphone
2. camera status light
3. camera
4. display
Regulatory Model: : P19S
Regulatory Type: : P19S002
2012- 06
Page 2
5. power button
6. eSATA/USB 2.0 connector
7. powered USB 3.0 connector
8. volume control buttons
9. wireless switch
10. optical drive
11. ExpressCard slot
12. fingerprint reader (optional)
13. contactless smart card reader
(optional)
14. Secure Digital (SD) memory-card
reader
15. touchpad buttons (2)
16. touchpad
17. trackstick buttons (3)
18. trackstick
19. keyboard
20. device status lights
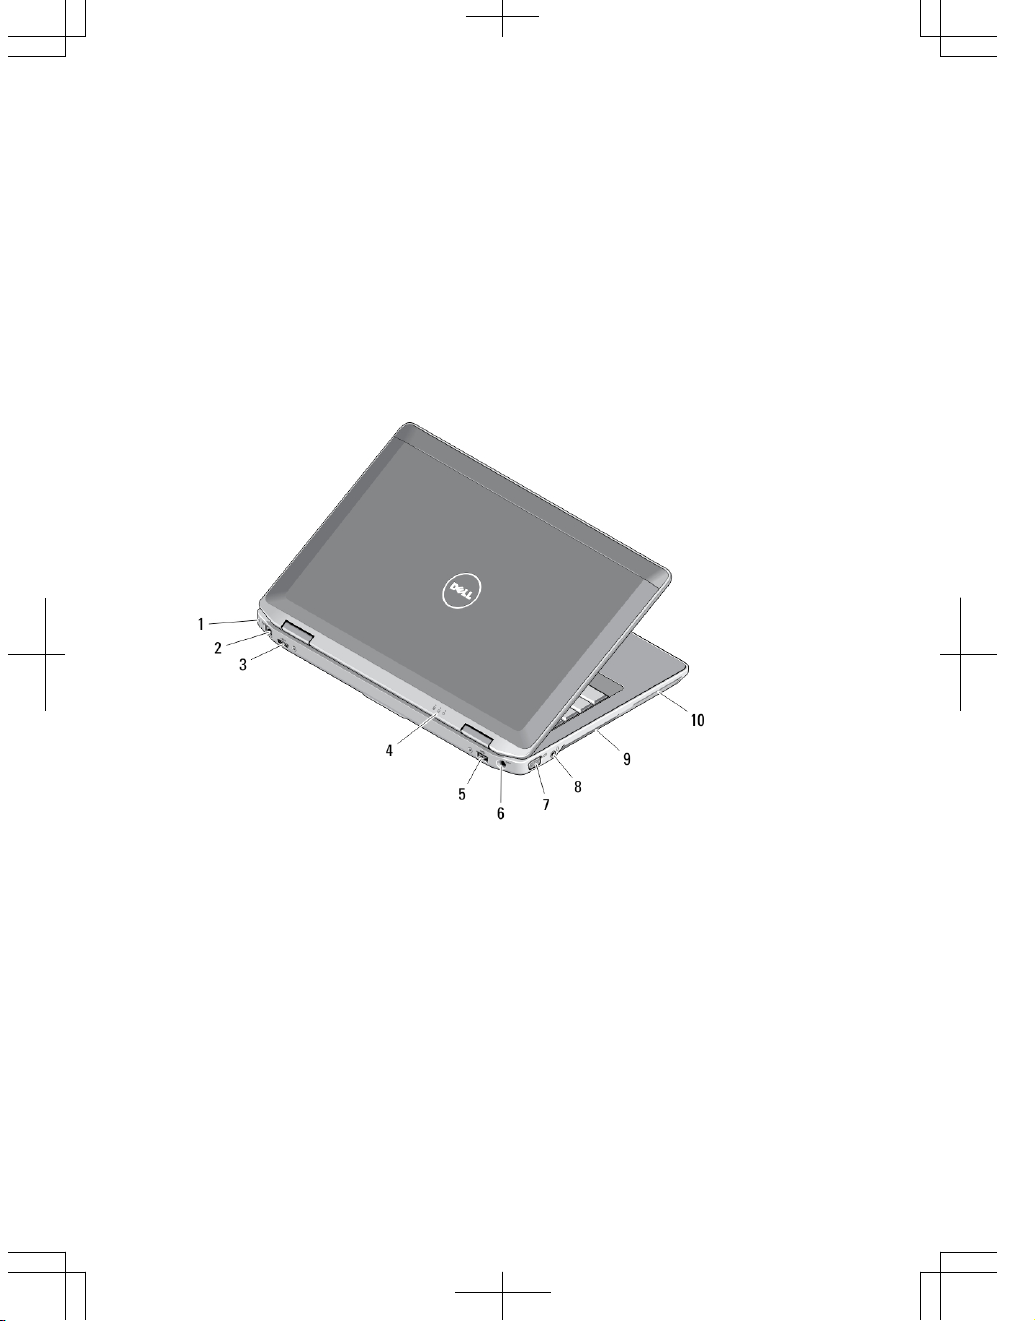
Figure 2. Back view
1. security cable slot
2. network connector
3. mini HDMI connector
4. device status lights
5. USB 3.0 connector
6. power connector
7. VGA connector
8. audio/microphone combo
connector
9. cooling vents
10. smart card slot (optional)
2
Page 3

WARNING: Do not block, push objects into, or allow dust to accumulate in the air
vents. Do not store your Dell computer in a low-airflow environment, such as a
closed briefcase, while it is running. Restricting the airflow can damage the
computer or cause a fire. The computer turns on the fan when the computer gets
hot. Fan noise is normal and does not indicate a problem with the fan or the
computer.
Quick Setup
WARNING: Before you begin any of the procedures in this section, read the safety
information that shipped with your computer. For additional best practices
information, see www.dell.com/regulatory_compliance
WARNING: The AC adapter works with electrical outlets worldwide. However,
power connectors and power strips vary among countries. Using an incompatible
cable or improperly connecting the cable to the power strip or electrical outlet may
cause fire or equipment damage.
CAUTION: When you disconnect the AC adapter cable from the computer, grasp
the connector, not the cable itself, and pull firmly but gently to avoid damaging the
cable. When you wrap the AC adapter cable, ensure that you follow the angle of the
connector on the AC adapter to avoid damaging the cable.
NOTE: Some devices may not be included if you did not order them.
1. Connect the AC adapter to the AC adapter connector on the computer and to the
electrical outlet.
Figure 3. AC Adapter
2. Connect the network cable (optional).
3
Page 4

Figure 4. Network Connector
3. Connect USB devices, such as a mouse or keyboard (optional).
Figure 5. USB Connector
4. Open the computer display and press the power button to turn on the computer.
Figure 6. Power Button
NOTE: It is recommended that you turn on and shut down your computer at least
once before you install any cards or connect the computer to a docking device or
other external device, such as a printer.
Specifications
NOTE: Offerings may vary by region. The following specifications are only those
required by law to ship with your computer. For more information regarding the
configuration of your computer, click Start → Help and Support and select the
option to view information about your computer.
Power
AC Adapter 65 W and 90 W
4
Page 5

Power
NOTE: 65 W AC adapter is available only
for computers with integrated video card.
Input voltage 100 VAC to 240 VAC
Coin-cell battery 3 V CR2032 lithium coin cell
Physical
Height 26.92 mm to 32.26 mm (1.06 inch to 1.27 inches)
Width 335.00 mm (13.19 inches)
Depth 223.30 mm (8.79 inches)
Weight 1.76 kg (3.87 lb)
Environmental
Operating Temperature: 0 °C to 35 °C (32 °F to 95 °F)
Information para NOM (únicamente para México)
The following information is provided on the device described in this document in
compliance with the requirements of the official Mexican standards (NOM).
Voltaje de alimentación
100 V CA – 240 V CA
Frecuencia 50 Hz – 60 Hz
Consumo eléctrico 1,50 A/1,60 A/1,70 A/2,50 A
Voltaje de salida 19,50 V de CC
Intensidad de salida 3,34 A/4,62 A
Finding More Information and Resources
See the safety and regulatory documents that shipped with your computer and the
regulatory compliance website at www.dell.com/regulatory_compliance for more
information on:
• Safety best practices
• Regulatory certification
5
Page 6

• Ergonomics
See www.dell.com for additional information on:
• Warranty
• Terms and Conditions (U.S. only)
• End User License Agreement
Additional information on your product is available at support.dell.com/manuals.
Information in this publication is subject to change without notice.
© 2012 Dell Inc. All rights reserved.
Reproduction of these materials in any manner whatsoever without the written permission of Dell
Inc. is strictly forbidden.
Trademarks used in this text: Dell™, the DELL logo, Dell Precision™, Precision ON™,
ExpressCharge™, Latitude™, Latitude ON™, OptiPlex™, Vostro™, and Wi-Fi Catcher™ are
trademarks of Dell Inc. Intel®, Pentium®, Xeon®, Core™, Atom™, Centrino®, and Celeron® are
registered trademarks or trademarks of Intel Corporation in the U.S. and other countries. AMD® is a
registered trademark and AMD Opteron™, AMD Phenom™, AMD Sempron™, AMD Athlon™,
ATI Radeon™, and ATI FirePro™ are trademarks of Advanced Micro Devices, Inc. Microsoft®,
Windows®, MS-DOS®, Windows Vista®, the Windows Vista start button, and Office Outlook® are
either trademarks or registered trademarks of Microsoft Corporation in the United States and/or
other countries. Blu-ray Disc
™
is a trademark owned by the Blu-ray Disc Association (BDA) and
licensed for use on discs and players. The
Bluetooth
®
word mark is a registered trademark and
owned by the
Bluetooth
®
SIG, Inc. and any use of such mark by Dell Inc. is under license.
Wi-Fi
®
is
a registered trademark of Wireless Ethernet Compatibility Alliance, Inc.
Other trademarks and trade names may be used in this publication to refer to either the entities
claiming the marks and names or their products, Dell Inc. disclaims any proprietary interest in
trademarks and trade names other than its own.
6
 Loading...