

Dell Latitude E6420 User Manual [th]

Dell Latitude E6420 and E6420 ATG Owner's
Manual
Regulatory Model P15G
Regulatory Type P15G001, P15G002

หมายเหตุ ขอควรระวัง และคำเตือน
หมายเหตุ: 'หมายเหตุ' จะระบุถึงขอมูลที่สำคัญที่จะชวยใหคุณใชงานคอมพิวเตอรไดมีประสิทธิภาพยิ่งขึ้น
ขอควรระวัง: 'ขอควรระวัง' จะชี้ถึงโอกาสเกิดความเสียหายกับฮารดแวรหรือการสูญหายของขอมูลหากไมปฏิบัติตามคำแนะนำ
คำเตือน: 'คำเตือน' ใชเพื่อแจงอันตรายที่อาจเกิดขึ้นกับสถานที่ การบาดเจ็บหรือการเสียชีวิต
ขอมูลในเอกสารชุดนี้อาจมีการเปลี่ยนแปลงโดยไมตองแจงใหทราบ
© 2011 Dell Inc. สงวนลิขสิทธิ์
หามผลิตเอกสารขอมูลทั้งหมดนี้ซ้ำโดยเด็ดขาดไมวาดวยวิธีการใดๆ โดยมิไดรับอนุญาตอยางเปนลายลักษณอักษรจาก Dell Inc.
เครื่องหมายการคาที่ใชในเอกสารนี้ :
Latitude ON™, OptiPlex™, Vostro™ และ Wi-Fi Catcher™ เปนเครื่องหมายการคาของ Dell Inc. Intel®, Pentium®, Xeon®,
Core™, Atom™, Centrino® และ Celeron® เปนเครื่องหมายการคาจดทะเบียนหรือเครื่องหมายการคาของ Intel Corporation ทั้งใน
สหรัฐอเมริกาและประเทศอื่นๆ AMD® เปนเครื่องหมายการคาจดทะเบียน และ AMD Opteron™, AMD Phenom™, AMD Sempron™,
AMD Athlon™, ATI Radeon™ และ ATI FirePro™ เปนเครื่องหมายการคาของ Advanced Micro Devices, Inc. Microsoft®,
Windows®, MS-DOS®, Windows Vista ® และเครื่องหมายปุม Start ของ Windows Vista และ Office Outlook® เปน
เครื่องหมายการคาหรือเครื่องหมายการคาจดทะเบียนของ Microsoft Corporation ในสหรัฐอเมริกาและ/หรือประเทศอื่นๆ Blu-ray Disc™ เปน
เครื่องหมายการคาของ Blu-ray Disc Association (BDA) และไดรับอนุญาตใหใชกับแผนดิสกและเครื่องเลน Bluetooth® เปนเครื่องหมายการคา
จดทะเบียนของ Bluetooth® SIG, Inc. และ Dell นำมาใชโดยไดรับอนุญาตแลว Wi-Fi® เปนเครื่องหมายการคาจดทะเบียนของ Wireless
Ethernet Compatibility Alliance, Inc.
เครื่องหมายการคาอื่นๆ และชื่อทางการคาที่ใชในเอกสารนี้ จะใชเพื่ออางถึงองคกรที่เปนเจาของเครื่องหมายการคาและชื่อทางการคานั้น หรือเพื่ออางถึงผลิตภัณฑ
ขององคกรเหลานั้น Dell Inc. ปฏิเสธความเปนเจาของในทรัพยสิน ในเครื่องหมายการคา และชื่อทางการคาใดๆ นอกเหนือจากของ Dell เทานั้น
2011 – 07
Dell™, เครื่องหมาย DELL, Dell Precision™, Precision ON™, ExpressCharge™, Latitude™,
Rev. A00

Contents
หมายเหตุ ขอควรระวัง และคำเตือน...............................................................................2
บทที่ 1: การทำงานกับสวนประกอบภายในของคอมพิวเตอร..................................................9
การดำเนินการกับสวนประกอบภายในคอมพิวเตอร....................................................................................9
เครื่องมือที่แนะนำใหใช...............................................................................................................10
การปดคอมพิวเตอร....................................................................................................................10
หลังจากทำงานกับสวนประกอบภายในของคอมพิวเตอร.............................................................................11
2 ATG Handle...............................................................................................13
Removing The ATG Handle..............................................................................................13
Installing The ATG Handle...............................................................................................14
3 ATG Port Cover.........................................................................................15
Removing the ATG Port Cover.........................................................................................15
Installing The ATG Port Cover.........................................................................................16
4 Modem Connector Plug..........................................................................17
Removing the Modem Connector Plug............................................................................17
Installing the Modem Connector Plug.............................................................................18
5 ExpressCard..............................................................................................19
Removing the ExpressCard.............................................................................................19
Installing the ExpressCard..............................................................................................19
บทที่ 6: แบตเตอรี่..................................................................................................21
Removing the Battery......................................................................................................21
Installing the Battery.......................................................................................................22
7 Subscriber Identity Module (SIM) Card...............................................23
Removing the Subscriber Identity Module (SIM) Card...................................................23

Installing the Subscriber Identity Module (SIM) Card....................................................24
8 Secure Digital (SD) Card.........................................................................25
Removing the Secure Digital (SD) Card..........................................................................25
Installing the Secure Digital (SD) Card............................................................................25
9 Base Cover................................................................................................27
Removing the Base Cover...............................................................................................27
Installing the Base Cover................................................................................................28
บทที่ 10: Hard Drive........................................................................................29
Removing the Hard Drive................................................................................................29
Installing the Hard Drive..................................................................................................30
บทที่ 11: Optical Drive....................................................................................31
Removing The Optical Drive............................................................................................31
Installing the Optical Drive..............................................................................................34
12 Memory Card..........................................................................................35
Removing the Memory Card............................................................................................35
Installing the Memory Card.............................................................................................36
บทที่ 13: Wireless Local Area Network (WLAN) Card.............................37
Removing the Wireless Local Area Network (WLAN) Card............................................37
Installing the Wireless Local Area Network (WLAN) Card.............................................39
14 Wireless Wide Area Network (WWAN) Card...................................41
Removing the Wireless Wide Area Network (WWAN) Card..........................................41
Installing the Wireless Wide Area Network (WWAN) Card...........................................43
บทที่ 15: Coin-Cell Battery............................................................................45
Removing the Coin-Cell Battery......................................................................................45
Installing the Coin-Cell Battery.......................................................................................46

บทที่ 16: Heat Sink..........................................................................................47
Removing The Heat Sink.................................................................................................47
Installing The Heat Sink..................................................................................................49
บทที่ 17: Bluetooth Card................................................................................51
Removing the Bluetooth Card.........................................................................................51
Installing the Bluetooth Card...........................................................................................53
18 Keyboard Trim.........................................................................................55
Removing the Keyboard Trim..........................................................................................55
Installing the Keyboard Trim...........................................................................................56
19 Keyboard..................................................................................................57
Removing the Keyboard..................................................................................................57
Installing the Keyboard...................................................................................................60
20 Modem Card............................................................................................61
Removing the Modem Card.............................................................................................61
Installing the Modem Card..............................................................................................63
21 Palm Rest.................................................................................................65
Removing the Palm Rest Assembly.................................................................................65
Installing the Palm Rest Assembly..................................................................................68
22 Smart Card Reader.................................................................................69
Removing the Smart Card................................................................................................69
Installing the Smart Card.................................................................................................71
23 Media Board...........................................................................................73
Removing The Media Board............................................................................................73
Installing the Media Board..............................................................................................75
24 ExpressCard Cage..................................................................................77
Removing the ExpressCard Cage....................................................................................77

Installing the ExpressCard Cage.....................................................................................78
บทที่ 25: สวนประกอบของบอรดระบบ.......................................................................79
Removing the System Board...........................................................................................79
Installing the System Board............................................................................................84
บทที่ 26: Speaker............................................................................................85
Removing the Speakers..................................................................................................85
Installing the Speakers....................................................................................................87
27 Modem Connector.................................................................................89
Removing the Modem Connector....................................................................................89
Installing the Modem Connector.....................................................................................93
บทที่ 28: Input/Output Panel.........................................................................95
Removing the Input/Output (I/O) Board...........................................................................95
Installing the Input/Output (I/O) Board............................................................................97
29 DC-In Port................................................................................................99
Removing DC-in Port.......................................................................................................99
Installing DC-In Port......................................................................................................102
30 Display Assembly.................................................................................103
Removing the Display Assembly...................................................................................103
Installing the Display Assembly....................................................................................106
31 Display Hinges......................................................................................107
Removing the Display Hinge Covers.............................................................................107
Installing the Display Hinge Covers..............................................................................110
32 Display Bezel.........................................................................................111
Removing the Display Bezel..........................................................................................111
Installing the Display Bezel...........................................................................................112

บทที่ 33: Display Panel................................................................................113
Removing the Display Panel..........................................................................................113
Installing the Display Panel...........................................................................................115
34 Display Bracket....................................................................................117
Removing the Display Bracket......................................................................................117
Installing the Display Bracket.......................................................................................117
บทที่ 35: Camera...........................................................................................119
Removing the Camera...................................................................................................119
Installing the Camera....................................................................................................120
บทที่ 36: รายละเอียดทางเทคนิค..............................................................................121
Technical Specifications...............................................................................................121
บทที่ 37: System Setup................................................................................129
Setup Overview.............................................................................................................129
Entering System Setup..................................................................................................129
System Setup Menu......................................................................................................129
บทที่ 38: การวินิจฉัยระบบ....................................................................................141
Diagnostic LED Codes...................................................................................................141
Battery Status Lights.....................................................................................................142
Device Status Lights......................................................................................................143
บทที่ 39: การติดตอกับ Dell.................................................................................145
การติดตอกับ Dell..................................................................................................................145

8
การทำงานกับสวนประกอบภายในของคอมพิวเตอร 1
การดำเนินการกับสวนประกอบภายในคอมพิวเตอร
ปฏิบัติตามคำแนะนำตอไปนี้เพื่อปกปองคอมพิวเตอรจากความเสียหาย และเพื่อความปลอดภัยของตัวคุณเอง ขั้นตอนที่
แจงในเอกสารนี้แนะนำภายใตเงื่อนไขดังตอไปนี้ ยกเวนมีระบุไวเปนอยางอื่น:
• คุณไดปฏิบัติตามขั้นตอนในหัวขอ การทำงานกับสวนประกอบภายในคอมพิวเตอร
• คุณไดอานขอมูลดานความปลอดภัยที่ใหมาพรอมกับคอมพิวเตอรของคุณแลว
• สวนประกอบที่สามารถเปลี่ยนใหม หรือในกรณีของสวนประกอบจัดซื้อแยกจะตองติดตั้งตามขั้นตอนการถอดโดย
ยอนลำดับขั้นตอน
คำเตือน: กอนดำเนินการกับสวนประกอบภายในคอมพิวเตอร กรุราอานขอมูลดานความปลอดภัยที่จัดมาใหพรอมกับ
คอมพิวเตอรกอนในเบื้องตน ดูรายละเอียดเพิ่มเติมดานความปลอดภัยไดจากโฮมเพจการควบคุมมาตรฐานไดที่
www.dell.com/regulatory_compliance
ขอควรระวัง: การซอมแซมหลายสวนสามารถดำเนินการไดโดยชางที่ผานการรับรองเทานั้น คุณสามารถแกไขปญหาและ
ซอมแซมเครื่องเบื้องตนตามที่แนะนำในเอกสารกำกับผลิตภัณฑ หรือตามที่ทีมใหบริการและชวยเหลือระบบออนไลนหรือ
โทรศัพทแจงเทานั้น ความเสียหายเนื่องจากการซอมแซมที่ไมไดรับการรับรองจาก Dell จะไมไดรับความคุมครองตามการรับ
ประกัน อานและปฏิบัติตามคำแนะนำดานความปลอดภัยที่จัดมาใหพรอมกับผลิตภัณฑ
ขอควรระวัง: เพื่อปองกันไฟฟาสถิต ใหคายประจุไฟฟาสถิตในตัวคุณโดยการใสสายรัดขอมือปองกันไฟฟาสถิต หรือใหสัมผัส
พื้นผิวโลหะที่ไมทาสี เชน ชองตอที่ดานหลังของคอมพิวเตอร เปนระยะ ๆ
ขอควรระวัง: ใชงานสวนประกอบและการดดวยความระมัดระวัง อยาสัมผัสที่สวนประกอบหรือหนาสัมผัสของการด ถือการด
จากขอบหรือที่หูยึดโลหะ ถือสวนประกอบ เชน โปรเซสเซอรที่ขอบ อยาจับที่ขาหนาสัมผัส
ขอควรระวัง: ในกรณีที่ตองการปลดสายตอ ใหดึงที่ขั้วตอหรือแถบดึง อยาดึงที่สาย สายบางชนิดมีขั้วตอพรอมแถบล็อค หาก
คุณปลดสายเหลานี้ใหกดที่แถบล็อคกอนนำสายตอออก ขณะดึงขั้วตอออก ใหดึงตามแนวที่ตอเพื่อไมใหขาตอเกิดการงอ กอนตอ
สาย ตรวจสอบกอนวาขั้วตอทั้งสองไดแนวถูกตองดีแลว
หมายเหตุ: สีของคอมพิวเตอรและของสวนประกอบบางอยางอาจไมเหมือนกับสีที่แสดงในเอกสารนี้
เพื่อปองกันความเสียหายที่อาจเกิดขึ้นกับคอมพิวเตอร ใหปฏิบัติตามขั้นตอนตอไปนี้กอนทำงานกับภายในของ
คอมพิวเตอร
ตรวจสอบวาพื้นผิวที่ใชวางคอมพิวเตอรนั้นเรียบและสะอาดเพื่อปองกันไมใหฝาครอบคอมพิวเตอรมีรอยขีดขวน
1.
2. ปดคอมพิวเตอร (ดูในหัวขอ การปดคอมพิวเตอร)
3. หากคอมพิวเตอรตออยูกับอุปกรณพวง (ชุดพวงอุปกรณเสริม) เชน Media Base หรือ Battery Slice
ใหปลดการเชื่อมตอ
9
ขอควรระวัง: ปลดสายเครือขายโดยถอดสายออกจากคอมพิวเตอรกอน แลวจึงถอดสายจากอุปกรณเครือขาย
ถอดสายโทรศัพทหรือสายเครือขายทั้งหมดออกจากคอมพิวเตอร
4.
5. ถอดปลั๊กคอมพิวเตอรและอุปกรณตาง ๆ ทั้งหมดที่ตออยูกับคอมพิวเตอรออกจากเตารับไฟฟา
ปดฝาจอแสดงผลและพลิกคอมพิวเตอรคว่ำลงบนพื้นผิวเรียบ
6.
หมายเหตุ: คุณตองถอดแบตเตอรี่หลักออกกอนทำการดูแลรักษาคอมพิวเตอร เพื่อปองกันไมใหเมนบอรดเสียหาย
ถอดแบตเตอรี่หลักออก
7.
พลิกคอมพิวเตอรขึ้น
8.
เปดจอแสดงผล
9.
10. กดปุมเปด/ปดเครื่องเพื่อคายประจุเมนบอรด
ขอควรระวัง: เพื่อปองกันไฟฟาดูด ใหถอดปลั๊กคอมพิวเตอรออกจากเตารับทุกครั้งกอนจะถอดฝาครอบออก
ขอควรระวัง: กอนสัมผัสสวนประกอบดานในคอมพิวเตอร ใหลงกราวดตัวเองโดยสัมผัสพื้นผิวโลหะที่ไมมีการเคลือบผิว เชน
โลหะที่ดานหลังคอมพิวเตอร ขณะปฏิบัติงาน ใหสัมผัสพื้นที่โลหะไมเคลือบผิวเปนประจำเพื่อถายประจุไฟฟาสถิตที่อาจเปน
อันตรายตอสวนประกอบภายในของคอมพิวเตอร
11. ถอด ExpressCards หรือ Smart Cards จากชองเสียบ
เครื่องมือที่แนะนำใหใช
ขั้นตอนตาง ๆ ในเอกสารนี้อาจจำเปนตองใชเครื่องมือตอไปนี้ :
• ไขควงปากแบนขนาดเล็ก
• ไขควงหัวแฉกเบอร 0
• ไขควงหัวแฉกเบอร 1
• แทงพลาสติกขนาดเล็กสำหรับงัด
• ซีดีโปรแกรมอัพเดตงแฟลช BIOS
การปดคอมพิวเตอร
ขอควรระวัง: เพื่อปองกันการสูญหายของขอมูล ใหบันทึกและปดไฟลทั้งหมดที่เปดอยู และออกจากโปรแกรมตาง ๆ กอนที่จะ
ปดคอมพิวเตอร
ปดระบบปฏิบัติการ
1.
• สำหรับ Windows Vista :
คลิก Start
Shut Down
10
จากนั้นคลิกที่ลูกศรที่มุมดานขวาลางของเมนู Start ตามภาพดานลาง จากนั้นคลิกเลือก

• สำหรับ Windows XP:
คลิก Start → Turn Off Computer → Turn Off คอมพิวเตอรจะปดทำงานหลังจากระบบ
ปฏิบัติการปดการทำงานเสร็จสิ้น
2. ตรวจสอบวาคอมพิวเตอรและอุปกรณทั้งหมดที่ตอพวงปดทำงานแลว หากคอมพิวเตอรและอุปกรณตอพวงไมปด
การทำงานอัตโนมัติเมื่อปดระบบปฏิบัติการ ใหกดปุมเปดปดเครื่องคางไวประมาณ 4 วินาทีเพื่อปดการทำงาน
หลังจากทำงานกับสวนประกอบภายในของคอมพิวเตอร
หลังจากที่คุณดำเนินการเปลี่ยนชิ้นสวนใด ๆ เสร็จสิ้นแลว ตรวจสอบวาคุณไดตออุปกรณตอพวง การด และสายใด ๆ ให
เรียบรอยกอนที่จะเปดเครื่องคอมพิวเตอรของคุณ
ขอควรระวัง: เพื่อปองกันความเสียหายตอคอมพิวเตอร ใหใชเฉพาะแบตเตอรี่ที่ไดรับการออกแบบมาสำหรับคอมพิวเตอร
Dell รุนนี้โดยเฉพาะ หามใชแบตเตอรี่ที่ออกแบบมาสำหรับคอมพิวเตอรของ Dell รุนอื่น
1. ตออุปกรณตอพวง เชน ตัวจำลองพอรต, battery slice หรือ media base แลวใสการด เชน
ExpressCard กลับเขาที่
เสียบสายโทรศัพทหรือสายเครือขายเขากับคอมพิวเตอร
2.
ขอควรระวัง: สำหรับการเสียบสายเครือขาย ใหเสียบสายเขากับอุปกรณเครือขายกอน แลวจึงเสียบสายอีกดานเขากับ
คอมพิวเตอร
ใสแบตเตอรี่กลับเขาที่
3.
4. เสียบปลั๊กคอมพิวเตอรและอุปกรณตาง ๆ ทั้งหมดที่ตออยูกับคอมพิวเตอรเขากับเตารับไฟฟา
เปดคอมพิวเตอร
5.
11

12
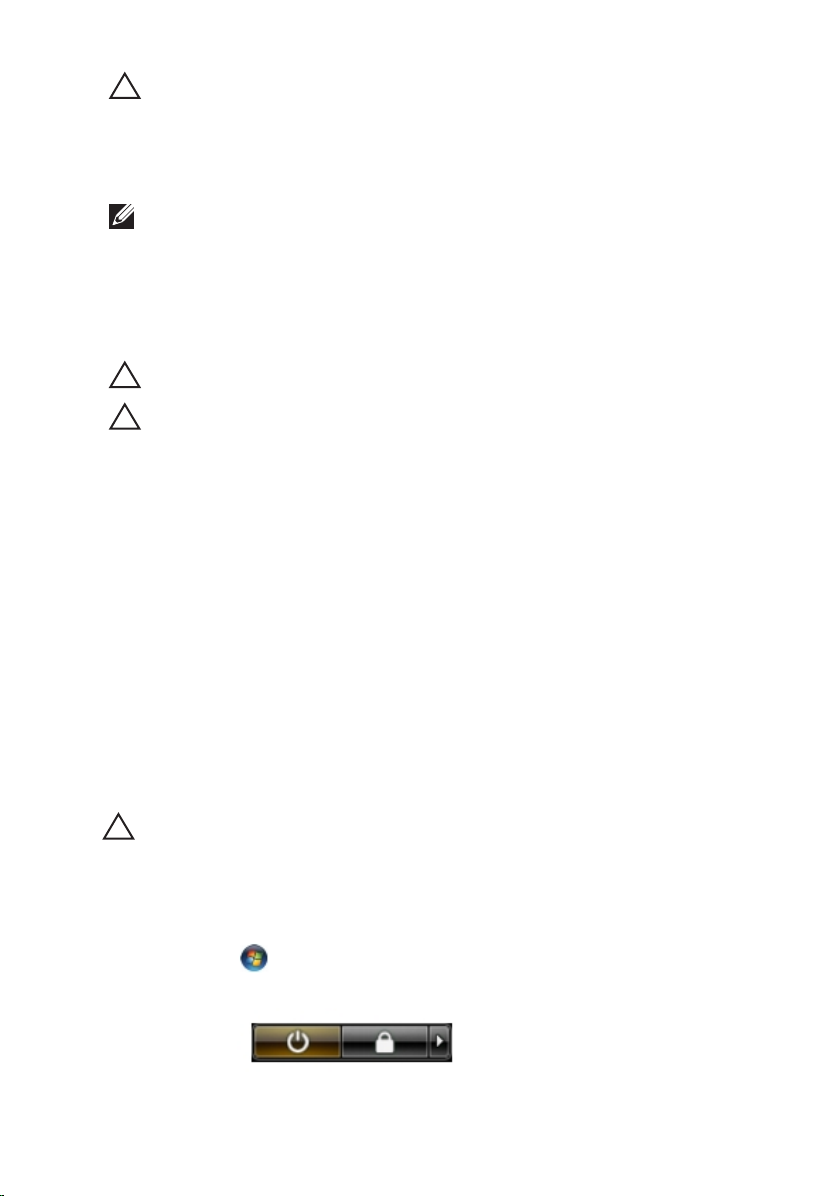
ATG Handle 2
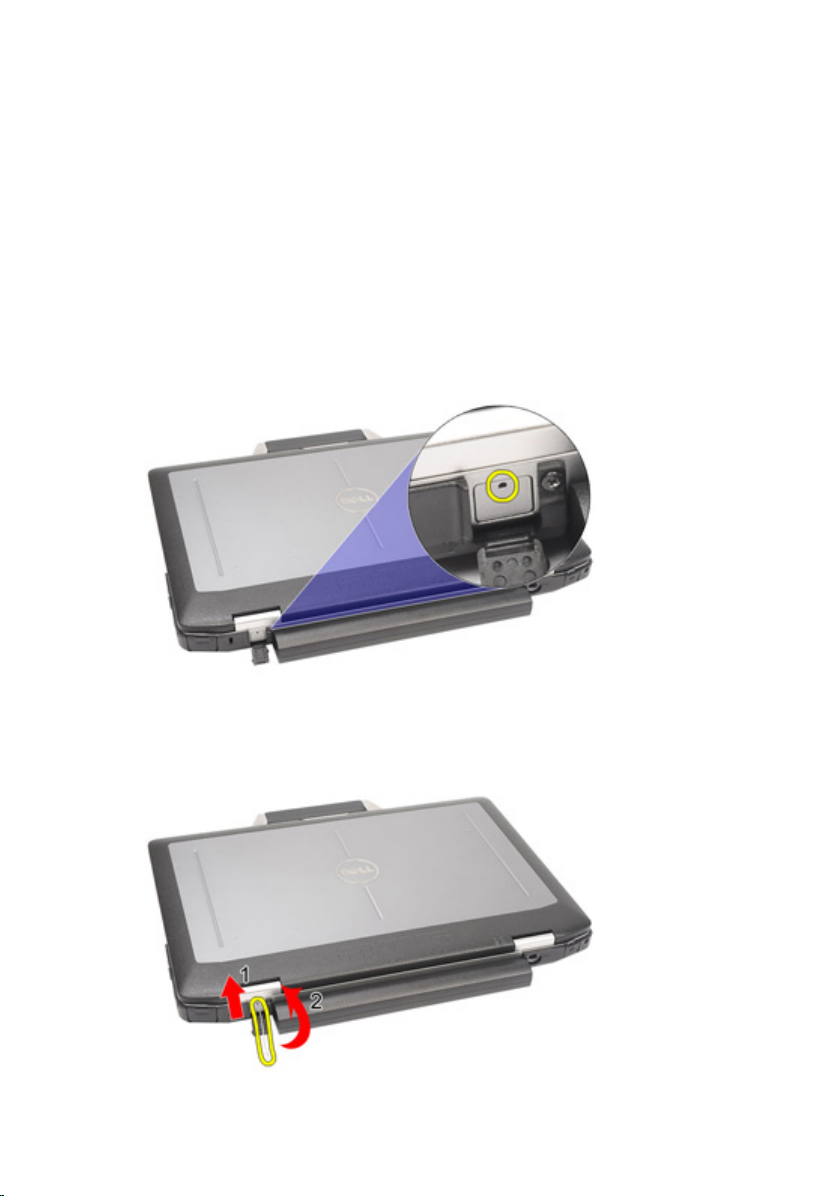
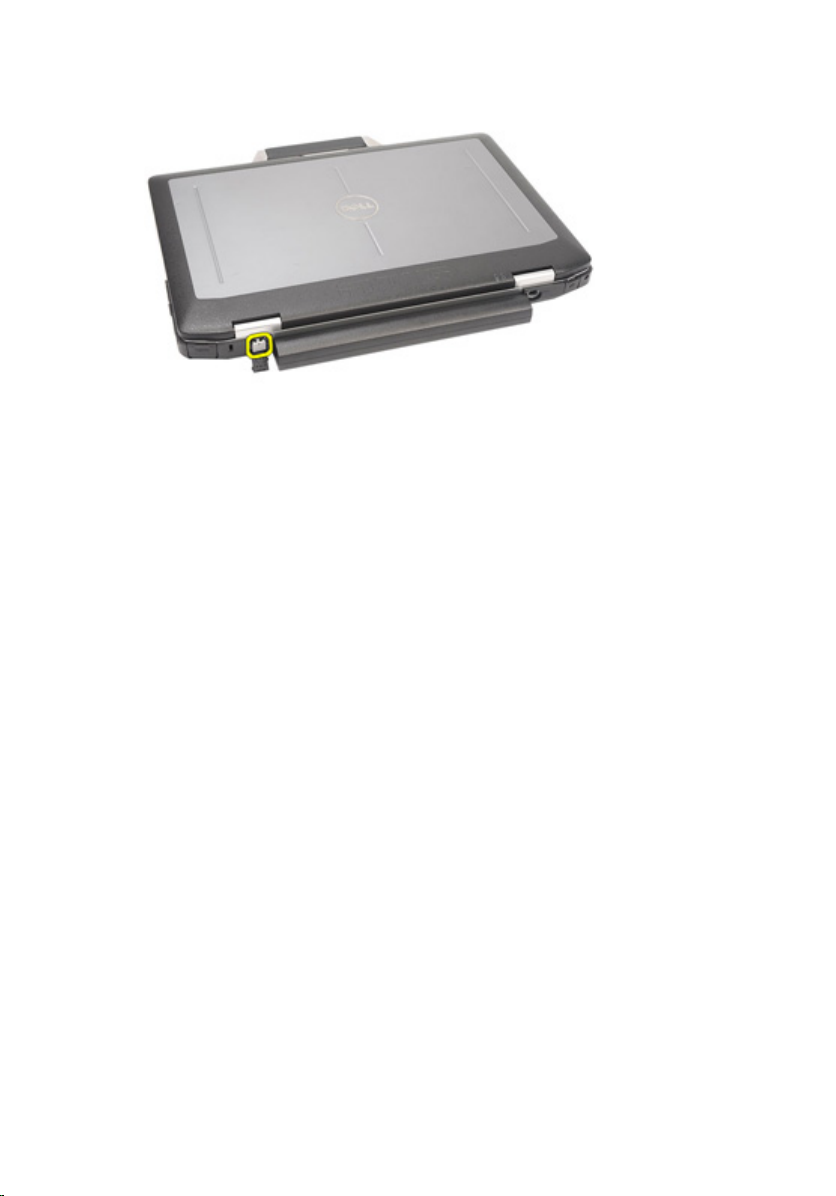
Removing The ATG Handle
1. Follow the procedures in
2. Remove the screws that secure the ATG handle to the computer.
3. Remove the ATG handle out of the computer.
Before Working On Your Computer
.
13

Installing The ATG Handle
1. Place the ATG handle and tighten the screws that secure it to the
computer.
2. Follow the procedures in
After working inside your computer
.
14
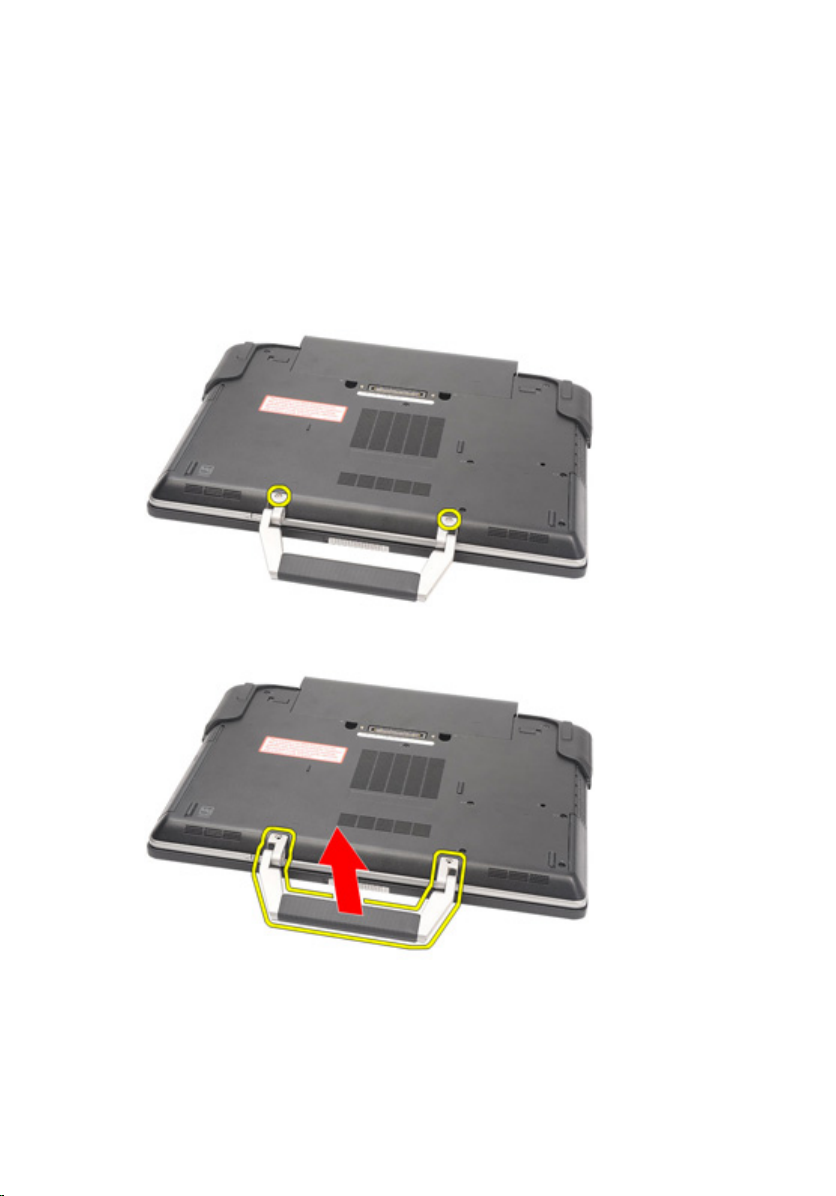
ATG Port Cover 3
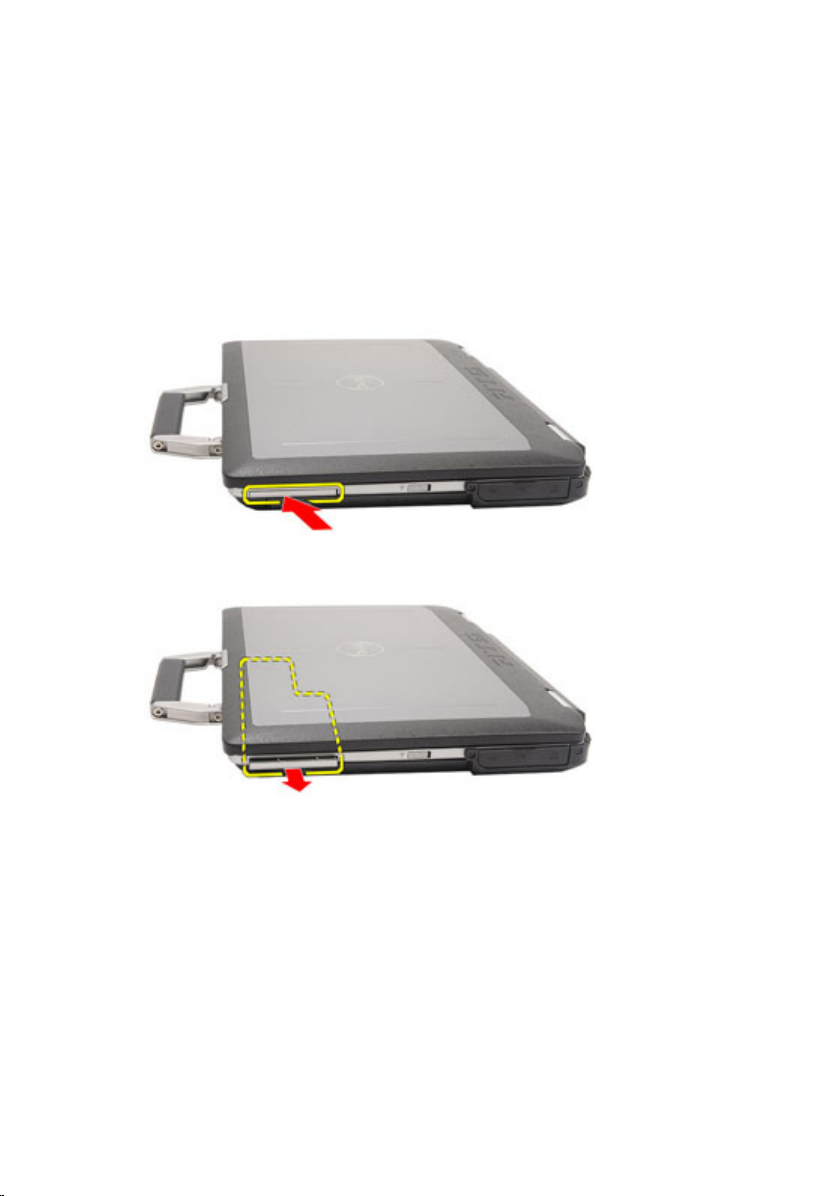
Removing the ATG Port Cover
1. Follow the procedures in
2. Remove the screws on the right ATG Port Cover.
3. Remove the right ATG port cover.
Before Working On Your Computer
.
4. Remove the screws on the left ATG port cover.
15
5. Remove the left ATG Port Cover.
Installing The ATG Port Cover
1. Place the ATG Port Covers and tighten the screws that secure it to the
computer.
2. Follow the procedures in
After working inside your computer
.
16
Modem Connector Plug 4
Removing the Modem Connector Plug
1. Follow the procedures in
2. Remove the
3. Pop open the rubber cover.
4. Identify the pin hole.
5. Insert a pin into the hole and pull the pin upwards to release the latch
cover.
battery
Before Working On Your Computer
.
.
17
6. Remove the cover.
Installing the Modem Connector Plug
1. Place the modem cover.
2. Identify the pin hole and insert a pin into the hole and pull the pin to lock the
cover.
3. Lock the rubber cover.
4. Install the
5. Follow the procedures in
Battery
.
After Working Inside Your Computer
.
18
ExpressCard 5
Removing the ExpressCard
1. Follow the procedures in
2. Press in on the ExpressCard to release it from the computer.
3.
Slide the ExpressCard out of the computer.
Installing the ExpressCard
Before Working On Your Computer
.
1. Slide the ExpressCard into its slot until it clicks into place.
2. Follow the procedures in
After working inside your computer
.
19

20
แบตเตอรี่ 6
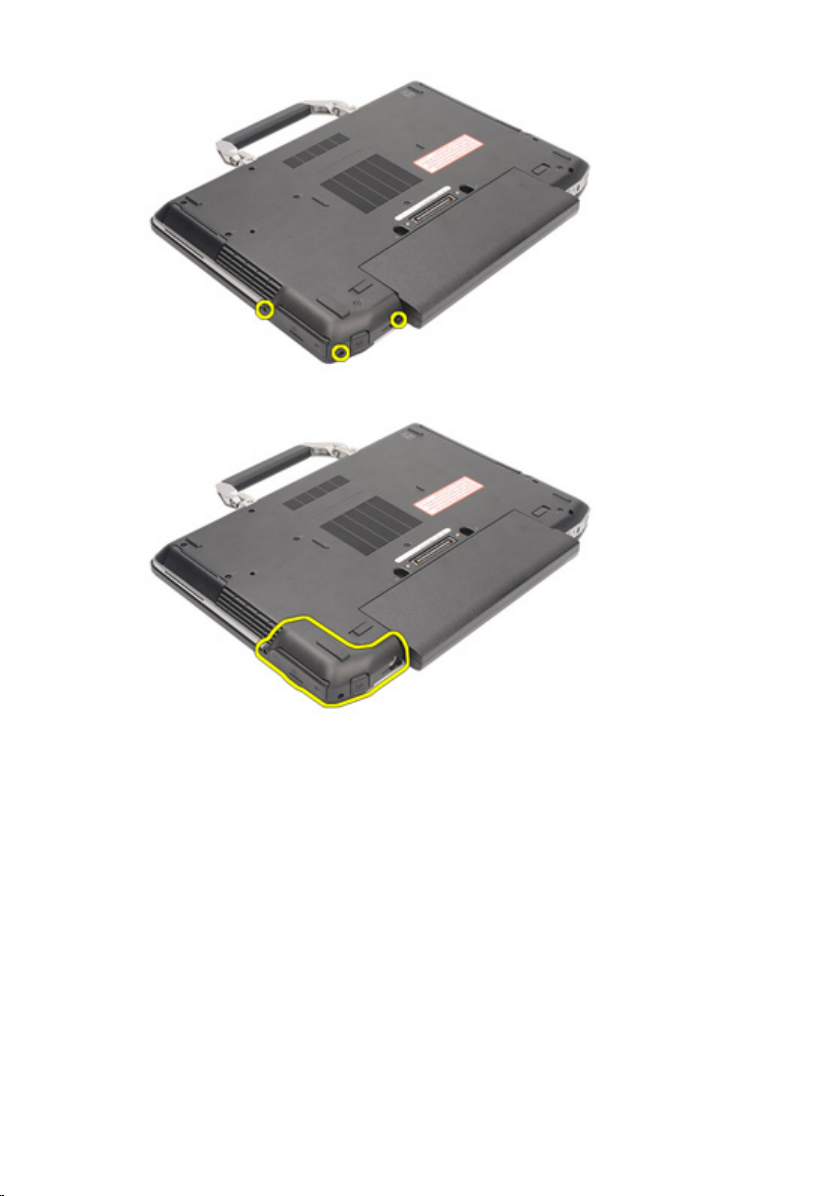
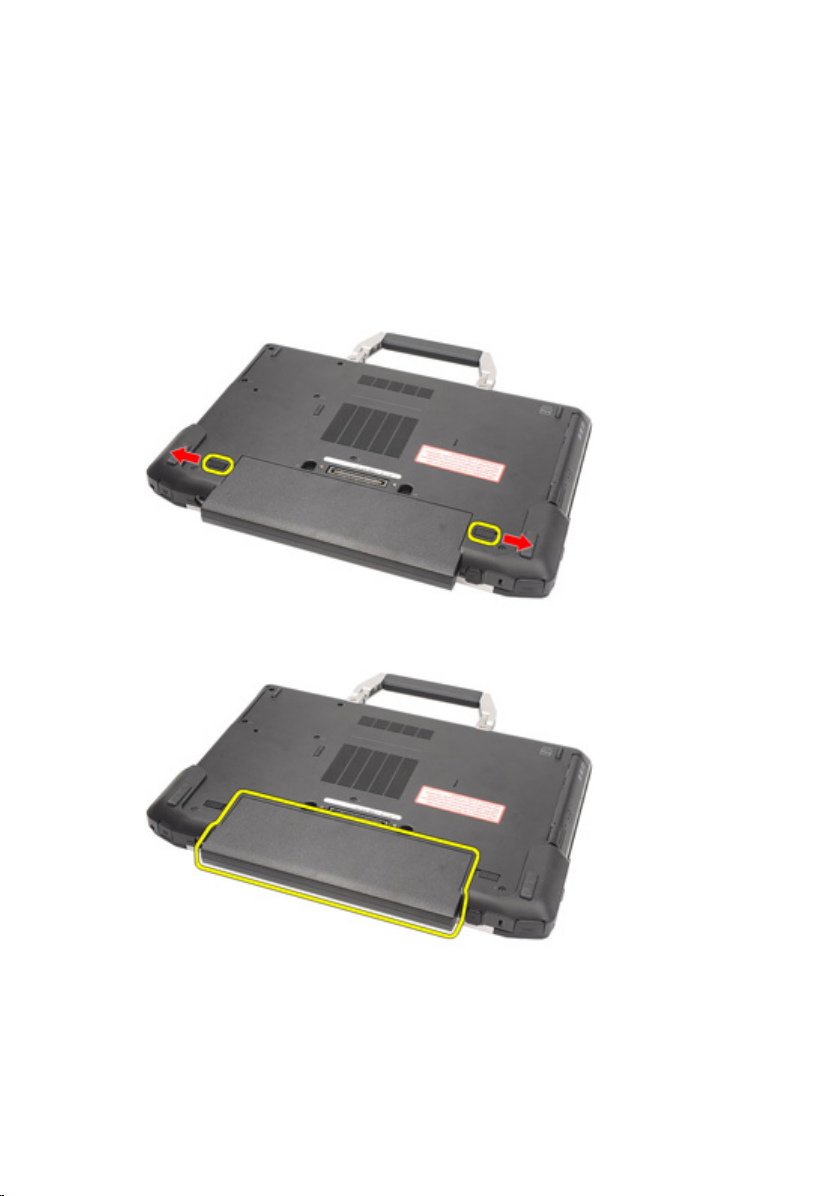
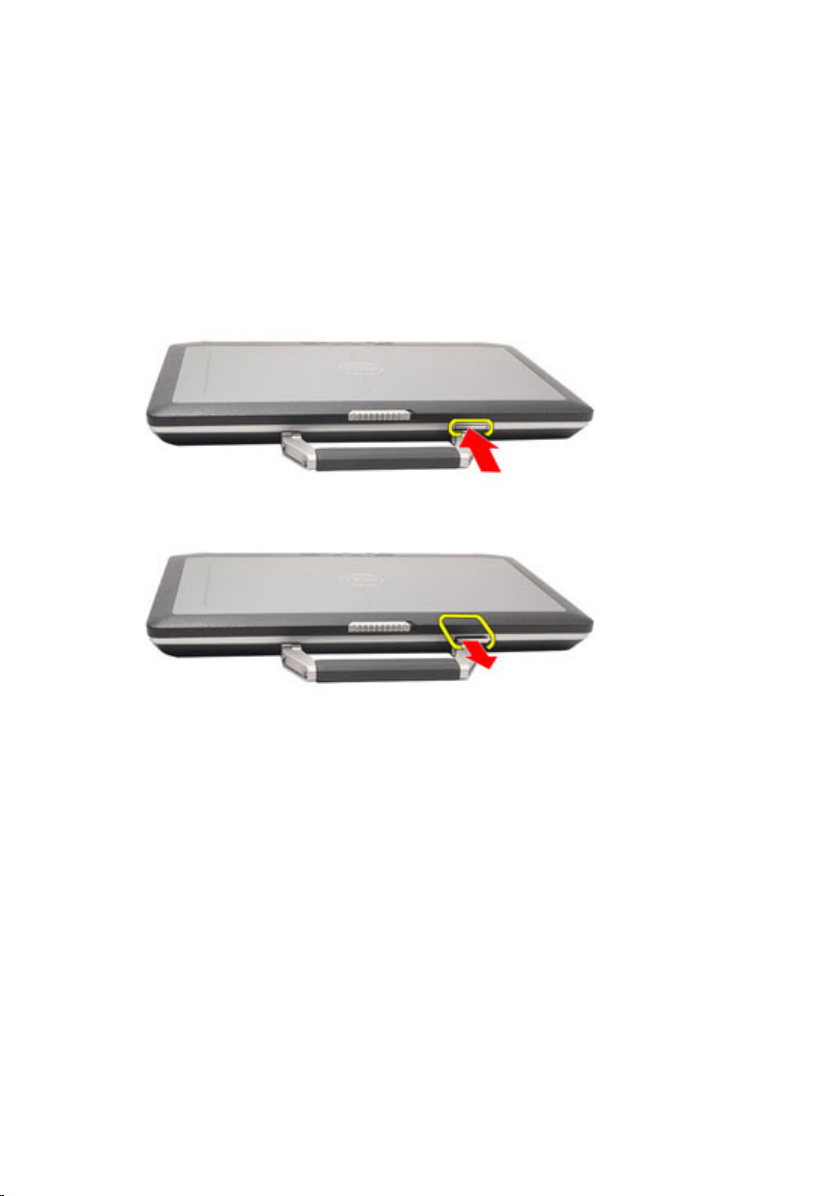
Removing the Battery
1. Follow the procedures in
2. Slide the battery latches toward the unlock position.
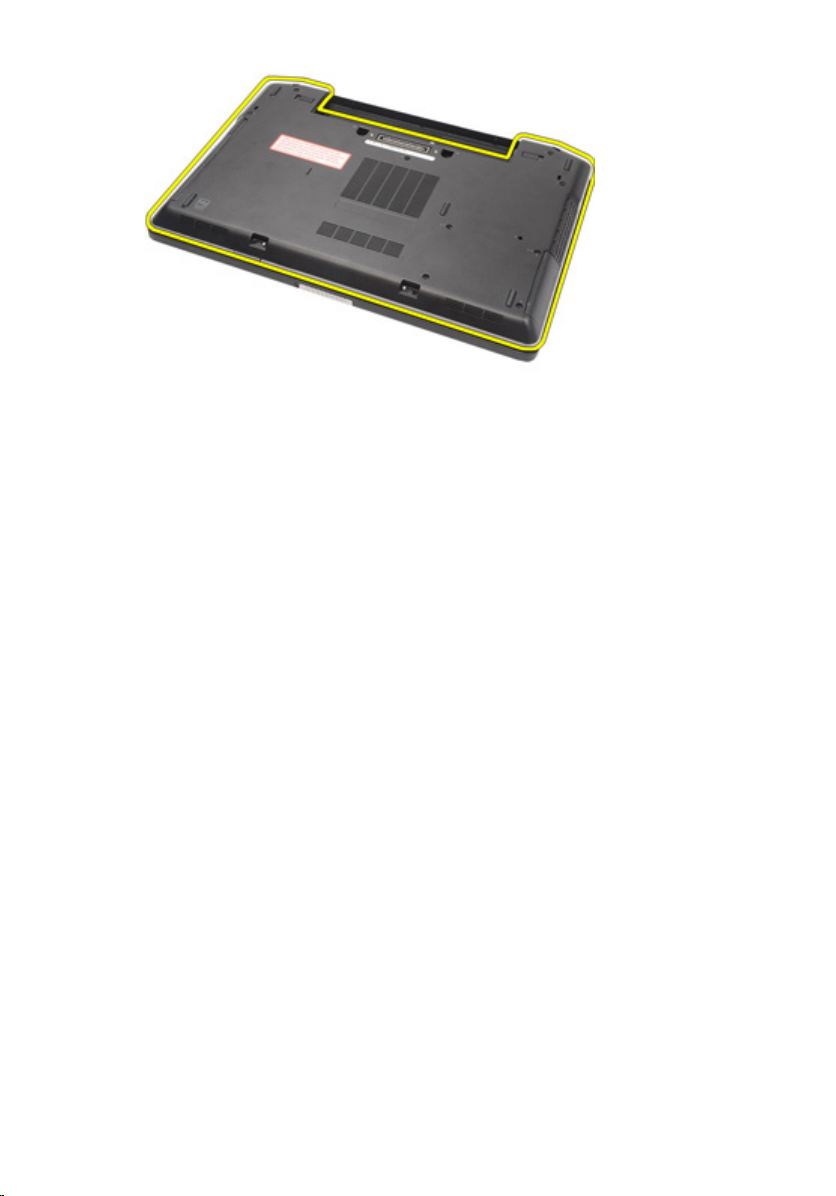
3. Slide the battery out of the computer and remove it.
Before Working On Your Computer
.
21

Installing the Battery
1. Slide the battery into its slot until it clicks into place.
2. Follow the procedures in
After working inside your computer
.
22

Subscriber Identity Module (SIM)
Card 7
Removing the Subscriber Identity Module (SIM) Card
1. Follow the procedures in
2. Remove the
3. Insert the SIM card into the slot.
4. Remove the SIM card from the system.
Battery
Before Working On Your Computer
.
.
23

Installing the Subscriber Identity Module (SIM) Card
1. Slide the SIM card into its slot.
2. Install the
3. Follow the procedures in
Battery
.
After Working Inside Your Computer
.
24
Secure Digital (SD) Card 8
Removing the Secure Digital (SD) Card
1. Follow the procedures in
2. Press in on the SD card to release the SD card from the computer.
3. Slide the SD card out of the computer.
Installing the Secure Digital (SD) Card
1. Slide the Secure Digital (SD) card into its slot until it clicks into place.
2. Follow the procedures in
Before Working On Your Computer
After working inside your computer
.
.
25

26

Base Cover 9
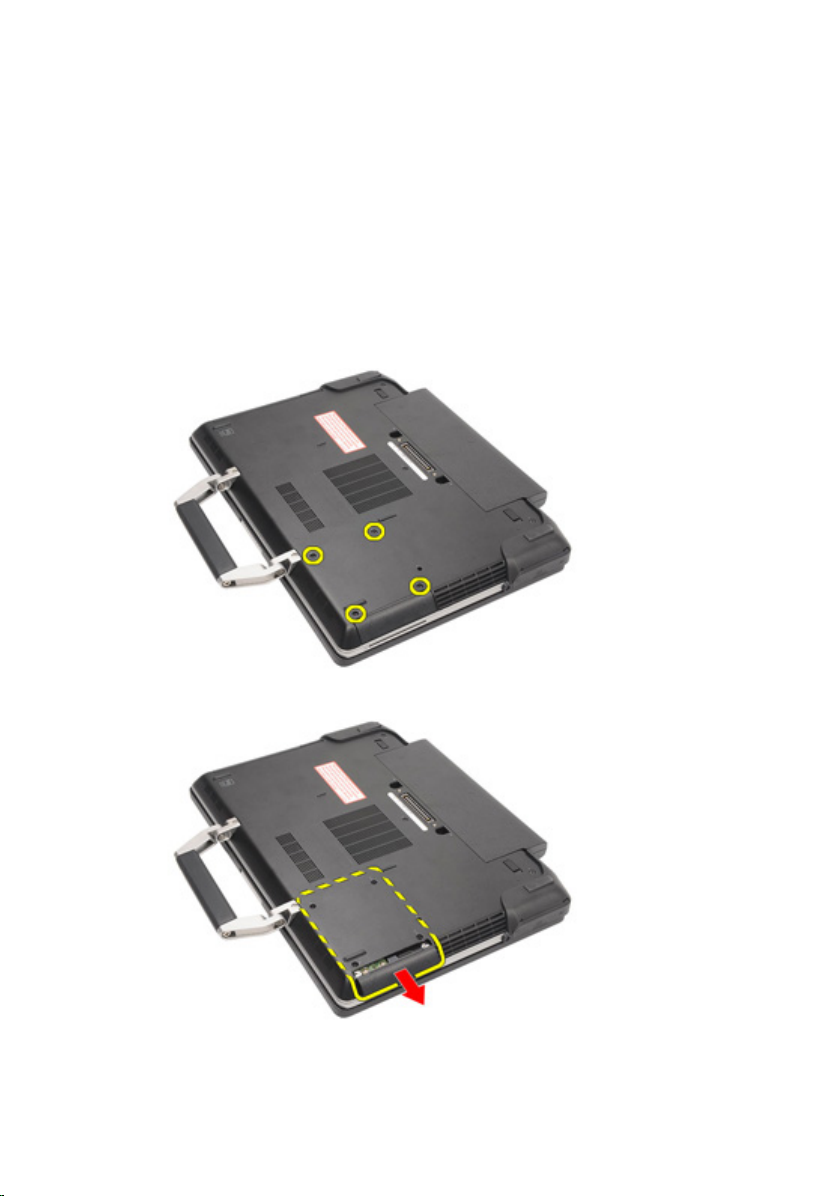
Removing the Base Cover
1. Follow the procedures in
2. Remove the
3. Remove the
4. Remove the
5. Remove the
6. Remove the screws that secure the base cover to the computer.
7. Lift the base cover up and away from the computer.
ATG Handle
ATG Port Cover
Battery
SD Card
Before Working On Your Computer
(only for E6420 ATG systems).
(only for E6420 ATG systems).
.
.
.
27
Installing the Base Cover
1. Place the base cover to align the screw holes correctly with the computer.
2. Tighten the screws that secure the base cover to the computer.
3. Install the
4. Install the
5. Install the
6. Install the
7. Follow the procedures in
Secure Digital (SD) Card
Battery
.
ATG Port Cover
ATG Handle
(only for E6420 ATG systems).
(only for E6420 ATG systems).
After Working Inside Your Computer
.
.
28
Hard Drive 10
Removing the Hard Drive
1. Follow the procedures in
2. Remove the
3. Remove the screws that secure the hard drive to the computer.
4. Slide and remove the hard drive out of the computer.
Battery
Before Working On Your Computer
.
.
5. Remove the screw that secures the hard drive caddy to the hard drive.
29
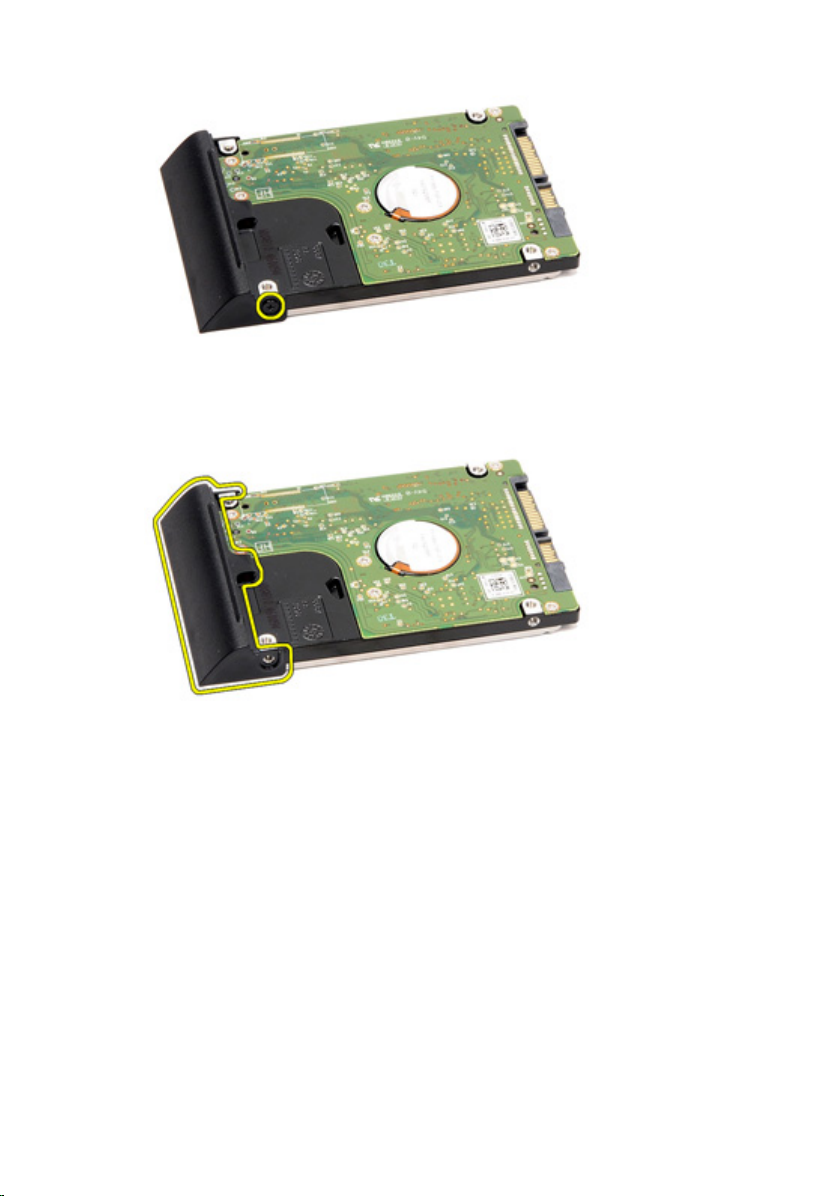
6. Pull and remove the hard drive caddy away from the hard drive.
Installing the Hard Drive
1. Attach the hard drive caddy to the hard drive.
2. Tighten the screw to secure the hard-drive caddy to the hard drive.
3. Slide the hard drive into the computer.
4. Replace and tighten the screws that secure the hard drive to the computer.
5. Install the
6. Follow the procedures in
30
Battery
.
After working inside your computer
.
 Loading...