

Dell Latitude 3000 Owner's Manual
Dell™ Dimension™ 3000
Owner’s Manual
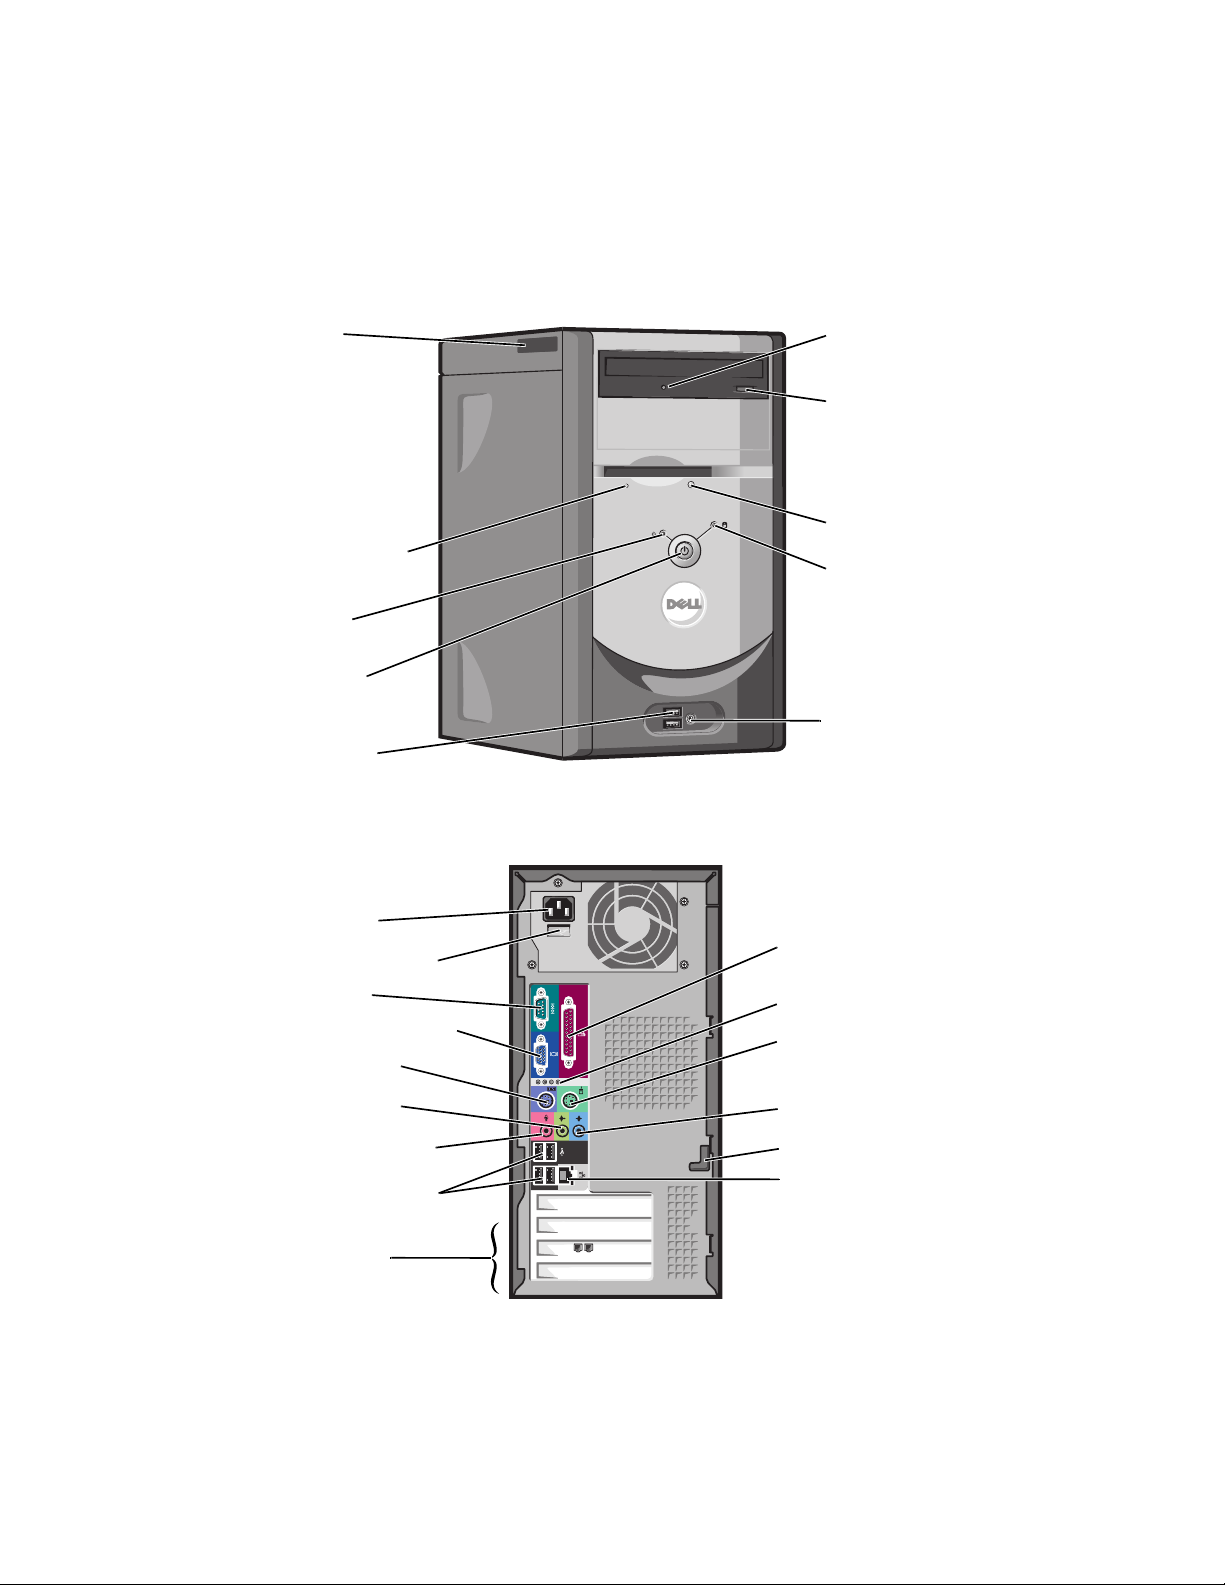
service tag
floppy drive light
power light
power button
USB 2.0
connectors (2)
CD or DVD drive
activity light
CD or DVD eject button
floppy drive eject button
hard-drive activity light
headphone connector
Model DMC
power connector
voltage selection switch
serial connector
integrated video connector
keyboard connector
line-out connector*
microphone connector*
USB 2.0 connectors (4)
PCI card slots (3)
*On computers with integrated sound.
**May not be present on all computers.
www.dell.com | support.dell.com
parallel connector
diagnostic lights (4)
mouse connector
line-in connector*
cover latch**
network adapter connector

Notes, Notices, and Cautions
NOTE: A NOTE indicates important information that helps you make better use of your computer.
NOTICE: A NOTICE indicates either potential damage to hardware or loss of data and tells you how to avoid the
problem.
CAUTION: A CAUTION indicates a potential for property damage, personal injury, or death.
Abbreviations and Acronyms
For a complete list of abbreviations and acronyms, see the
Dell Dimension Help
file. To access the help file, see
"Finding Information" on page 7.
If you purchased a Dell™ n Series computer, any references in this document to Microsoft
®
Windows®
operating systems are not applicable.
____________________
Information in this document is subject to change without notice.
© 2005 Dell Inc. All rights reserved.
Reproduction in any manner whatsoever without the written permission of Dell Inc. is strictly forbidden.
Trademarks used in this text: Dell, the DELL logo, Inspiron, Dell Precision, Dimension, OptiPlex, Latitude, PowerEdge, PowerVault,
PowerApp, PowerConnect, and Dell OpenManage are trademarks of Dell Inc.; Intel, Pentium, and Celeron are registered trademarks of Intel
Corporation; Microsoft, Windows, and Outlook are registered trademarks of Microsoft Corporation.
Other trademarks and trade names may be used in this document to refer to either the entities claiming the marks and names or their products.
Dell Inc. disclaims any proprietary interest in trademarks and trade names other than its own.
Model DMC
September 2005 P/N J6758 Rev. A04

Contents
Finding Information . . . . . . . . . . . . . . . . . . . . . . . . . . . . . . . . 7
1 Setting Up and Using Your Computer
Setting Up a Printer . . . . . . . . . . . . . . . . . . . . . . . . . . . . . . . . 9
Printer Cable
Connecting a USB Printer
. . . . . . . . . . . . . . . . . . . . . . . . . . . . . . . . . 9
. . . . . . . . . . . . . . . . . . . . . . . . . . . 9
Connecting a Parallel Printer
. . . . . . . . . . . . . . . . . . . . . . . . 10
Setting Up a Home and Office Network
Connecting to a Network Adapter
Network Setup Wizard
Connecting to the Internet
. . . . . . . . . . . . . . . . . . . . . . . . . . . 12
. . . . . . . . . . . . . . . . . . . . . . . . . . . . 12
Setting Up Your Internet Connection
Copying CDs and DVDs
How to Copy a CD or DVD
. . . . . . . . . . . . . . . . . . . . . . . . . . . . . . 14
. . . . . . . . . . . . . . . . . . . . . . . . . . 14
Using Blank CDs and DVDs
Helpful Tips
. . . . . . . . . . . . . . . . . . . . . . . . . . . . . . . . . 15
See the Sonic website at www.sonic.com for additional information.
Hyper-Threading
. . . . . . . . . . . . . . . . . . . . . . . . . . . . . . . . . 16
. . . . . . . . . . . . . . . . . . . . . 11
. . . . . . . . . . . . . . . . . . . . . 11
. . . . . . . . . . . . . . . . . . . . 13
. . . . . . . . . . . . . . . . . . . . . . . . . 14
. . . . 16
2 Solving Problems
Troubleshooting Tips. . . . . . . . . . . . . . . . . . . . . . . . . . . . . . . 17
Battery Problems
Drive Problems
CD and DVD drive problems
Hard drive problems
. . . . . . . . . . . . . . . . . . . . . . . . . . . . . . . . . 17
. . . . . . . . . . . . . . . . . . . . . . . . . . . . . . . . . . 17
. . . . . . . . . . . . . . . . . . . . . . . . 18
. . . . . . . . . . . . . . . . . . . . . . . . . . . . 19
E-Mail, Modem, and Internet Problems
Error Messages
IEEE 1394 Device Problems
. . . . . . . . . . . . . . . . . . . . . . . . . . . . . . . . . 20
. . . . . . . . . . . . . . . . . . . . . . . . . . . 21
. . . . . . . . . . . . . . . . . . . . . 19
Contents 3

Keyboard Problems . . . . . . . . . . . . . . . . . . . . . . . . . . . . . . . 22
Lockups and Software Problems
The computer does not start up
The computer stops responding
A program stops responding
A program crashes repeatedly
. . . . . . . . . . . . . . . . . . . . . . . . 22
. . . . . . . . . . . . . . . . . . . . . . 22
. . . . . . . . . . . . . . . . . . . . . . 22
. . . . . . . . . . . . . . . . . . . . . . . . 23
. . . . . . . . . . . . . . . . . . . . . . . 23
A program is designed for an earlier Windows operating system
A solid blue screen appears
Other software problems
Memory Problems
Mouse Problems
Network Problems
Power Problems
Printer Problems
Scanner Problems
. . . . . . . . . . . . . . . . . . . . . . . . . . . . . . . . 24
. . . . . . . . . . . . . . . . . . . . . . . . . . . . . . . . . 25
. . . . . . . . . . . . . . . . . . . . . . . . . . . . . . . . 26
. . . . . . . . . . . . . . . . . . . . . . . . . . . . . . . . . 26
. . . . . . . . . . . . . . . . . . . . . . . . . . . . . . . . . 27
. . . . . . . . . . . . . . . . . . . . . . . . . . . . . . . . 28
Sound and Speaker Problems
No sound from speakers
No sound from headphones
. . . . . . . . . . . . . . . . . . . . . . . . 23
. . . . . . . . . . . . . . . . . . . . . . . . . . 24
. . . . . . . . . . . . . . . . . . . . . . . . . . 29
. . . . . . . . . . . . . . . . . . . . . . . . . . 29
. . . . . . . . . . . . . . . . . . . . . . . . 30
. . . . . 23
3 Advanced Troubleshooting
4 Contents
Video and Monitor Problems
If the screen is blank
If the screen is difficult to read
. . . . . . . . . . . . . . . . . . . . . . . . . . 30
. . . . . . . . . . . . . . . . . . . . . . . . . . . . 30
. . . . . . . . . . . . . . . . . . . . . . . 31
Diagnostic Lights. . . . . . . . . . . . . . . . . . . . . . . . . . . . . . . . . 33
Dell Diagnostics
Dell Diagnostics Main Menu
Drivers
. . . . . . . . . . . . . . . . . . . . . . . . . . . . . . . . . . . . . . 38
What Is a Driver?
Identifying Drivers
Reinstalling Drivers
. . . . . . . . . . . . . . . . . . . . . . . . . . . . . . . . . 36
. . . . . . . . . . . . . . . . . . . . . . . . 36
. . . . . . . . . . . . . . . . . . . . . . . . . . . . . . 38
. . . . . . . . . . . . . . . . . . . . . . . . . . . . . 38
. . . . . . . . . . . . . . . . . . . . . . . . . . . . . 38

Restoring Your Operating System . . . . . . . . . . . . . . . . . . . . . . . . 39
Using Microsoft
Using Dell PC Restore by Symantec
Using the Operating System CD
Windows XP System Restore . . . . . . . . . . . . . . . 40
. . . . . . . . . . . . . . . . . . . . 41
. . . . . . . . . . . . . . . . . . . . . . . 43
Follow the instructions on the screen to complete the installation.
Resolving Software and Hardware Incompatibilities
. . . . . . . . . . . . . 44
. . . . . . 44
4 Removing and Installing Parts
Before You Begin. . . . . . . . . . . . . . . . . . . . . . . . . . . . . . . . . 45
Recommended Tools
Turning Off Your Computer
Before Working Inside Your Computer
Front and Back View of the Computer
Front View
Back View
. . . . . . . . . . . . . . . . . . . . . . . . . . . . . . . . . . 47
. . . . . . . . . . . . . . . . . . . . . . . . . . . . . . . . . . 48
Removing the Computer Cover
Inside View of Your Computer
System Board Components
Memory
. . . . . . . . . . . . . . . . . . . . . . . . . . . . . . . . . . . . . . 53
DDR Memory Overview
Memory Installation Guidelines
Installing Memory
. . . . . . . . . . . . . . . . . . . . . . . . . . . . 45
. . . . . . . . . . . . . . . . . . . . . . . . . 45
. . . . . . . . . . . . . . . . . . . 46
. . . . . . . . . . . . . . . . . . . . . . 47
. . . . . . . . . . . . . . . . . . . . . . . . . . 50
. . . . . . . . . . . . . . . . . . . . . . . . . . 52
. . . . . . . . . . . . . . . . . . . . . . . . . . . . 53
. . . . . . . . . . . . . . . . . . . . . . . . . . . 54
. . . . . . . . . . . . . . . . . . . . . . 54
. . . . . . . . . . . . . . . . . . . . . . . . . . . . . . 55
. . . . . . . . . . . . . . . . . . . . . . . . . . . . . . . . . . . . . . . 56
Cards
PCI Cards
Front Panel
Removing the Front Panel
Removing the Front-Panel Insert
Reattaching the Front Panel
. . . . . . . . . . . . . . . . . . . . . . . . . . . . . . . . . . . . . . . 62
Drives
General Installation Guidelines
Connecting Drive Cables
. . . . . . . . . . . . . . . . . . . . . . . . . . . . . . . . . . 57
. . . . . . . . . . . . . . . . . . . . . . . . . . . . . . . . . . . . 60
. . . . . . . . . . . . . . . . . . . . . . . . . . 60
. . . . . . . . . . . . . . . . . . . . . . 61
. . . . . . . . . . . . . . . . . . . . . . . . 62
. . . . . . . . . . . . . . . . . . . . . . . 63
. . . . . . . . . . . . . . . . . . . . . . . . . . 63
Contents 5

Hard Drive . . . . . . . . . . . . . . . . . . . . . . . . . . . . . . . . . . . . 64
Removing a Hard Drive
Installing a Hard Drive
. . . . . . . . . . . . . . . . . . . . . . . . . . . 64
. . . . . . . . . . . . . . . . . . . . . . . . . . . 66
Floppy Drive
Removing a Floppy Drive
Installing a Floppy Drive
CD/DVD Drive
Removing a CD/DVD Drive
Installing a CD/DVD Drive
Adding a Second CD or DVD Drive
Battery
Replacing the Computer Cover
. . . . . . . . . . . . . . . . . . . . . . . . . . . . . . . . . . . 67
. . . . . . . . . . . . . . . . . . . . . . . . . . 67
. . . . . . . . . . . . . . . . . . . . . . . . . . 68
. . . . . . . . . . . . . . . . . . . . . . . . . . . . . . . . . . . 69
. . . . . . . . . . . . . . . . . . . . . . . . . 70
. . . . . . . . . . . . . . . . . . . . . . . . . . 71
. . . . . . . . . . . . . . . . . . . . . 71
. . . . . . . . . . . . . . . . . . . . . . . . . . . . . . . . . . . . . . 73
. . . . . . . . . . . . . . . . . . . . . . . . . 75
5 Appendix
Specifications . . . . . . . . . . . . . . . . . . . . . . . . . . . . . . . . . . 77
System Setup
Overview
Entering System Setup
System Setup Options
Boot Sequence
. . . . . . . . . . . . . . . . . . . . . . . . . . . . . . . . . . . 80
. . . . . . . . . . . . . . . . . . . . . . . . . . . . . . . . . . 80
. . . . . . . . . . . . . . . . . . . . . . . . . . . 81
. . . . . . . . . . . . . . . . . . . . . . . . . . . . 82
. . . . . . . . . . . . . . . . . . . . . . . . . . . . . . . 85
Index . . . . . . . . . . . . . . . . . . . . . . . . . . . . . . . . . . . . . . . . 107
6 Contents
Clearing Forgotten Passwords
Dell Technical Support Policy (U.S. Only)
. . . . . . . . . . . . . . . . . . . . . . . . . . 86
. . . . . . . . . . . . . . . . . . . . 87
Definition of "Dell-Installed" Software and Peripherals
Definition of "Third-Party" Software and Peripherals
FCC Notices (U.S. Only)
Class A
Class B
. . . . . . . . . . . . . . . . . . . . . . . . . . . . . . . . . . . 88
. . . . . . . . . . . . . . . . . . . . . . . . . . . . . . . . . . . 88
FCC Identification Information
Contacting Dell
. . . . . . . . . . . . . . . . . . . . . . . . . . . . . . . . . . 89
. . . . . . . . . . . . . . . . . . . . . . . . . . . . . 88
. . . . . . . . . . . . . . . . . . . . . . . 89
. . . . . . . . . . 87
. . . . . . . . . . . . 88
Finding Information
What Are You Looking For? Find It Here
• Warranty information
• Safety instructions
• Regulatory information
• Ergonomics information
• End User License Agreement
• Terms and Conditions
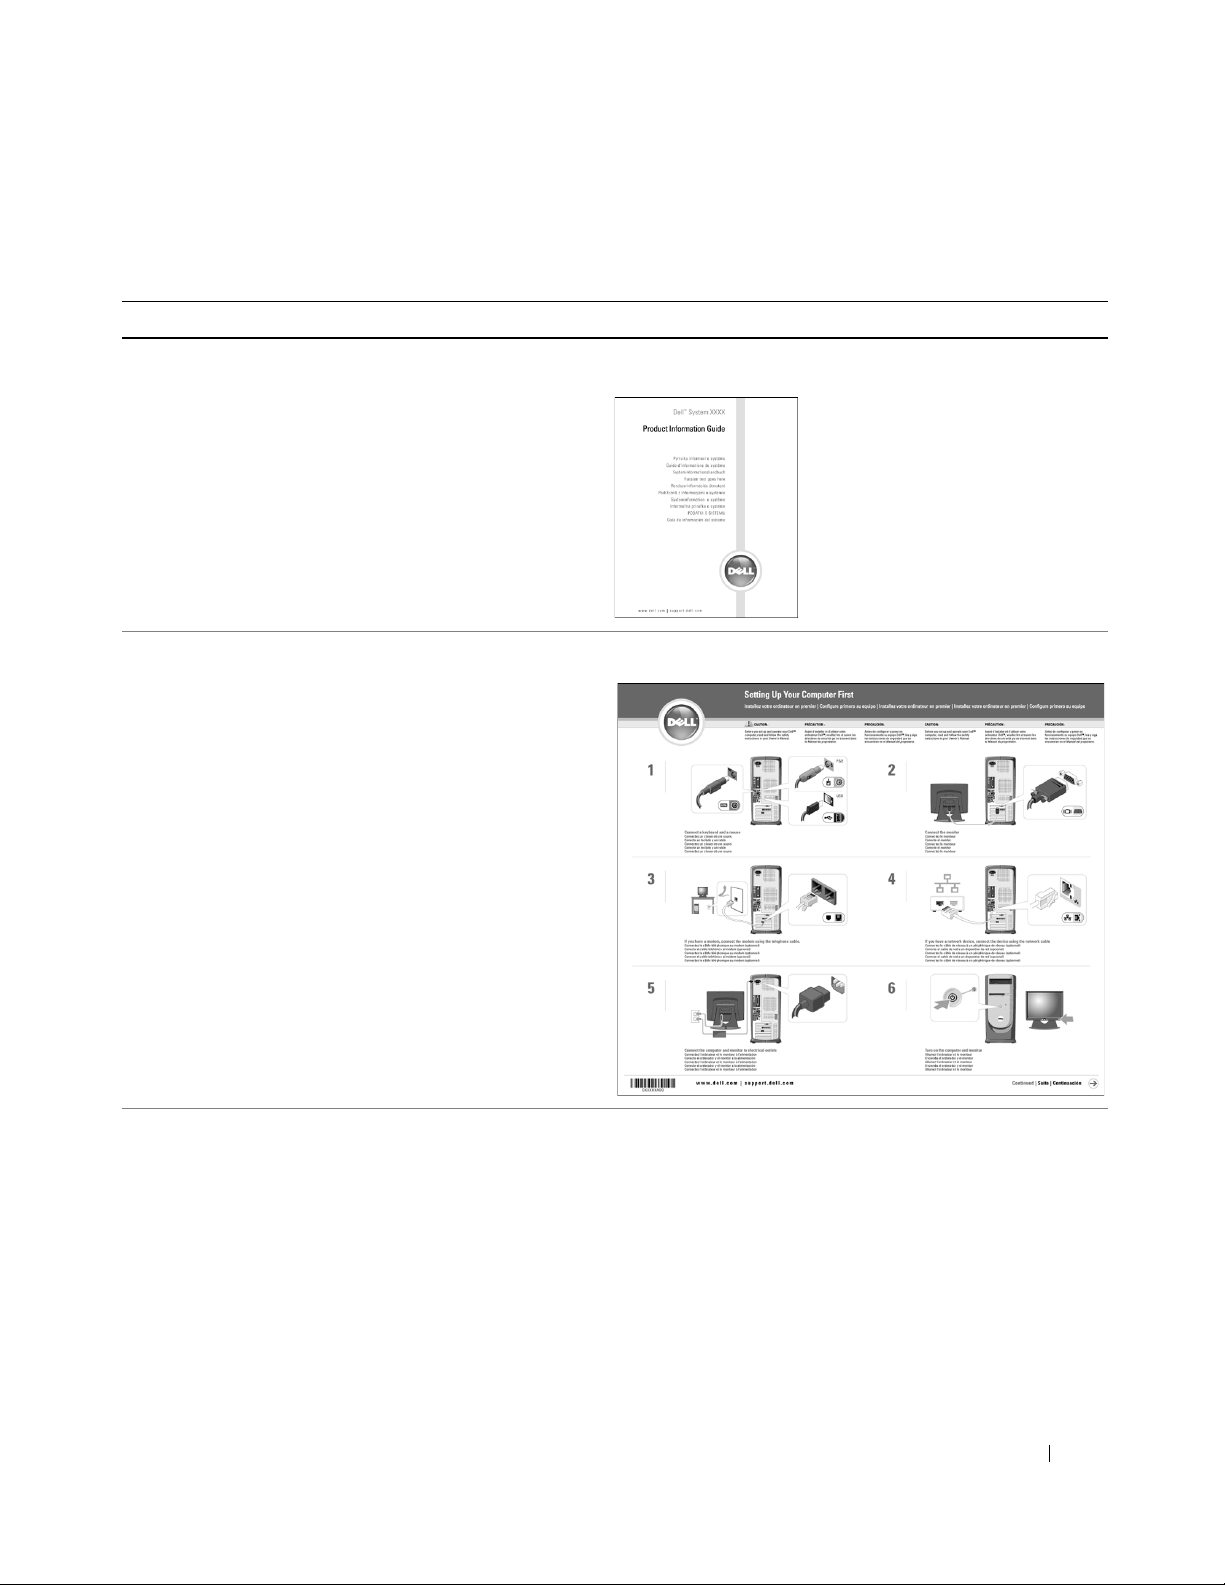
• How to set up my computer
Dell™ Product Information Guide
Setup Diagram
• Tips on using Microsoft® Windows® XP
• How to play CDs and DVDs
• How to use standby mode and hibernate mode
• How to change my display resolution
• How to clean my computer
Dell Dimension Help File
1
Click the
2
Click
3
Click
Start
button and click
User and system guides
Dell Dimension Help
Help and Support
and click
.
Finding Information 7
User’s guides
.
.

What Are You Looking For? Find It Here
• Service Tag and Express Service Code
• Microsoft Windows License Label
• Latest drivers for my computer
• Answers to technical service and support questions
• Online discussions with other users and technical
support
• Documentation for my computer
Service Tag and Microsoft Windows License
These labels are located on your computer.
• Use the Service Tag to
identify your computer
when you use
support.dell.com
contact technical
support.
• Enter the Express Service Code to direct your call when
contacting technical support. The Express Service Code
is not available in all countries.
Dell Support Website — support.dell.com
or
NOTE: Select your region to view the appropriate support
site.
The Dell Support website provides several online tools,
including:
• Solutions — Troubleshooting hints and tips, articles
from technicians, and online courses
• Community — Online discussion with other Dell
customers
• Upgrades — Upgrade information for components, such
as memory, the hard drive, and the operating system
• Customer Care — Contact information, order status,
warranty, and repair information
• Downloads — Drivers, patches, and software updates
• Reference — Computer documentation, product
specifications, and white papers
• How to use Windows XP
• Documentation for my computer
• Documentation for devices (such as a modem)
8 Finding Information
Windows Help and Support Center
1
Click the
2
Type a word or phrase that describes your problem and
click the arrow icon.
3
Click the topic that describes your problem.
4
Follow the instructions on the screen.
Start
button and click
Help and Support
.

Setting Up and Using Your Computer
Setting Up a Printer
NOTICE: Complete the operating system setup before you connect a printer to the computer.
See the documentation that came with the printer for setup information, including how to:
• Obtain and install updated drivers.
• Connect the printer to the computer.
• Load paper and install the toner or ink cartridge.
• Contact the printer manufacturer for technical assistance.
Printer Cable
Your printer connects to your computer with either a USB cable or a parallel cable. Your printer may not
come with a printer cable, so if you purchase a cable separately, ensure that it is compatible with your
printer. If you purchased a printer cable at the same time you purchased your computer, the cable may
arrive in the computer box.
Connecting a USB Printer
NOTE: You can connect USB devices while the computer is turned on.
1
Complete the operating system setup if you have not already done so.
2
Install the printer driver if necessary. See the documentation that came with your printer.
Setting Up and Using Your Computer 9
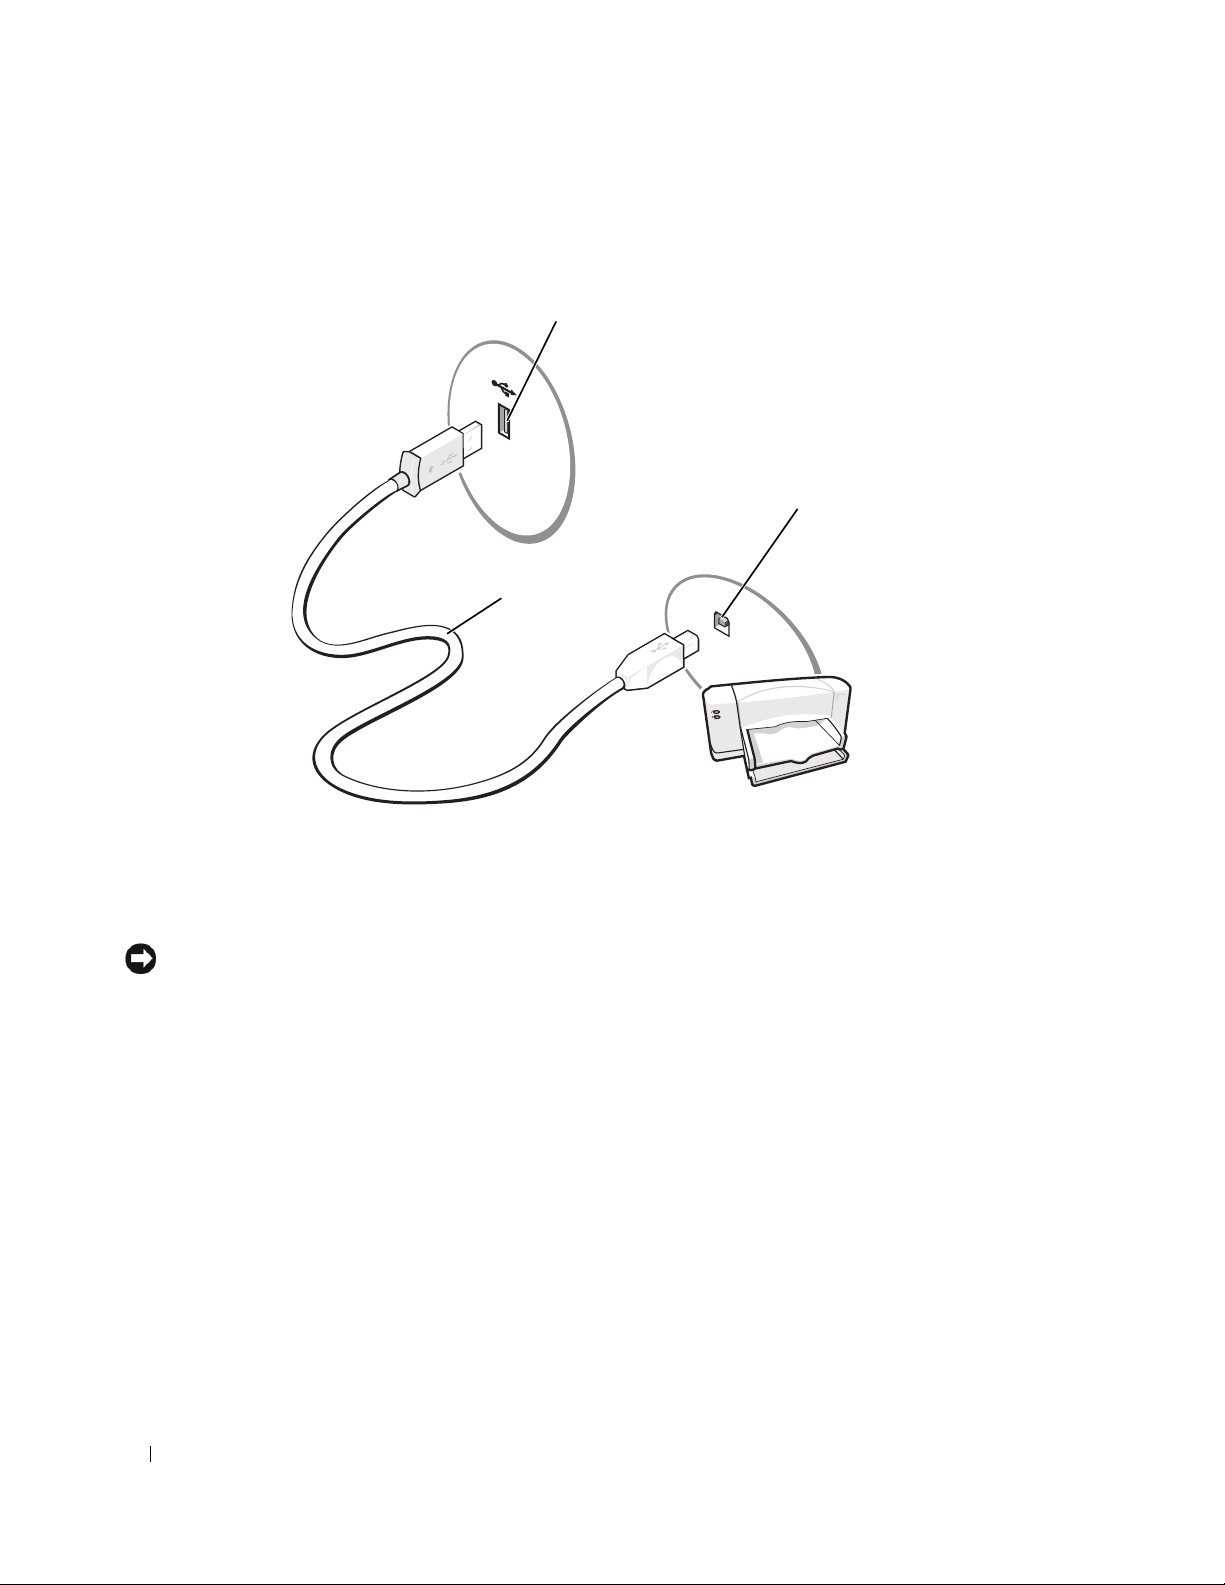
3
Attach the USB printer cable to the USB connectors on the computer and the printer. The USB
connectors fit only one way.
USB connector on computer
USB connector
on printer
USB printer
cable
Connecting a Parallel Printer
1
Complete the operating system setup, if you have not already done so.
2
Turn off the computer (see page 45).
NOTICE: For best results, use a 3-m (10-ft) or shorter parallel cable.
3
Attach the parallel printer cable to the parallel connector on the computer and tighten the two screws.
Attach the cable to the connector on the printer and snap the two clips into the two notches.
10 Setting Up and Using Your Computer

parallel connector on computer
connector on printer
clips (2)
screws (2)
notches (2)
parallel printer cable
4
Turn on the printer and then turn on the computer. If the
appears, click
5
Install the printer driver if necessary. See the documentation that came with your printer.
Cancel
.
Add New Hardware Wizard
window
Setting Up a Home and Office Network
Connecting to a Network Adapter
NOTE: Plug the network cable into the network adapter connector on the computer. Do not plug the network cable
into the modem connector on the computer. Do not plug a network cable into a telephone wall jack.
1
Connect the network cable to the network adapter connector on the back of your computer.
Insert the cable until it clicks into place, and then gently pull it to ensure that it is secure.
2
Connect the other end of the network cable to a network device.
Setting Up and Using Your Computer 11
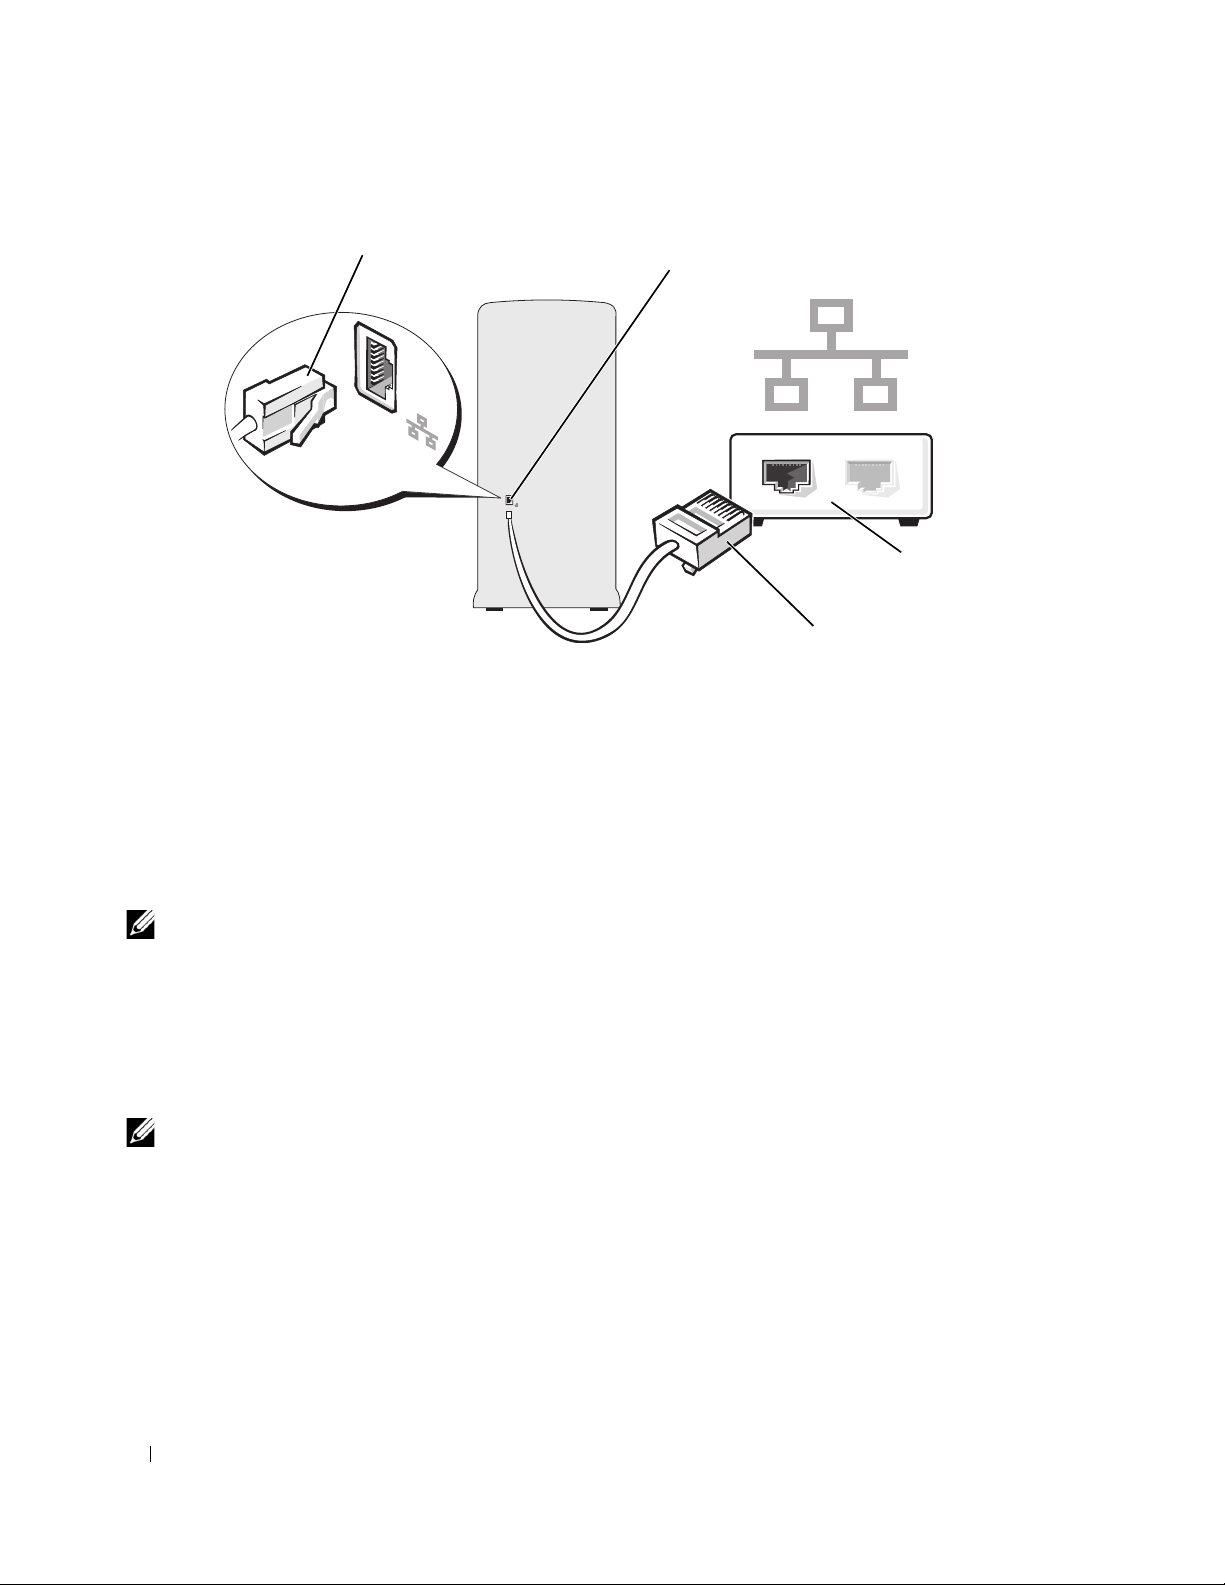
network adapter connector
network adapter connector on computer
network device
network cable
Network Setup Wizard
The Microsoft® Windows® XP operating system provides a Network Setup Wizard to guide you through
the process of sharing files, printers, or an Internet connection between computers in a home or small office.
1
Click the
Network Setup Wizard
Start
button, point to
All Programs→ Accessories→ Communications
.
, and then click
2
On the welcome screen, click
3
Click
Checklist for creating a network
NOTE: Selecting the connection method This computer connects directly to the Internet enables the integrated
firewall provided with Windows XP Service Pack 1 (SP1).
4
Complete the checklist and required preparations.
5
Return to the Network Setup Wizard and follow the instructions on the screen.
Next
.
.
Connecting to the Internet
NOTE: ISPs and ISP offerings vary by country.
To connect to the Internet, you need a modem or network connection and an Internet service provider
(ISP), such as AOL or MSN. Your ISP will offer one or more of the following Internet connection options:
• Dial-up connections that provide Internet access through a telephone line. Dial-up connections are
considerably slower than DSL and cable modem connections.
• DSL connections that provide high-speed Internet access through your existing telephone line. With a
DSL connection, you can access the Internet and use your telephone on the same line simultaneously.
• Cable modem connections that provide high-speed Internet access through your local cable TV line.
12 Setting Up and Using Your Computer

If you are using a dial-up connection, connect a telephone line to the modem connector on your computer
and to the telephone wall jack before you set up your Internet connection. If you are using a DSL or cable
modem connection, contact your ISP for setup instructions.
Setting Up Your Internet Connection
To set up an AOL or MSN connection:
1
Save and close any open files, and exit any open programs.
2
Double-click the
3
Follow the instructions on the screen to complete the setup.
MSN Explorer
or
AOL
icon on the Microsoft® Windows® desktop.
If you do not have an
connection with a different ISP:
1
Save and close any open files, and exit any open programs.
2
Click the
The
3
Click
4
In the next window, click the appropriate option:
• If you do not have an ISP and want to select one, click
• If you have already obtained setup information from your ISP but you did not receive a setup CD,
• If you have a CD, click
5
Click
If you selected
on the screen to complete the setup.
NOTE: If you do not know which type of connection to select, contact your ISP.
6
Click the appropriate option under
Start
New Connection Wizard
Connect to the Internet
providers (ISPs)
Set up my connection manually
click
Next
MSN Explorer
button and click
.
.
Set up my connection manually
or
AOL
Internet Explorer
appears.
.
Use the CD I got from an ISP
How do you want to connect to the Internet?
icon on your desktop or if you want to set up an Internet
.
Choose from a list of Internet service
.
.
, continue to step 6. Otherwise, follow the instructions
, and then click
Next
.
7
Use the setup information provided by your ISP to complete the setup.
If you are having problems connecting to the Internet, see "E-Mail, Modem, and Internet Problems" on
page 19. If you cannot connect to the Internet but have successfully connected in the past, the ISP might
have a service outage. Contact your ISP to check the service status, or try connecting again later.
Setting Up and Using Your Computer 13

Copying CDs and DVDs
NOTE: Please observe all copyright laws when creating CDs or DVDs.
This section applies only to computers that have a CD-RW, DVD+/-RW, or CD-RW/DVD (combo)
drive.
NOTE: The types of CD or DVD drives offered by Dell may vary by country.
The following instructions explain how to make an exact copy of a CD or DVD. You can also use Sonic
DigitalMedia for other purposes, such as creating music CDs from audio files stored on your computer or
backing up important data. For help, open Sonic DigitalMedia and then click the question mark icon in
the upper-right corner of the window.
How to Copy a CD or DVD
NOTE: CD-RW/DVD combo drives cannot write to DVD media. If you have a CD-RW/DVD combo drive and you
experience recording problems, check for available software patches on the Sonic support website at
www.sonic.com.
The DVD-writable drives installed in Dell™ computers can write to and read DVD+/-R, DVD+/-RW
and DVD+R DL (dual layer) media, but cannot write to and may not read DVD-RAM or DVD-R DL
media.
NOTE: Most commercial DVDs have copyright protection and cannot be copied using Sonic DigitalMedia.
1
Click the
Start
button, point to
All Programs→
Sonic→ DigitalMedia Projects
and then click Copy
.
2
Under the
3
To copy the CD or DVD:
•
•
Once you have finished copying the source CD or DVD, the CD or DVD that you have created will
automatically eject.
Copy
tab click
If you have one CD or DVD drive
button. The computer will read your source CD or DVD and copy the data to a temporary folder
on your computer hard drive.
When prompted, insert a blank CD or DVD into the drive and click
If you have two CD or DVD drives
DVD and click the
to the blank CD or DVD.
Disc Copy
Disc Copy
.
, ensure that the settings are correct and click the
OK
.
, select the drive into which you have inserted your source CD or
button. The computer copies the data from the source CD or DVD
Disc Copy
Using Blank CDs and DVDs
CD-RW drives can write to CD recording media only (including high-speed CD-RW) while
DVD-writable drives can write to both CD and DVD recording media.
Use blank CD-Rs to record music or permanently store data files. After creating a CD-R, you cannot
write to that CD-R again (see the Sonic documentation for more information). Use blank CD-RWs to
write to CDs or to erase, rewrite, or update data on CDs.
14 Setting Up and Using Your Computer

Blank DVD+/-Rs can be used to permanently store large amounts of information. After you create a
DVD+/-R disc, you may not be able to write to that disc again if the disc is "finalized" or "closed" during
the final stage of the disc creation process. Use blank DVD+/-RWs if you plan to erase, rewrite, or
update information on that disc later.
CD-Writable Drives
Media Type Read Write Rewritable
CD-R Yes Yes No
CD -R W Yes Yes Yes
DVD-Writable Drives
Media Type Read Write Rewritable
CD-R Yes Yes No
CD -R W Yes Yes Yes
DVD+R Yes Yes No
DVD-R Yes Yes No
DV D+ RW Ye s Ye s Yes
DV D- RW Yes Yes Yes
DVD+R DL Yes Yes No
DVD-R DL Maybe No No
DVD-RAM Maybe No No
Helpful Tips
• Use Microsoft® Windows® Explorer to drag and drop files to a CD-R or CD-RW only after you start
Sonic DigitalMedia and open a DigitalMedia project.
• Use CD-Rs to burn music CDs that you want to play in regular stereos. CD-RWs do not play in most
home or car stereos.
• You cannot create audio DVDs with Sonic DigitalMedia.
• Music MP3 files can be played only on MP3 players or on computers that have MP3 software installed.
• Commercially available DVD players used in home theater systems may not support all available DVD
formats. For a list of formats supported by your DVD player refer to the documentation provided with
your DVD player or contact the manufacturer.
• Do not burn a blank CD-R or CD-RW to its maximum capacity; for example, do not copy a 650-MB
file to a blank 650-MB CD. The CD-RW drive needs 1-2 MB of the blank space to finalize the
recording.
Setting Up and Using Your Computer 15

• Use a blank CD-RW to practice CD recording until you are familiar with CD recording techniques. If
you make a mistake, you can erase the data on the CD-RW and try again. You can also use blank
CD-RWs to test music file projects before you record the project permanently to a blank CD-R.
See the Sonic website at
www.sonic.com
for additional information.
Hyper-Threading
Hyper-Threading is an Intel® technology that can enhance overall computer performance by allowing one
physical processor to function as two logical processors, capable of performing certain tasks simultaneously.
It is recommended that you use the Microsoft
system because Windows XP is optimized to take advantage of
Hyper-Threading technology. While many programs can benefit from Hyper-Threading, some programs have
not been optimized for Hyper-Threading and may require an update from the software manufacturer.
Contact the software manufacturer for updates and information about using Hyper-Threading with your
software.
To determine if your computer is using Hyper-Threading technology:
1
Click the
2
Click
3
In the
enabled, the processor is listed twice.
You can enable or disable Hyper-Threading through system setup. For more information on accessing system
setup, see "Entering System Setup" on page 81. For more information on Hyper-Threading, search the
Knowledge Base on the Dell Support website at
Start
button, right-click
Hardware
Device Manager
and click
Device Manager
window, click the plus (+) sign next to
®
Windows® XP Service Pack 1 (SP1) or later operating
My Computer
.
support.dell.com
, and then click
Processors
.
Properties
.
. If Hyper-Threading is
16 Setting Up and Using Your Computer

Solving Problems
Troubleshooting Tips
Follow these tips when you troubleshoot your computer:
• If you added or removed a part before the problem started, review the installation procedures and
ensure that the part is correctly installed.
• If a peripheral device does not work, ensure that the device is properly connected.
• If an error message appears on the screen, write down the exact message. This message may help
technical support personnel diagnose and fix the problem(s).
• If an error message occurs in a program, see the program’s documentation.
Battery Problems
CAUTION: There is a danger of a new battery exploding if it is incorrectly installed. Replace the battery
only with the same or equivalent type recommended by the manufacturer. Discard used batteries according
to the manufacturer's instructions.
CAUTION: Before you begin any of the procedures in this section, follow the safety instructions located in
the Product Information Guide.
REPLACE THE BATTERY — If you have to repeatedly reset time and date information after turning on
the computer, or if an incorrect time or date displays during start-up, replace the battery (see page 73).
If the battery still does not work properly, contact Dell (see "Contacting Dell" on page 89).
Drive Problems
CAUTION: Before you begin any of the procedures in this section, follow the safety instructions located in
the Product Information Guide.
ENSURE THAT MICROSOFT® WINDOWS® RECOGNIZES THE DRIVE — Click the Start button and
click My Computer. If the floppy, CD, or DVD drive, is not listed, perform a full scan with your
antivirus software to check for and remove viruses. Viruses can sometimes prevent Windows from
recognizing the drive.
Solving Problems 17

TEST THE DRIVE —
• Insert another floppy disk, CD, or DVD to eliminate the possibility that the original one is defective.
• Insert a bootable floppy disk and restart the computer.
CLEAN THE DRIVE OR DISK — See the Dell Dimension Help file. T
CHECK THE CABLE CONNECTIONS
CHECK FOR RUN THE HARDWARE TROUBLESHOOTER — See page 44.
RUN THE DELL DIAGNOSTICS — See page 36.
o access help files, see page 7.
CD and DVD drive problems
NOTE: High-speed CD or DVD drive vibration is normal and may cause noise, which does not indicate a defect in
the drive or the CD or DVD.
NOTE: Because of different regions worldwide and different disc formats, not all DVD titles work in all DVD drives.
ADJUST THE WINDOWS VOLUME CONTROL —
• Click the speaker icon in the lower-right corner of your screen.
• Ensure that the volume is turned up by clicking the slidebar and dragging it up.
• Ensure that the sound is not muted by clicking any boxes that are checked.
CHECK THE SPEAKERS AND SUBWOOFER — See "Sound and Speaker Problems" on page 29.
Problems writing to a CD/DVD-RW drive
CLOSE OTHER PROGRAMS — The CD/DVD-RW drive must receive a steady stream of data when
writing. If the stream is interrupted, an error occurs. Try closing all programs before you write to the
CD/DVD-RW.
TURN OFF STANDBY MODE IN WINDOWS BEFORE WRITING TO A CD/DVD-RW DISC — See the Dell
Dimension Help file (
information on power management modes.
see page 7)
or search for the keyword standby in Windows Help (see page 8) for
18 Solving Problems

Hard drive problems
RUN CHECK DISK —
1
Click the
2
Right-click
3
Click
4
Click the
5
Under
6
Click
7
Click
Start
button and click
Local Disk C:
Properties
Tools
.
tab.
Error-checking
, click
My Computer
.
Check Now
.
.
Scan for and attempt recovery of bad sectors
Start
.
.
E-Mail, Modem, and Internet Problems
CAUTION: Before you begin any of the procedures in this section, follow the safety instructions located in the
Product Information Guide.
NOTE: Connect the modem to an analog telephone jack only. The modem does not operate while it is connected to
a digital telephone network.
CHECK THE MICROSOFT OUTLOOK® EXPRESS SECURITY SETTINGS — If you cannot open your
e-mail attachments:
1
In Outlook Express, click
2
Click
Do not allow attachments
Tools
, click
Options
to remove the checkmark.
, and then click
Security
.
CHECK THE TELEPHONE LINE CONNECTION —
C
HECK THE TELEPHONE JACK —
ONNECT THE MODEM DIRECTLY TO THE TELEPHONE WALL JACK —
C
SE A DIFFERENT TELEPHONE LINE —
U
• Verify that the telephone line is connected to the jack on the modem. (The jack has either a green label
or a connector-shaped icon next to it.)
• Ensure that you hear a click when you insert the telephone line connector into the modem.
• Disconnect the telephone line from the modem and connect it to a telephone. Listen for a dial tone.
• If you have other telephone devices sharing the line, such as an answering machine, fax machine, surge
protector, or line splitter, then bypass them and use the telephone to connect the modem directly to the
telephone wall jack. If you are using a line that is 3 m (10 ft) or more in length, try a shorter one.
RUN THE MODEM HELPER DIAGNOSTICS — Click the Start button, point to All Programs, and then
click Modem Helper. Follow the instructions on the screen to identify and resolve modem problems.
(Modem Helper is not available on all computers.)
Solving Problems 19

VERIFY THAT THE MODEM IS COMMUNICATING WITH WINDOWS —
1
Click the
2
Click
3
Click
4
Click the
5
Click the COM port for your modem.
6
Click
communicating with Windows.
If all commands receive responses, the modem is operating properly.
ENSURE THAT YOU ARE CONNECTED TO THE INTERNET — Ensure that you have subscribed to an
Internet provider. With the Outlook Express e-mail program open, click File. If Work Offline has a
checkmark next to it, click the checkmark to remove it and connect to the Internet. For help, contact
your Internet service provider.
SCAN THE COMPUTER FOR SPYWARE — If you are experiencing slow computer performance, you frequently
receive pop-up advertisements, or you are having problems connecting to the Internet, your computer
might be infected with spyware. Use an antivirus program that includes anti-spyware protection (your
program may require an upgrade) to scan the computer and remove spyware. For more information, go
to support.dell.com and search for the keyword spyware.
Start
button and click
Printers and Other Hardware
Phone and Modem Options
Modems
Properties
tab.
, click the
Control Panel
Diagnostics
.
.
.
tab, and then click
Query Modem
to verify that the modem is
Error Messages
CAUTION: Before you begin any of the procedures in this section, follow the safety instructions located in the
Product Information Guide.
If the message is not listed, see the documentation for the operating system or the program that was running
when the message appeared.
A FILENAME CANNOT CONTAIN ANY OF THE FOLLOWING CHARACTERS: \ /:*?“<>|—Do not
use these characters in filenames.
A REQUIRED .DLL FILE WAS NOT FOUND — The program that you are trying to open is missing an
essential file. To remove and then reinstall the program:
1
Click the
2
Select the program you want to remove.
3
Click the
4
See the program documentation for installation instructions.
20 Solving Problems
Start
button, click
Change or Remove Program
Control Panel
, and then click
icon.
Add or Remove Programs
.

drive letter :\ IS NOT ACCESSIBLE. THE DEVICE IS NOT READY — The drive cannot read the disk.
Insert a disk into the drive and try again.
INSERT BOOTABLE MEDIA — Insert a bootable floppy disk or CD.
NON-SYSTEM DISK ERROR — Remove the floppy disk from the drive and restart your computer.
NOT ENOUGH MEMORY OR RESOURCES. CLOSE SOME PROGRAMS AND TRY AGAIN — Close all
windows and open the program that you want to use. In some cases, you might have to restart your
computer to restore computer resources. If so, run the program that you want to use first.
OPERATING SYSTEM NOT FOUND — Contact Dell (see "Contacting Dell" on page 89).
IEEE 1394 Device Problems
CAUTION: Before you begin any of the procedures in this section, follow the safety instructions located in the
Product Information Guide.
ENSURE THAT THE CABLE FOR THE IEEE 1394 DEVICE IS PROPERLY INSERTED INTO THE DEVICE AND
INTO THE CONNECTOR ON THE COMPUTER
ENSURE THAT THE IEEE 1394 DEVICE IS RECOGNIZED BY WINDOWS —
1
Click the
2
Click
If your IEEE 1394 device is listed, Windows recognizes the device.
IF YOU HAVE PROBLEMS WITH A DELL IEEE 1394 DEVICE — Contact Dell (see "Contacting Dell" on
page 89).
F YOU HAVE PROBLEMS WITH AN IEEE 1394 DEVICE NOT PROVIDED BY DELL — Contact the
I
manufacturer of the IEEE 1394 device.
Start
button and click
Printers and Other Hardware
Control Panel
.
.
Solving Problems 21

Keyboard Problems
CAUTION: Before you begin any of the procedures in this section, follow the safety instructions located in the
Product Information Guide.
CHECK THE KEYBOARD CABLE —
• Ensure that the keyboard cable is firmly connected to the computer.
• Shut down the computer (see page 45), reconnect the keyboard cable as shown on the setup diagram for
your computer, and then restart the computer.
• Check the cable connector for bent or broken pins and for damaged or frayed cables. Straighten bent
pins.
• Remove keyboard extension cables and connect the keyboard directly to the computer.
TEST THE KEYBOARD — Connect a properly working keyboard to the computer, and try using the
keyboard.
RUN THE HARDWARE TROUBLESHOOTER — See page 44.
Lockups and Software Problems
CAUTION: Before you begin any of the procedures in this section, follow the safety instructions located in the
Product Information Guide.
The computer does not start up
CHECK THE DIAGNOSTIC LIGHTS — See page 33.
ENSURE THAT THE POWER CABLE IS FIRMLY CONNECTED TO THE COMPUTER AND TO THE
LECTRICAL OUTLET
E
The computer stops responding
NOTICE: You might lose data if you are unable to perform an operating system shutdown.
TURN THE COMPUTER OFF — If you are unable to get a response by pressing a key on your keyboard or
moving your mouse, press and hold the power button for at least 8 to 10 seconds until the computer
turns off. Then restart your computer.
22 Solving Problems

A program stops responding
END THE PROGRAM —
1
Press <Ctrl><Shift><Esc> simultaneously.
2
Click
Applications
3
Click the program that is no longer responding.
4
Click
End Task
.
.
A program crashes repeatedly
NOTE: Software usually includes installation instructions in its documentation or on a floppy disk or CD.
CHECK THE SOFTWARE DOCUMENTATION — If necessary, uninstall and then reinstall the program.
A program is designed for an earlier Windows operating system
RUN THE PROGRAM COMPATIBILITY WIZARD —
The Program Compatibility Wizard configures a program so it runs in an environment similar to nonWindows XP operating system environments.
1
Click the
Wizard
2
In the welcome screen, click
3
Follow the instructions on the screen.
.
Start
button, point to
All Programs→ Accessories
Next
.
, and then click
Program Compatibility
A solid blue screen appears
TURN THE COMPUTER OFF — If you are unable to get a response by pressing a key on your keyboard or
moving your mouse, press and hold the power button for at least 8 to 10 seconds until the computer
turns off. Then restart your computer.
Solving Problems 23

Other software problems
CHECK THE SOFTWARE DOCUMENTATION OR CONTACT THE SOFTWARE MANUFACTURER FOR
TROUBLESHOOTING INFORMATION —
• Ensure that the program is compatible with the operating system installed on your computer.
• Ensure that your computer meets the minimum hardware requirements needed to run the software. See
the software documentation for information.
• Ensure that the program is installed and configured properly.
• Verify that the device drivers do not conflict with the program.
• If necessary, uninstall and then reinstall the program.
BACK UP YOUR FILES IMMEDIATELY
USE A VIRUS-SCANNING PROGRAM TO CHECK THE HARD DRIVE, FLOPPY DISKS, OR CDS
SAVE AND CLOSE ANY OPEN FILES OR PROGRAMS AND SHUT DOWN YOUR COMPUTER THROUGH THE
START MENU
Memory Problems
CAUTION: Before you begin any of the procedures in this section, follow the safety instructions located in the
Product Information Guide.
IF YOU RECEIVE AN INSUFFICIENT MEMORY MESSAGE —
• Save and close any open files and exit any open programs you are not using to see if that resolves the
problem.
• See the software documentation for minimum memory requirements. If necessary, install additional
memory (see page 53).
• Reseat the memory modules to ensure that your computer is successfully communicating with the
memory (see page 53).
• Run the Dell Diagnostics (see page 36).
24 Solving Problems

IF YOU EXPERIENCE OTHER MEMORY PROBLEMS —
• Reseat the memory modules (see page 53) to ensure that your computer is successfully communicating
with the memory.
• Ensure that you are following the memory installation guidelines (see page 53).
• Your Dell Dimension™ computer supports DDR memory. For additional information on the type of
memory supported by your computer, see "Memory" on page 77.
• Run the Dell Diagnostics (see page 36).
Mouse Problems
CAUTION: Before you begin any of the procedures in this section, follow the safety instructions located in the
Product Information Guide.
CLEAN THE MOUSE — See the Dell Dimension Help file for instructions on cleaning the mouse. To
page 7
access the help file, see
CHECK THE MOUSE CABLE —
1
Check the cable connector for bent or broken pins and for damaged or frayed cables. Straighten bent
pins.
2
Remove mouse extension cables, if used, and connect the mouse directly to the computer.
3
Shut down the computer (see page 45), reconnect the mouse cable as shown on the setup diagram for
your computer, and then restart the computer.
.
RESTART THE COMPUTER —
1
Simultaneously press <Ctrl><Esc> to display the
2
Ty p e u, press the keyboard arrow keys to highlight
3
After the computer turns off, reconnect the mouse cable as shown on the on the setup diagram for your
computer.
4
Start the computer.
TEST THE MOUSE — Connect a properly working mouse to the computer, and try using the mouse.
CHECK THE MOUSE SETTINGS —
1
Click the
2
Click
3
Try adjusting the settings.
Start
Mouse
button, click
.
Control Panel
, and then click
Start
menu.
Shut down
Printers and Other Hardware
or
Turn Off
, and then press <Enter>.
.
Solving Problems 25

REINSTALL THE MOUSE DRIVER — See page 38.
RUN THE HARDWARE TROUBLESHOOTER — See page 44.
Network Problems
CAUTION: Before you begin any of the procedures in this section, follow the safety instructions located in the
Product Information Guide.
CHECK THE NETWORK CABLE CONNECTOR — Ensure that the network cable is firmly inserted into
both the network connector on the back of the computer and the network jack.
CHECK THE NETWORK LIGHTS ON THE BACK OF THE COMPUTER — If the link integrity light is off,
that indicates no network communication exists. Replace the network cable. For a description of
network lights, see "Controls and Lights" on page 79.
RESTART THE COMPUTER AND LOG ON TO THE NETWORK AGAIN
CHECK YOUR NETWORK SETTINGS — Contact your network administrator or the person who set up
your network to verify that your network settings are correct and that the network is functioning.
RUN THE HARDWARE TROUBLESHOOTER — See page 44.
Power Problems
CAUTION: Before you begin any of the procedures in this section, follow the safety instructions located in the
Product Information Guide.
IF THE POWER LIGHT IS GREEN AND THE COMPUTER IS NOT RESPONDING — See "Diagnostic Lights"
on page 33.
IF THE POWER LIGHT IS BLINKING GREEN — The computer is in standby mode. Press a key on the
keyboard, move the mouse, or press the power button to resume normal operation.
26 Solving Problems

IF THE POWER LIGHT IS OFF — The computer is either turned off or is not receiving power.
• Reseat the power cable into both the power connector on the back of the computer and the electrical
outlet.
• If the computer is plugged into a power strip, ensure that the power strip is plugged into an electrical
outlet and that the power strip is turned on. Also bypass power protection devices, power strips, and
power extension cables to verify that the computer turns on properly.
• Ensure that the electrical outlet is working by testing it with another device, such as a lamp.
• Ensure that the main power cable and front panel cable are securely connected to the system board (see
page 53).
IF THE POWER LIGHT IS BLINKING AMBER — The computer is receiving electrical power, but an
internal power problem might exist.
• Ensure that the voltage selection switch (see page 48) is set to match the AC power at your location (if
applicable).
• Ensure that the processor power cable (see page 53) is securely connected to the system board.
IF THE POWER LIGHT IS STEADY AMBER — A device might be malfunctioning or incorrectly installed.
• Remove and then reinstall the memory modules (see page 53).
• Remove and then reinstall any cards (see page 56).
• Remove and then reinstall the graphics card, if applicable (see page 56).
ELIMINATE INTERFERENCE — Some possible causes of interference are:
• Power, keyboard, and mouse extension cables
• Too many devices on a power strip
• Multiple power strips connected to the same electrical outlet
Printer Problems
CAUTION: Before you begin any of the procedures in this section, follow the safety instructions located in the
Product Information Guide.
NOTE: If you need technical assistance for your printer, contact the printer’s manufacturer.
CHECK THE PRINTER DOCUMENTATION — See the printer documentation for setup and
troubleshooting information.
ENSURE THAT THE PRINTER IS TURNED ON
Solving Problems 27

CHECK THE PRINTER CABLE CONNECTIONS —
• See the printer documentation for cable connection information.
• Ensure that the printer cables are securely connected to the printer and the computer (see page 9).
TEST THE ELECTRICAL OUTLET — Ensure that the electrical outlet is working by testing it with another
device, such as a lamp.
VERIFY THAT THE PRINTER IS RECOGNIZED BY WINDOWS —
1
Click the
2
Click
If the printer is listed, right-click the printer icon.
3
Click
port(s):
setting is
REINSTALL THE PRINTER DRIVER — See the printer documentation for instructions.
Start
button, click
View installed printers or fax printers
Properties
setting is
USB
.
and click the
LPT1 (Printer Port)
Control Panel
Ports
tab. For a parallel printer, ensure that the
. For a USB printer, ensure that the
, and then click
.
Printers and Other Hardware
Print to the following
Print to the following port(s):
.
Scanner Problems
CAUTION: Before you begin any of the procedures in this section, follow the safety instructions located in the
Product Information Guide.
NOTE: If you need technical assistance for your scanner, contact the scanner’s manufacturer.
CHECK THE SCANNER DOCUMENTATION — See the scanner documentation for setup and
troubleshooting information.
UNLOCK THE SCANNER — Ensure that your scanner is unlocked if it has a locking tab or button.
RESTART THE COMPUTER AND TRY THE SCANNER AGAIN
CHECK THE CABLE CONNECTIONS —
• See the scanner documentation for cable connection information.
• Ensure that the scanner cables are securely connected to the scanner and the computer.
28 Solving Problems

VERIFY THAT THE SCANNER IS RECOGNIZED BY MICROSOFT WINDOWS —
1
Click the
2
Click
If your scanner is listed, Windows recognizes the scanner.
REINSTALL THE SCANNER DRIVER — See the scanner documentation for instructions.
Start
button, click
Scanners and Cameras
Control Panel
.
, and then click
Printers and Other Hardware
.
Sound and Speaker Problems
CAUTION: Before you begin any of the procedures in this section, follow the safety instructions located in the
Product Information Guide.
No sound from speakers
NOTE: The volume control in some MP3 players overrides the Windows volume setting. If you have been listening
to MP3 songs, ensure that you did not turn the player volume down or off.
NOTE: If you have installed a PCI audio card, the internal speaker is disabled.
CHECK THE SPEAKER CABLE CONNECTIONS — Ensure that the speakers are connected as shown on
the setup diagram supplied with the speakers. If you purchased a sound card, ensure that the speakers
are connected to the card.
ENSURE THAT THE SUBWOOFER AND THE SPEAKERS ARE TURNED ON — See the setup diagram
supplied with the speakers. If your speakers have volume controls, adjust the volume, bass, or treble to
eliminate distortion.
ADJUST THE WINDOWS VOLUME CONTROL — Click or double-click the speaker icon in the lower-right
corner of your screen. Ensure that the volume is turned up and that the sound is not muted.
DISCONNECT HEADPHONES FROM THE HEADPHONE CONNECTOR — Sound from the speakers is
automatically disabled when headphones are connected to the computer’s front-panel headphone
connector.
TEST THE ELECTRICAL OUTLET — Ensure that the electrical outlet is working by testing it with another device,
such as a lamp.
ELIMINATE POSSIBLE INTERFERENCE — Turn off nearby fans, fluorescent lights, or halogen lamps to
check for interference.
Solving Problems 29

RUN THE SPEAKER DIAGNOSTICS
REINSTALL THE SOUND DRIVER — See page 38.
RUN THE HARDWARE TROUBLESHOOTER — See page 44.
No sound from headphones
CHECK THE HEADPHONE CABLE CONNECTION — Ensure that the headphone cable is securely inserted
into the headphone connector (see page 47).
ADJUST THE WINDOWS VOLUME CONTROL — Click or double-click the speaker icon in the lower-right
corner of your screen. Ensure that the volume is turned up and that the sound is not muted.
Video and Monitor Problems
CAUTION: Before you begin any of the procedures in this section, follow the safety instructions located in the
Product Information Guide.
NOTE: See the monitor documentation for troubleshooting procedures.
If the screen is blank
CHECK THE MONITOR CABLE CONNECTION —
• Ensure that the graphics cable is connected as shown on the setup diagram for your computer.
• If you are using a graphics extension cable and removing the cable solves the problem, the cable is
defective.
• Swap the computer and monitor power cables to determine if the power cable is defective.
• Check the connector for bent or broken pins. (It is normal for monitor cable connectors to have missing
pins.)
CHECK THE MONITOR POWER LIGHT — If the power light is off, firmly press the button to ensure that
the monitor is turned on. If the power light is lit or blinking, the monitor has power. If the power light is
blinking, press a key on the keyboard or move the mouse.
TEST THE ELECTRICAL OUTLET — Ensure that the electrical outlet is working by testing it with another
device, such as a lamp.
30 Solving Problems
 Loading...