

Dell E5515H User Manual

Model No.: E5515H
User‘s Guide
Dell E5515H
Regulatory model: E5515Hc

NOTE: A NOTE indicates important information that helps you make
better use of your monitor.
CAUTION: A CAUTION indicates potential damage to hardware or
loss of data if instructions are not followed.
WARNING: A WARNING indicates a potential for property damage,
personal injury, or death.
© 2014 Dell Inc. All rights reserved.
Information in this document is subject to change without notice.
Reproduction of these materials in any manner whatsoever without the
written permission of Dell Inc. is strictly forbidden.
Trademarks used in this text: Dell and the DELL logo are trademarks
of Dell Inc. Microsoft and Windows are either registered trademarks
or trademarks of Microsoft Corporation in the United States and/ or
other countries. ENERGY STAR is a registered trademark of the U.S.
Environmental Protection Agency. As an ENERGY STAR partner, Dell Inc.
has determined that this product meets the ENERGY STAR guidelines for
energy efficiency.
Other trademarks and trade names may be used in this document to refer
to either the entities claiming the marks and names or their products.
Dell Inc. disclaims any proprietary interest in trademarks and trade names
other than its own.
2014 – 08 Rev. A00

Contents
Dell Display Manager User's Guide ................6
Overview . . . . . . . . . . . . . . . . . . . . . . . . . . . . . . 6
Using the Quick Settings Dialog . . . . . . . . . . . . . . . . 6
Setting Basic Display Functions . . . . . . . . . . . . . . . . 7
Assigning Preset Modes to Applications . . . . . . . . . . . 7
Organizing Windows with Easy Arrange . . . . . . . . . . . 9
Applying Energy Conservation Features . . . . . . . . . . .11
About Your Monitor ............................12
Package Contents . . . . . . . . . . . . . . . . . . . . . . . 12
Product Features . . . . . . . . . . . . . . . . . . . . . . . . 13
Remote Control . . . . . . . . . . . . . . . . . . . . . . . . . 14
Inserting the batteries in the remote control. . . . . . . . . . . . . 15
Handling the remote control . . . . . . . . . . . . . . . . . . . . . . 15
Operating range of the remote control . . . . . . . . . . . . . . . . 16
Identifying Parts and Controls . . . . . . . . . . . . . . . . .17
Monitor Specifications . . . . . . . . . . . . . . . . . . . . . 19
Power Management Modes . . . . . . . . . . . . . . . . . . . . . . . 19
Pin Assignments . . . . . . . . . . . . . . . . . . . . . . . . . . . . . . 20
Plug and Play Capability . . . . . . . . . . . . . . . . . . . . 23
Flat-Panel Specifications . . . . . . . . . . . . . . . . . . . . . . . . . 23
Resolution Specifications . . . . . . . . . . . . . . . . . . . . . . . . 24
Support Video Mode . . . . . . . . . . . . . . . . . . . . . . . . . . . 24
Electrical Specifications . . . . . . . . . . . . . . . . . . . . . . . . . 24
Preset Display Modes . . . . . . . . . . . . . . . . . . . . . . . . . . . 25
3

Physical Characteristics . . . . . . . . . . . . . . . . . . . . . . . . . 26
Environmental Characteristics . . . . . . . . . . . . . . . . . . . . . 27
LCD Monitor Quality & Pixel Policy . . . . . . . . . . . . . 28
Maintenance Guidelines . . . . . . . . . . . . . . . . . . . 28
Caring for Your Monitor . . . . . . . . . . . . . . . . . . . . . . . . . 28
Setting Up the Monitor..........................29
Attaching the Monitor . . . . . . . . . . . . . . . . . . . . . 29
Connecting Your Monitor . . . . . . . . . . . . . . . . . . . 30
Connecting the blue VGA Cable . . . . . . . . . . . . . . . . . . . . 30
Connecting the black HDMI Cable . . . . . . . . . . . . . . . . . . . 30
Removing the Monitor Stand . . . . . . . . . . . . . . . . 32
Wall Mounting (Optional) . . . . . . . . . . . . . . . . . . . 32
Operating the Monitor ..........................34
Power On the Monitor . . . . . . . . . . . . . . . . . . . . . 34
Using the Function Controls . . . . . . . . . . . . . . . . . 34
Front-Panel Keys. . . . . . . . . . . . . . . . . . . . . . . . . . . . . . 35
Using the On-Screen Display (OSD) Menu . . . . . . . . . 36
Accessing the Menu System . . . . . . . . . . . . . . . . . . . . . . . 36
OSD Warning Messages . . . . . . . . . . . . . . . . . . . . 47
Setting the Maximum Resolution . . . . . . . . . . . . . . 50
Troubleshooting ...............................51
Self-Test . . . . . . . . . . . . . . . . . . . . . . . . . . . . . 51
Built-in Diagnostics. . . . . . . . . . . . . . . . . . . . . . . 53
Product-Specific Problems . . . . . . . . . . . . . . . . . . 58
Appendix ......................................59
FCC Notices (U.S. Only) and Other Regulatory Information
. . . . . . . . . . . . . . . . . . . . . . . . . . . . . . . . . . . 59
4

Contact Dell . . . . . . . . . . . . . . . . . . . . . . . . . . . 59
Setting Up Your Monitor ........................60
Setting the display resolution to 1920 x 1080 (Maximum) 60
If you have a Dell desktop or a Dell portable computer with
Internet access . . . . . . . . . . . . . . . . . . . . . . . . . 61
If you have a non Dell desktop, portable computer, or
graphics card . . . . . . . . . . . . . . . . . . . . . . . . . . 61
Procedures for setting up dual monitors in Windows® 7 or
Windows® 8/Windows® 8.1 . . . . . . . . . . . . . . . . . 62
For Windows® 7 . . . . . . . . . . . . . . . . . . . . . . . . . . . . . . 62
For Windows® 8/Windows® 8.1 . . . . . . . . . . . . . . . . . . . . 64
Setting Display Styles For Multiple Monitor . . . . . . . . . . . . . 66
5

Dell Display Manager User's Guide
Overview
Dell Display Manager is a Windows application used to manage a monitor
or a group of monitors. It allows manual adjustment of the displayed
image, assignment of automatic settings, energy management, image
rotation and other features on select Dell models. Once installed, Dell
Display Manager will run each time the system starts and will place its
icon in the notification tray. Information about monitors connected to the
system is always available when hovering over the notification tray icon.
E5515H
Using the Quick Settings Dialog
Clicking Dell Display Manager’s notification tray icon opens the Quick
Settings dialog box. When more than one supported Dell model is
connected to the system, a specific target monitor can be selected using
the menu provided. The Quick Settings dialog box allows convenient
adjustment of the monitor’s Brightness and Contrast levels, Preset Modes
can be manually selected or set to Auto Mode, and the screen resolution
can be changed.
E5515H
1920x1080
6 Dell Display Manager User's Guide

The Quick Settings dialog box also provides access to Dell Display
Manager’s advanced user interface which is used to adjust Basic
functions, configure Auto Mode and access other features.
Setting Basic Display Functions
A Preset Mode for the selected monitor can be manually applied using
the menu on the Basic tab. Alternatively, Auto Mode can be enabled. Auto
Mode causes your preferred Preset Mode to be applied automatically
when specific applications are active. An onscreen message momentarily
displays the current Preset Mode whenever it changes.
The selected monitor’s Brightness and Contrast can also be directly
adjusted from the Basic tab.
Assigning Preset Modes to Applications
The Auto Mode tab allows you to associate a specific Preset Mode
with a specific application, and apply it automatically. When Auto
Mode is enabled, Dell Display Manager will automatically switch to the
corresponding Preset Mode whenever the associated application is
activated. The Preset Mode assigned to a particular application may be
the same on each connected monitor, or it can vary from one monitor to
the next.
Dell Display Manager User's Guide 7

Dell Display Manager is pre-configured for many popular applications. To
add a new application to the assignment list, simply drag the application
from the desktop, Windows Start Menu or elsewhere, and drop it onto the
current list.
NOTE: Preset Mode assignments targeting batch files, scripts, and
loaders, as well as non-executable files such as zip archives or packed
files, are not supported and will be ineective.
8 Dell Display Manager User's Guide

Organizing Windows with Easy Arrange
Some Dell models feature Easy Arrange, which allows the selected
monitor’s desktop to be organized into various predefined or custom
window layouts. When Easy Arrange is enabled, windows can easily be
made to reposition and resize automatically to fill specific regions within a
window layout.
To get started with Easy Arrange, choose a target monitor and select one
of the predefined layouts. The regions for that layout will be displayed
momentarily on the monitor. Next, drag an open window across the
monitor. While the window is being dragged, the current window layout
will be displayed and an active region will be highlighted as the window
passes over it. At any time, drop the window into the active region and it
will automatically resize and reposition to fill that region.
To create a custom window layout, first size and position up to 10
windows on the desktop and then click the Save link in Easy Arrange.
The size and position of thewindows is saved as a custom layout and the
custom layout icon is created.
NOTE: The application that owns each window is not saved in the
custom layout. Only the size and position of the windows is saved.
Dell Display Manager User's Guide 9

To use the currently saved custom layout, select the custom layout icon.
To save a new custom layout, first postion and size up to 10 windows on
the desktop andthen click the Save link in Easy Arrange. To delete the
currently saved custom layout, close all windows on the desktop and then
click the Save link in Easy Arrange.
10 Dell Display Manager User's Guide

Applying Energy Conservation Features
On supported Dell models the PowerNap tab will be available to provide
energy conservation options. When the screensaver activates, the
monitor’s Brightness can automatically be set to minimum level or the
monitor can be put to sleep in order to save additional power.
Dell Display Manager User's Guide 11

About Your Monitor
Package Contents
Your monitor ships with all the components shown below. Ensure that
you have received all the components and Contact Dell if anything is
missing.
NOTE: Some items may be optional and may not ship with your
monitor. Some features or media may not be available in certain
countries.
•Monitor
•Monitor Base
•Screws: M4 (12mm) x 4
•Remote Control & Batteries (AAA x 2)
12 About Your Monitor
•Audio Cable
•Power Cable (varies by countries)
•VGA Cable

•Mini HDMI to HDMI Cable
•USB Upstream Cable (enable the USB
ports on the monitor)
E5515H
G6MH8A00
G6MH8
Q70G55C170001A
August 2014
•Drivers and Documentation media
•Quick Setup Guide
•Safety, Environment, and Regulatory
Information (SERI)
Product Features
The Dell E5515H flat-panel display has an active matrix, Thin-Film
Transistor, Liquid Crystal Display. The monitor’s features include:
• E5515H: 1386.84 mm (54.6 inches) diagonal viewable image size,
1920 x 1080 resolution, plus full-screen support for lower resolutions.
• LED backlight.
• Removable pedestal and Video Electronics Standards Association
(VESA) 400 mm x 400 mm mounting holes for flexible mounting
solutions.
• Plug and play capability if supported by your system.
• Connectivity : VGA, HDMIx2
• On-Screen Display (OSD) adjustments for ease of set-up and screen
optimization.
• Software and documentation media which includes an information file
(INF), Image Color Matching File (ICM), and product documentation.
• Dell Display Manager Software (comes in the CD shipped with the
monitor).
• ENERGY STAR-compliant.
• Asset Management Capability.
• Build-in Speaker (5W)x2
• RoHS compliant.
• BFR/PVC Free (Halogen-Free) monitor excluding external cables.
• Arsenic-Free glass and Mercury-Free for panel only.
• 0.5W Standby power when in the sleep mode.
About Your Monitor 13

Remote Control
1
11
14
15
2
3
4
5
6
7
8
9
13
10
12
4
Left
Press to move the selection left in
OSD menu.
5
Down
Press to move the selection down in
OSD menu.
6
Menu
Press to turn on the OSD menu.
7
Brightness -
Press to decrease the Brightness.
8
Volume -
Press to decrease the Volume.
9
MUTE
Press to turn the mute function on/
o.
10
Preset Modes
Display information about Preset
Modes.
1
Power On/O
Switch this monitor on or o.
2
Input Source
Select input source. Press [<] or
[>] button to select from
HDMI2
confirm and exit.
3
Up
or
VGA
Press to move the selection up in
OSD menu.
14 About Your Monitor
HDMI1
. Press [√] button to
11
Right
Press to move the selection right in
OSD menu.
12
OK
Confirm an entry or selection.
13
Exit
Press to exit the Menu.
14
Brightness +
Press to increase the Brightness.
,
15
Volume +
Press to increase the Volume.

Inserting the batteries in the remote control
The remote control is powered by two 1.5V AAA batteries.
To install or replace batteries:
1. Press and then slide the cover to open it.
2. Align the batteries according to the (+) and (–) indications inside the
battery compartment.
3. Replace the cover.
CAUTION:
The incorrect use of batteries can result in leaks or bursting. Be sure to
follow these instructions:
• Place “AAA” batteries matching the (+) and (–) signs on each battery to
the (+) and (–) signs of the battery compartment.
• Do not mix battery types.
• Do not combine new batteries with used ones. It causes shorter life or
leakage of batteries.
• Remove the dead batteries immediately to prevent them from liquid
leaking in the battery compartment. Don’t touch exposed battery acid,
as it can damage your skin.
• NOTE: If you do not intend to use the remote control for a long
period, remove the batteries.
Handling the remote control
• Do not subject to strong shock.
• Do not allow water or other liquid to splash the remote control. If the
remote control gets wet, wipe it dry immediately.
• Avoid exposure to heat and steam.
• Other than to install the batteries, do not open the remote control.
About Your Monitor 15

Operating range of the remote control
Point the top of the remote control toward the LCD monitor’s remote
sensor during button operation.
Use the remote control within a distance of about 8 m from remote
control sensor or at a horizontal and vertical angle of within 15° within a
distance of about 5.6 m.
NOTE: The remote control may not function properly when the
remote control sensor on the display is under direct sunlight or
strong illumination, or when there is an obstacle in the path of signal
transmission.
15 15
16 About Your Monitor

Identifying Parts and Controls
1
CAN ICES-3 (B)/NMB-3(B)
Service Tag:1NGTQV1
Express SVC code:359 576 607 7
S/N: CN-0 P2NYV-64180-46D-001T
REV A00
Manufactured Date: Jul. 2014
DELL
Model No. : E5515Hc
: 100-240V 50/60Hz 2.5A
The equipment must be connected to an earthed mains socket-outlet.
L'appareil doit être branché sur une prise de courant munie d'une mise
à la terre.
Raheen Business Park Limerick Ireland www.dell.com
Made in China
Flat Panel Monitor /Moniteur écran plat
1
2
3
4
5
Front View
1 IR Lens (with LED indicator)
Back View
Back View with monitor stand
Label Description Use
1 VESA mounting holes (400
mm x 400 mm)
2 Regulatory label Lists the regulatory approvals.
3 AC power connector To connect the monitor power cable.
4 Function buttons (For more
information, see Operating
the Monitor)
5 Security lock slot Secures monitor with security lock.
Wall mount monitor using VESAcompatible wall mount kit (400 mm x
400 mm).
Use the buttons on the back of the
monitor to adjust the image settings.
About Your Monitor 17

Side View
1 1
1
2
3
4
5
Label Description Use
1 USB downstream
port
2 USB upstream port Connect the USB cable that comes with your
3 Audio-Line in Connect your computer audio output with
4 VGA connector Connect your computer to the monitor using a
5 HDMI 1/HDMI 2 Connect your HDMI devices with HDMI cable.
Connect your USB device. You can only use
this connector after you have connected the
USB cable to the computer and USB upstream
connector on the monitor.
monitor to the computer. Once this cable is
connected, you can use the USB connectors on
the monitor.
audio cable.
VGA cable.
Bottom View
1 Speakers
18 About Your Monitor

Monitor Specifications
The following sections give you information about the various power
management modes and pin assignments for the various connectors of
your monitor.
Power Management Modes
If you have VESA’s DPM compliance display card or software installed
in your PC, the monitor automatically reduces its power consumption
when not in use. This is referred to as Power Save Mode. If the computer
detects input from keyboard, mouse, or other input devices, the monitor
automatically resumes functioning. The following table shows the power
consumption and signaling of this automatic power saving feature:
VESA
Modes
Normal
operation
Active-o
mode
Switch o - - O Less than 0.5 W*
Horizontal
Sync
Active Active Active White 135 W (Maximum)**
Inactive Inactive Blank Glowing
Vertical
Sync
Video
Power
Indicator
white
Power
Consumption
65 W (Typical)***
Less than 0.5 W
* Zero-power consumption in OFF mode can only be achieved by
disconnecting the main cable from the monitor.
** Maximum power consumption with max luminance and contrast.
*** Typical power consumption with OSD default setting, audio and USB
inactive.
The OSD will only function in the normal operation mode. When any
button except power button is pressed in Active-off mode, the following
messages will be displayed:
Dell
E5515H
There is no signal coming from your computer. Press any key on the
keyboard or move the mouse to wake it up. If there is no display, press
the monitor button now to select the correct input source on the
On-Screen-Display menu.
About Your Monitor 19
Activate the computer and monitor to gain access to the Using the OnScreen Display (OSD) Menu.
NOTE: The Dell E5515H monitor is ENERGY STAR®-compliant.
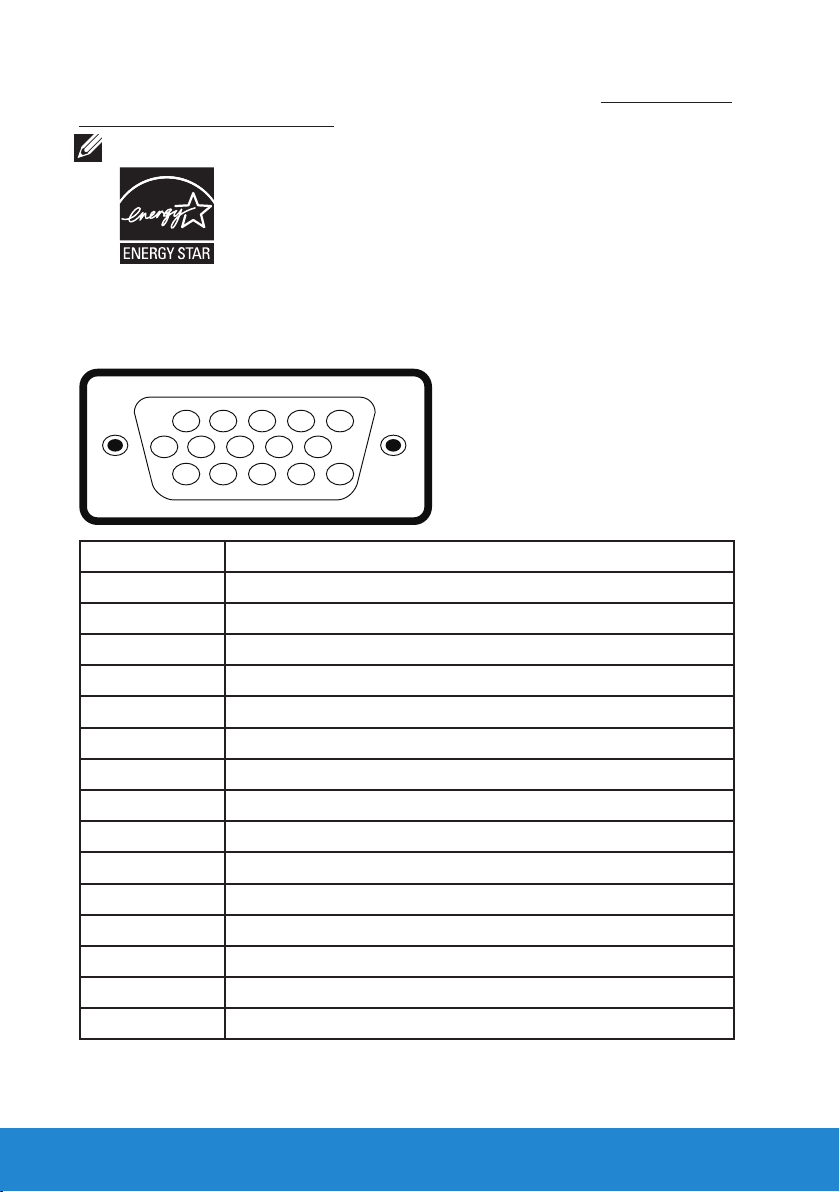
Pin Assignments
15-pin D-Sub connector
1 2 3 4 5
6 7 8 9 10
11 12 13 14 15
Pin Number Monitor Side of the 15-pin Side Signal Cable
1 Video-Red
2 Video-Green
3 Video-Blue
4 GND
5 Self-test
6 GND-R
7 GND-G
8 GND-B
9 DDC +5 V
10 GND-sync
11 GND
12 DDC data
13 H-sync
14 V-sync
15 DDC clock
20 About Your Monitor

19-pin HDMI connector
Pin Number Monitor Side of the 19-pin Side Signal Cable
1 TMDS Data2+
2 TMDS Data2 Shield
3 TMDS Data2-
4 TMDS Data1+
5 TMDS Data1 Shield
6 TMDS Data1-
7 TMDS Data0+
8 TMDS Data0 Shield
9 TMDS Data0-
10 TMDS Clock+
11 TMDS Clock Shield
12 TMDS Clock13 CEC
14 Reserved (N.C. on device)
15 SCL
16 SDA
17 DDC/CEC Ground
18 +5V Power
19 Hot Plug Detect
About Your Monitor 21
 Loading...