

Dell D00DX User Manual [de]

Dell Wyse Cloud Client
Wyse
Quick Start Guide
Snelstartgids
Guide de démarrage rapide
Schnellstart-Handbuch
5010
1
Install the vertical stand
Installeer de verticale standaard
Installez le socle vertical
Installieren Sie den vertikalen Standrahmen
Or use Dell-approved mounting accessory kit
Of gebruik de door Dell goedgekeurde set montagehulpstukken
Ou bien utilisez un kit d’accessoires de montage homologué par Dell
oder verwenden Sie einen von Dell genehmigten Installationszubehör-
Bausatz
3 Connect the network
Sluit het netwerk aan
Connectez le réseau
Stellen Sie eine Netzwerkverbindung her
Or | OF | Ou | oder
Or | OF | Ou | oder
Network connector
Netwerkaansluiting
Connecteur réseau
Netzwerkanschluss
Wireless antenna
Antenne voor draadloze verbinding
Antenne sans fil
WLAN-Antenne
4 Connect the display
Sluit de display aan
Connectez l’écran
Schließen Sie den Bildschirm an
Or
| OF | Ou | oder
Display Port connector
Aansluiting display
Connecteur de port de l’écran
Bildschirmanschluss
DVI-I connector
DVI-I-aansluiting
Connecteur DVI-I
DVI-I-Anschluss
5 Connect the power cable on your client
device and display
Sluit de stroomkabel aan op uw clientapparaat en uw display
Connectez le câble d’alimentation à votre périphérique client et à
votre écran
Verbinden Sie das Stromkabel mit Ihrem Client-Gerät und dem
Bildschirm
Client device power connector
Stroomaansluiting clientapparaat
Connecteur d’alimentation du
périphérique client
Stromversorgungsanschluss des
Client-Geräts
Display power connector
Stroomaansluiting display
Connecteur d’alimentation de l’écran
Bildschirm-Stromversorgungsanschluss
Connect the keyboard and mouse
2
Sluit het toetsenbord en de muis aan
Connectez le clavier et la souris
Schließen Sie die Tastatur und Maus an
USB Connector
USB-aansluiting
Connecteur USB
USB-Anschluss
Fiber SFP module
Glasvezel-SFP-module
Module SFP Fibre
Fiber SFP-Modul
NOTE: To remove the Fibre SFP module, rotate the latch and unplug it from its slot.
N.B. Als u de SFP-module wilt verwijderen, dient u de vergrendeling omhoog te draaien en
de module uit de aansluiting te verwijderen.
REMARQUE : Pour retirer le module SFP Fibre, tournez le loquet puis détachez le module
de son logement.
ANMERKUNG: Drehen Sie zum Entfernen des Fibre-SFP-Moduls den Riegel und trennen
Sie die Verbindung zum Anschluss.
Or
| OF | Ou | oder
VGA adapter
VGA-adapter
Adaptateur VGA
VGA-Adapter
NOTE: Your client device is ready to use when the client device activity light goes off.
N.B. Uw clientapparaat is klaar voor gebruik zodra het activiteitslampje van het
clientapparaat uit gaan.
REMARQUE : Votre périphérique client est prêt à l’emploi lorsque son voyant
d’activité s’éteint.
ANMERKUNG: Ihr Client-Gerät ist zur Verwendung bereit, wenn die Aktivitätsleuchte des
Client-Geräts aus geht.
6 Turn on your client device and display
Zet uw clientapparaat en display aan
Mettez sous tension votre périphérique client et votre écran
Schalten Sie Ihr Client-Gerät und den Bildschirm an
Product support and manuals
Productondersteuning en handleidingen
Support produits et manuels
Produkt-Support und Handbücher
dell.com/support
dell.com/support/manuals
Features
Functies | Caractéristiques | Funktionen
Contact Dell
Contact opnemen met Dell
Kontaktaufnahme mit Dell
Regulatory and safety
Informatie over regelgeving en veiligheid
Réglementation et sécurité
Betriebs- und Sicherheitsbestimmungen
Regulatory model
Model regelgeving
Vorschriftenmodell
Client device model
Model clientapparaat
Client-Gerät-Modell
© 2015 Dell Inc.
| Contacter Dell
| Modèle réglementaire
|
Modèle de périphérique client
0K3ND7A00
dell.com/contactdell
dell.com/regulatory_compliance
Dx0D
Dell Wyse Cloud Client
Wyse 5010
Printed in Poland.
2015-04
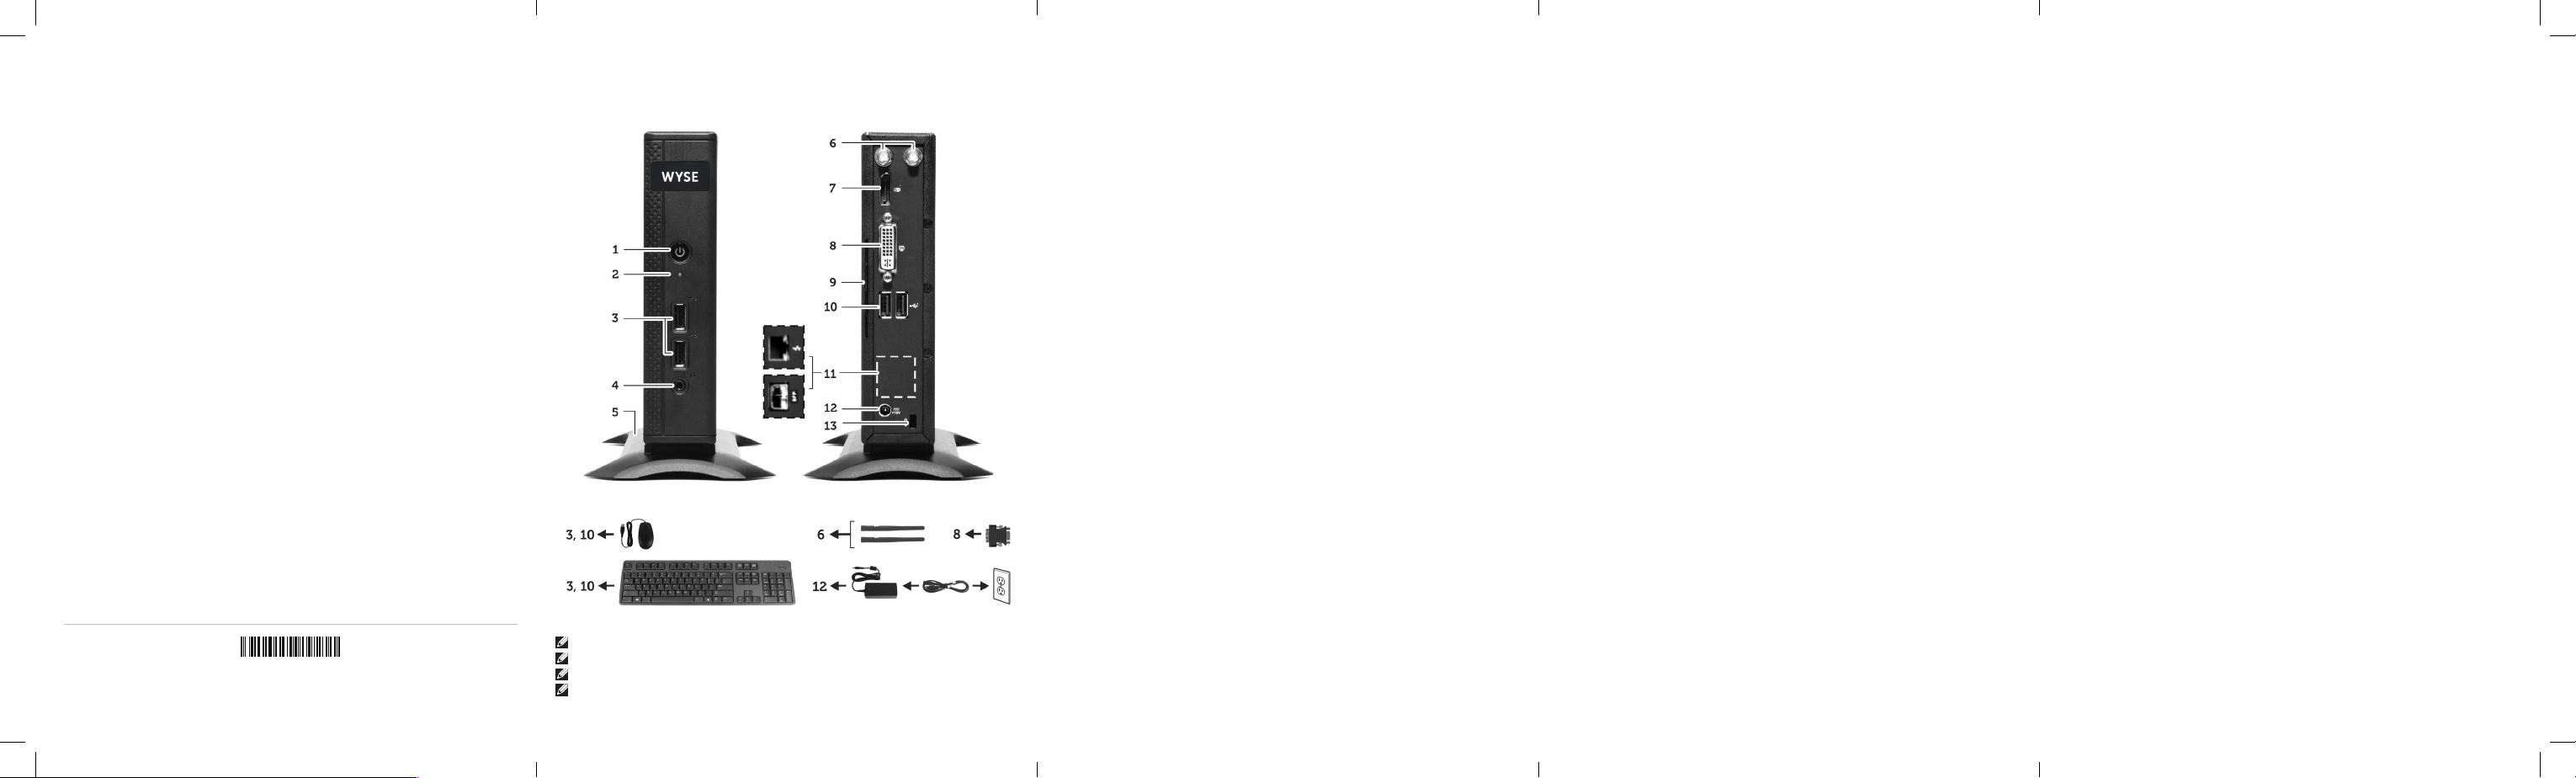
NOTE: Components may vary based on model and location.
N.B. Onderdelen kunnen verschillen al naar gelang model en locatie.
REMARQUE : Les composants peuvent varier en fonction du modèle et de votre région.
ANMERKUNG: Komponenten können je nach Modell oder Standort unterschiedlich sein.
1. Power on/off button and light
2. Activity light
3. USB 2.0 port (2x)
4. Headphone/microphone jack
5. Vertical Stand
6. Wireless antenna port (2x) (optional)
7. Display Port connector
8. DVI-I port [1x DVI-D / 1x VGA]
9. Product Information tab
10. USB 2.0 port (2x)
1. Aan/uit-knop en lampje
2. Activiteitslampje
3. USB 2.0-poort (2x)
4. Aansluiting hoofdtelefoon/
microfoon
5. Verticale standaard
6. Poort antenne draadloze verbinding
(2x) (optioneel)
7. Aansluiting display
8. DVI-I-poort [1x DVI-D / 1x VGA]
9. Label productinformatie
11. Network port, 10/100/1000 Base-T
or SFP
12. +19V Power adapter input
13. Lock recptacle
10. USB 2.0-poort (2x)
11. Netwerkpoort, 10/100/1000 Base-T
of SFP
12. Ingang +19V netadapter
13. Bevestigingsplaats slot
1. Bouton d’arrêt/marche et voyant
d’alimentation
2. Voyant d’activité
3. Port USB 2.0 (2x)
4. Prise pour casque/microphone
5. Socle vertical
6. Port d’antenne sans-fil (2x)
(en option)
7. Connecteur de port de l’écran
8. Port DVI-I (1x DVI-D / 1x VGA)
1. Ein-/Ausschalttaste und Leuchte
2. Aktivitätsleuchte
3. USB 2.0-Anschluss (2x)
4. Kopfhörer-/Mikrofonbuchse
5. Vertikaler Standrahmen
6. WLAN-Antennenanschluss (2x)
(optional)
7. Bildschirmanschluss
8. DVI-I-Anschluss [1x DVI-D / 1x VGA]
9. Produktinformationsetikett
10. USB 2.0-Anschluss (2x)
9. Étiquette d’informations sur
le produit
10. Port USB 2.0 (2x)
11. Port réseau, 10/100/1000
Base-T ou SFP
12. Entrée d’adaptateur
d’alimentation +19V
13. Réceptacle de verrouillage
11. Netzwerk-Anschluss, 10/100/1000
Base-T oder SFP
12. +19V Netzteil-Eingang
13. Verriegelungsbuchse
 Loading...