


Dell™ Client Configuration
Toolkit Version 1.1
User’s Guide

Notes
NOTE: A NOTE indicates important information that helps you make better use of
your computer.
____________________
Information in this document is subject to change without notice.
© 2010 Dell Inc. All rights reserved.
Reproduction of these materials in any manner whatsoever without the written permission of Dell Inc.
is strictly forbidden.
Trademarks used in this text: Dell, the DELL logo, PowerEdge, PowerVault, OptiPlex, Precision,
Latitude
and OpenManage are trademarks of Dell Inc.; Microsoft, MS-DOS, Windows, Windows NT,
Active Directory, and Windows Server are either trademarks or registered trademarks of Microsoft
Corporation in the United States and/or other countries; Novell, NetWare, and SUSE are registered
trademarks of Novell, Inc. in the United States and other countries; Red Hat and Red Hat Enterprise
Linux are registered trademarks of Red Hat, Inc. in the United States and other countries.
Other trademarks and trade names may be used in this document to refer to either the entities claiming
the marks and names or their products. Dell Inc. disclaims any proprietary interest in trademarks and
trade names other than its own.
April 2010

Contents
1 Introduction . . . . . . . . . . . . . . . . . . . . . . . 13
Supported Operating Systems . . . . . . . . . . . . . . 13
Supported Systems . . . . . . . . . . . . . . . . . . . 13
What’s New
. . . . . . . . . . . . . . . . . . . . . . . 13
2 Windows Install/Uninstall . . . . . . . . . . . . 15
Install Prerequisites . . . . . . . . . . . . . . . . . . . 15
Installing CCTK . . . . . . . . . . . . . . . . . . . . . 15
Important Information
Uninstalling CCTK
Creating a Bootable Image Using Windows PE
Creating a Bootable Image Using
Windows PE 2.0
Creating a Bootable Image Using
Windows PE 3.0 . . . . . . . . . . . . . . . . . . 20
Running CCTK Commands Using a
Bootable Image
Upgrading CCTK . . . . . . . . . . . . . . . . . . . . . 21
. . . . . . . . . . . . . . . . . . . . . 21
. . . . . . . . . . . . . . . 17
. . . . . . . . . . . . . . . . . . . . 18
. . . . 18
. . . . . . . . . . . . . . . . . . 18
3 Linux Install/Uninstall . . . . . . . . . . . . . . . 23
Install Prerequisites . . . . . . . . . . . . . . . . . . . 23
Contents 3

Installing CCTK . . . . . . . . . . . . . . . . . . . . . 23
Prerequisite
. . . . . . . . . . . . . . . . . . . . . 23
Uninstalling CCTK
. . . . . . . . . . . . . . . . . . . . 24
Upgrading CCTK . . . . . . . . . . . . . . . . . . . . . 24
4 CCTK Options . . . . . . . . . . . . . . . . . . . . . . 27
Command Syntax Overview . . . . . . . . . . . . . . . 27
Command Line Syntax
Case-Sensitivity
Command Line Option Delimiters . . . . . . . . . 28
Read and Write Options
File Input and Output Commands
Log Files . . . . . . . . . . . . . . . . . . . . . . 30
Help Option
. . . . . . . . . . . . . . . . . . . . . 31
Error Checking and Error Messages
CCTK Options
. . . . . . . . . . . . . . . . . . . . . . 31
CCTK General Options
-h or --help
. . . . . . . . . . . . . . . . . . . . . 32
-i or --infile . . . . . . . . . . . . . . . . . . . . . 32
-l or --logfile
No option
. . . . . . . . . . . . . . . . . . . . 33
. . . . . . . . . . . . . . . . . . . . . . 34
-o or --outfile
--version
. . . . . . . . . . . . . . . . . . . . . . 35
BIOS Options
--acpower
--activityled
--adddevice
. . . . . . . . . . . . . . . . . . . . . 36
. . . . . . . . . . . . . . . . . . . . . 36
. . . . . . . . . . . . . . . . . . . . . 37
--adjcacheprefetch . . . . . . . . . . . . . . . . . 38
--admsetuplockout
--agpslot
. . . . . . . . . . . . . . . . . . . . . . 39
. . . . . . . . . . . . . . . 27
. . . . . . . . . . . . . . . . . . 28
. . . . . . . . . . . . . . 30
. . . . . . . . . . 30
. . . . . . . . 31
. . . . . . . . . . . . . . . 31
. . . . . . . . . . . . . . . . . . . . 34
. . . . . . . . . . . . . . . . . . . . 36
. . . . . . . . . . . . . . . . . 38
4 Contents

--amblightsen . . . . . . . . . . . . . . . . . . . 39
--asfmode
. . . . . . . . . . . . . . . . . . . . . 39
--asset . . . . . . . . . . . . . . . . . . . . . . . 40
--audiomode
--autoon
. . . . . . . . . . . . . . . . . . . . 40
. . . . . . . . . . . . . . . . . . . . . . 41
--autoonhr . . . . . . . . . . . . . . . . . . . . . 41
--autoonmn
--bioscharacteristics
. . . . . . . . . . . . . . . . . . . . . 41
. . . . . . . . . . . . . . . . 42
--bioscurrentlang . . . . . . . . . . . . . . . . . 42
--bioslistinstalllang
--biosromsize
. . . . . . . . . . . . . . . . . 43
. . . . . . . . . . . . . . . . . . . . 43
--biosver . . . . . . . . . . . . . . . . . . . . . . 43
--bisreq
--bitsmart
. . . . . . . . . . . . . . . . . . . . . . . 44
. . . . . . . . . . . . . . . . . . . . . . 44
--bltinpntdevice . . . . . . . . . . . . . . . . . . 44
--bluetoothdevice
bootorder
. . . . . . . . . . . . . . . . . 45
. . . . . . . . . . . . . . . . . . . . . . 45
--bootspeed . . . . . . . . . . . . . . . . . . . . 49
--busratio
--camera
. . . . . . . . . . . . . . . . . . . . . . 49
. . . . . . . . . . . . . . . . . . . . . . 50
--cellularradio . . . . . . . . . . . . . . . . . . . 50
--charger
--chasintrusion
--clearsel
--cmosdefaults
--completioncode
--coolnquiet
--cpucore
--cpucount
. . . . . . . . . . . . . . . . . . . . . . 50
. . . . . . . . . . . . . . . . . . . 51
. . . . . . . . . . . . . . . . . . . . . . 51
. . . . . . . . . . . . . . . . . . . 51
. . . . . . . . . . . . . . . . . 52
. . . . . . . . . . . . . . . . . . . . 52
. . . . . . . . . . . . . . . . . . . . . . 52
. . . . . . . . . . . . . . . . . . . . . 53
--cpuspeed . . . . . . . . . . . . . . . . . . . . . 53
--cpuxdsupport
--cstatesctrl
. . . . . . . . . . . . . . . . . . . 53
. . . . . . . . . . . . . . . . . . . . 54
--dramprefetch . . . . . . . . . . . . . . . . . . . 54
Contents 5

--embnic1 . . . . . . . . . . . . . . . . . . . . . . 55
--embnic2
. . . . . . . . . . . . . . . . . . . . . . 55
--embsataraid . . . . . . . . . . . . . . . . . . . 55
--esataport
--esataports
. . . . . . . . . . . . . . . . . . . . . 56
. . . . . . . . . . . . . . . . . . . . 56
--expresscard . . . . . . . . . . . . . . . . . . . 56
--expresscharge
--externalhotkey
. . . . . . . . . . . . . . . . . . 57
. . . . . . . . . . . . . . . . . . 57
--fastboot . . . . . . . . . . . . . . . . . . . . . . 58
--floppy
--hddacousticmode
. . . . . . . . . . . . . . . . . . . . . . . 58
. . . . . . . . . . . . . . . . . 59
--hddfailover . . . . . . . . . . . . . . . . . . . . 60
--hddprotection
--hdfreefallprotect
. . . . . . . . . . . . . . . . . . . 60
. . . . . . . . . . . . . . . . . 60
--hotdock . . . . . . . . . . . . . . . . . . . . . . 61
--htkeywxanradio
--htassist
. . . . . . . . . . . . . . . . . . 61
. . . . . . . . . . . . . . . . . . . . . . 61
--hwprefetcher . . . . . . . . . . . . . . . . . . . 62
--hwswprefetch
--infrareddevice
. . . . . . . . . . . . . . . . . . 62
. . . . . . . . . . . . . . . . . . 63
--instanton . . . . . . . . . . . . . . . . . . . . . 63
--integratedaudio
--integratedraid
--integratedsas
--integratedusbhub
--internalminipci
--internalusb
--interwirelessuwb
--keyboardclick
. . . . . . . . . . . . . . . . . . 63
. . . . . . . . . . . . . . . . . . . 64
. . . . . . . . . . . . . . . . . . . 64
. . . . . . . . . . . . . . . . . 64
. . . . . . . . . . . . . . . . . . 65
. . . . . . . . . . . . . . . . . . . . 65
. . . . . . . . . . . . . . . . . 65
. . . . . . . . . . . . . . . . . . . 66
--keyboardillumination . . . . . . . . . . . . . . . 66
--keypad
--lastbiosupdate
. . . . . . . . . . . . . . . . . . . . . . 66
. . . . . . . . . . . . . . . . . . 67
--latitudeonflash . . . . . . . . . . . . . . . . . . 67
6 Contents

--limitcpuidvalue . . . . . . . . . . . . . . . . . . 67
--logicproc
. . . . . . . . . . . . . . . . . . . . . 68
--lowpowers5 . . . . . . . . . . . . . . . . . . . 68
--lpt
. . . . . . . . . . . . . . . . . . . . . . . . . 69
--lptmode
. . . . . . . . . . . . . . . . . . . . . . 69
--mediacard . . . . . . . . . . . . . . . . . . . . 70
--mediacardand1394
--mem
. . . . . . . . . . . . . . . . . . . . . . . 71
. . . . . . . . . . . . . . . . 70
--microphone . . . . . . . . . . . . . . . . . . . . 71
--minicardssd
--modulebaydevice
. . . . . . . . . . . . . . . . . . . 71
. . . . . . . . . . . . . . . . . 72
--monitortoggling . . . . . . . . . . . . . . . . . . 72
--mouse
--multicpucore
. . . . . . . . . . . . . . . . . . . . . . 72
. . . . . . . . . . . . . . . . . . . 73
--nmibutton . . . . . . . . . . . . . . . . . . . . . 73
--numlock
--onboard1394
. . . . . . . . . . . . . . . . . . . . . . 73
. . . . . . . . . . . . . . . . . . . 74
--onboardmodem . . . . . . . . . . . . . . . . . . 74
--osmode
--ovrwrt
. . . . . . . . . . . . . . . . . . . . . . 74
. . . . . . . . . . . . . . . . . . . . . . . 75
--passwordbypass . . . . . . . . . . . . . . . . . 75
--pccard
--pccardand1394
--pci
--pcislots
--penmisindication
--penresumeon
--pntdevice
--postf12key
. . . . . . . . . . . . . . . . . . . . . . 75
. . . . . . . . . . . . . . . . . . 76
. . . . . . . . . . . . . . . . . . . . . . . . 76
. . . . . . . . . . . . . . . . . . . . . . 77
. . . . . . . . . . . . . . . . . 78
. . . . . . . . . . . . . . . . . . . 78
. . . . . . . . . . . . . . . . . . . . . 78
. . . . . . . . . . . . . . . . . . . . 79
--postf2key . . . . . . . . . . . . . . . . . . . . . 79
--posthelpdeskkey
--postmebxkey
. . . . . . . . . . . . . . . . . 79
. . . . . . . . . . . . . . . . . . . 80
--powermgmt . . . . . . . . . . . . . . . . . . . . 80
Contents 7

--primidemast . . . . . . . . . . . . . . . . . . . . 81
--primideslav
. . . . . . . . . . . . . . . . . . . . 81
--pwdlock . . . . . . . . . . . . . . . . . . . . . . 81
--radiotransmission
--rearsingleusb
. . . . . . . . . . . . . . . . . 82
. . . . . . . . . . . . . . . . . . . 82
--remotebiosupdate . . . . . . . . . . . . . . . . 82
--rptkeyerr
--safeusb
. . . . . . . . . . . . . . . . . . . . . 83
. . . . . . . . . . . . . . . . . . . . . . 83
--sata0 . . . . . . . . . . . . . . . . . . . . . . . 83
--sata1
. . . . . . . . . . . . . . . . . . . . . . . 84
--sata2
. . . . . . . . . . . . . . . . . . . . . . . 84
--sata3 . . . . . . . . . . . . . . . . . . . . . . . 84
--sata4
. . . . . . . . . . . . . . . . . . . . . . . 85
--sata5
. . . . . . . . . . . . . . . . . . . . . . . 85
--sata6 . . . . . . . . . . . . . . . . . . . . . . . 85
--sata7
. . . . . . . . . . . . . . . . . . . . . . . 86
--satactrl
. . . . . . . . . . . . . . . . . . . . . . 86
--satadipm . . . . . . . . . . . . . . . . . . . . . 86
--scndidemaster
--scndideslave
. . . . . . . . . . . . . . . . . . 87
. . . . . . . . . . . . . . . . . . . 87
--serial1 . . . . . . . . . . . . . . . . . . . . . . . 87
--serial2
--serialcomm
--serrdmimsg
--setuppwd
--sma
--smartcardreader
--smarterrors
--snoopfilter
. . . . . . . . . . . . . . . . . . . . . . . 88
. . . . . . . . . . . . . . . . . . . . 88
. . . . . . . . . . . . . . . . . . . . 89
. . . . . . . . . . . . . . . . . . . . . 89
. . . . . . . . . . . . . . . . . . . . . . . . 90
. . . . . . . . . . . . . . . . . 90
. . . . . . . . . . . . . . . . . . . . 90
. . . . . . . . . . . . . . . . . . . . 91
--speakervol . . . . . . . . . . . . . . . . . . . . 91
--speedstep
--splashscreen
. . . . . . . . . . . . . . . . . . . . . 91
. . . . . . . . . . . . . . . . . . . 92
--sriov . . . . . . . . . . . . . . . . . . . . . . . . 92
8 Contents

--strongpwd . . . . . . . . . . . . . . . . . . . . 93
--surroundview
. . . . . . . . . . . . . . . . . . . 93
--svctag . . . . . . . . . . . . . . . . . . . . . . 93
--sysid
. . . . . . . . . . . . . . . . . . . . . . . 94
--sysname
. . . . . . . . . . . . . . . . . . . . . 94
--syspwd . . . . . . . . . . . . . . . . . . . . . . 94
--sysrev
--sysbatcharger
. . . . . . . . . . . . . . . . . . . . . . . 95
. . . . . . . . . . . . . . . . . . 95
--tabletbuttons . . . . . . . . . . . . . . . . . . . 95
--tpm
. . . . . . . . . . . . . . . . . . . . . . . . 96
--tpmactivation
. . . . . . . . . . . . . . . . . . . 96
--turbomode . . . . . . . . . . . . . . . . . . . . 97
--uartpowerdown
--usb30
. . . . . . . . . . . . . . . . . . . . . . . 97
. . . . . . . . . . . . . . . . . 97
--usbemu . . . . . . . . . . . . . . . . . . . . . . 98
--usbflash
--usbports
. . . . . . . . . . . . . . . . . . . . . . 98
. . . . . . . . . . . . . . . . . . . . . 98
--usbportsexternal . . . . . . . . . . . . . . . . . 99
--usbportsfront
--usbpowershare
. . . . . . . . . . . . . . . . . . . 99
. . . . . . . . . . . . . . . . . . 100
--usbport00 . . . . . . . . . . . . . . . . . . . . . 100
--usbport01
--usbport02
--usbport03
--usbport04
--usbport05
--usbport06
--usbport07
--usbport08
. . . . . . . . . . . . . . . . . . . . . 100
. . . . . . . . . . . . . . . . . . . . . 101
. . . . . . . . . . . . . . . . . . . . . 101
. . . . . . . . . . . . . . . . . . . . . 101
. . . . . . . . . . . . . . . . . . . . . 102
. . . . . . . . . . . . . . . . . . . . . 102
. . . . . . . . . . . . . . . . . . . . . 102
. . . . . . . . . . . . . . . . . . . . . 103
--usbport09 . . . . . . . . . . . . . . . . . . . . . 103
--usbport10
--usbport11
. . . . . . . . . . . . . . . . . . . . . 103
. . . . . . . . . . . . . . . . . . . . . 104
--usbport12 . . . . . . . . . . . . . . . . . . . . . 104
Contents 9

--usbport13 . . . . . . . . . . . . . . . . . . . . . 104
--usbport14
. . . . . . . . . . . . . . . . . . . . . 105
--usbport15 . . . . . . . . . . . . . . . . . . . . . 105
--usbreardual
--usbreardual2stack
. . . . . . . . . . . . . . . . . . . . 105
. . . . . . . . . . . . . . . . 106
--usbrearquad . . . . . . . . . . . . . . . . . . . 106
--usbwake
--uuid
. . . . . . . . . . . . . . . . . . . . . 106
. . . . . . . . . . . . . . . . . . . . . . . . 107
--valsetuppwd . . . . . . . . . . . . . . . . . . . 107
--valsyspwd
--vgadacsnoop
. . . . . . . . . . . . . . . . . . . . . 107
. . . . . . . . . . . . . . . . . . . 108
--videoexpansion . . . . . . . . . . . . . . . . . . 108
--videomemsize
--virtualization
. . . . . . . . . . . . . . . . . . . 109
. . . . . . . . . . . . . . . . . . . 109
--vtfordirectio . . . . . . . . . . . . . . . . . . . . 109
--wakeonlan
--wakeonlanbootovrd
. . . . . . . . . . . . . . . . . . . . 110
. . . . . . . . . . . . . . . 111
--watchdogtimer . . . . . . . . . . . . . . . . . . 111
--wificatcherchanges
--wifilocator
. . . . . . . . . . . . . . . . . . . . 112
. . . . . . . . . . . . . . . 111
--wirelessadapter . . . . . . . . . . . . . . . . . 112
--wirelessuwb
--wirelessdevice
--wirelesswitchbluetoothctrl
--wirelesswitchcellularctrl
--wirelesswitchchanges
--wirelesswitchnlanctrl
--wxanradio
. . . . . . . . . . . . . . . . . . . 113
. . . . . . . . . . . . . . . . . . 113
. . . . . . . . . . . . 113
. . . . . . . . . . . . . 114
. . . . . . . . . . . . . . 114
. . . . . . . . . . . . . . 115
. . . . . . . . . . . . . . . . . . . . . 115
10 Contents
PCI Reporting
. . . . . . . . . . . . . . . . . . . . . . 116
TPM Activation . . . . . . . . . . . . . . . . . . . . . 117
Completion Code
. . . . . . . . . . . . . . . . . . . . . 118

5 Troubleshooting CCTK . . . . . . . . . . . . . . 119
Running CCTK Displays Error Messages . . . . . . . . 119
Running CCTK on 32-bit and 64-bit
Supported System
Running CCTK on Windows Vista or Windows 7
When User Account Control is Enabled
Running CCTK on Linux . . . . . . . . . . . . . . . . . 120
. . . . . . . . . . . . . . . . . . . . 119
. . . . . . . . 119
While Applying the ini File
. . . . . . . . . . . . . . . 120
A Sample File Formats . . . . . . . . . . . . . . . 121
Sample CCTK Utility .ini File Format . . . . . . . . . . 121
B Messages and Codes . . . . . . . . . . . . . . 125
CCTK Error Codes and Messages . . . . . . . . . . . . 125
Failure Messages
. . . . . . . . . . . . . . . . . 125
Index . . . . . . . . . . . . . . . . . . . . . . . . . . . . . . 139
Contents 11

12 Contents

1
Introduction
Dell™ Client Configuration Toolkit (CCTK) is a packaged software
offering that provides configuration capability to Dell business client
platforms – OptiPlex™, Latitude™ and Precision™. This product consists
of a command line utility to configure various BIOS features,
and documentation of the utility. CCTK can be used in a Microsoft
Windows
Windows (XP, Vista, and Windows 7), and Enterprise - Red Hat
environments.
Supported Operating Systems
For the list of operating systems that the CCTK supports, see the readme.txt
available on the Dell Support website at support.dell.com.
Supported Systems
For the list of Dell client systems that the CCTK supports, see the readme.txt
available on the Dell Support website at support.dell.com.
®
Preinstallation Environment (Windows PE), Microsoft
®
Linux®
What’s New
• Support for systems with Unified Extensible Firmware Interface (UEFI)
enabled BIOS
• Support for new BIOS options
Introduction 13

14 Introduction

Windows Install/Uninstall
2
This section describes how to install and uninstall CCTK on Microsoft®
Windows XP
section also describes how to create a bootable image with CCTK to
configure systems in a pre-operating system environment.
®
, Windows Vista®, Windows 7® operating systems. This
Install Prerequisites
Ensure that you have:
• The CCTK installation file
• A Windows workstation
Installing CCTK
Installing CCTK creates the CCTK directory structure in the system.
displays the directory structure of CCTK after the installation.
Table 2-1. Directory Structure of CCTK
Directory Associated Files / Directories
X86 cctk.exe
cctk_x86_WinPE.bat
cctk_x86_WinPE_3.bat
pci.ids
HAPI
X86_64 cctk.exe
cctk_x86_64_WinPE.bat
cctk_x86_64_WinPE_3.bat
pci.ids
HAPI
Ta b l e 2 - 1
Windows Install/Uninstall 15

To install C C T K:
NOTE: Ensure that you have administrator privileges.
1
Download the latest CCTK self-extractable zip (SEZ) installation file.
2
Extract the installation file.
a
Double-click the downloaded installation file.
The
Systems Management
dialog box is displayed with information
about the software version, supported systems, supported operating
systems, and supported languages.
b
In the
Systems Management
c
Specify the folder where you want to unzip the installation file and
click
OK
and follow the instructions on the screen.
NOTE: By default, the installation file is extracted to the C:\Dell\Drivers
directory.
d
Click
OK
after the files are extracted.
The
e
Close the file.
Readme.txt
file appears.
dialog box, click
Continue
The folder to which the files are extracted is displayed with
and
ReadMe.txt
3
Double-click the
a
On the
The
InstallShield Wizard
License Agreement
.msi
.
file.
screen, click Next.
screen appears.
.
cctk.msi
b
Read the license agreement and accept the agreement by clicking the
appropriate radio button. Click
The
Customer Information
c
Provide the requisite information (such as user name and organization
name). Select anyone who uses the computer as a user for CCTK or
only you as a user for CCTK. Click
The
Setup Type
d
Select the setup type. Select
screen appears.
directory and choose the directory to install CCTK in the next screen.
Click
Next
.
16 Windows Install/Uninstall
Next.
screen appears.
Next.
Custom
to install CCTK in a customized

e
Click
Install
.
The default CCTK installation directory for a 32-bit supported system is
C:\Program Files\Dell\CCTK
C:\Program Files (x86)\Dell\CCTK
and for a 64-bit supported system, it is
. During installation, the files are
copied to the default directory or selected directory with the files for 32-bit
support in the
\X86
subdirectory and for 64-bit support in the
\X86_64
subdirectory.
NOTE: To see the CCTK documentation, click Start → Program Files →
Dell → CCTK → User’s Guide.
4
Using the command prompt, navigate to the
X86
or
X86_64
directory
depending on the architecture of the operating system.
5
Run the CCTK commands to configure the system.
For more details on running the CCTK commands, see CCTK Options.
NOTE: CCTK can run only on a Dell system. It will generate the following
error on a non-Dell system: "This is not a Dell machine. CCTK supports only
Dell machines."
NOTE: For silent installation of CCTK, run the following command:
msiexec.exe /i cctk.msi /qn.
Important Information
CCTK requires Hardware Application Programming Interface version 5.9.2
(HAPI) or later installed on the system where you run the CCTK commands.
If your system does not have HAPI installed, CCTK automatically installs
HAPI when you run a CCTK command. After the option is configured,
HAPI is uninstalled. If the system has an older version of HAPI, when you
run a CCTK command, HAPI is automatically upgraded to the latest version.
In this scenario, HAPI will not be downgraded to the earlier version.
want to run the CCTK commands frequently, it is recommended that you
install HAPI on the system before you execute CCTK commands. To
HAPI, navigate to the HAPI directory and run HAPIinstall.bat.
If you
install
Windows Install/Uninstall 17

Uninstalling CCTK
Uninstalling CCTK removes all CCTK-related directories from your system.
NOTE: Uninstalling CCTK will not uninstall HAPI. To uninstall HAPI, navigate to the
HAPI directory and run HAPIUninstall.bat.
To uninstall CCTK, do any of the following:
•Click
•Click
Start → Programs → Dell → CCTK
Start → Settings → Control Panel → Add or Remove Programs
Select
Client Configuration Toolkit
→ Uninstall
and click
.
Remove
.
.
Creating a Bootable Image Using Windows PE
For client systems that do not have an operating system installed, you can
create a bootable image that contains CCTK to run the CCTK commands on
Windows Preinstallation Environment 2.0 (Windows PE) or Windows PE
3.0. Windows PE provides a standalone preinstallation environment that is
used to prepare a system for Windows installation. Use Microsoft Windows
Automated Installation Kit (Windows AIK) to create a Windows PE image.
Creating a Bootable Image Using Windows PE 2.0
Using Windows PE 2.0, you can integrate CCTK, HAPI, and related drivers
into a Windows Imaging Format (WIM) file. Using the WIM file, you can
create a bootable ISO image.
Use the following steps to create a bootable image using Windows PE 2.0:
1
Download Microsoft Windows Automated Installation Kit (AIK) from the
Microsoft website.
2
Install AIK.
3
Download the CCTK installation file from the Dell Support website at
support.dell.com
4
Double-click
5
Integrate the CCTK directory structure in a WIM file using the
following steps:
CCTK provides the
to integrate CCTK, HAPI, and related Dell drivers into the WIM file.
and extract it.
cctk.msi
and follow the instructions.
cctk_x86_winpe.bat
and cctk_x86_64_winpe.bat
scripts
18 Windows Install/Uninstall

a
Navigate to the directory where the script is located. By default, the
script for 32-bit systems is located in the
for 64-bit systems is located in the
b
Run the appropriate script with the
cctk\X86
cctk\X86_64
.wim
file and CCTK directory
directory. The script
directory.
locations entered as two arguments:
cctk_winpe.bat <path_of_wim_file> <path_of_cctk>
If CCTK is installed on the default directory, the 32-bit system script,
cctk-x86-winpe.bat
, would be run as:
cctk_x86_winpe.bat C:\winPE_x86
C:\Progra~1\Dell\CCTK
If CCTK is installed on the default directory, the 64-bit system script,
cctk_x86_64_winpe.bat
, would be run as:
cctk_x86_64_winpe.bat C:\winPE_x86_64
C:\Progra~2\Dell\CCTK
A
.wim
file,
winpe.wim
, is created in the location that you provided.
The files required to create the bootable ISO image file are also created in
the same location.
c
Rename the
d
Overwrite the
the
<path_of_wim_file>
<path_of_wim_file>
<path_of_wim_file>
\boot.wim
\winpe.wim
file as
boot.wim
\ISO\sources\boot.wim
file.
.
file with
Example:
copy c:\winPE_x86\boot.wim
c:\winPE_x86\ISO\sources\boot.wim
6
Create a bootable Windows PE image using Windows AIK.
a
Click
Start
→
Programs
Tools Command Prompt
NOTE: If you want to prepare a bootable image for a 64-bit supported
system, from the command prompt, navigate to the
<AIK_installation_directory>\Windows AIK\Tools\amd64 directory.
Run the following command:
b
→
Microsoft Windows AIK
.
Windows Install/Uninstall 19
→
Windows PE

oscdimg –n –b<path_of_wim_file>\etfsboot.com
<path_of_wim_file>\ISO
<path_of_wim_file\image_file_name.iso>
Example:
oscdimg –n –bc:\winPE_x86\etfsboot.com
c:\winPE_x86\ISO c:\winPE_x86\WinPE2.0.iso
This command creates a bootable ISO image,
WinPE2.0.iso,
in the WIM
file directory.
Creating a Bootable Image Using Windows PE 3.0
Using Windows PE 3.0, you can integrate CCTK, HAPI, and related drivers
directly into a bootable ISO image.
Use the following steps to create a bootable image using Windows PE 3.0:
1
Download Microsoft Windows Automated Installation Kit (AIK) from the
Microsoft website.
2
Install AIK.
3
Download the CCTK installation file from the Dell Support website at
support.dell.com
4
Double-click
5
Integrate the CCTK directory structure to an ISO file using the
following steps:
CCTK provides the
scripts to integrate CCTK, HAPI, and related Dell drivers into the ISO
image.
a
Navigate to the directory where the script is located. By default, the
script for 32-bit systems is located in the
for 64-bit systems is located in the
b
If you installed AIK in a non-default directory, open the script, set the
AIKTOOLS
For example:
and extract it.
cctk.msi
and follow the instructions.
cctk_x86_winpe_3.bat
path, and save the file.
and cctk_x86_64_winpe_3.bat
cctk\X86
cctk\X86_64
directory. The script
directory.
Set AIKTOOLS=C:\WINAIK\Tools
20 Windows Install/Uninstall

c
Run the script with the path where you want to create the ISO file and
the CCTK installation directory as two arguments.
NOTE: The directory where you want to create the ISO image should not
exist.
Example for a 32-bit system:
cctk_x86_WinPE_3.bat C:\winPE_x86
C:\Progra~1\Dell\CCTK
Example for a 64-bit system:
cctk_x86_64_WinPE_3.bat C:\winPE_x86
C:\Progra~2\Dell\CCTK
This creates a directory,
created inside the
winPE_x86
WIM
directory under
. The ISO image and the WIM file are
winPE_x86
.
Running CCTK Commands Using a Bootable Image
Do the following to run CCTK commands using a bootable image:
1
Burn a CD with the ISO image and boot the system that you want to
configure from the CD.
2
Based on the system’s architecture, navigate to the
directory to run the CCTK commands.
For more details on running the CCTK commands, see to CCTK Options.
cctk\x86
or
cctk\x86_64
Upgrading CCTK
You can upgrade CCTK 1.0.1 to CCTK 1.1 using the CCTK 1.1 installer.
To upgrade CCTK 1.0.1 to CCTK 1.1 using the installer, do the following:
1
Download the latest CCTK self-extractable zip (SEZ) installation file.
2
Extract the installation file.
a
Run the following command:
msiexec.exe /i cctk.msi REINSTALL=ALL
REINSTALLMODE=vomus
Windows Install/Uninstall 21

The
InstallShield Wizard
3
Follow the instructions on the screens to upgrade.
NOTE: For silent upgrading, use the following command: msiexec.exe /i
dialog box appears.
cctk.msi /qn REINSTALL=ALL REINSTALLMODE=vomus
To upgrade CCTK 1.0 to CCTK 1.1, uninstall CCTK 1.0 and then install
CCTK 1.1.
To upgrade CCTK 1.0 to CCTK 1.1, do the following:
1
Download the latest CCTK installation file from the Dell Support website.
2
Uninstall CCTK 1.0. For more information, see the Uninstalling CCTK
section.
3
Install CCTK 1.1. For more information, see the Installing CCTK section.
22 Windows Install/Uninstall

3
Linux Install/Uninstall
This section describes how to install and uninstall CCTK on Linux
operating systems.
Install Prerequisites
Ensure that you have:
• The CCTK installation file,
• A Linux workstation
Installing CCTK
To install CCTK, install the RPMs provided in the CCTK installation file.
Prerequisite
• You should be a user with root privileges.
• CCTK can run only on a Dell system. It will generate the following
error on a non-Dell system: "This is not a Dell machine. CCTK supports
only Dell machines."
To install CCTK, do the following:
1
Download the
Dell Support website at
2
Untar the file.
For ex a mple:
cctk-linux-version-buildnum.tar.gz
cctk-linux-version-buildnum.tar.gz
file from the
support.dell.com
.
tar -zxvf cctk-linux-version-buildnum.tar.gz
The file contains the following:
srvadmin-ipmi-6.0.1-800.DUP.i386.rpm
and
cctk-linux-version-buildnum.i386.rpm.
srvadmin-omilcore-6.0.1-800.i386.rpm,
,
srvadmin-hapi-6.0.1-800.i386.rpm,
Linux Install/Uninstall 23

3
Install the RPMs in the following order:
rpm –ivh srvadmin-ipmi-6.0.1-800.DUP.i386.rpm
rpm –ivh srvadmin-omilcore-6.0.1-800.i386.rpm
rpm –ivh srvadmin-hapi-6.0.1-800.i386.rpm
rpm –ivh cctk-linux-version-buildnum.i386.rpm
4
Using the command prompt, navigate to the
directory to run the CCTK commands.
For more details on running the CCTK commands, see the CCTK Options
section.
/opt/dell/toolkit/bin
Uninstalling CCTK
To uninstall CCTK, remove the CCTK RPMs.
1
Run the following command to uninstall CCTK:
rpm -e cctk-linux-version-buildnum.i386
2
Run the following command to uninstall HAPI:
rpm -e srvadmin-hapi-6.0.1-800.i386
3
Run the following command to uninstall omilcore:
rpm -e srvadmin-omilcore-6.0.1-800.i386
4
Run the following command to uninstall the IPMI RPM:
rpm -e srvadmin-ipmi-6.0.1-800.DUP.i386
Upgrading CCTK
To upgrade CCTK 1.0.1 to CCTK 1.1, do the following:
1
Download the latest installation file from the Dell Support website at
support.dell.com
2
Untar the file.
3
Upgrade the CCTK rpm,
the following command:
rpm -U cctk-linux-version-buildnum.i386.rpm
24 Linux Install/Uninstall
and save it on your system.
cctk-linux-version-buildnum.i386.rpm
, using

To upgrade CCTK 1.0 to CCTK 1.1, you need to uninstall the CCTK 1.0
rpm, and then install CCTK 1.1 rpm.
To upgrade CCTK 1.0 to CCTK 1.1, do the following:
1
Uninstall the CCTK RPM,
cctk-linux-1.0.0-buildnum.i386.rpm
. For more
information, see the Uninstalling CCTK section.
2
Download the latest installation file from the Dell Support website at
support.dell.com
3
Install the latest CCTK RPM. For more information, see Installing CCTK.
and save it on your system.
Linux Install/Uninstall 25

26 Linux Install/Uninstall

4
CCTK Options
This chapter documents a general overview of the Client Configuration
Toolkit (CCTK) command line utility. It also describes the command line
options, configuration file format, and individual executables used to
configure client BIOS settings.
Command Syntax Overview
Syntax refers to the way a command and its parameters are entered.
CCTK Command Line Interface (CLI) commands can be arranged in
any order in a command line instance as long as they conform to the basic
command line syntax.
Command Line Syntax
The general usage models of the CCTK utilities are as follows:
CCTK --option1=[arg1]
or
cctk --option1=[arg1]...--optionX=[argX]
NOTE: Some of the options in CCTK are followed by an asterisk. Such options
are used for reporting purposes only. Reporting options cannot be used with
set options.
Table 4-1 lists the generic command line characters and arguments present in
the command line options with a short description of these characters.
Table 4-1. Command Line Syntax
Element Description
- Single-character options are prefixed with a hyphen (-).
-- Multi-character options are prefixed with two (2) hyphens (--).
utilname Generic designation for a CCTK utility name.
-o Generic single-character designation for an option.
CCTK Options 27

Table 4-1. Command Line Syntax
Element Description
optionX Generic multi-character designation for a utility name, where X can
be used to distinguish multiple options used in the same command
line instance.
argX Generic designation for an argument, where X can be used to distinguish
multiple arguments used in the same command line instance.
[mandatory
option]
<string> Generic designation for a string.
<filename> Generic designation for a filename.
[ ] Indicates a component of the command line. Enter only the
... Indicates that the previous argument can be repeated several times in
| Separates mutually exclusive choices in a syntax line. For example:
Generic designation for a mandatory argument.
information within the brackets, not the brackets themselves.
a command. Enter only the information, not the ellipsis (...) itself.
numlock: Turns the keyboard number lock on or
off.
Arguments: on | off
Enter only one choice: --numlock=on, --numlock=
off
(continued)
Case-Sensitivity
• Command line options, pre-defined and user-defined arguments,
and filenames given as arguments are all case-sensitive.
• Unless specified otherwise, enter all commands, options, arguments,
and command line switches in lowercase letters.
Command Line Option Delimiters
• Single-character options are
• Multi-character options are
Example: utilname -o --option
Table 4-2 lists some examples of valid and invalid CCTK command lines.
28 CCTK Options
prefixed
with a preceding hyphen (-).
prefixed
with two (2) preceding hyphens (--).

Table 4-2. CCTK Command Line Examples
Valid/
Invalid
valid cctk --option1 --option2 cctk --asset --mem
invalid cctk --option1=[argument]
valid cctk -o=filename
valid cctk -l=filename
valid cctk -i=filename
valid cctk --option=argument cctk --embnic1=on
CCTK Command Line Example
cctk --asset=1750
--option2 --option3
--option1
--option2
or
cctk -o filename
--option1
--option2
--option1
--option2
or
cctk -l filename
--option1
--option2
--option1
--option2
or
cctk -i filename
--option1
--option2
--floppy --biosromsize
cctk -o=/tmp/myfile.txt -
--mem
--sysname
or
cctk -o /tmp/myfile.txt -
--mem
--sysname
cctk -l=/tmp/myfile.txt
--mem --sysname
or
cctk -l /tmp/myfile.txt
--mem --sysname
cctk -i=/tmp/myfile.txt -
--mem --sysname
or
cctk -i /tmp/myfile.txt -
--mem --sysname
NOTE: Options that specify report and set actions must not be combined in a
command line instance.
NOTE: Example 2 is invalid because the report and set actions are used in the
same command line.
NOTE: Examples 3, 4, and 5 are valid because report and set actions are not
combined.
CCTK Options 29

Read and Write Options
Options that specify read and write actions should not be combined in a
command line instance. Table 4-3 provides examples for read and
write commands.
Table 4-3. Read and Write Command Examples
Valid/Invalid CCTK Command Line Example
valid cctk --option1 --option2
valid cctk --option1=arg --option2=arg
invalid cctk --option1=arg --option2
File Input and Output Commands
• File input is specified by the -i=<
where <
filename
> is the name of the input file.
• File output is specified by the
where <
filename
> is the name of the output file.
filename
> command,
-o=<filename
> command,
Log Files
The -l=<filename> or --logfile=<filename> option records
information output on the command line to the specified log file.
If the log file already exists, information is appended to the file. This allows
multiple tools to use the same log file to record information. This option
must be used instead of redirection to record a utility’s output, as time data
can assist with task diagnosis.
The log duplicates all standard output and error information to the specified
file. Each log file begins with a time stamp and utility name. For example,
YYYY/MM/DD HH:MM:SS <utilname> - <output text>.
The following is an example of the logging behavior:
2010/05/16 10:23:17 cctk - option1=on
2010/05/16 10:23:17 cctk - option2=on
2010/05/16 10:23:17 cctk - option3=off
30 CCTK Options

Help Option
The -h and --help options display general usage information for the utility.
If the argument matches a valid option, that option's usage information
is displayed. If the option has arguments, the arguments are displayed,
separated by a | character. If the argument does not match a valid option,
a usage error is given (and usage information is displayed).
Error Checking and Error Messages
The CCTK utilities check your commands for correct syntax when you
enter them. Unrecognized or invalid options and arguments result in a usage
error that displays the CCTK utility name and version along with the
message.
CCTK Options
CCTK options can be divided into types:
•
General options: apply to all systems
•
BIOS options
NOTE: If you are running the CCTK commands on Windows® Vista® or later, you
need to run the commands with the administrator privileges. Running the command
displays a pop-up window where you can enter the administrator ID and password.
CCTK General Options
: apply only if a system's BIOS supports them
NOTE: Some of the options in CCTK are followed by an asterisk. These options do
not accept any suboptions or arguments. The values associated with these options
are those that are reported by the BIOS. These values cannot be modified.
CCTK Options 31

-h or --help
Valid Argument
none or <
Description
valid option name
>
Without an argument, this option displays general usage information for
the utility. If the argument matches a valid option, that option's usage
information is displayed. If the option has arguments, the arguments are
displayed, separated by a | character. If the option has suboptions,
all suboptions, valid arguments, and a description are listed. If the
argument does not match a valid option, a usage error is given
(and usage information is displayed).
Example
A:>cctk -h --asfmode
asfmode: Sets the asf (alert standard format)
mode. DASH and ASF 2.0 set enables LOM to have
DASH and ASF 2.0 functionality.
Arguments: off | on | alertonly
-i or --infile
Valid Argument
<
filename
Description
Directs the CCTK utility to take input from a
>
.ini
file. The utility searches
the file for a section heading identical to the utility name. An error is
returned if the file or section is not found. If the section is found, each
name/value pair is applied to the system. The names must match a valid
option, and the arguments must be in the proper format for the option.
If an option is not available on a system and it is specified in a file,
the utility ignores the option. If any errors are found in the format of the
names or values, that option is skipped. The remaining options are applied
to the system.
32 CCTK Options

If this option is used with other function command options, they are
applied in the order in which they appear on the command line, overriding
any previous commands.
In the
.ini
file, bootorder is displayed as a list of comma separated device
short forms in the order they are assigned.
For ex a mple:
bootorder=+pcmcia,+hdd.1,-floppy,+cdrom,hdd.2,+nic.1,-hdd.3,+nic.2
A plus (+) symbol with the device name indicates that the device is
enabled and a minus (
can enable or disable the devices by changing the
-
) symbol indicates that the device is disabled. You
+
or - symbol displayed
with the device short name. These symbols are optional and if not present,
the current status of the device is retained.
Change the boot order by changing the order of the list. You can also enter
the device number instead of the device name.
NOTE: The bootorder option in the ini file will be applied to a system based on
its active boot list. If the ini file is generated from a system with the active boot
list set as uefi, and it is applied on a system with the active boot list set as
legacy, the boot order is set only if the devices are available in the system. It is
recommended that you apply the ini file on a system with the same active boot
list as of the system from where the ini file is generated.
Example
A:>cctk -i <c:/cctk>/filename.ini
-l or --logfile
Valid Argument
<
filename
Description
Logs the command line output to a time-stamped file. The utility either
appends the information to an existing log file or creates a new file.
The log file contains the same information as the standard output,
plus timestamp information. Users should use this option instead of
redirection for task diagnosis.
>
CCTK Options 33

Example
A:>cctk -l <c:/cctk>/logfile
No option
Valid Argument
NA
Description
If an option is not given, the CCTK utility outputs usage information.
The usage information is displayed in the format shown below.
Example
A:>cctk
Usage error.
cctk Version 1.1.0 (Windows - April 5 2010,
17:46:37)
Copyright (c) 2010 Dell Inc.
Usage: cctk --option[=argument]
For more information about a particular command,
use the option '-h' followed by the command name.
Example: cctk -h --asset
-o or --outfile
Valid Argument
<
filename
Description
Writes all BIOS options, that you can replicate to another system’s BIOS,
to the specified filename. The file name you specify should have
extension and it is created in the default installation directory. The format
of the output is in a
header. If a file with the same name already exists, the information is
appended to the file. If this option is used with other function commands,
34 CCTK Options
>
.ini
format, with the utility name as the section
.ini

the commands are applied in the order in which they appear. This option
captures replicable BIOS options. The file is created in the directory where
you run the CCTK command.
In the
.ini
file, bootorder is displayed as a list of comma separated device
short forms in the order they are assigned. A plus (
device name indicates that the device is enabled and a minus (
+
) symbol with the
-
) symbol
indicates that the device is disabled. Change the boot order by changing
the order of the list. You can also enter the device number instead of the
device name.
You can enable or disable the devices by changing the
+
or - symbol
displayed with the device. These symbols are optional and if not present,
the current status of the device is retained.
NOTE: The bootorder option in the ini file will be applied to a system based on
its active boot list. If the ini file is generated from a system with the active boot
list set as uefi, and it is applied on a system with the active boot lis set as
legacy, the boot order is set only if the devices are available in the system. It is
recommended that you apply the ini file on a system with the same active boot
list as of the system from where the ini file is generated.
Example
A:>cctk -o <c:/cctk>/filename.ini
--version
Valid Argument
read-only argument
Description
Displays the version information, current time, and date for the utility.
This is a read-only option.
Example
A:>cctk --version
cctk Version 1.1.0 Windows - April 05 2010, 14:24:32
Copyright (c) 2010 Dell Inc.
CCTK Options 35

BIOS Options
The following list describes CCTK options and arguments along with a
description of their expected behavior. Options and arguments are case
sensitive. All options and pre-defined arguments are lowercase unless
stated otherwise.
NOTE: Some of the following options or arguments might not be available on
all systems due to the BIOS version or hardware feature set. Entering CCTK on
a command line without arguments will display only those options that are valid for
your system. For more details, refer to No option.
NOTE: If you have set a setup password and system password for the system,
while changing a BIOS value, you are prompted to type the setup password.
--acpower
Valid Argument
off, last, on
Description
Sets the behavior of the system after AC power is lost.
off: After an AC power loss, when AC power is restored, the system
will stay off.
on: After an AC power loss, when AC power is restored, the system will
power on.
last: After an AC power loss, when AC power is restored, the system will
return to the state as in when power was lost.
Example
A:>cctk --acpower=off
acpower=off
--activityled
Valid Argument
networkactivityledindicator, wlanradioonoffindicator, disableactivityled
36 CCTK Options

Description
Sets the Network Activity LED to any of the following:
networkactivityledindicator: sets the Activity LED to be controlled by an
ACPI OS and driver.
wlanradioonoffindicator: sets the Activity LED as a wireless LAN radio
on/off indicator.
disableactivityled: sets the Activity LED to be off always.
Example
A:>cctk --activityled=enable
activityled=enable
--adddevice
Valid Argument
usb
Description
Adds the specified device to the boot device list. At present, only the USB
storage device is supported. This option is not valid in all the systems. The
USB storage device is added at the end of the boot order. If the USB device
is already added in the boot order list, executing the option does not
change anything. If the USB storage device is already added in the boot
order list, the following message is displayed while executing the option:
“USB device is already present in this machine.”
NOTE: The adddevice option is not supported on the systems with UEFI-
based BIOS.
Example
A:>cctk --adddevice=usb
CCTK Options 37

Figure 4-1. Output of the adddevice Option
--adjcacheprefetch
Valid Argument
enable, disable
Description
When this option is set to
containing the currently requested data, and prefetches the following
cache line.
enabled
, the processor fetches the cache line
When this option is set to
disabled
, the processor fetches only the cache
line containing the currently requested data.
Example
A:>cctk --adjcacheprefetch=enable
adjcacheprefetch=enable
--admsetuplockout
Valid Argument
enable, disable
Description
Sets admin setup Lockout to enable or disable.
enable: if administrator password is set for the system, user can see the
Setup screens only after entering the correct administrator password. If
administrator password is not set, user can see the Setup screens.
disable: the user can view the Setup screens without entering
administrator password even if the administrator password is set in the
system.
38 CCTK Options

Example
A:>cctk --admsetuplockout=enable
admsetuplockout=enable
--agpslot
Valid Argument
enable, disable
Description
Enables or disables on-board AGP slot.
Example
A:>cctk --agpslot=enable
agpslot=enable
--amblightsen
Valid Argument
enable, disable
Description
Enables or disables the ambient light sensor.
Example
A:>cctk --amblightsen=enable
amblightsen=enable
--asfmode
Valid Argument
on, off, alertingonly, dash
CCTK Options 39

Description
Sets the alert standard format. The alertonly argument enables only
error messages. The dash argument enables LOM to have DASH and
ASF 2.0 functionality.
Example
A:>cctk --asfmode=on
asfmode=on
--asset
Valid Argument
<string>
Description
Reports or sets the customer-programmable asset tag number for a system.
The maximum length of an asset tag is 10 characters. Asset tag values
should not contain any spaces.
Example
A:>cctk --asset=ASSETTAG
--audiomode
Valid Argument
disable, halfduplex, fullduplex
Description
Sets the audio mode to any of the following values:
disable
•
•
•
Example
: Completely releases the onboard hardware resources.
halfduplex
fullduplex
: Allows only record or playback at a time.
: Allows record and playback simultaneously.
A:>cctk --audiomode=halfduplex
audiomode=halfduplex
40 CCTK Options

--autoon
Valid Argument
disable, everyday, weekdays
Description
Sets the auto on configuration.
Example
A:>cctk --autoon=disable
autoon=disable
--autoonhr
Valid Argument
integers ranging from 0 to 23
Description
Sets the auto on configuration on hours.
Example
A:>cctk --autoonhr=5
autoonhr=5
--autoonmn
Valid Argument
integers ranging from 0 to 59
Description
Sets the auto on configuration on minutes.
Example
A:>cctk --autoonmn=30
autoonmn=30
CCTK Options 41

--bioscharacteristics
Valid Argument
read-only argument
Description
Displays the features supported by the specific version of the BIOS.
This contains bit-flags which define support attributes for the BIOS and
the system. The first 32-bits are from the reference specification available
on the Distributed Management Task Force website at
These must be set only if the system supports the following features:
ISA, EISA, PCI, PC Card/PCMCIA, PnP, APM, Upgradeable BIOS,
BIOS Shadowing allowed, VL VESA, ESCD.
32 to 47 are always set to 0 by Dell-developed BIOS.
48 sets to 1 if the built-in NIC supports MagicPacket.
49 sets to 1 if the system supports Wake-on-LAN.
50 sets to 1 if the system supports chassis intrusion.
51 sets to 1 if the built-in NIC supports pattern-matching.
52 sets to 1 if the system BIOS supports a 7-character service tag.
53 to 63 are reserved for future assignments.
dmtf.org
.
Example
A:>cctk --bioscharacteristics
bioscharacteristics=1700007d019b90
--bioscurrentlang
Valid Argument
read-only argument
Description
Displays the selected language for the BIOS.
42 CCTK Options

Example
A:>cctk --bioscurrentlang
bioscurrentlang=en|US|iso8859-1
--bioslistinstalllang
Valid Argument
read-only argument
Description
Displays a list of installable languages for the BIOS.
Example
A:>cctk --bioslistinstalllang
bioslistinstalllang=en|US|iso8859-1
--biosromsize
Valid Argument
read-only argument
Description
Displays the physical size of this BIOS ROM device in kilobytes.
Example
A:>cctk --biosromsize
biosromsize=2048kb
--biosver
Valid Argument
read-only argument
Description
Reports the BIOS version for a system.
CCTK Options 43

Example
A:>cctk --biosver
biosver=A08
--bisreq
Valid Argument
accept, deny, reset
Description
Enables or disables the Boot Integrity Services (BIS) in BIOS.
Example
A:>cctk --bisreq=accept
bisreq=accept
--bitsmart
Valid Argument
enable or disable
Description
Enables or disables Bitsmart.
Example
A:>cctk --bitsmart=enable
bitsmart=enable
--bltinpntdevice
Valid Argument
disable, enable
Description
Enables or disables built-in pointing device.
44 CCTK Options

Example
A:>cctk --bltinpntdevice=disable
bltinpntdevice=disable
--bluetoothdevice
Valid Argument
enable, disable
Description
Enables or disables bluetooth device.
Example
A:>cctk --bluetoothdevice=enable
bluetoothdevice=enable
bootorder
Valid Argument
None
Description
Displays or sets the boot order sequence, activates boot list, and enables or
disables the supported devices for legacy boot list and for UEFI boot list.
When you run the
bootorder
option, the following information is
displayed:
• Device status—the current device status. Can be either enabled or
disabled.
• Device number—a unique number to identify the device on the
system.
• Device type—the device type.
CCTK Options 45

• Short form—short form of the device. If the system has many devices
of the similar device type, the short form of the device is displayed
with a .
<number>
notation. For example, if the system has an
internal HDD, a USB storage device, and a modular Bay HDD, the
short forms will be displayed as hdd.1, hdd.2, and hdd.3 respectively.
• Device description—description of the device.
Supported devices are:
• floppy—floppy disk
• usbfloppy—USB floppy disk
• hdd—hard disk
•cdrom—CD Rom
• usbcdrom—USB CD Rom
• pcmcia—PCMCIA device
• usbdev—USB device
• usbhdd—USB hard disk
• embnic—embedded NIC
•nic—NIC
• usbzip—USB ZIP
• usbdevzip—USB device ZIP
•bev—BEV device
NOTE: For legacy boot list, unknown devices are displayed as hexadecimal
values. For UEFI boot list, some of the devices are displayed as uefi with a
.<number> notation. Change the bootorder by providing the short form of the
unknown device.
NOTE: While changing the bootorder sequence, if the system is set with a
setup password, specify the setup password as the --valsetuppwd argument.
If the system has a system password set and no setup password is set, specify
the system password as the --valsyspwd argument.
46 CCTK Options
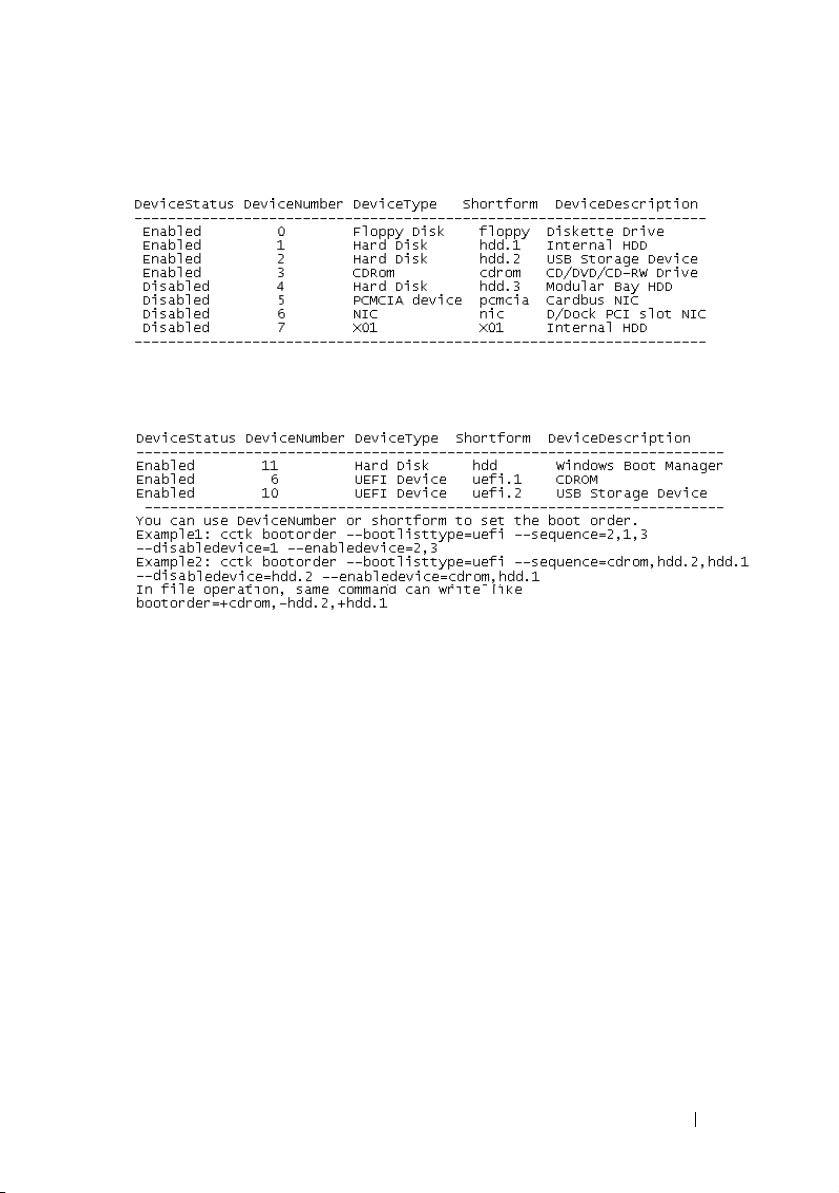
Figure 4-2. Output of the bootorder Option for Legacy Boot List
Figure 4-3. Output of the bootorder Option for UEFI Boot List
Sub Options
--sequence
Sets the bootorder based on the arguments provided. Use the device
number or device short form as the argument.
Example
A:>cctk bootorder --sequence=embnic,hdd.1
or
A:>cctk bootorder --sequence=1,3
Example for Unknown Devices
A:>cctk bootorder --sequence=x01.1,x01.2
--enabledevice
Enables a device in the boot sequence. Use the device number or device
short form as the argument.
CCTK Options 47

Example
A:>cctk bootorder --enabledevice=embnic,hdd.1
or
A:>cctk bootorder --enabledevice=1,3
--disabledevice
Disables a device in the boot sequence. Use the device number or device
short form as the argument.
Example
A:>cctk bootorder --disabledevice=embnic,hdd.1
or
A:>cctk bootorder --disabledevice=1,3
Example With Sub Options
A:>cctk bootorder --sequence=hdd.1,floppy -enabledevice=cdrom,hdd.2 --disabledevice=
nic.1,hdd.3
--activebootlist
Activates the boot list to UEFI or legacy. On re-boot, the system boot to
the boot list specified.
NOTE: With --activebootlist, do not specify any other sub options, such as
sequence
Example
,
--enabledevice
, and
--disabledevice
.
A:>cctk bootorder --activebootlist=uefi
--bootlisttype
Specifies the boot list as UEFI or legacy. If you want to run any bootorder
options, such as sequence, enabledevice, and so on, on the UEFI boot list,
you must specify this sub option with uefi argument. The following are the
supported arguments: legacy and uefi.
If
--bootlisttype
is not specified, running the bootorder sub options applies
changes on the legacy boot list.
48 CCTK Options
--

Example
A:>cctk bootorder --bootlisttype=uefi
Example With Sub Options
With the
options:
--bootlisttype=uefi
option, you can specify the following sub
--sequence, --enabledevice
, and
--disabledevice
.
A:>cctk bootorder --bootlisttype=uefi --sequence=
hdd.1,floppy --enabledevice=cdrom,hdd.2
--bootspeed
Valid Argument
default, compatible
Description
Sets CPU speed to Default or Compatible. Sets CPU speed to Compatible
(significantly slower). This is implementation dependent. There is no set
speed for Compatible, only that it is significantly slower than Default.
Example
A:>cctk --bootspeed=default
bootspeed=default
--busratio
Valid Argument
max, 6.0x , 7.0x , 7.5x, 8.0x , 8.5x , 9.0x, or 9.5x
Description
Sets the bus ratio in CPU.
Example
A:>cctk --busratio=max
busratio=max
CCTK Options 49

--camera
Valid Argument
disable, enable
Description
Enables or disables camera.
Example
A:>cctk --camera=disable
camera=disable
--cellularradio
Valid Argument
disable, enable
Description
Enables or disables the cellular radio, that is, the wwan module.
Example
A:>cctk --cellularradio=disable
cellularradio=disable
--charger
Valid Argument
enable, disable
Description
Enables or disables the battery charging system.
NOTE: When the computer is turned off, the battery charger is enabled.
Example
A:>cctk --charger=enable
charger=enable
50 CCTK Options

--chasintrusion
Valid Argument
enable, disable, silentenable
Description
Enables or disables the system to detect and report chassis intrusion events
to the system display on boot-up.
Example
A:>cctk --chasintrusion=enable
chasintrusion=enable
--clearsel
Valid Argument
none
Description
Erases the contents of the system event log.
Example
A:>cctk --clearsel
--cmosdefaults
Valid Argument
enable, disable
Description
Enables or disables the request for a default of CMOS values on the next
booting.
Example
A:>cctk --cmosdefaults=enable
cmosdefaults=enable
CCTK Options 51

--completioncode
Valid Argument
read-only argument
Description
Defines the completion code
of an update operation performed by BIOS
in the recent shutdown or reboot operation. For more information, refer
to
Completion Code.
Example
A:>cctk --completioncode
completioncode=0000h
--coolnquiet
Valid Argument
enable, disable
Description
Enables or disables AMD cool and Quiet processor feature.
Example
A:>cctk --coolnquiet=enable
coolnquiet=enable
--cpucore
Valid Argument
1, 2, 4, 6, 8, 10, 12, or all
Description
Controls the number of enabled cores in each processor. By default,
maximum number of cores per processor will be enabled.
52 CCTK Options

Example
A:>cctk --cpucore=all
cpucore=all
--cpucount
Valid Argument
read-only
Description
Reports the number of processors in the system.
Example
A:>cctk --cpucount
cpucount=1
--cpuspeed
Valid Argument
read-only
Description
Reports the current speed of the processor.
Example
A:>cctk --cpuspeed
cpuspeed=1600MHz
--cpuxdsupport
Valid Argument
enable, disable
Description
Enables or disables the CPU eXecute Disable (XD) feature support.
CCTK Options 53

Example
A:>cctk --cpuxdsupport=enable
cpuxdsupport=enable
--cstatesctrl
Valid Argument
enable, disableDescription
Enables or disables the C states.
When set to enable, the processor can operate in all available Power C states.
When set to disable, there are no C states available for the processor.
Example
A:>cctk --cstatesctrl=enable
cstatesctrl=enable
--dramprefetch
Valid Argument
enable, disable
Description
Sets the DRAM to the following:
disable: disables DRAM references from triggering DRAM prefetch
requests.
enable: enables DRAM references from triggering DRAM prefetch
requests.
Example
A:>cctk --dramprefetch=enable
dramprefetch=enable
54 CCTK Options

--embnic1
Valid Argument
off, on, onnopxe, onwithiscsi, onwithrplboot, onwithimageserverboot
Description
Defines whether built-in NIC is enabled or disabled.
Enabled with ImageServer boot will be used in the deployment
of Dell SmartClient products.
Example
A:>cctk --embnic1=off
embnic1=off
--embnic2
Valid Argument
on, off, onnopxe, onwithiscsi, onwithrplboot, onwithimageserverboot
Description
Enables or disables the second embedded NIC.
Example
A:>cctk --embnic2=on
embnic2=on
--embsataraid
Valid Argument
off, combined, ata, ahci, raid, qdma
Description
Configures the embedded SATA RAID controller.
CCTK Options 55

Example
A:>cctk --embsataraid=off
embsataraid=off
--esataport
Valid Argument
auto, off
Description
Sets the external Serial ATA (e-sata) port to Off or Auto.
Example
A:>cctk --esataport=auto
esataport=auto
--esataports
Valid Argument
enable, disable
Description
Enables or disables all e-sata ports. If the system supports a dock,
this status is also applicable to all e-sata ports on the dock.
Example
A:>cctk --esataports=enable
esataports=enable
--expresscard
Valid Argument
enable, disable
56 CCTK Options

Description
Enables or disables the express card port that allows the user to insert an
express card to configure it.
Example
A:>cctk --expresscard=enable
expresscard=enable
--expresscharge
Valid Argument
enable, disable, once
Description
Enables or disables the express charge battery charge algorithm.
The once argument enables the system to use express charge algorithm
for one charge cycle.
Example
A:>cctk --expresscharge=enable
expresscharge=enable
--externalhotkey
Valid Argument
disable, scrolllock
Description
Enables or disables the external keyboard hot-key feature.
Scroll Lock allows the Scroll Lock key on an external keyboard to act
as the FN key on the internal keyboard.
Example
A:>cctk --externalhotkey=disable
externalhotkey=disable
CCTK Options 57

--fastboot
Valid Argument
thorough, minimal, automatic
Description
Enables fast booting. If set to minimal, sets POST to perform minimal
hardware testing.
If set to thorough, sets POST to perform complete hardware and
configuration testing.
If set to automatic, allows the BIOS to decide what level of POST
test is used.
Example
A:>cctk --fastboot=thorough
fastboot=thorough
--floppy
Valid Argument
on, off, auto, readonly, usb
Description
Configures the floppy diskette controller.
auto: Enables the auto-configuration of the system’s built-in floppy
controller.
readonly: floppy controller becomes read-only, no write operations are
permitted.
usb: the built-in floppy controller is disabled but booting to a USB floppy
is still allowed.
Example
A:>cctk --floppy=on
floppy=on
58 CCTK Options

--forcepxenextboot
Valid Argument
enable, disable
Description
Enables or disables Force PXE on next boot in BIOS.
If enabled, when the BIOS boots next time, the first PXE-capable device is
inserted as the first device in the boot sequence. Enabling this value causes
this operation on the next boot only, and does not cause a change in the
system's defined boot sequence. The BIOS chooses the first PXE-capable
device as the system's onboard network controller, if present and enabled,
or the first bootable network device found in the system's standard PCI
search order - whichever comes first.
If disabled, the boot override feature is disabled and the system boot
sequence is in effect.
Example
A:>cctk --forcepxenextboot=enable
forcepxenextboot=enable
--hddacousticmode
Valid Argument
bypass, quiet, suggested, performance
Description
Sets the hard disk acoustic mode. If set to Bypass, BIOS does not modify
the hard disks' currently set acoustic mode. Quiet sets the hard disks'
acoustic mode to the quietest operation. Suggested sets the hard disks'
acoustic mode to the manufacturer's suggested setting. Performance sets
the hard disks' acoustic mode for the highest disk performance.
Example
A:>cctk --hddacousticmode=bypass
hddacousticmode=bypass
CCTK Options 59

--hddfailover
Valid Argument
on, off
Description
Specifies the devices in the hard disk drive sequence menu that are
attempted in the boot sequence. If set to off, only the first device is
attempted in the boot sequence. If set to on, all devices are attempted as
listed in the hard disk drive sequence.
Example
A:>cctk --hddfailover=on
hddfailover=on
--hddprotection
Valid Argument
on, off
Description
Enables or disables the HDD protection feature. The Hard Disk Protection
is an advanced feature intended to keep the HDD data secure and
unchangeable. See the documentation provided with your system for more
details on this feature.
Example
A:>cctk --hddprotection=on
hddprotection=on
--hdfreefallprotect
Valid Argument
enable, disable
Description
Enables or disables hard drive free fall protection.
60 CCTK Options

Example
A:>cctk --hdfreefallprotect=enable
hdfreefallprotect=enable
--hotdock
Valid Argument
on, off
Description
Enables or disables hot docking.
Example
A:>cctk --hotdock=on
hotdock=on
--htkeywxanradio
Valid Argument
enable, disable
Description
Enables or disables hotkey to toggle WxAN radio. Enabling this option
allows to set wxanradio option. For more information, see --wxanradio.
Example
A:>cctk --htkeywxanradio=enable
htkeywxanradio=enable
--htassist
Valid Argument
enable, disable
CCTK Options 61

Description
Enables or disables the Probe Filter chipset option in the BIOS setup. The
chipset feature affects the performance of some applications.
Example
A:>cctk --htassist=enable
htassist=enable
--hwprefetcher
Valid Argument
enable, disable
Description
Enables or disables the CPU’s hardware prefetcher.
Example
A:>cctk --hwprefetcher=enable
hwprefetcher=enable
--hwswprefetch
Valid Argument
enable, disable
Description
Enables or disables hardware prefetcher from considering software
prefetches when detecting strides for prefetch requests.
Example
A:>cctk --hwswprefetch=enable
hwswprefetch=enable
--idecdrom
Valid Argument
auto, off
62 CCTK Options

Description
Enables or disables the CD drive.
Example
A:>cctk --idecdrom=auto
idecdrom=auto
--infrareddevice
Valid Argument
disabled, COM1, COM2, COM3, COM4
Description
Sets the infrared port.
Example
A:>cctk --infrareddevice=COM1
infrareddevice=COM1
--instanton
Valid Argument
enable, disable
Description
Enables or disables the Latitude on Instant ON feature.
Example
A:>cctk --instanton=
instanton=
enable
enable
--integratedaudio
Valid Argument
enable, disable, auto
CCTK Options 63

Description
Sets the status of the system’s integrated sound device.
Example
A:>cctk --integratedaudio=enable
integratedaudio=enable
--integratedraid
Valid Argument
enable, disable
Description
Enables or disables the integrated RAID.
Example
A:>cctk --integratedraid=enable
integratedraid=enable
--integratedsas
Valid Argument
enable, disable
Description
Enables or disables the integrated SAS controller.
Example
A:>cctk --integratedsas=enable
integratedsas=enable
--integratedusbhub
Valid Argument
compatible, high speed
64 CCTK Options

Description
Sets the integrated USB hub to compatible or high speed.
Example
A:>cctk --integratedusbhub=compatible
integratedusbhub=compatible
--internalminipci
Valid Argument
enable, disable
Description
Enables or disables the internal mini PCI slot.
Example
A:>cctk --internalminipci=enable
internalminipci=enable
--internalusb
Valid Argument
on, off
Description
Enables or disables internal USB ports.
Example
A:>cctk --internalusb=on
internalusb=on
--interwirelessuwb
Valid Argument
enable, disable
CCTK Options 65

Description
Enables or disables Ultra Wide Band (UWB) card.
Example
A:>cctk --interwirelessuwb=enable
interwirelessuwb=enable
--keyboardclick
Valid Argument
enable, disable
Description
Enables or disables the keyboard click sound.
Example
A:>cctk --keyboardclick=enable
keyboardclick=enable
--keyboardillumination
Valid Argument
on, off, auto
Description
Sets the keyboard illumination to enabled, disabled, or auto status. If set to
auto, illumination is set based on ambient light level.
Example
A:>cctk --keyboardillumination=on
keyboardillumination=on
--keypad
Valid Argument
enabledbynumlock, enabledbyfnkey
66 CCTK Options

Description
Enables the keypad in two different ways: numlock and function key.
Example
A:>cctk --keypad=enabledbynumlock
keypad=enabledbynumlock
--lastbiosupdate
Valid Argument
Read-only
Description
Identifies the major release of the System BIOS.
Example
A:>cctk --lastbiosupdate
lastbiosupdate=<string>
--latitudeonflash
Valid Argument
enable, disable
Description
Enables or disables the ability to boot to the Latitude ON Flash module.
Example
A:>cctk --latitudeonflash=enable
latitudeonflash=enable
--limitcpuidvalue
Valid Argument
on, off
CCTK Options 67

Description
Limits the maximum value the processor standard CPUID function
supports. Some operating systems will be unable to install if the
maximum CPUID function supported is greater than 3. If set to
the CPUID function is limited to 3. If set to
off
, the CPUID function
is not limited to 3.
Example
A:>cctk --limitcpuidvalue=on
limitcpuidvalue=on
--logicproc
Valid Argument
enable, disable
Description
Enables or disables hyper threading on the next system boot. On some
Dell platforms, that support multi-core processor technology, this is
enabled or disabled though the platform does not support hyper threading.
In this case, this command may enable or disable multi-core processor
technology.
Example
A:>cctk --logicproc=enable
on
,
logicproc=enable
--lowpowers5
Valid Argument
enable, disable
Description
Enables or disables the low power (S5) state. If set to enabled, the system
will go into lowest-Power Off mode in S4 and S5, turning off as much of
the power-consuming circuitry as required, to attempt to meet 1W power
limit. This may disable things like PME, USB power, etc. If set to disabled,
the system will be in a normal power-use mode when in S4 or S5.
68 CCTK Options

Example
A:>cctk --lowpowers5=enable
lowpowers5=enable
--lpt
Valid Argument
lpt1, lpt2, lpt3
Description
Defines the parallel port configuration. lpt1 enables the system’s built-in
parallel port to operate in LPT1 mode, using I/O address 378. lpt2
enables the system’s built-in parallel port to operate in LPT2 mode,
using I/O address 278. lpt3 enables the system’s built-in parallel port
to operate in LPT3 mode, using I/O address 3BC.
Example
A:>cctk --lpt=lpt1
lpt=lpt1
--lptmode
Valid Argument
disable, at, ps2, ecp, epp, ecpdma1, ecpdma3
Description
Set the parallel port mode to any of the following:
disable: disables the system’s built-in parallel port.
at: enables the system’s built-in parallel port to operate in
AT mode (output-only).
ps2: enables the system’s built-in parallel port to operate in
PS/2 mode (bi-directional).
ecp: enables the system’s built-in parallel port to operate in ECP mode,
no DMA channel assigned.
epp: enables the system’s built-in parallel port to operate in EPP mode.
CCTK Options 69

ecpdma1: enables the system’s built-in parallel port to operate in ECP
mode DMA channel 1.
ecpdma3: enables the system’s built-in parallel port to operate in ECP
mode DMA channel 3.
Example
A:>cctk --lptmode=at
lptmode=at
--mediacard
Valid Argument
enable, disable
Description
Enables or disables the media card.
Example
A:>cctk --mediacard=enable
mediacard=enable
--mediacardand1394
Valid Argument
enable, disable
Description
Enables or disables the media card and 1394 devices.
Example
A:>cctk --mediacardand1394=enable
mediacardand1394=enable
70 CCTK Options

--mem
Valid Argument
read-only
Description
Reports the amount of system memory physically installed in the system,
not the amount of memory available to an operating system. The last
two characters of the memory value indicate the order of magnitude
used (KB or MB).
Example
A:>cctk --mem
mem=256MB
--microphone
Valid Argument
enable, disable
Description
Enables or disables Dell notebook’s internal or external microphone.
Example
A:>cctk --microphone=enable
microphone=enable
--minicardssd
Valid Argument
enable, disable
Description
Enables or disables minicard SSD module.
CCTK Options 71

Example
A:>cctk --minicardssd=enable
minicardssd=enable
--modulebaydevice
Valid Argument
enable, disable
Description
Enables or disables the module bay device, except the battery.
Example
A:>cctk --modulebaydevice=enable
modulebaydevice=enable
--monitortoggling
Valid Argument
enable, disable
Description
Enables or disables monitor toggling.
Example
A:>cctk --monitortoggling=enable
monitortoggling=enable
--mouse
Valid Argument
off, on
Description
Turns the mouse controller on or off.
72 CCTK Options

Example
A:>cctk --mouse=off
mouse=off
--multicpucore
Valid Argument
enable, disable
Description
Allows the users to disable or enable Multiple CPU Cores if needed.
If disabled, this would prevent the operating system from accessing
additional cores present on a single CPU package.
Example
A:>cctk --multicpucore=enable
multicpucore=enable
--nmibutton
Valid Argument
enable, disable
Description
Enables or disables the front bezel NMI button. The NMI button can be
used to alert the operating system in certain cases.
Example
A:>cctk --nmibutton=enable
nmibutton=enable
--numlock
Valid Argument
on, off
CCTK Options 73

Description
Enables or disables the keyboard’s number lock.
Example
A:>cctk --numlock=on
numlock=on
--onboard1394
Valid Argument
enable, disable
Description
Enables or disables on-board 1394 controller on the next boot.
Example
A:>cctk --onboard1394=enable
onboard1394=enable
--onboardmodem
Valid Argument
enable, disable
Description
Enables or disables the onboard modem.
Example
A:>cctk --onboardmodem=enable
onboardmodem=enable
--osmode
Valid Argument
enable, disable
74 CCTK Options

Description
Enables or disables the operating system installation mode.
Example
A:>cctk --osmode=enable
osmode=enable
--ovrwrt
Valid Argument
read-only
Description
This option is only used with the
-o
option to cause the output file to be
overwritten if a file of the same name already exists.
Example
A:>cctk -o=filename.ini --ovrwrt
The file filename has been overwritten.
--passwordbypass
Valid Argument
off, reboot bypass, resumebypass, rebootandresume bypass
Description
Sets the password bypass feature.
Example
A:>cctk --passwordbypass=off
passwordbypass=off
--pccard
Valid Argument
enable, disable
CCTK Options 75

Description
Enables or disables the PC card.
Example
A:>cctk --pccard=enable
pccard=enable
--pccardand1394
Valid Argument
enable, disable
Description
Enables or disables the PC card and 1394 devices.
Example
A:>cctk --pccardand1394=enable
pccardand1394=enable
--pci
Valid Argument
read-only argument
Description
Performs a scan of all PCI buses and displays the results. The utility uses
an open source
looks for a file called
pci.ids
file for vendor/device name resolution. The utility
pci.ids
in the current working directory. If the file
is not found in the current working directory, the directory containing
the CCTK executable is searched. If the
-n
option is used to specify
a filename, this filename is used for resolution. If a specific filename is
not given and the
pci.ids
file cannot be found,
Unknown
will be printed
for all vendor and device codes.
For more information, see the "PCI Reporting" section.
76 CCTK Options

Example 1 (the pci.ids filename is specified in the command line instance):
A:>cctk --pci -n <location_of_pci.ids>
PCI Bus: 0, Device: 0, Function: 0
Vendor: 1166 - ServerWorks
Device: 0012 - CMIC-LE
Slot: 00
Class: 06 - Bridge
SubClass: 00 - CPU/PCI
PCI Bus: 0, Device: 0, Function: 1
Vendor: 1166 - ServerWorks
Device: 0012 - CMIC-LE
Slot: 00
Class: 06 - Bridge
SubClass: 00 - CPU/PCI
PCI Bus: 0, Device: 0, Function: 2
Vendor: 1166 - ServerWorks
Device: 0000 - Unknown
--pcislots
Valid Argument
enable, disable
Description
Enables or disables the system's add-in PCI slots.
Example
A:>cctk --pcislots=enable
pcislots=enable
CCTK Options 77

--penmisindication
Valid Argument
enable, disable
Description
Enables or disables the missing pen indication. This property is used to
control Tablet PC pen removal. If the pen has been removed out of the
retaining well, the pen LED will blink.
Example
A:>cctk --penmisindication=enable
penmisindication=enable
--penresumeon
Valid Argument
enable, disable
Description
Enables or disables the resume on pen setting.
Example
A:>cctk --penresumeon=disable
penresumeon=disable
--pntdevice
Valid Argument
disable , disable
Description
Enables or disables the pointing device.
78 CCTK Options

Example
A:>cctk --pntdevice=enable
pntdevice=disable
--postf12key
Valid Argument
enable, disable
Description
Enables or disables F12 boot menu on POST boot screen.
Example
A:>cctk --postf12key=enable
postf12key=enable
--postf2key
Valid Argument
enable, disable
Description
Enables or disables F2 boot menu on POST boot screen.
Example
A:>cctk --postf2key=enable
postf2key=enable
--posthelpdeskkey
Valid Argument
enable, disable
CCTK Options 79

Description
Enables or disables display of the
ctrl+h
help desktop hotkey message on
the post screen if Management Engine (ME) is alive and Client Initiated
Remote Access (CIRA) is supported.
Example
A:>cctk --posthelpdeskkey=enable
posthelpdeskkey=enable
--postmebxkey
Valid Argument
off, on
Description
Controls the display of the MEBx hotkey (Ctrl-P) at POST on the
sign-on screen.
Example
A:>cctk --postmebxkey=on
postmebxkey=on
--powermgmt
Valid Argument
disabled, minimum, regular, maximum
Description
Defines the power management settings.
Example
A:>cctk --powermgmt=minimum
powermgmt=minimum
80 CCTK Options

--primidemast
Valid Argument
auto, off
Description
Enables or disables primary IDE master channel.
Example
A:>cctk --primidemast=off
primidemast=off
--primideslav
Valid Argument
auto, off
Description
Enables or disables primary parallel IDE slave channel.
Example
A:>cctk --primideslav=auto
primideslav=auto
--pwdlock
Valid Argument
lock, unlock
Description
Controls the ability to set the system password. If the password is locked,
it cannot be changed. The lock argument locks the current state of the
system password. If a system password has been set, it cannot be removed.
If a system password has not been set, it cannot be set. On specific BIOS
settings, this feature does not work. See the BIOS documentation for more
information.
CCTK Options 81

Example
A:>cctk --pwdlock=lock
pwdlock=lock
--radiotransmission
Valid Argument
on, off
Description
Enables or disables the radio transmission from MiniPCI wireless or
bluetooth module.
Example
A:>cctk --radiotransmission=on
radiotransmission=on
--rearsingleusb
Valid Argument
enable, disable
Description
Enables or disables the Rear Single USB ports.
Example
A:>cctk --rearsingleusb=enable
rearsingleusb=enable
--remotebiosupdate
Valid Argument
enable, disable
Description
Enables or disables the remote BIOS update.
82 CCTK Options

Example
A:>cctk --remotebiosupdate=enable
remotebiosupdate=enable
--rptkeyerr
Valid Argument
enable, disable
Description
Configures or reports whether the BIOS reports keyboard errors during
POST.
Example
A:>cctk --rptkeyerr=disable
rptkeyerr=disable
--safeusb
Valid Argument
enable, disable
Description
Enables or disables selective USB feature to disable all USB ports,
except the two selective USB ports. This option allows only the
keyboard or mouse connected to the selective USB ports for the
boot process to continue.
Example
A:>cctk --safeusb=enable
safeusb=enable
--sata0
Valid Argument
auto, off
CCTK Options 83

Description
Enables or disables SATA port 0.
Example
A:>cctk --sata0=auto
sata0=auto
--sata1
Valid Argument
auto, off
Description
Enables or disables SATA port 1.
Example
A:>cctk --sata1=auto
sata1=auto
--sata2
Valid Argument
auto, off
Description
Enables or disables SATA port 2.
Example
A:>cctk --sata2=auto
sata2=auto
--sata3
Valid Argument
auto, off
84 CCTK Options

Description
Enables or disables SATA port 3.
Example
A:>cctk --sata3=auto
sata3=auto
--sata4
Valid Argument
auto, off
Description
Enables or disables SATA port 4.
Example
A:>cctk --sata4=auto
sata4=auto
--sata5
Valid Argument
auto, off
Description
Enables or disables SATA port 5.
Example
A:>cctk --sata5=auto
sata5=auto
--sata6
Valid Argument
auto, off
CCTK Options 85

Description
Enables or disables SATA port 6.
Example
A:>cctk --sata6=auto
sata6=auto
--sata7
Valid Argument
auto, off
Description
Enables or disables SATA port 7.
Example
A:>cctk --sata7=auto
sata7=auto
--satactrl
Valid Argument
enable, disable
Description
Enable or disable all the SATA controllers. The option applies to
all SATA controllers.
Example
A:>cctk --satactrl=0
satactrl=0
--satadipm
Valid Argument
enable, disable
86 CCTK Options

Description
Disables or enables the feature that allows SATA HDDs to initiate link
power management transitions.
Example
A:>cctk --satadipm=enable
satadipm=enable
--scndidemaster
Valid Argument
auto, off
Description
Enables or disables secondary parallel IDE master channel.
Example
A:>cctk --scndidemaster=on
scndidemaster=on
--scndideslave
Valid Argument
auto, off
Description
Enables or disables secondary parallel IDE slave channel.
Example
A:>cctk --scndideslave=auto
scndideslave=auto
--serial1
Valid Argument
disable, auto, com1, com2, com3, com4
CCTK Options 87

Description
Defines the serial port 1 configuration.
Example
A:>cctk --serial1=disable
serial1=disable
--serial2
Valid Argument
disable, auto, com2, com4
Description
Defines the serial port 2 configuration.
Example
A:>cctk --serial2=disable
serial2=disable
--serialcomm
Valid Argument
off, on, com1cr, com2cr
Description
Sets the behavior of the serial port communication. When set to on,
this option tells the BIOS to enable COM port 1 and COM port 2.
These ports are made available for use by the operating system or
applications. BIOS Console Redirection is disabled.
When set to com1cr, this option tells the BIOS to enable COM port 1 and
COM port 2. These ports are made available for use by the operating
system or applications. BIOS Console Redirection is through COM port 1.
When set to com2cr, this option tells the BIOS to enable COM port 1 and
COM port 2. These ports are made available for use by the operating
system or applications. BIOS Console Redirection is through COM port 2.
88 CCTK Options

When set to off, this option tells the BIOS to disable COM port 1 and
COM port 2.
Example
A:>cctk --serialcomm=on without console
redirection
serialcomm=on without console redirection
--serrdmimsg
Valid Argument
on, off
Description
Enables or disables serr Dmi messages.
Example
A:>cctk --serrdmimsg=on
serrdmimsg=on
--setuppwd
Valid Argument
<password>
Description
Sets the setup password. An argument is required. The password cannot
be reported. Initially you can set the password. If you want to remove
the password, provide one blank space and the old password
Example
A:>cctk --setuppwd=<new-password> --valsetuppwd=
<old-password>
CCTK Options 89
.

--sma
Valid Argument
enable, disable
Description
Enables or disables processor sequential memory access.
Example
A:>cctk --sma=disable
sma=disable
--smartcardreader
Valid Argument
enable, disable
Description
Enables or disables the smart card reader.
Example
A:>cctk --smartcardreader=enabled
smartcardreader=enable
--smarterrors
Valid Argument
enable, disable
Description
Enables or disables SMART errors.
Example
A:>cctk --smarterrors=enable
smarterrors=enable
90 CCTK Options

--snoopfilter
Valid Argument
enable, disable
Description
Enables or disables the snoop filter option from the system BIOS.
Example
A:>cctk --snoopfilter=enable
snoopfilter=enable
--speakervol
Valid Argument
enable, disable, low, medium, high
Description
Controls the volume of the speaker.
enable: Enables the built-in speaker. The speaker is enabled at the single
system-supported volume. This should be used only if the Speaker Volume
Low/Medium/High attributes are not supported by the system.
disable: Disables the built-in speaker.
low: Enables the built-in speaker, at a low volume.
medium: Enables the built-in speaker, at a medium volume.
high: Enables the built-in speaker, at a high volume.
Example
A:>cctk --speakervol=off
speakervol=off
--speedstep
Valid Argument
automatic, disabled, max performance, max battery
CCTK Options 91

Description
Sets the speedstep status to automatic, disabled, max performance,
or max battery.
Example
A:>cctk --speedstep=automatic
speedstep=automatic
--splashscreen
Valid Argument
enable or disable
Description
Enables or disables the display of the splash or summary screen,
rather than the detail of the POST flow.
Example
A:>cctk --splashscreen=enable
splashscreen=enable
--sriov
Valid Argument
enable, disable
Description
Enables or disables BIOS support for Single Root I/O Virtualization (SRIOV) devices.
Example
A:>cctk --sriov=enable
sriov=enable
92 CCTK Options

--strongpwd
Valid Argument
enable, disable
Description
Enables to enforce a strong password.
Example
A:>cctk --strongpwd=enable
strongpwd=enable
--surroundview
Valid Argument
enable, disable
Description
Enables or disables SurroundView to use an additional AMD PCIE video
card in conjunction with the onboard graphics card that allows to use
multiple monitors concurrently. It is applicable only on the AMD
platform.
Example
A:>cctk --surroundview=enable
surroundview=enable
--svctag
Valid Argument
read-only
Description
Reports the service tag for a system.
CCTK Options 93

Example
A:>cctk --svctag
svctag=113CD1S
--sysid
Valid Argument
read-only argument
Description
Defines the Dell Systems ID byte for systems that support it. The value of
this feature is -1, if the system does not support it.
Example
A:>cctk --sysid
sysid=0169
--sysname
Valid Argument
read-only argument
Description
This function command reports the system identification string for a
server, which is the string displayed under the Dell logo during POST.
Example
A:>cctk --sysname
sysname=Latitude D630
--syspwd
Valid Argument
<password>
94 CCTK Options

Description
Sets the system password. An argument is required. The password cannot
be reported. Initially you can set the password using cctk. If you want to
remove the password, provide one blank space and old password.
Example
A:>cctk --syspwd=<password> --valsyspwd=<oldpassword>
--sysrev
Valid Argument
read-only
Description
Reports the system revision.
Example
A:>cctk --sysrev
sysrev=000
--sysbatcharger
Valid Argument
enable, disable
Description
Enables or disables the battery charging system.
Example
A:>cctk --sysbatcharger=enable
sysbatcharger=enable
--tabletbuttons
Valid Argument
enable, disable
CCTK Options 95

Description
Enables or disables tablet buttons.
Example
A:>cctk --tabletbuttons=enable
tabletbuttons=enable
--tpm
Valid Argument
on, off
Description
Enables or disables the trusted platform module (TPM).
Example
A:>cctk --tpm=on
tpm=on
--tpmactivation
Valid Argument
activate, deactivated
Description
Remotely activates the TPM depending on certain security criteria.
The deactivated option is a read-only argument for reporting the current
activation state of the TPM. For more details, see the section, TPM
Activation.
Example
A:>cctk --tpmactivation=activate
tpmactivation=activate
96 CCTK Options

--turbomode
Valid Argument
enable, disable
Description
Enables or disables single core-based turbo mode. When enabled,
®
Intel
Turbo Boost Technology allows processor(s) to run at
frequencies higher than the advertised frequency.
Example
A:>cctk --turbomode=enable
turbomode=enable
--uartpowerdown
Valid Argument
on, off
Description
Enables operating system to power down UART or disables operating
system from powering down UART.
Example
A:>cctk --uartpowerdown=on
uartpowerdown=on
--usb30
Valid Argument
enable, disable
Description
Enables or disables USB 3.0.
CCTK Options 97

Example
A:>cctk --usb30=enable
usb30=enable
--usbemu
Valid Argument
enable, disable, enableexceptbootabledev
Description
Enables or disables emulation of USB devices.
Example
A:>cctk --usbemu=enable
usbemu=enable
--usbflash
Valid Argument
auto, floppy, hard disk
Description
Sets the USB flash drive emulation to auto, floppy, or hard disk.
Example
A:>cctk --usbflash=auto
usbflash=auto
--usbports
Valid Argument
enable, disable, noboot
Description
Enables or disables user accessible USB ports.
98 CCTK Options

noboot: Enables BIOS emulation of all supported USB devices except for
bootable devices (floppy, USB flash, etc.). This is a security feature that
will prevent users from inserting a USB boot device and booting an
operating system from it. Non-bootable devices (keyboard, mouse, hub)
are still emulated.
Example
A:>cctk --usbports=enable
usbports=enable
--usbportsexternal
Valid Argument
enable, disable
Description
Enables or disables the external USB ports.
Example
A:>cctk --usbportsexternal=enable
usbportsexternal=enable
--usbportsfront
Valid Argument
disable, enable
Description
Enables or disables the USB ports on the front of the chassis.
Example
A:>cctk --usbportsfront=disable
usbportsfront=disable
CCTK Options 99

--usbpowershare
Valid Argument
enabled, disabled
Description
Enables or disables the USB power share.
Example
A:>cctk --usbpowershare=enable
usbpowershare=enable
--usbport00
Valid Argument
enable, disable
Description
Enables or disables USB port 00.
Example
A:>cctk --usbport00=enable
usbport00=enable
--usbport01
Valid Argument
enable, disable
Description
Enables or disables USB port 01.
Example
A:>cctk --usbport01=enable
usbport01=enable
100 CCTK Options
 Loading...