

Page 1

Dell™ 1250c Color Printer
User's Guide
www.dell.com | support.dell.com
Page 2

Page 3

Contents
Before Beginning .......................................11
A Notes, Notices, and Cautions . . . . . . . . . 13
1 Dell™ 1250c Color Printer User's Guide . 15
2 Finding Information . . . . . . . . . . . . . . . . . 17
3 Product Features . . . . . . . . . . . . . . . . . . . 21
4 About the Printer . . . . . . . . . . . . . . . . . . . 23
Front View . . . . . . . . . . . . . . . . . . . . . . . . 23
Rear View . . . . . . . . . . . . . . . . . . . . . . . . 24
Space Requirements
Operator Panel
Securing the Printer . . . . . . . . . . . . . . . . . . . 26
Ordering Supplies
. . . . . . . . . . . . . . . . . . 25
. . . . . . . . . . . . . . . . . . . . . 26
. . . . . . . . . . . . . . . . . . . . 27
Setting Up Printer (Printer Setup) ...........29
Contents 1
Page 4

5 Connecting Your Printer . . . . . . . . . . . . . 31
Connecting Printer to Computer . . . . . . . . . . . . . 31
Turning On the Printer
. . . . . . . . . . . . . . . . . . 32
6 Loading Paper . . . . . . . . . . . . . . . . . . . . . 35
7 Installing Printer Drivers on Computers Running
Windows 41
Inserting the Drivers and Utility CD . . . . . . . . . . . 41
Installing Printer Driver . . . . . . . . . . . . . . . . . 41
For installing host-based printer driver
For installing XML Paper Specification (XPS) printer driver 41
. . . . . . 41
8 Installing Printer Drivers on Computers Running
Macintosh 45
Installing the Drivers and Software . . . . . . . . . . . 45
Adding a Printer on Mac OS X 10.5 or Later Version(s)
Adding a Printer on Mac OS X 10.4.11
Adding a Printer on Mac OS X 10.3.9
. . . . . . . 46
. . . . . . . . 46
45
Using Your Printer .....................................47
9 Print Media Guidelines . . . . . . . . . . . . . . 49
Paper . . . . . . . . . . . . . . . . . . . . . . . . . . . 49
Paper Characteristics
2 Contents
. . . . . . . . . . . . . . . 49
Page 5

Recommended Paper . . . . . . . . . . . . . . . 50
Unacceptable Paper . . . . . . . . . . . . . . . . 51
Selecting Paper
Selecting Preprinted Media and Letterhead
. . . . . . . . . . . . . . . . . . 51
. . . . 52
Printing on Letterhead . . . . . . . . . . . . . . . 52
Loading Letterhead
Selecting Pre-Punched Paper
. . . . . . . . . . . . . . . . . 53
. . . . . . . . . . . 53
Envelopes
Labels
. . . . . . . . . . . . . . . . . . . . . . . . 54
. . . . . . . . . . . . . . . . . . . . . . . . . . 55
Storing Print Media . . . . . . . . . . . . . . . . . . . 56
Identifying Print Media and Specifications
Supported Paper Sizes
Supported Paper Types
. . . . . . . . . . . . . . . 56
. . . . . . . . . . . . . . 57
. . . . . . 56
Paper Type Specifications . . . . . . . . . . . . . 58
10 Loading Print Media . . . . . . . . . . . . . . . . 59
Capacity . . . . . . . . . . . . . . . . . . . . . . . . . 59
Print Media Dimensions . . . . . . . . . . . . . . . . 59
Loading Print Media
Loading Envelopes
Loading Letterhead
Using the Output Tray Extension
. . . . . . . . . . . . . . . . . . . 59
. . . . . . . . . . . . . . . . . 64
. . . . . . . . . . . . . . . . . 66
. . . . . . . . . . . . 67
11 Operator Panel . . . . . . . . . . . . . . . . . . . . 69
Using the Operator Panel Buttons . . . . . . . . . . . 69
Understanding the Operator Panel Lights
. . . . . . . 71
Contents 3
Page 6

Common Light Sequences . . . . . . . . . . . . . 71
Warnings . . . . . . . . . . . . . . . . . . . . . . 72
Operator Call Errors
Secondary light sequences
. . . . . . . . . . . . . . . . 73
. . . . . . . . . . . . 75
Fatal Errors . . . . . . . . . . . . . . . . . . . . . 76
Firmware Errors
. . . . . . . . . . . . . . . . . . 76
Printing a Device Settings Page
. . . . . . . . . . . . 77
Resetting Defaults . . . . . . . . . . . . . . . . . . . . 77
12 Printing . . . . . . . . . . . . . . . . . . . . . . . . . . 79
Tips for Successful Printing . . . . . . . . . . . . . . . 79
Tips on Storing Print Media
Avoiding Paper Jams
Sending a Job to Print
Canceling a Print Job
. . . . . . . . . . . . . . . . . . 79
. . . . . . . . . . . . . . . . . . 80
Canceling From the Operator Panel
Canceling a Job From the Computer Running Windows
Manual Duplex Printing (Windows Printer Driver Only)
Printing a Report Page
. . . . . . . . . . . . . . . . . 82
Printing a Printer Settings Page
The Operator Panel
The Tool Box
. . . . . . . . . . . . . . . . . . . . 83
. . . . . . . . . . . . 79
. . . . . . . . . . . . . . . . 79
. . . . . . . . 80
81
. . . . . . . . . . 82
. . . . . . . . . . . . . . . . . 83
80
Printer Settings
. . . . . . . . . . . . . . . . . . . . . 83
Know Your Printer .....................................85
4 Contents
Page 7

13 Understanding the Tool Box Menus . . . . 87
Printer Settings Report . . . . . . . . . . . . . . . . . 87
Printer Information
Menu Settings
Reports . . . . . . . . . . . . . . . . . . . . . . . 89
Printer Maintenance . . . . . . . . . . . . . . . . . . 90
System Settings
Paper Density . . . . . . . . . . . . . . . . . . . 92
Adjust BTR
Adjust Fuser
Color Registration Adjustment . . . . . . . . . . . 94
Adjust Altitude
Reset Defaults
Non-Dell Toner . . . . . . . . . . . . . . . . . . . 96
BTR Refresh Mode
. . . . . . . . . . . . . . . . . 87
. . . . . . . . . . . . . . . . . . . 88
. . . . . . . . . . . . . . . . . . 90
. . . . . . . . . . . . . . . . . . . . . 92
. . . . . . . . . . . . . . . . . . . . 93
. . . . . . . . . . . . . . . . . . . 95
. . . . . . . . . . . . . . . . . . . 96
. . . . . . . . . . . . . . . . . 97
Diagnosis
. . . . . . . . . . . . . . . . . . . . . . . . 97
Chart Print
Machine Check
. . . . . . . . . . . . . . . . . . . . . 98
. . . . . . . . . . . . . . . . . . 98
Environment Sensor Info . . . . . . . . . . . . . . 99
Developer Stir Mode
Refresh Mode
Resetting Defaults
. . . . . . . . . . . . . . . . 99
. . . . . . . . . . . . . . . . . . . 100
. . . . . . . . . . . . . . . . . . . . 100
14 Understanding Your Printer Software . . 103
Windows
®
. . . . . . . . . . . . . . . . . . . . . . . . 103
Printer Status Window
Status Monitor Console
Dell Supplies Management System
Software Update
. . . . . . . . . . . . . . . 103
. . . . . . . . . . . . . . 103
. . . . . . . . 103
. . . . . . . . . . . . . . . . . . 104
Contents 5
Page 8

Quick Launch Utility . . . . . . . . . . . . . . . . 104
User Setup Disk Creating Tool . . . . . . . . . . . 105
Macintosh
®
. . . . . . . . . . . . . . . . . . . . . . . 106
Status Monitor Widget
. . . . . . . . . . . . . . . 106
15 Specifications . . . . . . . . . . . . . . . . . . . . 111
Operating System Compatibility . . . . . . . . . . . . 111
Power Supply
. . . . . . . . . . . . . . . . . . . . . . 111
Dimensions . . . . . . . . . . . . . . . . . . . . . . . 112
Memory
. . . . . . . . . . . . . . . . . . . . . . . . . 112
Page Description Language (PDL)/Emulation, Operating System, and
Interface
Environment
Cables
. . . . . . . . . . . . . . . . . . . . . . . . . 112
. . . . . . . . . . . . . . . . . . . . . . . 112
. . . . . . . . . . . . . . . . . . . . . . . . . . 113
Maintaining Your Printer .......................115
16 Maintaining Your Printer . . . . . . . . . . . . 117
6 Contents
Conserving Supplies . . . . . . . . . . . . . . . . . . . 117
Storing Print Media . . . . . . . . . . . . . . . . . . . 117
Storing Consumables
Replacing Toner Cartridges
Removing the Toner Cartridges
Installing a Toner Cartridge
. . . . . . . . . . . . . . . . . . 118
. . . . . . . . . . . . . . . 118
. . . . . . . . . . 119
. . . . . . . . . . . . 120
Page 9

Cleaning Inside the Printer . . . . . . . . . . . . . . . 122
Cleaning the Color Toner Density (CTD) Sensor
Adjusting Color Registration
Performing Auto Correct
. . . . . . . . . . . . . . 126
. . . . . . . . . . . . . . 127
Printing the Color Registration Chart
Determining Values
. . . . . . . . . . . . . . . . 128
. . . . 125
. . . . . . . 127
Entering Values . . . . . . . . . . . . . . . . . . . 129
17 Clearing Jams . . . . . . . . . . . . . . . . . . . . 131
Avoiding Jams . . . . . . . . . . . . . . . . . . . . . . 131
Identifying the Location of Paper Jams
Clearing Paper Jams From the Front of the Printer
. . . . . . . . . 132
. . . 133
Clearing Paper Jams From the Back of the Printer . . . 134
Clearing Paper Jams From the Output Tray
. . . . . . . 136
Troubleshooting .......................................139
18 Troubleshooting . . . . . . . . . . . . . . . . . . 141
Basic Printer Problems . . . . . . . . . . . . . . . . . 141
Display Problems
Printing Problems
Print Quality Problems
The output is too light
Toner smears or print comes off/Stain on back side
. . . . . . . . . . . . . . . . . . . . 141
. . . . . . . . . . . . . . . . . . . . 142
. . . . . . . . . . . . . . . . . 143
. . . . . . . . . . . . . . . 143
144
Contents 7
Page 10

Random spots/Blurred images . . . . . . . . . . . 145
The entire output is blank . . . . . . . . . . . . . 146
Streaks appear on the output
Pitched color dots
. . . . . . . . . . . . . . . . . 147
. . . . . . . . . . . 147
Vertical blanks . . . . . . . . . . . . . . . . . . . 147
Mottle
. . . . . . . . . . . . . . . . . . . . . . . . 148
Ghosting
. . . . . . . . . . . . . . . . . . . . . . 148
Fog . . . . . . . . . . . . . . . . . . . . . . . . . 150
Bead-Carry-Out (BCO)
Auger mark
. . . . . . . . . . . . . . . . . . . . . 151
. . . . . . . . . . . . . . . 150
Wrinkled/Stained paper . . . . . . . . . . . . . . 152
The top margins is incorrect
Color registration is out of alignment
. . . . . . . . . . . . 153
. . . . . . . 154
Protrudent / Bumpy paper . . . . . . . . . . . . . 155
Noise . . . . . . . . . . . . . . . . . . . . . . . . . . . 156
. . . . . . . . . . . . . . . . . . . . . . . . . . . . 157
Jam
Misfeed jam
. . . . . . . . . . . . . . . . . . . . 158
Multi-feed jam . . . . . . . . . . . . . . . . . . . 159
Other Problems . . . . . . . . . . . . . . . . . . . . . 160
Contacting Service
. . . . . . . . . . . . . . . . . . . 160
Appendix ...................................................161
B Appendix . . . . . . . . . . . . . . . . . . . . . . . . 163
Dell Technical Support Policy . . . . . . . . . . . . . . 163
Online Services
Warranty and Return Policy
Recycling Information
8 Contents
. . . . . . . . . . . . . . . . . . . 163
. . . . . . . . . . . . . . . 164
. . . . . . . . . . . . . . . 164
Page 11

Contacting Dell . . . . . . . . . . . . . . . . . . . . . 164
Contents 9
Page 12

10 Contents
Page 13

Before Beginning
11
Page 14

12
Page 15

Notes, Notices, and Cautions
NOTE: A NOTE indicates important information that helps you make better use of
your printer.
NOTICE: A NOTICE indicates either potential damage to hardware or loss of data
and tells you how to avoid the problem.
CAUTION: A CAUTION indicates a potential for property damage, personal injury,
or death.
Information in this document is subject to change without notice.
© 2010 Dell Inc. All rights reserved.
Reproduction of these materials in any manner whatsoever without the written permission of
Dell Inc. is strictly forbidden.
Dell
, the
DELL
Trademarks used in this text:
Windows, Windows Server,
Microsoft Corporation in the United States and/or other countries.
XML Paper Specification (XPS)
Microsoft Corporation. The terms and conditions upon which Microsoft is licensing such
intellectual property may be found at http://go.microsoft.com/fwlink/?LinkId=52369;
product includes software developed by Eric Young (eay@mincom.oz.au);
2003, Dr Brian Gladman, Worcester, UK. All rights reserved. This product uses published AES
software provided by Dr Brian Gladman under BSD licensing terms;
1988-1997 Sam Leffler and Copyright
: Copyright© 1998-2004 Marti Maria.
cms)
Other trademarks and trade names may be used in this document to refer to either the entities
claiming the marks and names or their products. Dell Inc. disclaims any proprietary interest in
trademarks and trade names other than its own.
The printer software uses some of the codes defined by the Independent JPEG Group.
and
Windows Vista
: This product may incorporate intellectual property owned by
logo are trademarks of Dell Inc.;
are either trademarks or registered trademarks of
©
1991-1997 Silicon Graphics, Inc.;
TIFF (libtiff)
Microsoft
AES
: Copyright©
ICC Profile (Little
,
DES
: This
: Copyright©
____________________
Notes, Notices, and Cautions 13
Page 16

UNITED STATES GOVERNMENT RESTRICTED RIGHTS
This software and documentation are provided with RESTRICTED RIGHTS. Use, duplication
or disclosure by the Government is subject to restrictions as set forth in subparagraph (c)(1)(ii)
of the Rights in Technical Data and Computer Software clause at DFARS 252.227-7013 and in
applicable FAR provisions: Dell Inc., One Dell Way, Round Rock, Texas, 78682, USA.
September 2010 Rev. A00
14 Notes, Notices, and Cautions
Page 17

1
Dell™ 1250c Color Printer User's Guide
Click the links to the left for information on the features, options, and
operation of your printer. For information on other documentation included
with your printer, see
To order replacement toner cartridges or supplies from Dell:
1
Double-click the icon on your desktop.
If you cannot find the icon on your desktop, follow the procedure below.
a
Navigate to
where
b
Click the file
c
Click
d
Choose
Desktop(create shortcut)
2
Visit the Dell Printer Supplies website at
Dell printer supplies by phone.
For best service, have your Dell printer Service Tag ready.
"Finding Information
x:\abc\Dell Printers\Additional Color Software\Reorder
x:\abc
is the location where the printer software is installed.
DLRMM.EXE
File
on the toolbar.
Send To
from the drop-down menu, and then click
on the submenu that appears.
" on page17.
.
www.dell.com/supplies
, or order
,
To locate the Service Tag of your printer, see "Express Service Code and
Service Tag" on page19.
Dell™ 1250c Color Printer User's Guide 15
Page 18

16 Dell™ 1250c Color Printer User's Guide
Page 19
Finding Information
NOTE: The USB cable is not shipped with your printer.
What are you looking for? Find it here
• Drivers for my printer
User's Guide
•My
Drivers and Utilities
The
Drivers and Utilities
documentation, and drivers for your printer. You can
use the CD to install/re-install drivers or access your
setup video and documentation.
2
CD
CD contains setup video,
• How to use my printer
Readme files may be included on your CD to provide
last-minute updates about technical changes to your
printer or advanced technical reference material for
experienced users or technicians.
Quick Reference Guide
Finding Information 17
Page 20
What are you looking for? Find it here
• Safety information
•Warranty information
Product Information Guide
CAUTION: Read and follow all safety instructions in
your
Product Information Guide
operating your printer.
How to set up my printer
Setup diagram
prior to setting up and
Troubleshooting "Troubleshooting" on page 141
18 Finding Information
Page 21
What are you looking for? Find it here
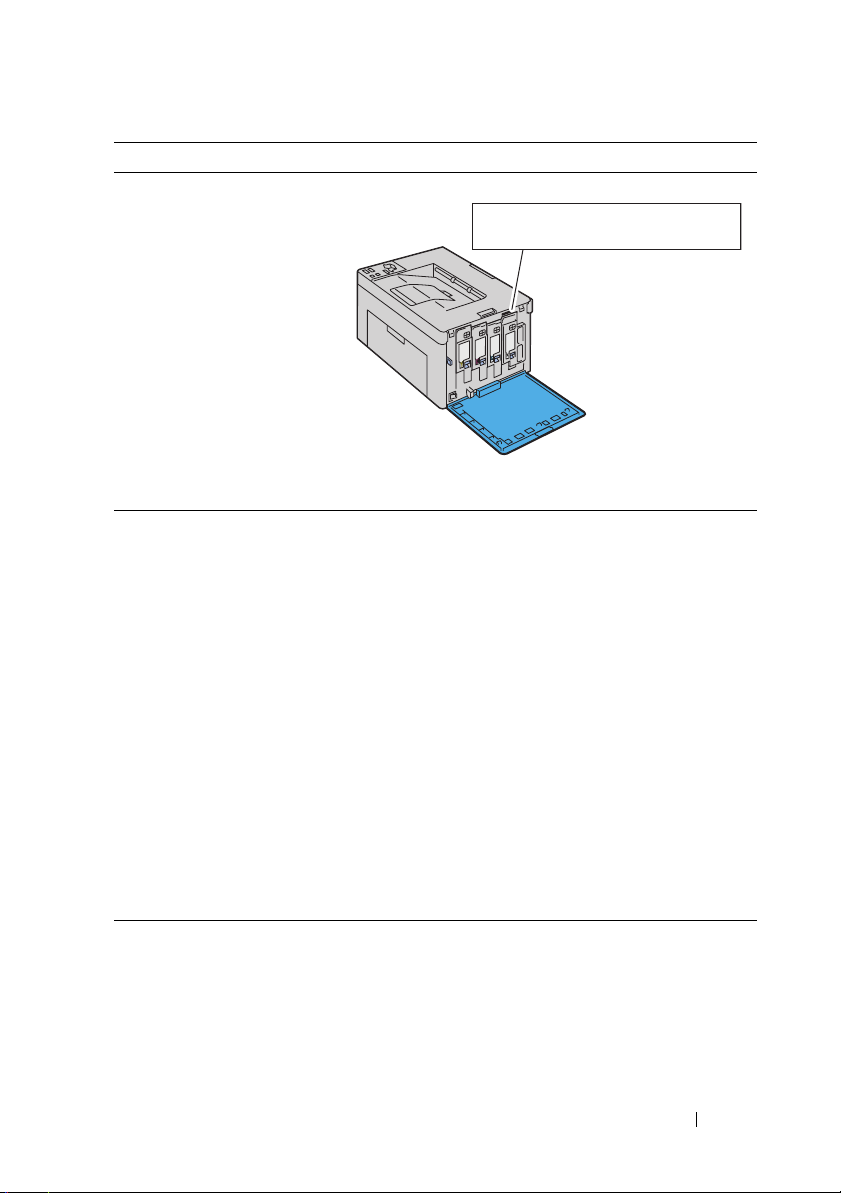
Service Tag Express Service Code
xxxxxxx 000 000 000 00
Express Service Code and
Service Tag
The Express Service Code and Service Tag are located
inside the side door of your printer.
• Latest drivers for my printer
Go to support.dell.com
• Answers to technical service
and support questions
• Documentation for my
printer
support.dell.com provides several online tools,
including:
• Solutions — Troubleshooting hints and tips,
articles from technicians, and online courses
• Upgrades — Upgrade information for
components, such as printer driver
• Customer Care — Contact information, order
status, warranty, and repair information
•Downloads — Drivers
• Manuals — Printer documentation and product
specifications
Go to support.dell.com. Select your region, and fill in
the requested details to access help tools and
information.
Finding Information 19
Page 22

20 Finding Information
Page 23
Product Features
This chapter describes the product features and indicates their links.
3
2-Sided (Manual Duplex Print)
Manual Duplex Print is to print two or
more pages on the front and back side of
a single sheet of paper manually. This
feature allows you to reduce the paper
consumption.
For more information, see "Manual
Duplex Printing (Windows Printer
Driver Only)" on page81.
Multiple Up in the Layout tab (N-up Print)
N-up Print enables you to print multiple
pages on a single sheet of paper. This
feature allows you to reduce the paper
consumption.
For more information, see the printer
driver's help.
Product Features 21
Page 24

22 Product Features
Page 25
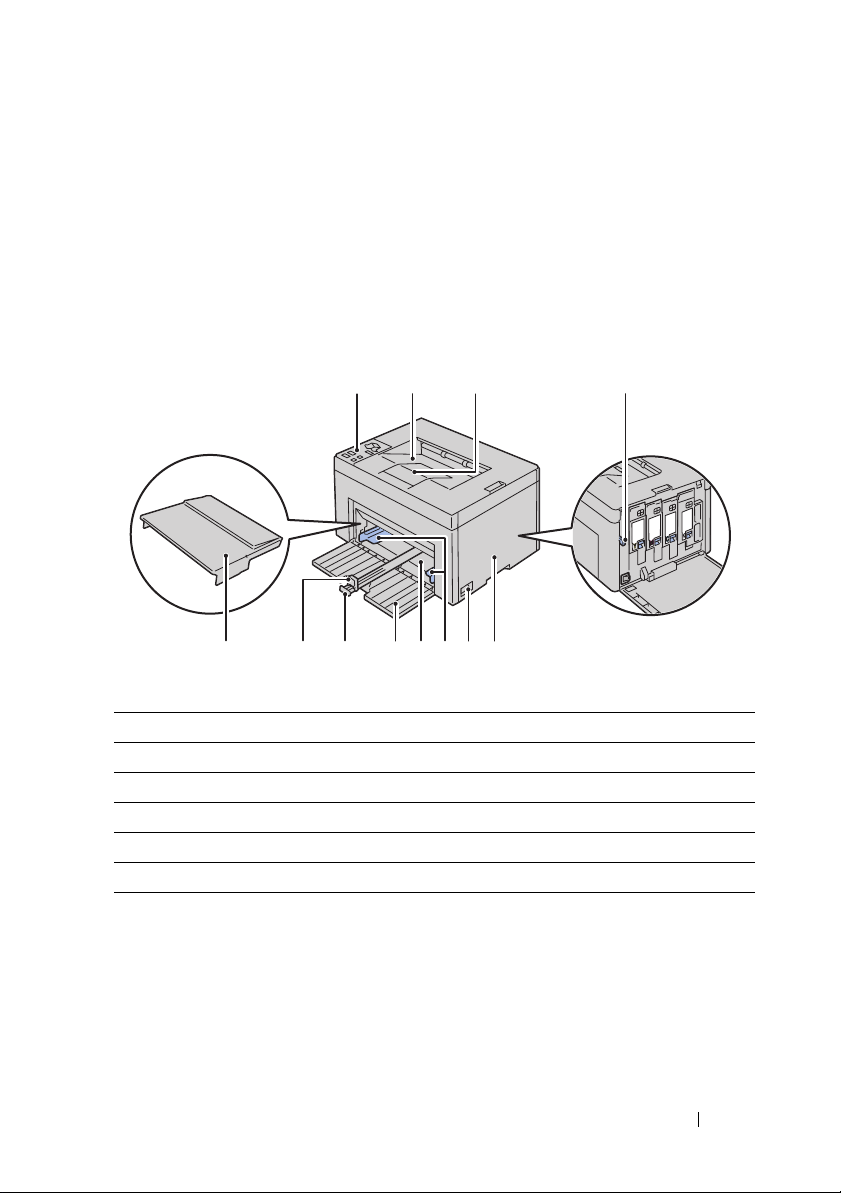
About the Printer
1
6 57101112 9 8
423
This chapter provides an overview of your Dell™ 1250c Color Printer.
Front View
4
1 Operator Panel 2 Output Tray
3 Output Tray Extension 4 Print Head Cleaning Rod
5 Toner Ac c e s s Co v er 6 Power Switch
7 Pap er Width Guid es 8 Multipurpose Feeder (MPF)
9 Front Cover 10 Length Guide
11 MPF Extension 12 Paper Cover
About the Printer 23
Page 26
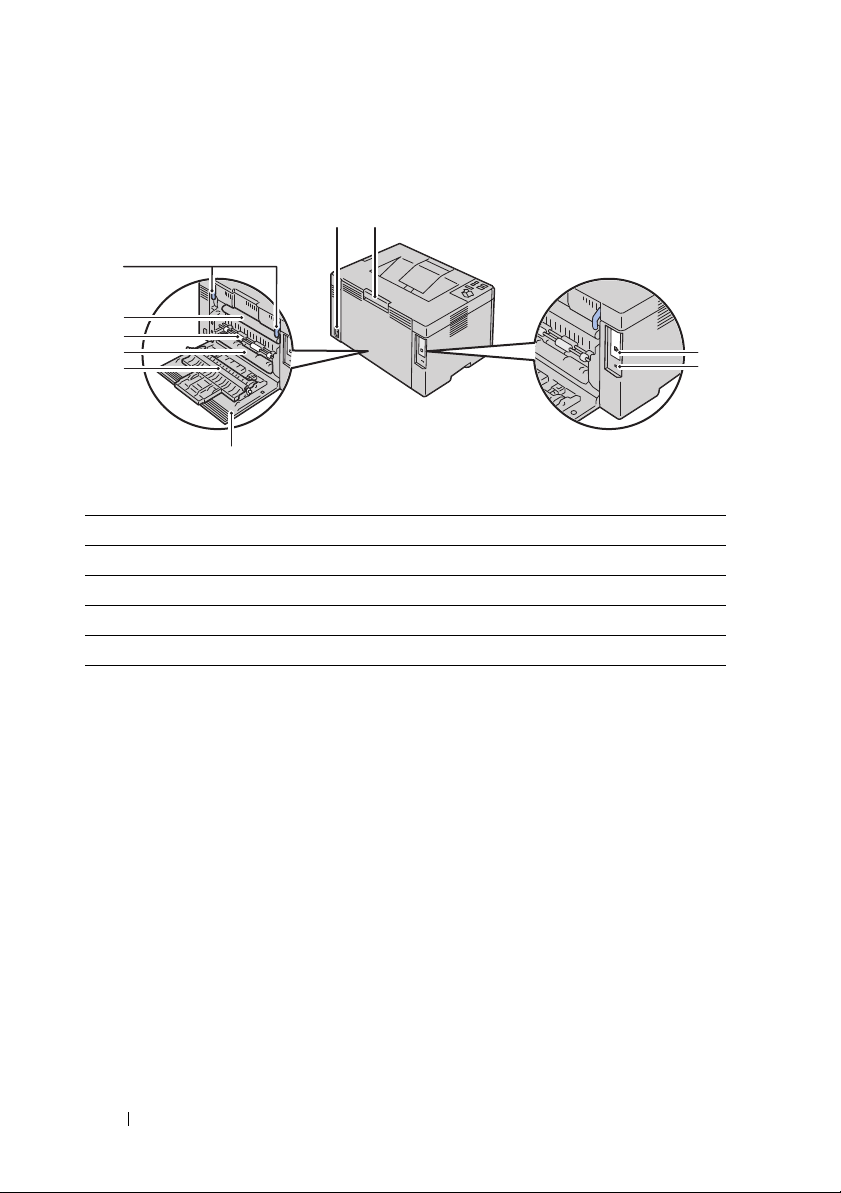
Rear View
1
2
10
9
8
7
6
5
1 Wall Jack Connector 2 Rear Cover Release Handle
3 USB Port 4 Security Slot
5 Rear Cover 6 Transfer Roller
7 Paper Chute 8 Paper Feed Roller
9 Tra n s fer B e lt 10 Fuser Release Lever
3
4
24 About the Printer
Page 27
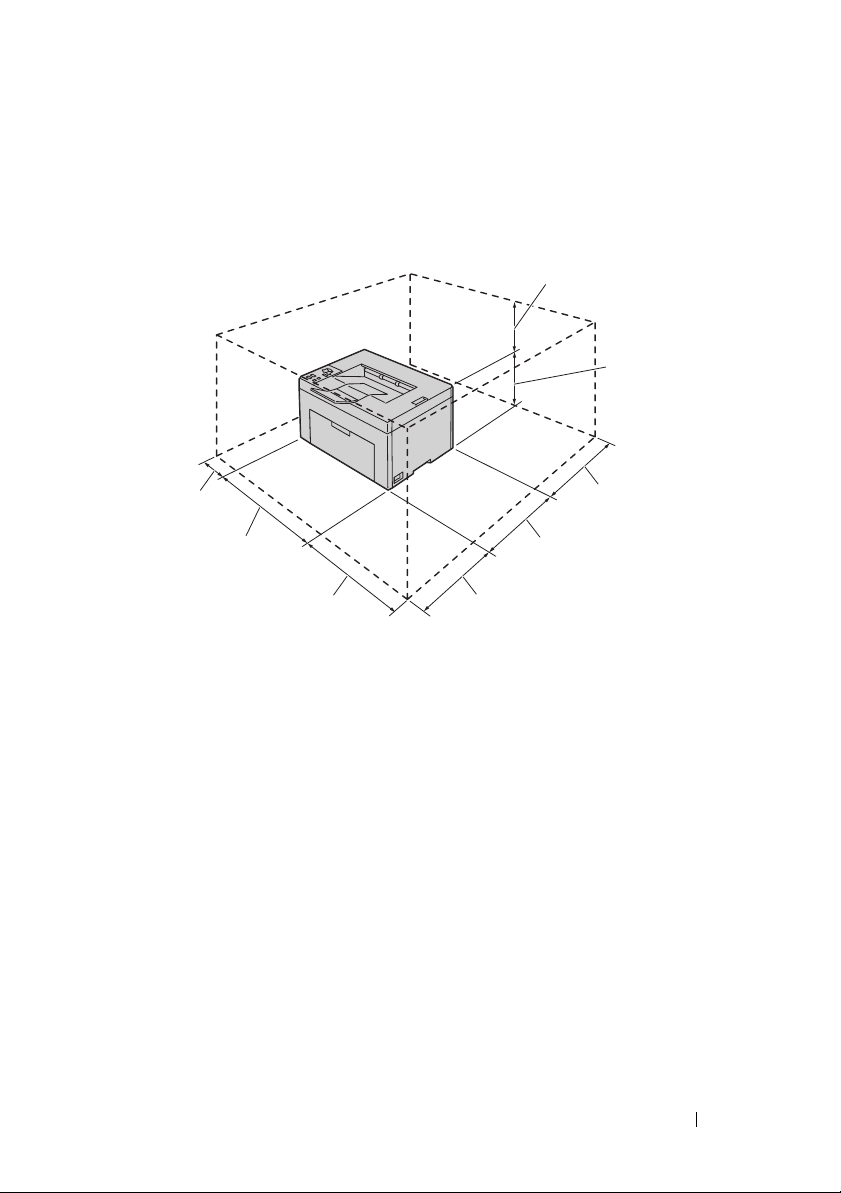
Space Requirements
69 mm/2.7 inches
225 mm/
8.9 inches
300 mm/11.8 inches
329.5 mm/13 inches
307 mm/12.1 inches
394 mm/
15.5 inches
295.5 mm/
11.6 inches
100 mm/
3.9 inches
Place the printer at a location such that there is adequate space for using the
printer feeder and covers.
To avoid irregular screen image or malfunctioning of your printer, avoid
placing the printer in direct sunlight with the front cover opened.
About the Printer 25
Page 28
Operator Panel
For more information on the operator panel, see "Operator Panel" on page69.
Securing the Printer
To protect your printer from theft, you can use the optional Kensington lock.
Attach the Kensington lock to the security slot on your printer.
Security slot
For details, see the operating instructions supplied with the Kensington lock.
26 About the Printer
Page 29
Ordering Supplies
Service Tag Express Service Code
xxxxxxx 000 000 000 00
You can order consumables from Dell on the Internet when using a networked
printer. Enter the IP address of your printer in your web browser, launch the
Dell Printer Configuration Web Tool, and click the Order Supplies at: to
order toner for your printer.
You can also order toner cartridges by the following method:
1
Click
Start All Programs Dell Printers Additional Color Laser
Software
The
Dell Supplies Management System
2
Select your printer from the
3
If ordering from the web:
a
Select a web address from the
b
Click the
The
Dell Supplies Management System
Visit Dell Printer supplies ordering web site
Dell 1250c Color Printer - Dell Supplies Management System
screen appears.
c
Enter the Service Tag, and then click OK.
The Service Tag is located inside the toner access cover of your printer.
Dell supplies web site appears.
window appears.
Select Printer Model
Select Reorder URL
.
list.
list.
.
About the Printer 27
Page 30

If you order by phone, call the number that appears in the Order by Phone
section.
28 About the Printer
Page 31

Setting Up Printer (Printer Setup)
29
Page 32

30
Page 33

Connecting Your Printer
1
Your Dell™ 1250c Color Printer interconnection cable must meet the
following requirements:
Connection type Connection specifications
USB USB 2.0 compatible
5
1 USB Port
Connecting Printer to Computer
A local printer is a printer attached to your computer using the USB cable.
USB Cable
The following operating systems support USB connection:
•Microsoft® Windows® XP
• Microsoft Windows XP 64-bit Edition
Connecting Your Printer 31
Page 34

•Windows Server® 2003
• Windows Server 2003 x64 Edition
• Windows Server 2008
• Windows Server 2008 64-bit Edition
• Windows Server 2008 R2
•Windows Vista
®
• Windows Vista 64-bit Edition
•Windows 7
• Windows 7 64-bit Edition
•Mac OS
®
X 10.3.9/10.4.11/10.5/10.6
To attach the printer to a computer:
1
Ensure that the printer, computer, and any other attached devices are
turned off and unplugged from the power source/outlet.
2
Connect the smaller USB connector into the USB port at the back of the
printer.
3
Connect the other end of the cable into a USB port of the computer.
NOTE: Do not connect the printer USB cable to the USB port available on the
keyboard.
Turning On the Printer
CAUTION: Do not use extension cords or power strips.
32 Connecting Your Printer
Page 35

CAUTION: The printer should not be connected to a UPS system.
1
Connect the power cable to the wall jack connector on the back of your
printer (see "Rear View" on page24).
2
Connect the other end of the cable to the power source.
3
Turn on the printer.
Connecting Your Printer 33
Page 36

34 Connecting Your Printer
Page 37

Loading Paper
NOTE: Use only laser print media. Do not use ink jet paper in your printer.
NOTE: For printing envelopes, see "Loading Print Media" on page 59.
1
Open the front cover by pulling out the instruction sheet.
2
Pull the paper cover out.
6
3
Remove the instruction sheet attached to the paper cover with adhesive
tape.
Loading Paper 35
Page 38

4
Pull the length guide forward until it stops.
5
Pull the MPF extension forward until it stops.
6
Adjust the paper width guides to their maximum width.
36 Loading Paper
Page 39

7
Before loading the print media, flex the sheets back and forth, and then
fan them. Straighten the edges of the stack on a level surface.
8
Load print media on the MPF with the top edge first and with the
recommended print side facing up.
9
Adjust the width guides until they rest lightly against the edges of the
stack of print media.
Loading Paper 37
Page 40

10
Slide the length guide towards the printer until it touches the print media.
NOTE: Depending on the size of print media, first slide the length guide
backward until it stops, and then slide the MPF extension until it touches print
media.
38 Loading Paper
Page 41

11
Insert the paper cover into the printer and then align the paper cover to
the marking on the paper tray.
12
Select the paper type from the printer driver if the loaded print media is
not standard plain paper. If a user-specified print media is loaded in the
MPF, you must specify the paper size setting by using the printer driver.
Loading Paper 39
Page 42

40 Loading Paper
Page 43

Installing Printer Drivers on Computers Running Windows
Inserting the Drivers and Utility CD
1
Insert the
Navigator.
Drivers and Utilities
CD into your computer to start Easy Setup
7
NOTE: If the CD does not automatically launch, click
(for Windows Vista and Windows 7)
Run
Windows 7)
is the drive letter of your CD), and then click OK.
, and then type D:\setup_assist.exe (where D
Accessories
Start All Programs
(for Windows Vista and
Installing Printer Driver
For installing host-based printer driver
1
Click
Software Installation
Connect printer to your computer
2
When the installation is completed, click
For installing XML Paper Specification (XPS) printer driver
NOTE: Download and install the XPS printer driver at support.dell.com/support
NOTE: XPS driver is supported on the following operating systems: Windows 7,
Windows 7 64-bit Edition, Windows Vista, Windows Vista 64-bit Edition, Windows
Server 2008 R2, Windows Server 2008, and Windows Server 2008 64-bit Edition.
Windows Vista or Windows Vista 64-bit Edition
1
Extract the zip file you downloaded to your desired location.
2
Click
3
4
Start
Click
Add a printer
Click
Add a local printer
Control Panel
.
.
screen appears.
Hardware and Sound
.
Finish
to exit this tool.
Printers
.
Installing Printer Drivers on Computers Running Windows
Page 44

5
Select the port connected to this product, and then click
6
Click
Have Disk
7
Click
Browse
8
Click OK.
9
Select your printer name and click
10
To change the printer name, enter the printer name in the
to display the
Install From Disk
dialog box.
, and then select the extracted folder in step 1.
Next
.
box. To use this printer as the default printer, select the check box
displayed under the
Printer name
. Click
Next
.
Installation starts.
If the
User Account Control
NOTE: If you are an administrator on the computer, click Continue; otherwise,
contact your administrator to continue the desired action.
11
As the driver installation is completed, click
dialog box appears, click
Print a test page
page.
12
Click
Finish
.
Windows Server 2008 or Windows Server 2008 64-bit Edition
NOTE: You must log in as an administrator.
1
Extract the zip file you downloaded to your desired location.
2
Click
Start
3
Click
Add a printer
4
Click
Add a local printer
5
Select the port connected to this product, and then click
6
Click
Have Disk
7
Click
Browse
8
Click OK.
9
Select your printer name and click
10
To change the printer name, enter the printer name in the
Control Panel
Hardware and Sound
.
.
to display the
Install From Disk
dialog box.
, and then select the extracted folder in step 1.
Next
.
box.
To use this printer as the default printer, select the
check box. Click
printer
Next
.
Set as the default
Next
Printer name
Continue
to print a test
Printers
Next
Printer name
.
.
.
.
42 Installing Printer Drivers on Computers Running Windows
Page 45

Installation starts.
11
If you do not share your printer, select
share your printer, select
can find and use it
12
As the driver installation is completed, click
Share this printer so that others on your network
. Click
Next
Do not share this printer
.
Print a test page
page.
13
Click
Finish
.
Windows 7, Windows 7 64-bit Edition, or Windows Server 2008 R2
1
Extract the zip file you downloaded to your desired location.
2
Click
Start
3
Click
Add a printer
4
When you use Windows Server 2008 R2, click Add a local or network
Devices and Printers
.
.
printer as an administrator.
If the
User Account Control
NOTE: If you are an administrator on the computer, click Ye s; otherwise,
contact your administrator to continue the desired action.
5
Click
Add a local printer
6
Select the port connected to this product, and then click
7
Click
Have Disk
8
Click
Browse
9
Click OK.
10
Select your printer name and click
11
To change the printer name, enter the
box, and then click
to display the
, and then select the extracted folder in step 1.
Next
dialog box appears, click
.
Install From Disk
Next
.
printer name
.
Yes
Next
dialog box.
in the Printer name
Installation starts.
. If you
to print a test
.
.
12
If you do not share your printer, select
share your printer, select
can find and use it
13
As the driver installation is completed, click
Share this printer so that others on your network
. Click
Next
Do not share this printer
.
Print a test page
page. To use this printer as the default printer, select the
check box.
printer
Installing Printer Drivers on Computers Running Windows 43
. If you
to print a test
Set as the default
Page 46

14
Click
Finish
.
44 Installing Printer Drivers on Computers Running Windows
Page 47

Installing Printer Drivers on Computers Running Macintosh
Download and install the printer drivers and software for Macintosh
operating system at support.dell.com/support
Installing the Drivers and Software
1
After downloading the drivers and software, double-click the
Installer
2
Click
3
Select a language for the Software License Agreement.
4
After reading the Software License Agreement, click
5
If you agree to the terms of the Software License Agreement, click
continue the installation process.
6
Confirm the installation location, and then click
7
Click
If you choose the custom installation, click
that you want to install, and then click
icon, and then click
Continue
Install
on the
to perform the standard installation.
Continue
Introduction
.
screen.
Install
Continue
Continue
Customize
.
Dell 1250c
.
.
, select the items
8
Agree
to
• Printer Driver
• Status Monitor Widget
8
Type the administrator's name and password, and then click OK.
9
Click
Install
to proceed with the installation.
10
Click
Close
to complete installation.
Adding a Printer on Mac OS X 10.5 or Later Version(s)
1
Turn on the printer.
2
Connect the USB cable between the printer and Macintosh computer.
3
Open the
System Preferences
Installing Printer Drivers on Computers Running Macintosh
, and click
Print & Fax
.
Page 48

4
Click the Plus (+) sign, and click
5
Select the printer connected via USB from the
6
Name
and
7
Click
Add
.
Print Using
are automatically entered.
Default
.
Printer Name
list.
Adding a Printer on Mac OS X 10.4.11
1
Turn on the printer.
2
Connect the USB cable between the printer and Macintosh computer.
3
Start
Printer Setup Utility
NOTE: You can find Printer Setup Utility in the Utilities folder in Applications.
4
Click
Add
.
5
Click
Default Browser
6
Select the printer connected via USB from the Printer list.
7
Name
and
Print Using
8
Click
Add
.
.
in the
Printer Browser
are automatically entered.
dialog box.
Adding a Printer on Mac OS X 10.3.9
1
Turn on the printer.
2
Connect the USB cable between the printer and the Macintosh computer.
3
Start
Printer Setup Utility
.
NOTE: You can find Printer Setup Utility in the Utilities folder in Applications.
4
Click
Add
.
5
Select
USB
from the menu.
6
The
Printer Model
7
Click
Add
.
46 Installing Printer Drivers on Computers Running Macintosh
is automatically selected.
Page 49

Using Your Printer
47
Page 50

48
Page 51

9
Print Media Guidelines
Print media can be paper, labels, envelopes, and coated paper among others.
Your printer provides high-quality printing on a variety of print media.
Selecting the appropriate print media for your printer helps avoid printing
troubles. This section describes selecting print media, caring for print media,
and loading the print media in Multipurpose Feeder (MPF).
Paper
For the best print quality in color, use 75 g/m2 (20 lb) xerographic, grain long
paper. For the best print quality in black and white, use 90 g/m
xerographic, grain long paper. Before buying large quantities of any print
media, it is recommended that you try a sample first.
When loading paper, identify the recommended print side on the paper
package, and load the paper accordingly. See "Loading Paper" on page35 for
detailed loading instructions.
Paper Characteristics
The following paper characteristics affect print quality and reliability. It is
recommended that you follow these guidelines when evaluating new paper
stock.
Weight
The MPF automatically feeds paper whose weights range from 60 to 163 g/m2
(16 to 44 lb bond) grain long. Paper lighter than 60 g/m
properly, and could cause paper jams. For best performance, use 75 g/m
lb bond) grain long paper.
Curl
Curl is the tendency of print media to curve at its edges. Excessive curl can
cause paper feeding problems. Curl usually occurs after the paper passes
through the printer, where it is exposed to high temperatures. Storing paper
2
2
(24 lb)
(16 lb) may not feed
2
(20
Print Media Guidelines 49
Page 52

unwrapped, even in the paper feeder, can contribute to paper curling prior to
printing and cause feeding problems regardless of humidity. When printing
on curled paper, straighten the paper and then insert it into the MPF.
Smoothness
The degree of paper smoothness directly affects print quality. If the paper is
too rough, the toner does not fuse to the paper properly, resulting in poor
print quality. If the paper is too smooth, it can cause paper feeding problems.
Smoothness between 150 and 250 Sheffield points produces the best print
quality.
Moisture Content
The amount of moisture in the paper affects both print quality and the ability
of the printer to feed the paper properly. Leave the paper in its original
packaging until you are ready to use it. This limits the exposure of the paper
to moisture changes that can degrade its performance.
Grain Direction
Grain refers to the alignment of the paper fibers in a sheet of paper. Grain is
either grain long, running the length of the paper, or grain short, running the
width of the paper. For 60 to 135 g/m
fibers are recommended. For paper heavier than 135 g/m
2
(16 to 36 lb bond) paper, grain long
2
(36 lb bond), grain
short is preferred.
Fiber Content
Most high-quality xerographic paper is made from 100% chemically pulped
wood. Paper containing fibers such as cotton possess characteristics that can
result in degraded paper handling.
Recommended Paper
To ensure the best print quality and feed reliability, use dry 75 g/m2 (20 lb)
xerographic paper. Business paper designed for general business use also
provide acceptable print quality. Only use paper able to withstand high
temperatures without discoloring, bleeding, or releasing hazardous emissions.
The laser printing process heats paper to high temperatures. Check with the
manufacturer or vendor to determine whether the paper you have chosen is
acceptable for laser printers.
50 Print Media Guidelines
Page 53

NOTE: Always print several samples before buying large quantities of any type of
print media. When choosing any print media, you should consider the weight, fiber
content, and color.
Unacceptable Paper
The following paper types are not recommended for use with the printer:
• Chemically treated paper used to make copies without carbon paper, also
known as carbonless paper, carbonless copy paper (CCP), or no carbon
required (NCR) paper
• Preprinted paper with chemicals that may contaminate the printer
• Preprinted paper that can be affected by the temperature in the fuser
• Preprinted paper that require a registration (the precise print location on
the page) greater than ±0.09 inches, such as optical character recognition
(OCR) forms
In some cases, you can adjust registration with your software program to
successfully print on these forms.
• Coated paper (erasable bond), synthetic paper, thermal paper
• Rough-edged, rough or heavily textured surface paper, or curled paper
• Recycled paper containing more than 25% post-consumer waste that do
not meet DIN 19 309
• Multiple-part forms or documents
• Print quality may deteriorate (blank spaces or blotches may appear in the
text) when printing on talc or acid paper.
• Moist paper that may cause wrinkle
Selecting Paper
Proper paper selection helps prevent jams and ensures trouble-free printing.
To help avoid jams or poor print quality:
• Always use new, dry, and undamaged paper.
• Before loading the paper, identify the recommended print side of the
paper. This information is usually indicated on the paper package.
• Do not use paper that you have cut or trimmed yourself.
Print Media Guidelines 51
Page 54

• Do not mix print media sizes, weights, or types in the same source. This
may result in a paper jam.
• Ensure that the paper is properly loaded in the MPF.
• Flex paper back and forth, and then fan them. Straighten the edges of the
stack on a level surface.
Selecting Preprinted Media and Letterhead
When selecting preprinted media and letterhead paper for the printer:
• Use grain long paper for best results.
• Use only forms and letterhead printed using an offset lithographic or
engraved printing process.
• Select paper that absorb ink, but do not bleed.
• Avoid paper with rough or heavily textured surfaces.
• Use paper printed with heat-resistant inks designed for use in xerographic
copiers. The ink must withstand temperatures of 225°C (437°F) without
melting or releasing hazardous emissions.
• Use inks that are not affected by the resin in toner or the silicone in the
fuser. Inks that are oxidation-set or oil-based should meet these
requirements; latex inks might not. If you are in doubt, contact your paper
supplier.
Printing on Letterhead
Check with the manufacturer or vendor to determine whether the pre-printed
letterhead you have selected is acceptable for laser printers.
52 Print Media Guidelines
Page 55

Loading Letterhead
Load the letterhead in the printer with the print side facing up. Ensure that
the title on the letter head enters the printer first.
Selecting Pre-Punched Paper
Pre-punched paper brands can differ in the number and placement of holes
and in manufacturing techniques. However, it may not be possible to print on
the paper to depending on the placement of holes on the paper.
To select and use pre-punched paper:
• Test paper from several manufacturers before ordering and using large
quantities of pre-punched paper.
• Paper should be punched at the paper manufacturer and not drilled into
paper already packaged in a ream. Drilled paper can cause jams when
multiple sheets feed through the printer. This may result in a paper jam.
• Pre-punched paper can include more paper dust than standard paper. Your
printer may require more frequent cleaning and feed reliability may not be
as good as standard paper.
• Weight guidelines for pre-punched paper are the same as non-punched
paper.
Print Media Guidelines 53
Page 56

Envelopes
Depending on the choice of envelopes, it is possible to expect variable levels
of light wrinkling. Before buying large quantities of any print media, it is
recommended that you try a sample first. See "Loading Print Media" on
page59 for instructions on loading an envelope.
When printing on envelopes:
• Use only high-quality envelopes that are designed for use in laser printers.
• Set the print media source to MPF. Set the paper type to
select the correct size of envelope from the printer driver.
• For best performance, use envelopes made from 75 g/m
paper. You can use up to 105 g/m
feeder as long as the cotton content is 25% or less. Envelopes with 100%
cotton content must not exceed 90 g/m
• Use only freshly unpackaged, undamaged envelopes.
• Use envelopes that can withstand temperatures of 205°C (401°F) without
sealing, excessive curling, wrinkling, or releasing hazardous emissions. If
you have any doubts about the envelopes you are considering, check with
the envelope supplier.
• Adjust the guide to fit the width of the envelopes.
• To load envelope in MPF, the print side must be facing up.
• See "Loading Envelopes" on page64 for instructions on loading an
envelope.
• Use one envelope size during a print job.
• Ensure that the humidity is low because high humidity (more than 60%)
and the high printing temperatures may seal the envelopes.
• For best performance, do not use envelopes that:
– Have excessive curl or twist
– Are stuck together or damaged in any way
– Contain windows, holes, perforations, cutouts, embossing
– Use metal clasps, string ties, or metal folding bars
– Have an interlocking design
– Have postage stamps attached
2
(28 lb bond) weight for the envelope
2
(24 lb bond) weight.
Envelope
2
(20 lb bond)
, and
54 Print Media Guidelines
Page 57

– Have nicked edges or bent corners
– Have rough, cockle, or laid finishes
Labels
Your printer can print on many labels designed only for use with laser printers.
When selecting labels:
• Label adhesives, face sheet (printable stock), and topcoats must be able to
withstand temperatures of 205 °C (401 °F) and pressure of 25 pounds per
square inch (psi).
• Use labels that can be without sealing, excessive curling, wrinkling, or
releasing hazardous emissions.
• Do not use label sheets with a slick backing material.
NOTICE: Before buying large quantities of any print media, it is recommended that
you try a sample first.
When printing on labels:
• Use labels that can withstand temperatures of 205 °C (401 °F) without
sealing, excessive curling, wrinkling, or releasing hazardous emissions.
• Set the paper type to
• Do not load labels together with paper in the same tray.
• Do not print within 1 mm (0.04 inches) of the die-cut.
• Do not print within 1 mm (0.04 inches) of the edge of the label, of the
perforations, or between die-cuts of the label.
• Do not print a label through the printer more than once.
• Portrait orientation is preferred, especially when printing bar codes.
• Do not use labels that have exposed adhesive.
• Use full label sheets. Partial sheets may cause labels to peel off during
printing, resulting in a jam.
• Do not use label sheets that have adhesive to the edge of the sheet. It is
recommended that zone coating of the adhesive is done at least 1 mm
(0.04 inches) away from edges. Adhesive material contaminates your
printer and could void your warranty.
Label
from the printer driver.
Print Media Guidelines 55
Page 58

CAUTION: Otherwise the printer occur in a jam and contaminate your printer and
your cartridges with adhesive. As a result, could void your printer and cartridge
warranties.
Storing Print Media
For proper print media storage, the following guidelines help avoid media
feeding problems and uneven print quality.
• For best results, store print media in an environment where the
temperature is approximately 21°C (70°F) and the relative humidity is
40%.
• Store cartons of print media on a pallet or shelf, rather than directly on the
floor.
• If you store individual packages of print media out of the original carton,
ensure that they rest on a flat surface so that the edges do not buckle or
curl.
• Do not place anything on top of the print media packages.
Identifying Print Media and Specifications
This section provides information on supported paper sizes, types, and
specification.
Supported Paper Sizes
A4 (210x297 mm)
B5 (182x257 mm)
A5 (148x210 mm)
C5 (162x229 mm)
Monarch (3.875x7.5 in)
Monarch LEF (7.5x3.875 in)*
Envelope #10 (4.125x9.5 in)
DL (110x220 mm)
56 Print Media Guidelines
1
Multipurpose Feeder (MPF)
Y
Y
Y
Y
Y
Y
Y
Y
Page 59

Multipurpose Feeder (MPF)
DL LEF (220x110 mm)*
1
Letter (8.5x11 in)
Legal (8.5x14 in)
Folio (8.5x13 in)
Executive (7.25 x 10.5 in)
Custom*2*
3
1
*
You can place the originals in a long-edge feed direction or in a short-edge
feed direction. The following illustration shows SEF and LEF. The arrow mark
in the illustration shows the orientation of the paper loading.
NOTE: Not available when the XPS Printer Driver is used.
*2Custom width: 76.2 mm (3.00 inches) to 215.9 mm (8.50 inches)
The maximum width for envelope (DL LEF): 220 mm (8.66 inches)
Custom length: 127 mm (5.00 inches) to 355.6 mm (14.00 inches)
The maximum length for envelope (Monarch LEF): 98.4 mm
3
Only the administrator user can set the custom size from the printer driver.
*
LEFSEF
Y
Y
Y
Y
Y
Y
Supported Paper Types
Media Multipurpose Feeder (MPF)
Plain
Plain Side 2
Plain Thick
Plain Thick Side 2
Y*
Y
Y
Y
Print Media Guidelines 57
Page 60

Media Multipurpose Feeder (MPF)
Recycled
Recycled Side 2
Label
Covers
Covers Side 2
Envelope
Coated
Coated Side 2
* Values marked by an asterisk (*) are the factory default menu settings.
Y
Y
Y
Y
Y
Y
Y
Y
Paper Type Specifications
Paper type Weight (gsm) Remarks
Plain Paper 60–90 -
Plain Thick Paper 91–105 -
Covers 106–163 -
Coated 106–163 Inkjet printer paper cannot
be used.
Label - Inkjet printer paper cannot
be used.
Envelopes - -
Recycled 60–105 -
58 Print Media Guidelines
Page 61

10
Loading Print Media
Loading print media properly helps prevent jams and ensures trouble-free
printing.
Before loading print media, identify the recommended print side of the print
media. This information is usually on the print media package.
Capacity
Multipurpose Feeder (MPF) can hold:
• 150 sheets of standard paper
• 16.2 mm (0.64 inches) of thick paper
• One sheet of coated paper
• 16.2 mm (0.64 inches) of post cards
• Five envelopes
• 16.2 mm (0.64 inches) of labels
Print Media Dimensions
The MPF accepts print media within the following dimensions:
• Width — 76.2 mm (3.00 inches) to 215.9 mm (8.50 inches)
• Length — 127 mm (5.00 inches) to 355.6 mm (14.00 inches)
Loading Print Media
NOTE: Use only laser print media. Do not use ink jet paper in this printer.
1
Open the front cover.
Loading Print Media 59
Page 62

2
Pull the paper cover out.
3
Pull the length guide forward until it stops.
4
Pull the MPF extension forward until it stops.
60 Loading Print Media
Page 63

5
Adjust the paper width guides to their maximum width.
6
Before loading the print media, flex the sheets back and forth, and then
fan them. Straighten the edges of the stack on a level surface.
7
Load print media on the MPF with the top edge first and with the
recommended print side facing up.
Loading Print Media 61
Page 64

8
Adjust the width guides until they rest lightly against the edges of the
stack of print media.
9
Slide the length guide towards the printer until it touches the print media.
NOTE: Depending on the size of print media, first slide the length guide
backward until it stops, and then slide the MPF extension until it touches print
media.
62 Loading Print Media
Page 65

10
Insert the paper cover into the printer and then align the paper cover to
the marking on the paper tray.
Loading Print Media 63
Page 66

Loading Envelopes
NOTE: When you print on envelopes, be sure to specify the envelope setting on the
printer driver. If not specified, the print image will be rotated 180 degrees.
When Loading Envelope#10, DL, or Monarch
Load envelopes with the side to be printed on facing up, the flap side facing
down, and the flap turned to the right.
To prevent DL and Monarch from being wrinkled, they are recommended to
be loaded with the print-side facing up, flap opened, and facing you.
When Loading C5
Load envelopes with the side to be printed on facing up, with the flap open.
64 Loading Print Media
Page 67

NOTICE: Never use envelopes with windows, or coated linings. These lead to
paper jams and can cause damage to the printer.
NOTE: If you do not load envelopes in the MPF right after they have been removed
from the packaging, they may bulge. To avoid jams, flatten them as shown below
when loading them in the MPF.
NOTE: If envelopes are still not fed correctly, add some bending to the flap of the
envelopes as shown in the following illustration.
The amount of the bending shall be 5mm (0.20 inches) or less.
Loading Print Media 65
Page 68

NOTE: To confirm the correct orientation of each print media such as envelopes,
see the instruction on the Envelope/Paper Setup Navigator on the printer driver.
Loading Letterhead
The letterhead must be toward the top edge of MPF with the print side facing
up. However, the letterhead must be inserted top edge first with the print side
facing down when loading paper into the MPF.
66 Loading Print Media
Page 69

Using the Output Tray Extension
The output tray extension is designed to prevent print media from falling
from the printer after the print job is complete.
Before printing a document, ensure that the output tray extension is fully
extended.
Loading Print Media 67
Page 70

68 Loading Print Media
Page 71

11
5
Operator Panel
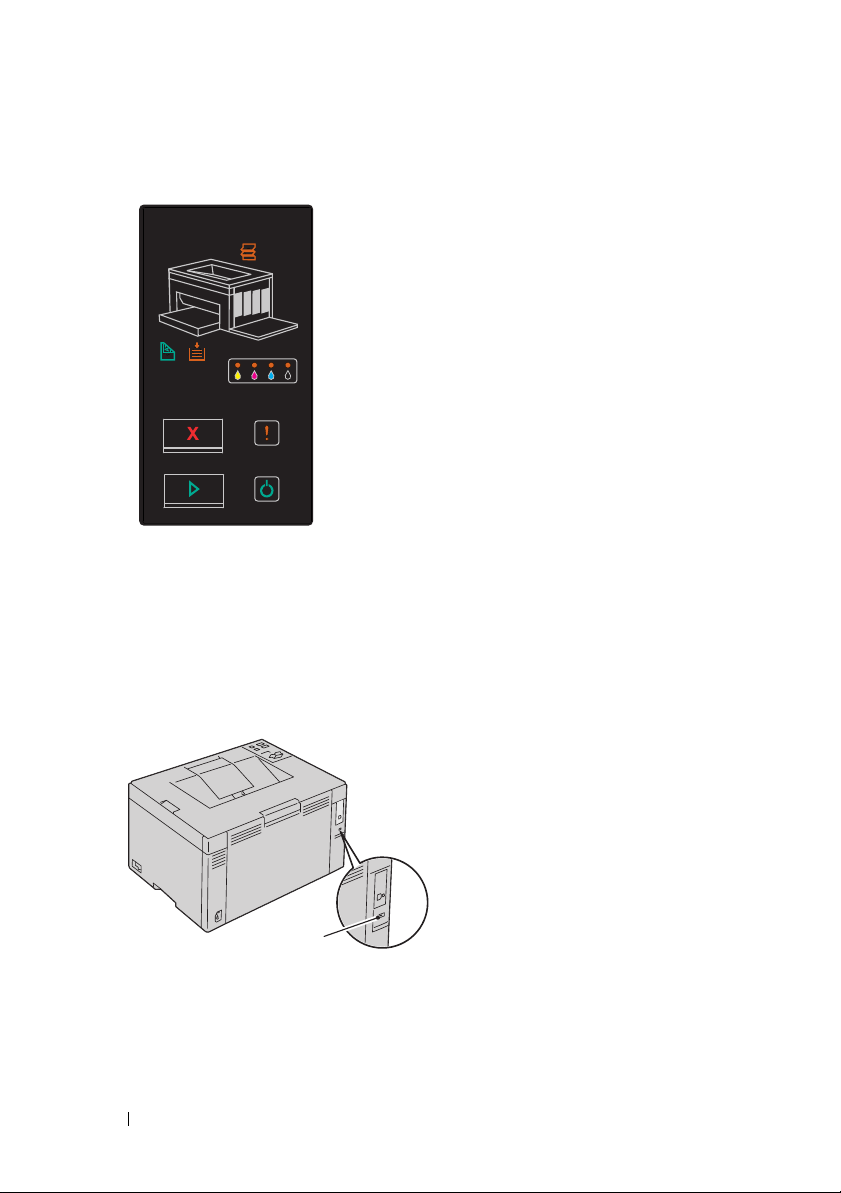
Using the Operator Panel Buttons
The operator panel has two buttons and several indicators that show the
status of the printer.
1
2
3
5
(Jam)
1
• Indicates that a paper jam occurred or the rear cover is open.
2
• Indicates that the toner is low or empty, or toner error occurred.
3 (Error)
• Indicates that an error occurred.
4
• Indicates the printer status, such as receiving and printing data.
5
• Press this button to start duplex printing after loading paper.
• Press and hold this button to print the Report pages.
indicator
(Toner)
indicator
(Ready/Data)
(Start)
button/indicator
indicator
indicator
4
Operator Panel 69
Page 72

6
(Cancel)
button
• Press this button to cancel a job or clear an error.
7
(Manual Duplex)
indicator
• Indicates that the printer is ready to print the second side (odd) pages
for duplex printing.
8
(Load Paper)
indicator
• Indicates that no paper is loaded or a paper jam occurred in the
multipurpose feeder.
The indicators provide information on the status of the printer and help you
locate each problem.
Indicator Status Condition
Jam Orange on A paper jam occurred.
Orange blinks The rear cover is open.
Toner Orange on The specified toner cartridge is empty or not
installed when Dell toner cartridges are used
Non-Dell Toner is set to Off).
(
Orange blinks The specified toner is low when Dell toner
cartridges are used (
Off).
to
All toner indicators blink when the printer is in
the non-Dell toner mode (
is set to On).
Error Orange on A fatal error occurred.
Orange blinks An error occurred.
Ready/Data Green on The printer is ready to print.
Green blinks The printer is processing or printing.
Orange on The printer is in the power saver mode.
Orange blinks The printer is canceling.
Start Green on To continue printing, press the (Start) button.
Non-Dell Toner is set
Non-Dell Toner
Cancel - To cancel the current job or clear the error, press
the (Cancel) button.
70 Operator Panel
Page 73

Indicator Status Condition
5
Manual Duplex Green blinks The printer is waiting for manual duplex printing.
Load Paper Orange on No paper is loaded or a paper jam occurred in the
multipurpose feeder.
Orange blinks The wrong size of paper is loaded.
Understanding the Operator Panel Lights
The operator panel lights mean different things, depending on their
sequence. Orange or green lights that are off, on, and/or blinking indicate
printer conditions such as printer status, intervention (for example, out of
paper), or service.
Off On Fast Blink Slow Blink
-None
-
1
2
3
5
4
Common Light Sequences
The following table shows the most common light status.
Operator Panel 71
Page 74

1 2 3 4 5 7 8 Printer Status
Jam Toner Error Ready
--- - - -
/Data
Start Manual
Duplex
Load
Paper
Ready
--- - - -
--- - - -
--- - - -
--- - - -
--- - - -
--- - - -
--- - - -
--- - - -
--- - - -
--- -
*1
Load paper for the second side (odd) pages, and press the (Start) button . See
"Manual Duplex Printing (Windows Printer Driver Only)" on page 81.
Processing
Printing
Canceling
Calibrating
Warm i n g up
Waiting for incoming data
Initializing NVM
On Diagnosis when starting
In power saver mode
Waiting for manual duplex
printing.
*1
Warnings
The following table shows the warning conditions. You can continue printing
even though the warning appears.
72 Operator Panel
Page 75

1 2 3 4 5 7 8 Printer Status
Jam Toner Error Ready/
YMC K
- --- -
-- -- -
--- --
---- -
--
Start Manual
Data
*1
*1
*1
*1
*1
Duplex
- - - The yellow toner is low.
-- -The magenta toner is low.
- - - The cyan toner is low.
-- -The black toner is low.
- - - The printer is in the non-Dell
Load
Paper
toner mode.
*1
- --- -
-- -- -
--- --
*1
The Ready/Data indicator blinks or lights up green depending on the printer status.
*2
This warning appears only when Dell toner cartridges are used (Non-Dell
- - - The yellow toner is empty.
*1
- - - The magenta toner is empty.
*1
- - - The cyan toner is empty.
Toner is set to Off).
*3
In this case, you can continue printing in black and white.
*2
*2
*2
*2
*3
*3
*3
Operator Call Errors
The following table shows the location where an error occurred. Operator call
errors require some kind of intervention to resolve the problem.
Operator Panel 73
Page 76

1 2 3 4 5 7 8 Cause/Remedy
Jam Toner Error Ready/
YMC K
Data
Start Manual
Duplex
Load
Paper
- - - - - - - No paper is loaded.
Load paper and press the
(Start) button.
See "Loading Paper" on
page 35.
- - - - - - - - Paper jam occurred.
See "Clearing Jams" on
page 131.
---- - - - -The rear cover is open.
Close the rear cover.
----- - - The wrong size of paper is
loaded.
See "Loading Paper" on
page 35.
- - - - - - - - - An error occurred.
Press and hold the (Start)
button to display the
secondary error light
sequences.
- - - - - - - - The specified toner cartridge
is low, not installed or not
-- -- - - - -
--- - - - - -
supported.
See "Replacing Toner
Cartridges" on page 118.
---- - - - -
- - - - - - - - The density of the specified
toner is not enough. Re-install
-- -- - - - -
or replace the specified toner
cartridge.
--- - - - - -
---- - - - -
See "Replacing Toner
Cartridges" on page 118.
74 Operator Panel
Page 77

Secondary light sequences
When the Error indicator blinks, a secondary error has occurred. Press and
hold the (Start) button to display the secondary error light sequences.
1 2 3 4 5 7 8 Cause/Remedy
Jam Toner Error Ready/
YMC K
---- - - Memory overflow
- - - - - - PDL (Page Description
- - - - - - Invalid job environment
Data
Start Manual
Duplex
Load
Paper
Press the (Cancel) button
to clear the message and
cancel the current print job.
See "Canceling a Print Job" on
page 80.
Language) error
the
Press
to clear the message and
cancel the current print job.
See "Canceling a Print Job" on
page 80.
The configuration of the
printer set on the printer driver
does not match the
configuration of your printer.
Press the (Cancel) button
to cancel the current print job.
See "Canceling a Print Job" on
page 80.
(Cancel) button
Operator Panel 75
Page 78

Fatal Errors
Contact Dell if this error occurs repeatedly. See "Contacting Dell" on
page 164.
1 2 3 4 5 7 8 Cause/Remedy
Jam Toner Error Ready/
Data
- - - - - - A fatal error occurred.
Start Manual
Duplex
Load
Paper
Turn off the printer, and then
on.
Firmware Errors
Contact Dell if this error occurs repeatedly. See "Contacting Dell" on
page 164.
1 2 3 4 5 7 8 Cause/Remedy
Jam Toner Error Ready/
YMC K
- - - - - - A firmware error occurred.
- - - - - A ROM erasing error occurred.
- - - - A ROM writing error occurred.
Data
Start Manual
Duplex
Load
Paper
Press the (Cancel) button
to clear the error.
See "Canceling a Print Job
page 80.
Turn off the printer, and then
on.
Turn off the printer, and then
on.
" on
76 Operator Panel
Page 79

1 2 3 4 5 7 8 Cause/Remedy
Jam Toner Error Ready/
YMC K
- - - An error occurred while
Data
Start Manual
Duplex
Load
Paper
downloading the firmware.
Turn off the printer, and then
on.
Printing a Device Settings Page
Press and hold the (Start) button when the Ready/Data indicator lights
(ready status) until the Ready/Data indicator blinks.
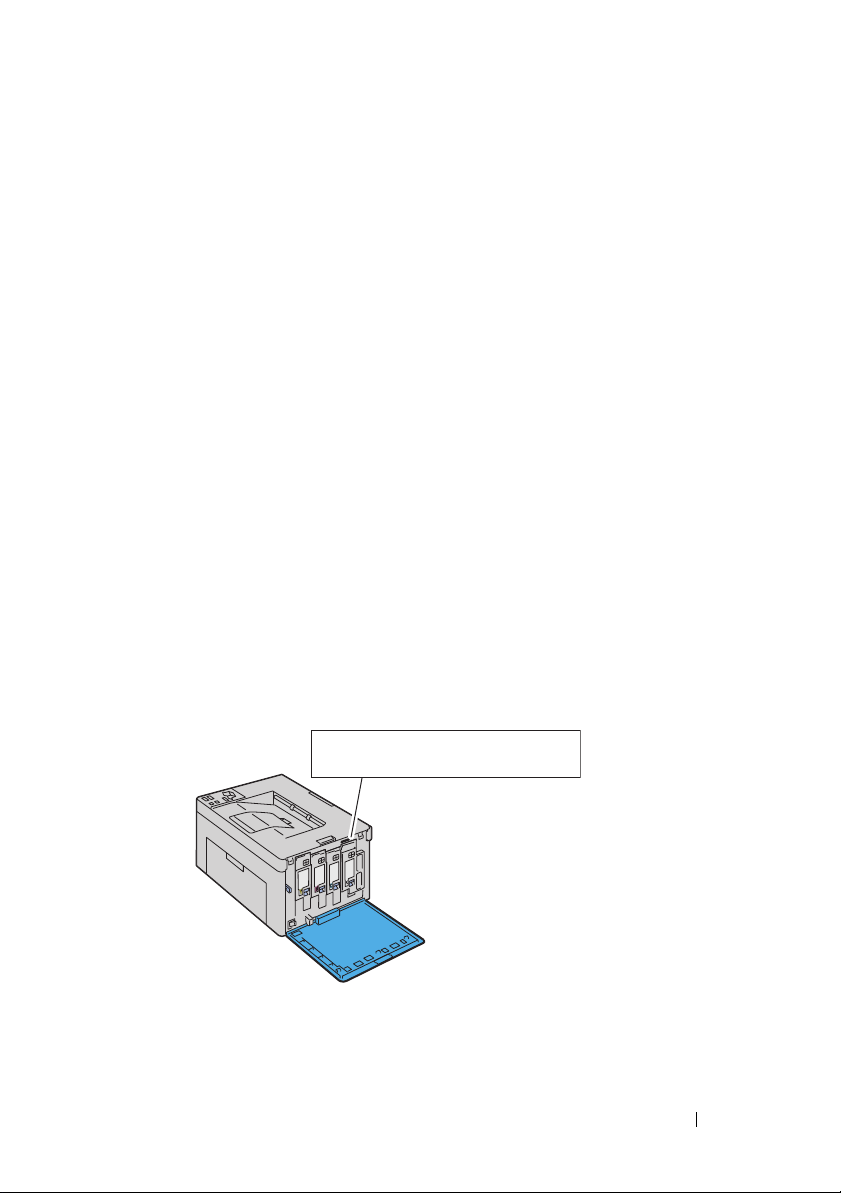
Resetting Defaults
After executing this function and rebooting the printer, all the menu
parameters are reset to their default values.
1
Turn off the printer.
2
Open the rear cover.
3
While holding down the
same time, turn on the printer.
4
After the Orange LED on the Ready/Data indicators go out, release the
and
(Start)
5
Close the rear cover.
(Cancel)
• Initializes the non-volatile memory (NVM).
(Start)
buttons.
and the
(Cancel)
buttons at the
CAUTION: Never attempt to turn off the printer. The printer will cease to
function.
The printer restarts automatically to apply the settings and prints the
printer settings and device settings pages.
6
Check if the factory settings are restored by referring to the Printer
Settings and Device Settings pages.
Operator Panel 77
Page 80

78 Operator Panel
Page 81

12
Printing
This chapter covers tips for printing, how to print certain lists of information
from your printer, and how to cancel a job.
Tips for Successful Printing
Tips on Storing Print Media
Store your print media properly. For more information, see "Storing Print
Media" on page117.
Avoiding Paper Jams
NOTE: It is recommended that you try a limited sample of any print media you are
considering using with the printer before purchasing large quantities.
By selecting appropriate print media and loading it properly, you can avoid
paper jams. See the following instructions on loading print media:
• "Loading Print Media" on page59
• "Avoiding Jams" on page131
If you experience a jam, see
"Jam
" on page157 for instructions.
Sending a Job to Print
To support all of the printer features, use the printer driver. When you choose
Print from a software program, a window representing the printer driver
opens. Select the appropriate settings for the specific job you are sending to
print. Print settings selected from the driver have precedence over the default
menu settings selected from Tool Box.
You may need to click Preferences from the initial Print box to see all of the
available system settings you can change. If you are not familiar with a feature
in the printer driver window, open the online Help for more information.
®
To print a job from a typical Windows
1
Open the file you want to print.
application:
Printing 79
Page 82

2
From the
3
Verify that the correct printer is selected in the dialog box. Modify the
system settings as needed (such as the pages you want to print or the
number of copies).
4
Click
screen, and then click
5
Click OK or
File
menu, select
Preferences
Print
Print
.
to adjust system settings not available from the first
OK
.
to send the job to the selected printer.
Canceling a Print Job
There are several methods for canceling a print job.
Canceling From the Operator Panel
To cancel a job after it has started printing:
1
Press the
NOTE: Printing is canceled only for the current job. All the following jobs will
continue to print.
Canceling a Job From the Computer Running Windows
Canceling a Job From the Taskbar
When you send a job to print, a small printer icon appears in the right corner
of the taskbar.
1
Double-click the printer icon.
A list of print jobs appears in the printer window.
(Cancel)
button.
2
Select the job you want to cancel.
3
Press
Delete
on the keyboard.
Canceling a Job From the Desktop
1
Minimize all programs to reveal the desktop.
Click
StartPrinters and Faxes
Click
Start
2008 R2).
80 Printing
Devices and Printers
(for Windows XP)
(for Windows 7 and Windows Server®
.
Page 83

Click
Start
Windows Vista
Click
Start
A list of available printers appears.
2
Double-click the printer you selected when you sent the job.
A list of print jobs appears in the printer window.
3
Select the job you want to cancel.
4
Press
Delete
Control Panel
®
).
Control Panel
on the keyboard.
Hardware and Sound
Printers
(for Windows Server 2008).
Printers
(for
Manual Duplex Printing (Windows Printer Driver Only)
NOTE: When printing on curled paper, straighten the paper and then insert it into
the feeder.
NOTE: The XPS printer driver does not support manual duplex printing.
When you start manual duplex printing, the instruction window appears.
Note that the window cannot be reopen once closed. Do not close the
window until duplex printing is complete.
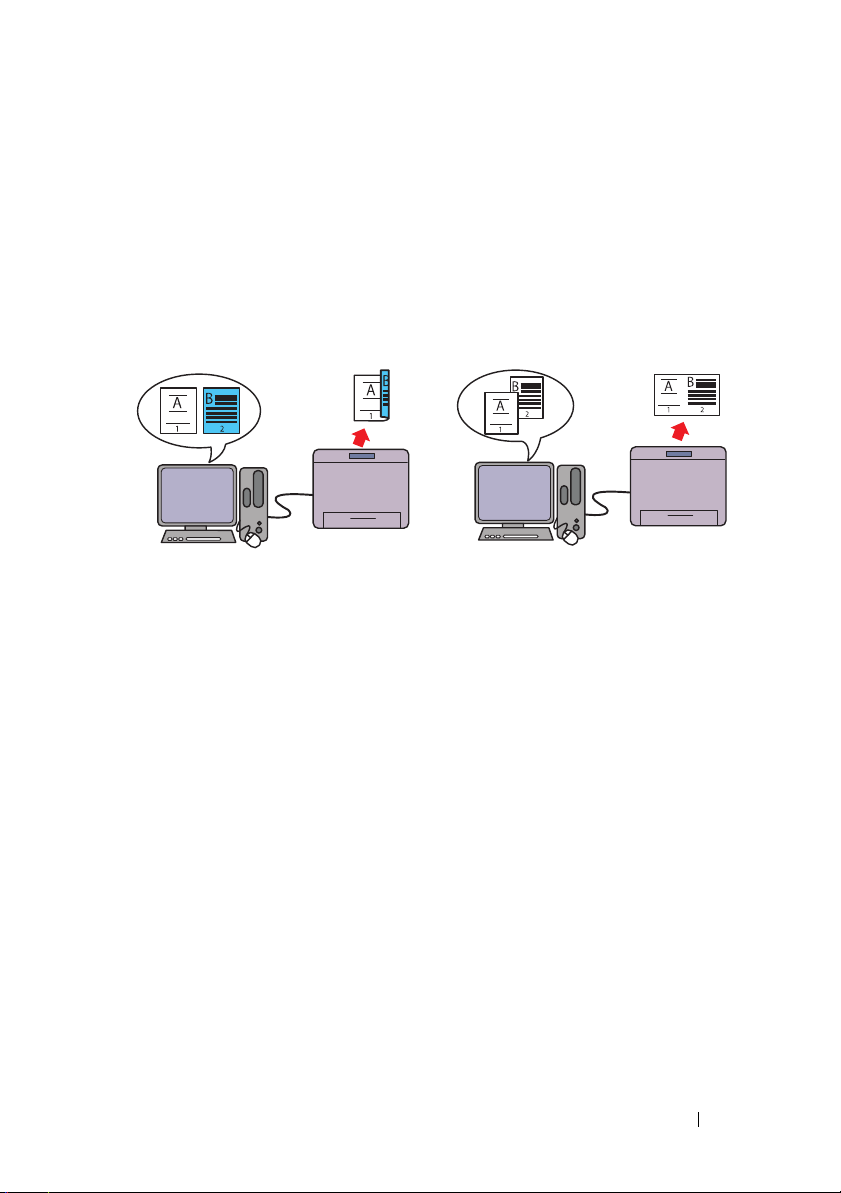
1
First print the even pages (rear sides).
For a six page document, rear sides are printed in the order of page 6, page
4, then page 2.
Printing 81
Page 84

2
After the printing of even pages is complete, remove the paper stack from
the output tray.
NOTE: Warped or curled prints can cause paper jams. Straighten them
before setting them.
3
Next stack the prints and set them as they are (with the blank side face up)
into the MPF. Pages are printed in the order of page 1, page 3, then page 5.
4
Press the
NOTE: Printing on both sides of the paper is not possible if the document
consists of various sizes of papers.
(Start)
button.
Printing a Report Page
To confirm your printer settings, print a report page.
This section describes two methods of printing a report page.
Printing a Printer Settings Page
To verify detailed printer settings, print a printer settings page.
See "Operator Panel" on page69 or "Understanding the Tool Box Menus" on
page87 to identify the display and operator panel buttons if you need help.
82 Printing
Page 85

The Operator Panel
1
Ensure that the green LED on the
not blinking, and then press and hold the
seconds.
The printer settings page is printed.
The Tool Box
NOTE:
1
Click
Start
Tool Box
NOTE: The Select Printer window appears in this step, when multiple printer
drivers are installed on your computer. In this case, click the name of Dell
1250c Color Printer listed in Printer Name, and then click OK.
The
Tool Box
2
Click the
3
Select
The
Reports
4
Click the
The printer settings page is printed.
All Programs
.
opens.
Printer Settings Report
Reports
from the list at the left side of the page.
page is displayed.
Printer Settings
button.
(Ready/Data)
Dell Printers
tab.
indicator is on and
(Start)
button for over three
Dell 1250c Color Printer
Printer Settings
You can select menu items and corresponding values from the Tool Box.
NOTE:
NOTE: Factory defaults may vary for different countries.
These settings are active until new ones are selected or the factory defaults are
restored.
To select a new value as a setting:
1
Click
Start
Tool Box
All Programs
.
Dell Printers
Dell 1250c Color Printer
Printing 83
Page 86

NOTE: The Select Printer window appears in this step, when multiple printer
drivers are installed on your computer. In this case, click the name of Dell
1250c Color Printer listed in Printer Name, and then click OK.
The
Tool Box
2
Click the
3
Select the desired menu item.
opens.
Printer Maintenance
tab.
Each menu item has a list of values for the menu item. A value can be:
• A phrase or word to describe a setting
• A numerical value that can be changed
• An On or Off setting
4
Select the desired value, and then click the associated button with each
menu item.
Driver settings may have precedence over changes previously made and may
require you to change the Tool Box defaults.
84 Printing
Page 87

Know Your Printer
85
Page 88

86
Page 89

13
Understanding the Tool Box Menus
The Tool Box allows you to view or specify the printer settings. You can also
diagnose the printer settings by using the Tool Box.
The Tool Box consists of the Printer Settings Report, Printer Maintenance,
and Diagnosis tabs.
NOTE: For how to start Tool Box, see "Understanding Your Printer Software" on
page 103.
Printer Settings Report
The Printer Settings Report tab contains the Printer Information, Menu
Settings, and Reports pages.
NOTE: Values marked by an asterisk (*) are the factory default menu settings.
Printer Information
Purpose:
To display the information of your printer.
Va l u e s:
Dell Service Tag Number Displays Dell's service tag number.
Express Service Code Displays the express service code of the printer.
Printer Serial Number Displays the serial number of the printer.
Printer Type Displays the type of the printer. Color Laser is
displayed normally.
Asset Tag Number Displays the asset tag number of the printer.
Memory Capacity Displays the memory capacity.
Processor Speed Displays the processing speed.
Firmware Version Displays the version of the controller.
MCU Firmware Version Displays the version of the Machine Control Unit
(MCU) firmware.
Understanding the Tool Box Menus 87
Page 90

Printing Speed (Color) Displays the speed for color printing.
Printing Speed
(Monochrome)
Displays the speed for monochrome printing.
Menu Settings
Purpose:
To display the current settings of your printer.
Va l ue s :
System Settings Power Saver Timer Sleep Displays the time taken by the
printer before it enters Sleep mode
after it finishes a job.
Power Saver Timer Deep
Sleep
Fault Time-Out Displays the time taken by the
Job Time-Out Displays the amount of time that
Auto Log Print Displays whether to automatically
Default Print Paper Size Displays the default paper size.
Low Toner Alert Message Displays whether to show the alert
Pape r Densit y Plain Displays the paper density of plain
Label Displays the paper density of
Adjust BTR Plain Displays the voltage setting of the
Displays the time taken by the
printer before it enters Deep Sleep
mode after it goes into Sleep
mode.
printer before it cancels jobs that
stop abnormally.
the printer waits for data to arrive
from the computer.
print a job history report after
every 10 jobs.
message when the toner is low.
paper.
labels.
transfer roller for plain paper.
88 Understanding the Tool Box Menus
Page 91

Plain Thick Displays the voltage setting of the
transfer roller for thick plain paper.
Recycled Displays the voltage setting of the
transfer roller for recycled paper.
Covers Displays the voltage setting of the
transfer roller for cover paper.
Coated Displays the voltage setting of the
transfer roller for coated paper.
Envelope Displays the voltage setting of the
transfer roller for envelopes.
Label Displays the voltage setting of the
transfer roller for labels.
Adjust Fuser Plain Displays the temperature setting
of the fuser for plain paper.
Plain Thick Displays the temperature setting
of the fuser for thick plain paper.
Recycled Displays the temperature setting
of the fuser for recycled paper.
Covers Displays the temperature setting
of the fuser for cover paper.
Coated Displays the temperature setting
of the fuser for coated paper.
Envelope Displays the temperature setting
of the fuser for envelopes.
Label Displays the temperature setting
of the fuser for labels.
Auto Registration
Adjustment
Adjust Altitude Displays the altitude of the location where the printer is installed.
Non-Dell Toner Displays whether to use toner cartridge of another manufacturer.
BTR Refresh
Mode
Displays whether to automatically adjust color registration.
Displays whether to execute counter measures for curling/
separating discharge of the paper.
Reports
Purpose:
Understanding the Tool Box Menus 89
Page 92

To print the settings and history information of your printer.
The reports are printed in the paper size specified in printer settings. The
default is A4 or Letter.
Va l ue s :
Printer Settings Click to print a detailed list of the printer settings.
Device Settings Click to print a detailed list of the device settings.
Job History Click to print the completed jobs history.
Error History Click to print the error history.
Color Test Page Click to print a color test page.
Printer Maintenance
The Printer Maintenance tab contains the System Settings, Paper Den sity,
Adjust BTR, Adjust Fuser, Color Registration Adjustment, Adjust Altitude,
Reset Defaults, Non-Dell Toner, and BTR Refresh Mode pages.
NOTE: Values marked by an asterisk (*) are the factory default menu settings.
System Settings
Purpose:
To configure the power saving mode, time-out time, job log auto print, mm/
inch setting, default paper size setting, and low toner alert message setting.
Va l ue s :
*1
Sleep
Deep Sleep 6 minutes
5 minutes
5–30 minutes
1–6 minutes
*
*
90 Understanding the Tool Box Menus
Specifies the time taken by the
printer before it enters Sleep
mode after it finishes a job.
Specifies the time taken by the
printer before it enters Deep
Sleep mode after it goes into
Sleep mode.
Page 93

Fault Time-Out 0: Off Disables the fault time-out.
60 seconds* Specifies the time taken by the
3–300 seconds
printer before it cancels jobs that
stop abnormally. The print job is
cancelled if it times out.
Job Time-Out 0: Off Disables the job time-out.
30 seconds
*
5–300 seconds
Specifies the amount of time that
the printer waits for data to arrive
from the computer. The print job
is cancelled if it times out.
Auto Log Print Off* Does not automatically print a job
history report.
On Automatically prints a job history
report after every 10 jobs.
Default Print Paper
*2
Size
Low Toner Alert
Message
A4 Specifies the default paper size.
Letter
On
*
Shows the alert message when the
toner is low.
Off Does not show the alert message.
Apply New
Settings
Restart printer to
apply new settings
*1 Enter 5 in Sleep to put the printer in the Sleep mode five minutes after it finishes a
job. This uses less energy, but requires more warm-up time for the printer. Enter 5 if
your printer shares an electrical circuit with room lighting and you notice lights
flickering.
Select a high value if your printer is in constant use. In most circumstances, this
keeps the printer ready to operate with minimum warm-up time. Select a value
between 5 and 30 minutes for the Sleep mode if you want a balance between energy
consumption and a shorter warm-up period.
The printer automatically returns to the standby mode from the Sleep mode when it
receives data from the computer. You can also return the printer to the standby mode
by pressing any button on the operator panel.
2
The default for mm/inch and Default Print Paper Size vary depending on country-
*
specific factory default.
After you complete the settings, press the Apply New Settings
button to apply the changes.
Press the Restart printer to apply new settings button to apply
the changes.
Understanding the Tool Box Menus 91
Page 94

Paper Density
Purpose:
To specify the paper density.
Va l ue s :
Plain Normal* Specifies the paper density of plain paper.
Light
Label Normal* Specifies the paper density of labels.
Light
Apply New Settings After you complete the settings, press the Apply New
Settings button to apply the changes.
Restart printer to apply new
settings
Press the Restart printer to apply new settings button
to apply the changes.
Adjust BTR
Purpose:
To specify the optimum voltage settings for printing for the transfer roller
(BTR). To lower the voltage, set negative values. To increase, set positive
values.
The default settings may not give the best output on all paper types. If you
see mottles on the print output, try to increase the voltage. If you see white
spots on the print output, try to decrease the voltage.
NOTE: The print quality changes depending on the values you select for this item.
Va l ue s :
Plain 0*
-3 – +3
Plain Thick 0*
-3 – +3
Recycled 0*
-3 – +3
92 Understanding the Tool Box Menus
Page 95

Covers 0*
-3 – +3
Coated 0*
-3 – +3
Envelope 0*
-3 – +3
Label 0*
-3 – +3
Apply New
Settings
Restart printer
to apply new
settings
After you complete the settings, press the Apply New Settings
button to apply the changes.
Press the Restart printer to apply new settings button to apply the
changes.
Adjust Fuser
Purpose:
To specify the optimum temperature settings for printing for the fuser. To
lower the temperature, set negative values. To increase, set positive values.
The default settings may not give the best output on all paper types. When
the printed paper has curled, try to lower the temperature. When the toner
does not fuse on the paper properly, try to increase the temperature.
NOTE: The print quality changes depending on the values you select for this item.
Va l u e s:
Plain 0*
-3 – +3
Plain Thick 0*
-3 – +3
Recycled 0*
-3 – +3
Covers 0*
-3 – +3
Understanding the Tool Box Menus 93
Page 96

Coated 0*
-3 – +3
Envelope 0*
-3 – +3
Label 0*
-3 – +3
Apply New
Settings
Restart printer
to apply new
settings
After you complete the settings, press the Apply New Settings
button to apply the changes.
Press the Restart printer to apply new settings button to apply the
changes.
Color Registration Adjustment
Purpose:
To set Color Registration Adjustment (individual yellow, magenta, cyan
correction) settings. When Auto Registration Adjustment is set to On, the
printer prints the color registration chart and adjusts the color registration by
using the chart. Color registration adjustments need to be made during the
initial setup of the printer or when the printer is moved to a different
location.
Va l ue s :
Auto Registration
Adjustment
Auto Correct
Print Color Regi Chart
On* Automatically adjusts color registration.
Off Does not automatically adjust color registration.
*1
*1*2
Click Start to automatically correct color
registration.
Click Start to open the Print Color Regi Chart
window, and then select the paper size and click
OK to print a color registration chart.
94 Understanding the Tool Box Menus
Page 97

Registration
Adjustments
Y(Yellow) 0* Specifies lateral (perpendicular to
*1
M(Magenta) 0*
-5–+5
paper feed direction) color
adjustment values individually.
-5–+5
C(Cyan) 0*
-5–+5
LY(L ef t
Yellow)
LM(Left
Magenta)
LC(Left
Cyan)
RY(Right
Yellow)
RM(Right
Magenta)
RC(Right
Cyan)
0* Specifies process (paper feed
-5–+5
0*
direction) color adjustment values
individually.
-5–+5
0*
-5–+5
0*
-5–+5
0*
-5–+5
0*
-5–+5
Apply New Settings After you complete the settings, press the Apply
New Settings button to apply the changes.
Restart printer to apply new
settings
*1 This item is available only when Auto Registration Adjustment is set to Off.
*2 The color registration chart prints a lattice pattern of yellow, magenta, and cyan
lines. On the chart, find the values on the right side that are next to the line that is
perfectly straight for each of the three colors. If the value for this line is 0, color
registration is not needed. If the value for this line is any value other than 0, specify
the adjustment values under Registration Adjustments.
Press the Restart printer to apply new settings
button to apply the changes.
Adjust Altitude
Purpose:
To specify the altitude of the location where the printer is installed.
Understanding the Tool Box Menus 95
Page 98

The discharge phenomenon for charging the photo conductor varies with
barometric pressure. Adjustments are performed by specifying the altitude of
the location where the printer is being used.
NOTE: An incorrect altitude adjustment setting leads to poor printing quality,
incorrect indication of remaining toner.
Va l ue s :
0 meter* Specifies the altitude of the location where the printer
1000 meters
2000 meters
3000 meters
Apply New Settings After you complete the settings, press the Apply New
Restart printer to apply new
settings
is installed.
Settings button to apply the changes.
Press the Restart printer to apply new settings button
to apply the changes.
Reset Defaults
Purpose:
To initialize NVM (non-volatile memory) for system parameters. After
executing this function and rebooting the printer, all the menu parameters are
reset to their default values.
For details, see "Resetting Defaults" on page 100.
Va l ue s :
Start Click to initialize the system parameters.
Non-Dell Toner
Purpose:
To use toner cartridge of another manufacturer.
96 Understanding the Tool Box Menus
Page 99

NOTE: Using non-Dell-brand toner cartridges may make some printer features
unusable, reduce print quality and decrease the reliability of your printer. Dell
recommends only new Dell-brand toner cartridges for your printer. Dell does not
provide warranty coverage for problems caused by using accessories, parts, or
components not supplied by Dell.
NOTE: Before you use toner cartridge of another manufacturer, be sure to restart
the printer.
Va l u e s:
Non-Dell
To ne r
Apply New Settings After you complete the settings, press the Apply New
Restart printer to apply new
settings
Off* Does not use toner cartridge of another manufacturer.
On Use toner cartridge of another manufacturer.
Settings button to apply the changes.
Press the Restart printer to apply new settings button
to apply the changes.
BTR Refresh Mode
Purpose:
To execute counter measures for curling/separating discharge of the paper.
Va l u e s:
BTR Refresh
Mode
Apply New Settings After you complete the settings, press the Apply New
Restart printer to apply new
settings
*
Off
On Automatically executes counter measures for curling/
Does not automatically execute counter measures for
curling/separating discharge of the paper.
separating discharge of the paper.
Settings button to apply the changes.
Press the Restart printer to apply new settings button
to apply the changes.
Diagnosis
The Diagnosis tab contains the Chart Print, Machine Check, Environment
Sensor Info, Developer Stir Mode, and Refresh Mode pages.
Understanding the Tool Box Menus 97
Page 100

NOTE: Values marked by an asterisk (*) are the factory default menu settings.
Chart Print
Purpose:
To print various charts that can be used for diagnosing your printer.
Va l ue s :
Pape r Size A 4 Selects the paper size to print charts.
Letter
Ghost Configuration Chart Click to print a chart to check for ghost printing.
4 Colors Configuration
Chart
Alignment Chart Click to print a chart, and then check for proper
Drum Refresh
Configuration Chart
Click to print bands of yellow, magenta, cyan, and
black with varying density.
alignment of the print image on the paper.
Prints a chart to check the light fatigue of the drum
cartridge.
Machine Check
Purpose:
To check the operation of the different components of the printer.
Va l ue s :
98 Understanding the Tool Box Menus
 Loading...