


Wireless Collection
Owner’s Manual
Sound Bar System with Wireless Streaming
Contents
What’s in the Box |
3 |
Hooking Up Your W Studio to Your TV |
4 |
Sound Bar Buttons & Remote |
5 |
Getting Started with Wireless Streaming |
6 |
Apps |
7 |
Playing Music |
7 |
Adding Multiple Devices |
8 |
Placement Options |
9 |
Frequently Asked Questions |
10 |
Specifications |
14 |
Technical Assistance & Contact |
14 |
Sound Bar System with Wireless Streaming
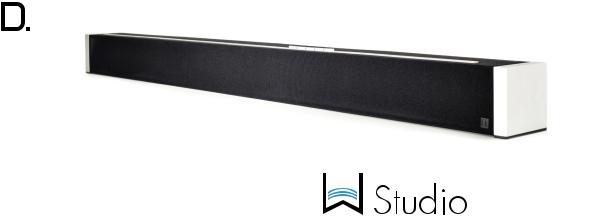
The W Studio sound bar system is Definitive Technology’s flagship wireless soundbar that perfectly blends high-performance theater sound with hiresolution musical reproduction. The W Studio’s purposefully slim design (only 3.5” deep) is only overshadowed by its fit and finish, featuring solid aluminum end caps. The W Studio uses Definitive Technology’s proprietary Spatial Array technology that aids in creating a high-definition, room-filling 5.1 channel surround sound experience.
The compact wireless subwoofer creates waves of big bass via its downward firing 8-inch woofer, bass port and robust 200 Watt amplifier. HDMI switching for both audio and video maximizes this home theater’s high performance potential.
The Definitive Technology Wireless Collection
The W Studio is part of Definitive Technology’s Wireless Collection which is an all-encompassing solution for distributing audiophile-grade music anywhere or everywhere in your home. The W Studio can be used as a
stand-alone wireless speaker or as part of a family. Stream your favorite music services, internet radio and your personal digital music library all from your smartphone, tablet or computer. What’s more, the streamlined setup process allows you to be up and running in a matter of minutes. And because you can Mix-and-match speakers with the open DTS Play-Fi® technology standard, future-proofing your technology has never been easier.
www..definitivetech..com |
2 2 |
 Studio
owner’s manual
Unpacking your W Studio
Please unpack the components carefully, removing the subwoofer first as indicated on the carton and then the sound bar. We recommend saving all cartons and packing materials in case you move, or should you need to ship your W Studio.
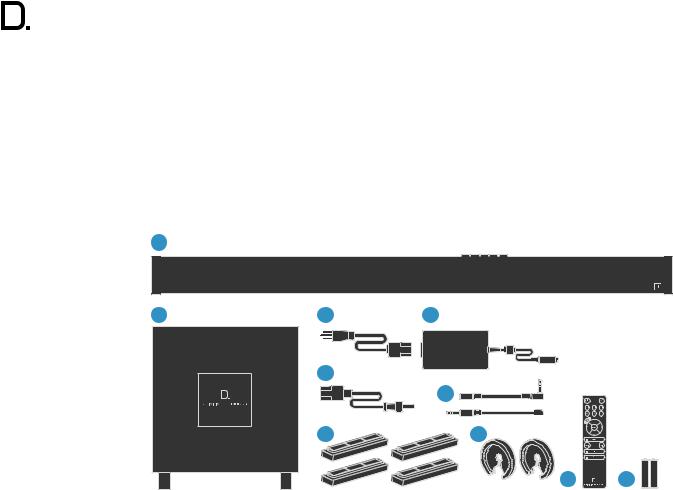
What’s in the Box
Included in your W Studio carton:
1
1. |
sound bar |
|
|
|
2. |
subwoofer |
|
|
|
3. |
power cord |
|
|
|
4. |
power supply |
|
|
|
5. |
subwoofer power cord |
2 |
3 |
4 |
6. |
IR adapters (input and output) |
|
|
|
7. |
four risers (magnetic) |
|
|
|
8. |
two spacers for wall mounting |
|
|
|
9. |
remote control |
|
5 |
|
10. |
batteries |
|
|
6 |
|
|
|
|
|
• wall mount template |
|
|
|
|
• online registration card |
|
7 |
8 |
|
9
10 |
AAA |
AAA
www.definitivetech.com |
3 |

Hooking Up Your W Studio to Your TV
Connection Method #1
All sources into your W Studio via HDMI (recommended)
TV |
Blu-ray |
HDMI |
|
IN |
|
|
Cable |
 Studio
owner’s manual
Connection Method #3
All sources into your TV with 3.5mm analog mini-jack to the sound bar.
HDMI IN |
Blu-ray |
INPUTS |
|
|


 Cable
Cable
R 
L 
The HDMI cable runs from the HDMI output of the W Studio to an HDMI input on the TV set.
You will use the W Studio remote for switching between the sources you have connected to the system (Blu-Ray player, cable box etc.). We recommend this method; it ensures the highest resolution audio and video signals for the best possible audio performance.
NOTE: For greater convenience, you can program the W Studio to respond to the power, volume, mute, and source select commands of your TV or cable box remote. See the “IR Learn” section of the OSD Set-up Menu Functions for instructions.
Connection Method #2
All sources into your TV, with TOSLINK
optical audio output from the TV set to the sound bar.
INPUTS
HDMI IN |
Blu-ray |
TV


 Cable
Cable
OPT
OUT
NOTE: Some older TV’s have only an analog output connection. In this scenario, the TV does all the switching between sources and the W Studio is always set to INPUT #4. A Dolby Digital or DTS digital audio signal cannot be passed through a TV’s analog output connection. The best audio signal quality that can be reproduced using this method is two-channel stereo audio. This method is the least-preferred connection method of the three described here.
Pairing the Subwoofer
The sound bar and the subwoofer come paired from the factory. All you do is plug in the subwoofer’s power cord and turn on the ON/OFF POWER switch. When you turn on the sound bar, both the bar and subwoofer will establish a communication link.
The TV does all the switching between sources, and the sound bar is always set to INPUT #5.
NOTE: Most TV’s cannot pass a Dolby Digital or DTS 5.1 channel audio signal through an optical audio output connection. They can only pass 2 channel stereo through Toslink. The W Studio will simulate a surround experience, but it will not be as effective as when processing a true 5.1 digital surround signal. This hookup method offers convenience: most functions (including source switching) can be done through one remote control, such as your cable box or TV remote. But you won’t get the best
system sound quality, or be able to use all of the features of the W Studio, including your OSD (on-screen displays).
www.definitivetech.com |
4 |
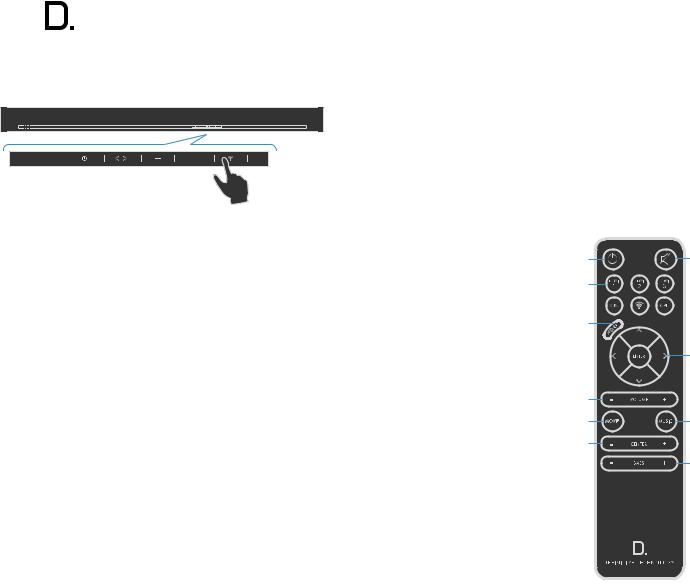
Sound Bar Button Controls
1.POWER: Press  to turn on the system (sound bar and wireless subwoofer).
2.SOURCE (Symbol 
 ): Six LED lights correspond to each of the six source inputs. Example: You want to play a Blu-ray disc and are currently playing another source on input #1. Your Blu-ray player is connected to source input #2. Simply touch this switch once to select the input.
NOTE: When advancing more than one source, please allow for a few seconds of delay.
3.Volume DOWN: Press – to decrease the system volume. A row of LED’s displays the volume level. It takes 4-5 presses to change the LED, but you will hear, and see on the OSD pop-up screen, that the volume is decreasing.
4.Volume UP: Pressing + to increase the system volume, with a corresponding change in the LED display/OSD.
5.Wi-Fi Source/Setup: Press once to select Wi-Fi Input. For Wi-Fi setup instructions, see page 6.
NOTE: you can also press and hold the Wi-Fi button on the remote to connect.
 Studio
owner’s manual
Remote Control Functionality
1.Power: Press Power to toggle the unit on/off. A front panel light recognizes the command. The subwoofer also turns on when it sees a signal from the sound bar. Please allow approximately 10 seconds for the system to turn on.
2.Mute: Turns sound off while the system remains on. Press MUTE again to return the sound to the previous volume level. The On-Screen Display (OSD) pop-up menu confirms your selection
3.Sources: HDMI 1, HDMI 2, HDMI 3,
AUX, Wi-Fi, Optical. These enable |
1 |
2 |
|
you to select sources, such as a |
|||
3 |
|
||
Blu-ray player or tuner that you’ve |
|
||
connected to the rear panel source |
|
|
|
inputs. The OSD pop-up confirms your |
4 |
|
|
selection. |
|
||
4. Menu: Press MENU to call up the |
|
5 |
|
On-Screen Display (OSD). This |
|
|
|
shows a series functions that can be |
6 |
|
|
accessed to make system changes. |
|
||
Press MENU again to exit from the |
7 |
8 |
|
OSD once you’ve completed making |
|||
your selections. See the section titled |
9 |
|
|
“On-Screen Display set-up menu |
|
10 |
|
functions” for more detail. |
|
|
5.Cursor control/Enter button: Press the four arrow keys, with the ENTER button in the middle, to select and adjust menu items such as surround
immersion level. The OSD pop-up menu confirms your selection.
6.Master Volume up/down (+ –): Press (+) to increase the system volume. Press (–) to decrease the volume. Volume is displayed on the front panel LEDs and on the OSD pop-up menu.
7.Movie: Press MOVIE to optimize the bass output, surround processing and other sound parameters, so movies sound their best. The OSD pop-up menu confirms your selection.
8.Music: Press MUSIC to optimize the sound characteristics for maximum music enjoyment. The OSD pop-up menu confirms your selection.
9.Center + or – : Use to increase or decrease the center channel volume, independently of changing the overall volume level. For example, if family members are sleeping, you may want to improve the movie dialog audibility without significantly increasing the overall volume level.
10.Bass output up/down (+ –): Press (+) to increase the bass output of the subwoofer relative to the system volume. Press (–) to decrease the bass output. The OSD pop-up menu confirms
your selection.
www.definitivetech.com |
5 |
 Loading...