


Owner’s Manual
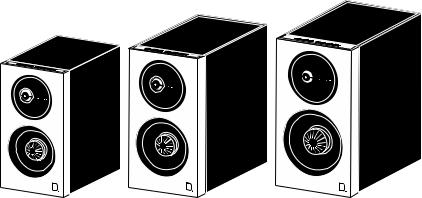
D11, D9, D7

DEFINITIVE TECHNOLOGY
WHAT OBSESSION SOUNDS LIKE™
Thank you for choosing the Definitive Technology Demand Series bookshelf speakers. The Demand Series offers the most cutting-edge audio technologies, including Balanced Double Surround System (BDSS) high output mid-bass drivers, a Linear Response Waveguide™ and annealed aluminum dome tweeters for improved dispersion and
a wider listening sweet spot—all delivering full-range, room-filling sound and precise imaging that fit nearly anywhere with their compact, elegant styling. This extraordinary speaker is truly state-of-the-art in both music and home theater sound reproduction. It's time to hear and feel a sonic signature unlike any other.
Our engineers have spent many years developing this product. In order to ensure that you experience the finest performance possible—one we’ve continued to perfect since 1990—we encourage you to take a moment to fully read this owner’s manual and
familiarize yourself with the proper installation and set-up procedures for your Demand Series bookshelf speakers.
2
D7 |
D9 |
D11 |
|
|
|

SAFETY PRECAUTIONS
CAUTION! To reduce the risk of electric shock and fire, do not remove the cover or back plate of this device. There are no user serviceable parts inside. Please refer all servicing to licensed service technicians.
CAUTION! The international symbol of a lightning bolt inside of a triangle is intended to alert the user to uninsulated “dangerous voltage” within the device’s enclosure. The international symbol of
an exclamation point inside of a triangle is intended to alert the user to the presence of important operating, maintenance and servicing information in the manual accompanying the device.
CAUTION! To reduce the risk of electrical shock, do not expose this equipment to rain or moisture.
1.READ INSTRUCTIONS—All safety and operating instructions should be read before operating the device.
2.RETAIN INSTRUCTIONS—The safety and operating instructions should be retained for future reference.
3.HEED WARNINGS—All warnings on the device and in the operating instructions should be adhered to.
4.FOLLOW INSTRUCTIONS—All operating and safety instructions should be followed.
5.WATER & MOISTURE—The device should never be used in, on or near water for risk of fatal shock.
6.VENTILATION—The device should always be located in such a way that it maintains proper ventilation. It should never be placed in
a built-in installation or anywhere that may impede the flow of air through its heat sink where applicable.
7.HEAT—Never locate the device near heat sources such as radiators, floor registers, stoves or other heat-generating devices.
8.CLEANING—The device should be cleaned in accordance with manufacturer’s instructions. We recommend using a lint roller or household duster for the grille cloth—and a clean, dry microfiber cloth for the black gloss finish.
9.DANGEROUS ENTRY—Care should be taken that no foreign objects or liquids fall or are spilled inside the device.
10.DAMAGE REQUIRING SERVICE—The device should be serviced by licensed technicians when:
•The plug or power supply cord has been damaged
•Objects have fallen on or liquid has spilled inside the device
•The device has been exposed to moisture
•The device does not appear to be operating properly or exhibits a marked change in performance
•The device has been dropped or the cabinet becomes damaged
11.SERVICE—The device should always be serviced by licensed technicians. Only replacement parts specified by the manufacturer should be used. The use of unauthorized substitutions may result in fire, shock, or other hazards.
This symbol on our electrical products or their packaging indicates that it is forbidden in Europe to discard the product in question as domestic waste. In order to ensure that you dispose of the products correctly, please dispose of the products according to local laws and regulations on the disposal of electrical and electronic equipment. In doing so
you are contributing to the retention of natural resources and to the promotion of environmental protection by the treatment and disposal of electronic waste.
4

We're delighted that you're part of our
DefinitiveTechnology family.
Please take a few minutes to register your product* so we have a complete record of your purchase. Doing so helps us serve you the best we can now and in the future. It also lets us contact you for any service or warranty alerts (if required).
Register here: http://www.definitivetechnology.com/product-registration
No internet? Call Customer Service
M-F 9:30 a.m. - 6 p.m. US ET
at (800) 228-7148 (US & Canada), 01 (410) 363-7148 (all other countries)
Note: the data we gather during online registration is never sold or distributed to third parties.
*Serial number can be found at the back of the manual
STAY VIGILANT ON ALL THINGS DEFINITIVE TECHNOLOGY
@DefinitiveTec |
@DefinitiveTech |
@definitivetech |
5
Unpacking Your Demand Series Speakers
Please unpack your system carefully. We recommend saving all cartons and packing materials in case you move or need to ship your system. It is important to save this booklet, as it contains the serial number for your product. You can also find the serial number on on rear of the Demand Series speaker on input cup. Each loudspeaker leaves our factory in perfect condition. Any visible or concealed damage most likely occurred in handling after it
left our factory. If you discover any shipping damage, please report this to your Definitive Technology dealer or the company that delivered your loudspeakers.
What’s in the box:
∙1 pair of Demand Series speakers with magnetic grilles
∙Owner’s Manual
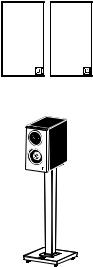
Optional Accessories for Your
Demand Series Speakers:
Demand Series ST1 bookshelf speaker stands (sold separately)
For more information, or to purchase, visit www.definitivetechnology.com
Figure 1 | Demand Series ST1 bookshelf speaker stand(s)
6
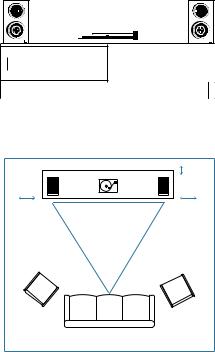
Positioning the Speakers in Your Room |
|
|||
L |
|
R |
Your Demand Series speakers are very flexible |
|
|
in terms of positioning. However, you must pay |
|||
|
|
|
full attention to their placement—each model |
|
|
|
|
in the series consists of dedicated L/R speakers |
|
|
|
|
and must be set up that way to accurately enjoy |
|
|
|
|
them. To optimize their performance, please |
|
|
|
|
follow these simple guidelines. Although the |
|
|
|
|
following recommendations will usually yield the |
|
|
|
|
best results, all rooms and listening setups are |
|
|
|
|
different, so do not be afraid to experiment with |
|
|
|
|
the speaker placement. Whatever sounds best to |
|
|
|
≥ 4" |
you is likely correct. |
|
|
|
|
||
|
|
(10CM) |
|
|
≥ 6" |
|
≥ 6" |
We recommend setting up the speakers and |
|
B |
listening position in an equilateral triangle as |
|||
(30CM) |
(30CM) |
|||
|
|
|
illustrated in Figure 2. You will also get good |
|
A |
C |
|
results if the listeners are a bit farther away. For |
|
|
example, if line A and C are each 10' long then |
|||
|
|
|
line B could be between 7' and 10' wide. Toeing |
|
|
|
|
the speakers in slightly, if possible, toward your |
|
|
|
|
listening area will also provide a stronger center |
|
|
|
|
image. Once you’ve found the right location, feel |
|
|
|
|
free to contact Definitive Technology or your place |
|
|
|
|
of purchase for additional guidance on speaker |
|
|
|
|
positioning. |
|
7

Connecting Your Loudspeakers
STRIP 1/4" (6MM) WIRE
1.UNSCREW A SET OF BINDING POST AND CONNECT WIRE
2.TIGHTEN UNTIL SECURE
1.IDENTIFY MARKINGS ON WIRE AND ASSIGN +/–
2.APPLY BANANA PLUGS OR SPADES AT THIS POINT IF APPLICABLE
+ –
ENSURE THAT THE SPEAKER IS ALWAYS
CONNECTED TO THE RECEIVER OR AMPLIFIER +
TO + AND – TO –
Figure 3 | Wiring and Polarity
8
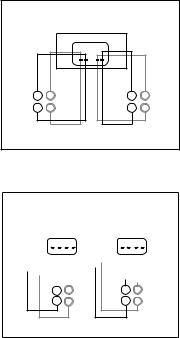
Bi-Wiring & Bi-Amping (D11 and D9 only)
If you decide to bi-wire or bi-amp, you must remove the flat metal jumpers between terminal posts. Failure to do this could result in damage to your amplifier and loudspeakers.
POWER AMPLIFIER
|
FRONT |
|
|
|
_ + |
_ + |
|
|
R |
L |
|
+ |
_ |
+ |
_ |
|
|
||
|
|
LOW FREQUENCY |
|
|
HIGH FREQUENCY |
|||||||||
|
|
AMPLIFIER |
|
|
AMPLIFIER |
|||||||||
|
|
|
|
|
|
|
|
|
|
|
|
|
|
|
|
|
+R_ +L_ |
|
|
+R_ +L_ |
|||||||||
|
|
|
|
|
|
|
|
|
|
|
|
|
|
|
|
|
|
|
|
|
|
|
|
|
|
|
|
|
|
|
|
|
|
|
|
|
|
|
|
|
|
|
|
|
|
|
|
|
|
|
|
|
|
|
|
|
|
|
|
|
|
|
|
|
|
|
|
|
|
|
|
|
|
|
|
|
|
|
|
|
|
|
|
|
|
|
|
|
|
|
|
|
|
|
|
|
|
|
|
|
|
|
|
|
+ |
_ |
+ |
_ |
|
|
Bi-wiring, or using separate speaker wire connections for high and low frequency sections.
Bi-wiring can provide noticeable improvements in the overall transparency of your loudspeakers by running separate speaker wires to further enhance its low and high frequencies. After removing the jumpers, connect one set of speaker wires to the upper binding post terminals on each speaker and one set of (usually heavier gauge) wires
to the lower binding post terminals. Connect the other ends of both wire sets to the corresponding amplifier outputs.
Bi-amping, or using separate amplifiers for the low and high frequency sections of your speakers.
Bi-amping allows you to use separate amplifiers for the high and low frequency sections of your loudspeaker for greater dynamic range and lower distortion. After removing the jumpers, connect the speaker wires from the high frequency amplifier outputs to the upper set of terminal posts on each speaker. Follow the same procedure for connecting the low frequency amplifier outputs to the lower set of terminals. Remember to maintain correct wiring polarity (+ to +, - to -) in all connections.
Ensure the sensitivity of each amplifier is the same to avoid poor sound
quality.
9
 Loading...