

Page 1

DOP505*
Le guide d’utilisation de votre four
User Manual for Your Oven
Betriebsanleitung des Backofens
De gebruikshandleiding van uw oven
B
rugervejledning til ovnen
La guía de utilización del horno
O guia de utilização do seu forno
FR
GB
DE
NL
DK
ES
PT
99636072_ML_ DOP505.qxd 17/03/05 15:39 Page 1
Page 2

22
Throughout the manual,
indicates safety recommendations,
indicates advice and tips
Introduction P.23
What does your oven look like?
Description of the appliance P.24
Accessories P.25
Safety Recommendations P.26
How do you install your oven?
Electrical connection P.27
Changing the power cable P.28
Useful dimensions for installing your oven P.29
How does your oven work?
Close-up view of your programmer P.30
How do you set the clock on the oven? P.31
How do you program for immediate cooking? P.32
How do you set a cooking programme? P.33-34
How does the timer work? P.34
How do you program for Eco cooking? P.35
Oven cooking modes P.36-37
How do you care for your oven? P.38-39
How do you change the bulb? P.40
What do you do in case of operating malfunctions? P.40
Table of Contents
99636072_ML_ DOP505.qxd 17/03/05 15:40 Page 22
Page 3

23
GB
Introduction
Dear Customer,
You have just acquired a DE DIETRICH oven and we would like to thank you.
Our research teams have created a new generation of appliances for you. Their
quality, design and technological advances make them exceptional products
and reveal our unique know-how.
With modern, refined lines, your new DE DIETRICH oven blends harmoniously
into your kitchen and perfectly combines technological expertise, cooking performance and aesthetic luxury.
In the line of DE DIETRICH products, you will also find a wide range of hobs,
ventilation hoods, dishwashers, microwave ovens and refrigerators, all of which
can be built in and all of which can be coordinated with your new DE DIETRICH
oven.
Thanks to these "New Items of Value" that serve as guideposts in our everyday lives, DE DIETRICH, the reference of excellence, is truly an invitation to a
new art of living.
The DE DIETRICH brand.
99636072_ML_ DOP505.qxd 17/03/05 15:40 Page 23
Page 4
1
3
5
SETSET
ECO
24
W
hat does your oven look like?
1
2 3
4
5
7
6
1
2
5
6
7
3
4
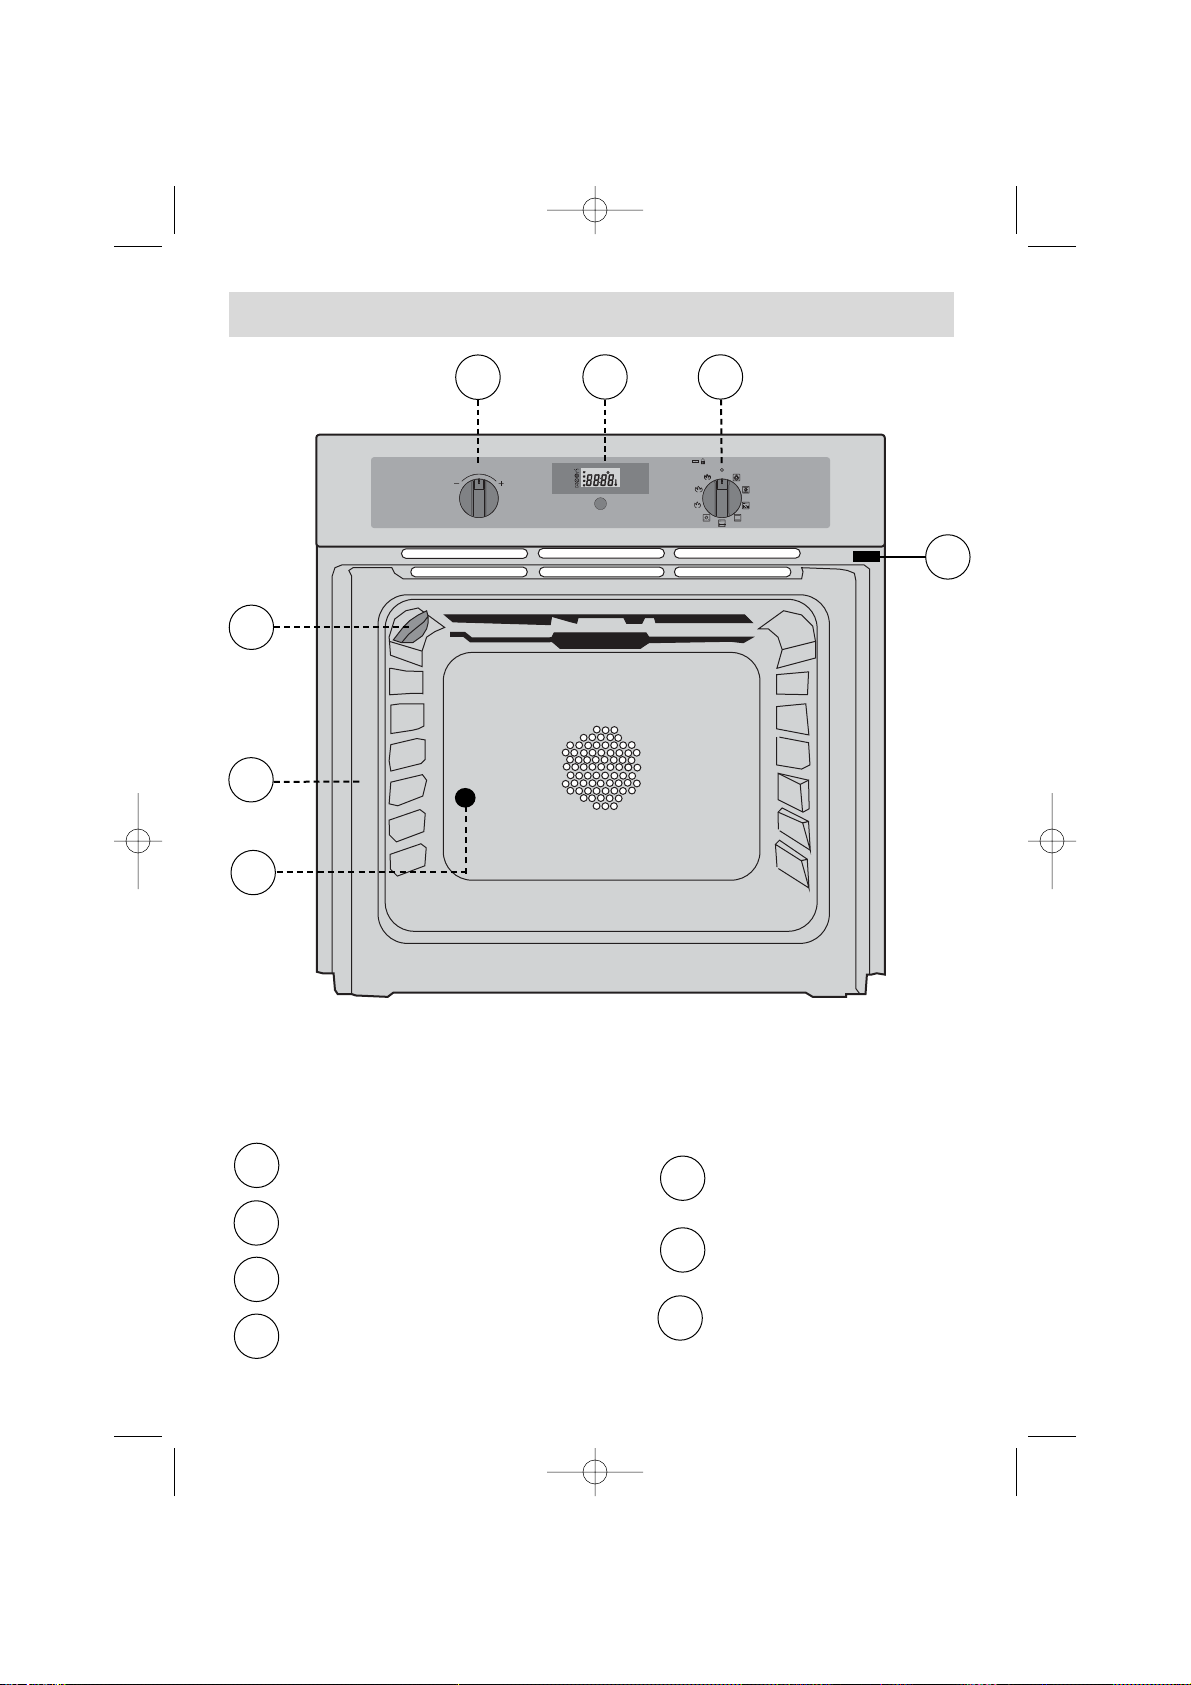
Temperature setting
Programmer
Function selector
Light
Shelf support indicator
Hole for rotisserie
Contact for open door
detector
DESCRIPTION OF THE APPLIANCE
99636072_ML_ DOP505.qxd 17/03/05 15:40 Page 24
Page 5
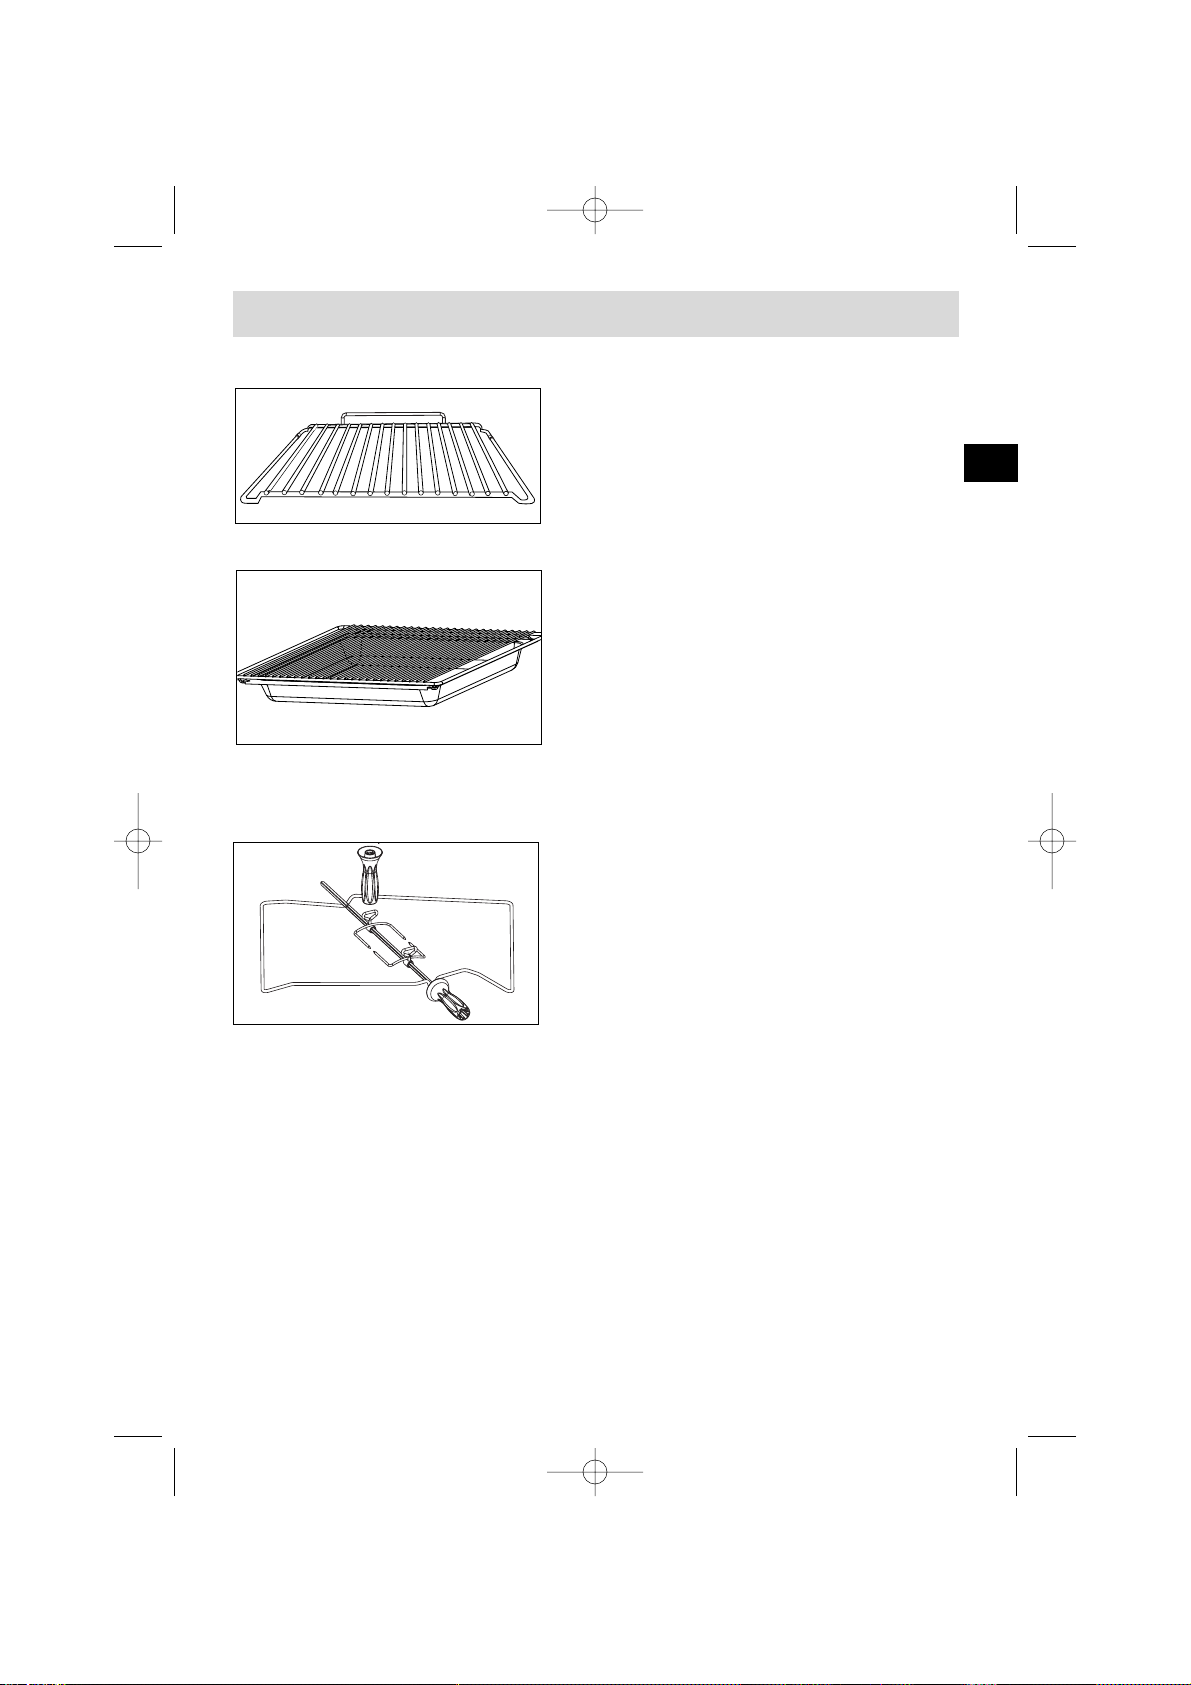
Accessories
GB
Dish + grid (drip tray)
Inserted under the grid, it catches barbecue
juices and grease. it can also be used half-full
of water for double-boiler cooking methods
Avoid placing roasts or meats directly in the
dish because you are certain to have major
spattering on the oven walls
25
Rear
Front
Curved anti-tipping safety grid
Its shape was designed to allow you to position
your dish between two shelf support levels.
Rotisserie (optional)
To use it:
• Place the multi-purpose baking tray at level
no. 1 to collect the cooking juices or on the
bottom of the oven if the piece of meat to be
roasted is too big.
• Slide one of the forks onto the spit; put the
piece of meat to be roasted onto the spit; slide
on the second fork; centre and tighten the two
forks.
• Place the spit on its cradle.
• Push gently to locate the tip of the spit in the turning mechanism situated at the
back of the oven.
• Remove the handle by unscrewing it. After cooking, screw the handle back onto
the spit to take it out without burning yourself.
At the end of the handgrip, a depression enables you to unscrew the forks.
99636072_ML_ DOP505.qxd 17/03/05 15:40 Page 25
Page 6
26
Safety Recommendations
Please become familiar with these recommendations before installing
and using your oven. This oven was designed for household use only. It is
intended solely for cooking foodstuffs. This oven does not contain any asbestosbased components.
FIRST USE:
Before using your oven for the first time, heat it up while empty with the door
closed for approximately 15 minutes using the maximum setting in order to “cure”
the appliance. The rock wool that surrounds the oven cavity may initially release
a particular odour caused by its composition. Similarly, you may notice the release
of some smoke. All of this is normal.
SUBSEQUENT USES:
- Ensure that the door of your oven is completely closed so that the seal
can properly do its job.
- Do not let anyone lean against or sit on the oven door when it is open.
- When using the grill with the door semi-open, exposed parts
and surfaces may become hot. Keep small children away.
- When in use, the appliance becomes hot. Be careful not to touch the heat-
ing elements located inside the oven.
- After cooking, do not use bare hands to touch the dishes or accessories
(grid, rotisserie, drip tray, rotisserie support, etc.); use a potholder or heat-resistant
material.
- Do not use a steam cleaner or high-pressure cleaner.
- Do not line your oven with sheets of aluminium. Otherwise, the result
could be an accumulation of heat that could have an undesirable effect on cooking and roasting results and could damage the enamel.
The oven must be turned off for all attempts to clean the cavity.
During pyrolysis, the exposed surfaces become hotter than during
normal use. It is advisable to keep small children at bay.
Before beginning a pyrolysis cycle, remove all grids and trays.
If the appliance has an electrical connection, it must remain
accessible after the appliance has been built in.
The function selector absolutely must be returned to 0 in order to
use your oven again.
99636072_ML_ DOP505.qxd 17/03/05 15:40 Page 26
Page 7
27
GB
How do you install your oven?
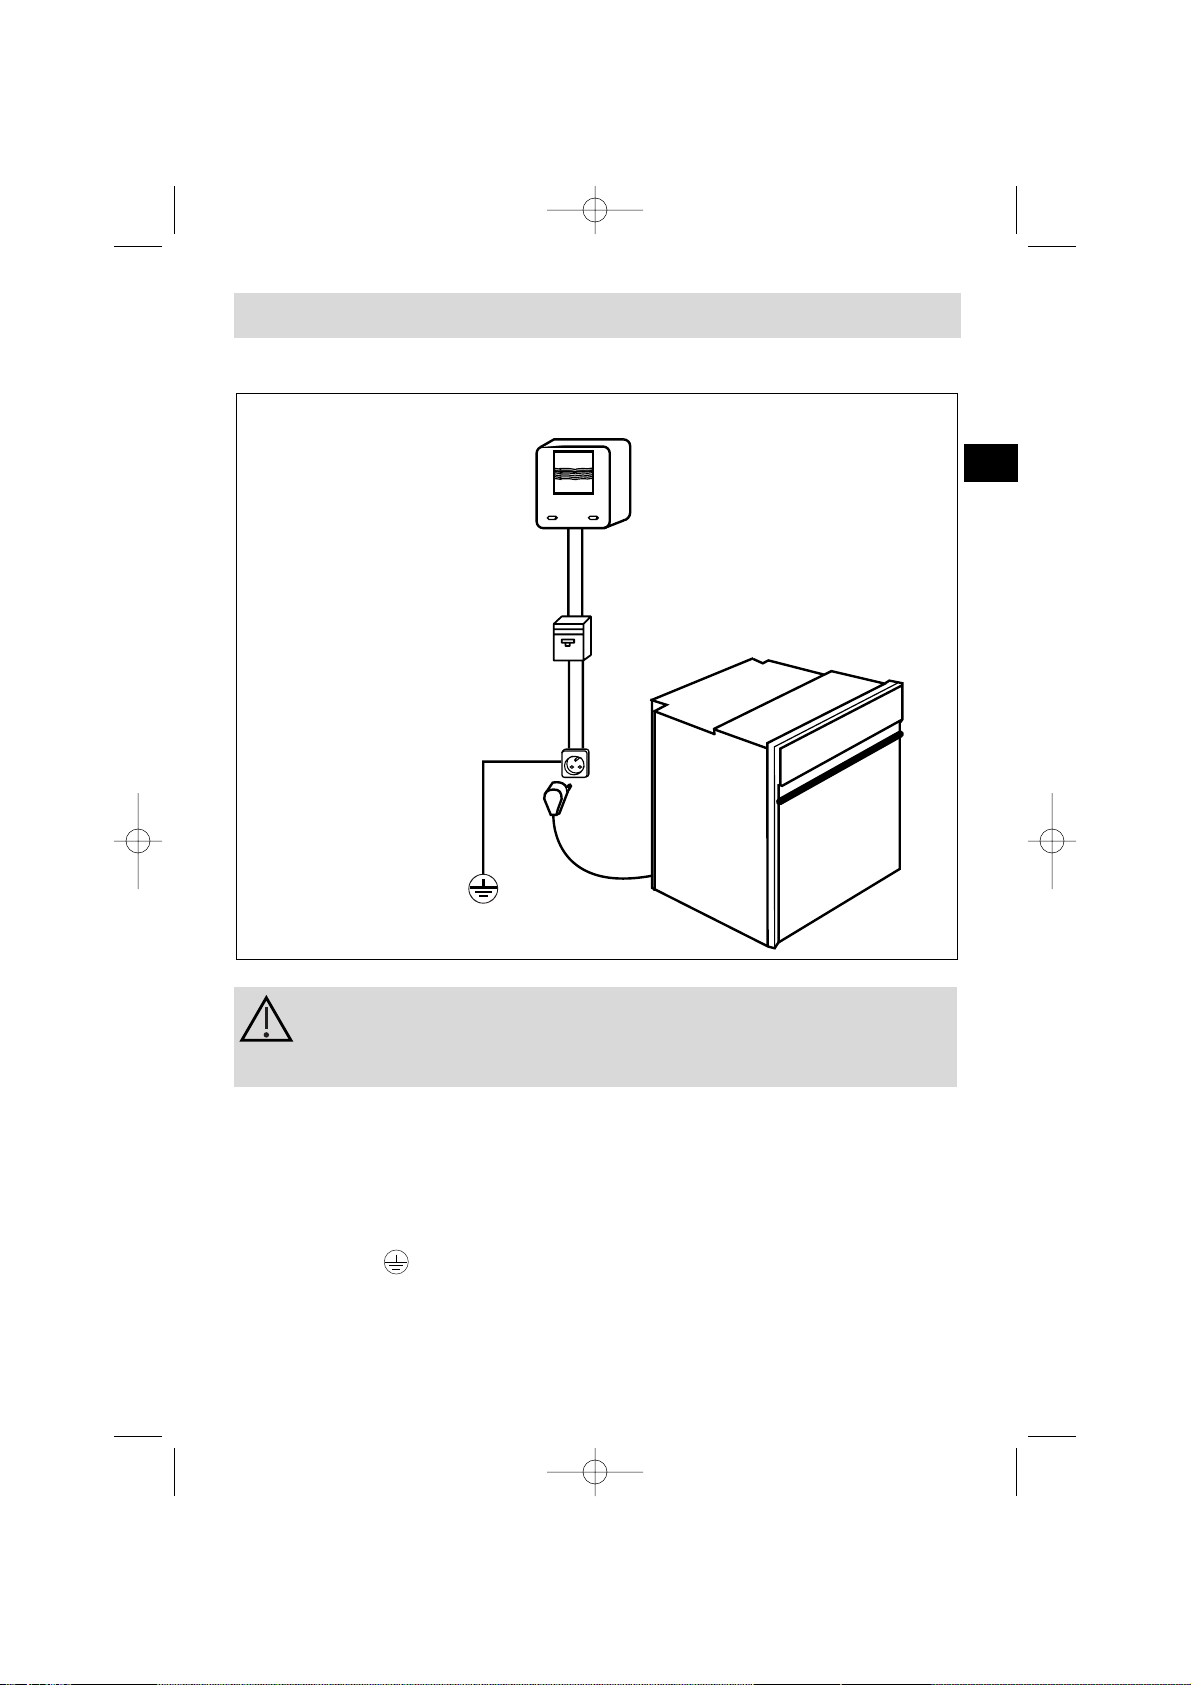
Monophase 20A Counter
220-240 V ~ 50 Hz
Electrical outlet
2 prong receptacle
+ ground lead
CEI Standard 60083
Monophase line 220-240 V ~
Electrical connection
Power cable
approximately
1.5 m in length
16A fuse or differential
circuit breaker
Before making the connection, ensure that the wires in your electrical installation have enough cross-sectional area to properly
supply electricity to the appliance.
The fuse in your set-up must be 16 amperes.
The electrical connection should be performed before the appliance is installed in
the cabinet.
•
The oven must be connected with a power cable (standardised) with three 1.5 mm
2
conductors (1 ph +1 N + ground) that must be connected to a monophase 220-240 V
network via a CEI 60083 standardised receptacle (1 ph +1 N + ground lead) or in accordance with installation rules. The safety wire (green-yellow) is connected to the ap-
pliance's terminal and must be connected to the ground lead of the electrical set-up.
• In the case of connections with an electric receptacle, it must remain accessible
after installation of the appliance.
• The oven's neutral conductor (blue wire) must be connected to the network's
neutral conductor.
99636072_ML_ DOP505.qxd 17/03/05 15:40 Page 27
Page 8

28
• The power cable (H05 RR-F, H05 RN-F or H05 VV-F) must be of sufficient length to
be connected to the build-in oven while it sits on the floor in front of the cabinet.
To do this the appliance must be disconnected from the electrical network:
• Open the inspection flap located at the lower right of the back cover by unscrewing the two screws, then pivot the inspection flap.
• Strip 12 mm along each wire of the new power cable.
• Carefully twist together the strands.
• Loosen the screws from the terminal board and remove the power cord to be replaced.
• Introduce the power cable through the side of the cover in the cable clip located
to the right of the terminal board.
• Connect the power cord wires in accordance with the written markings on the
terminal board.
• All the strands of the electricity wires must be captured under the screws.
• The phase wire on the L terminal.
• The green-yellow coloured ground wire should be connected to the terminal .
• The neutral conductor (blue) on the N terminal.
• Screw down tightly the screws on the terminal board and check the connection by
pulling on each wire.
• Attach the cable with the cable clip located to the right of the terminal board.
• Close the inspection flap using the two screws.
Changing the power cable
We cannot be held responsible for any accident resulting from an
non-existent, defective or incorrect ground lead.
How do you install your oven?
99636072_ML_ DOP505.qxd 17/03/05 15:40 Page 28
Page 9

29
GB
How do you install your oven?
To be certain that you have properly installed your appliance, do
not hesitate to call on a household appliance specialist.
Useful dimensions for installing your oven
The oven can be installed under a work top or in a column of cabinetry
(open* or closed) having the appropriate dimensions for built-in installation (see adjacent diagram).
Your oven has optimised air circulation that allows it to achieve remarkable cooking
and cleaning results if the following guidelines are respected:
• Centre the oven in the cabinet so as to guarantee a minimum distance of 5 mm
between the appliance and the neighbouring cabinet.
• The material of the built-in cabinetry must be heat resistant (or be covered with
such a material).
• For greater stability, attach the oven in the cabinet with two screws through the
holes provided for this purpose on either side of the front inner panel (see diagram).
To do this:
1) Remove the rubber screw covers to access the mounting holes.
2) Drill a Ø 3 mm hole in the cabinet panel to avoid splitting the wood.
3) Attach the oven with the two screws.
4) Replace the rubber screw covers (they also serve to absorb the shock caused
by closing the oven door).
(*) If the cabinet is open, its opening must be 70 mm (maximum).
70
550
Location of
retaining screw
50 x 50 mm cut-out
Location of
retaining screw
99636072_ML_ DOP505.qxd 17/03/05 15:40 Page 29
Page 10

30
How does your oven work?
1. Close-up of your analog programmer
Display for temperatures, times, cooking times and timer
Temperature display indicator
Cooking time display indicator
End of cooking display indicator
Independent timer display indicator
Touch control for accessing various time setting programmes
1
3
4
5
6
2
SET
6
2
3
4
5
1
99636072_ML_ DOP505.qxd 17/03/05 15:40 Page 30
SET
Page 11

31
GB
a) When supplied with electricity
• The display flashes.
• Set the time by turning the + or – selector (continual turning of the + or – selector allows for rapid
number advancement)
• Press the SET touch control to enter.
Example: 12:30.
b) Resetting the clock time
• Press SET for a few seconds, 000 appears, release
-> the time blinks.
• Adjust the time with the selector (+ or –).
• Press the SET touch control to enter.
2. How do you set the oven clock?
If the SET touch control is not pressed, the adjustment
will be automatically recorded after a few seconds.
How does your oven work?
SET
SET
SET
SET
SET
SET
SET
SET
SET
SET
SET
SET
SET
SET
SET
SET
99636072_ML_ DOP505.qxd 17/03/05 15:40 Page 31
SET
SET
SET
SET
Page 12

32
How does your oven work?
3. How do you program for immediate cooking?
The analog programmer should display only the time; it should not be flashing.
• Choose the cooking mode:
Turn the function selector to the position of your
choice.
Example: position " "-> the oven turns on.
Your oven recommends the most commonly used temperature.
Place your dish in the oven based on the recommendations provided by the cookbook.
It is, however, possible to adjust the temperature by turning the selector toward + or –.
Example " " set to 210°.
After these steps, the oven begins to heat up and the display alternates between
the temperature in the oven and the temperature selected.
A series of beeps will be emitted when the oven reaches the selected temperature. Once this temperature is reached, it remains on the display.
The symbol continues blinking.
After a cooking cycle, the circulating fan continues to function for a period in order to cool the oven.
SET
SET
SET
SET
SET
SET
SET
SET
SET
SET
SET
SET
SET
SET
SET
SET
SET
SET
SET
SET
SET
SET
SET
SET
SET
SET
99636072_ML_ DOP505.qxd 17/03/05 15:40 Page 32
ECO
SET
SET
Page 13

33
GB
How does your oven work?
4.
How do you set a cooking programme?
a) With immediate start
1. Set the desired cooking mode and adjust the tempera-
ture if necessary.
Example: position “ ”
Temperature 200°C.
2. Press the SET touch control until the cooking time indi-
cator flashes “ ”.
The display flashes 0:00 to indicate that you can now
adjust the setting.
3. Turn the + or - selector to set the desired time.
Example: 25 min cooking time.
The cooking time is automatically recorded after a few seconds -> the display no longer flashes and returns to temperature display mode.
The countdown of the length of time begins immediately
after it has been set.
After these three steps, the oven heats up:
A series of beeps will be emitted when the oven reaches the selected temperature.
At the end of cooking (end of programmed time),
- the oven stops
- the cooking time indicator turns off
- 0:00 is displayed
- a series of beeps is emitted for a few minutes.
The beeping sound stops definitively when the function selector is reset to 0.
After a cooking cycle, the circulating fan continues to function for a period in order to cool the oven.
SET
SET
SET
SET
SET
SET
SET
SET
SET
SET
SET
SET
SET
SET
SET
99636072_ML_ DOP505.qxd 17/03/05 15:40 Page 33
ECO
SET
SET
SET
Page 14

34
How does your oven work?
b) With delayed start (choose end time)
Proceed as with programmed cooking.
After setting the cooking time,
Press the SET touch control until the end of cooking
indicator flashes “ ”.
The display flashes 0:00 to indicate that you can now
adjust the setting.
Turn the + or – selector to set the desired cooking
end time.
Example: End of cooking at 13:00.
After these steps, the oven heating is delayed so that
cooking ends at 13:00.
At the end of cooking (end of programmed time),
- The oven stops
- The cooking time indicator turns off
- 0:00 is displayed
- A series of beeps is emitted for a few minutes.
The beeping sound stops definitively when the function selector is reset to 0.
After a cooking cycle, the circulating fan continues to function for a period in order to cool the oven.
SET
SET
SET
SET
SET
SET
SET
SET
SET
99636072_ML_ DOP505.qxd 17/03/05 15:40 Page 34
SET
SET
Page 15

35
GB
5. How do you use the timer?
Your oven is equipped with an electronic timer that is independent of the
oven functions, making it possible to measure times.
In this case, the timer display takes priority over the time of day and temperature
display.
Press the SET touch control until the timer indicator flashes -> the display
flashes.
Turn the selector (+ or –) until the desired time is displayed (60 minutes maximum).
The display stops flashing after a few seconds or after the SET touch control is
pressed and the timer starts working, counting down the time in seconds.
Once the time has expired, the timer emits a series of beeps to notify you.
It is possible to change or cancel the timer programme at any
time.
99636072_ML_ DOP505.qxd 17/03/05 15:40 Page 35
Page 16

36
* Programme(s) used to obtain the results indicated on the energy label in compliance w
Combined heat
Cooking controlled by the upper
and lower heating elements at the
back of the oven and by the fan.
Turbo grill
Cooking controlled, alternately,
by the upper element and
by the fan.
Double grill
Cooking controlled by the upper
element
This position allows for energy
savings while preserving the
quality of the cooking.
The ECO position is used for the
energy label performance.
Hold warm function
Heat dosages from the element at
the back of the oven combined
with fan.
Stabilisation at low temperatures.
Symbol
Name of cooking mode
Description of cooking mode
6. Oven cooking modes
*
Quick temperature
increase. Some dishes can
be placed in the oven
while it is still cold.
ECO Traditional
Cooking controlled by the upper
and lower heating elements with
no fan.
Three combined sources
of heat: a lot of heat from
the bottom, a little
circulating heat and a bit
from the grill.
The double grill covers the
entire grid surface.
As for the simple grill, it is
equally effective for smaller quantities.
This mode combines the effects
of the fan and the grill; the grill
pulses the food with infrared and
the air movement generated by
the fan attenuates the effect.
C
ircular heating
Cooking controlled by the heating
element located at the back of the
oven and by the fan.
*
99636072_ML_ DOP505.qxd 17/03/05 15:40 Page 36
ECO
Page 17

GB
37
Recommended for quiches, potpies
and juicy fruit tarts.
Recommended for grilling chops,
sausages, toast, prawns placed
on the grid.
Recommended for letting dough rise
for bread, buns, cakes, etc. without
exceeding 40° C (plate warming,
defrosting).
Recommendations
Oven Cooking Modes
Recommended for preserving tenderness in
white meats, fish, vegetables
For cooking multiple items on up to three levels.
Note: All cooking is done without
preheating.
Recommended for sealing and thoroughly
cooking red and white meat.
To slowly cook poultry weighing up to 2
kg.
Recomm. Temp.
mini
recomm.
maxi
35
180
235
mini
recomm
maxi
35
205
275
mini
recomm
maxi
200
230
mini
recomm
maxi
35
275
mini
recomm
maxi
35
80
100
180
200
mini
recomm
maxi
1
4
4
99636072_ML_ DOP505.qxd 17/03/05 15:40 Page 37
Page 18

38
1. W
hat is pyrolysis?
If your oven emits smoke during preheating or releases large volumes of smoke
during cooking. If your oven releases an unpleasant odour when cooled after
various cooking applications (lamb, fish, barbecue, etc.).
2. In what situations should pyrolysis be used?
You should not wait until the oven is coated in grease to initiate a
cleaning cycle.
- Pyrolysis is a cycle during which the oven cavity is heated to a very high temperature in order to eliminate soiling from splattering and spills. The smoke and
odours released are destroyed as they move through a catalyzer.
- Pyrolysis is not necessary after each cooking cycle, but simply when the dirtiness
warrants it.
- As a safety measure, the cleaning operation only begins after the door has
automatically locked. As soon as the internal temperature of the oven exceeds
cooking temperatures, it is impossible to unlock the door--even if the "function
selector" knob is turned to 0.
How do you clean the cavity of your oven?
RELATIVELY
CLEAN COOKING
APPLICATIONS
DIRTY COOKING
APPLICATIONS
VERY DIRTY
COOKING
APPLICATIONS
Biscuits, vegetables, pastry,
quiches, soufflés
Meats, fish, (in a dish)
stuffed vegetables
Large cuts of meat
on the spit
Splatter-free cooking
Pyrolysis is not warranted
Pyrolysis is warranted after
three cooking cycles
Pyrolysis can be performed
after one cooking application
of this kind if there is a
lot of splattering
99636072_ML_ DOP505.qxd 17/03/05 15:40 Page 38
Page 19

39
3. How do you use the pyrolysis function?
How do you clean the cavity of your oven?
1) How do you program for immediate pyrolysis?
a) Remove the grids and trays from the oven and
clean any major spill residue.
b) Ensure that the programmer is displaying the
time of day and that it is not flashing
c) Turn the «function selector» knob to the
«PYRO» position.
The duration of the pyrolysis cycle is 1:30 ) or 1:45 ( ) or 2:00 ( )
(non-adjustable) and the oven cannot be used for 2:00, 2:15 or 2:30.
This time includes the cooling time until the door can be unlocked.
• During the pyrolysis cycle, the lock indicator located on the band lights up to show
that the door is locked.
• Lock indicator switches off to indicate that pyrolysis has ended automatically and
that you may then open the door.
d) Return the function selector to the 0 position 0.
e) When the oven is cool, use a damp cloth to remove the white ashes. The
oven is clean and once again ready for the cooking application of your choice.
2) How do you program for delayed pyrolysis?
Follow the instructions described in the ”How do you program for immediate
pyrolysis?” section, then:
a) Press the “SET” touch control. The end of cooking time flashes to
indicate that it is now possible to set it.
b)Press the + or - touch controls to set the desired end time.
Example: Cooking ends at 4:00.
After these steps, the beginning of the pyrolysis cycle is delayed so that it finishes
at 4:00. When the pyrolysis cycle is over, return the function selector to 0.
GB
99636072_ML_ DOP505.qxd 17/03/05 15:40 Page 39
ECO
Page 20

40
How do you change the bulb?
• The bulb is located on the ceiling of your oven's cavity.
a) Unscrew the view port (see adjacent
diagram).
b) Remove the bulb.
Bulb specifications:
- 25 W
- 220-240 V
- 300°
- G9
c) Replace the bulb then reposition the
view port and reconnect your oven.
Disconnect your oven before performing any task on the bulb to
avoid the risk of electric shock and, if necessary, let the appliance
cool down.
Bulb
Unscrew
View port
99636072_ML_ DOP505.qxd 17/03/05 15:41 Page 40
Page 21

41
W
hat do you do in case of operating
malfunctions?
If you have a doubt about the functioning of your oven, this does not
necessarily mean that there is a malfunction.
In any event, check the following items:
You notice that...
Possible causes What should you do?
The oven is not heating.
• The oven is not connected.
• The fuse in your electrical set-up
is not working.
• The selected temperature is too
low.
- Connect the oven.
- Replace the fuse in your electrical
set-up and check its capacity (16A).
- Increase the selected temperature.
The temperature indicator is
flashing.
• Problem with the door's locking
mechanism.
• Defective temperature sensor
- Call the After Sales Service
Department.
- Call the After Sales Service
Department.
The oven light is not working.
• The light is out of order.
• The oven is not connected or the
fuse is not working.
- Replace the light.
- Connect the oven or replace the
fuse.
The pyrolysis cleaning cycle does
not begin.
• The door is not properly closed.
• The locking system is defective.
- Verify that the door is locked.
- Call the After Sales Service Department.
GB
99636072_ML_ DOP505.qxd 17/03/05 15:41 Page 41
 Loading...