

Page 1
FR GUIDE D'INSTALLATION ET INSTRUCTIONS D’EMPLOI
EN GUIDE TO INSTALLATION AND USE
ES MANUAL DE INSTALACIÓN Y UTILIZACIÓN
PT MANUAL DE INSTALAÇÃO E INSTRUÇÕES DE UTILIZAÇÃO
DE EINBAU- UND BETRIEBSANLEITUNG
Four De Dietrich
De Dietrich Oven
Horno De Dietrich
Forno De Dietrich
De Dietrich Ofen
Page 2

2
Dear valued customer,
To discover a
DDee DDiieettrriicchh
product is to experience the range of unique emotions
which only high-value items can produce.
The attraction is immediate, from the moment you set eyes on the product. The
sheer quality of the design shines through thanks to the timeless style and
outstanding finishes which make each appliance an elegant and refined little
masterpiece in its own right, each in perfect harmony with the others.
Next, comes the irresistible urge to touch it.
DDee DDiieettrriicchh''ss
design makes
extensive use of robust and prestigious materials. The accent is placed firmly
upon authenticity.
By combining state-of-the-art technology with top quality materials,
DDee DDiieettrriicchh
produces beautifully crafted products to help you get the most from the culinary
arts, a passion shared by all lovers of cooking and fine food.
We hope that you enjoy using this new appliance and we would love to receive
your suggestions and to answer any questions you may have. Please feel free to
contact our customer service department via our website.
To benefit from the many advantages offered by the brand, we recommend that
you register your product at:
wwwwww..ddee--ddiieettrriicchh..ccoomm..
Thank you for choosing a
DDee DDiieettrriicchh pprroodduucctt..
DDee DDiieettrriicchh
You can find a full range of information about the brand at www.de-dietrich.com
Visit the De Dietrich Gallery, 6 rue de la Pépinière (Paris eighth district)
Open from Tuesday to Saturday from 10 am to 7 pm
Customer service department: 0892 02 88 04
As part of our commitment to constantly improving our products, we reserve the right to make
changes to them based on advances to their technical, functional and/or aesthetic properties.
Important:
Before installing and using your appliance, please read this Installation and Usage
Guide carefully, as it will allow you to quickly familiarise yourself with its operation.
Page 3

3
TABLE OF CONTENTS
EN
1 / NOTICES TO THE USER
••
Safety instructions
_________________________________________
4
••
Caring for the Environment
__________________________________
5
••
Stand by mode
____________________________________________
5
2 / INSTALLING YOUR APPLIANCE
••
Choice of location
__________________________________________
6
••
Build-in
___________________________________________________
6
••
Electrical connection
_______________________________________
7
3 / DESCRIPTION OF YOUR APPLIANCE
••
Accessories
_______________________________________________
9
4 / CARING FOR AND CLEANING YOUR APPLIANCE
••
Cleaning the outer surfaces
__________________________________
12
••
Cleaning the door __________________________________________ 12
••
Self-degreasing catalytic
____________________________________
14
••
Changing the catalytic panels
Dismantling the wire supports
________________________________
15
••
What is pyrolysis?
__________________________________________
16
••
In what situations should pyrolysis be used?
____________________
16
5 / ADJUSTING YOUR APPLIANCE
••
Replacing the oven lamp
____________________________________
17
6 / TROUBLESHOOTING
__________________________________________
19
7 / AFTER-SALES SERVICE
________________________________________
20
Page 4

4
1 / NOTICES TO THE USER
EN
SAFETY INSTRUCTIONS
— This oven was designed for use by private
individuals in their homes. It is intended solely
for cooking foodstuffs. This oven does not
contain any asbestos-based components.
— Please make sure children do not play with
the appliance.
— When you receive the appliance, unpack it
or have it unpacked immediately. Give it an
overall inspection. Make note of any concerns
or reservations on the delivery slip and make
sure to keep a copy of this form.
— Your appliance is intended for standard
household use. Do not use it for commercial
or industrial purposes or for any other
purpose than that for which it was designed.
— Do not modify or attempt to modify any of
the characteristics of this appliance. This
would be dangerous to your safety.
— WARNING: accessible parts may be hot
when in use. It is advisable to keep small
children away from the apppliance.
— Never pull your appliance by the door
handle.
— Before using your oven for the first time,
heat it while empty for approximately 15
minutes. Make sure that the room is
sufficiently ventilated. You may notice a
particular odour, or a small release of smoke.
All of this is normal.
— WARNING: accessible parts may become
hot when the grill is used. It is advisable to
keep children away from the apppliance.
— When in use, the appliance becomes hot.
Be careful not to touch the heating elements
located inside the oven.
— When placing dishes inside or removing
them from the oven, do not place your hands
close to the upper heating elements and use
heat-protective kitchen gloves.
— During pyrolysis, the exposed surfaces
become hotter than during normal use. It is
advisable to keep small children away from
the oven.
— Before beginning a pyrolysis cleaning cycle
in your oven, remove all parts of your grids,
trays and accessories and remove major spill
residue. During pyrolysis, exposed surfaces
become hotter than during normal use. It is
advisable to keep small children away from
the oven.
— At the end of cooking, do not pick up oven
or grill items (grid, rotisserie,...) with your bare
hands.
— Never place aluminium foil directly in
contact with the floor of the oven (see the
chapter on oven description), as accumulated
heat may cause deterioration of the enamel.
— Do not place heavy weights on the oven
door when open, and make sure that children
cannot climb or sit on it.
— The oven must be turned off when cleaning
inside the oven.
— This appliance is not intended to be used by
persons (including children) with reduced
physical, sensory or mental abilities, or persons
lacking experience or awareness, unless using
it with the help of a person reponsible for their
safety, or under supervision and with prior
instruction in its use.
— In addition to the accessories supplied with
your oven, only use dishes capable of
withstanding high temperatures (follow the
manufacturer’s instructions).
— After using your oven, make sure that all the
controls are in their stop position.
— Do not use your oven as a larder or to store
any items after use.
— Never use steam or high-pressure devices to
clean the oven (electrical safety requirement).
••
Important
Keep this user guide with your
appliance. If the appliance is ever sold or
transferred to another person, ensure that
the new owner receives the user guide.
Please become familiar with these
recommendations before installing and
using your oven. They were written for your
safety and the safety of others.
Page 5

CARING FOR THE ENVIRONMENT
••
5
1 / NOTICES TO THE USER
EN
CARING FOR THE ENVIRONMENT
••
— This appliance’s packing materials are
recyclable. Recycle them and play a role in
protecting the environment by depositing
them in local authority containers provided
for this purpose.
— Your appliance also contains
many recyclable materials. It is
therefore marked with this logo to
indicate that used appliances must
not be mixed with other waste.
Recycling of the appliances
organised by your manufacturer will thus be
undertaken in optimum conditions, in
accordance with European directive
2002/96/CE relating to electrical and
electronic equipment waste. Contact your
local council or your retailer to find out the
drop-off points for used appliances that are
nearest to your home.
— We thank you for your help in protecting the
environment.
Warning
Installation should only be performed
by qualified installers and technicians.
This appliance complies with the following
European directives:
- Low Voltage Directive 2006/95/CE for
affixing the CE mark.
- Electromagnetic Compatibility Directive
89/336/CEE modified by directive
93/68/CEE for attaching the CE mark.
- CE regulation 1935/2004 concerning
materials and objects intended for contact
with food substances.
This appliance is intended to be connected
to a main supply with maximum permissible
system impedance Zmax of 0.4372 Ohm at
the connection point.
User must ensure that main supply fulfills
the requirement above. If needed, the power
supply company can be asked for the
system impedance at the connection point.
—
(
Depending on the model):
For your
safety, your oven is equipped with an
AUTOMATIC STOP, if you forget to turn off
your oven by mistake. After 23 hours and
30 minutes of continuous use, the AS
(Automatic Stop) feature will be activated and
your oven will turn itself off. AS or Auto Stop
will be displayed instead of the time and a
series of successive beeps will be emitted for
a short time.
- The main circuit supplying the oven must
have a single-pole cut-off switch with at least
3mm between contacts.
- Ensure the appliance is unplugged from the
mains before replacing the oven lam, to avoid
electric shock.
Warning
To avoid the risk of electric shock,
ensure the appliance is disconnected from
the power before replacing the lamp. Work
only when the appliance is cool.
Whether a external disturbance occurs in
mains the appliance can stop the current
cooking or cleaning cycle and the display
can be switched off for few seconds. After
that the program can be launched again by
the user.
Page 6
6
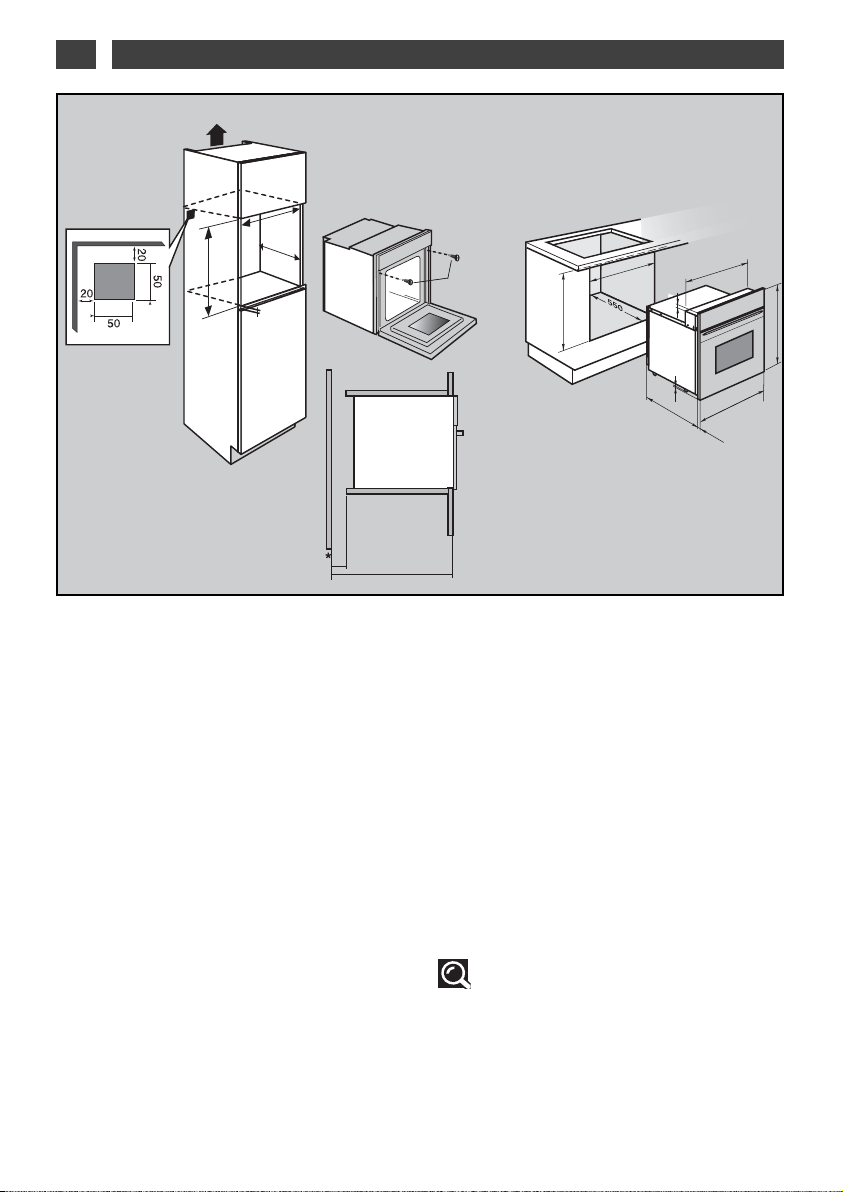
2 / INSTALLING YOUR APPLIANCE
EN
BUILD-IN
To do this:
1) Drill a hole in the cabinet panel to avoid
splitting the wood.
2) Attach the oven with the 2 screws.
••
CHOICE OF LOCATION
The above diagrams show the dimensions of a
cabinet that will be able to hold your oven.
The oven can be installed under a work top or
in a column of cabinetry (open* or closed)
having the appropriate dimensions for built-in
installation (see adjacent diagram).
Your oven has optimised air circulation that
allows it to achieve remarkable cooking and
cleaning results if the following guidelines are
followed:
• Centre the oven in the cabinet so as to
guarantee a minimum distance of 5 mm
between the appliance and the cabinet beside it.
• The material or coating of the cabinet must
be heat-resistant.
• For greater stability, attach the oven in the
cabinet with two screws through the holes
provided for this purpose on either side of the
front inner panel (fig.1).
••
fig.1
Tip
To be certain that you have properly
installed your appliance, do not hesitate to
call on a household appliance specialist.
+4
-0
560
+3
-0
597
555
8
8
529/545
553
21
595.5
592/593
22/25
+4
-0
560
+4
-0
600
50
555
Page 7

7
2 / INSTALLING YOUR APPLIANCE
EN
••
ELECTRICAL CONNECTION
Single-phase 20A Meter
220-240V~50Hz
Electrical outlet
2 poles
++ eeaarrtthh
standard CEI 60083
220-240 V~Single-phase line
Power
supply cable
length 1.50 m
approx.
16A fuse or differential
circuit breaker
The appliance must be fitted correctly to
guarantee electrical safety. During fitting and
maintenance operations, the appliance must
be unplugged from the electrical grid. Fuses
must be switched off or removed.
The electrical connections are made before
the appliance is installed in its housing.
Ensure that:
- the electrical installation has sufficient
voltage,
- the electrical wires are in good condition,
- the diameter of the wires complies with the
installation requirements.
Your oven must be connected with a
(standard) power cable with 3 conductors of
1.5mm
2
(1 live + 1 neutral + earth) which must
be connected to a 220-240V
~
single-phase
grid by means of a 1 live + 1 neutral + earth
CEI 60083 standard power socket or via an
all-poles cut-off device in compliance with the
installation rules.
Warning
The safety wire (green-yellow) is
connected to the appliance’s
terminal and must be connected to the
earth terminal of the electrical set-up.
You must enable the appliance to be
disconnected from the supply network after
installation.
Disconnection can be enabled by ensuring
that there is an accessible power plug or by
incorporating a switch into the fixed wiring in
compliance with the installation rules.
The fuse in your set-up must be 16 amperes.
If the power cable is damaged, it should be
replaced by the manufacturer, its after-sales
service department or a similarly qualified
person to avoid danger.
OVEN WITH PYROLYSIS
FUNCTION
Page 8

Warning
FREESTANDING NO PYROLYSIS OVENS:
the appliance must be connected to the mains with a red
single-phase connection with the neutral (blue)
connection guaranteed. Fit the oven into the space,
ensuring there is no excess cable in the upper part .
Screw it to the setting using the two screws supplied .
8
2 / INSTALLING YOUR APPLIANCE
EN
Warning
We cannot be held responsible for any accident resulting from inexistent, defective or
incorrect earthing.
If the electrical installation in your residence requires any changes in order to hook up your
appliance, contact a professional electrician.
If the oven malfunctions in any way, unplug the appliance or remove the fuse corresponding
to the sector where the oven is hooked up.
Page 9

9
3 / DESCRIPTION OF YOUR APPLIANCE
EN
••
Safety grid with handle (fig.1)
Equipped with a handle at the front to make it
easy to grasp. The grid can be used to hold all
dishes and moulds containing foodstuffs to
be cooked or browned.
It can be used for barbecues (to be placed
directly on the grid).
ACCESSORIES
(
depending on the model)
••
fig.1
fig.2
Front
Rear
• 45 mm multi-purpose tray. Fully
accessible sliding rail system (fig.2)
The new sliding rail system with support (fully
accessible) makes food more practical and
easier to handle as the trays can be effortlessly pulled for simpler handling. The trays
can be completely removed, providing full
access. Their stability ensures that food can
be handled safely, reducing the risk of burns.
This means that you can take food out of the
oven far more easily. Please note: the tray and
its support will remain hot. For more effective
use, place the tray and its support on the
rails, between the stops.
Do not directly place meat or poultry on the
drip tray for roasting. This would inevitably
produce splashes and dirty the sides of the
oven.
Warning
Before starting a pyrolysis cleaning cycle, make sure that any accessories that are not
pyrolysis safe have been removed from the oven (sliding rails, baking trays, chrome-plated
grills, and so on) as well as any cookware. The side grills are pyrolysis safe and may be left
inside the oven during pyrolysis.
Front
Rear
Page 10

10
3 / DESCRIPTION OF YOUR APPLIANCE
EN
ACCESSORIES
(
depending on the model)
••
••
Baking sheet (fig.3)
This aluminium baking sheet features a foodgrade non-stick surface and is designed
especially for your pastry creations,
particularly light pastries. You can set your
choux and puff pastries, meringues,
madeleines and other delights directly on it.
••
Multi-purpose 45 mm dish (fig.4)
When inserted in the supports under the grid,
it collects juice and fat from grilling, and can
be used half-filled with water as a doubleboiler.
Avoid placing roasts or meat directly in the
dish because this is certain to cause
significant spattering on the oven walls.
NN..BB
.: The baking sheet should never be used
to hold baking dishes or cake moulds.
fig.3
fig.4
Front
Rear
Front
Rear
Page 11

11
3 / DESCRIPTION OF YOUR APPLIANCE
EN
fig.5
fig.6
fig.7
•Turnspit (fig.5)
Pass the spit through the joint to be roasted,
thread on the second fork, centre the joint
and screw the forks tight.
Place the spit in its cradle: the cradle should
be placed in the deep enamel dish.
Slide the cradle on to shelf support 3, push
gently to engage the end of the spit into the
square drive at the back of the oven (Fig. 6).
Unscrew and remove the handle, so that the
door can close. At the end of cooking, screw
the handle back on to the spit, so that you can
remove the joint without burning yourself.
NN..BB
.: should you wish to roast a large piece of
meat, you can place the dish on the bottom of
the oven and insert the cradle in shelf support
3, to prevent the meat from touching the back
of the dish and stopping the spit from turning.
ACCESSORIES (DEPENDING ON MODEL)
••
Front
Rear
Page 12

12
4 / CARING FOR AND CLEANING YOUR APPLIANCE
EN
CLEANING THE OUTER SURFACES
••
To clean both the electronic programmer window and the oven door, use a window washing
product applied to a soft cloth.
Do not use abrasive creams or scouring sponges.
- Clean the glass using a soft sponge and
washing-up liquid (fig.3).
Do not immerse the glass in water.
Do not use abrasive creams or scouring
pads. Rinse with clean water and dry with a
lint-free cloth.
CLEANING THE DOOR
••
••
Removing the door
fig.3
Warning
Before unclipping the glass, allow the
appliance to cool.
Before removing the back panel,
disconnect the appliance from the power.
After cleaning, the back panel must be put
back in place, as detailed in the
instructions.
Warning
Do not use abrasive cleaning
products or hard metal scrapers for
cleaning the glass oven door, as they could
scratch the surface and cause the glass to
shatter.
- Open the door completely and block it open
using the two red stops (fig.1).
They are supplied with your machine in the
plastic pack.
- Remove the first attached window as follows:
Use the metal part as a lever at the points
marked AAon one side then the other to unclip
the glass (fig. 2).
••
Disassembling the door
(
depending on the model)
fig.1
AA
CLIC
CLIC
Page 13

13
4 / CARING FOR AND CLEANING YOUR APPLIANCE
EN
fig. 7
- If necessary, remove all the door's inner glass
panels (fig.4).
This unit is made up of one or two glass panels
depending on the model, with a black rubber buffer
in each corner
(fig. 5).
- After cleaning, replace the four rubber corners,
taking care to follow the markings on the glass:
ttoopp lleefftt:: LL
ttoopp rriigghhtt:: RR
Place the interior glass unit in the door, so that L and
R are on the hinge side
(fig.6).
- If your oven has just one interior glass, this will be
found next to
the clip-on glass.
- Clip in the final glass by placing the
”P.Y.R.O.L.Y.T.I.C” marking towards you (fig.7).
- Remove the red plastic stops (fig. 8).
Your appliance is now ready for use again.
fig. 6
fig. 5
fig. 4
L
R
PYROLYTIC
Page 14

14
4 / CARING FOR AND CLEANING YOUR APPLIANCE
EN
CATALYTIC ENAMEL OVEN (SELF-DEGREASING)
••
- The oven has an enclosure fitted with removable panels covered with a special microporous
enamel (catalytic enamel) which gives them self-degreasing properties. As soon as dirt appears,
it spreads out and is dispersed into the micropore holes. It oxidises on to both surfaces and gradually disappears. The self-degreasing enamel is mainly suitable for fatty, rather than sugary
substances. This is why the oven floor, which is more likely to suffer sugary spillages, is not coated with this enamel.
We strongly recommend:
- That you do not scrub these catalytic panels with metal brushes, pointed or sharp implements.
- That you do not try to clean them with commercial scouring products.
- When grilling food, the temperature of the panels is not always sufficient to eliminate major fat
splashes.
In this case, when you have finished cooking, leave the oven switched on for 20 to 30 minutes
at the maximum temperature for the sequence chosen.
If there are traces remaining, they will dissipate during subsequent cooking.
BBeeffoorree ssttaarrttiinngg ttoo ddiissaasssseemmbbllee tthhee aapppplliiaannccee,,
aallllooww iitt ttoo ccooooll ddoowwnn aanndd eennssuurree tthhaatt iitt hhaass
bbeeeenn ddiissc
coonnnneecctteedd ffrroomm tthhee ppoowweerr ssuuppppllyy..
REMOVING THE WIRE SHELF SUPPORTS (DEPENDING ON MODEL)
••
Warning
- For any cleaning operation inside the
oven cavity, the oven must be switched off.
Before you remove the back panel, the
appliance must be disconnected from the
power. After cleaning, the back panel must
be put back in place, as detailed in the
instructions.
WWiirree sshheellff ssuuppppoorrttss wwiitthh hhooookkss iinn tthhee
cceennttrree..
To remove them, lift up the front part of the
shelf support to disengage the front hook
from its housing (fig.1).
Then gently pull the whole of the support
towards you and lift the back to release the
rear hook from its housing (fig.2).
Pull out the two shelf side supports.
fig.1
fig.2
Page 15

15
4 / CARING FOR AND CLEANING YOUR APPLIANCE
EN
It is recommended that you replace the two
catalytic side panels when their selfdegreasing capability is no longer effective.
Start by removing the wire shelf side
supports – see the “Removing wire shelf
supports” section).
Remove the two old catalytic side panels
and replace them with new ones.
REPLACING THE CATALYTIC SIDE PANELS
(catalytic oven model)
••
WWiirree sshheellff ssuuppppoorrttss wwiitthh cclliipp ssyysstteemm..
Push down on the upper part of the shelf
support to unclip it from the central support
(fig. 1). Tilt the support towards the inside of
the oven and lift gently upwards to
disengage it from the two holes at the
bottom (fig. 2).
To re-fit the shelf supports after cleaning,
follow the above steps in the reverse order.
fig.2
fig.1
fig.1
Page 16

16
4 / CARING FOR AND CLEANING YOUR APPLIANCE
EN
If your oven emits smoke during preheating or releases large amounts of smoke during cooking.
If your oven releases an unpleasant odour when cooled after various types of cooking (lamb,
fish, grills, etc...).
- Pyrolysis is a cycle during which the oven cavity is heated to a very high temperature in order
to eliminate spatters and spills. Smoke and odours released during pyrolysis are destroyed by
moving through a catalyzer.
- Pyrolysis is not necessary after each cooking cycle, simply when the degree of soiling warrants it.
- As a safety measure, the cleaning operation only begins after the door has automatically
locked. As soon as the internal temperature of the oven exceeds cooking temperatures, it is
impossible to unlock the door even if the “function selector” is set to 0.
RReellaattiivveellyy cclleeaann
ccooookkiinngg ooppeerraattiioonnss
MMeessssyy
ccooookkiinngg ooppeerraattiioonnss
VVeerryy mmeessssyy
ccooookkiinngg ooppeerraattiioonnss
Biscuits, vegetables, pastry,
quiches, soufflés...
Meat, fish (in a dish), stuffed
vegetables.
Large cuts of meat on the spit.
Splatter-free cooking: pyrolysis is
not warranted.
Pyrolysis may be warranted after
every 3 cooking cycles.
Pyrolysis can be performed after
one cooking application of this
kind, as there is a lot of
splattering.
WHAT IS PYROLYSIS?
Tip
You should not wait until the oven is overly coated in grease to initiate a cleaning cycle.
IN WHAT SITUATIONS SHOULD PYROLYSIS BE USED?
••
••
Tip
Your oven is equipped with enamelled wire shelf supports: these need to be removed
before running the pyrolysis cycle.
Warning
Remove any cookware, grids and trays from the oven and clean any major spill residue
before carrying out the pyrolysis.
Page 17

17
5 / ADJUSTING YOUR APPLIANCE
EN
The lamp is accessible:
IInnssiiddee tthhee oovveenn ((ffiigg..11))..
The bulb is located on the ceiling of your
oven’s cavity.
- Unscrew the view port counter-clockwise
(fig.2),
- Pull out the bulb.
Bulb specifications:
- 25 W
- 220-240 V
~
- 300°C
- G9.
- Replace the bulb then replace the view port
and reconnect your oven.
Tip
To unscrew the view port and the light,
use a rubber glove, which will make
disassembly easier.
Warning
Make sure the appliance is
disconnected from the power before
replacing the lamp in order to avoid the risk
of electric shock. Change the lamp only
when the appliance has cooled down.
fig.1
REPLACING THE OVEN LAMP
••
Bulb
Unscrew
View port
fig.2
Light
Page 18

18
5 / ADJUSTING YOUR APPLIANCE
EN
Remove the wire shelf supports (see the section “Removing the wire shelf supports” on
page 14).
- The lamps are accessible: Inside the oven
(fig.1).
- Use the red stop as a lever to remove the
glass (fig. 2-3).
- Remove the bulb (fig. 4).
Bulb specification:
- 25W,
- 220-240 V~,
- 300°C
- G9.
- Replace the bulb, then replace the glass and
reconnect the oven.
fig.1
REPLACING THE OVEN LAMP
••
Bulb
fig.2
Lamp
fig.4
Glass panel
Glass panel
fig.3
Warning
Make sure the appliance is
disconnected from the power before
replacing the lamp in order to avoid the risk
of electric shock. Change the lamp only
when the appliance has cooled down.
Page 19

EN
6 / TROUBLESHOOTING
Tip
In all circumstances, if your efforts are not sufficient, contact the After-Sales Service
Department without delay.
IIff yyoouu hhaavvee aa ddoouubbtt aabboouutt tthhee ccoorrrreecctt ffuunnccttiioonniinngg ooff yyoouurr oovveenn,,
this does not
necessarily mean that there is a malfunction.
IInn aannyy eevveenntt,, cchheecckk tthhee ffoolllloowwiinngg ppooiinnttss::
Warning
- Repairs to your appliance should only be performed by professionals. Non-standard
repairs may be a source of danger for the user.
**
OOnnllyy ffoorr mmooddeellss wwiitthh tthhee ppyyrroollyyssiiss ffuunnccttiioonn..
YYOOUU OOBBSSEERRVVEE
TTHHAATT……
PPOOSSSSIIBB LLEE
CC AAUUSSEESS
WWHHAATT SSHHOOUULLDD YYOOUU DDOO??
TThhee oovveenn iiss nnoott hheeaattiinngg..
- The oven is not connected to
the power supply.
- Your fuse is not working.
- The selected temperature is
too low.
➡ Plug in your oven.
➡ Replace the fuse in your electrical
set-up and check its capacity (16A).
➡ Increase the selected temperature.
**
TThhee ppaaddlloocckk iiss ffllaasshhiinngg..
- Problem with the door’s
locking mechanism.
➡ Call the After-Sales Service
Department.
TThhee oovveenn lliigghhtt iiss nnoott
wwoorrkkiinngg..
- The light is not working.
- The oven is not connected or
the fuse is not working.
➡ Change the bulb.
➡ Plug in your oven or change the
fuse.
**
TThhee ppyyrroollyyssiiss cclleeaanniinngg
ccyyccllee ddooeess nnoott bbeeggiinn..
- The door is not properly
closed.
- The locking system is
defective.
➡ Verify that the door is locked.
➡ Call the After-Sales Service
Department.
YYoouurr oovveenn iiss bbeeeeppiinngg..
- During cooking.
- At the end of a cooking cycle.
➡ The temperature recommended
for your choice has been reached.
➡ Your programmed cooking cycle
is finished.
TThhee ccoooolliinngg ffaann ccoonnttiinnuueess
ttoo ooppeerraattee aafftteerr tthhee oovveenn
ssttooppss..
- The fan should work for up to
an hour after cooking, or
when the oven temperature is
greater than 125°C.
- If it does not stop after 1 hour.
➡ Open the oven door to cool down
the oven faster.
➡ Call the After-Sales Service
Department.
19
Page 20

20
EN
7 / AFTER-SALES SERVICE
Any repairs that are made to your appliance
must be handled by a qualified professional
authorised to work on the brand. When you
call, mention your appliance’s complete
reference (model, type, serial number). This
information appears on the manufacturer’s
nameplate
(fig.1).
GENUINE REPLACEMENT PARTS
During maintenance work, request that
only
certified genuine replacement parts are
used.
• SERVICE CALLS
fig.1
FFaaggoorrBBrraannddtt SSAASS
, Management company – SAS: social capital of 20,000,000 euros RCS Nanterre 440 303 196.
CZ5700665-04 03-12
MADE IN FRANCE
230V ~ 50 Hz
BRANDT APPLIANCES SAS
7 rue Henri Becquerel
92500 RUEIL MALMAISON
 Loading...