

Page 1
FR GUIDE D'UTILISATION
EN USER GUIDE
ES MANUAL DE UTILIZACIÓN
PT MANUAL DE UTILIZAÇÃO
DE BETRIEBSANLEITUNG
Four
Oven
Horno
Forno
Backofen
Page 2

2
Dear valued customer,
To discover a
DDee DDiieettrriicchh
product is to experience the range of unique emotions
which only high-value items can produce.
The attraction is immediate, from the moment you set eyes on the product. The
sheer quality of the design shines through thanks to the timeless style and
outstanding finishes which make each appliance an elegant and refined little
masterpiece in its own right, each in perfect harmony with the others.
Next, comes the irresistible urge to touch it.
DDee DDiieettrriicchh''
s design makes extensive
use of robust and prestigious materials. The accent is placed firmly upon
authenticity.
By combining state-of-the-art technology with top quality materials,
DDee DDiieettrriicchh
produces beautifully crafted products to help you get the most from the culinary
arts, a passion shared by all lovers of cooking and fine food.
We hope that you enjoy using this new appliance and we would love to receive
your suggestions and to answer any questions you may have. Please feel free to
contact our customer service department via our website.
To benefit from the many advantages offered by the brand, we recommend that
you register your product at:
wwwwww..ddee--ddiieettrriicchh..ccoomm..
Thank you for choosing a
DDee DDiieettrriicchh pprroodduucctt..
DDee DDiieettrriicchh
You can find a full range of information about the brand at www.de-dietrich.com
Visit the De Dietrich Gallery, 6 rue de la Pépinière (Paris eighth district)
Open from Tuesday to Saturday from 10 am to 7 pm
Customer service department: 0892 02 88 04
Page 3

3
1/ DESCRIPTION OF YOUR APPLIANCE
• Introduction to your oven
____________________________________ 4
• Introduction to the controls __________________________________ 5
2 / USING YOUR APPLIANCE
• Cooking __________________________________________________ 6
• Settings when switching on for the first time ___________________ 7
º
Resetting the time. _____________________________________ 7
• Putting into standby mode ___________________________________ 8
• The “EXPERT” function _____________________________________ 8
º Temperature __________________________________________ 9
º Cooking time and end of cooking time _____________________ 9
º Grill+ option ___________________________________________ 10
º Starting a cooking programme ___________________________ 11
• The “RECIPE” function ______________________________________ 12
º Advice and tips ________________________________________ 13
• The “I.C.S.” function ________________________________________ 18
• “LOW TEMPERATURE function”______________________________ 26
• The “SETTINGS” function
____________________________________ 27
º Time
_________________________________________________ 27
º
Sound________________________________________________ 27
º
Display _______________________________________________ 27
º
Consumption __________________________________________ 28
º
Language _____________________________________________ 28
º
Services ______________________________________________ 29
º
Demo mode ___________________________________________ 29
• The “TIMER” function
_______________________________________ 30
•
The “CLEANING” function ___________________________________ 31
• Locking the controls (child safety)
____________________________ 32
3 / AFTER-SALES SERVICE
• Repairs
___________________________________________________ 34
• Customer relations
_________________________________________ 34
CONTENTS
EN
Page 4
4
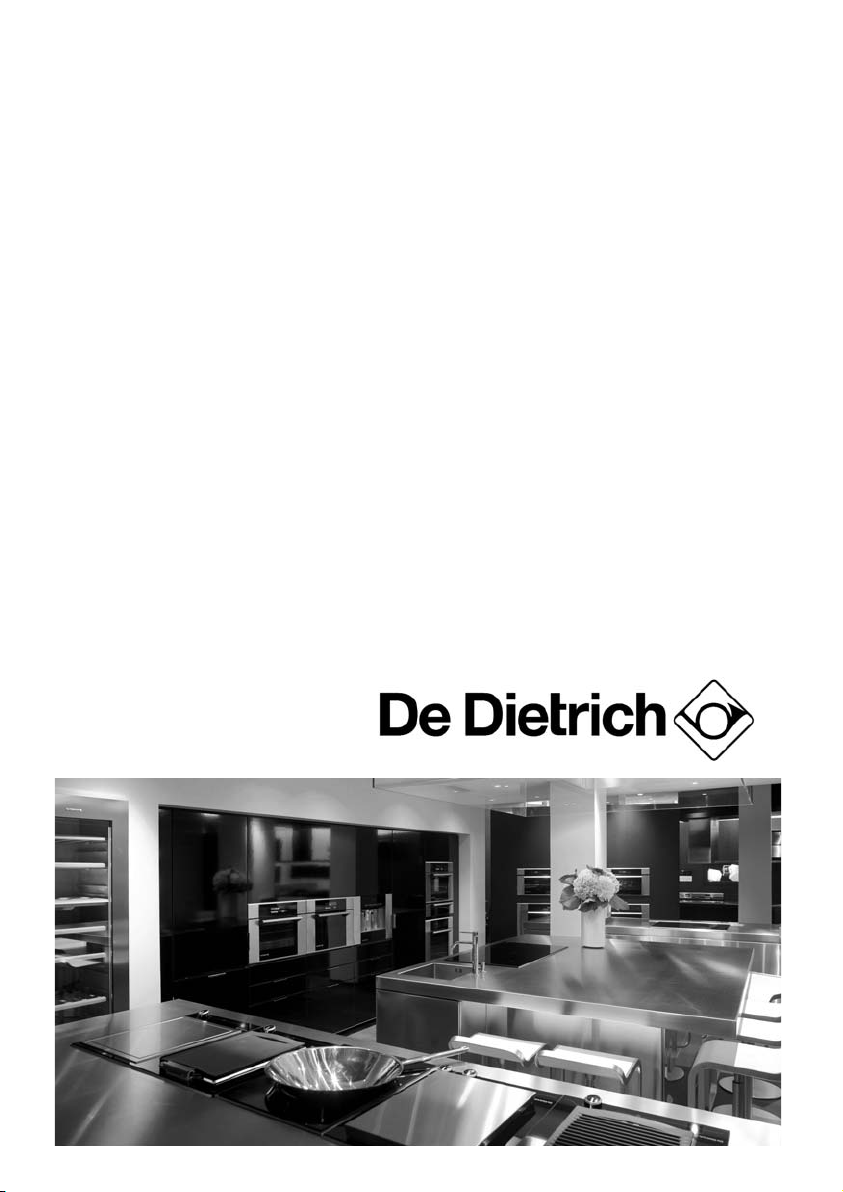
INTRODUCTION TO YOUR OVEN
•
Programmer
Control buttons
WWaakkee uupp
Wire shelf supports
Lamp
Hole for rotisserie
A
B
C
D
E
EN
1 / DESCRIPTION OF YOUR APPLIANCE
D
B
A
F
E
1
2
3
4
5
C
F
Page 5
5
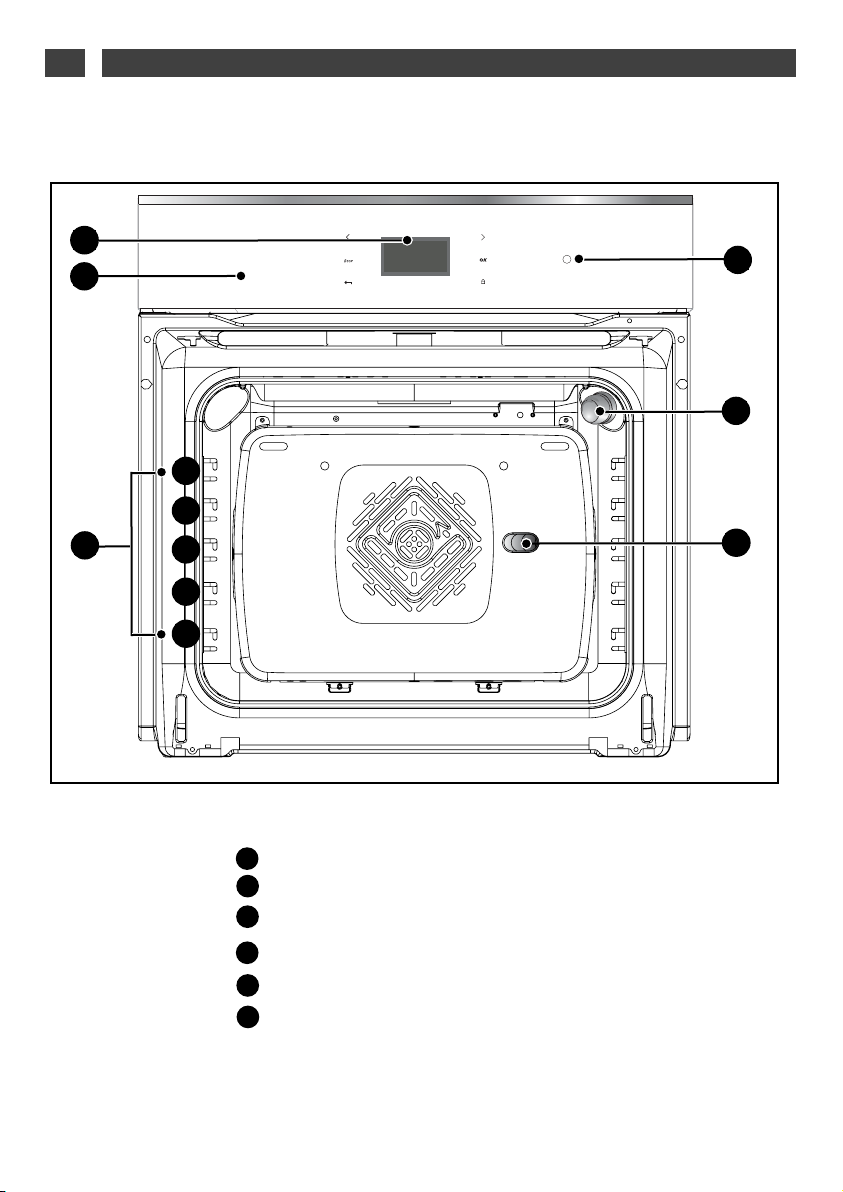
List of symbols:
Programming in progress
Door locked
Keypad locked
Cleaning recommended
Selector buttons
Switch off the oven or cooking programme
Back to the previous level
Information display
Keypad locking
Confirm button
“Wake up” button (come out of standby)
A
B
C
D
D
E
First use: before using your oven for the first
time, heat it up while empty with the door
closed for approximately 15 minutes on the
maximum setting, in order to “cure” the
appliance. The rock wool that surrounds the
oven cavity may initially release a particular
odour caused by its composition. Similarly,
you may notice a little smoke. All of this is
normal.
A
B
C
E
F
F
INTRODUCTION TO THE CONTROLS
•
G
G
EN
1 / DESCRIPTION OF YOUR APPLIANCE
Page 6

6
COOKING
•
This oven gives you to access four different types of programming, depending on your knowledge
of the recipe in question:
- For a recipe where you know all the settings (you choose the type of cooking, temperature and cooking time yourself): select the “EXPERT” function.
- For a recipe where you need assistance from the oven (simply choose the type of food from a list and
the weight; the oven will select the most suitable settings: temperature, cooking time, type of cooking), select the “RECIPE” function.
- For a recipe managed automatically by the oven: you select from a list ofthe 12 most popular dishes,
the one which you would like to cook(temperature, cooking time and cooking programme are defined
by the oven), select the “ICS” function (Intelligent Cooking System).
- For a recipe to a specific programme managed electronically by the oven, to give you an incomparably tender result for meat and exceptional flavour, select the “LOW TEMPERATURE” function.
EN
2 / USING YOUR APPLIANCE
Page 7
7
•
Language
The oven automatically displays the
following screen.
It allows you to select your language by
pressing the < and > buttons.
Confirm by pressing OK.
•
Time
A second screen then appears, to allow you
to set the time.
Set the time using the < and > buttons and
then press OK.
The hours flash, you can adjust them with
the < and > buttons and confirm by pressing
OK.
Do the same for the minutes (1).
You can choose a 12-hour (am/pm) or
24-hour display (2).
Select using the < and > buttons and then
confirm by pressing OK.
Digital display
SETTINGS WHEN SWITCHING ON FOR THE FIRST TIME
•
O K
(1)
(2)
EN
2 / USING YOUR APPLIANCE
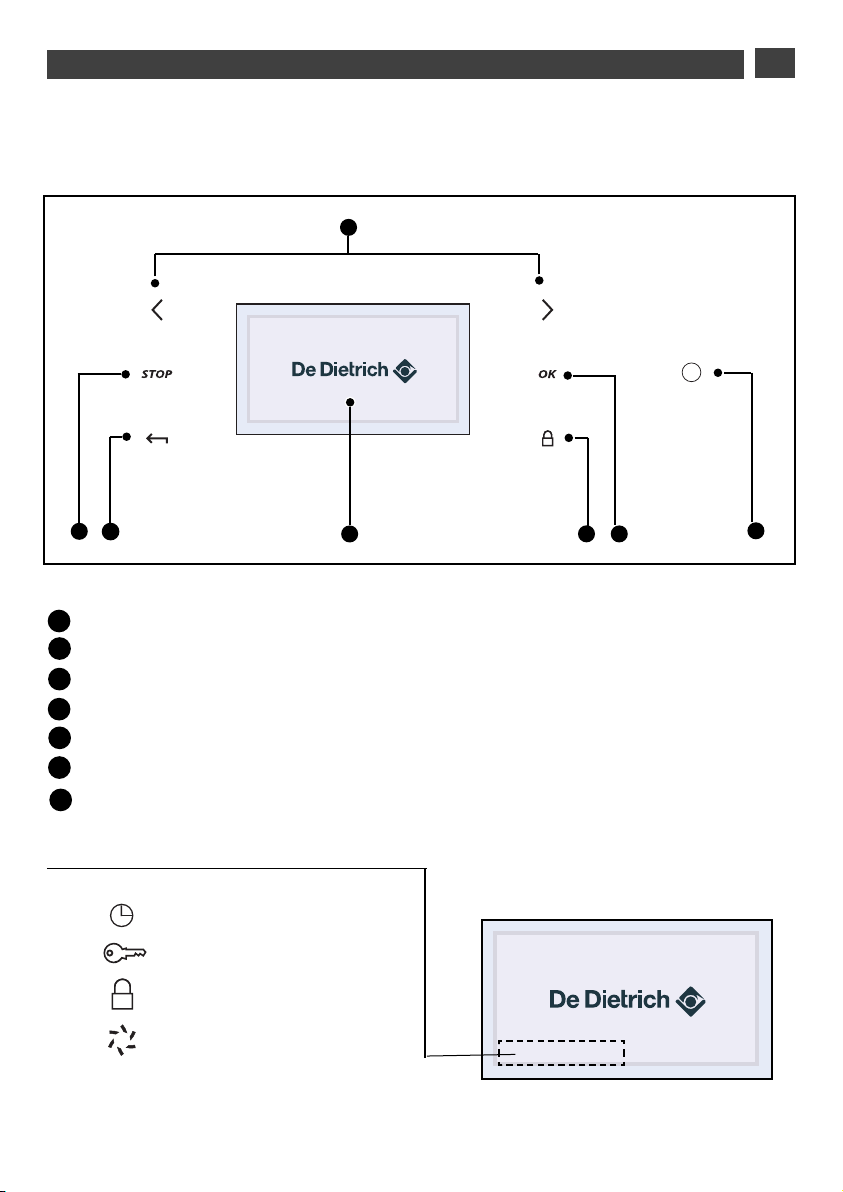
•
Resetting the time
- Press the OK button.
The oven displays the following screen by
default (“Expert” function).
- Press the < and > buttons until the
“Settings” screen appears, confirm with OK.
The “time” screen is displayed; press OK
again to access the time data screen and
then proceed as for switching on for the first
time.
21
TTIIMMEE
English
Francais
Deutsch
OK
EXPERT
21
Heure
Page 8
8
Example
•
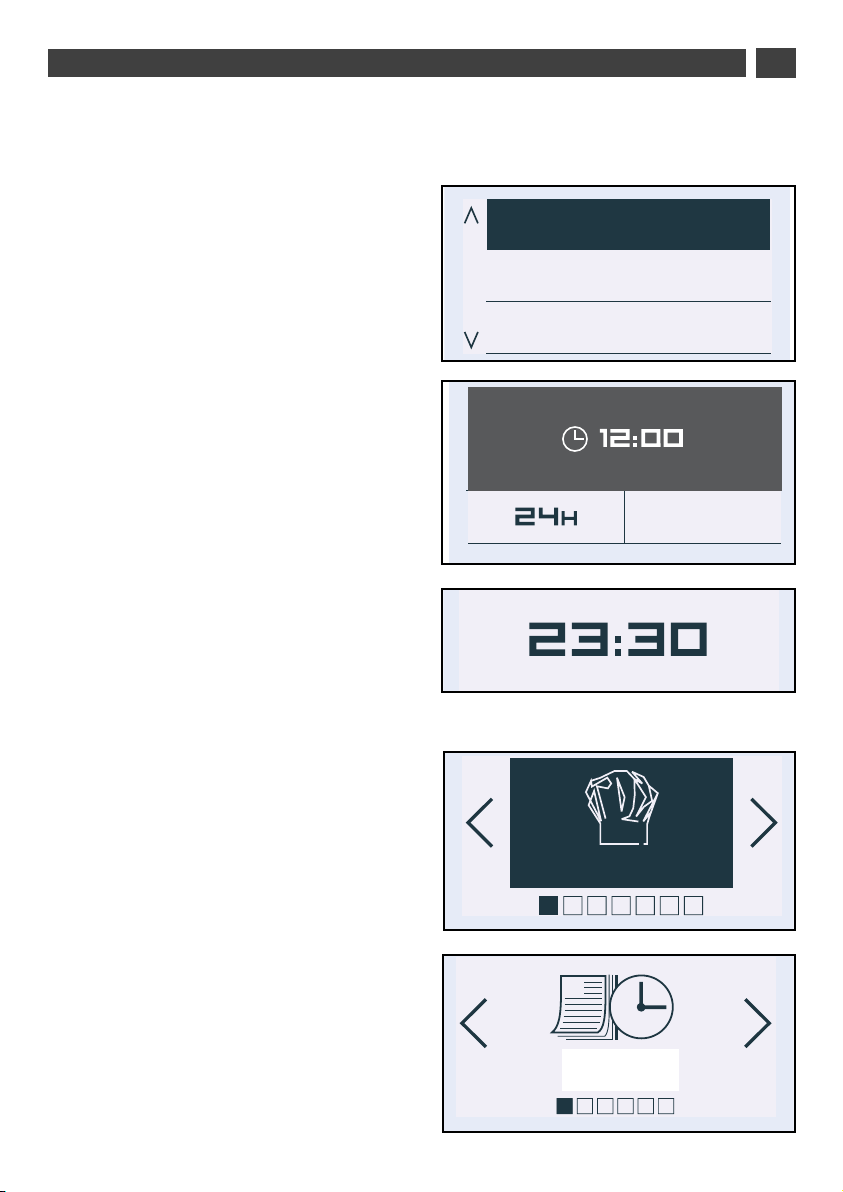
The “Expert” function
The Expert function allows you to set the
cooking parameters yourself: temperature,
type of cooking, cooking time
- Press the OK button. You move to the
“Expert” screen.
- Press OK again to choose the type of
cooking from the following list by pressing
the < and > buttons (to make a selection,
refer to the cooking guide on the next page):
· Circulating heat
· Combined heat
· Traditional Eco
· Turbo grill (+ Rotisserie)
· High grill (+ Rotisserie)
· Medium grill (+ Rotisserie)
· Keep warm
· Bread
· Defrost
Confirm your selection by pressing OK.
THE “EXPERT” FUNCTION
•
EN
2 / USING YOUR APPLIANCE
PUTTING INTO STANDBY MODE
•
After 4 minutes with no action by the user, the
display switches off to save energy (except for
a delayed start) and the button starts
flashing. The screen is then in standby mode.
To activate the oven and restore the display to
full brightness, press the “wake up”
button.
The screen shows the time again.
Fan oven
Warning
90 seconds after closing the door or
start a cooking lamp turns off the
oven cavity.
A simple press a button lights the lamp
(Except STOP)
EXPERT
Chal. tournante
Page 9

9
*
Programme(s) used to obtain the results indicated on the energy label in accordance with European
standard EN 50304 and European Directive 2002/40/CE.
FFAANN
(recommended temperature
119900°°CC
min 35°C max 250°C)
•
Cooking controlled by the heating element located at the back of the oven by the
fan.
•
Rapid temperature increase: Some dishes can be placed in the oven while it is still
cold.
•
Recommended for keeping white meat, fish and vegetables moist.
For cooking multiple items on up to.3 levels.
CCOOMMBBIINNEEDD HHEEAATT
(recommended temperature
118800°°CC
min 35°C max 230°C)
•
Cooking controlled by the upper and lower heating elements and by the fans.
•
Three combined sources of heat: a lot of heat from the bottom, a little circulating
heat and a bit from the grill.
•
Recommended for quiches, pies, wet fruit tarts, placed preferable on an
earthenware dish.
EECCOO HHEEAATT
(recommended temperature
220000°°CC
min 35°C max 275°C)
•
Cooking is controlled by the upper and lower heating elements.
•
This position allows for energy savings while preserving the quality of the cooking.
•
The ECO position is used for energy label performance.
•
All types of cooking are done
wwiitthhoouutt pprreehheeaattiinngg..
TTUURRBBOO GGRRIILLLL ++ SSPPIITT
(recommended temperature
119900°°CC
min 100°C max 250°C)
•
Cooking controlled, alternately, by the upper element and by the fan.
•
Preheating is unnecessary. Roasts and poultry are juicy and crispy all over.
•
The spit keeps turning until the door is opened.
•
Slide the drip tray onto the bottom shelf support.
•
Recommended for all poultry and roasts on the spit, for cooking leg joints
thoroughly, and cuts of beef. To keep fish steaks moist.
*
*
“EXPERT” COOKING MODES
EN
THE “EXPERT” COOKING MODES
•
Page 10

10
HHIIGGHH GGRRIILLLL ++ SSPPIITT
(recommended positions 44- min 1 - max 4)
•
Cooking is done by the upper element without the fan.
•
Preheat the oven for 5 minutes.
•
Recommended for browning vegetable dishes, pasta, fruit, etc, placed under the
grill.
MMEEDDIIUUMM GGRRIILLLL ++ SSPPIITT
(recommended positions 22- min 1 - max 4)
•
Cooking is done by the upper element.
•
Preheating is unnecessary. Roasts and poultry are juicy and crispy all over.
•
The spit keeps turning until the door is opened.
•
Slide the drip tray onto the bottom shelf support.
•
Recommended for all
rrooaassttss
on the spit, for sealing and thoroughly cooking
lleegg
,
ccuuttss ooff bbeeeeff
. To keep
ffiisshh sstteeaakkss
moist.
KKEEEEPP WWAARRMM
(recommended temperature
6600°°CC
min 30°C max 100°C)
•
This position allows you to keep your dishes hot by occasional heating from
the bottom of the oven along with the fan.
•
Recommended for letting dough rise for bread, brioche, kugelhopf... without
exceeding 40°C (plate warming, defrosting).
BBRREEAADD
(recommended temperature
220055°°CC
min 35°C max 275°C)
•
Cooking sequence recommended for baking bread.
•
After preheating, place the ball of dough on the pasty dish - 2nd shelf.
•
Do not forget to place a ramekin of water on the bottom to get a crispy, shiny crust.
DDEEFFRROOSSTTIINNGG
(recommended temperature
3300°°CC
min 30°C max 50°C)
•
Dishes are defrosted by a limited amount of heat and the fan.
•
Ideal for delicate dishes (fruit tart, custard pie, etc).
•
Meat, buns, etc, are defrosted at 50°C (meat should be placed under the grill with a
dish underneath to catch drips from the defrosting which are not edible).
“EXPERT” COOKING MODES
EN
THE “EXPERT” COOKING MODES
•
Page 11

11
The oven asks you to enter the other cooking
parameters.
•
Temperature
Based on the type of cooking you have
already selected, the oven will recommend
the ideal cooking temperature. This
temperature can be adjusted as follows:
Select the “Temperature” box by pressing
< or >. Confirm with the OK button and the
“Temperature” symbol flashes: choose the
desired temperature by pressing < or > and
then confirm.
In the grill position (medium or high), select
the “grill power” symbol and use the < and >
buttons to set the power to the desired level
(between 1 and 4) and then confirm.
•
Cooking time and end of cooking
time.
You may enter the cooking time for your dish
by selecting the symbol.
Press < or > and then
confirm so that the symbol flashes. Enter the
cooking time by pressing < and > and then
confirm. When you set the cooking time, the
end of cooking time (symbol )
automatically moves forward.
You can change the end of cooking time, if
you want to delay the programme start.
In that case, select the field and
proceed as described for
setting the cooking time.
Once you have selected the cooking end
time, confirm.
Your oven will display the time and the end of
cooking time symbol until cooking starts.
O K
O K
O K
THE “EXPERT” FUNCTION
•
EN
2 / USING YOUR APPLIANCE
NB: You can opt not to select a cooking time. In this case, leave the cooking time and end of
cooking time blank and go directly to “OK”. Confirm to start cooking. To switch the oven off,
press the “STOP” button twice, when you feel the dish has been cooked sufficiently.
Standard
OK
Standard
OK
Standard
OK
Page 12

12
O K
•
The “Grill+” option
Select the “Standard” symbol and then
confirm by pressing OK. “Standard” starts to
flash. You can access the “Grill+” function by
pressing the < and > buttons and confirming.
This function lets you finish your cooking
programme by browning the dish for the last
five minutes of the cooking time.
This function is represented by a flashing
grill on the screen when it is activated five
minutes before the end of cooking.
Note
: “Grill +” can be used with the “Expert”
and “Recipe” cooking modes, with the
exception of some functions, such as: grill
(high grill, variable grill), keep warm and
traditional Eco.
THE “EXPERT” FUNCTION
•
EN
2 / USING YOUR APPLIANCE
Grill +
OK
Page 13

13
(1)
(2)
(3)
(4)
(5)
(6)
•
Starting a cooking programme
When cooking begins, the following screen is
displayed, telling you that the oven is in rapid
heating mode (Booster), depending on the
type of cooking. You can monitor the progress
of the temperature rise in the oven by looking
at the shading in the arrow. The current oven
temperature is indicated on the left and the
recommended temperature is displayed on
the right.
Once this temperature has been reached, the
oven goes into cooking mode and the
following screen is displayed:
Cooking with no specified duration
(1) the temperature inside the oven
(2) the time
(3) the type of cooking chosen (animation).
Cooking for a set time
(1) the temperature
(2) the time
(3) the type of cooking chosen (animation).
(4) the cooking time
(5) the remaining cooking time (flashing)
(6) the end of cooking time
AT THE END OF COOKING
:
Cooking with no specified duration
Turn off the oven when cooking is complete
by pressing the STOP button.
Confirm the end of cooking by pressing OK.
Cooking for a set time
The oven turns off automatically and beeps for
2 minutes.
Press OK to stop the beeps.
An animation wishes you “Bon Appétit”!
THE “EXPERT” FUNCTION
•
EN
2 / USING YOUR APPLIANCE
BON APPETIT !
Page 14

14
The “Recipe” function selects the appropriate
cooking parameters for you based on the food
being prepared and its weight.
1. Press the < and > buttons. Select
“Recipes”. Confirm.
2. The oven then suggests various food
categories.
Press the < and > buttons to choose from the
families offered:
· White meat
· Red meat
· Fish
· Vegetables
· Cakes
· Tarts and quiches
When you have made your choice, press OK
to confirm.
3. Then choose the specific dish you are
cooking and confirm.
4. Once you have selected the food, the
oven will ask you to enter its weight
(symbol ) or the material your cookware is
made of (aluminium, porcelain, etc) in some
cases such as cakes, quiches, tarts and
vegetables or the size of the food (brioche).
Enter the weight (or cookware type) and the
oven will automatically calculate and display
the ideal cooking time. If you wish, you can
change the end of cooking time by selecting
the symbol “ ” and displaying the new end
of cooking time.
Once you have confirmed by pressing “OK”,
the oven recommends the height of the shelf
on which you should place the dish.
O K
EN
2 / USING YOUR APPLIANCE
THE “RECIPE” FUNCTION
•
CCooookkiinngg gguuiiddee
CChhiicckkeenn
Chicken turnspit
Duck
Meat poultry
RECETTES
Viande blanche
Poulet
Poulet TB
Canard
Standard
OK
Page 15

15
5. Place your dish in the oven on the
recommended shelf level (from 1 at the
bottom to 5 at the top).
6. Confirm by pressing OK; the oven
switches on.
7. The oven beeps and switches off when
the cooking time has finished and and
animation wishes you “Bon appetit!”.
•
Additional details for cooking
according to: “Recipes”
All cooking is done WITHOUT preheating the
oven.
COOKING PROGRAMME: RED MEAT
- Lamb - saddle
- Lamb - leg
- Roast beef - medium
- Roast beef - rare
Cooking is done automatically with the
TURBO-GRILL element.
You should place the meat on the shelf using
the shelf + drip tray assembly (without a
dish). You can turn the meat half-way through
cooking.
COOKING PROGRAMME: CAKES/TARTS
Choosing the type of baking tin:
Aluminium: coloured non-stick tins and
flexible silicone moulds are very suitable for
moist batters (quiches or fruit tarts).
COOKING PROGRAMME: TERRINES
Place the terrine in a bain-marie (a larger
dish, half-full of boiling water).
THE “RECIPE” FUNCTION
•
EN
2 / USING YOUR APPLIANCE
IInnsseerrtt
tthhee ddiisshh
nniivveell 11
Insérer
le plat au
niveau
BON APPETIT !
Page 16

16
EN
2 / USING YOUR APPLIANCE
FFAAMMIILLIIEESS
WHITE MEAT:
RED MEAT:
FISH:
VEGETABLES:
CAKES:
TARTS/QUICHES:
RREECCIIPPEESS
chicken (dish)
chicken (spit)
duck
turkey leg
rabbit
goose
guinea fowl
pork loin
pork fillet
terrine
veal roast
shoulder of lamb
leg of lamb
saddle of lamb
beef medium done
beef rare
pheasant
harebrochet
pike
bream
whiting
salmon
trout
fish terrine
roast fish
endives
vegetable flans
potato gratin
lasagna
stuffed peppers
stuffed tomatoes
bun
cake
puff pastry
chocolate cake
yoghurt cake
genoese
kugelhopf
meringues
pound cake
biscuits/cookies
quiche
short crust
flaky crust
cheese tart
rising crust
fruit tart
meat pie
soufflé
bread
Viande blanche
Viande rouge
Poissons
Légumes
Gateaux
Tartes/Quiches
Page 17

EN
2 / USING YOUR APPLIANCE
•
Beef, pork, lamb
- You must take all meat out of the refrigerator well before cooking it: cold-hot temperature
shocks toughen meat; this way you will produce roast beef that is browned outside, red
inside and warm in the middle.
Do not salt before cooking: salt absorbs the blood and dries out the meat. Use spatulas to
turn the meat: if you pierce the meat, the blood runs. Always let meat rest
after cooking for 5 to 10 minutes: wrap it in a sheet of aluminium foil and place
in a warm oven: this allows the blood drawn towards the outside during cooking to return to
the middle and moisten the roast.
- Use earthenware roasting dishes: glass encourages grease splashes.
- Do not cook in the enamelled drip tray.
- Avoid sticking garlic cloves into a leg of lamb, this will cause it to lose its blood; rather slip
the garlic between the meat and the bone or cook unpeeled cloves alongside the lamb and
crush them when cooking is complete to season the sauce; strain it and serve it very hot in a
gravy boat.
•
Fish
- When you buy it, it should smell pleasant and not too “fishy”.
- The body should be firm and rigid and the scales should be firmly stuck to the skin;
the eyes should be bright and rounded and the gills look shiny and moist.
•
Tarts, quiches
- Avoid glass and porcelain dishes: because they are too thick, they extend the cooking time
and the bottom of the crust is not crispy.
- With fruit, the bottom of the tart risks becoming soggy: just add a few spoonfuls of fine
semolina, crushed biscuit crumbs, almond powder or tapioca, which will absorb the juice
during cooking.
- With high-water content or frozen vegetables (leeks, spinach, broccoli or tomatoes) you
can sprinkle in a tablespoon of corn flour.
•
Pizza
- To prevent cheese or tomato sauce from dripping in the oven, you can place a piece of
parchment paper between the shelf and the pizza.
17
Page 18

18
EN
2 / USING YOUR APPLIANCE
THE “I.C.S.” FUNCTION
The ICS (Intelligent Cooking System) function
completely simplifies cooking for you because
the oven automatically calculates all the
cooking parameters (temperature, cooking
time, cooking mode) based on the selected
dish, using electronic sensors in the oven that
constantly measure the moisture level and
temperature variations.
OPERATING THE ICS FUNCTION:
- Press the < and > buttons until the “ICS”
function appears and confirm.
The oven offers a choice of 14 dishes:
· Pizza
- Savoury tarts
· Beef (rare, medium, well done)
· Roast pork
· Chicken
· Lamb (pink, well done)
· Fish
· Stuffed vegetables
· Sweet tarts
· Cakes
- Small biscuits
- Soufflé
- Press the < and > buttons to select your dish.
Example: Pizza
After selecting your dish, confirm by pressing
OK.
You can change the end of cooking time
before putting your dish in the oven at the
recommended shelf height.
- Enter by pressing the OK button to start
cooking.
•
O K
IInnsseerrtt
tthhee ddiisshh
nniivveell 11
ICS
Pizza
Insérer
le plat au
niveau
OK
Page 19

19
EN
2 / USING YOUR APPLIANCE
N.B.: No preheating is required when using
the ICS function. Cooking absolutely MUST
start in a cool oven. You should wait for the
oven to cool down completely before
beginning a second cooking programme.
IMPORTANT: Do not open the door during
this phase or you may disturb the recording
of data.
This information gathering phase is identified
by a symbol alongside the cooking
time.
This cooking mode takes place in two phases:
1. An information gathering phase during
which the oven starts heating and determines
the ideal cooking time. This phase lasts
between 5 and 40 minutes depending on the
dish.
2. A second cooking phase: the oven has
calculated the necessary time; the
symbol disappears. The remaining cooking
time indicated takes into account the cooking
time from the first phase. You can now open
the door (e.g. to baste a roast).
- The oven beeps and switches off when the
cooking time is complete and the screen then
indicates that the dish is ready.
DELAYED START FUNCTION:
To program a delayed start,
- Select the cooking end function and
change the cooking end time.
PLEASE NOTE: If you want to programme a
subsequent ICS cooking cycle, wait until the
oven has cooled completely. However, you
can still use the “Expert” function, even if the
oven is hot.
THE “I.C.S.” FUNCTION
•
calculation phase (information gathering)
cooking phase
Page 20

20
I.C.S. FUNCTIONS
EN
PP
iizzzzaa
• Fresh store-bought pizza
• Ready-to-use pizza dough
• Home-made pizza dough
• Frozen pizza
TT
aarrttss
((ssaavvoouurryy))
• Fresh quiches
• Frozen quiches
• Frozen mini-pastry
RR
ooaasstt
BB
eeeeff
• Roast beef
(prepared rare)
• Place the roast on the grid using the grid +
drip tray assembly.
YYoouu ccaann ttuurrnn iitt oovveerr wwhheenn tthhee ccooookkiinngg ttiimmee bbeeccoommeess
ffiixxeedd..
RR
ooaasstt
PP
oorrkk
• Pork roasts
- Loin
- Tenderloin
CC
hhiicckkeenn
• Chickens weighing 1 to 1.7 kg
• Duck, guinea fowl, etc.
LL
aammbb
Leg of 1kg to 2,500kg
• Place the roast on the grid using the grid +
drip tray assembly.
YYoouu ccaann ttuurrnn iitt oovveerr wwhheenn tthhee ccooookkiinngg ttiimmee bbeeccoommeess
FF
iisshh
• Whole fish
(sea bream, pollock, trout, mackerel, etc.)
• Roasted fish
VV
eeggeettaabblleess
ssttuuffffeedd
• Tomatoes, stuffed peppers & vegetables
• Lasagna (fresh or frozen)
• Shepherd’s pie, brandade, etc.
TT
aarrttss
((sswweeeett))
• Fresh tarts
• Frozen tarts
CC
aakkeess
• Home-style cakes: sweet or savoury loaves,
pound cake.
• Ready-to-mix batters in packets.
SS
mmaallll
BB
iissccuuiittss
• Small individual pastries: cookies, croissants, buns,
fruit bread in a mould, croque-monsieur.
SS
oouufffflléé
• Use a tall mould with straight edges and a diameter
of 21cm.
Page 21

21
I.C.S. FUNCTIONS
EN
• Place it on the grid for a crispy crust (you can place a sheet of parchment paper between the grid and the
pizza to protect the oven from cheese drippings).
• Place the pizza on the baking tray for a soft crust.
• Use a non-stick aluminium mould: the crust will be crispy on the bottom.
• Remove the tray from frozen quiches before placing them on the grid.
• Take the roast out of the refrigerator at least one hour before starting the cooking programme:
• If you prefer meat rare; if you prefer it well done, opt for a traditional cooking function.
• Trim away as much fat as possible: it causes smoke.
• At the end of cooking, allow the meat to sit for 7 to 10 minutes wrapped in a sheet of aluminium foil before
carving.
• Take the roast out of the refrigerator at least one hour before starting the cooking programme: the colder
the meat is, the closer it will be to the end of cooking.
• Use an earthenware dish. Add one to two tablespoons of water.
• At the end of cooking, allow the meat to sit for 7 to 10 minutes wrapped in a sheet of aluminium foil before
carving. Add salt when cooking is finished.
• Turnspit cooking: do not forget to place the drip tray on the first shelf support to catch the drippings.
• Cooking in a dish: Opt for earthenware dishes to avoid splattering.
• Pierce the skin of poultry to avoid splattering.
• Take the meat out of the refrigerator at least one hour before starting the cooking programme:
• Select a leg that is round and plump rather than long and lean.
• Wrap the meat in aluminium and let it sit after cooking.
• Use this function only for whole fish cooked with herbs and white wine.
(Grilled fish or papillote preparations require that the oven be preheated.)
• Properly adjust the dimensions of the dish to the quantity of food to be cooked to avoid juices spilling over.
• Use a non-stick aluminium mould:
• The crust will be crispy on the bottom.
• Cakes made in a cake mould, round, square... and always placed on the grid.
It is possible to place two cake moulds side by side.
• Small individual cakes made on a pastry tray and placed on the grid.
Puff pastry must be cooked on “CAKES” to achieve good results.
• Butter the mould and do not touch the inside with your fingers or the soufflé will not rise.
Page 22

22
TIPS AND HINTS FOR ICS
EN
PPiizzzzaa
To prevent cheese or tomato sauce from dripping in the oven, you can place a piece of
parchment paper between the grid and the pizza.
TTaarrttss // QQuuiicchheess
Avoid glass and porcelain dishes: because they are too thick, they extend the cooking time
and the bottom of the crust is not crispy. With fruit, the bottom of the tart risks becoming
soggy: just add a few spoonfuls of fine semolina, crushed biscuit crumbs, almond powder or
tapioca, which will absorb the juice during cooking. With high-water content or frozen
vegetables (leeks, spinach, broccoli or tomatoes) you can sprinkle a tablespoon of cornmeal.
FFiisshh
When buying it, it should smell pleasant and not too “fishy”. The body should be firm and rigid
and the scales should be firmly attached to the skin; the eyes should be bright and rounded
and gills will appear shiny and moist.
BBeeeeff // PPoorrkk // LLaammbb
You
mmuusstt
take all meet out of the refrigerator well before cooking it: cold-hot temperature
shocks toughen meat; this way you will produce a roast beef that is golden outside, red inside
and warm in the middle. Do not salt before cooking: salt absorbs the blood and dries out the
meat. Turn the meat using spatulas: if you pierce the meat the blood drips out. Always let meat
sit after cooking for 5 to 15 minutes: wrap it in a sheet of aluminium and place it just inside a
warm oven: This allows the blood drawn toward the outside during cooking to return to the
middle and moisten the roast.
Use earthenware roasting dishes: glass promotes grease splattering.
Do not cook in the enamelled drip tray.
Avoid piercing the leg of lamb with cloves of garlic as the lamb will lose its juices; instead, slide
the garlic in underneath the skin, or bake the unpeeled garlic beside the leg and crush it when
it has finished cooking to flavour the gravy; sieve it and serve very hot in a gravy boat.
Page 23

23
SOME ICS RECIPES
EN
PPiizzzzaa
Base: 1 pizza crust
*with vegetables:
6 tablespoons tomato sauce + 100g diced courgettes + 50g diced bell
peppers + 50g sliced aubergine +2 small sliced tomatoes + 50g grated gruyere + oregano + salt
+ pepper.
*with roquefort and smoked bacon:
6 tablespoons tomato sauce + 100g smoked bacon
+ 100g roquefort in small chunks + 50g walnuts + 60g grated gruyere.
*with sausage and cottage cheese:
200 g drained cottage cheese spread on the crust +
4 sausages, sliced + 150g ham slivers + 5 olives + 50g grated gruyere + oregano + salt +
pepper.
QQuuiicchheess::
Base: 1 aluminium mould, diameter 27 to 30 cm
1 ready-to-use short crust pastry
3 beaten eggs + 50 cl heavy cream
salt, pepper, nutmeg.
Various garnishes:
200g precooked larding bacon
or - 1 kg cooked endives + 200g grated gouda
or - 200g broccoli + 100g small bacon pieces + 50g blue cheese
or - 200g salmon + 100g spinach, cooked and drained
RRooaasstt bbeeeeff
PARSLEY SAUTERNES Sauce with ROQUEFORT:
Cook 2 tablespoons of sliced shallots in butter until translucent. Add 10 cl Sauternes,
let it evaporate. Add 100g Roquefort, let it melt slowly. Add 20 cl liquid cream, salt, pepper.
Bring to a boil.
RRooaasstt ppoorrkk
Pork with prunes
Ask the butcher to carve a hole through the length of the roast. Stuff 20 prunes inside.
Serve sliced with its juices or cold with an endive salad.
CChhiicckkeenn
Stuff it with a good bouquet of fresh tarragon or rub it with a mixture of 6 crushed
cloves of garlic with a pinch of coarse salt, and some peppercorns.
LLaammbb
Anchovy sauce:
Puree 100g black olives, 50g capers and 3 anchovies, 1/2 clove of garlic and 10 cl olive
oil. Add 10 cl crème fraîche. Serve with sliced leg of lamb.
Page 24

24
SOME ICS RECIPES
EN
FFiisshh
Black sea bream with dry cider:
1 bream weighing 1.5 kg.
500g button mushrooms.
2 sour apples.
2 shallots.
2 tablespoons heavy cream.
100g butter.
1/2 litre cider. Salt, pepper.
Gut and scale the fish. Place it in a buttered dish on the finely minced shallots and sliced
mushrooms. Add the cider, salt and pepper and some cubes of butter. Put it in the oven. In the
butter cook the unpeeled quartered apples. When cooking is complete, transfer the fish to a
warm dish, strain the juice and deglaze the dish with the cream. Add the cream to the juice,
serve with apples and mushrooms.
SSttuuffffeedd vveeggeettaabblleess
Leftovers from pot au feu, leg of lamb, pork roasts, and roasted poultry can be finely chopped
for an excellent base.
FFllaakkyy pprraalliinnee aappppllee ttaarrtt
1 flaky pastry crust rolled and pricked with a fork.
200 ml cream brought to a boil with a vanilla pod.
2 beaten eggs with 30g sugar, add the cooled cream.
2 apples cut into cubes rolled in 70g crushed pralines.
Add cream and apples to crust. Place in the oven.
PPoouunndd ccaakkee wwiitthh cciittrruuss ffrruuiittss
Caramel: 20 lumps of sugar (200g).
Cake: 4 eggs.
200g granulated sugar.
200g flour.
200g good butter.
2 teaspoons baking powder.
Fruits: 1 small tin of citrus fruits in syrup.
Drain the fruit. Prepare a caramel icing. When it has taken on colour, turn it out into a cake pan;
tip it around to distribute the caramel. Let cool. In the bowl of an electric blender, mix the
softened butter with the sugar. Add the whole eggs one at a time, then the sifted flour. Finish
with the baking powder. Place the citrus sections in a flower pattern on the caramel icing. Pour
in the batter. Place in the oven on the “CAKES” setting. Unmould in a pretty dish and serve
cold. Other fruits can be used, such as apples, pears or apricots.
Page 25

25
SOME ICS RECIPES
EN
IInnddiivviidduuaall cchhooccoollaattee ccaakkeess
12 individual aluminium ramekins.
60g butter.
200g bitter chocolate (more than 50% cocoa).
100g caster sugar.
4 eggs.
1 packet of baking powder.
70g sifted flour.
Melt the chocolate with the butter over very low heat. Work the egg yolks into the sugar until
the mixture becomes smooth. Add the flour, melted chocolate with butter and finish with the
baking powder. Beat the egg whites into stiff peaks and gently fold them into the mixture.
Lightly butter and flour the aluminium ramekins and pour the batter into them (without dripping
any on the edges). Place the ramekins on the baking tray and choose the “BISCUITS” mode.
Unmould and let cool on a grid. Serve with vanilla crème anglaise or coconut ice cream.
SSoouuffffllééss
Béchamel sauce base:
1/2 litre milk.
60g flour.
100g butter.
4 egg yolks + whites beaten into stiff peaks.
salt, pepper, nutmeg.
Depending on the type of soufflé, you will add 150g shredded gruyere or 1 kg cooked,
chopped spinach or 1 kg cooked, chopped cauliflower or 150g shredded leftover cooked fish
or 150g chopped ham.
Page 26

26
EN
2 / USING YOUR APPLIANCE
“LOW TEMPERATURE” FUNCTION
•
It is absolutely essential that “LOW
TEMPERATURE”cooking starts in a cool
oven.
Select “LOW TEMPERATURE” with the < and
> buttons and confirm.
Choose the cooking type from the following
lists by pressing the < and > buttons and place
your food on the wire shelf, except for pots of
yoghurt which should be placed in the enamel
dish.
- Roast veal (4h15)
- Roast beef rare (3h00)
- Roast beef well done (4h00)
- Roast pork (4h15)
- Lamb rare (1h50)
- Lamb well done (4h00)
- Chicken (6h00)
- Small fish (1h15)
- Large fish (1h35)
- Yoghurt (3h00)
Example:
yoghurt (fig.2).
Confirm your selection by pressing OK.
- The recommended shelf level is displayed.
You can modify the end of cooking time, if
necessary,
(1) then confirm by pressing OK.
During cooking, the screen displays: the
cooking time
(2) which cannot be altered, the
remaining cooking time
(3) and the end of
cooking time
(4).
The oven automatically switches off and beeps
for 2 minutes to tell you that the food is ready.
Press OK to stop the beeps.
Meat is kept warm (for 1 hour).
For yoghurt, there is a “rapid cooling” phase
(duration 1 hour).
O K
(1)
(2)
(3)
(4)
IInnsseerrtt
tthhee ddiisshh
nniivveell 11
LLooww TTeemmppeerraattuurree
BASSE T°C
Yaourt
Insérer
le plat au
niveau
OK
Page 27

EN
27
2 / USING YOUR APPLIANCE
O K
Press the < and > buttons until the “Settings”
screen is displayed.
Confirm by pressing OK.
You have access to the following settings:
- Time (see beginning of this section)
- Sound
- Display
- Consumption
- Language
- De Dietrich services
Sound:
Press the < and > buttons until “Sound” is
displayed.
Adjustment of the sound emitted when
buttons are pressed:
If you wish, you can mute the beeps emitted
each time you press confirm.
To do this, go to this option and select:
Beep on (active) or Beep off (silent). Confirm.
Display:
Adjustment of screen brightness:
Press the < and > buttons until “Display” is
displayed.
Select the line with the < and > buttons and
confirm.
Increase or decrease the brightness using
the < and > and then confirm by pressing
OK.
•
THE “SETTINGS” FUNCTION
CCOONNTTRRAASSTT
DDIISSPPLLAAYY
SSOOUUNNDD
SSeettttiinngg
REGLAGES
Son
Affichage
CONTRASTE
OK
Page 28

28
EN
2 / USING YOUR APPLIANCE
Consumption:
- Adjusting electricity consumption:
By accessing this screen, you will be able to
view your oven’s energy consumption since
the last time it was reset to zero (RESET).
If you have an energy bill arrangement with
off-peak hours, you can consult the
corresponding time periods and obtain
detailed information about your consumption
during peak and off-peak hours.
To enter or modify this data, press OK, then
enter the times for peak and off-peak periods.
End of
“Off-peak hours”
Start of
“Off-peak hours”
You may enter up to
3 different periods
O K
Language:
- Setting the language:
By selecting this screen, you can choose the
language used to communicate with your
oven.
There are 7 languages available:
- French
- English
- German
- Dutch
- Danish
- Spanish
- Portuguese
If you want to carry out an immediate pyrolysis cycle, you will have to cancel the programmed
off-peak hours.
Note
If you entered off-peak hours, whenever you programme a pyrolysis cycle, your oven will
automatically suggest that you schedule the cycle to begin cleaning during the next off-peak
period.
Peak hours
Language
THE “SETTINGS” FUNCTION
•
Consommation
HEURES CREUSES
Periode 1
OK
Langue
English
Francais
Deutsch
Page 29

EN
29
2 / USING YOUR APPLIANCE
De Dietrich services
This option provides you with contact
information for the Customer Service and
After Sales Service departments.
THE “SETTINGS” FUNCTION
•
Customer service
DEMO MODE:
- Set the time to 00:00 (1).
See how to set the timer page 7.
Press the < and > for 10 secondes (2).
DDEEMMOO
appears in the display.
Perform the operation described in step 2 to
return to normal.
(1)
(2)
Warning
When your oven is in “DEMO MODE”,
the heaters are not active.
Services
RENDEZ-VOUS SUR
www.de-dietrich.com
DEMO
Page 30

30
EN
2 / USING YOUR APPLIANCE
Select this option to access the timer
function.
This function is accessible, so long as the
oven is not in pyrolysis mode.
Press the < and > buttons until “Timer” is
displayed then confirm.
The displays flashes 00:00:00.
Enter the desired time using the < or > button
and confirm with the OK button.
The timer starts to count down when OK is
pressed and beeps at the end.
Press the Stop button to cancel the timer.
THE “TIMER” FUNCTION
•
TTiimmeerr
MINUTERIE
Page 31

31
EN2 / USING YOUR APPLIANCE
If your oven releases smoke during
preheating or releases a great deal of smoke
during cooking or if there is an unpleasant
odour after cooking various dishes (lamb,
fish, grills, etc.).
Note
You should not wait until the oven is
heavily coated in grease to carry out a
cleaning cycle.
Low mess
cooking operations
Messy
cooking operations
Extremely messy
cooking operations
Biscuits, vegetables, pastry,
quiches, soufflés...
Meats, fish (in a dish), stuffed
vegetables.
Large cuts of meat on the spit.
Cooking with no splashing:
pyrolysis is not required.
Pyrolysis may be required after
three cooking cycles.
Pyrolysis can be done after
cooking this type of dish, since
there is a lot of splashing.
This oven is equipped with a pyrolysis
cleaning function:
- Pyrolysis is a cycle during which the oven
cavity is heated to a very high temperature in
order to eliminate dirt caused by splashes
and spills.
Fumes and odours released are destroyed by
passing through a catalytic converter.
- Pyrolysis is not necessary after each
cooking cycle, but simply when the degree of
dirt warrants it; your oven will inform you
when cleaning is required via the control
panel (1).
As a safety measure, cleaning only occurs
after the door locks automatically. Once the
temperature inside the oven exceeds
cooking temperatures, it is not possible to
open the door.
(1)
WHEN TO USE PYROLYSIS
•
THE CLEANING FUNCTION
•
CClleeaanniinngg
NETTOYAGE
Page 32

32
EN
2 / USING YOUR APPLIANCE
(1)
(2) (3)
(4)
(5)
Remove any large-scale food residue that
may be in the oven, to avoid the risk of
ignition or excessive smoke.
Select “Cleaning” from the main menu. Your
oven indicates the dirtiness of the cavity and
suggests two cleaning modes:
Pyromax and Pyrocontrol.
A) Pyromax
Pyromax is a pyrolysis system with a pre-set
duration: it lasts for two hours and provides
thorough, intensive cleaning of the oven
cavity.
To delay the start time, select end time and
change it by entering the desired end time
for the pyrolysis cycle.
Note: If you entered the information for offpeak hours and peak hours (see Settings
function), your oven recommends a cleaning
cycle during off-peak hours to save on
energy costs. However, you can change this
recommendation by changing the end of
pyrolysis time and starting the cleaning cycle
immediately, if you choose.
Confirm by pressing “OK”.
The cleaning cycle begins. Your screen
indicates:
- the time (1)
- the total cycle time (2)
- the remaining time (3)
- the pyrolysis cycle end time (4)
- door locking (5)
Note
Surfaces may become hotter than
during normal use. It is advisable to keep
small children at a distance.
O K
B) Pyrocontrol
Pyrocontrol is a system that lets the oven
automatically calculate the cleaning time
depending on the amount of soiling, which
makes it possible to save energy by adjusting
the pyrolysis time to actual need.
If you with to delay the start time, select the
end time and change it by entering the
desired end time for the pyrolysis cycle.
Confirm by pressing “OK”
O K
HOW TO PROGRAMME A PYROLYSIS CYCLE
•
DDeeggrreeee ooff ssttaaiinniinngg
Niveau de salissure
PYROMAX PYROCONTROL
OK
OK
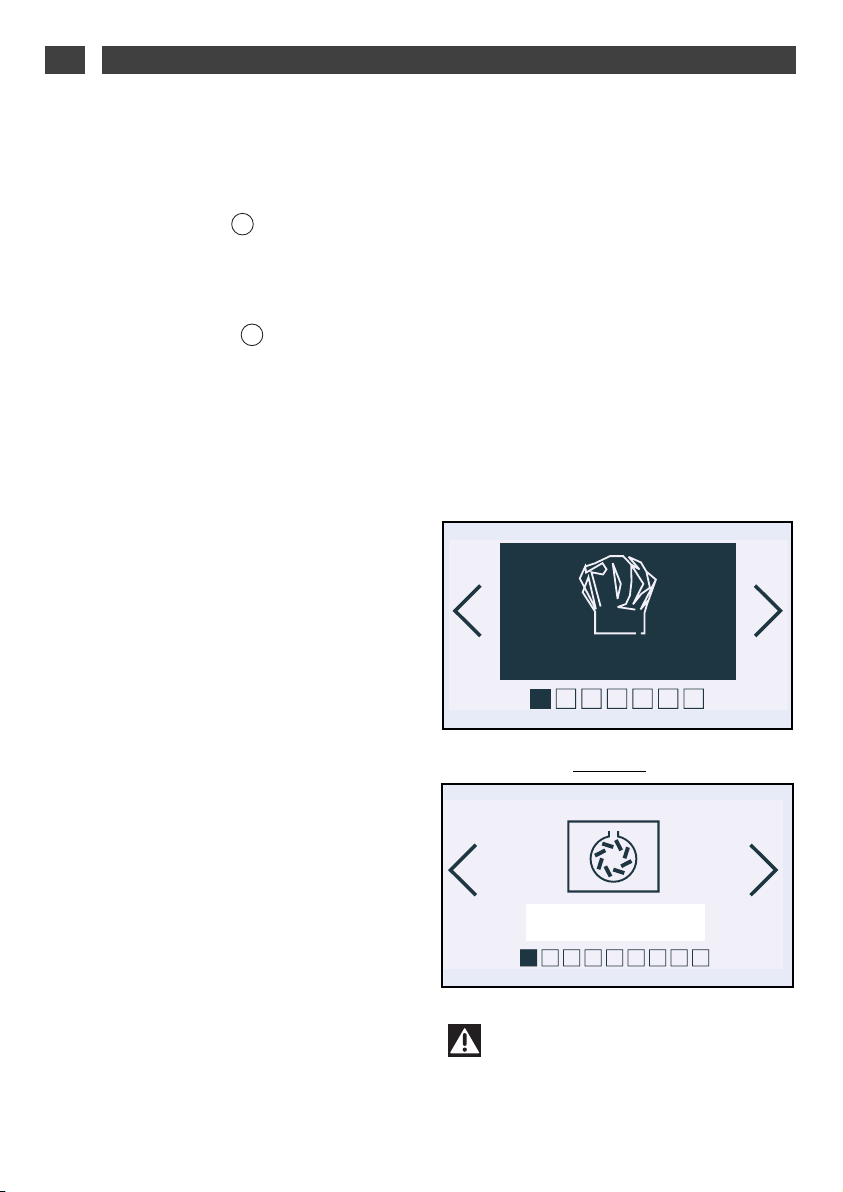
Page 33

EN
33
At the beginning of the cycle, the oven
calculates the pyrolysis time based on the
level of dirt. This step lasts a few minutes and
is represented by rotating arrows on the
screen (1).
The screen displays:
- the rotating arrows (1)
- the time remaining (2)
- the planned pyrolysis cycle end time (3)
- the time (4)
- door locking (5)
You can prevent access to the oven controls
by taking the following steps:
When the oven is off, hold the button
pressed for a few seconds; a padlock will
then be displayed on the screen and access
to the oven controls is now blocked.
To unlock it, press the button again,
then select the “Unlock” symbol and confirm.
The oven controls are once again accessible.
Note
You cannot lock the oven if you have programmed a cooking cycle.
The oven informs you when the pyrolysis
cleaning cycle is complete.
Once the door has been unlocked, the oven
informs you that the cleaning cycle has
finished.
Simply remove the ash residue from the cavity
with a damp sponge.
END OF PYROLYSIS
•
(4)
(1)
(2)
(3)
(5)
LOCKING THE CONTROLS (Child safety)
•
CClleeaanniinngg
ffiinniisshheedd !!
CZ5700674-00 08/11
2 / USING YOUR APPLIANCE
Nettoyage
terminé !
 Loading...