

Page 1
Manual de instalação e uso da máquina de lavar integrável
Installation and user manual for the integrated washing machine
Page 2

advertências
Para evitar riscos de incêndio, descargas eléctricas, danos pessoais ou outros danos
ao utilizar a máquina de lavar roupa, tome as seguintes precauções:
Esta máquina de lavar roupa é fornecida
com um manual que inclui instruções de
funcionamento, de manutenção e instalação.
Leia todas as instruções antes de utilizar a
máquina de lavar roupa.
Não lave artigos que tenham sido
previamente limpos, lavados, de molho ou
tratados com gasolina, dissolventes para
limpeza a seco, outras substâncias
inflamáveis ou explosivas, visto que se criam
vapores que podem inflamar ou explodir.
Não junte gasolina, dissolventes para
limpeza a seco nem outras substâncias
inflamáveis ou explosivas à água de lavagem
visto que se criam vapores que podem
inflamar ou explodir.
Não repare nem substitua nenhuma peça
da máquina de lavar roupa nem tente
qualquer tipo de serviço a menos que tenha
sido recomendado nas instruções de
manutenção do manual.
Não se ponha em cima da máquina nem
se apoie na porta de carga aberta.
Não utilize uma extensão ou um adaptador
para ligar a máquina de lavar roupa à rede.
A máquina deve ser unicamente utilizada
para os efeitos para os quais foi concebida.
Siga as instruções de lavagem
recomendadas pelo fabricante da peça a
lavar.
Não ligue a máquina de lavar roupa em
funcionamento até se assegurar de que:
• Tenha sido instalada de acordo com as
instruções de instalação.
• Todas as ligações de água, descarga, à
rede eléctrica e ligação à terra estejam
de acordo com as normas locais e/ou
outras normas aplicáveis.
48
Page 3
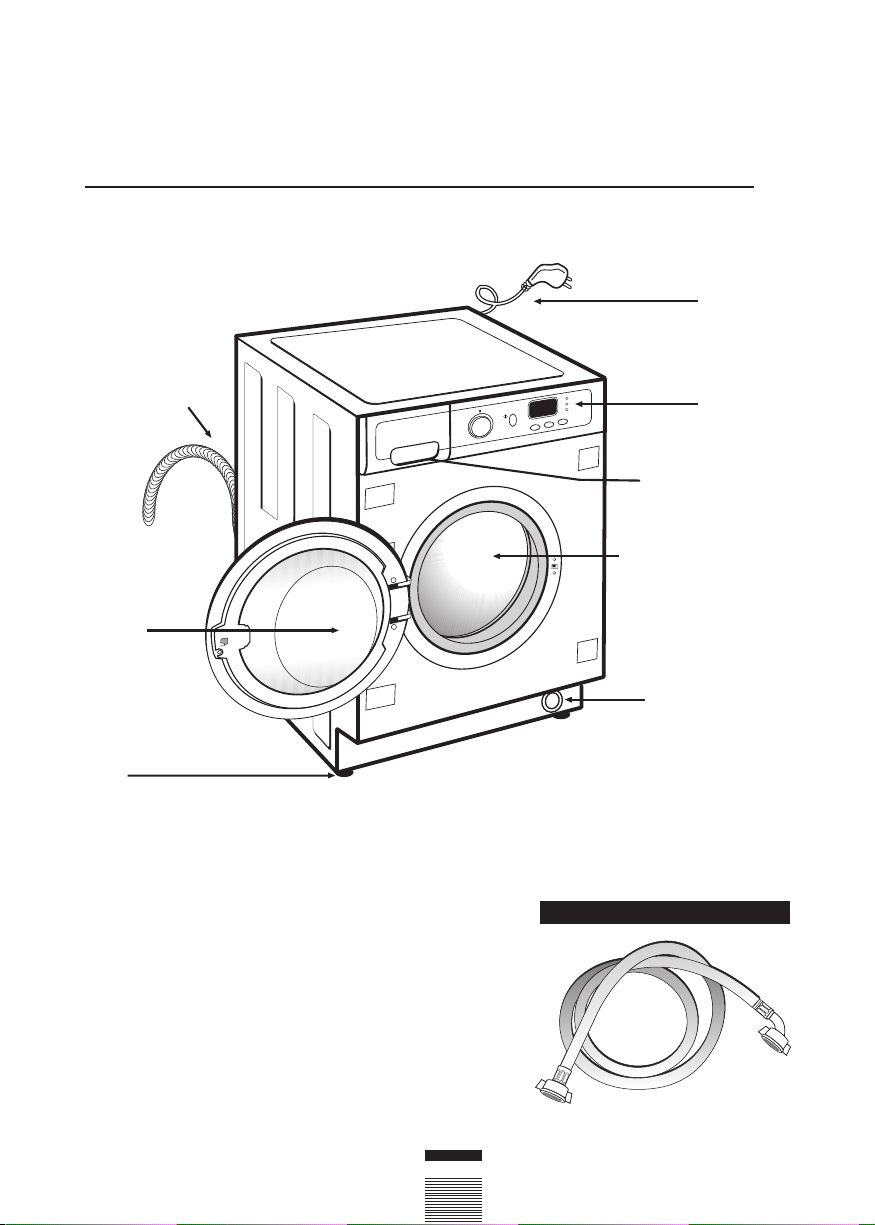
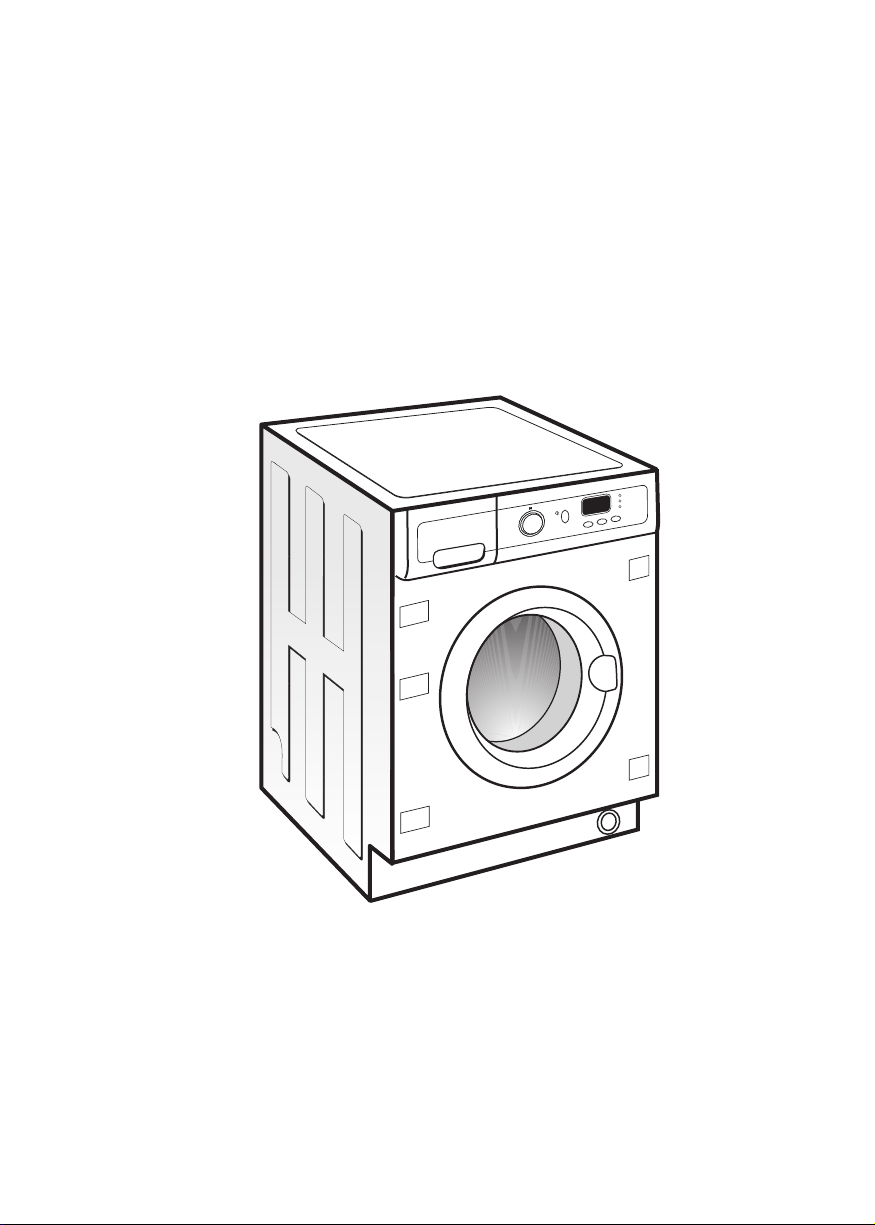
máquina de lavar roupa
Mangueira
de descarga
Óculo
quadro técnico
Cabo de
alimentação
Painel de
comandos
Compartimento
de detergente
Tambor de lavagem
em aço inoxidável
Filtro acessível
Pés
reguláveis
ACCESÓRIOS
Mangueira de entrada da água.
49
Page 4
máquina de lavar roupa
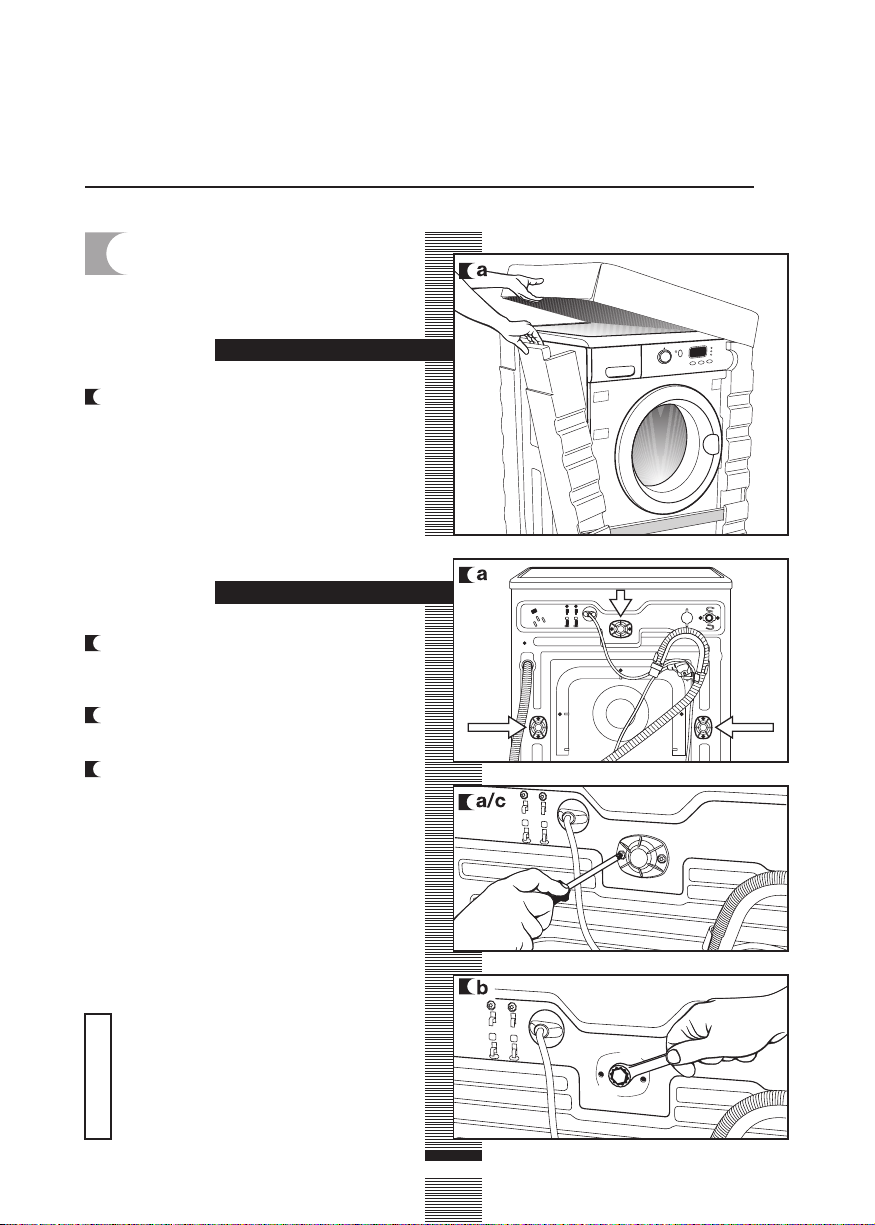
PARA DESEMBALAR
1
E DESBLOQUEAR A
MÁQUINA DE LAVAR
ROUPA
a Retire a base, esquinas e a cobertura
superior.
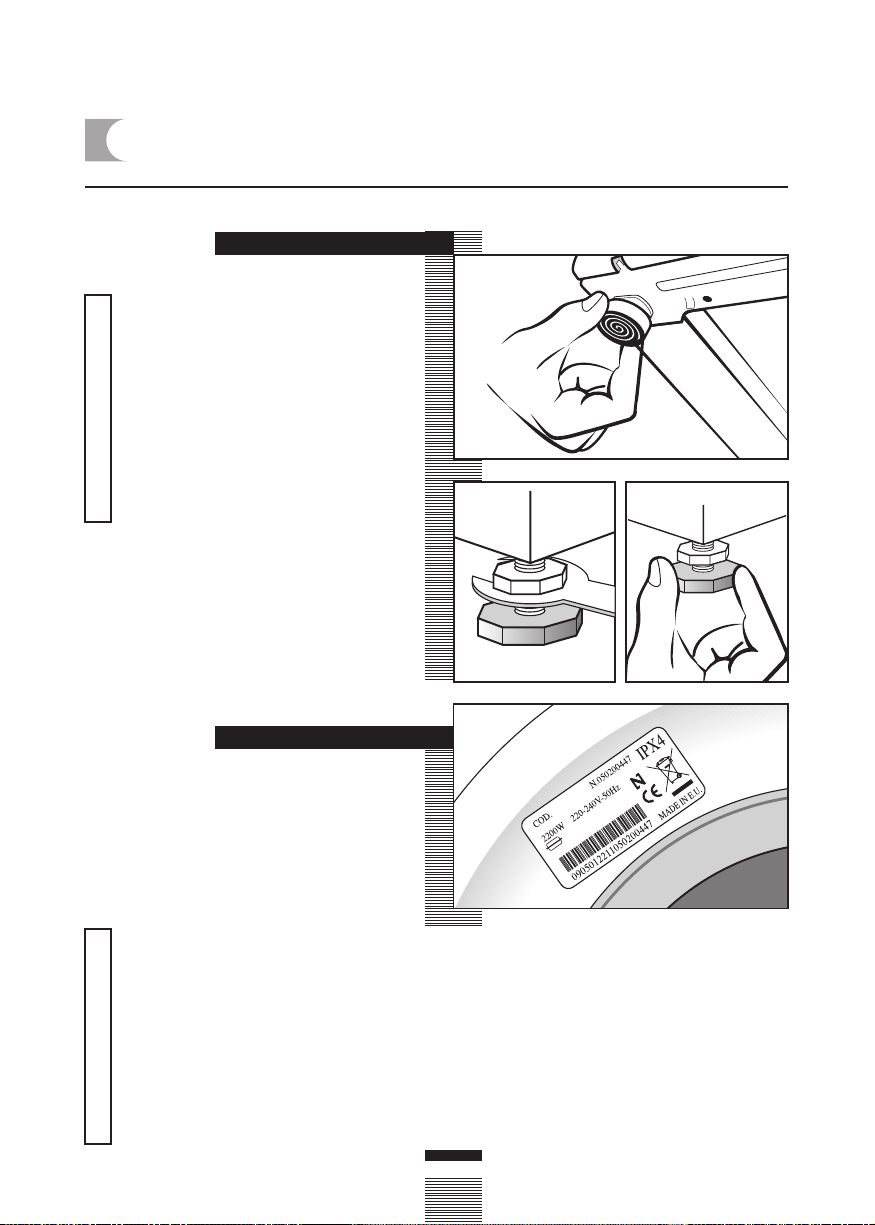
a Desaperte os parafusos que fixam as 3
placas de plástico à parte de trás da
máquina de lavar roupa.
b Desaperte os 3 parafusos de bloqueio
e retire-os.
instalação e montagem
PARA DESEMBALAR
PARA DESBLOQUEAR
c Tape os orifícios com as placas de
plástico anteriormente retiradas.
Guarde os parafusos de bloqueio para
uma possível futura deslocação da
máquina.
Importante
50
Page 5
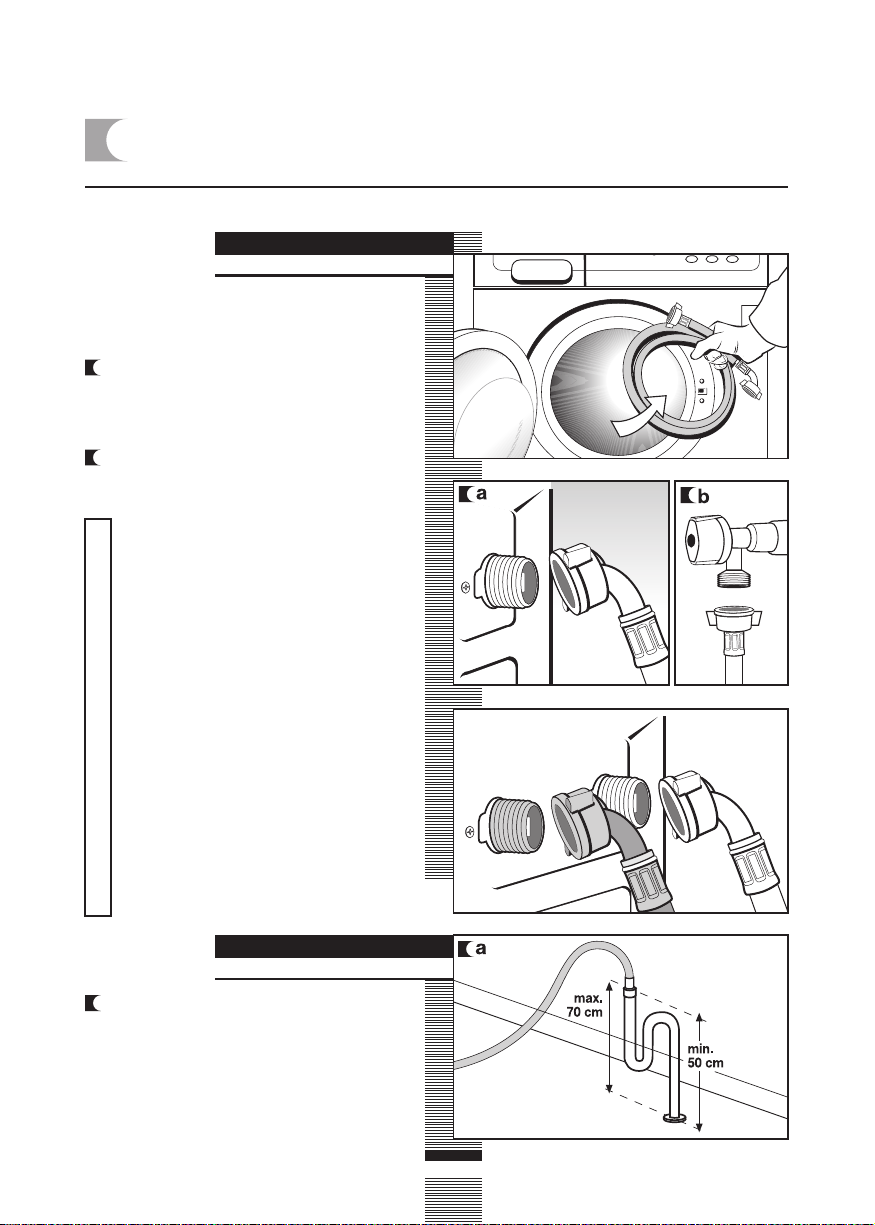
LIGAÇÃO À REDE DE ÁGUA E
2
DESCARGA
LIGAÇÃO À
REDE DE ÁGUA
No interior do tambor encontrará a
conduta de entrada de água:
a Ligue a extremidade em joelho da
conduta à entrada roscada da
electroválvula situada na parte de trás
do aparelho.
b Ligue a outra extremidade do tubo à
entrada de água. Uma vez realizada a
operação aperte bem a porca de ligação.
É importante que o joelho do tubo de
descarga fique bem fixo à saída para
evitar a queda e, como consequência,
o risco de inundação.
Se a máquina de lavar roupa admitir
entrada de água quente, ligue o tubo
com rosca vermelha à torneira de
água quente e à electroválvula com
filtro de cor vermelha.
A máquina de lavar roupa deve ser
ligada à rede de alimentação de água,
usando os tubos de alimentação
novos fornecidos com o aparelho.
Importante
Não se deve utilizar os tubos de
alimentação de água anteriormente
utilizados.
Para um funcionamento correcto da
máquina de lavar roupa, a pressão
da rede de água deve situar-se entre
0,05 a 1MPa (0,5 a 10 Kgr/cm
2
instalação e montagem
).
LIGAÇÃO À
REDE DE DESCARGA
a É aconselhável ter uma saída fixa de
descarga a uma distância do chão de
50 a 70 cm.
Evite que o tubo de descarga fique muito
ajustado, que tenha dobras ou
estrangulamentos.
51
Page 6
NIVELAMENTO DA MÁQUINA DE LAVAR ROUPA E
3
LIGAÇÃO À REDE ELÉCTRICA
instalação e montagem
NIVELAMENTO
Nivele a máquina de lavar roupa
através dos pés reguláveis de forma
a assentar perfeitamente no chão.
Assim vai conseguir reduzir o nível
de ruído e evitar que a máquina se
mova durante a lavagem.
Evite retirar excessivamente os pés.
Consegue-se uma melhor
Importante
estabilidade.
Nos modelos que usem porca, é
preciso fixar com uma chave.
LIGAÇÃO ELÉCTRICA
Consulte os dados da placa de características
situada no óculo da máquina de lavar roupa
antes de realizar as ligações eléctricas. Verifique
se a tensão que chega à base da ficha é a
que aparece na placa.
Não retire a placa de características, os
dados que contém são importantes.
A máquina de lavar roupa deve ser ligada
a uma tomada com ligação à terra
regulamentada.
A instalação eléctrica, ficha, tomada,
fusíveis ou interruptor automático e
contador devem estar dimensionados
para a potência máxima indicada na placa
Importante
de características. Não meta a ficha da
máquina de lavar roupa na tomada com
as mãos molhadas ou húmidas.
Para retirar o cabo de alimentação puxe
o corpo da ficha. Se o cabo de alimentação
estiver danificado deve ser substituído por
um cabo ou conjunto especial a fornecer
pelo fabricante ou serviço pós-venda.
Nas máquinas de lavar roupa encastradas,
a ficha de tomada deve ser acessível
depois da instalação.
52
Page 7
LIMPEZA PRÉVIA
4
LIMPEZA PRÉVIA
Agora que já instalou satisfatoriamente a
máquina de lavar roupa, aconselhamos a fazer
uma limpeza prévia da máquina de lavar roupa.
Isto serve para comprovar a instalação, as
ligações e a descarga, para além de limpar
completamente o interior antes de levar a
cabo um programa de lavagem na máquina
de lavar roupa (ver instruções de utilização
nas páginas seguintes).
b Seleccione o programa normal 60ºC.
c Prima a tecla Arranque/Paragem.
ba
53
Page 8

máquina de lavar roupa
utilização do aparelho e conselhos práticos
PREPARAÇÃO DA
1
ROUPA ANTES DA
LAVAGEM
PREPARAÇÃO
Antes de meter a roupa no tambor,
certifique-se de todos os bolsos estão
vazios.
Os pequenos objectos podem
obstruir a motobomba de descarga
Importante
de água.
CLASSIFICAÇÃO
a Classifique a roupa pelo tecido ou
pela elaboração.
Recomenda-se utilizar os programas
delicados para peças delicadas. As
peças de lã podem ser lavadas num
programa especial de lã.
b Classifique a roupa pela sujidade.
• Lave as peças ligeiramente sujasnum
programa curto.
• Lave as peças normalmente sujas num
programa sem pré-lavagem.
• Pode lavar as peças muito sujasnum
programa longo com pré-lavagem.
c Classifique a roupa por cores.
Lave separadamente as peças brancas
e as peças de cores.
Pré-lavagem
Lavagem
Importante
Certifique-se
previamente
de que as
peças de lã
podem ser
lavadas à
máquina.
Lavagem
Recomenda-se encher a máquina de
lavar na sua capacidade máxima.
Assim poupará água e energia.
É recomendado lavar sempre que
seja possível as peças de roupa de
diferentes tamanhos num mesmo
programa de lavagem, de forma a
reforçar a acção da lavagem. Assim,
para além de favorecer a distribuição
da roupa dentro do tambor na fase
de centrifugação, conseguirá que a
Importante
máquina trabalhe mais
silenciosamente.
É conveniente que as peças de
tamanho reduzido sejam metidas
numa bolsa de lavagem.
54
60
90
30
40
Frío
Page 9
UTILIZAÇÃO DO DETERGENTE E DOS ADITIVOS
2
utilização do aparelho e conselhos práticos
DETERGENTE
E ADITIVOS
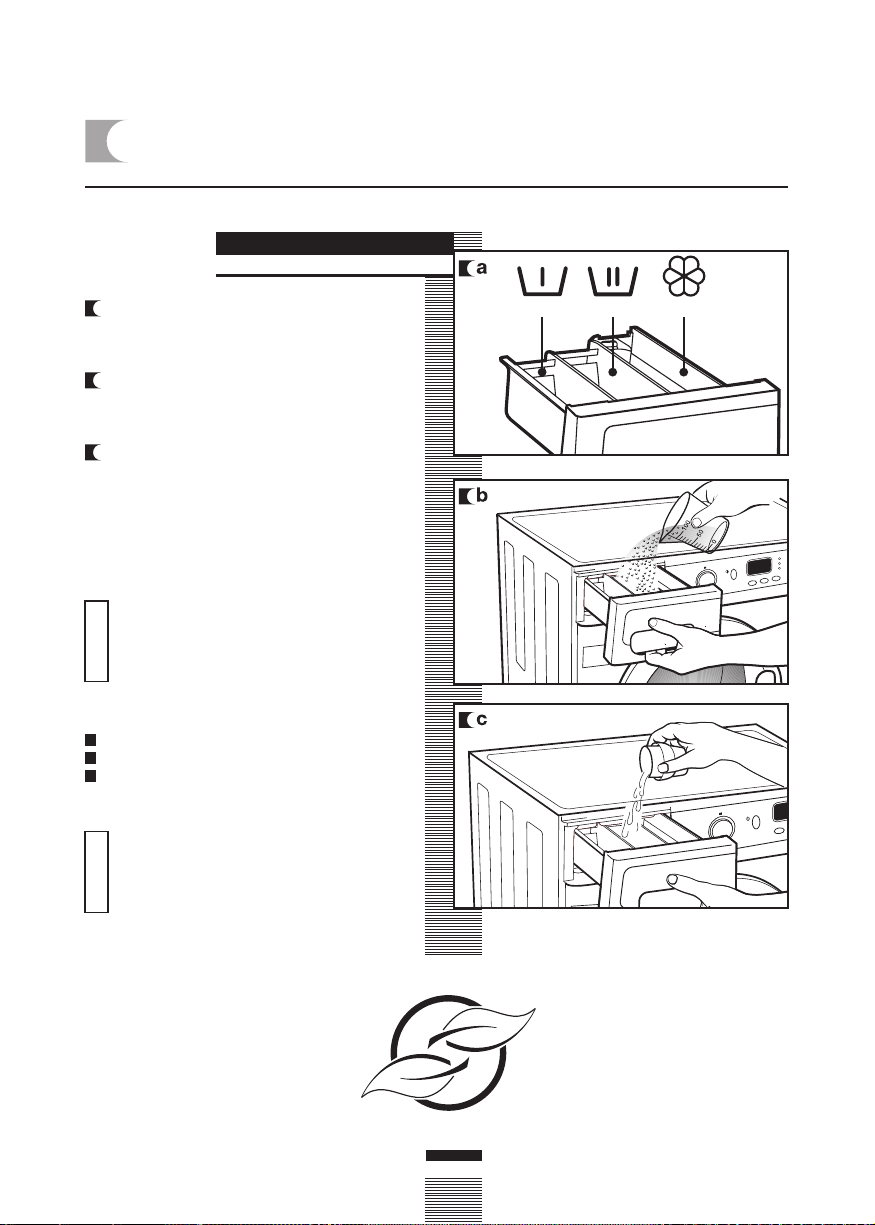
a O compartimento de detergente da sua
máquina de lavar roupa possui três
compartimentos.
b Introduza antes do início do programa
de lavagem o detergente ou aditivo no
compartimento de detergente.
c Nesta máquina de lavar roupa também
pode utilizar detergentes líquidos
utilizando para isso o compartimento
opcional que pode ser adquirido através
da Rede de Assistência Técnica.
O depósito opcional deve ser colocado
no compartimento de lavagem.
O nível do líquido não deve em
nenhum caso ultrapassar o sinal MAX
de referência, gravado na parede do
compartimento.
Importante
Lembre-se que a dose de detergente a utilizar
depende sempre de:
Quantidade de roupa a lavar.
Sujidade da roupa.
Dureza da água (as informações do grau
de dureza da água podem ser solicitadas nas
entidades locais competentes).
Recomenda-se usar um produto anticalcário se a dureza da água da zona
for elevada.
Importante
PRÉ-LAVAGEM
LAVAGEM
AMACIADOR
nota ecológica
Tenha em conta que existem detergentes
concentrados que são mais cuidadosos
com a natureza e com o meio ambiente.
A utilização de uma maior quantidade
de detergente do que a necessária
não ajuda a melhorar os resultados de
lavagem e para além de representar
igualmente um prejuízo económico
contribui negativamente para a
conservação do meio ambiente.
Por isso, é recomendado seguir as
instruções do fabricante de detergente.
55
Page 10

SELECÇÃO DO PROGRAMA DE LAVAGEM E SECAGEM
3
utilização do aparelho e conselhos práticos
tecla
arranque/
paragem
visor
compartimento de detergente
compartimento de detergente
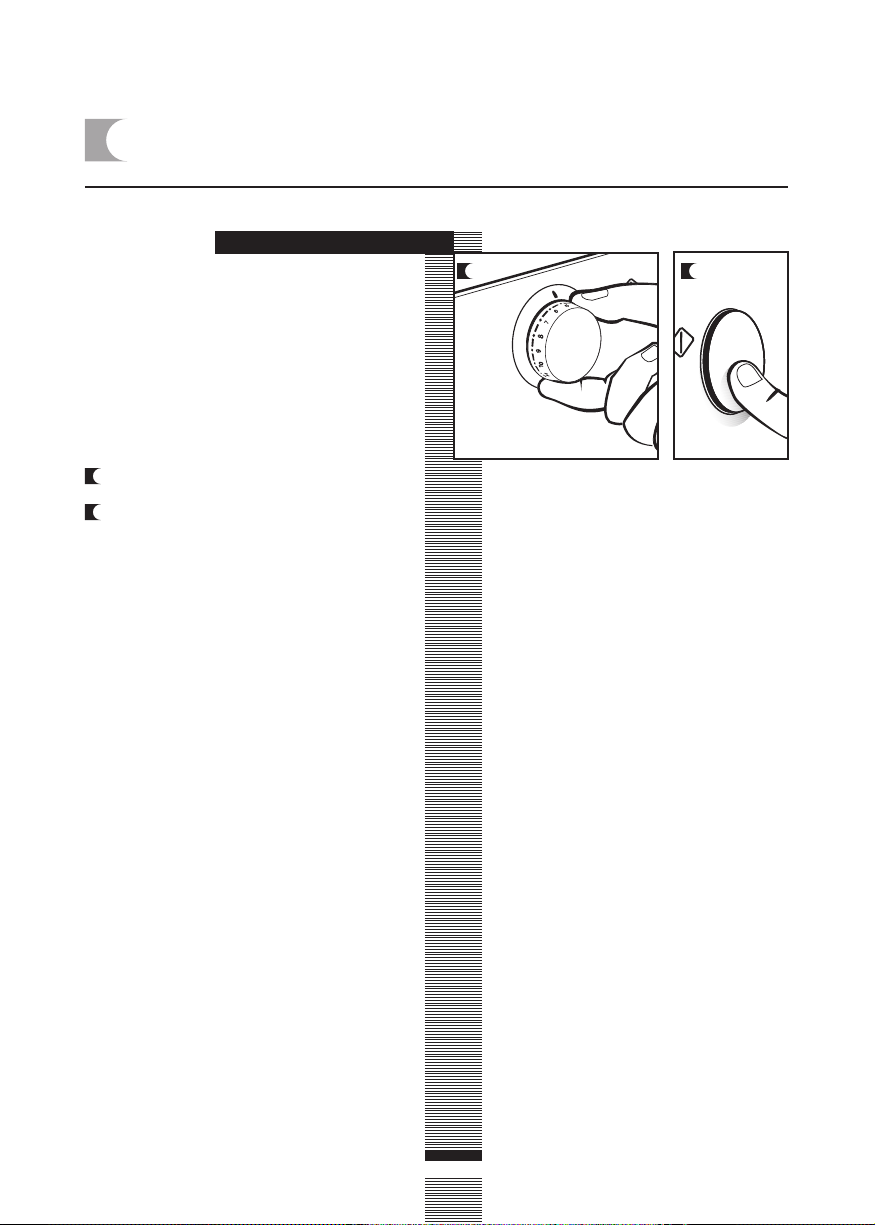
Para seleccionar o programa de lavagem
e secagem, siga os seguintes passos:
a Accione o comando de selecção de
programas premindo para fora.
b Seleccionar o programa de lavagem
virando o botão de selecção de
programas (ver tabela de programas).
No portacomandos activar-se-á o visor.
comando
selector de
programas
comando
selector de
programas
tecla centrifugação
+ flot
tecla
arranque/
paragem
tecla centrifugação
+ flot
visor
tecla
atraso
horário
tecla
atraso
horário
tecla
funções
adicionais
tecla
funções
adicionais
56
Page 11
utilização do aparelho e conselhos práticos
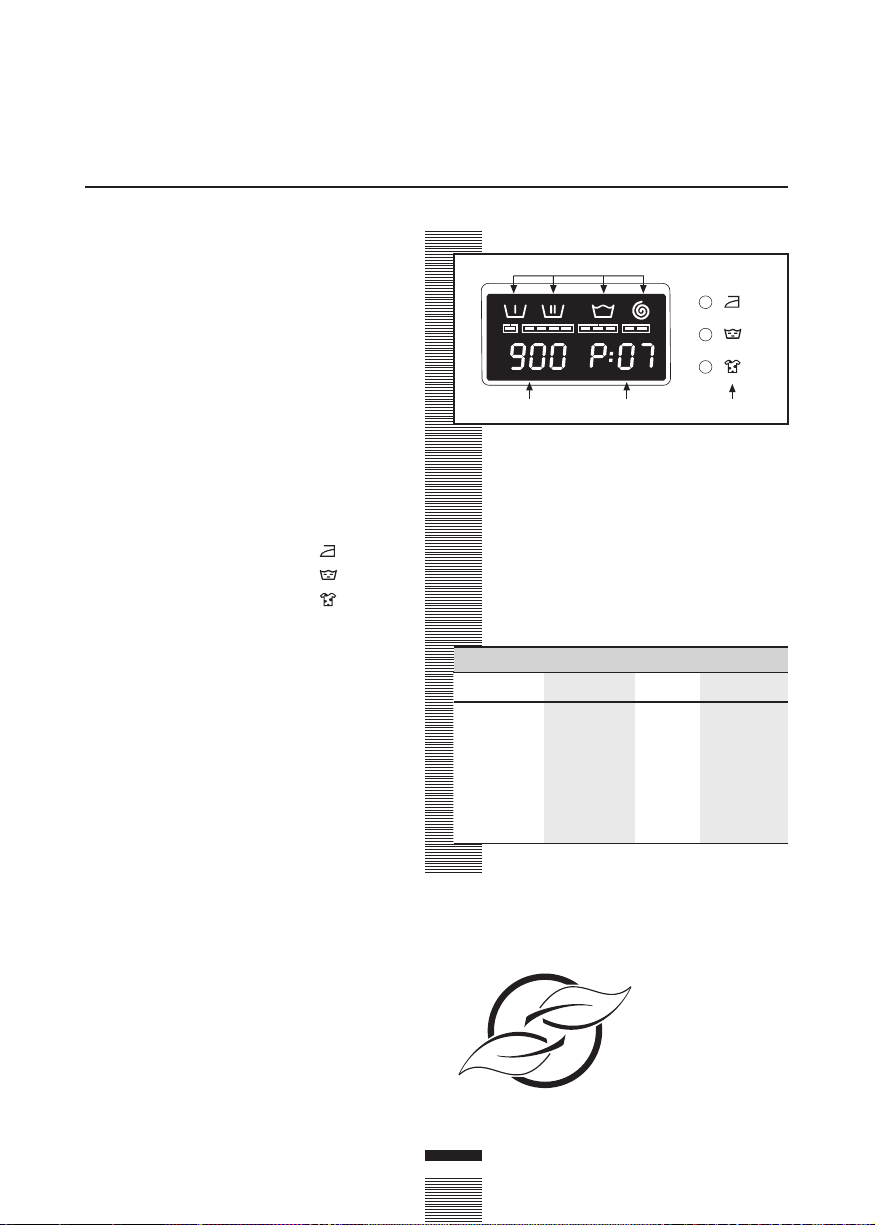
Ao seleccionar o programa visualiza-se a
seguinte informação:
1 Fases do programa de lavagem
Pré-Lavagem
Lavagem
Enxaguamento
Centrifugação e esvaziamento
2 N.º de revoluções
3 N.º de programa (durante alguns
segundos) e em seguida a duração
do mesmo.
4 Funções adicionais
Passar a ferro facilmente
Enxaguamento extra
Lavagem intensiva
Pode seleccionar quatro tipos de programas:
Programas normais
Programas delicados
Programas de lã
Programas auxiliares
1
23 4
PROGRAMAS
Normais AuxiliaresLã
Normal frío
Celeris 30ºC
2
Normal 30ºC
3
Normal 40ºC
4
Normal 60ºC
5
Normal 90ºC
6
7
Pré-lavagem 60ºC
Delicados
8
Delicado frío
9
Delicado 30ºC
10
Delicado 40ºC
11
Delicado 60ºC
Lã 35ºC1
12
Enxaguamentos
13
Centrifugaçao
14
Esvaziamento
15
nota ecológica
É aconselhável seleccionar o programa
adequado de lavagem, para evitar a prélavagem sempre que for possível. Vai
poupar dinheiro e ajudar a conservar melhor
o meio ambiente.
57
Page 12
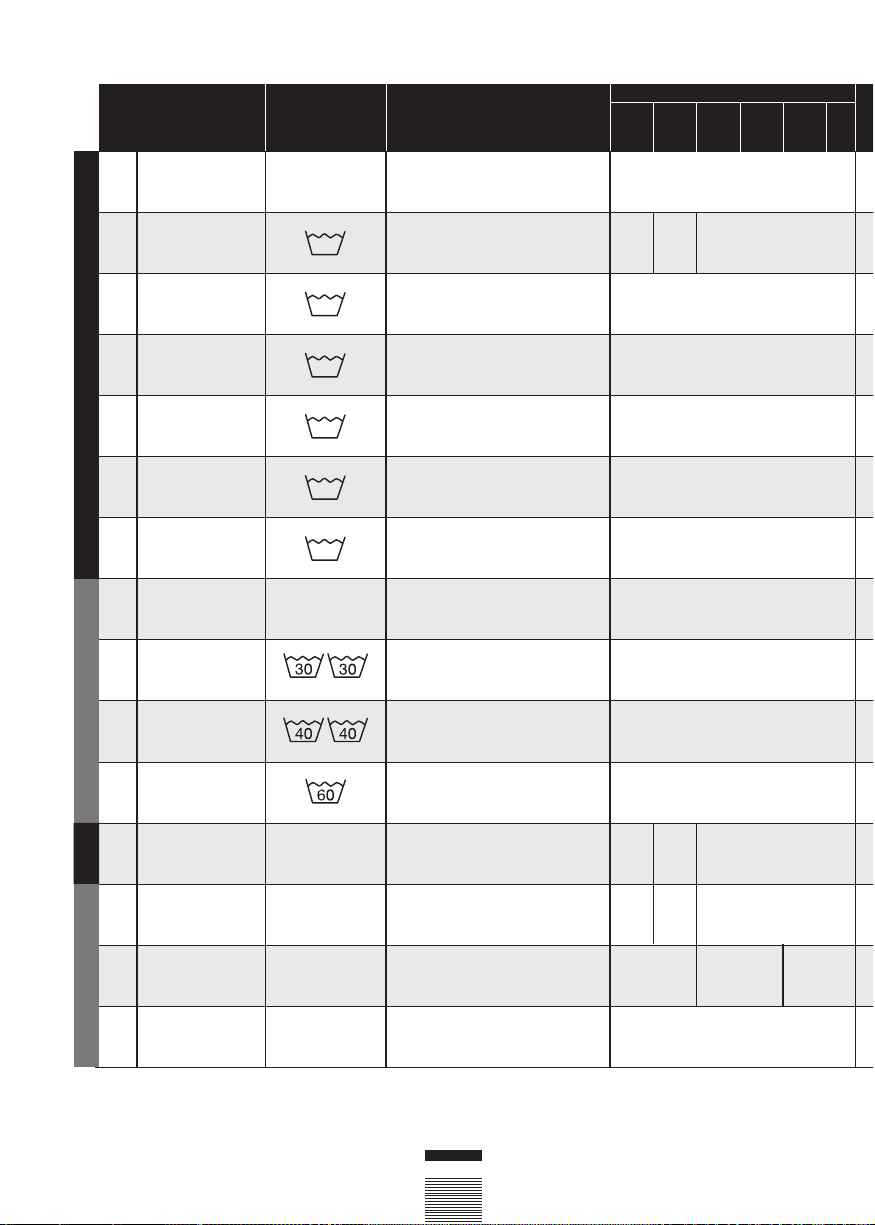
Programa
1
Normal frío
2
Celeris 30ºC
3
Normal 30ºC
4
Normal 40ºC
5 (*)
Normal 60ºC
Programas normaisProgramas delicados
6
Normal 90ºC
7
Pré-lavagem 60ºC
8
Delicado frio
9
Delicado 30ºC
10
Delicado 40ºC
11
Delicado 60ºC
12
Lã 35ºC
Prog. lã
13
Enxaguementos
14
Centrifugação
Prog. auxiliares
15
Esvaziamento
Temperatura
aconsejada
Frío
30
30
40
60
90
60
Frio
—– –
—– –
—
LÃ 35
_
_
_
Tipo de tecido
Algodão/linho
cores delicadas
pouca sujidade
Algodão/linho
branco/cor
pouca sujidade
Algodão/linho
cores delicadas
pouca sujidade
Algodão/linho
cores sólidas
pouca sujidade
Algodão/linho
cores sólidas
sujidade normal
Algodão/linho
branco
sujidade forte
Algodão/linho
branco/cores sólidas
sujidade forte
Sintético/mistura algodão
cores delicadas
pouca sujidade
Sintético/mistura algodão
cores delicadas
pouca sujidade
Sintético/mistura algodão
cores delicadas
sujidade normal
Sintético/mistura algodão
branco/cores sólidas
sujidade normal
Lã/mistura lã
Branco/Cor
pouca sujidade
Algodão/mistura algodão
Sintético/Delicado
Lã/mistura lã
Algodão/mistura algodão
Sintético/Delicado
Lã/mistura lã
Algodão/mistura algodão
Sintético/Delicado
Lã/mistura lã
Teclas de opções possiveis
Enxaguamento
extra
Lavagem
ntensiva
Passar a ferro
facilmente
Selecção
centrifugação
SIM
SIM NÃO SIM
SIM
SIM
SIM
SIM
SIM
SIM
SIM
SIM
SIM
SIM NÃO
SIM NÃO
SIM
SIM
SIMNÃONÃO
NÃO
Elimina
centrifugação
Anti-vincos
(*)
Programa para valorização da lavagem e consumo de energia de
acordo com a norma EN60456, accionando a tecla de lavagem
intensiva.
58
Page 13
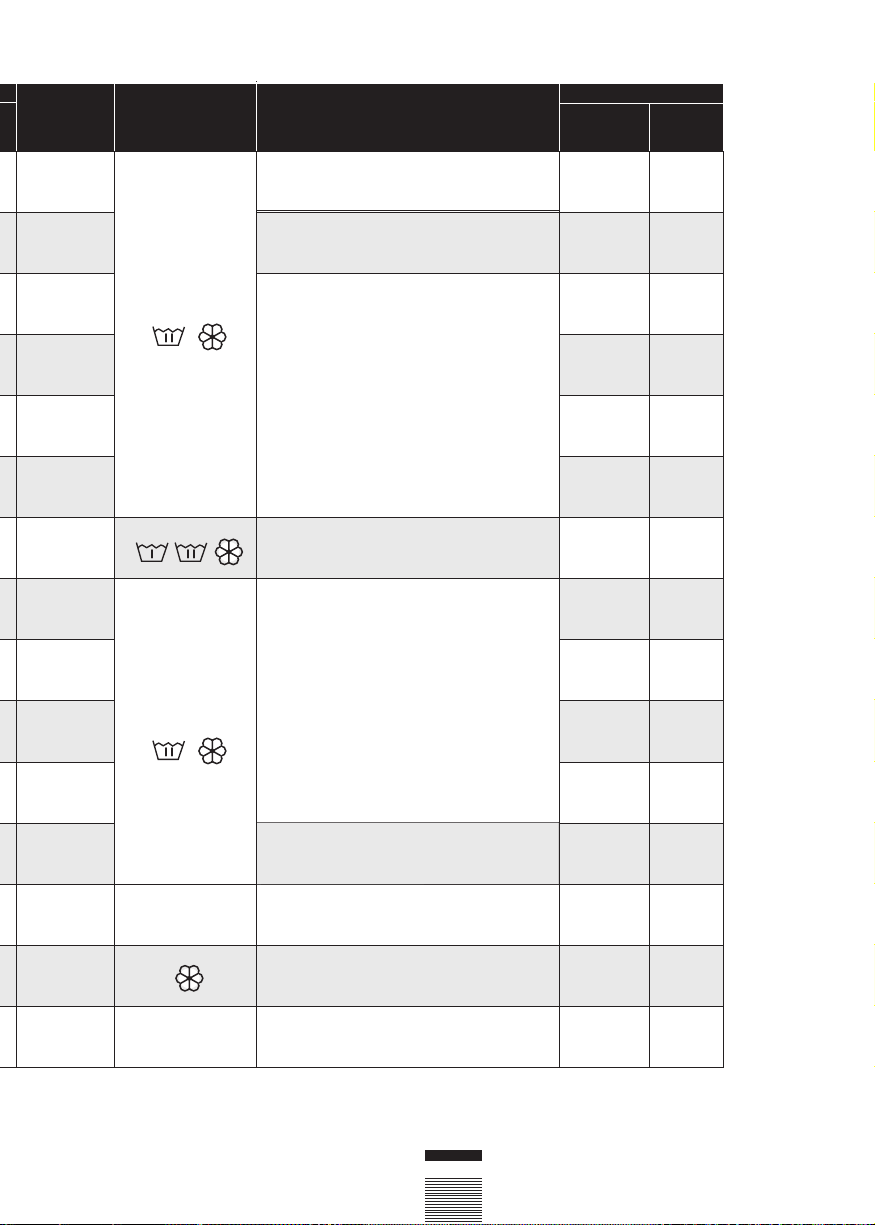
Ant
v ncos
-
Carga
de roupa
máx (Kg)
6
1,5
Compartimento
produtos
de lavagem
Descrição
do programa
Lavagem normal, enxaguamentos,
absorção automática de aditivos se
se quiser e grande centrifugação final
Lavagem CURTA, enxaguamentos,
absorção automática de aditivos se
se quiser e grande centrifugação final
TURBO TIME PLUS
Consumo
total
KWh/litros
0,15/46
0,20/30
Duração
aprox.
(minutos)
60
30
6
6
Lavagem normal, enxaguamentos,
absorção automática de
aditivos se se quiser e
grande centrifugação final
6
6
Pré-lavagem, lavagem normal,enxaguamentos,
6
absorção automática de aditivos se quiser e
grande centrifugação final
3
3
Lavagem delicada, enxaguamentos,
absorção automática de
aditivos se se quiser e
centrifugação final suave
3
3
Lavado de LANA, aclarados,
1
6
_
absorción automática de aditivos si
se desean y centrifugado final suave
Aclarados, absorção automática
de aditivos se se quiser e
grande centrifugação final
0,40/49
0,65/49
1,02/49
1,90/55
1,45/60
0,15/55
0,30/55
0,60/55
0,95/50
0,50/60
0,05/25
82
91
80
120
105
55
55
60
70
40
23
6
6
NOTA: os consumos de kWh e litros, assim como a duração dos programas podem
variar em função do tipo e quantidade de roupa, pressão da rede de água, etc.
_
Centrifugação final
Descarga
59
0,05/0
0,00/0
10
2
Page 14
SELECÇÃO DA CENTRIFUGAÇÃO
4
utilização do aparelho e conselhos práticos
CENTRIFUGAÇÃO
As opções de lavagem devem ser sempre
seleccionadas depois de seleccionar o
programa de lavagem. Qualquer alteração de
programa durante a selecção anula as opções
previamente seleccionadas.
a Tecla de selecção de centrifugação
e anti-vincos (flot)
O programa seleccionado tem atribuídas
umas revoluções de centrifugação.
b Pode alterar a centrifugação premindo
sucessivamente a tecla correspondente,
e o número de rotações reduzir-se-á de
100 em 100 até o valor 400 nos modelos
com display, ou acenderá o piloto nos
modelos sem display.
c Eliminação de centrifugação
Premindo novamente a tecla de
centrifugação chegamos à opção
eliminação de centrifugação. Um
programa em centrifugação final é
utilizado para evitar a formação de vincos
de tecidos especiais.
a
b
c
d Opção: flot/anti-vincos
Para-se no último enxaguamento,
ficando a roupa com água. Quando a
função se desactivar a máquina de lavar
roupa continua o programa
descarregando e centrifugando. Utilizase, por exemplo, quando não se está
em casa e pretende-se atrasar a
centrifugação, para evitar os vincos na
roupa depois da centrifugação e a sua
espera no tambor para ser retirada.
d
60
Page 15

utilização do aparelho e conselhos práticos
ATRASO HORÁRIO
Tecla de selecção de atraso horário
Pode seleccionar um atraso de até 24 horas.
O atraso deve ser seleccionado depois de
seleccionar o programa de lavagem.
Para seleccionar a programação diferida, prima
a tecla do relógio. Cada vez que premir o
botão, o início será retardado 1 hora.
Anulação do atraso
Para anular o atraso é preciso premir
sucessivamente a tecla do relógio. O atraso
anula-se atingindo 24 horas e premindo mas
uma vez. Se mudar o programa também se
anula o atraso.
FUNÇÕES ADICIONAIS
Tecla de selecção de funções adicionais
de acordo com cada programa.
a Possui 3 opções: fácil engomado,
enxaguamento extra, e lavagem
intensiva.
Prima a tecla para visualizar a opção
pretendida.
b Premindo várias vezes poderá
seleccionar entre várias combinações
de uma, duas e até três funções
adicionais simultaneamente em função
do programa seleccionado.
Tecla: Passar a ferro facilmente ( )
Esta opção evita a formação de vincos
nas peças através da realização de um
programa especial em que se produzem
várias rotações especiais para que as
peças depois da centrifugação sejam
mais fáceis de engomar.
Tecla: Enxaguamento extra ( )
Aumenta o grau de enxaguamento final
obtido na roupa; indicado para grandes
cargas e prendas de pessoas com pele
sensível. Aumenta o consumo de água!
Tecla: Lavagem intensiva ( )
Esta opção, especialmente
recomendada para peças muito sujas
e com manchas, consegue melhores
resultados ao aumentar o ciclo normal
de lavagem.
Se durante a selecção de funções adicionais,
mudar de programa ou carregar na tecla
Arranque/Paragem, anulam-se todas as
funções até então seleccionadas.
Importante
61
Page 16

FUNCIONAMENTO E
6
SELECÇÃO DO BLOQUEIO
utilização do aparelho e conselhos práticos
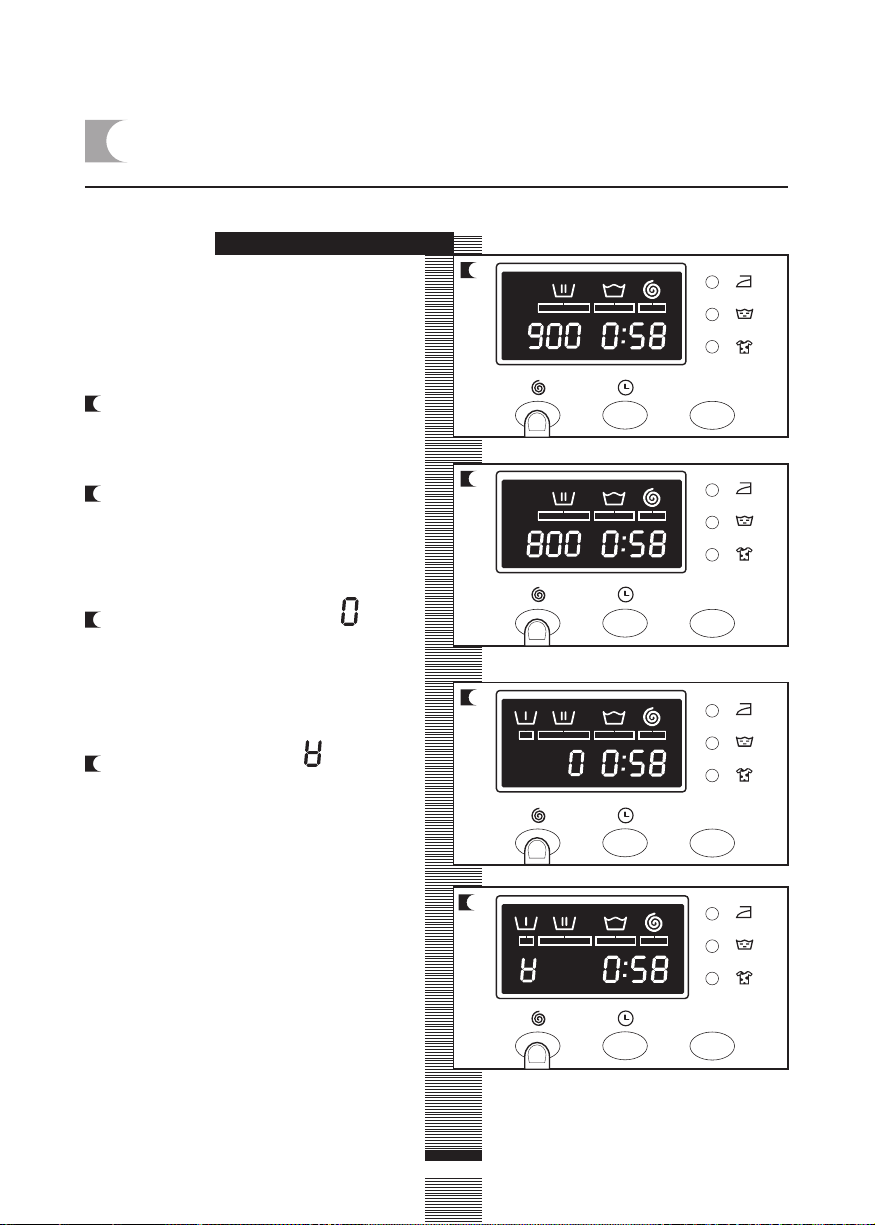
FUNCIONAMENTO
Tecla Arranque/Paragem
a Para accionar a máquina de lavar roupa
é preciso premir a tecla de
Arranque/Paragem. Em cada momento
surgirá no ecrã os minutos restantes
para a finalização da lavagem e
secagem.
BLOQUEIO
Selecção do bloqueio
Mediante o bloqueio, as eventuais manipulações
das teclas não irão influir no programa nem
nas opções de lavagem e secagem
seleccionadas, evitando assim qualquer
manipulação realizada por crianças, etc.
O bloqueio deve ser activado depois de ter
seleccionado o programa de lavagem e todas
as opções do mesmo.
a
a
Accionar o bloqueio
a O bloqueio acciona-se mantendo
premida a tecla de Arranque/Paragem
durante, pelo menos, 3 segundos.
No visor poderá visualizar que está
activado.
Desactivar o bloqueio
b O bloqueio elimina-se ao terminar o
programa de lavagem.
Se quiser desactivar o bloqueio sem
chegar ao final do programa é preciso
manter premida, novamente, a tecla de
funcionamento durante, pelo menos, 3
segundos. Ao passar os 3 segundos
desaparece o indicador de bloqueio do
visor, ficando em estado de pausa.
A tecla Arranque/Paragem não elimina
o bloqueio.
b
62
Page 17

DESENVOLVIMENTO DO PROGRAMA DE LAVAGEM E CORTES
5
NA ALIMENTAÇÃO ELÉCTRICA
utilização do aparelho e conselhos práticos
DESENVOLVIMENTO
DO PROGRAMA
Uma vez o programa em funcionamento, no
display surge a fase actual e o tempo restante
para a finalização.
As fases activas irão aparecendo
sucessivamente na parte de cima do visor à
medida que o programa avança. O tempo que
falta para que o programa acabe também irá
aparecendo no visor. Actualiza-se a intervalos
periódicos, mas não minuto a minuto.
Qualquer tecla de opção pode ser
seleccionada desde que não tenha passado
a fase de lavagem em que tenha efeito e
quando o programa admita esta opção.
Premir durante a lavagem o botão de retardo
não influirá na máquina de lavar.
O accionamento da tecla Arranque/Paragem
durante a lavagem deixa a máquina de lavar
roupa em estado de PAUSA.
Se durante a lavagem e secagem muda o
programa mediante o selector, a máquina de
lavar passará para o estado de PAUSA,
anulando-se o programa.
Se precisar adicionar ou retirar alguma peça,
prima a tecla Arranque/Paragem e certifiquese de que o nível de água não ultrapassa o
do óculo da porta e de que a temperatura no
Importante
interior não seja elevada. Voltando a premir
a tecla Arranque/Paragem, a lavagem volta
a activar-se a partir da mesma fase de ciclo
em que foi interrompida.
CORTE NA ALIMENTAÇÃO
ELÉCTRICA
Se houver um corte de energia, ao
restabelecer-se a máquina de lavar roupa
continua o seu funcionamento normal no ponto
onde tinha parado (tem memória de poucas
horas). O mesmo acontece no caso de
accionar a tecla ON/OFF.
advertências
Para reduzir o ruído na centrifugação: nivele
a máquina de lavar roupa através dos pés
reguláveis.
É recomendado lavar sempre que seja
possível as peças de roupa de diferentes
tamanhos num mesmo programa de lavagem,
favorecendo a distribuição da roupa dentro
do tambor ao centrifugar.
Todos os modelos possuem um sistema de
segurança na centrifugação que impede que se realize
caso a distribuição da roupa dentro do tambor esteja
muito concentrada, desta forma evita-se que o aparelho
atinja um nível excessivo de vibrações.
Se detectar em algum caso que a roupa não sai
convenientemente escorrida, volte a tentar centrifugá-
la depois de ter repartido a roupa no tambor de forma
mais uniforme.
63
Page 18

máquina de lavar roupa
a
b
Depois de cada lavagem deixe a porta
de carga aberta durante um determinado
tempo para que o ar circule livremente
pelo interior da máquina.
É aconselhável realizar de vez em
quando, dependendo da dureza dá
água, um ciclo de lavagem completo
utilizando um produto descalcificante.
Desta forma vai alargar a vida útil
da sua máquina de lavar.
Antes de levar a cabo qualquer
operação de limpeza ou manutenção,
é aconselhável desligar a máquina
de lavar roupa da rede eléctrica.
LIMPEZA DO COMPARTIMENTO DO DETERGENTE
1
manutenção e limpeza
MANUTENÇÃO
Limpe o compartimento de detergente
sempre que houver resíduos visíveis de
algum produto de lavagem.
a Retire totalmente o compartimento
de detergente puxando a asa com
força para fora.
b Lave todas as divisórias do
compartimento. Utilize água morna
e uma escova.
c Limpe também os tubos do
compartimento de aditivos, retirandoos previamente e uma vez limpos,
coloque-os assegurando que estão
bem encaixados no fundo.
Volte a introduzir o compartimento
na máquina de lavar roupa.
Um tubo mal encaixado ou sujo
impede a entrada de aditivos e deixa
água no compartimento no final da
lavagem.
Importante Importante
64
a
b
c
Page 19

LIMPEZA DO FILTRO ACESSÍVEL E
2
LIMPEZA EXTERIOR
LIMPEZA FILTRO
Lave o filtro acessível se a bomba de
descarga tiver ficado bloqueada por
objectos estranhos.
a Vire a tampa do filtro utilizando uma
moeda.
b Retire a tampa do filtro.
c Para recolher a água que sai ao soltar
o filtro, coloque um prato ou outro
recipiente por baixo do mesmo.
d Rode o filtro um quarto ou meia volta
para a esquerda. Começa a sair água.
e Finalizada a evacuação da água, vire o
filtro varias vezes até ser possível a
extracção do mesmo, puxando
levemente.
f Retire os objectos ou fios que possam
ter ficado no filtro ou dentro da bomba
de descarga.
Volte a colocar no seu lugar o filtro e a
tampa do filtro.
manutenção e limpeza
Para evitar queimaduras não realize
esta operação quando a água de
lavagem for superior a 30ºC.
Importante
LIMPEZA EXTERNA
Para a limpeza externa da máquina de lavar
utilize água morna ensaboada ou um agente
de limpeza suave que não seja abrasivo nem
dissolvente.
A seguir, seque-a bem com um pano suave.
Quando houver derrames de detergente ou
aditivos do compartimento sobre o móvel
da máquina de lavar roupa, limpe-os quanto
antes, são corrosivos.
Importante
65
Page 20

máquina de lavar roupa
segurança e solução de problemas
Se detectar algum problema na
utilização da máquina de lavar
roupa, provavelmente possa
resolvê-lo depois de consultar as
indicações que se seguem.
Se não for assim, desligue o
aparelho e que se ponha em
contacto com o SERVIÇO DE
ASSISTÊNCIA TÉCNICA.
É importante não abrir o
aparelho em caso
nenhum: no interior não
há fusíveis nem peças que
possam ser substituídos
pelo utilizador.
Importante
INCIDÊNCIAS
Por que é que a máquina de
lavar não funciona?
Indicador
FO1
FO2
CO3
FO4
FO5
.
.
.
.
.
F10
Pode ser porque:
Certifique-se de que a porta esteja bem fechada.
A máquina de lavar não está ligada à rede eléctrica, ou
não há tensão na rede eléctrica.
Não premiu a tecla de Arranque/Paragem.
Se a porta da máquina de lavar está mal fechada,
surgirá no display F04.
Incidências
Não entra água
Não descarga, nem centrifuga
Não centrifuga
Não se activa
Avise o Serviço de Assistência Técnico
Por que é que a máquina de
lavar roupa vibra ou faz um
ruído excessivo?
Pode ser porque:
Os parafusos de bloqueio e transporte não foram
retirados.
A máquina de lavar roupa está mal nivelada ou assente
sobre o chão.
Na fase de centrifugação o motor emite um zumbido
agudo, com origem na normal acção mecânica do
próprio motor.
66
Page 21

segurança e solução de problemas
Por que é que não entra
água na máquina de lavar?
Por que é que a máquina de
lavar não descarga nem
centrifuga?
Por que é que a máquina de
lavar não centrifuga?
Se a água não entra na máquina, o display mostrará
a mensagem de erro F01.
O indicador F01, falta de entrada de água, pode darse devido a um corte na alimentação de água, torneira
de entrada de água à máquina de lavar roupa fechada
ou filtro de entrada de água à máquina de lavar roupa
obstruído.
Por isso é possível: esperar a que volte a alimentação
de água, abrir a torneira de entrada de água, e soltar
a mangueira de entrada de água e limpar o filtro.
Esta falha mostra-se no display através da mensagem F02.
Os motivos do indicador F02 podem ser: obstrução
da motobomba de descarga da máquina de lavar
roupa, obstrução nos tubos de descarga do edifício,
ou má instalação eléctrica da motobomba.
Acção: se o motivo for a obstrução da motobomba,
aceda tal como se indica na secção 2, manutenção e
limpeza do aparelho.
Esta falha mostra-se no display através da mensagem C03.
Isto deve-se à distribuição da roupa no tambor
descompensada que pode provocar um nível excessivo
de vibrações.
Por que é que não vejo água
no tambor durante a
lavagem?
A acção a tomar é seleccionar um programa de
centrifugação.
Isto pode dever-se ao facto de a máquina de lavar estar
dotada de um sistema que tem a capacidade de se adaptar
à carga da roupa e à natureza do tecido, ajustando o nível
de água e energia utilizados, de forma a preservar o meio
ambiente. Por isso, embora a quantidade de água que
pode observar através do óculo lhe pareça reduzido, não
se preocupe, o grau de eficácia da lavagem e
enxaguamento vai ser excelente.
67
Page 22

segurança e solução de problemas
Por que é que fica água no
compartimento?
¿Por que é que não posso
abrir o óculo imediatamente
depois de acabar a
lavagem?
Informação adicional
Pode dever-se ao facto de que o compartimento precise
de ser limpo. Esta operação simples é descrita na secção
Manutenção e limpeza do aparelho.
1- Limpeza do compartimento de detergente.
As máquinas de lavar roupa actuais possuem sistemas de
segurança para os utilizadores. Um desses sistemas é de
não poder abrir a máquina de lavar roupa sem garantir que
o tambor está totalmente parado. Por isso é preciso cerca
de 2 minutos para poder abrir o óculo.
A máquina de lavar roupa tem a possibilidade de detectar
outras indicações. Quando isto acontecer visualiza-se no
visor diversos indicadores F05, F06…, F10. Contacte com
o Serviço Técnico Oficial.
68
Page 23

advertências sobre o meio ambiente
nota ecológica
INFORMAÇÃO PARA A CORRECTA GESTÃO DOS RESÍDUOS DE APARELHOS
ELÉCTRICOS E ELECTRÓNICOS
Ao final da vida útil do aparelho, este não deve
ser eliminado misturando com os resíduos
domésticos gerais.
Pode entregar, sem qualquer custo adicional, em
centros específicos de recolha, diferenciados pelas
administrações locais, ou distribuidores que
facilitem este serviço.
Eliminar por separado um resíduo de
electrodoméstico significa evitar possíveis
consequências negativas para o meio ambiente
e a saúde, derivadas de uma eliminação
inadequada, e permite um tratamento e reciclagem
dos materiais que compões, obtendo poupanças
importantes de energia e recursos.
Para salientar a obrigação de colaborar com uma
recolha selectiva, no produto aparece a marca
que mostra como advertência a não utilização de
recipientes tradicionais para a sua eliminação.
Para mais informação, entre em
contacto com as autoridades
locais ou com a loja onde adquiriu
o produto.
69
Page 24

warnings
To avoid the risk of fire, electric shocks, injury or damage when using your washing
machine, please take the following precautions:
This washing machine comes with a
manual that includes operating, maintenance
and installation instructions. Please read all
the instructions before using the washing
machine.
Do not wash items that have previously
been cleaned, washed, soaked or treated
with petrol, solvents for dry cleaning, other
inflammable substances or explosives, as
they produce fumes that could catch fire or
explode.
Do not add petrol, solvents for dry cleaning
or other inflammable or explosive substances
to the wash water as they produce fumes
that could catch fire or explode.
Do not repair or replace any part of the
washing machine or try to carry out any type
of servicing unless it is recommended in the
maintenance instructions in the manual.
Do not climb onto the machine or stand
on the open hatch door.
Do not use an extension lead or adaptor
to connect your washing machine to the
mains supply.
The machine should only be used for the
purpose it is designed for.
Follow the washing instructions
recommended by the manufacturer of the
garment to be washed.
Do not turn your washing machine on until
you are sure that:
• It has been installed in accordance with
the installation instructions.
• All the water, drainage, mains electricity
and earth connections meet the local
regulations and/or other applicable
regulations.
70
Page 25

washing machine
Drain hose
Hatch
Adjustable
feet
specifications
Power
cord
Control
panel
Detergent
dispenser
Stainless
steel drum
Accessible filter
71
ACCESSORIES
Water inlet hose.
Page 26

washing machine
UNPACKING AND
1
UNBLOCKING THE
WASHING MACHINE
a Remove the base, corner protectors and
top cover.
a Remove the screws holding the plastic
covers to the back of the washing
machine.
b Loosen and remove the 3 blocking
screws.
installation and assembly
UNPACKING
UNBLOCKING
c Cover the holes with the plastic covers
you have just removed.
Do not throw the blocking screws
away. You may need to move the
washing machine at a later date.
Important
72
Page 27

CONNECTION TO THE MAINS WATER SUPPLY AND
2
DRAINAGE
installation and assembly
CONNECTION TO THE
MAINS WATER SUPPLY
The water supply hose is inside the drum:
a Connect the bent end of the hose to the
threaded inlet of the electrovalve located
at the rear of the washing machine.
b Connect the other end of the hose to
the water intake. Then securely tighten
the connection nut.
It is important that the drain hose
bend is correctly fastened to the
outlet, to prevent any risk of it
becoming detached and causing
flooding.
If your washing machine has a hot
water intake, connect the hose with
the red threaded end to the hot water
tap, and to the electrovalve with the
red filter.
The washing machine must be
connected to the mains water supply,
Important
using the new supply hoses supplied
with the appliance. Do not use water
supply hoses that have been used
before.
For your washing machine to work
properly, the mains water pressure
must be between 0.05 and 1MPa (0.05
and 10 Kgr/cm
2
).
DRAINAGE
CONNECTION
a It is recommended that you have a fixed
drainage outlet 50 to 70 cm from the
floor.
Avoid the drain hose being too tight,
kinked or restricted.
73
Page 28

LEVELLING THE WASHING MACHINE AND CONNECTING
3
IT TO THE MAINS ELECTRICITY SUPPLY
installation and assembly
LEVELLING
Use the adjustable feet to level the
washing machine. This will reduce
the noise level and prevent it from
moving during use.
Do not bring the feet too far out, you
will achieve better stability.
Important
You need to use a spanner for the
models that have a nut.
ELECTRICAL CONNECTION
Consult the specifications plate located on the
hatch door of the washing machine before
making the electrical connections. Ensure that
the voltage reaching the plug is the same as
that on the plate.
Do not remove the specifications plate.
The information on it is important.
It is very important to correctly earth the
washing machine. The electrical
installation, plug, socket, fuses or
automatic switch and counter must be
correctly dimensioned for the maximum
power indicated on the specifications
plate.
Important
Do not plug the washing machine plug
into the socket with wet or damp hands.
To remove the power cord, pull on the
body of the plug.
If the power cord is damaged, it must be
replaced by a cord or special unit provided
by either the manufacturer or your aftersales service.
With built-in washing machines, the plug
must be accessible after installation.
74
Page 29

PRE-CLEANING
4
PRE-CLEANING
When your washing machine has been
correctly installed, we recommend that you
pre-clean the machine.
This is to check that the installation, the
connections and the drainage are all correct,
and to thoroughly clean the inside of the
washing machine before any wash
programmes are run (see the operating
instructions on the following pages).
a Select the normal programme at 60ºC.
b Press the Start/Stop button.
ba
75
Page 30

washing machine
PREPARING
1
GARMENTS FOR
using the appliance and practical tips
WASHING
PREPARATION
Before placing the clothes in the
drum, make sure all the pockets are
empty.
Any small objects may block the drain
pump.
Important
SORTING THE CLOTHES
a Sort the clothes according to fabric
and how they are made:
We recommend using the delicate
programmes for sensitive fabrics. There
is a special wool programme for
woollens.
b Sort clothes according to how soiled
they are.
• Wash lightly soiled garments using a
short programme.
• Use a programme without prewash
for medium-soiled garments.
• Wash heavily soiled garments using a
long programme with prewash.
Prewash
Wash
Important
Make sure
beforehand
that your
woollens can
be machinewashed.
Wash
a Sort your clothes according to colour.
Wash whites and coloured separately.
We recommend loading the washing
machine to its full capacity. This
means savings on water and energy.
Whenever possible, we recommend
that you wash garments of different
sizes within the same wash
programme. This improves the
washing action and also aids the
correct distribution of the garments
in the drum when spin-drying, and
Important
the washing machine will therefore
be quieter.
It is a good idea to put small garments
in a wash bag.
76
60
90
30
40
Cold
Page 31

2
USING DETERGENT AND ADDITIVES
using the appliance and practical tips
DETERGENT AND
ADDITIVES
a Your washing machine’s detergent
dispenser has three compartments.
b Put the detergent or additive into the
detergent dispenser before starting the
wash programme.
c Liquid detergents may also be used in
this washing machine. An optional
detergent dispenser is to be used for
this, which can be obtained from the
Technical Service Network.
Place this optional dispenser inside the
wash compartment.
The level of liquid must never be
higher than the MAX mark printed on
the dispenser wall.
Important
Remember that the amount of detergent to
be used will always depend on:
The amount of clothes to be washed.
How heavily the clothes are soiled.
The hardness of the water (Information on
water hardness in your area can be obtained
from the competent local authorities).
We recommend the use of a
decalcifying product if the water
hardness is high in your area.
Important
PREWASH
WASH
FABRIC SOFTENER
eco-note
Remember that concentrated detergents
exist which are more environment- and
nature-friendly.
The use of more detergent than
necessary will not improve your
washing results, and apart from costing
you money it will have a negative effect
on the preservation of the
environment.
We therefore recommend you follow
the detergent manufacturer’s
instructions.
77
Page 32

3
SELECTING THE WASH AND DRY PROGRAMME
using the appliance and practical tips
start/
stop
button
START
PAUSE
screen
SPIN
DELAY
TIME SELECTION
EXTRA
INTENSIVE
EASY
IRON
RINSE
WASH
detergent dispenser
detergent dispenser
The procedure for selecting the wash and
dry programme is as follows:
a Activate the programme selector by
pressing it to release it.
b Select the wash programme by turning
the programme selector dial (see
programme table).
The display on the control panel will light
up.
programme
selector
programme
selector
spin and
anti-crease
button
start/
stop
button
spin and
anti-crease
button
time
delay
button
screen
time
delay
button
additional
function
button
additional
function
button
78
Page 33

using the appliance and practical tips
When you select the programme, the following
information will be displayed:
1 Wash programme phases:
Prewash
Wash
Rinse
Spin-drying and draining
2 Spin speed
3 Programme nº (for a few seconds)
and then programme duration.
4 Additional functions
Easy iron
Extra rinse
Intensive wash
There are four types of programme:
Normal programmes
Delicate programmes
Wool programmes
Auxiliary programmes
1
23 4
PROGRAMMMES
Normal AuxiliaryWool
Normal cold
2
Quick 30ºC
3
Normal 30ºC
4
Normal 40ºC
5
Normal 60ºC
6
Normal 90ºC
7
Prewash 60ºC
Delicate
8
Delicate cold
9
Delicate 30ºC
10
Delicate 40ºC
11
Delicate 60ºC
12
Wool 35ºC1
Rinses
13
Spin-drying
14
Draining
15
eco-note
We recommend you choose a wash
programme without prewash whenever
possible. This will save you money and
help protect the environment.
79
Page 34

Programme
M
o
1
Normal cold
2
Quick 30ºC
3
Normal 30ºC
4
Normal 40ºC
5 (*)
Normal 60ºC
Normal programmesDelicate programmes
6
Normal 90ºC
7
Prewash 60ºC
8
Delicate cold
9
Delicate 30ºC
10
Delicate 40ºC
11
Delicate 60ºC
12
Wool 35ºC
Wool prog
13
Rinses
14
Spin-drying
Auxiliary Prog.
15
Draining
Recommended
temperature
Cold
30
30
40
60
90
60
Cold
—– –
—– –
—
WOOL 35
_
_
_
Fabric type
Cotton/Linen
delicate colours
very light soil
Cotton/Linen
whites/colours
very light soil
Cotton/Linen
delicate colours
light soil
Cotton/Linen
fast colours
light soil
Cotton/Linen
fast colour
medium soil
Cotton/Linen
whites
heavy soil
Cotton/Linen
whites/fast colours
heavy soil
Synthetic/mix cotton
delicate colours
very light soil
Synthetic/mix cotton
delicate colours
light soil
Synthetic/mix cotton
delicate colours
medium soil
Synthetic/mix cotton
whites/fast colours
medium soil
Wool/woll mix
whites/colours
light soil
Cotton/cotton mix
Synthetic/Delicate
Wool/wool mix
Cotton/cotton mix
Synthetic/Delicate
Wool/wool mix
Cotton/cotton mix
Synthetic/Delicate
Wool/wool mix
Possible option buttons
Extra
rinse
Intensive
wash
Easy-iron
Spin speed
YES
YES
NO
YES
YES
YES
YES
YES
YES
YES
YES
YES
YES
YES
NO
YES
NO
NO NO
YES
YES
YES
NO
selection
No spin
Anti-crease
(*)
Programme for wash and energy consumption assessment in
accordance with standard EN60456, press intensive wash button.
80
Page 35

Ant
crease
Max load
of clothes
-
(Kg)
6
1,5
Wash
product
compartment
Programme
description
Normal wash, rinses,
automatic additive absorption if
desired and long final spin
SHORT wash, rinses,
automatic additive absorption if
desired and long final spin
TURBO TIME PLUS
Total
consumption
KWh/Litres
0,15/46
0,20/30
Approx.
duration
(minutes)
60
30
6
6
Normal wash, rinses,
automatic additive absorption
if desired and
long final spin
6
6
Prewash, normal wash, rinses,
6
automatic additive absorption if
desired and long final spin
3
3
3
Delicate wash, rinses,
automatic additive absorption
if desired and
gentle final spin
3
1
6
_
WOOL, wash, rinses,
automatic additive absorption if
desired and gentle final spin
Rinses, automatic additive
absorption if desired and
long final spin
0,40/49
0,65/49
1,02/49
1,90/55
1,45/60
0,15/55
0,30/55
0,60/55
0,95/50
0,50/60
0,05/25
82
91
80
120
105
55
55
60
70
40
23
6
6
NOTE: the KWh and litre consumptions and programme durations may vary depending
on the type and amount of clothes, mains water pressure, etc.
_
Long final spin
Draining
81
0,05/0
0,00/0
10
2
Page 36

SPIN SPEED SELECTION
4
using the appliance and practical tips
SPIN-DRYING
The wash options must always be selected
after choosing the wash programme. Any
programme change during selection cancels
the previously selected options.
a Spin speed selection and anti-crease
button
The selected programme has its own
particular spin speed.
a
b You can change it by repeatedly pressing
the spin button. The spin speed will
gradually be reduced at 100 r.p.m.
intervals to 400 r.p.m. for display models.
On non-display models the LED will
light up.
c No spin
Press the spin button again to get to the
no spin option. A programme without a
final spin. It is used to prevent creasing
when washing special fabrics.
d Anti-crease option
The wash programme stops on the last
rinse, with the clothes left in water. When
the function is deactivated, the washing
machine continues the programme,
draining and spin-drying.
It is used, for example, when you are
not at home and want to delay the spindrying until you get home, to prevent
the clothes creasing after spin-drying
and being left in the drum to be removed.
b
c
d
82
Page 37

using the appliance and practical tips
TIME DELAY
Time delay selection button
A delay of up to 24 hours can be selected.
The delay must be selected after choosing the
wash programme.
To select the hours of delay, press the clock
button. Each time the button is pressed the
start of washing is delayed by 1 more hour.
Cancelling the delay
To cancel the delay you have to press the
clock button successively. The delay will be
cancelled when 24 hours have been reached
and the button is pressed once more. If the
programme is changed the delay is also
cancelled.
ADDITIONAL FUNCTIONS
Additional function selection button
depending on programmes.
a There are 3 options: easy iron, extra rinse
and intensive wash.
Press the button and the desired option
will be displayed.
b By pressing the button several times you
can choose between several
combinations of one, two and up to three
additional functions at the same time
depending on the programme selected.
Button: Easy-iron ( )
This option prevents garments from
creasing by means of carrying out a
special programme with special turns to
fluff out the garments after spin-drying
and make them easier to iron.
Button: Extra rinse ( )
Increases the level of the final rinse
obtained in the clothes; suitable for large
loads and garments belonging to people
with sensitive skin. Increases water
consumption!
Button: Intensive wash ( )
This option, specially recommended for
heavily soiled, stained clothes, achieves
better results by extending the normal
wash cycle.
If during the additional function selection, the
programme is changed or the Start/Stop
button is pressed, all the functions selected
until then are cancelled.
Important
83
Page 38

STARTING UP AND
6
BLOCK FUNCTION SELECTION
using the appliance and practical tips
STARTING UP
Start/Stop button
a To start up the washing machine you
have to press the Start/Stop button.
The minutes remaining until the end of
washing and drying will appear on the
display at all times.
BLOCK FUNCTION
Block function selection
The lock function ensures that the programme
will not be affected if any buttons are pressed.
It is used when children could press the
buttons, etc.
The block function should be activated after
the wash programme has been selected
together with all its options.
a
a
Activating the block function
a The block function is activated by
pressing the Start/Stop button and
holding it down for at least 3 seconds.
The display will show if it is activated.
Deactivating the block function
b The block function is cancelled when
the wash programme comes to an end.
If you want to deactivate the block
function before the end of the
programme, you have to hold the start
button down again for at least 3 seconds.
After 3 seconds, the block function
indicator will disappear from the display,
and it will go into pause status.
The Start/Stop button does not cancel
the block function.
b
84
Page 39

WASH PROGRAMME PHASES
5
AND POWER CUTS
using the appliance and practical tips
PROGRAMME
PHASES
When the programme is running, the
programme phase and the time remaining for
it to end will appear on the display..
The active phases will appear successively at
the top of the display as the programme
progresses. The time remaining until the end
of the programme will also appear on the
display. It updates at regular intervals, but not
minute by minute.
Any option button can be selected provided
the wash phase in which it takes effect has
not been passed and when the programme
accepts the option.
Pressing the delay button during washing will
have no effect on the washer.
Pressing the Start/Stop button during the wash
activates the PAUSE function.
If the programme is changed on the selector
dial during the washing and drying process,
the washer will go onto PAUSE status and
the programme will be cancelled.
If you need to add or remove a garment, press
the Start/Stop button and make sure that the
water level is not above the door overflow
level and that the temperature inside is not
Important
high. Press the Start/Stop button again to
restart the wash from the same cycle phase
it had stopped at.
POWER CUTS
If there is a power cut, when the electricity
comes back on the washing machine will
continue to run from where it left off (it has
several hours of memory). The same will
happen if the ON/OFF button is pressed.
warnings
Level the washing machine by adjusting the
feet to reduce the noise caused by spin-drying.
Try and wash clothes of different sizes in
the same wash programme to favour the
distribution of the clothes inside the drum
during spin-drying.
All the models have a safety system for spin-drying
that prevents spin-drying from being carried out if the
distribution of the clothes inside the drum is too
concentrated. This prevents the appliance from vibrating
too much.
If you find that the clothes are not properly wrung out,
try spin-drying them again after having distributed the
clothes more evenly in the drum.
85
Page 40

washing machine
a
b
After each wash, leave the door open
for a while to allow the air to circulate
freely inside the machine.
From time to time, depending on the
hardness of your water, it is
recommendable to run a full wash cycle
using a decalcifying product. This will
extend the life of your washing
machine.
The washing machine should be
disconnected from the mains
electricity supply before any
cleaning or maintenance is carried
out.
CLEANING THE DETERGENT DISPENSER
1
maintenance and cleaning
MAINTENANCE
Clean the detergent dispenser whenever
there is any washing product residue left
inside.
a Pull outwards on the detergent
dispenser to remove it completely.
b Use warm water and a brush to
clean the compartments.
c Also clean the additive
compartment siphons, having
removed them first. Once they
have been cleaned, put them back
making sure that they fit right in to
the back.
Put the dispenser back into the
washing machine.
A dirty or incorrectly fitted siphon will
prevent the additives from being taken
in and leave water inside the
compartment at the end of the wash.
Important Important
86
a
b
c
Page 41

CLEANING THE ACCESSIBLE FILTER
2
AND THE OUTSIDE
CLEANING THE FILTER
Clean the accessible filter if the drain pump
is blocked by any foreign objects.
a Use a coin to turn the filter cap.
b Pull out the filter cap.
c Place a container under the drain pump
filter to collect any water that comes out
of it.
d Half- or quarter-turn the filter to the left.
Water will start to come out.
e When all the water has drained out of
the washing machine, turn the filter
several times until it can be completely
removed by gently pulling on it.
f Remove the objects or fluff caught in the
filter or the drain pump.
Put the filter and the filter cap back in
place.
maintenance and cleaning
To avoid burns, do not carry out this
operation when the wash water is at
a temperature of over 30ºC.
Important
CLEANING THE OUTSIDE
The outside of the washing machine should
be cleaned with warm soapy water or a gentle
cleaning agent. Do not use abrasive cleaning
products or solvents.
It should then be thoroughly dried with a soft
cloth.
When there have been spillages of detergent
or additives from the dispenser onto the
washing machine cabinet, clean them up
right away as they are corrosive.
Important
87
Page 42

washing machine
safety and troubleshooting
If you detect any problems with
your washing machine, you will
probably be able to rectify them
yourself by consulting the following
instructions.
If this is not the case, unplug the
appliance and contact the
TECHNICAL ASSISTANCE
SERVICE.
Do not open up the
washing machine. It does
not contain any fuses or
similar components that
can be replaced by the
Important
user.
PROBLEMS
Why won’t the washing
machine start?
Indicaor
FO1
FO2
CO3
FO4
FO5
.
.
.
.
.
F10
This may be due to the following:
Check the door is properly shut.
The washing machine is not plugged into the mains or
there is no voltage in the mains supply.
The Start/Stop button has not been pressed.
If the washing machine door is not properly shut, F04
will appear on the display.
Problems
No water coming in
Does not drain or spin-dry
Does not spin-dry
Does not start
Call the Technical Assistance Service
Why is the washing machine
vibrating or making too
much noise?
This may be due to the following:
The blocking and transport screws have not been
removed.
The washing machine has not been correctly levelled.
On spin-drying, the motor makes a kind of whistling
noise. This is due to the mechanical action of the motor
itself and is perfectly normal.
88
Page 43

safety and troubleshooting
Why doesn’t the washing
machine take in water?
Why doesn’t the washing
machine drain or spin-dry?
Why doesn’t the washing
machine spin-dry?
If no water is entering, F01 will appear on the display.
Indicator F01, no water coming in, this may be due to
a cut in the water supply, a tap turned off or a blocked
water inlet filter.
The possible solutions are as follows: wait for the water
supply to be reconnected, turn on the tap, or remove
the water inlet hose and clean the filter.
If this failure is detected, F02 will appear on the display.
The reasons for the F02 indicator may be the following:
washing machine drain pump blocked, building drainage
pipes blocked, or incorrect pump electrical connection.
Solution: if the pump is blocked, gain access to it as
described in section 2, maintaining and cleaning the
appliance.
If this failure is detected, C03 will appear on the display.
This may be due to an uneven distribution of clothes
in the drum and may cause an excessive level of
vibrations.
Why can’t I see any water in
the drum during the wash?
The solution is to select a spin-drying programme.
This is due to the fact that the washing machine is provided
with a system which is able to adapt to the load and type
of fabrics, adjusting the levels of water and energy used,
in order to preserve the environment.
So, although the water level you can see through the hatch
may look low, there is no cause for concern as washing
and rinsing efficiency will still be optimum.
89
Page 44

safety and troubleshooting
Why is there still some water
in the dispenser?
Why can’t I open the hatch
immediately after the wash
has finished?
Other indications
This may be because the dispenser needs cleaning. This
simple operation is described in Maintaining and cleaning
the appliance.
1- Cleaning the detergent dispenser.
Washing machines today are provided with safety systems
for users. One of them is that the washing machine cannot
be opened until it is certain that the drum is quite still. This
is why the hatch cannot be opened for 2 minutes.
The washing machine can detect other indications. When
this happens a number of other indicators appear on the
display: F05, F06..., F10. If this happens, call the Official
Technical Service.
90
Page 45

environmental warnings
eco-note
INFORMATION FOR THE CORRECT DISPOSAL OF WASTE ELECTRICAL AND
ELECTRONIC APPLIANCES
When your appliance is of no further use, it should
not be disposed of together with general domestic
waste.
It can be taken, free of charge, to a specific waste
collection centre, run by your local authority, or
dealers who provide this service.
Disposing of waste domestic appliances separately
means avoiding possible negative consequences
for the environment and health, derived from
incorrect disposal. This will enable the materials
in them to be treated and recycled, obtaining
important savings in energy and resources.
To highlight the obligation of collaborating with
selective waste collection, the product is marked
with a symbol to warn against using traditional
containers for disposing of the appliance.
For further information, contact
your local authority or the shop
where you purchased the product.
91
Page 46

10/06 LJ6A029Z7
 Loading...