

Page 1
Personal Digital Assistant (PDA)
User’s Manual
Page 2

Datalogic ADC S.r.l.
Via S. Vitalino, 13
40012 Lippo di Calderara di Reno
Bologna - Italy
Telephone: (+39) 051-3147011
Fax: (+39) 051-3147205
©2016 Datalogic ADC S.r.l.
An Unpublished Work - All rights reserved. No part of the contents of this
documentation or the procedures described therein may be reproduced or transmitted
in any form or by any means without prior written permission of Datalogic ADC S.r.l. or
its subsidiaries or affiliates ("Datalogic" or “Datalogic ADC”). Owners of Datalogic
products are hereby granted a non-exclusive, revocable license to reproduce and
transmit this documentation for the purchaser's own internal business purposes.
Purchaser shall not remove or alter any proprietary notices, including copyright
notices, contained in this documentation and shall ensure that all notices appear on
any reproductions of the documentation.
Should future revisions of this manual be published, you can acquire printed versions
by contacting your Datalogic representative. Electronic versions may either be
downloadable from the Datalogic website (www.datalogic.com) or provided on
appropriate media. If you visit our website and would like to make comments or
suggestions about this or other Datalogic publications, please let us know via the
"Contact Datalogic" page.
Datalogic has taken reasonable measures to provide information in this manual that is
complete and accurate, however, Datalogic reserves the right to change any
specification at any time without prior notice.
Datalogic and the Datalogic logo are registered trademarks of Datalogic S.p.A. in many
countries, including the U.S.A. and the E.U. DL-Axist™ and SoftSpot are trademarks of
Datalogic S.p.A. or of Datalogic Group companies. The Bluetooth word mark and logos
are owned by Bluetooth SIG, Inc. and any use of such marks by Datalogic Group
companies is under license. Android™ is a trademark of Google Inc. All other brand and
product names are trademarks of their respective owners.
Patent. See www.patents.datalogic.com
Disclaimer
Patents
for patent list.
Page 3

Table of Contents
Introduction ....................................................................... 1
Conventions ..................................................................................1
Product Presentation ..................................................................2
Available Models ..........................................................................3
Out of the Box ...............................................................................4
General View .................................................................................5
Front View .............................................................................5
Back View ..............................................................................6
Side View ...............................................................................7
Top View ................................................................................7
Bottom View .........................................................................7
Accessories ...................................................................................8
Battery................................................................................ 9
Install the Battery ........................................................................9
Charge the Battery .................................................................... 12
Charge with USB ................................................................ 12
Charge with the dock ........................................................ 14
Replace the Battery .................................................................. 19
SD Card/ SIM Card.......................................................... 21
Install the MicroSD Card ........................................................... 21
Install the SIM Card ................................................................... 24
Getting Started ............................................................... 27
Power Button ............................................................................. 27
Power On ............................................................................ 27
Suspend Mode ................................................................... 27
User’s Manual i
Page 4

Long Press Power Menu ...................................................28
Home Screen ..............................................................................35
Home Screen Items ...........................................................36
Customize the Home Screen ............................................36
Virtual Keyboard ................................................................38
Applications ................................................................................39
Resetting the Terminal ..............................................................42
Configuration Reset ...........................................................42
Device Reset .......................................................................44
LED Indicators ............................................................................45
Settings ............................................................................ 47
Overview .....................................................................................47
Scanner Settings ........................................................................48
Notification .........................................................................49
Good Read ...........................................................................52
Formatting ..........................................................................53
Scanner Options .................................................................56
Wedge .................................................................................59
Symbology Settings ...........................................................61
Global Settings ...................................................................63
Wi-Fi Settings .............................................................................65
Connect to Wi-Fi Network ................................................65
Bluetooth Settings .....................................................................70
Enable Bluetooth® .............................................................70
Connect to Other Bluetooth@ Devices ............................72
Configure, Rename or Unpair Bluetooth@ Devices .......73
Ethernet Configuration ..............................................................75
NFC Settings ...............................................................................77
Enable NFC .........................................................................77
System Upgrade .........................................................................79
Local Upgrade .....................................................................79
ii DL-Axist™
Page 5

Recovery Mode .................................................................. 84
Advanced Settings .................................................................... 85
Suspend Timeout .............................................................. 85
Wake-Up Configuration .................................................... 88
Input Configuration ........................................................... 88
About Phone .............................................................................. 96
Datalogic Applications................................................... 99
Desktop Configuration Utility (DXU) ........................................ 99
How DXU Works .............................................................. 100
Installation ....................................................................... 102
Controls ............................................................................ 103
Tasks ................................................................................. 122
SoftSpot™ .................................................................................. 155
Tap2Deploy .............................................................................. 158
Create pairing tag ............................................................ 161
Advanced Tag Writer ....................................................... 165
Settings ............................................................................ 168
Restart Connection ......................................................... 168
About ................................................................................ 169
Tools............................................................................... 171
USB ADB Driver & USB CD-ROM ............................................ 171
SDK Add-on .............................................................................. 172
Install SDK Add-on .......................................................... 172
Install Android™ Studio ................................................... 176
Install Android SDK ......................................................... 177
Install ADB Driver ............................................................ 178
Create a New Application with Android Studio ............ 180
SureLock ................................................................................... 181
SureFox ..................................................................................... 182
Connections .................................................................. 183
USB Connection ....................................................................... 183
User’s Manual iii
Page 6

USB Direct Connection .................................................... 183
USB Dock Connection ..................................................... 184
Ethernet Connection ............................................................... 185
Ethernet Dock Connection ............................................. 185
WLAN Connection ................................................................... 186
MIMO (Multiple-Input and Multiple-Output) ............... 187
WWAN Connection .................................................................. 188
WPAN Connection ................................................................... 190
Near Field Communication (NFC) .......................................... 192
Read NFC Tags ................................................................ 192
Wireless and Radio Frequencies Warnings ......................... 193
Data Capture................................................................. 197
Imager Data Capture ............................................................... 197
Technical Features....................................................... 199
Technical Data ......................................................................... 199
Decode Distances .................................................................... 202
Test Codes..................................................................... 203
Maintenance................................................................. 211
Cleaning .................................................................................... 211
Ergonomic Recommendations .............................................. 211
Safety and Regulatory Information ........................... 213
General Safety Rules .............................................................. 213
Power Supply ........................................................................... 214
Laser Safety ............................................................................. 215
LED Class ................................................................................. 223
Audio Safety ............................................................................. 223
Canadian Statement ....................................................... 224
Radio Compliance .................................................................... 224
Information for the User ................................................ 227
FCC Compliance ....................................................................... 228
FCC Interference Statement .......................................... 228
iv DL-Axist™
Page 7

Industry Canada Compliance ................................................. 231
SAR Compliance ....................................................................... 234
SAR Information (for European Union) ......................... 235
FCC SAR values ................................................................ 235
Body-worn Operation ..................................................... 235
European Union Regulatory Notice ....................................... 236
WEEE Compliance ................................................................... 237
Reference Documentation........................................... 239
Services and Support ................................................... 241
Warranty Terms and Conditions ........................................... 242
Glossary......................................................................... 243
User’s Manual v
Page 8

NOTES
vi DL-Axist™
Page 9

Introduction
Conventions
This manual uses the following conventions:
'PDA', ‘terminal’, ‘device’ and 'DL-Axist' refer to the DL-Axist PDA.
‘Dock’ and “Single Dock” refer to the DL-Axist Single Slot Dock.
The label artworks may be only a draft. Refer to the product labels
for more precise information.
User’s Manual 1
Page 10

Introduction
Product Presentation
The DL-Axist PDA combines Datalogic expertise, the latest mobile
technologies and user friendly experience in a complete package.
An appealing look and feel and a brilliant full touch 5” HD screen are
combined with industrial robustness to survive indoor and outdoor
usage. The PDA also leverages an additional protective rubber boot
and Gorilla® Glass 3 screen to ensure ruggedness.
The DL-Axist PDA is equipped with a 2D imager allowing quick and
easy data capture from high density codes to the standard range
distances, along with Datalogic’s patented ‘Green Spot’ technology
for good-read feedback with a fast aimer. For applications requiring
evidence of task execution or damaged documentation, a 5 MP
autofocus camera with a built-in LED flash provides easy
documentation with photos. Moreover, this PDA embeds Datalogic’s
proprietary ‘SoftSpot™’ technology: a user-definable ‘floating soft
trigger’ to leverage the large touch display, allowing a new triggering
experience for the user.
The DL-Axist PDA leverages five embedded wireless technologies:
Wi-Fi 802.11 a/b/g/n Cisco CCXv4 certified for quick network access
and with superior MIMO technology (ensures higher throughput and
better coverage), 3G/4G for real-time wide area voice and data
coverage, Enterprise Class Assisted GPS (A-GPS) for location based
applications, Bluetooth® wireless technology v4 for fast and low
power consuming data connections and NFC for easy and intuitive
configuration and pairing.
The embedded Android™’ operating system (the leading OS for mobile
devices) is complemented by a suite of tools enabling Enterprise level
security, fast deployment and easy management, thus helping to
maximize the users’ ROI.
2DL-Axist™
Page 11

Introduction
Available Models
The DL-Axist is available in different models depending on the
options it is equipped with. All options are listed below:
• 944600001 DL-Axist Full Touch PDA, 802.11 a/b/g/n+MIMO,
Bluetooth v4 & NFC, 1GB RAM/8GB Flash, Multi-purpose 2D
Imager w Green Spot, Android v4
• 944600003 DL-Axist Full Touch PDA, 3G/4G HSPA+ WW/no
US, 802.11 a/b/g/n, Bluetooth v4 & NFC, 1GB RAM/8GB Flash,
Multi-purpose 2D Imager w Green Spot, Android v4
• 944600005 DL-Axist Full Touch PDA, 3G/4G HSPA+ US, 802.11
a/b/g/n, Bluetooth v4 & NFC, 1GB RAM/8GB Flash,
Multi-purpose 2D Imager w Green Spot, Android v4
For further details about the DL-Axist models refer to the web site:
http://www.datalogic.com.
For further information regarding Android refer to the website:
www.android.com.
User’s Manual 3
Page 12

Introduction
Out of the Box
The DL-Axist package contains:
•DL-Axist (device)
• Rechargeable battery
• USB charge/communication cable
• Battery Box (for spare battery)
•Quick Start Guide
• Safety & Regulatory Addendum
•EULA sheet
Remove all the components from their packaging; check their
integrity and compare them with all the packing documents.
Keep the original packaging for use when sending
products to the technical assistance center. Damage
caused by improper packaging is not covered under the
CAUTION
warranty.
4DL-Axist™
Page 13
General View
Back Button
Home Button
Scan Key
Menu
Button
Charging LED
Touch Panel
Display
Logo
(Notifications/
Good Read
Indicator)
Front View
Introduction
User’s Manual 5
Page 14
Introduction
LED Flash
Color Camera
SIM Card Socket
Memory Card Socket
Battery
Latch
Battery Latch
Battery
Door
Speaker
Back View
6DL-Axist™
Page 15
Side View
Power Button
Left Trigger
Volume Control
Buttons
Micro USB Port
Right Trigger
Function Key
Data Capture Window
Audio Jack
Dock Contacts
Introduction
User’s Manual 7
Top View Bottom View
Page 16

Introduction
Accessories
Docks
94A150071 DOCK, SINGLE SLOT, DL-AXIST
94A150072 DOCK, ETHERNET SINGLE SLOT, DL-AXIST
94A150074 CHARGER, 4 SLOT BATTERY, DL-AXIST
Batteries
94ACC0128 BATTERY, STANDARD CAPACITY, DL-AXIST
94ACC0129 BATTERY, EXTENDED CAPACITY, DL-AXIST
Power Supplies
94ACC0135 POWER SUPPLY, MICROUSB, DL-AXIST
94ACC0136 POWER SUPPLY, SINGLE SLOT DOCK, DL-AXIST
94ACC0137 POWER SUPPLY, 4 BATTERY CHARGER, DL-AXIST
Various
94ACC0130 STD BATTERY DOOR, DL-AXIST
94ACC0131 EXT BATTERY DOOR, DL-AXIST
94ACC0132 RUBBER BOOT, DL-AXIST
94ACC0133 HANDSTRAP, DL-AXIST
94ACC0134 STYLUS, DL-AXIST (10 PCS)
94ACC0144 CABLE, MICROUSB, DL-AXIST
8DL-Axist™
Page 17
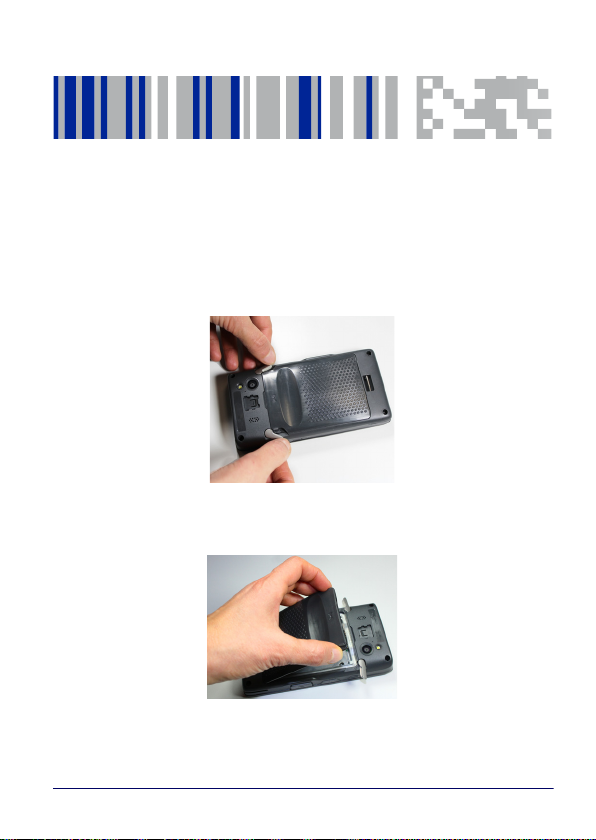
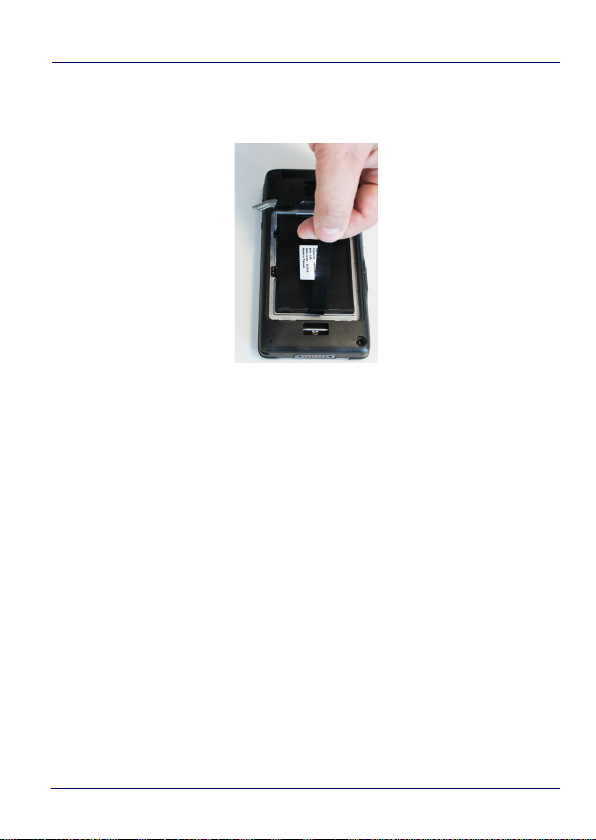
Battery
Install the Battery
To install the battery pack, follow the steps below:
1. Rotate the latches to the open position:
2. Grab the battery cover by the sides and lift it out of the way:
User’s Manual 9
Page 18
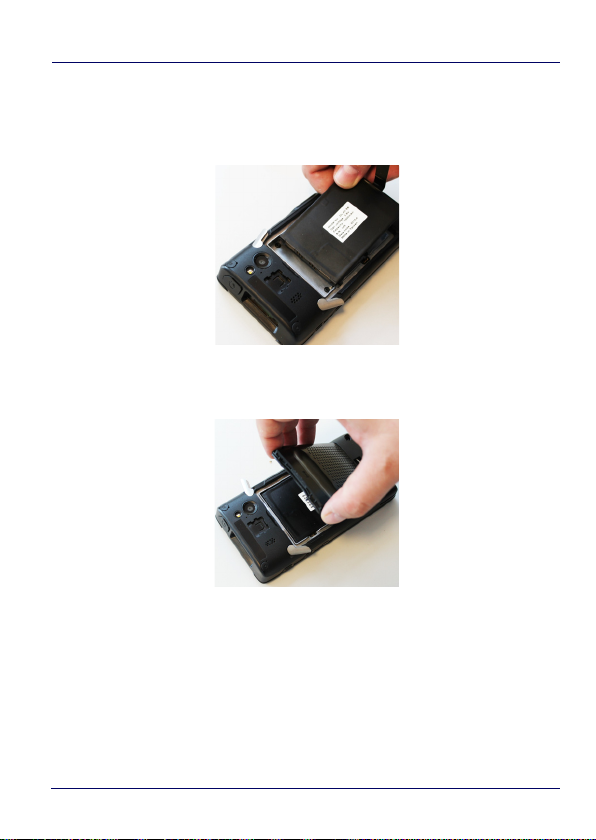
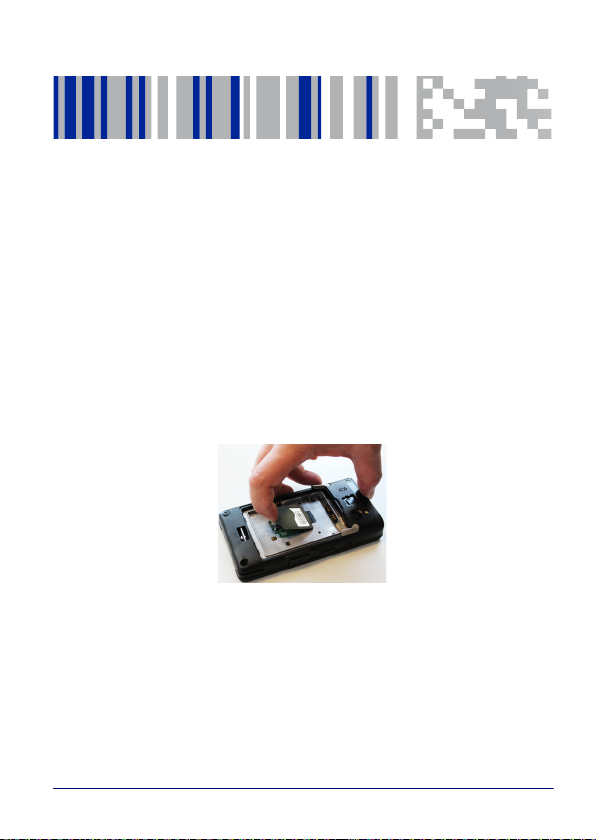
Battery
3. Remove the battery pack from the battery box*. Insert the
battery pack into the slot, top (contacts) side first, and press it
into place:
4. Insert the battery cover, bottom first, and press it into place:
* Always use the battery box to carry the battery pack. Do not put
the battery pack in your pocket.
10 DL-Axist™
Page 19
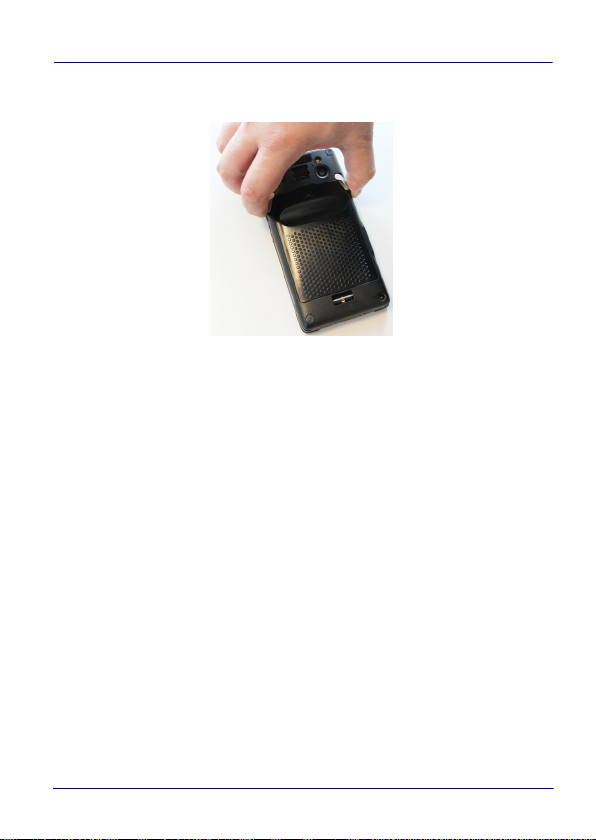
5. Rotate the latches to the lock position to lock the cover:
6. Press and release the power button to turn the DL-Axist on.
Battery
User’s Manual 11
Page 20

Battery
Charge the Battery
The DL-Axist battery pack is not initially fully charged. After installing
the battery, charge it with the USB cable or with the single dock.
Charge the battery for a minumum of 4 hours for the
standard battery and 8 hours for the extended battery.
NOTE
During the charging process the charging LED positioned at the top
left side of the display glows red constantly. Once the charging
process has been completed
constantly.
Charge with USB
You can use the provided USB charge/communication cable in
conjunction with the power supply adapter (p/n 94ACC0135) to
charge the terminal from a power outlet. To prevent the risk of
short-circuiting, first connect the USB cable to the DL-Axist micro
USB port, and then connect the USB cable to the power adapter.
, the charging LED glows green
12 DL-Axist™
Page 21

NOTE
Battery
Use only a Datalogic approved power supply.
User’s Manual 13
Page 22

Battery
Charge with the dock
The dock provides power to the DL-Axist and allows the charging of
the battery.
You can also charge an additional battery pack by inserting it into the
rear slot of the dock.
By default, the battery pack is disconnected at the
factory to avoid damage due to excessive draining.
Annual replacement of rechargeable battery pack avoids
CAUTION
CAUTION
possible risks or abnormalities and ensures maximum
performance.
Avoid storing batteries for long periods in a state of full
charge or very low charge.
We recommend charging the battery pack every two to
three months to keep its charge at a moderate level to
maximize battery life.
14 DL-Axist™
Page 23

WARNING
NOTE
NOTE
NOTE
Battery
Risk of explosion if battery is replaced by an incorrect
type.
Dispose of used batteries according to the instructions.
l y a risque d’explosion si la batterie est remplacée par
une batterie de type incorrect.
Mettre au rebut les batteris usagées conformément
aux instructions.
Even if the storage temperature range is wider, in order to
achieve the longest battery life, store the terminal and the
spare batteries between 20 to 30°C (68 to 86°F).
Charging is allowed in the battery temperature range from
0°C to 45°C.
To maximize battery life, turn off radios when they are not
needed.
To maximize operating autonomy, the DL-Axist checks its
battery level at all times. If the battery is not sufficiently
charged, the DL-Axist will not turn on when the ON/OFF
Power button is pressed.
In this case, either substitute with a charged battery,
insert the DL-Axist into a powered dock, or plug it into a
wall charger.
User’s Manual 15
Page 24

Battery
WARNING
Installing, charging and/or any other action should be
done by authorized personnel and following this
manual.
The battery pack may get hot, explode, ignite, and/or
cause serious injury if exposed to abusive conditions.
If the battery pack is replaced with an improper type,
there is risk of explosion and/or fire.
Use the battery box to carry the battery pack, do not put
the battery pack in your pocket.
Do not place the battery pack in or near a fire or other
heat source; do not place the battery pack in direct
sunlight, or use or store the battery pack inside
unventilated areas in hot weather; do not place the
battery pack in microwave ovens, in clothes dryers, in
high pressure containers, on induction cook surfaces or
similar devices. Doing so may cause the battery pack to
generate heat, explode or ignite. Using the battery pack
in this manner may also result in a loss of performance
and a shortened life expectancy.
Use only a Datalogic approved power supply. The use of
an alternative power supply will void the product
warranty, may cause product damage and may cause
heat, an explosion, or fire.
16 DL-Axist™
Page 25

WARNING
Battery
The area in which the units are charged should be
clear of debris and combustible materials or
chemicals.
Do not use the battery pack of this terminal to power
devices other than this terminal.
Immediately discontinue use of the battery pack if,
while using, charging or storing the battery pack, the
battery pack emits an unusual smell, feels hot,
changes color or shape, or appears abnormal in any
other way.
Do not short-circuit the battery pack contacts
connecting the positive terminal and negative
terminal. This might happen, for example, when you
carry a spare battery pack in your pocket or purse;
accidental short–circuiting can occur when a metallic
object such as a coin, clip, or pen causes direct
connection of the contacts of the battery pack (these
look like metal strips on the battery pack). Short–
circuiting the terminals may damage the battery pack
or the connecting object.
Do not apply voltages to the battery pack contacts.
Do not pierce the battery pack with nails, strike it with
a hammer, step on it or otherwise subject it to strong
impacts, pressures, or shocks.
Do not disassemble or modify (i.e. bend, crush or
deform) the battery pack. The battery pack contains
safety and protection devices, which, if damaged, may
cause the battery pack to generate heat, explode or
ignite.
User’s Manual 17
Page 26

Battery
WARNING
In case of leakage of liquid from the battery, avoid
contact with liquid the skin or eyes. If the contact
occurs, immediately wash the affected area with water
and consult a doctor.
Do not solder directly onto the battery pack.
Do not expose the battery pack to liquids.
Avoid any knocks or excessive vibrations. If the device
or the battery is dropped, especially on a hard surface,
you should take it to the nearest Authorised Repair
Centre for inspection before continuing to use it.
Before replacing the battery pack, turn off the device or
put it in swap battery mode (see
page 29
).
"Swap Battery" on
Do not remove or damage the battery pack’s label.
Do not use the battery pack if it is damaged in any part.
Battery pack usage by children should be supervised.
Collect and recycle waste batteries separately from the
device in compliance with European Directive
2006/66/EC, 2011/65, 2002/96/EC and subsequent
modifications, with US and China regulatory laws and
regulations about the environment.
18 DL-Axist™
Page 27
Battery
Replace the Battery
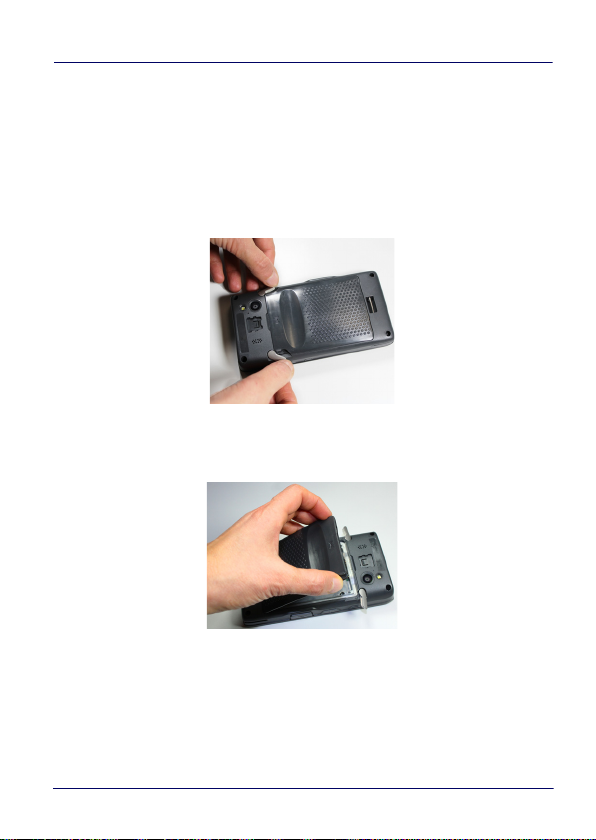
To replace the battery pack, follow the steps below:
1. Turn off the DL-Axist, or put it in Swap Battery mode (see “Swap
Battery” on page -29).
2. Rotate the latches to the open position:
3. Grab the battery cover by the sides and lift it out of the way:
User’s Manual 19
Page 28
Battery
4. Remove the battery by pulling the tab on the bottom of the
battery:
5. Insert the new battery pack into the slot (see “Install the
Battery” on page -9, steps 3 to 6).
20 DL-Axist™
Page 29
SD Card/ SIM Card
Install the MicroSD Card
DL-Axist supports microSD memory cards. To access the microSD
card slot and insert the card follow the steps below:
1. Turn off the DL-Axist or put it in Swap Battery mode (see “Swap
Battery” on page -29
2. Remove the battery pack (see “Replace the Battery” on
page -19, steps 1 to 4).
3. Lift the retaining door:
User’s Manual 21
Page 30
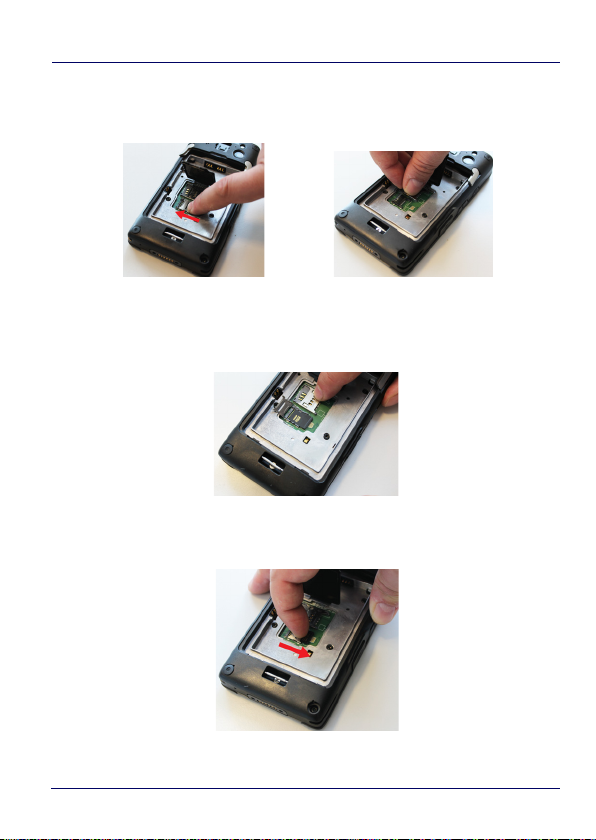
SD Card/ SIM Card
4. Slide the memory card holder to the left to unlock it. Lift the
holder:
5. Insert the memory card into the holder. Make sure the contacts
side is face down:
6. Close the holder and shift it to the right to lock it:
22 DL-Axist™
Page 31

SD Card/ SIM Card
7. Close the retaining door.
8. Insert the battery pack into the slot (see “Install the Battery” on
page -9, steps 3 to 6).
Remove the MicroSD Card
To remove the microSD card, follow the steps above to access the
microSD slot, and remove it from its slot.
User’s Manual 23
Page 32

SD Card/ SIM Card
Install the SIM Card
A SIM card stores the subscriber's personal information, GSM/GPRS
radio settings, security keys, contacts, etc. SIM cards can be installed
in compatible mobile devices, enabling you to switch devices without
losing personal and setup information.
To access the SIM card slot and insert the card follow the steps
below:
1. Turn off the DL-Axist or put it in Swap Battery mode (see “Swap
Battery” on page -29
2. Remove the battery pack (see “Replace the Battery” on page -19,
steps 1 to 4).
3. Lift the retaining door:
4. Slide the SIM card holder to the left to unlock it. Lift the holder:
24 DL-Axist™
Page 33

SD Card/ SIM Card
5. Insert the SIM card into the holder. Make sure the contacts side
is face down:
6. Close the holder and shift it to the right to lock it:
7. Close the retaining door.
8. Insert the battery pack into the slot (see “Install the Battery” on
page -9, steps 3 to 6).
Remove the SIM Card
To remove the SIM card, follow the steps above to access the SIM
card slot, and remove it from its slot.
User’s Manual 25
Page 34

SD Card/ SIM Card
NOTES
26 DL-Axist™
Page 35

Getting Started
Power Button
Power On
The DL-Axist turns on when a charged battery pack is inserted.
Suspend Mode
Suspend mode automatically turns the screen off and locks the
terminal to save battery power when the terminal is inactive for a
programmed period of time.
Press and release the power button to toggle the terminal in or out
of suspend mode:
User’s Manual 27
Page 36

Getting Started
To unlock the home screen, tap and drag the Lock icon to the right
side of the screen.
To set the timeout limit, see “Suspend Timeout” on page -85.
Long Press Power Menu
Press and hold the Power button until the Long Press Menu menu
displays:
Power Off
Tap Power Off to turn off the terminal. When you turn off the
terminal, the session you are working on expires and it won't be
possible to restore it.
Airplane Mode
Tap Airplane Mode to toggle the mode ON or OFF.
Reboot
Tap Reboot to perform a Soft Reset (see “Soft Reset” on page -44).
28 DL-Axist™
Page 37

Getting Started
Swap Battery
Swap Battery mode is a low power suspend mode that allows you to
replace the battery pack without closing files and applications. It
maintains the main memory contents and keeps applications
running but does not allow you to operate any of the device's
functions.
To switch to Swap Battery mode:
1. Tap Swap Battery.
2. Wait for the red Logo indicator to turn off.
3. Replace the battery (see “Replace the Battery” on page -19).
4. Press and release the power button to resume your session.
Pair Device
Scan2Pair and Tap2Deploy allow to start a pairing session with a PC
via DXU software.
DXU is the Datalogic system application for device configuration and
firmware upgrade from a Windows PC. See "Desktop Configuration
Utility (DXU)" on page 99 for further information.
Scan2Pair
Starts a pairing with DXU by reading a barcode containing the
configuration data of your PC.
Open DXU on your PC and tap Scan2Deploy:
User’s Manual 29
Page 38

Getting Started
From the Wi-Fi Configuration window you can select the barcode
type and set the Wi-Fi and pairing configuration data.
Tap Print to create the barcode; tap Save to save it on your hard disk:
30 DL-Axist™
Page 39

Getting Started
If you select Print, the barcode displays on the screen:
From DL-Axist’s Long Press Power Menu, tap Pair Device >
Scan2Pair. Tap anywhere on the screen:
User’s Manual 31
Page 40

Getting Started
Tap Scan to read the barcode:
Tap2Deploy (NFC)
Starts a pairing with DXU by reading an NFC tag containing the
configuration data of your PC.
The tag is automatically created by connecting the DL-Axist to your
PC using the dock or the USB cable.
Alternatively, from DL-Axist’s Long Press Power Menu, tap Pair
Device > Tap2Deploy > Pair with DXU > Create Pairing Tag:
32 DL-Axist™
Page 41

Tap IP to set the IP address and the port number:
Getting Started
User’s Manual 33
Page 42

Getting Started
Tap WiFi to set the Wi-Fi info:
For further information, see “Tap2Deploy” on page -158.
34 DL-Axist™
Page 43

Home Screen
Notification/
Status Bar
All Apps Icon
DXU Icon
Browser Icon
Favorites Tray
SoftSpot Icon
Settings Icon
Getting Started
User’s Manual 35
Page 44

Getting Started
Home Screen Items
Notification/
Status Bar
Favorites Tray
DXU Icon
SoftSpot Icon
All Apps Icon
Settings Icon
Browser Icon
Displays the time, status icons (right side), and notification
icons (left side).
It is like a dock for your home screen. By default, it includes
commonly used apps, but you can customize it.
Launch the DXU Agent
Launch the SoftSpot application.
Opens the Apps window. Tap it to view the Apps and
Widgets loaded on your device.
Opens the Settings.
Opens the Browser application.
Customize the Home Screen
Application shortcuts placed on the Home screen allow quick and
easy access to applications. Widgets are self-contained applications
placed on the Home screen to access frequently used features.
The user can add application icons, shortcuts, widgets and other
items to any part of the Home screen where there is free space.
To add an application shortcut:
1. Tap the All Apps icon.
2. Tap and hold the app icon you want to add until the home screen
appears.
3. Drag and drop the icon into position on the home screen panel or
in an open spot in the Favorites tray.
To add a widget:
1. Tap the All Apps icon.
36 DL-Axist™
Page 45

Getting Started
2. Tap the Widget tab.
3. Tap and hold the item you want to add until the home screen
appears.
4. Drag and drop the widget into position on the home screen
panel.
To create a folder:
Drag and drop an application icon on top of another icon.
Tap the folder.
Tap the title area and enter a folder name using the keyboard.
1. Tap anywhere on the home screen to close the folder. The folder
name appears under the folder.
To delete items:
2. Tap and hold the shortcut, widget or folder until it floats on the
screen.
3. Drag the item to "X Remove" at the top of the screen.
User’s Manual 37
Page 46

Getting Started
Virtual Keyboard
The virtual keyboard appears when you open an application or select
a field that requires text or numerical input.
To configure the keyboard settings, tap Settings > Language & input
> Android keyboard:
38 DL-Axist™
Page 47

Getting Started
Applications
The All Apps screen displays icons for all installed applications. The
table below lists the default applications installed on the DL-Axist.
Icon Description
AnExplorer - Another Material File Manager you can use to
easily find, browse, move, compress, and otherwise manage
your apps.
Browser - Use to access the Internet or intranet.
Calculator - Provides the basic and scientific arithmetic
functions.
Calendar - Use to manage events and appointments.
Camera - Take photos or record videos.
Clock - Use to schedule alarms for appointments or as a
wake-up.
Downloads - Lists all downloads files.
DXU Agent - Launch to start a pairing with DXU by reading a
barcode containing the configuration data of your PC (see
“Desktop Configuration Utility (DXU)” on page -99
User’s Manual 39
).
Page 48

Getting Started
Icon Description
Email - Use to send and receive email.
Enterprise Agent- Enhances the lockdown functionalities of
SureLock and SureFox to ensure advanced device security
(see
182
Gallery - Use to view photos stored on the internal storage
memory and on the microSD card.
Movie Studio - Create movie videos.
Music - Play music stored on the internal storage memory
and on the microSD card.
People - Use to manage contact information.
Phone - Use to make phone calls.
“SureLock” on page -181
).
and
SureFox on page
Scan2Pair – Enables 2D imager data capture (see
Data Capture” on page -197
Scanner – Enables data capture (see
page -197
Search - Use the Google search engine to search the
Internet and the DL-Axist.
40 DL-Axist™
).
).
“Data Capture” on
“Imager
Page 49

Icon Description
Settings - Use to configure the DL-Axist (see
on page -47
SoftSpot - A configurable application meant to provide easy
access to frequently used functionalities (see
on page -155
Sound Recorder - Use to record audio.
SureFox - Use to controls web access for the users (see
"SureFox" on page 182
SureLock - Use to secure and lock your device (see
"SureLock" on page 181
Getting Started
“Settings”
).
“SoftSpot™”
).
).
).
Tap2Deploy - Use to enable NFC pairing (see
“Tap2Deploy” on page -158
User’s Manual 41
).
Page 50

Getting Started
Resetting the Terminal
Configuration Reset
Configuration reset sets the configuration of the device (all its
settings) to a known status: the factory status or an
enterprise-user-defined status.
Factory Reset
Brings the device to the default configuration, clearing all the
user-customized settings.
1. Tap Settings >Backup&reset.
2. Tap Factory data reset
3. Tap Reset phone.
42 DL-Axist™
Page 51

Getting Started
Enterprise Reset
Enterprise Reset brings the device to an enterprise-user-defined
configuration, clearing all data and settings except the ones
persisted by the enterprise system applications in the /enterprise
flash partition and in the /splash flash partition.
The Enterprise folder is a file system storage that is used for
deployment and device-unique data. It is persistent and maintains
data after an Enterprise reset. Applications and custom settings (i.e.
custom boot animation and wallpaper) can persist data after an
Enterprise Reset by saving data to the enterprise folder.
1. Tap Settings >Backup&reset.
2. Tap Enterprise reset
3. Tap Reset phone.
User’s Manual 43
Page 52

Getting Started
Device Reset
Device reset restarts the device.
Soft Reset
Restarts Android Operative System through an Android API function.
It is generally used when some applications stop responding, or it is
automatically issued by Android after a Configuration reset.
1. Press and hold the Power button.
2. Tap Reboot.
3. The device shuts down and then reboots.
Hard Reset
Restarts the device resetting all the hardware components. This
procedure guarantees the safe reboot of the device in any condition,
without causing damage to the device and without data loss. It is
generally used when the device stops responding or after a critical
failure that compromises its usability.
Simultaneous press and hold the following buttons:
• Power button
• Left trigger
•Search button
44 DL-Axist™
Page 53

Getting Started
LED Indicators
The LEDs illuminate to indicate various functions or errors on the
reader. The following tables list these indications. The good read
LED indicator is programmable, and may or may not be turned on
(see “Scanner Settings” on page -48 for more details).
LED Status Description
Red Constant Light is solid red while charging.
Charging LED
Good Read LED
Green Costant
Red Blink Blinking red indicates a charge fault.
Red
Green
Light is solid green once the charging
process has completed (full charge).
Light is red from the time the user
presses the scan key until the barcode
is decoded, until the scanner times out,
or until the user releases the scan key.
Light changes to green when a good
decode is completed.
User’s Manual 45
Page 54

Getting Started
NOTES
46 DL-Axist™
Page 55

Settings
Overview
The Settings app allows you to check or set system parameters to
customize your device. Tap Settings or pull down the notification
panel and then tap the Settings icon next to the date:
User’s Manual 47
Page 56

Settings
Scanner Settings
Before you start reading barcodes, use the Settings app to view and
configure all settings for the scanner.
From the applications menu, tap Settings > Scanner Settings. Select
the desired configuration from the following options:
48 DL-Axist™
Page 57

Settings
Notification
Use it to configure the good read LED, green spot, tone and vibration
notification:
Good read duration
Sets the duration of the notification (LED, green spot, beep or
vibration) the scanner emits on a good read.
Good read interval
Sets the interval between each notification (LED, green spot, beep or
vibration) the scanner emits on a good read.
Good read number
Sets the number of notifications (LED, green spot, beep or vibration)
the scanner emits on a good read.
User’s Manual 49
Page 58

Settings
Enable display notification
Enables display notifications (toasts) and is selected by default. If
cleared, the scanner is disabled until you launch a scanner listener
application developed using the Datalogic SDK or enable a
keyboard/intent wedge.
Good read audio mode
Sets the audio tone to:
•None
• Beep tone
•Audio file
If Audio file is selected, the option Good read audio file displays. Tap
it to select the file you want to use as good read ringtone.
50 DL-Axist™
Page 59

The Notification settings do not apply to an audio file.
NOTE
Good read audio volume
Sets the volume of beep tone or audio file (if enabled).
Settings
User’s Manual 51
Page 60

Settings
Good Read
Use it to enable good read notifications (LED, Green Spot, Vibrator):
Tap Enable good read to enable/disable notifications (main enabler),
then select the notification you want to use.
52 DL-Axist™
Page 61

Settings
Formatting
Allows to format the barcode text by enabling and configuring the
use of prefix, suffix, group separator and code identifier:
Label prefix
Tap Label prefix to enter the characters you will be using as prefix.
Tap Add special to select a special character to be added in the
current cursor position:
User’s Manual 53
Page 62

Settings
Label suffix
Tap Label suffix to enter the characters you will be using as suffix.
Tap Add special to select a special character to be added in the
current cursor position:
Group Separator replacement
The Group Separator replacement is a non printable data separator
character (ASCII code 1D hex). Tap Group Separator replacement to
enter a string that will be used as GS data separator substituting the
standard GS character.
Tap Add special to select a special character to be added in the
current cursor position:
Remove non-printable characters
Select it to remove non-printable characters from a unicode string.
54 DL-Axist™
Page 63

Settings
Send code ID
Tap Send code ID to add a code identifier prefix or suffix to the
barcode string:
The AIM ID (Association for Automatic Identification and Mobility) is
an international barcode identifier. When AIM identifier before is
enabled, the AIM ID is inserted at the beginning of the decoded
barcode.
DLM identifier is a Datalogic specific character identifier.
User defined identifier is a user specific character identifier you can
set in the related symbology settings menu.
User’s Manual 55
Page 64

Settings
Scanner Options
Tap Scanner Options to customize the DL-Axist scanning behavior.
Enable picklist
If selected, it allows you to pick and decode a barcode from multiple
barcodes printed close together, when the scan illumination
intersects more than one barcode. Only the targeted barcode will be
returned.
Enable illumination
If selected, it causes the scanner to turn on the illumination to aid
decoding.
Enable aim
Enables the laser aim.
56 DL-Axist™
Page 65

Settings
Target mode
If enabled, when the scan button is pressed, the scanner will project
an aiming pattern to assist in centering over the barcode before
scanning. Tap Target mode to select the desired targeting behavior:
No delay
Target mode is disabled.
Spot Timeout
Scanning takes place after a programmable time upon pressing the
scan button. Tap Target timeout to set the duration of the spot:
User’s Manual 57
Page 66

Settings
Release Scan
Scanning takes place after the scan button is released. Tap Release
scan timeout to set the scanning timeout after releasing the scan
button:
Decode timeout
Drag the Decode timeout slider to set the maximum amount of time
the scanner attempt to decode after target timeout (in case Spot
Timeout is enabled) or after the scan button is pressed (in case
Target mode is disabled):
58 DL-Axist™
Page 67

Settings
Wedge
Use it to enable or disable the keyboard wedge and the intent
wedge:
Enable keyboard wedge
Inputs the scanned data directly in the current text area in focus.
The scanner is enabled whenever a text area is in focus and can
receive text.
Keyboard wedge only on focus
Provides a safer way to input keystrokes into the foreground app.
It allows to send captured data in the form of key events only to the
current text area with active keyboard input.
User’s Manual 59
Page 68

Settings
If this setting is not enabled, keystrokes will be always dispatched to
the foreground application.
Enable intent wedge
Enables the broadcast of specific intents to the listening
applications. The broadcasted intent can have its custom Action,
Category and extra content fields. The scanner is enabled whenever
the intent option is flagged.
60 DL-Axist™
Page 69

Settings
Symbology Settings
Each barcode symbology can be customized with additional settings
that may affect that specific barcode decoding. Tap Symbology
settings to configure symbology decoding options:
Refer to the sample symbology control panels for examples of the
types of fields and options you can modify. The sample below shows
the settings of a Code 128 barcode symbology:
User’s Manual 61
Page 70

Settings
62 DL-Axist™
Page 71

Settings
Global Settings
Use this section to change symbologies settings globally and to
persist them.
Enable all symbologies
Enables all barcode symbologies.
Disable all symbologies
Disables all barcode symbologies.
Reset configuration
Resets back to default scanner configuration settings.
User’s Manual 63
Page 72

Settings
Commit
Saves the configuration settings to a persistent storage. Any change
you make is temporary and will be lost when the system restarts,
unless you tap Commit.
64 DL-Axist™
Page 73

Settings
Wi-Fi Settings
Connect to Wi-Fi Network
1. To turn the wi-fi on, tap Settings and slide the Wi-Fi switch to
the ON position:
2. Tap Wi-Fi. The DL-Axist scans for available wi-fi networks
within range and lists them. If the terminal previously
connected to a wi-fi network, it automatically reconnects to the
same network. Secured networks are indicated with a lock icon:
User’s Manual 65
Page 74

Settings
3. Select the network name you want to connect to from the
available network list.
4. If the network is open, tap the profile and then tap Connect, or
press and hold and then select Connect to network:
66 DL-Axist™
Page 75

Settings
5. If the network is secured, a dialog box appears requesting
information relevant to the network security protocol (e.g.,
password, key, or certificate). Enter the required information,
then tap Connect:
Add a Wi-Fi Network
1. Tap Settings, verify the wi-fi is turned on and then tap Wi-Fi.
2. Tap the Add Network icon '+' located at the bottom of the
available wi-fi network list:
User’s Manual 67
Page 76

Settings
3. Enter the Network SSID (wi-fi network name). For secure wi-fi
network connections, tap None under Security, and then select
the type of security protocol required from the pop-up menu (e.g.,
WEP, WPA/WPA2 PSK or 802.1xEAP). Enter any additional
security information required by the type of security protocol
selected.
68 DL-Axist™
Page 77

4. Tap Save.
Settings
User’s Manual 69
Page 78

Settings
Bluetooth Settings
To create a Bluetooth® pairing between your device and another
device that has Bluetooth® capabilities, ensure that the two devices
are turned on, discoverable, and within close range.
Enable Bluetooth®
1. To turn the Bluetooth® on, tap Settings and slide the Bluetooth
switch to the ON position. Once the Bluetooth® radio is enabled,
the terminal automatically starts searching for discoverable
devices.
2. Tap DL-Axist to make your device visible to other Bluetooth®
devices. The device will be discoverable for 2 minutes.
70 DL-Axist™
Page 79

Settings
User’s Manual 71
Page 80

Settings
Connect to Other Bluetooth@ Devices
1. Tap Settings > Bluetooth to search for available Bluetooth®
devices. Flick the list and select a device. The Bluetooth pairing
request dialog box displays on the screen:
2. Make sure both devices show the same passkey and tap Pair on
both devices.
3. The selected Bluetooth® device is added to the Paired Devices list
and a paired connection is established.
72 DL-Axist™
Page 81

Settings
Configure, Rename or Unpair Bluetooth@ Devices
1. Tap Settings > Bluetooth.
2. Select a device from the Paired Devices list and tap the settings
icon next to its name. The Paired Bluetooth device window
displays on the screen:
3. Tap Rename, Unpair or select a different profile from the Profiles
list available for the paired device:
User’s Manual 73
Page 82

Settings
74 DL-Axist™
Page 83

Settings
Ethernet Configuration
To enable ethernet communication:
1. Tap Settings > Ethernet configuration.
2. Select the Ethernet check box to turn on ethernet.
By default, the DL-Axist is configured to obtain IP addresses
automatically via DHCP server. Alternatively, the device can be
configured to use a statically assigned IP address.
1. Tap Ethernet Preference.
2. Select Static IP under Connection Type, and then input the IP
address and any additional information based on your network
configuration.
User’s Manual 75
Page 84

Settings
76 DL-Axist™
Page 85

Settings
NFC Settings
NFC allows data exchanges between the DL-Axist and other NFC
devices or tags.
Enable NFC
1. Tap Settings > More (under Wireless & Networks):
2. Select the NFC box to enable short-range wireless data
exchange. Android Beam is automatically enabled:
User’s Manual 77
Page 86

Settings
78 DL-Axist™
Page 87

Settings
System Upgrade
Allows you to upgrade your operative system to the latest version.
Local Upgrade
From the Settings menu, tap System upgrade > Local upgrade. The
System Updates window displays on screen:
Select Local Update
Allows you to navigate the file system and select a pre-charged
update package:
User’s Manual 79
Page 88

Settings
•Tap sdcard0/ to navigate the internal storage.
•Tap sdcard1/ to navigate the SD card internal storage.
•Tap usbdisk/ to navigate the USB disk.
Select the update package you want to install and then tap OK:
80 DL-Axist™
Page 89

Settings
The following window displays on screen, showing information
about the device and the update package components:
User’s Manual 81
Page 90

Settings
The General Informations section shows information about the
device model and OS version and the update package version.
The Components section shows information about each single
update component.
The Options section allows to:
• reset the device after the update (see “Resetting the Terminal”
on page -42)
• force the update of all components, including those already
updated.
Tap Install Update. The device will reboot and a success notification
will be displayed. Tap the notification to display a report showing the
installed update components:
82 DL-Axist™
Page 91

Settings
If the update fails, the screen will display a failure message and a
report showing the reasons for failure.
During the update, ensure that:
• battery level is at least 40% in case of critical update
(xloader, bootloader or recovery partition) and 20% in
NOTE
case of any other update;
or
• the DL-Axist is connected to a power source (USB or
dock).
Update is always done in recovery mode (see “Recovery
Mode” on page -84
).
NOTE
User’s Manual 83
Page 92

Settings
Recovery Mode
Recovery is an independent, runtime environment that’s included on
a separate bootable partition from the main Android OS. It contains
tools to help repair your installations as well as install official OS
updates by using a combination of key presses. Its main purpose is
to reset the device, wipe data or perform system updates when the
system crashes and the screen is unresponsive.
To enter Recovery Menu:
1. Perform a device reset (see “Device Reset” on page -44).
2. During reset, press and hold the Search button.
3. The Recovery Menu displays on the screen:
4. Use the volume buttons to navigate the menu. You can
apply/force updates and perform a configuration reset. Press the
front trigger to select.
5. Select Reboot system now, then press the front trigger. The
device reboots and the reset is complete.
In Recovery mode, you can only apply updates from
external storage (see
“Local Upgrade” on page -79).
NOTE
84 DL-Axist™
Page 93

Settings
Advanced Settings
Suspend Timeout
You have two options to set the suspend timeout (see “Suspend
Mode” on page -27 for more information on Suspend Mode):
1. Tap Settings > Advanced settings:
• Suspend on external power to set the number of seconds
without user input activity before the system is suspended
while running on external power:
User’s Manual 85
Page 94

Settings
• Suspend on internal battery to set the number of seconds
without user input activity before the system is suspended
while running on battery power:
86 DL-Axist™
Page 95

Settings
2. Tap Settings > Display > Sleep to set the number of seconds
without user input activity before the system is suspended
while running on either battery power or external power:
If you use the Advanced settings page to set the auto-suspend
timeouts, then the Display page’s Sleep control will display the
Suspend on external power setting the next time you look in the
Display page.
If you set the Display page’s Sleep control to a new value, it will
override both timeouts for external power and internal battery.
User’s Manual 87
Page 96

Settings
Wake-Up Configuration
The default wake-up source is the Power button. Tap Settings >
Advanced settings > Configure wake-up sources to configure other
wake-up sources. Possible wake-up buttons are the left, right and
front triggers:
Input Configuration
Lock Keyboard Input
Select Lock keyboard input to lock user input from the keyboard. The
following pop up windows displays on screen asking for
confirmation:
To unlock the keyboard, clear the Lock keyboard input check box.
88 DL-Axist™
Page 97

Settings
Key Remapping
Tap Key remapping to remap an input key, then press the key you
want to remap. You can remap all the hard keys, including the Power
button.
Press the key you want to remap. The following window displays on
screen:
User’s Manual 89
Page 98

Settings
• Scancode represents the physical location of a keyboard key.
• Keycode represents the value that is mapped to a specific key.
Tap Remap type to select the remapping type:
90 DL-Axist™
Page 99

Settings
Keycode
Tap Keycode to map the selected key to a new function:
• Tap the second menu (default = DISABLE KEY) to select the
new function you want to assign to the selected key.
• Tap the last menu (default = None) to add a modifier key (such
as Ctrl, Shift or Alt).
Tap Add a new mapping. A window displays showing the new
keymap.
User’s Manual 91
Page 100

Settings
Unicode
Tap Unicode to remap a key to display Unicode characters (such as
symbol ‘€’):
92 DL-Axist™
 Loading...