

Page 1
OWNER’S USE AND CARE GUIDE
GUIDE D’UTILISATION ET SOINS DE PROPRIÈTAIRE
GUÍA DE UTILIZACIÓN Y CUIDADO PARA EL PROPIETARIO
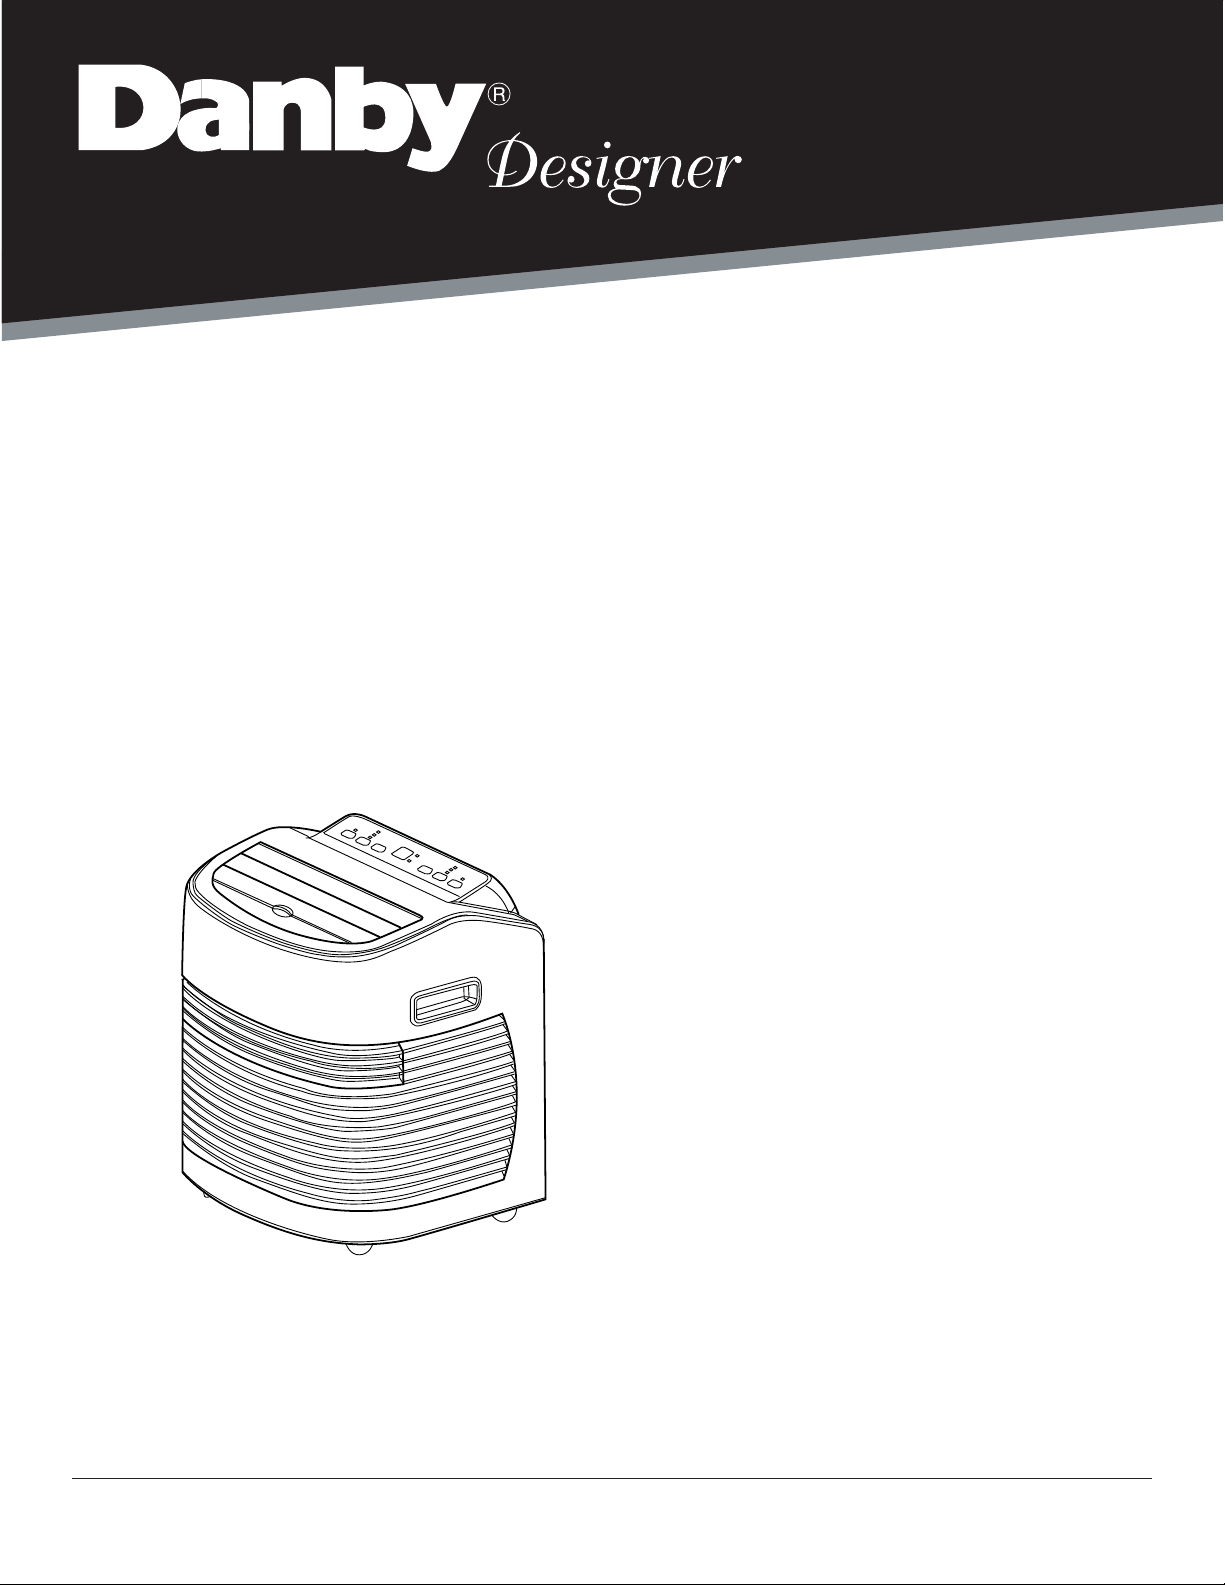
PORT ABLE AIR CONDITIONER
CLIMATISEUR PORTATIF
ACONDICIONADOR DE AIRE PORTÁTIL
MODEL • MODÈLE • MODELO
DPA100D1MDD / DPA100D1WDD
DANBY PRODUCTS LIMITED, ONTARIO, CANADA N1H 6Z9
DANBY PRODUCTS INC., FINDLAY, OHIO, USA 45840
V1.14.11.13
Page 2

TO OBTAIN WARRANTY SERVICE YOU MUST PROVIDE A VALID PROOF OF
PURCHASE. PLEASE STAPLE YOUR RECEIPT TO THIS PAGE FOR FUTURE
REFERENCE.
------------------------------------------------------------------------------------------------------------------POUR OBTENIR LE SERVICE SUR GARANTIE VOUS DEVEZ FOURNIR UNE
PREUVE D’ACHAT VALIDE. VEUILLEZ AGRAFER VOTRE REÇU À CETTE PAGE
POUR RÉFÉRENCE FUTURE.
------------------------------------------------------------------------------------------------------------------PARA OBTENER SERVICIO DE GARANTÍA, DEBE PROVEER UN RECIBO
ORIGINAL. POR FAVOR ENGRAPE SU RECIBO A ÉSTA PÁGINA EN CASO QUE
NECESITE HACER UN RECLAMO.
IMPORTANT - GROUNDING METHOD
This product is factory equipped with a power supply cord that has a three-pronged grounded plug. It must
be plugged into a mating grounding type receptacle in accordance with the National Electrical Code and
applicable local codes and ordinances. If the circuit does not have a grounding type receptacle, it is the
responsibility and obligation of the customer to exchange the existing receptacle in accordance with the
National Electrical Code and applicable local codes and ordinances. The third ground prong should not,
under any circumstances, be cut or removed. Never use the cord, the plug or the appliance when they show
any sign of damage. Do not use your appliance with an extension cord unless it has been checked and
tested by a qualifi ed electrician or electrical supplier.
IMPORTANT - MÉTHODE POUR LA MISE À LA TERRE
Ce produit arrive d’origine avec un cordon d’alimentation équipé d’une prise à trois fi ches. Il doit être
branché dans une prise avec une fi che de mise à la terre en conformité avec le Code National de l’Électricité
et les codes et règles locales applicables. Si le prise murale n’a pas de mise à la de terre, il est de la
responsabilité et l’obligation du client de changer la prise existante pour la rendre conforme aux Codes
Nationaux de l’Électricité, aux codes et règles locaux applicables. La fi che de la mise à la terre ne doit pas,
en aucune circonstance, être coupée ou retirée. Si vous apercevez des signes de dommage, n’utilisez jamais
le cordon d’alimentation, la prise ou l’appareil. N’utilisez jamais l’appareil avec une rallonge sauf si elle a été
vérifi ée et testée par un électricien qualifi é ou un fournisseur de matériel électrique.
IMPORTANTE - MÉTODO DE CONEXIÓN A TIERRA
Este producto viene equipado con un cable eléctrico que tiene un enchufe de tres patas con conexión
a tierra. Este debe colocarse en una toma de corriente con conexión a tierra de acuerdo con el Código
nacional de electricidad y códigos y ordenanzas locales correspondientes. Si el circuito no cuenta con
una toma de corriente con conexión a tierra, es responsabilidad y obligación del cliente sustituir la toma
de corriente actual de acuerdo con el Código nacional de electricidad y códigos y ordenanzas locales
correspondientes. Bajo ninguna circunstancia se debe cortar o eliminar la tercera pata de conexión a tierra.
Nunca utilice el cable, el enchufe o el artefacto cuando muestre un signo de daño visible. No utilice el
artefacto con una extensión salvo que un proveedor eléctrico o electricista califi cado la inspeccione y la
pruebe.
Page 3
CONTENTS
PORT ABLE AIR CONDITIONER
Owner’s Use and Care Guide ................................1-11
• Important Safety Information
• Installation Instructions
• Features and Components
• Operation
• Care and Maintenance
• Troubleshooting
• Warranty
CLIMATISEUR PORTATIF
Manuel d’utilisation et d’entretien du propriétaire
• Consignes de Sécurité Importantes
• Consignes d’installation
• Caractéristiques et composants
• Fonctionnement
• Soins et Entretien
• Dépannage
• Garantie
ACONDICIONADOR DE AIRE PORTÁTIL
Guía del proprietario de utilización y cuidado ......23-33
• Instrucciones de seguridad importantes
• Instrucciones de instalación
• Funciones y componentes
• Operación
• Cuidado y mantenimiento
• Diagnósticos de problemas
• Garantia
.....
12-22
CAUTION
Read and follow all safety rules and
operating instructions before fi rst use of this
product.
PRÉCAUTION
Veuillez lire attentivement les consignes
de sécurité et les instructions d’utilisation
avant l’utilisation intiale de ce produit.
PRECAUCIÓN
Lea y observe todas las relgas de seguridad y las instrucciones de operación antes
de usar este producto por la primera vez.
Page 4
WELCOME
Welcome to the Danby family. We are proud of our quality products, and we believe in dependable service, like you will
fi nd in this Owner’s Use and Care Guide, and like you will receive from our friendly customer service department. Best of
all, you will experience these values each and every time you use your Danby appliance. That is important, because your
new appliance will be a part of your family for a long time.
Note the information below; you will need this information to obtain service under warranty.
To receive service, you must provide the original receipt.
Model No:
Serial No:
Date Purchased:
NEED HELP?
Before you call for service, here are a few things you can do to
help us serve you better:
Read this Owner’s Use and Care Guide:
It contains instructions to help you use and maintain your
appliance properly.
If you received a damaged appliance:
Immediately contact the retailer (or builder) that sold you the
appliance.
Save time and money:
Check the Troubleshooting section at the end of the guide
before calling. This section helps you solve common problems
that may occur.
If you do need service, you can relax, knowing help is only a
phone call away.
WARNING
Improper connection of the grounding plug can result in risk of
fi re, electric shock and/or injury to persons associated with the
appliance. Check with a qualifi ed service representative if in doubt
that the appliance is properly grounded.
Tel: 1-800-26-
(1-800-263-2629)
1
Page 5
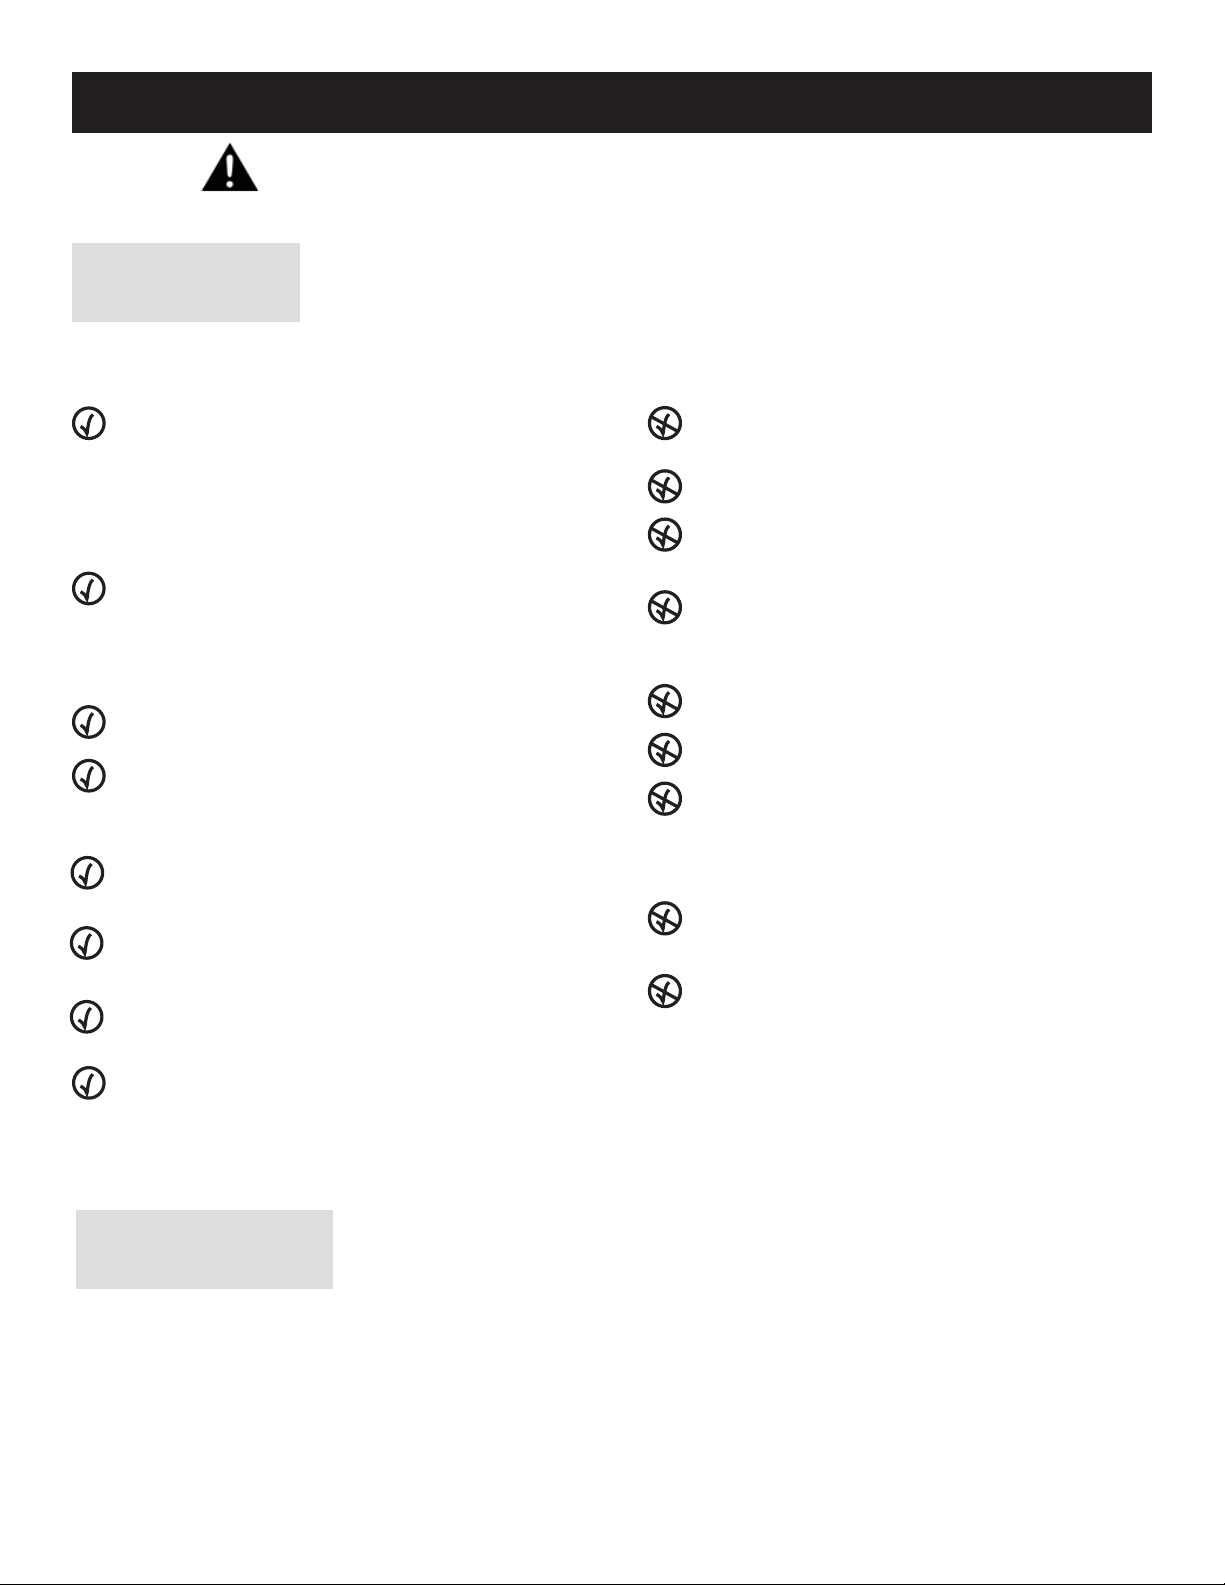
IMPORTANT SAFETY INFORMATION
READ AND FOLLOW ALL SAFETY INSTRUCTIONS
SAFETY
PRECAUTIONS
ALWAYS DO THIS NEVER DO THIS
Your air conditioner should be used in such a way
that it is protected from moisture e.g. condensation,
splashed water, etc. Do not place or store your air
conditioner where it can fall or be pulled into water
or any other liquid. Unplug the unit immediately if
this occurs.
Always transport your air conditioner in a vertical
position and place on a stable, level surface during
use. If the unit is transported laying on its side it
should be stood up and left unplugged for 4 hrs
prior to use.
Turn the unit off when not in use.
Always contact a qualifi ed person to perform
repairs. If the power cord is damaged, it must be
repaired by a qualifi ed technician.
Keep clearance of at least 50cm all around the unit
from walls, furniture and curtains.
If the air conditioner is knocked over during use,
turn the unit off and unplug it immediately.
Always use the button on the control panel to turn
the unit off.
Do not operate your air conditioner in a wet room
such as a bathroom or laundry room.
Do not touch the unit with wet or damp hands.
Do not press the buttons on the control panel with
anything other than your fi ngers.
Do not remove any fi xed components. Never use
this appliance if it is not working properly, or if it has
been dropped or damaged.
Never use the plug to start and stop the unit.
Do not cover or obstruct the inlet or outlet grilles.
Do not use hazardous chemicals to clean or oth-
erwise come into contact with the unit. Do not use
the unit in the presence of fl ammable substances or
vapours such as alcohol, insecticides, petrol,etc.
Do not allow children to operate the unit unsupervised.
Do not use this product for functions other than
those described in this instruction manual.
Portable air conditioners exhaust large amounts
of room air. Always ensure an adequate supply of
make-up air to operate effi ciently.
ENERGY SAVING
TIPS
• Use the unit in the recommended room size.
• Locate the unit where furniture cannot obstruct the air fl ow.
• Keep blinds/curtains closed during the sunniest part of the day.
• Keep the fi lters clean.
• Keep doors and windows closed to keep cool air in and warm air out (when in cooling mode).
2
Page 6
IMPORTANT SAFETY INFORMATION
READ AND FOLLOW ALL SAFETY INSTRUCTIONS
OPERATING
CONDITIONS
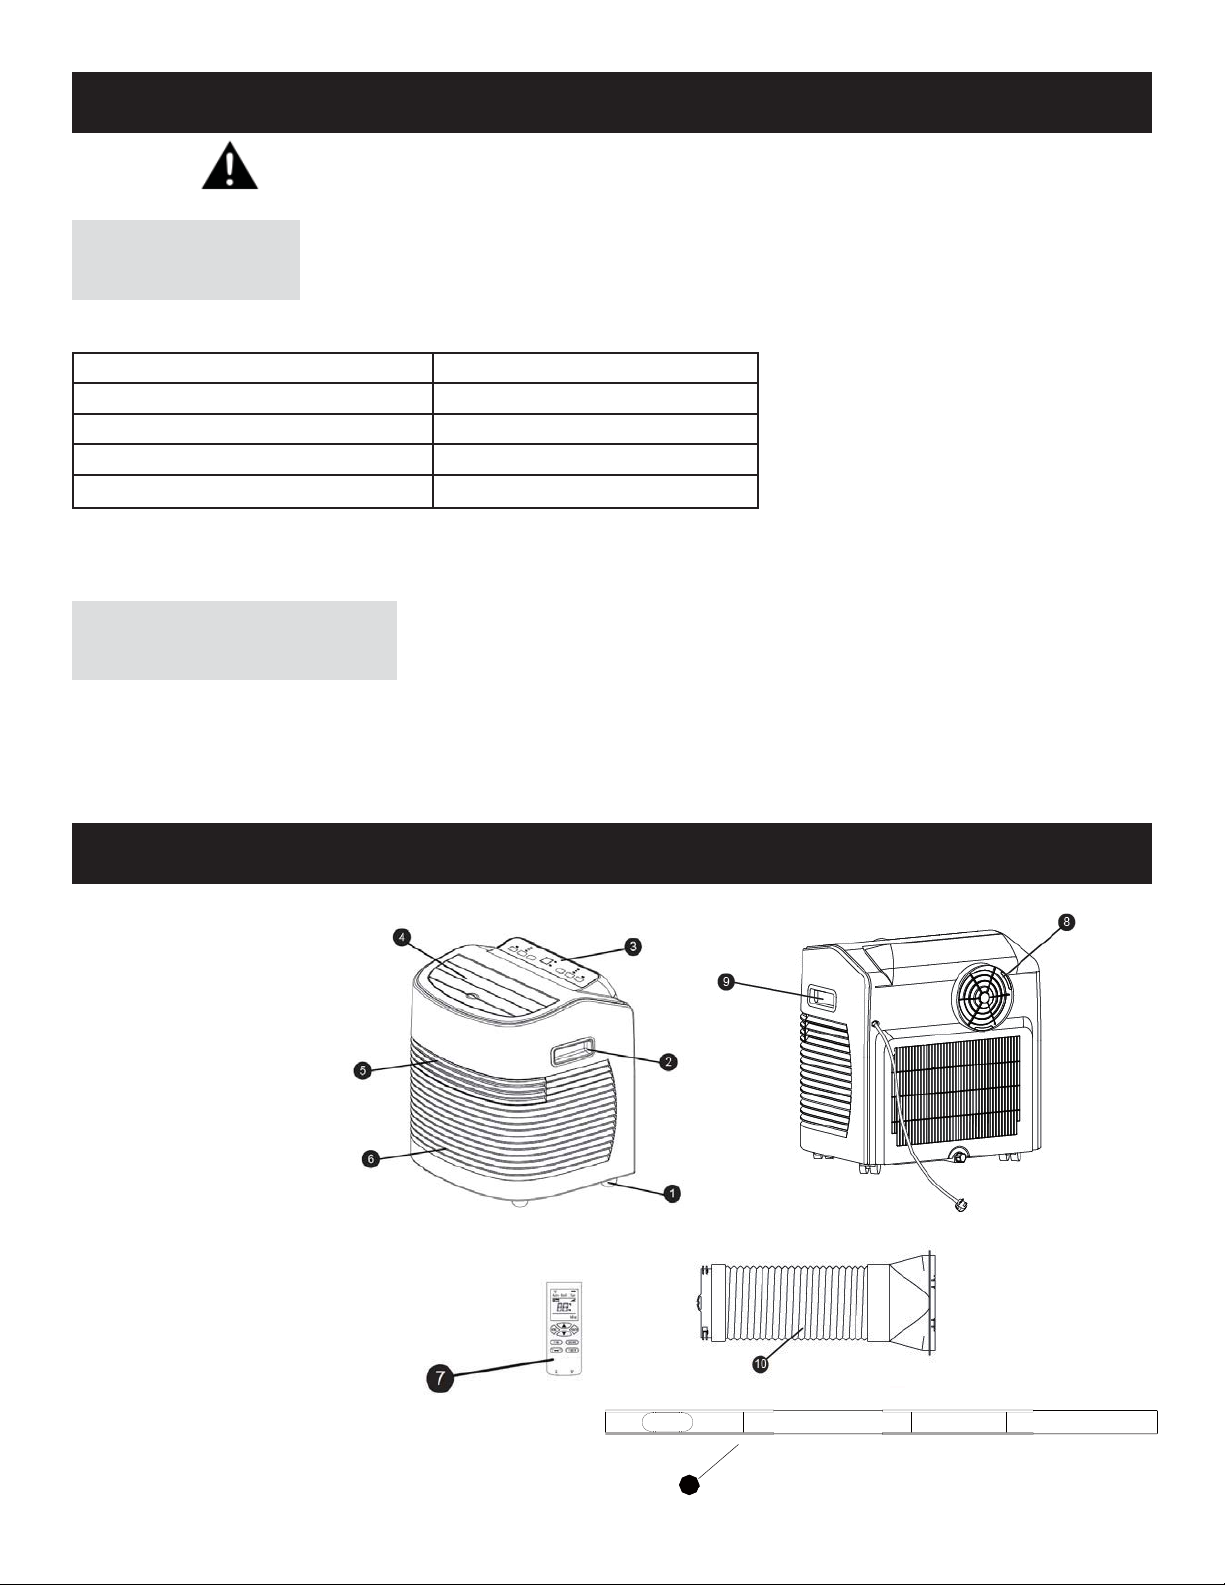
The air conditioner must be operated within the temperature ranges indicated below:
MODE ROOM TEMPERATURE
COOL 17°C (62°F) - 35°C (95°F)
DRY 13°C (55°F) - 35°C (95°F)
*HEAT (heat pump type) 5°C (41°F) - 30°C (86°F)
*HEAT (electrical or heat pump) <30°C (86°F)
(*) Optional feature, some models may not have this feature.
Note: Performance may be reduced outside of these operating temperatures.
TOOLS FOR WINDOW
KIT INSTALLATION
1. Screwdriver (medium size, Phillips)
2. Tape measure or ruler
3. Knife or scissors
4. Saw (In the event that the window kit needs to be cut down in size because the window is too narrow for direct
installation). See www.danby.com for general instruction guide.
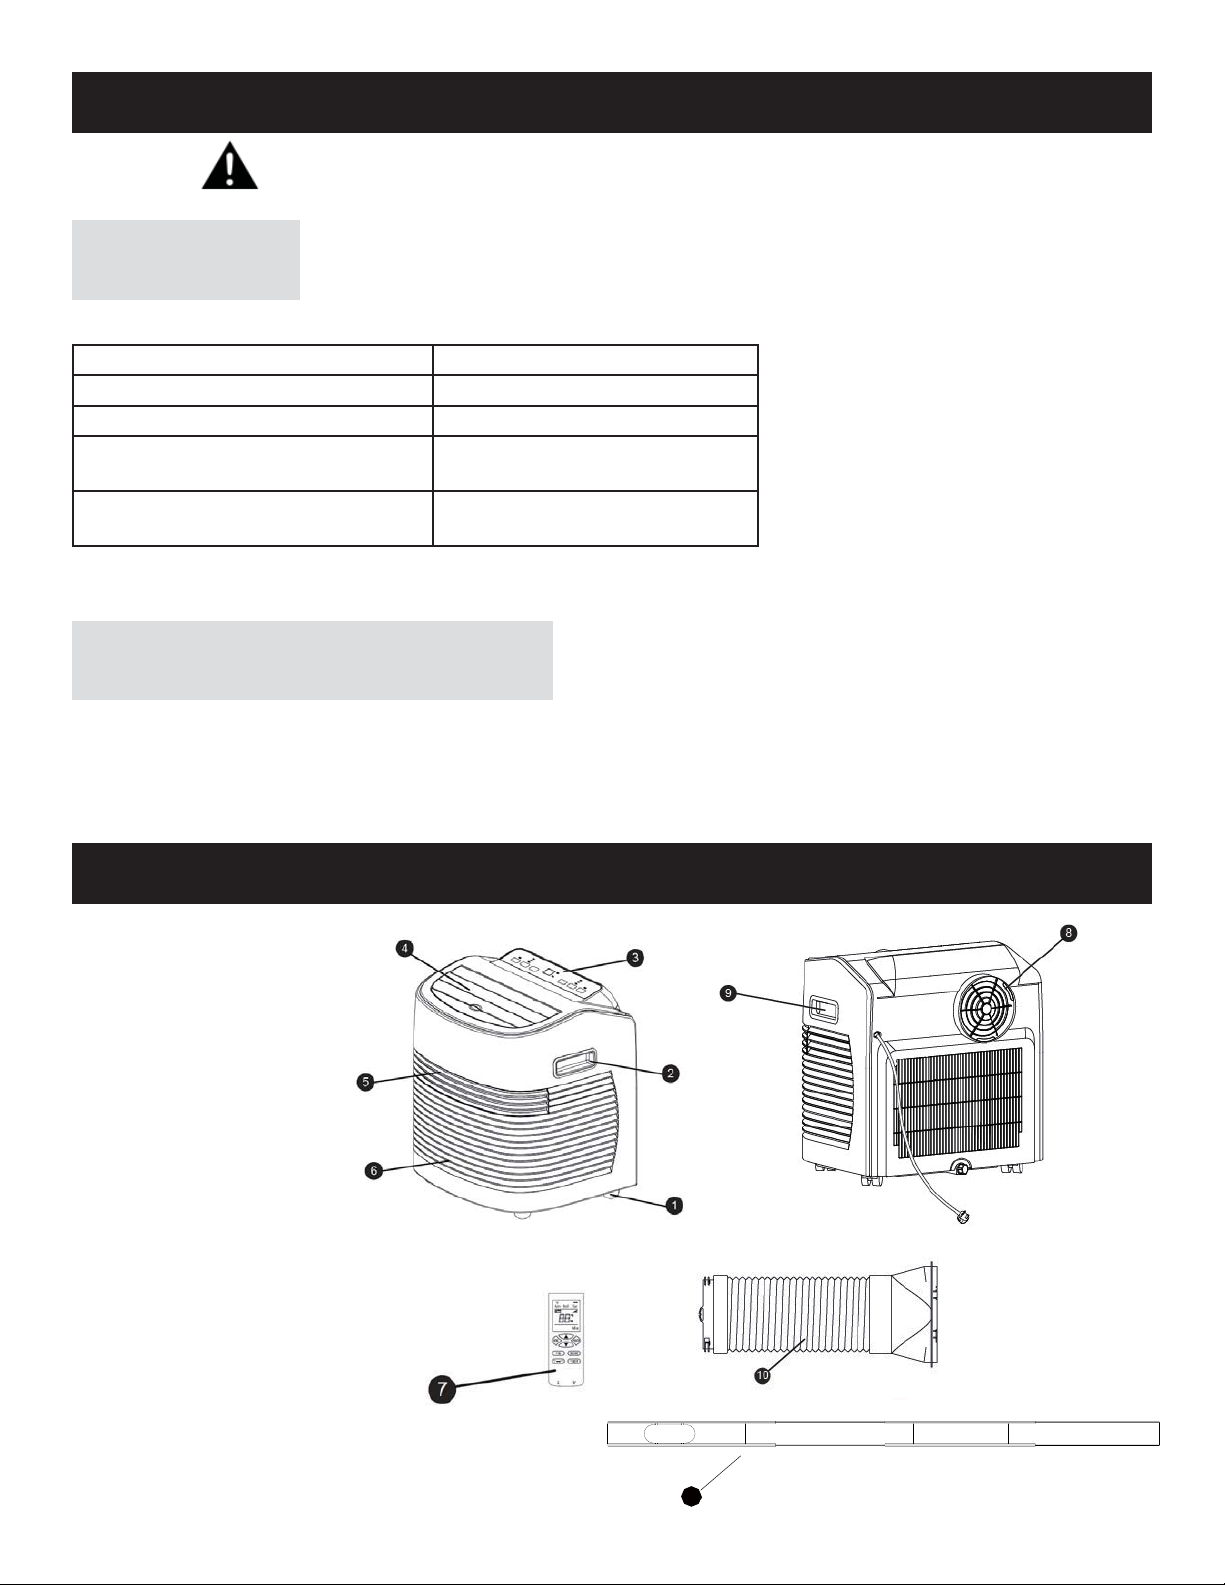
FEATURES AND COMPONENTS
1. Caster
2. Handle (L)
3. Control Panel
4. Wind louver
5. Air inlet grille
6. Air inlet
7. Remote control
8. Exhaust outlet
9. Handle (R)
10. Exhaust pipe assembly
11. Window sealing plate
assembly
11
3
Page 7
FEATURES AND COMPONENTS
CONTROL PANEL &
REMOTE CONTROL
4
8
4
7
4
6
4
5
4
4
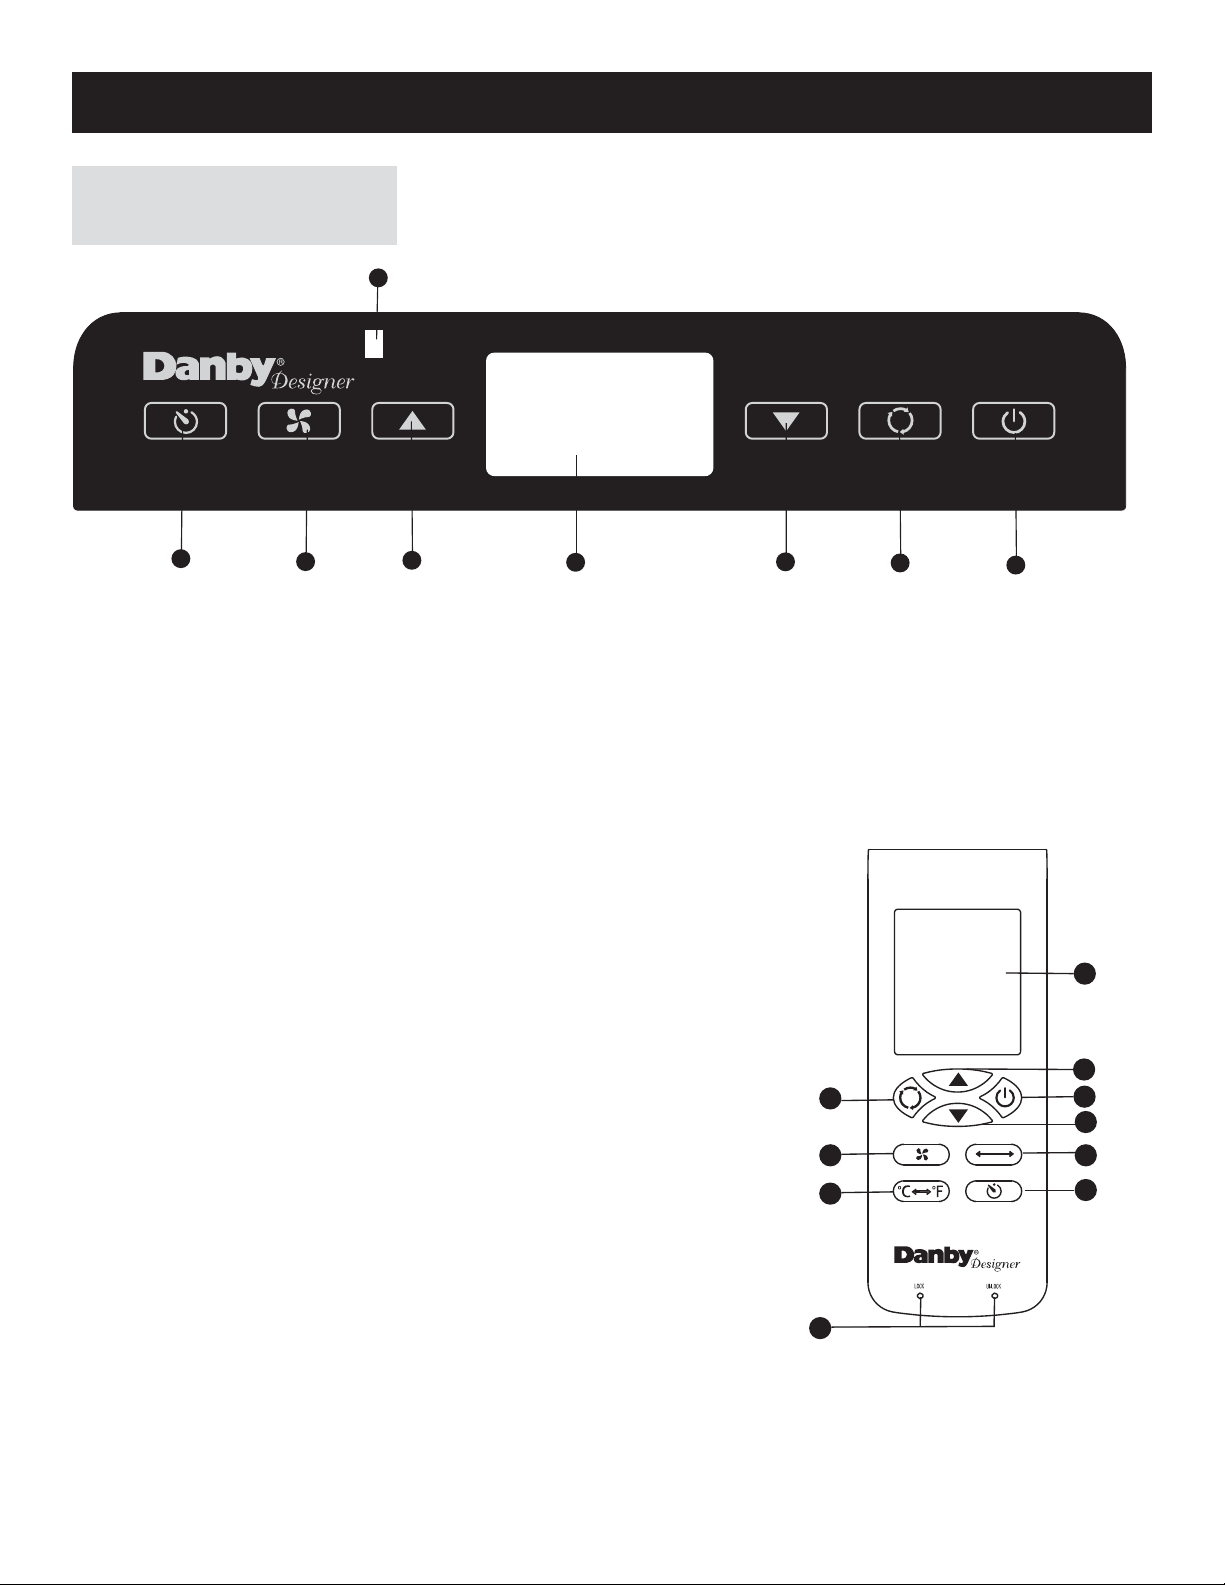
1. Power button
Press the button to turn the unit ON or OFF.
2. Mode button
Press the button to cycle between Auto, Cool, Fan, and Dry
modes.
3. Down button
Press the button in Cool mode to reduce the temperature setting;
press it in Timer mode to adjust the ON/OFF time. Press the Up
and Down buttons simultaneously to switch between Fahrenheit
and Centigrade temperature displays.
4. LCD Temperature/ Timer display window
This window displays the room temperature and the timer settings.
5. Up button
Press the button in Cool mode to increase the temperature setting;
press it in Timer mode to adjust the ON/OFF time.
6. Speed button (control panel)/ Fan button (remote control)
Press the button to select between High/ Medium/ Low fan speed.
7. Timer button
Press the button in standby mode to set TURN-ON time.
Press this button to set TURN-OFF time when the unit is on.
8. Remote controller receiving window
REMOTE CONTROL
4
3
2
14
6
14
9
4
2
4
1
4
4
4
5
14
1
4
3
4
10
4
7
9. °C / °F switching button
Press the button to switch between °C and °F.
10. Swing button
Press this button at any time after turning on the A/C to swing the
wind louvers automatically.
11. Lock button
Press this button to lock/ unlock the the control panel button. You
will need to use a paperclip or similar item to access the button.
4
14
11
Page 8
INSTALLATION INSTRUCTIONS
PLACEMENT
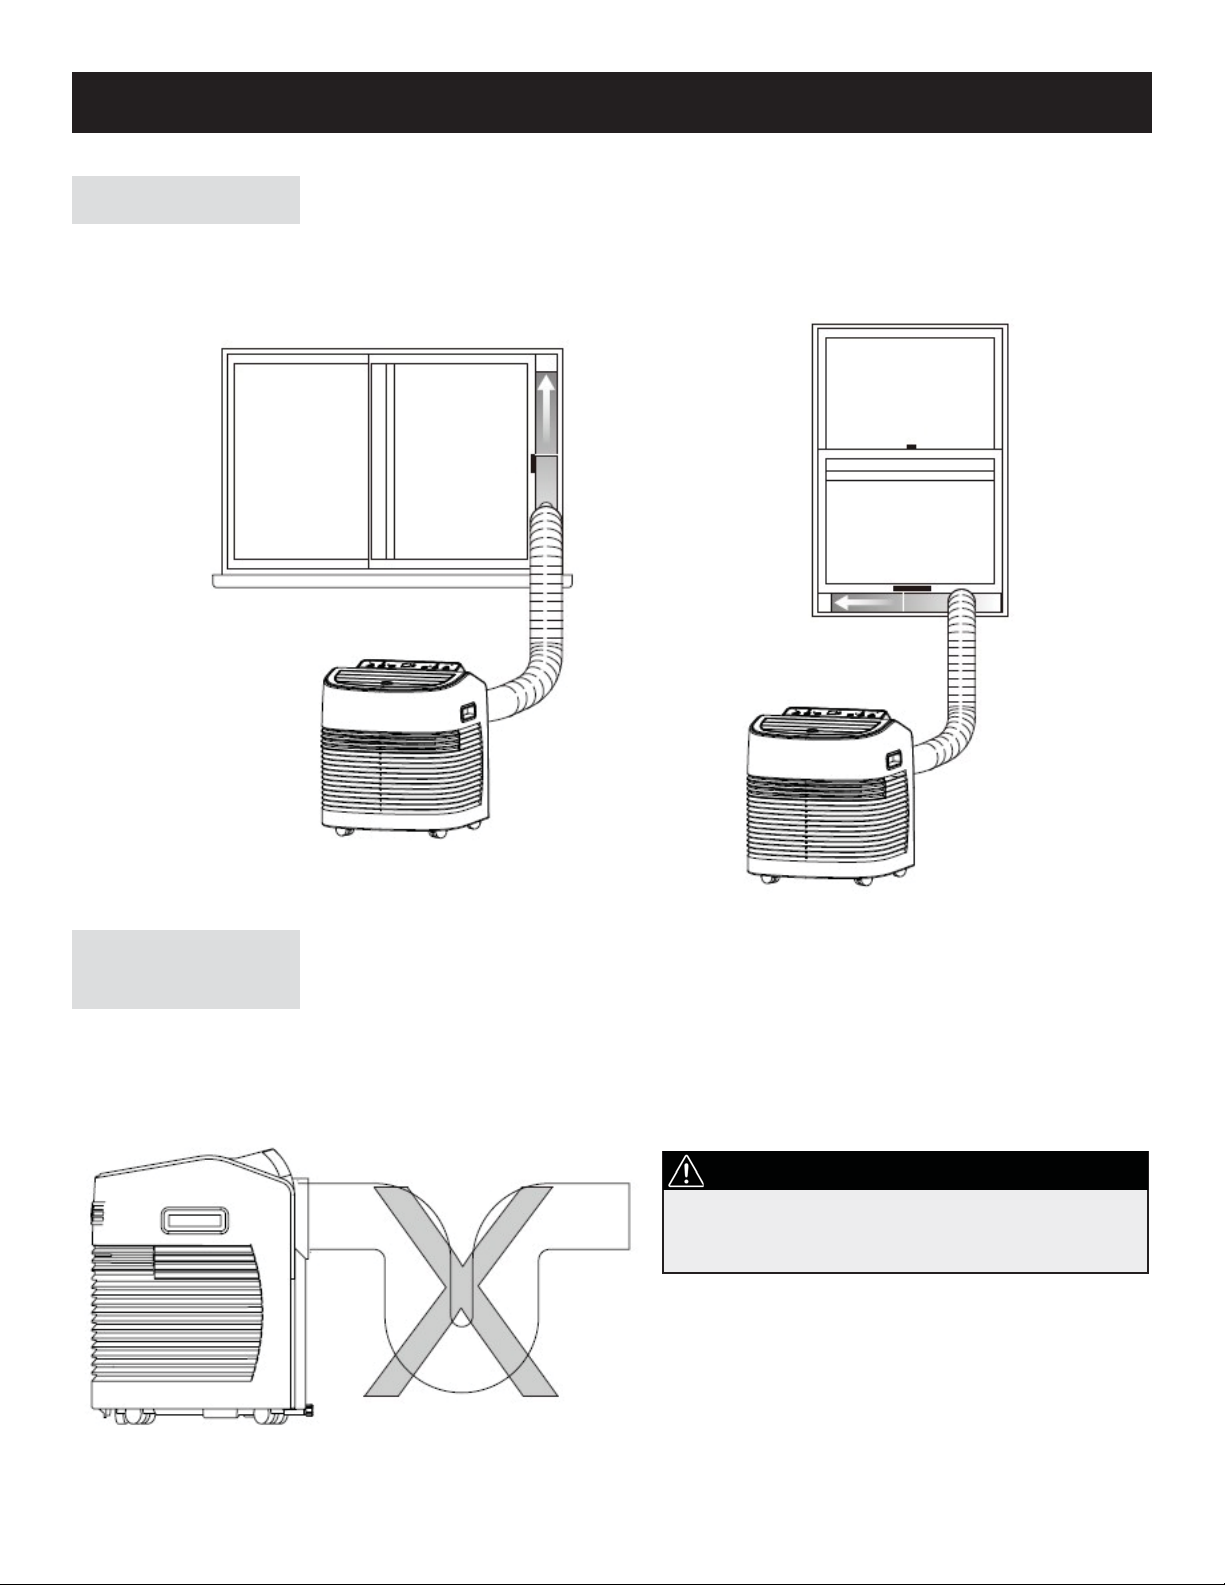
Place the unit on an even and dry surface and keep it at least 50cm away from any nearby objects.
19 5/8 “ (50 cm)
INSTALLATION
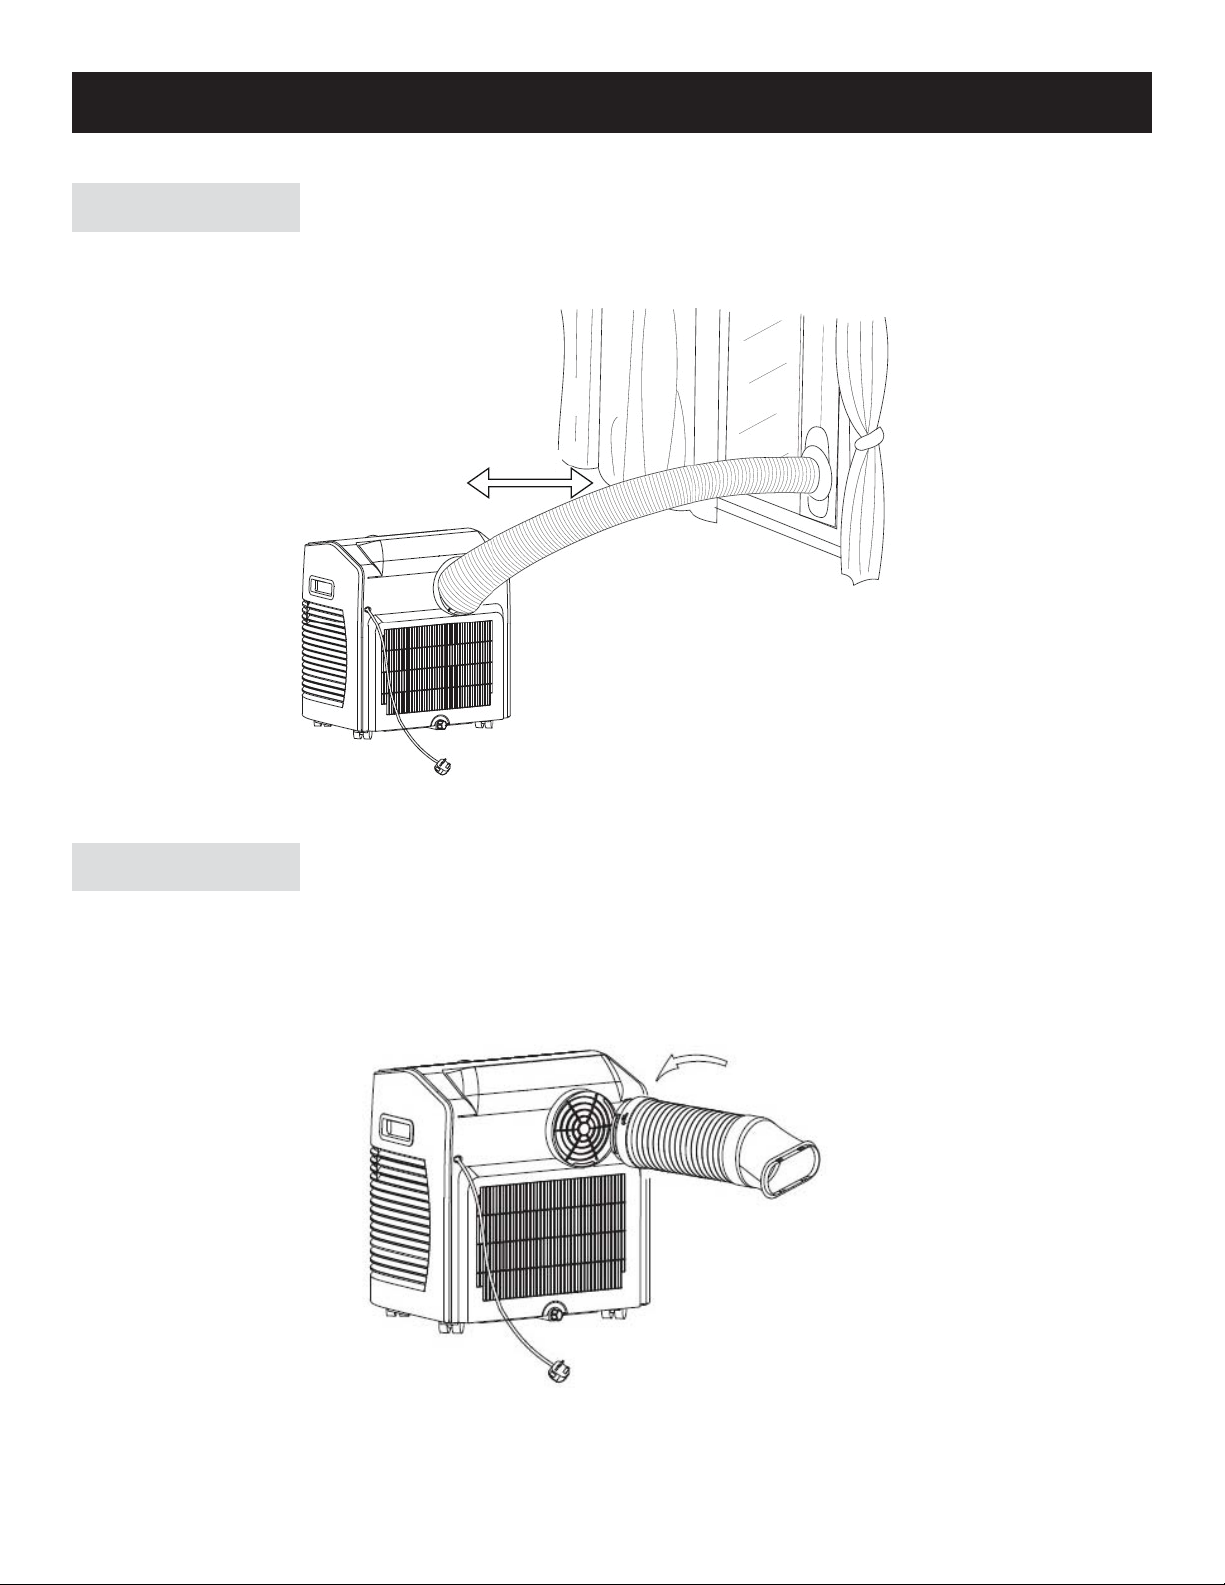
Fasten the exhaust pipe assembly to the air outlet in the back panel (counterclockwise).
5
Page 9
INSTALLATION INSTRUCTIONS
INSTALLATION
Insert the air exhaust hose into the window sealing plate. Adjust the opening width of the window to fi t the sealing plate.
The length of the sealing plate is adjustable.
INCORRECT
INSTALLATION
It is important to keep the exhaust pipe straight. Incorrect installation will affect the effi ciency of the A/C. Do not bend the
exhaust pipe. Ensure air can fl ow freely .
WARNING
The exhaust duct is designed especially for this
model. Don’t replace it with another model’s duct
or lengthen it.
NOTICE:
The maximum length of the exhaust pipe is 59 inches
(150 cm).
6
Page 10

OPERATING INSTRUCTIONS
Cool mode
• When the A/C enters Cool mode automatically, or Cool mode is selected after the unit is turned on, the Cool indicator
symbol lights up.
• Press the Up or Down buttons to adjust the temperature setting in the range 17°C-30°C (62°F- 86°F).
• Press the Speed button to choose High/ Medium/ Low fan speed.
Fan mode
• Press the mode button on the control panel or the Fan button on the remote control to select Fan mode. The Fan
indicator symbol lights up to show that the unit is operating in Fan mode.
• Press the Speed button to choose High/ Medium/ Low fan speed.
• The temperature cannot be set in Fan mode.
Dry mode (dehumidifying function)
• When you wish to run the unit in Dry (dehumidifying) mode, perform the following change to the drain at the back of
the unit. Turn the unit off and unplug it. Remove the exhaust pipe assembly. Unscrew the drain cover, pull out the water plug, and attach a drain hose. The drain hose can be a common garden hose which can be screwed directly onto
the threads of the drain. Ensure that you place the other end of the hose into an appropriate drain (e.g. a fl oor drain),
to prevent water from leaking onto the fl oor. Restart your unit.
• Press the mode button on the control panel or the remote control to select Dry mode. The Dry indicator symbol lights
up on the LCD display window to show that the unit is operating in Dry mode.
• Upon entering Dry mode, if the room temperature is 15°C (59°F) or greater, the compressor will start to operate. If the
room temperature is 13°C (55°F) or less, the compressor will shut off. When the temperature rises again to 15°C, the
compressor will restart (there will be a 3 minute delay in order to protect the compressor).
• In Dry (dehumidifying) mode, the fan will default to run at Low speed, and the speed cannot be adjusted.
• The temperature cannot be set in Dry mode.
NOTE: When choosing Dry (dehumidifying) mode, please remove the exhaust pipe assembly. Otherwise, it will affect
dehumidifying performance and the display window will indicate “FL”.
Auto mode
• Press the Mode button on the control panel or on the remote control to select Auto mode. The Auto indicator symbol
lights up to show that the unit is operating in Auto mode.
• After choosing auto mode, the operation setting is determined by the ambient temperature. When ambient temperature is higher than 25°C (77°F), the operation setting is the same as that of Cool mode; when it is lower than 25°C
(77°F), the operation setting is the same as that of Fan mode.
Max Cool mode (optional)
• When in Cool mode, press the TIMER and UP buttons at the same time to enter Max Cool mode.
• In Max Cool mode, the A/C will cool regardless of temperature restrictions.
• In Max Cool mode, the fan will default to run at High speed, and the speed cannot be adjusted.
• To cancel Max Cool mode press the TIMER and UP buttons again.
Sleep mode (optional)
• When in Cool mode, press the TIMER and DOWN buttons at the same time to enter Sleep mode.
• In Sleep mode, the set temperature will increase by 1° (C or F, depending on the current setting of the unit) every 2
hours, for the fi rst 4 hours of operation. After this, the set temperature will not change further.
• In Sleep mode, the fan will default to run at low speed, and the speed cannot be adjusted.
NOTE:
• To switch between degrees Celsius and Fahrenheit, press the Up and Down buttons on the control panel at the same
time.
• The “swing louvers” option is only available from the remote control.
7
Page 11
OPERATING INSTRUCTIONS
Timer mode
• When the unit is plugged in, but the Power button has not been pressed, the unit is in Standby mode. To set an automatic time after which the unit should turn on, press the Timer button while the unit is in Standby mode. While the
display is fl ashing, use the Up/ Down buttons to select a time between 0 and 24 hours. The unit will come on AFTER
the number of hours that you have selected have passed e.g. if you select 6 H, the unit will come on after 6 hours.
The Timer symbol on the display will light up to indicate that the Timer has been set.
• To set the duration of the run time using the Timer, the unit must be running (not in stand-by mode). When the unit is
running, press the Timer button. While the display is fl ashing, use the Up/ Down buttons to select a time between 0
and 24 hours. The unit will run for the number of hours that you selected e.g. if you selected 6 H, the unit will run for a
period of 6 hours. The Timer symbol will light up to indicate that the Timer has been set.
• To turn the Timer function off, press the Timer button. The display will start to fl ash. While it is fl ashing, press the
Down button to bring the time down to 0. When the display stops fl ashing, the Timer symbol should disappear from
the display, to indicate that the Timer is off.
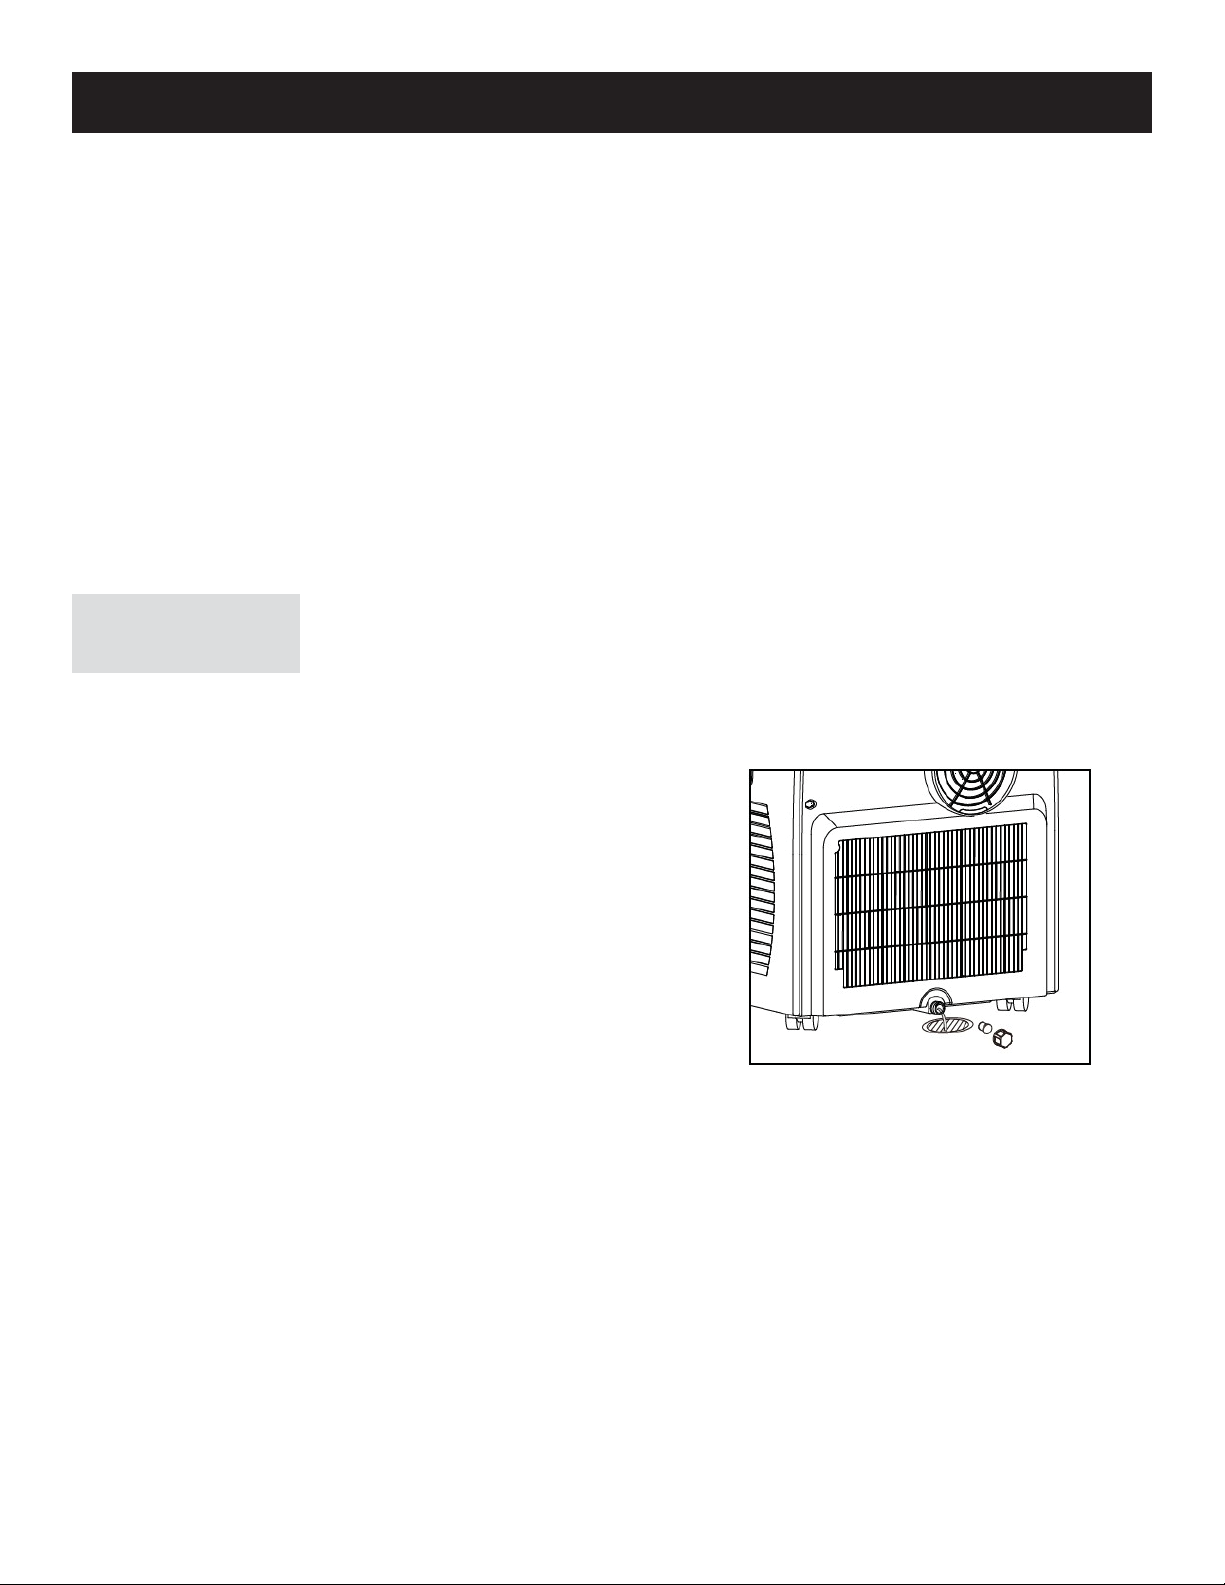
DRAINAGE
METHOD
• If the internal container is full of water, the display screen will
display “FL”, and the compressor will stop working automatically. Turn the unit off, unplug it, unscrew the drain cover, pull out
the water plug to drain out the water, and the compressor will
return to normal after being restarted. Ensure that you position
the unit over a fl oor drain to avoid water spills on your fl oor.
This product is equipped with an automatic water evaporation system. The
condensed water is recycled to cool the condenser, which improves cooling effi ciency and saves energy.
8
Page 12
CARE AND MAINTENANCE
NOTICE
In order to avoid electric shock, please turn off the A/C and
CLEANING
• Unplug before cleaning.
• Wipe with soft semi-dry cloth. DO NOT use chemical agents, such as benzene, alcohol, gasoline, etc. Otherwise the
surface of the A/C and, potentially, the whole A/C will be damaged.
• Prevent water from spilling into the A/C.
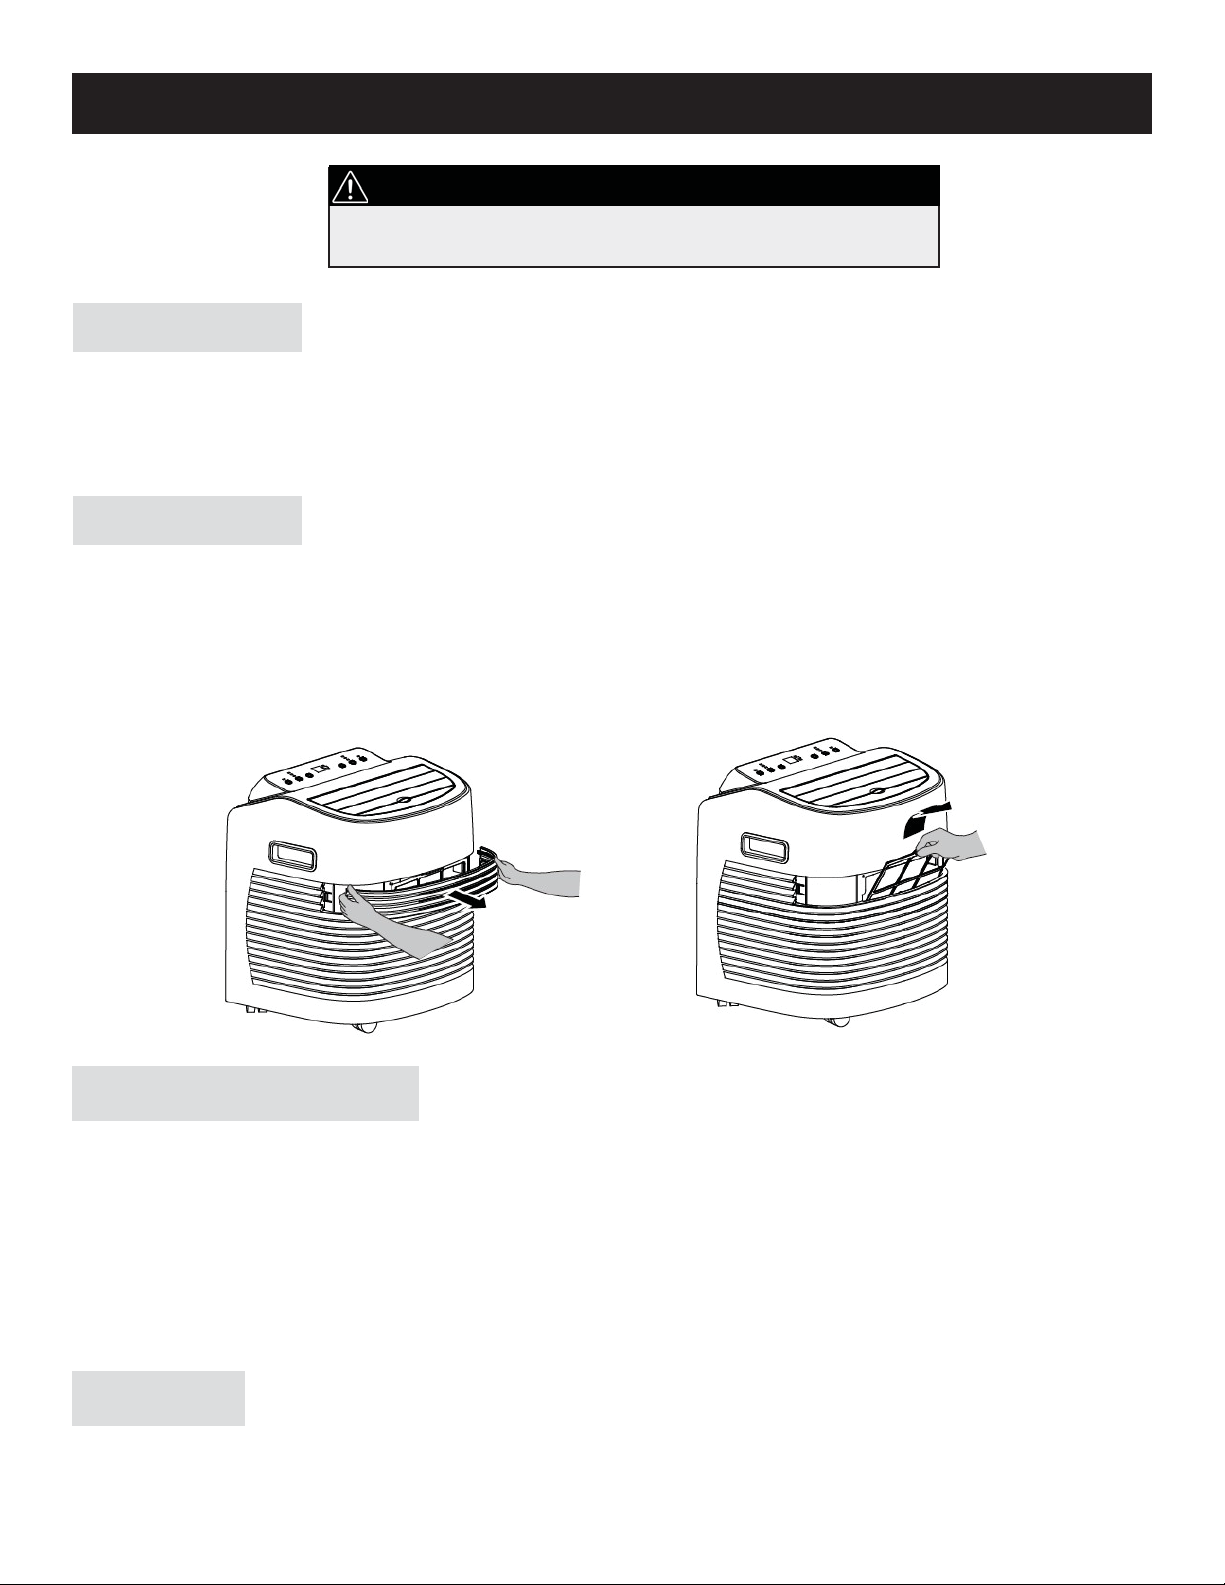
FILTER
• Wash the fi lter once every two weeks. It may be necessary to wash it more often if air quality is poor. If it is blocked by
dust, the effi ciency of the A/C will be reduced.
• Pull out the air inlet grille and the fi lter as shown in the picture below.
• Wash the air inlet grille and the fi lter in warm water (about 40°C / 104°F) with neutral detergent added. Allow to dry in
a shaded area after cleaning.
unplug the plug before maintenance or repair.
SEASONAL CLEANING
If the A/C will not be used for a long time:
• Drain the internal container as outlined in the Drainage Method section.
• Run the A/C under fan mode for 2 hours until the inside is dry.
• Turn the A/C off and unplug it.
• Wash and dry the air inlet grille and the fi lter and reassemble them.
• Remove the exhaust pipe.
• Cover the A/C and exhaust pipe with a plastic bag and store them in a dry place.
DISPOSAL
Check for local regulatory compliance regarding the approved and safe disposal of this appliance.
9
Page 13

CARE AND MAINTENANCE
INTELLIGENT ERROR
DETECTION
Error-detecting code Cause
E1 Error with the coils temperature sensor.
E2 Error with the indoor temperature sensor.
E4 Frost protection: the temperature of the coil is too low and the A/C shuts down to
prevent excess frost build-up. When the temperature increases to 8°C (46.4°F), the
protective setting is released and the previous setting is applied.
TROUBLESHOOTING
Occasionally, a problem may arise that is minor in nature, and a service call may not be necessary. Use this
troubleshooting guide for a possible solution. If the unit continues to operate improperly, call an authorized service depot
or Danby’s Toll Free Number 1-800-263-2629 for assistance.
PROBLEM POSSIBLE CAUSE SOLUTION
The A/C doesn’t work Not plugged in.
Plug the unit in.
The display panel displays “FL”.
Timer TURN OFF function is
started.
The A/C starts frequently Direct sunlight
Doors and windows are open;
there are many people or heat
sources in the room.
Filter is very dirty.
Air inlet or air outlet is blocked.
Loud noise from the A/C The A/C is placed on an uneven
surface.
The compressor doesn’t work Its delay protection is activated. Wait for 3min., turn on after tem-
Power off A/C and drain water.
Restore power.
The A/C can be restarted 3
minutes after being turned off.
Close the curtain or blinds.
Close doors and windows, remove
heat source.
Clean or replace it.
Remove the blockage.
Place it on even and strong
ground, avoid shaking.
perature decreases.
10
Page 14

LIMITED IN-HOME APPLIANCE WARRANTY
LIMITED IN-HOME APPLIANCE WARRANTY
This quality product is warranted to be free from manufacturer’s defects in material and workmanship, provided that the unit is used under the normal operating
This quality product is warranted to be free from manufacturer’s defects in material and workmanship, provided that the unit is
conditions intended by the manufacturer.
used under the normal operating conditions intended by the manufacturer.
This warranty is available only to the person to whom the unit was originally sold by Danby Products Limited (Canada) or
This warranty is available only to the person to whom the unit was originally sold by Danby Products Limited (Canada) or Danby Products Inc. (U.S.A.) (hereafter
Danby Products Inc. (U.S.A.) (hereafter “Danby”) or by an authorized distributor of Danby, and is non-transferable.
“Danby”) or by an authorized distributor of Danby, and is non-transferable.
TERMS OF WARRANTY
Plastic parts, are warranted for thirty (30) days only from purchase date, with no extensions provided.
TERMS OF WARRANTY
Plastic parts, are warranted for thirty (30) days only from purchase date, with no extensions provided.
First 18 Months
First Year
To obtain
Service
To obtain
Service
Boundaries of
In Home Service
Boundaries of
In Home Service
Nothing within this warranty shall imply that Danby will be responsible or liable for any spoilage or damage to food or other
Nothing within this warranty shall imply that Danby will be responsible or liable for any spoilage or damage to food or other c ontents of this appliance, whether due
contents of this appliance, whether due to any defect of the appliance, or its use, whether proper or improper.
to any defect of the appliance, or its use, whether proper or improper.
Except as herein provided, Danby, there are no other warranties, conditions, representations or guarantees, express or
Save as herein provided, Danby, there are no other warranties, conditions, representations or guarantees, express or implied, m ade or intended by Danby or its
implied, made or intended by Danby or its authorized distributors and all other warranties, conditions, representations or
authorized distributors and all other warranties, conditions, representations or guarantees, including any warranties, conditio ns, representations or guarantees
guarantees, including any warranties, conditions, representations or guarantees under any Sale of Goods Act or like legislation
under any Sale of Goods Act or like legislation or statue is hereby expressly excluded. Save as herein provided, Danby shall no t be responsible for any damages
or statute is hereby expressly excluded. Except as herein provided, Danby shall not be responsible for any damages to
to persons or property, including the unit itself, howsoever caused or any consequential damages arising from the malfunction o f the unit and by the purchase of
persons or property, including the unit itself, howsoever caused or any consequential damages arising from the malfunction of
the unit, the purchaser does hereby agree to indemnify and hold harmless Danby from any claim for damages to persons or propert y caused by the unit.
the unit and by the purchase of the unit, the purchaser does hereby agree to indemnify and hold harmless Danby from any
claim for damages to persons or property caused by the unit.
No warranty or insurance herein contained or set out shall apply when damage or repair is caused by any of the following:
No warranty or insurance herein contained or set out shall apply when damage or repair is caused by any of the following:
1) Power failure.
1) Power failure.
2) Damage in transit or when moving the appliance.
2) Damage in transit or when moving the appliance.
3) Improper power supply such as low voltage, defective house wiring or inadequate fuses.
3) Improper power supply such as low voltage, defective house wiring or inadequate fuses.
4) Accident, alteration, abuse or misuse of the appliance such as inadequate air circulation in the room or abnormal operating
4) Accident, alteration, abuse or misuse of the appliance such as inadequate air circulation in the room or abnormal operating con ditions
conditions (extremely high or low room temperature).
5) Use for commercial or industrial purposes (ie. If the appliance is not installed in a domestic residence).
6) Fire, water damage, theft, war, riot, hostility, acts of God such as hurricanes, floods etc.
7) Service calls resulting in customer education.
8) Improper Installation (ie. Building-in of a free standing appliance or using an appliance outdoors that is not approved for
outdoor application).
(extremely high or low room temperature).
5) Use for commercial or industrial purposes (ie. If the appliance is not installed in a domestic residence).
6) Fire, water damage, theft, war, riot, hostility, acts of God such as hurricanes, oods etc.
7) Service calls resulting in customer education.
8) Improper Installation (ie. Building-in of a free standing appliance or using an appliance outdoors that is not approved for out door application).
During the first eighteen (18) months, any functional parts of this product found to be defective, will be
repaired or replaced, at warrantor’s option, at no charge to the ORIGINAL purchaser.
During the rst twelve (12) months, any functional parts of this product found to be defective, will be repaired or replaced, at warrantor’s
option, at no charge to the ORIGINAL purchaser.
Danby reserves the right to limit the boundaries of “In Home Service” to the proximity of an Authorized
Service Depot. Any appliance requiring service outside the limited boundaries of “In Home Service”, it
Danby reserves the right to limit the boundaries of “In Home Service” to the proximity of an Authorized Service Depot. Any app liance
will be the consumer’s responsibility to transport the appliance (at their own expense) to the original
requiring service outside the limited boundaries of “In Home Service” ,
retailer (point of purchase) or a service depot for repair. See “Boundaries of In Home Service” below.
their own expense) to the original retailer (point of purchase) or a service depot for repair. See “Boundaries of In Home Serv ice” below.
Contact your dealer from whom your unit was purchased, or contact your nearest authorized Danby
Contact your dealer from whom your unit was purchased, or contact your nearest authorized Danby service depot, where service
service depot, where service must be performed by a qualified service technician. If service is performed
must be performed by a qualied service technician.
on the unit by anyone other than an authorized service depot, or the unit is used for commercial
application, all obligations of Danby under this warranty shall be void.
If service is performed on the units by anyone other than an authorized service depot, or the unit is used for commercial appli cation, all
obligations of Danby under this warranty shall be void.
If the appliance is installed in a location that is 100 kilometers (62 miles) or more from the nearest
service center your unit must be delivered to the nearest authorized Danby Service Depot, as service
If the appliance is installed in a location that is 100 kilometers (62 miles) or more from the nearest service center your unit must be
must only be performed by a technician qualified and certified for warranty service by Danby. Transpor-
delivered to the nearest authorized Danby Service Depot, as service must only be performed by a technician qualied and certif ied for
tation charges to and from the service location are not protected by this warranty and are the responsi-
warranty service by Danby. Transportation charges to and from the service location are not protected by this warranty and are t he
bility of the purchaser.
responsibility of the purchaser.
EXCLUSIONS
EXCLUSIONS
GENERAL PROVISIONS
GENERAL PROVISIONS
i
t will be the consumer’s responsibility to transport the appliance (at
Proof of purchase date will be required for warranty claims; so, please retain bills of sale. In the event warranty service is required, present this document to our
Proof of purchase date will be required for warranty claims; so, please retain bills of sale. In the event warranty service is
AUTHORIZED SERVICE DEPOT.
required, present this document to our AUTHORIZED SERVICE DEPOT.
Danby Products Limited
Danby Products Limited
PO Box 1778, Guelph, Ontario, Canada N1H 6Z9
PO Box 1778, Guelph, Ontario, Canada N1H 6Z9
Telephone: (519) 837-0920 FAX: (519) 837-0449
Telephone: (519) 837-0920 FAX: (519) 837-0449
Warranty Service
In-home
Warranty Service
In-home
1-800-263-2629
1-800-263-2629
07/13
04/09
Danby Products Inc.
PO Box 669, Findlay, Ohio, U.S.A. 45840
PO Box 669, Findlay, Ohio, U.S.A. 45840
Telephone: (419) 425-8627 FAX: (419) 425-8629
Telephone: (419) 425-8627 FAX: (419) 425-8629
Danby Products Inc.
Page 15

BIENVENUE
Bienvenue dans la famille Danby. Nous sommes fi ers de la qualité de nos produits et nous croyons fermement au service
par une assistance fi able. Vous découvrirez au travers de ce quide, facile d’utilisation et vous en aurez la confi rmation par
notre service d’assistance à la clientèle. Mais ce qui est encore mieux, vous pourrez bénéfi cier de ces valeurs à chaque
utilisation de votre appareil. Ceci est important parce que votre nouvel appareil fera partie de votre famille pour longtemps.
S’il vous plaît écrivez informations ci-dessous; ces renseignements seront nécessaires si votre appareil a besoin
d’entretien ou pour les demandes de renseignements généraux. Pour bénéfi cier d’une opération de maintenance
ou dépannage, le reçu original sera exigé.
Numéro de modèle :
Numéro de série :
Date d’achat :
BESOIN D’ASSISTANCE ?
Veuillez trouver quelques conseils avant de faire appel à nos
services, cela nous aidera à mieux vous servir:
Lisez ce guide:
Il comprend des instructions pour l’utilisation et l’entretien
adapté de votre unité.
Si votre nouvel appareil est endommagé :
Contactez immédiatement le revendeur (ou le fabricant).
Gagnez du temps et de l’argent :
Avant de faire appel à nos services, consultez à nouveau
la section « “Dépannage ». Cette section vous aidera à
solutionner des problèmes courants.
Si une réparation est nécessaire, ne vous inquiétez pas, la
solution est au bout de l’appel téléphonique.
Tel: 1-800-26-
(1-800-263-2629)
AVERTISSEMENT :
Une fi che de mise à la terre mal branchée peut entraîner un risque d’incendie, de
choc électrique ou de blessures aux personnes qui utilisent l’appareil. Si vous
n’êtes pas certain que l’appareil est correctement mis à la terre, consultez un
préposé du service qualifi é.
12
Page 16

CONSIGNES DE SÉCURITÉ IMPORTANTES
LIRE ET RESPECTER ATTENTIVEMENT TOUTES LES
CONSIGNES DE SÉCURITÉ
MESURES
DE SÉCURITÉ
INSTRUCTIONS À RESPECTER À NE PAS FAIRE
Utiliser le climatiseur de manière à ce qu'il soit protégé en tout temps de l'humidité. ex : condensation,
éclaboussures d'eau, etc. Ne pas placer ou ranger le
climatiseur dans un endroit où il peut tomber ou entrer
en contact avec de l'eau ou tout autre liquide. Débrancher immédiatement le climatiseur si cela se produit.
Toujours transporter le climatiseur en position verticale
et le placer sur une surface stable et plane pendant
l'utilisation. Si l'appareil est transporté en position horizontale, le remettre en position verticale et le maintenir débranché pendant 4 heures, avant l’utilisation.
Éteindre l'appareil lorsqu'il n'est pas utilisé.
Toujours s'adresser à une personne compétente pour
effectuer des réparations. Si le cordon d'alimentation
est endommagé, il doit être réparé par un technicien
compétent.
Maintenir une distance de sécurité de 50 cm minimum
entre l'appareil et tout mur, meuble ou rideau.
Si le climatiseur tombe alors qu'il est en marche,
éteindre l'appareil et le débrancher immédiatement.
Toujours utiliser le bouton situé sur le panneau de
commandes pour éteindre l'appareil.
Les climatiseurs mobiles détournent de grandes
quantités d’air de la salle. Toujours assurer un approvisionnement suffi sant d’air afi n de fonctionner
effi cacement.
Ne pas utiliser le climatiseur dans un espace humide
tel qu'une salle de bain ou une buanderie.
Ne pas toucher l'appareil avec les mains mouillées ou
humides.
Ne pas appuyer sur les boutons du panneau de commande avec autre chose que les doigts.
Ne pas retirer d'éléments fi xes. Ne jamais utiliser cet
appareil s'il ne fonctionne pas correctement ou s'il est
tombé ou a été endommagé.
Ne jamais utiliser la prise d'alimentation pour allumer
ou éteindre l'appareil.
Ne pas couvrir ou obstruer les grilles d'entrée ou de
sortie d'air.
Ne pas utiliser de produits chimiques dangereux pour
nettoyer l'appareil ou mettre des produits chimiques
en contact avec l'appareil. Ne pas utiliser l'appareil à
proximité de substances infl ammables ou de vapeurs
d'alcool, d'insecticides, d'essence, etc.
Ne pas laisser les enfants utiliser l'appareil sans
surveillance.
Ne pas utiliser ce produit à des fi ns autres que celles
décrites dans le manuel d'instructions.
CONSEILS POUR
ÉCONOMISER L'ÉNERGIE
• Utiliser l'appareil dans une pièce de la taille recommandée.
• Placer l'appareil dans un endroit où le mobilier ne peut pas obstruer le fl ux d'air.
• Maintenir les rideaux et les stores fermés pendant les heures les plus ensoleillées de la journée.
• Nettoyer les fi ltres régulièrement.
• Fermer les portes et les fenêtres pour maintenir l'air frais à l'intérieur et l'air chaud à l'extérieur (mode de refroidissement).
13
Page 17
CONSIGNES DE SÉCURITÉ IMPORTANTES
LIRE ET RESPECTER ATTENTIVEMENT TOUTES LES
CONSIGNES DE SÉCURITÉ
CONDITIONS
D'UTILISATION
Le climatiseur doit être utilisé à des températures comprises dans la plage de températures ci-dessous :
MODE TEMPÉRA TURE AMBIANTE
COOL (REFROIDISSEMENT) 17 °C (62 °F) - 35 °C (95 °F)
DRY (SEC) 13 °C (55 °F) - 35 °C (95 °F)
*HEAT (CHAUFFAGE)
(modèle pompe thermique)
*HEAT (CHAUFFAGE)
(électrique ou pompe thermique)
(*) Fonction optionnelle, certains modèles ne sont pas équipés de cette fonction.
Remarque : Le rendement de l'appareil peut être moindre lorsqu'il fonctionne en dehors de cette plage de températures.
OUTILS POUR LE KIT
D'INSTALLATION POUR FENÊTRE
5 °C (41 °F) - 30 °C (86 °F)
<30 °C (86 °F)
1. Tournevis (taille moyenne, Phillips)
2. Ruban à mesurer ou règle
3. Couteau ou ciseaux
4. Scie (au cas où la taille du kit pour fenêtre doit être réduite car la fenêtre est trop étroite pour une installation
immédiate). Consulter www.danby.com pour accéder au manuel d'instructions générales.
CARACTÉRISTIQUES ET COMPOSANTS
1. Roulette
2. Poignée (gauche)
3. Panneau de commandes
4. Volet oscillant
5. Grille d'entrée d'air
6. Entrée d'air
7. Télécommande
8. Sortie d’aération
9. Poignée (droite)
10. Ensemble de tuyau
d'échappement
11. Ensemble de plaque
d'étanchéité de la fenêtre
11
14
Page 18

CARACTÉRISTIQUES ET COMPOSANTS
PANNEAU DE COMMANDES
ET TÉLÉCOMMANDE
4
8
4
7
4
6
4
5
4
4
1. Touche MARCHE/ARRÊT
Appuyer sur la touche MARCHE/ARRÊT pour ALLUMER/ÉTEINDRE le climatiseur.
2. Touche MODE
Appuyer sur la touche MODE pour naviguer entre les modes AUT O,
REFROIDISSEMENT (COOL), VENTILATION (FAN) et DÉSHUMIDIFICATION
(DRY).
3. Touche BAS
Appuyer sur la touche BAS en mode REFROIDISSEMENT (COOL) pour
réduire la température.
Appuyer sur la touche BAS en mode MINUTERIE (TIMER) pour régler
l'heure de MARCHE/ARRÊT de la minuterie. Appuyer sur les touches HAUT
et BAS simultanément pour affi cher la température en degrés Fahrenheit ou
Centigrade.
4. Fenêtre d'affi chage ACL de la température et de la minuterie
Cette fenêtre indique la température et les réglages de minuterie sélectionnés.
5. Touche HAUT
Appuyer sur la touche HAUT en mode REFROIDISSEMENT (COOL) pour
augmenter la température.
Appuyer sur la touche HAUT en mode MINUTERIE (TIMER) pour régler l'heure
de MARCHE/ARRÊT de la minuterie.
6. Touche VITESSE
Appuyer sur la touche VITESSE pour choisir la vitesse du ventilateur (élevée/
moyenne/lente).
7. Touche MINUTERIE (TIMER)
Appuyer sur la touche MINUTERIE en mode VEILLE (Standby) pour régler
l'heure de MISE EN MARCHE.
Appuyer sur la touche MINUTERIE lorsque l'appareil est allumé pour régler
l'heure de MISE EN VEILLE.
8. Fenêtre d'affi chage de la télécommande
4
3
2
14
6
14
9
14
11
4
2
4
1
4
4
4
5
14
1
4
3
4
10
4
7
TÉLÉCOMMANDE
9. Touche °C/°F
Appuyer sur la touche °C/°F pour changer le format d'affi chage de la
température.
10. Touche OSCILLATION (SWING)
Appuyer sur la touche OSCILLA TION à tout moment après avoir allumé le
climatiseur et les volets oscilleront automatiquement.
11. Touche VERROUILLAGE (LOCK)
Appuyer sur la touche VERROUILLAGE pour verrouiller/déverrouiller la touche
panneau de commande.
15
Page 19

CONSIGNES D'INSTALLATION
EMPLACEMENT
Placer le climatiseur sur une surface plane et sèche et à une distance de 50 cm minimum de tout objet.
19 5/8 pouces (50 cm)
INSTALLATION
Fixer le tuyau d'échappement à la sortie d'air située sur le panneau arrière (dans le sens antihoraire).
16
Page 20

CONSIGNES D'INSTALLATION
INSTALLATION
Insérer le tuyau d'échappement dans la plaque d'étanchéité de la fenêtre, régler la largeur d'ouverture de la fenêtre pour
que celle-ci corresponde à la largeur de la plaque d'étanchéité. La longueur de la plaque d'étanchéité est réglable.
INSTALLATION
INADÉQUATE
• Il est important de maintenir le tuyau d'échappement droit. Une installation inadéquate aura une incidence sur l'effi cacité
du climatiseur. Ne pas plier le tuyau d'échappement. S'assurer que l'air circule librement.
AVERTISSEMENT
Le conduit d'échappement a été spécifi quement
conçu pour ce modèle. Ne pas le remplacer par
un conduit d'échappement conçu pour un autre
modèle ou le rallonger.
NOTE :
La longueur maximale du tuyau d'échappement est de
59 pouces (150 cm).
17
Page 21

CONSIGNES D'UTILISATION
Mode REFROIDISSEMENT (COOL)
• Lorsque le climatiseur entre en mode REFROIDISSEMENT (COOL) automatiquement ou que le mode REFROIDISS-
MENT (COOL) est sélectionné après la mise en marche, le témoin COOL s'allume.
• Appuyer sur les touches HAUT/BAS pour régler la température entre 17 °C et 30 °C (62 °F et 86 °F).
• Appuyer sur la touche VITESSE pour choisir la vitesse du ventilateur
Mode VENTILATION (FAN)
• Lorsque la touche MODE est actionnée ou que le mode VENTILATION (FAN) est sélectionné par l'intermédiaire de la
télécommande, le témoin FAN s'allume et l'appareil fonctionne en mode VENTILATION (FAN).
• Appuyer sur la touche VITESSE pour choisir la vitesse du ventilateur (élevée/moyenne/lente).
• La température ne peut pas être réglée lorsque l'appareil est en mode VENTILATION (FAN).
Mode DÉSHUMIDIFICATION (DRY)
• Pour utiliser l’appareil en mode déshumidifi cation (Dry), effectuer les modifi cations suivantes sur le drain à l’arrière
de l’appareil. Éteindre l’appareil et le débrancher. Retirer l’ensemble du tuyau d’évacuation. Dévisser le capot du
dispositif, retirer le raccord d’eau et fi xer le bout du tube de drainage. Le tube de drainage peut être un simple tuyau
d’arrosage vissé directement sur le fi letage du drain. S’assurer de placer l’autre extrémité du tube dans une évacua-
tion adaptée (par ex, un siphon de sol), pour éviter toute fuite d’eau sur le sol. Remettre en fonction votre unité
• Appuyer sur la touche mode sur le panneau de commande ou sur la télécommande pour sélectionner le mode dés-
humidifi cation. Le symbole indiquant la déshumidifi cation s’allume sur l’écran ACL pour indiquer que l’appareil fonc-
tionne en mode de déshumidifi cation.
• Au moment de la mise en fonction de la déshumidifi cation, si la température ambiante est de 15 °C (59 °F) ou plus, le
compresseur se mettra en marche. Si la température ambiante est de 13 °C (55 °F) ou moins, le compresseur s’arrêtera. Quand la température augmente à nouveau à 15 °C, le compresseur redémarre (avec un temps de réponse de 3
minutes pour protéger le compresseur).
• En mode déshumidifi cation (Dry), le ventilateur fonctionnera à basse vitesse et celle-ci ne peut pas être ajustée.
• La température ne peut pas être réglée en mode déshumidifi cation (Dry).
(élevée/moyenne/lente).
REMARQUE : Au moment de la sélection en mode déshumidifi cation, retirer l’ensemble du tuyau d’évacuation. Si
l’ensemble du tuyau d’évacuation n’est pas retiré, la qualité de déshumidifi cation peut être reduite, et, sur l’écran, « FL »
s’affi chera.
Mode AUTO
• Appuyer sur la touche MODE sur le panneau de commandes ou sélectionner le mode AUTO par l'intermédiaire de la
télécommande pour activer le mode AUTO. Le témoin AUTO s'allume lorsque le climatiseur est en mode AUTO.
• Après la sélection du mode AUTO, les réglages de fonctionnement sont déterminés par la température ambiante :
lorsque la température ambiante est supérieure à 25 °C (77 °F), les réglages de fonctionnement sont les mêmes que
ceux du mode REFROIDISSEMENT (COOL), lorsque la température est inférieure à 25 °C (77 °F), les réglages de
fonctionnement sont les mêmes que ceux du mode VENTILATION (FAN).
Mode FRAÎCHEUR MAXI (MAX COOL) (fonction optionnelle)
• En mode REFROIDISSMENT (COOL), appuyer simultanément sur les touches MINUTERIE (TIMER) et HAUT pour
activer le mode FRAÎCHEUR MAXI (MAX COOL).
• En mode FRAÎCHEUR MAXI, le climatiseur rafraîchira la pièce sans restriction de température.
• En mode FRAÎCHEUR MAXI, la vitesse du ventilateur est réglée sur «élevée» et ne peut pas être modifi ée.
• Pour quitter le mode FRAÎCHEUR MAXI, appuyer de nouveau sur les touches MINUTERIE(TIMER) et HAUT simulta-
nément.
Mode VEILLE (SLEEP) (fonction optionnelle)
• Appuyer simultanément sur les touches MINUTERIE (TIMER) et BAS en mode REFROIDISSEMENT (COOL) pour
activer le mode VEILLE.
• En mode VEILLE, la température programmée augmente de 1 °(C ou F, selon le réglage courant de l’unité) toutes les
2 heures, pendant les 4 premières heures de fonctionnement. Après cela, cette température ne changera plus. En
mode VEILLE le ventilateur souffl e à vitesse lente et la vitesse ne peut pas être modifi ée.
18
Page 22

CONSIGNES D’UTILISATION
REMARQUE :
• Pour basculer entre degrés Celsius ou Fahrenheit, appuyer sur les touches Haut et Bas sur le panneau de contrôle
simultanément.
• La commande « volets oscillants » n’est possible qu’à partir de la télécommande.
Mode MINUTERIE (TIMER)
• Lorsque l’appareil est branché sans avoir enclenché l’interrupteur de mise en marche, l’appareil est en mode veille.
Pour régler la minuterie automatique après que l’appareil ait été mis en marche, appuyer sur la touche minuterie alors
que l’appareil est en veille. Pendant que l’écran clignote, utiliser les touches Haut / Bas pour sélectionner une durée
comprise entre 0 et 24 heures. L’appareil se met en marche APRÈS le nombre d’heures sélectionnées, par exemple,
en sélectionnant 6 H, l’appareil se mettra en marche après 6 heures. Le symbole de la minuterie à l’écran s’allumera
pour indiquer que la minuterie est enclenchée.
• Pour régler la durée de fonctionnement avec la minuterie, l’appareil doit être en marche (et non en mode veille).
Quand l’appareil est en fonction, appuyer sur le bouton de la minuterie. Pendant que l’écran clignote, utiliser les
touches Haut / Bas pour sélectionner une durée comprise entre 0 et 24 heures. L’appareil fonctionnera pendant le
nombre d’heures sélectionnées, par exemple, en sélectionnant 6 H, l’appareil fonctionnera pendant 6 heures. Le symbole de la minuterie s’allumera pour indiquer que la minuterie est enclenchée.
• Pour désactiver la fonction de minuterie, appuyer sur la touche minuterie. L’écran se met à clignoter. Pendant que
l’écran clignote, appuyer sur la touche Bas pour ramener la durée à 0. Quand l’écran cesse de clignoter, le symbole
de la minuterie devrait disparaître de l’écran, pour indiquer que la minuterie est désactivée.
MÉTHODE DE
DRAINAGE
• Si le récipient interne est rempli d’eau, le témoin “FL” apparaî-
tra sur l’écran d’affi chage et le compresseur cessera auto-
matiquement de fonctionner. Éteindre l’appareil, dévisser le
couvercle d’écoulement, retirer le raccord d’arrivée d’eau pour
drainer l’eau et le compresseur fonctionnera à nouveau normalement après avoir été relancé. S’assurer de placer l’appareil
au dessus d’un siphon de sol pour éviter les déversements
d’eau sur votre plancher.
Cet appareil est équipé d’un système d’évaporation automatique de l’eau.
L’eau condensée est recyclée pour refroidir le condenseur, ce qui améliore
l’effi cacité du refroidissement et économise de l’énergie.
19
Page 23

SOINS ET ENTRETIEN
NOTE
Afi n d’éviter tout choc électrique, éteindre et débrancher le
climatiseur avant entretien ou réparation.
NETTOYAGE
• Débrancher le climatiseur avant le nettoyage.
• Nettoyer avec un chiffon doux et humide. Ne pas utiliser de produits chimiques tels que du benzène, de l'alcool, du pétrole,
etc. L'utilisation de ces produits sur la surface du climatiseur pourrait endommager tout l'appareil ou une partie de l'appareil.
• Éviter que de l'eau s'infi ltre dans le climatiseur.
DE FILTRE
• Nettoyer le fi ltre toutes les deux semaines. Si la qualité de l’air le demande, il peut être nécessaire d’effectuer un net-
toyage plus fréquent. Si le fi ltre est obstrué par la poussière son effi cacité sera réduite.
• Retirer la grille d’entrée d’air et le fi ltre comme indiqué sur l'illustration ci-dessous.
• Mettre la grille d’entree d’air et le fi ltre dans de l'eau tiède (environ 40 °C/104 °F) et nettoyer avec un détergent neutre.
Après nettoyage, faire sécher les fi ltres dans un endroit à l'ombre.
NETTOYAGE
SAISONNIER
Si le climatiseur ne doit pas être utilisé pendant une période prolongée :
• Vider le réservoir interne comme décrit dans la section Méthode de drainage.
• Faire fonctionner le climatiseur en mode FAN pendant deux heures jusqu'à ce que l'intérieur soit sec.
• Éteindre le climatiseur et le débrancher.
• Laver et sécher la grille d’entrée d’air et le fi ltre et les remonter.
• Retirer le tuyau d'échappement.
• Couvrir le climatiseur et le tuyau d'échappement avec un sac plastique et les ranger dans un endroit sec.
MISE AU REBUT
Vérifi ez le respect des réglementations locales concernant la mise au rebut approuvée et sécurisée de cet appareil.
20
Page 24

SOINS ET ENTRETIEN
DÉTECTION INTELLIGENTE
DES ERREURS
Code de détection d'erreur Cause
E1 Erreur au niveau du capteur de température des bobines.
E2 Erreur au niveau du capteur de température ambiante.
E4 Protection contre le gel : la température du serpentin est trop basse et le climati-
seur s’arrête pour éviter l’excès de givre. Quand la température remonte au delà de
8 °C (46,4 °F), la sécurité contre le gel se désenclenche et les réglages précédents
sont restaurés.
DÉPANNAGE
Parfois, il peut arriver qu'un problème mineur survienne et qu'il ne soit pas nécessaire de faire appel à un réparateur. Se
servir de ce guide de dépannage pour déterminer la cause possible du problème. Si l'appareil continue de mal fonctionner,
veuillez appeler un centre de réparation agréé ou encore le numéro gratuit 1-800-263-2629 de Danby pour obtenir de l'aide.
PROBLÈME CAUSE POSSIBLE SOLUTION
Le climatiseur ne fonctionne pas L’appareil n’est pas branché. Brancher l’appareil au secteur.
Le témoin “FL” apparaît sur l’écran
d’affi chage.
La fonction MISE EN VEILLE de la
minuterie est enclenchée.
Le climatiseur se met en marche
fréquemment
Le climatiseur fait beaucoup de bruit Le climatiseur est placé sur une
Le compresseur ne fonctionne pas La protection à retardement est
Lumière directe du soleil Fermer les rideaux et les stores.
Les portes et les fenêtres sont
ouvertes, de nombreuses personnes
ou sources de chaleur sont présentes dans la pièce.
Le fi ltre est très sales. Nettoyer ou remplacer le fi ltre.
L’entrée ou la sortie d’air est bloquée.
surface irrégulière.
activée.
Éteindre le climatiseur et drainer
l’eau. Brancher à nouveau le climatiseur au secteur
Le climatiseur peut être relancé
3 minutes après avoir été éteint.
Fermer les portes et les fenêtres,
retirer les sources de chaleur de la
pièce.
Éliminer l’obstruction.
Placer le climatiseur sur une sur-
face stable et plane en évitant de le
secouer.
Attendre 3 minutes, mettre en
marche lorsque la température a
diminué.
21
Page 25

LIMITED IN-HOME APPLIANCE WARRANTY
This quality product is warranted to be free from manufacturer’s defects in material and workmanship, provided that the unit is used under the normal operating
APPAREIL ÉLECTROMÉNAGER À DOMICILE
GARANTIE LIMITÉE SUR
conditions intended by the manufacturer.
Cet appareil de qualité est garantie exempt de tout vice de matière première et de fabrication, s’il est utilisé dans les conditions
This warranty is available only to the person to whom the unit was originally sold by Danby Products Limited (Canada) or Danby Products Inc. (U.S.A.) (hereafter
normales recommandées par le fabricant.
“Danby”) or by an authorized distributor of Danby, and is non-transferable.
Cette garantie n’est offerte qu’à l’acheteur initial de l’appareil vendu par Danby Products Limited (Canada) ou Danby Products
Inc. (E.- U. d’A) (ci-après “Danby”) ou par l’un des ses distributeurs agréés et elle ne peut être transférée.
TERMS OF WARRANTY
Plastic parts, are warranted for thirty (30) days only from purchase date, with no extensions provided.
Les pièces en plastique sont garanties pour trente (30) jours seulement à partir de la date de l’achat, sans aucune prolongation
prévue.
First Year
Première 18 mois
To obtain
Pour bénéficier du
Service
Service
Limites de
l’entretien à
Boundaries of
domicile
In Home Service
Cette garantie indique en aucun temps la responsabilité de Danby de l’avarie ou dommage de la vin ou autre contenu, soit par
Nothing within this warranty shall imply that Danby will be responsible or liable for any spoilage or damage to food or other c ontents of this appliance, whether due
les vices de l’appareil, ou soit parl’utilisation convenable ou inexacte.
to any defect of the appliance, or its use, whether proper or improper.
En vertu de la présente, il n’existe aucune autre garantie, condition ou représentation, qu’elle soit exprimée ou tacite, de façon
Save as herein provided, Danby, there are no other warranties, conditions, representations or guarantees, express or implied, m ade or intended by Danby or its
manifeste ou intentionnelle, par Danby ou ses distributeurs agréés. De même, sont exclues toutes les autres garanties,
authorized distributors and all other warranties, conditions, representations or guarantees, including any warranties, conditio ns, representations or guarantees
conditions ou représentations, y compris les garanties, conditions ou représentations en vertu de toute loi régissant la vente
under any Sale of Goods Act or like legislation or statue is hereby expressly excluded. Save as herein provided, Danby shall no t be responsible for any damages
de produits ou de toute autre législation ou règlement semblables.
to persons or property, including the unit itself, howsoever caused or any consequential damages arising from the malfunction o f the unit and by the purchase of
En vertu de la présente, Danby ne peut être tenue responsable en cas de blessures corporelles ou des dégâts matériels, y
the unit, the purchaser does hereby agree to indemnify and hold harmless Danby from any claim for damages to persons or propert y caused by the unit.
compris à l’appareil, quelle qu’en soit les causes. Danby ne peut pas être tenue responsable des dommages indirects dus au
fonctionnement défectueux de l’appareil. En achetant l’appareil, l’acheteur accepte de mettre à couvert et de dégager Danby
de toute responsabilité en cas de réclamation pour toute blessure corporelle ou tout dégât matériel causé par cet appareil.
No warranty or insurance herein contained or set out shall apply when damage or repair is caused by any of the following:
1) Power failure.
La garantie ou assurance ci-dessus ne s’applique pas si les dégâts ou réparations sont dus aux cas suivants:
2) Damage in transit or when moving the appliance.
1) Panne de courant.
3) Improper power supply such as low voltage, defective house wiring or inadequate fuses.
2) Dommage subis pendant le transport ou le déplacement de l’appareil.
3) Alimentation électrique incorrecte (tension faible, câblage défectueux, fusibles incorrects).
4) Accident, alteration, abuse or misuse of the appliance such as inadequate air circulation in the room or abnormal operating con ditions
4) Accident, modification, emploi abusif ou incorrect de l’appareil tel qu'une circulation d'air inadéquate dans la pièce ou des
conditions de fonctionnement anormales (température extrêmement élevée ou basse).
5) Utilisation dans un but commercial ou industriel (à savoir, si l'appareil n'est pas installé dans un domicile résidentiel).
6) Incendie, dommage causés par l’eau, vol, guerre, émeute, hostilités, cas de force majeure (ouragan, inondation, etc.).
7) Visites d’un technicien pour expliquer le fonctionnement de l’appareil au propriétaire.
8) Installation inappropriée (par exemple, encastrement d'un appareil autoportant, ou utilisation extérieure d'un appareil non
conçu à cet effet).
Une preuve d’achat doit être présentée pour toute demande de réparation sous garantie. Prière de garder le reçu. Pour faire
honorer la garantie, présenter ce document à la station technique agréée ou s’adresser à:
(extremely high or low room temperature).
5) Use for commercial or industrial purposes (ie. If the appliance is not installed in a domestic residence).
6) Fire, water damage, theft, war, riot, hostility, acts of God such as hurricanes, oods etc.
7) Service calls resulting in customer education.
8) Improper Installation (ie. Building-in of a free standing appliance or using an appliance outdoors that is not approved for out door application).
Proof of purchase date will be required for warranty claims; so, please retain bills of sale. In the event warranty service is required, present this document to our
AUTHORIZED SERVICE DEPOT.
During the rst twelve (12) months, any functional parts of this product found to be defective, will be repaired or replaced, at warrantor’s
option, at no charge to the ORIGINAL purchaser.
Pendant les dix huit (18) mois, toutes pièces fonctionnelles de ce produit s’avèrent défectueuses, seront
réparées ou remplacées, selon le choix du garant, sans frais à l’acheteur INITIAL.
Danby reserves the right to limit the boundaries of “In Home Service” to the proximity of an Authorized Service Depot. Any app liance
Le client sera responsable pour le transport et tous les frais d’expédition de tout appareil exigeant le
requiring service outside the limited boundaries of “In Home Service” ,
service au dépot de service autorisé le plus proche. S’adresser au détaillant qui a vendu l’appareil, ou à
their own expense) to the original retailer (point of purchase) or a service depot for repair. See “Boundaries of In Home Serv ice” below.
la station technique agréée de service la plus proche, où les réparations doivent être effectuées par un
Contact your dealer from whom your unit was purchased, or contact your nearest authorized Danby service depot, where service
technicien qualifié. Si les réparations sont effectuées par quiconque autre que la station de service
must be performed by a qualied service technician.
agréée où à des fins commerciales, toutes les obligations de Danby en vertu de cette garantie seront
If service is performed on the units by anyone other than an authorized service depot, or the unit is used for commercial appli cation, all
annulées.
obligations of Danby under this warranty shall be void.
Si l'appareil est installé à plus de 100 kilomètres (62 milles) du centre de service le plus proche, il doit
être livré à l'atelier de réparation autorisé par Danby le plus proche, car l'entretien doit uniquement être
If the appliance is installed in a location that is 100 kilometers (62 miles) or more from the nearest service center your unit must be
réalisé par un technicien qualifié et certifié pour effectuer un entretien couvert par la garantie de Danby.
delivered to the nearest authorized Danby Service Depot, as service must only be performed by a technician qualied and certif ied for
Les frais de transport entre votre domicile et le lieu de l'entretien ne sont pas couverts par la présente
warranty service by Danby. Transportation charges to and from the service location are not protected by this warranty and are t he
garantie et doivent être acquittés par l'acheteur.
responsibility of the purchaser.
CONDITIONS
i
t will be the consumer’s responsibility to transport the appliance (at
EXCLUSIONS
EXCLUSIONS
GENERAL PROVISIONS
CONDITIONS GÉNÉRALES
Danby Products Limited
Danby Products Limited
PO Box 1778, Guelph, Ontario, Canada N1H 6Z9
PO Box 1778, Guelph, Ontario, Canada N1H 6Z9
Telephone: (519) 837-0920 FAX: (519) 837-0449
Telephone: (519) 837-0920 FAX: (519) 837-0449
Warranty Service
Service sous-garantie
In-home
Service au domicile
1-800-263-2629
1-800-263-2629
07/13
04/09
Danby Products Inc.
PO Box 669, Findlay, Ohio, U.S.A. 45840
PO Box 669, Findlay, Ohio, U.S.A. 45840
Telephone: (419) 425-8627 FAX: (419) 425-8629
Telephone: (419) 425-8627 FAX: (419) 425-8629
Danby Products Inc.
Page 26

BIENVENIDO
Bienvenido a la familia Danby. Estamos orgullosos de nuestros productos de alta calidad y creemos en el servicio confi -
able. Usted lo podrá apreciar en este manual fácil de usar, y lo escuchará enlas voces amistosas de nuestro departamento de servicio al consumidor. Sobre todo, usted apreciará estas ventajas cada vez que use su unidad. Eso es importante,
ya que su nuevo artefacto formará parte de su familia por mucho tiempo.
Por favor escriba la siguiente información; esta información será necesaria si su unidad requiere servicio o para
hacer consultas generales. Para recibir servicio técnico debe mostrar el recibo original.
Número de Modelo:
Número de Serie:
Fecha de la compra:
NECESIT A AYUDA
Antes de solicitar servicio, hayalgunas cosas que puede hacer
para ayudarnos a servirle mejor…
Lea este manual:
Contiene instrucciones que lo ayudarán a mantener correctamente su unidad.
Si usted recibe un artefacto dañado:
Llame inmediatamente al distribuidor (o constructor) que se lo
vendió.
Ahorre tiempo y dinero:
Lea la sección de Diagnóstico de Problemas antes de llamar.
Esta sección le ayudará a resolver problemas comunes que
pudieran ocurrir.
Si necesita asistencia, no se preocupe y llámenos.
ADVERTENCIA :
Tel: 1-800-26-
(1-800-263-2629)
Una instalación inadecuada de la conexión a tierra puede dar como resultado un
riesgo de incendio, descarga eléctrica o lesiones a las personas asociadas con
el artefacto. Verifi que con un representante califi cado de servicio en caso de
dudas sobre si el artefacto tiene una buena conexión a tierra.
23
Page 27

INSTRUCCIONES DE SEGURIDAD IMPORTANTES
LEA Y SIGA TODAS LAS INSTRUCCIONES DE SEGURIDAD
PRECAUCIONES
DE SEGURIDAD
SIEMPRE HAGA ESTO NUNCA HAGA ESTO
La unidad de aire acondicionado debe utilizarse de
modo tal que esté protegida contra la humedad, p. ej.,
condensación, salpicaduras de agua, etc.
No ubique ni almacene la unidad de aire
acondicionado en lugares donde pueda caerse o
ser arrojada al agua u otros líquidos. Si esto ocurre,
desenchufe la unidad inmediatamente.
Siempre traslade la unidad de aire acondicionado
en posición vertical y colóquela sobre una superfi cie
estable y nivelada durante su uso. Si se traslada
la unidad cuando está apoyada sobre uno de sus
lados, debe enderezarla y mantenerla desconectada
durante 4 horas.
Apague la unidad cuando no esté en uso.
Comuníquese siempre con personas califi cadas para
que efectúen reparaciones. Si el cable eléctrico está
dañado, debe ser reparado por un técnico califi cado.
Mantenga la unidad a una distancia de al menos
50 cm de las paredes, muebles y cortinas que estén
alrededor.
Si la unidad de aire acondicionado se golpea durante
su uso, apáguela y desconéctela inmediatamente.
Utilice siempre el botón en el panel de control para
apagar la unidad.
No haga funcionar el aire acondicionado en un
ambiente húmedo, como un baño o lavadero.
No toque la unidad con las manos mojadas o
húmedas.
No presione los botones en el panel de control con
otra cosa que no sean los dedos.
No extraiga ningún componente fi jo. Nunca utilice
este artefacto si no funciona correctamente o si se
ha caído o dañado.
Nunca utilice el enchufe para iniciar o detener la
unidad.
No cubra ni obstruya las rejillas de entrada o salida.
No utilice sustancias químicas peligrosas para
limpiar o entrar en contacto de otro modo con la
unidad. No utilice la unidad en presencia de vapores
o sustancias infl amables, como alcohol, insecticidas,
gasolina, etc.
No permita que los niños utilicen la unidad sin
supervisión.
No utilice este producto para cumplir funciones
diferentes a aquellas descritas en este manual de
instrucción.
Los aires acondicionados portátiles emanan
grandes cantidades de aire ambiente. Asegúrese
siempre de tener un suministro del aire de reposición para que funcione efi cientemente.
CONSEJOS
P ARA AHORRAR ENERGÍA
• Utilice la unidad en una habitación del tamaño recomendado.
• Ubique la unidad en un lugar donde los muebles no obstruyan el fl ujo de aire.
• Mantenga las persianas/cortinas cerradas durante las horas más soleadas del día.
• Mantenga los fi ltros limpios.
• Deje las puertas y ventanas cerradas para mantener el aire frío adentro y el aire tibio afuera (modo de refrigeración).
24
Page 28

INSTRUCCIONES DE SEGURIDAD IMPORTANTES
READ AND FOLLOW ALL SAFETY INSTRUCTIONS
CONDICIONES
DE FUNCIONAMIENTO
El aire acondicionado debe funcionar dentro del rango de temperatura indicado a continuación:
MODO TEMPERA TURA AMBIENTE
FRÍO 17 °C (62 °F) - 35 °C (95 °F)
SECO 13 °C (55 °F) - 35 °C (95 °F)
*CALOR (tipo bomba de calor) 5 °C (41 °F) - 30 °C (86 °F)
*CALOR (bomba eléctrica o de calor) <30 °C (86 °F)
(*) Función opcional. Es posible que algunos modelos no tengan esta función disponible.
Nota: El rendimiento puede disminuir cuando la temperatura se encuentre fuera de estos rangos de temperatura de
funcionamiento
HERRAMIENTAS PARA LA INSTALACIÓN
DEL EQUIPO PARA VENTANA
.
1. Desarmador (tamaño mediano, Phillips)
2. Cinta métrica o regla
3. Cuchillo o tijeras
4. Sierra (en caso de que sea necesario reducir el tamaño del equipo para ventana porque la ventana es muy angosta
para poder realizar una instalación directa). Visite www.danby.com para consultar la guía de instrucción general.
FUNCIONES Y COMPONENTES
1. Rueda pivotante
2. Manija (I)
3. Panel de control
4. Defl ector de viento
5. Rejilla de entrada de aire
6. Entrada de aire
7. Control remoto
8. Salida de escape
9. Manija (D)
10. Montaje del tubo de
escape
11. Montaje de la placa de
sellado para la ventana
11
25
Page 29

FUNCIONES Y COMPONENTES
PANEL DE CONTROL Y
CONTROL REMOTO
8
4
4
7
4
6
4
5
4
4
1. Botón de encendido
Presione el botón para ENCENDIDO/AP AGADO del aire acondicionado.
2. Botón de modo
Presione el botón para cambiar al modo automático (AUTO), refrigeración
(COOL), ventilador (FAN) o deshumidifi cación (DRY).
3. Botón “DISMINUIR”
Presione el botón cuando esté en el modo refrigeración para reducir la
temperatura; presiónelo cuando esté en el modo de temporizador para ajustar
el tiempo de ENCENDIDO/AP AGADO. Presione los botones “Aumentar” y
“Disminuir” simultáneamente para alternar la temperatura de la pantalla entre
grados Fahrenheit y centígrados.
4. Ventana LCD de visualización del temporizador y la temperatura
Esta ventana muestra la confi guración/temperatura ambiente y el
temporizador.
5. Botón “AUMENT AR”
Presione el botón cuando esté en el modo refrigeración para incrementar la
temperatura; presiónelo cuando esté en el modo de temporizador para ajustar
el tiempo de ENCENDIDO/AP AGADO.
6. Botón de velocidad
Presione el botón para elegir la velocidad del ventilador alta/media/baja.
7. Botón del temporizador
Presione el botón cuando esté en el modo de espera para confi gurar el
tiempo de ENCENDIDO.
Presione este botón para confi gurar el tiempo de APAGADO cuando la unidad
esté encendida.
8. Ventana de recepción del control remoto
CONTROL REMOTO
4
3
2
14
6
14
9
4
2
4
1
4
4
4
5
14
1
4
3
4
10
4
7
9. Botón de conmutación entre °C y °F
Presione el botón para alternar entre °C y °F.
10. Botón de oscilación automática
Presione este botón en cualquier momento después de encender el aire
acondicionado para encender los osciladores de viento automáticamente.
11. Botón de bloqueo
Presione este botón para bloquear/desbloquear el botón del panel de control
26
14
11
.
Page 30

INSTRUCCIONES DE INSTALACIÓN
UBICACIÓN
Ubíquelo sobre una superfi cie plana y seca y manténgalo a al menos 50 cm de todos los objetos cercanos.
19 5/8 pulgadas (50 cm)
INSTALACIÓN
Ajuste el montaje del tubo de escape a la salida de aire en el panel trasero (sentido contrario a las manecillas del reloj).
27
Page 31

INSTRUCCIONES DE INSTALACIÓN
INSTALACIÓN
Inserte la manguera de salida de aire dentro de la placa de sellado para la ventana y ajuste el ancho de la apertura de la
ventana para que encaje en la placa de sellado. La longitud de la placa de sellado es ajustable.
INCORRECTO
INSTALACIÓN
• Es importante mantener el tubo de escape derecho. Una instalación incorrecta afectará la efi ciencia del aire
acondicionado. No doble el tubo de escape. Asegúrese de que el aire pueda fl uir libremente.
ADVERTENCIA
El conducto de escape está diseñado
especialmente para este modelo. No lo reemplace
con un conducto de otro modelo ni lo alargue.
AVISO:
La longitud máxima del tubo de escape es de 59 pulgadas (150 cm).
28
Page 32

OPERACIÓN
Modo de refrigeración (COOL)
• Cuando el aire acondicionado pasa automáticamente al modo de refrigeración (COOL) o cuando se selecciona el modo
de refrigeración después de encenderlo, se enciende la luz indicadora de refrigeración.
• Presione el botón Aumentar/Disminuir para confi gurar la temperatura entre 17 °C -30 °C (62 °F- 86 °F).
• Presione el botón de velocidad para elegir la velocidad alta, media o baja del ventilador.
Modo de ventilación (FAN)
• Cuando presione el botón de modo o elija el modo de ventilación con el control remoto, la luz indicadora de ventilación se
encenderá y la unidad funcionará en el modo de ventilación.
• Presione el botón de velocidad para elegir la velocidad alta, media o baja del ventilador.
• No es posible confi gurar la temperatura cuando se encuentra en el modo de ventilación.
Modo Seco (Función de deshumidifi cación)
• Cuando desee ejecutar la unidad en modo seco (deshumidifi cación), realice el siguiente cambio del drenaje en la parte
posterior de la unidad. Apáguela y desconéctela. Retire el montaje del tubo de escape. Desatornille la cubierta del
drenaje, retire el tapón de agua y conecte la manguera de drenaje. La manguera de drenaje puede ser una manguera
de riego común que se puede ajustar directamente en las roscas del drenaje. Asegúrese de colocar el otro extremo de
la manguera en un área de drenaje adecuado (p. ej., drenaje de suelo) para evitar que el agua caiga al suelo. Reinicie la
unidad.
• Presione el botón de modo en el panel de control o control remoto para seleccionar el modo seco. El símbolo del
indicador de Modo seco se enciende en la pantalla LCD para mostrar que la unidad está funcionando en modo seco.
• Al entrar en modo seco, si la temperatura ambiente es 15 °C (59 °F) o mayor, el compresor empezará a funcionar. Si la
temperatura es 13 °C (55 °F) o menos, el compresor se apagará. Cuando la temperatura aumente nuevamente a 15 °C,
el compresor se reactivará (se producirá un retardo de 3 minutos para proteger el compresor).
• En modo seco (deshumidifi cación), el ventilador funcionará de manera predeterminada a baja velocidad, y la velocidad
no se podrá ajustar.
• En modo seco no se puede ajustar la temperatura.
NOT A: Al seleccionar el modo seco (deshumidifi cación), retire el montaje del tubo de escape. Caso contrario, afectará la
función de deshumidifi cación y la ventana de visualización indicará "FL".
Modo automático (AUTO)
• Presione el botón de modo en el panel de control o elija el modo automático en el control remoto para pasar al modo
automático. La luz indicadora de modo automático se encenderá cuando se encuentre en el modo automático.
• Después de elegir el modo automático, la confi guración del funcionamiento depende de la temperatura ambiente: cuando
la temperatura ambiente es superior a 25 °C (77 °F), la confi guración del funcionamiento es igual a la confi guración del
modo de refrigeración; cuando es inferior a 25 °C (77 °F), la confi guración del funcionamiento es igual a la del modo de
ventilación.
Modo de enfriamiento máximo (MAX COOL) (opcional)
• En el modo de enfriamiento presione los botones TEMPORIZADOR y AUMENTAR al mismo tiempo para ingresar el
modo de enfriamiento máximo.
• En el modo de enfriamiento máximo, el aire acondicionado enfriará independientemente de la restricción de temperatura.
• En el modo de enfriamiento máximo, la velocidad del ventilador es alta y no puede ajustarse.
• Para cancelar el modo de enfriamiento máximo, presione los botones TEMPORIZADOR y AUMENTAR otra vez.
Modo de reposo (SLEEP) (opcional)
• Presione el TEMPORIZADOR y el botón DISMINUIR al mismo tiempo mientras está en modo de enfriamiento para entrar
al modo de reposo.
• En el modo de reposo, la temperatura confi gurada aumentará 1° (C o F, según la confi guración actual de la unidad) cada
2 horas, las primeras cuatro horas de funcionamiento. Luego, la temperatura confi gurada no volverá a cambiar.
• En este modo, el ventilador funciona a baja velocidad y no se puede ajustar la velocidad del ventilador.
NOT A:
• Para cambiar entre grados Celsius y Fahrenheit, presione los botones arriba y abajo al mismo tiempo en el panel de
control.
• La opción "oscilador de persianas" se encuentra disponible únicamente en el control remoto.
29
Page 33

OPERACIÓN
Modo de temporizador
• Cuando la unidad está conectada, pero no se presiona el botón de encendido, la unidad permanece en modo de es-
pera. Para confi gurar el tiempo en que la unidad debe encenderse automáticamente, presione el botón temporizador
mientras la unidad esté en modo de espera. Mientras la pantalla parpadee, use los botones arriba y abajo para seleccionar el tiempo entre 0 y 24 horas. La unidad se encenderá LUEGO de transcurrido el número de horas seleccionadas p. ej., si seleccionó 6 h, la unidad se encenderá luego de 6 horas. El símbolo del temporizador en la pantalla se
encenderá para indicar que se ha confi gurado el temporizador.
• Para confi gurar la duración del tiempo de funcionamiento mediante el temporizador, la unidad debe estar funciona-
ndo (no en modo de espera). Cuando la unidad esté en funcionamiento, presione el botón temporizador. Mientras
la pantalla parpadee, use los botones arriba y abajo para seleccionar el tiempo entre 0 y 24 horas. La unidad funcionará durante las horas seleccionadas, p. ej., si seleccionó 6 h, la unidad operará durante 6 horas. El símbolo del
temporizador se encenderá para indicar que se ha confi gurado el temporizador.
• Para desactivar la función temporizador, presione el botón temporizador. La pantalla empezará a parpadear. Mien-
tras parpadea, presione el botón abajo para disminuir el tiempo a 0. Cuando la pantalla deje de parpadear, el símbolo temporizador debe desaparecer de la pantalla para indicar que la función temporizador está desactivada.
MÉTODO DE
DRENAJE
• Si el recipiente interno está lleno de agua, en la pantalla
aparecerá “FL”, y el compresor dejará de funcionar
automáticamente. Apague la unidad, desatornille la cubierta
de drenaje, retire el tapón de agua para drenar el agua y el
compresor volverá a la normalidad luego de ser reiniciado.
Asegúrese de colocar la unidad sobre el piso de drenaje para
evitar que el agua caiga sobre el suelo.
Este producto está equipado con un sistema de evaporación de agua automático. El agua condensada es reciclada para enfriar el condensador, lo
que mejora la efi cacia del enfriamiento y ahorra energía.
30
Page 34

CUIDADO Y MANTENIMIENTO
AVISO
Para evitar descargas eléctricas, apague el aire acondicionado
y desconecte la clavija antes de realizar mantenimiento o
reparación.
LIMPIEZA
• Desconecte antes de limpiar .
• Limpie con un paño suave semiseco. No utilice agentes químicos, como benceno, alcohol, gasolina, etc., de lo contrario
se dañará la superfi cie de la unidad de aire acondicionado y posiblemente toda la unidad.
• Evite que salpique agua al aire acondicionado.
FILTRO
• Lave el fi ltro una vez cada dos semanas. Tal vez sea necesario lavarlo con más frecuencia en caso la calidad del aire no
sea buena. Si este está bloqueado con polvo, la efi ciencia del aire acondicionado se verá reducida.
• Retire la rejilla de entrado de aire y el fi ltro, como se muestra en la imagen a continuación.
• Coloque la rejilla de entrado de aire y el fi ltro en agua tibia (alrededor de 40 °C / 104 °F) con detergente neutro.
Séquelos en un lugar bajo la sombra después de la limpieza.
LIMPIEZA
ESTACIONAL
Si el aire acondicionado no se va a usar durante un largo tiempo:
• Drene el contenedor interno según las indicaciones de la sección Método de drenaje.
• Haga funcionar el aire acondicionado en el modo de ventilador por dos horas hasta que el interior esté seco.
• Apague el aire acondicionado y desconecte.
• Lave y seque la rejilla de entrada de aire y el fi ltro y vuelva a colocarlos. Retire el tubo de escape.
• Cubra el aire acondicionado y el tubo de escape con una bolsa plástica y guárdelos en un lugar seco.
DESECHADO
Revise el cumplimiento regulatorio local respecto del desechado aprobado y seguro de este aparato.
31
Page 35

CUIDADO Y MANTENIMIENTO
DETECCIÓN INTELIGENTE
DE ERRORES
Código de detección de error Causa
E1 Error con el sensor de temperatura de las bobinas.
E2 Error con el sensor de temperatura de interior.
E4 Protección anticongelante: la temperatura de la bobina es muy baja y el aire
acondicionado se desactiva para evitar el congelamiento. Cuando la temperatura
aumenta a 8 °C (46,4 °F), se desactiva la confi guración de protección y se aplica la
confi guración anterior.
DIAGNÓSTICOS DE PROBLEMAS
Ocasionalmente, pueden presentarse problemas menores ante los cuales no será necesario llamar al servicio técnico.
Use esta guía para resolver problemas para encontrar una posible solución. Si la unidad continúa funcionando de manera
incorrecta, llame a un centro de servicio autorizado o al número gratuito de Danby, 1-800-263-2629 (EE. UU.), para
recibir asistencia.
PROBLEMA POSIBLE CAUSA SOLUCIÓN
El aire acondicionado no funciona. No está conectado.
En la pantalla aparece “FL”.
La función APAGADO del
temporizador está iniciada.
El aire acondicionado se inicia
frecuentemente.
Ruido fuerte del aire
acondicionado
El compresor no funciona Su protección retardada está
Luz del sol directa
Las puertas y ventanas están
abiertas; hay muchas personas o
fuentes de calor en la habitación.
El fi ltro está muy sucio.
La entrada de aire o salida de aire
está bloqueada.
El aire acondicionado está
colocado en una superfi cie
irregular.
activada.
Conecte la unidad.
Apague el aire acondicionado
y drene el agua. Restaure la
corriente eléctrica.
El aire acondicionado puede ser
reiniciado 3 minutos después de
ser apagado.
Cierre las cortinas o persianas.
Cierre las puertas y ventanas,
retire la fuente de calor.
Límpielo o cámbielo.
Retire el bloqueo.
Colóquelo en un terreno uniforme
y sólido, evite vibraciones.
Espere por 3 minutos, encienda
después de que baje la
temperatura.
32
Page 36

GARANTÍA LIMITADA PARA
LIMITED IN-HOME APPLIANCE WARRANTY
This quality product is warranted to be free from manufacturer’s defects in material and workmanship, provided that the unit is used under the normal operating
ELECTRODOMÉSTICO
conditions intended by the manufacturer.
Este producto de calidad está garantizado contra defectos de fabricación, incluyendo partes y mano de obra, siempre y cuando
This warranty is available only to the person to whom the unit was originally sold by Danby Products Limited (Canada) or Danby Products Inc. (U.S.A.) (hereafter
la unidad se utilice bajo las condiciones normales de funcionamiento para las que fue diseñado.
“Danby”) or by an authorized distributor of Danby, and is non-transferable.
Esta garantía está solamente disponible para la persona que haya comprado originalmente esta unidad directamente de
Danby Products Limited (Canada) o Danby Products Inc. (U.S.A.) (en adelante “Danby”) o uno de sus distribuidores autorizados, y no es transferible.
Plastic parts, are warranted for thirty (30) days only from purchase date, with no extensions provided.
Las piezas plásticas, se autorizan por treinta (30) días solamente a partir de la fecha de la compra, sin las extensiones
proporcionadas.
First Year
Primeros 18 Meses
To obtain
Para obtener
Service
Servicio
Límites del servicio
Boundaries of
técnico a domicilio
In Home Service
Nothing within this warranty shall imply that Danby will be responsible or liable for any spoilage or damage to food or other c ontents of this appliance, whether due
Nada dentro de esta garantía implica que Danby será responsable por cualquier daño que hayan sufrido los alimentos u otros
contenidos de este aparato, ya sea debido a un defecto del aparato, o su uso, adecuado o inadecuado.
to any defect of the appliance, or its use, whether proper or improper.
During the rst twelve (12) months, any functional parts of this product found to be defective, will be repaired or replaced, at warrantor’s
Durante los primer 18 meses, cualquier parte en buen estado de este producto que resulte defectuosa,
option, at no charge to the ORIGINAL purchaser.
incluyendo cualquier sistema sellado, será reparado o reemplazado, a opción del fabricante, sin cargo
para el comprador ORIGINAL.
Danby reserves the right to limit the boundaries of “In Home Service” to the proximity of an Authorized Service Depot. Any app liance
Danby se reserva el derecho de limitar la cobertura de "Servicio en Domicilio" sujeto a la proximidad de
requiring service outside the limited boundaries of “In Home Service” , it will be the consumer’s responsibility to transport the appliance (at
un Taller de Servicio Autorizado. Para todo artefacto que requiera servicio fuera del área limitada de
their own expense) to the original retailer (point of purchase) or a service depot for repair. See “Boundaries of In Home Serv ice” below.
"Servicio en Domicilio", el cliente será responsable por transportar dicho artefacto hasta el Taller de
Servicio Autorizado mas cercano. Consulte "Límites del servicio técnico a domicilio", a continuación.
Contact your dealer from whom your unit was purchased, or contact your nearest authorized Danby service depot, where service
Comuníquese con el distribuidor donde haya comprado la unidad, o llame al Taller de Servicio Autor-
must be performed by a qualied service technician.
izado más cercano, donde debe ser reparada por un técni co calificado. Si esta unidad es reparada en
If service is performed on the units by anyone other than an authorized service depot, or the unit is used for commercial appli cation, all
otro lugar que no sea un Taller de Servicio Autorizado, o si la unidad se utiliza para aplicaciones
obligations of Danby under this warranty shall be void.
comerciales, Danby no se hará responsable de ninguna forma y la garantía será anulada.
Si el electrodoméstico está instalado en un lugar que se encuentra a 100 kilómetros (62 millas) o más
If the appliance is installed in a location that is 100 kilometers (62 miles) or more from the nearest service center your unit must be
del centro de servicios más cercano, se debe llevar la unidad al Centro de servicios Danby autorizado
delivered to the nearest authorized Danby Service Depot, as service must only be performed by a technician qualied and certif ied for
más cercano, ya que dicho servicio sólo puede realizarlo un técnico calificado y certificado por Danby
warranty service by Danby. Transportation charges to and from the service location are not protected by this warranty and are t he
para prestar servicios de garantía. Los cargos por transporte desde y hacia el lugar en que se
efectúe el servicio técnico no están cubiertos por esta garantía y son de responsabilidad del comprador.
responsibility of the purchaser.
TERMS OF WARRANTY
CONDITIONS
EXCLUSIONES
Salvo lo aquí indicado por Danby, no existen otras garantías, condiciones o representaciones, explícitas o implícitas, concre-
Save as herein provided, Danby, there are no other warranties, conditions, representations or guarantees, express or implied, m ade or intended by Danby or its
tas o intencionales por parte de Danby o sus distribuidores autorizados y todas las demás garantías, condiciones o representaciones, incluyendo cualquier garantía, condiciones o representaciones bajo cualquier Acta de Venta de Productos o
authorized distributors and all other warranties, conditions, representations or guarantees, including any warranties, conditio ns, representations or guarantees
legislación o estatuto similar, quedan de esta forma expresamente excluidas. Salvo lo aquí indicado, Danby no serán respon-
under any Sale of Goods Act or like legislation or statue is hereby expressly excluded. Save as herein provided, Danby shall no t be responsible for any damages
sables por ningún daño a personas o bienes, incluyendo la propia unidad, sin importar su causa, o de ningún daño indirecto
to persons or property, including the unit itself, howsoever caused or any consequential damages arising from the malfunction o f the unit and by the purchase of
causado por el desperfecto de la unidad, y al comprar esta unidad, el comprador acepta por la presente, indemnizar y
the unit, the purchaser does hereby agree to indemnify and hold harmless Danby from any claim for damages to persons or propert y caused by the unit.
proteger a Danby contra cualquier reclamo por daños a personas o bienes causados por la unidad.
No se considerará ninguna de estas garantías o seguros cuando el daño o la necesidad de reparación sea el producto de los
No warranty or insurance herein contained or set out shall apply when damage or repair is caused by any of the following:
siguientes casos:
1) Falla del suministro eléctrico.
1) Power failure.
2) Daños en tránsito o durante el transporte de la unidad.
2) Damage in transit or when moving the appliance.
3) Alimentación incorrecta, como bajo voltaje, instalación eléctrica defectuosa o fusibles inadecuados.
4) Accidente, modificación, abuso o uso incorrecto del artefacto, tal como insuficiente ventilación del ambiente o condiciones
3) Improper power supply such as low voltage, defective house wiring or inadequate fuses.
de operación anormales (temperatura ambiente extremadamente alta o baja).
4) Accident, alteration, abuse or misuse of the appliance such as inadequate air circulation in the room or abnormal operating con ditions
5) Utilización comercial o industrial (v.g., si el electrodoméstico no está instalado en una vivienda particular).
6) Incendio, daños por agua, robo, guerra, disturbios, hostilidades, actos de fuerza mayor como huracanes, inundaciones, etc.
7) Pedidos de servicio debido a desinformación del usuario.
8) Instalación inadecuada (v.g., instalación empotrada de un electrodoméstico diseñado como unidad independiente o uso de
un electrodoméstico al aire libre que no esté aprobado para dicho fin).
Para acceder a la garantía se solicitará un comprobante de compra; por lo tanto, guarde su recibo. En caso de necesitar
servicio de garantía, presente ese documento al TALLER DE SERVICIO AUTORIZADO.
Proof of purchase date will be required for warranty claims; so, please retain bills of sale. In the event warranty service is required, present this document to our
(extremely high or low room temperature).
5) Use for commercial or industrial purposes (ie. If the appliance is not installed in a domestic residence).
6) Fire, water damage, theft, war, riot, hostility, acts of God such as hurricanes, oods etc.
7) Service calls resulting in customer education.
8) Improper Installation (ie. Building-in of a free standing appliance or using an appliance outdoors that is not approved for out door application).
CONDICIONES GENERALES
EXCLUSIONS
GENERAL PROVISIONS
AUTHORIZED SERVICE DEPOT.
Servicio de Garantía
Warranty Service
Servicio en Domicilio
In-home
Danby Products Limited
Danby Products Limited
PO Box 1778, Guelph, Ontario, Canada N1H 6Z9
PO Box 1778, Guelph, Ontario, Canada N1H 6Z9
Telephone: (519) 837-0920 FAX: (519) 837-0449
Telephone: (519) 837-0920 FAX: (519) 837-0449
1-800-263-2629
1-800-263-2629
07/13
04/09
Danby Products Inc.
PO Box 669, Findlay, Ohio, U.S.A. 45840
Telephone: (419) 425-8627 FAX: (419) 425-8629
PO Box 669, Findlay, Ohio, U.S.A. 45840
Telephone: (419) 425-8627 FAX: (419) 425-8629
Danby Products Inc.
Page 37
PORT ABLE AIR CONDITIONER
CLIMATISEUR PORTATIF
ACONDICIONADOR DE AIRE PORTÁTIL
MODEL • MODÈLE • MODELO
DPA100D1MDD/ DPA100D1WDD
PORT ABLE AIR CONDITIONER
All repair parts are available for purchase or special
order when you visit your nearest service depot.To
request service and/or the location of the service
depot nearest you, call the TOLL FREE number.
When requesting service or ordering parts, always
provide the following information:
• Product Type
• Model Number
• Part Number
• Part Description
ACONDICIONADOR DE AIRE PORTÁTIL
Todas las piezas de reparación disponibles para la
compra o la orden especial cuando usted visita su
depósito más cercano del servicio. Para pedir
servicio y/o la localización del depósito del servicio
lo más cerca posible usted, llama Danby gratis.
Al pedir servicio o pidiendo piezas, proporcione
siempre la información siguiente:
• Tipo de Producto
• Número de Modelo
• Pieza número
• Descripción de la Parte
CLIMATISEUR PORTATIF
Toutes les pièces de rechange ou commandes
spéciales sont disponibles à votre centre de
service régional autorisé. Pour obtenir le service
et/ou la localité de votre centre de service régional,
signalez le NUMÉRO D’APPEL SANS FRAIS.
Ayez les renseignements suivants à la portée de la
main lors de la commande de pièce ou service:
• Type de produit
• Numéro de modèle
• Numéro de pièce
• Description de la pièce
Tel: 1-800-26-
(1-800-263-2629)
Printed in China
Impreso en China
República Popular de China
DANBY PRODUCTS LIMITED, ONTARIO, CANADA N1H 6Z9
DANBY PRODUCTS INC., FINDLAY, OHIO, USA 45840
 Loading...