


DAKTRONICS SHOW CONTROL SYSTEM
USER HANDBOOK
DD2003514 – D13Q3-December 10, 2012
201 Daktronics Drive, PO Box 5128, Brookings, SD 57006 Tel: 800-325-8766 or 605-697-4000 Fax: 605-697-4700 www.daktronics.com email: helpdesk@daktronics.com

About this Handbook
The purpose of this handbook is to help facilitate a new Show Control System operator’s orientation and training on the system. It is laid out in a way that would follow a typical Show Control training session. This document assumes that the user has basic working knowledge of Microsoft Windows, including using menus and navigating a directory. If you are unfamiliar with using Microsoft Windows, there are many resources commercially available which can assist you in becoming acquainted with it.
Terms that describe typical personal computer operations will be used frequently. These terms, and their definitions, are as follows:
Point: Move the mouse pointer to a specified place.
Click: Press and release the left button of your mouse. A click will position a text cursor, activate a window, or select a choice.
Double-click: Press and release the left mouse button twice in rapid succession.
Right-click: Press and release the right button of your mouse.
Choose: Activate an item by clicking on it in order to tell the program what to do.
Select: Click to specify which files, windows, or text the software should act on.
The > character is sometimes used in place of then choose in descriptions of user interface paths. For example, Settings > Account Preferences means Click Settings, then choose Account Preferences.
Press: Press key(s) on your keyboard.
DAKTRONICS, INC.
Copyright 2012
All rights reserved. While every precaution has been taken in the preparation of this handbook, the publisher assumes no responsibility for errors or omissions. No part of this document covered by the copyrights hereon may be reproduced or copied in any form or by any means – graphic, electronic, or mechanical, including photocopying, taping, or information storage and retrieval systems – without written permission of the publisher.
All trademarks are the property of their respective companies.
i |
Daktronics Show Control System |
About this Manual |

Table of Contents |
|
|
About this Handbook......................................................................................................................................... |
|
i |
Getting to know your Show Control System ................................................................................................. |
1 |
|
Your User Station.................................................................................................................................................................................. |
|
1 |
Your Control Rack ................................................................................................................................................................................ |
|
1 |
Digital Media Players.......................................................................................................................................................... |
|
2 |
Video/Image Processors ................................................................................................................................................... |
2 |
|
Navigating the Show Control software .......................................................................................................... |
3 |
|
How do I open Display Studio? ...................................................................................................................................................... |
|
3 |
Display Studio’s Interface.................................................................................................................................................................. |
|
3 |
Opening Content Studio ................................................................................................................................................................... |
|
5 |
Some Content Studio Terminology............................................................................................................................................... |
6 |
|
Content Studio’s Interface ................................................................................................................................................................ |
|
7 |
Interface Components ....................................................................................................................................................... |
|
7 |
Content Studio Ribbon...................................................................................................................................................... |
|
8 |
Content Studio Plug-Ins.................................................................................................................................................... |
9 |
|
Creating a presentation: Part 1...................................................................................................................... |
11 |
|
Create a new presentation............................................................................................................................................................. |
|
11 |
Open an Existing Presentation..................................................................................................................................................... |
|
13 |
Adding and deleting layouts ........................................................................................................................................................ |
|
14 |
Adding a layout ................................................................................................................................................................. |
|
14 |
Inserting a layout .............................................................................................................................................................. |
|
15 |
Deleting a layout............................................................................................................................................................... |
|
15 |
Adding images and video to a presentation.......................................................................................................................... |
15 |
|
Image Import...................................................................................................................................................................... |
|
17 |
Video Import....................................................................................................................................................................... |
|
19 |
Adding text elements....................................................................................................................................................................... |
|
22 |
Create a text box............................................................................................................................................................... |
|
22 |
Formatting text .................................................................................................................................................................. |
|
23 |
Formatting paragraphs................................................................................................................................................... |
|
26 |
Add Scrolling Text ............................................................................................................................................................ |
|
28 |
Adding Real-Time Data (RTD) fields .......................................................................................................................................... |
30 |
|
Locating the correct RTD field..................................................................................................................................... |
31 |
|
Adding an RTD field to your presentation.............................................................................................................. |
32 |
|
Changing the length of an RTD field ........................................................................................................................ |
32 |
|
Adding Media RTD to your presentation................................................................................................................ |
33 |
|
Adding Color RTD to your presentation.................................................................................................................. |
35 |
|
Creating a presentation: Part 2...................................................................................................................... |
36 |
|
Adding element effects................................................................................................................................................................... |
|
36 |
ii |
Daktronics Show Control System |
Table of Contents |

Adding gradients............................................................................................................................................................................... |
|
36 |
Aligning elements ............................................................................................................................................................................. |
|
38 |
Arranging elements .......................................................................................................................................................................... |
|
40 |
Content Studio Timeline................................................................................................................................................................. |
|
40 |
Adjusting element and layout durations................................................................................................................. |
41 |
|
Additional Layout and Element Options ................................................................................................................. |
41 |
|
Adjusting the Timeline View......................................................................................................................................... |
42 |
|
Layout Storyboard............................................................................................................................................................................. |
|
43 |
Changing the order of layouts .................................................................................................................................... |
43 |
|
Adding layout transitions .............................................................................................................................................. |
43 |
|
Viewing your presentation............................................................................................................................................................. |
|
45 |
Layout zoom control ....................................................................................................................................................... |
|
45 |
Previewing your presentation...................................................................................................................................... |
46 |
|
Saving your presentation ............................................................................................................................... |
|
47 |
Media organization recommendations .................................................................................................................................... |
47 |
|
DMP-7000............................................................................................................................................................................ |
|
47 |
DMP-8000............................................................................................................................................................................ |
|
48 |
DMP-1500............................................................................................................................................................................ |
|
48 |
Mapping a network drive............................................................................................................................................................... |
|
49 |
Windows XP User Station .............................................................................................................................................. |
49 |
|
Windows 7 User Station................................................................................................................................................. |
49 |
|
Saving your presentation ............................................................................................................................................................... |
|
50 |
Media File Recommendations........................................................................................................................ |
|
51 |
Display Studio preliminary setup .................................................................................................................. |
52 |
|
Create a new workspace................................................................................................................................................................. |
|
52 |
Create workspace pages................................................................................................................................................................. |
|
53 |
Rename workspace pages ............................................................................................................................................................. |
|
54 |
Updating your Show Control Server.......................................................................................................................................... |
54 |
|
Configuring your Monitor Wall.................................................................................................................................................... |
|
55 |
Introduction to Containers............................................................................................................................. |
|
58 |
Create a container............................................................................................................................................................................. |
|
58 |
Create container pages ................................................................................................................................................................... |
|
59 |
Rename containers and container pages ................................................................................................................................ |
60 |
|
Renaming containers....................................................................................................................................................... |
|
60 |
Renaming container pages ........................................................................................................................................... |
60 |
|
Setting button sizes.......................................................................................................................................................................... |
|
61 |
Quick Display Containers and Buttons ......................................................................................................... |
62 |
|
Create a quick display container ................................................................................................................................................. |
62 |
|
Manage quick display container properties ........................................................................................................................... |
63 |
|
iii |
Daktronics Show Control System |
Table of Contents |

Create quick display buttons ........................................................................................................................................................ |
|
65 |
Automatic method: linking a container to a library ............................................................................................ |
65 |
|
Manual method: creating quick display buttons individually ......................................................................... |
66 |
|
Manage quick display buttons..................................................................................................................................................... |
|
72 |
Using the Display Queue................................................................................................................................................................ |
|
73 |
Scripting Containers and Buttons ................................................................................................................. |
75 |
|
Create a scripting container .......................................................................................................................................................... |
|
75 |
Manage scripting container properties .................................................................................................................................... |
76 |
|
Create scripting buttons ................................................................................................................................................................. |
|
77 |
Manage scripting buttons.............................................................................................................................................................. |
|
84 |
Custom scripting................................................................................................................................................................................ |
|
84 |
Common scripting buttons ............................................................................................................................ |
|
90 |
Control multiple displays................................................................................................................................................................ |
|
90 |
Play a media file................................................................................................................................................................................. |
|
91 |
Queue a Playlist.................................................................................................................................................................................. |
|
92 |
Blank one or more signs................................................................................................................................................................. |
|
93 |
Show video from an external source ......................................................................................................................................... |
93 |
|
Initialize VIP Button.......................................................................................................................................................... |
|
94 |
Key Video Button .............................................................................................................................................................. |
|
95 |
Stats Request....................................................................................................................................................................................... |
|
95 |
Include scripting from another button ..................................................................................................................................... |
98 |
|
Set a Display’s Dimming Level ..................................................................................................................................................... |
|
98 |
Audio containers and buttons |
.................................................................................................................... |
100 |
Create an audio container ........................................................................................................................................................... |
|
100 |
Manage audio container properties ........................................................................................................................................ |
101 |
|
Create audio buttons ..................................................................................................................................................................... |
|
102 |
Automatic method: linking a container to a library .......................................................................................... |
102 |
|
Manual method: creating audio buttons individually...................................................................................... |
104 |
|
Manage audio buttons.................................................................................................................................................................. |
|
108 |
Using the display queue ............................................................................................................................................................... |
|
109 |
Display Studio Dashboard ........................................................................................................................... |
|
110 |
Status Button..................................................................................................................................................................................... |
|
110 |
Display Studio Widgets................................................................................................................................................................. |
|
111 |
Open a Widget ................................................................................................................................................................ |
|
111 |
Volume Control ............................................................................................................................................................... |
|
111 |
Dimming Control ............................................................................................................................................................ |
|
112 |
M3 File Manager ............................................................................................................................................................. |
|
113 |
Daktronics Scoring and Timing Interface (DSTI) Widget ................................................................................ |
114 |
|
Display Studio Workspace Management .................................................................................................. |
116 |
|
iv |
Daktronics Show Control System |
Table of Contents |

Saving and opening your workspaces .................................................................................................................................... |
116 |
|
Saving your workspace |
................................................................................................................................................. |
116 |
Saving your workspace ....................................................................................................with a different name |
116 |
|
Opening a workspace ................................................................................................................................................... |
|
116 |
Working from multiple user stations....................................................................................................................................... |
117 |
|
Backing up and restoring your workspaces.......................................................................................................................... |
117 |
|
Backup your workspaces ............................................................................................................................................. |
117 |
|
Restore saved workspaces .......................................................................................................................................... |
118 |
|
System Startup, Shutdown and ..........................................................................................Maintenance |
121 |
|
Startup ................................................................................................................................................................................................. |
|
121 |
Shutdown............................................................................................................................................................................................ |
|
122 |
Routine Maintenance..................................................................................................................................................................... |
|
122 |
Antivirus/Antispyware................................................................................................................................................... |
|
123 |
V7ChkRif Utility................................................................................................................................................................ |
|
123 |
SyncBack............................................................................................................................................................................. |
|
124 |
Firewall Settings ............................................................................................................................................................................... |
|
124 |
Uninterruptible Power Supplies ...................................................................................................................................(UPSs) |
124 |
|
Third-Party Software ...................................................................................................................................................................... |
|
125 |
Software Licensing........................................................................................................................................ |
|
126 |
Verifying License Status ................................................................................................................................................................ |
|
126 |
Requesting License Code ............................................................................................................................................................. |
|
127 |
Calling Daktronics........................................................................................................................................................... |
|
127 |
Emailing Daktronics ....................................................................................................................................................... |
|
127 |
Activating Software License ........................................................................................................................................................ |
|
129 |
Troubleshooting............................................................................................................................................ |
|
132 |
Display Studio Status Errors ........................................................................................................................................................ |
|
132 |
Data Store.......................................................................................................................................................................... |
|
132 |
Show Control Server...................................................................................................................................................... |
|
132 |
ERTD errors........................................................................................................................................................................ |
|
133 |
File Server........................................................................................................................................................................... |
|
133 |
Venus 7000 (DMP-7000).............................................................................................................................................. |
134 |
|
DMP-8000.......................................................................................................................................................................... |
|
134 |
M3 (DMP-1500)............................................................................................................................................................... |
|
135 |
Sync Server ........................................................................................................................................................................ |
|
135 |
Video Processor............................................................................................................................................................... |
|
136 |
Software Licensing ......................................................................................................................................................... |
|
136 |
Troubleshooting Scenario: Video/Image ...............................................................................................Processor Error |
136 |
|
Troubleshooting Scenario: Single ..........................................button click adds multiple files to display queue |
137 |
|
Troubleshooting Scenario: Dynamic ...................................Content “jitters” or “jumps around” when playing |
138 |
|
Contact Daktronics ....................................................................................................................................... |
|
139 |
Mail ....................................................................................................................................................................................................... |
|
139 |
v |
Daktronics Show Control System |
Table of Contents |

Phone ................................................................................................................................................................................................... |
139 |
Internet ................................................................................................................................................................................................ |
139 |
vi |
Daktronics Show Control System |
Table of Contents |

Getting to know your Show Control System
Congratulations on your purchase of the latest and greatest in interactive display control system technology! We are confident that you will find your new Show Control System to be powerful yet userfriendly, innovative yet intuitive, and most of all, exactly what you’ve been waiting for.
Before we get started, you should get familiar with a few different components of your system. It will be helpful to understand these “pieces of the puzzle” and the role they play, and also because we will be referring to them throughout your system documentation.
Section Contents
Your User Station
Your Control Rack
Digital Media Players
Video/Image Processors
Your User Station
At the forefront of your system is your Show Control user station – the computer from which you will operate your Show Control software to create, plan, prepare and execute your digital shows. Your user station likely includes one or two touchscreen monitors. You will use this computer to run Daktronics Content Studio, Display Studio, and the rest of your Show Control user experience.
Your Control Rack
1 |
Daktronics Show Control System |
Getting to know SCS |
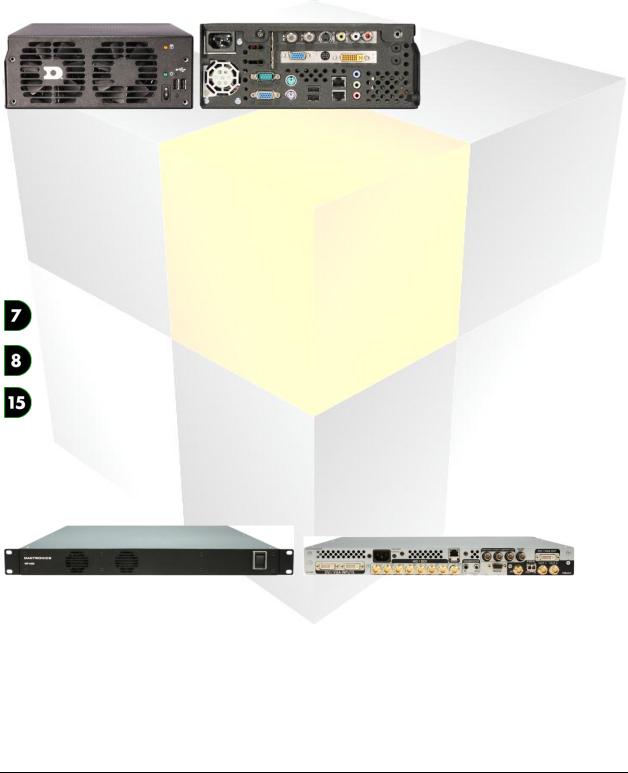
Your control rack holds the “brains” of your digital sign system. Here is where you can find your digital media player(s), video/image processor(s), scoring/timing machines, and other components involved in connecting all the pieces of your system together.
Digital Media Players
A digital media player (sometimes referred to simply as a “player”) is a device used to store and deliver content files to a display. In other words, think of your digital media players like how you think of a DVD player. If you want your television to play a DVD, without a DVD player your TV simply does not know what the disc is or what to do with it. With a DVD player, however, your TV now knows what the disc is, how to retrieve the content from that disc, and the proper way to display that content.
Like many pieces of your Show Control System, different digital media players have different features and capabilities. In various sections of this handbook, features and functionality are discussed which are only available for systems with certain types of players. These sections are identified by the below icons:
Identifies features which are available for systems containing a DMP-7000 display
Identifies features which are available for systems containing a DMP-8000 display
Identifies features which are available for systems containing a DMP-1500 display
Note: Sections which have no icon(s) preceding it are available for all Show Control Systems.
Video/Image Processors
A video/image processor is a device used to accept and process live video and/or computer graphics feeds before sending them to a display. This allows your display to communicate with video production equipment such as video switchers, character generators, and/or cameras, and other devices which output video feeds to display high quality video content clearly, smoothly and vibrantly.
2 |
Daktronics Show Control System |
Getting to know SCS |
Navigating the Show Control software
Now that you have a good idea of what is in your system, we can get into how to use it. In this section, we’ll help you acquaint yourself with Display Studio and Content Studio and how to get around within them.
Section Contents
How do I open Display Studio?
Display Studio’s Interface
Opening Content Studio
Some Content Studio Terminology
Content Studio’s Interface
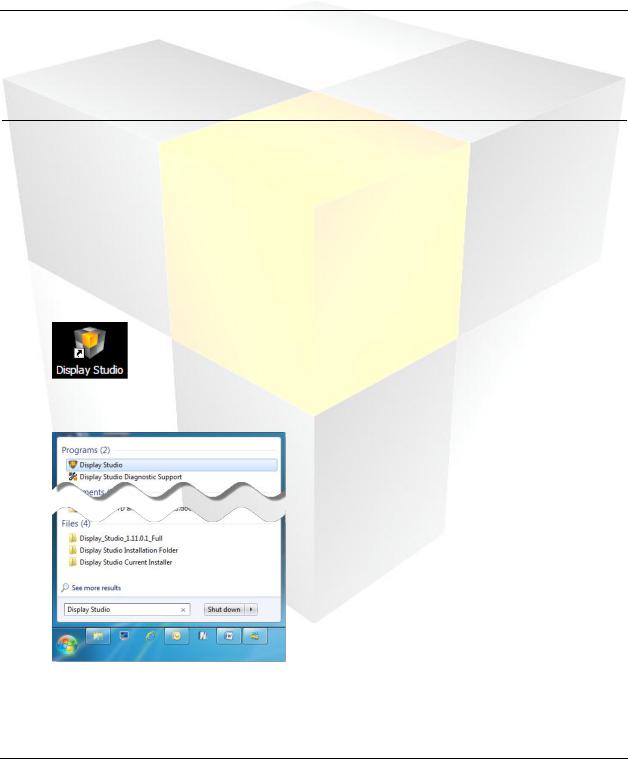
How do I open Display Studio?
A better first question may be “What is Display Studio?” Display Studio is the “face” of your new display control system – the primary user interface you will interact with to run your digital signs. From Display Studio you will be able to trigger content, send commands, monitor many aspects of your system’s health, and monitor what is playing on your displays.
Display Studio can be launched by either of two available navigation paths: A) Double-click its icon on your Windows desktop, or
A) Open the Start Menu and in the Search box type Display Studio, then press [Enter].
Display Studio’s Interface
Display Studio contains many parts that can help you execute an amazing digital presentation, but these are the most important ones:
3 |
Daktronics Show Control System |
Navigating SCS |
Workspace: The Workspace is where everything happens in Display Studio. This is where your Monitor Wall is docked and where your containers and buttons are arranged.
As you become acquainted with Display Studio’s other components, keep in mind that Display Studio was designed for versatility and flexibility. The user gets complete control over how they create and organize their control interface, so that they can execute their shows in the most efficient manner possible. The illustration below represents Display Studio’s organizational framework: Display Studio can contain one or more Workspaces, each of which can contain one or more Workspace Pages, each of which can contain one or more Containers, each of which can contain one or more Container Pages, each of which can contain one or more Buttons (and Buttons can contain one or more media files or script commands, by the way).
Display Studio
Workspace
Workspace Page
Container
Container Page
Button
4 |
Daktronics Show Control System |
Navigating SCS |

 Monitor Wall: The Monitor Wall holds your signs’ display monitors, each of which provides a regularly updating snapshot of what is appearing on that sign.
Containers and Buttons: There are two flavors of containers and buttons – Scripting containers and buttons and Quick Display containers and buttons. Buttons are what you will use to operate your control system – clicking a button is what sends a command to your display, your player, or your video/image processor. And containers are what you can use to store and organize your buttons.
Quick Display Container and Buttons: Quick Display buttons are used to simply play one or more media files on a display. Each quick display button is linked to one or more files and when clicked, will play the file(s) on the sign. Think of it as quick and easy access to your entire media library.
Scripting Container and Buttons: Scripting buttons are used to send script commands. These commands can provide instructions to your display (Display Control commands), to your player (Player Control commands), to your video/image processor (Video Processor commands), or to other parts of your system (System Control commands).
Dashboard: As the name implies, your Display Studio dashboard is a lot like the dashboard in your vehicle. This is where Display Studio’s status indicators and widgets are kept. The status button is a helpful tool for letting you know whether all systems are go, or if there might be something wrong. Display
Studio’s widgets are also handy tools and utilities that help expand Display Studio’s functionality to bring all of your control needs to within a single environment.
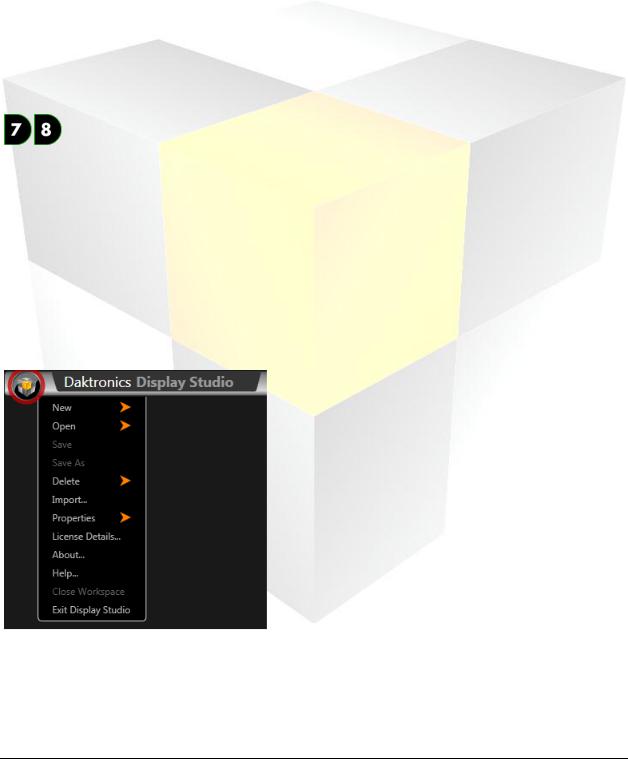
Display Studio Hub: The final piece of this puzzle is the Display Studio Hub. This provides access to Display Studio’s main menu, from which a variety of important operation functions are accessed. The button can be found in the upper left corner of the window – simply click it to open the menu.
Opening Content Studio
Sorry, are we getting ahead of ourselves again? Just in case you’re asking “What is Content Studio”, we’ll introduce you now. Content Studio is Show Control’s powerful digital content creation and editing application – the perfect complement to Display Studio’s powerful control interface. In Content Studio, you will be creating and editing engaging, content-rich digital presentations in no time!
5 |
Daktronics Show Control System |
Navigating SCS |

Content Studio can only be opened from within Display Studio by clicking the Launch Content Studio Button.
Tip: When switching between Display Studio and Content Studio (after you have Content Studio open already), we don’t recommend pressing the Launch Content Studio Button each time, as this will open a new instance of Content Studio each time.
Instead, simply press the Windows button  on your keyboard to reveal the Windows taskbar, and select your already-open Content Studio window from there! It will be faster, and require less system resources!
Some Content Studio Terminology
We will be using a lot of terminology when discussing Content Studio, so perhaps it would be a good idea to introduce you to a few of those terms:
1.Workspace: Yes, we did discuss workspaces already when we were talking about Display Studio, but Content Studio has workspaces too, and yes, they are different. A workspace in Content Studio refers to the collection of tools and options that you have set up for creating presentations for a particular player type. If you have a DMP-7000 display and a DMP-8000 display, for example, you’ll find that those respective player types have different options available for them in Content Studio. Therefore, the tools and options which are available for creating DMP-7000 presentations make up the DMP7000 workspace; the tools and options which are available for creating DMP-8000 presentations make up the DMP-8000 workspace; and the tools and options which are available for creating DMP-1500 presentations make up the DMP-1500 workspace.
2.Presentation: Presentations are what you create in Content Studio – a collection of layouts and (perhaps) pages which can contain images, text, RTD fields, animations, colors, and videos and which are played in a particular sequence. If comparing to a typed document, a presentation is similar to the entire document.
3.Layout: A layout is a single “slide”, and one or more layouts can make up a presentation. Layouts are where you can arrange a set of elements that you want to appear on your display during the same block of time. If continuing with the typed document comparison, a layout is similar to an individual page or section of that document.
4.Element: An element is an individual component which can be placed within a layout. Elements include textboxes, images, animations, videos, RTD fields, and paging elements.
5.Paging Element (DMP-8000 and DMP-1500 only): A paging element is a “layout within a layout”. It allows you to place multiple “slides” of elements within a single layout.
6.RTD Field: A placeholder which is inserted into a presentation which contains the placement and formatting instructions for the inclusion of a specific type of dynamic data into that presentation when it is played on a display.
6 |
Daktronics Show Control System |
Navigating SCS |

Content Studio’s Interface
Content Studio is where you’ll find all of the tools you need to create digital content that will inform, entertain and amaze.
Interface Components
These are the most important parts of the Content Studio interface (so they’re the main ones you should be aware of):
Ribbon: A menu pane which contains many of the tools you will use to create content in Content Studio. Refer to Content Studio Ribbon for more information.
Library Pane: The portion of Content Studio which contains the Dynamic Data Library, which provides access to all of your RTD and other dynamic data fields, and the Media Library, which provides access to your image and video collections.
Work Area: The “canvas” that provides a representation of your display which you use to assemble your presentation.
7 |
Daktronics Show Control System |
Navigating SCS |

Timeline & Storyboard Pane: The portion of Content Studio which contains your Timeline Editor, which allows you to control the sequencing and duration of all of the elements of your presentation, and your Storyboards, which allow you to control the sequencing and transitioning between layouts and paging elements.
Content Studio Ribbon
If you’re familiar with Microsoft Office 2007 or later, you already know how to use the Ribbon. The Ribbon gives you easy access to an enormous quantity of tools, options, and features without the need to waste time sifting through menus or clutter up your workspace with toolbars all over the place. Content Studio’s
Ribbon consists of five tabs: Home, Insert, Format, Effects, and View.
NOTE: The tools that are available in the Ribbon depend on the type of display you are creating content for. For the sake of completeness, the below graphics will show all Content Studio features. The tools available on your Ribbon may vary.
Content Studio Home tab
The Home tab contains many of the most commonly used features in Content Studio, including:
Clipboard: Tools for cutting, copying, and pasting items in your presentations
Layout: Buttons which allow you to Add, Insert, and Delete presentation layouts
Fonts: Options for customizing your presentations’ font elements
Paragraph: Options for customizing the paragraph formatting of your presentations’ font elements
Quick Insert: Quick and easy access to inserting a new image, video, or text box
Color: A selection of preset color schemes that you can apply to a layout or element
Review: Button which provides access to Content Studio’s Spell Check tool
Insert tab
The Insert tab contains tools which are used to insert various types of elements into a presentation, including:
Drawing: A set of drawing tools which can be used to modify images that have been inserted into a presentation
Media: Tools for inserting images, videos, and paging elements into presentations
Text: Tools for inserting text elements into presentations
Data: Tools for inserting data fields, such as the current time, temperature, or date into presentations
8 |
Daktronics Show Control System |
Navigating SCS |
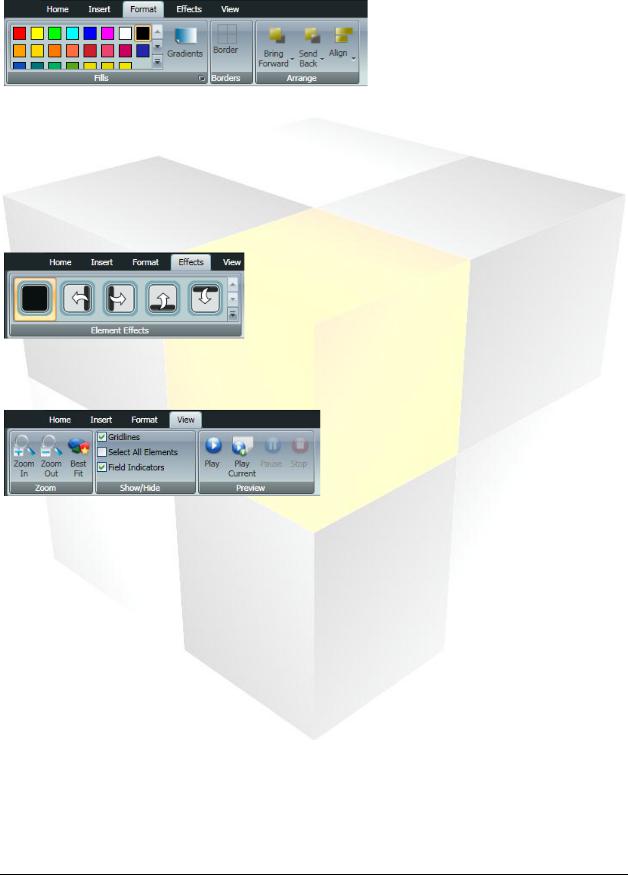
Format tab
The Insert tab holds a set of tools which can be used to make adjustments to how presentation elements look and are arranged, such as:
Fills: Options for adding color to a background or other transparent areas of a presentation
Borders: Options for adding borders to an element or other portion of a presentation
Arrange: Tools which provide help with aligning and arranging elements within a presentation
Effects tab
The Effects tab allows you to apply a transition effect, such as Fade In, to an element in a presentation.
View tab
The View tab helps you customize your Content Studio work area to make it as easy as possible to work with your content. Features include:
Zoom: Zoom controls for adjusting the level of detail you will be able to see in working with your presentation
Show/Hide: Preferences for showing or hiding tools which can prove helpful in creating your presentations, including gridlines, field indicators, and being able to select all elements
Preview: Preview controls for being able to view what your presentation, or portions of it, will look like when it is played
Content Studio Plug-Ins
Content Studio plug-ins are features of the Content Studio interface that provide specialized functionality for a particular purpose, and can be either enabled or disabled to suit your preferences. The following plug-ins are available:
Dynamic Data Library: provides access to real-time data which can be imported into a presentation
9 |
Daktronics Show Control System |
Navigating SCS |

Presentation File Size plug-in: tool which provides an up-to-date calculation of the storage space that the presentation is going to consume
Media Library: provides quick access to media files which can be imported into a presentation
Timeline: visual representation of the durations and sequencing of items contained within a presentation
Complete the following steps to enable or disable Content Studio plug-ins.
1.Click the Content Studio Button to open the Main Menu.
2.In the Main Menu, click the Content Studio Options button to reveal the Daktronics Content Studio Options window.
3.From the left column, select the Plug-ins option set.
4.In the right pane of the window, select the tab of the digital media player workspace you wish to configure.
5.Check the boxes of the plug-ins that you wish to enable in the workspace (or uncheck boxes of the plug-ins you wish to disable).
10 |
Daktronics Show Control System |
Navigating SCS |

Creating a presentation: Part 1
Now that you and Content Studio are properly introduced, it is time to begin making some presentations. By the time you complete this section, you should be comfortable with the basics of creating a presentation – adding layouts and creating elements. We’ll cover how to manipulate and add effects to the elements in part two.
Section Contents
Create a new presentation
Adding and deleting layouts
Adding images and video to a presentation
Adding text elements
Adding Real-Time Data (RTD) fields
Create a new presentation
The first step of creating content in Content Studio is starting a new presentation. Keep in mind that each player type has its own workspace with its own tools and options available. Creating a new presentation loads up the workspace for the type of content you are creating, and gives you the blank canvas with which to make your masterpiece.
1.From within Content Studio, create a new presentation by either: (a) clicking the Content Studio Button and selecting New; (b) clicking the New button; or (c) by pressing [CTRL+N] on your keyboard. Any of these actions will open the New Presentation Wizard.
2.The first question that the New Presentation Wizard will have for you is How do you want to create a presentation? Select to create a presentation for a particular Display or for a Display Type.
To help you with the decision, consider the following:
If you want to create content that you intend to only play on one specific display, select Display.
If you have multiple displays that use the same type of digital media player and have the same dimensions, and you want to create content that will be able to be played on any of those displays, select Display Type.
11 |
Daktronics Show Control System |
Presentations 101 |

3.Next, the New Presentation Wizard will ask you to pick the display or display type that you wish to create a presentation for. Click the desired display or display type, and click Next to continue.
4.After selecting the display or display type you wish to create a presentation for, Content Studio will load the appropriate player’s workspace and create a blank layout for you to get started with.
12 |
Daktronics Show Control System |
Presentations 101 |
Open an Existing Presentation
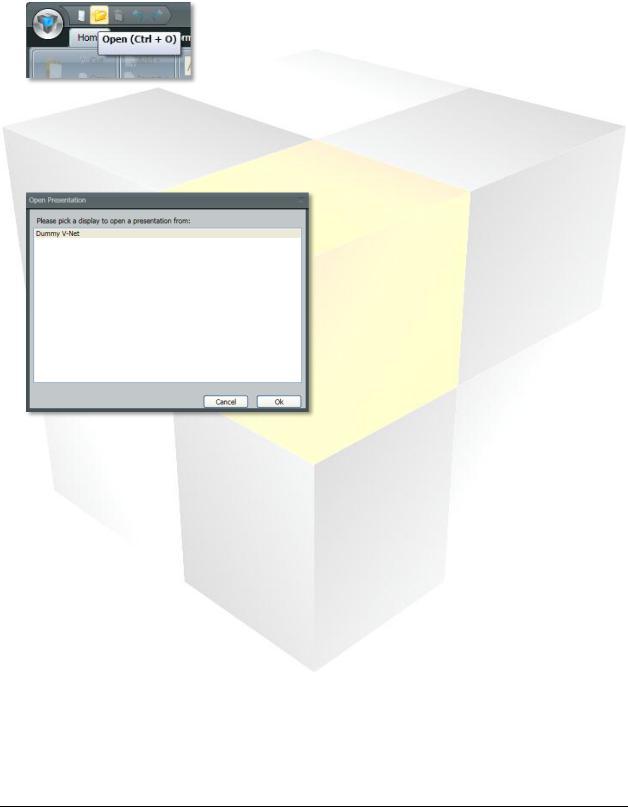
1.Click the Content Studio button, and click Open (CTRL + O). Or click the Open icon in the Content Studio Toolbar.
2.From the Content Studio pop-up select the player’s Content Studio workspace from the drop down menu. Click OK.
3.From the Open Presentation pop-up select a display to open a presentation from and click OK.
4.Use the file browser window to locate the desired presentation.
a.Go to last folder visited  : While navigating through the folder structure, click the
  button to return to the last folder visited.
b.Up one Level  : While navigating through the folder structure, click the
  button move the search up a level.
c.Delete  : Click the
  button to delete the selected file or folder.
d.Create new folder  : Click the
  button to create a new folder within the current folder.
13 |
Daktronics Show Control System |
Presentations 101 |
5.After selecting the desired presentation, click Open.
Adding and deleting layouts
The first of the many groups of buttons available on the Content Studio ribbon that we will explore is the Layout group, available on the Home tab of the Ribbon. This part of the ribbon allows you to Add, Insert, and Delete layouts – important tools for creating any presentation.
Adding a layout
To add a layout to your presentation, on the Home tab of the Content Studio ribbon, in the Layout group, click  . A new blank layout will be added to the end of your presentation.
14 |
Daktronics Show Control System |
Presentations 101 |

Inserting a layout
Adding a layout simply adds the layout to the end of your presentation. Inserting a layout, on the other hand, inserts the new blank layout into your presentation before the currently selected layout. To insert a layout into your presentation, on the Home tab of the Content Studio ribbon, in the Layout group, click

 .
.
Note: In this example, “Second Layout” is selected prior to clicking Insert.
Deleting a layout
If you’ve decided that you and your layouts just cannot settle your differences, you can delete it. Deleting a layout will completely remove it from your layout, including any elements there were on it. To delete a
layout, make sure that the offending layout is selected, and click 
 . Any layouts which are after the deleted layout will be moved up in the presentation by an amount of time equal to the duration of the deleted layout.
In this example, if “Layout – [2]” is deleted, “Layout – [3]” would be moved from playing from 6s – 8s to playing from 3s – 5s.
Adding images and video to a presentation
Any discussion of adding images or video to a Content Studio presentation must start with the Media Library. The Media Library is your one-stop shop for these types of elements, allowing simple and efficient drag-and-drop access to importing them into a layout. The media library is located on the left pane of your Content Studio window.
15 |
Daktronics Show Control System |
Presentations 101 |

Some tips for opening your Media Library…
If the Media Library pane is not visible, expand it by clicking and dragging it from the left border of the Content Studio window.
16 |
Daktronics Show Control System |
Presentations 101 |
If the pane is expanded, but Dynamic Data Library appears at the top instead of Media Library, click the Media Library tab toward the bottom of the pane to open the Media Library.
And now how to use your Media Library…
1.Select the appropriate Media Library tab for the type of element you want to add to your layout –
Images or Videos.
2.Confirm that the Media Library is looking for your desired media item in the correct location by ensuring that that location appears in the Search in box.
3.Locate the image or video that you wish to add to your presentation. Click the  and
and  buttons to browse through different pages of items.
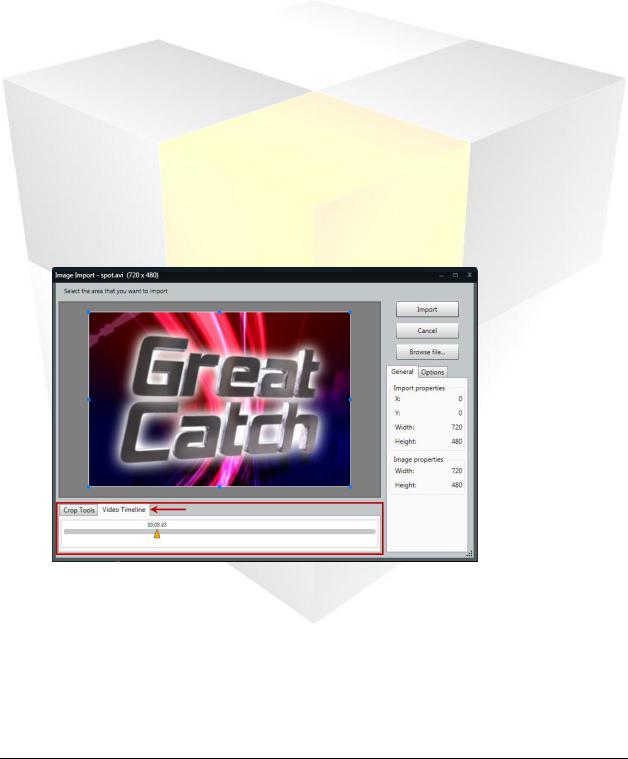
4.Click and drag the desired image or video onto your layout. The Image Import or Video Import window will appear.
Image Import
a.If you are importing a picture from a video file, use the Video Timeline slider bar to locate the frame you wish to use as an image in your presentation by clicking and dragging the slider until the desired image appears in the preview window.
b.Next, use the image import tools to select the area of the picture that you want to import. The adjustable box that surrounds the picture (the Selector Box) represents the area that will be imported into your presentation. The following steps describe how to use each of the image import tools, identified in the below graphic.
17 |
Daktronics Show Control System |
Presentations 101 |

i.Resizing Handles: Use the blue resizing handles located around the selector box to adjust the box’s size
ii.Click and drag the picture to adjust its position within the selector box.
iii.Import Properties: Provide the current location and dimensions of the selector box
iv.Import Mode: Located on the Options tab, the picture’s Import Mode determines how, and whether, the picture will be able to be resized after it is imported into your presentation
Best fit import mode allows you to resize the picture and keep the aspect ratio. Best fit is the default import mode. A black area adds to the side of the video to keep the aspect ratio correct
Stretch import mode allows you to resize the picture, but it does not keep the aspect ratio. The picture stretches across the resizing square. Pictures imported in Stretch import mode are often distorted
Normal import mode imports the picture exactly. You are not able to enlarge the picture, but you can crop the picture to allow only certain parts of the picture to display. The picture anchors to the left side of the resizing square. You cannot transform the picture itself; only the resizing square that contains the picture
v.Crop Tools: Use the crop tools to align the picture within the selector box
Dock left: Aligns the picture with the left side of the selector box
Dock top: Aligns the picture with the top of the selector box
Center: Centers the picture within the selector box
18 |
Daktronics Show Control System |
Presentations 101 |
Dock bottom: Aligns the picture with the bottom of the selector box
Dock right: Aligns the picture with the right side of the selector box
Select All: Sizes the selector box to surround the entire image
Display dimensions: Sizes the selector box to match the current display’s dimensions
vi.Zoom Tool: Use the Zoom drop-down menu to adjust the zoom level of the picture, which increases or decreases its size
vii.Image Properties: The full dimensions of the image
viii.Color Correction: Located on the Options tab, the Color Correction tools allow you to adjust the picture’s color
Checking the Grayscale box will convert the image from color to grayscale.
Use the Contrast slider to change the contrast of the image. Contrast options range from -50 to 50. -50 makes the image the same color as the background; 50 makes the image much lighter and brighter. 0 is the default setting for contrast.
Use the Brightness slider to change the brightness of the picture. Brightness options range from -50 to 50. -50 makes the picture darker, 50 makes the picture brighter. 0 is the default setting for brightness.
Press the Defaults button to restore the picture to the default settings for brightness, contrast, and color settings.
c.After the picture looks the way you want it, click Import. The picture will appear on your layout.
Video Import
a.In the Video Import window, use the video import tools to select the how you wish to import the video into your presentation. The adjustable box that surrounds the video (the Selector Box) represents the area that will be imported into your presentation. The following steps describe how to use each of the video import tools, identified in the below graphic.
19 |
Daktronics Show Control System |
Presentations 101 |

i.Resizing Handles: Use the blue resizing handles located around the selector box to adjust the box’s size
ii.Click and drag the video preview to adjust its position within the selector box.
iii.Import Properties: Provide the current location and dimensions of the selector box
iv.Import Mode: Located on the Options tab, the video’s Import Mode determines how, and whether, the video will be able to be resized after it is imported into your presentation.
Best fit import mode allows you to resize the video and keep the aspect ratio. Best fit is the default import mode. A black area adds to the side of the video to keep the aspect ratio correct.
Stretch import mode allows you to resize the video, but it does not keep the aspect ratio. The video stretches across the resizing square. Videos imported in Stretch import mode are often distorted.
Normal import mode imports the video and does not manipulate size. You are not able to enlarge the video, but you can crop the video to allow only certain parts of the video to display. The video anchors to the left side of the resizing square. You cannot transform the video itself; only the resizing square that contains the video.
20 |
Daktronics Show Control System |
Presentations 101 |
v.If you wish to import only a portion of the video, set the duration of the clip by using the Video Timeline slider bar. Click and drag the left slider to the desired starting point of the clip. Click and drag the right slider to the desired ending point of the clip.
vi.Zoom tools: Use the Zoom Tools to adjust the zoom level of the video, which increases or decreases its size
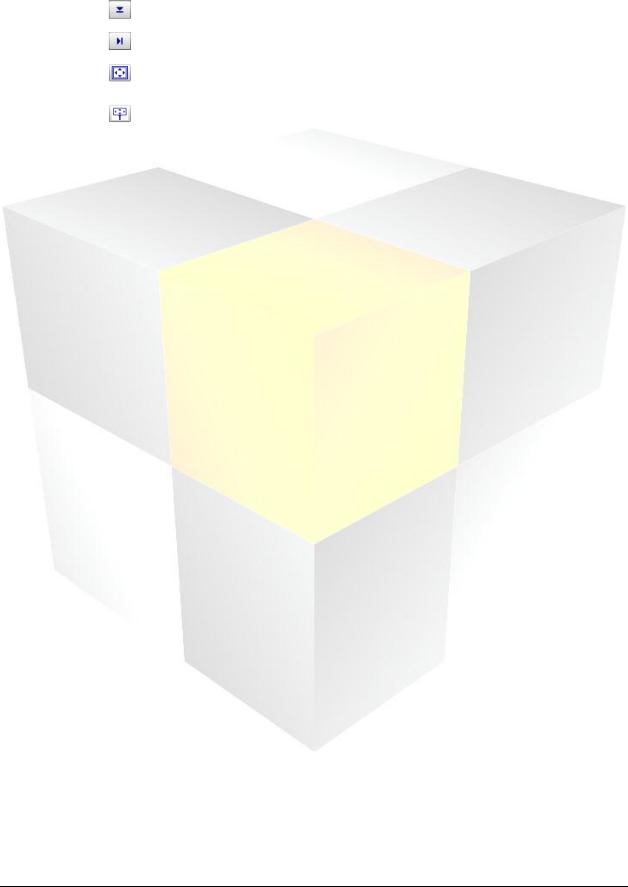
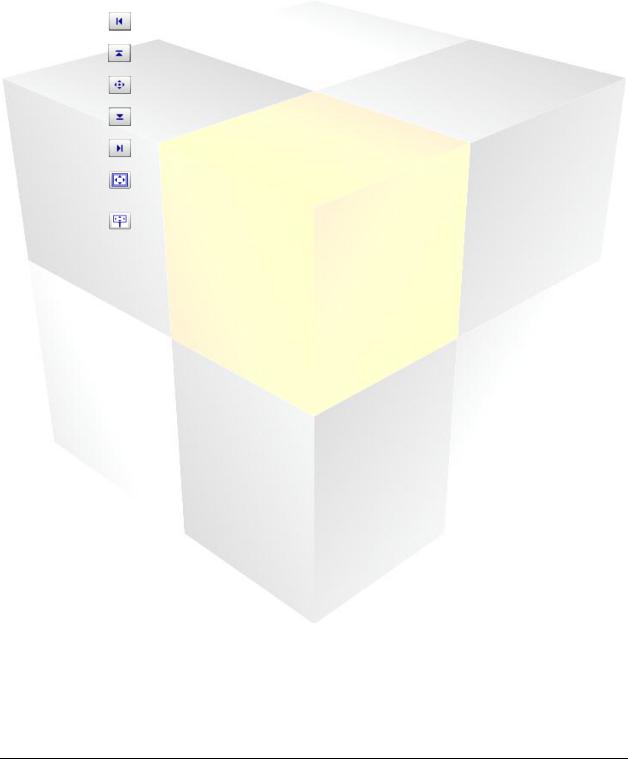
vii.Crop Tools: Use the crop tools to align the picture within the selector box
Dock left: Aligns the video with the left side of the selector box
Dock top: Aligns the video with the top of the selector box
Center: Centers the video within the selector box
Dock bottom: Aligns the video with the bottom of the selector box
Dock right: Aligns the video with the right side of the selector box
Select All: Sizes the selector box to surround the entire video
Display dimensions: Sizes the selector box to match the current display’s dimensions
viii.Use the Preview Buttons to view a preview of the video clip. Press  to play the clip using the start and end points selected on the Source video slider bar. While the clip is playing, press
  to pause the clip and press
  to stop the clip.
ix.Video Properties: Provides the full dimensions, length, and other information about the video
x.Final Frame Rate: If the frame rate of the video is able to be modified, use the Final Frame Rate drop-down menu to select the frame rate of the clip.
xi.Color Correction: Located on the Options tab, the Color Correction tools allow you to adjust the picture’s color.
Checking the Grayscale box will convert the video from color to grayscale.
Use the Contrast slider to change the contrast of the video. Contrast options range from -50 to 50. -50 makes the video the same color as the background; 50 makes the video much lighter and brighter. 0 is the default setting for contrast.
Use the Brightness slider to change the brightness of the video. Brightness options range from -50 to 50. -50 makes the video darker, 50 makes the video brighter. 0 is the default setting for brightness.
Press the Defaults button to restore the video to the default settings for brightness, contrast, and color settings.
b.After the video looks the way you want it, click Import. The video will be inserted onto your layout.
21 |
Daktronics Show Control System |
Presentations 101 |
Adding text elements
In this section we’ll go over how to add text to your Content Studio presentations, and how to perform some of the most common management functions of text that you will use.
Create a text box
The most frequently used way to add text to presentations in Content Studio is by using textboxes. Textboxes allow you to create text which you can then edit, move, resize, and arrange as much as you like.
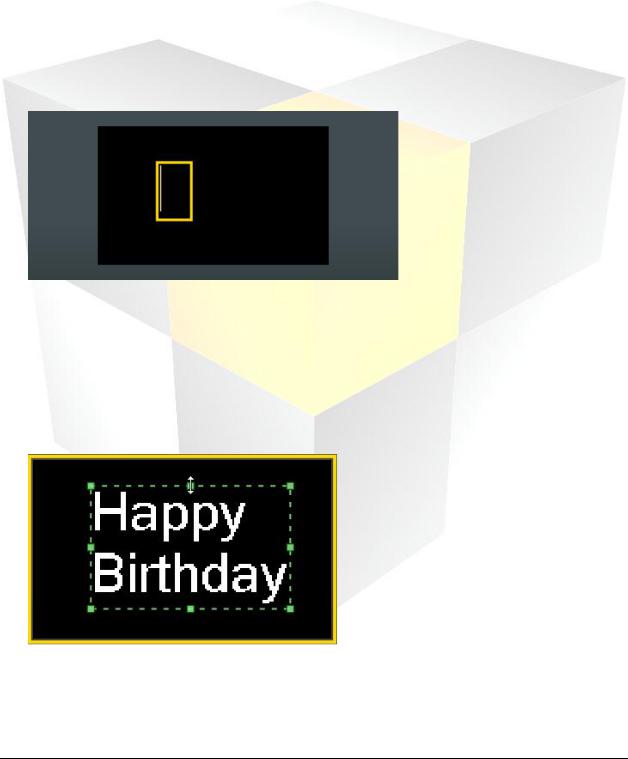
1.On the Insert tab, in the Text group, click Text Box. A square cursor will appear.
2.Click on a location within the layout where you would like the text to be. A yellow box with a blinking cursor will appear.
3.Type your message.
To resize or move the text box:
4.After entering the message, click outside of the text box, and then click back inside it. A green box with resizing handles will appear.
5.To resize, move your cursor over a green resizing handle and click and drag the box to the desired size.
6.To move, click inside the green box and drag it to the desired location.
22 |
Daktronics Show Control System |
Presentations 101 |

Formatting text
There are a number of font appearance attributes which can be managed in Content Studio. These characteristics may be used to directly customize the appearance of text characters so that your message appears exactly how you want it.
1.Select the text you wish to modify.
Note: Selecting an entire text box will modify all text within the box.
2.Go to the Home tab, in the Fonts group, to change the following attributes:
Font Face: Click to open the Font Face drop-down menu. Select a listed font face to change the selected text’s font face.
Notes:
If creating dynamic content in which it is important for the positioning and spacing of characters to be static as it changes (such as game clock feeds), using fixed-width fonts will ensure that the text does not “jump around”.
For example, compare the following fonts. In the first font, notice how every character is the same width – even 1’s and 0’s. This is not the case in the 2nd font.
Courier New (Fixed width) 09:11 Courier New (Fixed width) 10:00 1111 2222
Berlin Sans FB (Variable width) 09:11 Berlin Sans FB (Variable width) 10:00 1111 2222
Not all fonts are supported by each player type. For more information on supported font types, refer to Media File Recommendations.
Venus Fonts are Daktronics-created fonts. You cannot change the size or bold, italicize, or underline Venus fonts. TrueType Fonts are the most flexible fonts. You can change the font size and bold, italicize, and underline TrueType fonts.
Font Size: Click to open the Font Size drop-down menu. Select the desired font size to resize the selected text.
23 |
Daktronics Show Control System |
Presentations 101 |
 Loading...