

Daikin EHBH04 08DA, EHBX04 08DA, EHVH04S18D*, EHVH04S23D*, EHVH08S18D* Operation manuals
...
Operation manual
Daikin Altherma 3 R F+W
EHBH04+08DA
EHBX04+08DA
EHVH04S18D*
EHVH04S23D*
EHVH08S18D*
EHVH08S23D*
EHVX04S18D*
EHVX04S23D*
EHVX08S18D*
EHVX08S23D*
Operation manual
Daikin Altherma 3 R F+W
English

1 Table of contents
4
Space heating/cooling
Operation range
4.3
Table of contents
1 About this document 2
2 About the system 2
2.1 Components in a typical system layout ..................................... 3
3 Operation 3
3.1 User interface: Overview ........................................................... 3
3.2 Possible screens: Overview ...................................................... 3
3.2.1 Home screen............................................................... 4
3.2.2 Main menu screen ...................................................... 4
3.2.3 Setpoint screen ........................................................... 5
3.2.4 Detailed screen with values ........................................ 5
3.3 Space heating/cooling control ................................................... 6
3.3.1 Setting the space operation mode .............................. 6
3.3.2 To change the desired room temperature................... 6
3.3.3 To change the desired leaving water temperature...... 6
3.4 Domestic hot water control........................................................ 7
3.4.1 Reheat mode .............................................................. 7
3.4.2 Scheduled mode ......................................................... 7
3.4.3 Scheduled + reheat mode........................................... 7
3.4.4 Using DHW powerful operation................................... 7
3.5 Advanced usage........................................................................ 8
3.6 Schedule screen: Example........................................................ 8
3.7 Menu structure: Overview user settings .................................... 11
3.8 Installer settings: Tables to be filled in by installer .................... 12
3.8.1 Configuration wizard ................................................... 12
3.8.2 Settings menu ............................................................. 12
4 Energy saving tips 12
5 Maintenance and service 12
5.1 Overview: Maintenance and service ......................................... 12
5.2 To find the contact/helpdesk number ........................................ 13
6 Troubleshooting 13
6.1 To display the help text in case of a malfunction....................... 13
6.2 Symptom: You are feeling too cold (hot) in your living room..... 13
6.3 Symptom: The water at the tap is too cold ................................ 13
6.4 Symptom: Heat pump failure..................................................... 13
6.5 Symptom: The system is making gurgling noises after
commissioning........................................................................... 14
▪ General safety precautions:
▪ Safety instructions that you must read before operating your
system
▪ Format: Paper (in the box of the indoor unit)
▪ Operation manual:
▪ Quick guide for basic usage
▪ Format: Paper (in the box of the indoor unit)
▪ User reference guide:
▪ Detailed step-by-step instructions and background information
for basic and advanced usage
▪ Format: Digital files on http://www.daikineurope.com/support-
and-manuals/product-information/
Latest revisions of the supplied documentation may be available on
the regional Daikin website or via your installer.
The original documentation is written in English. All other languages
are translations.
Breadcrumbs
Breadcrumbs (example: [4.3]) help you to locate where you are in
the menu structure of the user interface.
1 To enable the breadcrumbs: In the home screen or
main menu screen, press the help button. The
breadcrumbs appear in the top left corner of the
screen.
2 To disable the breadcrumbs: Press the help button
again.
This document also mentions these breadcrumbs. Example:
1 Go to [4.3]: Space heating/cooling > Operation
range.
This means:
1 Starting from the home screen, turn the left dial and
go to Space heating/cooling.
7 Disposal 14
8 Glossary 14
1 About this document
Thank you for purchasing this product. Please:
▪ Read the documentation carefully before operating the user
interface to ensure the best possible performance.
▪ Request the installer to inform you about the settings that he used
to configure your system. Check if he has filled in the installer
settings tables. If not, request him to do so.
▪ Keep the documentation for future reference.
Target audience
Endusers
Documentation set
This document is part of a documentation set. The complete set
consists of:
Operation manual
2
2 Press the left dial to enter the submenu.
3 Turn the left dial and go to Operation range.
4 Press the left dial to enter the submenu.
2 About the system
Depending on the system layout, the system can:
▪ Heat up a space
▪ Cool down a space (if a heating/cooling heat pump model is
installed)
▪ Produce domestic hot water (if a DHWtank is installed)
EHBH/X04+08DA + EHVH/X04+08S18+23DA + EHVH/
X04+08S18+23DJ
Daikin Altherma 3 R F+W
4P584431-1 – 2019.06
3 Operation
d
a
b
c
e
f
g
BC
A
b
c
a
a
b
c
a b c d e
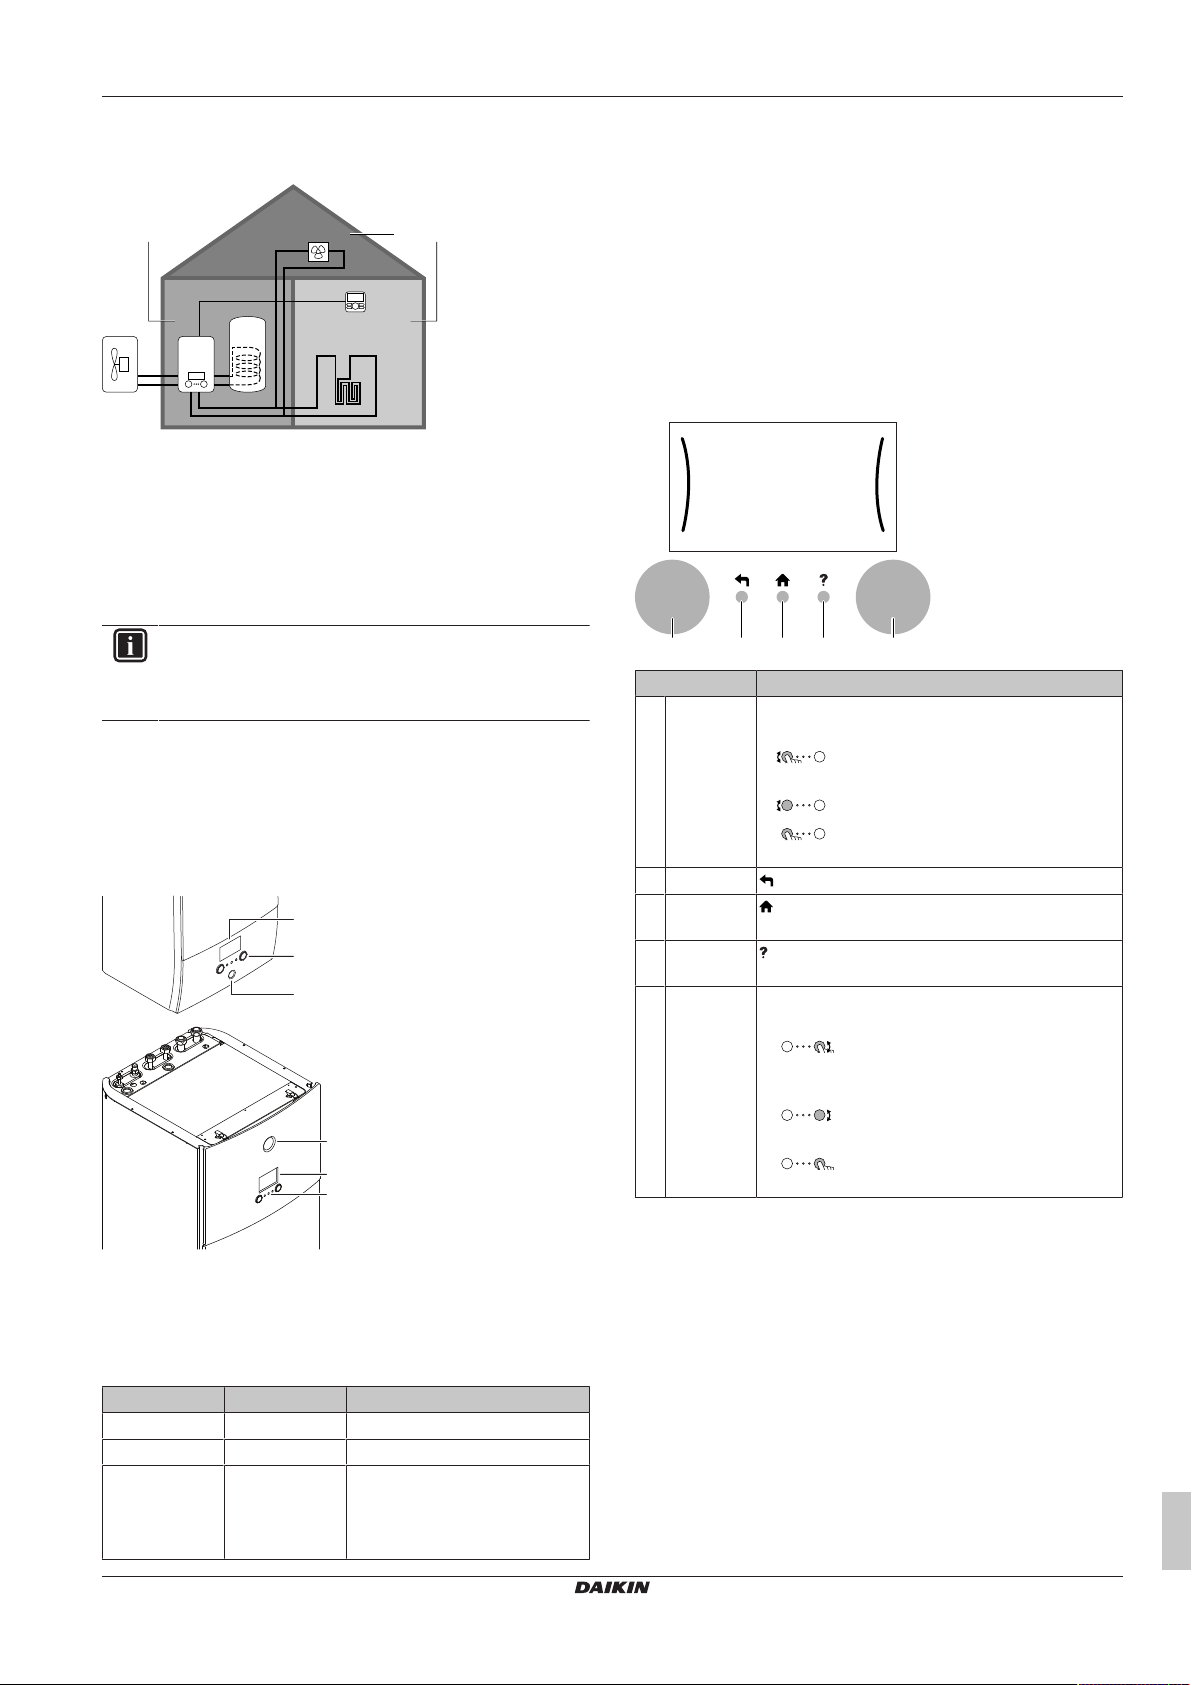
2.1 Components in a typical system layout
A Main zone. Example: Living room.
B Additional zone. Example: Bedroom.
C Technical room. Example: Garage.
a Outdoor unit heatpump
b Indoor unit heatpump
c Domestic hot water (DHW) tank
d User interface at the indoor unit
e User interface used as room thermostat
f Underfloor heating
g Radiators, heatpump convectors, or fancoil units
INFORMATION
The indoor unit and the domestic hot water tank (if
installed) can be separated or integrated depending on the
indoor unit type.
3 Operation
3.1 User interface: Overview
The user interface has the following components:
LCD screen
The LCD screen has a sleeping function. After a certain time of noninteraction with the user interface, the screen darkens. Pressing any
button or rotating any dial awakens the display. The time of noninteraction differs depending on the user permission level:
▪ User or Advanced user: 15min
▪ Installer: 1h
Dials and buttons
You use the dials and buttons:
▪ To navigate through the screens, menus and settings of the LCD
screen
▪ To set values
Item Description
a Left dial The LCD shows an arc on the left side of the
display when you can use the left dial.
▪ : Turn, then press the left dial. Navigate
through the menu structure.
▪ : Turn the left dial. Choose a menu item.
▪ : Press the left dial. Confirm your choice
or go to a submenu.
b Back button : Press to go back 1 step in the menu structure.
c Home
button
d Help button : Press to show a help text related to the current
e Right dial The LCD shows an arc on the right side of the
: Press to go back to the home screen.
page (if available).
display when you can use the right dial.
▪ : Turn, then press the right dial. Change
a value or setting, shown at the right side of the
screen.
▪ : Turn the right dial. Navigate through
the possible values and settings.
▪ : Press the right dial. Confirm your
choice and go to the next menu item.
a Status indicator
b LCD screen
c Dials and buttons
Status indicator
The LEDs of the status indicator light up or blink to show the
operating mode of the unit.
LED Mode Description
Blinking blue Standby The unit is not in operation.
Continuous blue Operation The unit is in operation.
Blinking red Malfunction A malfunction occurred.
EHBH/X04+08DA + EHVH/X04+08S18+23DA + EHVH/
X04+08S18+23DJ
Daikin Altherma 3 R F+W
4P584431-1 – 2019.06
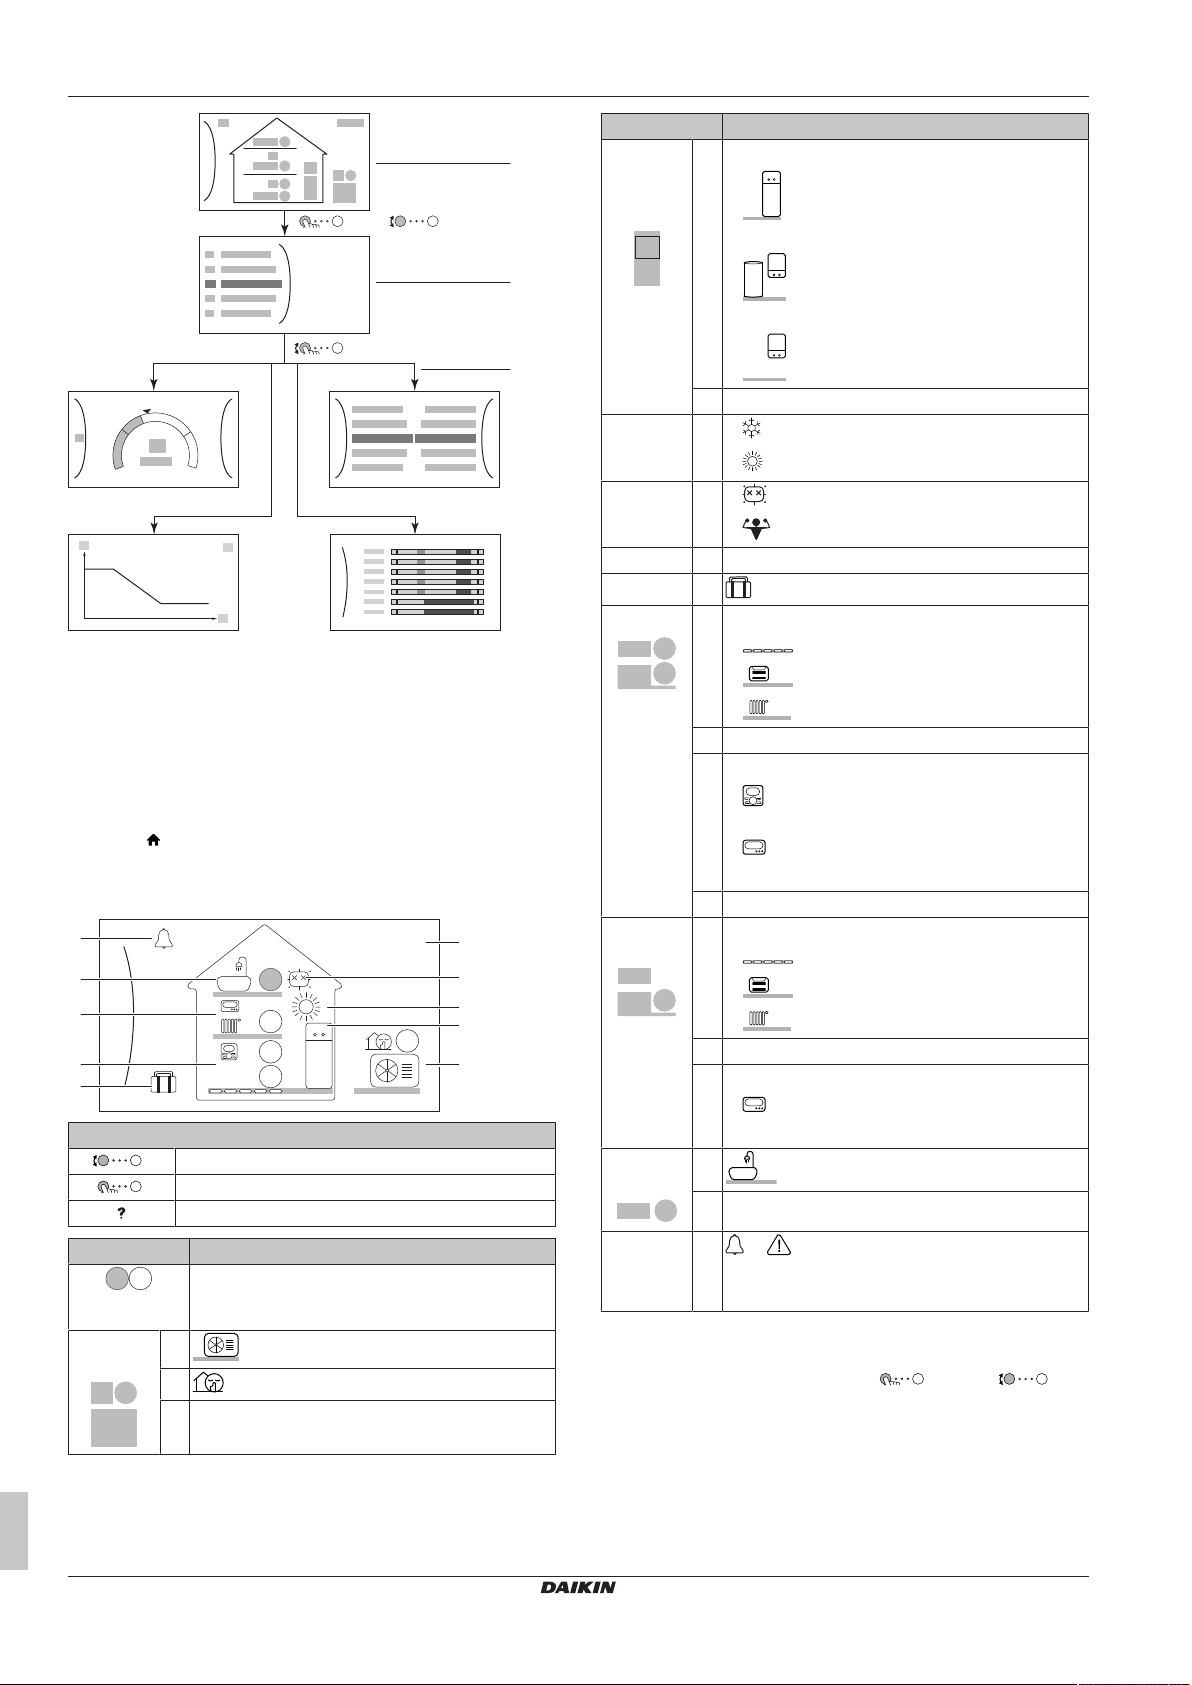
3.2 Possible screens: Overview
The most common screens are as follows:
See "6.1To display the help text
in case of a malfunction"on
page13 for more information.
Operation manual
3
3 Operation
+
–
a
OR
b
c
c2
c4
c1
c3
6
1.6
bar
18 Feb 2018
22:19
55
18
21
45
f
i
j
h
g
e
d
a
b
c
21
21
a2
a3
a1
b1
b2
g3
g1
g4
g2
h3
h1
h2
i1
i2
a Home screen
b Main menu screen
c Lower level screens:
c1: Setpoint screen
c2: Detailed screen with values
c3: Screen with weather-dependent curve
c4: Screen with schedule
Item Description
Indoor unit /
b1 Indoor unit:
domestic
hot water
tank
▪ : Floor-standing indoor unit with integrated
tank
▪ : Wall-mounted indoor unit with separated
tank
▪ : Wall-mounted indoor unit
b2 Water pressure
Space
operation
mode
Disinfection
/ Powerful
c
▪ : Cooling
▪ : Heating
d
▪ : Disinfection mode active
▪ : Powerful operation active
Date / time e Current date and time
Holiday f
Main zone
: Holiday mode active
g1 Heat emitter type:
▪ : Underfloor heating
▪ : Fancoil unit
▪ : Radiator
g2 Leaving water temperature setpoint
g3 Room thermostat type:
3.2.1 Home screen
Press the button to go back to the home screen. You see an
overview of the unit configuration and the room and setpoint
temperatures. Only symbols applicable for your configuration are
visible on the home screen.
Additional
zone
▪ : Daikin user interface used as room
thermostat
▪ : External control
▪ Hidden: Leaving water temperature control
g4 Measured room temperature
h1 Heat emitter type:
▪ : Underfloor heating
▪ : Fancoil unit
▪ : Radiator
h2 Leaving water temperature setpoint
h3 Room thermostat type:
▪ : External control
Possible actions on this screen
Go through the list of the main menu.
Go to the main menu screen.
Enable/disable breadcrumbs.
Item Description
The temperatures are shown in circles. If the circle
is grey, the corresponding operation (example:
space heating) is currently not active.
Outdoor
unit
a1
a2
: Quiet mode active
: Outdoor unit
a3 Measured ambient temperature
Domestic
hot water
Malfunction j
3.2.2 Main menu screen
Starting from the home screen, press ( ) or turn ( ) the
left dial to open the main menu screen. From the main menu, you
can access the different setpoint screens and submenus.
▪ Hidden: Leaving water temperature control
i1
: Domestic hot water
i2 Measured tank temperature
or : A malfunction occurred
See "6.1To display the help text in case of a
malfunction"on page13 for more information.
EHBH/X04+08DA + EHVH/X04+08S18+23DA + EHVH/
X04+08S18+23DJ
Daikin Altherma 3 R F+W
4P584431-1 – 2019.06
Operation manual
4
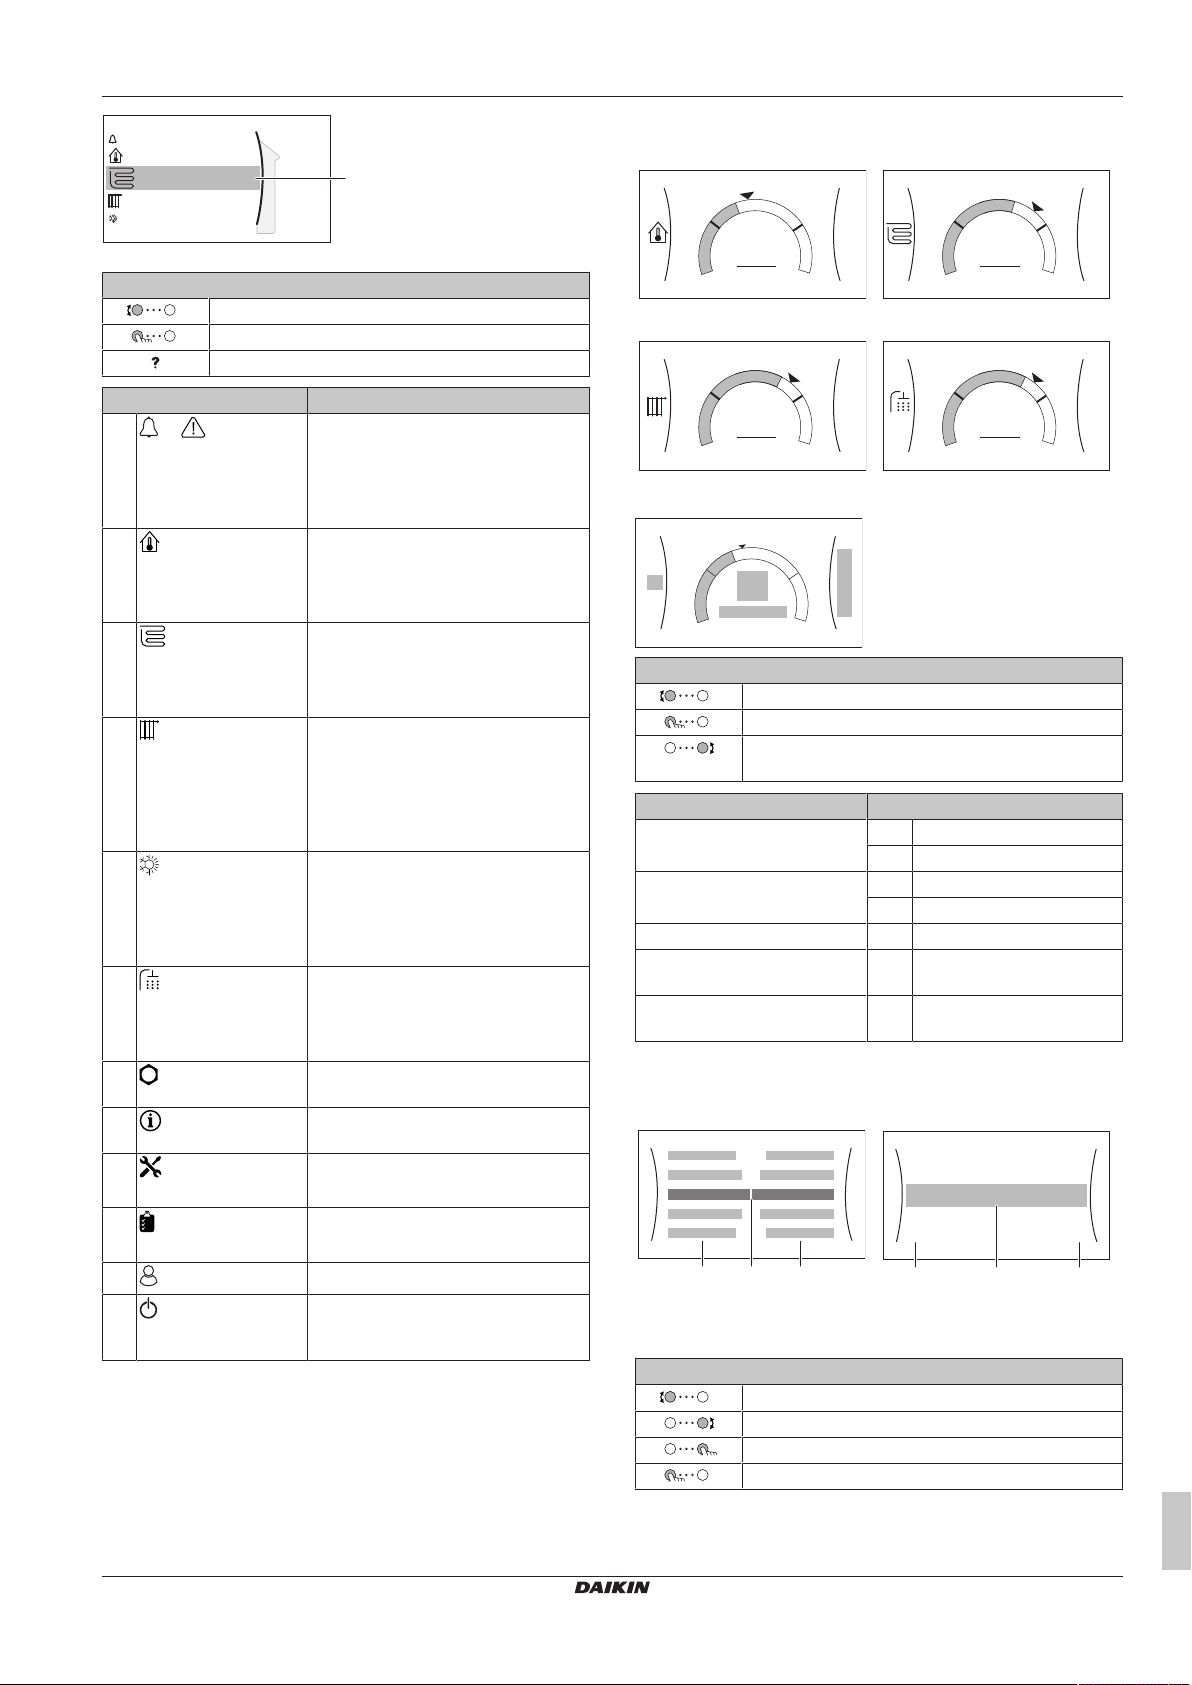
a
2
Main zone
Additional zone
Room
Malfunctioning
Space heating/cooling
a Selected submenu
+
–
21°C
1
Room
+
–
35°C
2
Main zone
+
–
45°C
3
Additional zone
+
–
50°C
5
Tank
a1
d
+
–
d
e
d
e
c
a2
b1
b2
a bc
a bc
7.2.1
Time/date
Hours
11
30
Minutes
Possible actions on this screen
Go through the list.
Enter the submenu.
Enable/disable breadcrumbs.
Submenu Description
[0]
or
Malfunctioning
[1]
Room
[2]
Main zone
[3]
Additional zone
[4]
Space heating/
cooling
[5]
Tank
[7]
User settings
[8]
Information
[9]
Installer
settings
[A]
Commissioning
[B]
User profile
[C]
Operation
Restriction: Only displayed if a
malfunction occurs.
See "6.1To display the help text in
case of a malfunction"on page13 for
more information.
Restriction: Only displayed if a room
thermostat is connected to the indoor
unit.
Set the room temperature.
Shows the applicable symbol for your
main zone emitter type.
Set the leaving water temperature for
the main zone.
Restriction: Only displayed if there
are two leaving water temperature
zones. Shows the applicable symbol
for your additional zone emitter type.
Set the leaving water temperature for
the additional zone (if present).
Shows the applicable symbol for your
unit.
Put the unit in heating mode or cooling
mode. You cannot change the mode
on heating only models.
Restriction: Only displayed if a
domestic hot water tank is present.
Set the domestic hot water tank
temperature.
Gives access to user settings such as
holiday mode and quiet mode.
Displays data and information about
the indoor unit.
Restriction: Only for the installer.
Gives access to advanced settings.
Restriction: Only for the installer.
Perform tests and maintenance.
Change the active user profile.
Turn heating/cooling functionality and
domestic hot water preparation on or
off.
3.2.3 Setpoint screen
The setpoint screen is displayed for screens describing system
components that need a setpoint value.
3 Operation
Examples
[1] Room temperature screen
[3] Additional zone screen
Explanation
Possible actions on this screen
Go through the list of the submenu.
Go to the submenu.
Adjust and automatically apply the desired
temperature.
Item Description
Minimum temperature limit a1 Fixed by the unit
Maximum temperature limit b1 Fixed by the unit
Current temperature c Measured by the unit
Desired temperature d Turn the right dial to
Submenu e Turn or press the left dial to
3.2.4 Detailed screen with values
a Settings
b Values
c Selected setting and value
Possible actions on this screen
Go through the list of settings.
Change the value.
Go to the next setting.
Confirm changes and proceed.
[2] Main zone screen
[5] Tank temperature screen
a2 Restricted by the installer
b2 Restricted by the installer
increase/decrease.
go to the submenu.
Example:
EHBH/X04+08DA + EHVH/X04+08S18+23DA + EHVH/
X04+08S18+23DJ
Daikin Altherma 3 R F+W
4P584431-1 – 2019.06
Operation manual
5
 Loading...