

Daikin BRC1D527 Installation manuals

BRC1D527
INSTALLATION MANUAL
Remote controller
1
2
1
1
4
1 2
2
7
5
3
S
S
1
M
S
2
M
PCB
3
4
6
P2P1 P2P1
1 1
4 5
6
1
a
5
6
2
7
8
3
UNIT No.
b
GROUP
c
4
SETTING
3
1
7
562
22
d
e
1+22
8

BRC1D527 Remote controller Installation manual
READ THIS MANUAL ATTENTIVELY
BEFORE STARTING UP THE UNIT. DO
NOT THROW IT AWAY. KEEP IT IN YOUR
FILES FOR FUTURE REFERENCE.
IMPROPER INSTALLATION OR
ATTACHMENT OF EQUIPMENT OR
ACCESSORIES COULD RESULT IN
ELECTRIC SHOCK, SHORT-CIRCUIT,
LEAKS, FIRE OR OTHER DAMAGE TO
THE EQUIPMENT. BE SURE ONLY TO
USE ACCESSORIES MADE BY DAIKIN
WHICH ARE SPECIFICALLY DESIGNED
FOR THE USE WITH THE EQUIPMENT
AND HAVE THEM INSTALLED BY A
PROFESSIONAL.
IF UNSURE OF INSTALLATION PROCEDURES OR USE, ALWAYS CONTACT
YOUR DEALER FOR ADVICE AND
INFORMATION.
The kit includes the following parts:
Remote controller Wood screws
BRC1D527
Remote controller
4PW16769-1
Wall plugs Machine screws
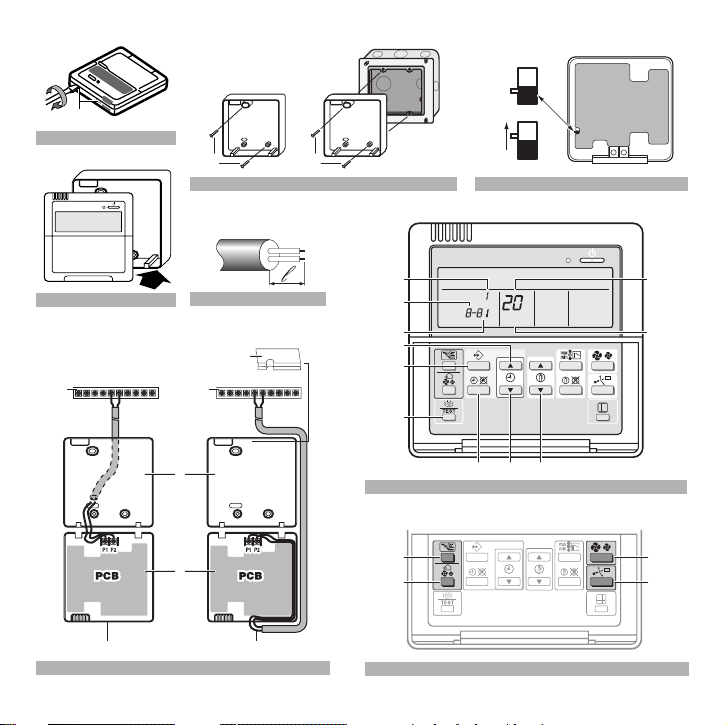
1. Remove the upper part of remote controller
Insert a minus screwdriver into the slots (1) in the
lower part of the remote controller (2 places), and
remove the upper part of the remote controller.
2. Fasten the remote controller (Refer
to figure 2)
1 for exposed mounting, fasten with the two
2 for flush-mounting, fasten with the two
For the field supplied switch box, use optional accessory
KJB111A or KJB211A.
NOTE Choose the flattest place possible for the
(Refer to figure 1)
The PC board is mounted in the upper part
of the remote controller. Be careful not to
damage the board with the minus
screwdriver.
included wood screws (Ø4x30) and plugs.
included machine screws (M4x16).
mounting surface. Be careful not to
distort the shape of the lower part of the
remote controller by overtightening the
mounting screws.
Installation manual
1
 Loading...