

Page 1
DHC-5600K
Instruction Manual
Manufactured under license from Dolby Laboratories. “Dolby”, “Pro
Logic” and the double-D Symbol are trademarks of Dolby Laboratories.
Confidential unpublished Works.
Copyright 1992-1997 Dolby Laboratories. All rights reserved.
Page 2

1
Table of Contents
Safety Information 3
Precautions 4
Accessories 5
Features 6
Definintion of Terms 9
Basic Connection 11
Control Reference Guide 16
1. Front Panel 16
2. Fluorescent Display 18
3. Rear Panel 19
4. Remote Controller Unit 20
4.1 General Function for Remote Control Unit 21
4.2 Basic Function 21
4.3 Advanced Function 22
4.4 DVD Function 23
4.5 SETUP Function 23
5. Using the Basic Function 24
5.1 Open/Close disc tray 24
5.2 Basic play of DVD,VCD,CDDA 25
5.3 Basic play of MP3 25
5.4 Selecting Video mode 26
5.5 Selecting Menu items 26
5.6 Stop and power off 27
5.7 Search 28
5.8 Skip 29
5.9 Slow Play 29
5.10 Selecting Audio 30
5.11 Selecting Subtitles 31
5.12 Selecting Angles 31
Page 3

2
6. Using the Advanced Function 32
6.1 3D Sound Effect 32
6.2 Repeat Selected Segment 32
6.3 Utilizing Repeat Function 33
6.4 Shuffle 34
6.5 Program 34
6.6 Digest 35
6.7 Marker 36
6.8 Display 37
6.9 Zooming Screen 38
7. Customising DVD Performance 39
7.1 Audio 39
7.2 Video 41
7.3 Other 42
7.4 Languages 43
7.5 Parental Lock 43
Troubleshooting 45
Specifications 46
Page 4

3
Safety Information
NOTE:
THIS PLAYER CAN BE USED ONLY WHERE THE POWER SUPPLY IS AC 90-250V, 50/60Hz. IT
CANNOT BE USED ELSEWHERE.
CAUTION:
DVD/VIDEO CD/CD PLAYER IS A CLASS 2 LASER PRODUCT. HOWEVER THIS DVD/VIDEOCD/CD
PLAYER USES A INVISIBLE LASER BEAM WHICH COULD CAUSE HAZARDOUS RADIATION
EXPOSURE IF DIRECTED. BE SURE TO OPERATE THE DVD/VIDEO CD/CD PLAYER CORRECTLY
AS INSTRUCTED.
WHEN THIS DVD PLAYER IS PLUGGED TO THE WALL OUTLET, DO NOT PLACE YOUR EYES
CLOSE TO THE OPENING OF THE DISC TRAY AND OTHER OPENINGS TO LOOK INTO THE INSIDE
OF THIS UNIT.
USE OF CONTROLS OR ADJUSTMENTS OR PERFORMANCE OF PROCEDURES OTHER THAN
THOSE SPECIFIED HEREIN MAY RESULT IN HAZARDOUS RADIATION EXPOSURE.
DO NOT OPEN COVERS AND DO NOT REPAIR YOURSELF. REFER SERVICING TO QUALIFIED
PERSONNEL.
TO REDUCE THE RISK OF FIRE OR ELECTRIC SHOCK, DO NOT EXPOSE THE UNIT TO RAIN OR
MOISTURE, USE THE RECOMMENDED ACCESSORIES ONLY.
☞
☞ To the risk of electric shock, do not remove the cover (or back). No user serviceable parts inside.
☞☞
Refer servicing to qualified service personnel.
☞
☞ The lightening flash with arrowhead symbol, within a triangle, is intended to alert the user to the
☞☞
presence of uninsulated “dangereous voltage” within the product’s enclosure that may be of sufficient
magnitude to constitute a risk of electric shock to persons.
☞
☞ The exclamation point within an equilateral triangle is intended to alert to the presence of important
☞☞
operating and maintenance (servicing) instructions in the literature accompanying the appliance.
Page 5

4
Precautions
Please read these precautions before operating this unit.
☞☞☞☞ Placement
Avoid placing the unit in areas of :
direct sunlight, heating radiators or closed automobiles
high temperature or high humidity
excessive dust
vibration, impact or where the surface is tilted, as the internal parts may be seriously damaged.
☞☞☞☞ Stacking
Place the unit in a horizontal position, and do not place anything heavy on it.
Do not place the unit on amplifiers or other equipment which may be become hot.
Do not move the unit when tray is opened. To close tray, connect AC power cord and wait until
tray closes or press OPEN/CLOSE button to close.
☞
☞ Power Cord Protection
☞☞
To avoid any malfunction of the unit, and to protect against electric shock, fire or personal injury,
please observe the following.
Do not connect or disconnect the AC power cord when your hands are wet.
Keep the AC power cord away from heating appliances.
Do not attempt to repair or reconstruct the AC power cord in any way.
If the unit has been dropped or otherwise damaged, turn off the power and disconnect the cord.
Hold your plug tightly when connecting or disconnecting the AC power cord to this unit.
☞
☞ Non-use periods
☞☞
When the unit is not being used, turn the power off.
When the unit is left unused for a long period of time, the unit should be unplugged from the
household AC outlet.
N.B. When you plug in the AC Power after taking the plug off from the outlet, you should wait at least
10 seconds before plugging in order to prevent the possible malfunction.
Page 6
5
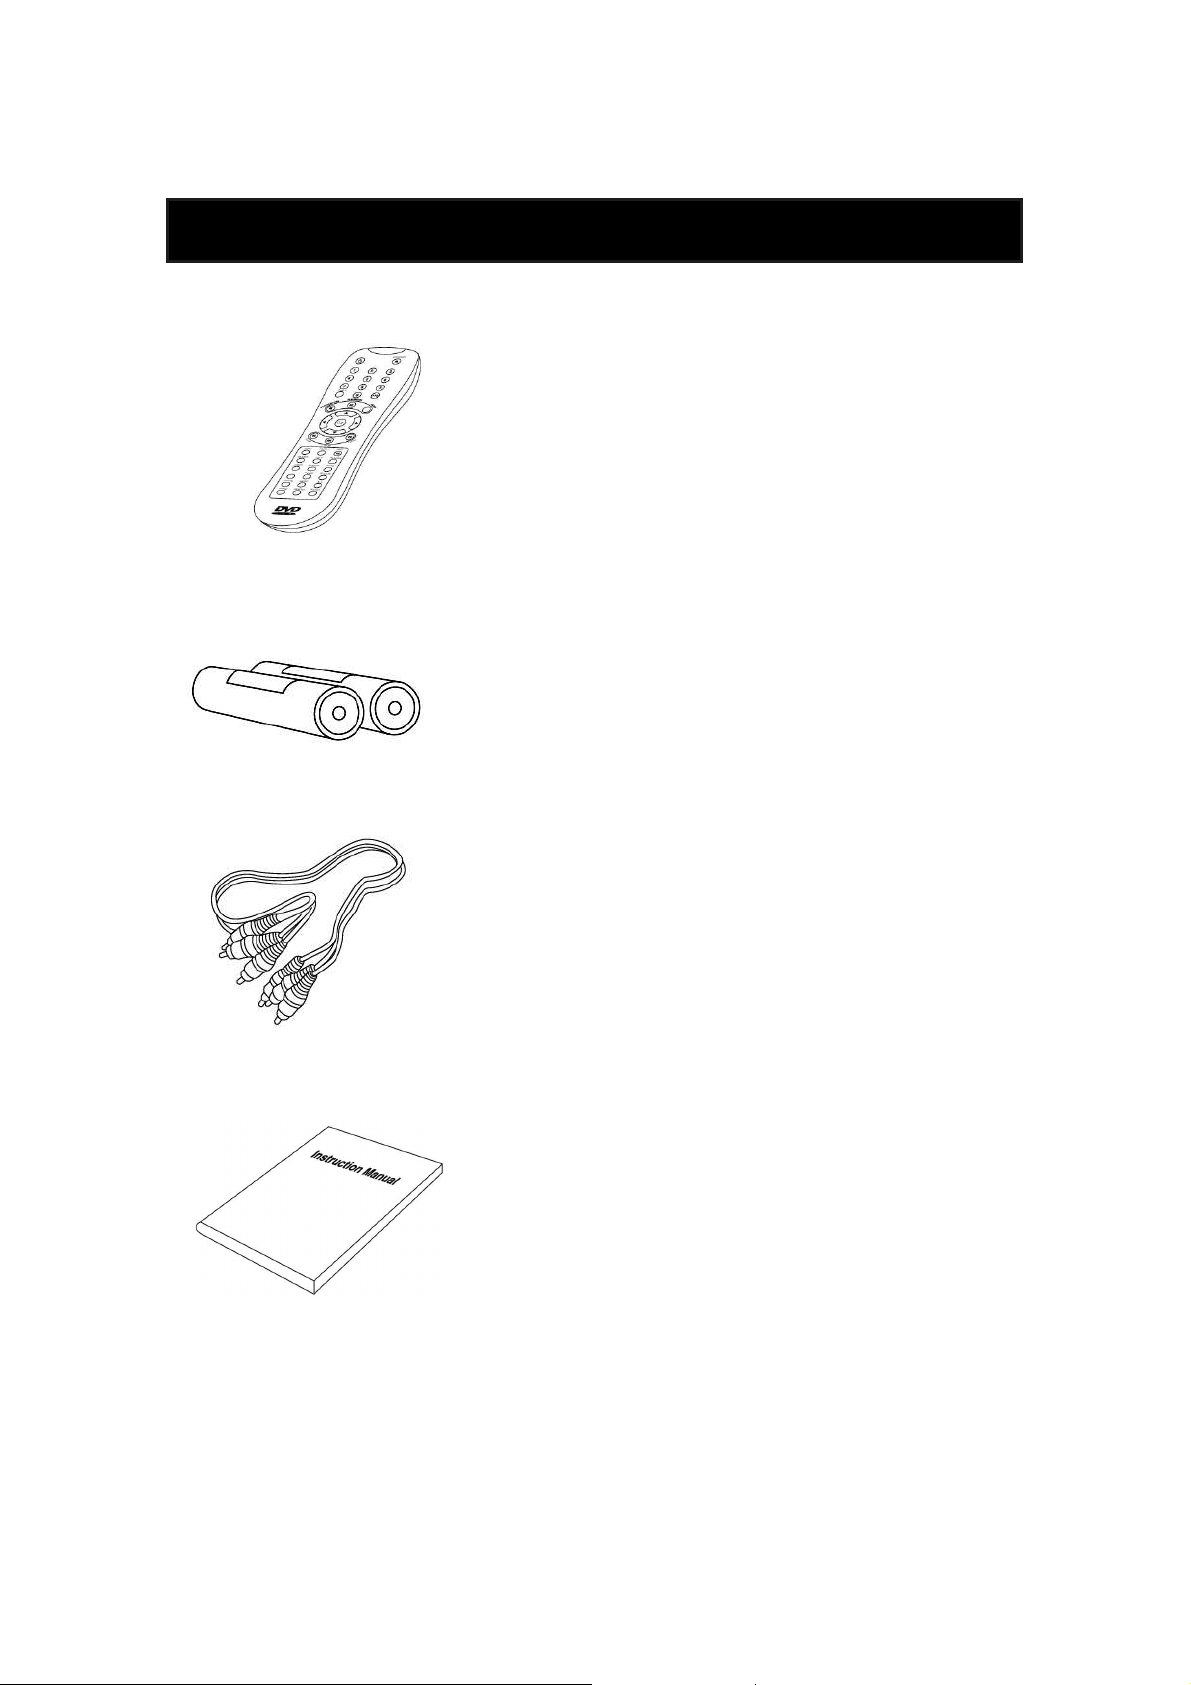
Accessories
Remote Control Unit (RCU) x 1
Batteries for Remote Control Unit x 2
(SIZE AAA 1.5V)
Audio/Video Cable x 1
Instruction Manual x 1
Page 7
6
Features
Full compatibility with DVD, Video CD (1.1, 2.0, 3.0), S-VCD and Audio CD
DISC FORMAT Playability Limitation
DVD Video Yes Region 2 or All
Version 1.0/1.1/2.0/3.0
Video CD Yes
SVCD/CVD
CD Yes PCM or dts
CD-G Yes Only Audio
Only MP3 file/
CD-ROM Yes
Up to 256 files
Video-CD / CD /
CD-R Yes
CD-ROM (with MP3 file)
Video-CD / CD /
CD-RW Yes
CD-ROM (with MP3 file)
DVD-ROM No
DVD-R Yes DVD Video only
DVD-RAM No
DVD+RW No
Photo CD No
Etc No
DVD Video CD CD
[ 8cm / 12cm disc ] [ 8cm / 12cm disc ] [ 8cm / 12cm disc ]
Page 8
7
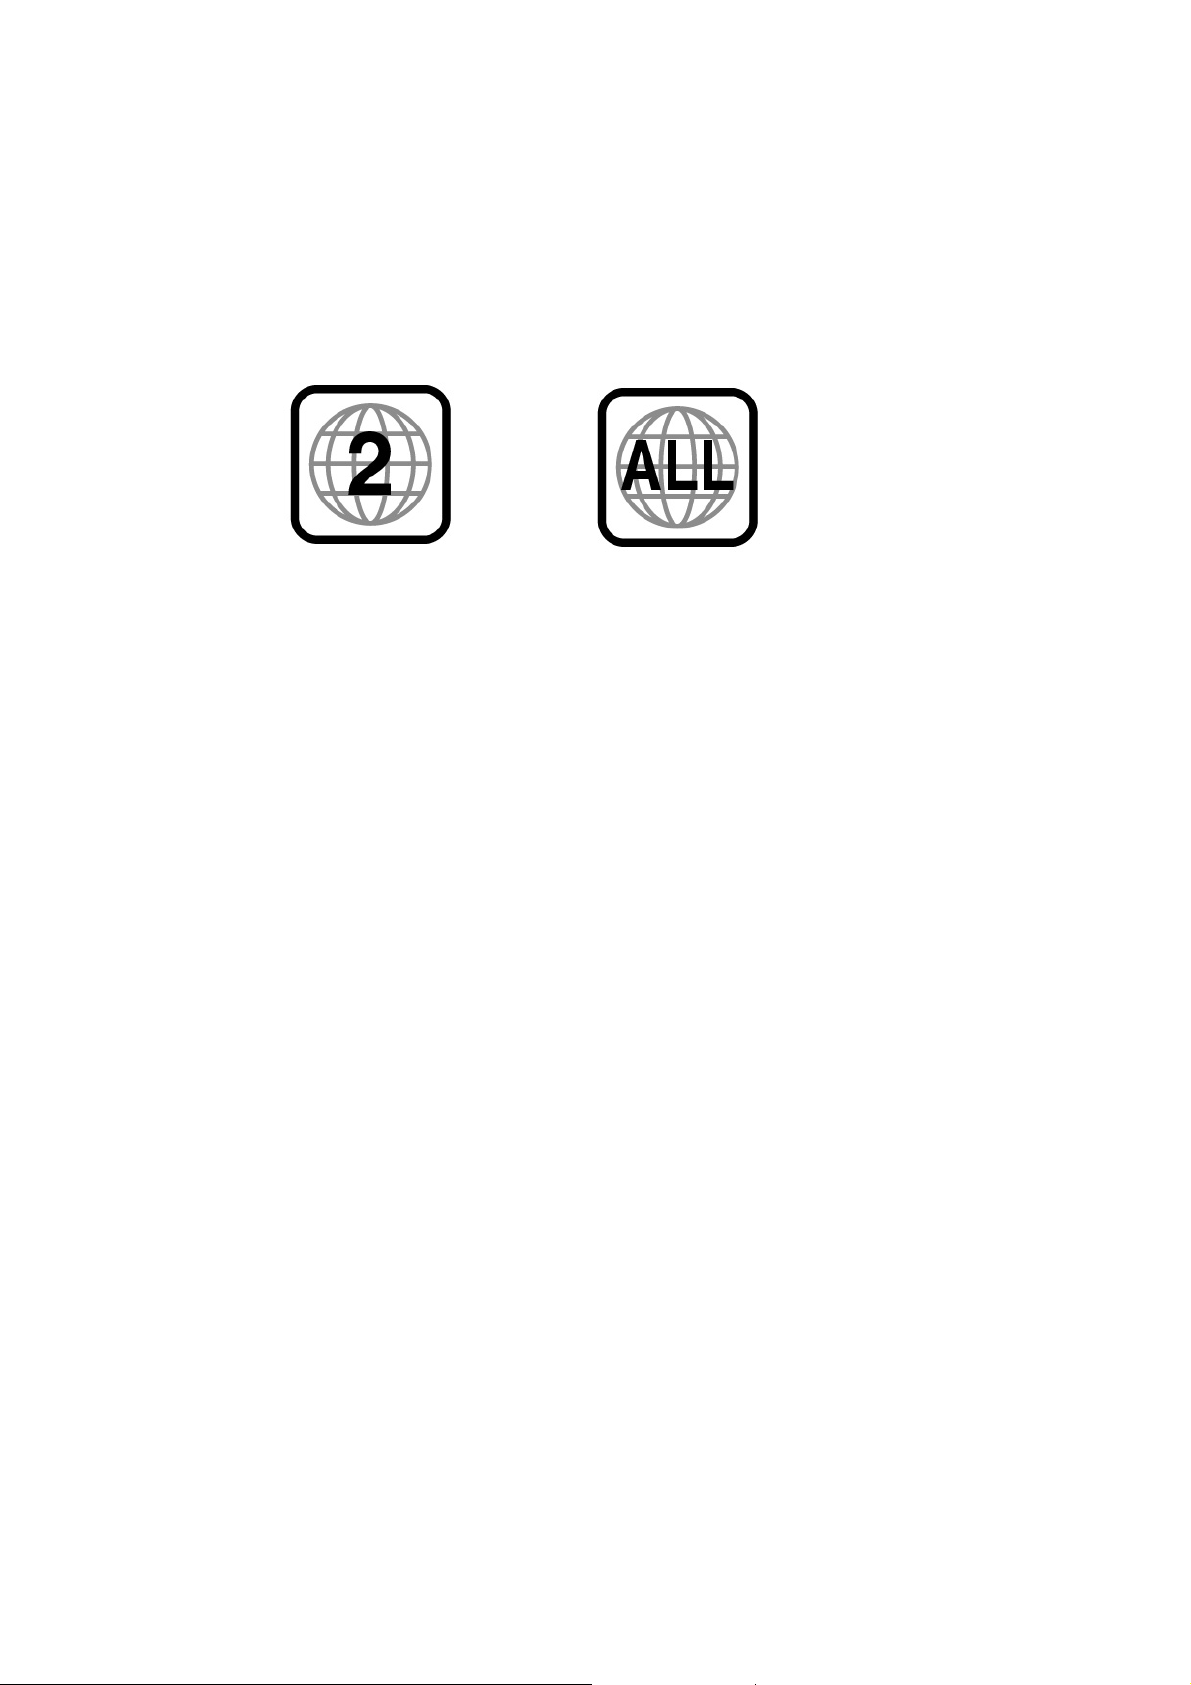
Region Management Information
This unit is designed and manufactured to respond to the Region Management Information that is
recorded on a DVD disc. The Region number of this player is “2“. If the region number described on
the DVD discs does not correspond to the Region number of this player, the player will not play this
disc. This player will play DVD discs made for “ALL” regions. Therefore, this player will play DVD
discs marked with labels containing the region number “2” or “ALL”:
(Region 2) (Region ALL)
Other Functions
MP3 Play function (CD-ROM MP3 file playback control)
Smart Scale of video for any TV type (PAL and NTSC)
GUI (Graphical User Interface) through on-screen display
By using the DISPLAY button on the Remote Control Unit or front panel, information on the
DVD/VCD/CD player and disc, can be displayed on the TV screen.
Screen saver mode when idle
3D Sound (from just 2 Speakers)
High bit / high sampling with 27 MHz / 10 bit video encoder
This unit has 27MHz / 10 bit capability, that enables the faithful reproduction of fine images.
High bit / high sampling with 96 KHz / 24 bit audio D/A converter
With this 96 KHz/24 bit linear Pulse Code Modulated signals, which constitute the highest
specifications in the DVD standards, you can enjoy faithfully reproduced sound in all of its various
modes. To support 96 KHz sampling/24 bit sound, the shaping noise of this multi-level digital
sigma type of D/A converter is kept flat up to 44 KHz, thus preventing the important audio signals
from being affected.
Coaxial digital outputs for PCM, Dolby Digital, and Digital Theatre System (dts).
By connecting a Dolby Digital/dts decoder or an amplifier incorporating a Dolby Digital/dts decoder,
you may enjoy high quality digital surround sound from Dolby Digital/dts discs.
Built-in Dolby Digital decoder
Audio analog output for 2-channel DOWNMIX (x2)
Audio analog output for 5.1-channel (x1)
SCART connector for audio/video out (x1)
Composite video out (x2)
S-Video out (x1)
Page 9

8
Slow Forward/Reverse Play
Fast Forward/Reverse Play
Title, Chapter and Time search for DVD, Track and Time search for VCD and CDs.
Multi Screen Aspect Ratio (4:3 Pan and Scan, 4:3 Letter Box and 16:9 Wide)
Repeat mode (Title/Chapter for DVD, Track (One)/Disc (All) for VCD and A-B for Both)
Marker function (up to 5 positions for convenient access, as desired)
Program function (VCD only)
Child key lock function
8 OSD (On Screen Display) languages function
This player can support eight on-screen-display languages (English, Russian, French, German,
Spanish, Italian, Dutch, Portuguese).
Parental Lock function (DVD only)
This function can prevent playback of software that may be unsuitable for children.
Multi Audio function (DVD only)
The audio soundtrack can be heard in up to 8 languages. In the case of SVCD or CVD, it depends
on the disc. (The number of audio languages depends on the software.)
Multi Subtitle function (DVD only)
The subtitle can be seen in up to 32 languages. In the case of SVCD or CVD, it depends on the
disc. (The number of subtitle languages depends on the software).
Multi Angle function (DVD only)
This function allows you to choose the viewing angle of scenes which were shot from a number of
different angles. (The number of angles depends on the software).
Closed caption (NTSC only)
Smart Zoom display function
Digest function (VCD with PBC off only)
Head Phone input (x1)
Head Phone volume level (x1)
Page 10

9
Definition of Terms
CDDA
Compact Disc Digital Audio
SVCD
SVCD short for Super Video CD. It's a kind of integrated Video CD.
DVD
Digital Versatile or Video Disc. DVD is a high dense optical disc recorded with high quality pictures
and sound.
MP3
Audio compression format that enables audio files to be stored and transferred on a computer with a
relatively small file size. It enables you to enjoy CD quality music. (Short for MPEG-1 Layer 3)
PBC
This is recorded on a Video CD 2.0, Video CD 3.0, SVCD and CVD. The scenes or information to be
viewed (or listened to) can be selected interactively with the TV monitor by looking at the menu shown
on the TV monitor. It stands for Play Back Control.
CHAPTER
A title is subdivided into many sections, each section is numbered, and specific parts of video
presentations can be searched quickly using these numbers.
TITLE
When a disc contains one or more movies, these movies are split into titles.
TRACK
Numbers are assigned to the tracks, which are recorded on Video CDs and CDs.
dts
Digital Theatre System is a 5.1-channel surround sound system, which is widely used in movie
theatres around the world. It enables the bit rate to be increased to provide good sound quality.
Multi Angle
Some DVD discs contain the various scenes that have been simultaneously shot from a number of
different angles.
Dolby Digital
A versatile and popular digital audio coder developed by Dolby Laboratories, Inc. It allows the use of
low data rates while still achieving excellent sound quality for 1 to 5.1 channels of audio.
Dolby Pro Logic
A popular active decoder for creating up to four channels of audio from Dolby Surround-encoded
2-channel material.
Page 11

10
PCM
Linear PCM is a signal-recording format used in a CD, While CD is recorded in 44.1 kHz/16 bit, a DVD
is recorded in 48 KHz/16 bit up to 96 KHz/24 bit.
Bitstream
A digital signal that comes out of CD and DVD players. Bitstreams can contain Dolby Digital, dts, PCM,
or other kinds of data.
L/R/C/LFE/LS/RS
In Dolby Digital and dts, a total 6 channels are used. 3 channels for front, 2 channels for surround and
1 channel for subwoofer. They are a front left, a front right, a center, a subwoofer, a rear left and a rear
right. L stands for front left, R for front right, C for center, LFE for subwoofer, LS for rear left surround
and RS for rear right surround.
DOWNMIX
In some listening situations, the audio output channel configuration will not match the encoded
channel format on the disc. ‘Downmixing’ is required in order to reproduce the complete audio
program. The downmix takes the information in the channels which do not have corresponding outputs
and mixes this information into the remaining channels.
S-VIDEO
The S-VIDEO output separates the color (C) and luminance (Y) signals before transmitting them to the
TV set in order to achieve a sharper picture. So this must be selected from the menu to enable the SVIDEO output to function.
Page 12
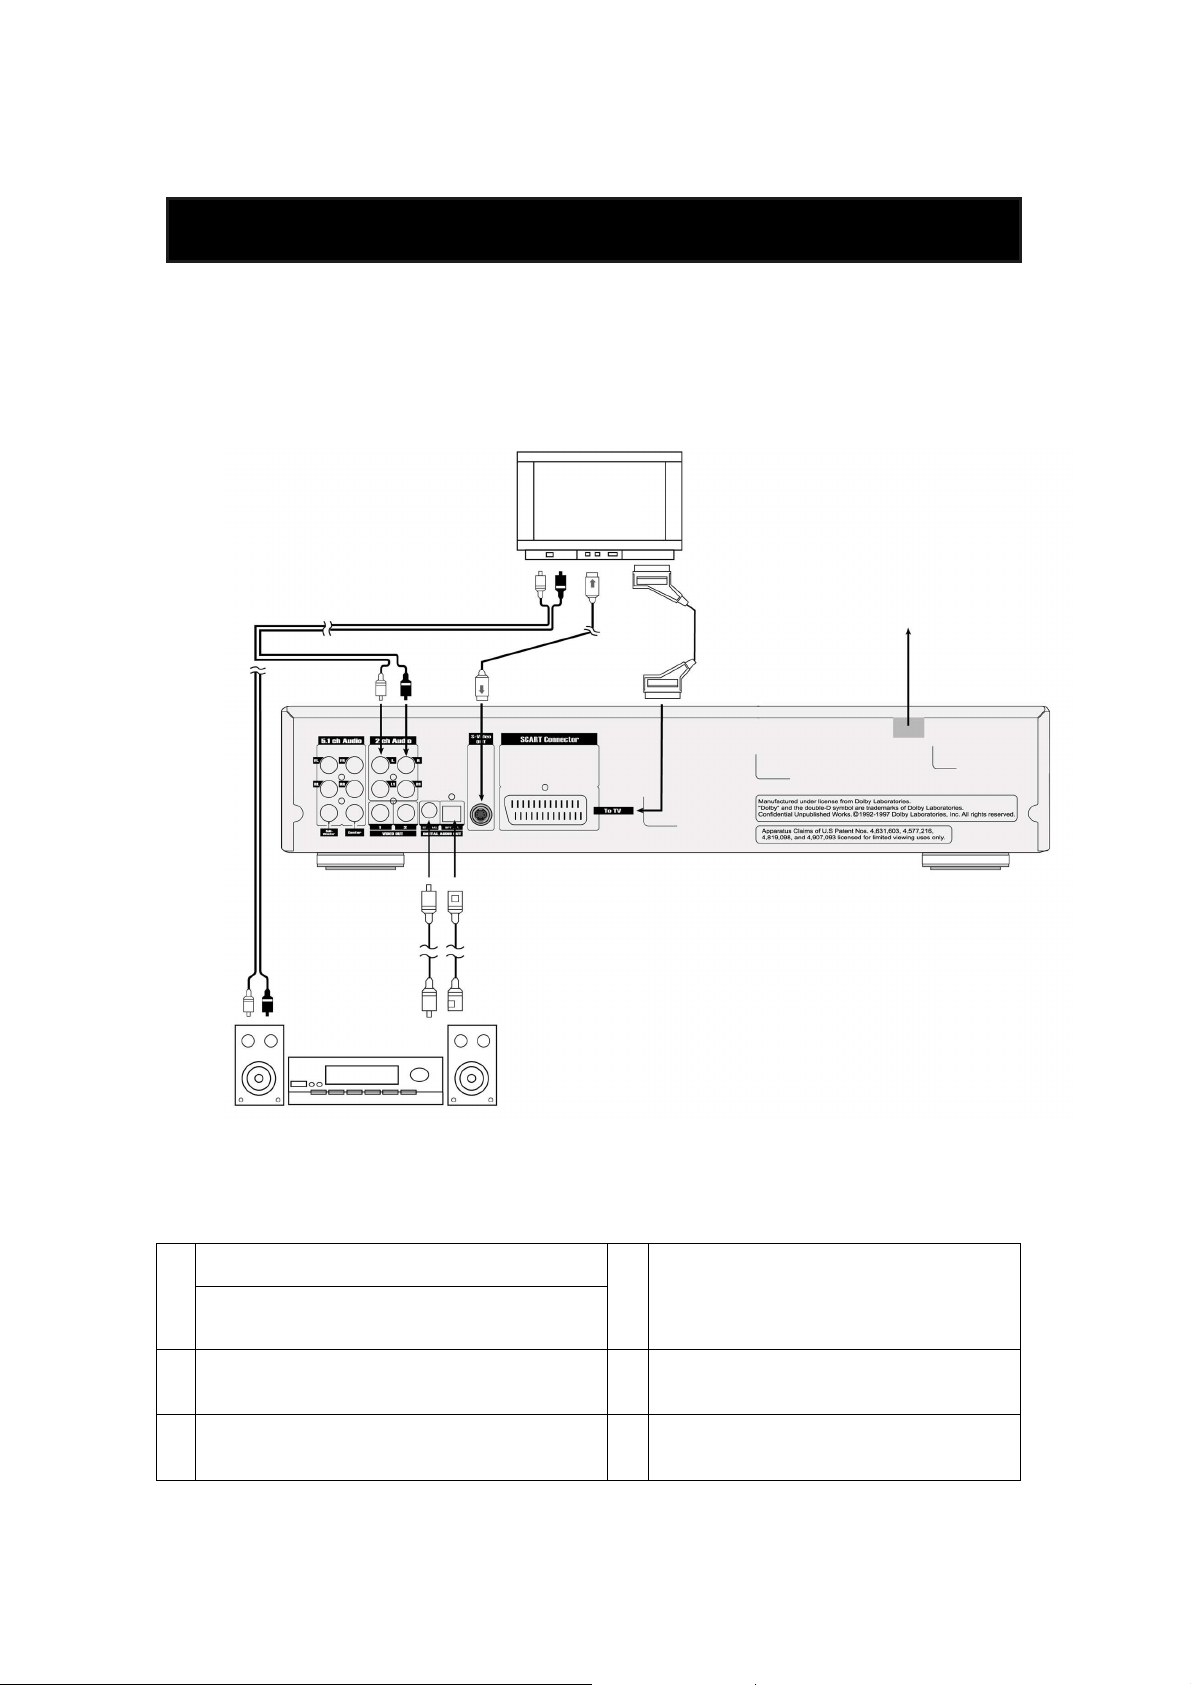
11
Basic Connection
d
TV
set
Audio equipment
N.B. First of all, read through the instructions before connecting other equipment. Make sure that this
unit and other equipment to be connected are set to the standby mode or off, and disconnect the AC
mains before starting connection. In order for air to circulate freely, please do not block ventilation holes
of any of the equipment. Select the appropriate screen size at the initial setting according to your TV set,
conventional 4:3 or wide screen 16:9.
a
e
f
Video/audio cable
To audio input connectors on TV (red, white)
a
Video/audio cable
To audio input connectors on audio equipment
(red, white)
Coaxial audio cable
b
To coaxial digital audio input connector
Optical digital audio cable.
c
To optical digital audio input connector
b
c
21-pin SCART cable
d
To 21-pin SCART input terminal
(RGB where available)
S-Video cable.
e
To S-Video input connector on TV
Mains lead
f
To mains socket (90-250V, 50/60Hz)
Page 13
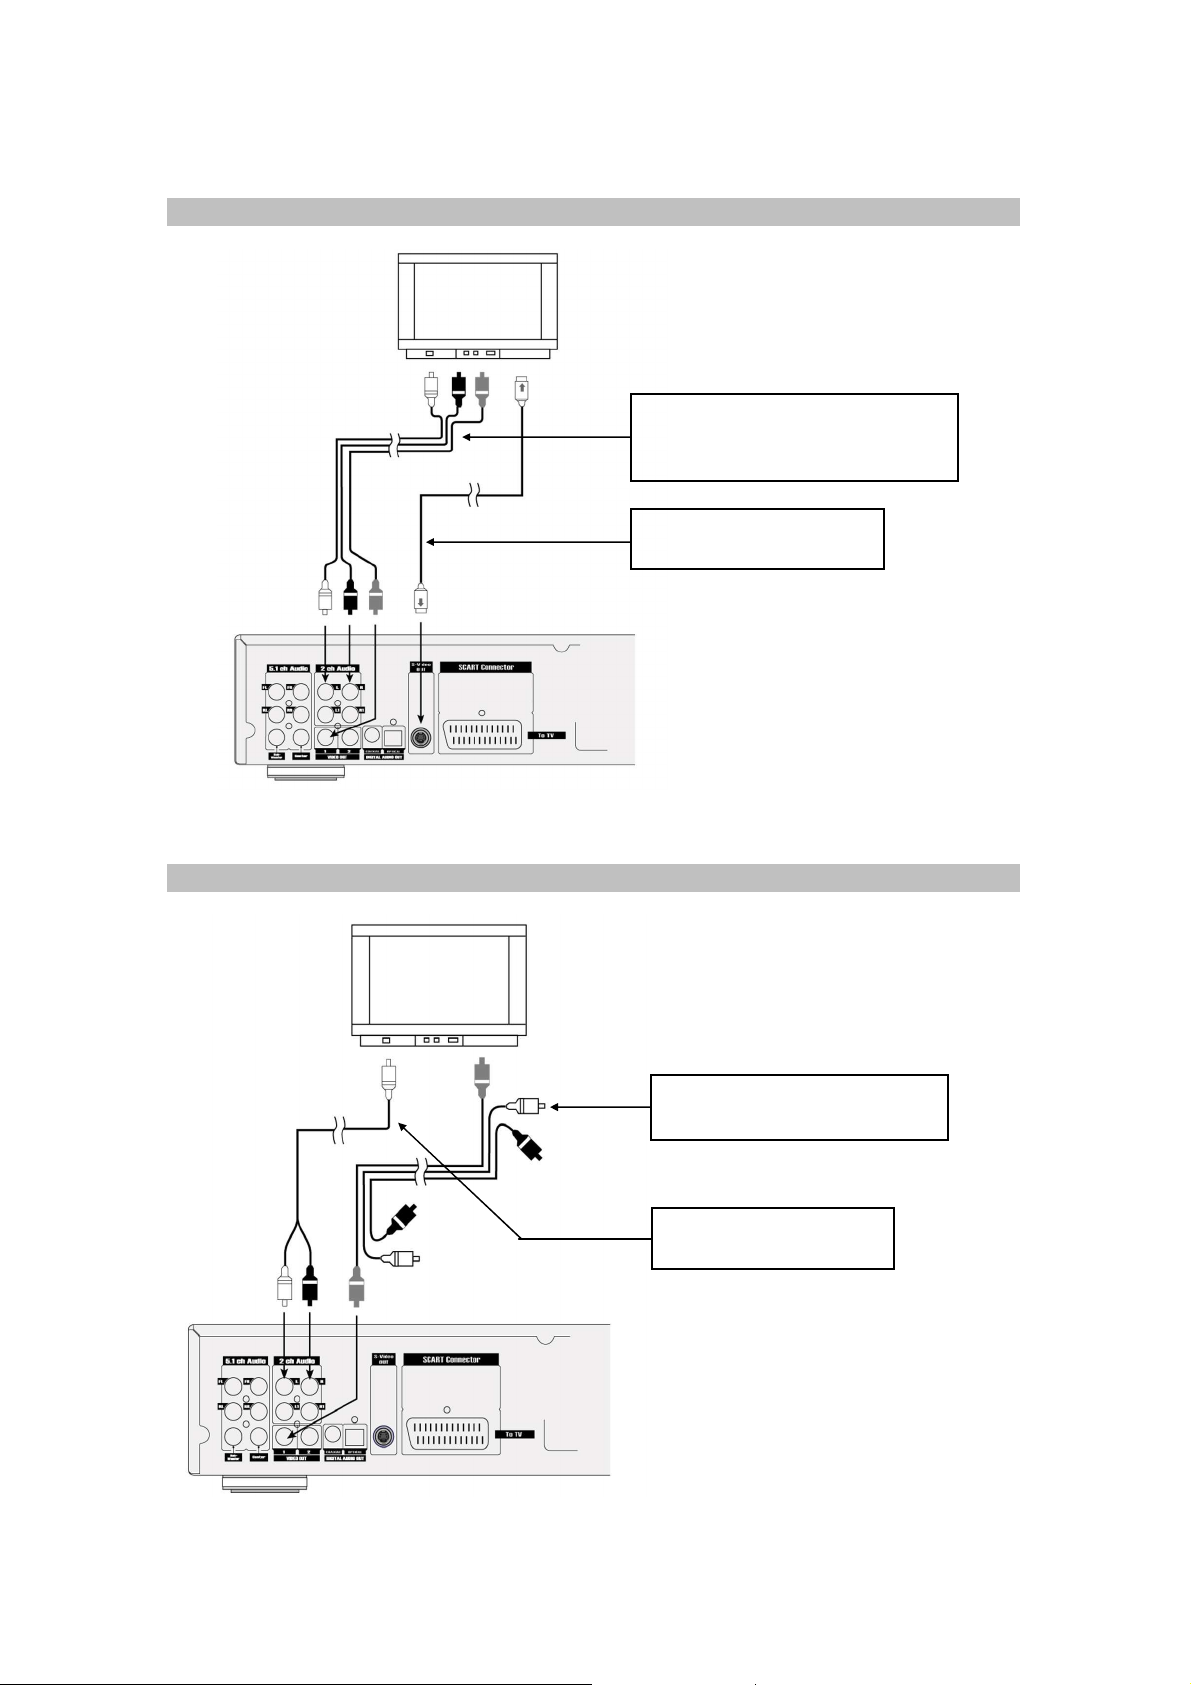
12
1 Connecting to a stereo TV set
Video/audio cable (supplied)
To audio input connector (red, white)
To video input connector (yellow)
S-Video cable (optional)
To S-Video input connector
2 Connecting to a monaural TV set
Video/audio cable (supplied)
To video input connector (yellow)
Audio cable (optional)
To audio input connector
Page 14
13
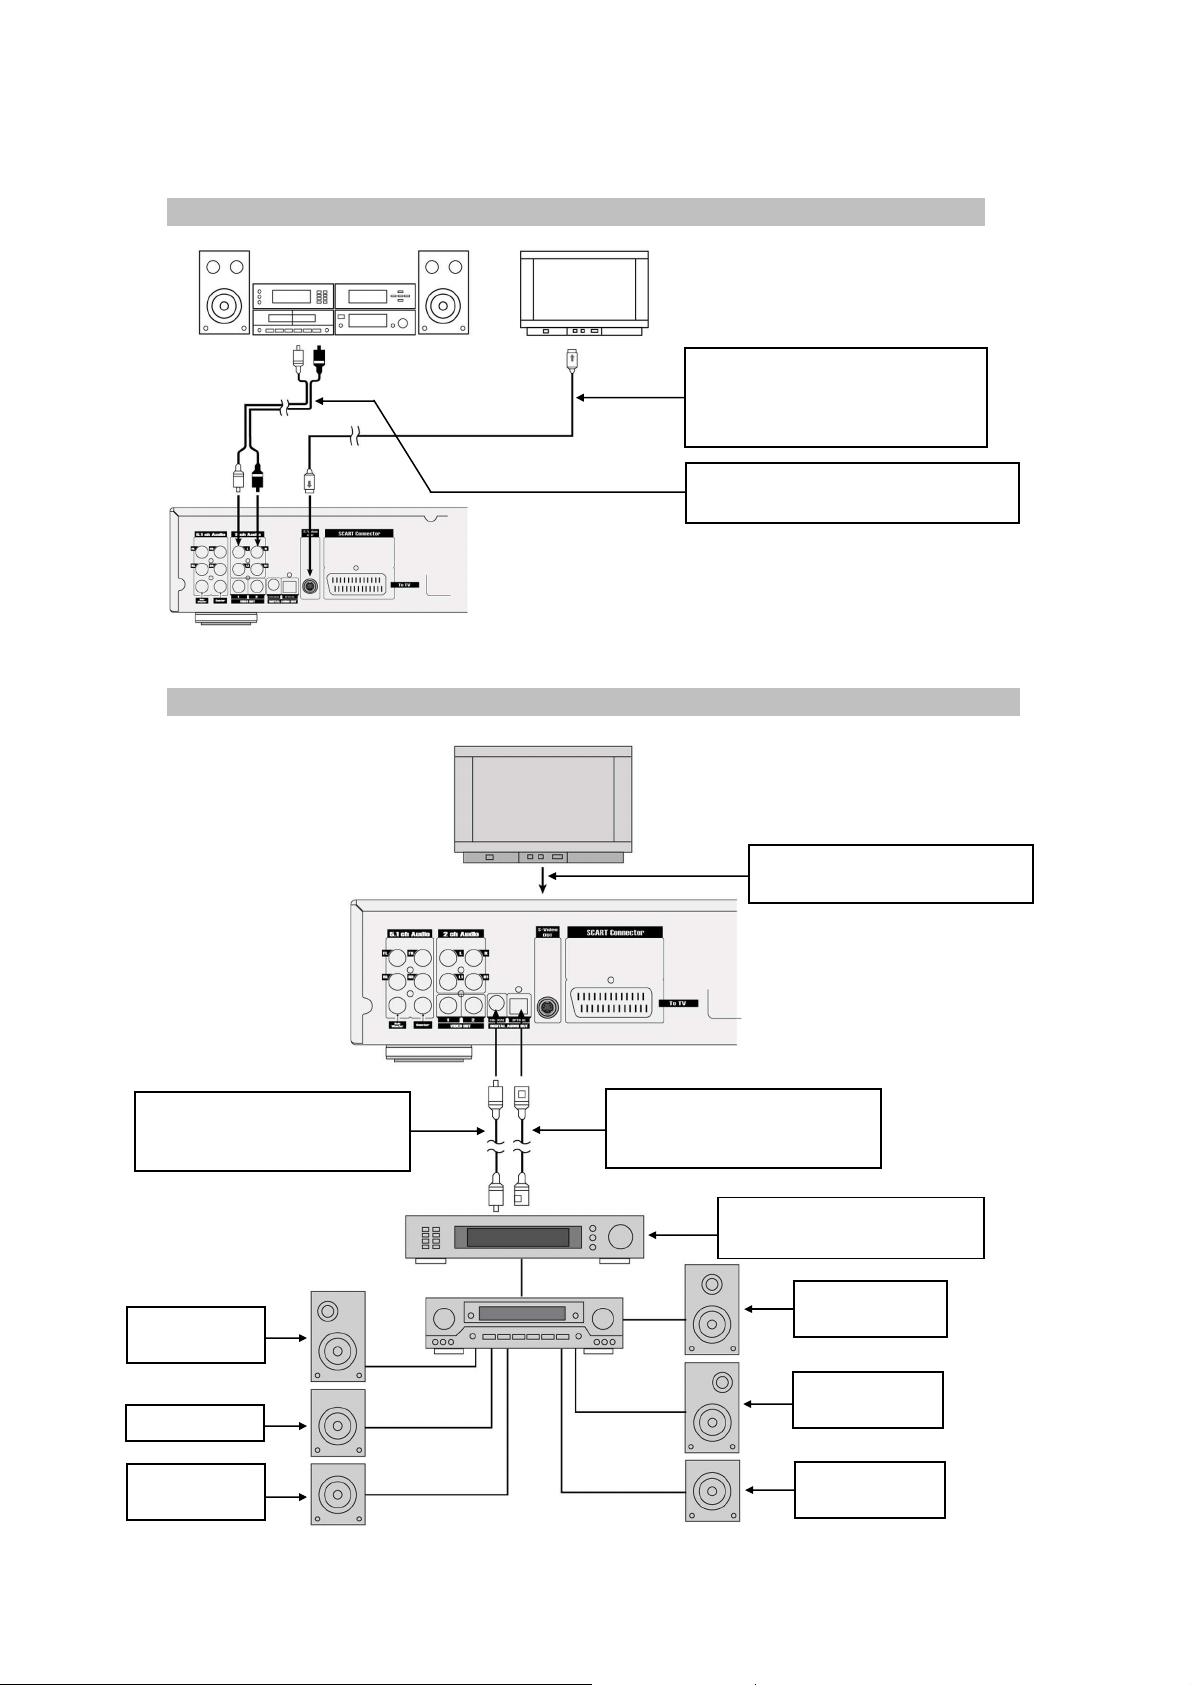
3 Connecting to audio equipment
Audio equipment
TV set
speaker (left)
Subwoofer
speaker (left)
speaker
speaker (right)
speaker (right)
S-Video cable (optional)
To S-Video input connector
Video/audio cable (supplied)
To video input connector (yellow)
Audio cable (optional)
To audio input connector (red, white)
4 Connecting to a decoder with Dolby Digital or dts processing
TV set
Video/audio cable (supplied)
S-Video cable (optional)
Coaxial audio cable (optional)
To coaxial digital audio input
connector
Front
Surround
Optical audio cable (optional)
To optical digital audio input
connector
Decoder or Amplifier with
Dolby Digital / dts processing
Centre
Front
Surround
Page 15
14
5. Connecting to a Dolby Pro Logic decoder
speaker (left)
(optional)
speaker
speaker
speaker (right
)
speaker
TV set
Video/audio cable (supplied)
S-Video cable (optional)
SCART cable (optional)
Dolby Pro Logic decoding amplifier
Front
Subwoofer
Surround
Centre
Front
Surround
N.B. You should set the DOWNMIX mode to LT/RT before using this configuration. Refer to the user’s
manual of amplifier to connect the speakers.
Page 16

15
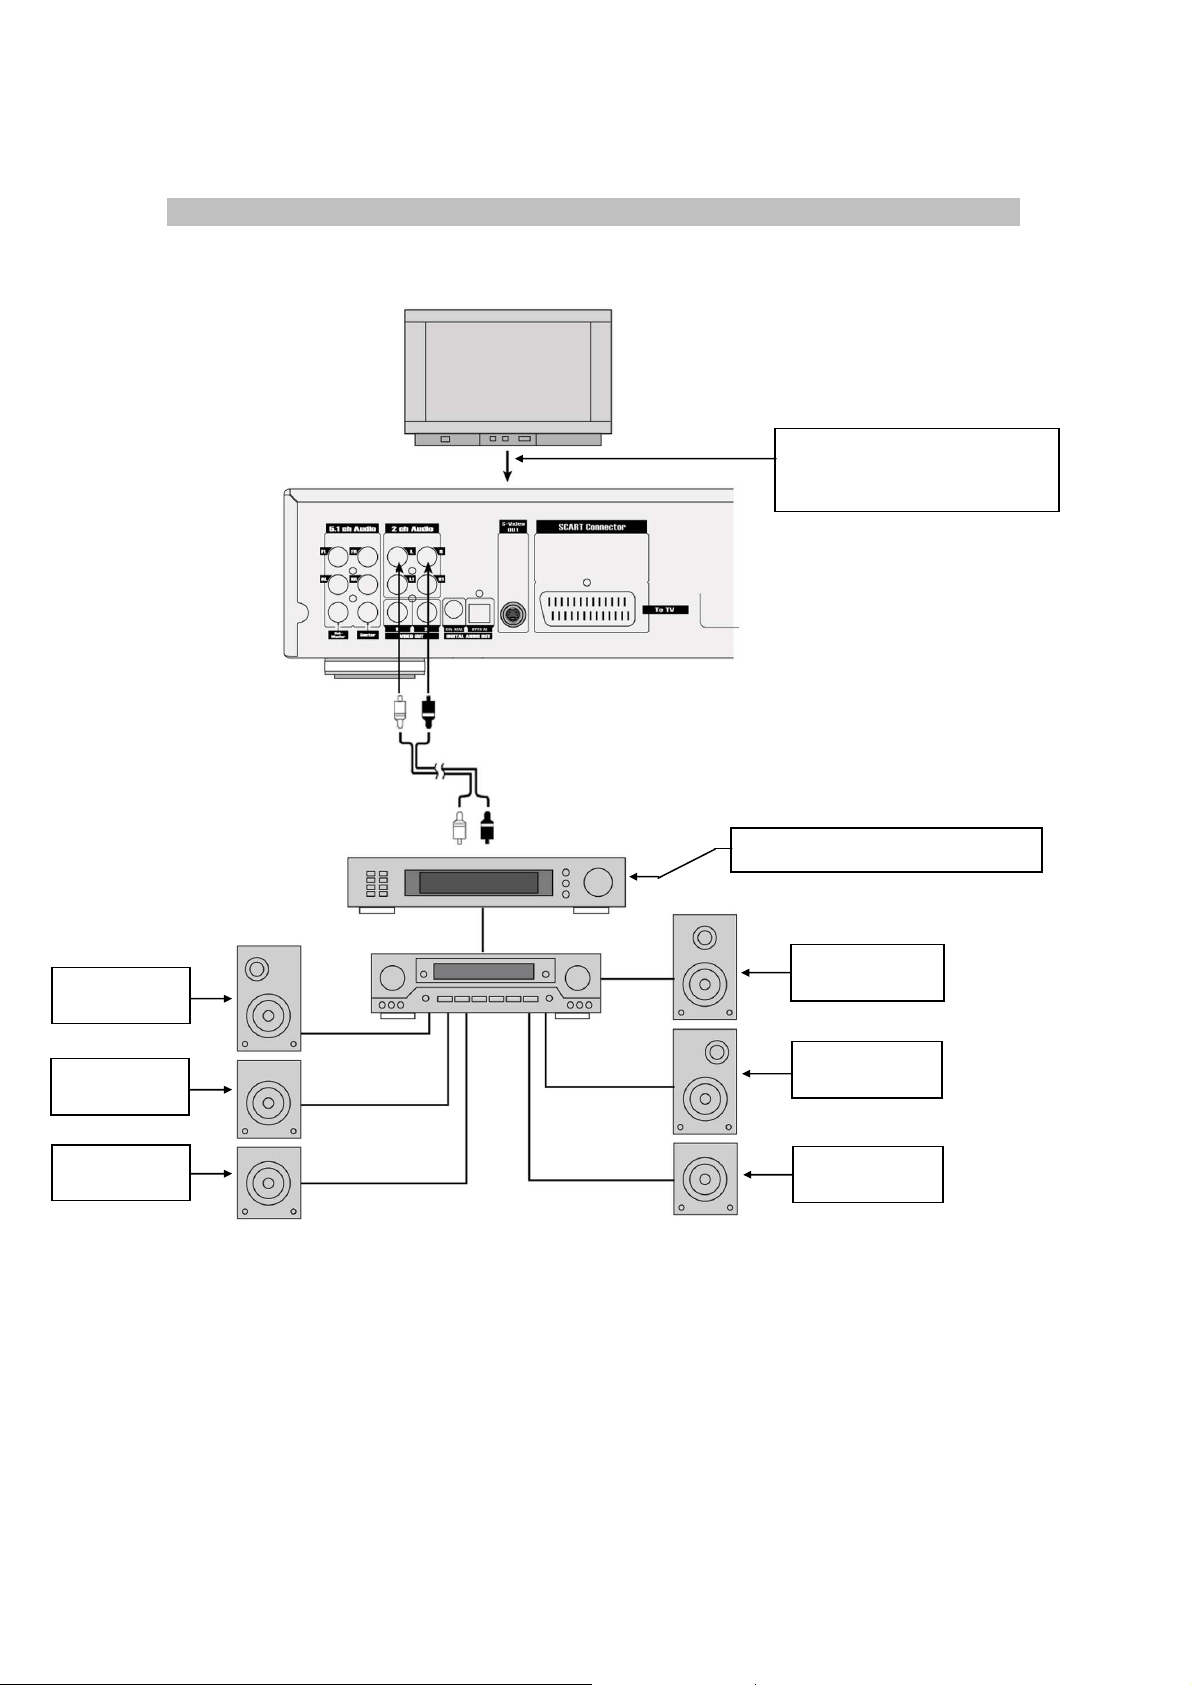
6. Connecting to an analogue 5.1 channel amplifier r
speaker (left)
Subwoofer
speaker (left)
speaker
speaker (right)
speaker (right)
Front
TV set
Video/audio cable (supplied)
S-Video cable (optional)
a
c e
b
d
f
Analog 5.1 channel amplifier
Centre
Surround
a To FRONT LEFT input connector on amplifier d
b To FRONT RIGHT input connector on amplifier e
c
To SURROUND LEFT input connector on
amplifier
Front
Surround
To SURROUND RIGHT input connector on
amplifier
To SUBWOOFER input connector on
amplifier
f To CENTER input connector on amplifier
Page 17

16
FLUORESCENT DISPLAY
5
7
4
86 9
2
11
10 12
3
1
15 13
14
16 17
Control Reference Guide
1. Front Panel
1 POWER (STANDBY/ON) button
To switch the unit On or Off when connected to AC power outlet.
2 DISC TRAY
To load or unload a disc. Put a disc to be played on here.
3 OPEN/CLOSE button
To open or close the disc tray.
4 REMOTE SENSOR
Receives a light signal from the remote controller.
5
Displays operation status (Refer to diagram at 2. Fluorescent Display).
6 PLAY/SELECT button
To play the loaded disc. Press this button to go to the preferred item when the menu is displayed on
the TV screen.
7 STEP button
Used to view one frame at a time during play. When you continue pressing this button, it will function
continuously. Press PLAY/SELECT button for normal play.
8 STOP button
To stop playing. If using a Video CD 2.0, SVCD or CVD with PBC, this button works as a RETURN
function to move to the previous menu. Use the PBC button on remote controller to stop.
9 FF (Fast Forward) button
To play the disc fast forward. It can also be used as a Slow Forward button when in pause or step
mode or a right arrow button when in menu mode.
10 FR (Fast Reverse) button
To play the disc fast reverse. It can also be used as a Slow Reverse button when in pause or step
mode or a left arrow button when in menu mode.
Page 18

17
11 NEXT button
To skip forward to the next chapter (for DVD) or track (for VCD or CD). When in menu mode, this
button also works as an up arrow(▲) button. If playing a Video CD with PBC, this button works as the
NEXT button to move to the next play list.
12 PREV button
To skip back from the current chapter (for DVD) or track (for VCD or CD). When in menu mode, this
button also works as a down arrow(▼) button. If playing a Video CD with PBC, this button works as
the PREV button to move to the previous play list
13 DISPLAY button
Multiple functions are included in this button. Viewing the playing information and title, chapter or track
search, time search. Bit rate meter function for DVD is also possible. See 6.8 DISPLAY for more
information
14 MENU button
To view the general information for the current loaded disc such as language selection, audio output
selection and subtitle language selection and so on
15 SETUP button
Used to set up the various operation information of this unit to customize DVD performance.
16 PHONES
Used to make connection with the head phone. Please insert the head phone jack into this socket.
The downmix mode is selected automatically whenever the headphones are plugged in.
17 PHONES LEVEL
Used to adjust the phone volume.
Page 19

18
2. Fluorescent Display
1 3 4 11 12 8 9 10
5 6 2 7 13
1 CDDA/SVCD/PBC/DVD/MP3
Illuminates the type of a disc loaded on disc tray
2 TITLE/CHAPTER
Illuminates the information of the TITLE or CHAPTER of the DVD disc under play
3 PLAY/PAUSE/STEP
Illuminates the current operation mode
4 ROTATION
Rotates when the disc is spinning
5 SHUFFLE
Illuminates under shuffle mode (Video CD with PBC off or CDDA only)
6 PROGRAM
Illuminates under program mode (Video CD with PBC off or CDDA only)
7 REPEAT T, C, 1, A-B, ALL
Illuminates when the current play mode is under repeat title, chapter, track (single), A-B, disc (all)
respectively
8 ANGLE
Indicates the current disc being played is viewed as multi angle. This function only works for discs
having scenes recorded at different angles
9 SUB-T
Indicates the current disc under play has multi subtitle. This function only works for discs having
recordings with multiple subtitle languages
10 AUD
Indicates the current disc under play has multi audio soundtrack languages. This function only works
for discs having recordings in multiple audio soundtrack languages
11 DTS, LPCM, MPEG,
Indicates the audio type of the disc under play is DTS, LPCM, MPEG or
12 L, C, R, LFE, LS, S, RS
Indicates the audio channel information of the disc under play. For DVD discs having the Dolby Digital
audio
13 TIME
Indicates time information and sometimes system information like STOP, MENU and so on
Page 20

19
Remove the dust protection cap from the optical digital audio output connector and connect
3. Rear Panel
5
1 DIGITAL OUT (COAXIAL or OPTICAL)
Connects digital audio under play mode into an AV amplifier or a receiver equipped with digital audio
decoder for you to enjoy the theatre-quality sound in your home.
2 VIDEO OUT
Connects composite video signal to Input AV/SCART or PHONO sockets of TV or monitor to achieve
high fidelity colour reproduction.
3 S-VIDEO OUT
Connects to TV or monitor equipped with S-VIDEO input. In order to achieve a sharper and cleaner
picture than that when connected via VIDEO OUT (composite video).
4 2 CHANNEL ANALOGUE AUDIO OUT
Two phono sockets for analogue 2 channel audio output in order to connect to a TV or stereo amplifier.
Use this sockets when the DOWNMIX mode is enabled (Lt/Rt or Lo/Ro). When the DOWNMIX mode
is enabled, the L, R, L1 and R1 output the downmixed 2 channel analogue audio. When the
DOWNMIX mode is OFF (multichannel mode enabled), the L, R, L1 and R1 output the FRONT left and
FRONT right respectively.
5 5.1 CHANNEL ANALOGUE AUDIO OUT
Six phono sockets for analogue 5.1 channel audio output in order to connect to an amplifier with
analogue 5.1 channel input terminal. They are FRONT left, FRONT right, SURROUND left,
SURROUND right, SUBWOOFER, CENTER respectively.
6 SCART Connector
If VIDEO OUT phono is not utilized, the SCART socket can be used to connect to a TV set, monitor or
VCR.
7 AC in power cord connection terminal
Creates POWER between wall outlet and the unit.
N.B.
the cable firmly so that the configurations of both the cable and connector match.
N.B.
dts decoder when you set the digital out option of setup information to BITSTREAM.
4
2
Do not connect to the digital audio input of an amplifier that does not have Dolby Digital and
3
1
6
7
Page 21

20
4. Remote Controller Unit
1. POWER
Numbers for each button on the remote control unit will be indicated in parenthesis mark
starting from the next page.
2. OPEN/CLOSE
3. NUMERIC BUTTONS (1-9, 0)
4. CLEAR
5. PBC
6. PLAY/PAUSE
7. STOP/RETURN
8. SETUP
9. ARROW (Left, Right, Up, Down)
10. SEL (SELECT)
11. FR/SR
12. FF/SF
13. STEP
14. PREV
15. DISPLAY
16. NEXT
17. MARKER
18. TITLE
19. MENU
20. ANGLE
21. SUBTITLE
22. AUDIO
23. VOLUME (+, -)
24. ZOOM
25. 3D SOUND
26. REPEAT
27. A-B
28. DIGEST
29. PROGRAM
30. SHUFFLE
Page 22

21
4.1 General Function for Remote Control Unit
1 POWER (1)
Activates the unit POWER ON or STANDBY.
2 OPEN/CLOSE (2)
After pressing power button, press OPEN/CLOSE button to open or close the disc tray. If pressed
under STAND BY, power is automatically turned on and the tray is opened.
3 NUMERIC (3)
Used from the menu to select, title/chapter search, time search and direct track number.
4 CLEAR (4)
Used when discarding wrong number input, returning to normal play during slow or search. This button
can also be used when clearing zoom state.
5 VOLUME +/- (23)
Used when adjusting analogue audio output level. This function doesn’t work if using digital audio
output utilizing the coaxial or optical connector.
4.2 Basic Function
1 PLAY/PAUSE (6, )
Use this button to play or pause the disc. Pressing this button during play, causes the disc to pause if
in pause mode it functions as the PLAY button.
2 STOP/RETURN button ( 7,
To stop the current playing mode, press STOP (7).
When using VIDEO CD 2.0, CVD, and SVCD with PBC function included, this button works as a
RETURN button. To stop PBC disc, use PBC button (5).
3 STEP button (13, )
Use this button to play one frame at a time. To do step backward, press this button during reverse
operation i.e. fast reverse or slow reverse.
4 FF/SF (12, )
To play a disc fast forward or slow forward. During pause or step state, this button works as Slow
Forward. See 5.7 and 5.9 for more information.
5 FR/SR (11, )
To play a disc fast reverse or slow reverse. During pause or step state, this button works as Slow
Reverse. See 5.7 and 5.9 for more information.
6 NEXT (16, )
Used to move to the next chapter (DVD) or track (VCD or CDDA) from the current chapter or track.
Pressing this button shows next play list when playing VCD with PBC. See 5.8 for more information.
7 PREV (14 , )
Used to move to the previous chapter (DVD) or track (VCD or CDDA) from the current chapter or track.
Pressing this button shows previous play list when playing VCD with PBC. See 5.8 for more
information.
■■■■
)
Page 23

22
4.3 Advanced Functions
1 REPEAT (26, Except VCD with PBC on)
To set up the repeat viewing during play. Two repeat modes are possible. When using a DVD,
REPEAT C repeats the current chapter and REPEAT T repeats all chapters in the current title. When
using a VCD with PBC off or CDDA, REPEAT 1 repeats the current track and REPEAT ALL repeats all
tracks on the disc. To clear the repeat function, press this button until you see REPEAT OFF on the
TV screen. Turn off PBC to use this function on VCD with PBC included. See 6.3 for more
information.
2 A-B (27, Except MP3)
To repeat the selected segment. The moment you press this button during play, the starting point for
the desired segment is selected. When you press this button again, the ending point is selected and
starts repeated play of the selected segment automatically. Press this button again to cancel the
repeating of the selected segment. See 6.2 for more information.
3 PROGRAM (29, VCD with PBC off and CDDA only)
Use this button to play the tracks, which you want to watch. You can program desired tracks up to the
total programmed time of 99 minutes. Turn off PBC to use this function on VCD with PBC included.
See 6.5 for more information.
4 SHUFFLE (30, VCD with PBC off and CDDA only)
Use this button to play the loaded disc in a random order. Turn off PBC to use this function on VCD
with PBC included. See 6.4 for more information.
5 DIGEST (28, VCD with PBC off and CDDA only)
Use this button to do quick search or preview the disc contents. This function shows thumbnail
contents of the loaded disc. Turn off PBC to use this function on VCD with PBC included. See 6.8 for
more information.
6 ZOOM (24, Except CDDA and MP3)
Enlarges DVD or VCD screen images up to eight times. You may also move the image using left, right,
up and down arrow button (9). See 6.9 for more information.
7 MARKER (17, Except MP3)
Stores playing point up to five locations for the easy search, when you want to move to the stored
playing point. See 6.7 for more information.
8 DISPLAY (15, Except MP3)
This button has multiple functions. Supports search of a chapter/title for DVD or a track for VCD and
CDDA. Also shows information for elapsed or remaining time. On DVD, you may see bit rate meter.
See 6.8 for more information.
9 3D SOUND (25)
Adds 3D surround effect to analogue audio output when downmixed. There are 4 surround modes.
See 6.1 for more information.
10 PBC (5, VCD with PBC only)
You may turn on or off the PBC function by pressing this button. When the VCD with PBC is loaded,
PBC function is enabled automatically. Video CD 2.0, SVCD and CVD are PBC controllable.
Page 24

23
4.4 DVD Function
1 TITLE (18)
Used to display the title menu of the loaded DVD disc. This function is disc dependent. A DVD disc
may not contain the title menu. See 5.5 for more information.
2 MENU (19)
Used to display the contents menu of the loaded DVD disc. This function is disc dependent. A DVD
disc may not contain a contents menu. See 5.5 for more information.
3 ANGLE (20)
Used to select a different angle when the loaded DVD disc supports multiple angles. This function is a
disc dependent. Many DVD discs don't support multiple angles. See 5.12 for more information.
4 SUBTITLE (21)
Used to change the subtitle language to a different language or off from the one selected at the initial
settings, when the loaded disc supports multiple languages. See 5.11 for more information.
5 AUDIO (22)
Used to change the audio language to a different language from the one selected at the initial settings,
when the loaded disc supports multiple audio languages. See 5.10 for more information.
4.5 SETUP Function
1 ARROW (9, ◀◀◀◀/▶▶▶▶/
Used to move to the desired menu and moves the image centre of an enlarged screen in zoom mode.
Also can be used in marker or display function.
2 SELECT (10)
Used to select the menu item. When pressed during STOP, PAUSE, STEP, SEARCH or SLOW state,
it also cancels the current state and converts to PLAY mode.
3 SETUP (8)
Sets up the various operation information of this unit to customize DVD performance. See 7 for more
information.
▲
▲/▼
▼
▲▲
▼▼
)
Page 25

24
5. Using Basic Function
5.1 Open/Close Disc Tray
1 Connect to AC power
When AC power is connected, the STAND-BY LED on the front panel is turned on.
2 Press POWER button
When the POWER button is pressed, the STAND-BY LED turns off. TV or monitor screen shows
the initial pictures as shown below.
3 Press OPEN/CLOSE button
When the disc tray opens, OPEN message is displayed on TV screen and Fluorescent display on
front panel simultaneously.
4 Load your selected disc using disc tray guide with logo-printed side up
5 Press OPEN/CLOSE button again to close the disc tray
Page 26

25
5.2 Basic play of DVD, VIDEO-CD or CDDA
1 Press PLAY/PAUSE button
When you press the PLAY/PAUSE button, the disc tray will be closed if opened and play will start
automatically. In the case of many DVD movies, an interactive DVD or Video CD with PBC, a
menu screen appears on the TV. In this case you should follow next instruction.
DVD menu screen Video CD menu screen
2 When a menu screen appears on the TV screen
When a DVD disc is loaded, select desired menu item using arrow button or numeric button
(remote only) and then press SELECT button to start play. When a VCD is loaded, select desired
menu item using numeric button (remote only) and then press SELECT button to start play.
Selecting DVD Menu Selecting Video CD Menu
5.3 Basic play of MP3
1 Load MP3 disc
When an MP3 disc is loaded, MP3 menu screen is displayed automatically depending on MP3
disc's folder (directory) structure as shown below.
2 Select desired folder
Use the arrow button to select the folder you want to play, by pressing the SELECT button. This
button allows, you to see the file lists under the folder.
Page 27

26
3 Select MP3 title when stopped
Use arrow button and select an MP3 title using the SELECT button then play will start
automatically. When you know the title number, enter the MP3 title number using the numeric
buttons on the remote controller and then press the SELECT button.
Selecting MP3 file
4 Select MP3 title when playing
Press NEXT button on remote controller to choose next title. Press PREV button for previous title.
When you know the title number, enter MP3 title number using the numeric buttons on the remote
controller and then press the SELECT button.
5.4 Selecting VIDEO MODE
1 Using SETUP
Press the SETUP button and select VIDEO submenu on SETUP screen. After that, select TV type
by pressing DOWN button until your TV mode is selected. See 7.2 for more information
5.5 Selecting MENU ITEMS (DVD or Video CD with PBC only)
1 Selecting 3rd menu item when DVD menu screen appears as shown below
Ex1) Press the numeric 3 button on remote controller and then press SELECT button
Ex2) Press DOWN button twice to highlight the 3rd menu item then press SELECT button
Select using numeric button Select using arrow button
2 Selecting the 3rd menu item when Video CD menu screen appears as shown below
Ex) Press the numeric 3 button on remote controller and then press SELECT button
Page 28

27
5.6 STOP and POWER OFF
1 Stop playing
Press the STOP/RETURN button during play mode. If playing a Video CD with PBC running
under PBC mode, you should press the PBC button to stop playing. If a DVD disc is playing,
PRESTOP OSD is displayed when you press the STOP/RETURN button once showing time
information and the play mark (▶) will be blinking on the Fluorescent Display instead of the STOP
message. This state is called PRESTOP. If you press PLAY/PAUSE in a PRESTOP state, the
picture is played from the point you previously stopped.
DVD PRESTOP VCD STOP
2 Removing DISC from the disc tray
Press OPEN/CLOSE button to open disc tray. When the disc tray is opened, take out the disc
from the tray. See 5.1 for more information.
3 Press POWER button
When POWER is pressed, disc tray is closed and POWER is off while STAND BY LED turns on.
If power is OFF, after pressing POWER button during PLAY or PRESTOP state, play is resumed from
the point where it was stopped. It is called RESUME function. If you switch OFF by disconnecting AC
cord, the machine will start playing from the first track or chapter.
Page 29

28
5.7 SEARCH
Use this function to play the DISC contents in fast forward or fast reverse. During searching, audio
will be muted.
5.7.1 FAST FORWARD
1 Press FF/SF button during play mode
FAST 2X is displayed on TV screen and the speed of forward direction becomes faster.
2 Press FF/SF button again
FAST 4X is displayed on TV screen and the speed of forward direction becomes faster. When
a DVD disc is loaded, it changes faster and faster from FAST 16X, FAST 32X and FAST 64X. If
you press the FF/SF button again during FAST 64X if playing a DVD (FAST 16X when VCD), it
goes back to FAST 2X. When an Audio CD is loaded, the playing speed changes faster and
displays a FAST 4X. If you press the FF/SF button again during FAST 4X it goes back to
PLAY status.
FAST 2X FAST 4X FAST 8X
FAST 16X FAST 32X FAST 64X
5.7.2 FAST REVERSE
1 Press FR/SR button during play mode
FAST 2X is displayed on TV screen and the speed of reverse direction becomes faster.
2 Press FR/SR button again
FAST 4X is displayed on TV screen and the speed of reverse direction becomes faster. When
a DVD disc is loaded, it changes faster and faster from FAST 16X, FAST 32X and FAST 64X. If
you press the FR/SR button again during FAST 64X if playing a DVD (FAST 16X when VCD), it
goes back to FAST 2X. When an Audio CD is loaded, the playing speed changes faster and
displays a FAST 4X. If you press the FR/SR button again during FAST 4X it goes back to
PLAY status.
FAST 2X FAST 4X FAST 8X
FAST 16X FAST 32X FAST 64X
Page 30

29
5.8 SKIP
Use this function to move to the next or previous chapter for DVD, track for VCD and CDDA.
5.8.1 SKIP FORWARD
1 Press NEXT button during play mode
If NEXT button is pressed, the current chapter or track stops and starts playing the next chapter or
track. By pressing this button continuously, you may locate the desired chapter or track even
faster. When the last chapter or track is encountered, if playing a VCD or Audio CD, it stops
playing and goes to the stop status. If playing a DVD, it depends on the disc's content. It may
display the menu contents of the disc.
SKIP FORWARD
5.8.2 SKIP REVERSE
1 Press PREV button during playing
If PREV button is pressed, the current chapter or tracks stop and start playing the previous
chapter or track. By pressing this button continuously, you may locate the desired chapter or track
even faster. When the first chapter or track is encountered, if playing a VCD or Audio CD, it stops
playing and goes to the stop status. If playing a DVD, it starts playing from the first chapter.
SKIP REVERSE
5.9 SLOW
Use this function when you want to view the movie slowly. This function works only for DVD or VCD.
5.9.1 SLOW FORWARD
1 Press PAUSE or STEP button during play mode
By pressing PAUSE or STEP button, it pauses the playing temporarily.
2 Press FF/SF button
If FF/SF button is pressed under PAUSE or STEP, ▶ SLOW 1/2 is displayed and the speed of
forward direction becomes slower.
Page 31

30
3 Press FF/SF button again
If FF/SF button is pressed again, ▶ SLOW 1/4 is displayed and the speed changes even slower.
If pressed again ▶ SLOW 1/8 is displayed and it changes slower in conformity to the ratio. To
return to normal play, press PLAY button (DVD and VCD) or FF/SF button again (VCD only)
under SLOW 1/8 state. The CLEAR button clears slow state at any speed of slow.
SLOW 1/2 SLOW 1/4 SLOW 1/8
5.9.2 SLOW REVERSE (DVD only)
1 Press PAUSE or STEP button during play mode
By pressing PAUSE or STEP button, the play mode is temporarily paused.
2 Press FR/SR button
If FR/SR button is pressed under PAUSE or STEP, ◀ SLOW 1/2 is displayed and the speed of
the reverse direction becomes slower.
3 Press FR/SR button again
If FR/SR button is pressed again, ◀ SLOW 1/4 is displayed and the speed changes even slower.
If pressed again ◀ SLOW 1/8 is displayed and it changes slower in conformity to the ratio. To
return to normal play, Press PLAY button or FR/SR button under SLOW 1/8 state. The CLEAR
button clears slow state at any speed of slow.
SLOW 1/2 SLOW 1/4 SLOW 1/8
5.10 Selecting Audio Languages (DVD, CVD, SVCD only)
It is possible to change the audio soundtrack language to a different language from the one selected
at the initial settings. This operation works only with discs on which multiple audio soundtrack
languages are recorded. If the loaded disc supports multiple languages, you can see AUD indicator
on FL display. If playing a CVD or SVCD, the AUD indicator is not turned on, even if it supports
multiple languages.
1 Press AUDIO button during play
If a disc does have multiple languages, the audio information is displayed as the figure shown
below and the audio language is changed. If the loaded disc does not support multiple audio, the
forbidden mark ( ) is displayed.
Audio Change
Page 32

31
2 Choosing desired audio language
Pressing the AUDIO button continuously until the desired audio language is displayed.
This function is a disc dependent. There are some DVD discs that prevent selecting languages even
though the disc supports multiple languages. If this is the case, languages should be selected via the
disc menu.
5.11 Selecting Subtitles (DVD, CVD and SVCD only)
It is possible to change the subtitle language to a different language from the one selected at the
initial settings. This operation works only with discs on which multiple subtitle languages are
recorded. If the loaded disc supports multiple subtitles, you can see SUB-T indicator on FL display.
If playing a CVD or SVCD, the AUD indicator is not turned on even if it supports multiple subtitles.
1 Press SUBTITLE button during playing
If playing a disc with multiple subtitles, the subtitle information is displayed as the figure shown
below and the subtitle language is changed. If the loaded disc does not support multiple subtitle,
the forbidden mark ( ) is displayed.
SUBTITLE Change
2 Choosing desired subtitle language
Press the SUBTITLE button continuously until the desired subtitle language is displayed.
This function is a disc dependent. There are some DVD discs that prevent selecting subtitle even
though the disc supports multiple subtitles. In this case, the subtitle should be selected via the disc
menu.
5.12 Selecting Angles (DVD only)
Some DVD discs may contain scenes, which have been shot simultaneously from a number of
different angles. For these discs, the same scene can be viewed from each of these different angles
using the ANGLE button. If the loaded disc supports multiple angles, you can see indicator on
the FL display and TV screen.
1 Press ANGLE button during play mode
When playing a disc with multiple angles recorded, the camera angle is changed as shown in the
figure.
Angle Change
Page 33

32
2 Choosing desired angle
Press the ANGLE button continuously until the desired angle is displayed.
This function is a disc dependent. There are some DVD discs that prevent selecting angle using
ANGLE button even though the disc supports multiple angles. In this case, angle changes should be
selected via the disc menu.
6. Using the Advanced Functions
6.1 3D sound Effect
This function outputs 3D effects on the stereo audio analog output. 3D effects are broken down into
4 surround modes.
1 Press 3D SOUND button
3D SOUND MODE 1 is displayed on TV screen. And analog stereo output is changed to surround
mode 1.
3D SOUND MODE1
2 Press 3D SOUND button again
Press the 3D SOUND button continuously until the desired 3D sound mode is selected.
3D SOUND MODE2 3D SOUND MODE3 3D SOUND MODE4 NORMAL
6.2 Repeat selected segment
Use this function to repeat the play of a selected segment. This is very useful for studying foreign
languages because it repeats the selected segment until canceled.
1 Press A-B button
Press A-B button at the point of where repeat play is to start. A TO B SET A and A-* are
displayed, followed by A- indicator on FL display turning on, and the starting point of your selected
segment is set up.
2 Press A-B button again
Press A-B button at the point of where repeat play is to end. While A TO B SET B and A-B are
displayed again and A-B indicator on FL display is turned on, the ending point is set up and PLAY
starts from the A point right away.
Page 34

33
3 Press A-B button once more
Press A-B button one more time to cancel the repeat play. A TO B CANCELLED and *-* are
displayed on TV screen.
A TO B SET A A TO B SET B A TO B CANCELLED
We recommend you set up the desired segment within a minimum 3 seconds for smooth repeat play.
6.3 Utilizing Repeat Function
Use this button to repeat the chapter/title for DVD or track/disc for VCD and CDDA.
1 Press REPEAT button
When playing a DVD, CHAPTER REPEAT ON is displayed on the TV screen and REPEAT C
indicator on the FL display is turned on. In this status, the selected chapter is played repeatedly
forever. Whilst if playing a VCD or CDDA, REPEAT ONE is displayed on the TV screen and
REPEAT 1 indicator on the FL display is turned on. In this case, the selected track is played
repeatedly forever.
In case of DVD In case of VCD
In order to use the repeat function on a VCD with PBC, you should turn off PBC by pressing
PBC button on the remote controller.
2 Press REPEAT button again
If playing a DVD, TITLE REPEAT ON is displayed on the TV screen and REPEAT T indicator on
the FL display is turned on. In this state, the selected title is played repeatedly forever. Whilst if
playing a VCD or Audio CD, REPEAT ALL is displayed on the TV screen and REPEAT ALL
indicator on the FL display is turned on. In this case, all tracks on disc are played repeatedly
forever.
In case of DVD In case of VCD
3 Press REPEAT button again
If you press the REPEAT button in REPEAT TITLE or REPEAT ALL state, REPEAT OFF is
displayed on the TV screen and REPEAT T or ALL on the FL display is cleared. The repeat
function becomes cleared and the playing state changes to normal.
Page 35

34
6.4 SHUFFLE (VCD with PBC off and Audio CD only)
This function selects random tracks and plays all the tracks on the disc just once in random order.
This function works only from the stop state.
1 Press STOP button
Press the STOP button for normal VCD or Audio CD, PBC button for CVD, SVCD and VCD 2.0
with PBC to stop playing because this function is valid only for STOP state.
2 Press SHUFFLE button on remote controller
When the SHUFFLE button is pressed, SHUFFLE ON is displayed on the TV screen and the
SHUFFLE indicator on the FL display is turned on.
3 Press PLAY/PAUSE button
When the PLAY/PAUSE button is pressed, the shuffled track starts playing.
4 Press SHUFFLE button after STOP button
To cancel SHUFFLE operation, press STOP to stop shuffle playing and then press SHUFFLE
button. When the SHUFFLE button is pressed, SHUFFLE OFF is displayed on TV and the
SHUFFLE indicator on the FL display is turned off.
Shuffle On Shuffle Off
In order to use the shuffle function on a VCD with PBC, you should turn off the PBC by pressing the
PBC button on remote controller.
6.5 PROGRAM (VCD, Audio CD only)
This function is used to play the tracks on the disc in an order you program.
1 Press STOP button
Press the STOP button for normal VCD or Audio CD, PBC button for CVD, SVCD and VCD 2.0
with PBC to stop playing because this function is valid only for the STOP state.
2 Press PROGRAM button on remote controller
When the PROGRAM button is pressed, PROGRAM P00:00 is displayed on the TV screen, the
PROGRAM indicator on the FL display is turned on, the title number on the FL display is 0 and
time information is 00:00.
3 Enter track number to program
Enter the number of the desired TRACK and press the SELECT button. When the number of the
desired TRACK is entered, PROGRAM PXX:YY is displayed on the TV screen and FL displays
the sum of TRACK numbers and time which is programmed (XX is the number of programmed
tracks and YY is the last entered track number). In the following figure, a total of 3 tracks are
programmed and the last track number is 5.
Page 36

35
Program Initial Screen Programmed – Total 3 tracks
4 Press a PLAY/PAUSE
When all the desired TRACK numbers are entered, press PLAY/PAUSE to play according to the
programmed order
5 Press PROGRAM after STOP button
To cancel the PROGRAM operation, press the STOP button to stop programmed playing and
then press the PROGRAM button twice. When the PROGRAM button is pressed, PROGRAM
P00:00 is displayed on the TV to facilitate reprogramming. If you don't want the program any more,
Press the PROGRAM button again. When the PROGRAM button is pressed again, STOP is
displayed on the TV and the PROGRAM indicator on the FL display disappears.
6.6 Digest (VCD and Audio CD only)
This function helps speedy search to the desired track by displaying 9 different small screens per
page showing information regarding the tracks recorded on the disc. When an Audio CD is loaded,
only the 1. INTRO function will work so be careful.
1 Press STOP button
Press the STOP button for normal VCD or Audio CD, PBC button for CVD, SVCD and VCD 2.0
with PBC to stop playing because this function is valid only for the STOP state.
2 Press DIGEST button
If the DIGEST button is pressed, 4 submenus are displayed on the TV screen as shown below.
Select the submenu, which you want, by pressing the appropriate number button and the SELECT
button. If you don't want this function, press number 4 for exit.
Digest submenu for VCD Digest submenu for Audio CD
1. INTRO plays each track for 10 seconds (VCD and Audio CD)
2. DISC shows digest screen based on the disc. It plays each track on the thumbnail screen for
about 5 seconds (VCD only).
3. TRACK shows digest screen based on the track. It plays partitioned track on thumbnail
screen for about 5 seconds (VCD only).
4. EXIT just exits digest function
3 When you choose INTRO
All the tracks on the disc are played for 10 seconds if no key is pressed. After all the tracks are
played, it stops and displays STOP on the TV.
Page 37

36
4 When you choose DISC or TRACK
Digest function will play and display in the small screen in the centre. Each screen plays
approximately five seconds while displaying a total of nine screens as shown in the figure.
Press NEXT button to see the next page and press PREV button to see the previous page.
Digest – DISC Digest - TRACK
5 Press the desired screen number
If you press the desired number of small screen, it starts playing from the position where the small
screen begins. You don't need to press the SELECT button.
6.7 MARKER (DVD, VCD with PBC off, Audio CD)
This function is to move to the desired location fast and easily during play by storing up to 5 markers
in advance.
1 Press MARKER button during play mode
When MARKER button is pressed during play, the screen is displayed as shown the figure below.
2 Storing marker
Go to the desired marker point using arrow buttons and press the SELECT button to store the
data to be viewed. V will be marked at the selected point.
3 Repeat storing marker as you want
By repeating the above 2 steps, you may store a maximum of 5 markers.
4 Choose stored marker
To play the marker point, press the MARKER button and select the desired marker using arrow
buttons.
5 Deleting stored marker
To cancel the marker function, press up, down or CLEAR button at the marker you want to delete
Marker Initial Screen 1 Marker Stored
Page 38

37
6.8 Display
The unit features On-Screen Menu icons showing disc information such as TITLE and CHAPTER for
DVD, TRACK for VCD, and TIME or Bit Rate (DVD only) during play. There are 7 sub functions for
DVD, 5 sub functions for VCD or Audio CD. DVD sub functions are TITLE/CHAPTER search, TIME
SEARCH, TITLE ELAPSED, TITLE REMAIN, CHAPTER ELAPSED, CHAPTER REMAIN, BIT
RATE METER. VCD sub functions are TRACK/TIME search, SINGLE ELAPSED, SINGLE REMAIN,
TOTAL ELAPSED and TOTAL REMAIN.
6.8.1 Display function for DVD
1 Perform TITLE and CHAPTER search
When the DISPLAY button is pressed during play. TITLE and CHAPTER information are
displayed as shown in the figure below. For TITLE search, Enter the number of your desired title
number using numeric buttons and then press the SELECT button or adjust title number using up
and down buttons and press the SELECT button at the TITLE column. For Chapter search, Adjust
chapter number in the same manner as for title search.
2 Perform TIME SEARCH
When the DISPLAY button is pressed twice during play, TIME SEARCH sub function is activated.
After entering the time you want to jump, press the SELECT button. If you want to go to 0:01:23 (0
hour, 1 min, 23 sec) press the numeric buttons in this order (0, 0, 1, 2, 3) then press the SELECT
button. The time you want to enter should be in the title boundary. After you press the SELECT
button, it starts playing from the time entered, if valid.
3 Viewing time information
When the DISPLAY button is pressed three times during play, title elapsed time information is
displayed on top of TV screen at the left corner. When the DISPLAY button is pressed again title
remain time information is displayed. If pressed again, CHAPTER elapsed time information is
displayed. Pressing the DISPLAY button once more activates CHAPTER remain time information.
Finally, another press of the DISPLAY button displays the Bit Rate Meter.
4 Displaying Off
Press DISPLAY button when Bit Rate Meter is activated.
Chapter/Title Search Time Search Title Elapsed
Title Remain Chapter Elapsed Chapter Remain Bit Rate Meter
6.8.2 Display function for VCD (PBC off only)
1 Perform TRACK search
When the DISPLAY button is pressed during play TRACK information and TIME search is
displayed as shown in the figure below. For TRACK search, enter the number of your desired
track using numeric buttons and then press the SELECT button or adjust track number using up
and down buttons and press the SELECT button at the TITLE column.
Page 39

38
2 Perform TIME search
After entering the time you want to jump, press the SELECT button. If you want to go to 01:23 (1
min, 23 sec), press the numeric buttons in this order (0, 1, 2, 3) and press the SELECT button.
The time you want to enter should be in this current track boundary. After you press the SELECT
button, it starts playing from the time entered if valid.
3 Viewing time information
When the DISPLAY button is pressed twice during play, track (single) elapsed time information is
displayed on the top of the TV screen at the left corner. When the DISPLAY button is pressed
again, a track (single) remain time information is displayed on the screen. If pressed again, disc
(total) elapsed time information is displayed on the screen. And next DISPLAY button activates
disc (total) remain time information. Finally, another press of the DISPLAY button quits the display
function.
4 Display Off
Press DISPLAY button when total remain time information activated.
Track Search Time Search Single Elapsed
Single Remain Total Elapsed Total Remain
6.9 Zoom screen
1 Zoom screen by X2
If the ZOOM button is pressed during play, ZOOM X2 is displayed and the screen is magnified to
twice the size.
2 Zoom screen by X4
If the ZOOM button is pressed again, ZOOM X4 is displayed and the screen size is quadrupled.
3 Zoom screen by X8
If the ZOOM button is pressed again, ZOOM X8 is displayed and the screen is magnified by eight
times.
4 Zoom off
If the ZOOM button is pressed again when in ZOOM X8 state, ZOOM function is turned off and a
normal screen is displayed. Pressing the CLEAR button at any time of ZOOM state clears ZOOM
function.
Zoom Off Zoom 2X Zoom 4X Zoom 8X
Page 40

39
7. Customizing DVD Performance
Once the initial settings have been completed, the player can always be operated under the same
conditions whenever the power is switched on. These settings are called SETUP data that are easily
modified and stored using the SETUP menu. The SETUP menu includes the information for AUDIO,
VIDEO, OTHER system controls, LANGuages and parental LOCK. AUDIO and VIDEO submenus deal
with items related to AUDIO and VIDEO. The OTHER submenu deals with items related to other system
controls. LOCK submenu deals with items related to parental locks, they are parental levels and
passwords. The submenu of SETUP is differentiated by two categories. One is submenu changeable
during play mode. The other is not. The ability to change during play is on the AUDIO and VIDEO
submenu. The other is OTHER, LANGuage and parental LOCK.
7.1 Audio
There are 6 sub items in the AUDIO submenu. They
are DIGITAL OUT, SPEAKER, OPERATIONAL,
DYNAMIC RNG and DUAL MONO. When you press
the SETUP button and select AUDIO among the five
submenus, the sub items for AUDIO are displayed as
shown in the figure beside.
1 DIGITAL OUT
DIGITAL OUT item controls the output condition of digital out (coaxial or optical) connector. There
are 3 values possible for DIGITAL OUT. They are OFF, BITSTREAM and PCM. In the case of
OFF value, No digital signal can be output. Only analog audio can be output. In the case of
BITSTREAM value, the original audio stream recorded on the disc is output through the digital out
connector. In the case of PCM value, the decoded audio stream will be output through the digital
out connector. The relation of amplifier and DIGITAL OUT option is shown below.
Amplifier available
No Amplifier OFF
Digital Decoder Amplifier (Dolby Digital, dts) OFF, BITSTREAM, PCM (Valid for Dolby Digital)
Stereo or Dolby Pro Logic Amplifier
2 SPEAKER
You can see this speaker submenu only when you disabled the downmix submenu. If you press
the SELECT button, you shall see a new menu figure shown below.
downmix enabled downmix disabled
DOWNMIX (Dolby Digital DVD disc only)
DOWNMIX is used to reproduce the proper analog audio when the audio channel recorded on the
disc differs from the output audio channel configuration. Assume that 5.1 channels audio are
recorded on the disc but you can receive only stereo audio channels. In this case downmix is
unavoidable and you will hear all the channels recorded on disc. There are two ways of
downmixing. One is LT/RT and the other is LO/RO. If you are using Dolby Surround Pro Logic
decoder, please set the downmix mode to LT/RT otherwise LO/RO. And the last sub item OFF
makes the downmixing operation stops. This means that you are using the full 5.1 channel audio
system. If you don’t have a amplifier, which have Dolby Digital, dts decoder or 5.1 channel analog
audio input, do not select this OFF sub item. If you do that you may hear the front stereo sound
only. Select this OFF sub item when you are going to use the full 5.1 channel analog audio with
your amplifier.
Possible DIGITAL OUT values
OFF, PCM (Valid for Dolby Digital not dts)
Page 41

40
CENTER
This submenu is valid when you are using an amplifier, which have the 5.1 channel analog audio
input. If you have the center speaker, please turn the sub item ON. If not, turn OFF. If you are
going to adjust the center delay, please turn the sub item ON. If not, you can’t adjust the center
delay.
center speaker on center speaker off
REAR
This submenu is valid when you are using an amplifier, which have the 5.1 channel analog audio
input. If you have the rear speaker, please turn the sub item ON. If not, turn OFF. If you are going
to adjust the rear delay, please turn the sub item ON. If not, you can’t adjust the rear delay.
SUBWOOFER
This submenu is valid when you are using an amplifier, which have the 5.1 channel analog audio
input. If you have the subwoofer speaker, please turn the sub item ON. If not, turn OFF.
CNTR DELAY
You can adjust the sound in home by adding delay time to the center speaker. See REAR DELAY
for more information.
REAR DELAY
Like CNTR DELAY, you can adjust the sound in home by adding delay time to the rear speaker.
You may hear the best quality sound if the distance between speakers is same when playing 5.1
channel surround sounds. But the displacement of speakers with same distance is very difficult in
real. Please refer the following figure and table, set the appropriate delay time.
Center
Speaker
Delay
Df – Dc (cm) Value (ms)
Df <= Dc 0
34 1
68 2
102 3
136 4
170 5
Ideal Front Speaker
Rear
Speaker
Delay
Df – Ds (cm) Value (ms)
Df <= Ds 0
102 3
204 6
306 9
408 12
510 15
Ideal Surround Speaker
3 OPERATIONAL
To simplify the implementation of dialogue normalization, dynamic range control, and downmixing,
Dolby Digital decoder implementations offer standard operational modes called Line Mode and
RF Mode. There are 2 values for OPERATIONAL. They are Line Mode and RF Mode. Choose
Line Mode when connecting to an amplifier, RF Mode for TV.
Page 42

41
4 DYNAMIC RNG (Valid for Dolby Digital DVD disc)
A consistent problem in the delivery of audio programming is that different members of the
audience desire or even need different amounts of dynamic range depending on the listening
situation. Original high quality programs, such as feature films, are typically mixed with a wide
dynamic range. Using dialogue as a reference, loud sounds like explosions are often 20 dB louder,
and faint sounds like leaves rustling may be 50 dB quieter. In many listening situations, it is
objectionable to allow the sound to become very loud, and the loudest sounds must be
compressed downwards in level. Likewise the very quiet sounds would be inaudible and must be
brought upwards in level to be heard. If you want to hear the original dynamic range recorded on
disc set the DYNAMIC RNG to 0. Otherwise set to 8 then the dynamic range is reduced by
bringing down the level of the loud sounds and bringing up the level of the quiet sounds.
5 DUAL MONOs
DUAL MONOs are two independent mono channels defined in Dolby Digital. DUAL MONO
programs are mainly used for different language versions in one program. This functions in a
similar fashion to TV or VCR supporting secondary audio program. From two MONO channels,
STEREO, LEFT MONO, RIGHT MONO and MIXED MONO may be output in 4 different
combinations.
STEREO L channel on L speaker, R channel on R speaker
LEFT MONO L channel on L and R speaker
RIGHT MONO R channel on L and R speaker
MIXED MONO Mix two mono and output mixed mono on both (L, R) speaker
7.2 Video
There are 5 submenus for VIDEO. They are OSD LANG, TV ASPECT, TV TYPE, SCART and
CAPTIONS. If you select VIDEO, VIDEO sub items are displayed as shown in the figure.
1 OSD LANG
This item is to select the language for On-Screen Display messages that will be displayed on the
TV screen. When your desired language is selected, all OSD messages are displayed in the
selected language.
2 TV ASPECT
Set up TV aspect according to your TV set. If WIDE screen is supported on your TV, select WIDE.
If your TV supports only 4:3, you may select both 4:3 PS (Pan & Scan) and 4:3 LB (Letter Box).
When using a wide screen TV (16:9 aspect ratio)
Select WIDE in the TV ASPECT value.
Discs may be recorded in more than one screen format. Following the chart below, make screen
aspect adjustments in your wide screen TV according to the aspect ratio on the disc you are
viewing.
Wide Screen Disc (16:9) Standard Screen Disc (4:3)
Page 43

42
When using a standard TV (4:3 aspect ratio)
Select 4:3 LB (Letter Box) or 4:3 PS (Pan & Scan) in the TV ASPECT value.
Following the chart below, make screen aspect adjustments according to the aspect ratio on the
disc you are viewing.
Wide Screen Disc (16:9) Standard Screen Disc (4:3)
Screen
TV Setting
Letter Box (4:3 LB)
No setting required
(Always Standard 4:3
screen )
Pan & Scan (4:3 PS)
3 TV TYPE
Set up TV type according to type supported by your TV or monitor. When you select MULTI, the
output video type is dependent on the disc loaded. If the recorded video type is PAL then it
outputs PAL. If NTSC then NTSC.
4 SCART
Achieving the clearer and higher definition picture than the normal composite output can be done
by selecting RGB. If you want to see the picture in RGB, choose RGB and connect to the TV set
using SCART connector. To make correct connection, refer to basic connection page for
connecting.
N.B. When RGB selected, S-Video (YC) will not come out. On the contrary RGB will not come
out when COMPOSITE selected.
5 CAPTIONS (NTSC only)
CLOSED CAPTION was invented for hearing impaired person. But it is very useful when learning
foreign languages. If your TV supports closed caption, select ON. If not, closed caption won't be
displayed.
7.3 Other
If you select OTHER, OTHER’s sub item is displayed as shown in the figure below. The sub item of
OTHER is related to system control on various subjects.
1 ANGLE MARK (Valid for DVD only)
It is possible to have 9 different angles on a DVD disc. This selects whether to display OSD
(On Screen Display) showing multi-angle on the TV screen or not, when playing DVD disc
supporting multiple angles. If you select ON, you can see the OSD when multi-angle is
detected while playing.
2 SCREEN SAVER
If a bright picture does not move for a long time, the TV may be
damaged. If on longer than 5 minutes, the screen saver works
when ON is selected. The screen saver protects the CRT
(Cathode Ray Tube) from damage by displaying a moving DVD
Page 44

43
logo continuously on the screen.
3 FLT DISPLAY
There are three levels of brightness to control FL display on the front panel. They are BRIGHT,
MEDIUM and DIM. In the bright daylight, you may select BRIGHT and DIM for dark nights.
4 FLT AUDIO CH (Dolby Digital DVD only)
If playing a Dolby Digital DVD disc, the audio channel configuration is varied according to the disc
loaded. When you select ON, this feature displays the audio channel configuration on the FL
display on the front panel.
5 FRONT KEY
To prevent children from pressing buttons on the front panel, you can select lock. This feature is
only effective when the power is on. Whenever you turn on the power, you should select LOCK
again to protect then front panel buttons.
6 DEFAULTS
If you are not confident about what you have selected in setup submenu items, you can initialize
them to the factory adjusted values. Be aware that, the password you already have set, remains
the same even after the values are changed to the factory defaults. If you forget the password,
please contact where you bought this unit.
7.4 Languages (DVD only)
If you select LANG., LANG's sub item is displayed as shown in the figure below. The sub item of
LANG is related to preferable language for audio, subtitle or disc menu.
1 AUDIO
Set this value to the preferred audio language. If an audio language is selected, whenever you
start playing a new disc, the selected audio language is played, if the selected language is
contained in the disc. For example, if you select ENGLISH as the preferred audio language and
ENGLISH audio language is contained in the disc, when the disc plays it will be in English.
2 SUBTITLE
Set this value to the preferred subtitle language. If a subtitle language is selected, whenever you
start playing a new disc, the selected subtitle language is played, if the selected language is
contained in the disc. For example, if you select ENGLISH as the preferred subtitle language and
ENGLISH subtitle language is contained in the disc. When you start playing the disc, you can see
English subtitles.
3 DISCMENU
Set this value to the preferred disc menu language. If a disc menu language is selected, whenever
you start playing a new disc, the selected disc menu language is played if the selected language
is contained in the disc. For example, if you select ENGLISH as the preferred disc menu language
and ENGLISH disc menu language is contained in the disc. When you start playing the disc, you
can see the disc menu in English.
7.5 Parental Lock (DVD only)
This function is to disable the playing of specified DVD discs
that are unsuitable for children. As each disc has slightly
different codes, please refer to the disc instruction. There are a
total of 8 levels. If the level is 8, the contents of the disc are
suitable for adult. If the level is 1, the contents of the disc are
suitable for children. If you didn't set a new password, there is
Page 45

44
no restriction in changing parental level. When you turn on this unit for the first time, a new
password set is recommended.
1 PARENTAL
Used to adjust the level of parental lock. Once selected, whenever you play a disc, the selected
parental level is compared to the level on the disc. If the level you selected is greater than the
level of the disc, you may play the loaded disc. If not, you may not play the disc. To set
appropriate parental level do the following instructions. If you move to the PARENTAL sub item,
you can see the values for the PARENTAL sub item. You can move to the value position by
pressing the RIGHT arrow button. Select proper value using UP and DOWN arrow button and
then press the SELECT button. If you press the SELECT button then it asks for the current
password. If there is no current password then it doesn't ask. A parental level change will be done
by entering the current stored password.
PARENTAL sub item PARENTAL Values Current PASSWORD
2 PASSWORD
Used to change the saved password to a new one. To change the current password, move to
PASSWORD sub item using UP and DOWN arrow buttons. If you move to the PARENTAL sub
item, you can see the value for the PASSWORD. Just one sub item CHANGE can be shown. You
can move to the value position by pressing RIGHT arrow button. Press SELECT button to change
password. If you press SELECT button, password change window appears as shown below. If it is
the first time change then there is no old password. If not, you should enter old password. Enter
new password in 4 digits. Re-enter new password for confirm then press SELECT button. To store
the password press SELECT button, password change is finished.
Change Sub item Password Change Window
No Old Password Password Change Finish
Page 46

45
Trouble Shooting
Before asking after service for this player, please check the chart below for the possible cause of the
problem you are experiencing. Some simple checks or a minor adjustment on your unit may eliminate
the problem and restore proper operation.
Trouble
No power Insert the AC power plug securely into the power outlet.
No picture Make sure that the equipment is connected properly.
Make sure that the input setting for the TV is Video (AV).
No sound Make sure that the equipment is connected properly.
Distorted sound Make sure that the input settings for the TV and stereo
system are correct.
No fast forward or fast reverse Some discs may have sections that prohibit fast forward or
fast reverse.
No proper aspect ratio Select the correct setup for TV aspect ratio that matches
your TV set.
No operations can be
performed with the remote
controller
No button operation Set the POWER button to OFF and then back to ON.
Audio soundtrack and/or
Subtitle language is not the
one you selected.
No Angle change This function is dependent on software availability. Even if a
Check the batteries are installed with the correct polarities.
Point the remote control unit at the remote control sensor
and operate.
Remove the obstacles between the remote control unit and
remote control sensor.
Alternatively, turn off the power, disconnect the power plug
and then reconnect it.
If the audio soundtrack and/or subtitle language does not
exist on the disc, the language selected at the initial settings
will not be seen.
disc has a number of angles recorded, these angles may be
recorded for specific scenes only.
Action
Page 47

46
Specifications
Playback System
DVD Video
Video CD (1.1, 2.0, 3.0)
SVCD and CVD
CDDA
CD-ROM with MP3 data
Television Signal System
NTSC/PAL
Video Performance
Video Out 1 Vpp into 75 ohm
S-Video Out
Component Out 0.7 Vpp into 75 ohm
D/A Converter 27MHz / 10bit
Audio Performance
Frequency Response
Output Level
D/A Converter 96KHz/24bit
S/N Ratio 110 dB
Y : 1 Vpp into 75 ohm
C : 0.286 Vpp into 75 ohm
DVD : fs 48/96KHz, 4Hz ~ 22/44KHz
Video CD : fs 44.1KHz, 4Hz ~ 20KHz
Audio CD : fs 44.1KHz, 4Hz ~ 20KHz
Analog : 2Vrms (1 KHz)
Digital : 1.15 Vpp
Page 48

47
AC 90~250V, 50/60Hz
Connections
Power Supply
Set
Coaxial digital out X1
Audio Analog out for 2-channel X1
SCART connector for Component Video X1
Composite Video out X1
S-Video out X1
Power Source
Power Consumption < 25 Watt
Dimensions (W X H X D) 420 X 84 X 270 (mm )
Net Weight 3.6 Kg
Gross Weight 4.9 Kg
Page 49

48
This product incorporates copyright protection technology that is protected by method claims of certain
U.S. patents and other intellectual property rights owned by Macrovision Corporation and other rights
owners. Use of this copyright protection technology must be authorized by Macrovision Corporation,
and is intended for home and other limited viewing uses only unless otherwise authorized by
Macrovision. Reverse engineering or disassembly is prohibited.
Certain specifications in this instruction manual are subject to change without prior notice to
Page 50

49
improve quality and function.
 Loading...