

Page 1

CyberLink
PowerDirector
User's Guide
Page 2

Copyright and Disclaimer
All rights reserved.
To the extent allowed by law, PowerDirector IS PROVIDED “AS IS”,
WITHOUT WARRANTY OF ANY KIND, EITHER EXPRESS OR IMPLIED,
INCLUDING WITHOUT LIMITATION ANY WARRANTY FOR
INFORMATION, SERVICES, OR PRODUCTS PROVIDED THROUGH OR IN
CONNECTION WITH PowerDirector AND ANY IMPLIED WARRANTIES OF
MERCHANTABILITY, FITNESS FOR A PARTICULAR PURPOSE,
EXPECTATION OF PRIVACY, OR NON-INFRINGEMENT.
BY USING THIS SOFTWARE, YOU AGREE THAT CYBERLINK WILL NOT BE
LIABLE FOR ANY DIRECT, INDIRECT, OR CONSEQUENTIAL LOSS
ARISING FROM THE USE OF THIS SOFTWARE OR MATERIALS
CONTAINED EITHER IN THIS PACKAGE.
The terms and conditions here under shall be governed and
construed in accordance with the laws of Taiwan.
PowerDirector is a registered trademark along with other company
and product names mentioned in this publication, used for
identification purposes and remain the exclusive property of their
respective owners.
Manufactured under license from Dolby Laboratories. Dolby and the
double-D symbol are registered trademarks of Dolby Laboratories.
Confidential unpublished works. Copyright 1995-2005 Dolby
Laboratories. All rights reserved.
For DTS patents, see http://patents.dts.com. Manufactured under
license from DTS Licensing Limited. DTS, the Symbol, & DTS and the
Symbol together are registered trademarks, and DTS 5.1 Producer is a
trademark of DTS, Inc. © DTS, Inc. All Rights Reserved.
International Headquarters
Mailing Address CyberLink Corporation
15F., No. 100, Minquan Rd., Xindian Dist.
New Taipei City 231, Taiwan (R.O.C.)
Web Site https://www.cyberlink.com
Telephone 886-2-8667-1298
Fax 886-2-8667-1385
Copyright © 2017 CyberLink Corporation. All rights reserved.
Page 3

Contents
Introduction
................................................................................................1Welcome
.................................................................................................1Latest Features
.................................................................................................2DirectorZone and CyberLink Cloud
.................................................................................................4PowerD irector Versions
................................................................................................5Minimum System Requirements
PowerDirector Editing Modes
................................................................................................8Auto Mode
................................................................................................10Slideshow Creator
.................................................................................................12Setting Music Preference s
.................................................................................................13Customizing Slideshows in the Slideshow Designer
PowerDirector Workspace
................................................................................................18PowerDirector Modules
................................................................................................19Rooms
.................................................................................................19Media Room
.................................................................................................21Effec t Room
.................................................................................................21PiP Objects Room
.................................................................................................21Particle Room
.................................................................................................22Title Room
.................................................................................................22Transition Room
.................................................................................................22Audio Mixing Room
.................................................................................................22Voice-Over Recording Room
.................................................................................................23Chapter Room
.................................................................................................23Subtitle Room
..................................................1
..................................................7
..................................................18
i
Page 4

Cyb erLink PowerDirector Help
................................................................................................23Library Window
.................................................................................................25Explorer View
.................................................................................................25Searching the PowerDirector Library
.................................................................................................26Filtering Media in the Library
.................................................................................................28Library Menu
................................................................................................28Expanding the Workspace
................................................................................................29Preview Window
.................................................................................................30Preview Player Controls
.................................................................................................31Preview Screen Snapshots
.................................................................................................31Preview /Display Options
.................................................................................................34Zoom In/Out
.................................................................................................34Undocking the Preview Window
.................................................................................................34Playing 360° Media Files
.................................................................................................36Previewing in 3D Mode
................................................................................................37Editing Workspace
.................................................................................................37Timeline Mode
.................................................................................................49Storyboard Mode
PowerDirector Projects
..................................................50
................................................................................................50Setting Project Aspect Ratio
................................................................................................51360° Video Projects
................................................................................................52Exporting Projects
................................................................................................52Reusing PowerDirector Projects
................................................................................................55CyberLink Cloud Projects
Importing Media into
PowerDirector
.................................................................................................58360° Media Files
.................................................................................................593D Media
.................................................................................................62Importing Pow erDirector Projects
ii
..................................................57
................................................................................................57Importing Media Files
................................................................................................62Capturing Media
Page 5

.................................................................................................63Capturing from a DV Camcorder
.................................................................................................64Capturing from an HDV Camcorder
.................................................................................................65Capturing from a TV Signal
.................................................................................................65Capturing from a Digital TV Signal
.................................................................................................65Capturing from a Webcam
.................................................................................................65Capturing from a Microphone
.................................................................................................65Capturing from a CD
.................................................................................................66Capturing from an AVCHD Camcorder
.................................................................................................66Capturing from an Optical Device
.................................................................................................66Capture Desktop with Screen Recorder
.................................................................................................66Captured Content
.................................................................................................67Quality Profile Setup
.................................................................................................67Capture Settings
.................................................................................................67Capture Preference s
................................................................................................68Downloading Media
.................................................................................................69Downloading Content from DirectorZone/CyberLink Cloud
.................................................................................................70Downloading Photos From Flickr
.................................................................................................71Downloading Royalty Free Music
Detecting Scenes, Extracting Audio, and Capturing
................................................................................................72
Snapshots
.................................................................................................72Detecting Scenes in a Video Clip
.................................................................................................73Extracting Audio from a Video Clip
.................................................................................................74Capturing Screen Snapshots from a Video Clip
PowerDirector Plug-ins
..................................................76
................................................................................................76Using the MultiCam Designer
.................................................................................................77Importing Media
.................................................................................................79Synchronizing Clips
.................................................................................................80Creating Recorded Content
.................................................................................................82Changing the Re corded Content
................................................................................................84Using the Theme Designer
.................................................................................................85Overview
.................................................................................................85Adding Theme Templates/Sequences
iii
Page 6

Cyb erLink PowerDirector Help
.................................................................................................87Adding Media Clips
.................................................................................................90Importing More Media Files
.................................................................................................91Editing Media Clips
.................................................................................................92Editing Background Music
.................................................................................................93Editing Title Text
.................................................................................................94Replacing Background Images
.................................................................................................94Adding Transitions Between Sequences
.................................................................................................95Previewing and Saving Movies
.................................................................................................95Editing C reated Movies
................................................................................................96Editing Video in the Action Camera Center
.................................................................................................98Fixing Video Clips
.................................................................................................100Creating Action Effects on Video Clips
.................................................................................................106Action Camera Center Settings
.................................................................................................107Changing the Action Camera Center Content
................................................................................................108Using an Express Project
................................................................................................109Recording Your Desktop with the Screen Recorder
.................................................................................................111Setting Capture Area
.................................................................................................117Configuring the Screen Recorder Settings
................................................................................................118Creating Overlays with the Blending Effect
.................................................................................................119Blending Image Presets/Templates
................................................................................................123Creating Video Collages
.................................................................................................124Creating a Video Collage
Arranging Media in Your
Production
..................................................128
................................................................................................129Adding Video Clips and Images to the Timeline
.................................................................................................129Adding Video Clips and Images
.................................................................................................131Adding Color Boards and Backgrounds
................................................................................................135Adding Audio Clips
.................................................................................................137Syncing Audio
................................................................................................140Syncing Clips by Audio
................................................................................................140Using the Magic Movie Wizard
iv
Page 7

................................................................................................141Using the Slideshow Creator
Editing Your Media
Using the Tools
..................................................142
................................................................................................142Editing 360° Video Projects
................................................................................................144Content Aware Editing
.................................................................................................145Using Content Aware Editing
................................................................................................149Splitting a Clip
................................................................................................150Unlinking Video/Audio Clips
................................................................................................151Trimming Video and Audio Clips
.................................................................................................151Trimming a Video Clip
.................................................................................................155Trimming an Audio Clip
................................................................................................157Setting a Media Clip's Duration
................................................................................................158Setting TV (Video Clip Interlacing) Format
................................................................................................158Adjusting Video Clip Aspect Ratio
................................................................................................160Stretching Images
................................................................................................160Cropping Images
................................................................................................161Changing the Shape of Media
................................................................................................162Fixing and Enhancing Images/Videos
.................................................................................................170Advanced Fixes and Enhancements
................................................................................................171Utilizing Keyframes on Media
.................................................................................................173Adding Ke yframes
................................................................................................176Muting Audio
................................................................................................176Advanced Audio Editing
................................................................................................177Time Info
................................................................................................177Magic Fix
................................................................................................177Magic Cut
..................................................179
................................................................................................179Using the Power Tools
.................................................................................................180Crop & Zoom Video
v
Page 8

Cyb erLink PowerDirector Help
.................................................................................................182Adjusting Video Speed in the Video Speed Designer
................................................................................................186Audio Ducking
................................................................................................187Motion Tracker
.................................................................................................188Tracking the Motion of Objects in Videos
.................................................................................................192Adding and Editing Trackers
.................................................................................................194Adding Motion Tracking Effects
................................................................................................198Action Camera Center
................................................................................................198Blending Effect
................................................................................................199View Designer
.................................................................................................200Customizing Direction of View in 360º Video Clips
.................................................................................................210Creating Little Planet Videos
................................................................................................217360º Start View Setting
Adding Effects
Creating PiP Effects
..................................................220
................................................................................................220Blending Clips on the Timeline
................................................................................................222Adding Video Effects
.................................................................................................224Modifying a Video Effect
................................................................................................225Using Magic Motion
.................................................................................................226Magic Motion De signer
................................................................................................227Using Magic Style
................................................................................................228Using the Freeze Frame Effect
..................................................229
................................................................................................229Adding PiP Objects
.................................................................................................231Types of PiP Objects
.................................................................................................231Creating Custom PiP Objects
................................................................................................232Using the Paint Designer
.................................................................................................233Creating a Paint Animation
................................................................................................236Modifying Media in the PiP Designer
.................................................................................................237Mode Selection and Zoom Tools
.................................................................................................238Modifying PiP Media Size and Position
vi
Page 9

.................................................................................................239Modifying PiP Media Properties
.................................................................................................243Adding Motion to PiP Media
.................................................................................................247Utilizing PiP Keyframes
.................................................................................................251Saving and Sharing PiP Objects
Adding Particle Effects
Adding Title Effects
..................................................253
................................................................................................255Modifying Particle Effects in the Particle Designer
.................................................................................................256Mode Selection and Zoom Tools
.................................................................................................257Adding Objects, Images, and Backgrounds
.................................................................................................258Modifying Particle Object Range and Position
.................................................................................................259Modifying Particle Object Properties
.................................................................................................264Adding Motion to Particle Objects
.................................................................................................264Utilizing Particle Keyframes
.................................................................................................267Saving and Sharing Particle Effect Templates
..................................................269
................................................................................................271Title Effect Categories
.................................................................................................271Standard 2D Title Effects
.................................................................................................2723D Title Effects
.................................................................................................272360º Title Effe cts
................................................................................................274Modifying Titles in the Title Designer - Basic
.................................................................................................275Zoom Tools
.................................................................................................275Adding Additional Title Text
.................................................................................................275Modifying Title Effect Position
.................................................................................................276Modifying Title Text Properties
.................................................................................................280Setting Title Text Length
.................................................................................................281Saving and Sharing Title Templates
................................................................................................283Modifying Titles in the Title Designer - Advanced
.................................................................................................284Mode Selection and Zoom Tools
.................................................................................................287Adding Text, Particles, Images, and Backgrounds
.................................................................................................289Modifying Title Effect Position
.................................................................................................290Modifying Title Text and Image Properties
.................................................................................................299Applying Animation Effects to Title Text
vii
Page 10

Cyb erLink PowerDirector Help
.................................................................................................302Adding Motion to Title Text
.................................................................................................305Utilizing Title Effect Keyframes
.................................................................................................308Saving and Sharing Title Templates
Creating Custom Masks in the
Mask Designer
Using Transitions
..................................................310
................................................................................................311Mode Selection and Zoom Tools
................................................................................................312Selecting Masks
................................................................................................315Creating Custom Masks
................................................................................................325Modifying Mask Size and Position
................................................................................................326Modifying Mask Object Settings
................................................................................................327Adding Motion to Masks
................................................................................................330Utilizing Mask Keyframes
................................................................................................334Saving and Sharing Masks
..................................................335
................................................................................................335Adding Transitions to a Single Clip
................................................................................................337Adding Transitions Between Two Clips
................................................................................................338Using Audio Transitions
................................................................................................340Setting Transition Behavior
................................................................................................341Modifying Transition Settings
................................................................................................342Modifying Alpha Transitions in the Transition Designer
.................................................................................................343Creating New Alpha Transitions
.................................................................................................344Modifying Alpha Transition Properties
.................................................................................................357Saving Alpha Transitions
Mixing Audio and Recording
Voice-Overs
..................................................360
................................................................................................360Adjusting Audio Clip Volume Levels
.................................................................................................360Mixing Audio In-Track
.................................................................................................362Mixing Audio in the Audio Mixing Room
.................................................................................................363Adding Fade Effects to Audio Clips
viii
Page 11

.................................................................................................364Restoring Audio Clip Volume Levels
................................................................................................364Recording Voice-Overs
Adding Chapters
Adding Subtitles
Producing Your Project
Creating Discs
..................................................366
................................................................................................366Adding Chapter Markers
................................................................................................366Setting Chapter Thumbnails
..................................................367
................................................................................................367Adding Subtitle Markers
................................................................................................368Importing Subtitles from a File
................................................................................................368Extracting Subtitles from an MKV File
................................................................................................369Editing Subtitles
................................................................................................370Syncing Subtitles
..................................................371
................................................................................................371Utilizing Intelligent SVRT
................................................................................................372Produce Window
.................................................................................................374Outputting to a Standard 2D File
.................................................................................................376Producing a 360° Video
.................................................................................................378Outputting in a 3D Format
.................................................................................................381Outputting to a Device
.................................................................................................383Uploading Video to Online Media Sites
.................................................................................................392Uploading a 360° Video
.................................................................................................396Batch Produce
..................................................398
................................................................................................399Importing Additional Disc Content
................................................................................................401Selecting a Disc Menu
................................................................................................403Editing Disc Menu Properties
.................................................................................................403Configuring Disc Menu Settings
.................................................................................................404Editing Disc Menu Text
.................................................................................................404Setting Disc Menu Music
.................................................................................................405Adding a First Play Video
ix
Page 12

Cyb erLink PowerDirector Help
.................................................................................................406Setting Disc Playback Mode
.................................................................................................406Specifying Buttons Per Page
.................................................................................................407Modifying Menu Object Properties
................................................................................................408Customizing Disc Menus in the Menu Designer
.................................................................................................409Mode Selection, Zoom Tools, and Context Menu
.................................................................................................410Setting Menu Opening and Background
.................................................................................................412Adding Title Text and Images to Menus
.................................................................................................413Modifying Text Object and Image Properties
.................................................................................................419Adding and Editing Menu Buttons
.................................................................................................421Enabling 3D Depth in Disc Menus
.................................................................................................421Saving and Sharing Disc Menu Templates
................................................................................................423Burning Your Production to Disc
.................................................................................................423Burning a Disc in 2D
.................................................................................................425Burning a Disc in 3D
.................................................................................................428Configuring Burn Settings
.................................................................................................429Erasing Discs
PowerDirector Preferences
..................................................430
................................................................................................430General Preferences
................................................................................................432Editing Preferences
................................................................................................434File Preferences
................................................................................................434Display Preferences
................................................................................................436Hardware Acceleration Preferences
................................................................................................436Project Preferences
................................................................................................437Produce Preferences
................................................................................................437Capture Preferences
................................................................................................438Confirmation Preferences
................................................................................................440DirectorZone Preferences
................................................................................................441CyberLink Cloud Preferences
................................................................................................442Improvement Program Preferences
x
Page 13

PowerDirector Hotkeys
Appendix
Technical Support
..................................................443
................................................................................................443Default Keyboard Hotkeys
.................................................................................................444Application Menu Bar Hotkeys
.................................................................................................447System Hotkeys
.................................................................................................447C apture Hotkeys
.................................................................................................448Edit Hotkeys
.................................................................................................448D esigner Hotkeys
................................................................................................449Customizing Keyboard Hotkeys
.................................................................................................450Hotkey Sets
..................................................452
................................................................................................452Intelligent SVRT: When Is Used?
................................................................................................453Licensing and Copyright Information
.................................................................................................455Lice nses and Copyrights
..................................................467
................................................................................................467Before Contacting Technical Support
................................................................................................468Web Support
................................................................................................468Help Resources
xi
Page 14

Cyb erLink PowerDirector Help
Note: this document is for reference and informational use only. Its content
and the corresponding program are subject to change without notice. For
more helpful tips on using the program, please visit our members forum or
see the video tutorials at https://directorzone.cyberlink.com/tutorial/pdr.
Chapter 1:
Introduction
This chapter introduces CyberLink PowerDirector and the digital video editing
process. It also outlines all of the latest features, available versions, and reviews the
minimum system requirements for CyberLink PowerDirector.
Welcome
Welcome to the CyberLink family of digital media tools. CyberLink PowerDirector is
a digital video editing program that lets you create professional-looking videos and
photo slideshows, complete with music, voice-overs, special effects, transitions,
and much more. You can then output your project to a file, camcorder, portable
device, upload it directly to various online video sharing web sites, or burn it to a
disc, complete with stylish menus.
Latest Features
Below is a list of some of the latest features within the CyberLink PowerDirector
program.
More True360* Video Editing Options
·
Use 360º Start View Setting to change the starting view in your 360º video
clips.
·
Apply more fixes to 360º video, including stabilization, brightness, and
denoise.
·
Convert titles and non-360º media clips in 360º video projects for better
looking results.
·
Track moving objects in 360º videos in the Motion Tracker to apply motion
tracking effects.
1
Page 15

More Editing Tools for E nhanced Creativity
Note: * optional feature in CyberLink PowerDirector. Check the version
table on our web site for detailed versioning information.
·
Create professional looking edits of your video quickly in the Video Collage
Designer*.
·
Utilize Audio Ducking to auto lower background music during dialogue or
voice overs.
·
Use 360º video clips to create unique little planet* videos.
·
Auto create conventional videos in the View Designer* by tracking moving
objects in 360º video.
·
Adds support for Academy Award winning Boris FX* plugin effects.
More Video Enhancement Options for Better Looking Videos
·
Set a matching color tone in your videos with Color Match.
·
Transform the colors in a video using color look-up tables (CLUT).
·
Produce creative color effects on your videos with Split Toning.
·
Apply the HDR effect on video clips and images.
More Usability I mprovements
Introduction
·
Choose the new Basic mode in the Title Designer for a simpler editing
experience.
·
Set the resolution of created shadow files.
·
Choose how to apply shadow effects in Title and PiP Designers.
·
Adds support for .MOV video (alpha PNG) and 10-bit video (H.265 decode only)
import.
DirectorZone and CyberLink Cloud
You can upload/download effects and templates, and back up media, preferences,
projects, and more with the DirectorZone and CyberLink Cloud* features.
2
Page 16
Cyb erLink PowerDirector Help
Note: * optional feature in CyberLink PowerDirector. Check the version
table on our web site for detailed versioning information.
Note: CyberLink Cloud is a subscription cloud storage service that is
included with some CyberLink products, and is available for purchase
through our web site. For more detailed information, see
https://www.cyberlink.com/products/cyberlink-cloud/.
DirectorZone
DirectorZone is a free web service that lets you search for and download theme
templates, PiP objects, paint animations, title templates, particle objects, sound
clips, and disc menus created by other users of CyberLink PowerDirector.
To access the benefits of DirectorZone, you can sign in by:
·
clic king the S ign in to DirectorZone link in the top right corner of the
CyberLink PowerDirector window.
·
clic king the button at the top of the window to open the PowerDirector
preferences, and then on the DirectorZone tab. See DirectorZone Preferences
for more information.
Also, be sure to periodically click the button to check out the latest
DirectorZone B ulletin and view the Popular templates on D irectorZone. Just click
in either of these sections in the Notifications window to view the bulletin or
download these templates. Or go to https://directorzone.cyberlink.com to find out
more information on the features and benefits of the DirectorZone web service.
CyberLink Cloud
CyberLink Cloud is a cloud storage service from CyberLink where users can upload
and download their effects and templates, PowerDirector projects, produced video
clips, and more. CyberLink Cloud allows users to back up media, preferences,
projects, etc., and ensure their working environment is the same on multiple
computers.
3
Page 17

Introduction
PowerDirector Versions
The features that are available to you within CyberLink PowerDirector are
completely dependent on the version you have installed on your computer.
Supported file formats, editing features, disc-making functions, and other features
vary depending on the version that you have.
To view the PowerDirector version table, please go to our web site:
https://www.cyberlink.com/products/powerdirector-ultra/compare_en_US.html
To determine your version of CyberLink PowerDirector, click on the CyberLink
PowerDirector logo in the top right corner or select ? > About CyberLink
PowerDirector.
PowerDirector Live
PowerDirector Live is a subscription based version of CyberLink PowerDirector that
provides all the editing features you expect, and adds the CyberLink Cloud storage
service and more.
With a PowerDirector Live subscription, you get:
·
All the award-winning features of the Ultimate version of CyberLink
PowerDirector, including the production of 4K ultra HD video and stunning 3D
movies.
·
The ability to back up program preferences, projects, project media, and (PiP
object, paint animation, title effect, particle effect, disc menu) templates on
the cloud storage space CyberLink Cloud.
·
Guaranteed updates to the latest versions of CyberLink PowerDirector
Ultimate.
PowerDirector Live is the must-have solution for on-the-go video editors who want
easy access to their media and the latest up-to-date editing technologies.
Updating PowerDirector
Software upgrades and updates (patches) are periodically available from CyberLink.
CyberLink PowerDirector automatically prompts you when either is available.
4
Page 18
Cyb erLink PowerDirector Help
Note: you can prevent CyberLink PowerDirector from auto checking for
updates/upgrades in General Preferences.
Note: you must connect to the Internet to use this feature.
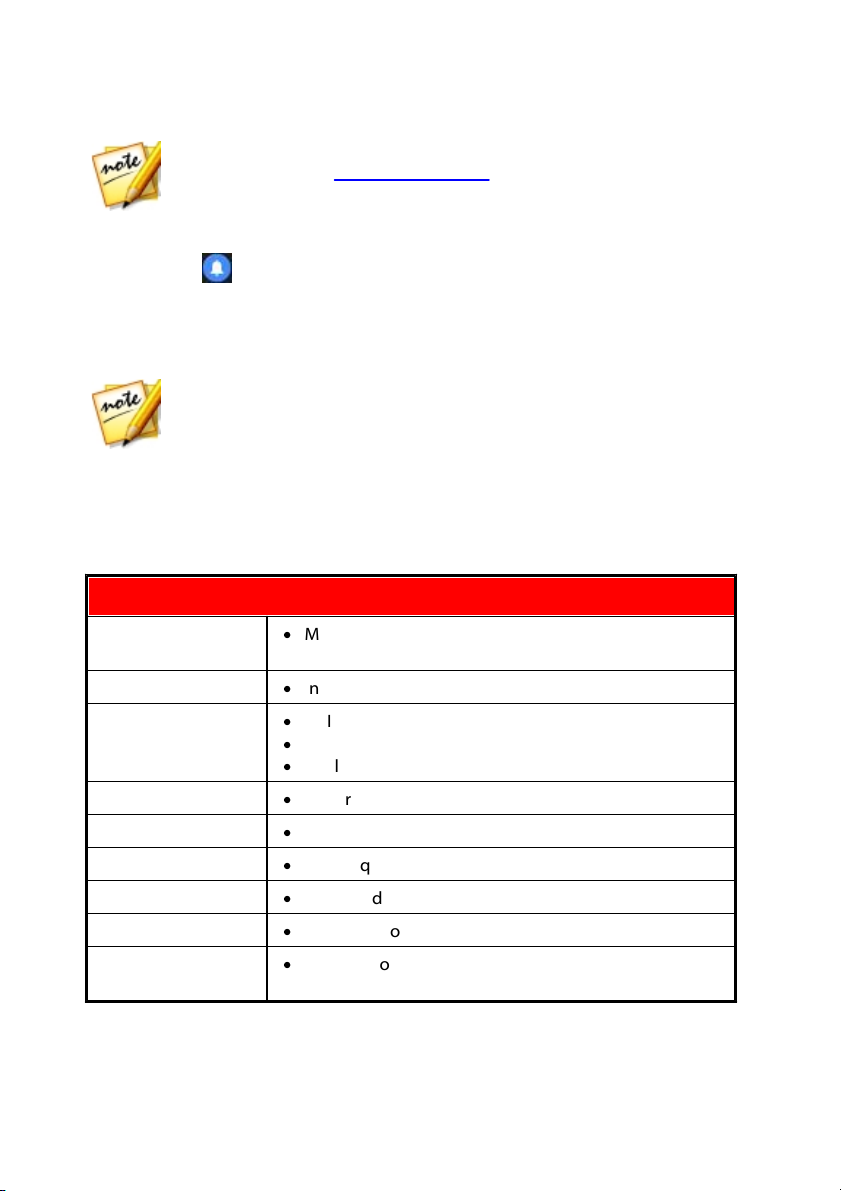
System R equirements
Operating System
·
Microsoft Windows 10, 8/8.1, 7 (64 bit OS
recommended)
Processor (CPU)
·
Intel Core™ i-series or AMD Phenom® II
Graphics Processor
(VGA)
·
NVIDIA GTX220/470 (2010 Fermi)
·
AMD 5450 (2010 Evergreen)
·
Intel Ivy Bridge (2012)
Memory
·
2 GB required (6 GB or above recommended)
Scr een Resolution
·
1024 x 768, 16-bit color
Hard Disk S pace
·
7 GB required
Burning Driv e
·
Burning drive is required for disc burning purpose
Sound Card
·
Windows compatible sound card is required
Internet Connection
·
Internet connection required for initial software &
file formats activation
To update your software, do this:
1. Click the button to open the Notifications window.
2. Check the New U pdates and U pgrade Info sections.
3. Select an item in these sections to open your web browser, where you can
purchase product upgrades or download the latest patch update.
Minimum System Requirements
The system requirements listed below are recommended as minimums for general
digital video production work.
5
Page 19

Introduction
Note: please consult the CyberLink web site
(https://www.cyberlink.com/products/powerdirectorultimate/spec_en_US.html) for the most recent system requirements
information. * optional feature in CyberLink PowerDirector. Check the
version table on our web site for detailed versioning information.
6
Page 20

Cyb erLink PowerDirector Help
Note: before selecting your preferred editing mode, be sure to set the video
aspect ratio for your project (16:9, 4:3, or 9:16).
Note: select the Al ways enter ti meli ne mod e option at the bottom of this
dialog to skip this window at startup. You can always reset this selection at
any time in Confirmation Preferences.
Chapter 2:
PowerDirector Editing Modes
When you launch the program from the start menu, or the CyberLink PowerDirector
shortcut on the desktop, you are prompted to choose one of the following editing
modes:
·
Timeline Mode: select this option to enter timeline mode, a multi video track
editing mode, where all of the program's features are available to you. For
more details about this mode and the available tracks, see Timeline Mode.
·
Storyboard Mode: select this option if you want to view a large graphical
display of all your video clips and images on the first track in the timeline. See
Storyboard Mode for more information about what's available in this mode.
·
Slideshow Creator: with the Slideshow Creator you can instantly turn your
photos into a dynamic slideshow. Follow the steps in the Slideshow Creator to
import your photos, add background music, and stylish slideshow templates.
Once done, you can preview the slideshow, before outputting it as a video file
or burning it to disc.
·
Auto Mode: if you are new to the editing process and not sure how or where
to get started, then auto mode's Magic Movie Wizard can help. The Magic
Movie Wizard takes you through a step-by-step process to import, style,
adjust, and preview your finished movie, in just a few steps. You can then edit
the created production, output it to a video file, or burn it to a disc.
·
360° E ditor*: select this option to create a 360° virtual reality video. See 360°
Media Files for information on importing these types of media files, or Editing
360° Video Projects for information on how to edit them.
7
Page 21
PowerDirecto r Editin g M odes
Note: if you want more creative control than the Magic Movie Wizard
provides, you can also use the Theme Designer to create your video
production. The Theme Designer allows you to customize the theme
templates used and choose the exact images, video clips, and background
music you want in your production. See Using the Theme Designer for more
information.
Note: if you are in the timeline mode, you can quickly launch the Magic
Movie Wizard by clicking on the button above the timeline and
selecting M agic M ovie Wizard.
Note: click to remove any unwanted media files from your production.
Auto Mode
If you are new to the editing process and not sure how or where to get started, then
auto mode's Magic Movie Wizard can help. The Magic Movie Wizard takes all of your
media and creates a completed video production in just a few steps.
To create your video production using the Magic Movie Wizard in auto mode, do
this:
1. Select Auto Mode when prompted which mode you prefer at startup. The
Magic Movie Wizard displays.
2. In the Source window, click to import all of the media you want to use in
your video production. Select I mport Media Files to import a number of
individual video or image files, or select Im port a Media Folder if all of your
media is in a specific folder on your computer's hard drive. CyberLink
PowerDirector will import all of the supported media file formats in the
selected folder.
3. Before proceeding to the next window, you can perform simple trims on
video clips and crop any imported images as follows:
·
hover your mouse over a video clip you want to trim, and then click on
its thumbnail to open the Trim window. See Performing a Single Trim for
information on how to trim video clips.
·
hover your mouse over an image you want to crop, and then click on its
thumbnail to open the Crop window. See Cropping Images for information on
how to crop images.
8
Page 22
Cyb erLink PowerDirector Help
Note: once you proceed, you can always click the Previous button to return
to the Source window to import more media or trim/crop the imported video
clips/images.
Note: the style templates with the 3D icon produce a 3D effect in 3D mode
and when outputted in 3D video productions. * optional feature in CyberLink
PowerDirector. Check the version table on our web site for detailed
versioning information.
Note: * optional feature in CyberLink PowerDirector. Check the version
table on our web site for detailed versioning information.
4. Once you are done importing, trimming and cropping, click Next to continue.
5. In the Style window, select from the available movie styles. Each style you
select will result in a different outputted video. Select Fr ee Dow nload* to get
more style templates. See DirectorZone for more information.
6. Click Next to continue.
7. In the Adjustm ent window, click to add music to your production.
Then use the available controls to do the following:
·
use the button to add more music files to the background music
playlist. Use the and buttons to set the order of the music in the
playlist. The total duration of all the music added is noted above the playlist.
·
Mix audio level between music and the video's audio: use the slider to mix the
audio level, by deciding whether to have more background music or the
original video's audio in the production.
·
Specify the movie duration: here you can specify how long your movie will
be. Select Original duration if you don't want the Magic Movie Wizard to make
any edits to your imported media; Select S et output duration to manually
specify how long you want the movie to be in the field provided; Select Fit
duration to background music if you want your video production to match
the duration of the music you imported into the playlist.
8. Click the Settings* button to use the sliders to customize the criteria the Magic
Movie Wizard uses to cut your movie. Click OK to save the settings.
9. Click Next to continue.
10. In the Preview window the Magic Movie Wizard generates a version of your
production. If available, enter a Starting title and E nding title for your
9
Page 23
PowerDirecto r Editin g M odes
Note: if you are not satisfied with the current video production you can click
the Previous button to return to previous windows to add/remove music,
select a different style, change the criteria settings, duration, or import more
media. You can also click the Reorder M edia button (if available) to
shuffle the media files in the created production for a different look, or the
Edit in the Theme Designer button if you want to customize the style
template used. See Using the Theme Designer for more information.
Note: if you are in the timeline mode, you can launch the Slideshow Creator
by adding photos to the timeline, selecting them, and then clicking on the
Slideshow button above the timeline. See Using the Slideshow Creator for
more information.
production in the fields provided, and then use the available player controls to
preview it.
11. Click Next to continue.
12. You are done. To finish and close the Easy Editor, choose one of the following:
·
Produce Video: click to enter the Produce module where you can output your
production to a video file, device, or upload it to a video sharing web site. See
Producing Your Project.
·
Create Disc: click to burn your production to a disc, complete with a
professional looking disc menu, in the Create Disc module. See Creating Discs.
·
Advanced Editing: click this option if you'd like to perform some more
advanced editing on your production in the Edit module.
Slideshow Creator
The Slideshow Creator is the easiest way to create a dynamic slideshow with your
photos.
To create a slideshow in the Slideshow Creator, do this:
1. Select Slideshow Creator when prompted which mode you prefer at startup.
The first Slideshow Creator window displays.
2. In the Source window, click to import all of the photos you want to use in
your slideshow. Select Im port Im age Files to import a number of individual
photos, or select Import an I mage Folder if all of your photos are in a specific
folder on your computer's hard drive. CyberLink PowerDirector will import all
of the supported image formats in the selected folder.
10
Page 24
Cyb erLink PowerDirector Help
Note: you can right-click on a photo and select Set 3D Sour ce Forma t if
required. For more information, please refer to Setting 3D Source Format.
You can also click to remove any unwanted photos from your
slideshow.
3. Click Next to continue.
4. In the Style & Music window, select a slideshow style. Each style you select will
result in a different slideshow.
5. In the Style & Music window, click the button to add background
music to your slideshow. After adding music, click the Music Preferences
button to customize the music duration and add fades. See Setting Music
Preferences for a detail description of the available preferences.
6. In the Style & Music window, click the Slideshow Preferences button to set
your slideshow preferences as follows:
·
Duration: use this option to set the length of your slideshow. Select Fit photos
to music to have the length of the slideshow match the duration of the added
background music . Select Fit music to photos (if launched in Full Feature
Mode) for the length of the music to match the duration of the slideshow, i.e.
its specified length on the timeline.
·
Sequence: use this option to set the order of the photos in the slideshow.
Select Timeline order (if launched in Full Feature Mode) to have the sequence
match the order the photos are currently displayed in the timeline. Select
Date/time taken for the photos to display in chronological order based on the
date and time they were taken.
·
Detect faces: some slideshow templates include this option. When selected,
the Slideshow Creator will scan and detect the faces in the photos included in
the slideshow. The faces in the photos will then become the area of focus in
the created photo slideshows.
·
Click OK to save your changes.
7. Click Next to continue.
8. In the Preview window, the Slideshow Creator generates a version of your
slideshow. Use the available player controls to preview it.
11
Page 25

PowerDirecto r Editin g M odes
Note: if you are not satisfied with the current slideshow, you can click the
Previous button to return to previous windows to select a different style, or
import more photos. Also, if available, click the Replace Background
button in the Preview window to replace the background image used in the
sl ideshow, or Customize to fully customize your slideshow in the
Slideshow Designer. See Customizing Slideshows in the Slideshow
Designer for a detailed description of all the available options for your
selected slideshow style.
Note: if you select the Advanced Editing option, the Slideshow Creator
adds your created slideshow to the timeline in the Edit window as a
combined video file. If you'd like to do further editing on this slideshow
(combined video file), just select it and click the Customize button above
the timeline to edit in the Slideshow Designer. If you would like to remove
the slideshow effects added by the template and display each individual
photo in the slideshow on the timeline, just right-click on the file and then
select Remove Slideshow Effects.
9. Click Next to continue.
10. You are done. To finish and close the Easy Editor, choose one of the following:
·
Produce Video: click to enter the Produce window where you can output your
slideshow to a video file, device, or upload it to a video sharing web site. See
Producing Your Project.
·
Create Disc: click to burn your slideshow to a disc, complete with a
professional looking disc menu, in the Create Disc window. See Creating Disc.
·
Advanced Editing: click this option if you'd like to perform some more
advanced editing on your slideshow in the Edit window.
Setting Music Preferences
If you are using background music in your slideshow, click on the Music
Preferences button in the Style & Music window of the Slideshow Creator to
configure the preferences as follows:
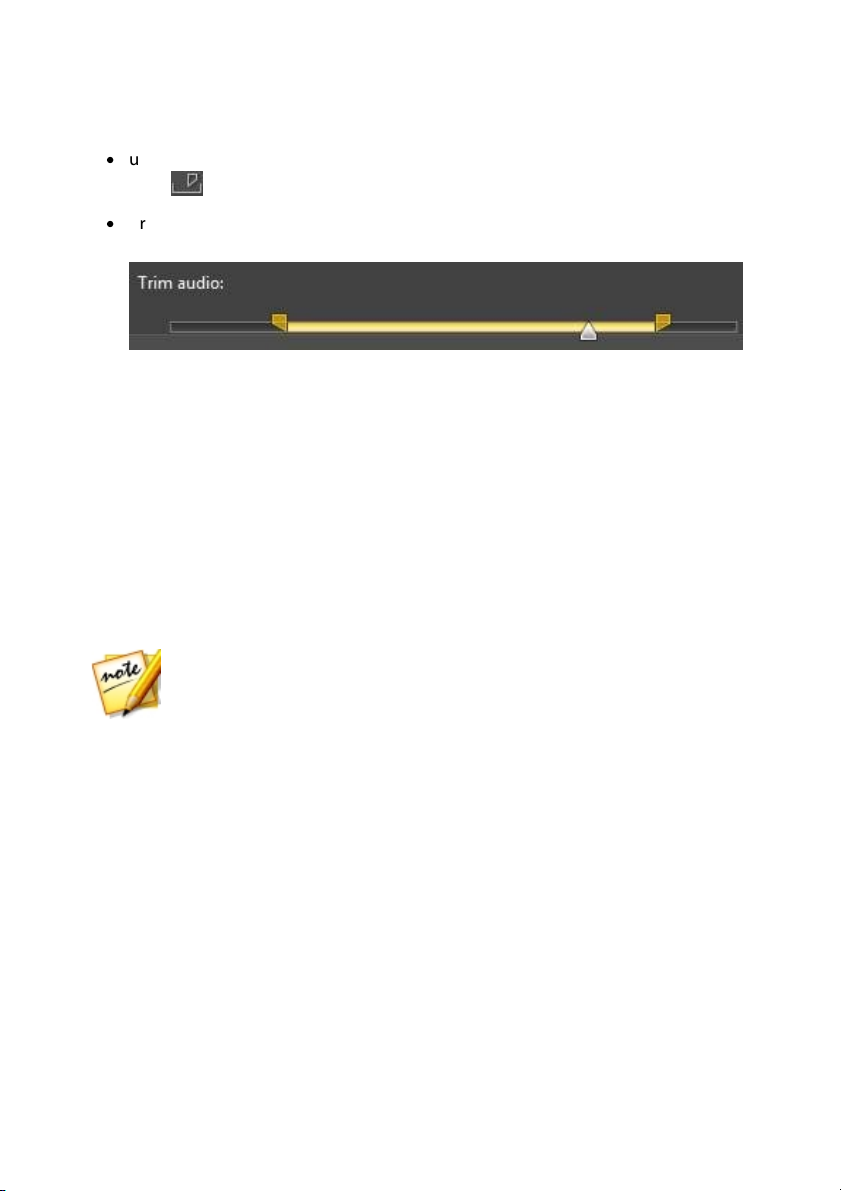
1. In the Trim audio section you can trim the length of the music file you added
as background music as follows:
·
use the player controls to find the desired start point for the music, and then
click .
12
Page 26
Cyb erLink PowerDirector Help
Note: if the Customize button is not available in the Preview window, the
slideshow style template you selected cannot be customized in the
Slideshow Designer.
·
use the player controls to find the desired end point for the music, and then
click .
·
drag the markers on the music timeline to set the desired start and end times
manually.
2. Select the Fade-in option to have the background music gradually fade-in at
the beginning of the slideshow.
3. Select the F ade out option to have the background music gradually fade-out
at the end of the slideshow.
4. Click OK to save your changes.
Customizing Slideshows in the Slideshow Designer
In the Preview window of the Slideshow Creator, click on the Customize button to
open the Slideshow Designer to modify the selected slideshow style.
13
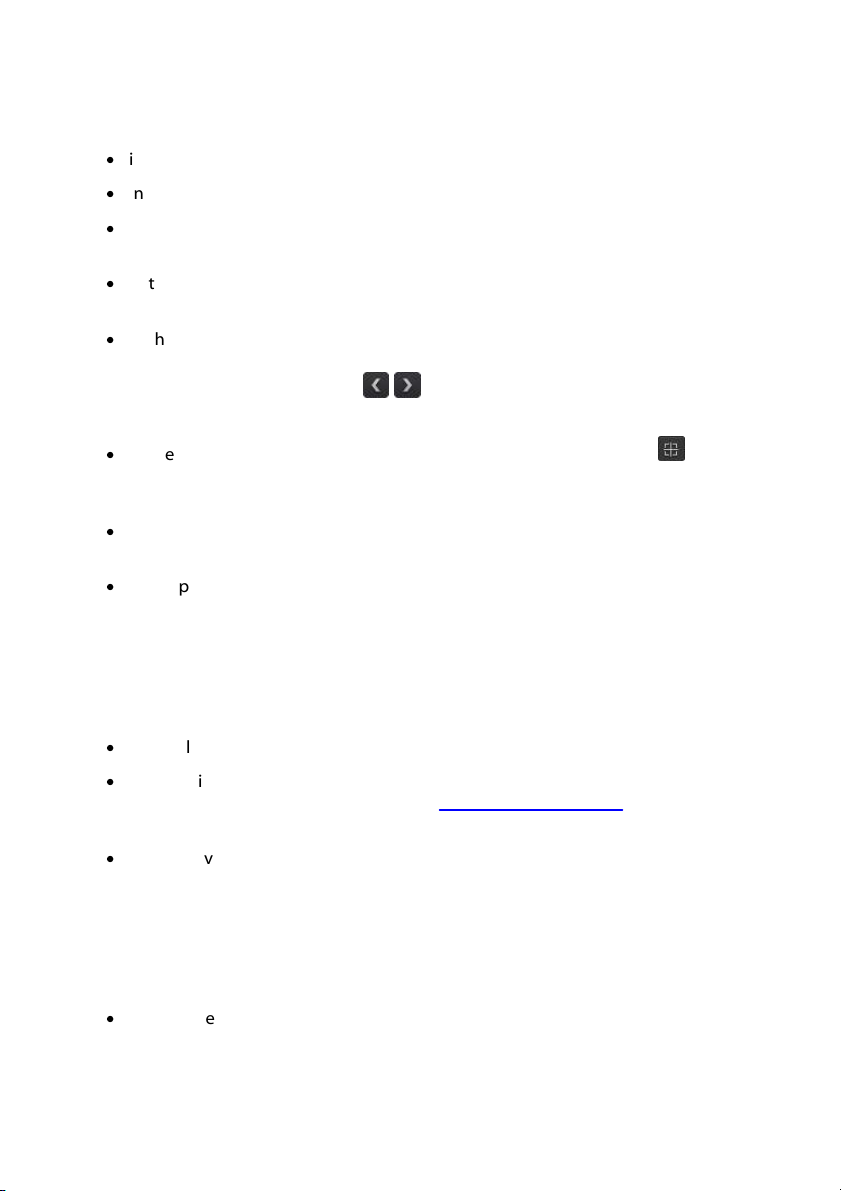
Page 27
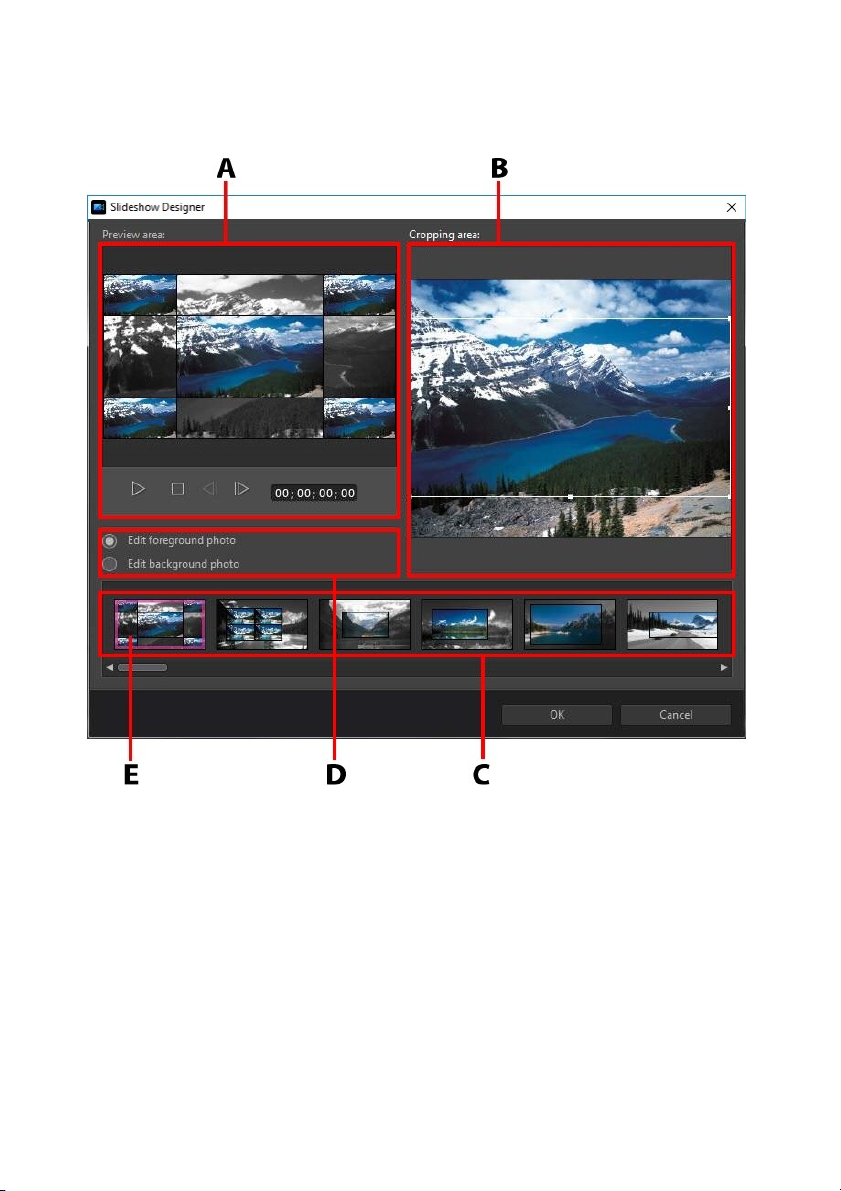
PowerDirecto r Editin g M odes
A - Preview Area, B - Editing Area, C - Sl ide Area, D - Extra Tool s Area, E - Selected Slide
The editing options and tools that are available in the Slideshow Designer, depend
on the slideshow style template you selected. The following outlines the editing
options available for the style templates that utilize the Slideshow Designer.
Camera/Cell Slideshow
When customizing a Camera or Cell slideshow in the Slideshow Designer, you can
perform the following functions:
14
Page 28
Cyb erLink PowerDirector Help
·
in the slide area, click on a specific slideshow slide to view and edit it.
·
in the preview area, click and drag a photo to an alternative cell.
·
in the editing area (Unused photos), click the Add Photos button to import
additional photos for use in the slideshow.
·
in the editing area (Unused photos), indicate the maximum number of photos
that are displayed on a slide.
·
in the editing area, drag and drop the photos from Unused photos to the cell
in the preview area where you want it on the slide. You can also highlight a
cell by clicking it and use the buttons to add or remove selected
photos.
·
in the preview area, select a cell with a photo and then click on the button
to set the focus of that cell on a specific portion of the photo. Manually resize
and drag the box to set the desired focus area.
·
in the extra tools area, click the Remix button to generate a new version of the
slideshow.
·
in the preview area, use the player controls to preview the slideshow.
Motion Slideshow
When customizing a Motion slideshow in the Slideshow Designer, you can perform
the following functions:
·
in the slide area, click on a specific slideshow slide to view and edit it.
·
in the editing area (Cropping area), use the Magic Motion Designer to
customize the motion on the slide. See Magic Motion Designer for detailed
instructions on using all its features.
·
in the preview area, use the player controls to preview the slideshow.
Highlight Slideshow
When customizing a Highlight slideshow in the Slideshow Designer, you can
perform the following functions:
·
in the slide area, click on a specific slideshow slide to view and edit it.
15
Page 29
PowerDirecto r Editin g M odes
Note: the slideshow background cannot be replaced for slideshows using
the Balloon template.
Note: to create a time-lapse slideshow, you need to prepare the photos for it
ahead of time. This feature works best with a series of photos taken with a
camera that supports time-lapse photography.
·
in the extra tools area, select whether you want to edit the foreground or
background photo.
·
in the editing area (Cropping area), resize and drag the box to the area of the
photo you want highlighted on the slide.
·
in the preview area, use the player controls to preview the slideshow.
3D/Balloon/Frozen Space/Outer Space
Slideshow
When customizing a 3D, Frozen Space, or Future slideshow in the Slideshow
Designer, you can perform the following functions:
·
in the slide area, click on a specific slideshow slide to view and edit it.
·
in the editing area (Cropping area), resize and drag the box to the area of the
photo you want highlighted in the photo on the slide.
·
clic k the R eplace B ackground button if you want to import a custom image
to use as the slideshow's background.
·
in the preview area, use the player controls to preview the slideshow.
Time-Lapse Slideshow
When customizing a time-lapse slideshow in the Slideshow Designer, you can
specify the following settings:
·
Duration of each image: in the field provided, specify how long you want each
of the imported images to display. Each image can display for as long as 99
frames, or as short as for 1 single video frame.
·
For each displayed image, skip: when importing a large number of images
that were taken over a period of time, you may find the need to remove some
16
Page 30

Cyb erLink PowerDirector Help
of the images to reduce the slideshow's duration. In the field provided, enter
the number of images you want to remove for each displayed image in your
slideshow.
17
Page 31

PowerDirecto r Workspace
Module
Description
Chapter 3:
PowerDirector Workspace
This chapter outlines the CyberLink PowerDirector workspace, and all of its features.
The workspace in the Edit module is where you will spend most of your time when
using CyberLink PowerDirector, so getting familiar with everything it has to offer is
recommended.
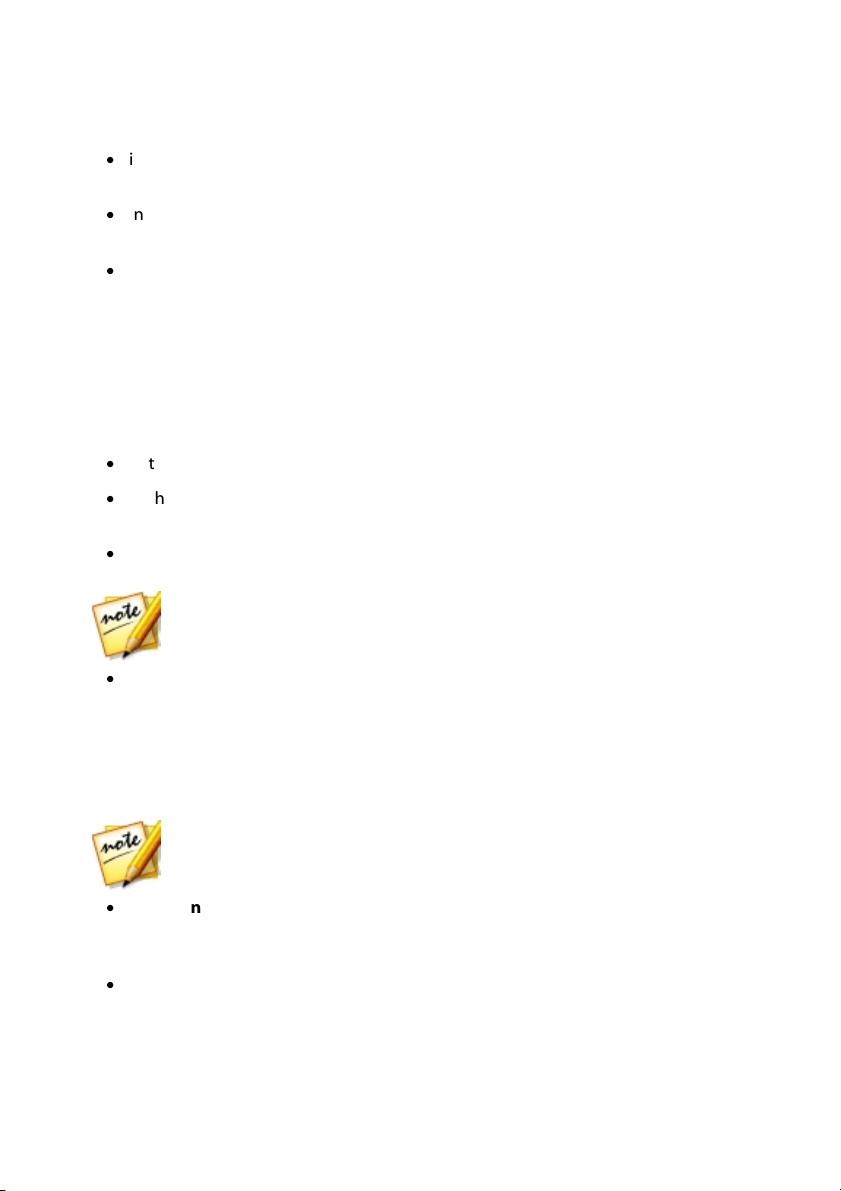
A - Roo ms, B - Im port Med ia, C - P owerDirector Plug -ins, D - Li brary Wi ndow, E - Exp andabl e
Workspace, F - Preview Win dow, G - Z oom I n/Out, H - Undo ck Preview Window , I - 3D Displa y
Configu ration, J - Enable/ Disable 3D Mode, K - Preview Quality/Di splay Options, L - Take Snapsho t,
M - Preview P layer Controls, N - Ed iting Workspac e, O - Range Selection, P - Functio n Buttons, Q Timeli ne Rul er, R - View Entire M ovie, S - Track M anager
PowerDirector Modules
When you are within the main program window of CyberLink PowerDirector, there
are four main modules available to you.
18
Page 32

Cyb erLink PowerDirector Help
Capture
Capture media in a number of formats, from a variety
of different sources. See Capturing Media.
Edit
In the Edit module you can edit and trim your
imported media, arrange it in your video production,
add effects, titles, PiP objects, transitions, music,
chapters, subtitles, and much more. See the relevant
section of this help file that corresponds with the
editing feature you'd like to use.
Produce
In the Produce module you can output your created
production to a video file in a variety of formats
(including 3D formats), a device (camcorder, mobile
phone, or other portable device), or upload it to
YouTube, Facebook, DailyMotion, Vimeo, and more.
See Producing Your Project.
Create Disc
Use the features in the Create Disc module to design
discs with menus, and then burn your video
production in a variety of different formats in 2D or
3D. See Creating Discs.
When CyberLink PowerDirector launches in timeline or storyboard mode, it
automatically opens in the Edit module. Just click on the module button at the top
of the window to quickly switch to the available modules to perform your required
task.
Rooms
The various rooms in the Edit module of CyberLink PowerDirector are where you
can access all of your media, effects, titles, and transitions when editing your video
production. You can also gain access to controls for recording and mixing audio,
adding chapters or subtitles. By default, the library window displays the Media
Room.
Media Room
The Media Room provides access to your media library and the PowerDirector plugins. The media library contains your video, audio, and image files. You can also
access a number of useful color boards and backgrounds for use in your video
productions, or view your library of saved and express projects.
19
Page 33

PowerDirecto r Workspace
Note: if you cannot find this button when in the media library, you may need
to resize the preview window to reveal it. See Expanding the Workspace for
more information.
Note: see Library Window for more information about the library menu
options available in all rooms.
Note: * optional feature in CyberLink PowerDirector. Check the version
table on our web site for detailed versioning information.
Click to access the PowerDirector plug-ins. See PowerDirector Plug-ins
for a detailed description of the plug-ins and their available features.
Managing the Media Library
Use the button to manage the media in your media library. You can sort the
media, change the media thumbnail icon size, or select Details to view file
information instead of a thumbnail.
Other media library management options include:
·
Export Library: select to export your entire media library as a file for backup,
in the PDL (PowerDirector Library) format.
·
Im port Library: select to import a media library PDL file, exported from
another project or version of CyberLink PowerDirector.
·
Empty the Library: select to empty the entire contents of the media library.
·
Remov e All Unused Content from Library: select if you just want to remove
the media that is not being used in the current project.
Content Aware Details
When in the Media Room, you can select the Content Aware Details* option from
the library menu to view the analysis results for all the video clips analyzed and
edited in Content Aware Editing. Clips that were previously analyzed are indicated
by the green (good parts) and light brown (bad parts) dots in the specific columns.
To analyze video clips in this view, select them in the Analyze column and then
clic k the Analyze button.
20
Page 34

Cyb erLink PowerDirector Help
Note: the video effects with the 3D icon produce a 3D effect in 3D mode and
when outputted in 3D video productions.
Note: the PiP objects with the 3D icon produce a 3D effect in 3D mode and
when outputted in 3D video productions.
Note: the particle effects with the 3D icon produce a 3D effect in 3D mode
and when outputted in 3D video productions.
To edit a video clip using Content Aware Editing, click . If the video clip has
not yet been analyzed, CyberLink PowerDirector will do this first before opening the
Content Aware Editing window. See Content Aware Editing for more detailed
information on this feature.
Effect Room
The Effect Room contains a library of special effects that are used on the video files
and images in your project. For more information, see Adding Effects.
PiP Objects Room
The PiP Objects Room contains a library of PiP objects, or graphics, that you can
add on top of the video or images on a video track. You can place PiP objects onto
any track in the timeline. The PiP Objects Room also includes paint animation
objects and access to the Paint Designer.
For information on adding PiP objects, see Adding PiP Objects. For information on
the hand drawn paint animation objects you can create in the Paint Designer, see
Using the Paint Designer.
Particle Room
The Particle Room contains a library of effects you can place on a video track to
add a particle object (snow, clouds, smoke, etc.) on top of a video or image on a
video track.
You can modify particles in the Particle Designer. For more information, see Adding
Particle Effects.
21
Page 35

PowerDirecto r Workspace
Note: the title effects with the 3D icon produce a 3D effect in 3D mode and
when outputted in 3D video productions.
Note: if you want to add subtitles to your video, see the Subtitle Room.
Note: you can create your own custom transitions, or edit existing alpha
transitions, using the Transition Designer. See Modifying Alpha Transitions
in the Transition Designer for more information.
Title Room
The Title Room contains a library of title effects that allow you to add movie titles,
screen captions, credits, etc. on your videos.
For m ore inform ation, see Adding Title Effects.
Transition Room
The Transition Room contains transitions that you can use on or between clips in
your project. Transitions let you control how media appears and disappears in your
project, and changes from one clip to the next. For more information, see Using
Transitions.
The transitions with the 3D icon produce a 3D effect in 3D mode and when
outputted in 3D video productions. See The Difference Between 3D and 3D-Like
Effects to learn more about both types of effects.
Audio Mixing Room
In the Audio Mixing Room you can use controls to mix all of the audio tracks in
your project. For more information, see Mixing Audio and Recording Voice-Overs.
Voice-Over Recording Room
In the Voice-Over Recording Room you can record a voice over for your video
production, while you are watching it play back. For more information, see
Recording Voice-Overs.
22
Page 36

Cyb erLink PowerDirector Help
Note: * optional feature in CyberLink PowerDirector. Check the version
table on our web site for detailed versioning information.
Chapter Room
In the Chapter Room* you can automatically or manually set chapter markers for
your project. Setting chapters on your final disc allows viewers to jump from the
menu page to the chapter markers you have set in order to navigate through your
disc. For more information, see Adding Chapters.
Subtitle Room
In the Subtitle Room you can add subtitles to your video production manually or
through the import of a TXT, SRT, or MKV file. For more information, see Adding
Subtitles.
Library Window
The library window contains all of the media in CyberLink PowerDirector, including
your video, images, and audio files. When you are in other rooms (Effect Room, PiP
Objects Room, etc.), it contains the effects, titles, and transitions you apply to your
media.
The media content and available buttons that display in the library window depend
on the room you are currently in.
Click the button above the library window and then use the slider to adjust the
size of the media thumbnails in the library.
23
Page 37

PowerDirecto r Workspace
You can also resize the media thumbnails by selecting a default size from the library
menu.
24
Page 38

Cyb erLink PowerDirector Help
Note: you can also use tags to filter the express projects in your library. See
Using an Express Project for more information on express projects.
Explorer View
Select the button to display the explorer view within the library windows.
In the explorer view you can use tags to categorize the media, templates, and
effects in your library. This lets you quickly browse through and filter what is in
each room.
In the explorer view you can:
·
clic k on to add a new tag in a library window.
·
select an existing tag and then click to delete a previously created tag.
·
filter the media in the library window by selecting an existing tag.
Searching the PowerDirector Library
If you are looking for specific media, effects, or templates in a library window, use
the search function to find it.
To search in the library, do this:
1. Enter in a keyword in the search field located on top of the library window.
2. CyberLink PowerDirector filters the content in the library window based on the
keywords entered.
25
Page 39

PowerDirecto r Workspace
Note: click on to clear the search results.
Filtering Media in the Library
Use the available drop-down menus at the top of the library window to filter the
media that is displayed. For example, when viewing the media in the Media Room,
use the Media Content drop-down to display just your media content, the available
color boards, backgrounds, your saved projects, or to select a tag. Select Express
Projects to view a library of project templates you can use. See Using an Express
Project for more information.
If you'd like to filter the media files that are in the library by file type, use the three
buttons above the library window. Click these buttons to hide media so you can
more easily find what you are looking for.
26
Page 40

Cyb erLink PowerDirector Help
27
Page 41

PowerDirecto r Workspace
Note: if you cannot find this button when in the media library, you may need
to resize the preview window to reveal it. See Expanding the Workspace for
more information.
Library Menu
Click on to access the library menu. In the library menu you can sort the
content in a room by name, date created, file size, and more. You can also select all
the content in the room or change the media/effect thumbnail display size. Other
options that are available in the library menu, but are dependent on the specific
room you are in.
Expanding the Workspace
The look and layout of the CyberLink PowerDirector workspace is fully expandable
and customizable based on your personal preference.
28
Page 42

Cyb erLink PowerDirector Help
Note: you can also undock the preview window for a much larger timeline
and library view. See Undocking the Preview Window for more information.
Simply drag the borders of the preview window and timeline to resize them to your
liking. This allows you to get the most out of your display device space and
customize the size of the preview window and timeline as you work.
Preview Window
While creating your video production, you can preview it in the preview window
using the available player controls.
29
Page 43

Preview Player Controls
Note: you can set PowerDirector to auto switch the playback mode to
Movie mode in Editing Preferences.
PowerDirecto r Workspace
With the player controls you can preview your production as you edit, including
playing your project from the current timeline position, or pausing and stopping
playback.
Click the Clip button to play back only the clip that is selected in the timeline, or
Movie to play the entire video production. When viewing media in Clip mode, the
cross hairs and grid lines/TV safe zone (if enabled) are visible to help with the
placement of the selected clip in the video display area. When in Movie mode,
these items are hidden.
Use the button to select a seek by method (frame, second, minute, scene,
subtitle, chapter, segment) and then use the buttons on either side of it for a more
precise step through of your current production.
30
Page 44

Cyb erLink PowerDirector Help
Note: if you want the screen snapshot to be the same resolution as the
original video clip, take it while the clip is in the media library. See
Capturing Screen Snapshot from a Video Clip for more details.
Note: * Optional feature in CyberLink PowerDirector. Check the version
table on our web site for detailed versioning information.
Note: you can also set these options in Display Preferences.
You can also click and drag the playback slider, or enter in a specific timecode in
the time field, and then press the enter key on your keyboard to quickly find a
specific scene.
Click the button to undock the preview window for a larger view of your
production. See Undocking the Preview Window for more information.
Preview Screen Snapshots
While previewing your video project, click to take a screen snapshot and save it
as an image file that's added to your media library. The resolution of preview screen
snapshots is 1920x1080, no matter the project preview resolution or the resolution
of the original clip.
You can also take a 3D* screen snapshot (just enable 3D mode) and then save it as
an MPO or JPS image file.
Before taking the snapshot, you can set its file format (and default file name) on the
File Preferences tab.
Preview/Display Options
CyberLink PowerDirector includes some preview and display options that help
make your editing experience easier. Click on to set the preview quality, show
the TV safe zone, display grid lines, or enable dual preview.
31
Page 45

PowerDirecto r Workspace
Note: Full HD and HD preview resolution are only available when the Ultra
or Ultimate version of CyberLink PowerDirector is installed on a 64-bit
operating system.
Note: you can also preview a portion of your video using the Render Preview
and Produce Range options. See Range Selection for more information on
these functions.
Preview Quality
Click , select Preview Quality, and then a preview quality from the list (Full HD*,
HD*, high, normal, low) to set the resolution/quality of the video used when
previewing your movie in the preview window. The higher the quality you select,
the more resources that are required to preview your video project.
Preview Mode
CyberLink PowerDirector provides two modes you can use to preview your video
production:
·
Real-time Preview: synchronizes and renders clips and effects in real-time,
displaying a preview of your video at the specified frames per second. See the
timeline frame rate option in General Preferences for information on setting
the correct frame rate for your production.
·
Non R eal-time Preview: mutes the audio and displays a preview at a reduced
speed to help make editing go more smoothly. Useful when editing highdefinition video, using multiple PiP tracks on a less powerful computer, or
when you receive dropped frames when previewing. By muting the audio and
slowing down the video, CyberLink PowerDirector lets you view more frames
per second when your computer has trouble providing a smooth preview
during editing.
TV Safe Zone/Grid Lines
When you place media on the timeline, use the TV safe zone and grid lines to help
with the precise placement on your video project's image. These display options are
only available when in the Clip preview mode.
32
Page 46

Cyb erLink PowerDirector Help
Note: to use a connected monitor or TV as a secondary preview window,
you must first enable extend desktop to a secondary display in the Windows
Display Properties Settings. * optional feature in CyberLink PowerDirector.
Check the version table on our web site for detailed versioning information.
Note: if both of your displays are 3D devices, you can only enable 3D on
one of the two devices in dual preview mode.
·
Click the button and then select TV Safe Zone > On to enable a box that
indicates the on-screen area of most TV displays.
·
Click the button, select Grid Lines, and then select the number of lines
you want to display in a grid over the video image. Use this grid to more
precisely place the PiP media and title text on the video image.
Once enabled, select S nap to Reference Lines* to have the selected objects snap to
the grid lines, TV safe zone, and the boundary of the preview window.
Dual Preview
If you have a secondary display device, such as a monitor, TV, or DV camcorder
connected to your computer, click the button and then select D ual Preview*
to extend your workspace and preview your project on a secondary display.
Once enabled, when you click play in the preview window, you can preview your
production on both your primary and secondary display when Prim ary 2D and
Secondary 2D Display is selected. Select DV Camcorder to extend your production
preview to a connected DV camcorder device.
3D Dual Preview
When your desktop is extended to a secondary display, you can enable 3D on one
of the two devices. If you want one of your previews to be in 3D, select either
Primary 2D and Secondary 3D Display or Primary 3D and Secondary 2D Display to
enable it. Your selection depends on which device you want to enable, and which
one supports 3D.
33
Page 47

PowerDirecto r Workspace
Note: * optional feature in CyberLink PowerDirector. Check the version
table on our web site for detailed versioning information.
Note: see 360° Media Files for more information about imported 360°
videos and images. * optional feature in CyberLink PowerDirector. Check
the version table on our web site for detailed versioning information.
Zoom In/Out
When you place media on the timeline, use the Fit* drop-down underneath the
preview window to zoom in or out on the video. Zooming in is useful for precise
placement of media, while zooming out lets you add media that begins off screen.
Undocking the Preview Window
Click the button to undock the preview window. Once undocked, you can
preview your production at full screen or move it to an extended desktop. You can
also resize the timeline and library window to your liking.
Once undocked, you can:
·
click to view your production at full screen, or to maximize the
preview window.
·
click to minimize the preview window, and hide it so you can edit more
freely. Click on next to the APP button to show the minimized preview
window.
·
clic k on to re-dock the preview window.
Playing 360° Media Files
After 360°* video and image files are imported into the media library, they can be
played back in 360° viewer mode. To play back a 360° media file in 360° viewer
mode, do this:
1. First, ensure your project's aspect ratio is set to 360. See Setting Project Aspect
Ratio for more information.
2. Select the 360° media file in the media library or on the project timeline.
3. Click to enable the 360° viewer mode.
34
Page 48

Cyb erLink PowerDirector Help
Note: you can also click and drag your mouse in the preview window to
explore the 360° environment.
4. If it is a video file, click the play button to start playing it back.
5. Use the 360 controls to view and explore the 360° environment.
360 Controls
When you select or play 360° media files, there are extra 360° controls available in
the preview window.
When viewing or playing a 360° media file, you can click and drag on the preview
window to pan around the 360° environment or use the controls to pan left,
35
Page 49

PowerDirecto r Workspace
Note: you can also use your mouse's scroll wheel to zoom in and out within
the 360° view.
Note: for detailed information on adding and setting the source format of 3D
media, see 3D Media. * Optional feature in CyberLink PowerDirector.
Check the version table on our web site for detailed versioning information.
right, up, or down. Note that you can click the in the middle of the controls at
any time to reset to the default viewing position.
Previewing in 3D Mode
In the preview window you can enable 3D* mode to view the media in your
production in 3D, while you work.
3D Configuration
Before you can enable 3D mode, you must first set your 3D display device.
To set your 3D display device, do this:
1. Select the 3D configuration menu underneath the preview window .
2. Select one of the following options:
·
select your 3D display type from the list, i.e. 3D -Ready HDT V (Checkerboard),
Micro-polarizer LCD 3D (Row -Interleaved), 120H z Time-sequential 3D LCD,
HDMI 1.4 Enabled 3D TV, etc.
·
if you are not sure which type of 3D display you have, select the Auto Detect
3D Mode option to have CyberLink PowerDirector detect it for you.
·
if you do not have a 3D display, select Anaglyph Red/Cyan mode and then use
anaglyphic (red/cyan) 3D glasses to view 3D content.
Enabling 3D Mode
Once you have set your 3D display device, you can enable 3D mode at any time to
preview your video production in 3D. To enable, just click the button.
36
Page 50

Cyb erLink PowerDirector Help
Note: any 2D media in your production will not display in 3D. However, you
can convert all of the 2D media to 3D using TrueTheater 3D in Power Tools.
See Power Tools: 2D to 3D for more information.
Note: once you have entered one of the editing workspace modes, if you'd
like to switch to the other mode, you can do so by pressing the Tab key on
your keyboard.
Track
Description
Video tracks contain your project's media clips (video clips and
images) and effects (PiP objects, particle effects, title effects, etc.)
on the timeline. By default, there are two video tracks in the
timeline, but you can have up to 100 video tracks by adding more
in the Track Manager. Each video track in the timeline may have
an associated audio track for the video clip's audio.
Audio tracks contain the audio in your project. The audio may be
the audio portion of a video clip on the video track, or a separate
audio track for music clips or other audio. By default there are
two audio tracks linked with a video track, and a separate audio
To disable 3D mode, just click the button.
Editing Workspace
The editing workspace is where you create your project by adding your media,
various effects, transitions, title effects, etc. The editing workspace has two different
modes, the timeline and storyboard modes. They are accessed at first launch in the
PowerDirector launcher window.
Timeline Mode
In timeline mode you can view your entire project based on running time. This view
is useful if you want to insert media, effects, subtitles, etc. at a specific moment in
production. The timeline also provides a view of all the tracks, media, and other
content (chapter markers, subtitle markers) that are displayed in the timeline.
Timeline Tracks
The timeline contains the following tracks:
37
Page 51

PowerDirecto r Workspace
track for music, which is always the bottom track in the timeline.
You can have up to 100 audio tracks by adding more in the Track
Manager.
The effect track contains any special effects that you want to
apply to your final video. Video effects in the effect track are
applied to all the video tracks that are positioned above it in the
timeline.
The title track contains the text title effects that appear in your
project. The titles you add to this track display over all the content
in every video track that display during their duration.
The voice track contains a narrative voice-over or other audio
clips.
The music track contains your video's soundtrack.
The chapter track contains all of the chapter markers in your
current video production. This track displays when you are in the
Chapter Room. Right-click on the timeline and then select Show
Chapter Track if you always want this track to display in the
timeline.
The subtitle track contains all of the subtitle markers in your
current video production. This track displays when you are in the
Subtitle Room. Right-click on the timeline and then select Show
Subtitle Track if you always want this track to display in the
timeline.
The SVRT track displays the Intelligent SVRT information for your
current project. See Utilizing Intelligent SVRT for more
information. Right-click on the timeline and then select Show
SVR T Track if you always want this track to display in the
timeline.
The clip marker track displays all of the clip markers on your
media clips. Clip markers are automatically added when using
Music Beat Detection or the Screen Recorder. Or they can be
added manually on each individual media clip on the timeline.
Right-click on the timeline and then select Show Clip Marker
Track if you always want this track to display in the timeline.
38
Page 52

Cyb erLink PowerDirector Help
Note: you cannot include transitions in grouped objects.
Timeline Behavior
The CyberLink PowerDirector timeline has several behavior features that make it
easy to manage media on the timeline.
On the timeline you can:
·
place media clips at any position on a video track. If no media is placed before
a media clip on the timeline, your video production displays a black screen
until the timeline position of your media clip is reached.
·
media clips will snap to other clips on the timeline for easy placement in your
production. If want to move the clips more freely on the timeline, you can
disable snap to clips in Editing Preferences.
·
hold down the Ctrl key on the keyboard and select multiple media clips on the
timeline.
·
click and drag the mouse to select multiple media clips on the timeline.
·
right-click on select media in the timeline and select Group Objects. Doing
this allows you to move all the selected media clips as a group. Select
Ungroup Objects to once again allow for individual media clip movement.
Timeline Ruler
You can resize the timeline ruler for a more expanded or condensed view of your
production. To resize the ruler, click on the ruler and drag it left or right.
Expanding the ruler is especially handy when aligning clips and effects, while
condensing it gives you a global overview of your entire production.
Click to auto fit your current project in the timeline area if you want to view the
entire movie in the editing workspace. You can also right-click on the timeline ruler
39
Page 53

PowerDirecto r Workspace
Note: * optional feature in CyberLink PowerDirector. Check the version
table on our web site for detailed versioning information.
Note: use the timeline ruler to expand the timeline for a more precise
placement of timeline markers.
and select View E ntire Movie to do this. Or select Zoom I n or Zoom Out to change
the view to your required size.
Use the timeline ruler slider located in the bottom left
corner to manually resize the timeline.
Timeline Markers
You can add timeline markers* to the timeline ruler for more precise media
placement on the timeline. Once added, media clips snap to the timeline markers,
allowing your media to appear in your video production at the exact moment you
want it.
Adding Timeline Markers
To add a timeline marker, do this:
1. Hover your mouse over the timeline ruler. The green timeline marker indicator
displays with the displayed time.
2. Once you have found the time where you want to place the timeline, rightclick on the ruler and then select Add Timeline Marker.
3. Input a Note for the new timeline marker, if required.
4. Click on OK to add the new timeline marker.
40
Page 54

Cyb erLink PowerDirector Help
Note: you can manually drag a timeline marker to different position if the
original is not in the exact location you wanted it. Expand the timeline ruler
for a more precise placement, if necessary.
Once a timeline marker is added, media will snap to it when added to a track in the
timeline.
Right-click on the timeline ruler and then select E dit Timeline Markers to view a list
of all the timeline markers you have added. In this list you can remove any of the
existing markers, or double-click in the Note column to edit the associated text.
Clip Markers
You can manually add markers to a selected clip in the timeline. Once added,
media clips and effects snap to the clip markers, allowing for more precise editing.
Adding Clip Markers
To add a clip marker, do this:
1. First, ensure that the clip marker track is displayed. To display it, right click on
the timeline and then select Show Clip Marker Track.
2. Select the clip on the timeline.
41
Page 55

PowerDirecto r Workspace
3. Drag the timeline slider to the moment/time position in the clip where you
want to add the marker.
4. Right-click at the timeline slider position on the clip marker track,
and then select Add Clip Marker.
5. Input a Note for the new clip marker, if required.
6. Click on OK to add the new timeline marker.
42
Page 56

Cyb erLink PowerDirector Help
Note: you can manually drag a clip marker to different position if the
original is not in the exact location you wanted it. Also, if you move the
media clip to another position on the timeline, its clip markers move with it.
Once a clip marker is added, media and effects will snap to it when added to a track
in the timeline.
Function Buttons
When you select media that is on the timeline, whether it's a video clip, image,
audio clip, effect, title effect, etc., several function buttons display above the
timeline. These buttons let you perform a variety of tasks or gain access to some
important features of CyberLink PowerDirector.
The function buttons that are available depend on the type of media content you
select. However, whenever you select media, the and buttons are
always displayed. Clic k to remove the selected media content from the
timeline, o r to gain access to more timeline functions, which vary
depending on the selected media.
43
Page 57

PowerDirecto r Workspace
Note: * optional feature in CyberLink PowerDirector. Check the version
table on our web site for detailed versioning information.
Magic Tools
When editing your video project in the timeline, you can click the button to
use the magic tools to edit and touch up your audio, video, and image clips. Magic
tools can also help you add a creative style to your video production or add the
right background music.
CyberLink PowerDirector offers the following magic tools:
·
Magic Movie Wizard: automatically creates an edited video blended with
stylish effects and transitions.
·
Magic Fix: fixes and enhances your photos and videos, including fixing shaky
video, enhancing video quality, removing red-eye, and enhancing the focus
on photos.
·
Magic Motion: applies zooms and pans to your images. You can also use the
Magic Motion Designer to manually customize motion on an image.
·
Magic Cut: condenses long video segments into shorter clips that contain only
the best moments.
·
Magic Style: creates professional videos with pre-designed style templates
automatically.
Click on the button within these tools to consult the iHelp for assistance on
using them.
Range Selection
Click and drag one of the arrows on either side of the timeline slider to select a
range* of media on the timeline.
44
Page 58

Cyb erLink PowerDirector Help
Note: * optional feature in CyberLink PowerDirector. Check the version
table on our web site for detailed versioning information.
Note: CyberLink PowerDirector auto adds a video and audio track for you
when all the current video/audio tracks in the timeline have media on them.
Once selected, right click on the selection, select Loop Playback, and then click the
play button if you want to continuously play back of the selected range. You can
also cut or copy the range, and then paste it to another position on the timeline.
You can also use this feature to manually highlight a portion of a clip that you want
to then remove or trim out.
Click Render Pr eview to have CyberLink PowerDirector render a video preview of
only the highlighted range for playback in the preview window. Click Produce
Range to produce just the selected range in the Produce window, outputting it as a
video file that will be added to the media library.
Click Lock R ange if you want to lock the selected range. Once locked, you can
more easily preview and even add additional media into the range for previewing,
rendering, or producing. Click Lock R ange again to unlock the selected range.
Track Manager
In the Track Manager* you can add additional video and audio tracks to the
timeline. You can have up to 100 video tracks (with or without an audio track) in the
timeline, or add up to 98 additional audio tracks.
Adding Tracks to Timeline
Each video track you add, adds another layer of PiP video on the tracks above it in
the timeline.
To add tracks to the timeline, do this:
45
Page 59

PowerDirecto r Workspace
Note: if you don't want your additional video tracks to have a track for its
audio, enter in 0 tracks in the Audio section.
Note: if you only want to add an audio track (i.e. without a linked video
track), enter in 0 tracks in the Video section.
1. In the timeline mode, click on to open the Track Manager.
2. In the Video section, enter in the number of video tracks you want to add to
the timeline. By default, one track is added, but you can add up to 98 video
tracks (100 in total) to the timeline, as required.
3. In the Video section, select the Position in the timeline where you want to add
the tracks.
4. In the Audio section, enter in the number of audio tracks you want to add to
the timeline. By default, one track is added, but you can add up to 98 audio
tracks (100 in total) to the timeline, as required.
5. In the Audio section, select the Position in the timeline where you want to add
the tracks.
6. Click on OK to add the tracks to the timeline.
To quickly remove any unwanted tracks from the timeline, just right-click on the
timeline and then select R emove Empty Tracks.
Customizing Timeline Tracks
In CyberLink PowerDirector you can customize the layout of the workspace timeline
and its tracks to fit your preference.
Customizing Track Names
To make it easy to identify all of your tracks if you have lots of media on multiple
tracks, drag the left sidebar to reveal the track names.
46
Page 60

Cyb erLink PowerDirector Help
You can give all the tracks in the timeline a custom name as required.
Reordering Tracks
You can reorder the video tracks in the timeline if required. To reorder, click on the
left sidebar and drag the track to the new position in the timeline.
You can also drag the effect track to a new position in the timeline. Effects on the
effect track are applied to all video tracks that are positioned above it in the
timeline.
47
Page 61

PowerDirecto r Workspace
Note: * optional feature in CyberLink PowerDirector. Check the version
table on our web site for detailed versioning information.
Adjusting Track Height
Click and drag the bottom of a track on the left sidebar to resize it to your
preference.
You can also right-click on the timeline and select Adjust Video Track Height to
adjust the height of all the video tracks in the timeline to one of the default sizes.
Select Adjust Audio Track Height to resize all of the audio tracks, including the
music track, voice track, and each video track's corresponding audio track.
Locking/Unlocking Tracks
To lock a track in the timeline, click at the left of the track. When a track is
locked, you cannot add new clips to the track, or move or edit the clips it contains.
To unlock a track in the timeline, click to the left of the track.
Enable/Disable Tracks
To disable a track in the timeline*, deselect to the left of the track. When a track
is disabled, the media it contains is not displayed in the Preview window. This
allows you to preview your project by tracks so you can concentrate on the track
you are working on.
To enable a track in the timeline, select to the left of the track.
48
Page 62

Cyb erLink PowerDirector Help
Note: some features are unavailable in the storyboard mode. If you try to
perform a function that is unavailable, the program switches to the timeline
mode automatically. You can switch back to storyboard mode after using
the function by pressing the Tab key on your keyboard.
Storyboard Mode
Storyboard mode is a large graphical display, or storyboard, of all your video clips
and images on the first track in the timeline. You can use it to visualize the main
scenes and overall production more clearly.
Added transitions and effects are viewable and editable in storyboard mode. Just
select the "i" icon and then the Effect function button to edit added effects, or
select the transition icon and then Modify to customize the transition settings.
To add background music in storyboard mode, just click the button and then
do this in the Add Background Music dialog:
1. Click the button.
2. Select the audio file you want to use as the background music.
3. Use the slider to mix the audio level, by deciding whether to have more
background music (More music) or the original video's audio (More video) in
the production.
4. Click the OK button.
49
Page 63

PowerDirecto r Projects
Note: a CyberLink PowerDirector project (.pds) file essentially contains a
list of the media clips and effects used in your project, and a log of all the
edits you want to make to your media. Project files do not include the media
clips in them. If you want to save all your video production files in one place,
use the Pack Project Materials function. To do this select, File > Pack
Project M aterials from the menu.
Note: saved PowerDirector projects are now easily accessible in the media
library, and they are also reusable. See Reusing PowerDirector Projects for
more information.
Note: * optional feature in CyberLink PowerDirector. Check the version
table on our web site for detailed versioning information.
Chapter 4:
PowerDirector Projects
When working on a new video production, click the button to save it as a .pds
file, a project file format that is used exclusively by CyberLink PowerDirector. These
project files can be imported directly into the timeline, if required. See Importing
PowerDirector Projects for more information.
Use the options in the File menu to save, create new, or open existing projects in
CyberLink PowerDirector. When you create a new project, CyberLink PowerDirector
resets your media library. If you want to create a new video production using the
same media that's currently in your library, select F ile > New Workspace.
If you have a CyberLink Cloud subscription you can upload saved projects and
more to CyberLink Cloud*. See CyberLink Cloud Projects for more information.
The changes you make to your media in CyberLink PowerDirector do not affect the
original media you imported into the program. Since your edits are all saved in the
project file, you can trim, edit, or remove clips, but still keep your original files on
your hard drive, untouched. So let yourself get creative. If you end up changing
things too drastically, you can always start over.
Setting Project Aspect Ratio
To set the aspect ratio for your project, and your outputted video, select 4:3, 16:9,
9:16*, or 360* from the aspect ratio drop-down at the top of the window.
50
Page 64

Cyb erLink PowerDirector Help
Note: * optional feature in CyberLink PowerDirector. Check the version
table on our web site for detailed versioning information.
Note: if an imported 360° media file is not displaying correctly (no 360°
logo), it usually means the file is in the RAW format and was not converted
(stitched) for playback. The 360° media file must be stitched before it can
be used in a 360° video project in CyberLink PowerDirector. See the
documentation for your 360 camera manufacturer for information on
stitching the files for viewing and editing. * this feature is not available in
some versions of CyberLink PowerDirector.
When you select 360, your project will actually have an aspect ratio of 2:1 and is for
users wanting to create and produce 360° virtual reality videos. See 360° Video
Projects for more detail about these types of projects, and Playing 360° Media Files
for more information on the extra preview window controls available in these types
of projects.
If you want to create/output a vertical video or video for playback on a portrait
monitor, you should select the 9:16 aspect ratio.
If some of the video clips you want to use in video production have a different
aspect, you can adjust their aspect ratio once in the timeline. See Adjusting Video
Clip Aspect Ratio for more information.
360° Video Projects
360°* video projects let you create virtual reality videos you can output as a video
file, or upload to YouTube, Vimeo, or Facebook.
To play a 360° media file, just select it in the media library and then use the
playback and 360 controls. See Playing 360° Media Files for more information. For
information about editing these types of projects, see Editing 360° Video Projects.
51
Page 65

PowerDirecto r Projects
Note: * optional feature in CyberLink PowerDirector. Check the version
table on our web site for detailed versioning information.
Note: reusing your projects is similar to express projects, except you
replace your media instead of the media placeholders. See Using an
Express Project for more information.
Exporting Projects
You can export your CyberLink PowerDirector projects by writing them to a DV
tape, or by packing all the materials in a folder on your computer's hard drive or
CyberLink Cloud*. Exported projects can then be imported into another computer
running CyberLink PowerDirector.
To export your project to a DV tape select File > Export > Write to DV Tape. To
export it to a folder select File > Pack Proj ect Materials. If you have a CyberLink
Cloud subscription you can select File > Pack Pr oject Materials and Upload to
CyberLink Cloud to back up all the media files, and the project file, in a folder on
CyberLink Cloud.
Reusing PowerDirector Projects
All projects created in CyberLink PowerDirector are now reusable, allowing you to
use them as templates for your future productions. To access all your saved
projects, make sure you are in the Media Room, and then do either of the following:
·
click to open the explorer view and then click My Proj ects.
·
select My Projects from the Media Content drop-down.
52
Page 66

Cyb erLink PowerDirector Help
Note: to play back a saved project, just double-click on it in the media
library.
Note: when you add a saved project to the timeline, all of its media is
automatically added back into the media library.
To reuse a saved project, just select it in the media library and then drag and drop it
to a desired position on the timeline. You can also insert the saved project
anywhere within a current project by dragging and dropping it to the desired
position on the timeline. Saved projects can be added to the timeline in the exact
same way as media clips. See Adding Media to the Workspace for detailed
information on adding content to the timeline.
Once the saved project is in the timeline, you can simply replace all of the existing
media clips, templates, and effects with the content you want to use in your new
production. To do this, just drag the media clips/effects/templates to the desired
positions on the timeline, hovering over the clip/effect/template you want to
replace, drop it, and then select Replace. This replaces the current content with the
new content you want to add, without changing the structure of the project.
53
Page 67

PowerDirecto r Projects
54
Page 68

Cyb erLink PowerDirector Help
Note: if a media clip you are replacing is shorter than a newly added
video/audio clip, CyberLink PowerDirector automatically trims the
video/audio clip to fit the space. For all other media clips, CyberLink
PowerDirector automatically resizes them to fit the original clip's duration.
Note: * optional feature in CyberLink PowerDirector. Check the version
table on our web site for detailed versioning information.
CyberLink Cloud Projects
If you have a CyberLink Cloud subscription you can select F ile > Upload Project to
CyberLink Cloud to store project files on the CyberLink Cloud* service from
CyberLink.
To download a project that was saved on CyberLink Cloud, including projects that
were packed in a folder with their media (materials), select Download Project from
55
Page 69

PowerDirecto r Projects
Note: when you open a packed project stored on CyberLink Cloud, the
project file and all the project media is downloaded to your local computer
and stored in the download folder specified in CyberLink Cloud
Preferences.
CyberLink Cloud from the File menu. In the window that displays, select a project
and then click Download.
56
Page 70

Cyb erLink PowerDirector Help
Note: media you import is saved in the current CyberLink PowerDirector
project you are working on. If you create a new project, you will be asked if
you want to merge the media in your library into the new project. You can
also select Fil e > New Workspace to create a new project, while
maintaining the current media in the library.
Note: if you import media files that are on a removable device into the
media library, they will be removed if the removable device is disconnected.
For best results, it is recommended that you copy the media to your
computer's hard drive before importing.
Note: for a more complete and up-to-date list of the supported file formats,
and supported devices, please visit out web site:
https://www.cyberlink.com/products/powerdirectorultimate/spec_en_US.html.
Chapter 5:
Importing Media into PowerDirector
You can import media in a wide variety of formats into CyberLink PowerDirector, in
many different ways. Whether you need to capture media from external sources,
import media that is already on your computer's hard drive, or download it from
the Internet. CyberLink PowerDirector makes it easy to get all your media into the
program quickly, so you can start working on your video production.
Importing Media Files
If you already have video, audio, and image files that you want to use in your
production on your computer's hard drive, in the Edit module you can import the
files directly into CyberLink PowerDirector's media library in the Media Room. You
can also import media files that are on a removable device.
CyberLink PowerDirector supports the following file formats:
Image: Animated-GIF, BMP, GIF, JPEG, PNG, TIFF
3D Image Format: JPS*, MPO*
CyberLink PowerDirector also supports the import of the following camera RAW
image formats, which are then converted to JPEG once imported: ARW (SONY), CR2
57
Page 71

Impo rting Media in to Po werDirector
Note: ** to enable, you must download the DivX codec online. Available on
Windows 32-bit only.
Note: * optional feature in CyberLink PowerDirector. Check the version
table on our web site for detailed versioning information.
Note: you can also drag and drop media onto the CyberLink PowerDirector
window to import it into the program.
Note: if an imported 360° video file is not displaying correctly (no 360°
logo), it usually means the file is not using the 360 equirectangular
projection video format required for editing. See the documentation for your
360 camera manufacturer for information on producing the video file in this
format. * this feature is not available in some versions of CyberLink
PowerDirector.
(Canon), DNG (Ricoh), ERF (Epson), KDC (Kodak), MRW (Konica Minolta), NEF (Nikon),
NRW (Nikon), ORF (OLYMPUS), PEF (Pentax), RAF (Fujifilm), RW2 (Panasonic), SR2
(SONY), SRF (SONY)
Video: 3GPP2, AVI, DAT, DivX**, DV-AVI, DVR-MS*, FLV (H.264), HD MPEG-2, M2T*,
MKV (H.264, H.265), MOD*, MOV, MOV (H.264), MP4, MPEG-1*, MPEG-2*, MPEG-4
AVC (H.264)*, MPEG-4 HEVC (H.265)*, MTS*, TOD*, VOB*, VRO*, WMV, WMV-HD,
WTV*, XAVC S*
3D Video Format: Dual-stream AVI, MVC*, Side-by-Side Video*, Over/Under Video
Audio: AAC, ALAC, M4A, MP3, OGG, WAV, WMA
To import media into CyberLink PowerDirector, in the Edit modul e, cli ck and
then select one of the following options:
·
Im port Media F iles: import media files individually.
·
Im port a Media F older: import the entire contents of a folder that contains the
media files you want to use in your current project.
360° Media Files
You can import and edit video and image files that were recorded with a 360*
camera. Once imported, the 360° video files are automatically detected and
indicated by a 360° logo in the top right of the thumbnail.
58
Page 72

Cyb erLink PowerDirector Help
Note: if you want to use 360° video clips and images in a 2D video
production, you still need to set the correct 360 projection format to ensure
the media displays properly in 2D.
Note: if you want to use 360° video clips in a conventional video production,
setting the projection format as 2D is not going to help. You will need to
create the conventional video using the 360° footage in the View Designer.
See Playing 360° Media Files for information on the additional preview controls
available in the preview window for these types of videos. See 360° Video Projects
for more information on the what type of editing you can perform with these types
of media files, and what features are not available.
Setting 360 Projection Format
If CyberLink PowerDirector did not detect your 360° video file and you are sure it
has been produced for playback and editing, you can manually set the 360
projection format. You can also disable 360° mode for a file that was mistakenly
detected as a 360° video file.
To set the 360 projection format, do this:
1. Right-click on a 360° media file in the media library and then select Set 360
Projection Format.
2. Select the 360 projection format by selecting one of the following:
·
Equirectangular (360°): equirectangular video is the standard projection used
in 360° video. Equirectangular projection displays the 360° video environment,
which is a sphere, onto a rectangular video screen.
·
2D Format (Not 360 °): select this option if the selected media file is actually
2D content.
3D Media
CyberLink PowerDirector supports various 3D* video and image formats. You can
use 3D media to create both 3D videos, and standard 2D video productions. All 3D
media in the library is indicated by a 3D icon in the top left of its thumbnail.
59
Page 73

Impo rting Media in to Po werDirector
Note: click the button to enable 3D mode to view the 3D content
during the editing process. For more information on enabling 3D mode and
configuring your 3D display settings, see Previewing in 3D Mode. * Optional
feature in CyberLink PowerDirector. Check the version table on our web
site for detailed versioning information.
Note: if you want to use 3D video clips and images in a 2D video
production, you still need to set the correct 3D source format to ensure the
media displays properly in 2D. CyberLink PowerDirector will incorporate the
specified eye frames into your 2D video.
You can use and arrange 3D video clips and images in your video productions the
same way you use 2D media. However, note that if you want to create a 3D video
production, any 2D media in your project must be converted to 3D before
production. See PowerTools: 2D to 3D for more information.
Setting 3D Source Format
When 3D media is imported into the media library, you may need to set the format
of the 3D source video. This is because 3D media comes in a variety of different
video source formats. CyberLink PowerDirector needs to know the source format of
each 3D media file so that it can display it properly in 3D.
To set the 3D source format of your 3D media, do this:
1. Right-click on a 3D media file in the media library and then select S et 3D
Source F ormat. If the media file is on the timeline, right-click on it, select Set
Clip Attributes, and then Set 3D Source For mat. The Set 3D Source Format
window displays.
2. Select the 3D source format by selecting one of the following:
·
Auto Detect 3D S ource Form at: if you are not sure what the source format is
of your 3D video, click this button to have CyberLink PowerDirector
automatically detect and set it for you.
·
2D: select this option if the selected media file is actually 2D content.
·
Side by side format: select this option if the 3D content has two different
images side by side. CyberLink PowerDirector merges the two images to
produce the 3D effect.
·
Over/Under form at: select this option if the 3D content has two different
video images, one on top of the other. CyberLink PowerDirector merges the
two images to produce the 3D effect.
60
Page 74

Cyb erLink PowerDirector Help
Note: * optional feature in CyberLink PowerDirector. Check the version
table on our web site for detailed versioning information.
·
Multiview video coding: select this option if the 3D content is in the MVC
video format (.mts or .m2ts file format).
·
Dual view form at: select this option if the 3D content is in the dual view
source format (.avi file format).
3. From the drop-down available, Specify whether to display the left or r ight eye
frame first. Use this feature if while editing or playing back 3D content you
begin to feel uncomfortable or uneasy. This may be because the layout of the
3D image is displayed differently than most standard content. If this occurs,
try selecting the opposite eye view. This switches the way the 3D content is
displayed on your display device, and may reduce the discomfort.
4. Click OK to set your changes to the selected media file.
The Difference Between 3D and 3D-Like
Effects
In supported versions of CyberLink PowerDirector, there are both 3D effects* and
effects that have "3D-Like" properties.
Like 3D media that can be imported into the library, 3D effects* are composed of
two images from slightly different perspectives. 3D effects have one image for the
left eye, and one image for the right eye. When these images are viewed together
with compatible 3D hardware and software, they produce an effect that gives the
perception of depth. In supported versions of CyberLink PowerDirector, you can
enable this type of 3D effect for PiP media, particle effects, title effects, and on disc
menus. The video effects and transitions indicated with the 3D icon on their
thumbnail, also have these 3D effect properties when viewed and included in 3D
video productions.
Some title effects, transitions, and other features in CyberLink PowerDirector have
3D-Like properties. Available in all versions of the program, these effects are simply
3D animations that only consist of one image. 3D-Like effects do not produce a 3D
depth effect when viewed in 3D mode.
61
Page 75

Impo rting Media in to Po werDirector
Importing PowerDirector Projects
CyberLink PowerDirector projects (.pds files) you worked on and saved previously
can be imported and then directly inserted into your video production's timeline.
To do this, select File > Insert Project from the menu. All of the media in the
original project will be imported into the current project's media library, and also
inserted at the current position of the timeline slider.
Capturing Media
CyberLink PowerDirector lets you capture media from a variety of sources directly
into the media library. Click the Capture button to enter the Capture module.
In the Capture module, the program appears as follows:
A - Capture from a DV Camco rder, B - Cap ture from an HDV Camco rder, C - Capture from a TV Signa l,
D - Capture from a Digi tal TV Signal , E - Capture from a Webcam, F - Cap ture from a Micropho ne, G Capture from a CD, H - Capture from a n External or Optical Device, I - Capture Desktop wi th Screen
Recorder, J - Ca pture Preview Window , K - Captured Co ntent, L - Qual ity Profil e Setup, M - Capture
Settings (Drive), N - Capture P layer Controls, O - Capture P references
62
Page 76

Cyb erLink PowerDirector Help
Note: to add a text remark, date, or timecode to the video you are capturing,
click on the button in capture preferences area to enable it. See
Capture Preferences for more information.
Note: this feature requires a DVD burner. * Optional feature in CyberLink
PowerDirector. Check the version table on our web site for detailed
versioning information.
Capturing from a DV Camcorder
You can capture video content that you recorded with a DV camcorder. Use the
capture from a DV camcorder option only if your camcorder connects to your
computer using an IEEE 1394 (FireWire) cable. You can capture a single scene or a
number of scenes in a batch from your camcorder.
If your DV camcorder connects to your computer via a USB connection, just import
the video files directly from your camcorder, as if it was another hard drive on your
com puter. See Importing Media for information on importing video files onto your
computer.
Capturing a Single Scene
You can capture a single segment of video from your camcorder using the capture
player controls (record, stop, fast forward, rewind, etc.) underneath the capture
preview window. This function is particularly useful, for example, if you want to
acquire a long video segment in its entirety without skipping over sections.
DV Backup
The DV Backup* feature lets you back up the digital video from your DV camcorder
directly to DVD using CyberLink PowerDirector.
Insert a blank DVD disc into your disc drive and then click the button to begin
backing up your video.
Batch Capture from a DV Camcorder
With Batch Capture, CyberLink PowerDirector scans your DV camcorder for intervals
or scenes (or allows you to set them manually) on the tape, and then captures these
scenes as separate video files and imports each of them into the program.
63
Page 77

Impo rting Media in to Po werDirector
Note: * optional feature in CyberLink PowerDirector. Check the version
table on our web site for detailed versioning information.
Note: * optional feature in CyberLink PowerDirector. Check the version
table on our web site for detailed versioning information.
Automatic Batch Capture
If you want CyberLink PowerDirector to auto capture and import each of the
intervals/scenes on your DV camcorder, click the button on the DV
Camcorder tab.
An interval/scene is the content you recorded each time you pressed record and
then stop during the video shooting process. For help on using this function, use
the tips on the user interface.
Manual Batch Capture
Using manual batch capture* gives you more control over the capturing process
and ensures that the scenes you want to include are captured. Manual batch
capture is recommended when you know which scenes you want to capture and
have a good idea where they are located on the tape.
Click the button to access the manual batch capture feature. For help on
using this function, use the helpful tips on the user interface.
Capturing from an HDV Camcorder
You can capture video footage you shot with an HDV* camcorder. Use the capture
from an HDV camcorder option only if your camcorder connects to your computer
using an IEEE 1394 (FireWire) cable. To a capture scene from your HDV camcorder,
use the capture player controls (record, stop, fast forward, rewind, etc.) underneath
the capture preview window.
If your HDV camcorder connects to your computer via a USB connection, just
import the video files directly from your camcorder, as if it was another hard drive
on your com puter. See Importing Media for information on importing video files
onto your computer.
64
Page 78

Cyb erLink PowerDirector Help
Note: * optional feature in CyberLink PowerDirector. Check the version
table on our web site for detailed versioning information.
Note: this feature is not available in all regions. * Optional feature in
CyberLink PowerDirector. Check the version table on our web site for
detailed versioning information.
Capturing from a TV Signal
If your computer has a TV* tuner card installed and you want to capture segments
from your favorite programs, select this option. To capture, use the capture player
controls (record, stop, change channel, etc.) underneath the capture preview
window.
Capturing from a Digital TV Signal
If your computer has a TV tuner card installed that receives a digital* TV signal and
you want to capture segments from your favorite programs, select this option. To
capture, use the capture player controls (record, stop, change channel, etc.)
underneath the capture preview window.
Capturing from a Webcam
You can record live content with a webcam that is attached to your computer and
then import it directly into your CyberLink PowerDirector media library. To capture,
use the capture player controls (record, stop, etc.) underneath the capture preview
window.
Capturing from a Microphone
Select this option to record audio with a microphone that is attached to your
computer. To capture, use the capture player controls (record, stop, etc.)
underneath the capture preview window.
Capturing from a CD
Use this option to rip your favorite music, or other audio, from an audio CD. To
capture, use the capture player controls (record, play, stop, next/previous track, etc.)
underneath the capture preview window.
65
Page 79

Impo rting Media in to Po werDirector
Note: * optional feature in CyberLink PowerDirector. Check the version
table on our web site for detailed versioning information.
Note: some DVDs are protected by technology that does not allow you to
capture the content they contain. * Optional feature in CyberLink
PowerDirector. Check the version table on our web site for detailed
versioning information.
Capturing from an AVCHD Camcorder
You can capture video content that is on an external device, such as an AVCHD
camcorder. Use the capture from an AVCHD camcorder option only if your
camcorder connects to your computer using an IEEE 1394 (FireWire) cable. To a
capture scene from your AVCHD camcorder, use the capture player controls
(record, stop, etc.) underneath the capture preview window.
If your AVCHD camcorder connects to your computer via a USB connection, just
import the video files directly from your camcorder, as if it was another hard drive
on your com puter. See Importing Media for information on importing video files
onto your computer.
Capturing from an Optical Device
You can capture content from an optical device, such as video scenes from a DVD.
To capture, use the capture player controls (record, play, stop, next/previous frame,
etc.) underneath the capture preview window. You can also use the DVD disc
structure tree to quickly select the titles and chapters you want to capture.
Capture Desktop with Screen Recorder
CyberLink PowerDirector's Screen Recorder lets you capture a video of your mouse
movements on your computer's desktop. See Recording Your Desktop with the
Screen Recorder for a detailed description of this feature.
Captured Content
All of the media you capture in the capture window is displayed in the Captured
Content area. When you return to the Edit module, all of the media is automatically
imported into your media library.
66
Page 80

Cyb erLink PowerDirector Help
Note: when capturing from a DVD, this button reads Drive, allowing you to
select the specific disc drive you want to capture from.
In the Captured Content area you can right-click on media to perform a number of
options, including detecting scenes in video clips and deleting unwanted content
so that it won't import into the Edit module.
The content captured in CyberLink PowerDirector is stored in the folder noted
underneath the Captured Content area. If you want to store it in a different location,
clic k the Change Folder button and select a different folder.
Quality Profile Setup
To set the file format and quality of the media you capture, click the Profile button.
If this button is grayed out, that means that the original format and quality of the
media is maintained, as set on the original media device (camcorder, etc.).
The profile settings that are available depend on the capture device connected and
the capture mode you have selected.
Capture Settings
Use the Settings button to configure the set up of your selected capture device. The
capture settings that are available depend on the capture device connected and the
capture mode you have selected.
Capture Preferences
Before capturing media, you can set the preferences for your captured content. The
capture preferences that are available, depend on the content you are capturing.
Set the capture preferences as follows:
·
to set a maximum capture length, select Time limit and then enter a time in
the timecode box.
·
to set a maximum captured file size, select Size limit and then enter a size
limit (in MB).
·
to add a text remark, date stamp, or time stamp to the video being captured,
click on the button. In the Add Text Overlay window, select which type
and display format of text overlay you want to include on your recorded video
67
Page 81

Impo rting Media in to Po werDirector
Note: * optional feature in CyberLink PowerDirector. Check the version
table on our web site for detailed versioning information.
on the Text tab. Select the Format tab to set the font and text position for the
text.
·
to take a still photo of a frame of video for use in your project, just click on
at the point where you want to take the snapshot. The image is saved to
the Captured content area. You can specify your preferred snapshot image file
format in preferences. See File Preferences for detailed information.
·
select Non r eal-time when capturing from a camcorder to continue
processing captured video after the original video stops playing in order to
ensure that no frames are dropped.
·
select B egin with fade-in to add fade-in to audio captured with a microphone.
·
select End w ith fade-out to add fade-out to audio captured with a
microphone.
·
select R ecord at maximum speed to record CD audio at a higher speed.
Capturing at a higher speed reduces processing time, but yields audio of a
lower quality.
Downloading Media
If you feel that you do not have enough media for your project, or you are looking
for specific media to make your creation just perfect, in the Edit module you can
download media from Flickr, DirectorZone, and CyberLink Cloud* into the media
room library.
To display all the current downloaded media in the media library, select
Downloaded from the Media Content drop-down.
68
Page 82

Cyb erLink PowerDirector Help
Note: * optional feature in CyberLink PowerDirector. Check the version
table on our web site for detailed versioning information.
Downloading Content from DirectorZone/CyberLink Cloud
You can download templates and effects created by CyberLink and other
PowerDirector users from DirectorZone. Users that have a CyberLink Cloud
subscription can also download any effects and templates you backed up on
CyberLink Cloud*.
Downloading Effects and Templates from
DirectorZone
If you are looking for additional PiP objects, paint animation objects, title effects,
particle effects, or disc menu templates for your library, you can click Download
Templates to download them directly from the DirectorZone web site in to the PiP
Objects Room, Particle Room, Title Room, or Create Disc module.
When in the Edit module's Media Room, you can download sound clips into the
media library. To do this, click on and then select Dow nload Sound Clips from
DirectorZone.
Visit the DirectorZone web site for more information: www.directorzone.com.
My DirectorZone Templates
In the My DirectorZone window you can conveniently download your custom PiP
object, paint animation object, title effect, particle effect, and disc menu templates
that you previously uploaded to DirectorZone. You can also access and download
templates from your DirectorZone download history and also your favorite
templates.
To download My DirectorZone templates, do this:
1. In the Edit module, clic k in the PiP Objects Room, Particle Room, Title
Room, or Create Disc module.
2. Click the My DirectorZone tab.
69
Page 83

Impo rting Media in to Po werDirector
3. Filter the templates by My U ploads, Dow nload History, or My Favorites, or
enter a search keyword in the field provided.
4. Select all of the templates you want to download.
5. Click Download to download them to your computer and import them into
the library.
Downloading Effects and Templates from
CyberLink Cloud
If you have a CyberLink Cloud subscription you can download the PiP object, paint
animation, title effect, particle effect, and disc menu templates you previously
backed up to CyberLink Cloud. Once downloaded, these templates are stored in the
download folder specified in CyberLink Cloud Preferences, and imported into your
media library.
To download template from CyberLink Cloud, do this:
1. In the Edit module, clic k in the PiP Objects Room, Particle Room, Title
Room, or Create Disc module.
2. Click the My CyberLink Cloud tab.
3. Filter the templates by selecting a collection from the drop-down, or enter a
search keyword in the field provided.
4. Select all of the templates you want to download.
5. Click Download to download them to your computer and import them into
the library.
Downloading Photos From Flickr
You can download your own photos directly from your account on Flickr into
CyberLink PowerDirector. You can also search for and browse other user’s photos
from within CyberLink PowerDirector, and then import them into your media
library for use in a project.
To download photos from Flickr, do this:
1. In the Edit module, click on and then select Download Photos from
Flickr.
70
Page 84

Cyb erLink PowerDirector Help
Note: having a Flickr account is not required to search for, browse, and
download photos from Flickr.
Note: use the drop-down filter menu at the top of the search window to sort
the photos.
Note: you cannot use the photos downloaded into your media library for
commercial use. Click on the button underneath a photo thumbnail to
view its copyright information.
Note: please consult the terms of use sections for both of these music
services before purchasing, downloading, and including the music in your
video pr oject.
2. Follow the steps in the wizard window to authorize CyberLink PowerDirector
to use your Flickr account and accept the Terms of Use from Flickr.
3. Select from the drop-down whether to search for photos from:
·
My Photos on Flickr: this option displays thumbnails of all the photos you
have uploaded to your Flickr account.
·
My Contacts' Photos: this option displays thumbnails of all the photos your
Flickr contacts have uploaded to Flickr.
·
Search for Photos on Flickr: select this option to perform a search for photos
on Flickr.
4. Select all of the photos that you want to import into your media library and
then click on the Download button.
Downloading Royalty Free Music
You can download royalty free music from Muserk and Audio Network, and use it
in your video productions.
To download royalty free music, in the Edit module c lick on and then select
Dow nload R oyal F ree Music fr om Muserk/Audio N etwork to go to the web site.
Consult the help/FAQ on these web sites for detailed information about how to get
music for your video productions.
71
Page 85

Impo rting Media in to Po werDirector
Note: depending on the file format, scene detection on certain clips may not
work as precisely as it does for others. You may need to split the scenes
manually in the Scene Detection window.
Detecting Scenes, Extracting Audio, and Capturing Snapshots
CyberLink PowerDirector can detect scenes in your video clips or extract the audio
from them. You can also capture screen snapshots from video clips for use in your
video projects. These new clips are displayed, separately from the original clips, in
the media library.
Detecting Scenes in a Video Clip
The scene detection function automatically creates individual clips based on the
individual scenes (or pre-edited shots) contained within a video clip. Detected
scenes are not split from the original clip, but can be added to the workspace like
any other media clip.
To detect the scenes in a video clip, do this:
1. Right-click on it in either the Captured Content area (Capture module), or in
the media library (Edit module), and then select Detect Scenes.
2. The scenes in the video clip are automatically detected and then displayed in
the Scenes panel.
3. Once you are done detecting the scenes in the video clip, click OK. The
detected clips are displayed in a sub folder under the original video clip.
When using scene detection, please note:
·
if required, use the Sensitivity slider to increase or decrease scene detection
sensitivity. Doing this may yield an increased or decreased number of scenes
that are detected. Click Detect to redetect the scenes in the video clip. You are
asked to confirm the clearing of the previously detected clips and then the
updated scenes are detected and displayed in the Scenes panel.
·
click on the button to configure the Advanced Scene Detection Settings. If
the selected video clip is a DV-AVI file, you have the option to D etect by
72
Page 86

Cyb erLink PowerDirector Help
change of v ideo frame (used on all other file formats) or Detect by change of
timecodes (i.e.: timecodes are automatically set when you start and stop
recording). Select the Disable preview during detection option to speed up
the detection process if you find your computer runs slow during the
process.
·
to stop the scene detection process before completion, click the stop button
on the playback controls.
·
to detect scenes manually, drag the slider (in Clip mode) to the beginning of
each new scene and then click .
·
to preview a detected scene, just select it in the Scenes panel (ensure Segment
is selected) and then click the play button.
·
to view all the detected scene markers on the clip timeline, ensure that Clip is
selected.
·
to merge two or more detected scenes into one longer scene, select them in
the Scenes panel and then click Merge. Click Remove All if you want to restore
the clip to the original.
You can add the individual scenes to the timeline or manage them in the media
library like any other video clip.
Video clips that contain detected scenes show a small folder icon in the lower right
corner of the clip when displayed in the media library. To display a clip’s scenes,
click the folder icon.
Extracting Audio from a Video Clip
If you just want to use the audio from a video clip in your production, you can
extract it in the media library by right-clicking on it and selecting E xtract Audio. The
audio is separated from the video and saved in the media library. You can use it in
your project like any other audio file.
73
Page 87

Impo rting Media in to Po werDirector
Note: when a video clip is already on the timeline, you can separate the
audio from the video file by right-clicking on it and selecting Unlink Video
and Audio.
Capturing Screen Snapshots from a Video Clip
You can capture screen snapshots while playing a video clip in the media library, or
when previewing your video project on the timeline. The screen snapshots are
added to the media library, and can be used in your video projects.
Screen Snapshot Formats
You can set the screen snapshot image file format in the Snapshot file name section
of File Preferences. The following file formats are available:
2D screen snapshots: BMP, JPG, GIF, or PNG
3D* screen snapshots: MPO or JPS
Screen Snapshot Resolution
The resolution of a captured screen snapshot is 1920x1080, when previewing your
video project on the timeline. If you want a screen snapshot to be the same
resolution as the original video clip, you can capture it while the clip is in the media
library.
Capturing Screen Snapshots
To capture a screen snapshot, do this:
1. While previewing your video project in the timeline, or a video clip in media
library, click the button on the preview controls to pause playback. You
can also drag the timeline slider, or use the other preview controls, to find the
exact moment in the video where you want to capture the snapshot.
2. Click to take the screen snapshot.
74
Page 88

Cyb erLink PowerDirector Help
Note: if you want a 3D* screen snapshot, click to enable 3D mode
first.
Note: * Optional feature in CyberLink PowerDirector. Check the version
table on our web site for detailed versioning information.
3. If required, browse to and then select the location where you want to save the
new image file.
4. If required, enter a filename for the snapshot file.
5. Click Save to add it to your media library.
75
Page 89

PowerDirecto r Plug-in s
Note: * optional feature in CyberLink PowerDirector. Check the version
table on our web site for detailed versioning information.
Note: * optional feature in CyberLink PowerDirector. Check the version
table on our web site for detailed versioning information.
Note: when entering the MultiCam Designer, any selected video files are
automatically imported into the available camera (video source) areas.
Chapter 6:
PowerDirector Plug-ins
CyberLink PowerDirector includes a number of plug-ins that can help you create
video content for your production. In the Edit module, click the button
above the Media Room library in the Edit module to view the available
PowerDirector plug-ins. See the following sections for detailed information:
·
Using the MultiCam Designer*
·
Using the Theme Designer*
·
Editing Video in the Action Camera Center
·
Using an Express Project
·
Recording Your Desktop with the Screen Recorder
·
Creating Blends in the Blending Effect Designer
·
Creating Video Collages
Using the MultiCam Designer
The MultiCam Designer lets you seamlessly edit footage from multiple cameras,
simulating the use of a live camera switcher. The MultiCam Designer* creates
professional-looking edited content for use in your CyberLink PowerDirector
projects.
To open the MultiCam Designer, in the Edit module, click the button and
then select MultiCam D esigner.
76
Page 90

Cyb erLink PowerDirector Help
Note: if you require more than four video sources for your production, you
can use Sync by Audio to align them on the timeline and then edit the
footage manually. See Syncing Clips by Audio for more information.
A - Imp ort Vid eo, B - Avai labl e Cameras (Vid eo Sources), C - I mport Audio, D - Sync hronizatio n Type,
E - Selec ted Ca mera (Vi deo Source), F - Recording Track, G - Rec ording/P layba ck Controls, H - Audi o
Source, I - Recorded Content, J - Avai labl e Audio Source, K - Source Tracks
Importing Media
In the MultiCam Designer you can have up to four different video sources from four
different cameras. Each available camera (video source) can have more than one
imported video clip on its source video track.
You can also import one or more audio files to use as the source audio in the clip
you are recording.
77
Page 91

PowerDirecto r Plug-in s
Note: once all the available camera areas are full, the next clip is imported
into the first camera area, after (on the corresponding source video track)
the previously imported clip.
Importing Video Clips
When you enter the MultiCam Designer, any video clips that were selected in the
media library are automatically imported into the empty camera (video source)
areas and the corresponding source video tracks.
If no clips were selected, you are prompted to select clips from your hard drive for
import. You can select multiple video clips for import. Each selected clip is placed
in the next available camera area. Once all the camera areas are full, the next clip is
imported into the first camera area, after (on the corresponding source video track)
the previously imported clip.
To import additional video clips, do either of the following:
·
clic k the I mport Video button and then Import Fr om Hard D rive to import
video clips from your computer's hard drive, or I mport From Media Room to
import clips from the existing media in the Media Room library. Select one or
more clips and then click Open. The clips are placed in the next available
camera areas and the corresponding source video tracks.
·
to import video clips into a specific camera (video source) area, click the
corresponding button. Next, select Im port From H ard Dr ive to import
video clips from your computer's hard drive, or I mport From Media Room to
import clips from the existing media in the Media Room library. Select one or
more clips and then click Open. The clips are placed in the camera area and
the corresponding source video tracks.
Source Video Tracks
All of the imported video clips are imported into the corresponding source video
tracks. You can move the video clips to different locations on the video tracks, or
even drag them to different tracks. You can also reorder the video clips on a source
track by clicking the button next to the track and then using the and
buttons to reorder them as required.
78
Page 92

Cyb erLink PowerDirector Help
To remove a video clip from a source video track, click next to the track, select
the check box next to the clip you want to remove, and then click . To add
additional video clips to the source track, click the button.
Importing Audio Clips
If you want to use an audio clip as the audio source in your recording instead of the
audio of the imported video clips, you can import it separately into the MultiCam
Designer.
To import audio clips, click the I m port Audio button and then Im port Fr om Hard
Drive to import audio clips from your computer's hard drive, or I mport From
Media R oom to import clips from the existing media in the Media Room library.
Select one or more clips and then click Open. The clips are placed on the source
audio track in the timeline.
Source Audio Track
All of the imported audio clips are imported into the source audio track. You can
move the audio clips to different locations on the audio track. You can also reorder
the audio clips on the source track by clicking the button next to the track and
then using the and buttons to reorder them as required.
To remove an audio clip from the source track, click next to the track, select the
check box next to the clip you want to remove, and then click . To add
additional audio clips to the source track, click the button.
Synchronizing Clips
Once you have imported all of the media clips into the MultiCam Designer that you
want to use in your recording, the next step is to synchronize them.
To synchronize the clips in the MultiCam Designer, do this:
1. Select the Audio source f or your recording from the drop-down. You can use
the audio of any of the imported video clips or select I mported Audio to use
the audio that was imported on to the source audio track.
2. In the Synchronization drop-down, select one of the following:
79
Page 93

PowerDirecto r Plug-in s
Note: you can also click the button in the camera area to manually
move the clip on the source track back one frame. Click to move it
forward one frame.
Note: this option can only be used if the video clips were recorded with a
DV or HDV camera that imprinted the timecode information in the clips and
were captured by CyberLink PowerDirector.
·
Manual: select this option if you want to manually adjust the starting position
of each clip on the source tracks. You can do this by clicking and dragging
the clips on the source track to a new position.
·
Timecodes: select this option and then click Apply if you want the MultiCam
Designer to synchronize using the video clip's timecodes. The MultiCam
Designer will auto adjust the clips on the source tracks.
·
File Created Time: select this option and then click Apply to use the date and
time the file was created as the synchronization points. The MultiCam
Designer will auto adjust the clips on the source tracks.
·
Audio Analysis: select this option and then click Apply if you want the
MultiCam Designer to analyze the audio and then sync the files based on the
audio in them. The MultiCam Designer will auto adjust the clips on the source
tracks.
·
Markers on Clips: select this option and then use the playback controls to find
the synchronization points in each clip. Once you find a point, right click on
the source track and then select Set Marker. Once you have manually added
all the markers, click the Apply button. The MultiCam Designer will adjust the
clips on the source tracks.
Creating Recorded Content
Once you have imported and then synchronized all the media clips in the MultiCam
Designer, you are ready to record your video. The recorded video is placed on the
recording track and then is imported into the Edit module's timeline once you click
OK.
To record your content, do this:
1. Select the camera (video source) you want to start off the recording with. You
can do this by simply clicking on the camera preview area.
80
Page 94

Cyb erLink PowerDirector Help
2. If required, click on in the recording controls to set the preview window
resolution. Select the Create Shadow File for HD Video option to also create a
shadow file for the recorded file. This can help speed up editing when using
high definition files in your production.
3. When you are ready, click to begin recording. The MultiCam Designer will
start recording, adding the current selected camera footage as recorded
content on the recording track.
4. As required during the recording process, click another camera (video source)
or use keyboard hotkeys 1-4 to switch the recording to that source's content.
5. Continue switching the camera (video source) as required, creating your
recorded content on the recording track.
81
Page 95

PowerDirecto r Plug-in s
Note: if you'd like to modify the MultiCam Designer recorded content once it
is in the timeline, just select it and then click the M ultiCam Designer
button. See Changing the Recorded Content for more information.
6. When you are done click the or button to stop the recording process.
7. Click on OK to close the MultiCam Designer, and import the recorded content
into the timeline.
Changing the Recorded Content
Once you have recorded your content in the MultiCam Designer and imported it
into the timeline, you can edit it like any other video clip on the timeline. However,
if you find that you want to replace some of the footage, or add more footage to
the recorded content, you can do this by re-entering the MultiCam Designer.
To change recorded content in the MultiCam Designer, click on it in the timeline
and then click on the MultiCam D esigner function button above the timeline.
Adding More Content
If required, you can record more content. You can record from the beginning over
the existing content, or continue from where you left off by using the playback
controls to find a specific starting point to record from. See Creating Recorded
Content for information on recording new content.
When you are done, click OK to save your changes and import the updated
recorded content into the timeline.
Replacing Existing Content
If you want to replace an existing segment on the recording track, do this:
1. Use the playback controls to find the segment you want to replace.
2. If you only want to replace part of a segment, you can split it into two
separate segments. To do this, ensure the timeline slider is at the starting
position of the part you want to replace, and then click Split.
82
Page 96

Cyb erLink PowerDirector Help
3. Right-click on the camera segment you want to replace, and then select
another camera (video source).
4. Repeat the above steps as required to edit and replace the segments.
5. When you are done, click OK to save your changes and import the updated
recorded content into the timeline.
83
Page 97

PowerDirecto r Plug-in s
Note: * optional feature in CyberLink PowerDirector. Check the version
table on our web site for detailed versioning information.
Using the Theme Designer
If you enjoy using the Magic Movie Wizard to create your video productions, you
can now fully customize the theme templates used to create these dynamic looking
videos in the Theme Designer*. A theme may consist of one or more theme
templates, or individual sequences from different theme templates.
As you customize the theme template, you can also fully customize how your
media is displayed, giving you more creative control over your outputted movie.
To open the Theme Designer, in the Edit module, click the button and
then select Theme Designer.
84
Page 98

Cyb erLink PowerDirector Help
A - Med ia Tab, B - Effects Tab, C - Seq uence Content Area, D - Added Sequences Area, E - Sel ected
Sequence, F - Title Settings, G - Theme Background Music , H - Sequenc e Bac kground Im age, I Transition Settings, J - P review Window , K - Preview Controls, L - Take a Snapsho t, M - Auto Fi ll M edia
Slots
Overview
Themes that you edit in the Theme Designer consist of theme templates and your
media (images and video clips). The resulting video is similar to the movie content
created by the Magic Movie Wizard and Magic Style, but the Theme Designer
provides much more creative control over the outputted movie.
Theme Templates
Theme templates are used to create a video production, with a specific type of
theme or style, and can be downloaded from DirectorZone. Theme templates
consist of a number of sequences. Each of these sequences contain elements, some
of which are customizable and some of which are not.
The customizable elements include the text and media (images, videos, and
background music) you add to each sequence. You can add effects on this media
and set how and when it is displayed. You can also set the background image on
some sequences, and select the transition between each sequence in templates
named "with transitions". Non-customizable elements include any animation
included in the sequences.
When selecting a theme template to use in the Theme Designer, you can choose to
add one or more theme templates, creating a more original production. You can
even just select some of the sequences in a theme template, or mix and match the
sequences used.
There are three types of sequences: opening, middle, and closing sequences.
Opening and closing sequences usually contain text, while the elements in middle
sequences are much more random.
Adding Theme Templates/Sequences
In the Theme Designer you can use one or more theme templates, or just certain
selected sequences, to create your video.
When you first enter the Theme Designer, you are prompted to select a theme
template.
85
Page 99

PowerDirecto r Plug-in s
Note: you can preview a theme template in the preview window by selecting
it and then using the available playback controls.
To add a theme template, just select it in the window and all of its sequences will be
added.
86
Page 100

Cyb erLink PowerDirector Help
Note: the number of media files you can add to a sequence is dependent on
its design.
If you don't want to use all the theme template's sequences, just deselect the ones
you don't want to use.
You can also select sequences from other theme templates and include them in
your video. The Theme Designer will remember the order of your selections.
Click OK once you have selected all the sequences. They will be loaded into the
added sequences area of the Theme Designer.
If you'd like to add more sequences, just click the button. You can drag and
drop the sequences to reorder them, or right click to remove the selected one.
Adding Media Clips
Once you have selected the theme templates (and their sequences) that you want
to use, you can start adding your images and video files to them.
87
 Loading...