

Page 1

CyberLink
PowerDirector
User's Guide
Page 2

Copyright and Disclaimer
All rights reserved. No part of this publication may be reproduced, stored in a
retrieval system, or transmitted in any form or by any means electronic,
mechanical, photocopying, recording, or otherwise without the prior written
permission of CyberLink Corporation.
To the extent allowed by law, PowerDirector IS PROVIDED “AS IS”, WITHOUT
WARRANTY OF ANY KIND, EITHER EXPRESS OR IMPLIED, INCLUDING
WITHOUT LIMITATION ANY WARRANTY FOR INFORMATION, SERVICES, OR
PRODUCTS PROVIDED THROUGH OR IN CONNECTION WITH PowerDirector
AND ANY IMPLIED WARRANTIES OF MERCHANTABILITY, FITNESS FOR A
PARTICULAR PURPOSE, EXPECTATION OF PRIVACY, OR NON-INFRINGEMENT.
BY USING THIS SOFTWARE, YOU AGREE THAT CYBERLINK WILL NOT BE LIABLE
FOR ANY DIRECT, INDIRECT, OR CONSEQUENTIAL LOSS ARISING FROM THE
USE OF THIS SOFTWARE OR MATERIALS CONTAINED EITHER IN THIS
PACKAGE.
The terms and conditions here under shall be governed and construed in
accordance with the laws of Taiwan.
PowerDirector is a registered trademark along with other company and product
names mentioned in this publication, used for identification purposes and
remain the exclusive property of their respective owners.
Manufactured under license from Dolby Laboratories. Dolby and the double-D
symbol are registered trademarks of Dolby Laboratories. Confidential
unpublished works. Copyright 1995-2005 Dolby Laboratories. All rights
reserved.
For DTS patents, see http://patents.dts.com. Manufactured under license from
DTS Licensing Limited. DTS, the Symbol, & DTS and the Symbol together are
registered trademarks, and DTS 5.1 Producer is a trademark of DTS, Inc. © DTS,
Inc. All Rights Reserved.
International Headquarters
Mailing Address
Web Site http://www.cyberlink.com
Telephone
Fax
Copyright © 2013 CyberLink Corporation. All rights reserved.
CyberLink Corporation
15F., No. 100, Minquan Rd., Xindian Dist.
New Taipei City 231, Taiwan (R.O.C.)
886-2-8667-1298
886-2-8667-1385
Page 3

Contents
Introduction
................................................................................................1Welcome
.................................................................................................1Latest Features
.................................................................................................2PowerDirector Versions
................................................................................................9DirectorZone
................................................................................................10System Requirements
PowerDirector Editing Modes
................................................................................................13Full Feature Editor
................................................................................................14Easy Editor
................................................................................................16Slideshow Creator
.................................................................................................18Setting Music Preferences
.................................................................................................20Customizing Slideshows in the Slideshow Designer
PowerDirector Workspace
................................................................................................25Rooms
.................................................................................................26Media Room
.................................................................................................27Effect Room
.................................................................................................27PiP Objects Room
.................................................................................................27Particle Room
.................................................................................................28Title Room
.................................................................................................28Transition Room
.................................................................................................28Audio Mixing Room
.................................................................................................28Voice-Over Recording Room
.................................................................................................28Chapter Room
.................................................................................................29Subtitle Room
..................................................1
..................................................13
..................................................25
i
Page 4

CyberL ink Po werD irector
................................................................................................29Library Window
.................................................................................................30Explorer View
.................................................................................................30Filtering Media in the Library
.................................................................................................31Library Menu
................................................................................................31Expanding the Workspace
................................................................................................32Preview Window
.................................................................................................32Preview Player Controls
.................................................................................................33Taking a Screen Snapshot
.................................................................................................33Preview/Display Options
.................................................................................................35Zoom In/Out
.................................................................................................35Undocking the Preview Window
.................................................................................................36Previewing in 3D Mode
................................................................................................37Editing Workspace
.................................................................................................37Timeline View
.................................................................................................46Storyboard View
PowerDirector Projects
................................................................................................47Setting Project Aspect Ratio
................................................................................................48Exporting Projects
Importing Media into
PowerDirector
..................................................47
..................................................49
................................................................................................49Importing Media Files
.................................................................................................503D Media
.................................................................................................52Importing PowerDirector Projects
................................................................................................53Capturing Media
.................................................................................................53Capturing from a DV Camcorder
.................................................................................................55Capturing from an HDV Camcorder
.................................................................................................55Capturing from a TV Signal
.................................................................................................56Capturing from a Digital TV Signal
.................................................................................................56Capturing from a Webcam
.................................................................................................56Capturing from a Microphone
ii
Page 5

.................................................................................................56Capturing from a CD
.................................................................................................56Capturing from an AVCHD Camcorder
.................................................................................................57Capturing from an Optical Device
.................................................................................................57Captured Content
.................................................................................................57Quality Profile Setup
.................................................................................................57Capture Settings
.................................................................................................58Capture Preferences
................................................................................................58Downloading Media
.................................................................................................59Downloading Photos From Flickr
.................................................................................................60Downloading Audio From Freesound
.................................................................................................60Downloading from DirectorZone
................................................................................................61Detecting Scenes and Extracting Audio
.................................................................................................61Detecting Scenes in a Video Clip
.................................................................................................62Extracting Audio from a Video Clip
PowerDirector Plug-ins
.................................................................................................65Importing Media
.................................................................................................67Synchronizing Clips
.................................................................................................68Creating Recorded Content
.................................................................................................69Editing Recorded Content
.................................................................................................72Overview
.................................................................................................72Adding Theme Templates/Sequences
.................................................................................................76Adding Media Clips
.................................................................................................79Editing Media Clips
.................................................................................................80Editing Background Music
.................................................................................................82Editing Title Text
.................................................................................................82Replacing Background Images
.................................................................................................82Adding Transitions Between Sequences
.................................................................................................83Previewing and Saving Movies
.................................................................................................84Editing Created Movies
..................................................63
................................................................................................64Using the MultiCam Designer
................................................................................................71Using the Theme Designer
iii
Page 6

CyberL ink Po werD irector
Arranging Media in Your
Production
................................................................................................85Adding Video Clips and Images to the Timeline
.................................................................................................86Adding Video Clips and Images
.................................................................................................88Adding Color Boards and Backgrounds
................................................................................................90Adding Audio Clips
.................................................................................................92Magic Music
.................................................................................................92Syncing Audio
................................................................................................95Using the Magic Movie Wizard
................................................................................................96Using the Slideshow Creator
Editing Your Media
................................................................................................97Content Aware Editing
.................................................................................................98Using Content Aware Editing
................................................................................................102Splitting a Clip
................................................................................................103Unlinking Video/Audio Clips
................................................................................................103Trimming Video and Audio Clips
.................................................................................................104Trimming a Video Clip
.................................................................................................107Trimming an Audio Clip
................................................................................................109Setting a Media Clip's Duration
................................................................................................109Setting TV (Video Clip Interlacing) Format
................................................................................................110Adjusting Video Clip Aspect Ratio
................................................................................................111Stretching Images
................................................................................................112Cropping Images
................................................................................................112Changing the Shape of Media
................................................................................................114Fixing and Enhancing Images/Videos
.................................................................................................114Applying ColorDirector Color Effects (Presets)
.................................................................................................115Advanced Fixes and Enhancements
................................................................................................116Utilizing Keyframes on Media
.................................................................................................118Adding Keyframes
..................................................85
..................................................97
iv
Page 7

................................................................................................120Power Tools
................................................................................................121Muting Audio
................................................................................................121Advanced Audio Editing
................................................................................................122Time Info
................................................................................................122Magic Fix
................................................................................................122Magic Cut
Adding Effects
Creating PiP Effects
Adding Particle Effects
..................................................125
................................................................................................125Adding Video Effects
.................................................................................................126Modifying a Video Effect
................................................................................................127Using Magic Motion
.................................................................................................128Magic Motion Designer
................................................................................................129Using Magic Style
................................................................................................130Using the Freeze Frame Effect
..................................................131
................................................................................................131Adding PiP Objects
.................................................................................................132Creating Custom PiP Objects
................................................................................................133Using the Paint Designer
.................................................................................................134Creating a Paint Animation
................................................................................................136Modifying Media in the PiP Designer
.................................................................................................137Mode Selection and Zoom Tools
.................................................................................................138Modifying PiP Media Size and Position
.................................................................................................138Modifying PiP Media Properties
.................................................................................................141Adding Motion to PiP Media
.................................................................................................145Adding PiP Masks
.................................................................................................145Utilizing PiP Keyframes
.................................................................................................147Saving and Sharing PiP Objects
..................................................149
................................................................................................151Modifying Particle Effects in the Particle Designer
.................................................................................................152Mode Selection and Zoom Tools
v
Page 8

CyberL ink Po werD irector
.................................................................................................153Adding Objects, Images, and Backgrounds
.................................................................................................154Modifying Particle Object Range and Position
.................................................................................................155Modifying Particle Object Properties
.................................................................................................159Adding Motion to Particle Objects
.................................................................................................159Utilizing Particle Keyframes
.................................................................................................162Saving and Sharing Particle Effect Templates
Adding Title Effects
Using Transitions
..................................................163
................................................................................................165Modifying Titles in the Title Designer
.................................................................................................166Mode Selection and Zoom Tools
.................................................................................................167Adding Text, Particles, Images, and Backgrounds
.................................................................................................168Modifying Title Effect Position
.................................................................................................169Modifying Title Text Properties
.................................................................................................174Applying Motion to Title Text
.................................................................................................177Saving and Sharing Title Templates
..................................................179
................................................................................................179Adding Transitions to a Single Clip
................................................................................................180Adding Transitions Between Two Clips
................................................................................................181Setting Transition Behavior
................................................................................................182Modifying Transition Settings
Mixing Audio and Recording
Voice-Overs
..................................................183
................................................................................................183Adjusting Audio Clip Volume Levels
.................................................................................................183Mixing Audio In-Track
.................................................................................................184Mixing Audio in the Audio Mixing Room
.................................................................................................185Adding Fade Effects to Audio Clips
.................................................................................................185Restoring Audio Clip Volume Levels
................................................................................................186Recording Voice-Overs
Adding Chapters
vi
..................................................189
................................................................................................189Adding Chapters Markers
Page 9

................................................................................................189Setting Chapter Thumbnails
Adding Subtitles
Producing Your Project
Creating Discs
..................................................191
................................................................................................191Adding Subtitle Markers
................................................................................................192Importing Subtitles from a File
................................................................................................192Extracting Subtitles from an MKV File
................................................................................................193Editing Subtitles
................................................................................................193Syncing Subtitles
..................................................195
................................................................................................195Utilizing Intelligent SVRT
................................................................................................196Produce Window
.................................................................................................198Outputting to a Standard 2D File
.................................................................................................200Outputting in a 3D Format
.................................................................................................202Outputting to a Device
.................................................................................................204Uploading Video to Online Media Sites
.................................................................................................211Batch Produce
..................................................213
................................................................................................214Importing Additional Disc Content
................................................................................................216Selecting a Disc Menu
................................................................................................217Editing Disc Menu Properties
.................................................................................................217Editing Disc Menu Text
.................................................................................................218Setting Disc Menu Music
.................................................................................................219Adding a First Play Video
.................................................................................................219Setting Disc Playback Mode
.................................................................................................220Specify Buttons Per Page
................................................................................................221Customizing Disc Menus in the Menu Designer
.................................................................................................222Mode Selection and Zoom Tools
.................................................................................................223Setting Menu Opening and Background
.................................................................................................224Adding Images to Menus
.................................................................................................224Adding and Editing Disc Menu Title Text
vii
Page 10

CyberL ink Po werD irector
.................................................................................................228Setting Object Properties
.................................................................................................229Adding and Editing Menu Buttons
.................................................................................................230Enabling 3D Depth in Disc Menus
.................................................................................................230Saving and Sharing Disc Menu Templates
................................................................................................231Burning Your Production to Disc
.................................................................................................231Burning a Disc in 2D
.................................................................................................233Burning a Disc in 3D
.................................................................................................236Configuring Burn Settings
.................................................................................................236Erasing Discs
PowerDirector Preferences
PowerDirector Hotkeys
..................................................237
................................................................................................237General Preferences
................................................................................................238Capture Preferences
................................................................................................239Confirmation Preferences
................................................................................................240DirectorZone Preferences
................................................................................................241Editing Preferences
................................................................................................242File Preferences
................................................................................................243Display Preferences
................................................................................................244Hardware Acceleration Preferences
................................................................................................244Project Preferences
................................................................................................245Produce Preferences
..................................................247
viii
................................................................................................247Default Keyboard Hotkeys
.................................................................................................248Application Menu Bar Hotkeys
.................................................................................................251System Hotkeys
.................................................................................................251Capture Hotkeys
.................................................................................................252Edit Hotkeys
.................................................................................................252Designer Hotkeys
................................................................................................253Customizing Keyboard Hotkeys
.................................................................................................254Hotkey Sets
Page 11

Appendix
Technical Support
..................................................257
................................................................................................257Intelligent SVRT: When Is Used?
................................................................................................258Licensing and Copyright Information
.................................................................................................260Licenses and Copyrights
..................................................273
................................................................................................273Before Contacting Technical Support
................................................................................................274Web Support
ix
Page 12

CyberL ink Po werD irector
x
Page 13

In tro du ctio n
Note: this document is for reference and informational use only. Its content and
the corresponding program are subject to change without notice. For more helpful
tips on using the program, please visit our members forum or see the video
tutorials at http://directorzone.cyberlink.com/tutorial/pdr.
Chapter 1:
Introduction
This chapter introduces CyberLink PowerDirector and the digital video editing
process. It also outlines all of the latest features, available versions, and reviews the
minimum system requirements for CyberLink PowerDirector.
Welcome
Welcome to the CyberLink family of digital media tools. CyberLink PowerDirector is
a digital video editing program that lets you create professional-looking videos and
photo slideshows, complete with music, voice-overs, special effects, transitions,
and much more. You can then output your project to a file, camcorder, portable
device, upload it directly to various online video sharing web sites, or burn it to a
disc, complete with stylish menus.
Latest Features
This section outlines the latest features within the CyberLink PowerDirector
program.
Utilize the MultiCam Designer to seamlessly edit footage from multiple
cameras, simulating the use of a live camera switcher.
Take more creative control in the creation of theme template created videos
in the Theme Designer.
Use motion blur to create smoother movement on titles and PiP media,
giving the movement a more natural and authentic look.
Unleash your PC's speed with TrueVelocity™ 4*.
Improved round trip editing with AudioDirector*, ColorDirector*, and
PhotoDirector*.
Import 2K* and 4K* Ultra HD video, and video or audio with up to 7.1 channels
for editing.
1
Page 14

CyberL ink Po werD irector
Note: * optional feature in CyberLink PowerDirector. Check the version table on
our web site for detailed versioning information.
Features
Ultimate
Ultra
Deluxe
HE3DHEDE
LE
Native 64-bit
Yes
Yes--------
--
Enhanced PowerDirector Design Studio (PiP Designer, Particle Designer, Title
Designer, Menu Designer), including improved chroma key, text kerning, and
more.
Use the updated Content Aware Editing* tool that now more accurately finds
the most exciting parts of your video clips.
Take advantage of the improved ripple editing feature, including the auto
adding of transitions between timeline clips.
Transform the color and look of videos clips by applying ColorDirector color
effects (presets) on them.
Copy and paste keyframe attributes (enhancements, video effects, and
motion) from one media clip to another on the timeline.
Use editable transition effects that allow you to modify background color,
effect direction, effect type, and more.
Produce only a selected range of your video production, outputting it as a
separate video file.
Extract subtitles from Matroska (MKV)* video files and create subtitles for
playback on MKV players.
Output video in one of many 2K* or 4K* Ultra HD formats.
Create and burn DVD discs with DTS 5.1ch audio.
PowerDirector Versions
The features that are available to you within CyberLink PowerDirector are
completely dependent on the version you have installed on your computer.
Supported file formats, editing features, disc-making functions, and other features
vary depending on the version that you have.
To determine your version of CyberLink PowerDirector, click on the CyberLink
PowerDirector logo in the top right corner or select ? > About CyberLink
PowerDirector.
2
Page 15

In tro du ctio n
Features
Ultimate
Ultra
Deluxe
HE3DHEDE
LE
Engine support
Import Medi a
3D Video (MVC,
Side-by-Side)
Yes
Yes
Yes
Yes
Yes----
3D Photo
(MPO, JPS)
Yes
Yes
Yes
Yes
Yes----
MPEG-1,
MPEG-2
Yes
Yes
Yes
Yes
Yes
Yes
--
FLV, MKV, DSLR
Yes
Yes
Yes
Yes**
Yes**
Yes**
Yes**
AVCHD file with
DDCD audio
file (.M2T/.
M2TS)
Yes
Yes
Yes
Yes**
Yes**----
AVCHD file with
LPCM audio file
(.M2T/.M2TS)
Yes
Yes
Yes
Yes**
Yes**
Yes**
Yes**
Apple Device/
PSP MPEG-4
Yes
Yes
Yes
Yes**
Yes**
Yes**
Yes**
4K video (more
than
1920*1080)
Yes
Yes--------
--
Clip with Dolby
Digital 2 ch
Yes
Yes
Yes
Yes
Yes----
Clip with Dolby
Digital 5.1 ch
Yes
Yes
Yes--------
Clip with Dolby
Digital Plus
5.1ch
Yes
Yes
Yes--------
Clip with DTS
5.1 ch
Yes
Yes----------Clip with WAV
7.1 ch
Yes
Yes
Yes--------
MOD, TOD
Yes
Yes
Yes
Yes
Yes----
WTV clip
(MPEG-2
Yes
Yes
Yes
Yes
Yes
Yes
--
3
Page 16

CyberL ink Po werD irector
Features
Ultimate
Ultra
Deluxe
HE3DHEDE
LE
Video)
WTV clip
(H.264)
Yes
Yes
Yes
Yes**
Yes**
Yes**
Yes**
DVR-MS
Yes
Yes
Yes
Yes
Yes
Yes
--
Cap ture Functions
HDV Camcorder
Capture
Yes
Yes
Yes
Yes
Yes
Yes--DVB-T Tuner
Capture
Yes
Yes
Yes
Yes
Yes
Yes--Analog TV
Tuner Capture
Yes
Yes
Yes
Yes
Yes
Yes
--
External or
Optical Device
Capture
Yes
Yes
Yes
Yes
Yes
Yes--AVCHD
Camcorder
Capture
Yes
Yes--------
--
QuickScan
Yes
Yes
Yes--------
SmartCaption
Yes
Yes
Yes--------
DV Backup
Yes
Yes
Yes
Yes
Yes
Yes
--
Edi t Functions
Convert 2D
Video/Photo to
3D
Yes
Yes--Yes----
--
3D PiP Effects
Yes
Yes
Yes
Yes
Yes----
3D Title Effects
Yes
Yes--Yes----
--
3D Particle
Effects
Yes
Yes----------3D Transition
Effect
Yes
Yes
Yes
Yes
Yes----
3D Video Effect
Yes
Yes--Yes----
--
3D Orientation
Adjustment
Yes
Yes--------
--
4
Page 17

In tro du ctio n
Features
Ultimate
Ultra
Deluxe
HE3DHEDE
LE
TrueTheater
Video
Enhancement
Yes
Yes
Yes--------
Theme
Designer
Yes
Yes
Yes--------
MultiCam
Designer
Yes
Yes--------
--
ColorDirector
--------------
Video in
Reverse
Yes
Yes
Yes--------
Video Speed Frame
Interpolated
Technology
Yes
Yes
Yes--------
Magic Cut - Set
Criteria
Yes
Yes
Yes--------
Video Stabilizer
- Fix Rotational
Camera Shake
Yes
Yes
Yes--------
Magic Motion
Designer
Yes
Yes
Yes--------
Magic Style
Templates
3131214444
Magic Music
SmartSound
Yes
Yes
Yes--------
Slideshow
Templates
13131311111111
Keyframe
Settings Panel
Yes
Yes
Yes--------
Preview Quality
Full HD/HD
Yes
Yes--------
--
WaveEditor
Yes
Yes
Yes--------
AudioDirector
--------------
Shadow File
Generation
Yes
Yes
Yes
Yes
Yes
Yes
--
5
Page 18

CyberL ink Po werD irector
Features
Ultimate
Ultra
Deluxe
HE3DHEDE
LE
Content Aware
Editing
Yes
Yes--------
--
Video Tracks
100
100
1004444
SVRT Track
Yes
Yes
Yes
Yes
Yes
Yes--Chapters Track
Yes
Yes
Yes
Yes
Yes
Yes
--
Dual Monitor
Support
Yes
Yes
Yes--------
Preview
Window - Zoom
Yes
Yes
Yes--------
Title Templates
115
11589666
6
Multi Trim Precise Cut
(Zoom)
Yes
Yes
Yes--------
Video Effects
138
118
113
103
103
103
103
Video Effect
Layers on Clip
Yes
Yes
Yes--------
Video Effect
Keyframes
Yes
Yes
Yes--------
Designers - 4
Color Gradient
Yes
Yes
Yes--------
PiP Objects
6464228888
PiP Designer Customizing
PiP Motion
Yes
Yes
Yes--------
PiP Designer Apply Shows
Yes
Yes
Yes
Yes
Yes
Yes
--
Paint Designer
Yes
Yes
Yes--------
Particle
Designer
Yes
Yes
Yes--------
Particle Effect
Templates
6767432222
Adding
Chapters
Yes
Yes
Yes
Yes
Yes
Yes
--
6
Page 19

In tro du ctio n
Features
Ultimate
Ultra
Deluxe
HE3DHEDE
LE
Subtitles Import/Export
Yes
Yes
Yes--------
Creating
Subtitles for
DVD
Yes
Yes
Yes
Yes
Yes----
3D Display
Support
Yes
Yes--Yes------Snap to
Reference Lines
Yes
Yes
Yes--------
Range
Selection
Yes
Yes
Yes--------
Pr od uce Functions
Output in 3D
Yes
Yes--Yes----
--
Upload 3D
Video to
YouTube
Yes
Yes--Yes----
--
Output to
MPEG-2
Yes
Yes
Yes
Yes
Yes
Yes
--
Output to
MPEG-2 with
Dolby Digital
5.1
Yes
Yes
Yes--------
Output to
QuickTime
Format
Yes
Yes
Yes--------
MPEG-4 AVCHD
format
Yes
Yes
Yes
Yes
Yes**----
Output to
MPEG-4 MVC,
H.264 MVC
Yes
Yes--Yes----
--
Write Back HDV
Tape
Yes
Yes
Yes--------
Output to HDD
Camcorder
Yes
Yes
Yes--------
2K/4K video to
Yes
Yes--------
--
7
Page 20

CyberL ink Po werD irector
Features
Ultimate
Ultra
Deluxe
HE3DHEDE
LE
H.264 AVC/
WMV/MPEG-4
2K/4K video to
Social Media
Sites
Yes
Yes----------AVCHD
Removable
Disk
Yes
Yes--Yes
Yes----
Output to
Mobile Phones
Yes
Yes
Yes
Yes**
Yes**
Yes**
Yes**
Output to
Apple Devices
Yes
Yes
Yes
Yes**
Yes**
Yes**
Yes**
Output to Sony
Devices
Yes
Yes
Yes
Yes**
Yes**
Yes**
Yes**
Create Disc Functions
Disc Menu
Templates
161615555N/A
3D Discs
Yes
Yes--Yes
Yes--N/A
3D Disc Menus
Yes
Yes--------
N/A
Dolby Digital
Stereo Creator
to Encode 2 ch
Audio
Yes
Yes
Yes
Yes
Yes--N/A
Dolby Digital
5.1 Surround
Yes
Yes
Yes------N/A
DVD Disc with
DTS audio
Yes
Yes--------
N/A
Blu-ray Disc
(TM) with DTS
Audio
Yes
Yes--------
N/A
Blu-ray Disc
(TM) Burning
(BDMV, BDXL)
Yes
Yes--Yes**
Yes**--N/A
AVCHD
Burning
Yes
Yes--Yes**
Yes**--N/A
8
Page 21

In tro du ctio n
Features
Ultimate
Ultra
Deluxe
HE3DHEDE
LE
(AVCHD)
VCD Burning
Yes
Yes
Yes------N/A
Note: ** Windows 7 and 8 only.
Note: you can prevent CyberLink PowerDirector from auto checking for updates/
upgrades in General Preferences.
Note: you must connect to the Internet to use this feature.
Updating PowerDirector
Software upgrades and updates (patches) are periodically available from CyberLink.
CyberLink PowerDirector automatically prompts you when either is available.
To update your software, do this:
1. Click the button to open the Upgrade window.
2. Click the available tabs to see the Updates, Upgrades, and enhancements (
Installed Packs) available.
3. Select an item on a tab to open your web browser, where you can purchase
product upgrades or download the latest patch update.
DirectorZone
DirectorZone is a free web service that lets you search for and download theme
templates, PiP objects, paint animations, title templates, particle objects, sound
clips, and disc menus created by other users of CyberLink PowerDirector.
Whenever you see the icon, you can click it to download free effects and
templates into your CyberLink PowerDirector libraries.
You may also share your own creations by uploading them to DirectorZone. To
sign in to DirectorZone, click the Sign in to DirectorZone link on the top of the
CyberLink PowerDirector window.
Go to http://directorzone.cyberlink.com to find out more information on the
features and benefits of the DirectorZone web service.
9
Page 22
CyberL ink Po werD irector
System Requirements
Operating System
Microsoft Windows 8 (32 bit and 64 bit).
Microsoft Windows 7 Home Basic, Home
Premium, Professional, Ultimate (32 bit
and 64 bit).
Microsoft Windows Vista Home Basic,
Home Premium, Business, Ultimate (32 bit
and 64 bit).
Microsoft Windows XP Home Edition,
Professional (32 bit with Service Pack 3).
Screen Resolution
1024 x 768, 16-bit color or above.
CPU Processor
CyberLink PowerDirector 12 is optimized for
CPUs with MMX/SSE/SSE2/3DNow!/3DNow!
Extension/HyperThreading/AVX2 technology.
SD video editing and export: Pentium 4 3.0
Ghz or AMD Athlon 64 X2 or above
(Required).
AVCHD* and BD* burning: Pentium Core 2
Duo E6400, or AMD Phenom II X4
(Recommended).
Full-HD video editing and export: Intel
Corei5/7 or AMD Phenom II X4
(Recommended).
2K/4K/3D* video editing and export: Intel
Corei7 or AMD FX with 64bit OS and 6 GB
RAM (Recommended).
Multiple camera editing: Intel Core i5/7 or
AMD Phenom II X4 (Recommended).
Graphics Card
128 MB VGA VRAM or higher (1 GB or
higher VRAM and OpenCL capable are
recommended).
Memory
2 GB required.
System Requirements
The system requirements listed below are recommended as minimums for general
digital video production work.
10
Page 23
In tro du ctio n
3 GB or above recommended for 32 bit
OS.
6 GB or above recommended for 64 bit
OS.
Hard Disk Space (Installation)
Deluxe
5 GB.
Ultra
6.5 GB.
Ultimate and Ultimate Suite
6.5 GB (10 GB recommended to install all
premium content).
Hard Disk Space (Burning)
10 GB (20 GB recommended) free for DVD
production.
60 GB (100 GB recommended) free for Bluray Disc/AVCHD production*.
Burning Drive
A CD or DVD burner (CD-R/RW, DVD+R/RW
or DVD-R/RW) is required to burn VCD/
DVD/SVCD/AVCHD* titles.
A Blu-ray Disc recordable drive is required
to burn Blu-ray Discs*.
Internet Connection
The import/export of some media formats
may require activation via an Internet
connection. Activation is fast, easy, and
free.
Other
Windows Media Player 9 or above is
required.
Note: please consult the CyberLink web site (http://www.cyberlink.com) for the
most recent system requirements information. * optional feature in CyberLink
PowerDirector. Check the version table on our web site for detailed versioning
information.
11
Page 24

CyberL ink Po werD irector
12
Page 25

Po werDirecto r Ed itin g M od es
Note: before selecting your preferred editing mode, be sure to set the video
aspect ratio for your project (16:9 or 4:3).
Note: select the Always enter the full feature editor option at the bottom of
this dialog to skip this window at startup. You can always reset this selection at
any time in Confirmation Preferences.
Chapter 2:
PowerDirector Editing
Modes
CyberLink PowerDirector has three separate editors to fit your editing requirements.
When you launch the program from the start menu, or the CyberLink
PowerDirector shortcut on the desktop, you are prompted to choose one of the
following editing modes:
Full Feature Editor: select this option to enter the classic editing mode of
CyberLink PowerDirector, where all of the program's features are available to
you.
Easy Editor: if you are new to the editing process and not sure how or where
to get started, then the Easy Editor can help. The Magic Movie Wizard takes
you through a step-by-step process to import, style, adjust, and preview your
finished movie, in just a few steps. You can then edit the created production,
output it to a video file, or burn it to a disc.
Slideshow Creator: with the Slideshow Creator you can instantly turn your
photos into a dynamic slideshow. Follow the steps in the Slideshow Creator to
import your photos, add background music, and stylish slideshow templates.
Once done, you can preview the slideshow, before outputting it as a video file
or burning it to disc.
Full Feature Editor
In the Full Feature Editor of CyberLink PowerDirector you have the freedom to
perform every function and use every feature that is available in your version of the
program. The path you take to create your video production is up to you. Use the
features you are familiar with to make your movie, or experiment to create
something new.
13
Page 26

CyberL ink Po werD irector
Module
Description
Capture
Capture media in a number of formats, from a variety
of different sources. See Capturing Media.
Edit
In the Edit module you can edit and trim your
imported media, arrange it in your video production,
add effects, titles, PiP objects, transitions, music,
chapters, subtitles, and much more. See the relevant
section of this help file that corresponds with the
editing feature you'd like to use.
Produce
In the Produce module you can output your created
production to a video file in a variety of formats
(including 3D formats), a device (camcorder, mobile
phone, or other portable device), or upload it to
YouTube, Facebook, DailyMotion, or Vimeo. See
Producing Your Project.
Create Disc
Use the features in the Create Disc module to design
discs with menus, and then burn your video
production in a variety of different formats in 2D or
3D. See Creating Discs.
Note: if you want more creative control than the Magic Movie Wizard provides,
you can also use the Theme Designer to create your video production. The
Theme Designer allows you to customize the theme templates used and choose
the exact images, video clips, and background music you want in your production.
See Using the Theme Designer for more information.
In the Full Feature Editor there are four main modules available to you:
When CyberLink PowerDirector launches in the Full Feature Editor, it automatically
opens in the Edit module. You can easily switch among the available modules to
perform your required task.
Easy Editor
If you are new to the editing process and not sure how or where to get started, then
the Easy Editor can help. The Magic Movie Wizard takes all of your media and
creates a completed video production in just a few steps.
To create your video production using the Magic Movie Wizard in the Easy Editor,
do this:
14
Page 27
Po werDirecto r Ed itin g M od es
Note: if you are in the Full Feature Editor, you can quickly launch the Magic
Movie Wizard by clicking on the button above the timeline and selecting
Magic Movie Wizard.
Note: click to remove any unwanted media files from your production.
Note: the style templates with the 3D icon produce a 3D effect in 3D mode and
when outputted in 3D video productions. * optional feature in CyberLink
PowerDirector. Check the version table on our web site for detailed versioning
information.
1. Select Easy Editor when prompted which mode you prefer at startup. The
Magic Movie Wizard displays.
2. In the Source window, click to import all of the media you want to use
in your video production. Select Import Media Files to import a number of
individual video or image files, or select Import a Media Folder if all of your
media is in a specific folder on your computer's hard drive. CyberLink
PowerDirector will import all of the supported media file formats in the
selected folder.
3. Click Next to continue.
4. In the Style window, select from the available movie styles. Each style you
select will result in a different outputted video. Select Download more
templates from DirectorZone* to get more style templates. See DirectorZone
for more information.
5. Click Next to continue.
6. In the Adjustment window, click to add music to your production.
Then use the available controls to do the following:
use the button to add more music files to the background music
playlist. Use the and buttons to set the order of the music in the
playlist. The total duration of all the music added is noted above the playlist.
Mix audio level between music and the video's audio: use the slider to mix the
audio level, by deciding whether to have more background music or the
original video's audio in the production.
Specify the movie duration: here you can specify how long your movie will
be. Select Original duration if you don't want the Magic Movie Wizard to make
any edits to your imported media; Select Set output duration to manually
specify how long you want the movie to be in the field provided; Select Fit
15
Page 28

CyberL ink Po werD irector
Note: * optional feature in CyberLink PowerDirector. Check the version table on
our web site for detailed versioning information.
Note: if you are not satisfied with the current video production you can click the
Previous button to return to previous windows to add/remove music, select a
different style, change the criteria settings, duration, or import more media. You
can also click the Reorder Media button to shuffle the media files in the created
production for a different look, or the Edit in the Theme Designer button if you
want to customize the style template used. See Using the Theme Designer for
more information.
duration to background music if you want your video production to match
the duration of the music you imported into the playlist.
7. Click the Settings* button to use the sliders to customize the criteria the
Magic Movie Wizard uses to cut your movie. Click OK to save the settings.
8. Click Next to continue.
9. In the Preview window the Magic Movie Wizard generates a version of your
production. Enter a Starting title and Ending title for your production in the
fields provided, and then use the available player controls to preview it.
10. Click Next to continue.
11. You are done. To finish and close the Easy Editor, choose one of the
following:
Produce Video: click to enter the Produce module where you can output
your production to a video file, device, or upload it to a video sharing web
site. See Producing Your Project.
Create Disc: click to burn your production to a disc, complete with a
professional looking disc menu, in the Create Disc module. See Creating Discs.
Advanced Editing: click this option if you'd like to perform some more
advanced editing on your production in the Edit module.
Slideshow Creator
The Slideshow Creator is the easiest way to create a dynamic slideshow with your
photos.
To create a slideshow in the Slideshow Creator, do this:
1. Select Slideshow Creator when prompted which mode you prefer at startup.
The first Slideshow Creator window displays.
16
Page 29

Po werDirecto r Ed itin g M od es
Note: if you are in the Full Feature Mode, you can launch the Slideshow Creator
by adding photos to the timeline, selecting them, and then clicking on the
Slideshow button above the timeline. See Using the Slideshow Creator for more
information.
Note: you can right-click on a photo and select Set 3D Source Format if
required. For more information, please refer to Setting 3D Source Format. You
can also click to remove any unwanted photos from your slideshow.
2. In the Source window, click to import all of the photos you want to
use in your slideshow. Select Import Image Files to import a number of
individual photos, or select Import an Image Folder if all of your photos are in
a specific folder on your computer's hard drive. CyberLink PowerDirector will
import all of the supported image formats in the selected folder.
3. Click Next to continue.
4. In the Style & Music window, select a slideshow style. Each style you
select will result in a different slideshow.
5. In the Style & Music window, click the button to add background
music to your slideshow. After adding music, click the Music Preferences
button to customize the music duration and add fades. See Setting Music
Preferences for a detail description of the available preferences.
6. In the Style & Music window, click the Slideshow Preferences button to set
your slideshow preferences as follows:
Duration: use this option to set the length of your slideshow. Select Fit photos
to music to have the length of the slideshow match the duration of the added
background music. Select Fit music to photos (if launched in Full Feature
Mode) for the length of the music to match the duration of the slideshow, i.e.
its specified length on the timeline.
Sequence: use this option to set the order of the photos in the slideshow.
Select Timeline order (if launched in Full Feature Mode) to have the sequence
match the order the photos are currently displayed in the timeline. Select
Date/time taken for the photos to display in chronological order based on the
date and time they were taken.
Detect faces: some slideshow templates include this option. When selected,
the Slideshow Creator will scan and detect the faces in the photos included in
the slideshow. The faces in the photos will then become the area of focus in
the created photo slideshows.
17
Page 30

CyberL ink Po werD irector
Note: if you are not satisfied with the current slideshow, you can click the
Previous button to return to previous windows to select a different style, or import
more photos. Also, if available, click the Replace Background button in the
Preview window to replace the background image used in the slideshow, or
Customize to fully customize your slideshow in the Slideshow Designer. See
Customizing Slideshows in the Slideshow Designer for a detailed description of
all the available options for your selected slideshow style.
Note: if you select the Advanced Editing option, the Slideshow Creator adds
your created slideshow to the timeline in the Edit window as a combined video file.
If you would like to view each individual slide/photo in the slideshow for advanced
editing, just right-click on the file in the timeline and then select Show
Individual Photos.
Click OK to save your changes.
7. Click Next to continue.
8. In the Preview window, the Slideshow Creator generates a version of your
slideshow. Use the available player controls to preview it.
9. Click Next to continue.
10. You are done. To finish and close the Easy Editor, choose one of the
following:
Produce Video: click to enter the Produce window where you can output your
slideshow to a video file, device, or upload it to a video sharing web site. See
Producing Your Project.
Create Disc: click to burn your slideshow to a disc, complete with a
professional looking disc menu, in the Create Disc window. See Creating Disc.
Advanced Editing: click this option if you'd like to perform some more
advanced editing on your slideshow in the Edit window.
Setting Music Preferences
If you are using background music in your slideshow, click on the Music
Preferences button in the Style & Music window of the Slideshow Creator to
configure the preferences as follows:
1. In the Trim audio section you can trim the length of the music file you added
as background music as follows:
use the player controls to find the desired start point for the music, and then
click .
18
Page 31

Po werDirecto r Ed itin g M od es
use the player controls to find the desired end point for the music, and then
click .
drag the markers on the music timeline to set the desired start and end times
manually.
2. Select the Fade-in option to have the background music gradually fade-in at
the beginning of the slideshow.
3. Select the Fade out option to have the background music gradually fade-out
at the end of the slideshow.
4. Click OK to save your changes.
19
Page 32

CyberL ink Po werD irector
Note: if the Customize button is not available in the Preview window, the
slideshow style template you selected cannot be customized in the Slideshow
Designer.
Customizing Slideshows in the Slideshow Designer
In the Preview window of the Slideshow Creator, click on the Customize button to
open the Slideshow Designer to modify the selected slideshow style.
A - P review Area , B - Editing Area , C - Sl ide Area , D - Extra Too ls Area , E - Selec ted Slide
The editing options and tools that are available in the Slideshow Designer, depend
on the slideshow style template you selected. The following outlines the editing
options available for the style templates that utilize the Slideshow Designer.
20
Page 33

Po werDirecto r Ed itin g M od es
Camera/Cell Slideshow
When customizing a Camera or Cell slideshow in the Slideshow Designer, you can
perform the following functions:
in the slide area, click on a specific slideshow slide to view and edit it.
in the preview area, click and drag a photo to an alternative cell.
in the editing area (Unused photos), click the Add Photos button to import
additional photos for use in the slideshow.
in the editing area (Unused photos), indicate the maximum number of photos
that are displayed on a slide.
in the editing area, drag and drop the photos from Unused photos to the cell
in the preview area where you want it on the slide. You can also highlight a
cell by clicking it and use the buttons to add or remove selected
photos.
in the preview area, select a cell with a photo and then click on the button
to set the focus of that cell on a specific portion of the photo. Manually resize
and drag the box to set the desired focus area.
in the extra tools area, click the Remix button to generate a new version of
the slideshow.
in the preview area, use the player controls to preview the slideshow.
Motion Slideshow
When customizing a Motion slideshow in the Slideshow Designer, you can perform
the following functions:
in the slide area, click on a specific slideshow slide to view and edit it.
in the editing area (Cropping area), use the Magic Motion Designer to
customize the motion on the slide. See Magic Motion Designer for detailed
instructions on using all its features.
in the preview area, use the player controls to preview the slideshow.
21
Page 34

CyberL ink Po werD irector
Note: to create a time-lapse slideshow, you need to prepare the photos for it
ahead of time. This feature works best with a series of photos taken with a
camera that supports time-lapse photography.
Highlight Slideshow
When customizing a Highlight slideshow in the Slideshow Designer, you can
perform the following functions:
in the slide area, click on a specific slideshow slide to view and edit it.
in the extra tools area, select whether you want to edit the foreground or
background photo.
in the editing area (Cropping area), resize and drag the box to the area of the
photo you want highlighted on the slide.
in the preview area, use the player controls to preview the slideshow.
3D/Frozen Space/Future Slideshow
When customizing a 3D, Frozen Space, or Future slideshow in the Slideshow
Designer, you can perform the following functions:
in the slide area, click on a specific slideshow slide to view and edit it.
in the editing area (Cropping area), resize and drag the box to the area of the
photo you want highlighted in the photo on the slide.
in the preview area, use the player controls to preview the slideshow.
Time-Lapse Slideshow
When customizing a time-lapse slideshow in the Slideshow Designer, you can
specify the following settings:
Duration of each image: in the field provided, specify how long you want
each of the imported images to display. Each image can display for as long as
99 frames, or as short as for 1 single video frame.
For each displayed image, skip: when importing a large number of images
that were taken over a period of time, you may find the need to remove some
22
Page 35

Po werDirecto r Ed itin g M od es
of the images to reduce the slideshow's duration. In the field provided, enter
the number of images you want to remove for each displayed image in your
slideshow.
23
Page 36

CyberL ink Po werD irector
24
Page 37

Po werDirecto r Work space
Chapter 3:
PowerDirector Workspace
This chapter outlines the CyberLink PowerDirector workspace, and all of its features.
The workspace in the Edit module is where you will spend most of your time when
using CyberLink PowerDirector, so getting familiar with everything is has to offer is
recommended.
A - R oom s, B - Im port M edi a, C - Pow erDirec tor Plug-ins, D - Libra ry Window , E - Expa nda bl e
Workspa ce, F - P revi ew W in dow , G - U ndock Preview Wi ndow , H - 3D D isp la y Configura tio n, I Ena bl e/D isa bl e 3D M ode, J - Z oom In/Ou t, K - P review Qu ali ty/Displa y Op tions, L - Ta ke Sna psh ot,
M - Previ ew Pla yer Controls, N - Edi ting W orkspa ce, O - Tim eli ne R uler, P - Function Buttons, Q Ra nge Sel ecti on, R - V iew Entire M ovie, S - Tra ck M a na ger, T - Tim eli ne/ Storyboa rd View
Rooms
The various rooms in the Edit module of CyberLink PowerDirector are where you
can access all of your media, effects, titles, and transitions when editing your video
production. You can also gain access to controls for recording and mixing audio,
adding chapters or subtitles. By default, the library window displays the Media
Room.
25
Page 38

CyberL ink Po werD irector
Note: if you cannot find this button when in the media library, you may need to
resize the preview window to reveal it. See Expanding the Workspace for more
information.
Note: see Library Window for more information about the library menu options
available in all rooms.
Note: * optional feature in CyberLink PowerDirector. Check the version table on
our web site for detailed versioning information.
Media Room
The Media Room provides access to your media library and the PowerDirector plugins. The media library contains your video, audio, and image files. You can also
access a number of useful color boards and backgrounds for use in your video
productions.
Click to access the PowerDirector plug-ins. See PowerDirector Plug-ins for a
detailed description of the plug-ins and their available features.
Managing the Media Library
Use the button to manage the media in your media library.
The options include:
Export Library: select to export your entire media library as a file for backup,
in the PDL (PowerDirector Library) format.
Import Library: select to import a media library PDL file, exported from
another project or version of CyberLink PowerDirector.
Empty the Library: select to empty the entire contents of the media library.
Select Remove All Unused Content from Library if you just want to remove
the media that is not being used in the current production.
Content Aware Details
When in the Media Room, you can select the Content Aware Details* option from
the library menu to view the analysis results for all the video clips analyzed and
edited in Content Aware Editing. Clips that were previously analyzed are indicated
by the green (good parts) and light brown (bad parts) dots in the specific columns.
To analyze video clips in this view, select them in the Analyze column and then
26
Page 39

Po werDirecto r Work space
Note: the video effects with the 3D icon produce a 3D effect in 3D mode and when
outputted in 3D video productions.
Note: the PiP objects with the 3D icon produce a 3D effect in 3D mode and when
outputted in 3D video productions.
click the Analyze button.
To edit a video clip using Content Aware Editing, click . If the video clip has
not yet been analyzed, CyberLink PowerDirector will do this first before opening the
Content Aware Editing window.
See Content Aware Editing for more detailed information on this feature.
Effect Room
The Effect Room contains a library of special effects that are used on the video files
and images in your project. For more information, see Adding Effects.
PiP Objects Room
The PiP Objects Room contains a library of PiP objects, or graphics, that you can
add on top of the video or images on a video track. You can place PiP objects onto
any track in the timeline. The PiP Objects Room also includes paint animation
objects and access to the Paint Designer.
There are four main types of objects in the PiP Objects Room:
static graphics.
motion graphics that move through clips.
decorative borders that are added to frame your video.
hand drawn paint animation objects you create in the Paint Designer.
For information on adding PiP objects, see Adding PiP Objects. For
information on the hand drawn paint animation objects you can create in the
Paint Designer, see Using the Paint Designer.
Particle Room
The Particle Room contains a library of effects you can place on a video track to
add a particle object (snow, clouds, smoke, etc.) on top of a video or image on a
video track.
27
Page 40

CyberL ink Po werD irector
Note: the particle effects with the 3D icon produce a 3D effect in 3D mode and
when outputted in 3D video productions.
Note: the title templates with the 3D icon produce a 3D effect in 3D mode and
when outputted in 3D video productions. See The Difference Between 3D and 3DLike Effects to learn more about both types of effects.
Note: the transitions with the 3D icon produce a 3D effect in 3D mode and when
outputted in 3D video productions. See The Difference Between 3D and 3D-Like
Effects to learn more about both types of effects.
You can modify particles in the Particle Designer. For more information, see
Adding Particle Effects.
Title Room
The Title Room contains the library of title effects that when applied to your
project, add credits or comments to your production. For more information, see
Adding Title Effects.
Transition Room
The Transition Room contains transitions that you can use on or between clips in
your project. Transitions let you control how media appears and disappears in your
project, and changes from one clip to the next. For more information, see Using
Transitions.
Audio Mixing Room
In the Audio Mixing Room you can use controls to mix all of the audio tracks in
your project. For more information, see Mixing Audio and Recording Voice-Overs.
Voice-Over Recording Room
In the Voice-Over Recording Room you can record a voice over for your video
production, while you are watching it play back. For more information, see
Recording Voice-Overs.
Chapter Room
In the Chapter Room* you can automatically or manually set chapter markers for
your project. Setting chapters on your final disc allows viewers to jump from the
menu page to the chapter markers you have set in order to navigate through your
disc. For more information, see Adding Chapters.
28
Page 41

Po werDirecto r Work space
Note: * optional feature in CyberLink PowerDirector. Check the version table on
our web site for detailed versioning information.
Subtitle Room
In the Subtitle Room you can add subtitles to your video production manually or
through the import of a TXT, SRT, or MKV file. For more information, see Adding
Subtitles.
Library Window
The library window contains all of the media in CyberLink PowerDirector, including
your video, images, and audio files. When you are in other rooms (Effect Room, PiP
Objects Room, etc.), it contains the effects, titles, and transitions you apply to your
media.
The media content and available buttons that display in the library window depend
on the room you are currently in.
Use the slider above the library window to adjust the size of the media thumbnails
in the library.
29
Page 42
CyberL ink Po werD irector
You can also resize the media thumbnails by selecting a default size from the
library menu.
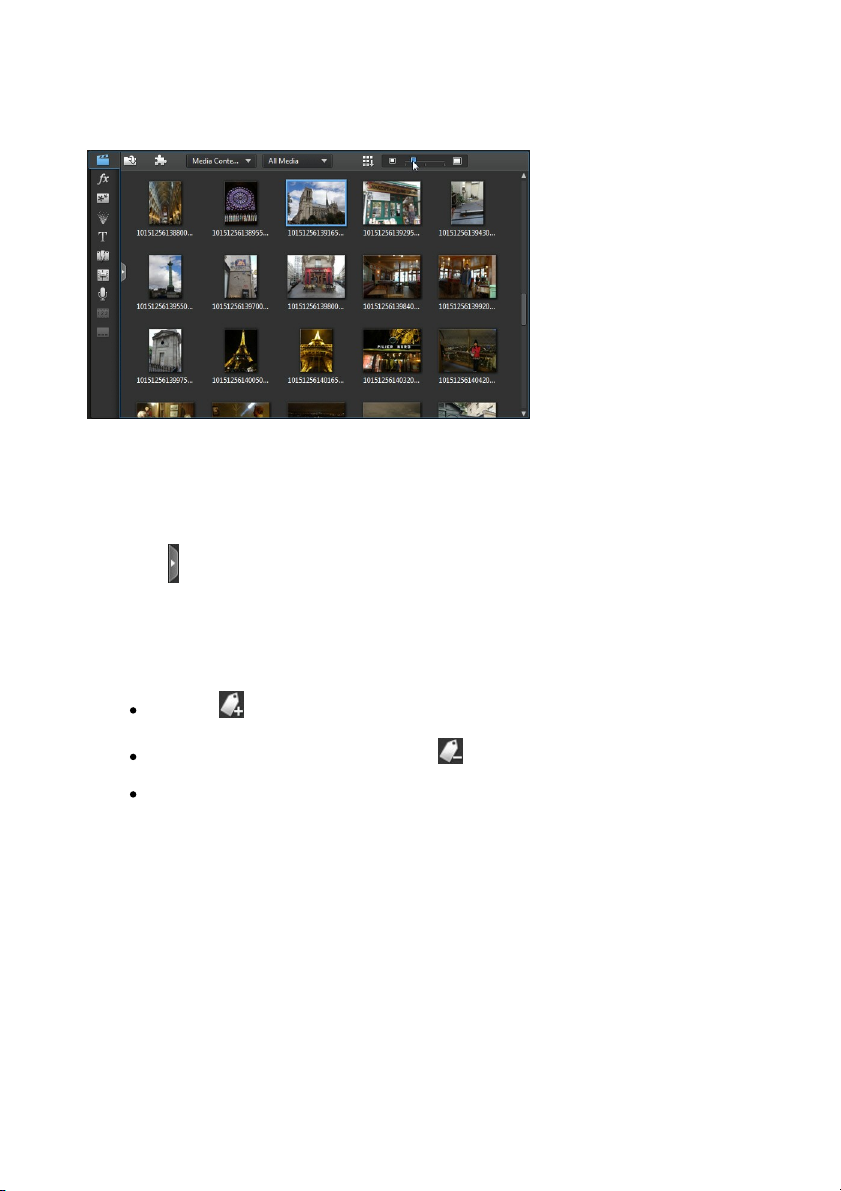
Explorer View
Select the button to display the explorer view within the library windows.
In the explorer view you can use tags to categorize the media in your library. This
lets you quickly browse through and filter the media in each room.
In the explorer view you can:
click on to add a new tag in a library window.
select an existing tag and then click to delete a previously created tag.
filter the media in the library window by selecting an existing tag.
Filtering Media in the Library
Use the available drop-down menus at the top of the library window to filter the
media that is displayed. For example, when viewing the media in the Media Room,
use the Media Content drop-down to display your media content, the available
color boards, backgrounds, or select a tag. Use the All Media drop-down to display
all or one type of media file if you want to find a certain type of media file quickly.
30
Page 43

Po werDirecto r Work space
Note: if you cannot find this button when in the media library, you may need to
resize the preview window to reveal it. See Expanding the Workspace for more
information.
Note: you can also undock the preview window for a much larger timeline and
library view. See Undocking the Preview Window for more information.
Library Menu
Click on to access the library menu. In the library menu you can sort the
content in a room by name, date created, file size, and more. You can also select all
the content in the room or change the media/effect thumbnail display size. Other
options that are available in the library menu, but are dependent on the specific
room you are in.
Expanding the Workspace
The look of the CyberLink PowerDirector workspace is fully expandable and
customizable based on your personal preference.
Simply drag the borders of the preview window and timeline to resize them to your
liking. This allows you to get the most out of your display device space and
customize the size of the preview window as you work.
31
Page 44

CyberL ink Po werD irector
Note: you can set PowerDirector to auto switch the playback mode to Movie
mode in Editing Preferences.
Preview Window
While creating your video production, you can preview it in the preview window
using the available player controls.
Preview Player Controls
With the player controls you can preview your production as you edit, including
playing your project from the current timeline position, or pausing and stopping
playback.
Click the Clip button to play back only the clip that is selected in the timeline, or
Movie to play the entire video production. When viewing media in Clip mode, the
cross hairs and grid lines/TV safe zone (if enabled) are visible to help with the
placement of the selected clip in the video display area. When in Movie mode,
these items are hidden.
32
Page 45

Po werDirecto r Work space
Note: you can set the default settings for these options in Display Preferences.
Note: Full HD and HD preview resolution are only available when the Ultra
version of CyberLink PowerDirector is installed on a 64-bit operating system.
Use the button to select a seek by method (frame, second, minute, scene,
subtitle, chapter, segment) and then use the buttons on either side of it for a more
precise step through of your current production.
You can also click and drag the playback slider, or enter in a specific timecode in
the time field, and then press the enter key on your keyboard to quickly find a
specific scene.
Click the button to undock the preview window for a larger view of your
production. See Undocking the Preview Window for more information.
Taking a Screen Snapshot
While previewing your project, you can take a still 2D screen snapshot and save it as
a BMP, JPG, GIF, or PNG image file. You can also take a still 3D screen snapshot and
save it as an MPO or JPS image file.
To do this click the button on the player controls.
You can change the image file format (or the default image file name) on the File
Preferences tab. See File Preferences for more information.
Preview/Display Options
CyberLink PowerDirector includes some preview and display options that help
make your editing experience easier. Click on to set the preview quality, show
the TV safe zone, display grid lines, or enable dual preview.
Preview Quality
Click , select Preview Quality, and then a preview quality from the list (Full HD*,
HD*, high, normal, low) to set the resolution/quality of the video used when
previewing your movie in the preview window. The higher the quality you select,
the more resources that are required to preview your video project.
33
Page 46

CyberL ink Po werD irector
Note: you can also preview a portion of your video using the Render Preview and
Produce Range options. See Range Selection for more information on these
functions.
Preview Mode
CyberLink PowerDirector provides two modes you can use to preview your video
production:
Real-time Preview: synchronizes and renders clips and effects in real-time,
displaying a preview of your video at the specified frames per second. See the
timeline frame rate option in General Preferences for information on setting
the correct frame rate for your production.
Non Real-time Preview: mutes the audio and displays a preview at a reduced
speed to help make editing go more smoothly. Useful when editing highdefinition video, using multiple PiP tracks on a less powerful computer, or
when you receive dropped frames when previewing. By muting the audio and
slowing down the video, CyberLink PowerDirector lets you view more frames
per second when your computer has trouble providing a smooth preview
during editing.
TV Safe Zone/Grid Lines
When you place media on the timeline, use the TV safe zone and grid lines to help
with the precise placement on your video project's image. These display options are
only available when in the Clip preview mode.
Click the button and then select TV Safe Zone > On to enable a box that
indicates the on-screen area of most TV displays.
Click the button, select Grid Lines, and then select the number of lines
you want to display in a grid over the video image. Use this grid to more
precisely place the PiP media and title text on the video image.
Once enabled, select Snap to Reference Lines* to have the selected objects snap to
the grid lines, TV safe zone, and the boundary of the preview window.
34
Page 47

Po werDirecto r Work space
Note: to use a connected monitor or TV as a secondary preview window, you must
first enable extend desktop to a secondary display in the Windows Display
Properties Settings. * optional feature in CyberLink PowerDirector. Check the
version table on our web site for detailed versioning information.
Note: if both of your displays are 3D devices, you can only enable 3D on one of
the two devices in dual preview mode.
Note: * optional feature in CyberLink PowerDirector. Check the version table on
our web site for detailed versioning information.
Dual Preview
If you have a secondary display device, such as a monitor, TV, or DV camcorder
connected to your computer, click the button and then select Dual Preview* to
extend your workspace and preview your project on a secondary display.
Once enabled, when you click play in the preview window, you can preview your
production on both your primary and secondary display when Primary 2D and
Secondary 2D Display is selected. Select DV Camcorder to extend your production
preview to a connected DV camcorder device.
3D Dual Preview
When your desktop is extended to a secondary display, you can enable 3D on one
of the two devices. If you want one of your previews to be in 3D, select either
Primary 2D and Secondary 3D Display or Primary 3D and Secondary 2D Display to
enable it. Your selection depends on which device you want to enable, and which
one supports 3D.
Zoom In/Out
When you place media on the timeline, use the Fit* drop-down underneath the
preview window to zoom in or out on the video. Zooming in is useful for precise
placement of media, while zooming out lets you add media that begins off screen.
Undocking the Preview Window
Click the button to undock the preview window. Once undocked, you can
preview your production at full screen or move it to an extended desktop. You can
also resize the timeline and library window to your liking.
35
Page 48

CyberL ink Po werD irector
Note: for detailed information on adding and setting the source format of 3D
media, see 3D Media. * Optional feature in CyberLink PowerDirector. Check the
version table on our web site for detailed versioning information.
Once undocked, you can:
click or to view your production at full screen.
click to minimize the preview window, and hide it so you can edit more
freely. Click on next to the PowerDirector logo to show the minimized
preview window.
click on to re-dock the preview window.
Previewing in 3D Mode
In the preview window you can enable 3D* mode to view the media in your
production in 3D, while you work.
3D Configuration
Before you can enable 3D mode, you must first set your 3D display device.
To set your 3D display device, do this:
1. Select the 3D configuration menu underneath the preview window .
2. Select one of the following options:
select your 3D display type from the list, i.e. 3D-Ready HDTV (Checkerboard),
Micro-polarizer LCD 3D (Row-Interleaved), 120Hz Time-sequential 3D LCD,
HDMI 1.4 Enabled 3D TV, etc.
if you are not sure which type of 3D display you have, select the Auto Detect
3D Mode option to have CyberLink PowerDirector detect it for you.
if you do not have a 3D display, select Anaglyph Red/Cyan mode and then use
anaglyphic (red/cyan) 3D glasses to view 3D content.
36
Page 49

Po werDirecto r Work space
Note: any 2D media in your production will not display in 3D. However, you can
convert all of the 2D media to 3D using TrueTheater 3D in Power Tools. See
Power Tools: 2D to 3D for more information.
Note: you can set which workspace view is displayed by default in Editing
Preferences.
Track
Description
Video tracks contain your project's media clips (video clips and
images) and effects (PiP objects, particle effects, title effects, etc.)
on the timeline. By default, there are two video tracks in the
Enabling 3D Mode
Once you have set your 3D display device, you can enable 3D mode at any time to
preview your video production in 3D. To enable, just click the button.
To disable 3D mode, just click the button.
Editing Workspace
The editing workspace is where you create your project by adding your media,
various effects, transitions, and title effects. The editing workspace has two
different views, the timeline and storyboard views, which are accessed by clicking
the or button.
Timeline View
The timeline view lets you view your entire project based on running time. This
view is useful if you want to insert effects, subtitles, etc. at a specific moment in
production. The timeline view also provides a view of all the tracks, media, and
other content (chapter markers, subtitle markers) that are displayed in the timeline.
To switch to timeline view, click .
Timeline Tracks
The timeline contains the following tracks:
37
Page 50

CyberL ink Po werD irector
timeline, but you can have up to 100 video tracks by adding more
in the Track Manager. Each video track in the timeline may have
an associated audio track for the video clip's audio.
Audio tracks contain the audio in your project. The audio may be
the audio portion of a video clip on the video track, or a separate
audio track for music clips or other audio. By default there are
two audio tracks linked with a video track, and a separate audio
track for music, which is always the bottom track in the timeline.
You can have up to 100 audio tracks by adding more in the Track
Manager.
The effect track contains any special effects that you want to
apply to your final video. Video effects in the effect track are
applied to all the video tracks that are positioned above it in the
timeline.
The title track contains the text title effects that appear in your
project. The titles you add to this track display over all the
content in every video track that display during their duration.
The voice track contains a narrative voice-over or other audio
clips.
The music track contains your video's soundtrack.
The chapter track contains all of the chapter markers in your
current video production. This track displays when you are in the
Chapter Room. Right-click on the timeline and then select Show
Chapter Track if you always want this track to display in the
timeline.
The subtitle track contains all of the subtitle markers in your
current video production. This track displays when you are in the
Subtitle Room. Right-click on the timeline and then select Show
Subtitle Track if you always want this track to display in the
timeline.
The SVRT track displays the Intelligent SVRT information for your
current project. See Utilizing Intelligent SVRT for more
information. Right-click on the timeline and then select Show
SVRT Track if you always want this track to display in the
timeline.
When using the Music Beat Detection feature, the music beat
track is enabled. This track displays all of the music beat markers
38
Page 51

Po werDirecto r Work space
for the music in your production. See Music Beat Detection for
more information. Right-click on the timeline and then select
Show Music Beat Track if you always want this track to display in
the timeline.
Note: you cannot include transitions in grouped objects.
Timeline Behavior
The CyberLink PowerDirector timeline has several behavior features that make it
easy to manage media on the timeline.
On the timeline you can:
place media clips at any position on a video track. If no media is placed
before a media clip on the timeline, your video production displays a black
screen until the timeline position of your media clip is reached.
media clips will snap to other clips on the timeline for easy placement in your
production. If want to move the clips more freely on the timeline, you can
disable snap to clips in Editing Preferences.
hold down the Ctrl key on the keyboard and select multiple media clips on
the timeline.
click and drag the mouse to select multiple media clips on the timeline.
right-click on select media in the timeline and select Group Objects. Doing
this allows you to move all the selected media clips as a group. Select
Ungroup Objects to once again allow for individual media clip movement.
Timeline Ruler
You can resize the timeline ruler for a more expanded or condensed view of your
production. To resize the ruler, click on the ruler and drag it left or right.
Expanding the ruler is especially handy when aligning clips and effects, while
condensing it gives you a global overview of your entire production.
39
Page 52

CyberL ink Po werD irector
Note: * optional feature in CyberLink PowerDirector. Check the version table on
our web site for detailed versioning information.
Note: use the timeline ruler to expand the timeline for a more precise placement
of timeline markers.
Click to auto fit your current project in the timeline area if you want to view the
entire movie in the editing workspace. You can also right-click on the timeline ruler
and select View Entire Movie to do this. Or select Zoom In or Zoom Out to change
the view to your required size.
Use the timeline ruler slider located in the bottom left corner
to manually resize the timeline.
Timeline Markers
You can add timeline markers* to the timeline ruler for more precise media
placement on the timeline. Once added, media clips snap to the timeline markers,
allowing your media to appear in your video production at the exact moment you
want it.
Adding Timeline Markers
To add a timeline marker, do this:
1. Hover your mouse over the timeline ruler. The green timeline marker indicator
displays with the displayed time.
2. Once you have found the time where you want to place the timeline, rightclick on the ruler and then select Add Timeline Marker.
3. Input a Note for the new timeline marker, if required.
4. Click on OK to add the new timeline marker.
40
Page 53

Po werDirecto r Work space
Note: you can manually drag a timeline marker to different position if the original
is not in the exact location you wanted it. Expand the timeline ruler for a more
precise placement, if necessary.
Once a timeline marker is added, media will snap to it when added to a track in the
timeline.
Right-click on the timeline ruler and then select Edit Timeline Markers to view a list
of all the timeline markers you have added. In this list you can remove any of the
existing markers, or double-click in the Note column to edit the associated text.
Function Buttons
When you select media that is on the timeline, whether it's a video clip, image,
audio clip, effect, title effect, etc., several function buttons display above the
timeline. These buttons let you perform a variety of tasks or gain access to some
important features of CyberLink PowerDirector.
The function buttons that are available depend on the type of media content you
select. However, whenever you select media, the and buttons are
always displayed. Click to remove the selected media content from the
timeline, or to gain access to more timeline functions, which vary
depending on the selected media.
Magic Tools
When editing your video project in the timeline, you can click the button to
use the magic tools to edit and touch up your audio, video, and image clips. Magic
tools can also help you add a creative style to your video production or add the
right background music.
CyberLink PowerDirector offers the following magic tools:
41
Page 54

CyberL ink Po werD irector
Note: * optional feature in CyberLink PowerDirector. Check the version table on
our web site for detailed versioning information.
Note: * optional feature in CyberLink PowerDirector. Check the version table on
our web site for detailed versioning information.
Magic Movie Wizard: automatically creates an edited video blended with
stylish effects and transitions.
Magic Fix: fixes and enhances your photos and videos, including fixing shaky
video, enhancing video quality, removing red-eye, and enhancing the focus
on photos.
Magic Motion: applies zooms and pans to your images. You can also use the
Magic Motion Designer to manually customize motion on an image.
Magic Cut: condenses long video segments into shorter clips that contain
only the best moments.
Magic Style: creates professional videos with pre-designed style templates
automatically.
Magic Music*: adds background music that automatically adjusts to suit
different durations.
Click on the button within these tools to consult the iHelp for assistance on
using them.
Range Selection
Click and drag one of the arrows on either side of the timeline slider to select a
range* of media on the timeline.
Once selected, right click on the selection, select Loop Playback, and then click the
play button if you want to continuously play back of the selected range. You can
also cut or copy the range, and then paste it to another position on the timeline.
42
Page 55

Po werDirecto r Work space
Note: * optional feature in CyberLink PowerDirector. Check the version table on
our web site for detailed versioning information.
Note: CyberLink PowerDirector auto adds a video and audio track for you when
all the current video/audio tracks in the timeline have media on them.
Note: if you don't want your additional video tracks to have a track for its audio,
enter in 0 tracks in the Audio section.
You can also use this feature to manually highlight a portion of a clip that you want
to then remove or trim out.
Click Render Preview to have CyberLink PowerDirector render a video preview of
only the highlighted range for playback in the preview window. Click Produce
Range to produce just the selected range in the Produce window, outputting it as a
video file that will be added to the media library.
Click Lock Range if you want to lock the selected range. Once locked, you can
more easily preview and even add additional media into the range for previewing,
rendering, or producing. Click Lock Range again to unlock the selected range.
Track Manager
In the Track Manager* you can add additional video and audio tracks to the
timeline. You can have up to 100 video tracks (with or without an audio track) in the
timeline, or add up to 98 additional audio tracks.
Adding Tracks to Timeline
Each video track you add, adds another layer of PiP video on the tracks above it in
the timeline.
To add tracks to the timeline, do this:
1. In the timeline view, click on to open the Track Manager.
2. In the Video section, enter in the number of video tracks you want to add to
the timeline. By default, one track is added, but you can add up to 98 video
tracks (100 in total) to the timeline, as required.
3. In the Video section, select the Position in the timeline where you want to add
the tracks.
4. In the Audio section, enter in the number of audio tracks you want to add to
the timeline. By default, one track is added, but you can add up to 98 audio
43
Page 56

CyberL ink Po werD irector
Note: if you only want to add an audio track (i.e. without a linked video track),
enter in 0 tracks in the Video section.
tracks (100 in total) to the timeline, as required.
5. In the Audio section, select the Position in the timeline where you want to
add the tracks.
6. Click on OK to add the tracks to the timeline.
To quickly remove any unwanted tracks from the timeline, just right-click on the
timeline and then select Remove Empty Tracks.
Customizing Timeline Tracks
In CyberLink PowerDirector you can customize the layout of the workspace
timeline and its tracks to fit your preference.
Customizing Track Names
To make it easy to identify all of your tracks if you have lots of media on multiple
tracks, drag the left sidebar to reveal the track names.
You can give all the tracks in the timeline a custom name as required.
Reordering Tracks
You can reorder the video tracks in the timeline if required. To reorder, click on the
left sidebar and drag the track to the new position in the timeline.
44
Page 57

Po werDirecto r Work space
You can also drag the effect track to a new position in the timeline. Effects on the
effect track are applied to all video tracks that are positioned above it in the
timeline.
Adjusting Track Height
Click and drag the bottom of a track on the left sidebar to resize it to your
preference.
You can also right-click on the timeline and select Adjust Video Track Height to
adjust the height of all the video tracks in the timeline to one of the default sizes.
Select Adjust Audio Track Height to resize all of the audio tracks, including the
music track, voice track, and each video track's corresponding audio track.
Locking/Unlocking Tracks
To lock a track in the timeline, click at the left of the track. When a track is
locked, you cannot add new clips to the track, or move or edit the clips it contains.
To unlock a track in the timeline, click to the left of the track.
45
Page 58

CyberL ink Po werD irector
Note: * optional feature in CyberLink PowerDirector. Check the version table on
our web site for detailed versioning information.
Note: some features are unavailable in the storyboard view. If you try to perform a
function that is unavailable, the program switches back to the timeline view.
Enable/Disable Tracks
To disable a track in the timeline*, deselect to the left of the track. When a track
is disabled, the media it contains is not displayed in the Preview window. This
allows you to preview your project by tracks so you can concentrate on the track
you are working on.
To enable a track in the timeline, select to the left of the track.
Storyboard View
The storyboard view is essentially a large graphical display, or storyboard, of all
your video clips and images on the first track in the timeline. You can use it to
visualize the main scenes and overall production more clearly.
To switch to storyboard view, click .
46
Page 59

Po werDirecto r Pro jects
Note: a CyberLink PowerDirector project (.pds) file essentially contains a list of
the media clips and effects used in your project, and a log of all the edits you want
to make to your media. Project files do not include the media clips in them. If you
want to save all your video production files in one place, use the Pack Project
Materials function. To do this select, File > Pack Project Materials from the
menu.
Note: when you create a new project, CyberLink PowerDirector resets your media
library. If you want to create a new video production using the same media
currently in your library, select File > New Workspace.
Chapter 4:
PowerDirector Projects
When working on a new video production, click the button to save it as a .pds
file, a project file format that is used exclusively by CyberLink PowerDirector. These
project files can be imported directly into the timeline, if required. See Importing
PowerDirector Projects for more information.
Use the options in the File menu to save, create new, or open existing projects in
CyberLink PowerDirector.
The changes you make to your media in CyberLink PowerDirector do not affect the
original media you imported into the program. Since your edits are all saved in the
project file, you can trim, edit, or remove clips, but still keep your original files on
your hard drive, untouched. So let yourself get creative. If you end up changing
things too drastically, you can always start over.
Setting Project Aspect Ratio
To set the aspect ratio for your project, select 4:3 or 16:9 from the aspect ratio
drop-down at the top of the window.
The preview window changes according to the aspect ratio you select. See
Adjusting Video Clip Aspect Ratio for information on modifying the aspect ratio of
a media file in your library.
47
Page 60

CyberL ink Po werD irector
Exporting Projects
You can export your CyberLink PowerDirector projects by writing them to a DV
tape, or by packing all the materials in a folder on your computer's hard drive.
Exported projects can then be imported into another computer running CyberLink
PowerDirector.
To export your project to a DV tape select File > Export > Write to DV Tape. To
export it to a folder, select File > Pack Project Materials.
48
Page 61

Im po rting Media in to Po werD irector
Note: media you import is saved in the current CyberLink PowerDirector project
you are working on. If you create a new project, you will be asked if you want to
merge the media in your library into the new project. You can also select File >
New Workspace to create a new project, while maintaining the current media in
the library.
Note: if you import media files that are on a removable device into the media
library, they will be removed if the removable device is disconnected. For best
results, it is recommended that you copy the media to your computer's hard drive
before importing.
Chapter 5:
Importing Media into
PowerDirector
You can import media in a wide variety of formats into CyberLink PowerDirector, in
many different ways. Whether you need to capture media from external sources,
import media that is already on your computer's hard drive, or download it from
the Internet.
CyberLink PowerDirector makes it easy to get all your media into the program
quickly, so you can start working on your video production.
Importing Media Files
If you already have video, audio, and image files that you want to use in your
production on your computer's hard drive, you can import the files directly into
CyberLink PowerDirector's media library in the Media Room. You can also import
media files that are on a removable device.
CyberLink PowerDirector supports the following file formats:
Image: Animated-GIF, BMP, GIF, JPEG, PNG, TIFF
3D Image Format: JPS*, MPO*
CyberLink PowerDirector also supports the import of the following camera RAW
image formats, which are then converted to JPEG once imported: ARW (SONY), CR2
(Canon), DNG (Ricoh), ERF (Epson), KDC (Kodak), MRW (Konica Minolta), NEF (Nikon),
NRW (Nikon), ORF (OLYMPUS), PEF (Pentax), RAF (Fujifilm), RW2 (Panasonic), SR2
(SONY), SRF (SONY)
49
Page 62

CyberL ink Po werD irector
Note: ** to enable, you must download the DivX codec online. Available on
Windows 32bit only.
Note: * optional feature in CyberLink PowerDirector. Check the version table on
our web site for detailed versioning information.
Note: you can also drag and drop media onto the CyberLink PowerDirector
window to import it into the program.
Note: click the button to enable 3D mode to view the 3D content during the
editing process. For more information on enabling 3D mode and configuring your
3D display settings, see Previewing in 3D Mode. * Optional feature in CyberLink
PowerDirector. Check the version table on our web site for detailed versioning
information.
Video: 3GPP2, AVI, DAT, DivX**, DV-AVI, DVR-MS*, FLV (H.264), HD MPEG-2, M2T*,
MKV (H.264), MOD*, MOV, MOV (H.264), MP4, MPEG-1*, MPEG-2*, MPEG-4 AVC
(H.264), MTS*, TOD*, VOB*, VRO*, WMV, WMV-HD, WTV*
3D Video Format: Dual-stream AVI, MVC*, Side-by-Side Video*, Over/Under Video
Audio: M4A, MP3, OGG, WAV, WMA
To import media into CyberLink PowerDirector, click and then select one of the
following options:
Import Media Files: import media files individually.
Import a Media Folder: import the entire contents of a folder that contains the
media files you want to use in your current project.
3D Media
CyberLink PowerDirector supports various 3D* video and image formats. You can
use 3D media to create both 3D videos, and standard 2D video productions. All 3D
media in the library is indicated by a 3D icon in the top left of its thumbnail.
You can use and arrange 3D video clips and images in your video productions the
same way you use 2D media. However, note that if you want to create a 3D video
production, any 2D media in your project must be converted to 3D before
production. See PowerTools: 2D to 3D for more information.
Setting 3D Source Format
When 3D media is imported into the media library, you may need to set the format
50
Page 63

Im po rting Media in to Po werD irector
Note: if you want to use 3D video clips and images in a 2D video production, you
still need to set the correct 3D source format to ensure the media displays
properly in 2D. CyberLink PowerDirector will incorporate the specified eye frames
into your 2D video.
of the 3D source video. This is because 3D media comes in a variety of different
video source formats. CyberLink PowerDirector needs to know the source format of
each 3D media file so that it can display it properly in 3D.
To set the 3D source format of your 3D media, do this:
1. Right-click on a 3D media file in the media library and then select Set 3D
Source Format. If the media file is on the timeline, right-click on it, select Set
Clip Attributes, and then Set 3D Source Format. The Set 3D Source Format
window displays.
2. Select the 3D source format by selecting one of the following:
Auto Detect 3D Source Format: if you are not sure what the source format is
of your 3D video, click this button to have CyberLink PowerDirector
automatically detect and set it for you.
2D: select this option if the selected media file is actually 2D content.
Side by side format: select this option if the 3D content has two different
images side by side. CyberLink PowerDirector merges the two images to
produce the 3D effect.
Over/Under format: select this option if the 3D content has two different
video images, one on top of the other. CyberLink PowerDirector merges the
two images to produce the 3D effect.
Multiview video coding: select this option if the 3D content is in the MVC
video format (.mts or .m2ts file format).
Dual view format: select this option if the 3D content is in the dual view
source format (.avi file format).
3. From the drop-down available, Specify whether to display the left or right eye
frame first. Use this feature if while editing or playing back 3D content you
begin to feel uncomfortable or uneasy. This may be because the layout of the
3D image is displayed differently than most standard content. If this occurs,
try selecting the opposite eye view. This switches the way the 3D content is
displayed on your display device, and may reduce the discomfort.
4. Click OK to set your changes to the selected media file.
51
Page 64

CyberL ink Po werD irector
Note: * optional feature in CyberLink PowerDirector. Check the version table on
our web site for detailed versioning information.
The Difference Between 3D and 3D-Like
Effects
In supported versions of CyberLink PowerDirector, there are both 3D effects* and
effects that have "3D-Like" properties.
Like 3D media that can be imported into the library, 3D effects* are composed of
two images from slightly different perspectives. 3D effects have one image for the
left eye, and one image for the right eye. When these images are viewed together
with compatible 3D hardware and software, they produce an effect that gives the
perception of depth. In supported versions of CyberLink PowerDirector, you can
enable this type of 3D effect for PiP media, particle effects, title effects, and on disc
menus. The video effects and transitions indicated with the 3D icon on their
thumbnail, also have these 3D effect properties when viewed and included in 3D
video productions.
Some title effects, transitions, and other features in CyberLink PowerDirector have
3D-Like properties. Available in all versions of the program, these effects are simply
3D animations that only consist of one image. 3D-Like effects do not produce a 3D
depth effect when viewed in 3D mode.
Importing PowerDirector Projects
CyberLink PowerDirector projects (.pds files) you worked on and saved previously
can be imported and then directly inserted into your video production's timeline.
To do this, select File > Insert Project from the menu. All of the media in the
original project will be imported into the current project's media library, and also
inserted at the current position of the timeline slider.
52
Page 65

Im po rting Media in to Po werD irector
Note: to add a text remark, date, or timecode to the video you are capturing, click
on the button in capture preferences area to enable it. See Capture
Preferences for more information.
Capturing Media
CyberLink PowerDirector lets you capture media from a variety of sources directly
into the media library. Click the Capture button to enter the Capture module.
In the Capture module, the program appears as follows:
A - Ca pture from a DV Ca mcorder, B - Ca pture from a n H DV Ca mcorder, C - Ca pture fro m a TV Si gna l,
D - Ca pture fro m a Digita l TV Sig na l, E - Ca pture fro m a W ebca m, F - Ca pture fro m a M icrophone, G Ca pture from a CD, H - Ca pture fro m a n Ex terna l o r Opti ca l D evice, I - Ca ptu re P review Wi ndow , J Ca ptured Co nten t, K - Qua lity Profi le Setup, L - Ca pture Settin gs, M - Ca pture P la yer Co ntrols, N Ca pture Preferen ces
Capturing from a DV Camcorder
You can capture video content that you recorded with a DV camcorder. Use the
capture from a DV camcorder option only if your camcorder connects to your
computer using an IEEE 1394 (FireWire) cable. You can capture a single scene or a
number of scenes in a batch from your camcorder.
53
Page 66

CyberL ink Po werD irector
Note: this feature requires a DVD burner. * Optional feature in CyberLink
PowerDirector. Check the version table on our web site for detailed versioning
information.
If your DV camcorder connects to your computer via a USB connection, just import
the video files directly from your camcorder, as if it was another hard drive on your
computer. See Importing Media for information on importing video files from your
computer.
Capturing a Single Scene
You can capture a single segment of video from your camcorder using the capture
player controls (record, stop, fast forward, rewind, etc.) underneath the capture
preview window. This function is particularly useful, for example, if you want to
acquire a long video segment in its entirety without skipping over sections.
DV Backup
The DV Backup* feature lets you back up the digital video from your DV camcorder
directly to DVD using CyberLink PowerDirector.
Insert a blank DVD disc into your disc drive and then click the button to
begin backing up your video.
Batch Capture from a DV Camcorder
With Batch Capture, CyberLink PowerDirector scans your DV camcorder for intervals
or scenes (or allows you to set them manually) on the tape, and then captures these
scenes as separate video files and imports each of them into the program.
Automatic Batch Capture
If you want CyberLink PowerDirector to auto capture and import each of the
intervals/scenes on your DV camcorder, click the button on the DV
Camcorder tab.
An interval/scene is the content you recorded each time you pressed record and
then stop during the video shooting process. For help on using this function, use
54
Page 67

Im po rting Media in to Po werD irector
Note: * optional feature in CyberLink PowerDirector. Check the version table on
our web site for detailed versioning information.
Note: * optional feature in CyberLink PowerDirector. Check the version table on
our web site for detailed versioning information.
Note: * optional feature in CyberLink PowerDirector. Check the version table on
our web site for detailed versioning information.
the tips on the user interface.
Manual Batch Capture
Using manual batch capture* gives you more control over the capturing process
and ensures that the scenes you want to include are captured. Manual batch
capture is recommended when you know which scenes you want to capture and
have a good idea where they are located on the tape.
Click the button to access the manual batch capture feature. For help on
using this function, use the helpful tips on the user interface.
Capturing from an HDV Camcorder
You can capture video footage you shot with an HDV* camcorder. Use the capture
from an HDV camcorder option only if your camcorder connects to your computer
using an IEEE 1394 (FireWire) cable. To a capture scene from your HDV camcorder,
use the capture player controls (record, stop, fast forward, rewind, etc.) underneath
the capture preview window.
If your HDV camcorder connects to your computer via a USB connection, just
import the video files directly from your camcorder, as if it was another hard drive
on your computer. See Importing Media for information on importing video files
from your computer.
Capturing from a TV Signal
If your computer has a TV* tuner card installed and you want to capture segments
from your favorite programs, select this option. To capture, use the capture player
controls (record, stop, change channel, etc.) underneath the capture preview
window.
55
Page 68

CyberL ink Po werD irector
Note: this feature is not available in all regions. * Optional feature in CyberLink
PowerDirector. Check the version table on our web site for detailed versioning
information.
Capturing from a Digital TV Signal
If your computer has a TV tuner card installed that receives a digital* TV signal and
you want to capture segments from your favorite programs, select this option. To
capture, use the capture player controls (record, stop, change channel, etc.)
underneath the capture preview window.
Capturing from a Webcam
You can record live content with a webcam that is attached to your computer and
then import it directly into your CyberLink PowerDirector media library. To capture,
use the capture player controls (record, stop, etc.) underneath the capture preview
window.
Capturing from a Microphone
Select this option to record audio with a microphone that is attached to your
computer. To capture, use the capture player controls (record, stop, etc.)
underneath the capture preview window.
Capturing from a CD
Use this option to rip your favorite music, or other audio, from an audio CD. To
capture, use the capture player controls (record, play, stop, next/previous track,
etc.) underneath the capture preview window.
Capturing from an AVCHD Camcorder
You can capture video content that is on an external device, such as an AVCHD
camcorder. Use the capture from an AVCHD camcorder option only if your
camcorder connects to your computer using an IEEE 1394 (FireWire) cable. To a
capture scene from your AVCHD camcorder, use the capture player controls
(record, stop, etc.) underneath the capture preview window.
If your AVCHD camcorder connects to your computer via a USB connection, just
import the video files directly from your camcorder, as if it was another hard drive
on your computer. See Importing Media for information on importing video files
from your computer.
56
Page 69

Im po rting Media in to Po werD irector
Note: * optional feature in CyberLink PowerDirector. Check the version table on
our web site for detailed versioning information.
Note: some DVDs are protected by technology that does not allow you to capture
the content they contain. * Optional feature in CyberLink PowerDirector. Check
the version table on our web site for detailed versioning information.
Capturing from an Optical Device
You can capture content from an optical device, such as video scenes from a DVD.
To capture, use the capture player controls (record, play, stop, next/previous frame,
etc.) underneath the capture preview window. You can also use the DVD disc
structure tree to quickly select the titles and chapters you want to capture.
Captured Content
All of the media you capture in the capture window is displayed in the Captured
Content area. When you return to the Edit module, all of the media is automatically
imported into your media library.
In the Captured Content area you can right-click on media to perform a number of
options, including detecting scenes in video clips and deleting unwanted content
so that it won't import into the Edit module.
The content captured in CyberLink PowerDirector is stored in the folder noted
underneath the Captured Content area. If you want to store it in a different location,
click the Change Folder button and select a different folder.
Quality Profile Setup
To set the file format and quality of the media you capture, click the Profile button.
If this button is grayed out, that means that the original format and quality of the
media is maintained, as set on the original media device (camcorder, etc.).
The profile settings that are available depend on the capture device connected and
the capture mode you have selected.
Capture Settings
Use the Settings button to configure the set up of your selected capture device. The
capture settings that are available depend on the capture device connected and the
capture mode you have selected.
57
Page 70

CyberL ink Po werD irector
Note: when capturing from a DVD, this button reads Drive, allowing you to select
the specific disc drive you want to capture from.
Capture Preferences
Before capturing media, you can set the preferences for your captured content. The
capture preferences that are available, depend on the content you are capturing.
Set the capture preferences as follows:
to set a maximum capture length, select Time limit and then enter a time in
the timecode box.
to set a maximum captured file size, select Size limit and then enter a size
limit (in MB).
to add a text remark, date stamp, or time stamp to the video being captured,
click on the button. In the Add Text Overlay window, select which type
and display format of text overlay you want to include on your recorded
video on the Text tab. Select the Format tab to set the font and text position
for the text.
to take a still photo of a frame of video for use in your project, just click on
at the point where you want to take the snapshot. The image is saved to
the Captured content area. You can specify your preferred snapshot image file
format in preferences. See File Preferences for detailed information.
select Non real-time when capturing from a camcorder to continue
processing captured video after the original video stops playing in order to
ensure that no frames are dropped.
select Begin with fade-in to add fade-in to audio captured with a microphone.
select End with fade-out to add fade-out to audio captured with a
microphone.
select Record at maximum speed to record CD audio at a higher speed.
Capturing at a higher speed reduces processing time, but yields audio of a
lower quality.
Downloading Media
If you feel that you do not have enough media for your project, or you are looking
for specific media to make your creation just perfect, in the Edit module you can
58
Page 71

Im po rting Media in to Po werD irector
Note: having a Flickr account is not required to search for, browse, and download
photos from Flickr.
Note: use the drop-down filter menu at the top of the search window to sort the
photos.
download media from Flickr, Freesound, and DirectorZone into the media room
library.
To display all the current downloaded media in the media library, select
Downloaded from the Media Content drop-down.
Downloading Photos From Flickr
You can download your own photos directly from your account on Flickr into
CyberLink PowerDirector. You can also search for and browse other user’s photos
from within CyberLink PowerDirector, and then import them into your media
library for use in a project.
To download photos from Flickr, do this:
1. Click on and then select Download from Flickr.
2. Follow the steps in the wizard window to authorize CyberLink PowerDirector
to use your Flickr account and accept the Terms of Use from Flickr.
3. Select from the drop-down whether to search for photos from:
My Photos on Flickr: this option displays thumbnails of all the photos you
have uploaded to your Flickr account.
My Contacts' Photos: this option displays thumbnails of all the photos your
Flickr contacts have uploaded to Flickr.
Search for Photos on Flickr: select this option to perform a search for photos
on Flickr.
4. Select all of the photos that you want to import into your media library and
59
Page 72

CyberL ink Po werD irector
Note: you cannot use the photos downloaded into your media library for
commercial use. Click on the button underneath a photo thumbnail to view its
copyright information.
Note: use the check boxes to filter the keyword search criteria before performing
your search.
Note: you cannot use the audio downloaded in to your media library for
commercial use. Click the button underneath an audio thumbnail to view its
copyright information.
then click on the Download button.
Downloading Audio From Freesound
You can download audio samples, such as sound effects or music clips, from the
Freesound service into CyberLink PowerDirector.
To download audio clips from Freesound, do this:
1. Click on and then select Download from Freesound.
2. Follow the steps in the wizard window to sign in to Freesound and then
accept the Terms of Use.
3. In the search window, perform a search for the audio clips you are looking
for.
4. Select all of the audio that you want to import into your media library and
then click on the Download button.
Downloading from DirectorZone
If you are looking for additional PiP objects, paint animation objects, title effects,
particle effects, or disc menu templates for your library, you can click to
download them from the DirectorZone web site in to the PiP Objects Room,
Particle Room, Title Room, or the Create Disc module.
When in the Edit module's Media Room, you can download sound clips into the
media library. To do this, click on and then select Download Sound Clips from
DirectorZone.
Visit the DirectorZone web site for more information: www.directorzone.com.
60
Page 73

Im po rting Media in to Po werD irector
Note: depending on the file format, scene detection on certain clips may not work
as precisely as it does for others. You may need to split the scenes manually in
the Scene Detection window.
Detecting Scenes and Extracting Audio
To assist with the editing process, CyberLink PowerDirector can detect scenes in
your video clips or extract the audio from them. These new clips are displayed,
separately from the original clips, in the media library.
Detecting Scenes in a Video Clip
The scene detection function automatically creates individual clips based on the
individual scenes (or pre-edited shots) contained within a video clip. Detected
scenes are not split from the original clip, but can be added to the workspace like
any other media clip.
To detect the scenes in a video clip, do this:
1. Right-click on it in either the Captured Content area (Capture window), or in
the media library, and then select Detect Scenes. In the media library, you can
also click the icon underneath a video clip's thumbnail to open the Scene
Detection window.
2. The scenes in the video clip are automatically detected and then displayed in
the Scenes panel.
3. Once you are done detecting the scenes in the video clip, click OK. The
detected clips are displayed in a sub folder under the original video clip.
When using scene detection, please note:
if required, use the Sensitivity slider to increase or decrease scene detection
sensitivity. Doing this may yield an increased or decreased number of scenes
that are detected. Click Detect to redetect the scenes in the video clip. You are
asked to confirm the clearing of the previously detected clips and then the
updated scenes are detected and displayed in the Scenes panel.
click on the button to configure the Advanced Scene Detection Settings. If
the selected video clip is a DV-AVI file, you have the option to Detect by
change of video frame (used on all other file formats) or Detect by change of
61
Page 74

CyberL ink Po werD irector
Note: when a video clip is already on the timeline, you can separate the audio
from the video file by right-clicking on it and selecting Unlink Video and Audio.
timecodes (i.e.: timecodes are automatically set when you start and stop
recording). Select the Disable preview during detection option to speed up
the detection process if you find your computer runs slow during the
process.
to stop the scene detection process before completion, click the stop button
on the playback controls.
to detect scenes manually, drag the slider (in Clip mode) to the beginning of
each new scene and then click .
to preview a detected scene, just select it in the Scenes panel (ensure Segment
is selected) and then click the play button.
to view all the detected scene markers on the clip timeline, ensure that Clip is
selected.
to merge two or more detected scenes into one longer scene, select them in
the Scenes panel and then click Merge. Click Remove All if you want to
restore the clip to the original.
You can add the individual scenes to the timeline or manage them in the media
library like any other video clip.
Video clips that contain detected scenes show a small folder icon in the lower right
corner of the clip when displayed in the media library. To display a clip’s scenes,
click the folder icon.
Extracting Audio from a Video Clip
If you just want to use the audio from a video clip in your production, you can
extract it in the media library by right-clicking on it and selecting Extract Audio.
The audio is separated from the video and saved in the media library. You can use it
in your project like any other audio file.
62
Page 75

Po werDirecto r Plu g-ins
Note: * optional feature in CyberLink PowerDirector. Check the version table on
our web site for detailed versioning information.
Chapter 6:
PowerDirector Plug-ins
CyberLink PowerDirector includes a number of plug-ins that can help you create
video content for your production. Click the button above the Media Room
library in the Edit module to view the available PowerDirector plug-ins.
Currently, CyberLink PowerDirector includes the two plug-ins. See the following
two sections for detailed information:
Using the MultiCam Designer*
Using the Theme Designer*
63
Page 76

CyberL ink Po werD irector
Note: when entering the MultiCam Designer, any selected video files are
automatically imported into the available camera (video source) areas.
Using the MultiCam Designer
The MultiCam Designer lets you seamlessly edit footage from multiple cameras,
simulating the use of a live camera switcher. The MultiCam Designer creates
professional-looking edited content for use in your CyberLink PowerDirector
projects.
To open the MultiCam Designer click the button and then select MultiCam
Designer.
A - Im port Video, B - Ava il able Ca mera s (Video Sou rces), C - Im port Audio, D - Selec ted Ca mera
(Video Sou rce), E - Synchroniza tion Ty pe, F - Rec ording Tra ck , G - R eco rding/Pla yba ck Control s, H Audio So urce, I - Recorded Video, J - Ava il abl e Audio So urce, K - Source Tra cks
64
Page 77

Po werDirecto r Plu g-ins
Note: once all the available camera areas are full, the next clip is imported into
the first camera area, after (on the corresponding source video track) the
previously imported clip.
Importing Media
In the MultiCam Designer you can have up to four different video sources from four
different cameras. Each available camera (video source) can have more than one
imported video clip on its source video track.
You can also import one or more audio files to use as the source audio in the clip
you are recording.
Importing Video Clips
When you enter the MultiCam Designer, any video clips that were selected in the
media library are automatically imported into the empty camera (video source)
areas and the corresponding source video tracks.
If no clips were selected, you are prompted to select clips from your hard drive for
import. You can select multiple video clips for import. Each selected clip is placed
in the next available camera area. Once all the camera areas are full, the next clip is
imported into the first camera area, after (on the corresponding source video track)
the previously imported clip.
To import additional video clips, do either of the following:
click the Import Video button and then Import From Hard Drive to import
video clips from your computer's hard drive, or Import From Media Room to
import clips from the existing media in the Media Room library. Select one or
more clips and then click Open. The clips are placed in the next available
camera areas and the corresponding source video tracks.
to import video clips into a specific camera (video source) area, click the
corresponding button. Next, select Import From Hard Drive to import
video clips from your computer's hard drive, or Import From Media Room to
import clips from the existing media in the Media Room library. Select one or
more clips and then click Open. The clips are placed in the camera area and
the corresponding source video tracks.
65
Page 78

CyberL ink Po werD irector
Source Video Tracks
All of the imported video clips are imported into the corresponding source video
tracks. You can move the video clips to different locations on the video tracks, or
even drag them to different tracks. You can also reorder the video clips on a source
track by clicking the button next to the track and then using the and
buttons to reorder them as required.
To remove a video clip from a source video track, click next to the track, select
the check box next to the clip you want to remove, and then click . To add
additional video clips to the source track, click the button.
Importing Audio Clips
If you want to use an audio clip as the audio source in your recording instead of the
audio of the imported video clips, you can import it separately into the MultiCam
Designer.
To import audio clips, click the Import Audio button and then Import From Hard
Drive to import audio clips from your computer's hard drive, or Import From
Media Room to import clips from the existing media in the Media Room library.
Select one or more clips and then click Open. The clips are placed on the source
audio track in the timeline.
Source Audio Track
All of the imported audio clips are imported into the source audio track. You can
move the audio clips to different locations on the audio track. You can also reorder
the audio clips on the source track by clicking the button next to the track and
then using the and buttons to reorder them as required.
To remove an audio clip from the source track, click next to the track, select the
check box next to the clip you want to remove, and then click . To add
additional audio clips to the source track, click the button.
66
Page 79

Po werDirecto r Plu g-ins
Note: you can also click the button in the camera area to manually move the
clip on the source track back one frame. Click to move it forward one frame.
Note: this option can only be used if the video clips were recorded with a DV or
HDV camera that imprinted the timecode information in the clips and were
captured by CyberLink PowerDirector.
Synchronizing Clips
Once you have imported all of the media clips into the MultiCam Designer that you
want to use in your recording, the next step is to synchronize them.
To synchronize the clips in the MultiCam Designer, do this:
1. Select the Audio source for your recording from the drop-down. You can use
the audio of any of the imported video clips or select Imported Audio to use
the audio that was imported on to the source audio track.
2. In the Synchronization drop-down, select one of the following:
Manual: select this option if you want to manually adjust the starting position
of each clip on the source tracks. You can do this by clicking and dragging
the clips on the source track to a new position.
Timecodes: select this option and then click Apply if you want the MultiCam
Designer to synchronize using the video clip's timecodes. The MultiCam
Designer will auto adjust the clips on the source tracks.
File Created Time: select this option and then click Apply to use the date and
time the file was created as the synchronization points. The MultiCam
Designer will auto adjust the clips on the source tracks.
Audio Analysis: select this option and then click Apply if you want the
MultiCam Designer to analyze the audio and then sync the files based on the
audio in them. The MultiCam Designer will auto adjust the clips on the source
tracks.
Markers on Clips: select this option and then use the playback controls to find
the synchronization points in each clip. Once you find a point, right click on
the source track and then select Add Marker. Once you have manually added
all the markers, click the Apply button. The MultiCam Designer will adjust the
clips on the source tracks.
67
Page 80

CyberL ink Po werD irector
Creating Recorded Content
Once you have imported and then synchronized all the media clips in the MultiCam
Designer, you are ready to record your video. The recorded video is placed on the
recording track and then is imported into the Edit module's timeline once you click
OK.
To record your content, do this:
1. Select the camera (video source) you want to start off the recording with. You
can do this by simply clicking on the camera preview area.
2. If required, click on in the recording controls to set the preview window
resolution. Select the Create Shadow File for HD Video option to also create
a shadow file for the recorded file. This can help speed up editing when using
high definition files in your production.
3. When you are ready, click to begin recording. The MultiCam Designer will
start recording, adding the current selected camera footage as recorded
content on the recording track.
4. As required during the recording process, click another camera (video
source) or use keyboard hotkeys 1-4 to switch the recording to that
source's content.
68
Page 81

Po werDirecto r Plu g-ins
Note: you can edit the video you just recorded by recording more video after the
current content or replacing specific camera segments on the recording track.
See Editing Recorded Content for more information.
5. Continue switching the camera (video source) as required, creating
your recorded content on the recording track.
6. When you are done click the or button to stop the recording process.
7. Click on OK to close the MultiCam Designer, and import the recorded content
into the timeline.
Editing Recorded Content
Once you have recorded your content in the MultiCam Designer and imported it
into the timeline, you can edit it like any other video clip on the timeline. If you
want to replace or add more footage to the recorded content, you can do this in
the MultiCam Designer.
To edit recorded content in the MultiCam Designer, click on it in the timeline and
then click on the MultiCam Designer function button.
Adding More Content
If required, you can record more content. You can record from the beginning over
the existing content, or use the playback controls to find a specific starting point to
record from. See Creating Recorded Content for information on recording new
content.
69
Page 82

CyberL ink Po werD irector
When you are done, click OK to save your changes and import the updated
recorded content into the timeline.
Replacing Existing Content
If you want to replace an existing segment on the recording track, do this:
1. Use the playback controls to find the segment you want to replace.
2. If you only want to replace part of a segment, you can split it into two
separate segments. To do this, ensure the timeline slider is at the starting
position of the part you want to replace, and then click Split.
3. Right-click on the camera segment you want to replace, and then select
another camera (video source).
4. Repeat the above steps as required to edit and replace the segments.
5. When you are done, click OK to save your changes and import the updated
recorded content into the timeline.
70
Page 83

Po werDirecto r Plu g-ins
Using the Theme Designer
If you enjoy using the Magic Movie Wizard to create your video productions, you
can now fully customize the theme templates used to create these dynamic
looking videos in the Theme Designer. A theme may consist of one or more theme
templates, or individual sequences from different theme templates.
As you customize the theme template, you can also fully customize how your
media is displayed, giving you more creative control over your outputted movie.
To open the Theme Designer click the button and then select Theme Designer.
A - M edia Ta b, B - Effects Ta b, C - Seq uen ce Co ntent Area , D - Ad ded Sequen ces Area , E - Sel ected
Seq uen ce, F - Title Settin gs, G - Them e Ba ckground M usi c, H - Sequence B ackground I ma ge, I Tra nsition Setti ngs, J - P review Wi ndow , K - P review Co ntrols, L - Au to Fi ll M edi a Sl ots
71
Page 84

CyberL ink Po werD irector
Overview
Themes that you edit in the Theme Designer consist of theme templates and your
media (images and video clips). The resulting video is similar to the movie content
created by the Magic Movie Wizard and Magic Style, but the Theme Designer
provides much more creative control over the outputted movie.
Theme Templates
Theme templates are used to create a video production, with a specific type of
theme or style, and can be downloaded from DirectorZone. Theme templates
consist of a number of sequences. Each of these sequences contain elements,
some of which are customizable and some of which are not.
The customizable elements include the text and media (images, videos, and
background music) you add to each sequence. You can add effects on this media
and set how and when it is displayed. You can also set the background image on
some sequences, and select the transition between each sequence in templates
named "with transitions". Non-customizable elements include any animation
included in the sequences.
When selecting a theme template to use in the Theme Designer, you can choose to
add one or more theme templates, creating a more original production. You can
even just select some of the sequences in a theme template, or mix and match the
sequences used.
There are three types of sequences: opening, middle, and closing sequences.
Opening and closing sequences usually contain text, while the elements in middle
sequences are much more random.
Adding Theme Templates/Sequences
In the Theme Designer you can use one or more theme templates, or just certain
selected sequences, to create your video.
72
Page 85

Po werDirecto r Plu g-ins
When you first enter the Theme Designer, you are prompted to select a theme
template.
To add a theme template, just select it in the window and all of its sequences will
be added.
73
Page 86

CyberL ink Po werD irector
If you don't want to use all the theme template's sequences, just deselect the ones
you don't want to use.
74
Page 87
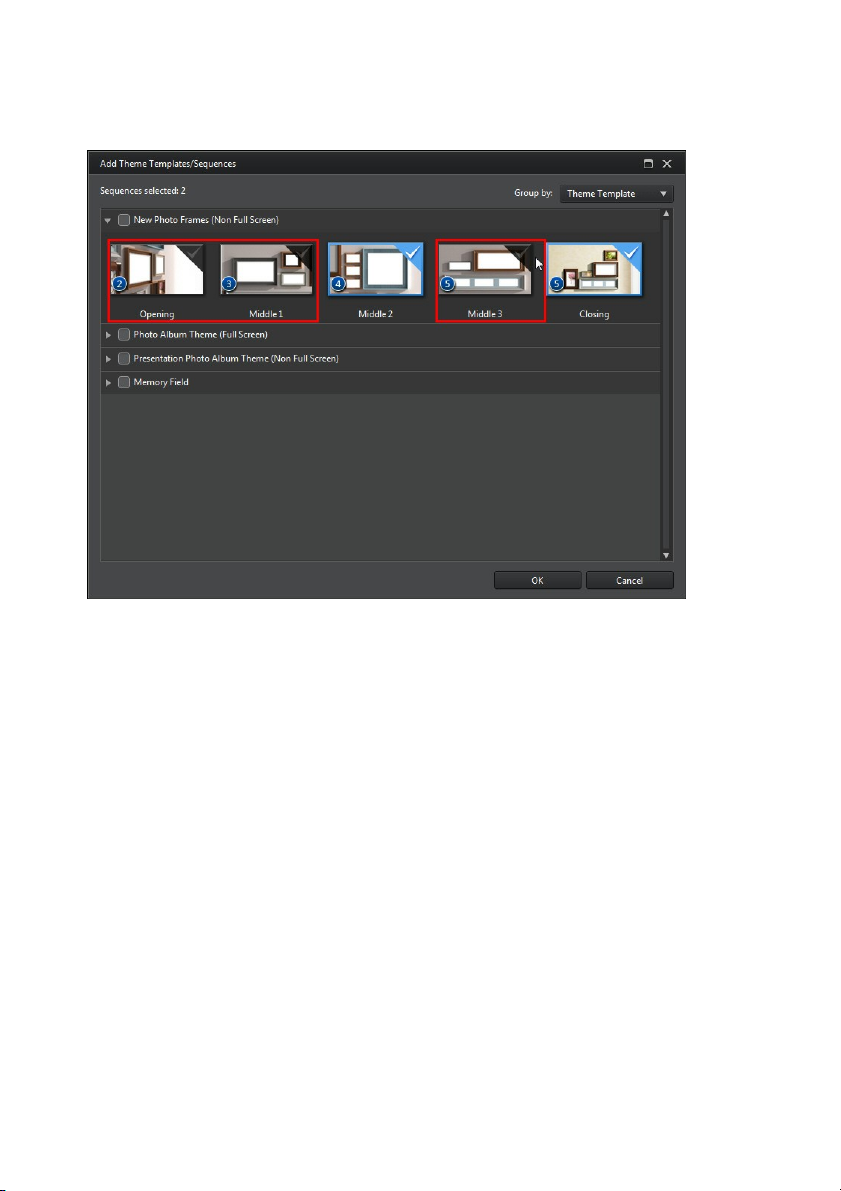
Po werDirecto r Plu g-ins
You can also select sequences from other theme templates and include them in
your video. The Theme Designer will remember the order of your selections.
75
Page 88
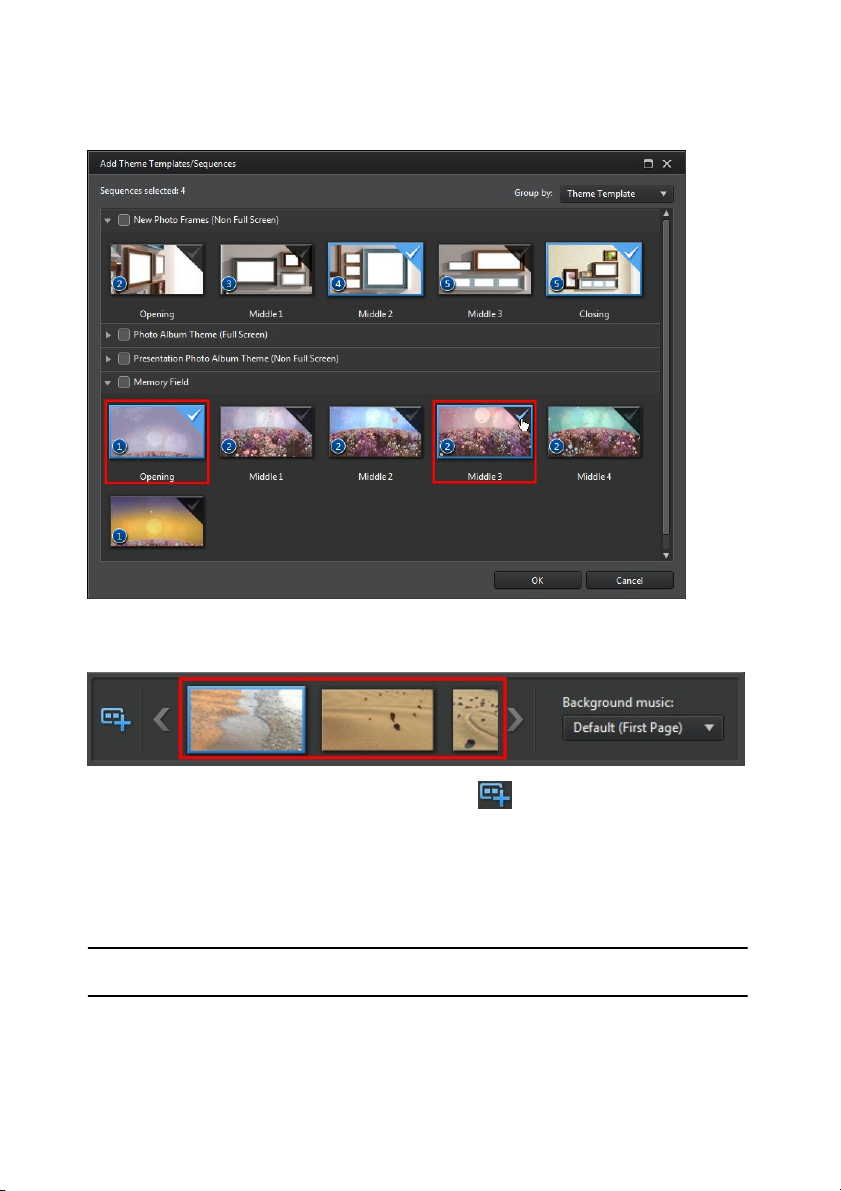
CyberL ink Po werD irector
Note: the number of media files you can add to a sequence is dependent on its
design.
Click OK once you have selected all the sequences. They will be loaded into the
added sequences area of the Theme Designer.
If you'd like to add more sequences, just click the button. You can drag and
drop the sequences to reorder them, or right click to remove the selected one.
Adding Media Clips
Once you have selected the theme templates (and their sequences) that you want
to use, you can start adding your images and video files to them.
To add media into the selected sequences, do this:
76
Page 89

Po werDirecto r Plu g-ins
Note: some of the media slots in sequences allow you to add both images and
videos into them, while others only allow one type of media.
Note: the media that is available on the Media tab are the videos and images you
imported into the Media Room library. Click Import M edia to import media from
your computer's hard drive.
1. In the added sequences area, select the individual sequence you want to add
media to. Note the number of media slots that are available in the sequence
content area. The number of available slots varies from sequence to
sequence.
2. Click on the Media tab and then drag and drop the media that you
want in the sequence to the desired slot.
3. Continue this process until all the media slots have been used.
77
Page 90

CyberL ink Po werD irector
Note: if you want a media file to continue playing from one sequence to the next,
ensure the Continue from last clip in the previous sequence is selected. The
first media slot will be auto populated with the content from the last media slot on
the previous sequence. Deselect this option if you want new media displayed in
the next sequence.
4. Select the next sequence, and then repeat steps 2 and 3 until all the
media slots have been filled.
78
Page 91

Po werDirecto r Plu g-ins
Note: when adding media you can also click the button to auto
fill all the empty media slots in the sequences. Select Auto Fill by Library
Order to fill by the created date, as displayed in the Media Room library. Select
Auto Fill Using Videos First if you want to add the video clips first.
Note: the editing options in the Theme Designer are limited to video trimming,
image duration, and adding effects. If you need to perform more complex editing
on your media clips, it is recommended that you do this before importing the clips
into the Theme Designer. See for Editing Your Media for more advanced editing
options.
5. Continue selecting all the sequences in your video until all of the media slots
and sequences contain media.
Editing Media Clips
There are several editing options available for the media clips you want to use in
the Theme Designer.
Trimming Video Clips
You can perform trims on the video clips used in the Theme Designer. To trim a
video clip, right-click on it in the Theme Designer and then select Trim. Or hover
your mouse over the video clip and click on in its thumbnail. See Performing a
Single Trim for detailed information on trimming video clips.
Muting Video Clips
Some theme templates and sequences contain background music that will be used
in your video. Because of this, you may want to mute the audio in the imported
video clips, so that it doesn't conflict with the background music.
To mute the audio in a video clip, hover your mouse over the video clip and then
click on in its thumbnail.
Modifying Image Duration
To modify the duration that an image clip is displayed in your outputted video, do
this:
79
Page 92

CyberL ink Po werD irector
1. Right-click on it in the Theme Designer and then select Set Duration. Or hover
your mouse over the image clip and then click on in its thumbnail.
2. In the Duration Settings window, enter in the how long you want it to display
in your video production. You can set the duration down to the number of
frames.
3. Click on OK.
Applying Zoom In on Media Clips
Some media slots in sequences allow you to zoom in on the media clip that was
added to it. If a zoom is available, then the icon is displayed in the top right
corner.
To apply a zoom in on the media clip, click on the icon. Click to remove it
if required.
Adding Video Effects to Clips
In the Theme Designer you can add special effects to your images and video clips.
Each special effect has unique attributes that you can customize to help achieve
the impression you want in your video production.
To add a video effect to a clip, do this:
1. Click on the Effects tab.
2. Select an effect and then drag and drop it on the clip.
3. If required, right-click on the clip and then select Modify Effect Settings. Use
the available sliders and options to customize the video effect to your
preference. Click on OK to save your changes.
See Adding Video Effects for more information on video effects.
Editing Background Music
You can customize the music that is used in your video. To edit the background
music, select one of the following options in the Background music drop-down:
80
Page 93

Po werDirecto r Plu g-ins
Note: if you select sequences from more than one theme template, the Theme
Designer uses the background music that is applied to the first sequence in the
video.
Default (First Page): select this option to use the background music that is
included by default in theme templates.
Imported: select this option if you want to import your own custom
background music from your computer's hard drive. Select the music you
want to use and then click OK to set it as the music used.
No Music: select this option if you don't want to have any background music
in your video.
Background Music Preferences
You can trim the music used in your video or add fades. To do this, select
Preferences in the Background music drop-down. Modify the music preferences as
follows:
if required, trim the background music using the player controls and the
mark-in/mark-out indicators.
if required, adjust the volume of the music using the available volume
control.
if required, use the slider to mix the audio level, by deciding whether to have
more background music or the original video's audio in the production.
Click OK to save your changes.
81
Page 94

CyberL ink Po werD irector
Editing Title Text
Some sequences contain title text that you can edit. If a sequence allows you to
edit title text, the text fields in Title settings will become active when the sequence
is selected.
To edit the title text, just enter the text you want to use in the fields provided. If you
don't want any text displayed in the selected sequences, just make sure the text
field blank.
Replacing Background Images
Some sequences let you replace their background image. A thumbnail of the
background image is displayed in the Background area if the sequence has a
replaceable background image.
Click to replace the background with an image from your computer's hard drive.
Click if you want to remove the background image from the sequence.
Adding Transitions Between Sequences
When viewing a video created with the Theme Designer, you will notice that there
are transitions between the sequences in a theme template. These transitions are
editable in theme templates named "with transitions". Transitions can also be
added between sequences if you are using sequences from different theme
templates.
82
Page 95

Po werDirecto r Plu g-ins
Note: in theme templates not named "with transitions", the transitions between
sequences are not editable. These theme templates use your media to make the
transitions between the sequences.
If adding a transition is available for a sequence, the Transition settings area
displays when the sequence is selected.
Click to add a transition before the selected sequence. Click if you want to
remove a selected transition from the sequence. See Using Transitions for more
information on transitions.
Previewing and Saving Movies
As you are creating your video in the Theme Designer, you can preview your
creation using the available preview controls.
Click to preview the entire movie, or to preview just the selected sequence.
Click to change the preview resolution, or to take a photo snapshot of your
movie.
The keyframe indicators on the preview timeline indicate where the media files in
the sequence are in the movie. Hover your mouse over a keyframe to view the clip
information.
Once you are done previewing your movie and you are satisfied with the results,
click on OK to close the Theme Designer, and import the created movie into the
timeline.
83
Page 96

CyberL ink Po werD irector
Editing Created Movies
Once you have created your content in the Theme Designer and imported it into
the timeline, you can edit it like any other video clip on the timeline. If you want to
edit or replace the media used in the created movie you can do this in the Theme
Designer.
To edit created content in the Theme Designer, do this:
1. Click on the created content in the timeline and then the Theme Designer
function button.
2. As required, edit the video in the Theme Designer.
3. When you are satisfied, click OK to save your changes and import the
updated created content into the timeline.
84
Page 97

Arran ging Media in Yo ur Pro duction
Note: the timeline view of the CyberLink PowerDirector workspace offers more
editing freedom and ease of movement in your production. Be sure to consult the
Timeline View and Timeline Behavior sections to get the most out of this view.
Note: * optional feature in CyberLink PowerDirector. Check the version table on
our web site for detailed versioning information.
Chapter 7:
Arranging Media in Your
Production
Once you have your media in the media library, you can begin putting your video
production together by adding media clips to the editing workspace. You add the
media clips in the order that tells the story you want to tell.
There are several program features you can utilize to assist with the arrangement of
media in your video production, including:
Magic Movie Wizard: auto creates a movie for you, using the media clips and
effects in your library. See Using the Magic Movie Wizard for more
information.
Slideshow Creator: auto creates a slideshow with your photos, in a few simple
steps. See Using the Slideshow Creator for more information.
Timeline markers*: add to the timeline ruler for more precise media clip
placement on the timeline. See Timeline Markers for more information.
Music Beat Detection*: use this feature to add music beat markers on the
music beat track, which you can use to arrange media clips to the music. See
Music Beat Detection for more information.
Adding Video Clips and Images to the Timeline
To start creating your video production, begin adding video clips and images to the
video tracks in the timeline.
If you are not sure which tracks you can add your media to, just select a clip in the
media library. The tracks in the timeline you can add the media to will "light up".
85
Page 98

CyberL ink Po werD irector
Note: you may prefer to add video clips and images using the storyboard view,
since this view is simpler than the timeline view. However, you can only add clips
to the first track in this view. Therefore, this section uses the timeline view in all of
the procedures.
Note: if you want to add media to a precise position on the timeline, consider
using timeline markers. See Adding Timeline Markers for more information.
Note: you can add additional tracks to your project's timeline in the Track
Manager, allowing you to have up to 99 PiP objects displayed on a video at the
same time. See Track Manager for more information.
Note: when you add video clips to the timeline, CyberLink PowerDirector
automatically adds its audio track (if available) to the linked audio track.
For more information on what media you can add to which track, see Timeline
Tracks.
You can add video clips and images at any position on any video track in the
timeline. You no longer need to place your media on the top track or at the
beginning of the timeline. You now have total freedom to add the media exactly
where you want, and in the order you want it. Just start placing the media on a
timeline track, in a sequence that tells your story.
If you insert or drop media onto other existing media clips that are on the timeline,
don't worry. CyberLink PowerDirector will prompt you to use its ripple editing
feature to overwrite, split, trim, transition, or speed up media to help you easily
place the media where you want it.
Once you add a video clip or image to any timeline track, click the Modify button
above the timeline to edit its properties in the PiP Designer. See Modifying Media in
the PiP Designer for more information.
Adding Video Clips and Images
You can add video clips and images onto any video track in the timeline, and at
any position.
To insert video clips or images into the workspace, do one of the following:
use the timeline slider to set the position where you want the media, select
the media in the library, and then click to add it to the
selected video track.
use the timeline slider to set the position where you want the media, right-
86
Page 99

Arran ging Media in Yo ur Pro duction
Note: the Crossfade option does not overwrite the content on the track, instead
adding an overlap transition between the two clips. See Setting Transition
Behavior for more information. The Crossfade option is only available if the end
of the new clip is not over any existing content on the track.
Note: this feature is also available when inserting image clips into a timeline gap
that have durations longer than the gap.
click on the media in the library, and then select Insert on Selected Track to
add it to the selected video track.
You can also manually drag and drop a media clip to a desired position on a video
track to add it to the timeline.
When adding a clip to the timeline (inserting or dragging and dropping), if the
timeline slider is over an existing clip, or you drop it on an existing clip, you are
prompted to use one of the ripple editing options to insert the clip:
Overwrite: select to overwrite the existing clip with the newly added clip.
Insert Here and Move Clips on this Track to the Right: select to split the clip
and insert the new clip between the two portions. CyberLink PowerDirector
also only moves the clips on the same track to the right.
Insert Here and Move All Clips on the Timeline to the Right: select to split the
clip and insert the new clip between the two portions. CyberLink
PowerDirector also moves all of the media clips on the timeline that lie to the
right of the inserted clip, right.
Crossfade: select to lay the clip over a portion of the existing clip and auto
add transitions between the two clips. CyberLink PowerDirector uses the fade
transition on the video track, and the constant gain audio transition if both
clips have audio on the corresponding audio track.
When inserting a video file, if the timeline slider is in a gap between two clips on a
timeline track, you are prompted to use one of these ripple editing options to insert
the clip:
Trim the Inserted Clip to Fit the Gap: select to have CyberLink PowerDirector
auto trim off the end of the video clip to fit the gap to the right of the
timeline slider.
Speed up the Inserted Clip to Fit the Gap: select to have CyberLink
PowerDirector auto speed up the video clip so that it fits the gap to the right
of the timeline slider.
87
Page 100

CyberL ink Po werD irector
Note: you can create your own custom color boards in the Media Room. See
Creating New Color Boards for more information.
Adding Color Boards and Backgrounds
The use of color boards allows you to insert solid frames of color into your video.
Color boards are really useful as quick transitions between video clips or as
background for titles and ending credits. Backgrounds provide interesting and
creative environments for PiP objects, titles, and more.
You can find color boards and backgrounds in your media library, by clicking to
open the explorer view, or selecting Color Boards or Backgrounds from the Media
Content drop-down.
To insert color boards or backgrounds into the workspace, do one of the following:
use the timeline slider to set the position where you want the color boards or
backgrounds, select it in the library, and then click to add it
to the selected video track.
use the timeline slider to set the position where you want the color boards or
backgrounds, right-click on it in the library, and then select Insert on Selected
Track to add it to the selected video track.
You can also manually drag and drop a color board or background to a desired
position on a video track to add it to the timeline.
When adding a color board or background to the timeline (inserting or dragging
and dropping), if the timeline slider is over an existing clip, or you drop it on an
existing clip, you are prompted to use one of the ripple editing options to insert the
clip:
Overwrite: select to overwrite the existing clip with the color board/
background.
88
 Loading...