

Page 1

M T
TM
M
M
e
dii
e
d
User's
@
@
S
S
h
h
o
o
w
w
Guide
Page 2

TM
CyberLink Medi@Show
All rights reserved. No part of this publication may be reproduced, stored
in a retrieval system, or transmitted in any form or by any means
electronic, mechanical, photocopying, recording, or otherwise without the
prior written permission of CyberLink Corporation.
Neither CyberLink Corporation nor its affiliates shall be liable to the
purchaser of this product or third parties for damages, losses, costs, or
expenses incurred by the purchaser or third parties as a result of: accident,
misuse, or abuse of this product or unauthorized modifications, repairs, or
alterations to this product.
CyberLink Corporation shall not be liable for any damages or problems
arising from the use of any options or any consumable products other than
those designated as original Medi@Show products or Medi@Show
approved products.
Medi@Show is a registered trademark along with other company and
product names mentioned in this publication and are used for
identification purposes and remain the exclusive property of their
respective owners.
International Headquarters:
CyberLink Corporation, 15F, No.100, Min-Chiuan Road, Hsin-Tian City,
Taipei Hsien, Taiwan, R.O.C.
Support: http://www.gocyberlink.com/
Telephone #: 886-2-8667-1298
Fax #: 886-2-8667-1300
Copyright © 1999-2003 CyberLink Corporation, Taipei, Taiwan, ROC.
MSW-MN-E-02/1118
Page 3

Medi@Show User's
Guide
Contents
1 WELCOME TO MEDI@SHOW................................................................... 1-1
C
ONTENTS OF THE PACKAGE
M
AIN FEATURES
S
UPPORTED MULTIMEDIA FILE FORMATS
2 INSTALLATION INFORMATION ............................................................2-1
SYSTEM
I
NSTALLING STEPS
3 MEDI@SHOW CONTROLS ........................................................................3-1
COMPILE
E
4 GETTING STARTED .................................................................................... 4-1
BASIC
C
C
R
Control Panel ...........................................................................................3-1
Audio Wave Recorder.......................................................................................3-3
AVI Video Recorder .......................................................................................... 3-4
Compilation Area....................................................................................3-5
Sorter & Viewer ....................................................................................... 3-6
DIT MODE CONTROLS
P
REPARATION
Audio Wave Recorder ............................................................................4-1
AVI Video Recorder................................................................................4-2
System Settings........................................................................................4-4
Play Settings.............................................................................................4-5
OMPILING WITH THE WIZARD
OMPILING WITH THE CLASSICAL STYLE
Importing Files......................................................................................... 4-8
Other Compiling Area Functions.......................................................... 4-9
.............................................................................................1-2
EQUIREMENTS
..........................................................................................2-1
M
ODE CONTROLS
......................................................................................4-1
.........................................................................1-1
.....................................................1-2
.................................................................................2-1
..........................................................................3-1
..................................................................................3-7
.....................................................................4-6
......................................................4-8
i
Page 4

S
ORTING
E
DITING
INAL OUTPUT
F
5 INTERNET EXTRAS..................................................................................... 5-1
UBLISHING ON THE INTERNET
P
6 TUTORIAL..................................................................................................... 6-1
....................................................................................................... 4-11
........................................................................................................ 4-14
Transition Effects...................................................................................4-14
Text Effects ............................................................................................. 4-15
Audio Effects.......................................................................................... 4-17
Masking Effects...................................................................................... 4-18
............................................................................................. 4-20
Image, Audio, Video Hubs ....................................................................5-1
Image, Audio, and Video Editing Utilities ..........................................5-2
Share Your Slide Shows.......................................................................... 5-2
.....................................................................5-3
Internet Export Glossary ........................................................................5-3
Internet Streaming Format ...............................................................................5-3
DHTML................................................................................................................ 5-4
HTML................................................................................................................... 5-6
Web Streaming Publication....................................................................5-6
Working with HTML Directly .........................................................................5-6
Working With Web Page Editing Software (Dreamweaver 2.0)................ 5-7
Web Server Configuration ...................................................................5-11
Step 1 - Using the Wizard....................................................................... 6-1
Step 2 - Naming Your Film File.............................................................6-1
Step 3 - Importing.................................................................................... 6-2
Step 4 - Play Settings...............................................................................6-2
Step 5 - Background Music.....................................................................6-2
Step 6 - Exporting for Internet Publication .......................................... 6-3
Step 7 - Wizard Completion................................................................... 6-3
Step 8 - Sorting Thumbnails................................................................... 6-3
Step 9 - Accessing the Edit Mode..........................................................6-4
Step 10 - Adding Transition Effects ...................................................... 6-4
Step 11 - Adding Text Effects................................................................. 6-4
Step 12 - Adding Audio Effects.............................................................6-5
Step 13 - Adding Text, Transition, & Audio Effects ........................... 6-5
Step 14 - The Conclusion ........................................................................ 6-6
Step 15 - Watching Your Slide Show .................................................... 6-6
Step 16 - Saving to Update Changes.....................................................6-7
Step 17 - Internet Publication................................................................. 6-7
ii
Page 5

7 TECHNICAL SUPPORT .............................................................................. 7-1
Web Support ............................................................................................7-1
E-Mail/Fax Support................................................................................7-1
Telephone Support..................................................................................7-1
iii
Page 6

Page 7

Welcome to Medi@Show
1 Welcome to
Medi@Show
Publishing and creating isn't what it used to be. Welcoming you to a new
era in showmanship, Medi@Show, the software that creates and publishes
multimedia presentations virtually anywhere, does it all with a flamboyant
yet unassuming flair.
A multi-purpose, multi-tasking, and multi-producing application,
Medi@Show incorporates compiling, arranging, and producing files in a
simple and straightforward software package.
Import a vast array of files from business charts and photo images to audio
and video clips via TWAIN acquire, from your own personal folders or
directly off the Internet! And after compiling and assembling, arrange and
edit sequences with numerous text effects, fantastic transition effects, cool
audio clips, and smashing masking effects to complete your masterpiece.
By integrating such astounding features, the newly lionized Medi@Show
is truly the Messiah of Multimedia.
Contents of the Package
Your CyberLink Medi@Show package contains the following items:
Medi@Show CD-ROM •
Medi@Show software
Photo images, Video Clips, Audio Clips
Tutorial
•
Medi@Show User's Guide
•
Medi@Show CD key (located on the CD case)
•
Customer Registration Card (in selected areas)
1-1
Page 8

Medi@Show User's Guide
If you are missing any of these items, please contact your dealer, or
CyberLink Corp.’s Customer Service Department at 886-2-8667-1298, or
go to Customer support website at: http://www.gocyberlink.com
.
Main Features
Integrates all types of multimedia files into one presentation
Acquires images directly from TWAIN compliant devices such as
scanners or digital camcorders
Over 100 dazzling 2D & 3D transition and text effects, smashing
masking effects, and cool audio clips
Present your masterpiece through:
executable files
screen savers
HTML & DHTML files for Internet publication
Internet Streaming slide shows
executable files for stand-alone playback
FLZthe exclusive data format for Medi@Show software
i-Power function features an embedded browser and all the right links
to unlimited video, audio and image resources
Drag and drop files directly from your Internet browser
Two simultaneous audio soundtracks
Imports PowerPoint presentation files directly allowing for original
playback or as an image format for re-editing
Supported Multimedia File Formats
Video: AVI, MPG, DAT (MPEG-1), MOV
Audio: WAV, MIDI, audio CDs, MP3
Image: JPG, CMP, TIF, BMP, ICO, CUR, PCO, DCX, PCD, DIC,
WMF, PSD, PNG, TGA, EPS, RAS, WPG, PCT, CMP
1-2
Page 9

Installation Information
2 Installation
Information
System Requirements
Please make sure your system meets the following minimal requirements
before installation:
Windows 98 or 95 operating system •
•
Pentium processor (minimum Pentium 233 with MMX technology)
•
32 MB RAM
•
15 MB free hard drive space
Installing Steps
Please follow the steps below for installing Medi@Show:
Please insert the CD into your CD-ROM and wait for auto-run. If
1.
auto-run is not activated, follow this path for manual set up:
D:\Program\Medi@Show\setup.exe.
Note: If your CD-ROM is located on another drive other than D Drive, please
select accordingly.
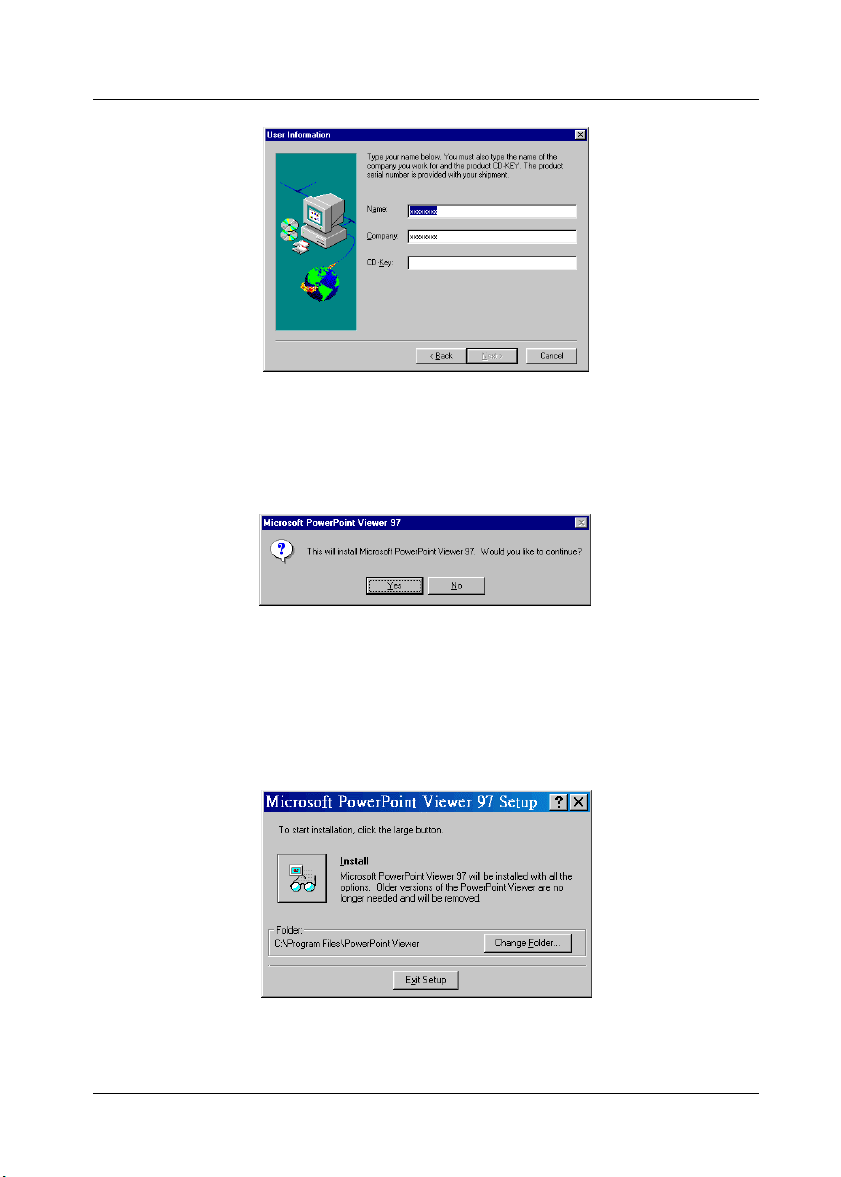
After you accept the items in the License Agreement, the screen will
2.
prompt you for your name, company and the CD-Key.
2-1
Page 10
Medi@Show User's Guide
Install Medi@Show to a specific folder or to the default folder.
3.
After installing the necessary requirements, a message will prompt
4.
you to install PowerPoint Viewer. If already installed, ignore this step
by clicking “No.”
Note: If you wish to import PowerPoint files without installing PowerPoint in
your system, special animation effects will not be retained for such files
and will appear as an image format available for re-editing.
Choose the default or another preferred folder for PowerPoint Viewer
5.
installation and then press the Install icon.
2-2
Page 11

Installation Information
Installation has been completed. Run Medi@Show by clicking on the
6.
Medi@Show application in the folder "Start/Programs/CyberLink
Medi@Show/Medi@Show", or through the desktop by clicking the
Medi@Show icon.
2-3
Page 12

Page 13
Medi@Show Controls
3 Medi@Show Controls
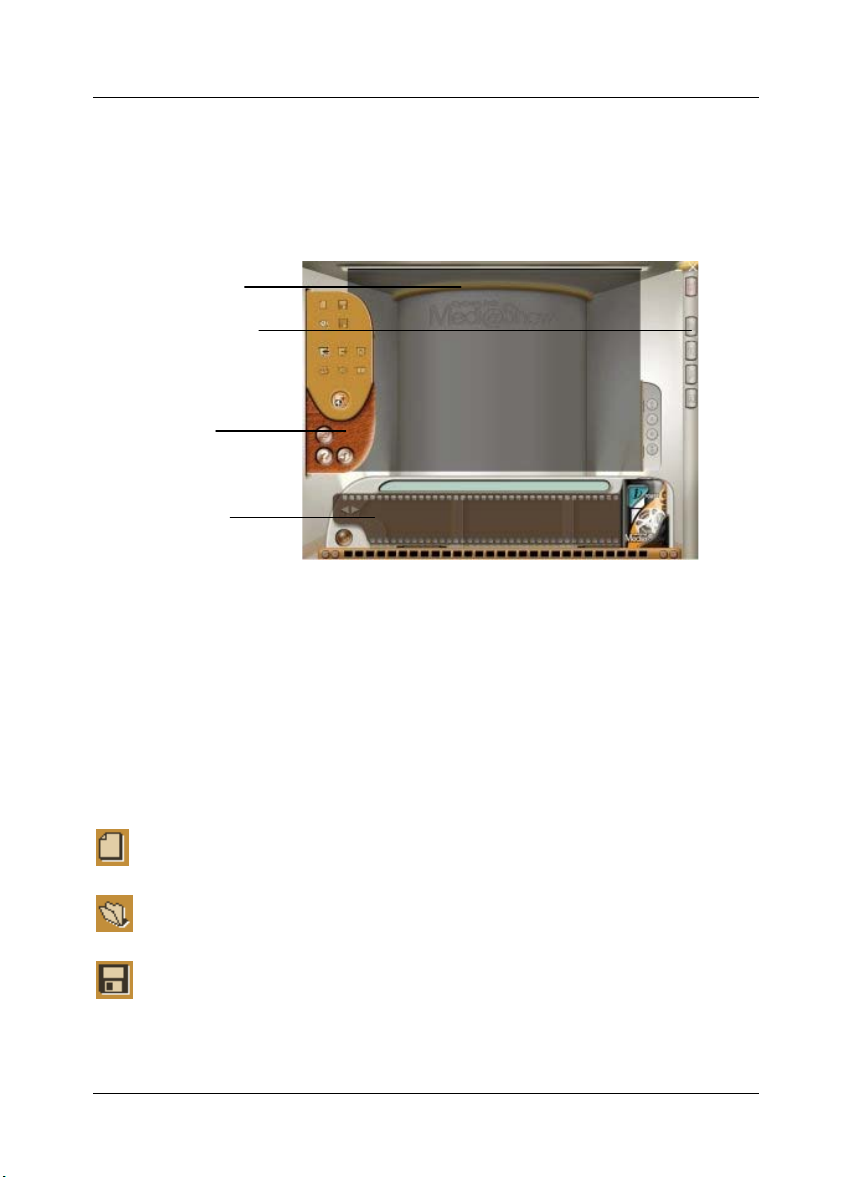
Primarily, controls are divided into two modesCompile and Edit.
Compilation Area
Edit Mode Controls
Control Panel
Sorter & Viewer
Compile Mode Controls
After starting your Medi@Show application, the default window is the
Compile Mode.
Control Panel
To access the Control Panel, simply move your mouse to the left side of
the screen. Otherwise, the Control Panel will be automatically hidden.
New film file
Opens previous film projects
Saves to disk
3-1
Page 14
Medi@Show User's Guide
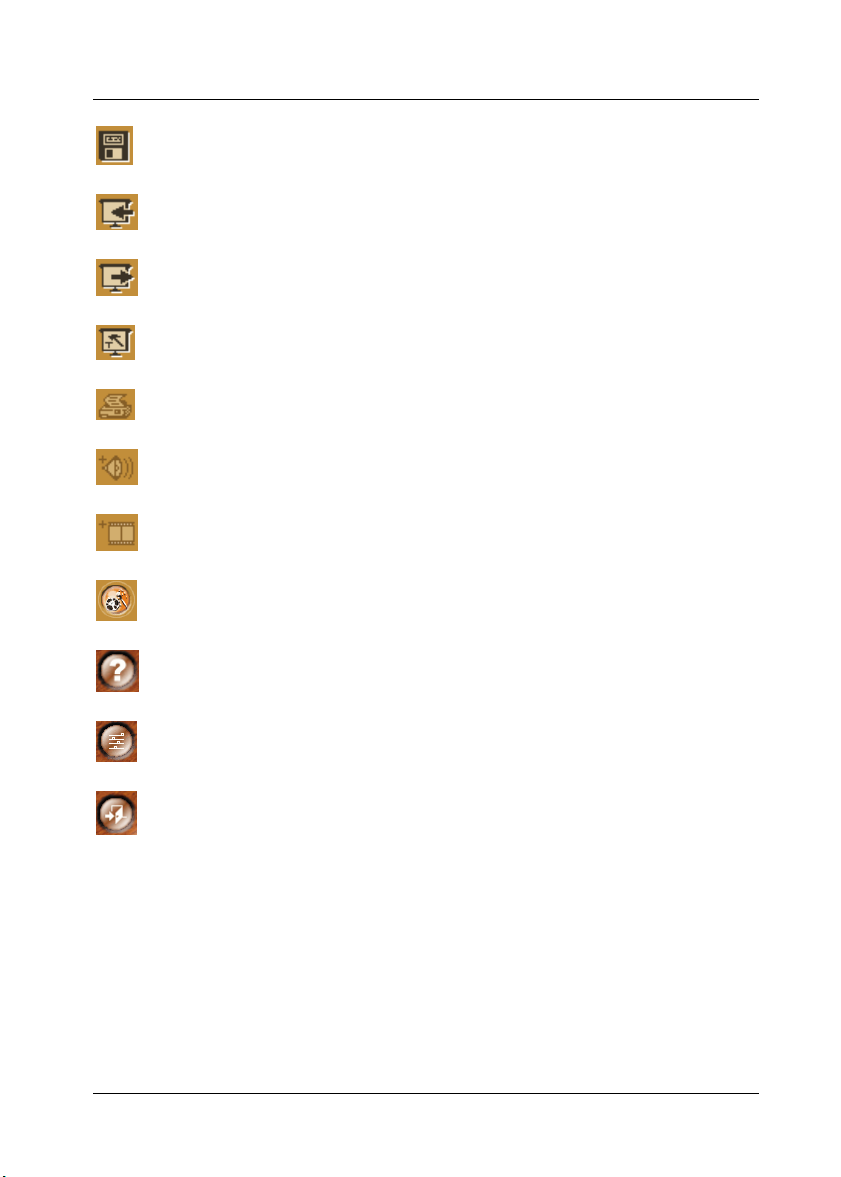
Saves as a new film or under a different name
Imports all types of media files
Exports your file into different formats. Refer to Ch. 4
Configures Play Settings
Prints selected images from Compilation Area
Records audio files using the .WAV format
Records video files using the .AVI format
Launches the Wizard in the Compile Mode
Accesses Help file
Adjust your System Settings
Exits application
3-2
Page 15
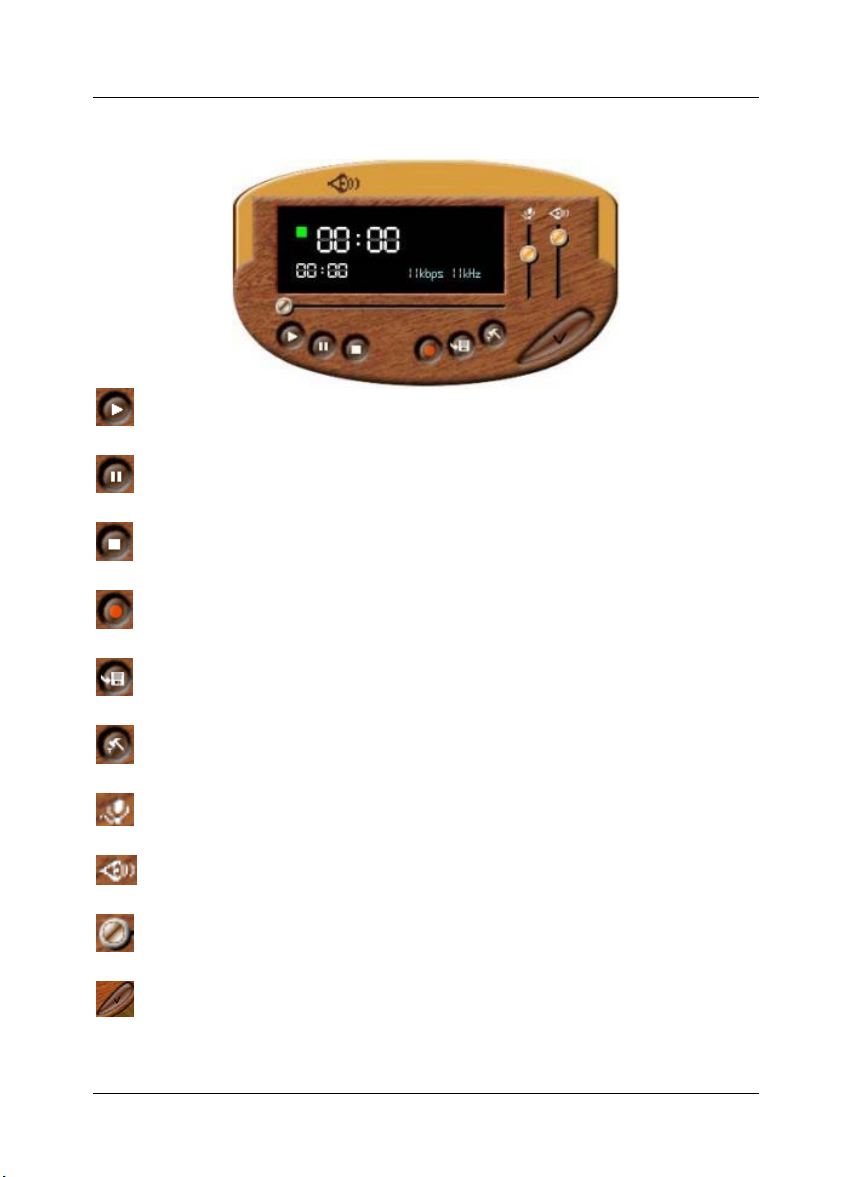
Audio Wave Recorder
Plays audio files
Pause mode
Stop mode
Records narration or audio content from CD-ROM
Medi@Show Controls
Saves audio file
Access setup for configuration
Microphone volume sets recording levels
Volume controls
Slider displaying time elapsed
Close Audio Wave Recorder
3-3
Page 16
Medi@Show User's Guide
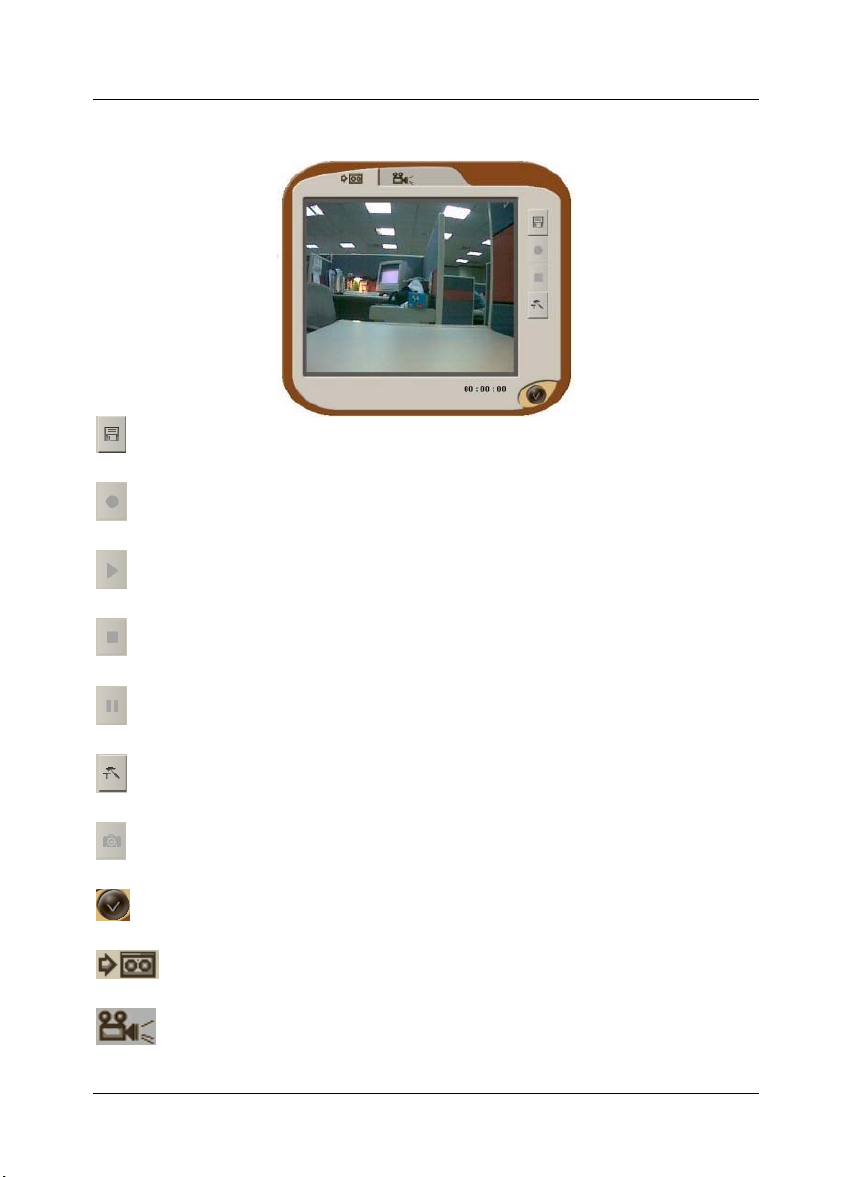
AVI Video Recorder
Saves as .AVI file
Records video content
Plays video content
Stop mode
Pause mode
Capture Device Settings
Capture screen
Exits AVI Video Recorder
Record mode
Play mode
3-4
Page 17
Medi@Show Controls
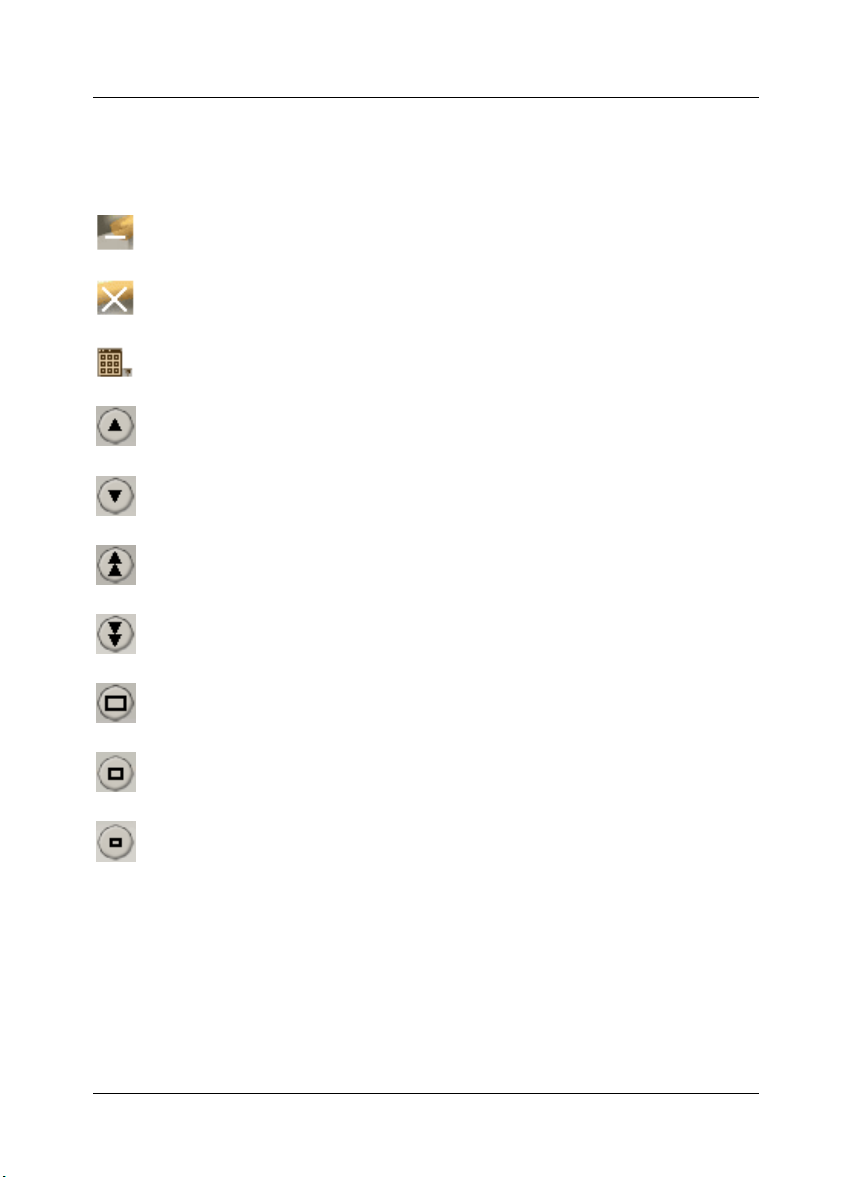
Compilation Area
This is the viewing area for all imported media files (as thumbnails).
Minimizes Medi@Show
Exits Medi@Show
Arranges media files
Scrolls up
Scrolls down
Page up
Page down
Displays large thumbnails size
Displays medium thumbnails size
Displays small thumbnails size
3-5
Page 18
Medi@Show User's Guide
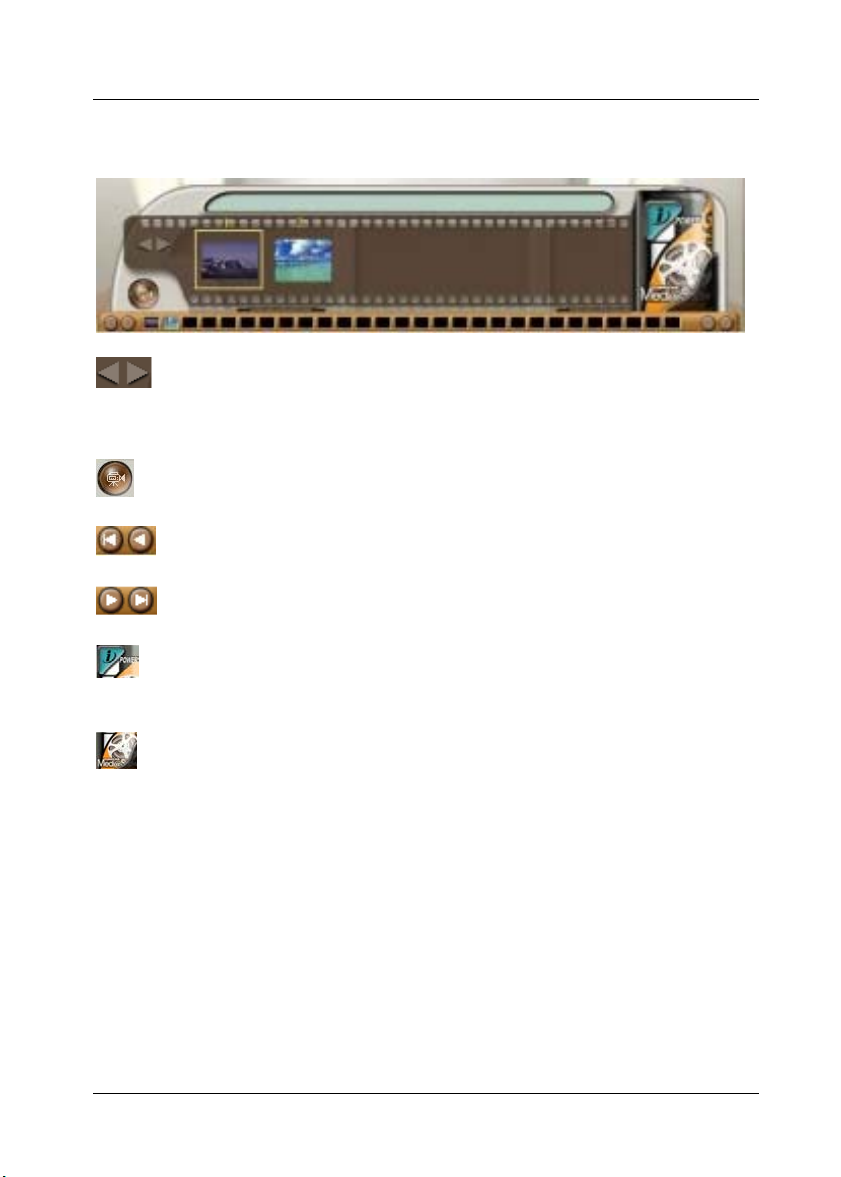
Sorter & Viewer
Scrolls slides left and right individually
Note: Keyboard arrows perform the same function
Plays film file
Scrolls Home and left respectively
Scrolls right and to the End respectively
i-Power instantly launches you into Cyberspace and back to
Medi@Show (refer to Ch. 5 for more information)
About CyberLink's Medi@Show software
Note the light green area located on top of the slides. This is the Details'
section that displays information on specific controls and functions
automatically when pointed to.
3-6
Page 19
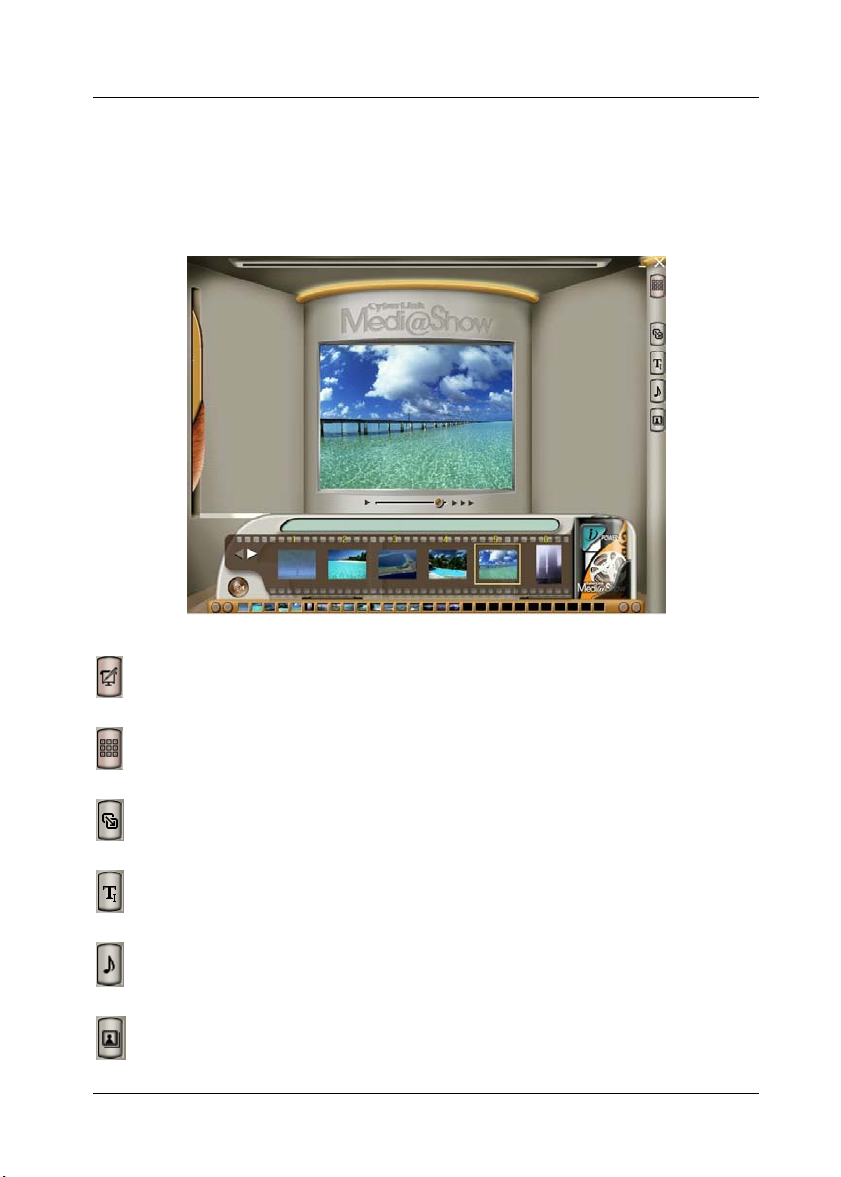
Edit Mode Controls
Controls are mostly located on the right tool bar.
Medi@Show Controls
Switches to Edit Mode
Switches to Compile Mode
Transition effects panel
Text effects panel
Audio effects panel
Masking effects panel
Edit Window
3-7
Page 20

Medi@Show User's Guide
Sets time settings for slides. Drag left to increase or right to
decrease
Refer to Ch. 4 for more details on individual panels.
3-8
Page 21

Getting Started
4 Getting Started
There are three basic steps in creating your masterpiece: Compiling
(includes importing new files), Sorting, and Editing. When you first open
Medi@Show, the Wizard will automatically start up. But first, there is
some Basic Preparation you may want to consider.
Basic Preparation
Use the i-Power function (refer to Ch. 5 for more details) to access a world
teeming of software or an endless amount of multimedia clips to begin
building your database. While collecting, modifying, and editing your
multimedia files, you may also want to use Medi@Show's built-in
recorders that provide you with more added convenience.
Audio Wave Recorder
For microphone or audio CD recording, the Audio Wave Recorder adds
another dimension to your film file.
If you would like to record microphone narration:
1. Activate the recorder in the Control Panel.
2. Be sure your microphone is hooked up correctly, adjust the
microphone recording volume, and then press the Record button.
If you would like to Enable Audio CD Recording:
1. Press the Setup button:
4-1
Page 22

Medi@Show User's Guide
2. Check the box and choose a track. Press OK when finished.
3. For formatting the recording quality, press Format.
4. Choose a Name, Format and select one of the Attributes (the higher
the Hz, the better quality but more memory consumed). Generally,
these are the minimum settings for the following qualities:
CD quality - 128 KB/s
Stereo quality - 64 KB/s
Radio quality - 22 KB/s
5. Adjust the recording levels via the microphone volume and then press
Record.
Be sure to press the Save As after recording and then open the new file
while in the Audio Effects panel to employ. Refer to Ch. 3 for more
details on individual controls.
AVI Video Recorder
Record video content through your own capture devices such as a PCI
video capture card or USB video capture box.
4-2
Page 23

Getting Started
When you first click on the AVI Video Recorder a live display should
automatically begin operating provided that your capture device and its
driver has been set up properly.
Click on the Capture Devices Settings button if you wish to adjust video
and audio settings for your recorder.
Choose a suitable frame rate. The faster the frame rate, the more motion
captured in the video content. The Driver and Compressor Settings are
as follows:
Driver Settings will all depend on the specific driver. Functions that may
be modified are brightness, color, RGB and etc. The Compressor Setting
is for saving the file and let's you choose from the available video codecs
(i.e. compression/decompression technology) supported by your computer.
The more the compression, the less disk space the file will use.
4-3
Page 24

Medi@Show User's Guide
To begin recording:
1. Press Save As to name your file before recording (saves vast amount
of time as compared to saving after recording).
2. Adjust the camera as you please.
3. Press record.
4. You may also capture screens by simply pressing the Capture button
and then selecting which folder to save it under.
System Settings
• Canvas Size: modify your default settings for your special effects or
the canvas size (computer's screen resolution). If you find that
playback is not smooth, choosing a smaller canvas size may improve
the graphic display.
• Text Effects & Transition Effects: changing the default setting will
alter default settings of previous slides that do not contain text.
However, for transition effects, previous slides' won't be affected by
later default adjustments since the transition effects are already in
place and being applied.
4-4
Page 25

Getting Started
Play Settings
Set play settings for your film/slide and select your background music
here. If you prefer continuous play, choose Loop. When the file reaches
the end during playback, it will automatically Loop to the beginning and
resume playback without pausing.
For Manual playback, the slides will advance by a click of the mouse
while Auto playback will play continuously with the time setting for
individual slides available for adjusting in the Edit Mode.
Background Music supports four types of audio formats:
• MIDI
• WAV
• MP3
• Audio CDs
Independent of the foreground narration or audio effects assigned to each
slide, the Background Music will continuously play the selected audio file
throughout the entire slide show and is only available for modification
here.
4-5
Page 26

Medi@Show User's Guide
There are
• Compiling with the Wizard
Compiling with the Wizard, best for users new to Medi@Show, will
automatically run during startup but may be disabled.
• Compiling with the Classical Style
Compiling with the Classic Style, for users already familiar with
Medi@Show or similar software, is basically the manual method where
users import, export, and set their own settings and effects without the
assistance of a Wizard.
2 Ways
to go about creating a project:
Compiling with the Wizard
Step 1: Film Wizard
Choose the first selection so as
to let the Wizard guide you
through the steps of creating a
new file or project. If you
select Open an existing
FILM file, the Wizard will
close after you select your file.
Step 2: Film Statistics
Choose a name and the
location (path) for your file by
pressing Browse. If you wish
to set a new path or rename
your project, press Browse
again.
4-6
Page 27

Getting Started
Step 3: Import Clips
Serves the same function as
Import (refer to the next
section). You will not be able
to advance unless you choose
Import now!
Step 4: Play Settings
Refer to the previous section in
the Play Settings for more
details.
Step 5: Background Music
Refer to the previous section in
the Play Settings for more
details.
Step 6: Wizard Completed
All done!
4-7
Page 28

Medi@Show User's Guide
Compiling with the Classical Style
Importing Files
1. Go to the Control Panel and select Import Media.
Import Media lets you browse and search in folders for specific media
files. Use the <shift> and <control> functions to select multiple files
within a folder.
Import Directory selects a folder. Choose one and click OK.
4-8
Page 29

Getting Started
TWAIN acquire will import content directly from TWAIN compliant
devices such as digital cameras and scanners. You will be able to choose
this selection in the Wizard if the aforementioned hardware is set up
properly beforehand.
2. All imported files will be displayed in the Compilation Area after
importing. File types are distinguished by the coloring of their outline
border:
BlueImage file
PinkVideo file
GreenPowerPoint file
To add/import files, repeat the above functions.
Other Compiling Area Functions
For deleting, select a file and press delete or right click for the following
menu:
This shortcut menu allows you to Select/Deselect All for quick removal,
transferring, printing, and adding to your film file through the Sorter.
While in the Compiling Mode, you may also double-click on any
thumbnail to get a close-up. For video thumbnails (highlighted in pink),
4-9
Page 30

Medi@Show User's Guide
double-click for a close-up and then right click on the mouse to call up the
following menu:
This allows you to preview your video file. Press Pause and then Capture
for capturing specific scenes in your video file. Back returns you to the
Compile Mode.
4-10
Page 31

Getting Started
Sorting
After completing the compiling stage, the next stage is sequencing your
film file.
1. After importing files into the Compilation Area, begin creating your
film file by clicking, dragging and dropping the thumbnails into the
Sorter (thumbnails will be highlighted in red).
Note: While in the Sorter, click on any file to switch instantly to the Edit mode.
2. For transferring files in groups, highlight thumbnails in the Compile
Area by clicking, dragging (enlarging area), and releasing. Notice that
all of the thumbnails in the outlined area will be highlighted in red.
Note: You may also right click (as mentioned in the previous section) for
deleting, selecting and adding to film.
3. Click any one of the highlighted thumbnails and drag into the Sorter
as shown below.
4-11
Page 32

Medi@Show User's Guide
4. To alter the order in the Sorter, click on a thumbnail (it will be
highlighted in yellow) and drag to the desired position. The highlight
will move in correspondence as you drag the original file to a new
position.
Note: Slides will always be placed directly in front of the highlighted slide
regardless when dragging from the right or left.
5. Finally, drop onto the allocated position.
6. For removing thumbnails out of the Sorter, select one and drag it
towards the outside perimeters. When the yellow border is no longer
visible, release as shown:
4-12
Page 33

Getting Started
The Viewer (located at the bottom of the Sorter) provides easy
accessibility when working with a sizeable film file by displaying a
greater number of slides albeit smaller in size. Simply click on any of the
files in the Viewer for quick retrieval.
4-13
Page 34

Medi@Show User's Guide
Editing
In the Editing mode, there are four major effects for modifying and
embellishing your film file: Transition, Text, Audio, and Masking
Effects. The audio, masking and text effects are unavailable for video files.
Switch to the Edit mode either through the right tool bar or by doubleclicking on the selected file in the Sorter. All the effects' panels are only
accessible through the Edit mode and located on the right tool bar.
Drag the slider located under the Edit Window to adjust the time setting
for each slide.
Transition Effects
Click here to insert special effects between your slides/files.
1. Choose an effect.
2. After clicking on each effect or dragging the slider above the window
to alter the speed of the effects, the preview window below will
automatically display the effect on your slide.
3. Reset effects by pressing
4-14
or click OK or Cancel to exit.
Page 35

Text Effects
Click here for dazzling text effects.
Getting Started
1. First, set your Font Settings
text in the text area.
The text will automatically appear in the center of the screen as you type:
(shown below) and then type the
4-15
Page 36

Medi@Show User's Guide
2. To move the text box, simply point and drag the text box (text
surrounded by a dotted border) after you finish inserting text.
3. Choose a text effect if desired and it will be previewed instantly (refer
to below).
4. Reset effects by pressing
If you wish to modify previously completed text:
1. Click on the specific text box while in the Text mode.
2. Access the Font Settings dialog box in the Text panel while the text
you wish to modify is displayed in the text area.
3. To delete a block of text, click on the specific text box and press
delete.
4. To change the text effect, click on the specific text box and then
choose another effect.
Please note that some of the effects may have an uncanny resemblance.
Rest assure that the effects do differ depending on a host of factors
including the number of lines inserted and the alignment of the text.
or click OK or Cancel to exit.
4-16
Page 37

Getting Started
Audio Effects
Medi@Show provides background music for the entire slide show
(located in Play Settings) and foreground audio effects for all files except
video format files.
Note: Foreground audio effects (for individual slides) will not support MP3
format files.
For adding audio files and effects to existing image files:
1. Click Audio Effects for a number of audio selections.
2. Click the drag-down menu and select one of the following options:
Continue retains the previous slide's audio effect
No Sound has an absence of audio effects except for background music
From List uses the software's built-in .WAV files
Customize a specific slide with your own personal audio file. Then, press
to browse and open an audio file.
4-17
Page 38

Medi@Show User's Guide
3. Reset effects by pressing
or click OK or Cancel to exit.
Masking Effects
Masking adds even more diverse effects to your clips by targeting specific
areas in images for dramatic modifications and improvisations. You may
first Browse
scratch.
1. Activate the Masking Effects' panel and then click on your image to
move your target so as to specify the area for masking (four-arrow
cursor will be displayed).
2. To shrink or enlarge the target, simply move your cursor to any corner
and drag anyway you prefer when the four-arrow cursor changes into
two-arrows. Below the screen, coordinates display where the target
area is located and the size of your target area (shown below).
for files that support the masking effect or start from
3. Or, you may use the Zooming
designated %) to adjust or reset your target area.
4-18
and viewing options (to a
Page 39

Getting Started
4. Choose one of the effects on the right hand side and press the Preview
button. You may also choose different effects while in the Preview
mode for an instant preview. Note that the text will not appear here
but nevertheless always appear on top of the masking effect.
5. You may also Clear the Masking Effects
to begin anew.
6. Reset effects by pressing
or click OK or Cancel to exit.
4-19
Page 40

Medi@Show User's Guide
Final Output
Select any clip from your Sorter and press Play. If none is selected, it will
automatically play from the last clip that was selected.
Upon completion, Export your file via controls in the Control Panel. The
drag-down menu gives you four options to choose from:
Collect Data simply saves your film (script) file and all other multimedia
clips in one directory. The .FLM file, individually (e.g. in another
directory), will be unable to recall any files.
Distributable saves as a Medi@Show proprietary data file (.FLZ) or
executable (.EXE) format, where you may play and view files without any
required software or browser applications. The bottom selection, Include
4-20
Page 41

Getting Started
the Medi@Show Player and make executable, will be automatically
checked.
Screen Saver allows you to save your film file in screen saver format
(.SCR) Save or Copy into the C:\Windows\System folder so it will be
available for screen saver selection. Click on Set as default screen saver
if you want it to be your current screen saver.
Internet Export saves your file in Internet Streaming Format, HTML, or
DHTML. For complete details, please refer to the next chapterInternet
Extras.
4-21
Page 42

Page 43

Internet Extras
5 Internet Extras
i-Power
Power up directly via Internet
The i-Power function is the wave of the future with its precocious
characteristics and functionality. Powered by an embedded browser and
exceptional links to immense video, audio, and image archives, i-Power
hopes to serve your creative nature unconditionally (as shown below).
Just click away and select your destination if you desire more multimedia
clips or a new software application for images, audio clips, or video clips.
Image, Audio, Video Hubs
Click on any of the Get… links to access the Hubs. At the Image Hub,
clink on the links to access royalty-free images and augment your
collection of slide shows. Remember that Medi@Show's unique feature of
dragging and dropping images (full size) directly can be employed here!
Just simply click, hold, drag, and then drop into the storyboard! It is that
simple (as shown below)!
5-1
Page 44

Medi@Show User's Guide
Or select the Audio Hub to spark up your presentation with some sizzling
MP3 audio effects from these web sites! You'll also find software, lyrics,
news and other music file formats!
Visit the Video Hub to add another dimension to your slide show with
video content that captures the imagination.
Image, Audio, and Video Editing Utilities
If you still feel your creativity has room to maneuver, look no further than
the next three sections for creating, editing and managing images, audio,
and video clips! Click here to access a host of software applications for
audio, images, and video to alter, modify, and intensify your slide show!
The final step is sharing your slide shows across the globe.
Share Your Slide Shows
After you have finished all the preparations, read the next section in order
to prepare and export your slide show for Internet streaming and Web
publication. The best part of it all is that many of the choices here are free
space for Web publication, or, alternatively defined as free of charge! Just
click on the last link and Medi@Show eagerly introduces you to a
5-2
Page 45

Internet Extras
collection of web sites devoted to sharing personal slide shows on the
Internet.
Publishing on the Internet
After you have finished your slide show and are ready to publish on the
Internet, the first step is exporting; except this time, you will be selecting
the last option, Internet Export. Take a look at the Glossary below to
determine which kind of Export will suit your publication needs.
Internet Export Glossary
Below is a factual description of all the files created during Internet
Exporting and what the differences are between the three options.
Internet Streaming Format
This format will play your Medi@Show file in all its entirety on your web
page in automatic mode similar to an executable file or with the
Medi@Show Player. If you do not check Include Web materials, only
a .FLZ file will be saved and won't be available for Internet Streaming.
When the Include Web materials is checked, there will be a total of five
files:
.FLZ file is the compressed Medi@Show proprietary data file suited •
5-3
Page 46

Medi@Show User's Guide
for Internet streaming. The .CAB and .JAR files have to accompany it
in order to be played on the Internet Explorer and Netscape Navigator
respectively.
.JAR file consists of a Netscape plug-in and needs to be in the same
•
directory as the .HTM and .FLZ file which allows for playback of the
Medi@Show file on Netscape Navigator. It will be located in the
same directory under the name Mediashow.JAR.
•
.CAB file consists of an ActiveX control and needs to be in the same
directory as the .HTM and .FLZ file allowing for playback of the
Medi@Show file on Internet Explorer. It will be located in the same
directory under the name Mediashow.CAB.
•
.JS file is a JavaScript file that detects the current version of the Web
browser and warns users if it is not up-to-date.
•
.HTM file is the template that compiles all the files for playback.
DHTML
By exporting with DHTML, your Medi@Show file will closely resemble
an executable file but the modes (manual or automatic) will depend on
your Play Settings. Some special effects will be unavailable (text and
transition) along with the background music. Your export will include one
HTML file, JavaScript file (.JS), and the same number of multimedia files
that you have in their original form. You will likely be prompted with this
dialog box:
5-4
Page 47

Internet Extras
If you wish to replace, drag-down menus are provided for Text or
Transition Effects. If not, just click OK. The next prompt is for picking a
theme:
Your completed DHTML export in manual mode with Netscape Navigator
using the Sky theme will look like this:
While playing the Medi@Show DHTML file, click on the Next and Prev
iconlocated below the slidesto advance or go back. In automatic
mode, these icons will be obsolete.
5-5
Page 48

Medi@Show User's Guide
Note: Some .bmp images will be unavailable for Netscape Navigator. Go and
get the plug-in.
HTML
Exporting here will lose all special effects and only keep still images.
Your export of HTML files will depend on the number of slides in your
file. For example, 9 slides will equal 9 HTML files. Shown below using
the Summer theme, it will also have the ability to go Next and Prev.
Web Streaming Publication
If you chose the Internet Streaming Format and the Include Web
materials option during exporting, you are now ready for the last step in
publishing your slide show (with all the effects intact) on your personal
web page in streaming format. You may either Work with HTML
Directly or with Web Page Editing Software.
Working with HTML Directly
1. Open your Medi@Show HTML template file (assumes the same name
as the corresponding .FLZ file created during export) with any web
page editor or software to access the source code (for e.g. Microsoft
Notepad).
5-6
Page 49

Internet Extras
2. Simply copy this entire section:
<!-- Use this segment of code in your page -->
<SCRIPT LANGUAGE="JavaScript" src="SelBrowser.js"></SCRIPT>
<SCRIPT>MediaShowObject('DEC.FLZ','320','240');
</SCRIPT>
<!-- End -->
3. Now paste this onto your web page's HTML file where you would like
your Medi@Show slide show.
4. Adjust width and height if current settings (W=320 H=240) are
inappropriate:
<SCRIPT>MediaShowObject('DEC.FLZ','320','240');
5. Save this file.
Note: For first time Internet Explorer users when playing your Medi@Show file,
it will be automatically enabled in your browser. For Netscape users, a
prompt to obtain the plug-in will appear. Click on Get Plug-in. Then,
Grant
select
when prompted for accepting the CyberLink certificate.
Working With Web Page Editing Software (Dreamweaver
2.0)
For Netscape Navigator:
After opening your web page file or site in Dreamweaver:
1. Choose Insert from the tool bar and select Plug-in.
5-7
Page 50

Medi@Show User's Guide
2. Select your Medi@Show .FLZ plug-in file (shown below).
Dreamweaver will then ask to copy it into your web page directory.
Click Yes.
5-8
Page 51

Internet Extras
3. Enlarge and alter your inserted .FLZ file by clicking on the image and
dragging the corners.
4. Now, go to the Selection Properties' tool bar (appears when Plug-in is
highlighted) and click on the Plg URL folder icon or type in the
HTML file directly. It should located in the same directory as
your .FLZ file.
Note: The
Src
just above the aforementioned slot should automatically display
the correct .FLZ file that you just inserted. If not, insert it manually.
5. In Dreamweaver, press F12 (depending on settings and if Netscape is
set as the default browser) to view your web page with Netscape
Navigator.
6. Your Medi@Show is now enabled and can be viewed on your web
page.
For first-time users, refer to the previous section on getting the plug-in and
obtaining the CyberLink certificate.
For the Internet Explorer:
5-9
Page 52

Medi@Show User's Guide
Please follow the above instructions from #1-3 first when inserting
ActiveX (instead of Plug-in) and copying the .FLZ file into the web page
directory.
1. After inserting, go to the Selection Properties' tool bar and fill in
ClassID:
clsid:5DBF08EF-4BDE-11D3B8E4-0080C84E9C66
2. Type in or browse for the Src, which should be the .FLZ file.
3. For Parameters, you will have to manually call up Mediashow.HTM
with Internet Explorer, and then check the Source located under
View. In most cases, the Parameter will be simply file, and the Value
the name of your .FLZ file as shown below:
5-10
Page 53

Internet Extras
4. Press F12 (depending on your settings) to view your file using
Internet Explorer.
5. Your Medi@Show is now enabled and can be viewed on your web
page.
Web Server Configuration
Make sure that your web server is configured to serve JAR files with the
MIME type application/java-archive and FLZ files (Medi@Show's
proprietary file) with MIME type application/x-MediaShow.
5-11
Page 54

Page 55

Tutorial
6 Tutorial
Be sure that your CD disk is currently in the drive to access the Tutorial
folder or it is saved on your hard disk before you begin.
This Tutorial will teach you how to create an all-in-one publication for the
Internet that will include compiling, sorting, and editing functions plus
background music, special text, transition, and masking effects. To view
the original, go to the Tutorial folder and choose Tutorial.exe
(application file). While you are here, you may also select the Collect
Data folder, which has the entire collection including the .FLM file for
perusal.
Note: Some of the longer audio files are in MPEG Layer-3 format. Your CPU
must support this file format. Go to www.iis.fhg.de/audio
this software.
You will begin by using the Wizard so please refer to the Wizard section
in Ch. 4 for dialog box graphics if not provided for.
Step 1 - Using the Wizard
to download
1. Launch the Wizard by pressing the in the Control Panel.
2. Click Next for Opening a new FILM file.
Step 2 - Naming Your Film File
1. Select Browse to choose the film file location. Click Next.
6-1
Page 56

Medi@Show User's Guide
Step 3 - Importing
1. Choose Import Directory. Then press Import Now!
2. Access the Tutorial folder in your Medi@Show folder and then click
on the Images folder.
3. Press OK.
Step 4 - Play Settings
1. Select the Auto playback only. Click Next.
Step 5 - Background Music
1. Select Browse and access the Tutorial/Audio folder.
2. Under this folder you will find a Track04 Layer-3.WAV file. Select
and press OK.
3. Go on to the next step.
6-2
Page 57

Tutorial
Step 6 - Exporting for Internet Publication
1. Choose Internet Export from the drag down menu and select Include
Web materials. The step for naming this Internet file will be after the
Wizard setup has been completed.
Step 7 - Wizard Completion
1. After you click Finish in the last Wizard dialog box, you will notice
that all the multimedia files of the Tutorial folder has been imported
into the Compilation Area and into the Sorter.
2. A dialog box will appear for naming and saving your Internet Export
file.
3. Click OK after you name your file.
Step 8 - Sorting Thumbnails
1. Before clicking on specific thumbnails, point to each and notice the
details displayed for each clip in the green area located in the Sorter.
2. Numerically sort and order the files from Photo001 to Photo009
(refer to the Sorter section in Ch. 4) with intro as the first slide and
credits as the last.
3. Please duplicate Photo009 for the tenth position by dragging it from
the Compile Area.
6-3
Page 58

Medi@Show User's Guide
4. In total, there should be 12 slides.
Step 9 - Accessing the Edit Mode
1. Now click on the Photo001 twice to access the Edit Mode for that
slide.
Step 10 - Adding Transition Effects
1. Click on the Transition Effects and choose Blur Right.
2. Adjust the time setting to 14 seconds.
3. Press OK
.
Step 11 - Adding Text Effects
1. Click on Text Effects and then click on Font Settings.
2. Deselect Shadow and choose Black for color and Times New Roman
for font.
3. Click in the text area and type "North State."
4. Move the text to the upper center location of the image. Press OK
6-4
.
Page 59

Tutorial
Step 12 - Adding Audio Effects
1. While in the Edit mode, click on the Audio Effects and then choose
Customize.
2. Go to Tutorial/Audio folder, and select 002.WAV file. Press OK
Step 13 - Adding Text, Transition, & Audio Effects
1. Insert the following text, time settings, text effects, audio effects' file
and accompanying transition effects for each photo starting from 002
to 008 following the same pattern as the first slide unless otherwise
noted :
Garrison Peninsula (11 seconds/Assembly Line/003.WAV/Film Clip)
Aremyn Mountains (11 seconds/Icicles/004/Wipe Right Soft)
Washii Waterfalls at bottom center (12 seconds/Slide Down/005/Page
Roll)
Frontier Lake (10 seconds/Unite/006/Laser)
Sea Life of Frontier Lake in Blue (12 seconds/Balloon/007/Pinwheel)
Cascade Palace in Fuchsia (9 seconds/Trance Center/008/Shutter Up)
Candy Beach in Navy at the center(18 seconds/Glitter/009/Shutter
Left).
6-5
.
Page 60

Medi@Show User's Guide
Step 14 - The Conclusion
1. For the first fireworks photo (10th slide), add the Stage01.WAV file as
an audio effect by selecting Customize and browsing in the Audio
folder. The time setting should be 4 seconds.
Note: When using consecutive slides, as demonstrated in this step, you can
create a great illusion that gives the appearance of one slide with multiple
effects. Fade is the most commonly used transition effect here.
2. For the 11th slide, type in "Fireworks Display Nightly!" in Maroon.
3. Choose the Magnets 1 text effect and Dissolve Fine-Grained for the
transition effect. Click OK
.
4. Click Audio Effects and choose Customize. Select 011.WAV file.
5. Then, access the Masking Effects' panel and choose any effect. Click
OK .
6. Set the time setting at 11 seconds.
Step 15 - Watching Your Slide Show
1. Click on the first slide once.
2. Press Play in the Sorter to watch your show.
6-6
Page 61

Tutorial
Step 16 - Saving to Update Changes
1. Save your file as a film file and choose Internet Export again to
update changes. You do not have to check the Include Web
Materials this time.
Step 17 - Internet Publication
1. Now follow the Publishing on the Internet instructions in Ch. 5 for
the final steps in releasing material publicly through the Internet.
6-7
Page 62

Page 63

Technical Support
7 Technical Support
Before asking CyberLink Corp. for technical support, please refer to this
user's guide or on-line help for more information. You may also contact
your local distributor/dealer. If your problem is still not resolved, the
following section provides ways to obtain technical support:
Web Support
Solutions to your problem are available 24 hours a day at our Web sites in
Taiwan, USA, or Japan:
www.gocyberlink.com
www.cyberlink.com.tw
www.cyberlink-usa.com
www.cli.co.jp
You may also find solutions in the FAQ section or at our Web sites. In
addition to frequently asked questions, we also provide troubleshooting
techniques, the latest in product news, and other relevant information.
Fax Support
In order to answer your technical questions as quickly as possible, please
(886) 2-8667-1300
fax us at
:
Note: Technical support is only offered to registered users, so please make sure
to jot down your CD-Key number located on your CD case when emailing or faxing.
Telephone Support
Users are welcome to call the CyberLink's Technical Support Hotline at
(886) 2-8667-1298. Phone support hours are Monday to Friday, 9:00 AM5:00 PM (GMT +8:00) Taiwan local time excluding holidays. When
calling for support, please have your computer ready and provide us with
the following information:
7-1
Page 64

Medi@Show User's Guide
• your registered CD-Key number
• the product version
• hardware type and specifications
• warning messages displayed
• detailed problem description and when it occurred
Note: Technical support is only offered to registered users, so please make sure
your CD-Key number is ready when calling.
7-2
 Loading...