

Page 1

CyberLink
MakeupDirector
User's Guide
Page 2

Copyright and Disclaimer
All rights reserved.
To the extent allowed by law, MakeupDirector IS PROVIDED “AS
IS”, WITHOUT WARRANTY OF ANY KIND, EITHER EXPRESS OR
IMPLIED, INCLUDING WITHOUT LIMITATION ANY WARRANTY FOR
INFORMATION, SERVICES, OR PRODUCTS PROVIDED THROUGH
OR IN CONNECTION WITH MakeupDirector AND ANY IMPLIED
WARRANTIES OF MERCHANTABILITY, FITNESS FOR A PARTICULAR
PURPOSE, EXPECTATION OF PRIVACY, OR NON-INFRINGEMENT.
BY USING THIS SOFTWARE, YOU AGREE THAT CYBERLINK WILL
NOT BE LIABLE FOR ANY DIRECT, INDIRECT, OR CONSEQUENTIAL
LOSS ARISING FROM THE USE OF THIS SOFTWARE OR MATERIALS
CONTAINED EITHER IN THIS PACKAGE.
The terms and conditions here under shall be governed and
construed in accordance with the laws of Taiwan.
MakeupDirector is a registered trademark along with other
company and product names mentioned in this publication, used
for identification purposes and remain the exclusive property of
their respective owners.
International Headquarters
Mailing Address CyberLink Corporation
15F., No. 100, Minquan Rd., Xindian Dist.
New Taipei City 231, Taiwan (R.O.C.)
Web Site
Telephone 886-2-8667-1298
Fax 886-2-8667-1385
Copyright © 2017 CyberLink Corporation. All rights reserved.
http://www.cyberlink.com
Page 3

Contents
..............................................................1
Introduction
................................................................................................1Welcome
.................................................................................................1Updating MakeupDirector
................................................................................................2Minimum System Requirements
..............................................................3
Importing Photos
................................................................................................3Supported File Formats
................................................................................................3Importing Photos into MakeupDirector
..............................................................5
The MakeupDirector Workspace
................................................................................................5MakeupDirector Modules
.................................................................................................5Makeup
.................................................................................................11Looks
................................................................................................11Photo Viewer Window
.................................................................................................12Selec ting Faces
.................................................................................................12Updating Feature Points
.................................................................................................14History
.................................................................................................14Get Makeup Tips
.................................................................................................14Full Screen and Viewer Zoom
.................................................................................................15Selecting Viewer Display Mode
..............................................................17
Applying Makeup
................................................................................................17Face
................................................................................................20Eyes
................................................................................................24Mouth
................................................................................................25Hair
i
Page 4

Cyb erLink MakeupDirecto r Help
..............................................................27
Using Looks
................................................................................................27Applying Looks on a Person
................................................................................................28Downloading Looks from Beauty Circle
................................................................................................28Sharing Custom Looks
................................................................................................29Managing Custom Looks
..............................................................31
Viewing History
..............................................................33
Saving and Sharing Photos
................................................................................................33Saving Photos
................................................................................................33Sharing Photos
.................................................................................................33Sharing Photos on Beauty Circle
.................................................................................................34Sharing Photos on Facebook
..............................................................35
MakeupDirector Preferences
................................................................................................35General Preferences
................................................................................................35Improvement Program Preferences
..............................................................37
MakeupDirector Hotkeys
..............................................................39
Technical Support
................................................................................................39Before Contacting Technical Support
................................................................................................40Web Support
................................................................................................40Help Resources
ii
Page 5
Introduction
Note: this document is for reference and informational use only. Its content
and the corresponding program are subject to change without notice.
Note: you can prevent CyberLink MakeupDirector from auto checking for
updates/upgrades in General Preferences.
Note: you must connect to the Internet to use this feature.
Chapter 1:
Introduction
This chapter introduces CyberLink MakeupDirector. It also outlines the system
requirements for installing and using the program.
Welcome
Welcome to the CyberLink family of digital media tools. CyberLink MakeupDirector
is a photography program that lets touch up and apply makeup on the people in
your digital photos. You can then share your photos on Facebook or Beauty Circle,
or save them as new photo files.
Updating MakeupDirector
Software upgrades and updates (patches) are periodically available from CyberLink.
CyberLink MakeupDirector automatically prompts you when either is available.
To update your software, do this:
1. Click the button to open the Notifications window.
2. Check the New U pdates and U pgrade Info sections.
3. Select an item in these sections to open your web browser, where you can
purchase product upgrades or download the latest patch update.
1
Page 6
Cyb erLink MakeupDirecto r Help
System R equirements
Operating System
· Microsoft Windows 10, 8/8.1, 7 (64 bit OS
recommended).
Processor (CPU)
· Intel Core™ i-series or AMD Phenom® II (Intel Corei7 or
AMD Phenom II X4 recommended).
Graphics
Processor (GPU)
· 128 MB VGA VRAM (1 GB VRAM and OpenCL capable
are recommended).
Memory
· 2 GB (6 GB recommended).
Scr een Resolution
· 1024 x 768, 16-bit color.
Hard Disk S pace
· 1 GB.
Other
· Required for program activation, Beauty Circle, and
other online services.
Minimum System Requirements
The system requirements listed below are recommended as minimums for using
the CyberLink MakeupDirector program.
2
Page 7

Impo rting Pho tos
Note: you can only import one photo at a time into CyberLink
MakeupDirector.
Chapter 2:
Importing Photos
The first step when using CyberLink MakeupDirector is to import a photo into the
program. CyberLink MakeupDirector supports a variety of different photo file types,
including most camera RAW file formats.
Supported File Formats
CyberLink MakeupDirector supports the following photo file formats:
Photos: JPEG, PNG, TIFF.
RAW photo formats: CyberLink MakeupDirector also supports the import of most
camera RAW photo formats. See the MakeupDirector specs page on the CyberLink
web site for an up-to-date list of all the supported RAW photo formats.
Importing Photos into MakeupDirector
You can import photos into CyberLink MakeupDirector from your computer's hard
drive.
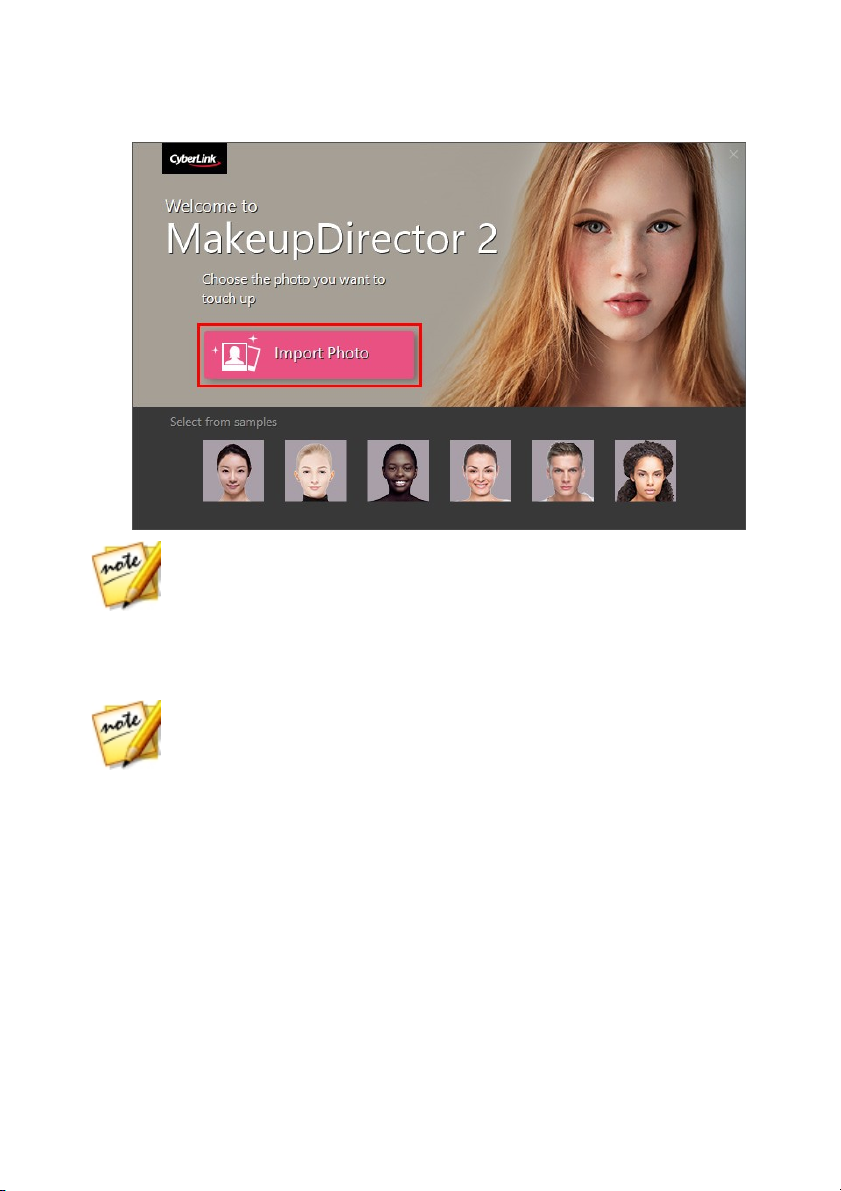
To import a photo into CyberLink MakeupDirector, do this:
1. In the MakeupDirector launch window, click the I mport Photo button.
3
Page 8
Cyb erLink MakeupDirecto r Help
Note: if you don't currently have a photo on your computer, you can select
and use one of the samples available at the bottom on the launch window.
You can also import a photo by dragging and dropping it onto the launch
window.
Note: the imported photo must contain at least one face. If CyberLink
MakeupDirector cannot detect any faces in the imported photo, you will be
asked to import another.
2. Browse to and then select the photo on your computer that you want to
import, and then click Open. The photo will be imported into the
MakeupDirector workspace.
4
Page 9
The Makeup Director Worksp ace
Chapter 3:
The MakeupDirector
Workspace
This chapter outlines the CyberLink MakeupDirector workspace, and all of its
features. Getting familiar with the workspace is helpful, because it is where you
spend all of your time when using CyberLink MakeupDirector.
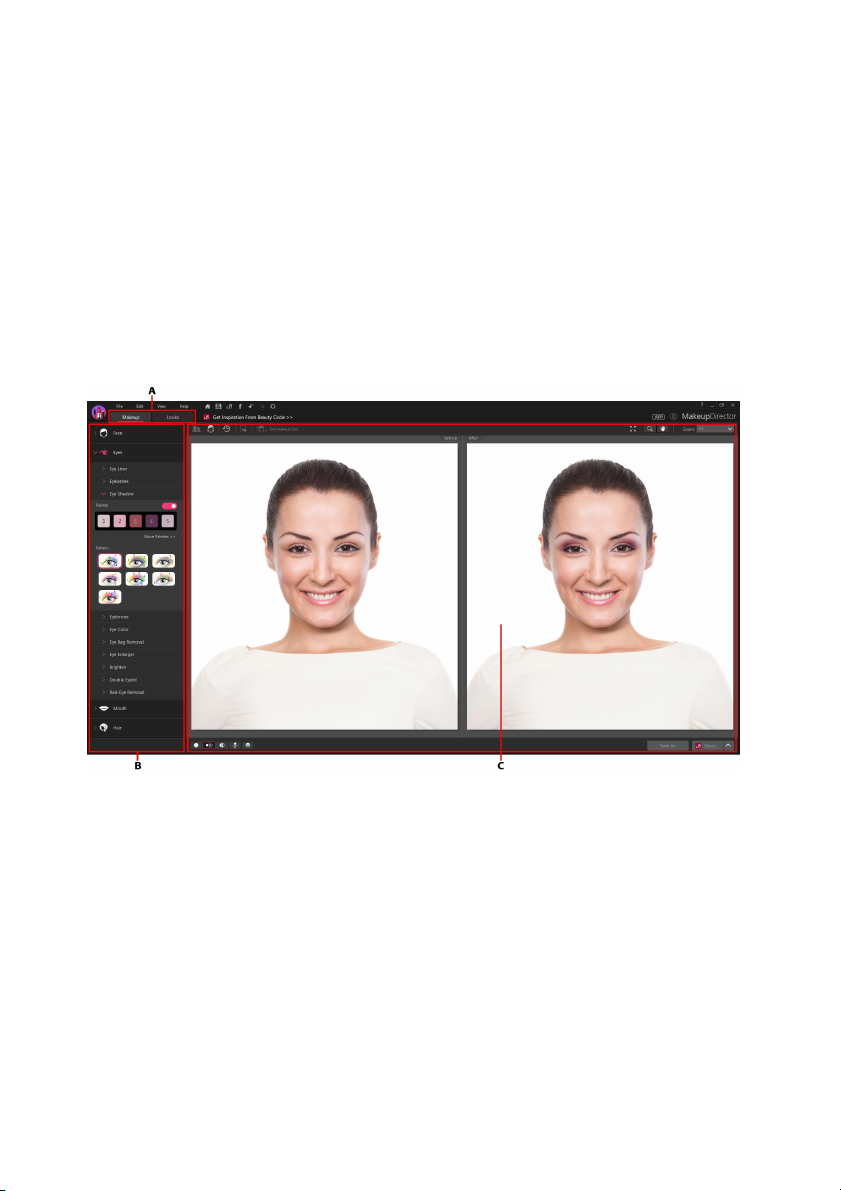
A - Ma keupDirector Modu les, B - M akeup/Lo oks Pan el, C - Ph oto Viewer Wi ndow
MakeupDirector Modules
CyberLink MakeupDirector is comprised of two main modules: Makeup and Looks.
Makeup
When you import a photo in CyberLink MakeupDirector, by default you are in the
Makeup module. In this module you can use the available features on the makeup
5
Page 10
Cyb erLink MakeupDirecto r Help
panel to touch up and apply makeup to the faces in your imported photo. See
Applying Makeup for more information.
Creating Custom Colors
When applying certain makeup, you may have the option of creating and using
your own custom color.
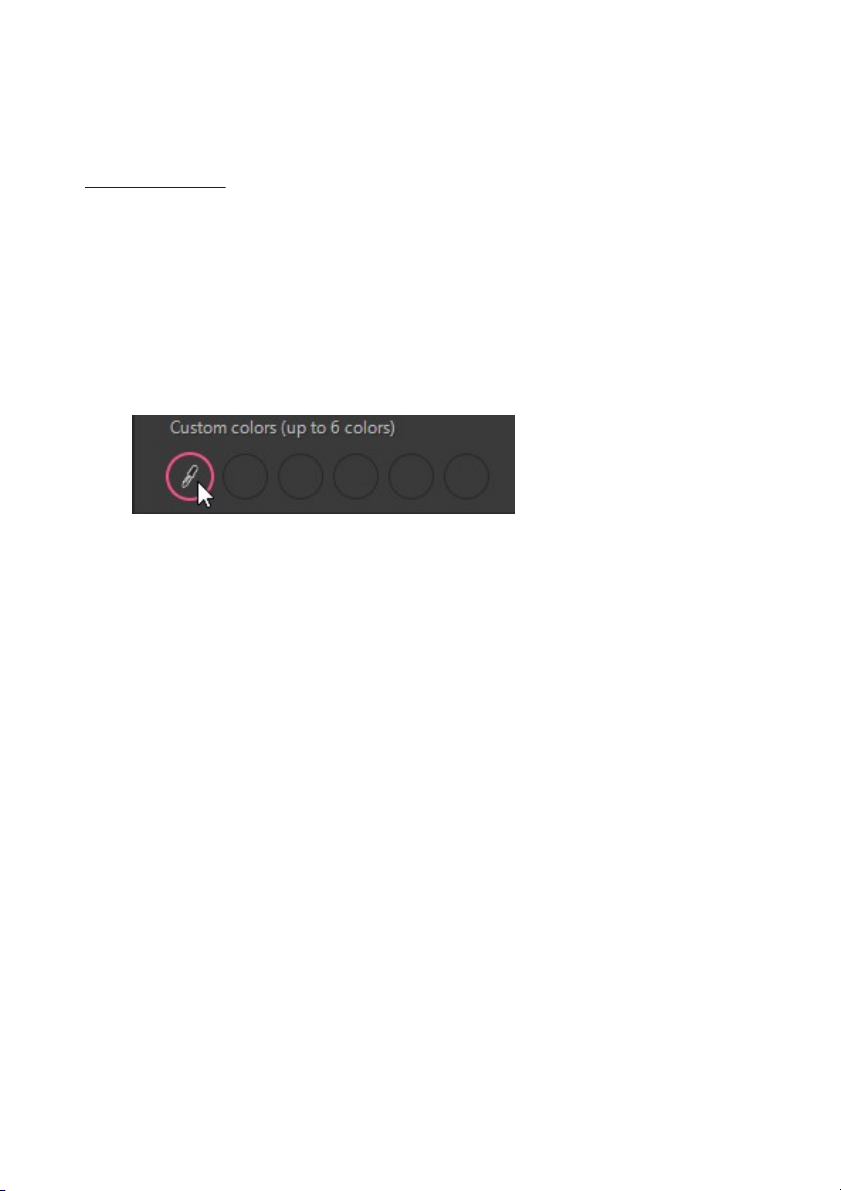
To create a custom color, do this:
1. In the Custom c olors section (if available), click on an empty circle to display
the color picker.
2. Choose a custom color by doing any of the following:
· hover your mouse over the color picker and then use the eye dropper to select
the color you want.
6
Page 11
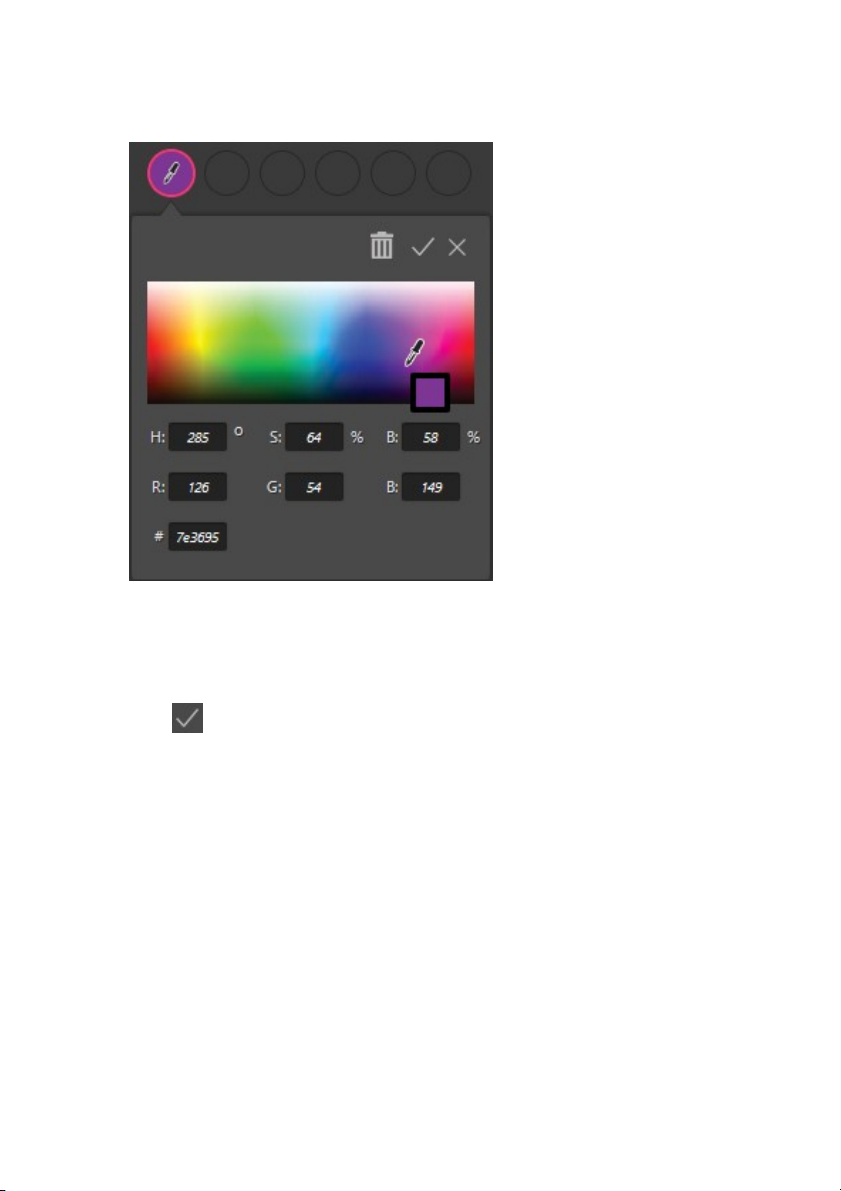
The Makeup Director Worksp ace
· enter the color's HSB color code in the fields provided.
· enter the color's RGB color code in the fields provided.
· enter the color's hex color code in the # field.
3. Click to save your changes and add the color to your custom colors.
Creating a 2 Tone Custom Color
When applying lipstick to a person in a photo, you can create and use a custom 2
tone color.
To create a custom 2 tone color, do this:
1. In the Custom c olors section on the 2 Tone tab, click on an empty circle to
display the color picker.
7
Page 12
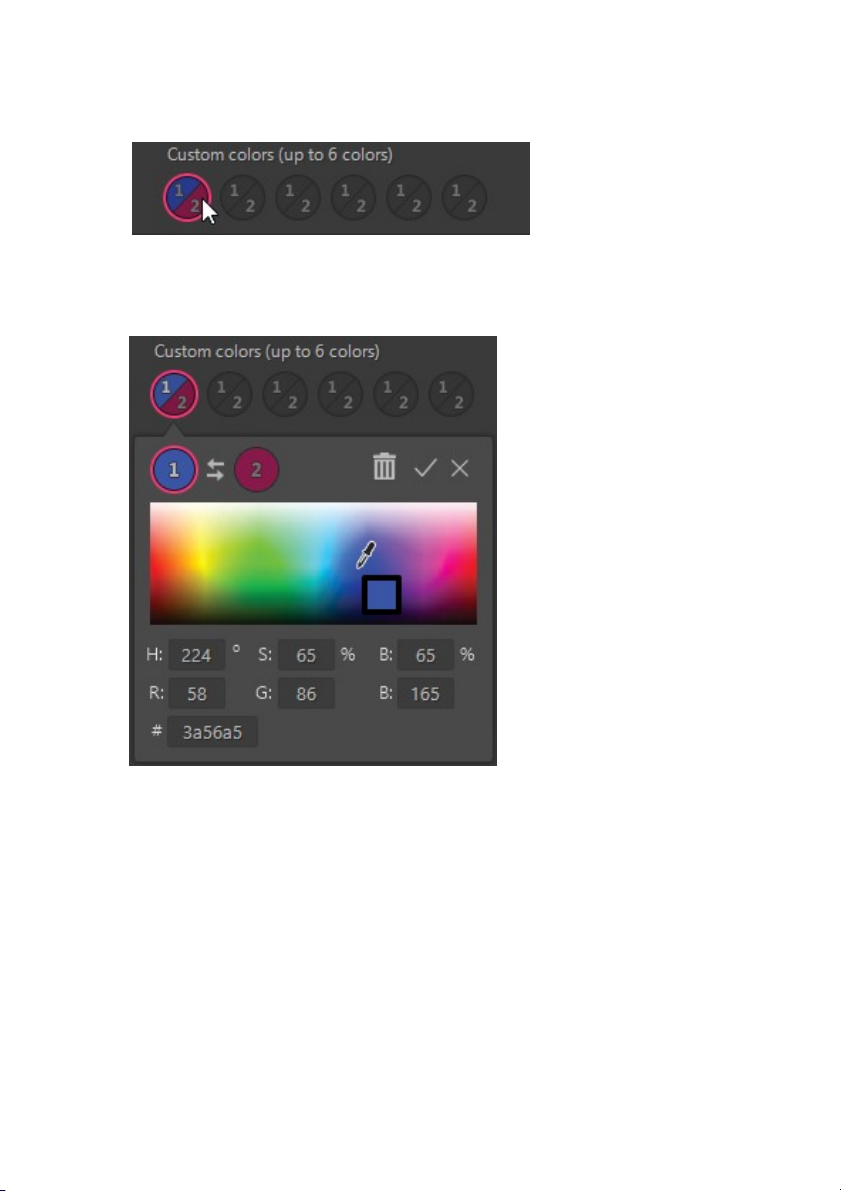
Cyb erLink MakeupDirecto r Help
2. Choose the first color by doing any of the following:
· hover your mouse over the color picker and then use the eye dropper to select
the color you want.
· enter the color's HSB color code in the fields provided.
· enter the color's RGB color code in the fields provided.
· enter the color's hex color code in the # field.
3. Click on the 2 to choose the second color.
8
Page 13

4. Repeat step 2 to select the second color.
Note: you can click to swap the 2 tone color order.
The Makeup Director Worksp ace
5. Click to save your changes and add the 2 tone color to your custom
colors.
Editing a Custom Color
To edit a custom color, do this:
1. Click on the custom color you want to edit.
2. Edit the color by doing any of the following:
9
Page 14
Cyb erLink MakeupDirecto r Help
· hover your mouse over the color picker and then use the eye dropper to select
the new color.
· enter the new color's HSB color code in the fields provided.
· enter the new color's RGB color code in the fields provided.
· enter the new color's hex color code in the # field.
3. Click to save your changes.
Removing a Color From Custom Colors
To remove a custom color, do this:
1. Click on the custom color you want to remove.
10
Page 15
The Makeup Director Worksp ace
2. Click to remove the color from your custom colors.
3. Click to save your changes.
Looks
Click the Looks button to apply makeup looks. These looks, which are similar to
photo presets, will instantly transform the faces in your imported photo. See Using
Looks for more information.
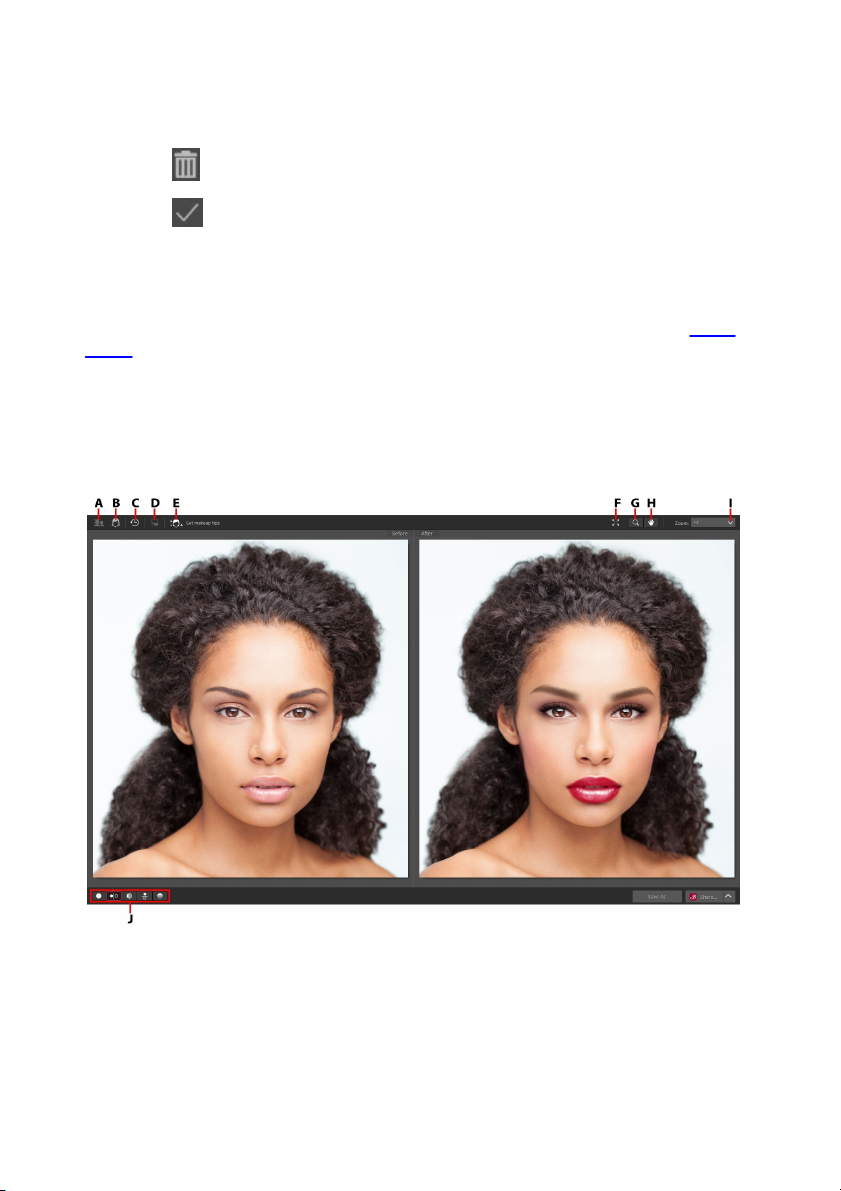
Photo Viewer Window
The photo viewer window displays the imported photo and any touch ups you
make to the faces are viewable here.
A - Selec t Fac e, B - Update Feature P oints, C - View History, D - Show Origi nal Photo, E - Get M akeup
Tips, F - View at Fu ll Sc reen, G - Zoom Too l, H - P an Tool , I - Vi ewer Zoom, J - Select Vi ewer Displa y
Mode
11
Page 16

Cyb erLink MakeupDirecto r Help
Note: if you want to touch up more than one person in a photo, you must do it
one person at a time.
Note: the feature points that are available depend on which feature on the
Makeup panel you are adjusting. For Blemish Removal and Hair Color, there
are no feature points available.
Selecting Faces
If there is more than one person detected in an imported photo, CyberLink
MakeupDirector will ask you which detected face you want to perfect. Select a face
by clicking on its corresponding box.
Once you are done touching up a person's face, just click to select a different
face in the photo.
Updating Feature Points
If you find that CyberLink MakeupDirector doesn't seem to be applying makeup
correctly, you can click to show and adjust the feature points. The feature
points should align to the features of the face (eyes, nose, mouth, chin, etc.).
12
Page 17

The Makeup Director Worksp ace
Note: the blue feature points on the eyes should align in the center of the
person's pupil. The blue feature points on the mouth should align around the
opening of the mouth.
If required, click and drag each feature point to its proper location on the photo.
Use the feature points dialog in the bottom left of the window to quickly zoom in
on the Left Eye, Right Eye, or Mouth. Clicking Face will display the entire face in the
photo viewer window.
Click to hide the feature points when you are done updating them. You can
also clic k Done to update the feature points, or Cancel to discard the changes.
Enabling Open Mouth
When you import a photo, CyberLink MakeupDirector detects whether a person's
mouth is opened or closed. If it detects that the mouth is closed, the teeth whitener
feature is not available.
If CyberLink MakeupDirector detected that a mouth is closed, but the person's
mouth is actually open, you can manually fix this with the control in the bottom
left of the photo viewer window. Just drag the control to the Mouth Open position.
Once in this position, drag the blue feature points so that they outline the mouth
opening.
13
Page 18

Cyb erLink MakeupDirecto r Help
History
While applying makeup and looks, click to view a history of all the touch ups
you have made to the current photo. See Viewing History for more information.
You can also click and hold the button to quickly view the original photo
during the touch up process.
Get Makeup Tips
When you apply a look to a photo, you can click the Get makeup tips button to
view a how-to on Beauty Circle. There you can see the steps on how you can
achieve the look on yourself in real life.
Full Screen and Viewer Zoom
When touching up photos, click to view the current photo at full screen. Once
in full screen mode, you can click to display the makeup/looks panel if
required. Click to hide the panel, or to exit full screen mode.
Zooming
Use the Zoom drop-down to set the size of the photo preview. Select Fit to resize
the selected photo so that is fits in the viewer window. When you zoom in or out on
a photo, a navigation thumbnail for the viewer displays below the drop-down. Click
and drag the available box to change the focus area to suit your zooming
requirements.
14
Page 19

The Makeup Director Worksp ace
Note: the Navigation option must be selected in the Zoom drop-down for
the navigation thumbnail to display. The navigation thumbnail is not
available when updating feature points or selecting a face.
Note: when selected, hold down the left mouse button and then draw a
square on the photo to quickly zoom in on a specific area.
You can also use the following zoom and pan tools for easier viewing of your
photos in the photo viewer window:
· - when selected, clicking the left mouse button in the photo viewer
window zooms in on the current photo. Click the right mouse button to zoom
out.
· - click to enable panning when zoomed in on a photo. To pan, just click
and drag on the photo to view different areas.
Selecting Viewer Display Mode
The photo viewer window has several display modes available for touching up
photos. Click the buttons in the bottom left corner of the photo viewer window to
set the display mode.
· Normal - shows only the photo you are touching up in the preview
window.
· Side by side - select to compare touch ups in photos side by side.
· Split - left/right - select to split the photo, with the left half containing
the original photo, and the right half of the photo with the touch ups applied.
· Top/bottom - select to compare touch ups in photos top to bottom.
· Split - top/bottom - select to split the photo, with the top half
containing the original photo, and the bottom half of the photo with the
touch ups applied.
15
Page 20

Cyb erLink MakeupDirecto r Help
Secondary Monitor
If you have more than one monitor connected to your computer and have
extended your desktop, select View > Secondary Monitor > On to duplicate the
viewer display on the secondary monitor.
16
Page 21

Apply ing Makeup
Chapter 4:
Applying Makeup
This chapter outlines all of the touch ups you can make to the faces in photos when
in CyberLink MakeupDirector.
Any touch ups you make are not auto-applied to the original photo file. CyberLink
MakeupDirector keeps a log of all the touch ups you want to make, and then
applies them to the photo when it is saved or shared. This leaves the original photo
untouched.
At any time you can:
· click to quickly peek at the original photo.
· click to view a log of the touch ups applied on a photo in History. See
Viewing History for more information.
Face
Click on Face in the makeup panel to touch up areas of the face, and apply
foundation and blush.
Skin Smoothener
Select the S kin Smoothener option to smoothen a person's skin. Drag the slider
right to set the amount of smoothening applied to the skin.
Foundation
The Foundation feature lets you apply foundation to a face, changing the overall
skin tone. Select a color, or create/select a custom color, to use as the foundation
for the new skin tone, and then use the slider to adjust the strength of the applied
color. Drag it right to increase the intensity of the color, or left to decrease it.
17
Page 22

Cyb erLink MakeupDirecto r Help
Blush
The Blush feature lets you apply blush on a person's cheeks. To apply blush, do this:
1. Select the Color of the blush by clicking on a corresponding colored circle.
You can also create and select a custom color for the blush.
2. Click on Pattern, and then set the shape of the applied blush.
3. Drag the available slider to set the strength of the applied blush. Drag it left to
reduce the strength, or right to increase it.
Face Shaper
Use the F ace Shaper to change the shape of a person's face. Drag the available
slider right to change the shape of the face as required.
Face Contour
Select the F ace Contour option if you want to enhance a person's facial features. To
modify a face's contours, do this:
Selecting a Color
The first thing you must do is choose a color. Colors are grouped in pairs that help
to enhance the facial features. To select a color, do this:
1. Drag the available control to the right to enable face contour on the selected
face.
2. Click More Colors to display a list of all the available face contour colors.
3. Select the color you want to use in the More Colors window.
4. Select the face contour Pattern you'd like to use by clicking on it. Changing
the pattern will help enhance different facial features.
5. Use the Strength slider to adjust the contours as required.
18
Page 23

Apply ing Makeup
Note: when you save a custom color, you can use it again later. Just click
M ore Colors and then click on M y Colors to find it.
Customizing Colors
If required, you can fully customize the face contour colors to your liking, creating
a new custom color that can be used later. To customize a face contour color, do
this:
1. Select one of the available colors to change it.
2. Hover your mouse over the color picker and then select a new color with the
eye dropper.
3. Repeat steps 1 and 2 for the other color, if required.
4. When you are done, click to set your changes. You can also click Save as
My Color to save the color for future use.
Nose Enhancement
Use the N ose E nhancement feature to make a person's nose look thinner by adding
shadows. Drag the available slider right to set the amount of enhancement applied.
Blemish Removal
Select the B lemish R emoval option and then drag the control to the On position to
auto remove all detected skin blemishes on a person's face.
Shine Removal
Select Shine Removal to remove any shiny areas on a person's face. Drag the
available slider right to set the amount of shine removal applied.
19
Page 24

Cyb erLink MakeupDirecto r Help
Note: you can click on to download more eye liner patterns from Beauty
Circle. Just click underneath the pattern you'd like to download.
Note: you can click on to download additional eyelashes from Beauty
Circle. Just click underneath the eyelashes you'd like to download.
Eyes
Click on Eyes in the makeup panel to apply makeup and touch ups on and around
the eyes.
Eye Liner
The Eye Liner feature lets you apply eye liner on a person in the photo. To apply eye
liner, do this:
1. Select the eyeliner Color you want to use by clicking on a corresponding
colored circ le. You can also create and select a custom color for the eyeliner.
2. Click on Pattern, and then select the eyeliner style you'd like to use by clicking
on it.
3. Drag the available slider to set the strength of the applied eyeliner. Drag it left
to reduce the strength, or right to increase it.
Eyelashes
In Eyelashes you can modify a person's eyelashes and apply mascara to them. To
modify the eyelashes, do this:
1. Select the color of Mascara by clicking on a corresponding colored circle. You
can also create and select a custom color for the mascara.
2. Click on Eyelashes and then the eyelash style you'd like to use by clicking on
it.
3. Drag the available slider to set the strength of the applied mascara. Drag it left
to reduce the strength, or right to increase it.
20
Page 25

Apply ing Makeup
Note: you can click M ore to download additional palettes from Beauty
Circle. Just click underneath the palette you'd like to download.
Eye Shadow
Select Eye Shadow to apply eye shadow on a person in the photo. To apply eye
shadow, do this:
Selecting a Palette
The first thing you must do is choose a palette. Palettes can have between one and
five different colors, which are applied to the eye at once. Each palette includes
different eye shadow patterns, which offer a different look. To select a palette, do
this:
1. Drag the available control to the right to enable eye shadow on the selected
face.
2. Click More Palettes to display a list of all the available eye shadow palettes.
3. Select the palette you want to use in the More Palettes window.
4. Select from the available patterns for that palette to apply the eye shadow.
Customizing Palettes
If required, you can fully customize the applied eye shadow to your liking, creating
a new custom palette that can be used later. To customize an eye shadow
palette, do this:
1. Select one of the available colors in the palette to change it.
2. Decide whether you want to enable or disable the Shimmer option by
dragging the control left or right. Shimmer adds a shinier look to the applied
eye shadow color. Disabling it gives the eye shadow a more matte
appearance.
3. If required, hover your mouse over the color picker and then select a new
color for the eye shadow.
21
Page 26

Cyb erLink MakeupDirecto r Help
Note: when you save a custom palette, you can use it again later. Just click
M ore Palettes and then click on M y Palettes to find it.
4. Use the available slider to set the strength of the applied eye shadow on the
specific area around the eye. Drag it left to reduce the strength, or right to
increase it.
5. Repeat steps 1-4 for each color in the selected palette, as required.
6. When you are done, click to set your changes. You can also click Save as
My Palette to save the palette for future use.
Eyebrows
Use the Eyebrows feature to transform a person's eyebrows. To transform the
eyebrows, do this:
1. Set the eyebrow color by selecting a corresponding colored circle on the
Color tab. You can also create and select a custom color for the eyebrows.
2. Click on the Pattern tab and choose whether to modify the person's actual
eyebrows, or select a pattern to completely transform them:
· to use the person's eyebrows, just make sure Original in the top left is
selected. You can always revert back to this selection at any time.
· to use a pattern, just click on it to apply it on the face. You can preview all the
available eyebrow patterns by selecting them.
3. Use the Color slider to set the strength of the eyebrow color. Drag it right to
increase the intensity of the color, or left to decrease it.
4. Use the Shape slider to change the eyebrow shape and thickness. Drag it right
to make them thinner, or drag it left to make the eyebrows thicker.
Eye Color
In this section you can change a person's Eye Color. To change the eye color, do
this:
1. Select a Pattern to change the look of the iris.
22
Page 27

Apply ing Makeup
2. Click on the Color tab and then choose the iris color by clicking on a
corresponding colored circle. You can also c reate and select a custom color
for the iris.
3. Use the Color slider to change the strength of the color. Dragging it right
increases the intensity of the color as it washes over the iris. Dragging it left
reduces the color intensity and strength of the applied pattern.
4. Drag the Size slider right to increase the size of the selected pattern/iris.
Eye Bag Removal
Use the E ye Bag R emoval feature to remove the bags under a person's eyes. Drag
the available slider right to set the amount of removal applied.
Eye Enlarger
The Eye Enlarger lets you increase the size of a person's eyes. Drag the available
slider right to increase the size of the eyes as required.
Brighten
Select the Brighten option to brighten the eyes of a person in the photo. Drag the
available slider right to increase the brightness of the eyes.
Double Eyelid
The Double Eyelid feature lets you add or modify the fold on a person's eyelid. To
use this feature, do this:
1. Click on the double eyelid style to apply it on the eyelids. You can preview all
the available double eyelid styles by selecting them.
2. Drag the slider to increase the perceived depth of the fold. Drag if right to
increase the depth, or left to decrease it.
23
Page 28

Cyb erLink MakeupDirecto r Help
Note: if there is more than one person in the photo who has red-eye, you
must repeat the red-eye removal process on each person. See Selecting
Faces for more information.
Red-Eye Removal
Select the R ed-Eye Removal option and then drag the control to the On position to
auto remove any red-eye on the currently selected person in a photo.
Mouth
Click on Mouth in the makeup panel to apply lipstick, whiten teeth, and adjust the
person's smile.
Lip Color
In the Lip Color section you can apply lipstick to a person in the photo. To apply
lipstick, do this:
1. Select the type of lipstick you want to apply:
· Color: to apply a uniform lipstick color, click on the Color tab and then
choose a corresponding colored circle. You can also create and select a
custom color for the lipstick.
· 2 Tone: to apply a two colored lipstick blend, click on 2 Tone and then choose
from the available color combinations. You can also create and select a
custom 2 tone color for the lipstick.
2. Drag the available slider to set the strength of the applied lipstick. Drag it left
to reduce the strength, or right to increase it.
3. Click on the Texture tab, and select a texture for the lips.
24
Page 29

Apply ing Makeup
Note: the Teeth Whitener feature is unavailable if CyberLink
MakeupDirector detects that a person's mouth in the photo is closed. If
MakeupDirector incorrectly detected a closed mouth, select the
button to manually enable. See Enabling Open Mouth for more information.
Note: if you previously applied a look that includes a wig, this feature will be
unavailable.
Teeth Whitener
Select Teeth Whitener to whiten a person's teeth in a photo. Drag the slider right to
set the amount of whitening applied to the teeth.
Smile
The Smile feature lets you modify a person's smile by stretching the corners of the
mouth. Drag the slider right to stretch the corners of the mouth as required.
Hair
Click on Hair in the makeup panel to change a person's hair color in your imported
photo.
Hair Color
To change a person's hair color, do this:
1. First select a new hair color by clicking the corresponding colored circle. You
can also create and select a custom color for the hair.
2. Use the Shine slider increase or decrease the shine on the hair. Drag it left to
reduce the shine, or right to increase it.
3. Drag the Color slider to change the strength of the color. Drag it left to reduce
the strength, or right to increase it.
25
Page 30

Cyb erLink MakeupDirecto r Help
Color Refinement Brushes
Once you have added hair color, you can use the two refinement brushes to touch
up the results.
To add color to areas that require it, do this:
1. Click to enable the add color brush.
2. Use the Size slider to set the size of the brush.
3. Zoom in on the photo and then click on the areas where you want the color
applied. CyberLink MakeupDirector will apply the color to the similar pixels in
the selected area.
To remove color from areas, do this:
1. Click to enable the erase color brush.
2. Use the Size slider to set the size of the brush.
3. Zoom in on the photo and then click on the areas where you want to remove
the color. CyberLink MakeupDirector will remove the color from the similar
pixels in the selected area.
26
Page 31

Usin g L ooks
Note: once you apply a look to a person in a photo, you can click the Get
makeup tips button to view how you can achieve the look on yourself.
Note: if there is more than one person in the photo, you apply the looks
separately on each person. This allows you to give each person a distinct
appearance. See Selecting Faces for more information.
Note: you can download more looks from Beauty Circle, which will be
available on the Downloaded tab. See Downloading Presets from Beauty
Circle for more information. Your customized looks are available on the M y
Looks tab.
Chapter 5:
Using Looks
Looks are a saved set of touch ups that you can instantly apply to a person in your
photo.
Click the Looks button to display the available looks. There are two types of looks
available:
· Natural Looks: these looks use makeup and touch ups to change the
appearance of a person in an imported photo.
· Costume Looks: use costume looks for special occasions or when you want to
apply a fun party look to a person in a photo.
The Default looks were installed with the MakeupDirector program, while the looks
on the Downloaded tab are looks downloaded from Beauty Circle. Looks on the My
Looks tab are from your touch ups on photos and are auto saved for you after you
save or share photos.
Applying Looks on a Person
You can apply any of the available looks in the Looks window on a selected person
in your imported photo.
To apply a look on a person in a photo, do this:
1. Decide whether you want to apply a Natural or Costume look by clicking on
the corresponding tab.
27
Page 32

Cyb erLink MakeupDirecto r Help
Note: the look will be on the Downloaded tab.
2. Click on a look to apply it to a person in the photo. You can preview all the
available looks by selecting them.
3. Use the slider that appears near the bottom of the photo to set the strength of
the applied look. Drag it left to reduce the strength, or right to increase it.
To remove a look on a person's face, just click Original.
Downloading Looks from Beauty Circle
You can download more looks from the Look Salon on Beauty Circle. To download
looks from Beauty Circle, do this:
1. Click on More to go to the Beauty Circle web site.
2. You must first sign in to Beauty Circle to download looks. If you don't have an
account, click the S ign in link at the top of the page for information on
getting one.
3. Find a look you want to download, click the Tr y it button, and then click
Download.
4. Follow the steps to download the look and save it on your computer. Find the
location on your computer where you saved the look file, and then doubleclick on it to install it in the Looks window.
Sharing Custom Looks
You can share all the touch ups you made to a photo in a customized look by
uploading them it Beauty Circle.
To share your look, do this:
1. Do either of the following:
· after saving a photo, click the S hare Look button in the confirmation dialog.
· in in the Looks panel, right click on a look on the My Looks tab, and then
select Share on B eauty Circle.
28
Page 33

Usin g L ooks
2. Sign in to Beauty Circle using your account. If you don't have an account, you
can cli ck Create account to get one for free, or connect using your Facebook
or Weibo account.
3. In the Share on Beauty Circle window, enter the details about your look as
follows:
· Category: select a category that best fits your look.
· Description: in the field provided, write a description about your look.
· Details: displays a list of the touch ups inside the look for your reference.
4. Click on Share to proceed with the upload.
5. Click on Close to close the share window.
Managing Custom Looks
You can manage the looks on the My Looks tab by renaming, deleting, and
exporting them. To view a detailed overview of the touch ups you made when
creating a look, just right click on it and then select Details.
To rename a look, right click on it on the My Looks tab, and then select Rename.
Enter the new name and then click OK to save. To delete any custom looks, right
click on them and then select Delete.
Exporting Custom Looks
You can export your custom looks for import and use on another computer. To
export a custom look, do this:
1. Right click on a look and then select E xport as Look File, or select File >
Export Look File from the program menu.
2. Enter a file name for the look, and then select the location where you want to
export it.
3. Click Save. CyberLink MakeupDirector saves the look in the .mklk file format.
Importing Custom Looks
To import a custom look, do this:
29
Page 34

Cyb erLink MakeupDirecto r Help
1. In the CyberLink MakeupDirector program, select File > I mport Look File.
2. Browse to location of the look file and then select Open to complete the
import.
30
Page 35

Viewin g H istory
Chapter 6:
Viewing History
Click on the button at the top of the photo viewer to view a history of all the
touch ups you made to the imported photo in CyberLink MakeupDirector.
Hover your mouse over an item in the history to view in the thumbnail what the
photo looked like at that moment in the adjustment history.
31
Page 36

Cyb erLink MakeupDirecto r Help
If required, click a history item to revert the photo back to that adjustment. Click
Apply to close the History window.
32
Page 37

Saving and S haring Pho tos
Note: once saved, you can share the touch ups you made in a new look by
cl icki ng the Sha re Loo k b utton. See Sharing Looks for more information.
Chapter 7:
Saving and Sharing Photos
When you are finished touching up a photo, you can save it or share it on Facebook
or Beauty Circle.
Saving Photos
After you touch up a photo, you can save it as a new photo file.
To save a photo in CyberLink MakeupDirector, do this:
1. Click the Save As button in the bottom right of the photo viewer window.
2. Browse to the location on your computer where you want to save the photo.
3. If required, give the photo a custom F ile name.
4. Select the photo file format in the Save as type drop-down. Photos can be
saved in the JPG, PNG, or TIF file format.
5. Click Save.
Sharing Photos
You can share the photo you touched up with others by uploading it to both
Facebook and Beauty Circle.
Sharing Photos on Beauty Circle
To share your photo by uploading it to Beauty Circle, do this:
1. Click in the bottom right of the photo viewer window and then click
Beauty Circle.
2. Sign in to Beauty Circle using your account. If you don't have an account, you
can cli ck Create account to get one for free, or connect using your Facebook
or Weibo account.
33
Page 38

Cyb erLink MakeupDirecto r Help
Note: if required, you can click Create a circle to add a new one that better
suits your photo. Once created, give your new circle a name and description.
Also choose a category, and whether your new circle is secret or available to
all.
3. In the Share on Beauty Circle window, enter the details about your photo as
follows:
· Title: enter a title for your photo.
· Pick a Circle: select which circle you want to add the photo to.
· Tags: enter in several tags, separated by a comma, that describe your photo.
Tags are keywords that people can search for on Beauty Circle.
4. If required, say something about your photo by entering a description in the
field provided.
5. Click the Share button to complete the upload process.
Sharing Photos on Facebook
To share your photo by uploading it to Facebook, do this:
1. Click in the bottom right of the photo viewer window and then click
Facebook.
2. If required, follow the instructions to authorize the upload of photos to your
Facebook account, and then click Continue.
3. Select the Facebook album you want to upload the photo to in the Add to
album drop down as follows:
· Add to Existing Album: select this option if you want to upload the photo to
an album that already exists on Facebook. Select the album you want to
upload it to from the list.
· Create and Add to New Album: select to add it to a new album. Enter the new
album info in the fields provided, including the album Privacy.
4. If required, enter a Description of the photo in Photo Settings.
5. Click the Share button to complete the upload process.
34
Page 39

Makeup Director Preferen ces
Chapter 8:
MakeupDirector
Preferences
To set your preferences in CyberLink MakeupDirector, select Edit > Preferences
from the menu, or click the button.
General Preferences
In the Preferences window, select the General tab. The available options are as
follows:
Language
· Use system default language: select this option for the language display to be
the same as the language of your operating system.
· User defined: select this option and then select the language from the drop-
down list that you want to use.
Update
· Automatically check for software updates: select to periodically check for
updates or new versions of MakeupDirector automatically.
Improvement Program Preferences
In the Preferences window, select the Improvement Program tab. The available
options are as follows:
CyberLink Product I mprovement Program
· I want to participate: select this item if you would like to participate in the
CyberLink Product Improvement Program for MakeupDirector. Once enabled,
CyberLink MakeupDirector will collect information about the hardware and
software configuration of your computer system, as well as your usage
35
Page 40

Cyb erLink MakeupDirecto r Help
Note: the CyberLink Product Improvement Program for MakeupDirector will
not collect any personal information for purposes of identifying you.
behavior and statistics related to the software. Click the R ead more
information about the improvement program online link to view more
detailed information about the content collected.
36
Page 41

Makeup Director Ho tkeys
Hotkey
Description
File/Project Features
Ctrl+N
Open new photo.
Ctrl+S
Save and apply current changes to current photo.
Ctrl+Shift+S
Save and apply current changes as a new photo.
Alt+C
Open MakeupDirector preferences.
Workspace
Alt+1
Disable compare mode (Normal preview window
display mode).
Alt+2
Enable side by side compare mode.
Alt+3
Enable split - left/right compare mode.
Alt+4
Enable top/bottom compare mode.
Alt+5
Enable split - top/bottom compare mode.
Ctrl+Alt+M
Toggle mirror mode on/off (secondary monitor
only).
Ctrl+Alt+N
Select to display nothing on the secondary
monitor.
F
Toggle full screen mode.
O
Press and hold to view original photo.
Ctrl+H
View touch up history.
Alt+M
Open Makeup module.
Alt+L
Open Looks module.
Ctrl+Home
Return to MakeupDirector launch/import window.
Chapter 9:
MakeupDirector Hotkeys
The following is a list of the hotkeys available in CyberLink MakeupDirector for your
convenience:
37
Page 42

Cyb erLink MakeupDirecto r Help
Hotkey
Description
F1
Open MakeupDirector help.
Operational
Ctrl+Z
Undo last change.
Ctrl+Y
Redo last change.
Ctrl+R
Reset changes to previously saved status.
Ctrl+[
Rotate photo left 90 degrees.
Ctrl+]
Rotate photo right 90 degrees.
Spacebar
Zoom to fit/100%.
Ctrl+Mouse wheel
Zoom in/out on photo in viewer window. Resize
photo thumbnails in browser panel when in
browser only mode.
Ctrl+Shift+C
Select face.
Ctrl+F
Update feature points.
Alt+F4
Close MakeupDirector.
38
Page 43

Technical S upp ort
Note: here are the steps to generate the system info DxDiag.txt file: Click
Windows (start) button, and then search for "dxdiag". Click Save All
Information button to save the DxDiag.txt file.
Chapter 10:
Technical Support
If you require technical support, then this chapter can help. It includes all the
information you need to find the answers you are looking for. You may also find
answers quickly by contacting your local distributor/dealer.
Before Contacting Technical Support
Before contacting CyberLink technical support, please take advantage of one or
more of the following free support options:
· consult the user’s guide or the online help installed with your program.
· refer to the Knowledge Base at the following link on the CyberLink web site:
http://www.cyberlink.com/support/search-product-result.do
· check the Help Resources page in this document.
When contacting technical support by e-mail or phone, please have the following
information ready:
· registered product key (your product key can be found on the software disc
envelope, the box cover, or in the e-mail received after you purchased
CyberLink products on the CyberLink store).
· the product name, version and build number, which generally can be found
by clicking on the product name image on the user interface.
· the version of Windows installed on your system.
· list of hardware devices on your system (capture card, sound card, VGA card)
and their specifications. For fastest results, please generate and attach your
system info using the DxDiag.txt.
· the wording of any warning messages that were displayed (you may want to
write this down or take a screen capture).
39
Page 44

Cyb erLink MakeupDirecto r Help
Note: you must first register as a member before using CyberLink web
support.
Language
Web Support UR L
English
http://www.cyberlink.com/cs-help
Traditional Chinese
http://tw.cyberlink.com/cs-help
Japanese
http://jp.cyberlink.com/cs-help
Spanish
http://es.cyberlink.com/cs-help
Korean
http://kr.cyberlink.com/cs-help
Simplified Chinese
http://cn.cyberlink.com/cs-help
German
http://de.cyberlink.com/cs-help
French
http://fr.cyberlink.com/cs-help
Italian
http://it.cyberlink.com/cs-help
· a detailed description of the problem and under what circumstances it
occurred.
Web Support
Solutions to your problems are available 24 hours a day at no cost on the CyberLink
web site:
CyberLink provides a wide range of web support options, including FAQs, in the
following languages:
Help Resources
The following is a list of help resources that may assist you when using any of
CyberLink's products.
· Acc ess CyberLink's Know ledge base and FAQ (frequently asked questions):
http://www.cyberlink.com/cs-resource
· View video tutorials for your software:
http://directorzone.cyberlink.com/tutorial/
40
Page 45

Technical S upp ort
Note: CyberLink’s user community forum is only available in English and
German.
· Ask questions and get answers from our users on the CyberLink Community
Forum: http://forum.cyberlink.com/forum/forums/list/ENU.page
41
Page 46

Cyb erLink MakeupDirecto r Help
42
Page 47

Index
2
2 tone 24
custom 7
B
Beauty Circle 33
downloading looks 28
uploading looks 28
Blemish removal 19
Blush 18
Index
E
Export
formats 33
Extend
display 15
Eye liner 20
Eye shadow 21
Eyebrows 22
Eyelashes 20
Eyes
bags 23
brighten 23
color 22
double eyelid 23
enlargen 23
red-eye 24
C
Color
custom 6
hair 25
lips 24
Contours 18
Custom colors 6
D
Double eyelid 23
Download
looks 28
F
Face
contours 18
selecting 12
shape 18
Facebook 34
Feature points 12
Formats
export 33
import 3
Foundation 17
Full screen 14
43
Page 48

Cyb erLink MakeupDirecto r Help
H
Hair color 25
Help 40
History 14, 31
Hotkeys 37
whiten teeth 25
N
Navigation 14
Nose
enhancing 19
I
Import
photos 3
L
Language 35
Lipstick 24
Looks 27
downloading 28
exporting 29
managing custom 29
sharing 28
uploading 28
M
Makeup
applying 17
Makeup tips 14
Mouth
lip color 24
open 12
smile 25
44
O
Original photo 14, 17
P
Photos
importing 3
original 17
saving 33
sharing 33, 34
supported formats 3
viewing original 14
Preferences 35
Presets 27
R
RAW 3
Red-eye removal 24
S
Secondary monitor 15
Share
Page 49

Share
on Beauty Circle 33
on Facebook 34
Shine removal 19
Skin
blemish removal 19
shine removal 19
smoothening 17
tone 17
Smile 25
Supported formats 3
System requirements 2
T
Technical support 39
Teeth whitener 25
Tips 14
Index
U
UI language 35
Updates 1, 35
W
Web support 40
45
 Loading...