

Page 1
also includes:
Corel R.A.V.E.
TM
2
USER GUIDE
Page 2

CorelDRAW® 11 and Corel R.A.V.E.™ 2 User Guide
The contents of this user guide and the associated CorelDRAW and Corel R.A.V.E.
software are the property of Corel Corporation and its respective licensors, and are
protected by copyright. For more complete copyright information about CorelDRAW,
please refer to the About CorelDRAW section in the Help menu of the software
(Windows) or the About CorelDRAW 11 section in the CorelDRAW 11 menu of the
software (Mac OS). For more complete copyright information about Corel R.A.V.E.,
please refer to the About Corel R.A.V.E. section in the Help menu of the software
(Windows) or the About Corel R.A.V.E. 2.0 section in the Corel R.A.V.E. 2.0 menu of
the software (Mac OS).
© 2002 Corel Corporation. All rights reserved.
Corel, the Corel logo, CorelDRAW, Corel R.A.V.E., CorelTUTOR, procreate,
deepwhite, Perfect Shapes, PowerClip, Docker, and Scrapbook are trademarks or
registered trademarks of Corel Corporation and/or its subsidiaries in Canada, U.S.,
and/or other countries. Microsoft, Visual Basic, Windows NT, and Windows are
registered trademarks of Microsoft Corporation in the United States and/or other
countries. Macintosh, Mac, and Sherlock are registered trademarks of Apple
Computer, Inc., registered in the United States and other countries. QuickTime is a
trademark used under license. QuickTime is registered in the United States and other
countries. Adobe, Acrobat, Reader, Illustrator, Photoshop, PostScript, and PostScript
3 are registered trademarks of Adobe Systems Incorporated in the United States
and/or other countries. ColorSync and Kodak are registered trademarks of Eastman
Kodak Company. Java and JavaScript are trademarks of Sun Microsystems, Inc.
Hexachrome, PANTONE, and PANTONE MATCHING SYSTEM are registered
trademarks of Pantone, Inc. Netscape and Netscape Navigator are registered
trademarks of Netscape Communications Corporation. Macromedia Flash is a
trademark of Macromedia, Inc. TRUMATCH is a registered trademark of Trumatch,
Inc. Bitstream, TrueDoc, Font Reserve, and Font Navigator are registered trademarks
of Bitstream, Inc. Digimarc is a registered trademark of Digimarc Corporation. Other
product, font, and company names and logos may be trademarks or registered
trademarks of their respective companies.
005222
Page 3

Page 4

Book Contents
Table of contents ...............i
Welcome .................1
Section 1: CorelDRAW ............13
Section 2: Corel R.A.V.E. ...........329
CorelDRAW Index .............437
Corel R.A.V.E. Index .............457
Page 5

Page 6

Table of Contents
Welcome.......................1
About Corel Corporation .................1
Registering Corel products ................1
Customer support ...................2
Customer feedback ...................3
Documentation conventions ................3
Installing and uninstalling applications.............4
Getting help .....................6
Using CorelTUTOR ..................7
VBA Programming Guide
Other resources ....................8
SECTION 1: CorelDRAW
Workspace tour ....................13
CorelDRAW terminology and concepts ............13
CorelDRAW application window ..............14
CorelDRAW workspace tools ...............16
Getting started in CorelDRAW ...............27
Starting and opening drawings ...............27
Finding and inserting drawing content ............29
Exploring the basic features of CorelDRAW ...........30
Working with templates .................31
Undoing, redoing, and repeating actions ............33
Accessing drawing information ...............35
Zooming and panning .................35
Previewing a drawing ..................37
Backing up and recovering files ..............39
Saving drawings ...................40
Closing drawings and quitting CorelDRAW...........42
.............8
Working with lines, outlines, and brush strokes .........43
Drawing lines ....................43
Table of contents i
Page 7

Formatting lines and outlines ...............50
Closing multiple line segments ...............53
Applying brush strokes .................54
Spraying objects along a line ...............55
Drawing flow and dimension lines ..............58
Drawing shapes ...................63
Drawing rectangles and squares ..............63
Drawing ellipses, circles, arcs, and wedges ...........65
Drawing polygons and stars ................67
Drawing spirals....................69
Drawing grids ....................70
Drawing predefined shapes ................71
Working with objects .................73
Selecting objects ...................73
Copying, duplicating, and deleting objects ...........76
Positioning objects ...................77
Aligning, distributing, and snapping objects ..........79
Changing the order of objects ...............82
Sizing and scaling objects ................83
Rotating and mirroring objects ...............85
Grouping objects ...................87
Combining objects...................89
Shaping objects ...................93
Working with curve objects ................93
Skewing and stretching objects ...............98
Smudging objects ..................101
Roughening objects ..................103
Applying distortion effects ................105
Shaping objects using envelopes ..............109
Splitting and erasing portions of objects ...........111
Trimming objects...................114
Welding and intersecting objects ..............116
Blending objects ...................118
Creating PowerClip objects ...............124
ii Table of contents
Page 8

Working with symbols .................127
Creating, editing, and deleting symbols............127
Using symbols in drawings ...............129
Sharing symbols between drawings .............131
Reference: Working with symbols .............131
Filling objects ....................135
Applying uniform fills .................135
Applying fountain fills .................136
Applying pattern fills .................138
Applying texture fills .................140
Applying mesh fills ..................142
Working with fills ..................144
Working with color ..................147
Choosing colors ...................147
Creating custom color palettes ..............152
Opening and editing custom color palettes ..........153
Understanding color models ...............154
Managing color for display, input, and output .........157
Understanding the Color management dialog box ........157
Working with color profiles ...............159
Choosing advanced color management settings .........162
Correcting colors for display ...............165
Adding three-dimensional effects to objects ..........167
Contouring objects ..................167
Applying perspective to objects ..............170
Creating vector extrusions ................172
Creating drop shadows .................178
Changing the transparency of objects ............181
Applying transparencies ................181
Applying merge modes .................184
Using lenses with objects ................189
Applying lenses ...................189
Editing lenses ....................192
Table of contents iii
Page 9

Working with drawing pages and layout tools .........193
Specifying the page layout ................193
Choosing a page background ...............195
Adding, renaming, and deleting pages ............196
Using the rulers ...................198
Calibrating the rulers .................199
Setting up the grid ..................200
Setting up guidelines .................201
Setting the drawing scale ................204
Working with layers .................207
Creating layers ...................207
Changing layer properties and stacking order ..........210
Moving and copying objects between layers ..........212
Printing layers ...................212
Adding and formatting text ...............215
Adding and selecting text ................215
Changing the appearance of text ..............218
Aligning and spacing text ................221
Shifting and rotating text ................223
Finding, editing, and converting text ............224
Moving text ....................226
Fitting text to a path .................226
Formatting paragraph text ................228
Combining and linking paragraph text frames .........231
Wrapping paragraph text around objects and text ........233
Embedding graphics and adding special characters ........234
Managing fonts ...................237
Substituting unavailable fonts ...............237
Embedding fonts ...................239
Using Font Navigator (Windows) .............240
Using Font Reserve (Mac OS) ...............240
Working with bitmaps .................241
Converting vector graphics to bitmaps ............241
iv Table of contents
Page 10

Adding bitmaps ...................242
Cropping and editing bitmaps ..............243
Applying special effects to bitmaps .............245
Applying color and tone effects ..............248
Changing color modes in bitmaps .............251
Changing the color mode of bitmaps ............251
Changing bitmaps to a black-and-white image .........252
Changing bitmaps to the paletted color mode .........254
Changing bitmaps to duotones ..............257
Creating Web-enabled objects ...............261
Using preset Internet objects ...............261
Optimizing bitmaps for the World Wide Web .........263
Creating rollovers ..................264
Creating Web-compatible text ..............266
Working with bookmarks and hyperlinks ...........267
Publishing to the Web .................271
Preparing files and objects for Web publishing .........271
Publishing to HTML .................274
Printing ......................277
Printing your work ..................277
Laying out print jobs .................279
Previewing print jobs .................280
Printing to a PostScript printer ..............282
Commercial printing ..................285
Preparing a print job for a service bureau ...........285
Working with imposition layouts ..............287
Printing printer’s marks ................290
Printing color separations ................293
Specifying In-RIP trapping settings .............295
Printing to film ...................298
Publishing to PDF ..................301
Saving documents as PDF files ..............301
Reducing PDF file size .................303
Table of contents v
Page 11

Preparing PDF files for a service bureau ...........305
Optimizing PDF files .................307
Importing and exporting files ..............309
Importing files ...................309
Exporting files ...................313
Working with graphic, text, and color styles .........317
Creating, applying, and editing graphic or text styles .......317
Creating and applying color styles .............319
From Adobe Illustrator to CorelDRAW ...........323
Comparing terminology.................323
Comparing tools ...................324
SECTION 2: Corel R.A.V.E.
Workspace tour ...................329
Corel R.A.V.E. terminology and concepts ...........329
Corel R.A.V.E. application window .............330
Corel R.A.V.E. workspace tools ..............332
Getting started in Corel R.A.V.E. .............343
How Corel R.A.V.E. works................343
Starting Corel R.A.V.E. and opening movies ..........344
Setting the properties of movies ..............345
Importing files ...................347
Finding and inserting images ...............348
Undoing, redoing, and repeating actions ...........350
Saving movies ....................351
Backing up and recovering files ..............352
Closing movies and quitting Corel R.A.V.E. ..........354
Working with stage layout and views ............357
Setting up the rulers..................357
Setting up the grid ..................358
Setting up guidelines .................359
Zooming and panning .................361
vi Table of contents
Page 12

Animating objects ...................365
Understanding animation methods and terms ..........365
Increasing the life span of objects .............366
Tweening objects ...................367
Tweening groups of objects ...............376
Repeating animated objects ...............377
Animating blends ..................378
Creating animation sequences from groups...........380
Animating objects frame-by-frame .............381
Reference: Animating objects ...............381
Animating text ....................385
Tweening text ....................385
Creating animated text effects...............387
Editing and previewing animation .............391
Working with timelines.................391
Working with tweens .................393
Using sound in movies .................395
Displaying multiple frames on the stage ...........396
Previewing animation .................397
Working with symbols and sprites .............399
Creating, editing, and deleting symbols............399
Using symbols in movies ................401
Creating, editing, and deleting sprites ............403
Using sprites in movies .................405
Sharing symbols and sprites between movies ..........407
Reference: Working with symbols and sprites ..........408
Creating interactive objects................413
Creating rollovers ..................413
Editing rollovers ...................416
Repeating animation in rollovers ..............417
Adding sound to rollovers ................419
Creating hyperlinks ..................419
Using behaviors ...................421
Table of contents vii
Page 13

Playing, stopping, and controlling movies ...........421
Controlling quality, visibility, and sound ...........423
Loading and unloading movies ..............424
Adding sound and hyperlinks ...............425
Adding and removing behaviors ..............426
Viewing and editing behaviors ..............431
Exporting and publishing movies .............433
Exporting movies...................433
Publishing movies to the World Wide Web ..........435
CorelDRAW Index ..................437
Corel R.A.V.E. Index .................457
viii Table of contents
Page 14

Welcome
CorelDRAW® is an intuitive graphics design application that gives designers a more
enjoyable work experience. CorelDRAW is built and designed to meet the demands of
today’s working designer to create ads or collateral for print or for the Web.
Corel R.A.V.E.™ makes it easy to create a wide range of animated graphics — from
animated logos and navigation controls to interactive animated graphics for the Web.
The Corel R.A.V.E. application combines the familiar graphics capabilities and user
interface of CorelDRAW with a powerful yet easy-to-use set of animation features.
In this section, you’ll learn about
Corel Corporation
registering Corel products
customer support
customer feedback
documentation conventions
installing and uninstalling applications
getting Help
using CorelTUTOR™
VBA programming guide
other resources
About Corel Corporation
Founded in 1985, Corel Corporation (www.corel.com) is a leading technology
company that offers software for home and small business users, creative professionals
and enterprise customers. With its headquarters in Ottawa, Canada, Corel’s common
stock trades on the Nasdaq Stock Market under the symbol CORL and on the
Toronto Stock Exchange under the symbol COR.
Registering Corel products
Registering Corel products is important. Registration provides you with timely access
to the latest product updates, valuable information about product releases, and access
Welcome 1
Page 15

to free downloads, articles, tips and tricks, and special offers. Also, when you register
a product, you are eligible for 30 days of free technical support.
You can register when you install the application, or choose to register at a later date.
You can register using the following methods:
online — you can launch online registration if you are connected to the Internet
when you install the Corel graphics application. If no Internet connection is
detected, a list of options displays in a dialog box.
FTP — you can complete the registration form and it will be sent automatically
when an Internet connection is detected
by phone — you can call the Corel Customer Service Center nearest you
For more information about registering a Corel product, visit
www.corel.com/support/register.
Customer support
Corel Support Services can provide you with prompt and accurate information about
Corel product features, specifications, pricing, availability, services, and technical
support.
World Wide Web
For information about Corel technical and customer service support, visit
www.corel.com/support.
Online service options Description
Support newsgroups Let you exchange information, tips and
techniques with other users of Corel
products
Corel® Knowledge Base Lets you read, print, and download
documents that contain answers to many
technical questions or problems
FAQs Answers common user questions
Downloads Lets you download service packs, printer
drivers, network administration guides, and
product information
2 User Guide
Page 16

Telephone
You can telephone Corel Support Services with your questions. For information about
the levels of service that Corel provides, visit www.corel.com/support.
North America — you can call Corel Support Services by calling our
1-800-772-6735 toll-free line. The hours of operation are 8:30 a.m. to 7:30 p.m.,
Monday to Friday, Eastern Standard Time (EST).
Outside North America — you can call a local authorized Corel Support Services
partner from a toll line at +353-1-213-3912.
Mail, fax, and email
You can send specific customer-service questions to Corel Support Services
representatives by mail, fax, and email.
Corel Corporation
Support Services
1600 Carling Avenue
Ottawa, Ontario
Canada K1Z 8R7
fax: 1-613-761-9176
email: custserv@corel.com
Customer feedback
If you have any comments or suggestions about CorelDRAW or Corel R.A.V.E., you
can send them by email to drawsuggest@corel.com.
If you have any comments or suggestions about the user guides, Help, and tutorials,
you can send them by email to drawdoc@corel.com or by regular mail to the
address below. You can check the product Web site for the latest news, tips and tricks,
and product upgrade information. Go to www.corel.com and follow the links to the
product site.
Creative Products Documentation Manager
Corel Corporation
1600 Carling Avenue
Ottawa, Ontario, Canada
K1Z 8R7
Documentation conventions
The table below describes important conventions used in the user guide and Help.
Welcome 3
Page 17

Convention Description Examples
Menu } Menu command
list box
Docker™ window
(Windows®)
palette (Mac® OS)
Enter
Click the menu item
followed by the menu
command.
A list of options that drops
down when a user clicks the
down arrow button.
A window containing
available commands and
settings relevant to a
specific tool or task.
Enter key (Windows)
Return key (Mac OS)
A note contains information
that is important to the
preceding steps. It can
describe conditions under
which the procedure can be
performed
A tip contains suggestions
for performing the
preceding steps. It can
present alternatives to the
steps, and other benefits and
uses of the procedure. You
can also create a hyperlink
using the Internet toolbar.
Click File } Open.
Choose a value from the
Force field list box on the
property bar
Double-click the name of
the group in the Timeline
Docker window/palette.
Type a value in the Eraser
thickness box on the
property bar, and press
Enter.
You can’t copy or clone a
compound blend.
If you click the Equal
margins button, you must
specify values in the
Top/left margin boxes.
Trimming an object can
reduce the drawing file size.
Installing and uninstalling applications
The application’s Installer makes it easy to install Corel applications and components.
It lets you
install any Corel applications included in your software package
add components to a currently installed application
refresh files and configurations of currently installed applications
4 User Guide
Page 18

To install an application (Windows)
1 Close all applications.
2 Insert Disc 1 in the CD drive.
If the installation wizard does not start automatically, click Start on the Windows
taskbar, and click Run. Type D:\Setup, where D is the letter that corresponds to
the CD drive.
3 Follow the instructions in the installation wizard and enable one of the following
options:
Typical — to install the default applications and components
Compact — to install the minimum components for the application to operate
Custom — to choose applications and writing tool components
4 Follow the instructions for installing and registering the application.
To install an application (Mac OS)
1 Close all applications.
2 Insert Disc 1 in the CD drive.
3 Double-click the CD icon on your desktop and double-click the Installer.
4 Enable one of the following options:
Easy install — to install the default applications and components
Custom install — to choose applications and components
5 Follow the instructions for installing and registering the application.
To uninstall applications (Windows)
1 On the Windows taskbar, click Start } Control Panel.
If your operating system is Windows 2000 or earlier, click Start } Settings }
Control Panel.
2 Double-click Add/Remove programs.
3 Choose a Corel application from the list, click Change/Remove, and enable the
Remove all option in the dialog box.
If your operating system is Windows 2000 or earlier, click the Remove button.
4 Follow the InstallShield® wizard instructions.
Welcome 5
Page 19

You can choose whether the uninstalling process will remove user files such as
preference, presets, user-created fills, customized files, and so on.
To uninstall applications (Mac OS)
1 Drag the Corel application folder to the Trash.
2 Open the Users\username\Library folder where you have Mac OS installed.
(username is your Mac OS username: for example, jsmith)
If you do not have a user profile, open Users\Corel\ Library.
3 Drag the folder Preferences\Corel application Preferences to the Trash.
(application is the name of the installed Corel application: for example, Corel®
Graphics Suite 11 Preferences.)
Getting help
You can get help from the accompanying user guide or directly from the user
interface. You can find topics from the Help by using the table of contents and search
tool. You can also print a Help topic and display Help topics relevant to the task you
are performing.
Help is available through the following tools:
User guide — provides commonly used procedures and information. Chapters
ending with From here tables contain keywords that direct you to additional
topics in the Help.
Help — lets you access Help directly from the user interface and find topics using
the contents topic, index, and word/phrase search tool
ToolTips — lets you access tips for using the application’s icons and buttons. To
view a ToolTip, position the cursor over an icon, button, or other application
control.
To use Help (Windows)
1 Click Help } Help topics.
2 Click one of the following tabs:
Contents — lets you browse through topics in the Help
Index — lets you use the index to find a topic
Search — lets you search the full text of the Help for a particular word. For
example, if you are looking for information about RGB color mode, you can
type “RGB” to display a list of relevant topics.
6 User Guide
Page 20

You can also
View Help for a dialog box
Print a specific Help topic Open a Help topic, click the frame you
Click the Help button.
want to print, and click Print.
You can also launch Help by pressing F1.
To use Help (Mac OS)
1 Click Help } Help topics.
2 Choose a section title from the contents list.
3 Click a topic title.
You can also
Search for a topic by keyword
Print a specific Help topic
View Help for a dialog box
The Help button returns you to the Mac OS Help Center.
Type a keyword and click Ask.
Click File } Print. Select a printer and
printer options, then click Print.
Click the Help button .
To return to the contents page from a procedure or overview topic, click the
Table of contents button at the bottom of the page.
Using CorelTUTOR
CorelTUTOR provides a series of project-based tutorials that introduce you to basic
and advanced features of CorelDRAW and Corel R.A.V.E.
To access CorelTUTOR
Click Help } CorelTUTOR.
Welcome 7
Page 21

VBA Programming Guide
The new VBA Programming Guide for CorelDRAW 11 will help you automate tasks
and create custom solutions using VBA in CorelDRAW. If you installed CorelDRAW
using the Typical install, or a Custom install that included VBA, then the guide is
accessible from a link in the CorelDRAW VBA Help.
Other resources
Corel has training partnerships with other firms and provides professional services for
its software products. The Corel Designer Web site contains a wealth of graphics
resources.
Training
Corel Training Events
Maximize your skills and attend a Corel® Training Camp — special intensive
Training Events held throughout North America on various Corel products. All
Training Camps are delivered by a Corel Training Specialist, with hands-on
instruction, exercises and practical real-world projects. To look at the training
schedule or to register for a course, please visit:
www.corel.com/trainingschedule.
Corel Customized Training
Once you have Corel applications running on your computers, our team of expert
Corel Training Specialists can help you make the most of them with customized
training, tailored to the specific needs of your work environment. We will help you
develop a custom curriculum which is practical and relevant to the needs of your
organization. For more information about Corel Customized Training, please visit
www.corel.com/customizedtraining.
Corel Training Partners (CTP)
A Corel® Training Partner is an independent, officially accredited local
organization that provides training on Corel products and is located worldwide for
your convenience. To find a partner near you, please visit
www.corel.com/trainingpartners.
Corel Corporate Services
Corel is committed to getting you up and running quickly with time and
money-saving workflow solutions. To simplify the process of deploying Corel
applications across your organization, our Corporate Services department offers a
8 User Guide
Page 22

comprehensive range of cost-effective services to meet your technology needs. This
group brings together highly skilled experts from across the company who are
dedicated to providing top-notch solutions. Our knowledgeable team is ready to offer
assistance through all stages of your project, from application development and
support to software systems integration and training.
For more information on Corel Corporate Services, please contact
proservices@corel.com.
Designer.com
Users are encouraged to visit Corel’s Designer.com Web site. It contains articles, tips
and tricks, free clipart, product news, tutorials, and other graphics resources to
inspire, excite, and illuminate. Visit www.designer.com to start.
Welcome 9
Page 23

Page 24
SECTION 1: CorelDRAW
CorelDRAW
Page 25

Page 26

Workspace tour 1
Becoming familiar with the terminology and workspace of CorelDRAW will help you
easily follow this user guide’s concepts and procedures.
In this section, you’ll learn about
CorelDRAW terminology and concepts
CorelDRAW application window
CorelDRAW workspace tools
CorelDRAW terminology and concepts
Before you get started with CorelDRAW, you should be familiar with the following
terms.
Term Description
object An element in a drawing such as an image,
shape, line, text, curve, symbol, or layer.
drawing The work you create in CorelDRAW: for
example, custom artwork, logos, posters,
and newsletters
Vector graphic An image generated from mathematical
descriptions that determine the position,
length, and direction in which lines are
drawn.
bitmap An image composed of grids of pixels or
dots
Docker window/palette A window containing available commands
and settings relevant to a specific tool or
task
flyout A button that opens a group of related tools
or menu items
Workspace tour 13
Page 27
Term Description
Artistic text A type of text to which you can apply
special effects, such as shadows
Paragraph text A type of text to which you can apply
formatting options, and which can be edited
in large blocks
CorelDRAW application window
When you launch CorelDRAW, the application window opens containing a drawing
window. The rectangle in the center of the drawing window is the drawing page
where you create your drawing. Although more than one drawing window can be
opened, you can apply commands to the active drawing window only.
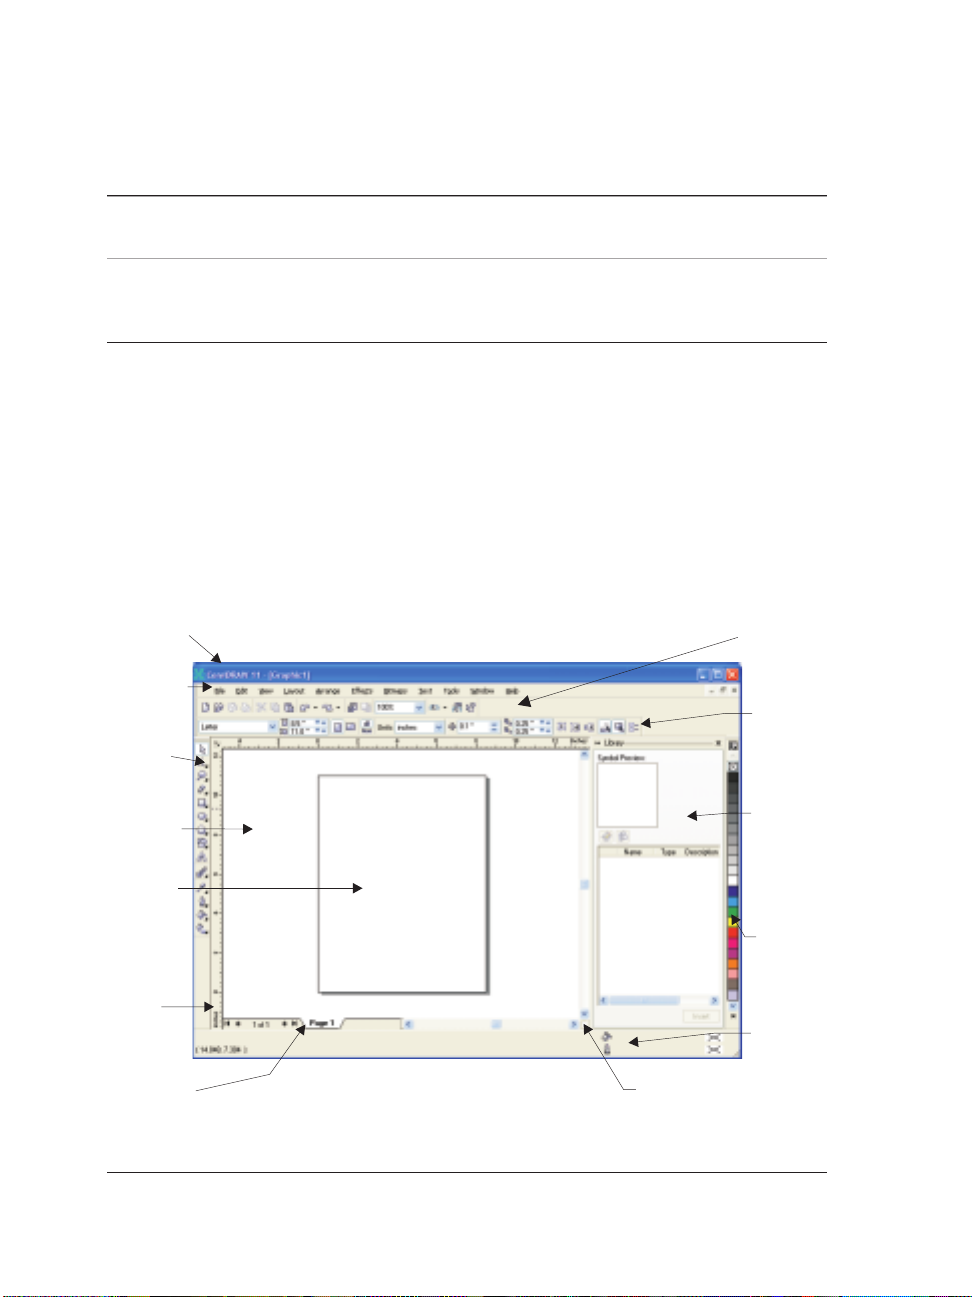
The CorelDRAW application window appears below. A description of its parts
follows.
Title bar
Menu bar
Toolbox
Drawing
window
Drawing
page
Ruler
Document
navigator
Toolbar
(standard)
Property
bar
Docker
window/
palette
Color
palette
Status
bar
Navigator
14 CorelDRAW: Chapter 1
Page 28

Part Description
Menu bar The area containing pull-down menu
options
Property bar A detachable bar with commands that
relate to the active tool or object. For
example, when the text tool is active, the
text property bar displays commands that
create and edit text.
Toolbar A detachable bar that contains shortcuts to
menu and other commands
Title bar The area displaying the title of the currently
open drawing
Rulers Horizontal and vertical borders that are
used to determine the size and position of
objects in a drawing
Toolbox A floating bar with tools for creating,
filling, and modifying objects in the
drawing
Drawing window The area outside the drawing page bordered
by the scroll bars and application controls
Drawing page The rectangular area inside the drawing
window. It is the printable area of your
work area.
Color palette (Windows) A dockable bar that contains
color swatches.
(Mac OS) A free floating bar that contains
the current color mode
Docker window/palette A window containing available commands
and settings relevant to a specific tool or
task
Workspace tour 15
Page 29

Part Description
Status bar An area at the bottom of the application
window that contains information about
object properties such as type, size, color,
fill, and resolution. The status bar also
shows the current mouse position.
Document navigator The area at the bottom left of the
application window that contains controls
for moving between pages and adding pages
Navigator A button at the bottom-right corner
(Windows) or bottom-left corner (Mac OS)
that opens a smaller display to help you
move around a drawing
To toggle between displaying and hiding the status bar, click Window }
Toolbars } Status bar.
To toggle between displaying and hiding the rulers, see “To hide or display
the rulers” on page 198.
CorelDRAW workspace tools
Application commands are accessible through the menu bar, toolbars, toolbox,
property bar, and Docker windows (Windows) and palettes (Mac OS). The property
bar and Docker windows/palettes provide access to commands that relate to the
active tool or current task. The property bar, Docker windows/palettes, toolbars, and
toolbox can be opened, closed, and moved around your screen at any time.
You can customize many of these workspace tools to suit your needs. For more
information, see “Customizing your application” in the Help .
Standard toolbar
The standard toolbar contains buttons that are shortcuts to many of the menu
commands.
On Windows, the standard toolbar displays by default. To display the standard
toolbar on Mac OS, see “To customize toolbar position and display” in the Help .
For information about customizing the position, contents, and appearance of toolbars,
see “Customizing toolbars” in the Help.
16 CorelDRAW: Chapter 1
Page 30
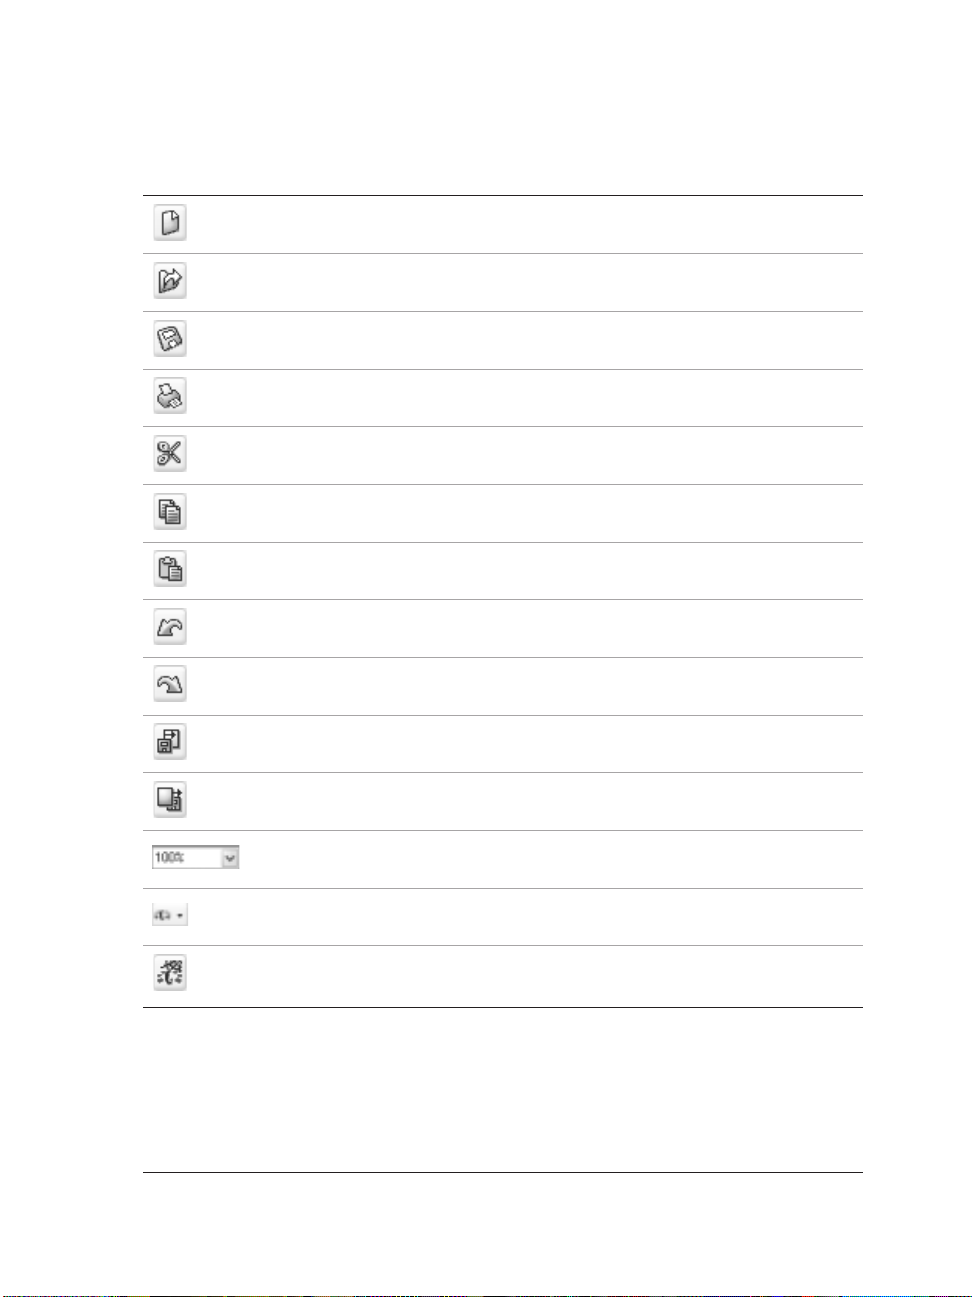
Click this button To
Start a new drawing
Open a drawing
Save a drawing
Print a drawing
Cut selected objects to the Clipboard
Copy selected objects to the Clipboard
Paste the Clipboard contents into a drawing
Undo an action
Restore an action that was undone
Import a drawing
Export a drawing
Set a zoom level
(Windows) Start Corel applications
(Windows) Launch to Corel Graphics
Community Web site
Workspace tour 17
Page 31

More about toolbars
In addition to the standard toolbar, CorelDRAW has toolbars for specific kinds of
tasks. For example, the Text toolbar contains commands relevant to using the Text
tool. If you use a toolbar frequently, you can display it in the workspace at all times.
For information about customizing the position, contents, and appearance of toolbars,
see “Customizing toolbars” in the Help.
The table below describes toolbars other than the standard toolbar.
Toolbar Description
Text Contains commands for formatting and
aligning text
Zoom Contains commands for zooming in and out
of a drawing page by specifying percentage
of original view, clicking the Zoom tool,
and selecting a page view
Internet Contains commands for Web-related tools
for creating rollovers and publishing to the
Internet
Print merge Contains commands for print merge items
that combine text with a drawing such as
creating and loading data files, creating
data fields for variable text, and inserting
print merge fields
Transform Contains commands for skewing, rotating,
and mirroring objects
(Windows) Visual Basic® for Applications Contains commands for editing, testing,
and running VBA commands
(Mac OS) You can add or remove toolbars by clicking Window } Toolbars }
More toolbars, and enabling or disabling a toolbar.
18 CorelDRAW: Chapter 1
Page 32

Exploring the toolbox
Flyouts open to display a set of related CorelDRAW tools. A small arrow in the
bottom, right corner of a toolbox button indicates a flyout: for example, the Shape
edit flyout . Clicking a flyout arrow opens a set of related tools. Clicking and
dragging the grab handles at the end of the flyout sets the flyout in its expanded
form.
The following table provides descriptions of the flyouts and tools in the CorelDRAW
toolbox.
Flyouts
Flyout Description
Shape edit
Zoom
Curve
Rectangle
Ellipse
Object
Perfect Shapes™
Lets you access the Shape, Knife, Eraser,
Smudge brush, Roughen brush, and Free
transform tools
Lets you access the Zoom and Hand tools
Lets you access the Freehand, Bézier,
Artistic media, Polyline, Pen, 3 point
curve, Dimension, and Interactive
connector tools
Lets you access the Rectangle and 3 point
rectangle tools
Lets you access the Ellipse and 3 point
ellipse tools
Lets you access the Graph paper, Polygon,
and Spiral tools
Lets you access the Basic shapes, Arrow
shapes, Flowchart shapes, Star shapes,
and Callout shapes tools
Workspace tour 19
Page 33

Flyout Description
Interactive tools
Eyedropper
Outline
Fill
Interactive fill
Tools
Lets you access the Interactive blend,
Interactive contour, Interactive
distortion, Interactive envelope,
Interactive extrude, Interactive drop
shadow, and Interactive transparency
tools
Lets you access the Eyedropper and
Paintbucket tools
Lets you access the Color Docker
window/palette, Outline pen and the
Outline color dialog boxes, and a selection
of outlines of various widths
Lets you access the Color Docker
window/palette, Fill color, Fountain fill,
Pattern fill, Texture fill, and PostScript®
fill dialog boxes
Lets you access Interactive fill and
Interactive mesh fill tools
Tool Description
The Pick tool lets you select and size, skew,
and rotate objects.
The Shape tool lets you edit the shape of
objects.
The Knife tool lets you cut through objects.
The Eraser tool lets you remove areas of your
drawing.
20 CorelDRAW: Chapter 1
Page 34

Tool Description
The Smudge brush tool lets you distort an
vector object by dragging along its outline
and distort a bitmap by dragging outside its
path.
The Roughen brush tool lets you distort the
outline of a vector object by dragging along
the outline.
The Free transform tool lets you transform
an object by using the Free rotation, Angle
rotation, Scale, and Skew tools.
The Zoom tool lets you change the
magnification level in the drawing window.
The Hand tool lets you control which part of
the drawing is visible in the drawing window
The Pen tool lets you draw curves one
segment at a time.
The Polyline tool lets you draw lines and
curves in preview mode.
The Freehand tool lets you draw single line
segments and curves.
The Bézier tool lets you draw curves one
segment at a time.
The 3 point curve tool lets you draw a curve
by defining the start, end, and center points.
The Artistic media tool provides access to
the Brush, Sprayer, Calligraphic, and
Pressure tools.
The Dimension tool lets you draw vertical,
horizontal, slanted, or angular dimension
lines.
The Interactive connector tool lets you join
two objects with a line.
Workspace tour 21
Page 35

Tool Description
The Rectangle tool lets you draw rectangles
and squares.
The 3 point rectangle tool lets you draw a
rectangle by dragging to create the rectangle
baseline and clicking to define its height.
The Ellipse tool lets you draw ellipses and
circles.
The 3 point ellipse tool lets you draw an
ellipse by dragging to create the center line
of the ellipse and clicking to define its height.
The Polygon tool lets you draw symmetrical
polygons and stars.
The Spiral tool lets you draw symmetrical
and logarithmic spirals.
The Graph paper tool lets you draw a grid
of lines similar to that on graph paper.
The Basic shapes tool lets you choose from a
full set of shapes, including hexagram, a
smiley face, and a right-angle triangle.
The Arrow shapes tool lets you draw arrows
of various shape, direction, and number of
heads.
The Flowchart shapes tool lets you draw
flowchart symbols.
The Star shapes tool lets you draw ribbon
objects and explosion shapes.
The Callout shapes tool lets you draw
callouts and labels.
The Text tool lets you type words directly on
the screen as artistic or paragraph text.
22 CorelDRAW: Chapter 1
Page 36

Tool Description
The Interactive blend tool lets you blend
two objects.
The Interactive contour tool lets you apply
a contour to an object.
The Interactive distortion tool lets you
apply a Push or Pull distortion, a Zipper
distortion, or a Twister distortion to an
object.
The Interactive envelope tool lets you
distort an object by dragging the nodes of
the envelope.
The Interactive extrude tool lets you apply
the illusion of depth to objects.
The Interactive drop shadow tool lets you
apply a drop shadow to an object.
The Interactive transparency tool lets you
apply transparencies to objects.
The Eyedropper tool lets you select a fill
from an object on the drawing window.
The Paintbucket tool lets you fill an object
on the drawing window after selecting a fill
using the Eyedropper tool.
The Interactive fill tool lets you apply
various fills.
Property bar
The property bar displays the most commonly used functions that are relevant to the
active tool or to the task you’re performing. Although it looks like a toolbar, the
property bar content changes depending on the tool or task.
For example, when you click the Text tool in the Toolbox, the property bar displays
Workspace tour 23
Page 37

only text-related commands. In the example below, the property bar displays text,
formatting, alignment, and editing tools.
You can customize the contents and position of the property bar to suit your needs.
For more information, see “Customizing the property bar” in the Help.
Docker windows and palettes
Docker windows (Windows) and palettes (Mac OS) display the same type of controls
as a dialog box, such as command buttons, options, and list boxes. Unlike most dialog
boxes, you can keep Docker windows/palettes open while working on a document, so
you can readily access the commands to experiment with different effects.
An example is the Object
properties Docker
window/palette. When
this Docker
window/palette is open,
you can click an object in
the drawing window and
view formatting,
dimensions, and other
properties of the object.
In Windows, Docker windows can be either docked or floating. Docking a Docker
window attaches it to the edge of the application window. Undocking a Docker
window detaches it from other parts of the workspace, so it can be easily moved
around. You can also collapse Docker windows to save screen space.
24 CorelDRAW: Chapter 1
Page 38

Status bar
The status bar displays information about selected objects (such as color, fill type, and
outline, cursor position, and relevant commands.
See “Customizing the status bar” in the Help for information about customizing the
contents and appearance of the status bar.
The graphic below shows some of the information displayed in a status bar.
Workspace tour 25
Page 39

Page 40

Getting started in CorelDRAW 2
Drawings are the work that you create and edit in CorelDRAW.
In this section, you’ll learn about
starting and opening drawings
finding and inserting drawing content
exploring the basic features of CorelDRAW
working with templates
undoing, redoing, and repeating actions
accessing drawing information
zooming and panning
previewing a drawing
backing up and recovering files
saving drawings
closing drawings and quitting CorelDRAW
Starting and opening drawings
CorelDRAW lets you start a new drawing from a blank page, from a template, or
from an existing drawing.
A blank page gives you the freedom to specify every aspect of a drawing.
A template provides you with a starting point and leaves the amount of customization
up to you. The templates included with CorelDRAW are available under the
following categories:
Full page
Label
Envelope
Side-fold
We b
For more information about creating and using templates, see “Working with
templates” on page 31.
Getting started in CorelDRAW 27
Page 41

Basing a new drawing on an existing drawing lets you reuse objects and page settings.
CorelDRAW lets you open existing drawings saved to a variety of file formats. For
information about the file formats you can open in CorelDRAW, see “File formats” in
the Help.
To start CorelDRAW (Windows)
Click Start } All programs } Corel Graphics Suite 11 } CorelDRAW 11.
To start CorelDRAW (Mac OS)
Double-click the CorelDRAW 11 icon in the application’s folder.
You can also start CorelDRAW from the Dock after you have installed the
application. To add the CorelDRAW icon to the Dock, drag the icon from
the application folder to the left of the line in the Dock.
To start a drawing
To Do the following
Start a drawing from a blank page
Start a drawing from a CorelDRAW
template
Click File } New.
Click File } New from template, click the
tab that corresponds to the template
category you want, and choose a template.
You can specify a layout style (template) by clicking Layout } Page setup
(Windows) or Document setup (Mac OS), clicking Layout in the list of
categories, and choosing a layout style from the Layout list box.
To open a drawing
1 Click File } Open.
2 Locate the folder where the drawing is stored.
3 Click a filename.
4 Click Open.
28 CorelDRAW: Chapter 2
Page 42

You can also open a drawing by clicking the Open button on the toolbar.
(Windows) If you want to view a thumbnail of the drawing, click the
Preview check box.
Finding and inserting drawing content
You can use clipart, photo images, and sounds stored on the Corel content CDs or
that are available online. The digital content manual contains pictures of the graphics
available on the CD and their folder locations.
In Windows, you can also access online images directly from Corel on the Web
through the Scrapbook™ Docker window.
Mac OS X has a content find-and-search tool, Sherlock®. You can use Sherlock to
browse for images using the thumbnail views or use keywords to search for content on
the CDs.
To browse for clipart, photos, and sound files (Windows)
1 Click Window } Dockers } Scrapbook } Browse.
2 Insert a Corel contents CD into the CD drive.
3 Double-click an icon in the CD list and navigate to a folder.
You can also
Browse for files on your computer or
network
Browse for images online
Double-click the Desktop icon, and
navigate to a folder.
Click the Content on the Web button.
To browse for images online, you must be connected to the Internet.
To change your browsing view in the Scrapbook Docker window, click the
flyout arrow, click View, and choose a view type.
Getting started in CorelDRAW 29
Page 43

To browse for clipart, photos, and sound files (Mac OS)
1 Insert a Corel contents CD into the CD drive.
2 Double-click the Sherlock icon in the Dock.
3 Double-click the contents CD icon in the list of disks.
4 Choose the folder you want to browse.
When you insert a CD into the CD drive, the CD’s icon displays on your
desktop. You can double-click it to browse through the content folders
inside.
For help on using Sherlock, click Help } Sherlock Help from the desktop.
To search for clipart, photos, and sound files (Windows)
1 Click Window } Dockers } Scrapbook } Search.
2 Insert a Corel contents CD into the CD drive.
3 Type a keyword in the Search for text box.
To search for clipart, photos, and sound files (Mac OS)
1 Insert a Corel contents CD into the CD drive.
2 Double-click the Sherlock icon in the Dock.
3 Enable the CD icon check box in the list of disks.
4 Enable the File names option.
5 Type a keyword.
6 Click the magnifying glass button.
For help on using Sherlock, click Help } Sherlock Help.
To insert an image or sound file
Drag the image or sound file to the drawing window.
Exploring the basic features of CorelDRAW
CorelDRAW has a virtually unlimited number of tools and capabilities to help you
create drawings. The following table provides you with the basic features of
CorelDRAW so that you can get started.
30 CorelDRAW: Chapter 2
Page 44

For information on See
Drawing lines “Working with lines, outlines, and brush
strokes” on page 43
Drawing shapes “Drawing shapes” on page 63
Creating and manipulating objects “Working with objects” on page 73
Adding color to objects “Filling objects” on page 135
Adding text to a drawing “Adding and formatting text” on page 215
Creating drawings for use on the World
Wide Web
Printing drawings “Printing” on page 277
“Publishing to the Web” on page 271
Working with templates
A template is a set of styles and page layout settings that govern the layout and
appearance of a drawing. You can use the default template (CorelDRAW.cdt)or
choose one from a wide variety of preset templates available in the application. For
information on starting a drawing from a template, see “Starting and opening
drawings”on page 27. If none of the preset templates meets your requirements, you
can create a template based on styles you create or styles taken from other templates.
For example, if you regularly put together a newsletter, you can save the newsletter’s
page layout settings and styles to a template.
When you create a new drawing using a template, CorelDRAW formats the page
using the template’s page layout settings and loads the template’s styles in the new
file.
You can edit a template by making changes to the styles, page layout settings, or
objects. For example, if you like a template but want to make it more versatile, you
can add styles that you’ve created or that you’ve taken from another template. For
information on setting page layout options, see “Specifying the page layout” on page
193. After you have started a drawing with a template, you can load a different
template. When you load a template, you can choose to load just the styles or to load
styles, page layout settings, and objects.
Getting started in CorelDRAW 31
Page 45

Use a template for drawing designs that you want to reuse.
To create a template
1 Click File } Save as.
2 Type a name in the File name list box (Windows) or Save as box (Mac OS).
3 Choose CDT - CorelDRAW template from the Save as type list box (Windows)
or choose CorelDRAW template from the Format list box (Mac OS).
4 Locate the folder where you want to save the template.
5 Click Save.
To edit a template
1 Click File } Open.
2 Choose CDT - CorelDRAW template from the Files of type list box (Windows)
or CorelDRAW template from the Show list box (Mac OS).
3 Locate the folder where the template is stored.
4 Double-click a template filename.
5 In the Open dialog box, enable the Open for editing check box.
To preview the contents of a template, enable the Preview check box.
32 CorelDRAW: Chapter 2
Page 46

To create a new file based on a saved template
1 Click File } Open.
2 Choose CDT - CorelDRAW template from the Files of type list box (Windows)
or CorelDRAW template from the Show list box (Mac OS).
3 Locate the folder where the template is stored.
4 Double-click a template filename.
5 Enable the New from template check box in the Open dialog box.
If, in addition to loading the template’s styles, you also want to load page settings
and objects, enable the With contents check box.
To load styles from another template
1 Click Tools } Graphic and text styles.
2 On the Graphic and text styles Docker window/palette, click the flyout button
and click Template } Load.
3 Locate the folder where the template is stored.
4 Click a template whose styles you want to load.
5 Click Open.
When you use the Load command, only the styles are loaded. CorelDRAW
does not use the template’s page layout settings and does not add objects
saved with the template to the page.
Undoing, redoing, and repeating actions
You can undo the actions you perform in a drawing, starting with the most recent
action. If you don’t like the result of undoing an action, you can redo it. Reverting to
the last saved version of a drawing also lets you remove one or more actions. Certain
actions applied to objects, such as stretching, filling, moving and rotating, can be
repeated to create a stronger visual effect.
Customizing the undo settings lets you increase or decrease the number of actions
that you can undo or redo.
Getting started in CorelDRAW 33
Page 47

To undo, redo, and repeat actions
To Do the following
Undo an action
Redo an action
Undo or redo a series of actions
Revert to the last saved version of a drawing
Repeat an action
When you undo a series of actions, all actions listed below the action you
choose are undone.
When you redo a series of actions, the action you choose and all actions listed
between it and the last undone action are redone.
You can repeat an action on another object or group of objects by selecting
the object or objects and clicking Edit } Repeat.
You can also undo or redo actions by clicking the Undo button or Redo
button on the Standard toolbar.
Click Edit } Undo.
Click Edit } Redo.
Click Tools } Undo Docker (Windows) or
Undo palette (Mac OS). Choose the action
that precedes all the actions you want to
undo, or choose the last action you want to
redo.
Click File } Revert.
Click Edit } Repeat.
To customize the undo settings
1 Do one of the following:
(Windows) Click Tools } Options.
(Mac OS) Click CorelDRAW 11 } Preferences.
2 In the Workspace list of categories, click General.
3 Type a value in the Regular box.
The value you specify is limited only by your computer’s memory resources.
The higher the value you specify, the greater the demand on memory
resources.
34 CorelDRAW: Chapter 2
Page 48

Accessing drawing information
You can access as you work drawing information such as the number of pages, fonts,
text statistics, color models used, and the types of objects the drawing contains. You
can also save and print this information.
To access drawing information
1 Click File } Document info.
2 Enable the check box beside each type of information you want to display.
You can also
Save drawing information
Print drawing information
Click Save as, specify a folder and filename,
and click Save.
Click Print.
Zooming and panning
You can change the view of a drawing by zooming in to get a closer look or by
zooming out to see more of the drawing. You can experiment with a variety of zoom
options to determine the amount of detail you want.
Another way in which you can view specific areas of a drawing is by panning. When
you work at high magnification levels or with large drawings, you may not be able to
see the whole drawing. Panning lets you view areas that aren’t displayed by moving
the page around in the drawing window.
While you are panning, you can zoom in and out. While you are zooming, you can
pan. This saves you from having to alternate between the two tools.
You can specify zooming and panning settings to zoom in quickly to detailed parts of
a drawing and zoom out to the larger context.
Getting started in CorelDRAW 35
Page 49

You can use the Hand tool to pan around a large image and view
particular areas.
To zoom
1 Open the Zoom flyout, and click the Zoom tool .
2 On the property bar, click one of the following buttons:
Zoom in
Zoom out
Zoom to selected
Zoom to all objects
Zoom to page
Zoom to page width
Zoom to page height
The Zoom to selected button is available only when you select one or more
objects before you open the Zoom flyout.
When you are not editing text, you can also access the Zoom tool by
pressing the Z key.
You can also zoom in by double-clicking or dragging anywhere in the
drawing window using the Hand tool. To zoom out, double right-click
(Windows) or Control + double-click (Mac OS) in the drawing window.
36 CorelDRAW: Chapter 2
Page 50

To pan in the drawing window
1 Open the Zoom flyout, and click the Hand tool .
2 Drag in the drawing window until the area you want to view displays.
When you are not editing text, you can also access the Hand tool by
pressing the H key.
If you want to pan in the drawing window while zoomed in on the
drawing, click the Navigator button in the bottom-right (Windows) or
bottom-left (Mac OS) corner of the drawing window or the N key. Drag
the cross-haired pointer around in the Navigator pop-up window.
To establish default settings for zooming and panning
1 Do one of the following:
(Windows) Click Tools } Options.
(Mac OS) Click CorelDRAW 11 } Preferences.
2 In the list of categories, double-click Toolbox, and click Zoom, Hand tool.
3 To specify what you want the Zoom or Hand tool to do when you right-click
(Windows) or Control + click (Mac OS) it in the drawing window, enable one of
the following options:
Zoom out — zooms out by a factor of two
Context menu — displays a menu of commands that you can choose from to
zoom to a specific level
Previewing a drawing
You can preview a drawing to see how it will look when you print and export. When
you preview a drawing, only the objects on the drawing page and in the immediate
area of the drawing window are displayed, and you can see all layers that are set to
print in Object Manager. If you want to get a closer look at specific objects in a
drawing, you can select and preview them, too. When you preview selected objects,
the rest of the drawing is hidden.
Before you preview a drawing, you can specify the preview mode. The preview mode
affects the speed at which your preview displays and the amount of detail that is
displayed in the drawing window.
You can also display consecutive pages on the screen at the same time and create
objects that span two pages.
Getting started in CorelDRAW 37
Page 51

To preview a drawing
Click View } Full-screen preview.
Click anywhere on the screen, or press any key, to return to the application
window.
To preview selected objects
1 Select the objects.
2 Click View } Preview selected only.
3 Click View } Full-screen preview.
Click anywhere on the screen, or press any key, to return to the application
window.
If Preview selected only mode is enabled and no objects are selected, Full
screen preview displays a blank screen.
You can disable Preview selected only mode after you return to the
application window by clicking View } Preview selected only.
To specify the full screen preview mode
1 Do one of the following:
(Windows) Click Tools } Options.
(Mac OS) Click CorelDRAW 11 } Preferences
2 In the Workspace list of categories, click Display.
3 Enable one of the following options:
Use normal view — displays the drawing without PostScript fills or
high-resolution bitmaps without using anti-aliasing
Use enhanced view — displays the drawing with or without PostScript fills
with anti-aliasing to display a sharper version of your drawing
You can have PostScript fills display when you preview in Enhanced mode by
enabling the Show PostScript fills in enhanced view check box.
To view facing pages
1 Do one of the following:
38 CorelDRAW: Chapter 2
Page 52

(Windows) Click Layout } Page setup.
(Mac OS) Click Layout } Document setup.
2 In the Document, Page list of categories, click Layout.
3 Enable the Facing pages check box.
4 Choose one of the following settings from the Start on list box:
Left side — starts the document on a left-facing page
Right side — starts the document on a right-facing page
You will be unable to view facing pages if the document uses a Tent card or
Top fold card layout style, or if it contains multiple page orientations. The
Left side option is only available for the Full page and Book layout styles.
Backing up and recovering files
CorelDRAW can automatically save backup copies of drawings and prompt you to
recover them when you restart the program in the event of a system error.
The auto backup feature saves drawings that you have open and modified. During
any working session with CorelDRAW, you can set the time interval for automatically
backing up files and specify where you want the files to be saved: by default in your
temporary folder or to a specified folder.
You can recover backed-up files from the temporary or specified folder when you
restart CorelDRAW. Backup files are stored in either the temporary or the
user-specified folder. You can choose not to recover a file; however, that file is
automatically erased when you shut down the program normally.
To specify auto backup settings
1 Do one of the following:
(Windows) Click Tools } Options.
(Mac OS) Click CorelDRAW 11 } Preferences.
2 In the Workspace list of categories, click Save.
3 Enable the Auto-backup every check box, and choose a value from the Minutes
list box.
4 In the Always back-up to area, enable one of the following options:
Temporary folder — lets you save an auto backup file in the temporary folder
Specific folder — lets you specify the folder for an auto backup file
Getting started in CorelDRAW 39
Page 53

You can also
Create a backup file every time you save
Disable auto backup
Enable the Make backup on save check
box.
Choose Never from the Minutes list box.
Auto backup files are named auto_backup_of_filename and can be saved
in any folder you specify. Backup files created when you save a drawing are
named backup_of_filename and are always stored in the same folder as the
original drawing.
All open or modified files other than CorelDRAW file format (.cdr) will be
backed up as .cdr files.
You can cancel the creation of an auto backup file by pressing Esc while
saving is in progress.
To recover a backup file
1 Restart CorelDRAW.
2 Click OK in the File recovery dialog box.
3 Save and rename the file in specified folder.
Recovered files are named GraphicsX.cdr, where X is the numbered
increment.
If you click Cancel, CorelDRAW ignores the backup file and deletes it when
you exit the program normally.
Saving drawings
CorelDRAW lets you save a drawing as you work.
CorelDRAW offers advanced options that let you assign notes, keywords, and
thumbnails to drawings so that you can find them more easily.
By default, drawings are saved to the CorelDRAW file format (.cdr); however,
advanced save options let you choose other file formats as well. If you are saving a
drawing to use in another application, you must save it to a file format that is
supported by that application. You can also save a drawing to a previous version of
CorelDRAW. For information about file formats supported by CorelDRAW, see “File
40 CorelDRAW: Chapter 2
Page 54

formats” in the Help. For information about saving files to other formats, see
“Exporting files” on page 313.
A drawing can also be saved as a template, allowing you to create other drawings
with the same properties. CorelDRAW lets you save selected objects in a drawing. If
you are working on a large drawing, saving only the selected objects reduces the file
size, which can decrease the time it takes to load the drawing. For information about
saving a drawing as a template, see “Working with templates” on page 31.
To save a drawing
1 Click File } Save as.
2 Locate the folder where you want to save the file.
If you want to save notes or keywords with the file, type them in the
corresponding box.
If you want to specify advanced settings, click Advanced, and specify the
settings you want in the Preferences (Windows) dialog box or Options (Mac
OS) dialog box.
3 Type a filename in the File name list box (Windows) or Save as list box (Mac OS).
4 Click Save.
If you want to save changes made to a previously saved drawing, click File
} Save.
You can also save a drawing by clicking the Save button on the Standard
toolbar.
To save only selected objects
1 Select the objects.
2 Click File } Save as.
3 Enable the Selected only check box.
4 Locate the folder where you want to save the file.
5 Type a filename in the File name list box (Windows) or Save as box (Mac OS).
6 Click Save.
Getting started in CorelDRAW 41
Page 55

Closing drawings and quitting CorelDRAW
You can close one or all open drawings at any time before quitting CorelDRAW.
To close drawings
To close Do the following
One drawing
All open drawings
Click File } Close.
Click Window } Close all.
To quit CorelDRAW
Do one of the following:
(Windows) Click File } Exit.
(Mac OS) Click CorelDRAW 11 } Preferences } Quit CorelDRAW 11.
You can also quit CorelDRAW by pressing Alt + F4 (Windows) or
Command + Q (Mac OS).
From here
For more information about (Windows) In the Help index, see
(Mac OS) In the Help Viewer, type
Working with views views
42 CorelDRAW: Chapter 2
Page 56

Working with lines,
outlines, and brush strokes
CorelDRAW lets you add lines and brush strokes using a variety of techniques and
tools. After you draw lines or apply brush strokes to lines, you can format them. You
can also format the outlines that surround objects.
CorelDRAW provides preset objects that you can spray along a line.
You can create flow and dimension lines in drawings.
In this section, you’ll learn about
drawing lines
formatting lines and outlines
closing multiple line segments
applying brush strokes
spraying objects along a line
drawing flow and dimension lines
3
Drawing lines
CorelDRAW lets you draw all kinds of different lines, from curved or straight lines to
calligraphic lines. You can create a line that is drawn as you drag the mouse. You can
create segments that are straight and curved in the same line. You can draw straight
or curved segments and then add one node at a time. You can also draw a curve by
specifying width and height.
Working with lines, outlines, and brush strokes 43
Page 57

You can draw a curved line by specifying its width (left), specifying its
height (center), and clicking the page (right).
Some lines have nodes and control points that you can manipulate to shape lines as
you draw. For information about node types, see “Working with curve objects” on
page 93.
You can draw multi-segment lines using the Bézier tool, by clicking each
time you want the line to change direction.
44 CorelDRAW: Chapter 3
Page 58

You can draw curves using the Bézier tool, by dragging the control points
at the ends of the Bézier curve.
CorelDRAW also lets you simulate the effect of a calligraphic pen when you draw
lines. Calligraphic lines vary in thickness according to the direction of the line and the
angle of the pen nib. By default, calligraphic lines display as closed shapes drawn with
a pencil. You can control the thickness of a calligraphic line by changing the angle of
the line you draw in relation to the calligraphic angle you choose. For example, when
the line you draw is perpendicular to the calligraphic angle, the line is at the
maximum thickness specified by the pen width. Lines drawn at the calligraphic angle,
however, have little or no thickness.
A calligraphic pen allows you to draw lines of various thicknesses.
Working with lines, outlines, and brush strokes 45
Page 59

CorelDRAW lets you create pressure-sensitive lines which vary in thickness. You can
create this effect using the mouse or a pressure-sensitive pen and graphics tablet. Both
methods result in lines with curved edges and varying widths along a path. For
information about using a pressure-sensitive pen on a graphics tablet, see the
manufacturer’s instructions.
A flower drawn by using three different artistic media lines: calligraphic
lines (left); pressure-sensitive lines (center) and the lineflat preset line
(right).
CorelDRAW provides preset lines that let you create thick strokes in a variety of
shapes. After you draw a calligraphic or preset line, you can apply a fill to it as you
would to any other object. For information about applying fills, see “Filling objects”
on page 135.
To draw a straight line
1 Open the Curve flyout , and click the Freehand tool .
2 Click where you want to start the line, and click where you want to end it.
You can also
Draw a straight line using the Polyline tool Open the Curve flyout and click the
Polyline tool . Click where you want to
start the line segment, and click where you
want to end the line segment. Double-click
to end the line.
46 CorelDRAW: Chapter 3
Page 60

You can also
Draw a straight line using the Bézier tool Open the Curve flyout, and click the
Bézier tool . Double-click where you
want to start the line. Click where you want
to end the line. If you want to create a
multi-segment line, double-click where you
want the new line segment to end.
Continue this process until the line has as
many segments as you want. Double-click
to finish the line.
Draw a straight line using the Pen tool Open the Curve flyout, and click the Pen
tool . Double-click where you want to
start the line. Click where you want to end
the line. If you want to create a jagged line,
double-click where you want the new line
segment to end. Continue this process until
the line has as many segments as you want.
Double-click to finish the line.
Preview a line using the Pen tool Click the Preview mode button in the
property bar. Click on the drawing page,
and release the mouse button. Move the
mouse and click to finish the line.
Add line segments to an existing line
Create a closed shape from two or more
connected lines
Using the Freehand tool, click the end
node of a selected line, and click where you
want the new segment to end.
Using the Freehand tool, click the end
node of a line with two segments. Click the
first node.
You can constrain a line created with the Freehand tool to a straight
vertical or horizontal line by holding down Ctrl (Windows) or Shift (Mac
OS) while you drag. You can change the angle of this line by clicking Tools
} Options (Windows) or clicking CorelDRAW 11 } Preferences (Mac
OS), clicking Edit in the Workspace list of categories and changing the
value in the Constrain Angle box.
Working with lines, outlines, and brush strokes 47
Page 61

To draw a curved line
1 Open the Curve flyout, and click the Freehand tool.
2 Click where you want to start the curve, and drag to draw the line.
You can also
Draw a curved line using the Polyline tool Open the Curve flyout, and click the
Polyline tool. Click where you want to start
the curve, and drag across the drawing
page. Double-click to finish the curve.
Draw a curved line using the Bézier tool Open the Curve flyout and click the Bézier
tool. Click where you want to place the first
node, and drag the control point in the
direction you want the curve to bend.
Release the mouse button. Position the
cursor where you want to place the next
node, and drag the control point to create
the curve you want. Double-click to finish
the curve.
Draw a curved line using the Pen tool Open the Curve flyout and click the Pen
tool. Click where you want to place the first
node, and drag the control point in the
direction you want the curve to bend.
Release the mouse button. Position the
cursor where you want to place the next
node, and drag the control point to create
the curve you want. Double-click to finish
the curve.
Preview a line using the Pen tool Click the Preview mode button in the
property bar. Click on the drawing page,
and release the mouse button. Move the
mouse and click to finish the curve.
You can erase a portion of a curved freehand line by holding down Shift and
dragging backward over the line before releasing the mouse button.
You can close an object with the Shape tool by opening the Shape flyout
and selecting a shape. Click on the Auto-close curve
button .
48 CorelDRAW: Chapter 3
Page 62

To draw a curve by specifying width and height
1 Open the Curve flyout, and click the 3 point curve tool .
2 Click where you want to start the curve, and drag to where you want the curve to
end.
3 Release the mouse button, and click where you want the center of the curve to be.
To draw a calligraphic line
1 Open the Curve flyout, and click the Artistic media tool .
2 Click the Calligraphic button on the property bar.
3 Type a value in the Calligraphic angle box on the property bar.
If you want to smooth the edges of the line, type a value in the Freehand
smoothing box on the property bar.
4 Drag until the line is the shape you want.
If you want to set the width of the line, type a value in the Artistic media tool
width box on the property bar.
The width you set is the maximum line width. The angle of the line you
draw in relation to the calligraphic angle determines the line’s actual width.
You can also access calligraphic lines by clicking Effects } Artistic media,
and specifying the settings you want on the Artistic media Docker
window/palette.
To draw a pressure-sensitive line
1 Open the Curve flyout, and click the Artistic media tool.
2 Click the Pressure button on the property bar.
If you want to smooth the edges of the line, type a value in the Freehand
smoothing box on the property bar.
3 Drag until the line is the shape you want.
If you want to change the width of the line, type a value in the Artistic media
tool width box on the property bar.
The width you set represents the line’s maximum width. The amount of
pressure you apply determines the line’s actual width.
Working with lines, outlines, and brush strokes 49
Page 63

If you are using the mouse, press the Up arrow or Down arrow to simulate
the pen pressure, and, therefore, the width of the line.
You can also access pressure-sensitive lines by clicking Effects } Artistic
media.
To draw a preset line
1 Open the Curve flyout, and click the Artistic media tool.
2 Click the Preset button on the property bar.
3 Choose a preset line shape from the Preset stroke list list box.
If you want to smooth the edges of the line, type a value in the Freehand
smoothing box on the property bar.
4 Drag until the line is the shape you want.
If you want to set the width of the line, type a value in the Artistic media tool
width box on the property bar.
Formatting lines and outlines
You can change the appearance of both lines and outlines. For example, you can
specify their color, width, style, corner shape, and cap style. You can also remove a
line or outline, and you can create your own line or outline style by adjusting the
distance between segments in the line.
CorelDRAW also lets you copy the color of an outline to other objects, convert
outlines to objects so that you can apply a fill to them, and create calligraphic
outlines. For more information about filling objects, see “Filling objects” on page 135.
You can also add arrowheads to lines and curves. In addition, you can create new
arrowhead and edit current or new ones.
Setting the miter limit for outlines lets you specify at what angle a sharp corner is
either mitered (pointed) or beveled (squared-off).
To specify line and outline settings
1 Select an object.
2 Open the Outline tool flyout , and click the Outline
pen dialog button .
3 Specify the settings you want.
50 CorelDRAW: Chapter 3
Page 64

You can also
Create a line style
Edit a line style
Click Edit style, and move the slider in the
Edit line style dialog box. By clicking the
boxes to the left of the slider, you can
specify the placement and frequency of the
dots in the new line style you create.
Choose a line style from the Style list box,
and click Edit style. Create a line style in
the Edit line style dialog box, and click
Replace.
You can change the outline color of a selected object by choosing a color
from the color picker in the Outline pen dialog box.
To copy outline color to another object
1 Open the Eyedropper flyout , and click the Eyedropper tool .
2 Click the Eyedropper fill/outline button on the property bar.
3 Click the edge of the object whose outline you want to copy.
4 Open the Eyedropper flyout, and click the Paintbucket tool .
5 Click the edge of the object to which you want to copy the outline.
The color of copied outlines may not exactly match the color of the original
outline. In some cases, the closest equivalent RGB color displays.
The outline’s thickness is not copied.
To convert an outline to an object
1 Select an object.
2 Click Arrange } Convert outline to object.
Working with lines, outlines, and brush strokes 51
Page 65

To create a calligraphic outline
1 Select an object.
2 Open the Outline tool flyout, and click the Outline pen dialog button.
3 In the Corners area, enable a corner style option.
4 Type a value in the Stretch box.
5 Type a value in the Angle box.
To remove an object’s outline
1 Select and object.
2 Open the Outline tool flyout, and click No Outline .
You can also remove an object’s outline by selecting the object and
right-clicking (Windows) or holding Option and clicking (Mac OS) No
Color on the color palette.
To add an arrowhead
1 Select a line or curve.
2 Open the Outline tool flyout, and click the Outline pen dialog button.
3 In the Arrows area, open the Start Arrowhead picker, and click a line-ending
shape.
4 Open the End Arrowhead picker, and click a line-ending shape.
You can also
Create an arrowhead
Edit an arrowhead
In the Arrows area, click Options } New.
Drag the side handles and hollow nodes to
shape the arrowhead.
Using the Pick tool, select an object with
an arrowhead. Click the Arrowhead
Selector button on the property bar. In the
arrowhead picker, click Other.IntheEdit
window, drag the side handles and hollow
nodes to shape the arrowhead.
52 CorelDRAW: Chapter 3
Page 66

Closing multiple line segments
You can quickly create a closed object from line segments by selecting which lines you
want to connect and the shape of the connecting line.
You can connect lines using the closest nodes between lines. The connecting line can
be either straight or curved. You can also connect lines using the start to end nodes of
the lines. The end node of the first selected line connects directly with the starting
node of the closest selected line. The connected lines will take on the properties of the
first line selected.
Closing multiple line segments can be the starting point for more complex
drawings.
To close multiple line segments
1 Hold down Shift, and select each object using the Pick tool .
2 Click Arrange } Close path, and click one of the following:
Closest nodes with straight lines
Closest nodes with curvy lines
Start to end with straight lines
Start to end with curvy lines
Text and blends fitted to a path will be detached from their paths when the
paths are closed.
Working with lines, outlines, and brush strokes 53
Page 67

You can also connect the subpaths in a group of objects.
You can also select lines by marquee selecting. If the lines are marquee
selected, the properties from the top object on a layer are used. To see which
object is the top one, open the Object manager Docker window/palette by
clicking Window } Dockers / Palette } Object manager.
Applying brush strokes
CorelDRAW lets you apply a variety of preset brush strokes, ranging from strokes
with arrowheads to ones that are filled with rainbow patterns. When you draw a
preset brush stroke, you can specify some of its attributes. For example, you can
change the width of a brush stroke and specify its smoothness.
The above image was created using different kinds of brush strokes and
widths.
You can also create custom brush strokes using an object or a group of vector objects.
When you create a custom brush stroke, you can save it as a preset.
To apply a preset brush stroke
1 Open the Curve flyout, and click the Artistic media tool.
2 Click the Brush button on the property bar.
3 Choose a brush stroke from the Brush stroke list box.
If you want to smooth the edges of the brush stroke, type a value in the Freehand
smoothing box on the property bar.
54 CorelDRAW: Chapter 3
Page 68

4 Drag until the stroke is the shape you want.
If you want to set the width of the stroke, type a value in the Artistic media tool
width box on the property bar.
If you have access to a brush stroke that isn’t listed in the Brush stroke list
box, you can apply it by clicking the Browse button on the property bar,
and locating the brush stroke file.
To create a custom brush stroke
1 Select an object or a set of grouped objects.
2 Open the Curve flyout, and click the Artistic media tool.
3 Click the Brush button on the property bar.
4 Click the object or grouped objects.
5 Click the Save artistic media stroke button on the property bar.
6 Type a filename for the brush stroke.
7 Click Save.
You can create custom brush strokes by clicking Effects } Artistic media,
and specifying the settings you want on the Artistic media Docker
window/palette.
Spraying objects along a line
CorelDRAW lets you spray a series of objects in a line. Besides graphic and text
objects, you can import bitmaps and symbols to spray along a line.
You can control how a sprayed line appears by adjusting the spacing between objects,
so they are closer or farther apart from each other. You can also vary the order of
objects in the line. For example, if you are spraying a series of objects that includes a
star, a triangle, and a square, you can change the spray order so that the square
appears first, followed by the triangle and then the star. CorelDRAW also lets you
shift the position of objects in a sprayed line by rotating them along the path or
offsetting them in one of four different directions: alternating, left, random, or right.
For instance, you can choose a left offset direction to align the objects you spray to the
left of the path.
Working with lines, outlines, and brush strokes 55
Page 69

Objects sprayed along a curved line. The objects and line can be edited
after the objects have been sprayed.
You can also create a new spraylist with objects of your own.
To spray a line
1 Open the Curve flyout, and click the Artistic media tool.
2 Click the Sprayer button on the property bar.
3 Choose a spraylist from the Spraylist file list box on the
property bar.
If the spraylist you want is not listed, click the Browse button on the property bar
to select the folder in which the file is located.
4 Drag to draw the line.
You can also
Adjust the number of objects sprayed at
each spacing point
Adjust the spacing between dabs Type a number in the bottom box of the
Type a number in the top box of the
Dabs/spacing of objects to be sprayed
box on the property bar.
Dabs/spacing of objects to be sprayed
box on the property bar.
56 CorelDRAW: Chapter 3
Page 70

You can also
Set the spray order
Adjust the size of spray objects
Increase or decrease the size of the spray
objects as they progress along the line
Reset a spraylist to its saved settings
Choose a spray order from the Choice of
spray order list box on the property bar.
Type a number in the top box of the Size of
objects to be sprayed box on the property
bar.
Type a number in the bottom box of the
Size of objects to be sprayed box on the
property bar.
Click the Reset values button on the
property bar.
Increasing the value for the size of spray objects along the line causes
objects to become larger as they are distributed along the path.
Spraylists that have more complex objects use more system resources.
CorelDRAW takes longer to produce lines using complex objects, and these
objects will increase the file size. Using symbols for each group in the list
can help reduce file size and demands on your system. For more
information about creating symbols, see “Working with symbols” on page
127.
To rotate the lines that you spray
1 Select the spraylist that you want to adjust.
2 Click the Rotation button on the property bar.
3 Type a value between zero and 360 in the Angle box on the property bar.
If you want each object in the spray to rotate incrementally, enable the Use
Increment check box and type a value in the Increment box.
4 Enable one of the following options:
Path based — rotates objects in relation to the line.
Page based — rotates objects in relation to the page.
5 Press Enter.
Working with lines, outlines, and brush strokes 57
Page 71

To offset the lines that you spray
1 Select a spraylist.
2 Click the Offset button on the property bar.
3 Enable the Use offset check box to offset objects from the path of the line
sprayed.
If you want to adjust the offset distance, type a new value in the Offset box.
4 Choose an offset direction from the Offset direction list box.
If you want to alternate between the left and right of the line, choose Alternating.
To create a new spray list
1 Click Effects } Artistic media.
2 Select an object, a set of grouped objects, or a symbol.
3 Click the Save button on the Artistic media Docker window/palette.
4 Enable Object sprayer.
5 Click OK.
6 Type a filename in the Filename box.
7 Click Save.
Drawing flow and dimension lines
You can draw flow lines in flowcharts and organizational charts to connect chart
shapes. Objects stay connected by these lines even when you move one or both
objects. For information about drawing flowchart shapes, see “Drawing pre-defined
shapes” on page 71.
You can draw callout lines that label and draw attention to objects.
You can also draw dimension lines to indicate the distance between two points in a
drawing or the size of objects. Dimension lines and the measurements shown on the
lines change with an object. You can also set how dimension lines are displayed.
58 CorelDRAW: Chapter 3
Page 72

Dimension lines can show the sizes of parts of an object.
To draw a flow line between two or more objects
To Do the following
Draw a flow line
Move a flow line
Open the Curve flyout, and click the
Interactive connector tool . Drag
from a node on one object to a node on
another object.
Select a flow line using the Shape tool, and
drag the node you want to move.
You can draw a flow line horizontally or vertically, but not both. All angles
in a flow line, therefore, are right angles.
To draw a callout
1 Open the Curve flyout, and click the Dimension tool .
2 Click the Callout tool on the property bar.
3 Click where you want the first callout segment to start.
4 Click where you want the second segment to start.
5 Type the callout text.
Working with lines, outlines, and brush strokes 59
Page 73

When you draw a callout line, a text cursor displays at the end of line,
showing where to type a label for the object.
To draw a dimension line
1 Open the Curve flyout, and click the Dimension tool.
2 On the property bar, click one of the following buttons:
Vertical dimension tool
Horizontal dimension tool
Slanted dimension tool
3 Click the start and end points of the dimension line.
4 Click where you want to place the dimension text.
You can also
Draw an angular dimension line
Open the Curve flyout, and click the
Dimension tool. Click the Angular
dimension tool button on the property bar.
Click where you want the two lines that
measure the angle to intersect. Click where
you want the first line to end, and click
where you want the second line to end.
Click where you want the angle’s label to
appear.
To set how the dimension units are displayed
1 Select a dimension line.
2 Click the Show units for dimension button on the property bar.
3 On the property bar, choose options from the following list boxes:
Dimension style
Dimension precision
Dimension units
60 CorelDRAW: Chapter 3
Page 74

You can also
Specify the position of the dimension units
Change the point size and font of the
dimension units
Click the Text position drop down button
on the property bar, and click a text
position.
Select a dimension line. Click Text }
Format text. Choose a font style from the
Font list box, and type a value in the Size
box.
From here
For more information about (Windows) In the Help index, see
(Mac OS) In the Help Viewer, type
Setting the miter limit miter limit
Working with lines, outlines, and brush strokes 61
Page 75

Page 76

Drawing shapes 4
CorelDRAW lets you draw basic shapes, which you can modify using special effects
and reshaping tools.
In this section, you’ll learn about
drawing rectangles and squares
drawing ellipses, circles, arcs, and wedges
drawing polygons and stars
drawing spirals
drawing grids
drawing predefined shapes
Drawing rectangles and squares
CorelDRAW lets you draw rectangles and squares. You can draw a rectangle or square
by dragging diagonally or draw a rectangle by specifying the width and height. After
you draw a rectangle or square, you can reshape it by rounding one or more of its
corners.
You can create a rectangle by drawing its baseline first and then its
height.
Drawing shapes 63
Page 77

To draw a rectangle or a square by dragging diagonally
To draw Do the following
A rectangle
A square Open the Rectangle flyout, and click the
Open the Rectangle flyout , and
click the Rectangle tool . Drag in the
drawing window until the rectangle is the
size you want.
Rectangle tool. Hold down Ctrl
(Windows) or Shift (Mac OS), and drag in
the drawing window until the square is the
size you want.
You can draw a rectangle from its center outward by holding down Shift
(Windows) or Option (Mac OS) as you drag. You can also draw a square
from its center outward by holding down Shift + Ctrl (Windows) or Shift
+ Option (Mac OS) as you drag.
You can draw a rectangle that covers the drawing page by double-clicking
the Rectangle tool.
To draw a rectangle by specifying height and width
1 Open the Rectangle flyout , and click the 3-point rectangle tool .
2 In the drawing window point to where you want to start the rectangle, drag to
draw the width, and release the mouse button.
3 Move the mouse perpendicularly to the first line to draw the height, and click.
To adjust the size of the rectangle, type values in the Object(s) size boxes on the
property bar.
Tip
Hold down Ctrl (Windows) or Shift (Mac OS) as you drag to constrain the
angle of the baseline to 15 degree increments.
To round the corners of a rectangle or a square
1 Click a rectangle or a square.
2 Type values in the Corner roundness areas on the property bar.
64 CorelDRAW: Chapter 4
Page 78

To apply the same roundness to all corners click the Round corners
together button on the property bar.
To set default corner roundness do one of the following:
(Windows) Click Tools } Options, double-click Toolbox in the list of
categories, click Rectangle tool, and move the slider or enter a number.
(Mac OS) Click CorelDRAW 11 } Preferences, double-click Toolbox in
the list of categories, click Rectangle tool, and move the slider or enter a
number.
Drawing ellipses, circles, arcs, and wedges
You can draw an ellipse or circle by dragging diagonally or you can draw an ellipse by
specifying its width and height. You can draw an ellipse or circle and change the
shape into an arc or wedge.
You can draw an ellipse by first drawing its centerline and then its
height.
To draw an ellipse or a circle by dragging diagonally
To draw Do the following
An ellipse
Drawing shapes 65
Open the Ellipse flyout , and click
the Ellipse tool . Drag in the drawing
window until the ellipse is the shape you
want.
Page 79

To draw Do the following
A circle Open the Ellipse flyout, and click the
Ellipse tool. Hold down Ctrl (Windows) or
Shift (Mac OS), and drag in the drawing
window until the circle is the size you want.
You can draw an ellipse or a circle from its center outward by holding down
Shift (Windows) or Option (Mac OS) as you drag.
To draw an ellipse by specifying width and height
1 Open the Ellipse flyout, and click the 3-point ellipse tool .
2 Click in the drawing window, drag to draw the centerline of the ellipse, and release
the mouse button.
The centerline runs through the center of the ellipse and determines its width.
3 Move the mouse perpendicularly to the first line to define the height of the ellipse,
and click.
To draw an arc or a wedge
To draw Do the following
An arc
A wedge
Open the Ellipse flyout and click the
Ellipse tool. Click the Arc button on the
property bar. Drag in the drawing window
until the arc is the shape you want.
Open the Ellipse flyout and click the
Ellipse tool. Click the Wedge button on
the property bar. Drag in the drawing
window until the wedge is the shape you
want.
To draw an arc, the ellipse or circle must have an outline.
66 CorelDRAW: Chapter 4
Page 80

You can change the direction of a selected arc or a wedge by clicking the
Clockwise/counterclockwise arcs or pies button on the property
bar.
You can constrain the movement of the node to 15-degree increments by
holding down Ctrl (Windows) or Shift (Mac OS) as you drag.
To create a wedge, drag the node of the ellipse (left) to the inside of the
ellipse (center). To create an arc, drag the node to the outside of the ellipse
(right).
Drawing polygons and stars
CorelDRAW lets you draw polygons and stars and then reshape them. For example,
you can convert polygons to stars and stars to polygons, change the number of sides
on a polygon or the number of points on a star, and sharpen the points of a star.
You can also draw a predefined star shape. For more information, see “To draw a
predefined shape” on page 71.
To draw a polygon or a star
To draw Do the following
A polygon
Drawing shapes 67
Open the Object flyout , click
the Polygon tool , and drag in the
drawing window until the polygon is the
size you want.
Page 81

To draw Do the following
A star
Open the Object flyout, click the Polygon
tool, drag in the drawing window until the
polygon is the size you want, and click the
Star button on the property bar.
You can draw a polygon or a star from its center by holding down Shift
(Windows) or Option (Mac OS) as you drag.
You can draw a symmetrical polygon or a star by holding down Ctrl
(Windows) or Shift (Mac OS) as you drag.
To reshape a polygon or a star
To Do the following
Change a polygon to a star or a star to a
polygon
Reshape a polygon or a star
Change the number of sides of a polygon or
number of points on a star
Select a polygon or a star, and click the
Polygon button or the Star button
on the property bar.
Click the Shape tool and click a node on
the object. Drag the node to change the
object’s shape.
Select a polygon or star, type a value in the
Number of points on polygon box on the
property bar, and press Enter.
Sharpen a star’s points
Select a star, and move the Sharpness slider
on the property bar.
The Sharpness slider displays only if the star you select has at least seven
points. The sensitivity of the slider increases with the number of points.
You can change a polygon to a star by selecting the polygon, clicking a node
on one of the sides, and dragging toward the center of the polygon.
68 CorelDRAW: Chapter 4
Page 82

Drawing spirals
You can draw two types of spirals: symmetrical and logarithmic. Symmetrical spirals
expand evenly so that the distance between each revolution is equal. Logarithmic
spirals expand with increasingly larger distances between revolutions. You can set the
rate by which a logarithmic spiral expands outward.
A symmetrical spiral (left) and a logarithmic spiral (right)
To draw a spiral
1 Open the Object flyout, and click the Spiral tool .
2 Type a value in the Spiral revolutions box on the property bar.
3 On the property bar, click one of the following buttons:
Symmetrical spiral
Logarithmic spiral
If you want to change the amount by which the spiral expands as it moves
outward, move the Spiral expansion slider.
4 Drag diagonally in the drawing window until the spiral is the required size.
You can draw a spiral from its center outward by holding down Shift
(Windows) or Option (Mac OS) as you drag.
You can also draw a spiral with even horizontal and vertical dimensions by
holding down Ctrl (Windows) or Shift (Mac OS) as you drag.
Drawing shapes 69
Page 83

Drawing grids
You can draw a grid and set the number of rows and columns. A grid is a grouped set
of rectangles, which you can break ungroup.
To draw a grid
1 Open the Object flyout, and click the Graph paper tool .
2 Type values in the top and bottom portions of the Graph paper columns and
rows box on the property bar.
The value you type in the top portion specifies the number of columns; the value
in the bottom portion specifies the number of rows.
3 Point to where you want the grid to display.
4 Drag diagonally to draw the grid.
If you want to draw the grid from its center point outward, hold down Shift
(Windows) or Option (Mac OS) as you drag; if you want to draw a grid with
square cells, hold down Ctrl (Windows) or Shift (Mac OS) as you drag.
To ungroup a grid
1 Select a grid using the Pick tool .
2 Click Arrange } Ungroup.
You can also break apart a grid by clicking the Ungroup button on the
property bar.
70 CorelDRAW: Chapter 4
Page 84

Drawing predefined shapes
You can draw predefined shapes, such as basic shapes, arrows, stars, and callouts using
the Perfect Shapes collection. Basic shapes, arrows shapes, star shapes, and callout
shapes have glyphs which let you modify their appearance.
You can drag a glyph to alter a shape.
You can add text to the inside or outside of the shape. For example, you might want
to put a label inside a flowchart symbol or a callout.
To draw a predefined shape
1 Open the Perfect Shapes flyout , and click one of the following tools:
Basic shapes
Arrows shapes
Flowchart shapes
Star shapes
Callout shapes
2 Open Perfect Shapes picker on the property bar, and click a shape.
3 Drag in the drawing window until the shape is the size you want.
Perfect Shapes can be modified like any other shapes.
Drawing shapes 71
Page 85

To modify a predefined shape
1 Select a shape with a glyph.
2 Drag a glyph until the shape is the form you want.
The right-angle, heart, lightning bolt, explosion, and flowchart shapes do not
have glyphs.
To add text to a predefined shape
1 Click the Text tool .
2 Position the cursor inside the shape’s outline until it changes to a Text cursor
box .
3 Type and format the font inside the shape.
72 CorelDRAW: Chapter 4
Page 86

Working with objects 5
Working with objects is an essential part of creating drawings.
In this section, you’ll learn about
selecting objects
copying, duplicating, and deleting objects
positioning objects
aligning, distributing, and snapping objects
changing the order of objects
sizing and scaling objects
rotating and mirroring objects
grouping objects
combining objects
Selecting objects
Before you can change an object, you must select it. You can select visible objects,
hidden objects, and a single object in a group or a nested group, and each object in
the order in which it is created. You can also select all objects at once and deselect
objects.
Working with objects 73
Page 87

A bounding box displays around a selected object, and an “X” appears at
its center.
You can select a single object from a group.
To select objects
To select Do the following
An object
Multiple objects
Click an object using the Pick tool .
Hold down Shift, and click each object you
want to select.
74 CorelDRAW: Chapter 5
Page 88

To select Do the following
An object, starting with the first object
created and moving toward the last object
created
An object, starting with the last object
created and moving toward the first object
created
All objects
An object in a group
An object in a nested group
A hidden object
Multiple hidden objects
Press Shift + Tab until a selection box
displays around the object you want to
select.
Press Tab until a selection box displays
around the object you want to select.
Click Edit } Select all } Objects.
Hold down Ctrl (Windows) or Command
(Mac OS), and click an object in a group.
Hold down Ctrl (Windows) or Command
(Mac OS), and click an object you want to
select until a selection box displays around
it.
Hold down Alt (Windows) or Option (Mac
OS), and click the topmost object until a
selection box displays around the hidden
object you want to select.
Hold down Shift + Alt (Windows) or Shift
+ Option (Mac OS) and click the topmost
object until a selection box displays around
the hidden objects you want to select.
A hidden object in a group
Hold down Ctrl + Alt (Windows) or
Command + Option (Mac OS) and click
the topmost object until a selection box
displays around the hidden object you want
to select.
The status bar displays a description of each hidden object as you select it.
You can also select one or more objects by dragging around the object or
objects using the Pick tool.
Working with objects 75
Page 89

To deselect objects
To deselect Do the following
All objects
A single object in multiple selected objects
Click the Pick tool, and click a blank space
in the drawing window.
Hold down Shift, and click the object using
the Pick tool.
Copying, duplicating, and deleting objects
CorelDRAW gives you two ways to copy objects. You can cut or copy an object to
place it on the Clipboard and paste it into a drawing or you can duplicate an object.
Cutting an object to the Clipboard removes it from the drawing; copying an object to
the Clipboard leaves the original in the drawing; and duplicating an object places a
copy directly in the drawing window, not the Clipboard. Duplicating is also faster
than copying and pasting. You can copy entire objects or their properties.
When you no longer need an object, you can delete it.
To cut or copy an object
1 Select an object.
2 Click Edit, and click one of the following:
Cut
Copy
You can also cut or copy an object by right-clicking (Windows) or Control +
clicking (Mac OS) the object, and clicking Cut or Copy.
To paste an object into a drawing
Click Edit } Paste.
To duplicate an object
1 Select an object.
2 Click Edit } Duplicate.
76 CorelDRAW: Chapter 5
Page 90

To copy an object’s fill properties to another object
1 Click the Pick tool .
2 Select the object to which you want to copy another object’s properties.
3 Click Edit } Copy properties from.
4 Enable any of the following check boxes:
Outline pen
Outline color
Fill
Text properties
5 Click OK.
6 Click the object whose properties you want to copy.
(Windows) You can copy fill or outline properties or both by clicking an
object with the right-mouse button, dragging over another object, and
choosing Copy fill here, Copy outline here,orCopy all properties.
To delete an object
1 Select an object.
2 Click Edit } Delete (Windows) or Clear (Mac OS).
You can also delete an object by right-clicking (Windows) or by Control +
clicking (Mac OS) the object and pressing Delete.
Positioning objects
You can position objects by dragging them to a new location, by nudging, or by
specifying their horizontal and vertical position.
The values you set in super nudging, and micro nudging allow you to move objects
into place by increments. By default, you can nudge objects in 0.1-inch increments,
but you can change the nudge values to suit your needs.
When you specify the position of an object, you can set horizontal and vertical
coordinates that are relative to the object’s center anchor point or to another anchor
point. You can also position objects by placing them at specific horizontal and vertical
coordinates in the drawing window according to the object’s anchor point.
Working with objects 77
Page 91

To move an object
Drag an object to a new position in the drawing.
You can move an object to another page by dragging the object over a page
number tab and then dragging over the page.
To move an object to another page
1 Drag the object over a page number tab of the page you want to move the object
to.
2 Drag the object over the page.
To nudge an object
To Do the following
Nudge a selected object by the nudge
distance
Nudge a selected object by a fraction of the
nudge distance
Nudge a selected object by a multiple of the
nudge distance
Press an Arrow key.
Hold down Ctrl (Windows) or Command
(Mac OS) and press an Arrow key.
Hold down Shift, and press an Arrow key.
To set nudge distances
1 Do one of the following:
(Windows) Click Tools } Options.
(Mac OS) Click CorelDRAW 11 } Preferences.
2 In the Document list of categories, click Rulers.
3 Type a value in the Nudge box.
4 Type a value in one of the following boxes:
Super nudge
Micro nudge
You can also set the nudge distance by deselecting all objects and typing a
value in the Nudge offset box on the property bar.
78 CorelDRAW: Chapter 5
Page 92

To position an object by x and y coordinates
1 Select an object.
2 On the property bar, type values in the following boxes:
x — lets you position the object on the x axis
y — lets you position the object on the y axis
3 Press Enter.
Aligning, distributing, and snapping objects
CorelDRAW lets you precisely align and distribute objects in a drawing as well as
snap objects to one another.
You can align objects to each other and to parts of the drawing page such as the
center, edges, and grid. When you align objects to objects, you can line them up by
their centers or by their edges.
CorelDRAW lets you align multiple objects to the center of the drawing page
horizontally or vertically. Single or multiple objects can also be arranged along the
edge of the page and to the nearest point on a grid.
You can distribute objects at equal intervals in a specified area.
The scattered objects (left) with vertical alignment applied to them (right).
When you snap one object to another, you select an object and drag it to the second
— or target — object. The selected object’s nodes or the point at which the cursor
has selected the object can be used to snap to one of the following areas in the target
object: nodes, areas between nodes, center, or bounding box.
Working with objects 79
Page 93

You can choose the distance at which objects will snap to one another by setting the
snapping threshold.
To align an object to an object
1 Select the objects.
2 Click Arrange } Align and distribute, and click one of the following:
Align left
Align right
Align top
Align bottom
Align centers horizontally
Align centers vertically
The object used to align the left, right, top, or bottom edges is determined
by the order of creation or order of selection. If you marquee select the
objects before you align them, the last object created will be used. If you
select the objects one at a time the last object selected will be the reference
point for aligning the others.
You can also align objects by selecting them and clicking the Align and
distribute button on the property bar.
To align an object to the page center
1 Select an object.
If you want to align multiple objects, marquee select the objects.
2 Click Arrange } Align and distribute, and click one of the following:
Center to page — aligns all objects to the page center
Center to page vertically — aligns objects to the page center along a vertical
axis
Center to page horizontally — aligns objects to the page center along a
horizontal axis
80 CorelDRAW: Chapter 5
Page 94

To align an object to the page edge
1 Select an object.
If you want to align an object group, select the group.
2 Click Arrange } Align and distribute } Align and distribute.
3 Click the Align tab.
4 Enable the check boxes that correspond to the horizontal and vertical alignment
you want.
If you want to align objects vertically, enable the Left, Center,orRight option.
If you want to align objects horizontally, enable the Top, Center,orBottom
option.
5 In the Align to area, enable the Edge of page option.
You can also align objects by selecting them and clicking the Align and
distribute button on the property bar.
You can align an object to the grid by clicking Align to grid.
To distribute objects
1 Select the objects.
2 Click Arrange } Align and distribute } Align and distribute.
3 Click the Distribute tab.
4 Enable the check boxes that correspond to the distribution you want.
5 In the Distribute area, enable a check box that corresponds to the distribution
area.
To snap objects
1 Click View } Snap to objects setup.
2 Enable the Snap to objects check box.
3 Enable one of the following check boxes in the Object(s) being moved area:
Use cursor position — snaps to the spot where you clicked the selected object
Use object nodes — snaps at any of the selected object’s nodes
4 Enable one of the following check boxes in Object(s) in drawing window:
Snap to nodes — snaps to any of the target object’s nodes
Snap between nodes — snaps to any point between two nodes on a path
Working with objects 81
Page 95

Snap to object center point — snaps to the center of the target object
Snap to bounding box — snaps to the bounding box of the target object
A new node is created when you use Snap between nodes. If the new node
is deleted, snapping will switch automatically to the nearest node.
An object’s center point is identified by an X in the bounding box.
To set snapping threshold
1 Click View } Snap to objects setup.
2 Choose one of the following snapping distances from the Snapping threshold list
box:
Low — snaps objects at four screen pixels
Medium — snaps objects at eight screen pixels
High — snaps objects at 16 screen pixels
Changing the order of objects
You can change the stacking order of objects on a layer by sending objects to the front
or back, or behind or in front of other objects. You can also position objects precisely
in the stacking order, as well as reverse the stacking order of multiple objects.
The four objects (left) are ordered from top to bottom to create the final
image (right).
82 CorelDRAW: Chapter 5
Page 96

To change the order of an object
1 Select an object.
2 Click Arrange } Order, and click one of the following:
To front — moves the selected object to the front of all other objects
To back — moves the selected object behind all other objects
Forward one — moves the selected object forward one position
Back one — moves the selected object behind one position
In front of — moves the selected object in front of a specific object
Behind — moves the selected object behind a specific object
To reverse the order of multiple objects
1 Select the objects.
2 Click Arrange } Order } Reverse order.
Sizing and scaling objects
CorelDRAW lets you size and scale objects. In both cases, you change the dimensions
of an object proportionally by preserving its aspect ratio. You can size an object’s
dimensions by specifying values or changing the object directly. Scaling changes an
object’s dimensions by a specified percentage.
You can change an object’s anchor point from its center to any of its eight selection
handles.
To size an object
To Do the following
Size a selected object Drag any of the corner selection handles.
Size a selected object from its center
Size a selected object to a multiple of its
original size
Working with objects 83
Hold down Shift, and drag one of the
selection handles.
Hold down Ctrl (Windows) or Shift (Mac
OS) and drag one of the selection handles.
Page 97

To Do the following
Stretch a selected object as you size it
Hold down Alt (Windows) or Command
(Mac OS) and drag one of the selection
handles.
You can also set a precise size for the object by typing values in the Object
size boxes on the property bar.
To scale an object
1 Select an object.
2 Click Window } Dockers / Palettes } Transformations } Scale.
3 In the Transformations Docker window/palette, type values in the following
boxes:
H — lets you specify a percentage by which you want to scale the object
horizontally
V — lets you specify a percentage by which you want to scale the object
vertically
If you want to change the object’s anchor point, enable the check box that
corresponds to the anchor point you want to set.
If you want to maintain the aspect ratio, disable the Non-proportional check
box.
You can also scale an object by dragging a selection handle.
84 CorelDRAW: Chapter 5
Page 98

Rotating and mirroring objects
CorelDRAW lets you rotate and create mirror images of objects.
You can rotate an object in a drawing by specifying horizontal and vertical
coordinates. You can move the center of rotation to a specific ruler coordinate or to a
point that is relative to the current position of the object.
Rotating objects around a single point
Mirroring an object flips it from left to right or top to bottom. By default, the mirror
anchor point is in the center of the object.
Mirroring an object from top to bottom
Working with objects 85
Page 99

To rotate an object
1 Select an object.
2 Click Window } Dockers / Palettes } Transformations } Rotate.
3 Disable the Relative center check box in the Transformations Docker
window/palette.
To rotate an object around a point relative to its current position, enable the
Relative center check box.
4 Type a value in the Angle box.
You can also
Specify the point around which you want to
rotate the object
Type values in the H and V boxes to specify
the horizontal and vertical positions. Click
Apply.
You can also rotate a selected object by dragging a rotation handle clockwise
or counterclockwise.
To rotate an object around a ruler coordinate
1 Select an object.
2 Open the Shape edit flyout, and click the Free transform tool .
3 Disable the Relative to object button on the property bar.
4 Type values in any of the following Center of rotation position boxes :
x — lets you specify the point on the horizontal ruler around which the object
will rotate
y — lets you specify the point on the vertical ruler around which the object will
rotate
5 Type a value in the Angle of rotation box on the property bar.
6 Press Enter.
86 CorelDRAW: Chapter 5
Page 100

To mirror an object
1 Select an object.
2 Click Window } Dockers / Palettes } Transformations } Scale.
3 In the Transformations Docker window/palette, click one of the following:
Horizontal mirror — lets you flip the object left to right
Vertical mirror — lets you flip the object top to bottom
If you want to flip the object on a specific anchor point, enable the check box that
corresponds to the anchor point you want to set.
4 Click Apply.
You can also mirror a selected object by holding down Ctrl (Windows) or
Shift (Mac OS) and dragging a selection handle to the opposite side of the
object.
You can open the Transformations Docker window/palette by clicking
Arrange } Transformations and selecting an option from the flyout.
Grouping objects
You can group objects in CorelDRAW.
When you group two or more objects, they are treated as a single unit. This lets you
apply the same formatting, properties, and other changes to all the objects within the
group at the same time. CorelDRAW also lets you group other groups to create
nested groups.
You can also add and remove objects to and from a group and delete objects that are
members of a group. If you want to edit a single object in a group, you can ungroup
the objects.
Working with objects 87
 Loading...