

Page 1

Page 2

Copyright © 2010 Corel Corporation. All rights reserved.
Corel DESIGNER® X5 User Guide
Product specifications, pricing, packaging, technical support and information
(“specifications”) refer to the retail English version only. The specifications for all other
versions (including other language versions) may vary.
Information is provided by Corel on an “as is” basis, without any other warranties or
conditions, express or implied, including, but not limited to, warranties of
merchantable quality, satisfactory quality, merchantability or fitness for a particular
purpose, or those arising by law, statute, usage of trade, course of dealing or otherwise.
The entire risk as to the results of the information provided or its use is assumed by you.
Corel shall have no liability to you or any other person or entity for any indirect,
incidental, special, or consequential damages whatsoever, including, but not limited to,
loss of revenue or profit, lost or damaged data or other commercial or economic loss,
even if Corel has been advised of the possibility of such damages, or they are foreseeable.
Corel is also not liable for any claims made by any third party. Corel's maximum
aggregate liability to you shall not exceed the costs paid by you to purchase the
materials. Some states/countries do not allow exclusions or limitations of liability for
consequential or incidental damages, so the above limitations may not apply to you.
Corel, the Corel logo, CorelDRAW, Corel DESIGNER, Corel PHOTO-PAINT,
CorelDRAW Concept Share, CorelTUTOR, Application Recovery Manager,
CONNECT, Digital Studio, Grammar As-You-Go, iGrafx, Knowledge Base, PaintShop
Photo, Painter, Perfect Shapes, PowerClip, PowerTRACE, Presentations, Quattro Pro,
QuickCorrect, VideoStudio, WinDVD, WinZip, and WordPerfect are trademarks or
registered trademarks of Corel Corporation and/or its subsidiaries in Canada, the U.S.,
and/or other countries. Other product, font, and company names and logos may be
trademarks or registered trademarks of their respective companies.
117080
Page 3

Contents
Getting started . . . . . . . . . . . . . . . . . . . . . . . . . . . . . . . . . . . . . 1
Welcome . . . . . . . . . . . . . . . . . . . . . . . . . . . . . . . . . . . . . . . . . . . . . . . . . . .3
Installing Corel DESIGNER Technical Suite applications . . . . . . . . . . . . . . . . . . 3
Changing languages . . . . . . . . . . . . . . . . . . . . . . . . . . . . . . . . . . . . . . . . . . . . . . 5
Changing startup settings . . . . . . . . . . . . . . . . . . . . . . . . . . . . . . . . . . . . . . . . . . 6
Registering Corel products . . . . . . . . . . . . . . . . . . . . . . . . . . . . . . . . . . . . . . . . . 6
Working with trial versions . . . . . . . . . . . . . . . . . . . . . . . . . . . . . . . . . . . . . . . . . 7
Updating Corel products . . . . . . . . . . . . . . . . . . . . . . . . . . . . . . . . . . . . . . . . . . . 7
Corel Support Services . . . . . . . . . . . . . . . . . . . . . . . . . . . . . . . . . . . . . . . . . . . . . 8
About Corel . . . . . . . . . . . . . . . . . . . . . . . . . . . . . . . . . . . . . . . . . . . . . . . . . . . . 8
What’s new in Corel DESIGNER X5? . . . . . . . . . . . . . . . . . . . . . . . . . . . . . .9
Connect to technical design assets . . . . . . . . . . . . . . . . . . . . . . . . . . . . . . . . . . . . 9
Exchange files seamlessly . . . . . . . . . . . . . . . . . . . . . . . . . . . . . . . . . . . . . . . . . . 11
Create technical illustrations with confidence. . . . . . . . . . . . . . . . . . . . . . . . . . . 13
Publish to technical communication standards. . . . . . . . . . . . . . . . . . . . . . . . . . 16
Use color with certainty. . . . . . . . . . . . . . . . . . . . . . . . . . . . . . . . . . . . . . . . . . . 16
Create graphics for the Web . . . . . . . . . . . . . . . . . . . . . . . . . . . . . . . . . . . . . . . 19
Learn about Corel DESIGNER . . . . . . . . . . . . . . . . . . . . . . . . . . . . . . . . . . . . . 20
Learning resources . . . . . . . . . . . . . . . . . . . . . . . . . . . . . . . . . . . . . . . . . .21
Getting help . . . . . . . . . . . . . . . . . . . . . . . . . . . . . . . . . . . . . . . . . . . . . . . . . . . 21
Using the Help and tooltips . . . . . . . . . . . . . . . . . . . . . . . . . . . . . . . . . . . . . . . 22
Welcome screen . . . . . . . . . . . . . . . . . . . . . . . . . . . . . . . . . . . . . . . . . . . . . . . . 25
CorelTUTOR . . . . . . . . . . . . . . . . . . . . . . . . . . . . . . . . . . . . . . . . . . . . . . . . . . 26
Tips and tricks . . . . . . . . . . . . . . . . . . . . . . . . . . . . . . . . . . . . . . . . . . . . . . . . . 26
Macro programming guide . . . . . . . . . . . . . . . . . . . . . . . . . . . . . . . . . . . . . . . . 27
Network deployment guide. . . . . . . . . . . . . . . . . . . . . . . . . . . . . . . . . . . . . . . . 27
Web-based resources . . . . . . . . . . . . . . . . . . . . . . . . . . . . . . . . . . . . . . . . . . . . . 27
Customized training and integration resources. . . . . . . . . . . . . . . . . . . . . . . . . . 28
Corel DESIGNER workspace tour . . . . . . . . . . . . . . . . . . . . . . . . . . . . . . . .29
Corel DESIGNER terms and concepts. . . . . . . . . . . . . . . . . . . . . . . . . . . . . . . . 29
Contents i
Page 4

Corel DESIGNER application window. . . . . . . . . . . . . . . . . . . . . . . . . . . . . . . . 30
Corel DESIGNER workspace tools. . . . . . . . . . . . . . . . . . . . . . . . . . . . . . . . . . . 32
Corel DESIGNER basics . . . . . . . . . . . . . . . . . . . . . . . . . . . . . . . . . . . . . . .51
Understanding vector graphics and bitmaps. . . . . . . . . . . . . . . . . . . . . . . . . . . . 51
Starting and opening drawings. . . . . . . . . . . . . . . . . . . . . . . . . . . . . . . . . . . . . . 52
Acquiring images from scanners and digital cameras . . . . . . . . . . . . . . . . . . . . . 58
Undoing, redoing, and repeating actions . . . . . . . . . . . . . . . . . . . . . . . . . . . . . . 60
Zooming, panning, and scrolling . . . . . . . . . . . . . . . . . . . . . . . . . . . . . . . . . . . . 62
Previewing drawings . . . . . . . . . . . . . . . . . . . . . . . . . . . . . . . . . . . . . . . . . . . . . 65
Choosing viewing modes . . . . . . . . . . . . . . . . . . . . . . . . . . . . . . . . . . . . . . . . . . 67
Working with views. . . . . . . . . . . . . . . . . . . . . . . . . . . . . . . . . . . . . . . . . . . . . . 69
Saving drawings. . . . . . . . . . . . . . . . . . . . . . . . . . . . . . . . . . . . . . . . . . . . . . . . . 70
Backing up and recovering files . . . . . . . . . . . . . . . . . . . . . . . . . . . . . . . . . . . . . 73
Adding and accessing drawing information . . . . . . . . . . . . . . . . . . . . . . . . . . . . 75
Closing drawings and quitting Corel DESIGNER . . . . . . . . . . . . . . . . . . . . . . . 75
Finding and managing content . . . . . . . . . . . . . . . . . . . . . . . . . . . . . . . .77
Exploring Corel CONNECT . . . . . . . . . . . . . . . . . . . . . . . . . . . . . . . . . . . . . . . 77
Browsing and searching for content . . . . . . . . . . . . . . . . . . . . . . . . . . . . . . . . . . 82
Viewing content . . . . . . . . . . . . . . . . . . . . . . . . . . . . . . . . . . . . . . . . . . . . . . . . 86
Using and managing content . . . . . . . . . . . . . . . . . . . . . . . . . . . . . . . . . . . . . . . 87
Working with precision . . . . . . . . . . . . . . . . . . . . . . . . . . . . . . . . . . . . . . .91
Using gravity snapping . . . . . . . . . . . . . . . . . . . . . . . . . . . . . . . . . . . . . . . . . . . 91
Using dynamic guides . . . . . . . . . . . . . . . . . . . . . . . . . . . . . . . . . . . . . . . . . . . . 95
Using constrain keys . . . . . . . . . . . . . . . . . . . . . . . . . . . . . . . . . . . . . . . . . . . . 102
Using object coordinates . . . . . . . . . . . . . . . . . . . . . . . . . . . . . . . . . . . . . . . . . 103
Working with templates . . . . . . . . . . . . . . . . . . . . . . . . . . . . . . . . . . . . .115
Searching for templates . . . . . . . . . . . . . . . . . . . . . . . . . . . . . . . . . . . . . . . . . . 116
Creating templates. . . . . . . . . . . . . . . . . . . . . . . . . . . . . . . . . . . . . . . . . . . . . . 118
Using saved templates to create files . . . . . . . . . . . . . . . . . . . . . . . . . . . . . . . . 120
Editing templates. . . . . . . . . . . . . . . . . . . . . . . . . . . . . . . . . . . . . . . . . . . . . . . 120
Loading styles from other templates . . . . . . . . . . . . . . . . . . . . . . . . . . . . . . . . . 121
ii Corel DESIGNER X5 User Guide
Page 5

Collaborating. . . . . . . . . . . . . . . . . . . . . . . . . . . . . . . . . . . . . . . . . . . . . .123
Using CorelDRAW ConceptShare . . . . . . . . . . . . . . . . . . . . . . . . . . . . . . . . . . 123
Lines, shapes, and outlines . . . . . . . . . . . . . . . . . . . . . . . . . . 125
Working with lines, outlines, and brushstrokes . . . . . . . . . . . . . . . . . . .127
Setting the default property values . . . . . . . . . . . . . . . . . . . . . . . . . . . . . . . . . 127
Drawing lines . . . . . . . . . . . . . . . . . . . . . . . . . . . . . . . . . . . . . . . . . . . . . . . . . 128
Closing multiple line segments . . . . . . . . . . . . . . . . . . . . . . . . . . . . . . . . . . . . 135
Drawing callouts . . . . . . . . . . . . . . . . . . . . . . . . . . . . . . . . . . . . . . . . . . . . . . . 135
Drawing connector lines . . . . . . . . . . . . . . . . . . . . . . . . . . . . . . . . . . . . . . . . . 139
Drawing dimension lines . . . . . . . . . . . . . . . . . . . . . . . . . . . . . . . . . . . . . . . . . 144
Formatting lines and outlines . . . . . . . . . . . . . . . . . . . . . . . . . . . . . . . . . . . . . 149
Adding arrowheads to lines and curves . . . . . . . . . . . . . . . . . . . . . . . . . . . . . . 153
Drawing calligraphic, pressure-sensitive, and preset lines. . . . . . . . . . . . . . . . . 156
Applying linear-pattern brushstrokes . . . . . . . . . . . . . . . . . . . . . . . . . . . . . . . 159
Spraying linear patterns along a line . . . . . . . . . . . . . . . . . . . . . . . . . . . . . . . . 160
Drawing shapes. . . . . . . . . . . . . . . . . . . . . . . . . . . . . . . . . . . . . . . . . . . .165
Drawing rectangles and squares . . . . . . . . . . . . . . . . . . . . . . . . . . . . . . . . . . . 165
Drawing ellipses, circles, arcs, and wedges . . . . . . . . . . . . . . . . . . . . . . . . . . . . 169
Drawing polygons and stars . . . . . . . . . . . . . . . . . . . . . . . . . . . . . . . . . . . . . . 171
Drawing grids . . . . . . . . . . . . . . . . . . . . . . . . . . . . . . . . . . . . . . . . . . . . . . . . . 172
Drawing predefined shapes . . . . . . . . . . . . . . . . . . . . . . . . . . . . . . . . . . . . . . . 173
Drawing by using shape recognition . . . . . . . . . . . . . . . . . . . . . . . . . . . . . . . . 174
Shaping objects. . . . . . . . . . . . . . . . . . . . . . . . . . . . . . . . . . . . . . . . . . . .177
Working with curve objects . . . . . . . . . . . . . . . . . . . . . . . . . . . . . . . . . . . . . . 177
Shaping curve objects by using Reflect Nodes mode . . . . . . . . . . . . . . . . . . . . 184
Cropping, splitting, and erasing objects . . . . . . . . . . . . . . . . . . . . . . . . . . . . . . 184
Trimming objects . . . . . . . . . . . . . . . . . . . . . . . . . . . . . . . . . . . . . . . . . . . . . . 190
Filleting, scalloping, and chamfering corners of curve objects. . . . . . . . . . . . . . 192
Welding and intersecting objects. . . . . . . . . . . . . . . . . . . . . . . . . . . . . . . . . . . 195
Creating new objects from boundaries . . . . . . . . . . . . . . . . . . . . . . . . . . . . . . . 196
Creating PowerClip objects . . . . . . . . . . . . . . . . . . . . . . . . . . . . . . . . . . . . . . . 197
Contents iii
Page 6

Smudging objects. . . . . . . . . . . . . . . . . . . . . . . . . . . . . . . . . . . . . . . . . . . . . . . 198
Roughening objects . . . . . . . . . . . . . . . . . . . . . . . . . . . . . . . . . . . . . . . . . . . . . 200
Applying distortion effects . . . . . . . . . . . . . . . . . . . . . . . . . . . . . . . . . . . . . . . . 202
Shaping objects by using envelopes . . . . . . . . . . . . . . . . . . . . . . . . . . . . . . . . . 204
Reference: Shaping objects . . . . . . . . . . . . . . . . . . . . . . . . . . . . . . . . . . . . . . . . 208
Projecting objects . . . . . . . . . . . . . . . . . . . . . . . . . . . . . . . . . . . . . . . . . .209
Understanding projected drawing modes . . . . . . . . . . . . . . . . . . . . . . . . . . . . . 209
Using projected drawing modes . . . . . . . . . . . . . . . . . . . . . . . . . . . . . . . . . . . . 211
Customizing drawing profiles. . . . . . . . . . . . . . . . . . . . . . . . . . . . . . . . . . . . . . 214
Objects, symbols, and layers . . . . . . . . . . . . . . . . . . . . . . . . 217
Working with objects . . . . . . . . . . . . . . . . . . . . . . . . . . . . . . . . . . . . . . . 219
Selecting objects. . . . . . . . . . . . . . . . . . . . . . . . . . . . . . . . . . . . . . . . . . . . . . . . 219
Changing object properties . . . . . . . . . . . . . . . . . . . . . . . . . . . . . . . . . . . . . . . 222
Copying, duplicating, and deleting objects . . . . . . . . . . . . . . . . . . . . . . . . . . . . 223
Copying object properties, transformations, and effects . . . . . . . . . . . . . . . . . . 226
Cloning objects . . . . . . . . . . . . . . . . . . . . . . . . . . . . . . . . . . . . . . . . . . . . . . . . 228
Moving objects . . . . . . . . . . . . . . . . . . . . . . . . . . . . . . . . . . . . . . . . . . . . . . . . 229
Sizing and scaling objects . . . . . . . . . . . . . . . . . . . . . . . . . . . . . . . . . . . . . . . . . 231
Rotating objects. . . . . . . . . . . . . . . . . . . . . . . . . . . . . . . . . . . . . . . . . . . . . . . . 233
Flipping objects . . . . . . . . . . . . . . . . . . . . . . . . . . . . . . . . . . . . . . . . . . . . . . . . 234
Skewing objects . . . . . . . . . . . . . . . . . . . . . . . . . . . . . . . . . . . . . . . . . . . . . . . . 235
Aligning and distributing objects . . . . . . . . . . . . . . . . . . . . . . . . . . . . . . . . . . . 236
Changing the order of objects . . . . . . . . . . . . . . . . . . . . . . . . . . . . . . . . . . . . . 240
Grouping objects . . . . . . . . . . . . . . . . . . . . . . . . . . . . . . . . . . . . . . . . . . . . . . . 242
Combining objects . . . . . . . . . . . . . . . . . . . . . . . . . . . . . . . . . . . . . . . . . . . . . . 244
Locking objects . . . . . . . . . . . . . . . . . . . . . . . . . . . . . . . . . . . . . . . . . . . . . . . . 245
Finding and replacing objects. . . . . . . . . . . . . . . . . . . . . . . . . . . . . . . . . . . . . . 246
Accessing and displaying geometric information about objects . . . . . . . . . . . . . 247
Inserting bar codes. . . . . . . . . . . . . . . . . . . . . . . . . . . . . . . . . . . . . . . . . . . . . . 248
iv Corel DESIGNER X5 User Guide
Page 7

Working with symbols . . . . . . . . . . . . . . . . . . . . . . . . . . . . . . . . . . . . . .249
Using symbols in drawings . . . . . . . . . . . . . . . . . . . . . . . . . . . . . . . . . . . . . . . 249
Managing collections and libraries . . . . . . . . . . . . . . . . . . . . . . . . . . . . . . . . . . 253
Creating, editing, and deleting symbols . . . . . . . . . . . . . . . . . . . . . . . . . . . . . . 254
Sharing symbols between drawings . . . . . . . . . . . . . . . . . . . . . . . . . . . . . . . . . 257
Reference: Working with symbols . . . . . . . . . . . . . . . . . . . . . . . . . . . . . . . . . . 258
Creating objects for the Web . . . . . . . . . . . . . . . . . . . . . . . . . . . . . . . . .261
Exporting bitmaps for the Web. . . . . . . . . . . . . . . . . . . . . . . . . . . . . . . . . . . . 261
Saving and applying Web presets . . . . . . . . . . . . . . . . . . . . . . . . . . . . . . . . . . 269
Exporting objects with transparent colors and backgrounds. . . . . . . . . . . . . . . 269
Creating rollovers . . . . . . . . . . . . . . . . . . . . . . . . . . . . . . . . . . . . . . . . . . . . . . 271
Adding bookmarks and hyperlinks to documents . . . . . . . . . . . . . . . . . . . . . . 273
Adding hotspots and alternate text to objects . . . . . . . . . . . . . . . . . . . . . . . . . 275
Working with layers . . . . . . . . . . . . . . . . . . . . . . . . . . . . . . . . . . . . . . . .277
Creating layers . . . . . . . . . . . . . . . . . . . . . . . . . . . . . . . . . . . . . . . . . . . . . . . . 277
Changing layer properties . . . . . . . . . . . . . . . . . . . . . . . . . . . . . . . . . . . . . . . . 281
Moving and copying layers and objects . . . . . . . . . . . . . . . . . . . . . . . . . . . . . . 284
Object linking and embedding . . . . . . . . . . . . . . . . . . . . . . . . . . . . . . . .287
Inserting linked or embedded objects . . . . . . . . . . . . . . . . . . . . . . . . . . . . . . . 287
Editing linked or embedded objects . . . . . . . . . . . . . . . . . . . . . . . . . . . . . . . . . 288
Working with object data . . . . . . . . . . . . . . . . . . . . . . . . . . . . . . . . . . . .291
Setting up the project database . . . . . . . . . . . . . . . . . . . . . . . . . . . . . . . . . . . . 291
Managing object data . . . . . . . . . . . . . . . . . . . . . . . . . . . . . . . . . . . . . . . . . . . 293
Applying CGM data to objects . . . . . . . . . . . . . . . . . . . . . . . . . . . . . . . . . . . . 295
Color and fills . . . . . . . . . . . . . . . . . . . . . . . . . . . . . . . . . . . . 303
Working with color . . . . . . . . . . . . . . . . . . . . . . . . . . . . . . . . . . . . . . . . .305
Understanding color models . . . . . . . . . . . . . . . . . . . . . . . . . . . . . . . . . . . . . . 305
Understanding color depth . . . . . . . . . . . . . . . . . . . . . . . . . . . . . . . . . . . . . . . 308
Choosing colors . . . . . . . . . . . . . . . . . . . . . . . . . . . . . . . . . . . . . . . . . . . . . . . . 309
Using the Document palette . . . . . . . . . . . . . . . . . . . . . . . . . . . . . . . . . . . . . . 319
Contents v
Page 8

Creating and editing custom color palettes . . . . . . . . . . . . . . . . . . . . . . . . . . . . 322
Organizing and displaying color palettes . . . . . . . . . . . . . . . . . . . . . . . . . . . . . 326
Displaying or hiding color palettes in the Palette libraries . . . . . . . . . . . . . . . . 328
Setting the properties of color palettes . . . . . . . . . . . . . . . . . . . . . . . . . . . . . . . 330
Filling objects . . . . . . . . . . . . . . . . . . . . . . . . . . . . . . . . . . . . . . . . . . . . .333
Applying uniform fills . . . . . . . . . . . . . . . . . . . . . . . . . . . . . . . . . . . . . . . . . . . 333
Applying fountain fills . . . . . . . . . . . . . . . . . . . . . . . . . . . . . . . . . . . . . . . . . . . 334
Applying hatch fills . . . . . . . . . . . . . . . . . . . . . . . . . . . . . . . . . . . . . . . . . . . . . 337
Applying pattern fills . . . . . . . . . . . . . . . . . . . . . . . . . . . . . . . . . . . . . . . . . . . . 341
Applying texture fills . . . . . . . . . . . . . . . . . . . . . . . . . . . . . . . . . . . . . . . . . . . . 345
Applying PostScript texture fills. . . . . . . . . . . . . . . . . . . . . . . . . . . . . . . . . . . . 347
Applying mesh fills . . . . . . . . . . . . . . . . . . . . . . . . . . . . . . . . . . . . . . . . . . . . . 347
Applying fills to areas . . . . . . . . . . . . . . . . . . . . . . . . . . . . . . . . . . . . . . . . . . . 350
Working with fills . . . . . . . . . . . . . . . . . . . . . . . . . . . . . . . . . . . . . . . . . . . . . . 352
Working with graphics, text, and color styles . . . . . . . . . . . . . . . . . . . .355
Creating, applying, and editing graphics styles or text styles . . . . . . . . . . . . . . 355
Customizing the Graphic and Text Styles docker . . . . . . . . . . . . . . . . . . . . . . . 358
Creating and applying color styles . . . . . . . . . . . . . . . . . . . . . . . . . . . . . . . . . . 358
Editing and sorting color styles . . . . . . . . . . . . . . . . . . . . . . . . . . . . . . . . . . . . 361
Moving and copying color styles . . . . . . . . . . . . . . . . . . . . . . . . . . . . . . . . . . . 362
Using color management . . . . . . . . . . . . . . . . . . . . . . . . . . . . . . . . . . . .363
Understanding color management . . . . . . . . . . . . . . . . . . . . . . . . . . . . . . . . . . 363
Getting started with color management in Corel DESIGNER . . . . . . . . . . . . . 369
Installing, loading, and embedding color profiles . . . . . . . . . . . . . . . . . . . . . . . 373
Assigning color profiles . . . . . . . . . . . . . . . . . . . . . . . . . . . . . . . . . . . . . . . . . . 375
Converting colors to other color profiles . . . . . . . . . . . . . . . . . . . . . . . . . . . . . . 376
Choosing color-conversion settings. . . . . . . . . . . . . . . . . . . . . . . . . . . . . . . . . . 377
Soft proofing . . . . . . . . . . . . . . . . . . . . . . . . . . . . . . . . . . . . . . . . . . . . . . . . . . 378
Working with color management presets . . . . . . . . . . . . . . . . . . . . . . . . . . . . . 382
Working with color management policies . . . . . . . . . . . . . . . . . . . . . . . . . . . . 383
Managing colors when opening documents . . . . . . . . . . . . . . . . . . . . . . . . . . . 385
Managing colors when importing and pasting files. . . . . . . . . . . . . . . . . . . . . . 387
Managing colors for print. . . . . . . . . . . . . . . . . . . . . . . . . . . . . . . . . . . . . . . . . 388
vi Corel DESIGNER X5 User Guide
Page 9

Using a safe CMYK workflow . . . . . . . . . . . . . . . . . . . . . . . . . . . . . . . . . . . . . 389
Managing colors for online viewing . . . . . . . . . . . . . . . . . . . . . . . . . . . . . . . . . 389
Special effects . . . . . . . . . . . . . . . . . . . . . . . . . . . . . . . . . . . . 391
Adding 3D effects to objects . . . . . . . . . . . . . . . . . . . . . . . . . . . . . . . . .393
Contouring objects . . . . . . . . . . . . . . . . . . . . . . . . . . . . . . . . . . . . . . . . . . . . . 393
Applying perspective to objects . . . . . . . . . . . . . . . . . . . . . . . . . . . . . . . . . . . . 397
Creating extrusions . . . . . . . . . . . . . . . . . . . . . . . . . . . . . . . . . . . . . . . . . . . . . 399
Creating bevel effects . . . . . . . . . . . . . . . . . . . . . . . . . . . . . . . . . . . . . . . . . . . 404
Creating drop shadows . . . . . . . . . . . . . . . . . . . . . . . . . . . . . . . . . . . . . . . . . . 407
Blending objects . . . . . . . . . . . . . . . . . . . . . . . . . . . . . . . . . . . . . . . . . . . . . . . 410
Changing the transparency of objects . . . . . . . . . . . . . . . . . . . . . . . . . .417
Applying transparencies . . . . . . . . . . . . . . . . . . . . . . . . . . . . . . . . . . . . . . . . . 417
Applying merge modes . . . . . . . . . . . . . . . . . . . . . . . . . . . . . . . . . . . . . . . . . . 420
Using lenses with objects . . . . . . . . . . . . . . . . . . . . . . . . . . . . . . . . . . . .423
Applying lenses . . . . . . . . . . . . . . . . . . . . . . . . . . . . . . . . . . . . . . . . . . . . . . . . 423
Editing lenses . . . . . . . . . . . . . . . . . . . . . . . . . . . . . . . . . . . . . . . . . . . . . . . . . 425
Text . . . . . . . . . . . . . . . . . . . . . . . . . . . . . . . . . . . . . . . . . . . . 427
Adding and formatting text . . . . . . . . . . . . . . . . . . . . . . . . . . . . . . . . . .429
Adding text. . . . . . . . . . . . . . . . . . . . . . . . . . . . . . . . . . . . . . . . . . . . . . . . . . . 429
Selecting text. . . . . . . . . . . . . . . . . . . . . . . . . . . . . . . . . . . . . . . . . . . . . . . . . . 433
Encoding text . . . . . . . . . . . . . . . . . . . . . . . . . . . . . . . . . . . . . . . . . . . . . . . . . 433
Changing the basic properties of text. . . . . . . . . . . . . . . . . . . . . . . . . . . . . . . . 434
Finding, editing, and converting text. . . . . . . . . . . . . . . . . . . . . . . . . . . . . . . . 438
Aligning text. . . . . . . . . . . . . . . . . . . . . . . . . . . . . . . . . . . . . . . . . . . . . . . . . . 440
Spacing text . . . . . . . . . . . . . . . . . . . . . . . . . . . . . . . . . . . . . . . . . . . . . . . . . . 443
Shifting and rotating text . . . . . . . . . . . . . . . . . . . . . . . . . . . . . . . . . . . . . . . . 446
Moving text . . . . . . . . . . . . . . . . . . . . . . . . . . . . . . . . . . . . . . . . . . . . . . . . . . 447
Fitting text to a path . . . . . . . . . . . . . . . . . . . . . . . . . . . . . . . . . . . . . . . . . . . . 448
Formatting paragraph text . . . . . . . . . . . . . . . . . . . . . . . . . . . . . . . . . . . . . . . 451
Hyphenating text . . . . . . . . . . . . . . . . . . . . . . . . . . . . . . . . . . . . . . . . . . . . . . 455
Contents vii
Page 10

Combining and linking paragraph text frames . . . . . . . . . . . . . . . . . . . . . . . . . 458
Wrapping paragraph text around objects, artistic text, and text frames . . . . . . 461
Embedding graphics and adding special characters. . . . . . . . . . . . . . . . . . . . . . 462
Inserting formatting codes . . . . . . . . . . . . . . . . . . . . . . . . . . . . . . . . . . . . . . . . 463
Displaying nonprinting characters . . . . . . . . . . . . . . . . . . . . . . . . . . . . . . . . . . 465
Working with Asian text . . . . . . . . . . . . . . . . . . . . . . . . . . . . . . . . . . . . .467
Formatting Asian text . . . . . . . . . . . . . . . . . . . . . . . . . . . . . . . . . . . . . . . . . . . 467
Using line-breaking rules for Asian text . . . . . . . . . . . . . . . . . . . . . . . . . . . . . . 469
Managing fonts. . . . . . . . . . . . . . . . . . . . . . . . . . . . . . . . . . . . . . . . . . . .471
Substituting fonts . . . . . . . . . . . . . . . . . . . . . . . . . . . . . . . . . . . . . . . . . . . . . . 471
Previewing and displaying fonts . . . . . . . . . . . . . . . . . . . . . . . . . . . . . . . . . . . . 473
Using writing tools . . . . . . . . . . . . . . . . . . . . . . . . . . . . . . . . . . . . . . . . .475
Using QuickCorrect . . . . . . . . . . . . . . . . . . . . . . . . . . . . . . . . . . . . . . . . . . . . . 475
Using the spelling checker and Grammatik . . . . . . . . . . . . . . . . . . . . . . . . . . . 478
Using the thesaurus . . . . . . . . . . . . . . . . . . . . . . . . . . . . . . . . . . . . . . . . . . . . . 480
Working with languages . . . . . . . . . . . . . . . . . . . . . . . . . . . . . . . . . . . . . . . . . 482
Customizing the writing tools . . . . . . . . . . . . . . . . . . . . . . . . . . . . . . . . . . . . . 483
Using checking styles. . . . . . . . . . . . . . . . . . . . . . . . . . . . . . . . . . . . . . . . . . . . 484
Using rule classes . . . . . . . . . . . . . . . . . . . . . . . . . . . . . . . . . . . . . . . . . . . . . . . 487
Analyzing a drawing . . . . . . . . . . . . . . . . . . . . . . . . . . . . . . . . . . . . . . . . . . . . 489
Using word lists . . . . . . . . . . . . . . . . . . . . . . . . . . . . . . . . . . . . . . . . . . . . . . . . 490
Checking statistics . . . . . . . . . . . . . . . . . . . . . . . . . . . . . . . . . . . . . . . . . . . . . . 494
Reference: Using writing tools . . . . . . . . . . . . . . . . . . . . . . . . . . . . . . . . . . . . . 494
Pages and layout . . . . . . . . . . . . . . . . . . . . . . . . . . . . . . . . . 501
Working with pages and layout tools. . . . . . . . . . . . . . . . . . . . . . . . . . . 503
Specifying the page layout . . . . . . . . . . . . . . . . . . . . . . . . . . . . . . . . . . . . . . . . 503
Choosing a page background . . . . . . . . . . . . . . . . . . . . . . . . . . . . . . . . . . . . . . 507
Adding, duplicating, renaming, and deleting pages . . . . . . . . . . . . . . . . . . . . . 508
Using the rulers . . . . . . . . . . . . . . . . . . . . . . . . . . . . . . . . . . . . . . . . . . . . . . . . 512
Calibrating the rulers . . . . . . . . . . . . . . . . . . . . . . . . . . . . . . . . . . . . . . . . . . . . 513
Setting up the grid. . . . . . . . . . . . . . . . . . . . . . . . . . . . . . . . . . . . . . . . . . . . . . 513
viii Corel DESIGNER X5 User Guide
Page 11

Setting up guidelines . . . . . . . . . . . . . . . . . . . . . . . . . . . . . . . . . . . . . . . . . . . . 515
Setting the drawing scale. . . . . . . . . . . . . . . . . . . . . . . . . . . . . . . . . . . . . . . . . 518
Working with tables . . . . . . . . . . . . . . . . . . . . . . . . . . . . . . . . . . . . . . . .521
Adding tables to drawings. . . . . . . . . . . . . . . . . . . . . . . . . . . . . . . . . . . . . . . . 521
Selecting, moving, and navigating table components . . . . . . . . . . . . . . . . . . . . 523
Inserting and deleting table rows and columns . . . . . . . . . . . . . . . . . . . . . . . . 526
Resizing table cells, rows, and columns . . . . . . . . . . . . . . . . . . . . . . . . . . . . . . 527
Formatting tables and cells . . . . . . . . . . . . . . . . . . . . . . . . . . . . . . . . . . . . . . . 529
Working with text in tables . . . . . . . . . . . . . . . . . . . . . . . . . . . . . . . . . . . . . . 531
Converting tables to text . . . . . . . . . . . . . . . . . . . . . . . . . . . . . . . . . . . . . . . . . 532
Merging and splitting tables and cells . . . . . . . . . . . . . . . . . . . . . . . . . . . . . . . 533
Manipulating tables as objects . . . . . . . . . . . . . . . . . . . . . . . . . . . . . . . . . . . . . 535
Adding images, graphics, and backgrounds to tables . . . . . . . . . . . . . . . . . . . . 535
Importing tables in a drawing . . . . . . . . . . . . . . . . . . . . . . . . . . . . . . . . . . . . . 536
Bitmaps . . . . . . . . . . . . . . . . . . . . . . . . . . . . . . . . . . . . . . . . . 539
Working with bitmaps . . . . . . . . . . . . . . . . . . . . . . . . . . . . . . . . . . . . . .541
Converting vector graphics to bitmaps . . . . . . . . . . . . . . . . . . . . . . . . . . . . . . 541
Importing bitmaps . . . . . . . . . . . . . . . . . . . . . . . . . . . . . . . . . . . . . . . . . . . . . 544
Cropping bitmaps . . . . . . . . . . . . . . . . . . . . . . . . . . . . . . . . . . . . . . . . . . . . . . 544
Changing the dimensions and resolution of bitmaps . . . . . . . . . . . . . . . . . . . . 545
Straightening bitmaps . . . . . . . . . . . . . . . . . . . . . . . . . . . . . . . . . . . . . . . . . . . 546
Using Digimarc watermarks to identify bitmaps . . . . . . . . . . . . . . . . . . . . . . . 548
Removing dust and scratch marks from bitmaps . . . . . . . . . . . . . . . . . . . . . . . 550
Applying special effects in bitmaps . . . . . . . . . . . . . . . . . . . . . . . . . . . . . . . . . 551
Working with colors in bitmaps . . . . . . . . . . . . . . . . . . . . . . . . . . . . . . . . . . . 553
Using the Image Adjustment Lab . . . . . . . . . . . . . . . . . . . . . . . . . . . . . . . . . . 554
Adjusting color and tone . . . . . . . . . . . . . . . . . . . . . . . . . . . . . . . . . . . . . . . . . 561
Using the Tone Curve filter . . . . . . . . . . . . . . . . . . . . . . . . . . . . . . . . . . . . . . . 564
Transforming color and tone . . . . . . . . . . . . . . . . . . . . . . . . . . . . . . . . . . . . . . 565
Editing bitmaps with Corel PHOTO-PAINT . . . . . . . . . . . . . . . . . . . . . . . . . 566
Contents ix
Page 12

Working with bitmap color modes . . . . . . . . . . . . . . . . . . . . . . . . . . . . .567
Changing the color mode of bitmaps . . . . . . . . . . . . . . . . . . . . . . . . . . . . . . . . 567
Changing bitmaps to black-and-white images . . . . . . . . . . . . . . . . . . . . . . . . . 568
Changing bitmaps to duotones. . . . . . . . . . . . . . . . . . . . . . . . . . . . . . . . . . . . . 569
Changing bitmaps to the paletted color mode . . . . . . . . . . . . . . . . . . . . . . . . . 571
Tracing bitmaps and editing traced results . . . . . . . . . . . . . . . . . . . . . .577
Tracing bitmaps. . . . . . . . . . . . . . . . . . . . . . . . . . . . . . . . . . . . . . . . . . . . . . . . 577
PowerTRACE controls . . . . . . . . . . . . . . . . . . . . . . . . . . . . . . . . . . . . . . . . . . . 581
Previewing traced results . . . . . . . . . . . . . . . . . . . . . . . . . . . . . . . . . . . . . . . . . 583
Fine tuning traced results. . . . . . . . . . . . . . . . . . . . . . . . . . . . . . . . . . . . . . . . . 583
Adjusting colors in traced results . . . . . . . . . . . . . . . . . . . . . . . . . . . . . . . . . . . 586
Setting default tracing options . . . . . . . . . . . . . . . . . . . . . . . . . . . . . . . . . . . . . 590
Tips for tracing bitmaps and editing traced results. . . . . . . . . . . . . . . . . . . . . . 591
Working with RAW camera files . . . . . . . . . . . . . . . . . . . . . . . . . . . . . . .593
Using RAW camera files . . . . . . . . . . . . . . . . . . . . . . . . . . . . . . . . . . . . . . . . . 593
Bringing RAW camera files into Corel DESIGNER. . . . . . . . . . . . . . . . . . . . . 594
Adjusting the color and tone of RAW camera files . . . . . . . . . . . . . . . . . . . . . . 597
Sharpening and reducing noise in RAW camera files . . . . . . . . . . . . . . . . . . . . 600
Previewing RAW camera files and obtaining image information . . . . . . . . . . . 601
Printing . . . . . . . . . . . . . . . . . . . . . . . . . . . . . . . . . . . . . . . . 603
Printing basics . . . . . . . . . . . . . . . . . . . . . . . . . . . . . . . . . . . . . . . . . . . . .605
Printing your work . . . . . . . . . . . . . . . . . . . . . . . . . . . . . . . . . . . . . . . . . . . . . 605
Laying out print jobs . . . . . . . . . . . . . . . . . . . . . . . . . . . . . . . . . . . . . . . . . . . . 607
Previewing print jobs . . . . . . . . . . . . . . . . . . . . . . . . . . . . . . . . . . . . . . . . . . . . 608
Applying print styles . . . . . . . . . . . . . . . . . . . . . . . . . . . . . . . . . . . . . . . . . . . . 609
Fine-tuning print jobs . . . . . . . . . . . . . . . . . . . . . . . . . . . . . . . . . . . . . . . . . . . 610
Printing colors accurately . . . . . . . . . . . . . . . . . . . . . . . . . . . . . . . . . . . . . . . . . 612
Printing to a PostScript printer . . . . . . . . . . . . . . . . . . . . . . . . . . . . . . . . . . . . 615
Using print merge . . . . . . . . . . . . . . . . . . . . . . . . . . . . . . . . . . . . . . . . . . . . . . 618
Viewing preflight summaries . . . . . . . . . . . . . . . . . . . . . . . . . . . . . . . . . . . . . . 623
x Corel DESIGNER X5 User Guide
Page 13

Preparing files for print service providers. . . . . . . . . . . . . . . . . . . . . . . .625
Preparing a print job for a print service provider . . . . . . . . . . . . . . . . . . . . . . . 625
Working with imposition layouts . . . . . . . . . . . . . . . . . . . . . . . . . . . . . . . . . . 626
Printing printers’ marks . . . . . . . . . . . . . . . . . . . . . . . . . . . . . . . . . . . . . . . . . 629
Maintaining OPI links. . . . . . . . . . . . . . . . . . . . . . . . . . . . . . . . . . . . . . . . . . . 632
Printing color separations . . . . . . . . . . . . . . . . . . . . . . . . . . . . . . . . . . . . . . . . 633
Working with color trapping and overprinting . . . . . . . . . . . . . . . . . . . . . . . . 635
Specifying In-RIP trapping settings . . . . . . . . . . . . . . . . . . . . . . . . . . . . . . . . . 639
Printing to film . . . . . . . . . . . . . . . . . . . . . . . . . . . . . . . . . . . . . . . . . . . . . . . . 642
Working with a print service provider . . . . . . . . . . . . . . . . . . . . . . . . . . . . . . . 643
File formats . . . . . . . . . . . . . . . . . . . . . . . . . . . . . . . . . . . . . . 645
Importing and exporting files . . . . . . . . . . . . . . . . . . . . . . . . . . . . . . . . .647
Importing files . . . . . . . . . . . . . . . . . . . . . . . . . . . . . . . . . . . . . . . . . . . . . . . . 647
Exporting files . . . . . . . . . . . . . . . . . . . . . . . . . . . . . . . . . . . . . . . . . . . . . . . . . 652
Working with 3D models . . . . . . . . . . . . . . . . . . . . . . . . . . . . . . . . . . . .657
Installing Deep Exploration. . . . . . . . . . . . . . . . . . . . . . . . . . . . . . . . . . . . . . . 657
Importing 3D models . . . . . . . . . . . . . . . . . . . . . . . . . . . . . . . . . . . . . . . . . . . 658
Exporting to PDF . . . . . . . . . . . . . . . . . . . . . . . . . . . . . . . . . . . . . . . . . . .659
Exporting documents as PDF files . . . . . . . . . . . . . . . . . . . . . . . . . . . . . . . . . . 659
Including hyperlinks, bookmarks, and thumbnails in PDF files . . . . . . . . . . . . 663
Reducing the size of PDF files . . . . . . . . . . . . . . . . . . . . . . . . . . . . . . . . . . . . . 664
Working with text and fonts in PDF files . . . . . . . . . . . . . . . . . . . . . . . . . . . . 666
Specifying an encoding format for PDF files . . . . . . . . . . . . . . . . . . . . . . . . . . 669
Specifying a viewing option for EPS files . . . . . . . . . . . . . . . . . . . . . . . . . . . . . 669
Specifying color management options for exporting PDF files . . . . . . . . . . . . . 670
Setting security options for PDF files . . . . . . . . . . . . . . . . . . . . . . . . . . . . . . . . 671
Optimizing PDF files . . . . . . . . . . . . . . . . . . . . . . . . . . . . . . . . . . . . . . . . . . . 673
Viewing preflight summaries for PDF files . . . . . . . . . . . . . . . . . . . . . . . . . . . 675
Preparing PDF files for a print provider . . . . . . . . . . . . . . . . . . . . . . . . . . . . . . 676
Contents xi
Page 14

Working with office productivity applications . . . . . . . . . . . . . . . . . . . .679
Importing files from office productivity applications. . . . . . . . . . . . . . . . . . . . . 679
Exporting files to office productivity applications . . . . . . . . . . . . . . . . . . . . . . . 679
Adding objects to documents . . . . . . . . . . . . . . . . . . . . . . . . . . . . . . . . . . . . . . 679
Exporting to HTML . . . . . . . . . . . . . . . . . . . . . . . . . . . . . . . . . . . . . . . . .681
Setting preferences for exporting images to HTML . . . . . . . . . . . . . . . . . . . . . 681
Creating Web-compatible text. . . . . . . . . . . . . . . . . . . . . . . . . . . . . . . . . . . . . 682
Previewing and verifying files before exporting to HTML . . . . . . . . . . . . . . . . 683
Exporting to HTML. . . . . . . . . . . . . . . . . . . . . . . . . . . . . . . . . . . . . . . . . . . . . 684
Supported file formats . . . . . . . . . . . . . . . . . . . . . . . . . . . . . . . . . . . . . .685
Adobe Illustrator (AI) . . . . . . . . . . . . . . . . . . . . . . . . . . . . . . . . . . . . . . . . . . . 687
Adobe Type 1 Font (PFB) . . . . . . . . . . . . . . . . . . . . . . . . . . . . . . . . . . . . . . . . 691
Windows Bitmap (BMP) . . . . . . . . . . . . . . . . . . . . . . . . . . . . . . . . . . . . . . . . . 692
OS/2 Bitmap (BMP) . . . . . . . . . . . . . . . . . . . . . . . . . . . . . . . . . . . . . . . . . . . . 693
Computer Graphics Metafile (CGM) . . . . . . . . . . . . . . . . . . . . . . . . . . . . . . . . 693
CorelDRAW (CDR). . . . . . . . . . . . . . . . . . . . . . . . . . . . . . . . . . . . . . . . . . . . . 696
Corel Presentation Exchange (CMX) . . . . . . . . . . . . . . . . . . . . . . . . . . . . . . . . 696
Corel PHOTO-PAINT (CPT) . . . . . . . . . . . . . . . . . . . . . . . . . . . . . . . . . . . . . 697
Corel Symbol Library (CSL) . . . . . . . . . . . . . . . . . . . . . . . . . . . . . . . . . . . . . . . 698
Cursor Resource (CUR) . . . . . . . . . . . . . . . . . . . . . . . . . . . . . . . . . . . . . . . . . . 698
Microsoft Word (DOC, DOCX, or RTF) . . . . . . . . . . . . . . . . . . . . . . . . . . . . . 699
Microsoft Publisher (PUB) . . . . . . . . . . . . . . . . . . . . . . . . . . . . . . . . . . . . . . . . 702
Corel DESIGNER (DES, DSF, DS4, or DRW). . . . . . . . . . . . . . . . . . . . . . . . . 703
AutoCAD Drawing Database (DWG) and AutoCAD Drawing Interchange Format
(DXF) . . . . . . . . . . . . . . . . . . . . . . . . . . . . . . . . . . . . . . . . . . . . . . . . . . . . . . . 704
Encapsulated PostScript (EPS) . . . . . . . . . . . . . . . . . . . . . . . . . . . . . . . . . . . . . 707
PostScript (PS or PRN) . . . . . . . . . . . . . . . . . . . . . . . . . . . . . . . . . . . . . . . . . . 713
GIF . . . . . . . . . . . . . . . . . . . . . . . . . . . . . . . . . . . . . . . . . . . . . . . . . . . . . . . . . 715
HTML . . . . . . . . . . . . . . . . . . . . . . . . . . . . . . . . . . . . . . . . . . . . . . . . . . . . . . . 716
JPEG (JPG) . . . . . . . . . . . . . . . . . . . . . . . . . . . . . . . . . . . . . . . . . . . . . . . . . . . 717
JPEG 2000 (JP2) . . . . . . . . . . . . . . . . . . . . . . . . . . . . . . . . . . . . . . . . . . . . . . . 718
Kodak Photo CD Image (PCD) . . . . . . . . . . . . . . . . . . . . . . . . . . . . . . . . . . . . 720
PICT (PCT) . . . . . . . . . . . . . . . . . . . . . . . . . . . . . . . . . . . . . . . . . . . . . . . . . . . 721
xii Corel DESIGNER X5 User Guide
Page 15

PaintBrush (PCX) . . . . . . . . . . . . . . . . . . . . . . . . . . . . . . . . . . . . . . . . . . . . . . 723
Adobe Portable Document Format (PDF) . . . . . . . . . . . . . . . . . . . . . . . . . . . . 724
HPGL Plotter File (PLT) . . . . . . . . . . . . . . . . . . . . . . . . . . . . . . . . . . . . . . . . . 727
Portable Network Graphics (PNG) . . . . . . . . . . . . . . . . . . . . . . . . . . . . . . . . . 729
Adobe Photoshop (PSD) . . . . . . . . . . . . . . . . . . . . . . . . . . . . . . . . . . . . . . . . . 730
Corel Painter (RIF) . . . . . . . . . . . . . . . . . . . . . . . . . . . . . . . . . . . . . . . . . . . . . 732
Scalable Vector Graphics (SVG). . . . . . . . . . . . . . . . . . . . . . . . . . . . . . . . . . . . 733
Macromedia Flash (SWF) . . . . . . . . . . . . . . . . . . . . . . . . . . . . . . . . . . . . . . . . 739
TARGA (TGA) . . . . . . . . . . . . . . . . . . . . . . . . . . . . . . . . . . . . . . . . . . . . . . . . 740
TIFF . . . . . . . . . . . . . . . . . . . . . . . . . . . . . . . . . . . . . . . . . . . . . . . . . . . . . . . . 741
TrueType Font (TTF) . . . . . . . . . . . . . . . . . . . . . . . . . . . . . . . . . . . . . . . . . . . 742
Visio (VSD) . . . . . . . . . . . . . . . . . . . . . . . . . . . . . . . . . . . . . . . . . . . . . . . . . . . 743
WordPerfect Document (WPD) . . . . . . . . . . . . . . . . . . . . . . . . . . . . . . . . . . . 743
WordPerfect Graphic (WPG) . . . . . . . . . . . . . . . . . . . . . . . . . . . . . . . . . . . . . 744
RAW camera file formats . . . . . . . . . . . . . . . . . . . . . . . . . . . . . . . . . . . . . . . . 745
Wavelet Compressed Bitmap (WI) . . . . . . . . . . . . . . . . . . . . . . . . . . . . . . . . . 745
Windows Metafile Format (WMF) . . . . . . . . . . . . . . . . . . . . . . . . . . . . . . . . . 746
Additional file formats. . . . . . . . . . . . . . . . . . . . . . . . . . . . . . . . . . . . . . . . . . . 746
Recommended formats for importing graphics . . . . . . . . . . . . . . . . . . . . . . . . 748
Recommended formats for exporting graphics . . . . . . . . . . . . . . . . . . . . . . . . . 749
General notes on importing text files . . . . . . . . . . . . . . . . . . . . . . . . . . . . . . . . 749
Customizing and automating . . . . . . . . . . . . . . . . . . . . . . . . 751
Setting basic preferences . . . . . . . . . . . . . . . . . . . . . . . . . . . . . . . . . . . .753
Disabling warning messages . . . . . . . . . . . . . . . . . . . . . . . . . . . . . . . . . . . . . . 753
Viewing system information . . . . . . . . . . . . . . . . . . . . . . . . . . . . . . . . . . . . . . 753
Corel Application Recovery Manager (Windows XP). . . . . . . . . . . . . . . . . . . . 754
Customizing Corel DESIGNER . . . . . . . . . . . . . . . . . . . . . . . . . . . . . . . . .755
Saving defaults . . . . . . . . . . . . . . . . . . . . . . . . . . . . . . . . . . . . . . . . . . . . . . . . 755
Using multiple workspaces . . . . . . . . . . . . . . . . . . . . . . . . . . . . . . . . . . . . . . . 756
Customizing keyboard shortcuts . . . . . . . . . . . . . . . . . . . . . . . . . . . . . . . . . . . 758
Customizing menus. . . . . . . . . . . . . . . . . . . . . . . . . . . . . . . . . . . . . . . . . . . . . 761
Customizing toolbars. . . . . . . . . . . . . . . . . . . . . . . . . . . . . . . . . . . . . . . . . . . . 763
Contents xiii
Page 16

Customizing the property bar . . . . . . . . . . . . . . . . . . . . . . . . . . . . . . . . . . . . . 767
Customizing the status bar. . . . . . . . . . . . . . . . . . . . . . . . . . . . . . . . . . . . . . . . 769
Customizing feedback sounds. . . . . . . . . . . . . . . . . . . . . . . . . . . . . . . . . . . . . . 770
Customizing filters. . . . . . . . . . . . . . . . . . . . . . . . . . . . . . . . . . . . . . . . . . . . . . 771
Customizing file associations . . . . . . . . . . . . . . . . . . . . . . . . . . . . . . . . . . . . . . 772
Using macros to automate tasks . . . . . . . . . . . . . . . . . . . . . . . . . . . . . .775
Working with macros . . . . . . . . . . . . . . . . . . . . . . . . . . . . . . . . . . . . . . . . . . . 775
Reference . . . . . . . . . . . . . . . . . . . . . . . . . . . . . . . . . . . . . . . 787
Comparing features . . . . . . . . . . . . . . . . . . . . . . . . . . . . . . . . . . . . . . . .789
Glossary . . . . . . . . . . . . . . . . . . . . . . . . . . . . . . . . . . . . . . . . . . . . . . . . . .793
Index . . . . . . . . . . . . . . . . . . . . . . . . . . . . . . . . . . . . . . . . . . 823
xiv Corel DESIGNER X5 User Guide
Page 17

Getting started
Welcome . . . . . . . . . . . . . . . . . . . . . . . . . . . . . . . . . . . . . . . . . . . . . . . . . . .3
What’s new in Corel DESIGNER X5? . . . . . . . . . . . . . . . . . . . . . . . . . . . . . .9
Learning resources . . . . . . . . . . . . . . . . . . . . . . . . . . . . . . . . . . . . . . . . . .21
Corel DESIGNER workspace tour . . . . . . . . . . . . . . . . . . . . . . . . . . . . . . . .29
Corel DESIGNER basics . . . . . . . . . . . . . . . . . . . . . . . . . . . . . . . . . . . . . . .51
Finding and managing content. . . . . . . . . . . . . . . . . . . . . . . . . . . . . . . . .77
Working with precision . . . . . . . . . . . . . . . . . . . . . . . . . . . . . . . . . . . . . . .91
Working with templates . . . . . . . . . . . . . . . . . . . . . . . . . . . . . . . . . . . . .115
Collaborating. . . . . . . . . . . . . . . . . . . . . . . . . . . . . . . . . . . . . . . . . . . . . .123
Corel DESIGNER X5 User Guide 1
Page 18

Page 19

Welcome
Corel DESIGNER® is a precision graphics application that is created to meet the
demands of technical illustrators. Its intuitive user interface lets you get started
quickly to produce professional results.
This section contains the following topics:
• Installing Corel DESIGNER Technical Suite applications
• Changing languages
• Changing startup settings
• Registering Corel products
• Working with trial versions
• Updating Corel products
• Corel Support Services
•About Corel
Installing Corel DESIGNER Technical Suite applications
The installation wizard makes it easy to install Corel DESIGNER Technical Suite
applications and components. You can choose a typical installation to quickly install the
suite, or you can customize the installation by choosing different options.
You can also use the installation wizard to do the following:
• modify the current installation by adding or deleting components
• repair the current installation by reinstalling all application features
• uninstall Corel DESIGNER Technical Suite
Repairing an installation is helpful when you encounter problems in using the
application, or when you suspect that the installation is corrupt. Before repairing an
installation, try resetting the current workspace to the default settings by holding down
F8 while starting the application.
Welcome 3
Page 20

To install Corel DESIGNER Technical Suite applications
1 Close all applications, including all virus detection programs.
2 Insert the DVD in the DVD drive.
(Windows® 7 and Windows Vista®) If the installation wizard does not start
automatically, click Start on the Windows® taskbar, and type X:\autorun.exe in
the search box, where X is the letter that corresponds to the DVD drive.
(Windows® XP) If the installation wizard does not start automatically, click Start
on the Windows taskbar, and click Run. Type X:\autorun.exe, where X is the
letter that corresponds to the DVD drive.
3 Read the license agreement, and then enable the I accept the terms in the license
agreement check box.
4 Click Next.
5 Ty p e y o u r n a m e i n t h e User name text box.
6 Type your serial number in the Serial number text box.
The serial number is not case-sensitive.
7 Click Next.
8 Follow the installation wizard instructions for installing the software.
To modify or repair a Corel DESIGNER Technical Suite installation
1 Close all applications.
2 On the Windows taskbar, click Start Control panel.
3 Do one of the following:
• (Windows 7 and Windows Vista) Click Uninstall a program.
• (Windows XP) Click Add or remove programs.
4 Do one of the following:
• (Windows 7 and Windows Vista) Double-click
Corel DESIGNER Technical Suite on the Uninstall or change a program
page.
• (Windows XP) In the Add or remove programs dialog box, choose
Corel DESIGNER Technical Suite from the list, and click Change/Remove.
5 Follow the instructions that appear.
4 Corel DESIGNER X5 User Guide
Page 21

To uninstall Corel DESIGNER Technical Suite
1 On the Windows taskbar, click Start Control Panel.
2 Do one of the following:
• (Windows 7 and Windows Vista) Click Uninstall a program.
• (Windows XP) Click Add or remove programs.
3 Do one of the following:
• (Windows 7 and Windows Vista) Double-click
Corel DESIGNER Technical Suite on the Uninstall or change a program
page.
• (Windows XP) In the Add or remove programs dialog box, choose
Corel DESIGNER Technical Suite from the list, and click Change/Remove.
4 Enable the Remove option in the wizard that appears, and follow the instructions.
To completely uninstall the product by removing user files, such as presets, usercreated fills, and customized files, enable the Remove user files check box.
Changing languages
If an application has been installed in more than one language, you can change the
language of the user interface and Help at any time.
If you did not install a specific Writing Tools language when you first installed the
product, you can do so now.
To change the language of the user interface and Help
1 Click To o l s Options.
2 In the list of categories, click Global.
3 Choose a language from the Select the language for the user interface list box.
If you want to change the language of the user interface and Help when you start
the application, enable the Ask me the next time the software starts check box.
4 Restart the application.
To add a language for Writing Tools
1 Close any open applications.
2 On the Windows taskbar, click Start Control panel.
Welcome 5
Page 22

3 Do one of the following:
• (Windows 7 and Windows Vista) Click Uninstall a program.
• (Windows XP) Click Add or remove programs.
4 Do one of the following:
• (Windows 7 and Windows Vista) Double-click
Corel DESIGNER Technical Suite on the Uninstall or change a program
page.
• (Windows XP) Choose Corel DESIGNER Technical Suite from the Currently
installed programs list.
5 Click Change/Remove.
6 On the feature tab, click Wri tin g t ool s, and enable the check box next to the
language that you want to install.
7 Follow the instructions in the installation wizard.
Changing startup settings
You can specify the startup settings for Corel DESIGNER, which control how the
application appears when it’s opened. For example, you can start the application with
the Welcome screen open or a new blank document.
To change startup settings
1 Click To o l s Options.
2 In the Wo r ks p a ce list of categories, click General.
3 In the Getting started area, choose an option from the On Corel DESIGNER X5
start-up list box.
If you want to hide the Create a new document dialog box when starting
documents, disable the Show new document dialog box check box.
Registering Corel products
Registering Corel® products is important. Registration provides you with timely access
to the latest product updates, valuable information about product releases, and access
to free downloads, articles, tips and tricks, and special offers.
6 Corel DESIGNER X5 User Guide
Page 23

You can register in one of the following ways:
• online — If you are connected to the Internet, you can start online registration
when you start the Corel graphics application. You can also register online at a later
date by clicking Help Registration. If no Internet connection is detected, a list
of options appears in a dialog box.
• by phone — You can call the Corel Customer Service Center nearest you. For more
information about customer service, see “Corel Support Services” on page 8.
Working with trial versions
You can download free trial versions of Corel graphics applications from the Corel Web
site. Trial versions let you use all the application features and tools for free, for a limited
time. After the trial period expires, you can access only limited functionality. For
example, you can open and view files, but you cannot save or export them. If you want
to purchase the application, you can buy a purchase key online that supplies you with a
serial number. You do not need to download another copy of the application.
To purchase the full version
1 In the trial message window, click Buy now.
If the trial version has not expired, the trial message window appears when you quit
the application. If the trial version has expired, the window appears when you start
the application.
2 In the Corel store window, choose an option, and follow the directions.
You can choose to buy a purchase key, or you can choose to buy a boxed version of
the application.
If you are not connected to the Internet, the Corel store window is not
displayed. Instead, you are prompted to purchase the full version by phone or
to purchase it online by first activating your Internet connection.
Updating Corel products
During product installation, you can choose the option to download product updates
and service packs. After installing the product, you can view information about product
updates by clicking Help Updates.
Welcome 7
Page 24

By default, you are automatically notified when product updates and news become
available. In addition, the application automatically downloads new product updates
and asks you for permission to install them. However, you can change the update
settings at any time.
To change the update settings
1 Click Help Welcome screen.
2 Click Settings at the top of the Update page.
3 In the Update settings window, enable or disable either of the following check
boxes:
• Notify me of available product updates, news, and tutorials.
• Automatically download product updates and ask me before installing.
Corel Support Services
Corel® Support Services can provide you with prompt and accurate information about
product features, specifications, pricing, availability, services, and technical support. For
the most current information on support services available for your Corel product,
please visit www.corel.com/support.
About Corel
Corel is one of the world’s top software companies, with more than 100 million active
users in over 75 countries. We develop software that helps people express their ideas and
share their stories in more exciting, creative, and persuasive ways. Through the years,
we’ve built a reputation for delivering innovative, trusted products that are easy to learn
and use, helping people achieve new levels of productivity. The industry has responded
with hundreds of awards for software innovation, design, and value.
Our award-winning product portfolio includes some of the world’s most widely
recognized and popular software brands, including CorelDRAW® Graphics Suite,
Corel® Painter™, Corel DESIGNER® Technical Suite, Corel® PaintShop Photo®
Pro, Corel® VideoStudio®, Corel® WinDVD®, Corel® WordPerfect® Office,
WinZip® and the recently released Corel® Digital Studio™ 2010. Our global
headquarters are in Ottawa, Canada, with major offices in the United States, United
Kingdom, Germany, China, Taiwan, and Japan.
8 Corel DESIGNER X5 User Guide
Page 25

What’s new in Corel DESIGNER X5?
The new and enhanced features of Corel DESIGNER X5 are described in the following
topics:
• Connect to technical design assets
• Exchange files seamlessly
• Create technical illustrations with confidence
• Publish to technical communication standards
• Use color with certainty
• Create graphics for the Web
• Learn about Corel DESIGNER
Connect to technical design assets
Content is central to any project. Whether it’s the perfect font, clipart, photo, a previous
project, or a client’s mockup, Corel DESIGNER helps you quickly access content so
that you can focus on your design.
Corel CONNECT (New and enhanced)
Corel® CONNECT™ is a full-screen browser that lets you peruse the suite’s digital
content and search your computer or local network to quickly find and incorporate
images in your technical drawings. You can browse content by category or search for
content by using a keyword. This handy utility is also available as a docker within
Corel DESIGNER. What’s more, you can keep a collection of content in the tray, which
is synchronized between the browser and the dockers to provide quick access to project
content.
What’s new in Corel DESIGNER X5? 9
Page 26
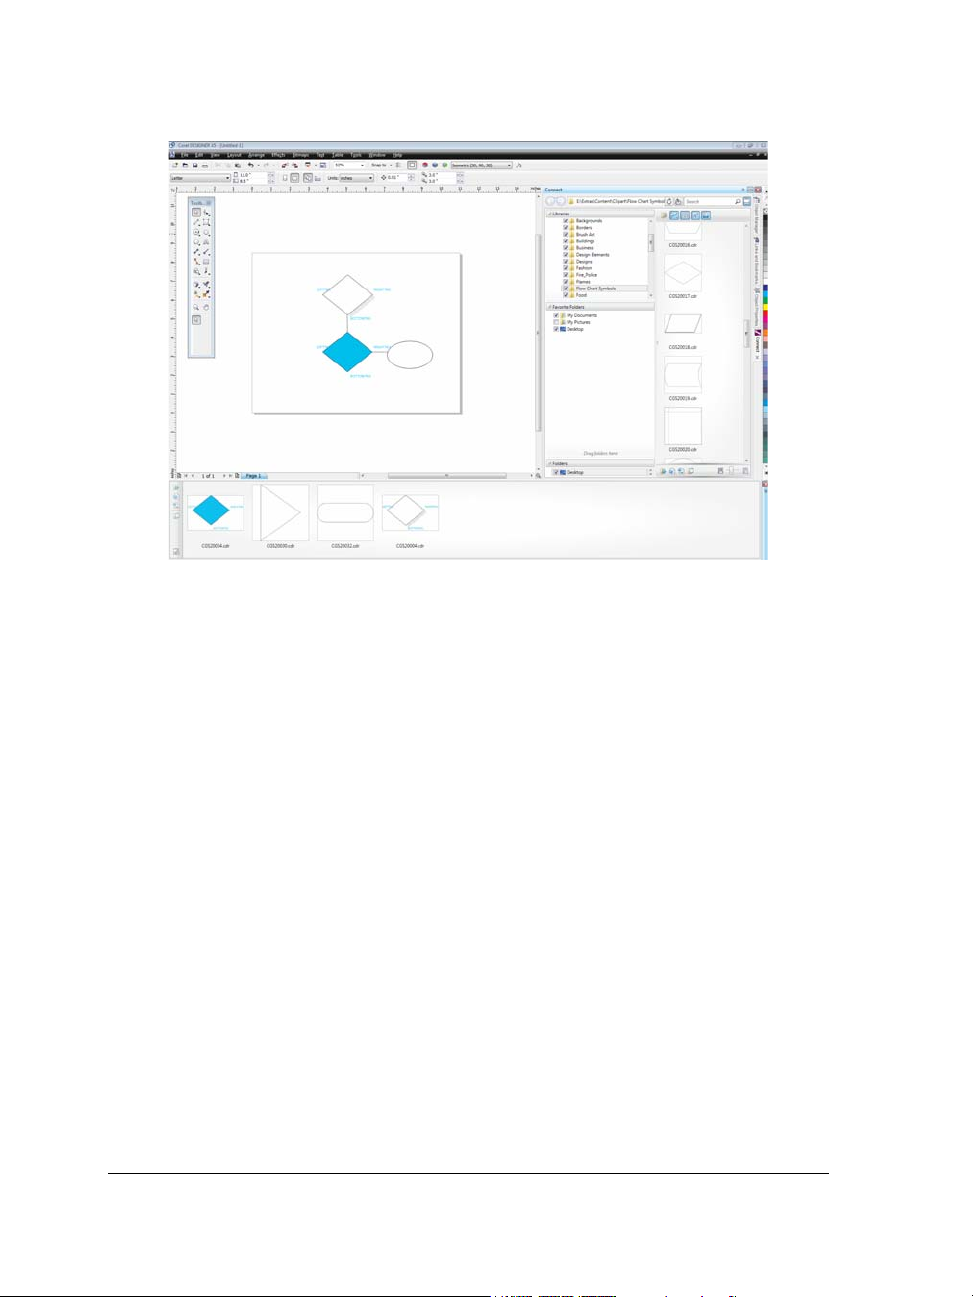
Corel CONNECT is available as a docker in Corel DESIGNER and as a
standalone application.
Color Palette Manager docker
(Enhanced)
The enhanced Color palette manager docker, which includes new and more accurate
PANTONE® palettes, makes it easier to create, organize, and show or hide both
default and custom color palettes. You can create Web-specific RGB palettes or printspecific CMYK palettes. For optimal color consistency, you can also add third-party
color palettes when working with multiple applications.
10 Corel DESIGNER X5 User Guide
Page 27
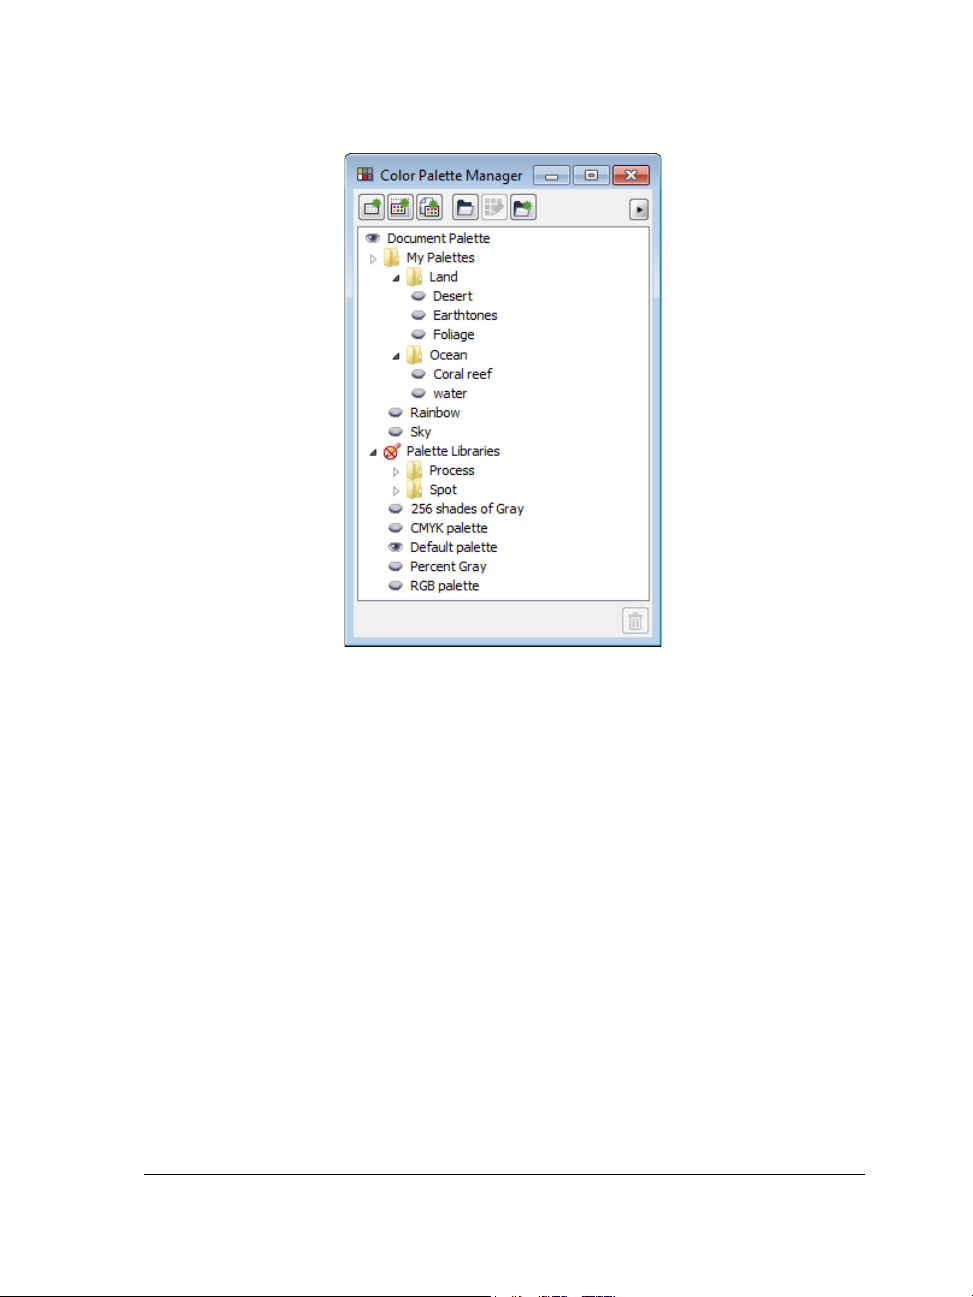
The enhanced Color palette manager docker lets you create and organize
custom palettes.
Exchange files seamlessly
Corel DESIGNER gives you an integrated solution for working with and saving files to
different formats.
Adobe product support
(Enhanced)
With support for multiple artboards, preservation of gradient transparency, blob brush
strokes, and a new Preflight section, you can also import files using the Adobe®
Illustrator® CS 5 file format and export files to the Adobe Illustrator CS 4 file format.
When you import and export PSD files using the Adobe® Photoshop® CS4 file
format, Corel DESIGNER preserves the appearance of adjustment layers and Masks
palette effects.
What’s new in Corel DESIGNER X5? 11
Page 28

In addition, you can import and export Adobe® Portable Document Format (PDF)
files, with support for Acrobat® 9 and heightened security encryption. When
importing PDF files, the suite also supports Bates numbering, including headers and
footers. During PDF export, you can define page size by object.
Windows Touch support
(New)
The suite looks right at home on Windows 7 — you can navigate each application
workspace by using finger gestures. Support for taskbar thumbnails lets you switch
between open documents quickly.
If your computer supports Windows Touch, you can use finger gestures to
navigate the application workspace.
EPS level 3 support
(Enhanced)
The encapsulated PostScript® (EPS) filter has been enhanced to support files created
with Adobe® PostScript® 3 and to preserve the color integrity of objects that use an
RGB color space or a LAB color space. You’ll now find that EPS files export and print
with brighter and more vivid colors.
VSTA integration
(New)
For more automation flexibility, you can now use Microsoft® Visual Studio® Tools for
Applications to create dynamic add-ins.
Multi-core support
(New)
The suite takes advantage of the multithreading capabilities of modern processors,
splitting resource-consuming tasks to improve performance and efficiency.
12 Corel DESIGNER X5 User Guide
Page 29

File format compatibility
(Enhanced)
With support for more than 60 file formats, including AutoCAD®, AutoCAD®
DWG™, DXF™, PLT, Microsoft® Visio® Filter, DOC, DOCX, RTF, and more, you
can confidently exchange files with customers and colleagues.
The TIFF filter provides greater compatibility with a variety of standard file
compression methods and multipage files.
Create technical illustrations with confidence
The suite provides significant new and enhanced features to help you create technical
drawings.
Preserved rectangle corner integrity with true radii
(Enhanced)
Now you can create chamfered, scalloped, or round corners from the Rectangle tool
options property bar. When you stretch or scale a rectangle, the rounded corners are
preserved without distortion, and you have the option of maintaining the original
corner radius. In addition, corners are now expressed in units of true radii, which makes
them easier to work with.
You can quickly create rectangles with round, scalloped, and chamfered corners
from the Rectangle tool options on the property bar.
What’s new in Corel DESIGNER X5? 13
Page 30
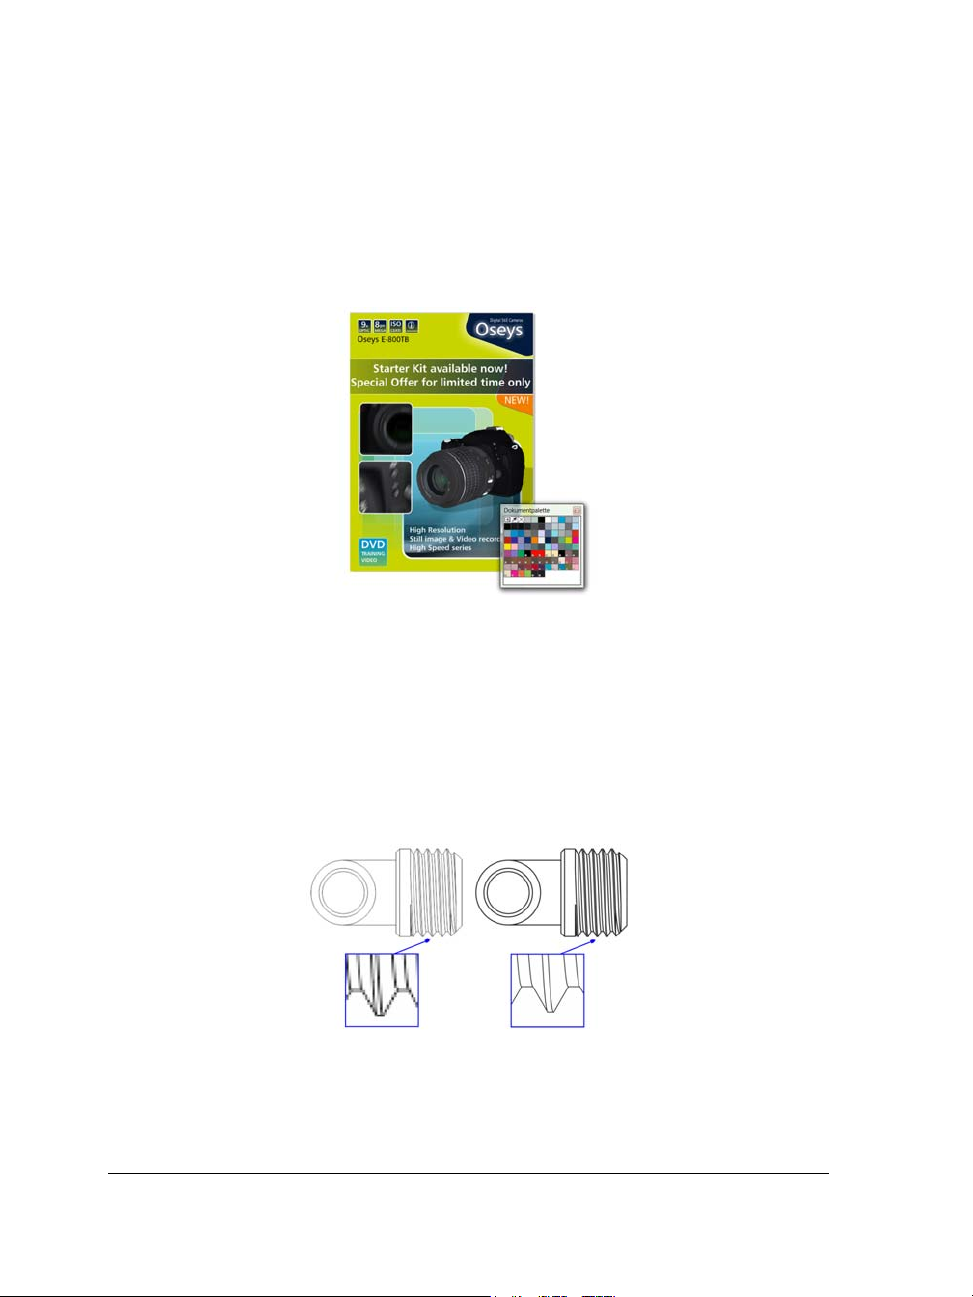
Document palette
(New)
With Corel DESIGNER X5, a custom color palette is automatically created on the fly
for each design project. The palette is saved with the file, which gives you quick access
to this project’s colors in the future.
A custom color palette is created on the fly for each design project.
Corel PowerTRACE X5
(Enhanced)
You can convert bitmaps into editable vector graphics and achieve smoother curves and
more accurate results. This version of Corel® PowerTRACE™ produces the best results
yet.
Corel PowerTRACE X5 provides greatly improved trace results.
14 Corel DESIGNER X5 User Guide
Page 31

Mesh Fill tool
(Enhanced)
The new Mesh Fill smoothing and transparency controls allow you to reproduce object
surfaces with more precision. The new Transparency option lets you reveal objects
behind individual nodes. With the new Smooth mesh color option on the property
bar, you can achieve more realistic color transitions. Any colors added to the mesh nodes
now blend seamlessly with the rest of the object. In addition, the number of nodes per
mesh has been greatly reduced to make the objects easier to manipulate.
Improved interpolation and new node transparency extend the possibilities of
the Mesh fill tool.
Join Curves docker
(New)
Corel DESIGNER now includes a Join Curves docker that lets you quickly transform
selected line segments into a closed object.
Joining multiple line segments can be the starting point for a more complex
drawing.
What’s new in Corel DESIGNER X5? 15
Page 32

Publish to technical communication standards
Corel DESIGNER provides support for industry standard file formats to meet your
technical publishing requirements.
WebCGM support
(Enhanced)
The WebCGM file format now supports the 2.0, 2.1 and S1000D profiles — to allow
you to create, interchange, and deliver standardized technical graphics.
Work with 3D models using Right Hemisphere Deep Exploration 6 CSE
(Enhanced)
Right Hemisphere® Deep Exploration™ 6 CSE is a 3D-visualization application that
lets you access and view existing 3D models. When you open a 3D model in Deep
Exploration, you can choose a specific view, such as parallel or perspective projected
view, then output the view to Corel DESIGNER as a 2D vector illustration or to
Corel® PHOTO-PAINT™ as photo-realistic bitmap rendering. You can also use Deep
Exploration to create cross sections and animations for assembly manuals.
Output a 3D view to Corel DESIGNER as a 2D vector illustration.
Deep Exploration CSE supports DWG, DXF, DWF, 3DS, SKP (SketchUp), VRML and
a few additional 3D file formats.
Use color with certainty
Corel DESIGNER X5 makes it easier than ever to achieve accurate color representation.
Whether you’re importing a client’s mockup, working with previous designs, or
sending a project to a print shop or manufacturing facility, you can be certain that your
colors are true.
16 Corel DESIGNER X5 User Guide
Page 33

Default Color Management Settings dialog box
(New)
For Corel DESIGNER X5, the color management engine has been completely
redesigned. The new Default color management settings dialog box lets you set
application color policies to help you achieve accurate color representation while
providing greater control for advanced users.
Corel DESIGNER X5 features a completely redesigned color management
engine.
Document Color Settings dialog box
(New)
The Document color settings dialog box lets you adjust color settings that apply only
to the current document.
Primary Color Mode setting
(New)
While continuing to support RGB, CMYK, and grayscale objects within the same
document, Corel DESIGNER X5 provides a new Primary color mode setting, which
governs the default color mode on export and the default palette colors (RGB or
CMYK).
Corel DESIGNER X5 provides a new Primary color mode setting.
What’s new in Corel DESIGNER X5? 17
Page 34

Color Proof Settings docker
(New and enhanced)
All color proof settings are grouped within a single docker, which lets you save presets
and prepare artwork for various output devices more efficiently. The docker helps you
save time by providing a list of output devices which you can choose from to preview
the output. When seeking approval from clients, you can also easily export soft proofs
and print hard proofs from the docker.
With the Color proof settings docker, you can proof your document as you go.
Color sampling options
(New)
The addition of the Eyedropper tool to various color dialog boxes lets you conveniently
sample and match colors from a document without closing the dialog box. The
Eyedropper tool is also available on color palettes, as well as in color pickers on the
property bar.
You can quickly and easily sample colors from a document.
18 Corel DESIGNER X5 User Guide
Page 35

Application of sampled color
(Enhanced)
When you sample color with the Eyedropper tool in Corel DESIGNER, the Apply
color mode is automatically activated so that you can immediately apply the sampled
color to another object. You can also drag a color directly from one object to another.
Create graphics for the Web
Hex color values
(Enhanced)
The suite now provides multiple options for viewing hexadecimal (hex) color values and
lets you choose colors by using their hex value. Web designers often specify colors in
standard hex format, which ensures consistent color representation. With
Corel DESIGNER X5, you can view hex values in the Uniform fill dialog box, in the
Eyedropper tooltip, in the Color docker, and on the status bar.
With Corel DESIGNER X5, you can view hex values.
Centralized Web export controls
(New)
The new Export for Web dialog box provides a single access point for common export
controls, eliminating the need to open additional dialog boxes when preparing a file for
export. It also lets you compare the results of various filter settings before you commit
to an output format, making it easier to achieve optimal results. In addition, you can
What’s new in Corel DESIGNER X5? 19
Page 36

specify object transparencies and matting colors for anti-aliased edges — all with realtime preview. You can also select and edit color palettes for indexed formats.
You can fine-tune your Web output while previewing the changes in real time.
Improved support for Web formats
(Enhanced)
The suite now provides optimization filters that produce consistent, high-quality Web
output. In addition, more comprehensive transparency controls let you easily
manipulate transparency on the fly.
Learn about Corel DESIGNER
Whether you’re a new or current user, Corel DESIGNER makes it easy to get started.
The suite provides many learning aids, including enhanced tooltips to provide assistance
while you draw.
Tooltips
(Enhanced)
The formatting and content of tooltips have been enhanced to improve readability and
provide more information. When you position the pointer over an icon or a button, a
tooltip appears describing the tool and its purpose.
Create a New Document/Image dialog boxes
(New and enhanced)
Corel DESIGNER X5 introduces a Create a new document dialog box, which
provides a selection of presets for page size, document resolution, preview mode, color
mode, and color profile. For new users, the Description area clarifies the available
controls and settings.
20 Corel DESIGNER X5 User Guide
Page 37

Learning resources
You can learn to use the product in various ways: by accessing the Help and tooltips;
by completing tutorials, and by exploring the resources on the Corel Web site
(www.corel.com). On the Web site, you can access tips, additional tutorials, and
training and integration resources. You can also check the Readme file (readme.html),
which is installed with the software.
This section contains the following topics:
• Getting help
• Using the Help and tooltips
• Welcome screen
•CorelTUTOR
• Tips and tricks
• Macro programming guide
• Network deployment guide
• Web-based resources
• Customized training and integration resources
Getting help
Various learning resources are available. The following table can help you decide what
learning resources to consult when you need assistance. You can access more
information about some resources by clicking the corresponding links.
To S e e
Start learning the applications CorelTUTOR™
Obtain additional information about
product tools and features
Learning resources 21
Help
Web-based resources
Tips and tricks
Page 38

To S e e
Learn to automate tasks by using macros Macro programming guide
Find information about deploying the suite
on a network
Find information about customized training
and workflow solutions
Find specific information about the latest
version of the suite
Network deployment guide
Customized training and integration
resources
Readme file, which is installed with the
software
Using the Help and tooltips
The Help provides comprehensive information about product features from within the
program. You can browse through the entire list of topics, look up tools and topics in
the index, or search the Help for a specific word or phrase. You can also access the
Corel® Knowledge Base™ on the Corel Web site and other online resources from the
Help window.
The Help is available as a user guide in PDF format and can be accessed through the
Start menu on the Windows taskbar.
Tooltips provide helpful information about application controls when you position the
pointer over icons, buttons, and other user interface elements.
Documentation conventions
The following table describes important conventions used in the user guide and Help.
Convention Description Examples
Menu
Menu command
22 Corel DESIGNER X5 User Guide
A menu item and menu
command that you need to
click in sequence
Click File
Open.
Page 39

Convention Description Examples
A note contains important
information that is relevant
to the preceding steps. It
may describe conditions
under which the procedure
can be performed.
A tip contains suggestions
for performing the preceding
steps. It may present
alternatives to the steps, or
other benefits or uses of the
procedure.
A compound blend cannot
be copied or cloned.
If you click the Equal
margins button, you must
specify values in the To p / l e f t
margin boxes.
Trimming an object can
reduce the drawing file size.
You can change the number
of swatches in the color grid
by dragging the Size slider.
To use the Help
1 Click Help Help topics.
2 Click one of the following tabs:
• Contents — lets you browse through topics in the Help. To open a topic, click
the topic heading in the left pane.
• Index — lets you use the index to find a topic. Use the scroll bar to browse, or
type a word or phrase in the search box to find a particular index entry.
• Search — lets you search the full text of the Help for a particular word or phrase
You can also
View context-sensitive Help from within a
dialog box
Print a specific Help topic Open a Help topic, click the page that you
Access the Corel Knowledge Base and other
online resources
Click the Help button in the dialog box.
want to print, and click Print at the top of
the Help window.
Click Resources at the top of the Help
window.
To search the Help
1 Click Help Help topics.
Learning resources 23
Page 40

2 Click the Search tab, and type a word or phrase in the search box.
For example, if you are looking for information about the RGB color mode, you can
type “RGB” to display a list of relevant topics. To search for a phrase, type the
phrase, and enclose it in quotation marks (for example, type “dynamic guides” or
“color mode”).
3 Click the List topics button.
4 Choose a topic from the list that appears, and press Enter.
If your search results do not include any relevant topics, check whether you spelled
the search word or phrase correctly. Note that the English Help uses American
spelling (for example, “color,” “favorite,” “center,” and “rasterize”), so searching for
British spellings (“colour,” “favourite,” “centre,” and “rasterise”) produces no
results.
You can also
Search for a word or phrase in a list of topics
generated by the previous search
Search for all forms of a word Enable the Match similar words check box.
Search only the titles of Help topics Enable the Search titles only check box.
Repeat a recently performed search On the search box, click the arrow that
Enable the Search previous results check
box.
For example, if you type “blend” and enable
this check box, the search results will include
topics that contain the words “blends” and
“blending.”
points down, and choose a word or phrase.
24 Corel DESIGNER X5 User Guide
Page 41

You can also
Search by using the Boolean operators AND,
OR, NEAR, or NOT
Type a search term in the box, and click the
flyout arrow that points to the right. Choose
a Boolean operator from the following list,
type another search term in the search box,
and press Enter.
AND — lets you find topics that contain all
search terms in the search box
OR — lets you find topics that contain at
least one of the words in the search box
NEAR — lets you find topics in which the
search terms appear close to each other.
NEAR provides more results than when you
use only a phrase search, and more relevant
results than when you search for individual
words.
NOT — lets you find topics that contain the
search term you type before NOT and that
do not contain the search term you type after
NOT.
To access the user guide in PDF format
• On the Windows Start menu, click Start All Programs
Corel DESIGNER Technical Suite X5 Documentation Corel DESIGNER
User Guide PDF.
Welcome screen
The Welcome screen gives you easy access to application resources and lets you quickly
complete common tasks, such as opening files and starting files from templates. You can
find out about the new features in Corel DESIGNER Technical Suite and view technical
illustration samples on the Gallery page. In addition, you can access tutorials and tips,
and receive the latest product updates.
The Welcome screen appears when you start Corel DESIGNER. You can also access the
Welcome screen after starting the application.
Learning resources 25
Page 42

To access the Welcome screen
•Click Help Welcome screen.
To view and access the available resources, click the tabs.
Welcome screen
CorelTUTOR
CorelTUTOR provides a series of project-based tutorials that introduce you to basic and
advanced features of Corel DESIGNER.
To access CorelTUTOR
•Click Help CorelTUTOR.
Tips and tricks
Quick tips highlight useful tools and shortcuts, and give you a starting point for
exploring some of the Corel DESIGNER Technical Suite features.
To access Tips and tricks
1 Click Help Welcome screen.
26 Corel DESIGNER X5 User Guide
Page 43

The Welcome screen appears.
2 Click the Learning tools tab, and click Tips & tricks.
Macro programming guide
The Corel DESIGNER Technical Suite X5 Macro Programming Guide provides a
streamlined instructional approach to programming macros for
Corel DESIGNER Technical Suite X5. You can use either Microsoft® Visual Basic®
for Applications (VBA) or Microsoft® Visual Studio® Tools for Applications (VSTA) to
create macros that automate tasks and provide customized solutions for
Corel DESIGNER, CorelDRAW®, and Corel PHOTO-PAINT.
To access the macro programming guide
• On the Windows Start menu, click Start All Programs
Corel DESIGNER Technical Suite X5 Documentation Macro
Programming Guide PDF.
Network deployment guide
The Corel DESIGNER Technical Suite X5 Deployment Guide is a step-by-step resource for
deploying Corel DESIGNER Technical Suite X5 to a network. This guide is provided
to customers who purchase a volume (“multi-seat”) license of
Corel DESIGNER Technical Suite X5 for their organization. To purchase a volume
license of the software and obtain its deployment guide, please contact Corel Support
Services.
Web-based resources
The following Web-based resources can help you get the most out of
Corel DESIGNER Technical Suite:
• Corel Knowledge Base — articles written by the Corel Technical Support Services
Team in response to questions by Corel DESIGNER Technical Suite users
• CorelDRAW.com community — an online environment to share your experience
with the product, ask questions, and receive help and suggestions from other users
• Learning resources — a Web page that contains links to online tutorials, case
studies, and more
Learning resources 27
Page 44

An active Internet connection is required to access Web-based resources.
Customized training and integration resources
Corel Corporation has training partnerships with other firms.
Corel customized training
Corel Training Specialists can provide you with customized training, tailored to your
work environment, to help you get the most out of the Corel software that you’ve
installed. These experts will help you develop a curriculum that is practical and
relevant to the needs of your organization. For more information, please visit
www.corel.com/customizedtraining.
Corel Training Partners
A Corel® Training Partner (CTP) is an independent, officially accredited local
organization that provides training for Corel products. CTPs are located worldwide for
your convenience. Please visit www.corel.com/trainingpartners to find a partner near
you.
Corel Technology Partners
Corel Technology Partners are businesses that embed Corel technology in their
products, develop plug-in applications for Corel software, or integrate standalone
applications into Corel technology solutions. This comprehensive program is designed
especially for developers and consultants. It includes the components that are necessary
to design, develop, test, and market custom solutions related to Corel products.
For more information about Corel Technology Partners, please e-mail Corel Corporation
at techpartner@corel.com.
28 Corel DESIGNER X5 User Guide
Page 45

Corel DESIGNER workspace tour
Becoming familiar with the terminology and workspace of Corel DESIGNER will help
you easily follow this user guide’s concepts and procedures.
This section contains the following topics:
• Corel DESIGNER terms and concepts
• Corel DESIGNER application window
• Corel DESIGNER workspace tools
Corel DESIGNER terms and concepts
Before you get started with Corel DESIGNER, you should be familiar with the
following terms.
Term Description
object An element in a drawing, such as an image, shape, line, text,
curve, or symbol
drawing
vector graphic An image generated from mathematical descriptions that
bitmap An image composed of grids of pixels or dots
artistic text A type of text to which you can apply special effects, such as
paragraph text A type of text to which you can apply formatting options, and
Corel DESIGNER workspace tour 29
The work you create in Corel DESIGNER: for example,
technical drawings, schematics, and diagrams
determine the position, length, and direction in which lines are
drawn
shadows
which can be edited in large blocks
Page 46

Corel DESIGNER application window
Title bar
Menu bar
Toolbox
Ruler
Drawing
window
Drawing
page
Document
navigator
Status bar
Navigator
Docker
Property
bar
Toolbar
Color
palette
When you launch Corel DESIGNER, the application window opens, containing a
drawing window. The rectangle in the center of the drawing window is the drawing
page where you create your drawing. Although more than one drawing window can be
opened, you can apply commands to the active drawing window only.
The Corel DESIGNER application window appears below. A description of its parts
follows.
Part Description
Menu bar The area containing pull-down menu options
Property bar A detachable bar that contains properties of the active tool or
object. For example, when the text tool is active, the text
property bar displays commands that create and edit text.
30 Corel DESIGNER X5 User Guide
Page 47

Part Description
Toolbar A detachable bar that contains shortcuts to menu and other
commands
Title bar The area displaying the title of the currently open drawing
Rulers Horizontal and vertical borders that are used to determine the
size and position of objects in a drawing
Toolbox A floating bar with tools for creating and modifying objects in
the drawing
Drawing window The area outside the drawing page bordered by the scroll bars
and application controls
Drawing page The rectangular area inside the drawing window. It is the
printable area of your work area.
Docker A window containing available commands and settings relevant
to a specific tool or task
Color palette A dockable bar that contains color swatches
Document palette A color palette that helps you keep track of the colors that you
use in your document by storing them for future use.
Status bar An area at the bottom of the application window that contains
information about object properties such as type, size, and
resolution. The status bar also shows the current mouse
position.
Document navigator The area at the bottom left of the drawing window that
contains controls for moving between pages and adding pages
Navigator A button at the bottom-right corner of the drawing window
that opens a smaller display to help you move around a drawing
To toggle between displaying and hiding the status bar, click View To o l b a r s
Status bar.
To toggle between displaying and hiding the rulers, see “To hide or display the
rulers” on page 512.
Corel DESIGNER workspace tour 31
Page 48

Corel DESIGNER workspace tools
Application commands are accessible through the menu bar, toolbars, toolbox, property
bar, and dockers. The property bar and dockers provide access to commands that relate
to the active tool or current task. The property bar, dockers, toolbars, and toolbox can
be opened, closed, and moved around your screen at any time.
You can customize many of these workspace tools to suit your needs. For more
information, see “Customizing Corel DESIGNER” on page 755.
Standard toolbar
The standard toolbar contains buttons that are shortcuts to many of the menu
commands.
The standard toolbar is displayed by default. For information about customizing the
position, contents, and appearance of toolbars, see “Customizing toolbars” on page 763.
Click this button To
Start a new drawing
Open a drawing
Save a drawing
Print a drawing
Cut selected objects to the Clipboard
Copy selected objects to the Clipboard
Paste the Clipboard contents into a drawing
Undo an action
Restore an action that was undone
32 Corel DESIGNER X5 User Guide
Page 49

Click this button To
Import a drawing
Export a drawing
Set a zoom level
Start Corel applications
Open the Welcome screen
Enable or disable automatic alignment for the grid, guidelines,
objects, and dynamic guides
Open the Options dialog box
More about toolbars
In addition to the standard toolbar, Corel DESIGNER has toolbars for specific kinds of
tasks. For example, the Te x t toolbar contains commands relevant to using the Te x t tool.
If you use a toolbar frequently, you can display it in the workspace at all times.
The table below describes toolbars other than the standard toolbar.
Toolbar Description
Text Contains commands for formatting and aligning text
Zoom Contains commands for zooming in and out of a drawing page
Internet Contains commands for Web-related tools for creating rollovers
and publishing to the Internet
Print Merge Contains commands for print merge items that combine text
with a drawing, such as creating and loading data files, data
fields for variable text, and inserting print merge fields
Transform Contains commands for skewing, rotating, and mirroring
objects
Corel DESIGNER workspace tour 33
Page 50

Toolbar Description
Macros Contains commands for editing, testing, and running macros
Drawing plane Contains commands for choosing a drawing plane and a
drawing profile, and lets you access the Projected axes docker.
This toolbar is displayed by default.
Exploring the toolbox
The Corel DESIGNER toolbox shows the active tool and the available categories of
tools in the upper area. The options symbol indicates that there are additional tools
or options.
When you choose a tool, any additional tools or options appear in the options area at
the bottom of the toolbox. When you choose a tool in the options area, it becomes the
active tool.
For example, if you click the Curve tools
button in the upper area, you see its associated
tools in the options area. If you click the 2-point line tool in the options area, it
34 Corel DESIGNER X5 User Guide
Page 51

becomes the active tool, and its icon appears on the Curve tools button in the upper
area.
You can use flyout menus instead of the options area. Click To o l s Options,
click To o l b o x in the Wo r k sp a c e list of categories, and enable Display tool
groups as flyout menus.
The following table provides descriptions of the tools in the Corel DESIGNER toolbox.
Pick tool
The Pick tool lets you select, size, skew, and rotate
objects.
Shape tools
The Shape tool lets you edit a curve object or text
character by manipulating nodes.
The Free transform tool lets you transform an object by
using the Free rotation, Free angle reflection, Free
scale, and Free skew controls on the property bar.
The Smudge brush tool lets you distort a vector object
by dragging along its outline.
Corel DESIGNER workspace tour 35
Page 52

The Roughen brush tool lets you distort the edge of a
vector object by dragging along its outline.
Curve tools
The 2-point line tool lets you draw a straight two-point
line segment.
The Multi-point line tool lets you draw lines and curves
one segment at a time, in preview mode.
The Freehand tool lets you draw single line segments
and curves.
The Bézier curve tool lets you draw curves one segment
at a time.
36 Corel DESIGNER X5 User Guide
Page 53

The B-spline tool lets you draw curved lines by setting
control points that shape the curve without breaking it
into segments.
The 3-point curve tool lets you draw a curve by
defining the starting point, endpoint, and center point.
The Pen tool lets you draw curves in segments, and
preview each segment as you draw.
The Smart drawing tool converts your freehand strokes
to basic shapes and smoothed curves.
Rectangle tools
The 2-point rectangle tool lets you draw a rectangle by
dragging diagonally.
Corel DESIGNER workspace tour 37
Page 54

The 3-point rectangle tool lets you draw rectangles at
an angle.
The Graph paper tool lets you draw a grid to simulate
graph paper.
Circle tools
The Center-point circle tool lets you draw a circle by
specifying the center point and a point on the
circumference.
The Center-radius circle tool lets you draw a circle by
specifying a value for the radius and then clicking where
you want the center to be.
The 3-point circle tool lets you draw a circle by
specifying three points on the circumference.
38 Corel DESIGNER X5 User Guide
Page 55

Ellipse tools
The 2-point ellipse tool lets you draw an ellipse by
dragging diagonally.
The 3-point ellipse tool lets you draw ellipses at an
angle.
Center-point polygon tools
The Center-point polygon tool lets you draw a polygon
by dragging from the center to a point (vertex) on the
polygon.
The Star tool lets you draw perfect stars.
The Complex star tool lets you draw complex stars that
have intersecting sides.
Corel DESIGNER workspace tour 39
Page 56

Text tool
The Te x t tool lets you add text, create a paragraph text
frame and type within it, or type text along a path if a
curve is selected.
Dimension tools
The Parallel dimension tool lets you draw slanted
dimension lines.
The Horizontal or vertical dimension tool lets you
draw horizontal or vertical dimension lines.
The Angular dimension tool lets you draw angular
dimension lines.
The Segment dimension tool lets you display the
distance between end nodes in single or multiple
segments.
40 Corel DESIGNER X5 User Guide
Page 57

The Radial dimension tool lets you display the radius of
a circle or circular arc.
The Diametric dimension tool lets you display the
diameter of a circle or a circular arc.
Callout tools
The 1-leg callout tool lets you draw a callout with one
leading line.
The 2-leg callout tool lets you draw a callout with a
two-segment leading line.
The 3-leg callout tool lets you draw a callout with a
three-segment leading line.
Corel DESIGNER workspace tour 41
Page 58

The Te x t s o u r c e button lets you enter callout text
interactively, from the Clipboard, from object properties,
or incrementally.
Connector tools
The Straight-line connector tool lets you draw a
straight connector line.
The Right-angle connector tool lets you draw a rightangle connector line.
The Round right-angle connector tool lets you draw a
right-angle connector line with curved corners.
The B-spline connector tool lets you draw a curved
connector line by using control points.
42 Corel DESIGNER X5 User Guide
Page 59

The Bézier curve connector tool lets you draw a
curved connector line one segment at a time.
The Edit anchor tool lets you modify connector line
anchor points.
Table tool
The Ta b l e tool lets you draw and edit tables.
Perfect Shapes™ tools
The Basic shapes tool lets you choose from a full set of
shapes, including a hexagram, a smiley, and a right-angle
triangle.
The Arrow shapes tool lets you draw arrows while
choosing the shape, direction, and number of heads.
These controls are available on the property bar.
Corel DESIGNER workspace tour 43
Page 60

The Flowchart shapes tool lets you draw flowchart
symbols. These controls are available on the property
bar.
The Miscellaneous shapes tool lets you draw ribbon
objects and explosion shapes. These controls are available
on the property bar.
The Callout shapes tool lets you draw callouts and
labels. These controls are available on the property bar.
Linear pattern tools
The Linear pattern brush tool lets you apply brush
strokes to a curve and create sweep arrows and similar
objects.
The Linear pattern sprayer tool lets you draw
chains, hoses, pipes, and similar objects.
44 Corel DESIGNER X5 User Guide
Page 61

The Linear pattern preset tool lets you draw curves by
using preset strokes.
The Calligraphic tool lets you draw lines that vary in
thickness according to the direction of the line and the
angle of the pen nib.
The Pressure tool lets you draw lines that vary in
thickness according to the pressure of the pen nib.
Interactive tools
The Extrude tool lets you apply 3D effects to objects to
create the illusion of depth.
The Blend tool lets you transform one object into
another through a series of intermediate shapes and
colors.
Corel DESIGNER workspace tour 45
Page 62

The Transparency tool lets you apply a transparency to
an object to partially reveal image areas underneath.
The Envelope tool lets you distort the shape of an object
by applying an envelope to it and dragging the nodes of
the envelope.
The Drop shadow tool lets you create the illusion of
lighting in a two-dimensional drawing by adding a
shadow to an object. You can adjust properties such as
feathering, opacity, edge style, and color.
The Contour tool lets you create a series of concentric
shapes that radiate into or out of an object.
The Distort tool lets you transform objects by applying
Push and Pull, Zipper, or Twister effects.
46 Corel DESIGNER X5 User Guide
Page 63

Deletion tools
The Virtual segment delete tool lets you delete
portions of objects between intersecting lines.
The Eraser tool lets you remove unwanted areas in a
drawing.
The Knife tool lets you slice an object into two separate
objects.
The Crop tool lets you remove the areas outside a
selection.
Interactive fill tools
The Fountain fill tool lets you fill an object with a
gradient of colors or shades.
Corel DESIGNER workspace tour 47
Page 64

The Smart fill tool lets you create objects from enclosed
areas and then apply a fill to those objects.
The Mesh fill tool lets you fill an object by blending
multiple colors or shades arranged over a mesh grid.
Eyedropper tools
The Color eyedropper tool lets you sample a color from
an object in the drawing window or on the desktop and
apply it to other objects.
The Attributes eyedropper tool lets you copy object
properties, such as line thickness, size, and effects, from
an object in the drawing window and apply them to
other objects.
Zoom tool
The Zoom tool lets you change the magnification level
in the drawing window.
48 Corel DESIGNER X5 User Guide
Page 65

Pan tool
The Pan tool lets you drag hidden areas of a drawing
into view without changing the zoom level.
Property bar
The property bar displays the most commonly used functions that are relevant to the
active tool or to the task you’re performing. Although it looks like a toolbar, the
property bar content changes depending on the tool or task. For example, when you
click the Te x t tool in the toolbox, the property bar displays only text-related
commands, such as text, formatting, alignment, and editing tools.
You can customize the contents and position of the property bar to suit your needs. For
more information, see “Customizing the property bar” on page 767.
Common property bar buttons
The Add preset button lets you save the current settings for reuse.
The Delete preset button lets you delete the item selected in the Presets list
Corel DESIGNER workspace tour 49
box.
The Fill button lets you open a dialog box where you set up a fill to apply to
an object.
The Outline pen button opens a dialog box where you set line properties.
The Geometric properties button opens the Property manager docker and
lets you set coordinates for the selected object.
The Keep settings button lets you use the current settings as the defaults for
new objects.
Page 66

Dockers
Dockers display the same type of controls as a dialog box, such as command buttons,
options, and list boxes. Unlike most dialog boxes, you can keep dockers open while
working on a document, so you can readily access the commands to experiment with
different effects.
An example is the Property manager docker. When this docker is open, you can click
an object in the drawing window and view formatting, dimensions, and other properties
of the object.
Dockers can be either docked or floating. Docking a docker attaches it to the edge of
the application window. Undocking a docker detaches it from other parts of the
workspace, so it can be easily moved around. You can also collapse dockers to save screen
space.
Status bar
The status bar displays information about selected objects, such as width and height,
cursor position, and relevant commands. While you are drawing a non-freehand line or
curve, the segment length and total length for all segments are displayed. It also
displays document color information, such as the document color profile and color
proofing status.
See “Customizing the status bar” on page 769 for information about customizing the
contents and appearance of the status bar.
The graphic shows some of the information displayed in a status bar.
50 Corel DESIGNER X5 User Guide
Page 67

Corel DESIGNER basics
Corel DESIGNER lets you create and edit drawings. In this section, you can find
information about commonly performed tasks.
This section contains the following topics:
• Understanding vector graphics and bitmaps
• Starting and opening drawings
• Acquiring images from scanners and digital cameras
• Undoing, redoing, and repeating actions
• Zooming, panning, and scrolling
• Previewing drawings
• Choosing viewing modes
•Working with views
• Saving drawings
• Backing up and recovering files
• Adding and accessing drawing information
• Closing drawings and quitting Corel DESIGNER
Understanding vector graphics and bitmaps
The two main types of computer graphics are vector graphics and bitmaps. Vector
graphics are made of lines and curves, and they are generated from mathematical
descriptions that determine the position, length, and direction in which lines are drawn.
Bitmaps, also known as raster images, are composed of small squares called pixels; each
pixel is mapped to a location in an image and has numerical color values.
Vector graphics are ideal for logos and illustrations because they are resolutionindependent and can be scaled to any size, or printed and displayed at any resolution,
without losing detail and quality. In addition, you can produce sharp and crisp outlines
with vector graphics.
Corel DESIGNER basics 51
Page 68

Bitmaps are excellent for photographs and digital paintings because they reproduce
color gradations well. Bitmaps are resolution-dependent — that is, they represent a
fixed number of pixels. They look good at their actual size, but they can appear jagged
or lose image quality when scaled, or when displayed or printed at a resolution higher
than their original resolution.
You can create vector graphics in Corel DESIGNER. You can also import bitmaps (such
as JPEG and TIFF files) into Corel DESIGNER and add them to your drawings. For
information about working with bitmaps, see “Working with bitmaps” on page 541.
Top: A vector graphic consists of lines and fills. Bottom: A bitmap is made up
of pixels.
Starting and opening drawings
When you start Corel DESIGNER, you can choose the workspace with which you feel
the most comfortable. For example, you can choose a workspace that has the look and
feel of CorelDRAW. If you are new to Corel DESIGNER, it is best to choose the default
workspace, on which all procedures in the Help and user guide are based.
Corel DESIGNER lets you start a new drawing from a blank page, a template, or an
existing drawing. A blank page gives you the freedom to specify every aspect of a
drawing. A template provides you with a starting point and leaves the amount of
52 Corel DESIGNER X5 User Guide
Page 69

customization up to you. The templates included with the application are available
under the following categories:
• ANSI (American National Standards Institute)
•Architectural
• DIN (Deutsches Institut für Normung)
•Engineering
• ISO
(International Organization for Standardization®)
For more information about creating and using templates, see “Working with
templates” on page 115.
Notes for starting new drawings
When starting a new drawing, Corel DESIGNER lets you specify page, document, and
color management settings. You can choose from a list of preset settings, which are
based on how you intend to use the drawing. For example, you can choose the Web
option if you are creating a drawing for the Internet, or the Default CMYK option if
you are creating a document destined for commercial printing. However, if the preset
settings are not suitable for the drawing that you want to create, you can also customize
the settings and save them for future use.
Notes for opening existing drawings
Basing a new drawing on an existing drawing lets you reuse objects and page settings.
Corel DESIGNER lets you open existing drawings saved to the Corel DESIGNER (DSF
or DES) format as well as drawings and proj ects saved to variou s other file formats, such
as CorelDRAW (CDR), Adobe Illustrator (AI), Adobe Portable Document Format
(PDF), Encapsulated PostScript (EPS), and Computer Graphics Metafile (CGM).
However, you may not be able to open certain files, depending on their file type and
contents. In such cases, you can try importing the files as objects in an open drawing.
For information about the file formats that you can import into Corel DESIGNER, see
“Supported file formats” on page 685.
If the drawing you are opening is from an earlier version of Corel DESIGNER and
contains text in a language different from the language of your operating system, you
can choose code page settings to ensure that text is properly converted according to the
Unicode® Standard. Code page settings help you correctly display text such as
keywords, file names, and text entries outside the drawing window — for example, in
the Object manager and Object data manager dockers. To display text correctly in
the drawing window, you must use encoding settings. For more information, see
“Encoding text” on page 433.
Corel DESIGNER basics 53
Page 70

If the drawing you are opening contains an embedded International Color
Consortium® (ICC) profile, the embedded color profile remains the document’s color
profile. For more information, see “Understanding color management” on page 363.
If you are using Windows 7 or Windows Vista, you can search for drawings by different
criteria, such as filename, title, subject, author, keyword, comment, text within the file,
and other properties attached to the file. For more information about searching for files
with Windows 7 or Windows Vista, see the Windows Help. If your operating system is
Windows XP, you can use Windows Desktop Search to find files. For more information
about browsing and searching for content, see “Browsing and searching for content” on
page 82.
You can also display previous versions of a drawing.
To start Corel DESIGNER
1 Click Start All programs Corel DESIGNER Technical Suite X5
Corel DESIGNER X5.
2 In the Select workspace dialog box, choose a workspace from the list box.
If you do not want the Select workspace dialog box to appear each time you start
Corel DESIGNER, enable the Do not show this dialog box on startup check
box.
Procedures in the Help are based on the default workspace.
To restore the Select workspace dialog box, click To o l s Customization,
click Wo r ks p a ce , and enable the Select workspace at startup check box.
To start a drawing
1 Do one of the following:
• On the Welcome screen, click Quick start New blank document.
• In the application window, click File New.
2 Type a filename in the Name text box.
3 From the Preset destination list box, choose an output destination for the
drawing:
• Default CMYK — applies settings for creating graphics that are destined for
commercial printing
54 Corel DESIGNER X5 User Guide
Page 71

• Corel DESIGNER Default — applies the Corel DESIGNER default settings
for creating graphics that are destined for printing
• Default RGB — applies settings for creating graphics that are destined for
printing to a high-fidelity printer
• We b — applies settings for creating graphics that are destined for the Internet
• Custom — lets you customize destination settings for a document
You can also
Change the unit of measurement for the
page
Change the page size
Change the page orientation Click one of the following page orientation
Set the default color mode for the document
to RGB or CMYK
Set the resolution for effects that will likely
be rasterized, such as transparency, drop
shadow, and bevel effects
Choose the preview mode for the drawing Choose a preview mode from the Preview
Choose an RGB profile for the drawing Choose a default RGB profile from the RGB
Choose a CMYK profile for the drawing Choose a default CMYK profile from the
Choose a unit of measurement from the
Drawing units list box.
Choose a page size for the drawing from
the Size list box or
Width and Height boxes
buttons:
•Portrait
•Landscape
Choose a color mode from the Primary
color mode list box.
Choose a rendering resolution from the
Rendering resolution list box.
mode list box.
profile list box.
CMYK profile list box.
type values in the
.
Choose a Grayscale profile for the drawing Choose a default Grayscale profile from the
Grayscale profile list box.
When you choose a color mode from the Primary color mode list box, the
color mode that you choose becomes the default color mode for the document.
The default color mode affects how colors work together in effects such as
Corel DESIGNER basics 55
Page 72

blends and transparencies. It does not restrict the type of colors that you can
apply to a drawing. For example, if you set the color mode to RGB, you can
still apply colors from a CMYK color palette to the document.
The primary color mode also specifies the default color mode for exporting
documents. For example, if you choose the RGB color mode and export a
document as a JPEG, the color mode is automatically set to RGB.
The selections that display in the Color settings area of the Create a new
document dialog box are based on the selections that are specified in the
Default color management settings dialog box.
If you do not want to show the Create a new drawing dialog box and prefer
to use the default settings to create new documents, enable the Do not show
this dialog again check box.
You can restore the Create a new drawing dialog box when starting drawings
by clicking To o l s Options, clicking General in the Wor ks pa ce list of
categories, and enabling the Show new document dialog box check box.
To create a custom preset
1 In the application window, click File New.
2 From the Create a new drawing dialog box, choose the settings that you want to
save as a preset destination.
3 Click the Add preset button.
4 In the Add preset dialog box, type a name for the new destination preset in the
text box.
You can delete a destination preset by choosing the preset name from the
Preset destination list box, and clicking the Remove preset button.
To start a drawing from a template
1 Click File New from template.
2 Choose a template from the Te m p l a t e s list.
3
Click Open.
56 Corel DESIGNER X5 User Guide
Page 73

To open a drawing
1 Click File Open.
2 Locate the folder where the drawing is stored.
3 Click a filename.
4 Click Open.
You can also
Extract an embedded International Color
Consortium (ICC) profile to the color folder
in which the application is installed
Maintain layers and pages when you open
files
View thumbnail of a drawing (Windows 7 and Windows Vista) Click the
Choose a code page (Windows 7 and Windows Vista) Choose a
Enable the Extract embedded ICC profile
check box.
This option is not available for all file
formats.
Enable the Maintain layers and pages
check box.
If you disable the check box, all layers are
combined in a single layer.
This option is not available for all file
formats.
arrow button next to the Views button, and
click Extra large icons, Large icons,
Medium icons, or Small icons.
(Windows XP) Do one of the following:
•Enable the Preview check box.
•Click the View menu button, and select
Thumbnails.
code page from the Select code page list
box. This option is not available for all file
formats.
(Windows XP) Choose a code page from the
Code page list box.
Corel DESIGNER basics 57
Page 74

You can also
Search for a drawing
(Windows 7 and Windows Vista)
Access a previous version of a file
(Windows 7 and Windows Vista)
To open a file you have recently worked on, click File Open recent, and click
the filename.
If you have multiple files open, you can navigate between them by clicking
Window Document and then clicking the name of the file that you want to
display in the drawing window.
Type a word or phrase in the search box.
The search box looks for files only in the
current folder and subfolders. To search for a
drawing in another location, you must first
navigate to the folder where the drawing is
stored.
Right-click a file, and click Restore
previous versions.
You can access a previous version of a file
only if System Protection is turned on.
For detailed information about accessing
previous versions of files, see the Windows
Help.
Acquiring images from scanners and digital cameras
You can load photos from digital cameras and scan images in Corel DESIGNER.
Corel DESIGNER supports scanners that use Microsoft Windows Image Acquisition
(WIA), which provides a standard interface for loading images. If your scanner or digital
camera does not support WIA, you can use the TWAIN driver of your scanner or
digital camera for loading images. The software interfaces and options vary. For
information about using the software associated with your scanner or digital camera, see
the manufacturer’s documentation.
To load photos from a digital camera
1 Connect a digital camera to your computer.
2 Click File Acquire image Select source.
58 Corel DESIGNER X5 User Guide
Page 75

3 Choose a digital camera from the Sources box.
A digital camera may have both a WIA and a TWAIN driver source.
4 Click File Acquire image Acquire.
5 Choose the images you want to load from the dialog box that appears.
If your digital camera does not support WIA, you are presented with the digital
camera’s TWAIN driver interface for loading images. Options vary, depending on
the digital camera.
6 Click Get pictures.
On your digital camera’s interface, this button may have a different name.
To load additional photos during the same session, click File Acquire image
Acquire.
If your digital camera does not support WIA or does not have a TWAIN
driver, you can still open photos in Corel DESIGNER by clicking File
Import, browsing to the digital camera directory, and selecting the photos
that you want to open.
To scan images
1 Click File Acquire image Select source.
2 Choose a scanner from the Sources list.
A scanner may have both a WIA and a TWAIN driver source. If you are scanning
48-bit color images, you must select the TWAIN driver.
3 Click Select.
4 Click File Acquire image Acquire.
If your scanner does not support WIA, you are presented with the scanner’s
TWAIN driver interface for loading images. Options vary, depending on the
scanner.
5 Preview the image, and select the area that you want to scan.
6 Click Scan.
On your scanner’s interface, this button may have a different name, such as OK or
Send.
The WIA interface is available only for the Windows XP operating system.
Corel DESIGNER basics 59
Page 76

To scan additional images during the same session, click File Acquire image
Acquire.
Undoing, redoing, and repeating actions
You can undo the actions you perform in a drawing, starting with the most recent
action. If you don’t like the result of undoing an action, you can redo it. Reverting to
the last saved version of a drawing also lets you remove one or more actions. Certain
actions applied to objects, such as stretching, filling, moving, and rotating, can be
repeated to create a stronger visual effect.
Undo docker
Customizing the Undo settings lets you increase or decrease the number of actions that
you can undo or redo.
To undo, redo, and repeat actions
To Do the following
Undo an action Click Edit Undo.
60 Corel DESIGNER X5 User Guide
Page 77

To Do the following
Redo an action Click Edit Redo.
Undo or redo a series of actions Click To o l s Undo. In the Undo docker,
choose the action that precedes all the
actions that you want to undo, or choose the
last undone action that you want to redo.
Revert to the last saved version of a drawing Click File Revert.
Repeat an action Click Edit Repeat.
When you undo a series of actions in the Undo docker, all actions listed below
the action you choose are undone.
When you redo a series of actions in the Undo docker, the action you choose
and all preceding undone actions are redone.
You can repeat an action on another object or group of objects by selecting the
object or objects and clicking Edit Repeat.
You can also undo or redo a series of actions by clicking the arrow button next
to the Undo button or Redo button on the Standard toolbar and
choosing an action from the list.
To specify the Undo settings
1 Click To o l s Options.
2 In the Wo r ks p a ce list of categories, click General.
3 Type a value in one or both of the following boxes:
• Regular — specifies the number of actions that can be reversed when you use
the Undo command with vector objects
• Bitmap effects — specifies the number of actions that can be reversed when you
work with bitmap effects
The value that you specify is limited only by your computer’s memory
resources. The higher the value you specify, the greater the demand on memory
resources.
Corel DESIGNER basics 61
Page 78

Zooming, panning, and scrolling
You can change the view of a drawing by zooming in to get a closer look or by zooming
out to see more of the drawing. You can experiment with a variety of zoom options to
determine the amount of detail you want.
Panning and scrolling are two additional ways to view specific areas of a drawing. When
you work at high magnification levels or with large drawings, you may not be able to
see the whole drawing. Panning and scrolling let you move the page around in the
drawing window to view previously hidden areas.
You can zoom in and out while you are panning, and you can pan while you are
zooming. In this way, you can avoid having to alternate between the two tools.
By specifying default zooming and panning settings, you can zoom in quickly to
detailed parts of a drawing and zoom out to the larger context.
If you use a mouse wheel, the wheel zooms in and zooms out by default. You can also
use the mouse wheel to scroll.
To zoom
1 In the toolbox, click the Zoom tool .
2 On the property bar, click one of the following:
• Zoom in
• Zoom out
• Zoom to selected
• Zoom to all objects
• Zoom to page
• Zoom to page width
• Zoom to page height
If you choose the Zoom in option, move the pointer to the drawing window, and
click to zoom in, or right-click to zoom out. To zoom in on or out of an area,
marquee-select the area by holding down the left or right mouse button.
The Zoom to selected button is available only if one or more objects are
selected before you click the Zoom tool.
When you are not editing text, you can also access the Zoom tool by pressing
the
Z key.
62 Corel DESIGNER X5 User Guide
Page 79

To zoom in, use the Pan tool , and double-click or drag anywhere in the
drawing window. To zoom out, right-click in the drawing window.
Use the following keyboard shortcuts to zoom during any task, such as when
you are drawing an object:
• F2 — zoom in around the pointer
• F3 — zoom out around the pointer
• F4
— zoom to all objects
• F5 — refresh the drawing window
• F6 — zoom to selected objects
• F7 — zoom to the page
The F2 and F3 shortcut keys let you zoom in and out around the pointer.
To pan in the drawing window
1 In the toolbox, click the Pan tool .
2 Drag in the drawing window until the area you want to view appears.
To pan in the drawing window while zoomed in on the drawing, click the
Navigator button in the lower-right corner of the drawing window.
Alternatively, you can press the N key and drag the crosshair pointer around
in the Navigator pop-up window.
You can quickly center the page in the drawing window by double-clicking the
Zoom tool in the toolbox.
Corel DESIGNER basics 63
Page 80

Using the Navigator (lower-right), you can display any part of a drawing
without having to zoom out.
To scroll by using a mouse wheel
• Do one of the following:
• To scroll vertically, press Alt while you move the wheel.
• To scroll horizontally, press Ctrl while you move the wheel.
To specify default settings for the Zoom tool and Pan tool
1 Click To o l s Options.
2 In the list of categories, click Wor k sp ac e , double-click To o l b o x , and click Zoom,
Pan tool.
3 To specify the action of the Zoom or Pan tool when you right-click in the drawing
window, enable one of the following options:
• Zoom out — zooms out by a factor of 2
• Context menu — displays a menu of commands that let you zoom to a specific
level
To establish default setting for the mouse wheel
1 Click To o l s Options.
2 In the list of categories, click Wo rk s p ac e, and click Display.
3 To specify the default action of the mouse wheel, choose Zoom or Scroll from the
Default action for mouse wheel list box.
64 Corel DESIGNER X5 User Guide
Page 81

Previewing drawings
You can preview a drawing to see how it will look when printed or exported. When you
preview a drawing, only the objects on the drawing page and in the immediate area of
the drawing window are displayed, and you can see all layers that are set to print in the
Object manager docker. If you want a closer look at specific objects in a drawing, you
can select and preview them. When you preview selected objects, the rest of the
drawing is hidden.
Before you preview a drawing, you can specify the preview mode. The preview mode
affects the speed with which your preview appears as well as the amount of detail
displayed in the drawing window.
By default, the borders of a page are displayed in the drawing window, but you can hide
them at any time. If a drawing is intended for print, you can display the area that will
actually print as well as the bleed, the part of the drawing that extends beyond the page
border. Bleeds are useful when a drawing contains a color page background or objects
that are positioned on the page border. Bleeds ensure that no white space appears
between the edges of a drawing and the edge of the paper after the printer cuts, binds,
and trims the document.
To preview a drawing
•Click View Full-screen preview.
Click anywhere on the screen, or press any key, to return to the application window.
You can press Page up and Page down to preview pages in a multipage
drawing.
To preview selected objects
1 Select the objects.
2 Click View Preview selected only.
Click anywhere on the screen, or press any key, to return to the application window.
If Preview selected only mode is enabled and no objects are selected, Full-
screen preview displays a blank screen.
Corel DESIGNER basics 65
Page 82

After you return to the application window, you can disable Preview selected
only mode by clicking View Preview selected only.
To choose a full-screen preview mode
1 Click To o l s Options.
2 In the Wo r ks p a ce list of categories, click Display.
3 Enable one of the following options:
• Use draft view — Drawings appear without PostScript fills or high-resolution
bitmaps, and no anti-aliasing is used.
• Use enhanced view — Drawings appear with or without PostScript fills, and
anti-aliasing is used to sharpen the display of the drawings.
You can display PostScript fills when you preview a drawing in Enhanced mode
by enabling the Show PostScript fills in enhanced view check box.
To set the page display
1 Click To o l s Options.
2 In the Document list of categories, click Page.
3 Enable one of the following options:
• Show page border — displays page borders
• Show printable area — usually displays two dotted lines inside or around the
page, depending on the current printer settings. One outline indicates the area
that can be printed on the current printer; the other outline indicates the paper
size that your printer is set to use.
• Show bleed area — displays the area of the drawing extending beyond the page
border. To change the bleed area, click Size in the list of categories, and type a
value in the Bleed box.
When preparing a drawing for commercial printing, you may also need to set
a bleed limit. For more information, see “To set a bleed limit” on page 631.
66 Corel DESIGNER X5 User Guide
Page 83

Choosing viewing modes
As you work, Corel DESIGNER lets you display a drawing in any of the following
modes:
• Simple wireframe — displays an outline of the drawing by hiding fills, extrusions,
contours, drop shadows, and intermediate blend shapes; also displays the bitmaps
in monochrome. This mode lets you quickly preview basic elements in a drawing.
• Wireframe — displays a drawing in simple wireframe mode plus intermediate
blend shapes
• Draft — displays fills and bitmaps with a low resolution. This mode eliminates
some detail to allow you to focus on the color balances in a drawing.
• Normal — displays a drawing without PostScript fills or high-resolution bitmaps.
This mode refreshes and opens slightly faster than the Enhanced mode.
• Enhanced — displays a drawing with PostScript fills, high-resolution bitmaps, and
anti-aliased vector graphics.
• Pixels — displays a pixel-based rendition of the drawing, which allows you to
zoom in on an area of an object, and then position and size the object more
precisely. This view also lets you see what the drawing will look like when it is
exported to a bitmap file format.
• Simulate overprints — simulates the color of areas where overlapping objects
were set to overprint and displays PostScript fills, high-resolution bitmaps, and
anti-aliased vector graphics. For information about overprinting objects, see “To
overprint selected objects” on page 637.
• Rasterize complex effects — rasterizes the display of complex effects, such as
transparencies, bevels, and drop shadows when in Enhanced view. This option is
useful for previewing how the complex effects will be printed. To ensure the
successful printing of complex effects, most printers require complex effects to be
rasterized.
The viewing mode you choose affects the amount of time it takes for a drawing to open
or be displayed on the monitor. For example, a drawing displayed in Simple wireframe
view takes less time to refresh or open than does a drawing displayed in Simulate
overprints view.
Corel DESIGNER basics 67
Page 84

Left to right: Simple wireframe, Draft, and Enhanced views
To choose a viewing mode
•Click View, and click one of the following modes:
• Simple wireframe
• Wireframe
• Draft
• Normal
• Enhanced
• Pixels
• Simulate overprints
• Rasterize complex effects
If you are overprinting, it is important to preview the objects in the Simulate
overprints mode before printing. The type of objects you are overprinting and
the type of colors you are mixing determine how overprinted colors are
combined. For more information about overprinting, see “Working with color
trapping and overprinting” on page 635.
You can set the default viewing mode by clicking To o l s Options, clicking
General in the Document list of categories, and choosing an option from the
View mode list box.
You can quickly switch between the selected viewing mode and the previous
viewing mode by pressing Shift + F9.
68 Corel DESIGNER X5 User Guide
Page 85

Working with views
You can save a view of any part of a drawing. For example, you can save a view of an
object at 230% magnification and then return to this specific view at any time.
If a document contains multiple pages, you can view them all at once by using the
Page Sorter view. You can also display consecutive left-hand and right-hand pages on
the screen at the same time (facing pages) and create objects that span two pages.
To save a view
1 Click Window View manager.
2 Use the Zoom tools in the View manager docker to set up a view.
3 Click Add current view .
You can also
Rename a view Double-click a view name, and type a new
name.
Delete a saved view Click a view, and click Delete current view
.
If you disable the page icon next to a saved view in the docker,
Corel DESIGNER switches to the magnification level only, not the page, when
you switch to that view. Similarly, if you disable the magnifying glass icon ,
Corel DESIGNER switches to the page only, not the magnification level.
You can also save the current view by clicking the Zoom or Pan tool in the
toolbox, clicking in the Zoom level list box on the standard toolbar, typing a
name, and pressing Enter.
To switch to a saved view
1 Click Window View manager.
2 Click a view in the View manager docker.
Corel DESIGNER basics 69
Page 86

You can also switch to a saved view by selecting it from the Zoom level list
box on the standard toolbar.
To view all pages in a multipage document
•Click View Page sorter view.
To view facing pages
1 Click Layout Page setup.
2 In the Document list of categories, click Layout.
3 Enable the Facing pages check box.
4 Choose one of the following settings from the Start on list box:
• Left side — starts the document on a left-hand page
• Right side — starts the document on a right-hand page
You cannot view facing pages if the document uses a Tent Card or Top-fold
Card layout style, or if it contains multiple page orientations. The Left side
option is available only for the Full Page and Book layout styles.
When you enable the Facing pages check box, the content on the facing pages
is merged on one page. The layer structure for the merged page is based on the
left-hand page. The layers from the right-hand page are inserted above the
layers on the left-hand page. This rule also applies if you reorder the pages. If
you disable the Facing pages check box, the layers and content are
redistributed across separate pages. Objects that cross both pages are assigned
to a page according to where the center of the object is found.
Saving drawings
By default, drawings are saved to the Corel DESIGNER file format (DES). You can save
a drawing to other vector file formats as well. If you want to use a drawing in another
application, you must save it to a file format that is supported by that application. For
information about saving files to other formats, see “Exporting files” on page 652.
When you save a drawing, Corel DESIGNER lets you add reference information so that
you can easily find and organize drawings later on. On Windows 7 and Windows Vista,
70 Corel DESIGNER X5 User Guide
Page 87

you can attach tags (also known as properties) such as title, subject, and rating. On
Windows XP, you can assign notes and keywords to a drawing.
You can also save selected objects in a drawing. For large drawings, saving only the
selected objects reduces the file size, which can decrease the time it takes to load the
drawing.
When saving a file, you can use advanced options to control how bitmaps, textures, and
vector effects, such as blends and extrusions, are saved with the drawing.
You can also save a drawing as a template, which lets you create other drawings with
the same properties. For information about saving a drawing as a template, see
“Working with templates” on page 115.
To save a drawing
1 Click File Save as.
2 Type a filename in the File name list box.
3 Locate the folder where you want to save the file.
If you want the drawing to be compatible with a previous version of
Corel DESIGNER, choose a version from the Vers io n list box.
If you want to save the drawing to a vector file format other than
Corel DESIGNER (DES), choose a file format from the Save as type list box.
You can also
Save only selected objects
Add reference information
(Windows 7 and Windows Vista)
Save notes or keywords with the file
(Windows XP)
Corel DESIGNER basics 71
With objects selected, click File
enable the Selected only check box. Locate the
folder where you want to save the file, type a
filename in the File name list box, and click
Save.
Do any the following:
• Type a title, subject, tag, comment, author, or
revision number in the corresponding box.
• Assign a rating to the file.
• Add copyright information.
Type notes or keywords in the corresponding
box.
Save as, and
Page 88

If you are using an expired trial version of Corel DESIGNER, you will not be
able to save drawings.
For more information about trial versions, see “Working with trial versions” on
page 7.
Saving a drawing to a previous version of Corel DESIGNER may result in loss
of certain effects that were not available in the previous version of the
application.
When you save to a previous version of Corel DESIGNER, the content and
appearance of the document is maintained, but layers are affected in the
following ways:
• Layer names are reset to Corel DESIGNER default names.
• The number of layers per page is set according to the page with the most
layers.
• Master layers are converted to local layers, with the exception of the
default master layers (Guides, Grid, Desktop).
•Local Guides layers are converted to regular layers.
For more information about layers, see “Working with layers” on page 277.
You can also save a drawing by clicking File Save.
You can also save a drawing by clicking the Save button on the Standard
toolbar.
To use advanced options when saving
1 Click File Save as.
2 Click Advanced.
3 Enable any of the following check boxes:
• Save presentation exchange — saves a drawing as a Corel® Presentations™
Exchange (CMX) file so that you can open and edit it in other Corel applications,
such as WordPerfect
• Use bitmap compression — reduces the file size by compressing bitmap
effects, such as bitmap extrusions, transparencies, and drop shadows
• Use graphic object compression — reduces the file size by compressing vector
objects, such as polygons, rectangles, ellipses, and perfect shapes
Using compression increases the time required for opening and saving a drawing.
72 Corel DESIGNER X5 User Guide
Page 89

4 If a drawing contains texture fills, enable one of the following options:
• Save textures with the file — saves custom texture fills with the file
• Rebuild textures when opening a file — re-creates texture fills when you open
the saved drawing
5 If a drawing contains blends and extrusions, enable one of the following options:
• Save blends and extrudes with the file — saves all blends and extrusions
included in a drawing
• Rebuild blends and extrudes when opening the file — re-creates blends and
extrusions when you open the saved drawing
Choosing to save textures, blends, and extrusions with the file increases the file
size but lets you open and save a drawing more quickly. Conversely, choosing
to rebuild textures, blends, and extrusions when a saved drawing is opened
decreases the file size but increases the time required for saving or opening a
drawing.
Backing up and recovering files
Corel DESIGNER can automatically save backup copies of drawings and prompt you
to recover them in the event of a system error.
The auto-backup feature saves drawings that you have opened and modified. During
any working session with Corel DESIGNER, you can set the time interval for
automatically backing up files and specify whether you want the files to be saved in your
temporary folder (the default location) or in a specified folder.
You can recover the backup files from the temporary or specified folder when you restart
Corel DESIGNER after a system error. If you choose not to recover the backup file, it
is automatically erased when you quit the application.
To specify auto-backup settings
1 Click To o l s Options.
2 In the Wo r ks p a ce list of categories, click Save.
3 Enable the Auto-backup every check box, and choose a value from the Minutes
list box.
Corel DESIGNER basics 73
Page 90

4 In the Always back up to area, enable one of the following options:
• Users temporary folder — lets you save an auto-backup file in the temporary
folder
• Specific folder — lets you specify the folder for an auto-backup file
You can also
Create a backup file every time you save Enable the Make backup on save check
box.
Disable the auto-backup feature Choose Never from the Minutes list box.
Auto-backup files are named auto_backup_of_filename and can be saved in
any folder you specify. Backup files are created when you save a drawing. They
are named backup_of_filename and are always stored in the same folder as
the original drawing.
All open or modified files that are not in Corel DESIGNER (DES) file format
are backed up as Corel DESIGNER files.
You can cancel the creation of an auto-backup file by pressing Esc while a file
is being saved.
To recover a backup file
1 Restart Corel DESIGNER.
2 Click OK in the File recovery dialog box.
The File recovery dialog box appears upon startup after a system error.
3 Save and rename the file in the specified folder.
Recovered files are named GraphicsX.des, where X is the numbered
increment.
If you click Cancel, Corel DESIGNER ignores the backup file and deletes it
when you quit the application.
74 Corel DESIGNER X5 User Guide
Page 91

Adding and accessing drawing information
Corel DESIGNER lets you add reference information, such as title, author, subject,
keywords, rating, and other notes to a drawing. Although adding document
information is optional, doing so makes it easier to organize and locate drawings later
on.
The application also lets you access other important document information, such as the
number of pages and layers, fonts, object and text statistics, and the types of objects the
drawing contains. You can also view color information such as the color profiles that are
used to define document colors as well as the primary color mode and rendering intent.
To add drawing information
1 Click File Document properties.
2 In the Document properties dialog box, type text in any of the following boxes:
• Title
• Subject
• Author
• Copyright
• Keywords
• Notes
3 To specify a rating, choose a rating from the Rating list box.
4 Click OK.
You can modify the drawing information at any time.
To access drawing information
•Click File Document properties.
Closing drawings and quitting Corel DESIGNER
You can close one drawing, or multiple drawings, at any time before quitting
Corel DESIGNER.
Corel DESIGNER basics 75
Page 92

To close drawings
To Do the following
Close one drawing Click File Close.
Close all drawings Click File Close all.
If you are unable to close a document, you may have a task, such as printing or
saving, in progress or a task that has failed. Please refer to the status bar to view
the status of a task.
To quit Corel DESIGNER
•Click File Exit.
You can also quit Corel DESIGNER by pressing Alt + F4.
76 Corel DESIGNER X5 User Guide
Page 93

Finding and managing content
Corel DESIGNER lets you find content on your computer, local network, the Corel
content DVD, or online. You can browse or search for clipart, photos, fonts, symbols,
objects, and even file formats that are not supported by the applications included in
the suite. When you find the content that you need, you can import it into your
document, open it in its associated application, or collect it in a tray for future
reference.
Corel DESIGNER is fully integrated with the search capabilities that are offered by
Windows 7 and Windows Vista. On Windows XP, you must have Windows Desktop
Search installed and running to search for content by using keywords. By default, the
application searches all locations that Windows Desktop Search is configured to index.
For information about modifying indexing options in Windows Desktop Search, see the
Windows Help. Windows Desktop Search is available as a free download from the
Microsoft Download Center. For more information, visit http://www.microsoft.com/
windows/desktopsearch/downloads/default.mspx. If you are using another third-party
computer indexing and search tool (for example, Google Desktop) or you don’t have
Windows Desktop Search installed, the application has limited search capabilities and
lets you search only by filename.
This section contains the following topics:
• Exploring Corel CONNECT
• Browsing and searching for content
•Viewing content
• Using and managing content
Exploring Corel CONNECT
You can browse and search for content by using Corel CONNECT. Corel CONNECT
is available both as a standalone utility and as a docker. You can choose whichever mode
better suits your workflow.
Finding and managing content 77
Page 94

The image below shows the main components of the Corel CONNECT utility:
3
6
2
1
14 13 12 11 10 9 8 7
5
4
Part Description
1. Libraries pane Lets you access online content as well as
content that is included with the latest
version or previous versions of the suite
2. Favorite folders pane Provides quick access to frequently used
folders
3. Folders pane Displays a representation of the file structure
available on your computer
78 Corel DESIGNER X5 User Guide
Page 95

Part Description
4. Tr a y pane Lets you collect files from one or more
folders
5. Zoom slider Lets you adjust the size of thumbnails in the
viewing pane
6. Viewing pane Lets you view thumbnails of content files
7. Help button Lets you launch the Help system
8. Search box Lets you search for files by using search
terms
9. Filter toolbar Lets you choose which type of content to
display in the viewing area: folders, vector
images, bitmap images, fonts, or files saved
to file formats that are not supported by the
suite
10. Go to parent folder button Lets you go one level up from the current
folder
11. Refresh/Cancel button Reloads the results from your last search or
initiates a new search based on the criteria
that you have specified. When a search is in
progress, the button changes to the Cancel
mode , which allows you to stop a search
at any time.
12. Address bar Shows the full path to the current location
13. Navigate forward button Takes you to the next page of content
14. Navigate back button Takes you to the previous page of content
In docker mode, the search utility has two components: Connect docker and Tr a y
docker. The Connect docker has two viewing modes: single pane and full view. In full
view, all panes are displayed. In single pane view, either the viewing pane or the
Libraries, Favorite folders, and Folders panes are displayed. You can resize the
docker to display all panes or toggle between the viewing pane and the Libraries,
Favorite folders, and Folders panes.
Finding and managing content 79
Page 96

The Connect docker with the viewing pane hidden (left) and the navigation
1
pane hidden (right). Click the toggle arrow (1) to display or hide panes. Resize
the docker to display both panes.
80 Corel DESIGNER X5 User Guide
Page 97

You can also customize the size and display of individual panes.
1
2
3
The grab area (1, 2, 3) lets you resize a pane.
You can use the Favorite folders pane to create shortcuts to folders that you visit
frequently. You can add locations to and remove locations from the Favorite folders
pane.
To start Corel CONNECT
To Do the following
Start the standalone utility
Finding and managing content 81
On the Windows taskbar, click Start
Programs
Corel DESIGNER Technical Suite X5
Corel CONNECT.
All
Page 98

To Do the following
Access the Connect docker
Display or hide the Tr a y docker
In Corel DESIGNER, click Window
Connect.
In Corel DESIGNER, click Window
Tr a y.
You can also display or hide the Tr a y docker by clicking the Show/Hide the
tray button in the Connect docker.
To resize a pane
• Point to the pane’s grab area, and when the cursor changes to a two-directional
arrow, drag the edge of the pane.
To display or hide a pane
• Click the arrow to toggle between displaying and hiding the pane.
To add a location to the Favorite Folders pane
• Drag a folder from the Libraries or Folders pane to the Favorite folders pane.
You can also add locations to the Favorite folders pane by right-clicking a
folder in the Libraries or Folders pane, and clicking Add to favorites.
To remove a location from the Favorite Folders pane
• Right-click a location in the Favorite folders pane, and click Remove from
favorites.
Browsing and searching for content
With the Corel CONNECT docker, you can browse for content, or you can search for
content by using keywords.
You can browse and search for content in one or multiple locations on your computer
or local network as well as online. You can also navigate to previously viewed content.
82 Corel DESIGNER X5 User Guide
Page 99

Activating access to online content
You can browse or search for images the Web sites of online content providers such as
Flickr, Fotolia, and iStockphoto. To activate access to online content, you must first
agree to the terms and conditions of the online content providers. You can disable access
to an online content provider, and you can restore access at any time.
The images that you find online are often subject to usage restrictions and may be
watermarked or low-resolution. For information about using such images, see “Using
and managing content” on page 87.
Searching for content
You can search by the name, category (for example, clipart, photo images, or fonts), or
reference information (for example, tags or notes) associated with a file. When you type
a term in the search box and initiate a search, all matching files are displayed as
thumbnail images in the viewing pane. For example, if you type “flower” in the search
box, the application automatically filters out all files that do not match, and you see only
the files that have the word “flower” in the filename, category, or tags assigned to the
file.
Narrowing and expanding search results
By default, your search results include all relevant content such as vector graphics,
bitmaps, fonts, and file formats that are not supported by the suite. You can narrow
your search results by excluding some content. For example, if you are searching for
graphics, you can display only vector graphics or bitmaps. If you need to choose a font
for your project, you can display only fonts.
You can expand your search results, and you can cancel a search at any time.
To activate access to online content
•In the Libraries pane, click one of the following:
• Flickr
• Fotolia
• iStockphoto
If you don’t see the Activate button, click the name of the content provider.
Finding and managing content 83
Page 100

You can also
Disable access to a content provider Disable the I have read and agree to the
terms of the use of any content sourced
from this third party provider check box.
The name of the content provider disappears
from the Libraries pane.
To browse for content
• Click a location in one of the following panes:
• Libraries — lets you browse for content that’s included with the latest version
and previous versions of the suite
• Favorite folders — lets you browse your favorite locations
• Folders — lets you browse the folder structure available on your computer
You can also
Specify the location where you want to
browse for content
Type a path in the Address box, and press
Enter.
The Address bar keeps track only of the
locations that you enter manually. To delete
all locations, click the Address bar dropdown arrow, and click Clear list.
You can browse the contents of only one folder at a time.
To search for content
1 Click a location in any of the following panes:
• Libraries — lets you search for content online as well as content that is included
with the latest version and previous versions of the suite
• Favorite folders — lets you search for content in your favorite locations
• Folders — lets you search for content in the folder structure available on your
computer
2 Enter a word in the search box, and press Enter.
Files that match the search term appear in the viewing pane.
84 Corel DESIGNER X5 User Guide
 Loading...