

Page 1
PUB. DIM-825
Version 2
Page 2
Corel Application Disc - Movie Backup, Playback,
Editing and Transfer
The Corel Application Disc CD-ROM includes software that will allow you to back up or
play back movies, transfer movies to a computer and easily edit them, and more. For
further details, refer to the help files of each program.
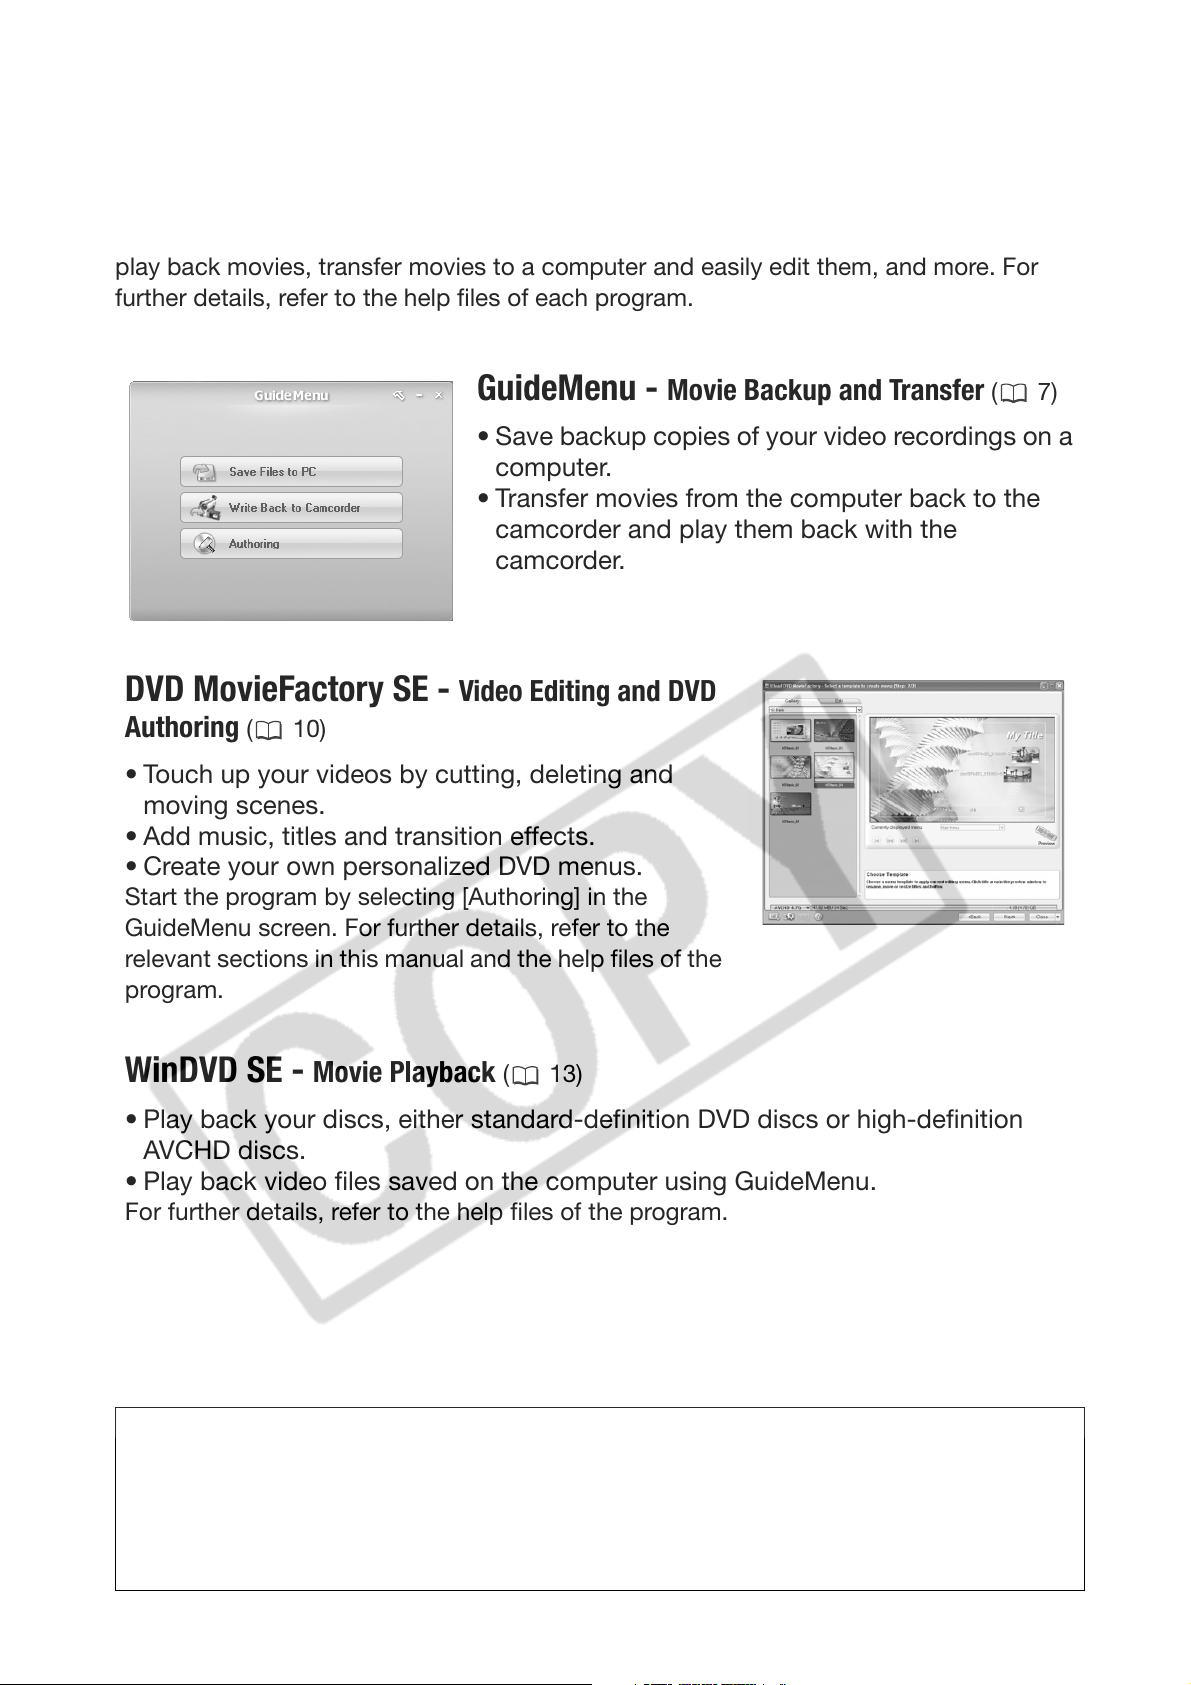
GuideMenu - Movie Backup and Transfer (7)
• Save backup copies of your video recordings on a
computer.
• Transfer movies from the computer back to the
camcorder and play them back with the
camcorder.
DVD MovieFactory SE - Video Editing and DVD
Authoring
• Touch up your videos by cutting, deleting and
moving scenes.
• Add music, titles and transition effects.
• Create your own personalized DVD menus.
Start the program by selecting [Authoring] in the
GuideMenu screen. For further details, refer to the
relevant sections in this manual and the help files of the
program.
(10)
WinDVD SE - Movie Playback (13)
• Play back your discs, either standard-definition DVD discs or high-definition
AVCHD discs.
• Play back video files saved on the computer using GuideMenu.
For further details, refer to the help files of the program.
For support concerning Corel Application Disc
Please call one of the customer support centers or access the support services
online (details on the back cover). Canon-related customer support centers
cannot provide support regarding software in the Corel Application Disc
CD-ROM.
2
Page 3
System Requirements
System requirements will vary based on the applications and features you
1
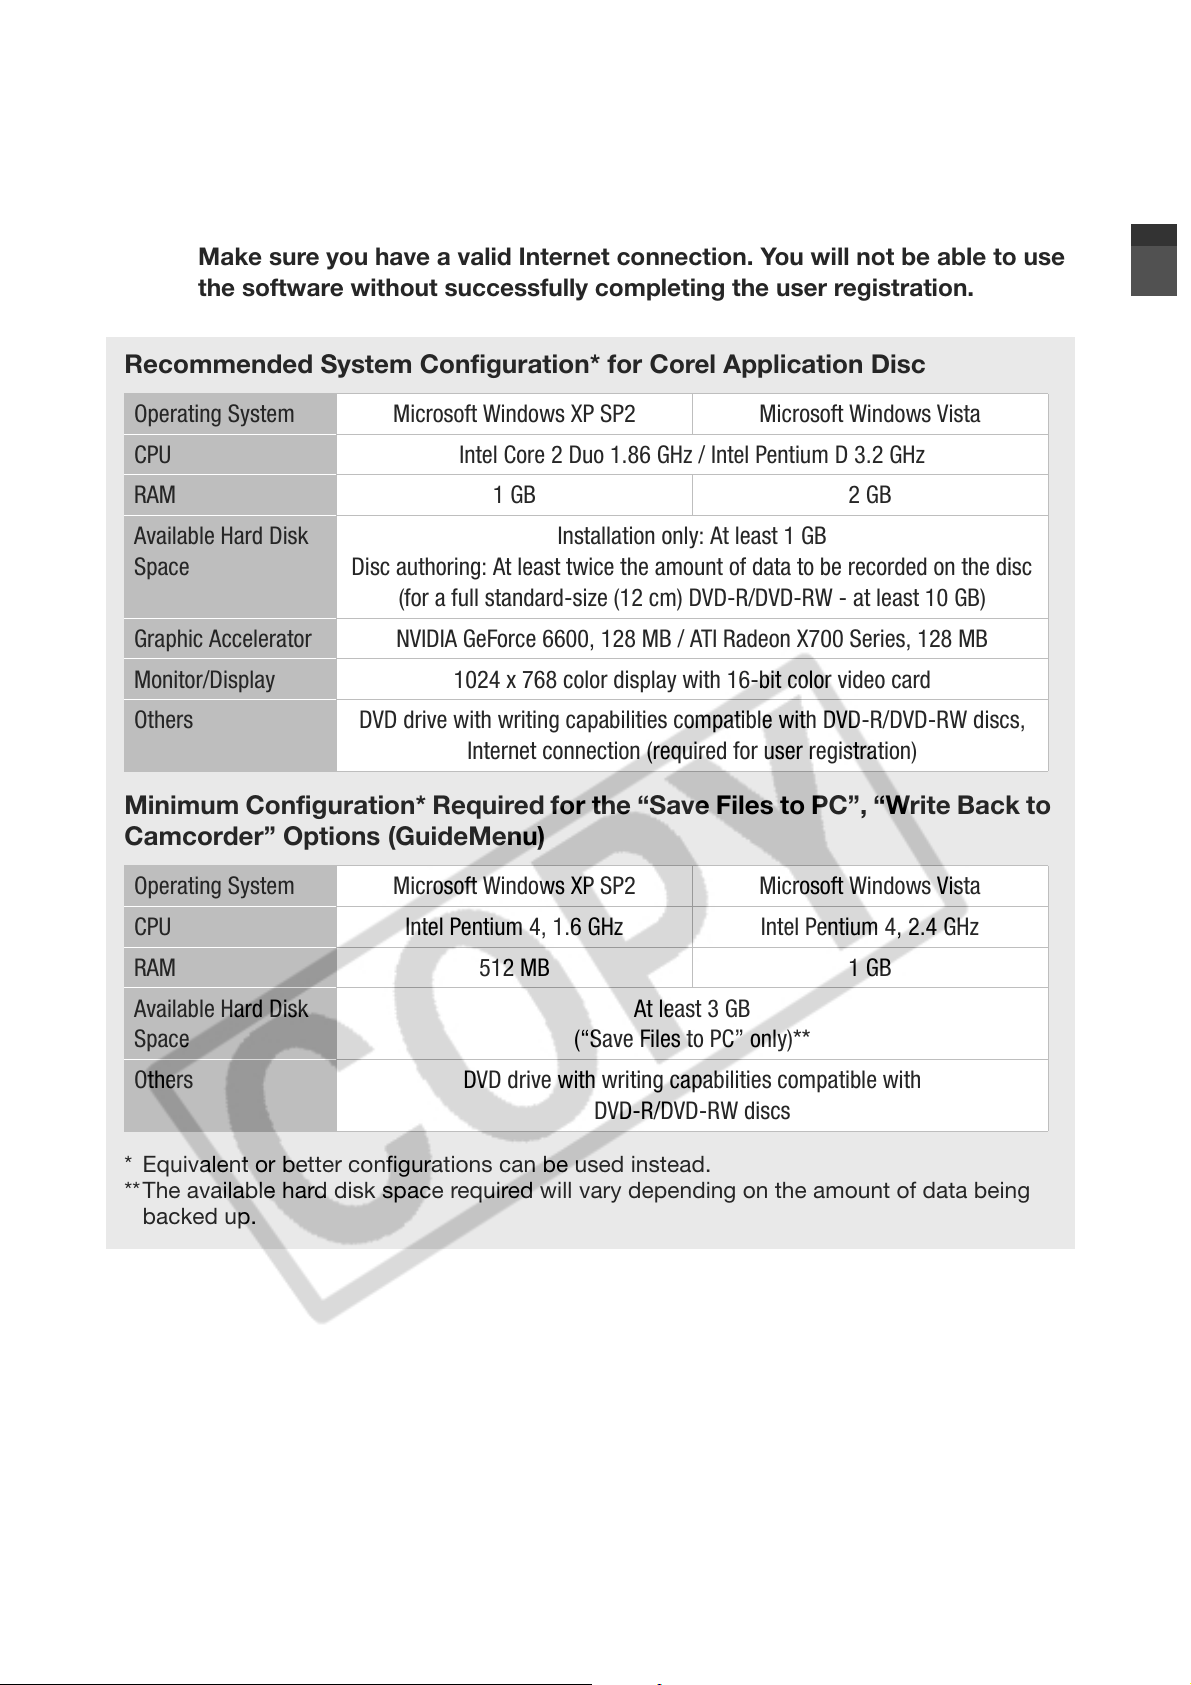
Recommended System Configuration* for Corel Application Disc
Operating System Microsoft Windows XP SP2 Microsoft Windows Vista
CPU Intel Core 2 Duo 1.86 GHz / Intel Pentium D 3.2 GHz
RAM 1 GB 2 GB
choose to install. The applications may not work correctly depending on the
specifications and settings of your computer and the software already installed.
Make sure you have a valid Internet connection. You will not be able to use
the software without successfully completing the user registration.
Available Hard Disk
Space
Graphic Accelerator NVIDIA GeForce 6600, 128 MB / ATI Radeon X700 Series, 128 MB
Monitor/Display 1024 x 768 color display with 16-bit color video card
Others DVD drive with writing capabilities compatible with DVD-R/DVD-RW discs,
Minimum Configuration* Required for the “Save Files to PC”, “Write Back to
Camcorder” Options (GuideMenu)
Operating System Microsoft Windows XP SP2 Microsoft Windows Vista
CPU Intel Pentium 4, 1.6 GHz Intel Pentium 4, 2.4 GHz
RAM 512 MB 1 GB
Available Hard Disk
Space
Others DVD drive with writing capabilities compatible with
Disc authoring: At least twice the amount of data to be recorded on the disc
(for a full standard-size (12 cm) DVD-R/DVD-RW - at least 10 GB)
Internet connection (required for user registration)
Installation only: At least 1 GB
At least 3 GB
(“Save Files to PC” only)**
DVD-R/DVD-RW discs
* Equivalent or better configurations can be used instead.
**The available hard disk space required will vary depending on the amount of data being
backed up.
3
Page 4
Software Installation
Turn on the computer and start Windows. Check that the camcorder is not
2
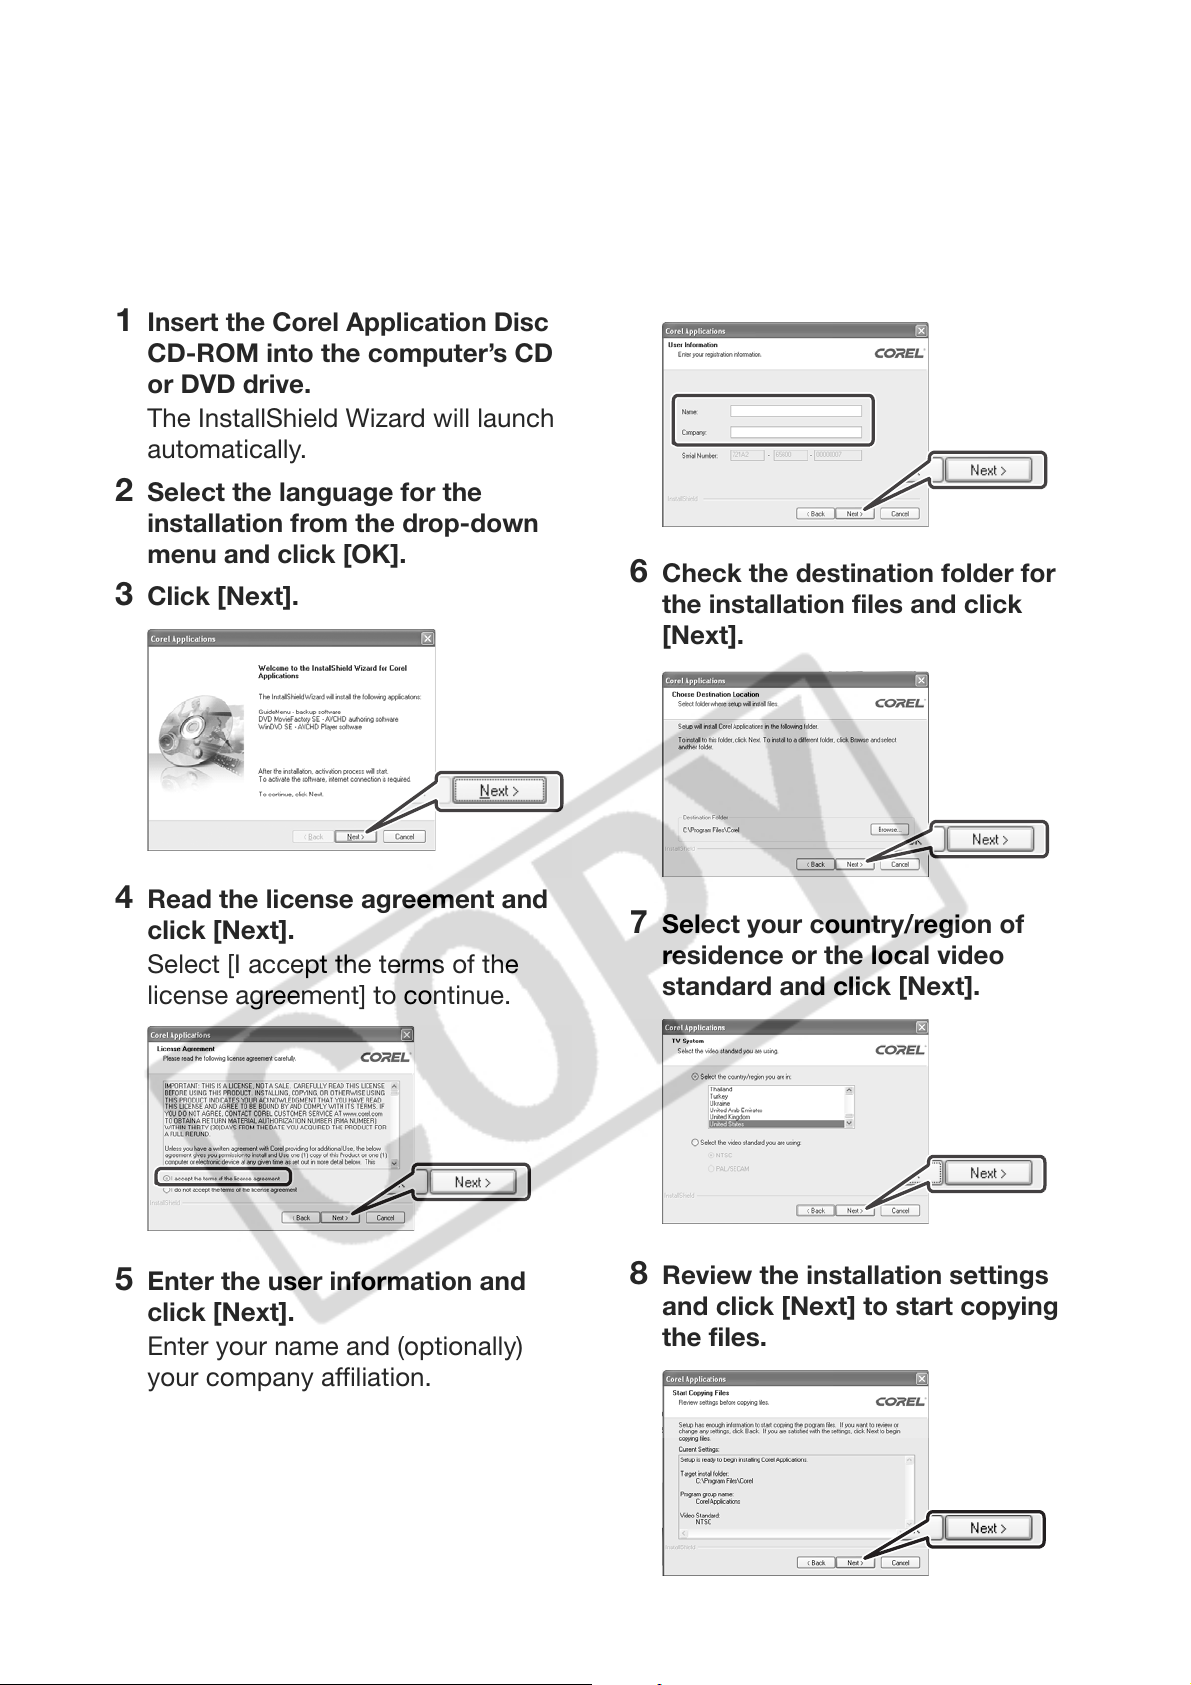
1 Insert the Corel Application Disc
CD-ROM into the computer’s CD
or DVD drive.
The InstallShield Wizard will launch
automatically.
2 Select the language for the
installation from the drop-down
menu and click [OK].
3 Click [Next].
connected to the computer.
6 Check the destination folder for
the installation files and click
[Next].
4 Read the license agreement and
click [Next].
Select [I accept the terms of the
license agreement] to continue.
5 Enter the user information and
click [Next].
Enter your name and (optionally)
your company affiliation.
7 Select your country/region of
residence or the local video
standard and click [Next].
8 Review the installation settings
and click [Next] to start copying
the files.
4
Page 5
User Registration
After the installation files have been copied, connect to the Internet to complete
3
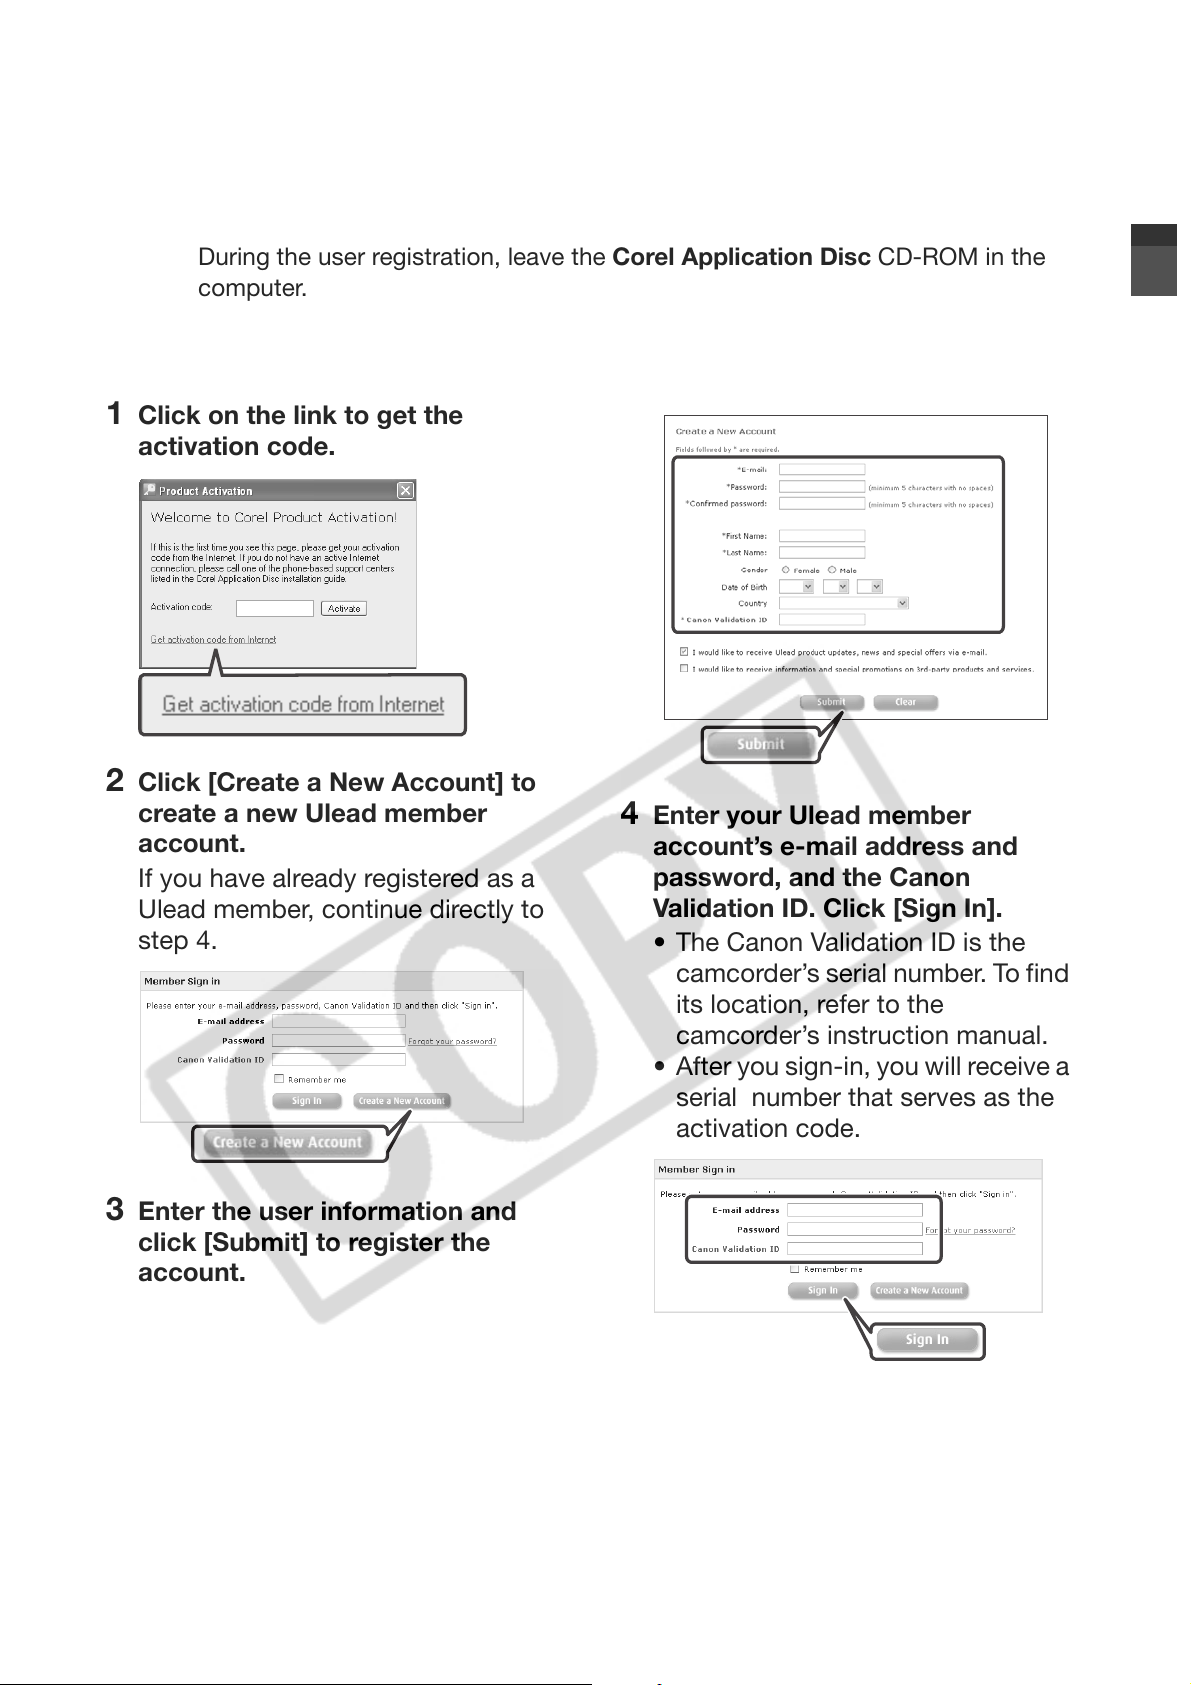
1 Click on the link to get the
activation code.
the user registration online. You will not be able to use the software without
successfully completing the user registration.
During the user registration, leave the Corel Application Disc CD-ROM in the
computer.
2 Click [Create a New Account] to
create a new Ulead member
account.
If you have already registered as a
Ulead member, continue directly to
step 4.
3 Enter the user information and
click [Submit] to register the
account.
4 Enter your Ulead member
account’s e-mail address and
password, and the Canon
Validation ID. Click [Sign In].
• The Canon Validation ID is the
camcorder’s serial number. To find
its location, refer to the
camcorder’s instruction manual.
• After you sign-in, you will receive a
serial number that serves as the
activation code.
5
Page 6

5 Enter the activation code (serial
number) you received over the
Internet and click [Activate].
6 Once the activation is completed,
click [OK].
7 Select [Yes, I want to restart my
computer now.] and click [Finish].
Connecting the Camcorder to the
Computer
Connect the camcorder to the
computer to back up your files on the
camcorder’s hard disk or transfer your
recordings from the computer back to
the camcorder. You can play back your
recordings (using WinDVD SE) or edit
your recordings (using DVD
MovieFactory SE) directly from your
computer’s hard disk without having to
connect the camcorder. For further
details, refer to the help files in the
respective software.
1 Connect the camcorder to a
power outlet.
Insert a fully charged battery pack
into the camcorder and power the
camcorder using the compact
power adapter.
IF YOU CANNOT CONNECT TO THE INTERNET
1 Call one of the customer support
centers listed on the back cover
to get the activation code over the
phone.
2 Skip directly to step 5 to enter the
activation code and continue with
the procedure as described.
2 Turn on the camcorder and set it
in video playback mode.
Refer to the camcorder's instruction
manual.
3 Connect the camcorder to the
computer using the USB cable.
• The GuideMenu screen will
appear automatically.
• If it does not, double-click the
desktop icon to launch the
GuideMenu application.
6
Page 7

IMPORTANT
• Do not disconnect the camcorder’s
power source or USB cable while using
this software. Doing so may result in
damage to the camcorder’s hard disk
and permanent data loss. Insert a fully
charged battery pack into the
camcorder in advance and use the
compact power adapter. Do not allow
the USB cable to be inadvertently
disconnected. Before disconnecting
the USB cable, use the “Safely Remove
Hardware” icon in the System Tray to
end the connection.
• While the camcorder is connected to
the computer, make sure the computer
does not enter power saving mode.
1 Click [Save Files to PC].
2 Select the folder where you want
to save the files and click [Next].
Select a folder on the computer’s
built-in hard disk.
GuideMenu - Movie Backup and
Transf er
You can back up movies recorded with
the camcorder onto the computer or
transfer those movies back. You can
also use DVD MovieFactory SE to
create high-definition AVCHD discs
and standard-definition DVD discs.
Refer to Creating an AVCHD Disc or a
DVD-Video Disc (10) for details.
Backing Up your Movies
Back up movies you recorded with the
camcorder onto the computer’s hard
disk. You can use DVD MovieFactory
SE to edit your movies and WinDVD SE
to play them back.
3 Select the scenes you want to
save and click [Start].
• You can also click on the following
buttons.
: Select all scenes at once.
: Remove the checkmarks from
all selected scenes at once.
• If there are less than 3 GB of
available hard disk space, the
backup operation will not start.
• It may take some time to display
all the scenes’ thumbnails.
4 When the files have been saved
successfully, click [OK].
7
Page 8

IMPORTANT
m2ts
If a folder on an external hard disk is
selected, the message “Delayed Write
Failed” will appear and you may not be
able to save the files.
NOTES
• Movies recorded with this camcorder
have a maximum file size of 2 GB
(about 17 min. in HXP mode; about 35
min. in SP mode). Longer scenes will be
divided into files smaller than 2 GB.
They will be saved as separate scenes
when transferred to a computer.
• The file name of scenes saved on the
hard disk reflects the date and time (in
24-hour format) of the original
recordings. For example, the file name
of a recording made around 9 p.m. on
October 25 will be:
20071025212030.m
YYYYMMDDhhmmss
• Unless you select a different folder in
step 2, scenes will be saved in folders
that reflect the date of recording under
the My Videos folder in the My
Documents folder.
The exact path is different for each
system but a typical path for the scene
on the previous example would be:
C:\Documents and Settings\
[User name]\My Documents\
My Videos\20071025
Transferring Movies Back to the
Camcorder
After movies have been transferred to
your computer, they can be transferred
back to the camcorder - even after
being edited with DVD MovieFactory
SE. After movies have been transferred
back, you can connect the camcorder
to a high-definition TV set to play back
your movies.
1 Click [Write Back to Camcorder].
2 Click [Select Folder]. In the
window that opens, select a
folder and then click [OK].
Select a folder on the computer’s
built-in hard disk. You cannot select
a folder on the computer’s CD or
DVD drive.
3 Select the scenes to transfer and
click [Start].
• It may take some time to display
all the scenes’ thumbnails.
• Scenes larger than 2 GB cannot
be selected.
8
Page 9

4 Read the message and click [Yes]
to continue.
Click [No] to cancel and return to the
GuideMenu screen.
5 Click [OK].
WHEN TRANSFERRING MOVIES WITH LARGE
FILE SIZES
When transferring movies back to the
camcorder, the computer requires
available hard disk space the same
size as the file sizes of the movies to be
transferred. You can change the
temporary folder used for this task by
performing the following steps.
1 Click in the main menu.
2 Click in the folder
configuration screen.
The folder selection screen appears.
• Do not disconnect the camcorder’s
power source or USB cable while
transferring movies back. Doing so may
result in damage to the camcorder’s
hard disk. Insert a fully charged battery
pack into the camcorder in advance
and use the compact power adapter.
Do not allow the USB cable to be
inadvertently disconnected.
• Movies transferred to this camcorder
will not play back properly if they
contain scenes that were recorded with
another camcorder or recorded in
another video specification/television
system.
• When transferring movies back to the
camcorder, the computer requires
available hard disk space the same size
as the file sizes of the movies to be
transferred.
• If the sum of the number of scenes in
the camcorder and the number of
scenes to be transferred is about 1,000
scenes, scenes may not be transferred
back.
• We recommend transferring back fewer
than 100 scenes at a time.
3 Select a folder on a hard disk that
has sufficient available hard disk
space and click [OK].
4 Click [OK] in the folder
configuration screen.
IMPORTANT
• Movies originally recorded with this
camcorder can be transferred from the
computer. They can be transferred even
if they were edited with DVD
MovieFactory SE. If other types of
movies are transferred back, correct
playback cannot be guaranteed.
• Make sure to back up all data in the
camcorder before transferring movies.
9
Page 10

NOTES
Additional Software in the Corel
• The date and time of movies transferred
back to the camcorder will reflect the
time of their transfer.
• Movies recorded with this camcorder
have a maximum file size of 2 GB
(about 17 min. in HXP mode; about 35
min. in SP mode). Longer scenes will be
divided into files smaller than 2 GB.
They will be saved as separate scenes
when transferred to a computer.
• In Windows Vista, when transferring
movies back to the camcorder from an
AVCHD disc created with DVD
MovieFactory SE, first insert the disc
into the computer’s DVD drive and copy
the movies onto the computer’s hard
disk.
On the original AVCHD disc, movies are
saved with the file name xxxxx.m2ts,
where “xxxxx” is a five-digit number, in
the following path on the computer’s
DVD drive:
BDMV\STREAM.
Then, in step 2, select the folder to
which the movies were copied.
• In Windows XP, when transferring movies
back to the camcorder from an AVCHD
disc created with DVD MovieFactory SE,
first import the movies on the disc into
DVD MovieFactory SE and then export
the movies to the computer as AVCHD
files. Then, in step 2, select the folder to
which the movies were exported.
( 12)
Application Disc CD-ROM
Editing Movies with DVD MovieFactory
SE
Use this editing software to touch up
(cut, delete and move) movies
transferred to your computer with
GuideMenu, to add music, titles and
transition effects and to create your
own DVDs with personalized menus.
For further details, refer to the help files
in the DVD MovieFactory SE software.
CREATING AN AVCHD DISC OR A
DVD-VIDEO DISC
You can create a high-definition
AVCHD disc or standard definition DVD
disc with movies on the camcorder you
have backed up onto your computer.
1 Connect the camcorder to the
computer.
Refer to Connecting the Camcorder
to the Computer (6).
2 Back up the movies on the
camcorder onto your computer.
Refer to Backing Up your Movies
(7).
10
3 Insert a standard-size (12 cm)
DVD disc into the DVD drive.
You can use either a DVD-RW or a
brand new DVD-R disc.
Page 11

4 Click [Authoring].
5 Click [Video disc] and then [New
project].
6 Select the disc type and click
[OK].
9 Select the scenes to add to the
disc and click [Open].
• You can click [Preview] to view
scenes.
• You can select multiple scenes by
pressing and holding the Shift key
or Ctrl key while making
selections.
10 Click [OK].
You can change the order of the
clips if necessary.
7 Click the icon.
8 Select the folder you backed up
the movies to in step 2.
11 Check that the movies to be
included are displayed and click
[Next].
To add a personalized menu, make
sure [Create menu] is selected. To
not add a menu, skip directly to step
13.
12 Select a menu template and click
[Next].
11
Page 12

13 Check the settings and click
[Burn].
You can change the settings if
necessary.
14 Select an option and click [OK].
IMPORTANT
NOTES
• If you have the editing software Roxio
MyDVD for Canon installed in your
computer and you specify more than
one disc, a disc cannot be created. Set
[Copies] to [1].
• To create the same disc again in the
future, select [Close DMF with saving
project file and go to launcher.] in step
14 and click [OK]. The next time you
create that same disc, select [Open
Existing Project] to open the saved
project.
• High-definition discs created or copied
using Corel software can be played
back only with AVCHD-compatible DVD
players. Do not insert such discs into a
DVD player that is not compatible with
AVCHD specifications as you may not
be able to eject the disc.
• When using a computer that has only
one DVD drive to copy a 12 cm disc,
you will only be able to use DVD-RW
discs; DVD-R and DVD-R DL discs
cannot be copied in such case.
• Use GuideMenu to transfer movies
from the camcorder to your computer.
Movies edited with MovieFactory SE
that exceed 2 GB cannot be
transferred. The following table gives
approximate times for a 2 GB scene in
each recording mode.
EXPORTING MOVIES ON AN AVCHD DISC TO
THE COMPUTER
You can use DVD MovieFactory SE to
import movies from an AVCHD disc
and export them to an AVCHD file.
1 Insert an AVCHD disc into the
computer's DVD drive.
2 Click [Authoring].
3 Click [Video disc] and then [New
project].
12
Recording Mode Playback time
HXP 17 min.
XP 28 min.
SP 35 min.
4 Select [AVCHD] and click [OK].
LP 45 min.
Page 13

5 Click the icon.
6 Select the DVD drive that contains
the AVCHD disc and click
[Import].
9 Select the folder where you want
to export the files and click
[Save].
Playing Back Movies with WinDVD SE
Play back video files saved on the
computer using GuideMenu and your
discs created with DVD MovieFactory
SE. For further details, refer to the help
files in the WinDVD SE software.
7 Select the video files to import
from the disc and click [Import].
You can preview the files by
selecting a file and clicking .
8 Select the scenes to export to a
file and click [Export Selected
Clips] and then [Fast Export
AVCHD Compliant Video].
NOTES
• Depending on the movie, disc and the
configuration of your computer, the
processor may be overloaded and you
may notice some anomalies such as
video stuttering or audio drop-outs.
Playback of discs recorded in high
definition requires higher CPU
resources. Close all running programs
before starting the playback.
• Regarding the playback of AVCHD discs:
You can play back discs created using
DVD MovieFactory SE. Correct
playback cannot be guaranteed when
playing back AVCHD discs recorded or
created using other devices/software.
• Correct playback of AVCHD discs
created using the supplied software
cannot be guaranteed for all AVCHD-
compatible devices. Discs created with
DVD MovieFactory SE can be played
back using WinDVD SE.
13
Page 14

• For Windows Vista users: Depending on
the configuration of your computer,
playback quality may be affected by
whether the Windows Aero graphic
interface is activated or not. If you
experience some anomalies during
playback even though your computer
complies with the system requirements,
try turning the Windows Aero function
on or off.
• Playback quality may be affected by
the power saving mode of the operating
system or the video card. If you are
using a laptop computer, try connecting
it directly to a power outlet.
• This program cannot be used to play
back CPRM-protected discs.
IF A DISC CREATED WITH DVD
M
OVIEFACTORY SE CANNOT BE PLAYED
BACK CORRECTLY
5 Click [Remove All Chapters] and
click [OK].
All the scenes will be combined into
one scene and will appear as a
single scene when playing back the
disc.
IF DVD MOVIEFACTORY SE OR WINDVD SE
ARE NOT WORKING CORRECTLY
If you have the editing software Roxio
MyDVD for Canon installed in your
computer, DVD MovieFactory SE or
WinDVD SE may not work correctly. In
such case, follow the procedure below
to solve the compatibility problem.
Close any running Corel applications
before continuing.
1 From the Start menu, open [My
Computer].
If you play back a high-definition disc
created with DVD MovieFactory SE on
an external AVCHD-compatible DVD
device you may notice that the video
freezes for a few seconds between
scenes. In such case, perform the
following procedure to create a new
disc where all video is read as one
continuous scene.
1 After adding the scenes you want
to include in the disc, select the
first scene.
2 Press and hold the Shift key and
select the last scene.
3 With all the scenes selected, click
[Join Video].
2 Right-click on the icon of the DVD
drive, and select [Properties].
3 Select the [UDF Reader] tab and
remove the check mark from the
[Enable UDF Reader on your
drives] option.
4 Click [Apply], then click [OK].
5 Start the Corel software.
4 Click [Add/Edit Chapter].
14
Page 15

Trademark Acknowledgements
• Corel, the Corel logo, Ulead, the Ulead logo, Ulead DVD MovieFactory, InterVideo, the InterVideo logo, WinDVD are trademarks or
registered trademarks of Corel Corporation and its subsidiaries.
• Microsoft, Windows and Windows Vista are trademarks or registered trademarks of Microsoft Corporation in the United States and/
or other countries.
• “AVCHD” and the “AVCHD” logo are trademarks of Matsushita Electric Industrial Co., Ltd. and Sony Corporation.
• Other names and products not mentioned above may be trademarks or registered trademarks of their respective companies.
Marques de commerce et marques déposées
• Microsoft, Windows et Windows Vista sont des marques déposées ou des marques enregistrées de Microsoft Corporation aux
Etats-Unis d’Amérique et/ou dans d’autres pays.
• “AVCHD” et le logo “AVCHD” sont des marques de commerce de Matsushita Electric Industrial Co., Ltd. et Sony Corporation.
• Les autres noms de produits non mentionnés ci-dessus peuvent être des marques de commerce ou des marques déposées de leur
compagnie respective.
Reconocimiento de marcas comerciales y registradas
• Microsoft, Windows® y Windows Vista son marcas comerciales de Microsoft Corporation, registradas en los Estados Unidos y/o en
otros países.
• “AVCHD” y el logotipo “AVCHD” son marcas comerciales de Matsushita Electric Industrial Co., Ltd. y Sony Corporation.
• Otros nombres y productos no mencionados anteriormente pueden ser marcas comerciales o registradas de sus respectivas
compañías.
Page 16

PUB. DIM-825
 Loading...