

Page 1

USER’S GUIDE
Page 2

Welcome
1
2
3
4
Shoot ..................................3
Load ......................................5
Edit ..........................................8
Jam! ...............................11
onto your computer
great digital pics
with the Jam photo editing software suite
Share online and e-mail to friends
Getting Started
Thank you for purchasing JamCam 3.0, the
digital camera for your digital life.
JamCam 3.0 makes getting connected to the
digital photo revolution as easy as 1-2-3-JAM! In just
a few simple steps, you’ll be taking high-quality digital
pictures, loading them onto your computer, editing,
and sharing them online with family and friends.
It’s that easy!
This manual provides a step-by-step guide that
will get you up and running with JamCam 3.0 in no
time. Don’t forget to visit www.jamonline.com
for photo sharing, activities, and updates. You can even
order high-quality prints of your JamCam 3.0 pics.
Introduce the world to the digital you
with JamCam 3.0!
It’s time to get started using your JamCam 3.0.
You’ll find the following sections in this manual:
Before you can get started, JamCam 3.0 does
require a 9V alkaline battery. To insert the battery,
first pop open the compartment door on the
bottom of your JamCam 3.0 and pull out the
connectors. Then, line up the connectors, firmly
connect the battery, insert the battery into the
compartment, and close the door.
For more battery information see page 15.
Now, let’s get jamming!
Page 3
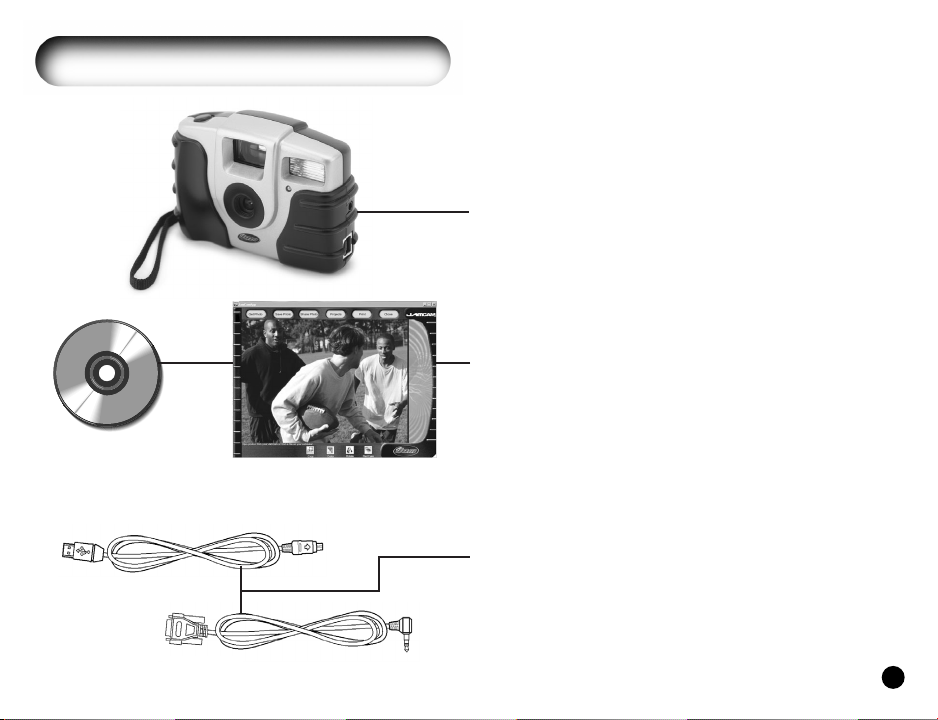
Package Contents
1
USB
Serial
The JamCam 3.0 package comes with all the tools
you need to snap, edit, and print quality digital photos
– no film, no developing time. The following components
are the essential parts to the JamCam 3.0 photo suite:
Digital Camera
The JamCam 3.0 digital camera is durable, portable,
and easy-to-use. It features a flash, self-timer, two
resolution settings, and a MultiMediaCard slot
(to add picture storage capacity).
See pages 2- 4 for more details.
Software
The JamCam 3.0 software suite, featuring JamCam
software and Adobe PhotoDeluxe
®
, makes digital
photography easy and fun. The JamCam 3.0
software includes essential editing tools and links
to fun projects, online photo sharing scrapbooks,
and high-quality printing.
See pages 6-13 for more details.
Cables
JamCam 3.0 comes with both a USB and a serial
cable. You can choose either one to connect your
camera to your computer.
See pages 5-6 for use and connection details.
Page 4
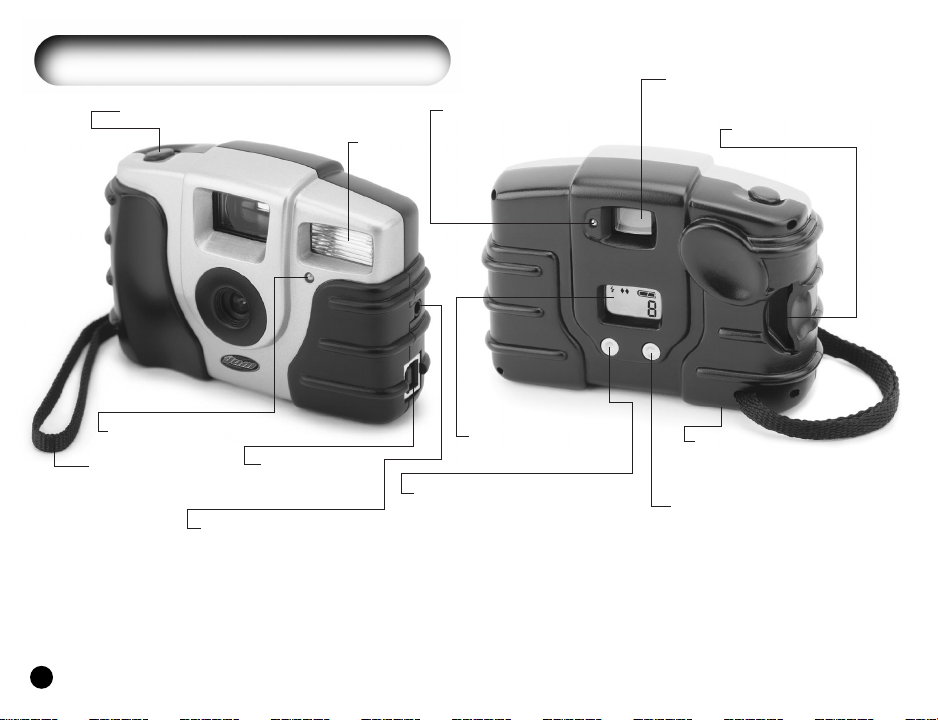
JamCamTM3.0
Shutter Button
Flash
LED - indicates picture
has been taken
Viewfinder
MultiMediaCard Slot
2
Self-Timer Indicator Light
Carrying Strap
Serial Port
USB Port
(recommended )
LCD
(Liquid Crystal Display)
On/Off /Select button
has two functions:
1. To t u rn the camera
on and off
2. To change the menu
settings
Battery
Compartment
(underneat h)
Menu button scrolls through
the 5 camera options:
1. Self-timer on/off
2. Flash on/off automatic
3. Resolution setting
4. Clear all pictures
5. Ta ke a picture
Page 5
It’s easy to get started taking great photos with
1
Shoot
great digital pics
3
JamCam 3.0. Here are some important tips and an
overview of the camera functions.
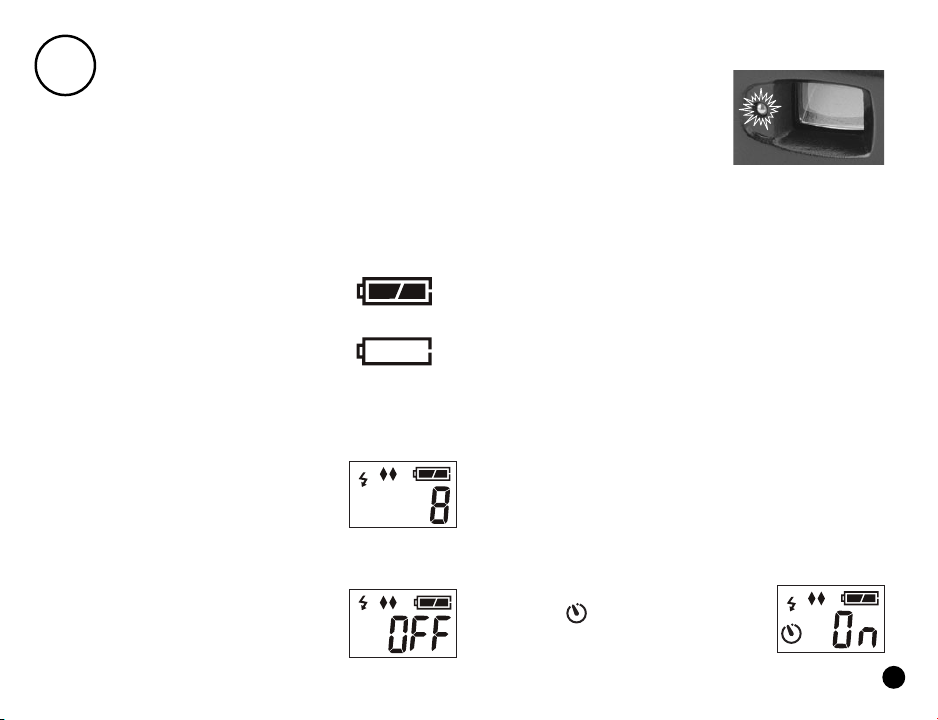
The Battery Life Indicator
JamCam 3.0 does require a 9V
alkaline battery. See back cover page
for insert instructions. The remaining
power of the camera’s 9V battery
is indicated in the upper right
corner of the LCD and has four
settings ( full, half, low and empty).
Turning JamCam 3.0 On and Off
To turn JamCam 3.0 on, press the
On/Off/Select button (see diagram on
previous page). By default, the camera
will be set to flash and will tell you that
you have 8 R2 pictures remaining ( see next page for
more information).
To turn JamCam 3.0 off, press and hold
the On/Off/Select button ( for about 4
seconds)until the LCDscreen reads OFF.
Release the button.
Full
Low
(
Empty when flashing)
Taking Pictures with JamCam 3.0
To take a picture, aim through
the viewfinder and press the
shutter button until the red
LED light goes on. While the
light is on, the subject and the
camera should stay steady. When the red LED light
goes off, the picture has been stored.
Click! Click! – Tips for better pics
1. Hold that pose! – Digital cameras take a few
seconds to adjust for lighting. Hold your camera
still until you see the red LED light go off.
2. Get out of my face! – JamCam 3.0 takes its best
pictures at 3 to 8 feet away from the subject.
3. Indoors and Outdoors – No matter what the
lighting, JamCam 3.0 has the situation covered.
The built-in flash can automatically assess the
setting and flash if necessary.
For more information on how to improve your photos after
you have taken them, see pages 6 -10.
Additional features and functions
of the JamCam 3.0:
Using the Self-Timer
Press the Menu button until the selftimer icon is selected. Use the
On/Off/Select button to turn the
self-timer on or off. After you press the
Page 6
shutter button, the Self-Timer Indicator light on the front
4
of the camera will flash at increasingly rapid rates before
the camera takes a picture. The total time is 10 seconds.
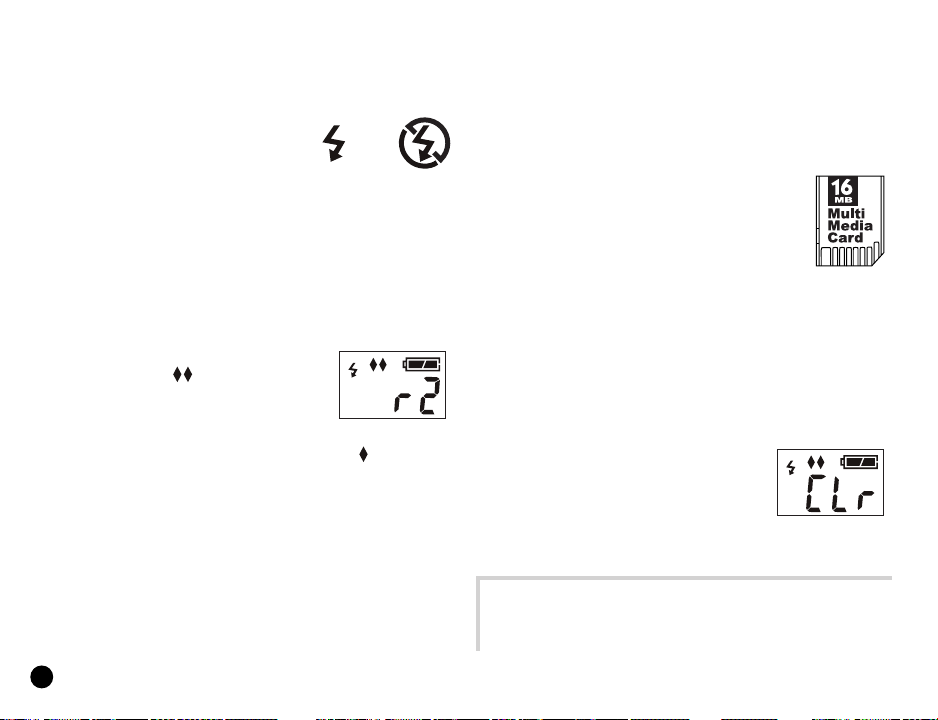
Using the Flash
Press the Menu button until the
flash icon is selected. Use the
On/Off/Select button to turn
the flash setting to on, off or
Flash On /AU Flash Off
automatic (AU). When the flash is in On mode, the flash
will trigger for every picture. When the flash is in
automatic mode, the camera will assess the light of your
setting and flash if necessary. In between pictures, the
flash icon will blink while the flash is recharging.
Changing Resolutions
The default resolution for JamCam 3.0
is R2(640 x 480).To change to a
different resolution, press the Menu
button until the resolution settings
are highlighted. Then press the On/Off/Select button
to switch between R2 and R1(320x240).
We recommend using the R2 setting for all images
you will want to print, use in projects, or post to a
web site. R2 pictures are substantially clearer, but you
cannot store as many pictures into JamCam’s memory
as you can at the R1 setting. Use the R1 setting for
e-mails, 2”x 3” ( or smaller) wallet photos,
or for small web site images.
Pictures Remaining
Depending on the resolution, JamCam 3.0’s internal
memory can hold up to 8 R2 pictures or 28 R1
pictures. You can also take a combination of R2 and
R1 pictures. After you take a picture, the JamCam 3.0
LCD will tell you how many pictures you have left at
the current resolution.
Adding More Memory
JamCam 3.0 features a MultiMediaCard
slot that allows for added picture memory.
After purchasing a MultiMediaCard, simply
insert the card into the MultiMediaCard slot on the
JamCam 3.0 with the camera turned off. When you
turn the camera on, you will see an increased picture
capacity. MultiMediaCards are available at
www.jamonline.com or your local computer retailer.
Note: The inser tion or removal of a memory card when the
camera is on will not be recognized by the camera.
Only insert or remove a MMC card when the camera is of f.
Clearing the Camera
Press the Menu button until the
LCD reads “CLr”.Press the
On/Off /Select button. The camera
will flash“---”while the pictures are clearing.
JamCam3.0 is now permanently cleared of all its pictures.
No Film, No Developing Time
So, you have taken pictures. Great! Let’s now upload
them onto your computer and see how they look…
Page 7

2
Load
onto your computer
Once you have taken some great JamCam 3.0 digital
pictures, you will want to load them onto your computer
and see the results. Follow the instructions below:
Windows
(
F
or Macintosh instructions turn to page 14
Step 1: Installing your software
The first thing you’ll need to do is install the camera
driver and photo editing software from the CD.
1. Place the CD into the CD-ROM drive.
2. The following
screen should
appear.
*
* If this screen does
not appear, go to
the Start menu and
select Run. In the
command line, type “d:\setup”. If “d” is not the letter of
the CD-ROM drive, please type in the appropriate letter.
3. Read through the text and click Next.
4. Follow the onscreen instructions.
Note: When installing the Adobe®software, please
choose the default installation directory. Changing
this directory will af fect and limit software usage.
(
Note: Step 1 only needs to be done the first time
you use the camera.)
Step 2: Connecting the JamCam 3.0
to your computer
(
Note: Keep your CD in the CD-ROM drive during this
process. The CD contains a necessary file that the computer will
look for when the camera is attached. If your computer cannot
find the f ile, you will need to direct it to the CD-ROM drive.)
Next you will have two options for connecting
the camera to the computer – USB or 9-pin serial
(
both cables are included).
)
USB is the recommended option because it is
significantly easier to connect and faster to
download pictures. See the pictures on the next
page to locate and connect to the proper ports.
1) Connect one end of the cable to your camera.
2) Connect the other end to the computer.
(
A. USB
Windows 98 - RECOMMENDED
To JamCam 3.0
Serial
or
USB
)
USB
Port
on your
computer
5
Page 8

B. Serial
6
(
Windows 95/98
)
2. Locate the Jam folder and click on JamCam 3.0.
To JamCam 3.0
(Serial Only)
JamCam 3.0 requires its own serial (COM) port in order to
function properly. If you are repeatedly seeing an error
message when trying to download pictures, your port may not
be enabled correctly or it may be sharing system resources with
another device. Please verify that your JamCam 3.0 is not
trying to use a COM port that is already in use by another
device (i.e. a modem or serial mouse) as the camera will not
work under this condition.
If you continue to have difficulties with your computer’s serial
ports and need further assistance, please consult your computer documentation or contact your computer manufacturer.
Step 3: Loading your pictures
Now you are ready to load your JamCam 3.0
pictures onto your computer. Mak
e sur
your JamCam 3.0 is on during this process.
1. Go to the Start menu
and choose Programs.
9-pin
Serial
Port
on your
computer
e that
3. The JamCam 3.0 application screen will appear.
4. Click on the Get Photo button.
5. Make sure JamCam 3.0 is the
selected source and
click on the From
JamCam 3.0 button.
6. This will open
the JamCam
Viewer
window and
start the
download.
After the
download is
complete, use the arrow buttons to scroll through
your images.
7. Once the pictures
are loaded, use the
controls to change
the lighting of the
image (if necessary). Press the setting that best
applies to the setting of the image. For example,
if the picture was taken inside your home, press
the Home button to correct the lighting.
Page 9

If you want to change the
universal settings of your images,
click on the Settings button.
•The Default Color
Settings controls will
change the light
settings of all the
images (rather than
individual images
as above).
• The Default Sharpening
controls will
add/subtract
sharpness from all the
pictures taken at a
certain resolution
(
R1 or R2).
Note: A high sharpening level can make the picture look
pixilated while a low sharpening level can make the
picture look fuzzy. We recommend that you experiment
with different sharpening settings to f ind the best f it
for your images.
8. Select the photos you want to download by:
a. Clicking on a single image,
b. Holding down the Control (Ctrl)key
and clicking on multiple images, or
c. Checking the Select All box.
9. When you have the
desired image(s)
highlighted, click on the
Download Picture button.
10 . Click the Close button on the JamCam Viewer
window to return to the JamCam 3.0 software.
All of the pictures you have downloaded are now
in thumbnail form in the JamCam 3.0 software.
11 . Your JamCam 3.0 pictures have now been
automatically saved in a My Jams folder on your
C: drive ( think of this folder as your set of
negatives). The assigned image name is written
under each thumbnail ( e.g. Jam001.jpg, Jam002.jpg ).
To change the name or to save in a different
location, highlight an image and hit the Save Photo
button.
These JamCam
files will remain
on your
computer until
you remove
them from the
My Jams folder.
Now that you have some images uploaded into
the JamCam 3.0 software, it is time to edit them.
See the next section for how to make your
JamCam 3.0 pictures even better.
7
Page 10

3
Edit
with the Jam photo editing software suite
Windows and Macintosh
Step 1: Editing within the JamCam 3.0 software
From the thumbnail screen, double-click on an image
to open it into large screen view. At the bottom of
the JamCam 3.0 software window, the following
options will be available:
Zoom In: Magnify your picture
to look more closely at
certain areas.
Zoom Out: Ta ke a step back
from the image.
Crop: Cut out an area of the image.
1. First select the area you want to crop by holding down
the left mouse button and dragging the cursor
across an area of the photo. Then use the handle
bars to expand, shrink or move the selected area.
2. To crop the selected area, press the Crop button
located in the orange control area.
3. Click the Done button to finalize the action.
Color: Adjust the color of the sky, human
skin, foliage, or neutral areas.
1. Click one of the four correction buttons in the
orange control area.
2. Now, click on a corresponding area in the image
(e.g. if you have chosen foliage, click on a green
leaf or bush).
3. Click the Done button to finalize the action.
8
Crop, Color, Rotate, Red Eyes
Clicking on one of these editing function buttons
along the bottom of the screen activates the
orange control area at the right of the screen.
Each area will include specific edit buttons as
well as:
Undo: Undo the last action.
Done: Finalize and save the action.
Close: Close out of the editing function
without saving.
Rotate: Use the two controls in the
Red Eyes: Eliminate red eye caused
1. Click the Red Eye button in the orange control area.
2. Click on an area of the image that needs to be fixed.
3. Click the Done button to finalize the action.
orange control area to rotate
the image right or left by 90
by the f lash.
o
.
Page 11

Step 2: Save, Share, Print and Projects
9
When you are done editing the images, the
JamCam 3.0 software offers four main categories
for continuing the digital photo journey:
Save Photo
Click here to save the highlighted
thumbnail or enlarged image to your hard drive.
Note: All uploaded images are automatically saved to the
My Jams folder on your hard drive. You can return to these
“negatives” at any time to reproduce the image.
Share Photo
Clicking on this button will bring up
your Internet browser to jamcam.jamonline.com.
From here you can create an online scrapbook to
save and share your photos with friends and family.
See page 12 for more details.
Note: Your online scrapbook will be a password protected area
that cannot be accessed without proper authority.
Print Photo
Clicking here brings up a dialog box
with two options: Order Prints Online and My Printer.
a. Order Prints Online
The Order Prints Online button will take you to
the JamCam web site where you can order highquality prints. At this site, you will also be able to
do some customized picture naming and
editing that will appear on the finished prints.
See page 13 for more details.
b. My Printer
Click here to print out an image on the printer
connected to your computer and/or network.
Projects
Clicking on the Projects button
also brings up a dialog box with two options:
Adobe PhotoDeluxe
a. Adobe PhotoDeluxe
This option launches the current picture into
Adobe PhotoDeluxe
®
and Online Projects.
®
®
, which is included in the
JamCam 3.0 software suite.
®
Adobe PhotoDeluxe
includes a number of special
effects and project functions for your pictures.
Here are some examples of what you can do with
a picture within PhotoDeluxe
®
:
Page 12

1) Special Effects – Under the Get & Fix Photo Tab
you will find a button labeled Special Effects. In the drop
down menu you will find over 40 different effects to
change your picture, including adding text, making an
old-fashioned look, and changing the background setting.
Here’s a fun example of what you can do:
1. Under the Special Effects
button, scroll down to
Fun and choose Motion.
2. Click on the Motion tab.
3. Click the Wind button.
4. In the pop-up window,
choose the motion
strength (Wind, Blast,
Stagger) and the direction
(left or right).
When done, click OK.
5. Your image now has
motion! Click the Done
button to move onto the
next effect or project.
2) Projects – Click on the Cards & More Tab to
seenumerous photo projects. The list includes sports
cards, calendars, certificates, and picture frames.
Using the same picture from before, here’s a
good example of what you can do:
1. In the Cards & More section, click on Covers.
2. Click on the Choose Cover tab and then the
Choose Cover icon.
3. In the pop-up window, double-click on “magazin1”.
4. Now, drag your image from the left hand bar into
the “Photo” spot on the
magazine cover.
5. Use the handle bars
to resize or rotate
the picture.
6. To change any text,
double-click on the
word and type in the
new text.
7. Nice look, Superstar. Click
Done if you are finished.
There are many more fun things to do within
Adobe PhotoDeluxe
®
.If you have any questions, use
the Help menu or go to www.adobe.com.
b. Online Projects
The Online Projects button will take you to the
JamCam web site at jamcam.jamonline.com where you
can do a number of fun projects with your images.
See the web site for more details.
10
Page 13

11
4
Jam!
Share online and e-mail to friends
KB Gear Interactive’s web site at www.jamonline.com
offers a number of creative activities using your
photos. To get to www.jamonline.com, click on the Jam
logo in the lower right corner of your
JamCam 3.0 software screen.
Here are some online activities:
Upload pictures online
•
Share your pictures on a photo sharing site
•
Order high-quality prints
•
Send your best pictures to the JamCam 3.0 gallery
•
to share with other JamCam 3.0 photographers
Enter contests to win prizes
•
Order MultiMediaCards and other accessories
•
Uploading Pictures Online
JamCam 3.0 pictures can be uploaded directly
to the Internet in one of two ways:
1. jamonline.com
a) Go to jamcam.jamonline.com and click
on the Share Photos button.
b) Follow the directions for uploading the
JamCam 3.0 pictures.
c) You can arrange your photos in an online
scrapbook, share with friends, or order
photo-quality prints. See page 13 for more details.
2. AOL’s “You’ve Got Pictures”
®
If you are using AOL
upload JamCam 3.0 pictures directly to “You’ve Got
Pictures” through the following steps. AOL members
get free storage space for their pictures so they won’t
take up valuable room on their hard drive.
a) From the AOL welcome
screen, click on the
“You’ve Got Pictures” film icon.
b) Click on the “Digital
Camera owners” link.
(Keyword: Pictures)
c) Click on “upload pictures now!”
d) The My Albums window will pop up. Click on
the “upload picture” button.
e) With your JamCam plugged in, go to the Edit
menu and scroll down to “Capture Picture.”
,Version 4.0 or later, you can
sm
service
Page 14

12
f)Check the Settings to make sure that JamCam 3.0
is the selected Twain source, and click on the
Capture button.
g)This will open the JamCam Viewer window.
See pages 6 and 7 for details.
h)Send a picture into the AOL Capture Picture
window by double-clicking on the thumbnail or
highlighting the thumbnail and clicking on
“Download Picture."
i)From the the Settings menu, choose Save As.
A save window will pop up. Choose location
for saving your pictures, type in a file name, and
click “Save.”
j)Back on the
My Albums
window, type
in the name for your album – you can upload to
an existing album or create a new one.
k)Click on the Browse button
and locate the saved images
from Step i. Highlight an image and click OK.
l)Click on the “upload picture”
button. Your photo is now
stored online.
Photo Sharing
1. jamonline.com
In the JamCam software, click on the Share Photo
button. This will launch your Internet browser to
jamcam.jamonline.com (modem users may need
to establish a dial-up connection). Here you can
link to the JamCam photo sharing site “Powered by
Shutterfly.”
If you do not have an account, you can start one
for free! Follow the easy sign-up instructions to get
started. In order to import JamCam 3.0 pictures into
your photo sharing site, follow the online instructions.
Note: Your photo sharing site is private and cannot be accessed
by outsiders without a password. If you want to share these
with friends and family, tell or e-mail them the web site location.
2. “You’ve Got Pictures”
Yo u learned how to upload photos to “You’ve Got
Pictures” for easy storage. You can also use this
service to share your photos with family and friends.
If you do not have AOL, the JamCam 3.0 package
features a Free Trial version of AOL. The free trial is
located on the JamCam 3.0 CD.
1. Follow the instructions for uploading your
photos to “You’ve Got Pictures.”
sm
Page 15

13
2. Click on the “You’ve Got Pictures” film icon on
the welcome screen and select the “My Albums”
tab. Locate the album containing the photo or
photos you uploaded and want to share.
3. You can e-mail your photos individually or share
the entire album. Customize your photo albums
by adding a title, captions and a custom background
color and layout.
Ordering High-Quality Prints
Another easy and exciting way to share your JamCam 3.0
pictures is by ordering high-quality prints of your
digital pictures at the JamCam 3.0 web site “Powered
by Shutterfly.” From your JamCam 3.0 software, click
on the Print button and then Order Prints Online.
This will take you to jamcam.jamonline.com (modem
users may need to establish a dial-up connection).
Follow the easy instructions for uploading and
choosing which photos you want to order. You will
also need to specify the mailing address(es), number
of copies, and the message or greeting you want
printed on the back of the photo(s). Within 24 hours,
your high-quality prints from your JamCam 3.0 photos
will be shipped.
E-mailing
It is easy to e-mail your JamCam 3.0 pictures to family
and friends. Attaching an image is usually done through
an “Insert Picture” or “Attach” command, depending on
your e-mail provider. Consult your e-mail provider for help.
America Online
You can also use AOL e-mail to share pictures
(remember if you want to store your pictures online,
or create online photo albums, you must first upload
your pictures to “You’ve Got Pictures”).
1. From the AOL start-up screen,
click on the Write Mail button.
2. In the pop-up e-mail
screen, click on the
Camera icon and choose
Insert a Picture.
3. Now, type in the recipient’s
address, a subject,
and any message
you wish to send
with the picture.
4. Click Send Now.
Page 16

Special Macintosh Section
14
Step 1: Installing the software
The first thing you’ll need to do is install the camera
driver and photo editing software from the CD.
1. Place the CD into the CD-ROM drive.
2. Double-click on the JamCam 3.0 CD
icon to open it.
3. Double-click on the
Installer icon, and the
the following screen
will appear.
4. Click Continue and
the next screen
will appear.
5. Choose Install and
follow any further
instructions.
Step 2: Connecting the JamCam 3.0 to
your computer
USB
Port
on your
computer
To JamCam 3.0
Step 3: Loading your pictures
Now you are now ready to load your JamCam 3.0
pictures onto your computer. Make sure that your
JamCam 3.0 is on during this process.
1. Open the hard drive,
open the JamCam folder,
and click on JamCam.
2. The JamCam 3.0 application screen will appear.
3. Click on the Get Photo button.
4. In the pop-up window,
click on the From
JamCam 3.0 button.
5. The following screen
will appear before you
download your pictures.
Pick a lighting setting
(sunny, cloudy, home,
office,or flash) that best
suits the pictures you
are going to download.
Also, choose a
sharpening level for
the images.
Page 17

A low sharpening number will make the pictures
15
look fuzzy while a high sharpening number will
make the pictures look pixilated. We recommend
that you download at a couple of different settings
to see the results.
Click Done when you are ready. Your pictures
will now upload into the JamCam 3.0 software.
7. Double-click on an
image to send it into
the JamCam 3.0
software. The JamCam
Viewer window will
stay open until you
close it, so that you
can open as many
pictures as you would like. All of the pictures you
have downloaded are now in thumbnail form in
the JamCam 3.0 software.
Also, your JamCam 3.0 pictures have now been
automatically saved in a My Jams folder on your
hard drive (think of this folder as your set of
negatives). The assigned image name is noted under
each thumbnail. To change the name or to save in
a different location, highlight an image and hit the
Save Photo button. ( Mac users now go to
page 8 further instructions.)
Additional battery and safety instructions
• To insert, remove, and replace the battery,see the instructions on the inside cover.
• An alkaline battery is recommended
• Batteries are to be inserted with the correct polarity
• Exhausted batteries are to be removed from the camera
• The supply terminals are not to be short-circuited
• The packaging and the user's guide should be kept since they contain
important information.
• Non-rechargeable batteries are not to be recharged.
Copyright © 2000 KB Gear Interactive. All rights reserved.
KB Gear Interactive makes no representation or warranties with regard to the
contents of this manual, and specifically disclaims the warranty of merchantability,
non-infringements, and fitness or suitability of the product for any particular
purpose and all other express, implied, or statutory warranties. The KB Gear
Interactive Limited Warranty is your exclusive warranty and remedy for defects.
Please see the Limited Warranty for details.
KB Gear Interactive reserves the right to make changes to the software,
documentation, and specifications without an obligation to notify any persons
about such revisions or changes.The software described in this manual is
furnished under a license agreement and may be used or copied only
in accordance with the terms of the license agreement.
Questions or comments regarding these products or documentation should
be directed to:
KB Gear Interactive
10250 Valley View Rd., Suite 137
Eden Prairie, MN 55344
JamCam 3.0 is a trademark of KB Gear Interactive, Inc. Windows and Microsoft
are registered trademarks of Microsoft Corporation in the U.S.and /or other
countries. Pentium is a registered trademark of Intel Corporation. SanDisk and
the SanDisk logo are registered trademarks of Sandisk Corporation.
Adobe PhotoDeluxe is a registered trademark of Adobe Systems Incorporated.
Mac and Macintosh are trademarks of Apple Computer, Inc., registered in the U.S.
and other countries. America Online ,AOL, and the Triangle Logo are registered
service marks of America Online, Inc.
All other trademarks are the properties of their respective owners.
JamCam 3.0
Silver SKU - KG-JC3S
Blue SKU - KG-JC3B
P/N 00246C
Page 18

Limited Warranty
16
KB GEAR INTERACTIVE MAKES NO REPRESENTATIONS OR WARRANTIES,
EXPRESSED OR IMPLIED, INCLUDING WARRANTIES OF MERCHANTABILITY,
NON-INFRINGEMENT, AND FITNESS FOR A PARTICULAR PURPOSE,EXCEPT
AS PROVIDED BELOW.
HARDWARE – KB Gear Interactive warrants to the original purchaser that its
product is free of defect in design, materials, and workmanship for one year after
the date of purchase of the product. KB Gear Interactive (or its authorized repair
center), at its option,will repair or replace, at the business location of KB Gear
Interactive, each part of the product which is proven to the satisfaction of
KB Gear Interactive to have been defective in design,material, or workmanship.
This warranty shall not apply to any part of the product that, in the judgment of
KB Gear Interactive, has been subjected to misuse, negligence, alteration, accident,
improper maintenance, or damage by excessive physical or electrical stress.
Adjustment of the product, where warning labels and operation manuals warn
against such adjustment, will void this warranty. This warranty is void if the serial
number of the product has been defaced, altered, or removed. This warranty
does not apply to components such as cables or cable adapters. Repair and
replacement parts will be furnished on an exchange basis and may be either
reconditioned or new. All replaced parts or products become property of
KB Gear Interactive.
SOFTWARE – KB Gear Interactive warrants that for a period of sixty (60) days
from the date of delivery to you as evidenced by a copy of your receipt, the CD
on which the program is furnished will, under normal use, be free of defect in
materials and workmanship. If KB Gear Interactive receives notification within
warranty period of defects in materials or workmanship, and such notification is
determined by KB Gear Interactive to be correct, KB Gear Interactive will replace
the defective CD or documentation.
KB Gear Interactive's entire liability and your exclusive remedy under this
warranty (which is subject to you returning the program to KB Gear Interactive
or an authorized dealer with a copy of your receipt) will be limited to the
replacement of defective CD(s) or documentation and shall not include or extend
to any claim for or right to recover any other damages,including, but not limited to,
loss of profit, data, or use of the software, or special, incidental, or consequential
damages or other similar claims, even if KB Gear Interactive has been specifically
advised of the possibility of such damages. In no event will KB Gear Interactive's
liability for any damages to you or any other person ever exceed the lower of
suggested list price or actual price for the license to use the software, regardless
of any form of claim.
KB Gear Interactive reserves the right to make changes to its software,
documentation, and specifications without any obligation to notify any persons
about such revisions or changes. The software described in this manual is
furnished under a license agreement and may be used or copied only in accordance
with the terms of that license agreement.
THE SOLE REMEDY FOR BREACH OF WARRANTY SHALL BE REPAIR OR
REPLACEMENT, AT THE OPTION OF KB GEAR INTERACTIVE, OF THE
DEFECTIVE PRODUCT.
End User Agreement
PLEASE READ THIS LICENSE CAREFULLY BEFORE USING THIS SOFTWARE.
By using this software, you are agreeing to be bound by all terms of this License.
If you do not agree to the terms of this License, promptly return the unused software
and its complete packaging to the retailer who sold it to you for a full refund.
LICENSE – In consideration of payment of the License fee, which is a portion of
the price you paid, the software, including any images incorporated in or generated
by the software, and data accompanying this License (the “Software”) and related
documentation are licensed (not sold) to you by KB Gear Interactive. KB Gear
Interactive does not transfer title to the software to you; this License shall not be
considered a “sale” of the Software. You own the CD-ROM on which the
Software is recorded, but KB Gear Interactive retains full and complete title to the
Software on the CD-ROM and the accompanying documentation, and all intellectual
and industrial property rights therein. This non-exclusive and personal License
gives you the right to use and display this copy of the Software. You must
treat the Software like any other copyrighted material except that you may either
(a) make one copy of the Software solely for backup or archival purposes, or
(b) install and use the Software on the hard disk drive of a single computer
provided you keep the original solely for backup or archival purposes.
You may not copy the written material accompanying the Software.
RESTRICTIONS – The Software contains copyrighted material, trade secrets, and
other proprietary material. You may not re-sell, decompile, reverse engineer,
disassemble, or otherwise reduce the Software to a human-perceivable form.
Except as provided for in this License, you may not copy, modify, network,rent,
lease, or otherwise distribute the Software;nor can you make the Software available
by "bulletin boards," on-line services, remote dial-ins, or network or
Page 19

telecommunications links of any kind; nor can you create derivative works or any
17
other works that are based upon or derived from the Software in whole or in
part. Within the terms of this License agreement, you may transfer all of the
license rights to the Software to another party, provided that the original CD-ROM
containing the Software, the related documentation, all copyright notices,and a
copy of this License are transferred to that party, and provided that party reads
and agrees to accept the terms and conditions of this License. If you transfer the
Software, you must remove the Software from your hard disk drive and you may
not retain any copies of the Software for your own use.
LIMITATION OF LIABILITY – Under no circumstances, including negligence, shall
KB Gear Interactive be liable for any special or consequential damages that result
from the use of, or the inability to use, the software or related documentation,
even if KB Gear Interactive or a KB Gear Interactive authorized representative
has been advised of the possibility of such damages. Some jurisdictions do not
allow the limitation or exclusion of liability or incidental or consequential
damages, so the above limitation or exclusion may not apply to you. In no
event shall KB Gear Interactive's total liability to you for all damages, losses, and
causes of action (whether in contract, tort [including negligence] or otherwise)
exceed the amount paid by you for the Software.
GOVERNING LAW AND SEVERABILITY – The License shall be governed by and
construed in accordance with the laws of the State of Minnesota, without giving effect
to any principles of conflicts of law. If any provision of this License shall be unlawful,
void, or for any reason unenforceable, then that provision shall be deemed severable
from this License and shall not affect the validity and enforceability of any remaining provisions. This entire agreement between the parties relates to the subject
matter herein and shall not be modified except in writing, signed by both parties.
TWAIN License
The TWAIN Toolkit is distributed as is. The developer and distributors of the
TWAIN Toolkit expressly disclaim all implied,express or statutory including, without
limitation, the implied warranties of merchantability, noninfringement of third party
rights and fitness for a particular purpose. Neither the developers nor the
distributors will be liable for damages, whether direct, indirect,special, incidental,
or consequential, as a result of the reproduction, modification,distribution or
other use of the TWAIN Toolkit.
Under the environment with electrostatic charge, the camera may malfunction
and require the user to reset the camera.
FCC Statement
FCC CLASS B STATEMENT
FEDERAL COMMUNICATIONS COMMISSION
RADIO FREQUENCY INTERFERENCE STATEMENT (U.S.A. ONLY)
Please note that changes or modifications to the camera not approved by
KB GEAR INTERACTIVE could void your authority to operate this equipment.
This equipment generates a user radio frequency energy and, if not installed
and used properly in strict accordance with the manufacturer's instructions,
may cause interference to radio and television reception.
It has been type-tested and found to comply with the limits for Class B computing
devices in accordance with subpart B of Part 15 of FCC Rules, which are designed
to provide reasonable protection against such interference in a residential installation.
However, there is no guarantee that interference will not occur in a particular
installation. If this equipment does cause interference to radio or to television
reception, which can be determined by turning the equipment off and on, the user
is encouraged to try to correct the interference by doing one or more of the
following: • Reorient the receiving antenna.
• Relocate the computer with respect to the receiver.
• Move the computer away from the receiver.
• Plug the computer into a different outlet so the computer
and receiver are on different branch circuits.
If necessary, the user should consult the dealer or an experienced
radio/television technician for additional suggestions. The user may find the
following booklet prepared by the Federal Communications Commission helpful:
“How to Identify and Resolve Radio-TV Interference Problems” This booklet is
available from the U.S. Government Printing Office,Washington, D.C. 20402, Stock
No. 004-000-002345-4.
To achieve compliance with the FCC Rules regarding radio emissions from host
computers (in those versions of this equipment labeled Class B compliant)
the following is needed:A shielded interface cable within 1.9 M / 5.9 feet.
UL - This product is for use with UL listed computers.
Page 20

Customer Support
System Requirements
We appreciate your business and would like to do
everything possible to enhance your JamCam 3.0
experience. Should you encounter any problems or
questions, please contact KB Gear first so that we
can help you.
1. Use KB Gear Interactive Web Site
http://www.jamonline.com
Our web site offers extensive answers
•
to “Frequently Asked Questions” and
downloads to the latest drivers.
2. E-mail KB Gear Interactive
http://jamcam.jamonline.com
Go to the web site and refer to the JamCam 3.0
•
support page for e-mail information.
If you continue to have issues and concerns,
KB Gear Customer Support Representatives
are available at:1-612-253-4528.
We believe our customers are our most important
resource. Please register at register.jamonline.com/jamcam
to receive important
information and
special offers from
KB Gear Interactive.
www.kbgear.com
9 V battery (not included)
•
PC Requirements
Microsoft®Windows®95, 98 or ME
•
Intel®Pentium®or CeleronTMProcessor,
•
233MHz or faster (or equivalent)
USB port enabled or
•
9-pin serial port enabled
32 MB of RAM
•
150 MB free hard disk space
•
Quad speed (4x) CD-ROM drive
•
800 x 600 display, 16-bit color
•
Macintosh Requirements
Mac OS 8.5.1 or above
•
(8.6 recommended)
USB port enabled
•
32 MB of RAM
•
90 MB free hard disk space
•
Quad speed (4x) CD-ROM drive
•
800 x 600 display, 16-bit color
•
Printed in China 09/00
 Loading...