

Page 1

-
4
LCS
L-Band Combiner Switch
Installation and Operation Manual
Part Number MN/LCS4.IOM Revision 1
Page 2

Page 3

Comtech EF Data is an ISO
9001 Registered Company.
LCS-4
L-Band Combiner Switch
Installation and Operation Manual
Part Number MN/LCS4.IOM
Revision 1
February 2, 2006
Comtech EF Data, 2114 West 7th Street, Tempe, Arizona 85281 USA, (480) 333-2200, FAX: (480) 333-2161.
Copyright © Comtech EF Data, 2006. All rights reserved. Printed in the USA.
Page 4

Customer Support
Contact the Comtech EF Data Customer Support Department for:
• Product support or training
• Information on upgrading or returning a product
• Reporting comments or suggestions concerning manuals
A Customer Support representative may be reached at:
Comtech EF Data
Attention: Customer Support Department
2114 West 7th Street
Tempe, Arizona 85281 USA
480.333.2200 (Main Comtech EF Data Number)
480.333.4357 (Customer Support Desk)
480.333.2161 FAX
Or, E-Mail can be sent to the Customer Support Department at:
service@comtechefdata.com
Contact us via the web at www.comtechefdata.com
To return a Comtech EF Data product (in-warranty and out-of-warranty) for repair or
replacement:
1. Request a Return Material Authorization (RMA) number from the Comtech EF
Data Customer Support Department.
2. Be prepared to supply the Customer Support representative with the model
number, serial number, and a description of the problem.
3. To ensure that the product is not damaged during shipping, pack the product in
its original shipping carton/packaging.
4. Ship the product back to Comtech EF Data. (Shipping charges should be
prepaid.)
For more information regarding the warranty policies, see Warranty Policy, p. xi.
.
ii
Page 5

Table of Contents
CHAPTER 1. INTRODUCTION .............................................................................................1–1
1.1 Introduction....................................................................................................................................... 1–1
1.2 Functional Description .....................................................................................................................1–2
1.3 Features.............................................................................................................................................. 1–4
1.4 Optional Items...................................................................................................................................1–4
1.5 External BUC/LNB Fault Input ................................................................................................1–5
CHAPTER 2. INSTALLATION ..............................................................................................2–1
2.1 Unpacking..........................................................................................................................................2–1
Unpack the LCS-4 as follows: .................................................................................................................. 2–1
2.2 Mounting............................................................................................................................................ 2–2
iii
Page 6

LCS-4 L-Band Combiner Switch Revision 1
Preface MN/LCS4.IOM
CHAPTER 3. SYSTEM OPERATION....................................................................................3–1
3.1 Coaxial Connectors........................................................................................................................... 3–1
3.2 Multi-Pin Connector Pinout............................................................................................................. 3–2
3.3 Remote Port Connector.................................................................................................................... 3–2
3.4 Fault and Online Status Connector................................................................................................. 3–3
3.5 (Future Option) Modulator Faults and TX On/Off Connector .................................................... 3–4
CHAPTER 4. LOW NOISE BLOCK ASSEMBLY .................................................................4–1
4.1 General............................................................................................................................................... 4–1
4.2 Options............................................................................................................................................... 4–2
4.3 Redundant C-Band LNB Installation .............................................................................................4–2
4.3.1 Tools Required.............................................................................................................................4–2
4.3.2 C-Band LNB Mounting Kits........................................................................................................ 4–2
4.3.3 Assemble Redundant C-Band LNB .............................................................................................4–3
4.3.4 C-Band LNB Installation .............................................................................................................4–6
4.4 Ku-Band LNB Installation ............................................................................................................... 4–7
4.4.1 Tools Required.............................................................................................................................4–7
4.4.2 Ku-Band LNB Mounting Kits...................................................................................................... 4–7
4.4.3 Assemble Redundant Ku-Band LNB........................................................................................... 4–8
4.4.4 Ku-Band LNB Installation ......................................................................................................... 4–10
4.5 Settings (LNB) Lo, Mix and Spectrum.......................................................................................... 4–11
4.5.1 C-Band ....................................................................................................................................... 4–11
4.5.2 Ku-Band..................................................................................................................................... 4–11
CHAPTER 5. BLOCK UP CONVERTER .............................................................................5–1
5.1 General............................................................................................................................................... 5–1
5.2 C-Band Redundant BUC Assembly Procedure.............................................................................. 5–1
5.2.1 Assemble Waveguide Switch Kit, AS/9528-1............................................................................. 5–2
5.2.2 Assemble BUC Mounting Kit (KT/9826-1) ................................................................................5–3
5.3 Ku-Band Redundant BUC Assembly Procedures.......................................................................... 5–4
5.3.1 Assemble Waveguide Switch Kit, PL/9527-1 .............................................................................5–4
5.3.2 Assemble Ku-Band Redundant BUCs .........................................................................................5–5
5.4 LO, MIX and Spectrum Settings ..................................................................................................... 5–7
5.4.1 C-Band ......................................................................................................................................... 5–7
5.4.2 Ku-Band....................................................................................................................................... 5–8
iv
Page 7

LCS-4 L-Band Combiner Switch Revision 1
Preface MN/LCS4.IOM
5.5 Single-Thread BUC Installation....................................................................................................... 5–9
5.5.1 Tools Required.............................................................................................................................5–9
5.5.2 Mounting Kits ..............................................................................................................................5–9
5.6 Installation....................................................................................................................................... 5–11
CHAPTER 6. CABLE INSTALLATION ................................................................................. 6–1
6.1 Introduction....................................................................................................................................... 6–1
6.2 Single Configuration Cable Installation .........................................................................................6–2
6.3 Redundant Configuration Cable Installation.................................................................................6–3
CHAPTER 7. FRONT PANEL CONTROL ............................................................................7–1
7.1 Introduction....................................................................................................................................... 7–1
7.2 Description.........................................................................................................................................7–1
7.2.1 BUC Control ................................................................................................................................7–2
7.2.2 LNB Control ................................................................................................................................7–3
7.2.3 Current Calibration ......................................................................................................................7–4
7.2.4 Redundancy Mode ....................................................................................................................... 7–4
7.2.5 LED Conditions ...........................................................................................................................7–5
7.3 Operation........................................................................................................................................... 7–6
7.3.1 AUTO / MAN Operation .............................................................................................................7–6
7.3.2 CAL Switch and LED Operation ................................................................................................. 7–6
7.3.3 LNB Voltage/Current Turn ON ...................................................................................................7–7
7.3.4 ODU/BUC or LNB Online Switch ..............................................................................................7–7
7.4 Fault Definitions for Switchover for LNB or ODU/BUC .............................................................. 7–7
APPENDIX A. REMOTE CONTROL OPERATION...................................................................1
A.1 description............................................................................................................................................. 1
A.1.1 EIA-485........................................................................................................................................... 1
A.1.2 EIA-232........................................................................................................................................... 2
A.2 Basic Protocol ....................................................................................................................................... 2
A.2.1 Packet Structure ..............................................................................................................................3
A.3 Commands or Responses..................................................................................................................... 6
APPENDIX B. SPECIFICATIONS ............................................................................................. 1
B.1 General Specification ...........................................................................................................................1
B.2 Environmental and Physical Specifications ....................................................................................... 3
v
Page 8

LCS-4 L-Band Combiner Switch Revision 1
Preface MN/LCS4.IOM
Figures
Figure 1-1. LCS-4 L-Band Combiner Switch.....................................................................................1–2
Figure 1-2. L-Band Multi-Modem Module Block Diagram (Redundancy) ......................................... 1–3
Figure 2-1. Typical Installation of the Optional Mounting Bracket, KT/6228-1 .................................2–3
Figure 3-1. Rear Panel......................................................................................................................3–1
Figure 4-1. C-Band Redundant LNB (KT/9526-1). ...........................................................................4–3
Figure 4-2. Switch Port Locations. ....................................................................................................4–4
Figure 4-3. C-Band LNB Switch........................................................................................................4–5
Figure 4-4. Ku-Band Redundant LNB (KT/10176-1)......................................................................... 4–8
Figure 4-5 Switch Port Locations .....................................................................................................4–9
Figure 4-6. Ku-Band LNB Switch ...................................................................................................... 4–9
Figure 5-1. Mounting Kit, KT/9928-1...............................................................................................5–10
Figure 6-1. Single Configuration Cable Installation ..........................................................................6–3
Figure 6-2. Redundant Configuration Cable Installation...................................................................6–5
Figure 7-1. LCS-4 Front Panel..........................................................................................................7–1
Tables
Table 3-1. Coaxial Connectors..........................................................................................................3–1
Table 3-2. Multi-Pin Connector Pinout .............................................................................................. 3–2
Table 3-3. Multi-Pin Connector Pinout .............................................................................................. 3–2
Table 4-1. For C-Band: LO and MIX Information for Demodulator and LNB..................................4–11
Table 4-2. For Ku-Band: LO and MIX Information for Demodulator and LNB ................................4–11
Table 5-1. LO, MIX, and MOD Spectrum Settings for Modulator and BUC...................................... 5–7
Table 5-2. LO, MIX, and MOD Spectrum Settings for Modulator and BUC...................................... 5–8
Table 5-3. Optional: C-Band Mounting Kit, KT/5738-1 (BUC to OMT) ............................................. 5–9
Table 5-4. Optional: Ku-Band Mounting Kit, KT/8924-1 (BUC to OMT) ...........................................5–9
Table 7-1. Fault Definitions for Switchover for LNB or ODU / BUC ..................................................7–7
Table B-1. General Specifications ................................................................................................... B–1
Table B-2. Environmental and Physical Specification ..................................................................... B–3
vi
Page 9
LCS-4 L-Band Combiner Switch Revision 1
Preface MN/LCS4.IOM
About this Manual
This manual provides installation and operation information for the Comtech EF Data
LCS-4 L-Band Combiner Switch. This is a technical document intended for earth station
engineers, technicians, and operators responsible for the operation and maintenance of
the LCS-4.
Conventions and References
Cautions and Warnings
CAUTION indicates a hazardous situation that, if not avoided, may result in
minor or moderate injury. CAUTION may also be used to indicate other
CAUTION
WARN ING
unsafe practices or risks of property damage.
WARNING indicates a potentially hazardous situation that, if not avoided,
could result in death or serious injury.
IMPORTANT indicates a statement that is associated with the task
IMPORTANT
being performed.
Metric Conversion
Metric conversion information is located on the inside back cover of this manual. This
information is provided to assist the operator in cross-referencing English to Metric
conversions.
Trademarks
Other product names mentioned in this manual may be trademarks or registered
trademarks of their respective companies and are hereby acknowledged.
Reporting Comments or Suggestions Concerning this Manual
Comments and suggestions regarding the content and design of this manual will be
appreciated. To submit comments, please contact:
Comtech EF Data Technical Publications Department: techpub@comtechefdata.com
vii
Page 10

LCS-4 L-Band Combiner Switch Revision 1
Preface MN/LCS4.IOM
ELECTRICAL SAFETY
The LCS-4 has been shown to comply with the following safety standard:
• EN 60950: Safety of Information Technology Equipment, including electrical business
machines.
The equipment is rated for operation over the range 100 - 240 volts AC. It has a maximum
power consumption of 2.9 amps.
FUSES
The LCS-4 is fitted with two fuses, one each for line and neutral connections. These are contained
within the body of the IEC power connector, behind a small plastic flap. For 115 and 130 volt AC
operation, use T3, 15A, TO.75A, 20mm fuses.
IMPORTANT
Environmental
The LCS-4 shall not be operated in an environment where the unit is exposed to extremes
of temperature outside the ambient range 0 to 50°C (32 to 122°F), precipitation,
condensation, or humid atmospheres above 95% RH, altitudes (un-pressurized) greater
than 2000 meters, excessive dust or vibration, flammable gases, corrosive or explosive
atmospheres.
Operation in vehicles or other transportable installations that are equipped to provide a
stable environment is permitted. If such vehicles do not provide a stable environment,
safety of the equipment to EN60950 may not be guaranteed.
For continued operator safety, always replace the fuses with the
correct type and rating.
viii
Page 11
LCS-4 L-Band Combiner Switch Revision 1
Preface MN/LCS4.IOM
Installation
The installation and connection to the line supply must be made in compliance to local or
national wiring codes and regulations.
The LCS-4 is designed for connection to a power system that has separate ground, line
and neutral conductors. The equipment is not designed for connection to power system
that has no direct connection to ground.
The LC-4 is shipped with a line inlet cable suitable for use in the country of operation. If
it is necessary to replace this cable, ensure the replacement has an equivalent
specification. Examples of acceptable ratings for the cable include HAR, BASEC and
HOXXX-X. Examples of acceptable connector ratings include VDE, NF-USE, UL, CSA,
OVE, CEBEC, NEMKO, DEMKO, BS1636A, BSI, SETI, IMQ, KEMA-KEUR and
SEV.
International Symbols:
Symbol Definition Symbol Definition
~
Alternating Current
Fuse
Telecommunications Terminal Equipment Directive
In accordance with the Telecommunications Terminal Equipment Directive 91/263/EEC,
this equipment should not be directly connected to the Public Telecommunications
Network.
Protective Earth
Chassis Ground
ix
Page 12

LCS-4 L-Band Combiner Switch Revision 1
Preface MN/LCS4.IOM
EMC (Electromagnetic Compatibility)
In accordance with European Directive 89/336/EEC, the LCS-4 has been shown, by
independent testing, to comply with the following standards:
Emissions: EN 55022 Class B - Limits and methods of measurement of radio interference
characteristics of Information Technology Equipment.
(Also tested to FCC Part 15 Class B)
Immunity: EN 50082 Part 1 - Generic immunity standard, Part 1: Domestic, commercial
and light industrial environment.
Additionally, the LCS-4 has been shown to comply with the following standards:
EN 61000-3-2 Harmonic Currents Emission
EN 61000-3-3 Voltage Fluctuations and Flicker
EN 61000-4-2 ESD Immunity
EN 61000-4-4 EFT Burst Immunity
EN 61000-4-5 Surge Immunity
EN 61000-4-6 RF Conducted Immunity
EN 61000-4-8 Power frequency Magnetic Field Immunity
EN 61000-4-9 Pulse Magnetic Field Immunity
EN 61000-4-11 Voltage Dips, Interruptions, and Variations Immunity
EN 61000-4-13 Immunity to Harmonics
In order that the Modem continues to comply with these standards,
observe the following instructions:
IMPORTANT
• Connections to the transmit and receive IF ports (Type N and Type F, female,
connectors) should be made using a good quality coaxial cable - for example
RG58/U (50Ω or RG59/U (75Ω).
• All 'D' type connectors attached to the rear panel must have back-shells that
provide continuous metallic shielding. Cable with a continuous outer shield
(either foil or braid, or both) must be used, and the shield must be bonded to the
back shell.
• The equipment must be operated with its cover on at all times. If it becomes
necessary to remove the cover, the user should ensure that the cover is correctly
re-fitted before normal operation commences.
x
Page 13

LCS-4 L-Band Combiner Switch Revision 1
Preface MN/LCS4.IOM
Warranty Policy
This Comtech EF Data product is warranted against defects in material and workmanship
for a period of 24 months from the date of shipment. During the warranty period,
Comtech EF Data will, at its option, repair or replace products that prove to be defective.
For equipment under warranty, the customer is responsible for freight to Comtech EF
Data and all related custom, taxes, tariffs, insurance, etc. Comtech EF Data is
responsible for the freight charges only for return of the equipment from the factory to
the customer. Comtech EF Data will return the equipment by the same method (i.e., Air,
Express, Surface) as the equipment was sent to Comtech EF Data.
Limitations of Warranty
The foregoing warranty shall not apply to defects resulting from improper installation or
maintenance, abuse, unauthorized modification, or operation outside of environmental
specifications for the product, or, for damages that occur due to improper repackaging of
equipment for return to Comtech EF Data.
No other warranty is expressed or implied. Comtech EF Data specifically disclaims the
implied warranties of merchantability and fitness for particular purpose.
Exclusive Remedies
The remedies provided herein are the buyer's sole and exclusive remedies. Comtech EF
Data shall not be liable for any direct, indirect, special, incidental, or consequential
damages, whether based on contract, tort, or any other legal theory.
Disclaimer
Comtech EF Data has reviewed this manual thoroughly in order to provide an easy-to-use
guide to your equipment. All statements, technical information, and recommendations in
this manual and in any guides or related documents are believed reliable, but the accuracy
and completeness thereof are not guaranteed or warranted, and they are not intended to
be, nor should they be understood to be, representations or warranties concerning the
products described. Further, Comtech EF Data reserves the right to make changes in the
specifications of the products described in this manual at any time without notice and
without obligation to notify any person of such changes.
If you have any questions regarding your equipment or the information in this manual,
please contact the Comtech EF Data Customer Support Department.
xi
Page 14

LCS-4 L-Band Combiner Switch Revision 1
Preface MN/LCS4.IOM
This page is intentionally left blank.
xii
Page 15

1.1 INTRODUCTION
The LCS-4 L-Band Combiner Switch (Figure 1-1) is available in the following configurations:
• Single Configuration (C-Band, Ku-Band, or L-Band)
• Redundant Configuration (C-Band, Ku-Band, or L-Band)
Procedures provided in this manual are based on utilizing Comtech EF Data
equipment. If other user equipment is utilized, the customer shall obtain the
IMPORTANT
The LCS-4 L-Band Combiner Switch has a 4-way transmit (TX) and Receive (RX) path
combiner/splitter.
• Combines four TX L-Band signals from L-Band modulators for delivery to an Outdoor
• The unit receives an L-Band signal from an LNB and splits it into four outputs for
• The unit provides current monitoring and switch drive capability for a 1:1 BUC/LNB
• The unit provides a 10 MHz reference for two ODU/BUCs and two LNBs. This
• The 10 MHz reference can be provided to four modems.
• FSK signals from one of the four modulators are passed through to the ODU/BUC.
• The unit supports hot swap redundant power supplies for itself and the ODU/BUC.
• Redundant, but not swappable, LNB power is developed internally.
• Redundant, but not swappable, power is internally generated for the ODU/BUC and LNB
documentation required to operate with the LCS-4 L-Band Combiner Switch.
Unit (ODU) or Block Up Converter (BUC).
delivery to four L-Band demodulators.
system
eliminates the need for a high stability reference in the L-Band modem.
switch drivers.
Chapter 1. INTRODUCTION
1–1
Page 16
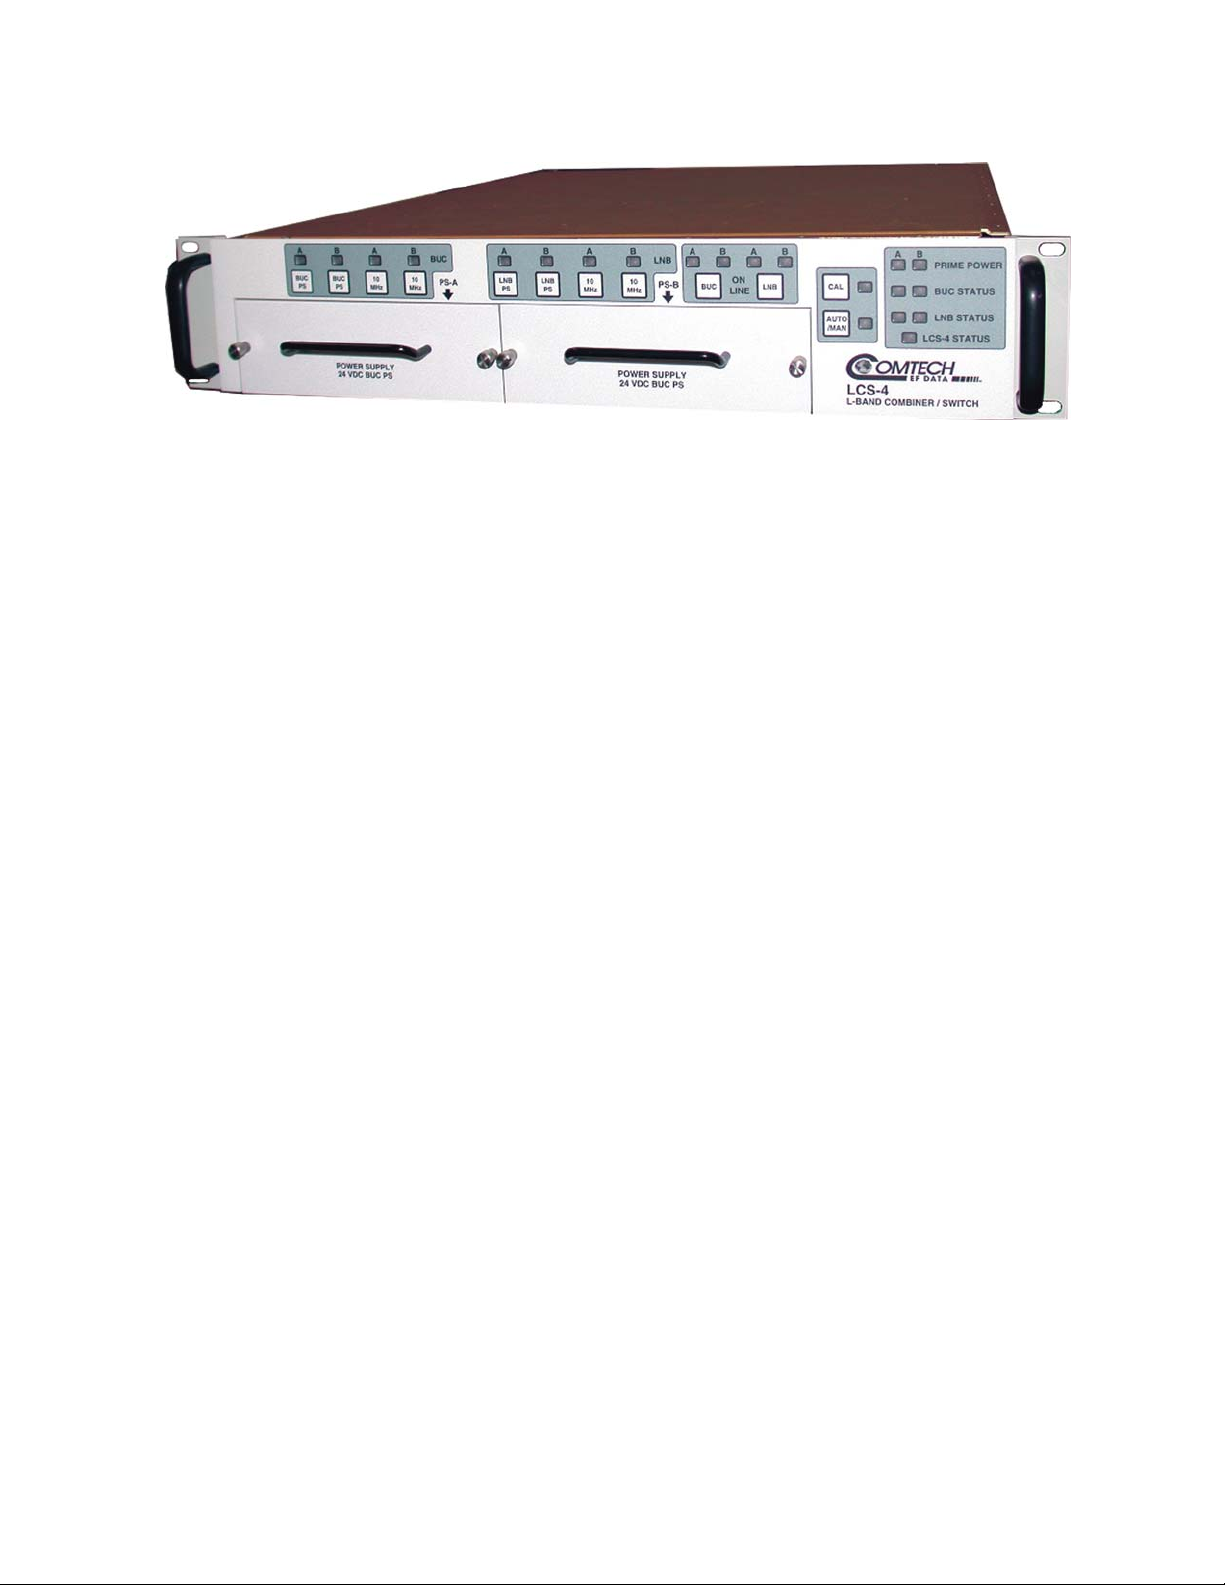
LCS-4 L-Band Combiner Switch Revision 1
Introduction MN/LCS4.IOM
Figure 1-1. LCS-4 L-Band Combiner Switch
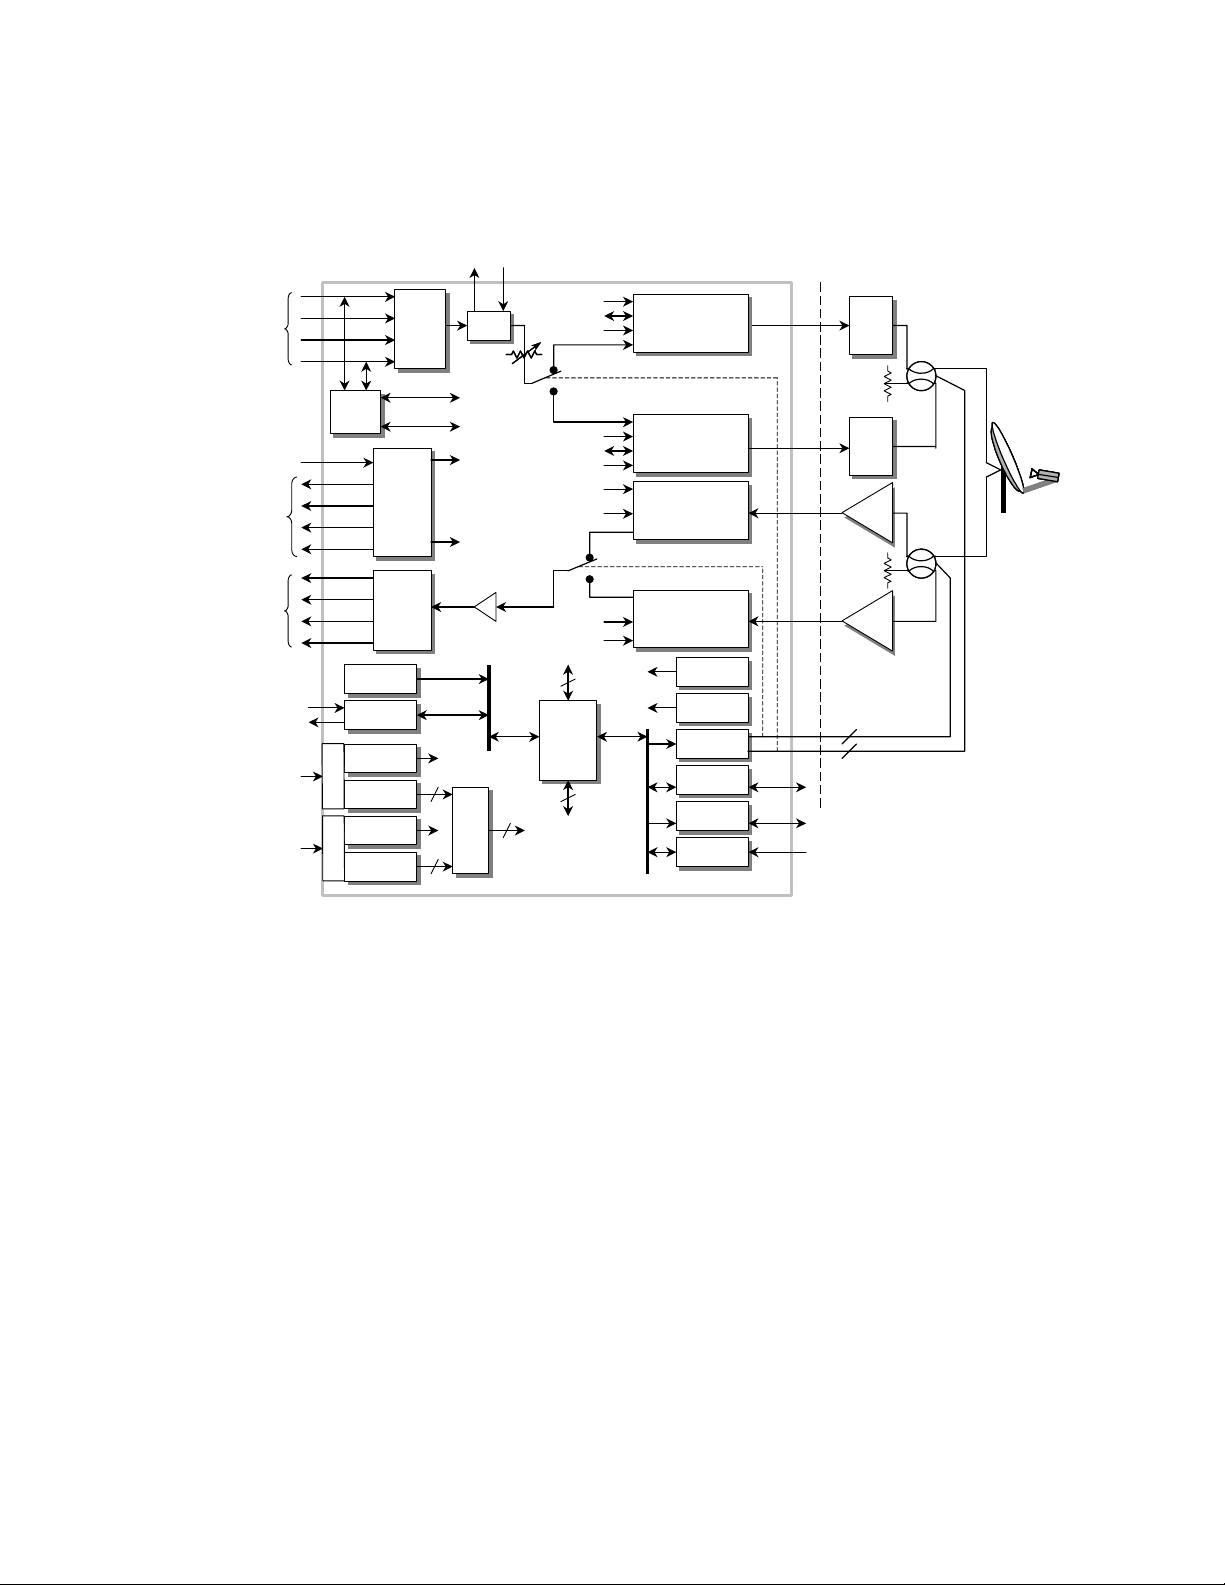
1.2 FUNCTIONAL DESCRIPTION
On the TX-side, the TX signals of up to four modems are combined. The combined output is
transmitted to one of the two outputs that feed an antenna system. Each TX output provides a
10 MHz BUC reference signal, a BUC power supply, and FSK communications. Each 10 MHz
BUC reference and power supply has an independent On/Off control. Figure 1-2 shows a block
diagram of the unit.
On the RX-side, one of the two antenna systems feed a splitter. The splitter outputs provide the
RX signal for up to four modem receivers. Each RX input provides a 10 MHz LNB reference
signal, a LNB power supply, and DESQ communications. Each 10 MHz LNB reference and
power supply has an independent On/Off control. The L-Band Multi-Modem has redundant
internal power supplies, BUC power supplies, and LNB power supplies. L-Band Multi-Modem
Module also provides a driver for an RF (baseball) switch.
1–2
Page 17
LCS-4 L-Band Combiner Switch Revision 1
Introduction MN/LCS4.IOM
UPC Interface
L-Band
Modulators
4 x Type N
10 MHz
10 MHz
To
Modems
L-Band
Demodulators
4 x Type F
Remote
Port
Prime
Power A
Prime
Power B
Ext
FSK
FSK
Select
Select
Monitors
Monitors
485 / 232
485 / 232
p
BUC PS A
a
BUC PS A
w
S
t
o
Unit PS A
H
Unit PS A
p
BUC PS B
a
BUC PS B
w
S
t
o
Unit PS B
H
Unit PS B
Internal FSK
Int / Ext
Int / Ext
10 MHz
10 MHz
VCXO
VCXO
PLL
PLL
L-Band
L-Band
÷
DC Blk
DC Blk
Fan
Fan
Host
Host
L-Band
L-Band
Σ
&
DC Blk
DC Blk
FSK
÷
&
&
Σ
&
SPDT
SPDT
Attenuator
10 MHz A
10 MHz B
Diode
Diode
Or
Or
Tx
BUC PS A
FSK
10 MHz A
BUC PS B
FSK
10 MHz B
LNB PS A
10 MHz A
LNB PS B
10 MHz B
Logic &
Logic &
Control
Control
Front
Panel
LCS-4
DC, FSK, 10 MHz
DC, FSK, 10 MHz
Insertion
Insertion
DC, FSK, 10 MHz
DC, FSK, 10 MHz
Insertion
Insertion
DC, 10 MHz
DC, 10 MHz
Insertion
Insertion
DC, 10 MHz
DC, 10 MHz
Insertion
Insertion
LNB PS A
LNB PS A
LNB PS B
LNB PS B
RF Switch
RF Switch
PS & Driver
PS & Driver
Mod I/O
Mod I/O
Fault Relay
Fault Relay
Status
Status
BUC / LNB
BUC / LNB
Fault Input
Fault Input
BUC A
BUC A
BUC B
BUC B
LNB A
LNB A
LNB B
LNB B
LNB Control
BUC Control
Outdoor
Equipment
& Sense
& Sense
Figure 1-2. L-Band Multi-Modem Module Block Diagram (Redundancy)
1–3
Page 18
LCS-4 L-Band Combiner Switch Revision 1
Introduction MN/LCS4.IOM
1.3 FEATURES
Standard FAST, or Hardware Phase Description
Combiner, Splitter
Hardware 1 Single or dual AC PS for unit or BUC (options)
Standard 1 L-Band Splitting/Combining
Standard 1 Flash of all programmable items via Remote RS-232 port
Standard 1 10 MHz External Reference input
Standard 1 Multiple fans and monitoring
Standard 1 BUC FSK control via modem (pass-though)
Standard 1 FSK driver/receiver hardware on RF card.
Standard 1 High temperature Alarm/Internal temperature report.
Standard 1 Front panel LED/Switch Control and Monitoring.
1:1 Switching Capability 1 Hardware support developed in Phase 1.
Standard 1 BUC/LNB switching
Standard 1 10 MHz sourcing to modems
Note: Separate definition of the ODU/BUC and LNB switches and interconnecting cables are
required for this unit to operate.
1.4 OPTIONAL ITEMS
Option Unit Power Supply ODU/BUC Power Supply Description
0 1 each, Non-redundant AC N/A Standard
1 2 each, Redundant AC N/A Optional
2 2 each, Redundant AC 2 each, 24 VDC 100W Redundant AC Optional
3 2 each, Redundant AC 2 each, 48 VDC 150W Redundant AC Optional
The following optional items are needed for this unit to function as a system.
Connector/Cable Assemblies L-Band IF Cable (Optional)
Outdoor LNB and BUC switch control (Optional)
Modem/Modulator Interconnect
Host (Optional)
ODU/BUC RF Switch Assembly and
Mounting Kits
LNB RF Switch Assembly and
Mounting Kits
PC to FSK BUC Cable For charging address of BUC.
Ku-Band (Optional)
C-Band (Optional)
Ka-Band (Future) (Optional)
Ku-Band (Optional)
C-Band (Optional)
Ka-Band (Optional)
1–4
Page 19

LCS-4 L-Band Combiner Switch Revision 1
Introduction MN/LCS4.IOM
1.5 EXTERNAL BUC/LNB FAULT INPUT
Use of this connector is optional. This connector permits fault inputs from ODU/BUC or
LNB that have fault contacts for fault indication. Normally, this connector is used in
applications where the ODU/BUC power supply or LNB power supply is external to the
LCS-4 to permit a means of indicating a fault to the LCS-4 so that ODU/BUC or LNB
switchover still occurs.
The external fault inputs are enabled in one of two ways:
1. By grounding the BUC Input Enable and /or the LNB Input Enable.
2. Activating the DIP-switches that control the BUC Input Enabled and/or LNB
Input Enable.
J21, 9-pin D Female
Pin # Signal Name
BUCA_FLT
1
BUCB_FLT_BUF
2
BUC_FLT_EN
8
LNBB_FLT
6
LNBB_FLT_BUF
7
LNB_FLT_EN
3
4,5,9 GND GND Ground
Signal
Direction
I
I
I
I
I
I
Description
External BUC A Fault. (Grounded is OK)
External BUC B Fault. (Grounded is OK)
External BUC Fault Input Enable – with
GND
External LNB A Fault (Grounded is OK)
External LNB B Fault (Grounded is OK)
External LNB Fault Input Enable – with
GND
1–5
Page 20

LCS-4 L-Band Combiner Switch Revision 1
Introduction MN/LCS4.IOM
This page intentionally left blank.
1–6
Page 21

Chapter 2. INSTALLATION
2.1 UNPACKING
Inspect shipping containers for damage. If shipping containers are damaged, keep them until the
contents of the shipment have been carefully inspected and checked for normal operation.
The LCS-4 and manual are packaged in pre-formed, reusable, cardboard cartons containing foam
spacing for maximum shipping protection.
Do not use any cutting tool that will extend more than 1 inch into the
container. This can cause damage to the equipment within.
CAUTION
Unpack
the LCS-4 as follows:
1. Cut the tape at the top of the carton indicated by OPEN THIS END.
2. Remove the cardboard/foam space covering the LCS-4.
3. Remove the LCS-4, manual, and power cord from the carton.
4. Save the packing material for storage or reshipment purposes.
5. Inspect the equipment for any possible damage incurred during shipment.
6. Check the equipment against the packing list to ensure the shipment is correct.
7. Refer to the following sections for further installation instructions.
2–1
Page 22

LCS-4 L-Band Combiner Switch Revision 1
Q
Installation MN/LCS4.IOM
2.2 MOUNTING
If the LCS-4 is to be mounted in a rack, ensure that there is adequate clearance for
ventilation, particularly at the sides. In rack systems where there is high heat dissipation,
forced air-cooling must be provided by top and bottom mounted fans or blowers.
UNDER NO CIRCUMSTANCE should the highest internal rack temperature be
allowed to exceed 50°C (122° F).
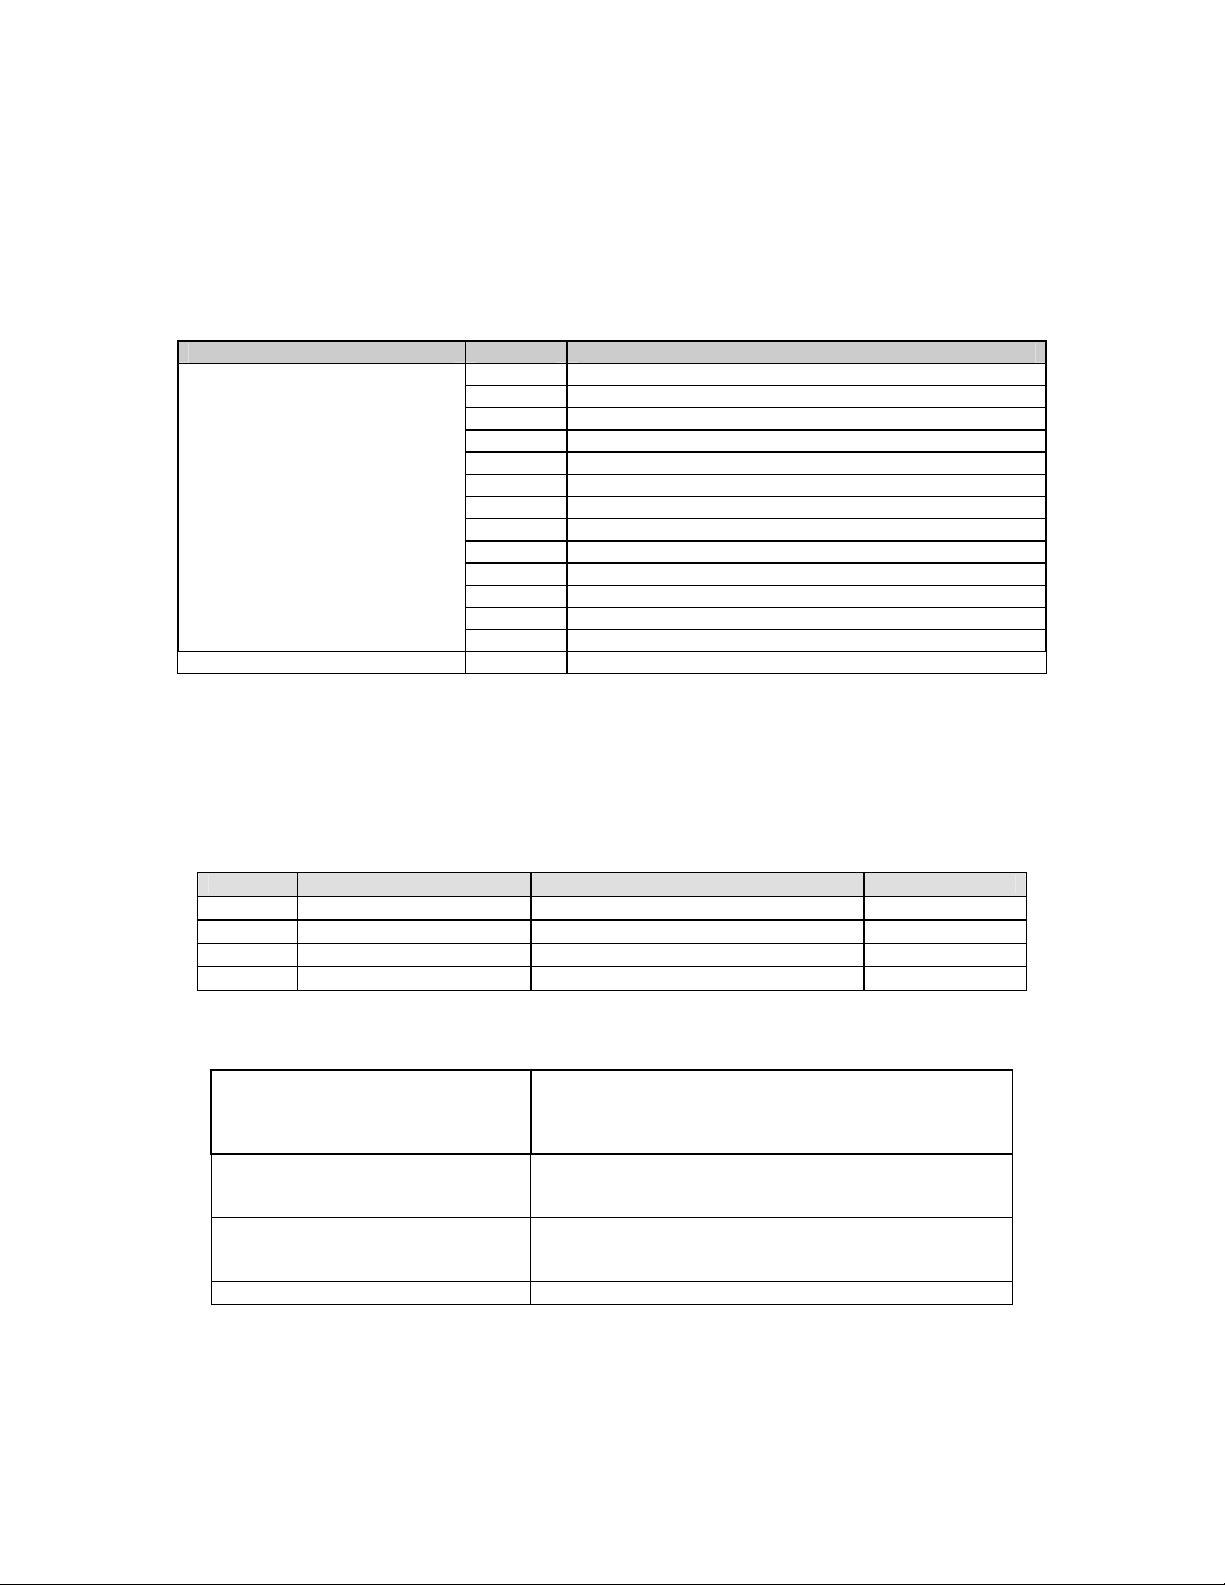
Install optional installation bracket (Figure 2-1) using mounting kit, KT/6228-1.
Optional: Mounting Kit, KT/6228-1
uantity Part Number Description
2 FP/6138-1 Bracket, Rear Support
4 HW/10-32x1/2RK Bolt, #10 Rack
2 HW/10-32HEXNUT Nut, #10 Hex
2 HW/10-32FLT Washer, #10 Flat
2 HW/10-32x1/4SHC Screw, Socket 10-32 x 1/4inch
The tools required for this installation are a medium Phillips screwdriver and a 5/32inch SAE Allen Wrench.
Refer to the Figure 2-1, and then install the LCS-4 rear support brackets as follows:
1. Install the rear support brackets onto the mounting rail of the rack. Fasten with
the bracket bolts.
2. Mount the LCS-4 into the equipment rack ensuring that the socket heads
engage into the LCS-4 slots of the rear support brackets,
3. Fasten the provided #10 socket head screws to the rear-side mounting slots on
either side of the chassis and secure with #10 flat washers and #10 hex nuts.
2–2
Page 23
LCS-4 L-Band Combiner Switch Revision 1
Installation MN/LCS4.IOM
Figure 2-1. Typical Installation of the Optional Mounting Bracket, KT/6228-1
2–3
Page 24

LCS-4 L-Band Combiner Switch Revision 1
Installation MN/LCS4.IOM
This page is intentionally left blank.
2–4
Page 25
Chapter 3. SYSTEM OPERATION
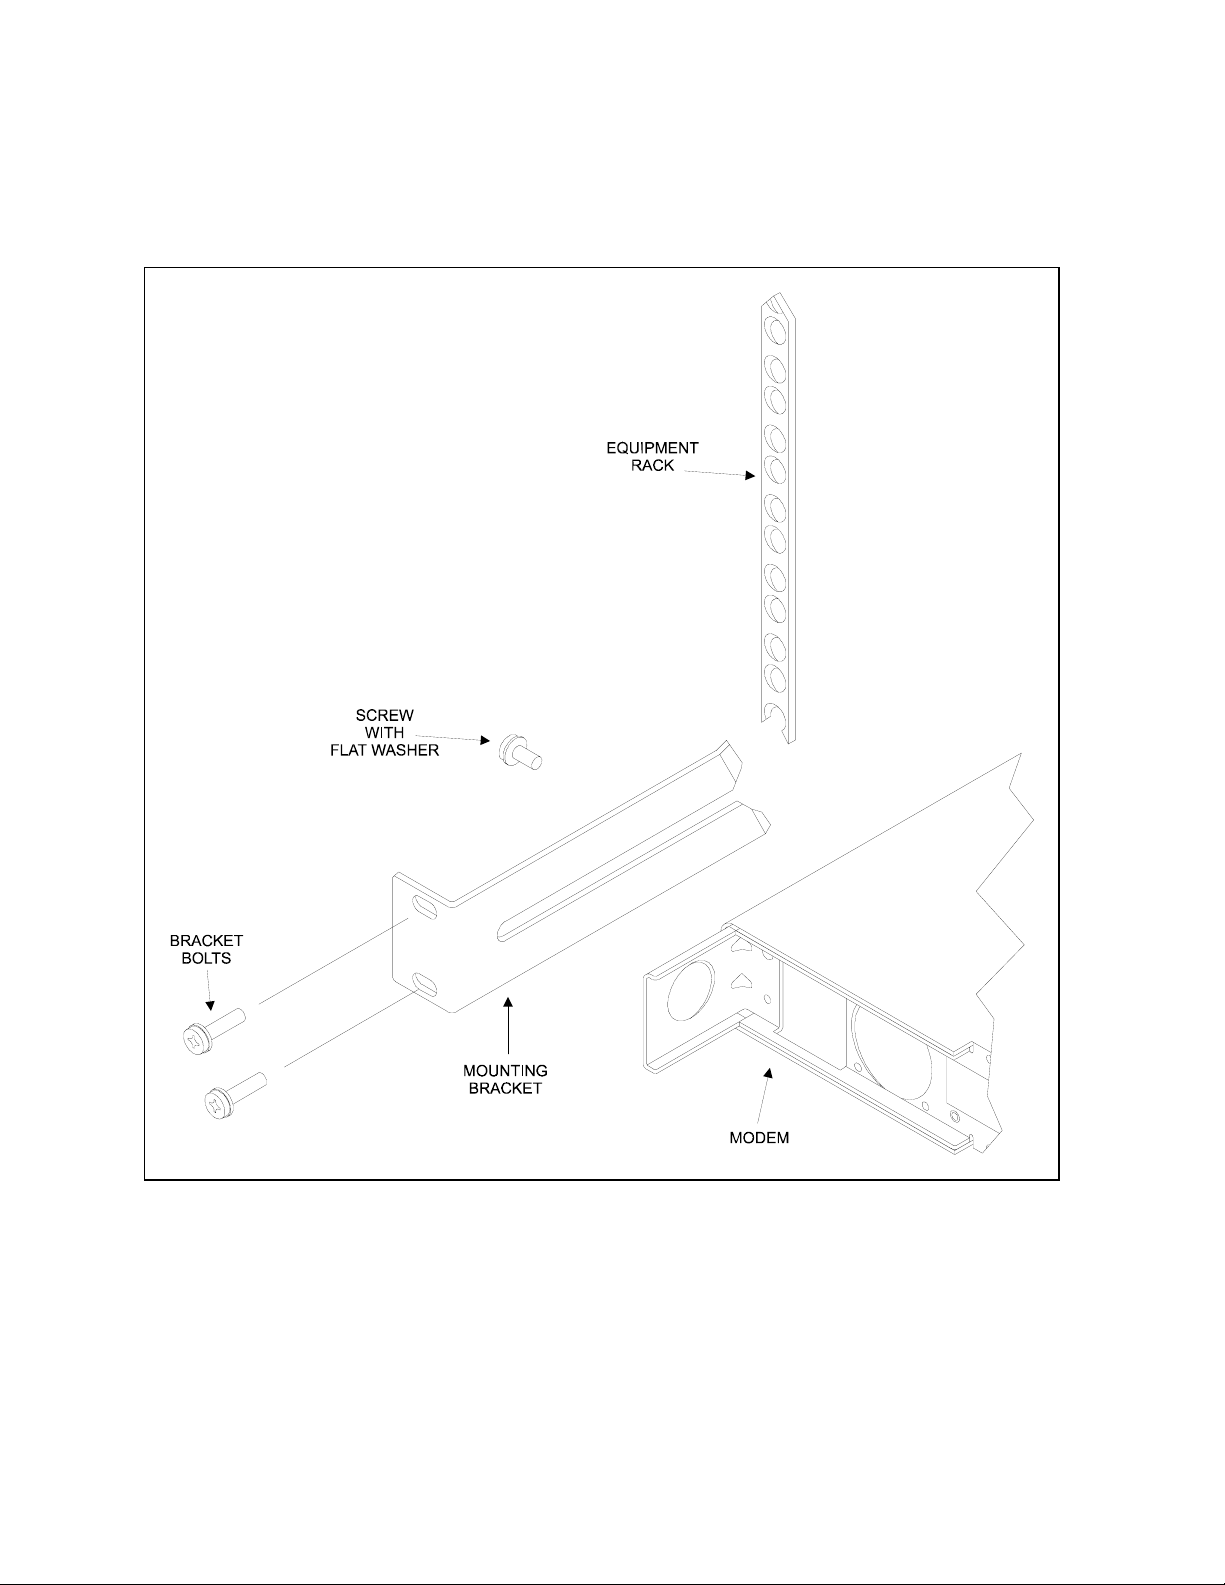
3.1 COAXIAL CONNECTORS
Figure 3-1. Rear Panel
Table 3-1. Coaxial Connectors
Coaxial
Connector
J1
J2
J3
J4
J5
J6
J7
J8
J9
J10
J11
J12
J13 BNC, Female I External 10 MHz Reference Input
J14
J15
J16
J18
J24
J25
Connector Type I/O Description
Type N, Female
Type N, Female
Type N, Female
Type N, Female
Type N, Female
Type N, Female
Type N, Female
Type N, Female
Type F, Female
Type F, Female
Type F, Female
Type F, Female
BNC, Female
BNC, Female
BNC, Female
BNC, Female
SMA, Female
SMA, Female
O
O
I/O
I/O
I/O
I/O
I/O
I/O
O
O
O
O
O
O
O
O
O
I
BUC B L-Band Output
BUC A L-Band Output
Modulator 1 L-Band Input, FSK I/O
Modulator 2 L-Band Input
Modulator 3 L-Band Input
Modulator 4 L-Band Input, FSK I/O
LNB B L-Band Inputs
LNB A L-Band Inputs
Demodulator 1 L-Band Output
Demodulator 2 L-Band Output
Demodulator 3 L-Band Output
Demodulator 4 L-Band Output
10 MHz Output
10 MHz Output
10 MHz Output
10 MHz Output
TX IF to Uplink Power Control (UPC) (Optional)
TX IF from UPC
3–1
Page 26

LCS-4 L-Band Combiner Switch Revision 1
Connector and Pinouts MN/LCS4.IOM
3.2 MULTI-PIN CONNECTOR PINOUT
Table 3-2. Multi-Pin Connector Pinout
Ref Des Description
J18 RS-232/485 Remote Port
J19 Online and Fault Status:
Status: Form C contacts ODC/BUC A/B Online and LNB A/B Online
BUC Faults: Form C contacts BUC A and B fault status
LNB Faults: Form C contacts LNB A and B faults status.
Combiner Switch Faults: Form C contacts failed/OK status.
J20 Modulator Fault/TX OFF: Inputs and Mute
J21 BUC/LNB Fault Input: BUC A and B, LNB A and B, Enable BUC Faults, Enable LNB Faults.
J22 LNB RF Switch Driver
J23 BUC RF Baseball Switch Driver
3.3 REMOTE PORT CONNECTOR
J18, 9-pin D Male, Remote Port
Table 3-3. Multi-Pin Connector Pinout
RS-232 RS-485
Pin # Signal Name I/O Signal Name I/O Description
1 GND GND GND GND GND
2 RS-232 TD Output TX Line
3 RS-232 RD Input RX Line
4
5 GND GND GND GND GND
6 RS-485 RX+B Input RX Line
7 RS-485 RX-A Input RX Line Complement
8 RS-485 TX+B Output TX Line
9 RS-485 TX-A Output TX Line Complement
Note: For RS-485, 2-Wire, half-duplex operation, Pin 7 (RX-A) and Pin 9 (TX-A) are tied
together to form TX/RX -. Similarly, Pin 6 (RX+B) and Pin 8 (TX+B) are tied together to
form TX/RX+.
3–2
Page 27

LCS-4 L-Band Combiner Switch Revision 1
Connector and Pinouts MN/LCS4.IOM
3.4 FAULT AND ONLINE STATUS CONNECTOR
J19, 25-pin D Female, Fault and Online Status.
Pins Connected
Pins # Signal Name Signal
Direction
2
BUC1_FLT_NO (BUC A)
1
BUC1_FLT_COM (BUC A)
14
BUC1_FLT_NC (BUC A)
16
BUC2_FLT_NO (BUC B)
15
BUC2_FLT_COM (BUC B)
3
BUC2_FLT_NC (BUC B)
5
LNB1_FLT_NO (LNB B)
4
LNB1_FLT_COM (LNB B)
17
LNB1_FLT_NC (LNB B)
19
LNB2_FLT_NO (LNB B)
18
LNB2_FLT_COM (LNB B)
6
LNB2_FLT_NC (LNB B)
8
SYS_FLT_NO
7
SYS_FLT_COM
20
SYS_FLT_NC
22
BUC2_ONLINE (BUC B)
21
BUC_ONLINE_COM BUC A/B)
9
BUC1_ONLINE (BUC A)
11
LNB2_ONLINE (LNB B)
10
LNB_ONLINE_COM (LNB
23
A/B)
LNB1_ONLINE (LNB A)
12
GND
13
GND
24
GND
25
GND
I/O Form C
I/O Form C
I/O Form C
I/O Form C
I/O Form C
I/O Form C
I/O Form C
GND
GND
GND
GND
The Fault/Alarm column shows the pins that are connected when a
fault condition exists. The OK column shows the pins connected in
the un-faulted/un-alarm condition. The conditions made when prime
IMPORTANT
power is disconnected from the unit are shown in the Power Off
column.
Type Fault
Alarm
Form C
Form C
Form C
Form C
Form C
Form C
Form C
Form C
Form C
Form C
Form C
Form C
Form C
Form C
GND
GND
GND
GND
1 - 14
15 - 3
4 -17
18 - 6
7 - 20
_
_
_
OK (No
Fault)
1 - 2
15 - 16
4 - 5
18 - 19
7 - 8
_
_
_
Power
Off
1 - 4
15 - 3
4 - 17
18 - 6
7 – 20
9 -21
10 - 23
_
3–3
Page 28

LCS-4 L-Band Combiner Switch Revision 1
Connector and Pinouts MN/LCS4.IOM
3.5 (FUTURE OPTION) MODULATOR FAULTS AND TX ON/OFF
CONNECTOR
Use of this connector is optional. It permits control of two 1:1 modulators by sensing the fault
status from the 1:1 modem pair.
Pin # Signal Name Signal
Direction
1 2 MOD1_FLT
MOD2_FLT
3 4 MOD3_FLT
MOD4_FLT
5 GND GND Ground
6 MOD1_TX_CNTRL O Turns Modulator 1 TX Carrier OFF TTL_OC Output
7 MOD2_TX_CNTRL O Turns Modulator 2 TX Carrier OFF TTL_OC Output
8 MOD3_TX_CNTRL O Turns Modulator 3 TX Carrier OFF TTL_OC Output
9 MOD4_TX_CNTRL O Turns Modulator 4 TX Carrier OFF TTL_OC Output
I
I
I
I
Notes:
1. Inputs not exceed +5 VDC or less than 0 VDC.
2. Outputs are TTL Open Collector and require an external pull-up resistor.
3. Fault is indicated by TTL high level. OK (NO LEVEL) is indicated by TTL Low Level.
Description
Modulator 1 TTL Fault Input
Modulator 2 TTL Fault Input
Modulator 3 TTL Fault Input
Modulator 4 TTL Fault Input
3–4
Page 29

4.1 GENERAL
The Low Noise Block (LNB) amplifies the input RF signal and down converts it to L-Band in
the range of 950 to 1750 MHz (there may be instances that the L-Band range = 950 to 1450
MHz). The choice of which downlink frequency band is determined by the selection of a
frequency range, usually from one of LNBs in the following bands:
LNBs are available that are either externally reference (EXT REF) or internally referenced
(INT REF).
• The EXT REF LNB accepts an external 10 MHz reference from the IDU. These units
have the best phase noise performance and the lowest frequency drift.
• The INT REF LNB includes its own internal oscillator. DC power is supplied to the
LNB through the IFL cable from the IDU.
The standard LNB noise temperature is: For C-Band < 35°K
For Ku-Band < 65°K
Optional: A TX Reject Filter (TRF) may be obtained with the system or supplied by the
customer.
Chapter 4. LOW NOISE BLOCK
ASSEMBLY
For C-Band, GHz For Ku-Band, GHz
3.625 to 4.2
4.50 to 4.80
10.95 to 11.70
11.70 to 12.20
12.25 to 12.75
4–1
Page 30

LCS-4 L-Band Combiner Switch Revision 1
Low Noise Block Assembly MN/LCS4.IOM
4.2 OPTIONS
Hardware
Hardware
Hardware
Hardware
IFL Cables
Externally Referenced from IDU or Internally Referenced
TX Reject Filter
Mounting Kits
4.3 REDUNDANT C-BAND LNB INSTALLATION
The KT/9526-1 Mounting LNB Switch Kit, is the kit for the Redundant Systems. It can be
mounted using one of the following kits:
• SPAR Mount, 1 x 2 Antenna Mounting Kit P/N, AS/0422
• SPAR Mount, 1.75 x 4 Antenna, Mounting Kit, P/N AS/0501
• Feed Horn Mounting Kit, P/n AS/0502
4.3.1 TOOLS REQUIRED
The following tools are recommended for unit installation.
QTY Description
1 Adjustable Wrench
Alternate: Set of variable box wrenches.
4.3.2 C-BAND LNB MOUNTING KITS
Part No. Nomenclature QTY
PL/9526-1 Kit, LNB Switch Mounting 1
4–2
Page 31

LCS-4 L-Band Combiner Switch Revision 1
Low Noise Block Assembly MN/LCS4.IOM
4.3.3 ASSEMBLE REDUNDANT C-BAND LNB
Part No. Nomenclature QTY
28P1084 Adapter 1
CN/CX50NMALE
GA/GSKTCPOR229FULL Gasket, CPR229 4
HW/1/4-20X5/8BT Bolt, 1/4-20 30
HW/1/4-FLT Washer, Flat 30
HW/1/4-SPLIT Washer, Split 30
SW/WGS+48V-229 Switch, Waveguide WR229, +48 VDC 1
*Customer-Furnished LNB 2
Termination, 50Ω
Note: Not included in Kit. May be customer-furnished or ordered separately from CEFD.
1
Figure 4-1. C-Band Redundant LNB (KT/9526-1)
4–3
Page 32

LCS-4 L-Band Combiner Switch Revision 1
Low Noise Block Assembly MN/LCS4.IOM
1. Remove all protective tape from switch and keep it clean.
2. Position LNBs and gaskets (GA/GSKTCP229FULL)
on Port 2 and Port 4 of switch.
3. Secure each LNB with eight bolts, flat washers, and
split washers.
4. Position adapter (28P1084) and gasket on Port 3 and
secure with bolts, flat washers, and split washers.
5. Place termination (CN/CX50NMALE) on threaded
port of adapter.
Figure 4-2. Switch Port locations
4–4
Page 33

LCS-4 L-Band Combiner Switch Revision 1
Low Noise Block Assembly MN/LCS4.IOM
6. Position the customer-furnished TRF filter and a gasket on Port 4 of the switch.
7. Install the optional support bracket (FP/BR0085). Secure with eight bolts, flat washers, and split
washers.
8. Set assembly aside for later installation.
Port 3
LNA-A
Port 2
Port 4
Port 1
LNA-B
Figure 4-3. C-Band LNB Switch
Ensure that the OUTPUT flange of the filter is against the switch.
IMPORTANT
4–5
Page 34

LCS-4 L-Band Combiner Switch Revision 1
Low Noise Block Assembly MN/LCS4.IOM
4.3.4 C-BAND LNB INSTALLATION
1. Remove the protective cover from the antenna OMT and LNB.
2. Install the appropriate gasket on the antenna end of the LNB, as follows:
a. If only one of the mounting surfaces has a groove, use the half-thick gasket.
b. If both mounting surfaces have grooves, use the full thick gasket.
3. Position the LNB (with gasket) in place on the antenna and fasten using the supplied
hardware.
4–6
Page 35

LCS-4 L-Band Combiner Switch Revision 1
Low Noise Block Assembly MN/LCS4.IOM
4.4 KU-BAND LNB INSTALLATION
The PL/10176-1, Mounting LNB Switch Kit, is the kit for the Redundant System. It can be
mounted using one of the following kits:
• SPAR Mount, 1 x 2 Antenna Mounting Kit, P/L, AS/0422
• SPAR Mount, 1.75 x 4 Antenna, Mounting Kit, P/N AS/0501
• Feed Horn Mounting Kit, P/n AS/0502.
4.4.1 TOOLS REQUIRED
The following tools are recommended for unit installation.
QTY Description
1 Adjustable Wrench
Alternate: Set of variable box wrenches.
4.4.2 KU-BAND LNB MOUNTING KITS
Part No. Nomenclature QTY
PL/10176-1 Kit, LNB Switch Mounting 1
4–7
Page 36

LCS-4 L-Band Combiner Switch Revision 1
Low Noise Block Assembly MN/LCS4.IOM
4.4.3 ASSEMBLE REDUNDANT KU-BAND LNB
Part No. Nomenclature QTY
99D1483 Waveguide Assy, WR75 2
CN/CX50NMALE
GA/GSKTWR75HALF Gasket, WR75 Half-Thickness
HW/6-32X1/2SHSC Screw, Socket Cap
HW/6-FLT Washer, Flat
HW/6-SPLIT Washer, Split
KT/2819 Waveguide Kit
KT/2820 Waveguide Kit
RF/ADP-WR75N Adapter, Waveguide
RF/TRF-KU-WR75G Filter, Transmit Reject
SW/WGS+48V-75SB Switch, Waveguide WR75, +48 VDC 1
*Customer-Furnished LNB 2
Termination, CN-50Ω
Note: Not included in Kit. May be customer-furnished or ordered separately from CEFD.
CustomerFurnished
Figure 4-4. Ku-Band Redundant LNB (KT/10176-1)
4–8
Page 37

LCS-4 L-Band Combiner Switch Revision 1
Low Noise Block Assembly MN/LCS4.IOM
1. Remove all protective tape from switch
and keep it clean.
2. Position LNBs and gaskets
(GA/GSKTCP75HALF) on Port 2 and
Port 4 of switch.
3. Secure each LNB with eight bolts,
flat washers, and split washers.
4. Position adapter (RF/ADP-WR75-N)
and gasket on Port 3 and secure with bolts,
flat washers, and split washers.
5. Place termination (CN/CX50NMALE)
on threaded port of adapter.
Port 2
Port 1
6. Position the customer-furnished TRF filter
and a gasket on Port 4 of the switch.
7. Install the optional support bracket
(FP/BR0085). Secure with eight bolts,
Figure 4-5. Switch Port Locations
flat washers, and split washers.
8. Set assembly aside for later installation.
Ensure that the OUTPUT flange of the filter
IMPORTANT
is against the switch.
Figure 4-6. Ku-Band LNB Switch
4–9
Page 38

LCS-4 L-Band Combiner Switch Revision 1
Low Noise Block Assembly MN/LCS4.IOM
4.4.4 KU-BAND LNB INSTALLATION
The Ku-Band LNB is mounted to the OMT, as follows:
1. Remove the protective cover from the antenna OMT and LNB.
2. Install the appropriate gasket on the antenna end of the LNB, as follows:
a. If only one of the mounting surfaces has a groove, use the half-thick gasket.
b. If both mounting surfaces have grooves, use the full thick gasket.
3. Position the LNB (with gasket) in place on the antenna and fasten using the supplied
hardware.
4–10
Page 39

LCS-4 L-Band Combiner Switch Revision 1
Low Noise Block Assembly MN/LCS4.IOM
4.5 SETTINGS (LNB) LO, MIX AND SPECTRUM
4.5.1 C-BAND
Table 4-1. For C-Band: LO and MIX Information for Demodulator and LNB
LNB Part No.
RF/LNB-C-55-35N 3.625 – 4.200 GHz
RF/LNB3.6-4.2FE 3.625 – 4.200 GHz
RF/LNB3.6-4.2F03 3.625 – 4.200 GHz
xxxxxxxxxxxxxx 3.625 – 4.200 GHz 5,150.00 _ 3.400.00 4,200.00 1,525.00 950.00 Invert 18 Type N
xxxxxxxxxxxxx 4.500 – 4.800 GHz 5,150.00 _ 4,500.00 4,500.00 1,525.00 950.00 Invert 18 Type N
Description
EXT REF
EXT REF
EXT REF
LO
(Offset)
Frequency
(MHz)
5,150.00 _ 3.625.00 4,200.00 1,525.00 950.00 Invert 18 Type N
5,150.00 _ 3.625.00 4,200.00 1,525.00 950.00 Invert 18 Type N
5,150.00 _ 3.625.00 4,200.00 1,525.00 950.00 Invert 18 Type N
MIX
(+/-)
Min
LNB
Satellite
Frequency
(MHz)
Max
LNB
Satellite
frequency
(MHz)
L-Band
Frequency
at LNB
Min
(MHz)
L-Band
Frequency
at LNB
Max
(MHz)
Demod
Spectrum
(Utility
Demod
Menu)
Operating
Voltage,
V
RF
Connector
4.5.2 KU-BAND
Table 4-2. For Ku-Band: LO and MIX Information for Demodulator and LNB
LNB Part No.
RF/LNB-10.9-
11.7FE
RF/LNB-11.7-
12.2FE
RF/LNB-12.2-
12.7FE
RF/LNB10.9-
11.7F03
RF/LNB-11.7-
12.2F03
RF/LNB-12.2-
12.7F03
Description
10.95-11.7 GHz
EXT REF
11.7 – 12.2 GHz
EXT REF
12.25 – 12.75 GHz
EXT REF
10.95 – 11.7 GHz
± 3 ppm
11.7 – 12.2 GHz
± 3 ppm
12.25 – 12.75 GHz
± 3 ppm
LO
(Offset)
Frequency
(MHz)
10,000.00 + 10,950.00 11,700.00 950.00 1700.00 Normal 18 Type F
10,750.00 + 11,700.00 12,200.00 950.00 1450.00 Normal 18 Type F
11,300.00 + 12,250.00 12,750.00 950.00 1450.00 Normal 18 Type F
10,000.00 + 11,200.00 11,700.00 950.00 1450.00 Normal 18 Type F
10,750.00 + 10,950.00 11,700.00 950.00 1700.00 Normal 18 Type F
11,300.00 + 12,250.00 12,750.00 950.00 1450.00 Normal 18 Type F
MIX
(+/-)
Min
LNB
Satellite
Frequency
(MHz)
Max
LNB
Satellite
frequency
(MHz)
L-Band
Frequency
at LNB
Min
(MHz)
L-Band
Frequency
at LNB
Max
(MHz)
Demod
Spectrum
(Utility
Demod
Menu)
Operating
Voltage,
V
RF
Connector
4–11
Page 40

LCS-4 L-Band Combiner Switch Revision 1
Low Noise Block Assembly MN/LCS4.IOM
This page is intentionally left blank.
4–12
Page 41

Chapter 5. BLOCK UP
CONVERTER
5.1 GENERAL
The Block Up Converter (BUC) translates the L-Band carrier output from the IDU (in the 950 to
1750 MHz range) to C- or Ku-Band frequencies typically between:
• C-Band: 5.845 and 6.425 GHz and amplifies the carrier to the desired TX power level.
• Ku-Band: 14.0 and 14.5 GHz and amplifies the carrier to the desired TX power level.
The local oscillator of the BUC locks to the 10 MHz reference signal from the IDU in order to
provide an accurate frequency translation. In the event the BUC cannot lock to the 10 MHz
reference, the output carrier is muted to prevent interference with adjacent carriers.
5.2 C-BAND REDUNDANT BUC ASSEMBLY PROCEDURE
Part No. Nomenclature QTY
PL/9528-1 BUC Assembly, C-Band 1
PL/9526-1 Mounting Kit, C-Band 1
5–1
Page 42

LCS-4 L-Band Combiner Switch Revision 1
Block Up Converter MN/LCS4.IOM
5.2.1 ASSEMBLE WAVEGUIDE SWITCH KIT, AS/9528-1
Part No. Nomenclature QTY
FP/WG0034 Termination, Small Fins 1
FP/WG0043 Waveguide, CPRG137 1
FP/WG0051 Waveguide, CPRG137 1
GA/GSKTCP137FULL Gasket, CP137 Full 4
HW/10-32X5/8SHC Screw, Socket Head Cap 32
HW/10-FLT Washer, Flt 32
HW/10-SPLIT Washer, Spit 32
SW-WGS+48V-137SB Switch, Waveguide (CPR130) 1
*Customer-Furnished LNB 2
1. Place gasket (GA/GSKTCP137FUL) on waveguide Port 1 of Switch
(SW-WSC+48V-137SB).
2. Assemble one waveguide (FP/WG10359-1) and secure with six screws, flat washers,
and split washers to Port 1 of Switch.
3. Place gasket on waveguide Port 3 of switch.
4. Assemble second waveguide to Port 3 of Switch and secure using six screws, flat
washers, and split washers.
5. Install termination (FPWG00354) and gasket to Port 4 of switch and secure using six
screws, flat washers, and split washers.
Port 2 of the Switch is reserved for customer-furnished equipment.
IMPORTANT
Cover Port 2 until used.
5–2
Page 43

LCS-4 L-Band Combiner Switch Revision 1
Block Up Converter MN/LCS4.IOM
5.2.2 ASSEMBLE BUC MOUNTING KIT (KT/9826-1)
Part No. Nomenclature QTY
FP/BR10351-1 Bracket, Mounting 1
FP/BR10352-1 Bracket, Mounting 2
FP/WG0034 Termination, Small Fins 1
FP/WG10359-1 Waveguide 3.75X2 2
GA/GSKTCP137FULL Gasket, Full Thickness, CP137 6
GA/GSKTCP137HALF Gasket, Half Thickness, CP137 1
HW/1/4-20HEXNUT Nut, Hex 2
HW/1/4-20X1/2SHSC Screw, SS 4
HW/1/4-FLT Washer, Flat 4
HW/1/4-SPIT Washer, Split 4
HW/10-SPLIT Washer, Split 4
HW/10-32X5/8SHSC Screw, Socket Cap 32
HW/10-FLT Washer, Flat 36
HW/10-SPLIT Washer, Split 36
HW/M4FLAT Washer, Flat 6
HW/M4LOCK Washer, Split 6
HW/M4X.07X8MMPHMS Screw, Panhead 6
SW-WGS+48V-137SB Switch, Waveguide CPR137G 1
Refer to BUC manufacturer’s documentation for installation on the
IMPORTANT
Comtech EF Data assembly.
1. Assemble brackets (FP/BR10352-2) on bracket FP/BR10351-1) and secure with two
bolts, flat washers, split washers, and two nuts.
2. Place gaskets on waveguides.
3. Install assembled waveguide to C-Band BUCs and secure using six screws, flat
washers, and split washers.
4. Place BUCs on bracket (FP/BR10351-1) and secure with screws. Flat washers, and
split washers.
5–3
Page 44

LCS-4 L-Band Combiner Switch Revision 1
Block Up Converter MN/LCS4.IOM
5.3 KU-BAND REDUNDANT BUC ASSEMBLY PROCEDURES
Part No. Nomenclature QTY
PL/9527-1 BUC Assembly, Ku-Band 1
KT/9828-1 Mounting Kit, Ku-Band 1
5.3.1 ASSEMBLE WAVEGUIDE SWITCH KIT, PL/9527-1
Part No. Nomenclature QTY
FP/7943-1 Bracket, Support Redundant Switch 1
GA/GSKTWR75FULL Gasket, Full Thickness 2
GA/GSKTWR75HALF Gasket, Half Thickness 3
HW/6-32X1/2SHSC Screw, Socket Head Cap 24
HW/6-FLT Washer, Flat 24
HW/6-SPLIT Washer, Split 24
RF/TERM-11923-2 Termination, RF 50W, 14.0 – 14.5 GHz WR75G 1
SW/WGS+48V-75SB Switch, Waveguide, +48V, WR75 1
1. Place gaskets on waveguide Port 1 of switch.
2. Assemble one waveguide to Port 1 of switch and secure using six screws, flat
washers, and split washers.
3. Place gasket on waveguide Port 3 of switch.
4. Assemble second waveguide to Port 3 of switch and secure using six screws, flat
washers, and split washers.
5. Install customer-selected TRF to Port 4 of switch and secure using six screws, flat
washers, and split washers.
5–4
Page 45

LCS-4 L-Band Combiner Switch Revision 1
Block Up Converter MN/LCS4.IOM
5.3.2 ASSEMBLE KU-BAND REDUNDANT BUCS
Refer to BUC manufacturer’s documentation for installation on the
IMPORTANT
1. Optional: Assemble brackets (FP/BR10352-1) on Bracket (FP/BR10351-1) and
secure with two bolts, four flat washers, four split washers, and two hex nuts.
2. Place gaskets on waveguides.
3. Install assembled waveguide Ku-Band BUCs and secure using six screws, flat
washers, and split washers.
4. Place BUCs on Bracket (FP/BR10351-1) and secure with screws, flat washers, and
split washers.
Part No. Nomenclature QTY
FP/BR5000 Waveguide, WG75G
FP/BR10352-1 Bracket, Mounting 1
FP/BR10353-1 Bracket, Mounting 2
GA/GSKTCP75FULL Gasket, Full Thickness, CP75 6
GA/GSKTCP75HALF Gasket, Half Thickness, CP75 1
HW/1/4-20HEXNUT Nut, Hex 2
HW/1/4-20X1/2SHSC Screw, SS 4
HW/1/4-FLT Washer, Flat 4
HW/1/4-SPLIT Washer, Split
HW/10-SPLIT Washer, Split 4
HW/6-32X5/8SHSC Screw, Socket Head Cap
HW/6-FLT Washer, Flat 32
HW/6-SPLIT Washer, Split 36
HW/M4FLAT Washer, Flat 6
HW/M4LOCK Washer, Split 6
HW/M4X.07X8MMPHMS Screw, Panhead 6
RF/TERM-11923-2
SW-WGS+48V-75SB Switch, Waveguide WR75, +48VDC 1
Comtech EF Data assembly.
Termination, 50Ω 14.0 – 14.5 GHz WR75G
5–5
Page 46

LCS-4 L-Band Combiner Switch Revision 1
Block Up Converter MN/LCS4.IOM
This page is intentionally left blank.
5–6
Page 47

LCS-4 L-Band Combiner Switch Revision 1
Block Up Converter MN/LCS4.IOM
5.4 LO, MIX AND SPECTRUM SETTINGS
5.4.1 C-BAND
Table 5-1. LO, MIX, and MOD Spectrum Settings for Modulator and BUC
P1dB_min
5 Watt C Yes RF/BUC05C-A-F-T 5.850 6.425 7,375.00 - Invert 24 VDC KT/8924-1 KT/9027-1
10 Watt C Yes RF/BUC10C-A-F-T 5.850 6.425 7,375.00 - Invert 48 VDC TBD TBD
1 Watt C No RF/BUC01C-A-N-N 5.850 6.425 4,900.00 + Normal 24 VDC KT/8924-1 KT/9027-1
2 Watt C No RF/BUC02C-A-N-N 5.850 6.425 4,900.00 + Normal 24 VDC KT/8924-1 KT/9027-1
5 Watt C No RF/BUC05C-A-N-N 5.850 6.425 4,900.00 + Normal 24 VDC KT/8924-1 KT/9027-1
2 Watt EXT C No RF/BUC02C-B-N-N 6.725 7.025 5,760.00 + Normal 24 VDC KT/8924-1 KT/9027-1
5 Watt EXT C No RF-BUC05C-B-N-N 6.725 7.025 5,760.00 + Normal 24 VDC KT/8924-1 KT/9027-1
Band
FSK
CEFD
Part #
RF Start
Frequency
(GHz)
RF End
Frequency
(GHz)
LO
(Offset)
Freq.
(MHz)
MIX
(+ / -)
Modem
Spectrum
(Utility
Modulator
Menu)
Supply
Voltage
SPAR
Mount Kit
Feed Mount Kit
5–7
Page 48

LCS-4 L-Band Combiner Switch Revision 1
Block Up Converter MN/LCS4.IOM
5.4.2 KU-BAND
Table 5-2. LO, MIX, and MOD Spectrum Settings for Modulator and BUC
P1dB_min
*2 Watt Ku Yes RF/BUC02KU-A-F-T 14.00 14.50 13,050.00 + Normal 24 VDC KT/8924-1 KT/9928-1
*4 Watt Ku Yes RF/BUC04KU-A-F-T 14.00 14.50 13,050.00 + Normal 24 VDC KT/8924-1 KT/9928-1
*8 Watt Ku Yes RF/BUC08KU-A-N-N 14.00 14.50 13,050.00 + Normal 48 VDC KT/8924-1 KT/9928-1
**1 Watt Ku No RF/BUC01KU-A-N-N 14.00 14.50 15,450.00 - Invert 24 VDC KT/8924-1 KT/9928-1
**2 Watt Ku No RF/BUC02KU-A-N-N 14.00 14.50 15,450.00 - Invert 24 VDC KT/8924-1 KT/9928-1
**4 Watt Ku No RF/BUC04KU-A-N-N 14.00 14.50 15,450.00 - Invert 24 VDC KT/8924-1 KT/9928-1
*2 Watt Ku EXT Yes RF/BUC02KU-B-F-T 13.75 14.25 12,800.00 + Normal 24 VDC KT/8924-1 KT/9928-1
*4 Watt Ku EXT Yes RF/BUC04KU-B-F-T 13.75 14.25 12,800.00 + Normal 24 VDC KT/8924-1 KT/9928-1
*8 Watt Ku EXT Yes RF/BUC08KU-B-F-T 13.75 14.25 12,800.00 + Normal 48 VDC KT/8924-1 KT/9928-1
**1 Watt
(Typical)
28 dBm
**2 Watt Ku EXT No RF/BUC02KU-B-N-N 13.75 14.25 15,200.00 - Invert 24 VDC KT/8924-1 KT/9928-1
Band
Ku EXT No RF/BUC01KU-B-N-N 13.75 14.25 15,200.00 - Invert 24 VDC KT/8924-1 KT/9928-1
FSK
CEFD
Part #
RF Start
Frequency
(GHz)
RF End
Frequency
(GHz)
LO
(Offset)
Freq.
(MHz)
MIX
(+ / -)
Modem
Spectrum
(Utility
Modulator
Menu)
Supply
Voltage
SPAR
Mount Kit
Feed Mount Kit
* Option A BUC Mounting
** Option B BUC Mounting
5–8
Page 49

LCS-4 L-Band Combiner Switch Revision 1
Block Up Converter MN/LCS4.IOM
5.5 SINGLE-THREAD BUC INSTALLATION
After removing the protective covers, ensure that no foreign material (FOD)
or moisture enters.
CAUTION
5.5.1 TOOLS REQUIRED
1/2-inch Box Wrench (or equivalent)
5/16-inch Box Wrench (or equivalent)
7/16-inch Box Wrench (or equivalent)
7/64-inch SAE Allen
M3 Metric Allen Wrench
Screw Driver Phillips
5.5.2 MOUNTING KITS
Table 5-3. Optional: C-Band Mounting Kit, KT/5738-1 (BUC to OMT)
Part No. Nomenclature QTY
03P1097 Bolt, Hex 8
FP/5195 Gasket, CPR137-Full 1
HW/1-32HEXNUT Nut, Hex 8
HW/10-FLT Washer, Flat 16
HW/10-SPLIT Washer, Split 8
HW/GKT-CPR137G Gasket, CPR137-Half 1
Table 5-4. Optional: Ku-Band Mounting Kit, KT/8924-1 (BUC to OMT)
Part No. Nomenclature QTY
32P1037 O-Ring 3
32P1039 O-Ring 3
HW/6-32HEXNUT Nut, #6 4
HW/6-32X7/8SHSC Screw, Socket #6 4
HW/6-FLT Washer, Flat, #6 8
HW/6-SPLIT Washer, Split #6 4
HW/8-FLT Washer, Flat #8 8
HW/8-SPLIT Washer, Split #8 8
HW/M4X12SHSC Screw, Socket, M4X12 4
HW/M4X25SHSC Screw, Socket, M4X25 4
5–9
Page 50

LCS-4 L-Band Combiner Switch Revision 1
Block Up Converter MN/LCS4.IOM
Item Part No. Nomenclature QTY **Remarks
1 FP/9026-1 Bracket, QP 1
2 FP/BR9927-1 Bracket, Upper 1 Use with Option B BUC
3 HW/M4FLAT Washer, Flat 2 Use with Option B BUC
4 HW/M4LOCK Washer, Lock 4 Use with Option B BUC
5 HW/M4X16PH Screw, Pan Head Phillips 2 Use with Option B BUC
6 HW/1/4-FLAT Washer, Flat 2
7 HW/1/4-SPLIT Washer, Split 2
8 03P1078 Bolt, Hex 1
9 HW/1/4-20HEXNUT Nut, Hex 1
10 FP/BR9929-1 Bracket 1 Use with Option A BUC
11 HW/1/4-20X5/8HEX Screw, Hex 1 Use with Option A BUC
*12 thru 19 Not Used
20 HW/5/16-FLT Washer, Flat 1
21 HW/5/16-18X1.25 Bolt, Hex Head 1
22 HW/5/16-SPLIT Washer, Split 1
23 HW/5/16-18HEXNT Nut, Hex 1
*Not Illustrated
**Refer to Table 3-3
Figure 5-1. Mounting Kit, KT/9928-1
5–10
Page 51

LCS-4 L-Band Combiner Switch Revision 1
Block Up Converter MN/LCS4.IOM
5.6 INSTALLATION
To install the BUC to the antenna:
1. If installed: Remove protective covers from the antenna OMT and SSPA.
After removing the protective cover, ensure that no foreign material (FOD)
or moisture enters the antenna waveguide or BUC.
CAUTION
2. Install the appropriate gasket (From KT/8924-1 or KT/5738-1) on the antenna OMT,
as follows:
3. Position the SSPA (with gasket) in place on the antenna, and install with provided
socket screws and washers (split and flat) from the mounting kit.
4. Install ODU Mounting Kit, KT/9928-1, as follows:
a. If only one of the mating flanges is grooved, the thin gasket should be
installed.
b. If both of the mating flanges are grooved, the thick gasket should be
installed.
OPTION A BUC
Step Procedure
a. Install bracket (10, figure 5-9) to BUC and secure with flat washers (6), split washers (7),
and screws (11).
b. Position universal lower ‘L’ bracket (1) to feed horn, loosely fastens with bolt (21), flat
washer (20), lock washer (22), and nut (23).
c. Align bracket (1) with bracket (10) to adjust the position of the BUC.
d. Insert bolt (8) with flat washer (6) through brackets (1, 10). Secure with flat washer (6), split
washer (7), and nuts (9).
e. Tighten all the hardware.
5–11
Page 52

LCS-4 L-Band Combiner Switch Revision 1
Block Up Converter MN/LCS4.IOM
OPTION B BUC
Step Procedure
a. Install bracket (2, figure 5-9) to the BUC. Secure with two screws (5), two lock washers (4),
and two flat washers (3).
b. Position universal lower ‘L’ bracket (1) to feed horn, loosely fasten with bolt (21), flat
washer (20), lock washer (22), and nut (23).
c. Align bracket (1) with bracket (2) to adjust the position of the BUC.
d. Insert bolt (8) with flat washer (6) through brackets (1, 2). Secure with flat washer (6), split
washer (7), and nuts (9).
e. Tighten all the hardware.
5–12
Page 53

Chapter 6. CABLE INSTALLATION
6.1 INTRODUCTION
Take care during cable installation. Install the cables using the most direct route and secure with
clamps and ties. Avoid all sharp bends.
Cable connectors used in outdoor applications shall be sealed to avoid leakage, particularly,
N-Type connectors. Moisture can seep into junctions at the plug end of the connector, between
the fixed and movable parts, and where the cable connects to the connector.
Signal attenuation and possible loss of signal can occur in the presence of moisture. All cable
junctions shall be sealed with a self-amalgamating tape, such as 3M, Type 23 Scotch SelfAmalgamating tape, or equivalent, including military style (MS) connectors.
6–1
Page 54

LCS-4 L-Band Combiner Switch Revision 1
Cable Installation MN/LCS4.IOM
6.2 SINGLE CONFIGURATION CABLE INSTALLATION
The LCS-4 Single Configuration consists of the LCS-4, up to four modems, one LNB and one
BUC. The LCS-4 shall be positioned above Modems A, B, C, and D. Refer to Figure 6-1.
Figure 6-1. Single Configuration Cable Installation
6–2
Page 55

LCS-4 L-Band Combiner Switch Revision 1
Cable Installation MN/LCS4.IOM
6.3 REDUNDANT CONFIGURATION CABLE INSTALLATION
The LCS-4 Redundant Configuration consists of the LCS-4, up to four modems, two LNBs and
two BUCs. The LCS-4 shall be positioned above Modems A, B, C, and D. Refer to Figure 6-2.
Figure 6-2. Redundant Configuration Cable Installation
6–3
Page 56

LCS-4 L-Band Combiner Switch Revision 1
Cable Installation MN/LCS4.IOM
This page is intentionally left blank.
6–4
Page 57

Chapter 7. FRONT PANEL CONTROL
7.1 INTRODUCTION
The purpose of the front panel is to control the state of the power supplies, the references, the
online condition (in redundancy mode), and whether the redundancy mode is in Auto or Manual
mode. It is also a visual indication of the fault status of the LCS-4 and the devices that are being
monitored.
7.2 DESCRIPTION
The front panel (Figure 7-1) is comprised of 21 switches and 21 LEDs Following is a description
and functionality of each switch and any associated LED.
Figure 7-1. LCS-4 Front Panel
7–1
Page 58

LCS-4 L-Band Combiner Switch Revision 1
Front Panel Control MN/LCS4.IOM
7.2.1 BUC CONTROL
The following controls the BUC power supplies and BUC 10 MHz reference.
Controls Description
BUC A Power Supply The BUC A power supply switch toggles the power supply from BUC A ON and OFF.
The associated LED will show the status of the power supply. The conditions of the
LED include: OFF, RED, GREEN, and FLASHING GREEN (see Table 7-1 for various
LED conditions).
BUC B Power Supply The BUC B power supply switch toggles the power supply from BUC B ON and OFF.
The associated LED will show the status of the power supply. The conditions of the
LED include: OFF, RED, GREEN, and FLASHING GREEN (see Table 7-1 for various
LED conditions).
BUC A Reference The BUC A reference switch toggles the 10 MHz reference for BUC A ON and OFF.
The associated LED will show the status of the reference. The conditions of the LED
include: OFF, RED, and GREEN (see Table 7-1 for various LED conditions). This
provides a 10 MHz reference delivered up the coax cable to the BUC for BUC’s that
require an external reference for locking the internal synthesizer.
BUC B Reference The BUC B reference switch toggles the 10 MHz reference for BUC A ON and OFF.
The associated LED will show the status of the reference. The conditions of the LED
include: OFF, RED, and GREEN (see Table 7-1 for various LED conditions). This
provides a 10 MHz reference delivered up the coax cable to the BUC for BUCs that
require an external reference for locking the internal synthesizer.
BUC Online The BUC ONLINE switch toggles the online unit between BUC A and BUC B. The
associated LED will show the ONLINE status of the BUC. The conditions of LED
include: OFF, RED, and GREEN (see Table 7-1 for various LED conditions).
7–2
Page 59

LCS-4 L-Band Combiner Switch Revision 1
Front Panel Control MN/LCS4.IOM
7.2.2 LNB CONTROL
The following controls the LNB power supplies and LNB 10 MHz reference.
Controls Description
LNB A Power Supply The LNB A power supply switch toggles the power supply from LNB A ON and OFF.
The associated LED will show the status of the power supply. The conditions of the
LED include: OFF, RED, GREEN, and FLASHING GREEN (see Table 7-1 for various
LED conditions).
LNB B Power Supply The LNB B power supply switch toggles the power supply from LNB B ON and OFF.
The associated LED will show the status of the power supply. The conditions of the
LED include: OFF, RED, GREEN, and FLASHING GREEN (see Table 7-1 for various
LED conditions).
LNB A Reference The LNB A reference switch toggles the 10 MHz reference for LNB A ON and OFF.
The associated LED will show the status of the reference. The conditions of the LED
include: OFF, RED, and GREEN (see Table 7-1 for various LED conditions). This
provides a 10 MHz reference delivered up the coax cable to the LNB for LNB’s that
require an external reference for locking the internal synthesizer.
LNB B Reference The LNB B reference switch toggles the 10 MHz reference for LNB A ON and OFF.
The associated LED will show the status of the reference. The conditions of the LED
include: OFF, RED, and GREEN (see Table 7-1 for various LED conditions). This
provides a 10 MHz reference delivered up the coax cable to the LNB for LNB’s that
require an external reference for locking the internal synthesizer.
LNB Online The LNB ONLINE switch toggles the online unit between LNB A and LNB B. The
associated LED will show the ONLINE status of the LNB. The conditions of LED
include: OFF, RED, and GREEN (see Table 7-1 for various LED conditions).
7–3
Page 60

LCS-4 L-Band Combiner Switch Revision 1
Front Panel Control MN/LCS4.IOM
7.2.3 CURRENT CALIBRATION
The CAL switch performs a ‘calibration’ of system currents. The purpose of this is to allow the
user to set up a ‘window’ in which, the various currents can be monitored and if the current goes
outside of the ‘window,’ an alarm will be activated. This switch ‘calibrates’ all currents of active
devices. When pressed, the associated LED flashes momentarily to indicate the ‘CAL’ process is
occurring (refer to Table 7-1 for various LED conditions).
7.2.4 REDUNDANCY MODE
The Redundancy Mode switch enables/disables AUTO mode, this is indicated by the associated
LED (refer to Table 7-1 for various LED conditions). When AUTO mode is enabled, the LCS-4
will automatically switch between BUC and LNB in Redundancy Mode when a fault occurs. The
keypad and Remote Port are also ‘locked’ out when in AUTO mode to prevent any accidental
configuration changes. When disabled, the LCS-4 will not switch automatically. This mode also
is used to do manual changes in the configuration using the front panel and Remote Port.
7–4
Page 61

LCS-4 L-Band Combiner Switch Revision 1
Front Panel Control MN/LCS4.IOM
7.2.5 LED CONDITIONS
Following is allowed conditions of the LEDs on the front panel.
CONDITION
LED OFF GREEN RED FLASHING DESCRIPTION
Prime Power A Disabled ON NA NA Prime Power A Status
Prime Power B Disabled ON NA NA Prime Power B Status
BUC A PS Disabled ON/OK Faulted Not cal’ed BUC A PS Status
BUC B PS Disabled ON/OK Faulted Not cal’ed BUC B PS Status
BUC A REF Disabled ON/OK Faulted NA BUC A REF Status
BUC B REF Disabled ON/OK Faulted NA BUC B REF Status
BUC Status A BUC A OFF ON/OK Faulted NA BUC A Status
BUC Status B BUC B OFF ON/OK Faulted NA BUC B Status
LNB A PS Disabled ON/OK Faulted Not cal’ed LNB A PS Status
LNB B PS Disabled ON/OK Faulted Not cal’ed LNB B PS Status
LNB A REF Disabled ON/OK Faulted NA LNB A REF Status
LNB B REF Disabled ON/OK Faulted NA LNB B REF Status
LNB Status A LNB A OFF ON/OK Faulted NA LNB A Status
LNB Status B LNB B OFF ON/OK Faulted NA LNB B Status
CAL I Normal NA NA Not cal’ed Current ‘Calibration’
AUTO/MAN Manual Mode AUTO Mode NA NA Redundancy Mode
Combiner Switch
(status)
BUC A ONLINE OFFLINE ONLINE/OK Faulted NA BUC A Online Status
BUC B ONLINE OFFLINE ONLINE/OK Faulted NA BUC B Online Status
LNB A ONLINE OFFLINE ONLINE/OK Faulted NA LNB A Online Status
LNB B ONLINE OFFLINE ONLINE/OK Faulted NA LNB B Online Status
NA System OK System Faulted NA Summary Fault
7–5
Page 62

LCS-4 L-Band Combiner Switch Revision 1
Front Panel Control MN/LCS4.IOM
7.3 OPERATION
7.3.1 AUTO / MAN OPERATION
The AUTO/Man switch selects automatic redundancy operation of the unhit in the AUTO mode
and permits operation of the unit from the front panel when MAN is selected.
The other keys on the front panel operate when MAN is selected and they are disabled when
AUTO is enabled.
7.3.2 CAL SWITCH AND LED OPERATION
When CAL function is actuated the L-Band Combiner Switch measures the current supplied to
the ODU/BUC(s) and LNB(s).
Senses BUC current and sets a measurement window of +20% and –20% of current measured
when the CAL function is actuated. The window shall not exceed the capabilities of the power
supply.
• This is accomplished automatically for the installed power supplies. If no BUC power
supplies are installed, No Fault is indicated in the event the unit is deployed only as a
combiner and power supplies are power supplies are provided external to the unit.
• It is possible to program the other upper and lower limits via the remote port. In this case
the CAL = ON enables the values set via the remote port.
Programs the LNB voltage window of 18 VDC +20% and –20% when the CAL function is
actuated. The window must not exceed the capabilities of the power supplies.
• It shall be possible to program other upper and lower via the remote port. In this
case the CAL = ON enables the value set via the remote port.
Senses LNB current and sets a measurement window of +20% and –20% of current measure
when the CAL function is actuated. The window shall not exceed the capabilities of the power
supply.
• It shall be possible to program other upper and lower limits via the remote port.
In this case the CAL = ON enables the value set via the remote port.
Once CAL is completed, if as BUC or LNB power supply is tuned OFF (Power Supply changes
require that the unit is in MAN mode) the faults associated with that BUC or LNB are disabled.
The faults are still disabled if the unit is returned to AUTO mode.
7–6
Page 63

LCS-4 L-Band Combiner Switch Revision 1
Front Panel Control MN/LCS4.IOM
7.3.3 LNB VOLTAGE/CURRENT TURN ON
Contact Comtech EF Data Customer Support for a procedure for setting the CAL current for the
LNB in the event it uses an internal ovenized oscillator. These units draw a higher current at turn
ON of the LNB voltage in order to heat up the crystal. After warm-up, the current drops back to
the normal steady-state value.
7.3.4 ODU/BUC OR LNB ONLINE SWITCH
Note: User shall use ODU/BUC or LNB Switch with indicator contacts.
The RED condition indicates the ODU Switch has failed. The switch has a set of indicator
contacts that are read by the unit controller to determine the position of the switch. When the A/B
indicator does not agree with the programmed position:
• Contact Comtech EF Data for a procedure to correct the problem.
• A RED failure is activated if it is not possible to correct position of the switch.
7.4 FAULT DEFINITIONS FOR SWITCHOVER FOR LNB OR ODU/BUC
Table 7-1. Fault Definitions for Switchover for LNB or ODU/BUC
TX Faults BUC Power Supply HI or Low Voltage Alarm
RX Faults LNB Power Supply HI or Low Voltage Alarm
Common Faults 10 MHz failure – reference to the BUC or LNB is compromised.
Switchover Time Less than 1.5 second following fault detection.
Automatic Switchover The starting point assumes both units are good. When a fault
Manual Switchover From front panel or remote port.
Modulator TX Carrier ON/OFF Unit senses modulator faults and applies control (bypasses UP)
Characteristics
BUC Current HI or Low Current Alarm
LNB Current HI or Low Current Alarm
Shut off the 10 MHz to the BUC and LNB
occurs in the ONLINE unit, it is replaced only with a functional
standby unit. No switching occurs if both units have failed.
to turn TX carrier Off at modulator for up to four modulators.
7–7
Page 64

LCS-4 L-Band Combiner Switch Revision 1
Front Panel Control MN/LCS4.IOM
This page is intentionally left blank.
7–8
Page 65

Appendix A. REMOTE CONTROL
A.1 DESCRIPTION
The electrical interface is either an RS-485 multi-drop bus (for the control of many
devices) or an RS-232 connection (for the control of a single device), and data is
transmitted in asynchronous serial form, using ASCII characters. Control and status
information is transmitted in packets, of variable length, in accordance with the structure
and protocol defined in later sections.
A.1.1 EIA-485
For applications where multiple devices are to be monitored and controlled, a full-duplex
(or 4-wire) RS-485 is preferred. Half-duplex (2-wire) RS-485 is possible, but is not
preferred.
In full-duplex RS-485 communication, there are two separate, isolated, independent,
differential-mode twisted pairs, each handling serial data is different directions. It is
assumed that there is a ‘controlled’ device (a PC or dumb terminal), which transmits data,
in a broadcast mode, via one of the pairs. Many ‘target’ devices are connected to this
pair, which all simultaneously receive data from the controller. The controller is the only
device with a line-driver connected to this pair – the target devices only have linereceivers connected.
In the other direction, on the other pair, each target has a tri-stateable line driver
connected, and the controller has a line-receiver connected. All the line drivers are held in
high-impedance mode until one (and only one) target transmit back to the controller.
Each target has a unique address, and each time the controller transmits, in a framed
‘packet’ of data, the address of intended recipient target is included. All of the targets
receive the packet, but only one (the intended) will reply. The target enables its output
line driver, and transmits its return data packet back tot eh controller, in the other
direction, on the physical separate pair:
OPERATION
A-1
Page 66

LCS-4 L-Band Combiner Switch Revision 1
Remote Control Operation MN/LCS4.IOM
RS-485 (Full-duplex) summary:
• Two differential pairs – one pair for controller to target, one pair for target to
controller.
• Controller-to-target pair has one line driver (controller), and all targets have
line–receivers.
• Target-to-controller pair has one line receiver (controller), and all targets have
tri-state drivers
A.1.2 EIA-232
This is much simpler configuration in which the controller device is connected directly to
the target via a two-wire-plus-ground connection. Controller-to-target is carried, tot eh
target via a two-wire-plus-ground connection. Controller-to-target is carried, via RS-232
electrical levels, on one conductor, and target-to-controller data is carried in the other
direction on the other conductor.
A.2 BASIC PROTOCOL
Whether in RS-232 or RS-485 mode, all data is transmitted as asynchronous serial
characters suitable for transmission and reception by a UART. In this case, the
asynchronous character format is fixed at 8-N-1, exclusively with the baud rate set at
19,200 baud.
All data is transmitted in framed packets. The master is assumed to be a PC or ASCII
dumb terminal, which is controlling the process of monitor and control. The controller is
the only device that is permitted to initiate the transmission of data. Targets are only
permitted to transmit when they have been specifically instructed to do so by the
Controller.
All bytes within a packet are printable ASCII characters, less than ASCII code 127. In
this context, the Carriage Return and Li characters are considered printable.
All messages from controller to target require a response (with one exception). This will
either be to return data that has been requested by the controller, or to acknowledge
reception of an instruction to change the configuration of the target. The exception to this
is when the controller broadcasts a message (such as Set time/date) using Address 0,
when the target is set to RS-485 mode
A-2
Page 67

LCS-4 L-Band Combiner Switch Revision 1
Remote Control Operation MN/LCS4.IOM
A.2.1 PACKET STRUCTURE
ONTROLLER-TO-TARGET:
C
Start of Packet
<
ASCII code 60
(1 character)
Target
Address
(4 characters)
Example: <0135/BSA=1{CR}
TARGET-TO-CONTROLLER:
Start of Packet
>
ASCII code 62
(1 character)
Target
Address
(4 characters)
Example: >0654/BSA=1{CR}{LF}
Each of the components of the packet is now explained.
Address
De-limiter
/
ASCII code 47
(1 character)
Address
De-limiter
/
ASCII code 47
(1 character) (3 characters)
Instruction
Code
(3 characters)
Instruction
Code
Code
Qualifier
= or ?
ASCII code
61 or 63
(1 character)
Code
Qualifier
= ?,!, or *
ASCII code
61,63, 33 or 42
(1 character)
Optional
Arguments End of Packet
Carriage
Return
ASCII code 13
(n characters)
Optional
Arguments
(From 0 to n
characters)
(1 character)
End of Packet
Carriage
Return
ASCII code 13, 10
(2 character)
A.2.1.1 START OF PACKET
Controller to Target: This is the character: < = (ASCII code 60)
Target to Controller: This is the character: > = (ASCII code 62)
Because this is used to provide a reliable indication of the start of packet, these two
characters may not appear anywhere else within the body of the message.
A-3
Page 68

LCS-4 L-Band Combiner Switch Revision 1
Remote Control Operation MN/LCS4.IOM
A.2.1.2 ADDRESS
Up to 9999 devices can be uniquely addressed. In RS-232 and RS-485 applications, the
permissible range of values is 1 to 9999. It is programmed into a slave unit using the Set
Physical Address (SPA) command.
The controller sends a packet with the address of a target - the destination
of the packet. When the target responds, the address used is the same
IMPORTANT
address, to indicate to the controller the source of the packet. The controller
does not have its own address.
A.2.1.3 INSTRUCTION CODE
This is a three-character alphabetic sequence that identifies the subject of the message.
Wherever possible, the instruction codes have been chosen to have some significance.
For example: BSA for BUC power supplies A, LCB for LNB Current window B,
etc. This aids in the readability of the message, should it be displayed in its raw
ASCII form. Only upper case alphabetic characters may be used (A-Z, ASCII
codes 65-90).
A.2.1.4 INSTRUCTION CODE QUALIFIER
This is a single character that further qualifies the preceding instruction code.
Code Qualifiers obey the following rules:
1. From Controller to Target, the only permitted values are:
= (ASCII code 61)
? (ASCII code 63)
They have these meanings:
The = code (controller to target) is used as the assignment operator, and is used to
indicate that the parameter defined by the preceding byte should be set to the value of the
argument(s) which follow it.
For example, in a message from controller to target, BSA = 1 would mean ‘enable
the power supply for BUC A.’
The ? code (controller to target) is used as the query operator, and is used to indicate that
the target should return the current value of the parameter defined by the preceding byte.
For example, in a message from controller to target, ‘BSA?’ would mean return the
current state of BUC A power supply.’
A-4
Page 69

LCS-4 L-Band Combiner Switch Revision 1
Remote Control Operation MN/LCS4.IOM
2. From Target to Controller, the only permitted values are:
= (ASCII code 61)
? (ASCII code 63)
! (ASCII code 33)
* (ASCII code 42)
# (ASCII code 35)
They have these meanings:
The = code (target to controller) is used in two ways:
• First, if the controller has sent a query code to a target (for example BSA?,
meaning ‘is BUC A power supply on or off?), the target would respond with,
BSA=x, where x represents the state in question, 1 being on and 0 being off.
• Second, if the controller sends an instruction to set a parameter to a particular
value, then, providing the value sent in the argument is valid, the target will
acknowledge the message by replying with BSA= (with no message arguments).
The ? code (target to controller) is only used as follows:
• If the controller sends an instruction to set a parameter to a particular value, then,
if the value sent in the argument is not valid, the target will acknowledge the
message by replying with (for example) with BSA? (with no message
arguments).
• This indicates that there was an error in the message sent by the master.
The * code (target to controller) is only used as follows:
• If the controller sends an instruction to set a parameter to a particular value, then,
if the value sent in the argument is valid, but the modem will not permit that
particular parameter to be changed at that time, the target will acknowledge the
message by replying with (for example) with BSA* (with no message
arguments).
The ! code (target to controller) is only used as follows:
• If the controller sends an instruction code which the target does not recognize,
the target will acknowledge the message by echoing the invalid instruction,
followed by the ! character. Example: XYZ!
The # code (target to controller) is only used as follows:
• If the controller sends an instruction code which the target cannot currently
perform because of hardware resource issues, the target will acknowledge the
message by echoing the invalid instruction, followed by the BSA# character.
A-5
Page 70

LCS-4 L-Band Combiner Switch Revision 1
Remote Control Operation MN/LCS4.IOM
A.2.1.5 MESSAGE ARGUMENTS
Arguments are not required for all messages. All arguments are ASCII codes for the
characters 0 to 9 (ASCII 48 to ASCII 57), period (ASCII 46) and comma (ASCII 44).
A.2.1.6 END OF PACKET
Controller to Target: This is the Carriage Return character (ASCII code 13)
Target to Controller: This is the two-character sequence Carriage Return, Line Feed.
(ASCII code 13, and code 10.)
Both indicate the valid termination of a packet.
A.3 COMMANDS OR RESPONSES
The commands and responses are provided to assist the technician in monitoring and
controlling the unit.
A-6
Page 71

Parameter
Type
BUC Power
Supply A
Enable
BUC Power
Supply B
Enable
BUC A
Reference
Oscillator
Enable
BUC B
Reference
Oscillator
Enable
BUC Fault
Logic
BUC A
Current
Window
LCS-4 L-Band Combiner Switch Revision 1
Remote Control Operation MN/LCS4.IOM
Command
(Instruction
Code and
qualifier)
BSA= 1 byte,
BSB= 1 byte,
BRA= 1 byte,
BRB= 1 byte,
BFL= 1 byte,
BCA= 2 bytes,
Arguments
for Cmd or
Response
to Query
value of 0,1
value of 0,1
value of 0,1
value of 0,1
value of 0,1
numerical
Description of Arguments
Note that all arguments are ASCII
numeric codes between 48 and 57.
Command or Query.
BUC A Power Supply, where:
0=Disabled
1=Enabled
Example: BSA=1
Parameter 2 of SGC Command
Command or Query.
BUC B Power Supply, where:
0=Disabled
1=Enabled
Example: BSB=1
Parameter 3 of SGC Command
Command or Query.
BUC A reference Oscillator, where:
0=Disabled
1=Enabled
Example: BRA=1
Parameter 4 of SGC Command
Command or Query.
BUC B reference Oscillator, where:
0=Disabled
1=Enabled
Example: BRB=1
Parameter 4 of SGC Command
Command or Query.
BFL controls whether or not the Summary Fault Relay
(SFR) is affected by the BUC Volt or Current window
monitor, where:
0=A BUC Volt/Current Fault does not effect the SFR,
1=A BUC Volt/Current Fault will effect the SFR.
Example: BFL=1
Parameter 8 of SGC Command
Command or Query.
BUC A Current Monitor Window, this command allows
the user to set the alarm window in ±% of
Response to
Command
(Target to
Controller)
BSA= (message ok)
BSA? (Received ok,
but invalid
arguments found)
BSA*(message ok,
but not permitted in
current mode)
BSB= (message ok)
BSB? (Received ok,
but invalid
arguments found)
BSB*(message ok,
but not permitted in
current mode)
BRA= (message ok)
BRA? (Received ok,
but invalid
arguments found)
BRA*(message ok,
but not permitted in
current mode)
BRB= (message ok)
BRB? (Received ok,
but invalid
arguments found)
BRB*(message ok,
but not permitted in
current mode)
BFL= (message ok)
BFL? (received ok,
but invalid
arguments found)
DAT= (message ok)
DAT? (received ok,
but invalid
arguments found)
Query
(Instruction
code and
qualifier)
BSA? BSA=x (same format as command
BSB? BSB=x (same format as command
BRA? BRA=x (same format as command
BRB? BRB=x (same format as command
BFL?
DAT? DAT=xx.xx
Response to query
(Target to Controller)
arguments)
arguments)
arguments)
arguments)
BFL=x (same format as
command arguments)
(same format as command
arguments)
A-7
Page 72

Parameter
Type
BUC A
Current
Window
BUC B
Current
Window
LNB Power
Supply A
Enable
LNB Power
Supply B
Enable
LNB A
Reference
Oscillator
Enable
LCS-4 L-Band Combiner Switch Revision 1
Remote Control Operation MN/LCS4.IOM
Command
(Instruction
Code and
qualifier)
BCA= 2 bytes,
BCB= 2 bytes,
LSA= 1 byte,
LSB= 1 byte,
LRA= 1 byte,
Arguments
for Cmd or
Response
to Query
numerical
numerical
value of 0,1
value of 0,1
value of 0,1
Description of Arguments
Note that all arguments are ASCII
numeric codes between 48 and 57.
Command or Query.
BUC A Current Monitor Window, this command allows
the user to set the alarm window in ±% of the
calibrated BUC A Current. Valid inputs are 20 to 50 in
increments of 1%. In addition, setting the value to 99
disables the alarm function.
Example: BCA=30, set the alarm window at ±30%
Parameter 6 of the SGC Command.
Command or Query.
BUC B Current Monitor Window, this command allows
the user to set the alarm window in ±% of the
calibrated BUC B Current. Valid inputs are 20 to 50 in
increments of 1%. In addition, setting the value to 99
disables the alarm function.
Example: BCB=30, set the alarm window at ±30%
Parameter 7 of the SGC Command.
Command or Query.
LNB A Power Supply, where:
0=Disabled
1=Enabled
Example: LSA=1
Parameter 10 of SGC Command
Command or Query.
LNB B Power Supply, where:
0=Disabled
1=Enabled
Example: LSB=1
Parameter 11 of SGC Command
Command or Query.
LNB A reference Oscillator, where:
0=Disabled
1=Enabled
Example: LRA=1
Parameter 12 of SGC Command
Response to
Command
(Target to
Controller)
BCA= (message ok)
BCA? (received ok,
but invalid
arguments found)
BCB= (message ok)
BCB? (received ok,
but invalid
arguments found)
LSA= (message ok)
LSA? (received ok,
but invalid
arguments found)
LSA*(message ok,
but not permitted in
current mode)
LSB= (message ok)
LSB? (received ok,
but invalid
arguments found)
LSB*(message ok,
but not permitted in
current mode)
LRA= (message ok)
LRA? (received ok,
but invalid
arguments found)
LRA*(message ok,
but not permitted in
current mode)
Query
(Instruction
code and
qualifier)
BCA? BSA=xx
BCB? BSB=xx
LSA? LSA=x (same format as command
LSB? LSB=x (same format as command
LRA? LRA=x (same format as command
Response to query
(Target to Controller)
(same format as command
arguments)
(same format as command
arguments)
arguments)
arguments)
arguments)
A-8
Page 73

Parameter
Type
LNB B
Reference
Oscillator
Enable
LNB Fault
Logic
LNB A
Current
Window
LNB B
Curent
Window
Calibrate All
Limits
Calibrate
BUC A Limits
LCS-4 L-Band Combiner Switch Revision 1
Remote Control Operation MN/LCS4.IOM
Command
(Instruction
Code and
qualifier)
LRB= 1 byte,
LFL= 1 byte,
LCA=
LCB=
CAL= 2 bytes,
CBA= None/5
Arguments
for Cmd or
Response
to Query
value of 0,1
value of 0,1
2 bytes,
numerical
2 bytes,
numerical
numerical
bytes
numerical
Description of Arguments
Note that all arguments are ASCII
numeric codes between 48 and 57.
Command or Query.
LNB B reference Oscillator, where:
0=Disabled
1=Enabled
Example: LRB=1
Parameter 13 of SGC Command
Command or Query.
LFL controls whether or not the Summary Fault Relay
(SFR) is affected by the BUC Volt or Current window
monitor, where:
0=A LNB Volt/Current Fault does not effect the SFR,
1=A LNB Volt/Current Fault will effect the SFR.
Example: LFL=1
Parameter 16 of SGC Command
Command or Query.
LNB A Current Monitor Window, this command allows
the user to set the alarm window in ±% of the
calibrated LNB A Current. Valid inputs are 20 to 50 in
increments of 1%. In addition, setting the value to 99
disables the alarm function.
Example: LCA=30, set the alarm window at ±30%
Parameter 14 of the SGC Command.
Command or Query.
LNB B Current Monitor Window, this command allows
the user to set the alarm window in ±% of the
calibrated LNB B Current. Valid inputs are 20 to 50 in
increments of 1%. In addition, setting the value to 99
disables the alarm function.
Example: LCB=30, set the alarm window at ±30%
Parameter 15 of the SGC Command.
Command only.
This command is used to set the calibration point for
the BUC/LNB Current alarm feature.
Example: CAL=
Command or Query.
This command is used to set the calibration point for
the BUC A Current alarm feature.
Command Example: CBA=
Query Example: CBA=02120
Response to
Command
(Target to
Controller)
LRB= (message ok)
LRB? (received ok,
but invalid
arguments found)
LRB*(message ok,
but not permitted in
current mode)
LFL= (message ok)
LFL? (received ok,
but invalid
arguments found)
LCA= (message ok)
LCA? (received ok,
but invalid
arguments found)
LCB= (message ok)
LCB? (received ok,
but invalid
arguments found)
CAL=(message ok) N/A N/A
CBA=(message ok) CBA? CBA=xxxxx
Query
(Instruction
code and
qualifier)
LRB? LRB=x (same format as command
LFL?
LCA? LCA=xx
LCB? LCB=xx
Response to query
(Target to Controller)
arguments)
LFL=x (same format as command
arguments)
(same format as command
arguments)
(same format as command
arguments)
(same format as command
arguments)
A-9
Page 74

Parameter
Type
Calibrate
BUC B Limits
Calibrate
LNB A Limits
Calibrate
LNB B Limits
Redundancy
Control
Mode
Redundancy
Switch
Control
Mode
Select TX
LCS
Function
LCS-4 L-Band Combiner Switch Revision 1
Remote Control Operation MN/LCS4.IOM
Command
(Instruction
Code and
qualifier)
CBB= None/5
CLA= None/5
CLB= None/5
RAM= 1 byte,
MOD= 1 byte,value
STT= 1 byte,
Arguments
for Cmd or
Response
to Query
bytes
numerical
bytes
numerical
bytes
numerical
value of 0,1
of 0,1
value of 0,1
Description of Arguments
Note that all arguments are ASCII
numeric codes between 48 and 57.
Command or Query.
This command is used to set the calibration point for
the BUC B Current alarm feature.
Command Example: CBB=
Query Example: CBB=02120
Command or Query.
This command is used to set the calibration point for
the LNB B Current alarm feature.
Command Example: CLA=
Query Example: CLA=120.8
Command or Query.
This command is used to set the calibration point for
the LNB B Current alarm feature.
Command Example: CLB=
Query Example: CLB=120.8
Command or Query
RAM controls whether or not the Redundancy
Controller is in automatic or manual mode, where:
0=Manual Mode
1=Auto Mode
Example: RAM=1
Parameter 22 of SGC Command.
Command or Query.
MOD controls whether BOTH BUC and LNB switches
switch together or independently when a fault occurs,
where:
0=Dependent Switching Mode
1=Indendent Switching Mode
Example: MOD=1
Parameter 23 of SGC Command
Command or Query.
STT Selects whether the LCS-4 will act as a 1:1
redundancy controller or a Combiner for the TX
Where:
0=Combiner
1=Redundancy Controller
Example: STT=0
Parameter 1 of SGC Command.
Response to
Command
(Target to
Controller)
CBB=(message ok) CBB? CBB=xxxxx
CLA=(message ok) CLA? CLA=xxx.x
CLB=(message ok) CLB? CLB=xxx.x
RAM=(message ok)
RAM? (received ok,
but invalid
arguments found)
RAM*(message ok,
but not permitted in
current mode)
MOD=(message ok)
MOD? (received ok,
but invalid
arguments found)
MOD* (message ok,
but not permitted in
current mode)
STT=(message ok)
STT? (Received ok,
but invalid
arguments found)
STT* (message ok,
but not permitted in
current mode)
Query
(Instruction
code and
qualifier)
RAM? RAM=x (same format as
MOD? MOD=x (same format as
STT? STT=x (same format as command
Response to query
(Target to Controller)
(same format as command
arguments)
(same format as command
arguments)
(same format as command
arguments)
command arguments)
command arguments)
arguments)
A-10
Page 75

LCS-4 L-Band Combiner Switch Revision 1
Remote Control Operation MN/LCS4.IOM
Command
(Instruction
Parameter
Type
Select RX
LCS
Function
UPC Control UPC= 1 byte
TX
Attenuator
Control
BUC Online
Control
LNB Online
Control
Modem FSK
Control
Code and
qualifier)
SRT= 1 byte,
ATT= 4 bytes,
BOC= 1 byte,
LOC= 1 byte,
FSM= 1 byte,
Arguments
for Cmd or
Response
to Query
value of 0,1
numerical
value or
1295 thru
4095
numerical
numerical
numerical
Description of Arguments
Note that all arguments are ASCII
numeric codes between 48 and 57.
Command or Query.
SRT Selects whether the LCS-4 will act as a 1:1
redundancy controller or a Combiner for the RX
Where:
0=Combiner
1=Redundancy Controller
Example: SRT=0
Parameter 9 of SGC Command.
Command or Query
This command is used to set UPC control, where:
0=Pass thru
1=UPC loop out Support
Example: UPC=0
Parameter 24 of SGC Command.
Command or Query.
Sets Gain control for TX
Example: ATT=1523
Command or Query.
This command is used to set which unit will be online,
where:
1=BUC A
2=BUC B
Example: BOC=1
Command or Query.
This command is used to set which unit will be online,
where:
1=LNB A
2=LNB B
Example: LOC=1
Command or Query.
This command is used to set which unit will be used for
the FSK link, where:
1=Modem 1
2=Modem 4
Example: FSM=1
Parameter 25 of SGC Command.
Response to
Command
(Target to
Controller)
SRT=(message ok)
SRT? (received ok,
but invalid
arguments found)
SRT* (message ok,
but not permitted in
current mode)
UPC=(message ok)
UPC? (received ok,
but invalid
arguments found)
ATT=(message ok)
ATT? (received ok,
but invalid
arguments found)
BOC=(message ok)
BOC? (received ok,
but invalid
arguments found)
BOC* (message ok,
but not permitted in
current mode)
LOC=(message ok)
LOC? (received ok,
but invalid
arguments found)
LOC* (message ok,
but not permitted in
current mode)
FSM=(message ok)
FSM? (received ok,
but invalid
arguments found)
FSM* (message ok,
but not permitted in
current mode)
Query
(Instruction
code and
qualifier)
SRT? SRT=x (same format as command
UPC? UPC=x (same format as
ATT? ATT=xxxx (same format as
BOC? BOC=x (same format as
LOC? LOC=x (same format as command
FSM? FSM=x (same format as
Response to query
(Target to Controller)
arguments)
command arguments)
command arguments)
command arguments)
arguments)
command arguments)
A-11
Page 76

LCS-4 L-Band Combiner Switch Revision 1
Remote Control Operation MN/LCS4.IOM
Command
(Instruction
Parameter
Type
Set RTC
Date
Set RTC
Time
Serial
Number
Retrieve
Equipment
Type
Lamp Test LMP= 1 byte,
Relay Test RLY= 1 byte,
Code and
qualifier)
DAY= 6 bytes,
TIM= 6 bytes,
N/A 9 bytes
N/A 12 bytes
Arguments
for Cmd or
Response
to Query
numerical
numerical
alpha
numerical
000000000
to
999999999
alpha
numerical
numerical
value of 0,1
Description of Arguments
Note that all arguments are ASCII
numeric codes between 48 and 57.
A command in the form ddmmyy,
where: dd=day of the month between 01 and 31
mm=month of the year, between 01 and 12
yy=year, between 97 and 96 (1997 to 2000,
then 2000 to 2096)
Example: DAY=240457 would ne April 24, 2057
A command in the form hhmmss, indicating the time
from midnight:
where: hh=hours, between 00 and 23
mm=minutes, between 00 and 59
ss=seconds, between 00 and 59
Example: TIM=231259 would be 23 hours, 12 minutes,
and 59 seconds from midnight.
Query only.
Used to Query the units 9 digit serial number.
Target returns its S/N in the form XXXXXXXXX.
Example: RSN=000000165
Query only.
LCS-4 returns a string indicating the Model Number
and the value of internal software revision installed.
Example: RET=LCS-4 V1.0.3
Command only.
Indicates Test Mode to enable/disable all LED’s,
where:
0=Normal Operation
1=LED’s all On
2=LED’s all OFF
Example: LMP=x
Note: In Mode 1 or 2, the unit automatically switches to
normal operation after 10 seconds.
Command only.
Indicates Test Mode to actuate.de-actuate Relays ,
where:
0=Normal Operation
1=Relays all actuated
2=Relays all de-actuated
Example: RLY=x
Note: In Mode 1 or 2, the unit automatically switches to
normal operation after 10 seconds.
Response to
Command
(Target to
Controller)
DAY= (message ok)
DAY? (received ok,
but invalid
arguments found)
DAY* (message ok,
but not permitted in
current mode)
TIM= (message ok)
TIM? (received ok,
but invalid
arguments found)
TIM* (message ok,
but not permitted in
current mode)
N/A RSN? RSN=xxxxxxxxx (same format as
N/A RET? RET=xxxxxxxxxxxx
LMP= (message ok)
LMP? (received ok,
but invalid
arguments found)
RLY= (message ok)
RLY? (received ok,
but invalid
arguments found)
Query
(Instruction
code and
qualifier)
DAY? DAY=xxxxxx (same format as
TIM? TIM=xxxxxx (same format as
N/A N/A
N/A N/A
Response to query
(Target to Controller)
command arguments)
command arguments)
command arguments)
(same format as command
arguments)
A-12
Page 77

Parameter
Type
Reference
Oscillator
Adjust
External
Reference
Oscillator
Enable
Reference
Oscillator
Source
Select
Internal
Reference
Oscillator
Power
Control
Reference
OSC. Fault
Logic
Synchronize
Reference
Cal
LCS-4 L-Band Combiner Switch Revision 1
Remote Control Operation MN/LCS4.IOM
Command
(Instruction
Code and
qualifier)
SRO= 3 bytes Command or Query.
N/A 1 byte,
RSS= 1 byte,
VPC= 1 byte,
RFL= 1 byte,
SRC=
No
Arguments
Arguments
for Cmd or
Response
to Query
value of 0,1
value of 0,1
value of 0,1
value of 0,1
4 bytes Command or Query.
Description of Arguments
Note that all arguments are ASCII
numeric codes between 48 and 57.
Ref Osc Adjust, between 000 to 255
Resolution 001
Example: SRO=087
Note: SRO cannot be adjusted when the Switch is
locked to an external reference source.
Parameter 19 of SGC Command.
Query only.
Ref OSC Status, where:
0=Internal Reference
1=External Reference
Example: XRF=1
Command or Query.
Ref OSC select, where:
0=Internal Reference
1=External Reference
Example: RSS=1
Parameter 17 of SGC Command.
Command or Query.
Ref Osc Power Control, where:
0=Off
1=ON
Example: VPC=1
Used to disable internal VCXO in the case of failure.
Parameter 18 of SGC Command.
Command or Query.
RFL controls whether or not the Software monitors the
external reference source. If enabled and no source is
present a fault will be reported.
0=EXT Reference not monitored.
1=EXT Reference is monitored and the lock state
reported.
Example: RFL=1
Parameter 20 of SGC Command.
SRC synchronizes internal reference voltage with
voltage of externally locked VCXO.
Query shows current locked voltage. Command sets
SRO value to match Vt.
Command Example: SRC=
Query Example: SRC=02.6
Response to
Command
(Target to
Controller)
SRO=(message ok)
SRO?(received ok,
but invalid
arguments found)
SRO* (message ok,
but not permitted in
current mode)
N/A
RSS=(message ok)
RSS?(received ok,
but invalid
arguments found)
RSS* (message ok,
but not permitted in
current mode)
VPC=(message ok)
VPC?(received ok,
but invalid
arguments found)
VPC* (message ok,
but not permitted in
current mode)
RFL= (message ok)
RFL? (received ok,
but invalid
arguments found)
SRC=(message ok)
SRC?(received ok,
but invalid
arguments found)
SRC* (message ok,
but not permitted in
current mode)
Query
(Instruction
code and
qualifier)
SRO? SRO=xxx
XRF? XRF=x
RSS? RSS=x
VPC? VPC=x
RFl? RFL=x
SRC? SRC=xx.x
Response to query
(Target to Controller)
(same format as command
arguments)
(same format as command
arguments)
(same format as command
arguments)
(same format as command
arguments)
(same format as command
arguments)
(same format as command
arguments)
A-13
Page 78

LCS-4 L-Band Combiner Switch Revision 1
Remote Control Operation MN/LCS4.IOM
Command
(Instruction
Parameter
Type
Cold Start CLD= 1 byte,
Remote
Address
(Physical
Address)
Clear All
Stored
Events
Retrieve next
5 unread
Stored
Events
Retrieve
Number of
unread
Stored
Events
Code and
qualifier)
SPA= 4 bytes,
CAE= None Command only.
N/A 145 bytes Query only.
N/A 2 bytes,
Arguments
for Cmd or
Response
to Query
value of 0,1
numerical
numerical
Description of Arguments
Note that all arguments are ASCII
numeric codes between 48 and 57.
Command or Query.
CLD enables masking reference lock detect for 3
minutes. During this time, the BUC references will be
disabled during this time. Values are:
0=Normal Operation
1=Cold Start Enabled
Example: CLD=1
Parameter 21 of SGC Command.
Command or Query.
Physical Address – between 0001 and 9999.
Resolution 0001
Example:SPA=0890
Instructs the target to clear all Stored Events. This
command takes no arguments.
LCS-4 returns the oldest 5 Stored Events, which have
not yet been read over the remote control. Reply
format: Sub-body{CR}Sub-body{CR} Sub-
body{CR}Sub-body{CR}Sub-body, where Subbody=
yyyyyyyyyy zz mmddyy hhmmss
Where:
yyyyyyyyyy = being the fault description
ZZ = being the alarm type
FT=Fault
OK=Clear
IF=Information
If there are no new events, the LCS-4 will reply with
LNE*
Query Only.
Returns the number of Stored Events, which remain
unread, in the form xx.
Example: reply: TNE=18
Response to
Command
(Target to
Controller)
CLD= (message ok)
CLD? (received ok,
but invalid
arguments found)
CLD* (message ok,
but not permitted in
current mode)
SPA= (message ok)
SPA? (received ok,
but invalid
arguments found)
SPA* (message ok,
but not permitted in
current mode)
CAE=(message ok) N/A
AFR= (message ok)
AFR? (received ok,
but invalid
arguments found)
N/A TNE? TNE=xx
Query
(Instruction
code and
qualifier)
CLD? CLD=x
SPA? SPA=xxxx
AFR?
(same format as command
Response to query
(Target to Controller)
(same format as command
arguments)
(same format as command
arguments)
N/A
AFR=x
(same format as command
arguments)
arguments)
A-14
Page 79

Parameter
Type
Summary
Fault Status
Terminal
Status
Change
Restore
Factory
Defaults
LCS-4 L-Band Combiner Switch Revision 1
Remote Control Operation MN/LCS4.IOM
Command
(Instruction
Code and
qualifier)
N/A 1 byte,
N/A 1 byte,
RST= 1 byte,
Arguments
for Cmd or
Response
to Query
value of 0,1
value of 0,1
value of 1
Description of Arguments
Note that all arguments are ASCII
numeric codes between 48 and 57.
Query only.
Used to Query the status of the LCS-4 Summary Fault
Relay.
Where:
0=OK
1=FT
Example: SFS=0
Query only.
Used to Query the status of the Terminal Status.
Where:
0=No Change in Status
1=Change in Status
Example: TSC=0
Command only.
Used to restore unit setting to factory default.
Example: RST =1
Following is a list of restore values:
RAM=0(manual)
MOD=1(independent switching)
SRO=Factory setting
VPC=1(On)
BCA, BCB, LCA, LCB=99 (Disabled)
CBA,CB,CLA,CLB=0 (Zero out Cal Values)
BSA, BSB, LSA, LSB=0 (PS Off)
BRA, BRB, LRA, LRB=0 (Ref Off)
BFL, LFL=0 (Summary Fault Unaffected)
RFL=0 (EXT REF Not Monitored)
CLD=0 (Disabled)
FSM=1 (Modem 1 FSK Control)
STT, SRT=0 (Combiner)
UPC=0 (Passthru)
ATT=2695 (Mid Point)
Response to
Command
(Target to
Controller)
N/A SFS? SFS=x
N/A TSC? TSC=x
RST= (message ok)
RST? (received ok,
but invalid
arguments found)
Query
(Instruction
code and
qualifier)
(same format as command
(same format as command
N/A
Response to query
(Target to Controller)
arguments)
arguments)
N/A
A-15
Page 80

Parameter
Type
Retrieve
Maintenance
Status
Concise
Maintenance
Status
LCS-4 L-Band Combiner Switch Revision 1
Remote Control Operation MN/LCS4.IOM
Command
(Instruction
Code and
qualifier)
N/A 159 bytes,
N/A 80 bytes,
Arguments
for Cmd or
Response
to Query
Query only.
alpha
numerical
numerical
Description of Arguments
Note that all arguments are ASCII
numeric codes between 48 and 57.
Used to Query the maintenance status of the LCS-4
Example: RMS=’cr’
48VPS=048.0’cr’
12VP1=012.0’cr’
12VP2=012.0’cr’
P5.0V=+05.0’cr’
N5.0V=-05.0’cr’
BUCAV=024.0’cr’
BUCBV=024.0’cr’
BUCAC=02500’cr’
BUCBC=02500’cr’
LNBAV=018.0’cr’
LNBBV=018.0’cr’
LNBAC=125.0’cr’
LNBBC=125.0’cr’
REFVT=005.0’cr’
FAN C=725.0’cr’
TEMPO=025.0’cr’’lf’]
Query only.
Used to Query the Maintenance status of the LCS-4
Example: CMS=aaa.a,bbb.b,ccc.c,ddd.d,eee.e
fff.f,ggg.g,hhh.h,iii.i,jjj.j,kkk.k,lll.l,mmm.m
nnn.n,ooo.o,ppp.p’cr’’lf’
where:
aaa.a = Main 48V Power Supply
bbb.b = 12V Power Supply 1
ccc.c = 12V Power Supply 2
ddd.d = +5V Power Supply
eee.e = -5V Power Supply
fff.f = BUC A Power Supply
ggg.g = BUC B Power Supply
hhh.h = BUC A Current in milliampers
iii.i = BUC B Current in milliamperes
jjj.j = LNB A Power Supply
kkk.k = LNB B Power Supply
lll.l = LNB A Current in milliampers
mmm.m = LNB B Current in milliampers
nnn.n = Reference Tune Voltage
ooo.o = Fan Current in milliampers
ppp.p = Unit Temperature
Response to
Command
(Target to
Controller)
N/A RMS? RMS=x…x
N/A CMS? CMS=x….x (see description for
Query
(Instruction
code and
qualifier)
Response to query
(Target to Controller)
(same format as command
arguments)
details of arguments)
A-16
Page 81

Parameter
Type
Concise
Utility Status
Retrieve
Alarm Status
LCS-4 L-Band Combiner Switch Revision 1
Remote Control Operation MN/LCS4.IOM
Command
(Instruction
Code and
qualifier)
N/A 32 bytes,
N/A 147 bytes,
Arguments
for Cmd or
Response
to Query
alpha
numerical
text
Description of Arguments
Note that all arguments are ASCII
numeric codes between 48 and 57.
Query only.
Used to Query the Utility status of the LCS-4 response
in comma delimited.
Example:
CUS=aaaaa,bbbbb,ccc.c,ddd.d,eee,f,g,h,’cr’’lf’]
where:
aaaaa = BUC A CAL Current
bbbbb = BUC B CAL Current
ccc.c = LNB A CAL Current
ddd.d = LNB B CAL Current
eee = Reference Adjust setting
f = External Reference Sense
g = BUC Online Status
h = LNB Online Status
Query only.
Used to Query the Alarm status of the LCS-4
Example: RAS=’cr’
48VLT=OK’cr’
12VP1=OK’cr’
12VP2=OK’cr’
P5VLT=OK’cr’
N5VLT=OK’cr’
BUCAV=OK’cr’
BUCBV=OK’cr’
BUCAC=OK’cr’
BUCBC=OK’cr’
BUCSW=OK’cr’
LNBAV=OK’cr’
LNBAC=OK’cr’
LNBBC=OK’cr’
LNBSW=OK’cr’
FANMC=OK’cr’
REFLD=OK’cr’
BUCSW=OK’cr’
LNBSW=OK’cr’
SFLTS=ok’cr’’lf’]
Response to
Command
(Target to
Controller)
N/A CUS? CUS=x….x (see description for
N/A RAS? RAS=x….x (see description for
Query
(Instruction
code and
qualifier)
Response to query
(Target to Controller)
details of arguments)
details of arguments)
A-17
Page 82

Parameter
Type
Concise
Alarm Status
LCS-4 L-Band Combiner Switch Revision 1
Remote Control Operation MN/LCS4.IOM
Command
(Instruction
Code and
qualifier)
N/A 41 bytes,
Arguments
for Cmd or
Response
to Query
numerical
Description of Arguments
Note that all arguments are ASCII
numeric codes between 48 and 57.
Query only.
Used to Query the Alarm status of the LCS-4 response
is comma delimited.
Example: CMS=abcdefghijklmnopqr’cr’’lf’
where: a thru t = 0 or 1, 0 = OK 1 = FT
a = Main 48V Power Supply A Alarm
b = 12V Power Supply B Alarm
c = 12V Power Supply Alarm
d = +5V Power Supply Alarm
e = -5V Power Supply Alarm
f = BUC A Voltage Alarm
g = BUC B Voltage Alarm
h = BUC A Current Alarm
i = BUC B Current Alarm
j = BUC Switch Alarm
k = LNB A Voltage Alarm
l = LNB B Current Alarm
m = LNB A Current Alarm
n = LNB B Current Alarm
o = LNB Switch Alarm
p = Fan Current Alarm
q = REF Lock Detect PLL Alarm
r = BUC Redundancy Switch Alarm
w = LNB Redundancy Switch Alarm
t = Summary Fault Status
Response to
Command
(Target to
Controller)
N/A CAS? CAS=abcdefghijklmnopqr (see
Query
(Instruction
code and
qualifier)
Response to query
(Target to Controller)
description for details of
arguments)
A-18
Page 83

Parameter
Type
Switch
Global
Configuration
LCS-4 L-Band Combiner Switch Revision 1
Remote Control Operation MN/LCS4.IOM
Command
(Instruction
Code and
qualifier)
SGC= 56 bytes,
Arguments
for Cmd or
Response
to Query
with
numerical
entries fixed
value
entries, and
delimiters
Description of Arguments
Note that all arguments are ASCII
numeric codes between 48 and 57.
Command or Query. Global configuration of Unit, in
the form:
SGC=abcdeffgghijklmmnnoopqrssstuvwxy’cr’’lf]
where:
a = Tx LCS Function (STT)
b = BUC A Power Supply Enable (BSA)
c = BUC B Power Supply Enable (BSB)
d = BUC A Reference Osc. Enable (BRA)
e = BUC B Reference Osc. Enable (BRB)
ff = BUC A Current Window (BCA)
gg = BUC B Current Window (BCB)
h= BUC Fault Logic (BFL)
i = RX LCS Function (SRL)
j = LNB A Power Supply Enable (LSA)
k = LNB B Power Supply Enable (LSB)
l = LNB A Reference Osc. Enable (LRA)
m = LNB B Reference Osc. Enable (LRB)
nn = LNB A Current Window (LCA)
oo = LNB B Current Window (LCB)
p = LNB Fault Logic (LFL)
q = Ref Source select (RSS)
r = VCXO Power Control (VPC)
sss = Reference OSC. Adjust. (SRO)
t= Reference Fault Logic (RFL)
u = Cold Start Enable (CLD)
v = Redundancy Switch Control Mode (RAM)
w = Redundancy Switch Control Mode (MOD)
x = UPC Support (UPC)
y = Modem FSK control (FSM)
Response to
Command
(Target to
Controller)
SGC= (message ok)
SGC? (received ok,
but invalid
arguments found)
Query
(Instruction
code and
qualifier)
SGC?
Response to query
(Target to Controller)
SGC=
abcdeffgghijklmmnnoopqrssstuvw
xy
(same format as command
arguments)
A-19
Page 84

NOTES:
LCS-4 L-Band Combiner Switch Revision 1
Remote Control Operation MN/LCS4.IOM
A-20
Page 85

Appendix B. SPECIFICATIONS
B.1 GENERAL SPECIFICATION
Operating Frequency Range 950 to 1950 MHz
TX IF Connector:
Modulator Side
BUC Side
TX IF Impedance/Return Loss
TX Input Level, Modulator Side 0 to –40 dBm, operating per port, +10 dBm maximum per port
TX Uplink Power Control (UPC) Access Input and output SMA female connectors. Routes composite
TX UPC Signal Level Combined TX input level –7 dB typical both connections
Isolation TX input to unselected output 50 dB minimum
TX Gain, Combiner Input to TX Output -10 dB maximum loss
TX Gain, Balance Adjust
TX Gain, Balance Control Control is via a momentary center OFF SPDT switch or M&C.
rd
TX 3
Order Products (2-tone) -55 dBc for two CW carriers at the TX Output each –6 dBm.
TX 2nd Order Products (2-tone) -55 dBc for two CW carriers at the TX Output each –6 dBm.
RX IF Impedance/Return Loss
RX IF Connector:
LNB Side
Demodulator Side
RX Input Level, LNB Side -90 to –5 dBm, operating, +10 dBm maximum composite
Gain RX In/Out
RX 3rd Order Products (2-tone) -30 dBc for two CW carriers at the RX Output each +7 dBm
RX 2nd Order products (2-tone) -40 dBc for two CW carriers at the RX Output each +7 dBm
Isolation 50 dB unused RX input to splitter output
Internal Frequency Reference:
Calibration
Frequency
Stability
Phase Noise db/Hz
Table B-1. General Specification
System Specification
Type N, Female, 4 combined inputs
Type N, Female, 2 switched outputs, 1 ON at a time
50Ω/10 dB minimum
modulator signals through UPC equipment then back to LCS-4
for external power leveling.
TX input or TX output to RX Output 90 dB minimum.
TX Level to BUC AB is adjustable ± 3 dB minimum with respect
to BUC A level in approx 0.1 dB increments.
75Ω/10 dB minimum 950 to 1750 (2150 goal) MHz
Type F, Female, 2 switched inputs, 1 ON at a time
Type F, Female, 4 outputs from a power splitter
0 ± 3 dB
Internal reference adjustable ± 1 kHz
10.0 MHz
± 0.02 ppm
-80
-110
-135
-140
-150
-150
Frequency Offset
1 Hz
10 Hz
100 Hz
1 kHz
10 kHz
100 kHz
B-1
Page 86

LCS-4 L-Band Combiner Switch Revision 1
Specifications MN/LCS4.IOM
Table B-1. General Specification (Continued)
10 MHz Reference:
To BUC
To LNB
Spurious Emissions TX Toward BUC or
RX Toward Demodulator
TX Output Level with TX Inputs Terminated -60 dBm or less over 800 MHz to 2.2 GHz measured in a 4kHz
TX Output with Modulated Carrier with Unused Ports
Terminated.
RF Input/RF Output Overload All TX and RX inputs or outputs shall sustain +13 dBm per port
FSK Communications to BUC Pass through from modem via ports 1 or 4 for primary and
FSK Drivers/Receivers Hardware is provided – software support for FSK is future.
Outdoor RF Switch Control Connector Indoor circuitry to drive outdoor BUC and LNB RF Switched.
Remote Port Connector RS-232 and RS-485 Control or Unit.
Relay Fault Status Connector ODU/BUC A ODU/BUC B/LNB A/LNB B and Combiner Switch
BUC/LNB Fault Input BUC A/B FLT inputs
DIP Switch Sensing (4) 1 switch indicates EXT ODU/BUC Fault contact inputs
Prime Power:
AC Inlet A
AC Inlet B
Optional Prime 48 VDC Power:
DC Inlet A
DC Inlet B
LNB Voltage via 2 RX Connectors 18 VDC at 500 mA, maximum. Selectable ON OFF via M&C
BUC Voltage via 2 RX Connectors Optional 24 to 48 VDC BUC power. Selectable ON/OFF via
Power Consumption:
100W BUC PS
150W BUC PS
Via TX (BUC)/RX (LNB) center conductor, selectable ON/OFF
0 ± 3 dBm
-3 ± +3 dBm
-55 dBc over 55 MHz to 2.2 GHz measured in a 4 kHz BW with
a CW source.
BW.
-55 dBc over the operating frequency range measured in a
4 kHz BW
-60 dBm over 1610 to1 680 MHz in a 4 kHz BW for Inmarsat
applications.
without damage.
backup access
Protocol: Interoperable with the SierraCom or Terrasat BUC.
Unit.
LNB A/B FLT
Separate FLT enable inputs for BUC and LNB
1 switch indicates EXT LNB fault contact inputs
2 switches - future
85 to 264 VDC, 47 to 63 Hz, 60W maximum, excluding BUC PS
85 to 264 VDC, 47 to 63 Hz, 60W maximum, excluding BUC PS
38 to 64 VDC, 60W maximum, excluding BUC PS
38 to 64 VDC, 60W maximum, excluding BUC PS
control. Voltage and current monitored with window limit
sensing. Short circuit protected.
M&C control. Voltage and current monitored with window limit
sensing. Short circuit protected.
220W maximum (Estimated)
300W maximum (Estimated)
B-2
Page 87

LCS-4 L-Band Combiner Switch Revision 1
Specifications MN/LCS4.IOM
B.2 ENVIRONMENTAL AND PHYSICAL SPECIFICATIONS
Table B-2. Environmental and Physical Specifications
Environmental Specifications
Temperature
Humidity 95% Non-condensing
Operation Shock MILS-STD-167-1
Survivability Shock and Vibration MIL-STD-810D, Method 514.4, Procedure 8, 1 hour/axis
Agency Approval CE Mark
Size 1.75H x 19W x 19.18D inches 1RU
Weight 14.5 lbs (6.51 kg) maximum
Mounting Standard 19-inch (48.26cm) rack mounts front and rear accepts
Airflow Two or more fans with fan monitors
Internal Temperature High temperature alarm/internal temperature report.
0 to -50°C (32 to 122°F)
When any one corner of the unit is dropped from 1 cm onto a
hard surface, the unit will not take any errors or faults.
Physical Specification
(4.44H x 48.26W x 48.72D cm)
standard rack mount.
B-3
Page 88

LCS-4 L-Band Combiner Switch Revision 1
Specifications MN/LCS4.IOM
NOTES:
B-4
Page 89

Metric Conversions
Units of Length
Unit
1 centimeter — 0.3937 0.03281 0.01094
1 inch 2.540 — 0.08333 0.2778
1 foot 30.480 12.0 — 0.3333
1 yard 91.44 36.0 3.0 —
Centimeter
Inch
Foot
Yard
Mile
6.214 x 10
1.578 x 10
1.893 x 10
5.679 x 10
Meter
-6
-5
-4
-4
0.01 — —
0.254 — 25.4
0.3048 — —
0.9144 — —
Kilometer Millimeter
1 meter 100.0 39.37 3.281 1.094
1 mile
1 mm — 0.03937 — — — — — —
1 kilometer — — — — 0.621 — — —
1.609 x 10
5
6.336 x 10⁴ 5.280 x 10³ 1.760 x 10³
6.214 x 10
-4
—
— — —
1.609 x 10³
1.609 —
Temperature Conversions
Unit
32° Fahrenheit
212° Fahrenheit
-459.6° Fahrenheit
° Fahrenheit
—
—
—
° Centigrade
0
(water freezes)
100
(water boils)
273.1
(absolute 0)
Formulas
C = (F - 32) * 0.555
F = (C * 1.8) + 32
Units of Weight
Unit
1 gram — 0.03527 0.03215 0.002205 0.002679 0.001
Gram
Ounce
Avoirdupois
Ounce
Troy
Pound
Avoir.
Pound
Troy
Kilogram
1 oz. avoir. 28.35 — 0.9115 0.0625 0.07595 0.02835
1 oz. troy 31.10 1.097 — 0.06857 0.08333 0.03110
1 lb. avoir. 453.6 16.0 14.58 — 1.215 0.4536
1 lb. Troy 373.2 13.17 12.0 0.8229 — 0.3732
1 kilogram
1.0 x 10
3
35.27 32.15 2.205 2.679 —
Page 90

2114 WEST 7TH STREET TEMPE ARIZONA 85281 USA
480 • 333 • 2200 PHONE
480 • 333 •
2161 FAX
 Loading...