

Page 1

r
KST-2000A/B
IMPORTANT NOTE: The information contained in this document supercedes all previously
published information regarding this product. Product specifications are subject to change
without prior notice.
AB.IOM Revisio Part Number MN/KST2000AB.IOMPart Number MN/KST2000AB.IOM Revision 7
Ku-Band Satellite Transceive
Installation and Operation Manual
Part Number MN/KST2000AB.IOM Revision 9
Page 2

Page 3

KST-2000A/B
Ku-Band Satellite Transceiver
Installation and Operation Manual
Comtech EF Data is an ISO 9001
Registered Company.
Part Number
Revision 9
June 25, 2007
Copyright © Comtech EF Data, 2007. All rights reserved. Printed in the USA.
Comtech EF Data, 2114 West 7th Street, Tempe, Arizona 85281 USA, 480.333.2200, FAX: 480. 333.2161
Page 4

Ku-Band Satellite Transceiver Revision 9
Preface MN/KST2000AB.IOM
Customer Service
Contact the Comtech EF Data Customer Support Department for:
• Product support or training
• Reporting comments or suggestions concerning manuals
• Information on upgrading or returning a product
A Customer Support representative may be reached at:
Comtech EF Data
Attention: Customer Support Department
2114 West 7th Street
Tempe, Arizona 85281 USA
480.333.2200 (Main Comtech EF Data Number)
480.333.4357 (Customer Support Desk)
480.333.2161 FAX
To return a Comtech EF Data product (in-warranty and out-of-warranty) for repair or replacement:
• Contact the Comtech EF Data Customer Support Department. Be prepared to supply the
Customer Support representative with the model number, serial number, and a description of
the problem.
• Request a Return Material Authorization (RMA) number from the Comtech EF Data
Customer Support representative.
• Pack the product in its original shipping carton/packaging to ensure that the product is not
damaged during shipping.
• Ship the product back to Comtech EF Data. (Shipping charges should be prepaid.)
For Online Customer Support:
An RMA number request can be requested electronically by contacting the Customer Support
Department through the online support page at
www.comtechefdata.com/support.asp.
Click on the “RMA Request Form” hyperlink, then fill out the form completely before sending.
Click on “Return Material Authorization” for detailed instructions on our return procedures.
Send e-mail to the Customer Support Department at service@comtechefdata.com.
For information regarding this product’s warranty policy, refer to page
xi.
ii
Page 5

Ku-Band Satellite Transceiver Revision 9
Preface MN/KST2000AB.IOM
Table of Contents
Customer Service......................................................................................................................................ii
About this Manual ...................................................................................................................................ix
Warnings and Cautions...........................................................................................................................ix
Installation Guidelines Regarding Power Line Quality ........................................................................ x
Warranty Policy.......................................................................................................................................xi
CHAPTER 1. INTRODUCTION ...........................................................................................1–1
Description.................................................................................................................................1–2
1.1
1.1.1 Receive Reject Filter.......................................................................................................... 1–2
1.1.2 Recommended Maintenance..............................................................................................1–3
1.1.3 Areas of Operation:............................................................................................................ 1–3
1.1.4 Features...............................................................................................................................1–4
1.1.5 Single-Thread KST-2000A System .................................................................................... 1–6
1.1.6 Single-Thread KST-2000B System .................................................................................... 1–8
1.1.7 Redundant System .............................................................................................................. 1–9
1.2 Specifications...........................................................................................................................1–10
CHAPTER 2. INSTALLATION.............................................................................................2–1
2.1. Single-Thread System Components.........................................................................................2–1
2.2. Redundant System Components..............................................................................................2–2
2.3. Description of Options.............................................................................................................. 2–3
2.4. Electrical Connections.............................................................................................................. 2–4
2.4.1. Converter Unit .................................................................................................................... 2–4
2.4.2. Data SSPAs....................................................................................................................... 2–13
2.4.3. LNA Connections ............................................................................................................. 2–20
2.4.4. LNB Connections.............................................................................................................. 2–20
CHAPTER 3. OPERATION..................................................................................................3–1
3.1
Initial Setup (Single-Thread System)...................................................................................... 3–1
3.1.1 Uplink Setup .......................................................................................................................3–3
3.1.2 Downlink Setup .................................................................................................................. 3–4
3.2 Initial Setup Redundant System.............................................................................................. 3–5
iii
Page 6

Ku-Band Satellite Transceiver Revision 9
Preface MN/KST2000AB.IOM
3.3 Redundant Junction Unit Description .................................................................................... 3–8
3.3.1 3.3.1 RJU-2000 Description................................................................................................3–9
3.4 Connector Descriptions ..........................................................................................................3–10
3.4.1 TX Switch Connector (J1) ................................................................................................3–10
3.4.2 RX Switch Connector (J2)................................................................................................ 3–10
3.4.3 1:1 Interface Connector (J3) ............................................................................................. 3–11
3.4.4 RFTA Remote Interface Connector (J4)........................................................................... 3–12
3.4.5 RFTB Remote Interface Connector (J5)........................................................................... 3–13
3.4.6 Interface M&C Connector (J6) .........................................................................................3–14
3.4.7 Other Connectors ..............................................................................................................3–15
3.5 Indicators Description ............................................................................................................3–15
3.6 1:1 Redundant KST-2000A/B System Operation.................................................................3–16
3.7 Reference Oscillator................................................................................................................ 3–22
3.8 Monitor and Control (M&C)................................................................................................. 3–23
3.8.1 Up Converter Description................................................................................................. 3–25
3.9 Ku- to L-Band Down Converter Description (KST-2000A)................................................3–26
3.10 L-Band to IF Down Converter Description (KST-2000A/B) .............................................. 3–27
3.11 Automatic Gain Control (AGC) ............................................................................................3–28
3.11.1 Operation........................................................................................................................... 3–29
3.11.2 Fault and Error Response.................................................................................................. 3–30
3.11.3 Manual Gain Operation..................................................................................................... 3–31
CHAPTER 4. FAULT INDICATION AND ISOLATION........................................................4–1
4.1
Fault Indication.........................................................................................................................4–1
4.2 Fault Isolation............................................................................................................................4–2
4.3 Stored Faults..............................................................................................................................4–2
CHAPTER 5. KEYPAD / DISPLAY........................................................................................... 1
5.1 Keypad/Display Overview............................................................................................................1
5.2 Front Panel Keypad/Display....................................................................................................... 2
5.2.1 Front Panel Controls .............................................................................................................. 3
5.3 The Menu Structure.....................................................................................................................5
5.3.1 Configuration ...........................................................................................................................6
iv
Page 7

Ku-Band Satellite Transceiver Revision 9
Preface MN/KST2000AB.IOM
5.3.2 Monitor .....................................................................................................................................9
5.3.3 Faults.......................................................................................................................................10
5.3.4 Utility.......................................................................................................................................13
5.3.5 System .....................................................................................................................................14
5.3.6 Redundancy..........................................................................................................................16
APPENDIX A. EQUIPMENT OUTLINE DRAWINGS .........................................................A–1
A.1 2 and 4 Watt SSPA Equipment Outline................................................................................. A–2
A.2 8 Watt SSPA Equipment Outline ........................................................................................... A–3
A.3 16 Watt SSPA Equipment Outline ......................................................................................... A–4
A.4 25/32/40 Watt SSPA Equipment Outline............................................................................... A–5
A.5 Ku-Band LNA Equipment Outline......................................................................................... A–6
A.6 KST-2000A/B Converter Equipment Outline ....................................................................... A–7
A.7 Ku-Band LNB Equipment Outline......................................................................................... A–8
APPENDIX B. TERMINAL MODE COMMANDS ................................................................B–1
B.1 General.......................................................................................................................................B–1
B.2 Message Structure.....................................................................................................................B–2
B.2.1 Start Character.....................................................................................................................B–2
B.2.2 Device Address...................................................................................................................B–2
B.2.3 Command/Response...........................................................................................................B–3
B.2.3 End Character......................................................................................................................B–4
B.3 System Configuration Commands...........................................................................................B–4
B.3.1 Configuration Commands/Responses.................................................................................B–5
B.3.2 System Configuration Commands......................................................................................B–6
B.3.3 Reset Commands.................................................................................................................B–8
B.3.4 Status Commands/Responses..............................................................................................B–8
B.3.5 Stored Faults........................................................................................................................B–11
B.3.6 Miscellaneous ...................................................................................................................B–14
B.4 Backup Operations/Self-Contained Redundancy ................................................................B–15
B.4.1 External Fault Mode .........................................................................................................B–16
B.5 Keypad/Display Related Commands ....................................................................................B–16
APPENDIX C. SINGLE-THREAD EQUIPMENT MOUNTING.............................................C–1
v
Page 8

Ku-Band Satellite Transceiver Revision 9
Preface MN/KST2000AB.IOM
C.1 Tools Required ......................................................................................................................... C–2
C.2 Converter Unit Installation.....................................................................................................C–3
C.2.1 Spar Arm Mount.................................................................................................................C–3
C.2.2 Pole Mount..........................................................................................................................C–6
C.3 SSPA Installation ................................................................................................................... C–10
C.3.1 Feed Mount Offset Antenna..............................................................................................C–10
C.4 LNA Installation..................................................................................................................... C–13
C.4.1 Feed Mount Offset Antenna..............................................................................................C–13
C.5 Cable Installation................................................................................................................... C–14
APPENDIX D. REDUNDANT EQUIPMENT MOUNTING....................................................D–1
D.1 Tools Required ......................................................................................................................... D–2
D.2 1:1 Converters Installation...................................................................................................... D–3
D.2.1 Spar Arm Mount ................................................................................................................ D–3
D.2.2 Pole Mount......................................................................................................................... D–6
D.3 1:1 SSPA Installation............................................................................................................. D–10
D.3.1 Feed Mount Offset Antenna............................................................................................. D–10
D.4 1:1 LNA Installation .............................................................................................................. D–11
D.4.1 Feed Mount Offset Antenna............................................................................................. D–11
D.5 Cable Installation................................................................................................................... D–11
APPENDIX E. FSK REMOTE CONTROL COMMANDS.....................................................E–1
E.1 Introduction...............................................................................................................................E–1
E.2 Basic Protocol............................................................................................................................E–2
E.2.1 Packet Structure ..................................................................................................................E–3
E.2.2 Start Of Packet ....................................................................................................................E–3
E.2.3 Address ...............................................................................................................................E–3
E.2.4 Instruction Code..................................................................................................................E–3
E.2.5 Instruction Code Qualifier ..................................................................................................E–4
E.2.6 Message Arguments............................................................................................................E–6
E.2.7 End Of Packet .....................................................................................................................E–6
E.3 Commands and Query ..............................................................................................................E–6
GLOSSARY
.....................................................................................................................g–1
vi
Page 9

Ku-Band Satellite Transceiver Revision 9
Preface MN/KST2000AB.IOM
INDEX ......................................................................................................................i–1
Figures
FIGURE 1-1. KST-2000A/B CONVERTER UNIT AND 8 WATT SSPA ........................................... 1–1
FIGURE 1-2. RECEIVE REJECT FILTER ..........................................................................................1–2
FIGURE 1-3. SINGLE THREAD KST-2000A SYSTEM.....................................................................1–6
FIGURE 1-4. SINGLE THREAD KST-2000B BLOCK DIAGRAM ................................................... 1–8
FIGURE 1-5. REDUNDANT KST-2000A SYSTEM BLOCK DIAGRAM......................................... 1–9
FIGURE 2-1. I/O VIEW OF KST-2000A/B CONVERTER UNIT...................................................... 2–4
FIGURE 2-2. PRIME POWER INPUT (J1).......................................................................................... 2–5
FIGURE 2-3. SERIAL (EIA-232) ADAPTER CABLE WIRING DIAGRAM.................................... 2–7
FIGURE 2-4. 16WATT SSPA............................................................................................................. 2–14
FIGURE 2-5. I/O CONNECTORS FOR THE 16 WATT SSPA ........................................................ 2–15
FIGURE 2-6. OUTPUT CONNECTION FOR THE 16 WATT SSPA (WAVEGUIDE)................... 2–16
FIGURE 2-7. 25/32/40 WATT SSPA ................................................................................................. 2–17
FIGURE 2-8. I/O CONNECTORS FOR THE 25/32/40 WATT SSPA.............................................. 2–18
FIGURE 2-9. OUTPUT CONNECTION FOR THE 25/32/40 WATT SSPA (WAVEGUIDE).........2–19
FIGURE 3-1. SINGLE-THREAD SYSTEM ........................................................................................ 3–2
FIGURE 3-2. 1:1 REDUNDANT SYSTEM BLOCK DIAGRAM....................................................... 3–7
FIGURE 3-3. RJU-2000 FRONT PANEL ............................................................................................ 3–8
FIGURE 3-4. RJU-2000 BLOCK DIAGRAM...................................................................................... 3–9
FIGURE 3-5. REDUNDANT KST-2000A/B SYSTEM SHOWING UNITS A AND B DESIGNATION
......................................................................................................................................................3–17
FIGURE 3-6. REDUNDANT HPA ASSEMBLY...............................................................................3–18
FIGURE 3-7. REDUNDANT LNA/B ASSEMBLY...........................................................................3–19
FIGURE 3-8. REFERENCE OSCILLATOR...................................................................................... 3–22
FIGURE 3-9. MONITOR AND CONTROL (M&C) BLOCK DIAGRAM ....................................... 3–23
FIGURE 3-10. IF TO S-BAND CONVERTER MODULE BLOCK DIAGRAM.............................. 3–25
FIGURE 3-11. S TO KU-BAND UP CONVERTER MODULE........................................................ 3–26
FIGURE 3-12. KU TO L-BAND DOWN CONVERTER MODULE BLOCK DIAGRAM.............. 3–26
FIGURE 3-13. L-BAND TO IF DOWN CONVERTER BLOCK DIAGRAM.................................. 3–27
FIGURE 3-14. AGC OPERATING REGION ..................................................................................... 3–31
FIGURE 5-1. KST-2000A/B TERMINAL KEYPAD...........................................................................5–2
FIGURE 5-2. KST-2000A/B SIGN ON MESSAGE............................................................................. 5–3
FIGURE 5-3. PRINCIPLE MENU TREES........................................................................................... 5–4
FIGURE 5-4. SELECT MENU ............................................................................................................. 5–5
FIGURE 5- 5. CONFIGURATION MENU ...........................................................................................5–6
FIGURE 5-6. MONITOR MENU ......................................................................................................... 5–9
FIGURE 5-7. FAULTS MENU FIGURE 5-8. FAULTS SUB-LEVEL ........................................ 5–10
FIGURE 5-9. UTILITY MENU ...........................................................................................................5–13
FIGURE 5-10. SYSTEM MENU ........................................................................................................5–14
FIGURE 5-11. REDUNDANCY MENU............................................................................................ 5–16
FIGURE A-1. 2 AND 4 WATT SSPA EQUIPMENT OUTLINE....................................................... A–2
FIGURE A-2. 8 WATT SSPA EQUIPMENT OUTLINE.................................................................... A–3
FIGURE A-3. 16 WATT SSPA EQUIPMENT OUTLINE.................................................................. A–4
FIGURE A-4. 25/32/40 WATT SSPA EQUIPMENT OUTLINE ....................................................... A–5
vii
Page 10

Ku-Band Satellite Transceiver Revision 9
Preface MN/KST2000AB.IOM
FIGURE A-5. KU-BAND LNA EQUIPMENT OUTLINE................................................................. A–6
FIGURE A-6. KST-2000A/B CONVERTER EQUIPMENT OUTLINE ............................................ A–7
FIGURE A-7. KU-BAND LNB EQUIPMENT OUTLINE ................................................................. A–8
FIGURE C-1. KST-2000A SINGLE THREAD SYSTEM INSTALLED ON SPAR ARM.................C–2
FIGURE C-2. TYPICAL CONVERTER UNIT INSTALLATION ON SPAR....................................C–5
FIGURE C-3. KST-2000A CONVERTER WITH MOUNTING BRACKETS....................................C–7
FIGURE C-4. REAR VIEW OF CONVERTER INSTALLED ON ROUND POLE ..........................C–8
FIGURE C-5. FRONT VIEW OF CONVERTER INSTALLED ON ROUND POLE........................C–9
FIGURE C-6. INSTALLING THE SSPA...........................................................................................C–11
FIGURE C-7. SSPA INSTALLED......................................................................................................C–12
FIGURE D-1. 1:1 SYSTEM INSTALLED ON SPAR ARM .............................................................. D–2
FIGURE D-2. CONVERTERS AND SSPAS ON SPAR ARM........................................................... D–5
FIGURE D-3. KST-2000A 1:1 CONVERTERS WITH MOUNTING BRACKETS.......................... D–7
FIGURE D-4. REAR VIEW OF CONVERTERS INSTALLED ON POLE....................................... D–9
FIGURE D-5. FRONT VIEW OF CONVERTERS INSTALLED ON POLE..................................... D–9
Tables
TABLE 1-1. FEATURES...................................................................................................................... 1–5
TABLE 1-2. CONVERTER UNIT SPECIFICATIONS ......................................................................1–10
TABLE 1-3. SYSTEM TRANSMIT CHARACTERISTICS (WITH SSPAS OF ≤ 40W).................. 1–11
TABLE 1-4. LNA CHARACTERISTICS............................................................................................ 1–12
TABLE 1-5. LNB CHARACTERISTICS............................................................................................ 1–12
TABLE 1–6. SSPA CHARACTERISTICS.......................................................................................... 1–13
TABLE 2-1. DESCRIPTION OF OPTIONS.........................................................................................2–3
TABLE 2-2. CONVERTER UNIT EXTERNAL CONNECTIONS...................................................... 2–5
TABLE 2-3. REMOTE M&C CONNECTOR (J2) PIN ASSIGNMENTS........................................... 2–6
TABLE 2-4. HPA CONNECTOR (J8) PIN ASSIGNMENTS (CEFD SSPA)................................... 2–10
TABLE 2-5. HPA CONNECTOR (J8) PIN ASSIGNMENTS (NON-KST SPECIFIC SSPA).......... 2–10
TABLE 2-6. HPA CONNECTOR (J8) PIN ASSIGNMENTS (TWTA CONNECTION)...................2–11
TABLE 2-7. 1:1 CONNECTOR (J10) PIN ASSIGNMENTS ............................................................ 2–12
TABLE 2-8. FAN (J4) PIN ASSIGNMENTS..................................................................................... 2–13
TABLE 3-1. CONNECTOR J1 PINOUT DESCRIPTION................................................................. 3–10
TABLE 3-2. CONNECTOR J2 PINOUT DESCRIPTION................................................................. 3–10
TABLE 3-3. 1:1 INTERFACE CONNECTOR J3 PINOUT DESCRIPTION.................................... 3–11
TABLE 3-4. RFTA REMOTE INTERFACE CONNECTOR J4 PINOUT DESCRIPTION..............3–12
TABLE 3-5. RFTB REMOTE INTERFACE CONNECTOR J5 PINOUT DESCRIPTION.............. 3–13
TABLE 3-6. INTERFACE M&C CONNECTOR J6 PINOUT DESCRIPTION................................3–14
TABLE 3-7. AGC FAULT AND ERROR RESPONSE .....................................................................3–30
TABLE 4-1. KST-2000A/B FAULT TREE..........................................................................................4–3
viii
Page 11
Ku-Band Satellite Transceiver Revision 9
Preface MN/KST2000AB.IOM
Preface
About this Manual
This manual provides installation and operation information for the Comtech EF Data
Ku-Band Satellite Transceiver. This is a technical document intended for earth station
engineers, technicians, and operators responsible for the operation and maintenance of
the KST-2000A/B.
Trademarks
Product names mentioned in this manual may be trademarks or registered trademarks of
their respective companies and are hereby acknowledged.
Warnings and Cautions
WARNING indicates a potentially hazardous situation that, if not
WARNING
CAUTION
IMPORTANT
avoided, could result in death or serious injury.
CAUTION indicates a hazardous situation that, if not avoided, may
result in minor or moderate injury. CAUTION may also be used to
indicate other unsafe practices or risks of property damage.
Indicates information critical for proper equipment function.
Reporting Comments or Suggestions Concerning this Manual
ix
Page 12

Ku-Band Satellite Transceiver Revision 9
Preface MN/KST2000AB.IOM
Comments and suggestions regarding the content and design of this manual will be
appreciated. To submit comments, please contact the Comtech EF Data Technical
Publications Department.
Related Documents
• Comtech EF Data KP-10 External Keypad Installation and Operation Manual
• Comtech EF Data Windows based Monitor and Control software for Comtech
EFData Satellite Terminals Installation and Operation Manual, part number
MN/M&CWIN.IOM.
Installation Guidelines Regarding Power Line Quality
As a company with many years of experience selling and servicing equipment installed
around the world, Comtech EF Data has become familiar with the varying quality of the
AC power grid around the world. The following offers some installation guidelines that
should help ensure a reliable installation.
• Surge suppression: High voltage surges can cause failure of the power supply.
These surges are typically caused by circuit switching on the main AC power
grid, erratic generator operation, and also by lightning strikes. While the
transceiver does have built in surge suppression, if the unit will be installed in a
location with questionable power grid quality, Comtech EF Data recommends
installation of additional power conditioning/surge suppression at the power
junction box.
• Grounding: The transceiver provides a grounding terminal. This is provided to
allow the user to ground the transceiver to the antenna’s grounding network. All
components installed at the antenna shall be grounded to a common grounding
point at the antenna.
• Electrical welding: If welding needs to take place at the antenna, disconnect all
cables from the transceiver except for the ground wire. Cap all RF connections
with terminations. This will prevent damage to the input/output circuitry of the
transceiver.
• Lightning: Lightning strikes on or around the antenna will generate extremely
high voltages on all cables connected to the transceiver. Depending on the
severity of the strike, the transceivers internal surge protection combined with the
recommended external suppression may protect the transceivers power supply.
However, if the installation will be in an area with a high probability of lightning
strikes, Comtech EF Data recommends the installation of surge suppression on
the RF and IF cables. One source of these suppressors is PolyPhaser
www.polyphaser.com)
(
For further information, please contact Comtech EF Data.
x
Page 13

Ku-Band Satellite Transceiver Revision 9
Preface MN/KST2000AB.IOM
Warranty Policy
Comtech EF Data products are warranted against defects in material and workmanship
for a period of two years from the date of shipment. During the warranty period,
Comtech EF Data will, at its option, repair or replace products that prove to be defective.
For equipment under warranty, the owner is responsible for freight to Comtech EF Data
and all related customs, taxes, tariffs, insurance, etc. Comtech EF Data is responsible for
the freight charges only for return of the equipment from the factory to the owner.
Comtech EF Data will return the equipment by the same method (i.e., Air, Express,
Surface) as the equipment was sent to Comtech EF Data.
All equipment returned for warranty repair must have a valid RMA number issued prior
to return and be marked clearly on the return packaging. Comtech EF Data strongly
recommends all equipment be returned in its original packaging.
Comtech EF Data Corporation’s obligations under this warranty are limited to repair or
replacement of failed parts, and the return shipment to the buyer of the repaired or
replaced parts.
Limitations of Warranty
The warranty does not apply to any part of a product that has been installed, altered,
repaired, or misused in any way that, in the opinion of Comtech EF Data Corporation,
would affect the reliability or detracts from the performance of any part of the product, or
is damaged as the result of use in a way or with equipment that had not been previously
approved by Comtech EF Data Corporation.
The warranty does not apply to any product or parts thereof where the serial number or
the serial number of any of its parts has been altered, defaced, or removed.
The warranty does not cover damage or loss incurred in transportation of the product.
The warranty does not cover replacement or repair necessitated by loss or damage from
any cause beyond the control of Comtech EF Data Corporation, such as lightning or other
natural and weather related events or wartime environments.
The warranty does not cover any labor involved in the removal and or reinstallation of
warranted equipment or parts on site, or any labor required to diagnose the necessity for
repair or replacement.
The warranty excludes any responsibility by Comtech EF Data Corporation for incidental
or consequential damages arising from the use of the equipment or products, or for any
inability to use them either separate from or in combination with any other equipment or
products.
A fixed charge established for each product will be imposed for all equipment returned
for warranty repair where Comtech EF Data Corporation cannot identify the cause of the
reported failure.
xi
Page 14

Ku-Band Satellite Transceiver Revision 9
Preface MN/KST2000AB.IOM
Exclusive Remedies
Comtech EF Data Corporation’s warranty, as stated is in lieu of all other warranties,
expressed, implied, or statutory, including those of merchantability and fitness for a
particular purpose. The buyer shall pass on to any purchaser, lessee, or other user of
Comtech EF Data Corporation’s products, the aforementioned warranty, and shall
indemnify and hold harmless Comtech EF Data Corporation from any claims or liability
of such purchaser, lessee, or user based upon allegations that the buyer, its agents, or
employees have made additional warranties or representations as to product preference or
use.
The remedies provided herein are the buyer’s sole and exclusive remedies. Comtech EF
Data shall not be liable for any direct, indirect, special, incidental, or consequential
damages, whether based on contract, tort, or any other legal theory.
xii
Page 15
Chapter 1. INTRODUCTION
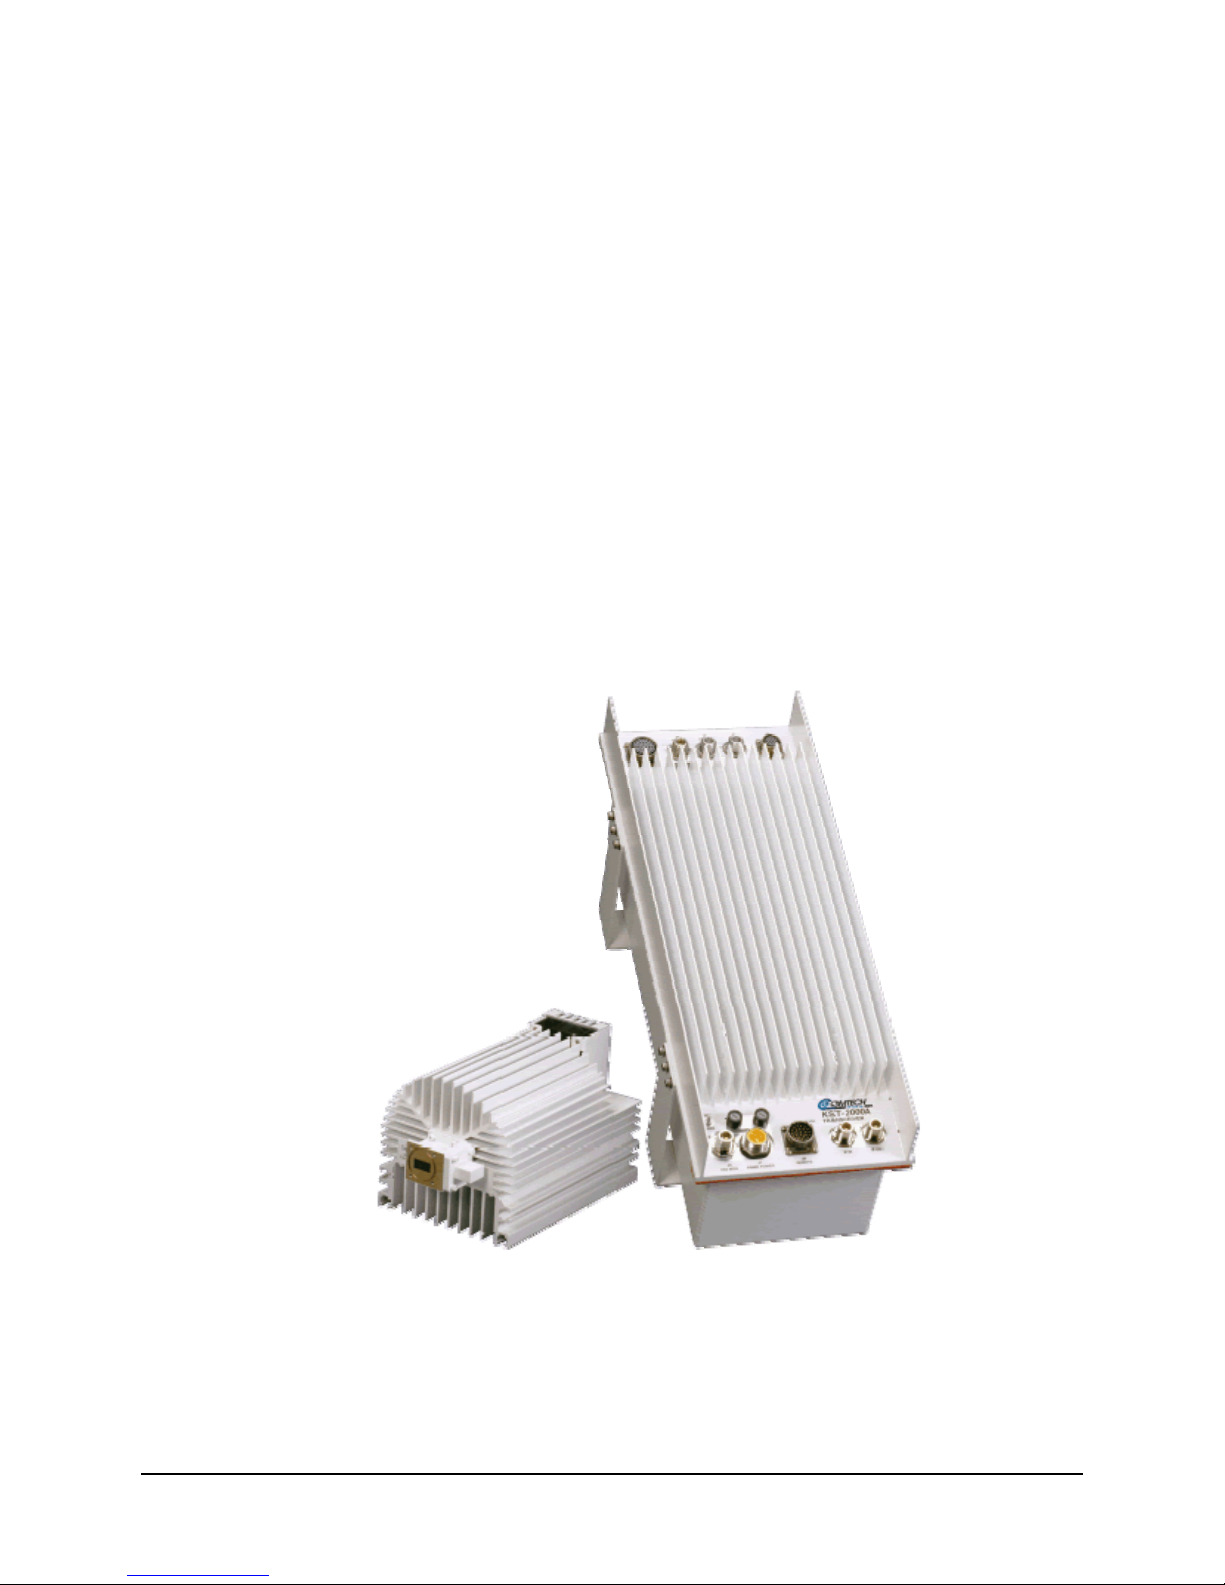
This chapter provides a description and the specifications for the KST-2000A/B satellite
terminal system. The converter unit and 8 Watt SSPA are shown in
Figure 1-1.
Figure 1-1. KST-2000A/B Converter Unit and 8 Watt SSPA
Various configurations of the KST-2000A/B Ku-Band satellite terminal system are
available with both optional and standard equipment.
1–1
Page 16
Ku- Band Satellite Transceiver Revision 9
Introduction MN/KST2000AB.IOM
1.1 Description
The KST-2000A/B Ku-Band satellite terminal is a high-performance, full-featured
transceiver designed for outdoor operation. The converter unit controls external High
Power Amplifiers (HPAs). Automatic Gain Control (AGC) from the converter input to
the HPA output assures power output stability over varying conditions for up to 40W
Comtech EF Data Solid-State Power Amplifier (SSPAs).
Note: For TX only application, downlink functions and hardware are not supplied or
available.
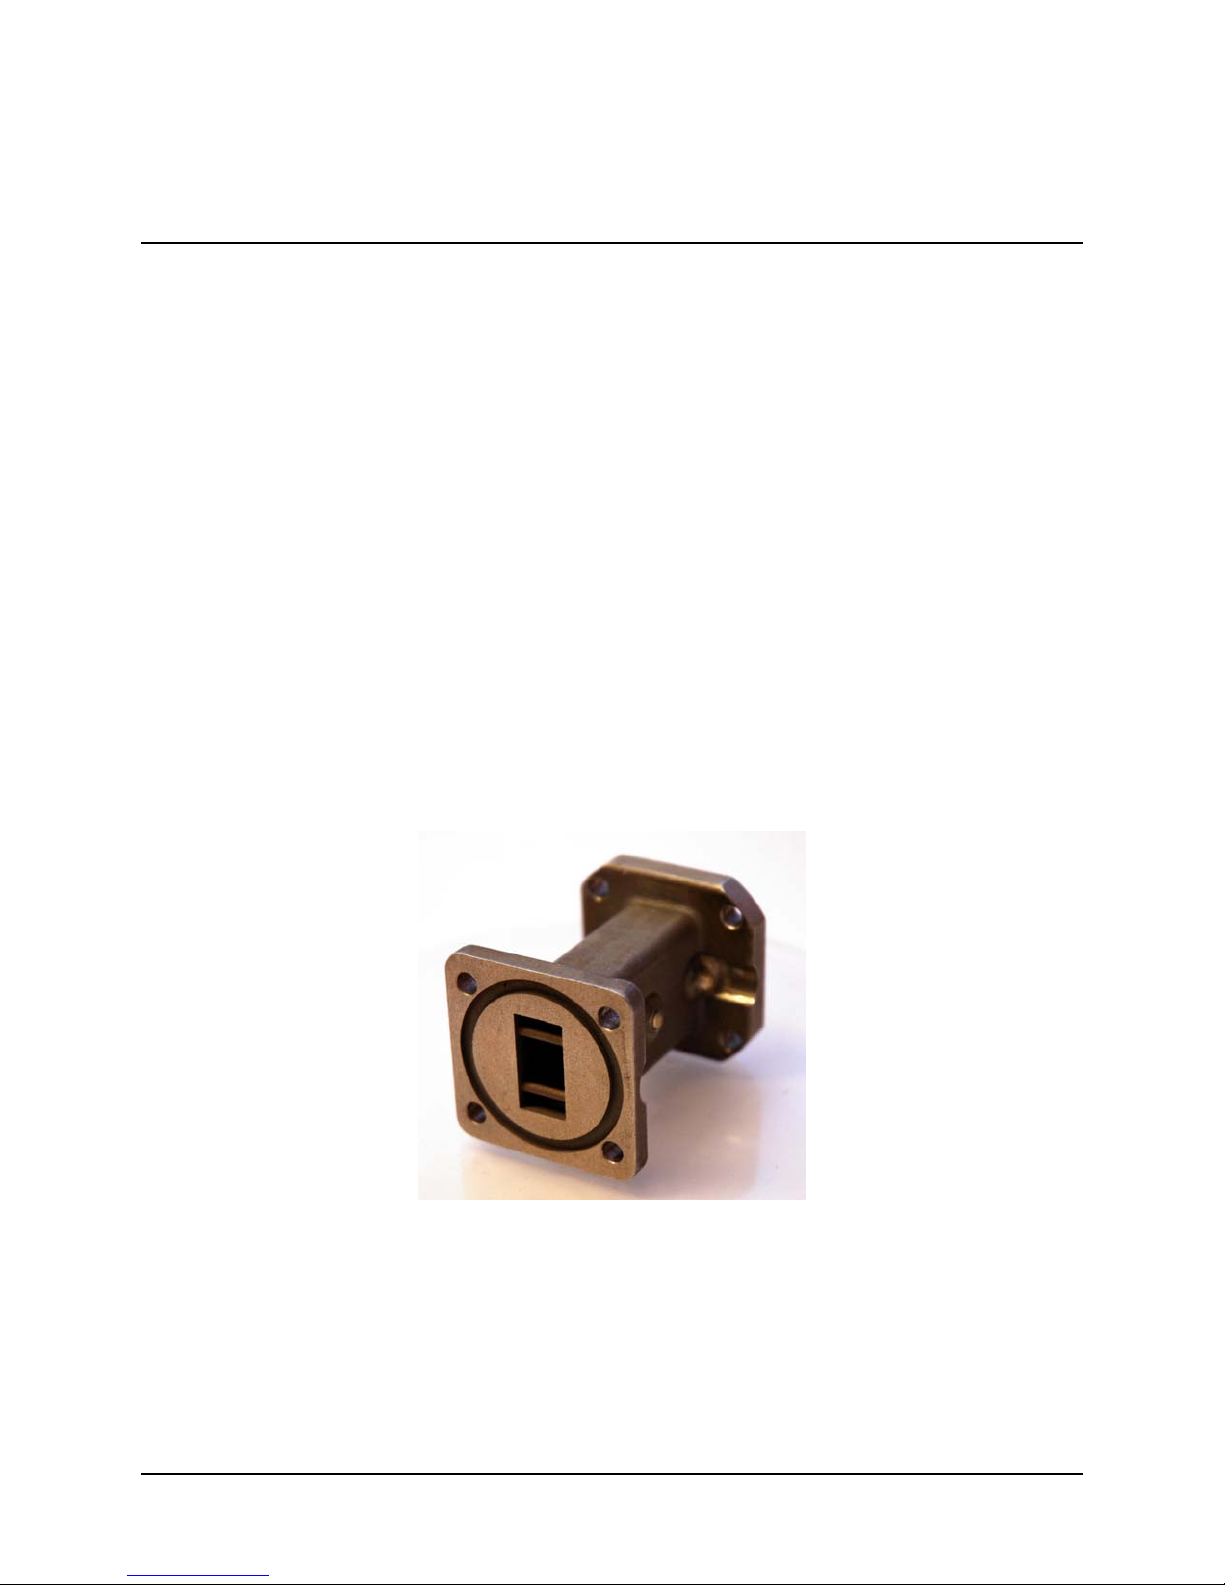
1.1.1 Receive Reject Filter
The KST-2000A/B is capable of operating over an uplink frequency of 13.75 to 14.5
GHz. Due to the proximity of the lower end of this band to the upper end of the Ku
receive band, it is possible for the upconverter to radiate noise power in the upper range
of the receive band.
If the transceiver Rx frequency is above 11.9 GHz, Comtech EF Data recommends
installing the supplied Receive Reject Filter (Figure 1-2) on the output of the SSPA for
single-thread systems and the output of the switch on redundant systems.
Figure 1-2. Receive Reject Filter
1–2
Page 17

Ku- Band Satellite Transceiver Revision 9
Introduction MN/KST2000AB.IOM
1.1.2 Recommended Maintenance
The fans utilized by the KST SSPAs are designed for long life even in a harsh
environment. They are still mechanical devices subject to wear and may need
replacement after several years. Industry environments, fan shroud removal facilitates
clearing the heat sink of accumulated dust.
Once a year (or sooner depending on environmental conditions), the SSPA heat sink
should be cleaned.
To perform this maintenance:
1. Disconnect power from the SSPA
2. Remove the fan shroud assembly
3. Using compressed air, blow through the SSPA heat sink to remove
any foreign object accumulation that may be obstructing airflow.
4. Reinstall the supply and fan assembly.
No routine maintenance is required for the KST base unit.
1.1.3 Areas of Operation:
The areas of operation are as follows:
Converter
HPA
KST-2000A Only – Low Noise
Amplifier (LNA)
KST–2000B Only – Low Noise
Block (LNB) Assembly
FSK Remote Commands (SingleThread Configuration only)
Convection cooled up/down converter with an internal
power supply and microprocessor-based Monitor and
Control (M&C). The converter contains a wide band block
Ku- to L-Band down converter in the KST-2000A, or this
function may be performed in an external Low Noise
Block converter (LNB) in the KST-2000B.
Offered with various power output capabilities.
LNAs with and without a Transmit Reject Filter (TRF) and
various noise temperatures or noise figures are available.
LNBs with various frequency coverage are available.
Modifications have been made to the KST-2000A
firmware and hardware to permit monitor and control
from the front panel of select Comtech EF Data Satellite
Modems. Currently the CDM-550T and CDM-600
modems can monitor and control the KST-2000A. This
control is transmitted via an FSK signal superimposed on
the RX connection.
1–3
Page 18

Ku- Band Satellite Transceiver Revision 9
Introduction MN/KST2000AB.IOM
1.1.4 Features
1.1.4.1 Full Ku-Band Transmit and Receive Coverage
KST-2000A Only
13.75 to 14.5 GHz
14.00 to 14.5 GHz
10.95 to 12.75 GHz
Transmit range in 1 MHz
Transmit range in 1 MHz (Optional)
Receive range in 1 MHz steps
KST-2000B Only
13.75 to 14.5 GHz
14.00 to 14.5 GHz
10.95 to 11.70 GHz
11.70 to 12.20 GHz
12.25 to 12.75 GHz
Transmit range in 1 MHz steps for HPAs of ≤ 40W
Transmit range in 1 MHz steps for HPAs of > 40W (Optional)
LNB-Select: Receive range in 1 MHz steps
1–4
Page 19

Ku- Band Satellite Transceiver Revision 9
Introduction MN/KST2000AB.IOM
1.1.4.2 Other Features
Table 1-1. Features
Feature Description
Automatic Gain
Control
Optional IF
Input/Output of 70 or
140 MHz
Redundancy
Controller (Built-in)
Selectable Serial
Communication
Keypad/Display
L-Band Received
Power Monitor Output
Internal or External
Reference
External LED
Indicators for Power
On and Fault
Indication
Power Factor
Corrected Internal
Power Supply
Flexible HPA options The KST-2000A/B converter has built-in monitor and control circuitry and
Industry Standards
Met
The KST-2000A/B incorporates a closed loop control system that
maintains the system’s conversion gain (as measured from the IF input to
the Ku-Band SSPA output) at the user’s preset value despite the effects
of temperature, aging, and cable loss. This feature is provided for use
with Comtech EF Data SSPAs up to and including 40W.
Optional on ordering.
Each KST-2000A/B converter unit contains the logic and switch drivers
necessary for redundant configurations when used with the RJU-2000.
There are several selectable serial communications:
• EIA-232, EIA-485, or EIA-422 half-duplex
• 300 to 19200 baud rate
• 8N1, 7E2, and 7O2 (information bits, parity, stop bits)
An optional weatherproof keypad/display designed to control the KST2000A/B configuration parameters and to monitor the fault system.
An isolated output covers the 950 to 1700 MHz downlink bands.
The KST-2000A/B’s internal reference may be locked to an external
standard at 5 or 10 MHz in order to reduce the system frequency errors
to that set by the external reference; or the high-stability, electrically and
mechanically tunable internal reference may be used.
A GREEN LED indicates prime power ON when blinking and TX RF
power ON when steady. A RED LED indicates a summary fault.
All KST-2000A/B power supplies have power factor corrected power
supplies and meet all CE Mark requirements.
functions that operate with the following equipment:
• KST-2000A/B product line SSPAs
• Selected other SSPAs
• Selected Traveling Wave Tube Amplifiers (TWTAs).
This flexibility enables adjusting the system’s power output to meet
application requirements by simply changing the HPA.
• IESS 308 and IESS 309
• FCC radiated emissions requirements
• CE Mark
The KST-2000A/B system components are completely weatherproof
units designed for the harsh environments of antenna-mounted systems.
The system’s operating parameters can be monitored and controlled
using Windows™ based M&C software with a personal computer, a
keypad/display built into the KST-2000A/B, or a hand held KP-10 as
described in Chapter 3.
1–5
Page 20
Ku- Band Satellite Transceiver Revision 9
Introduction MN/KST2000AB.IOM
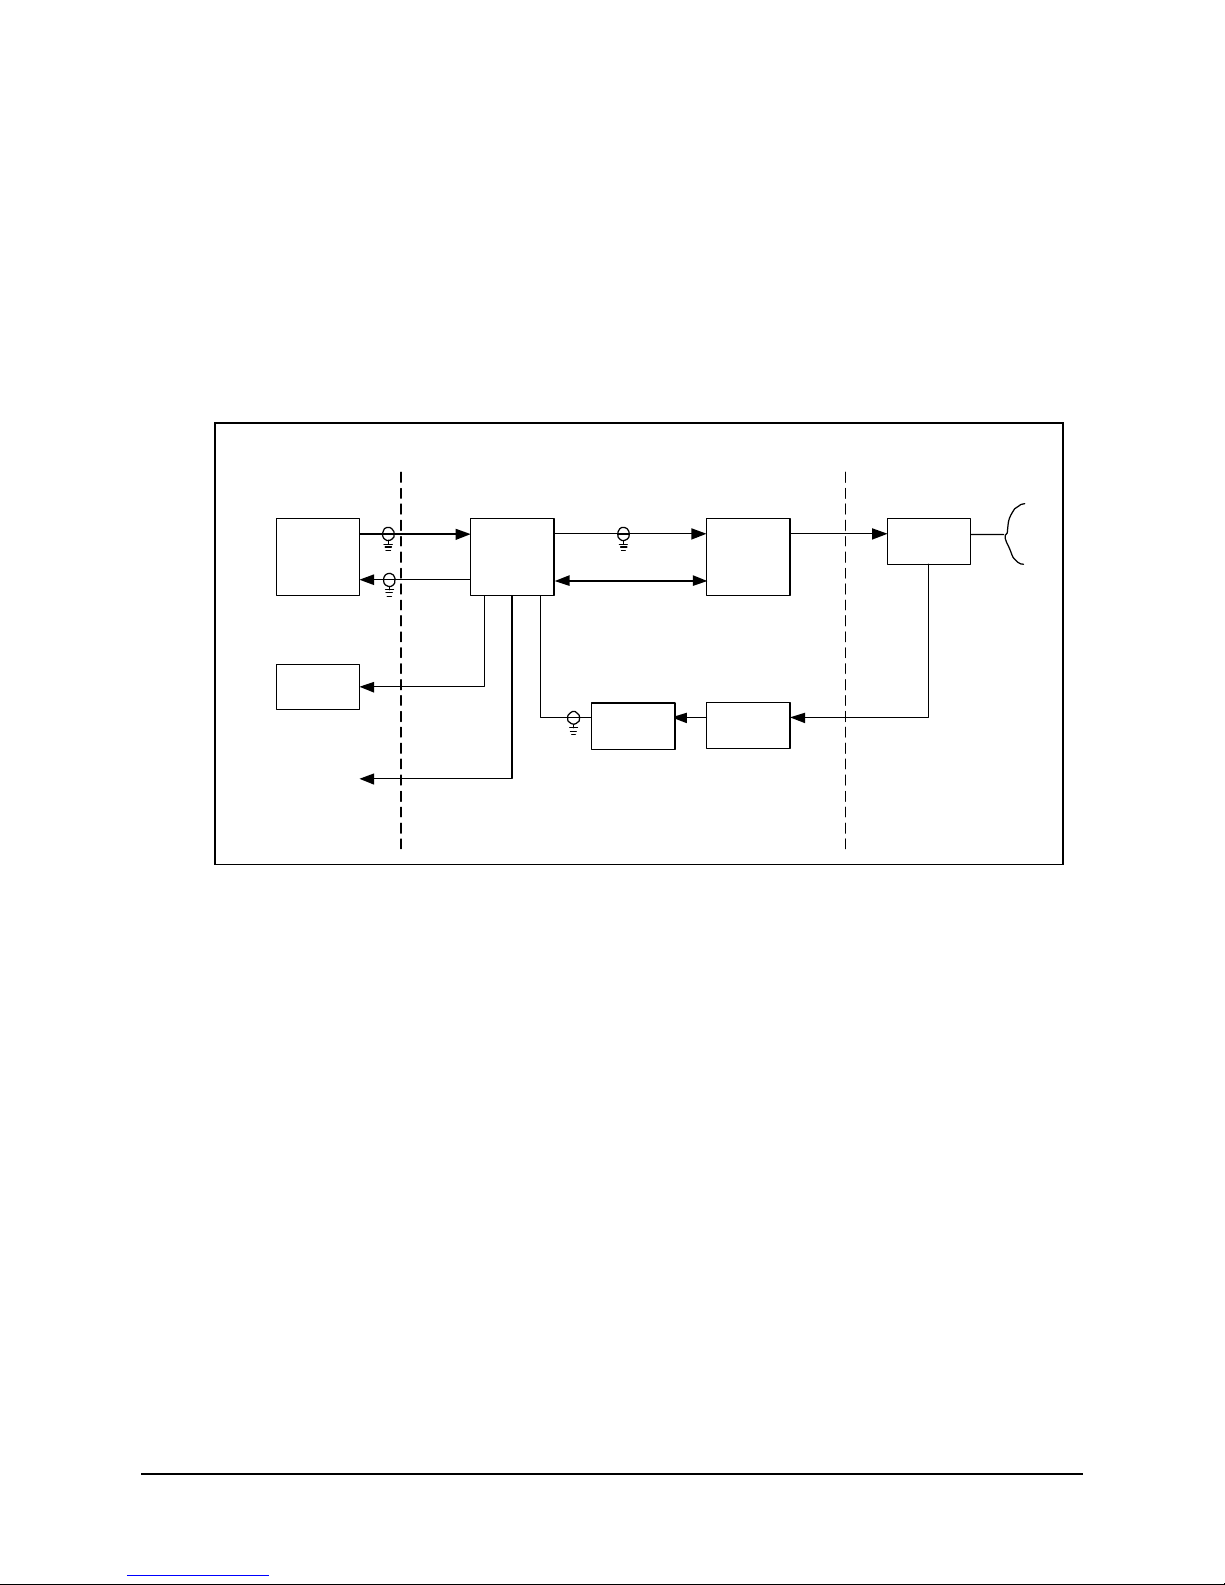
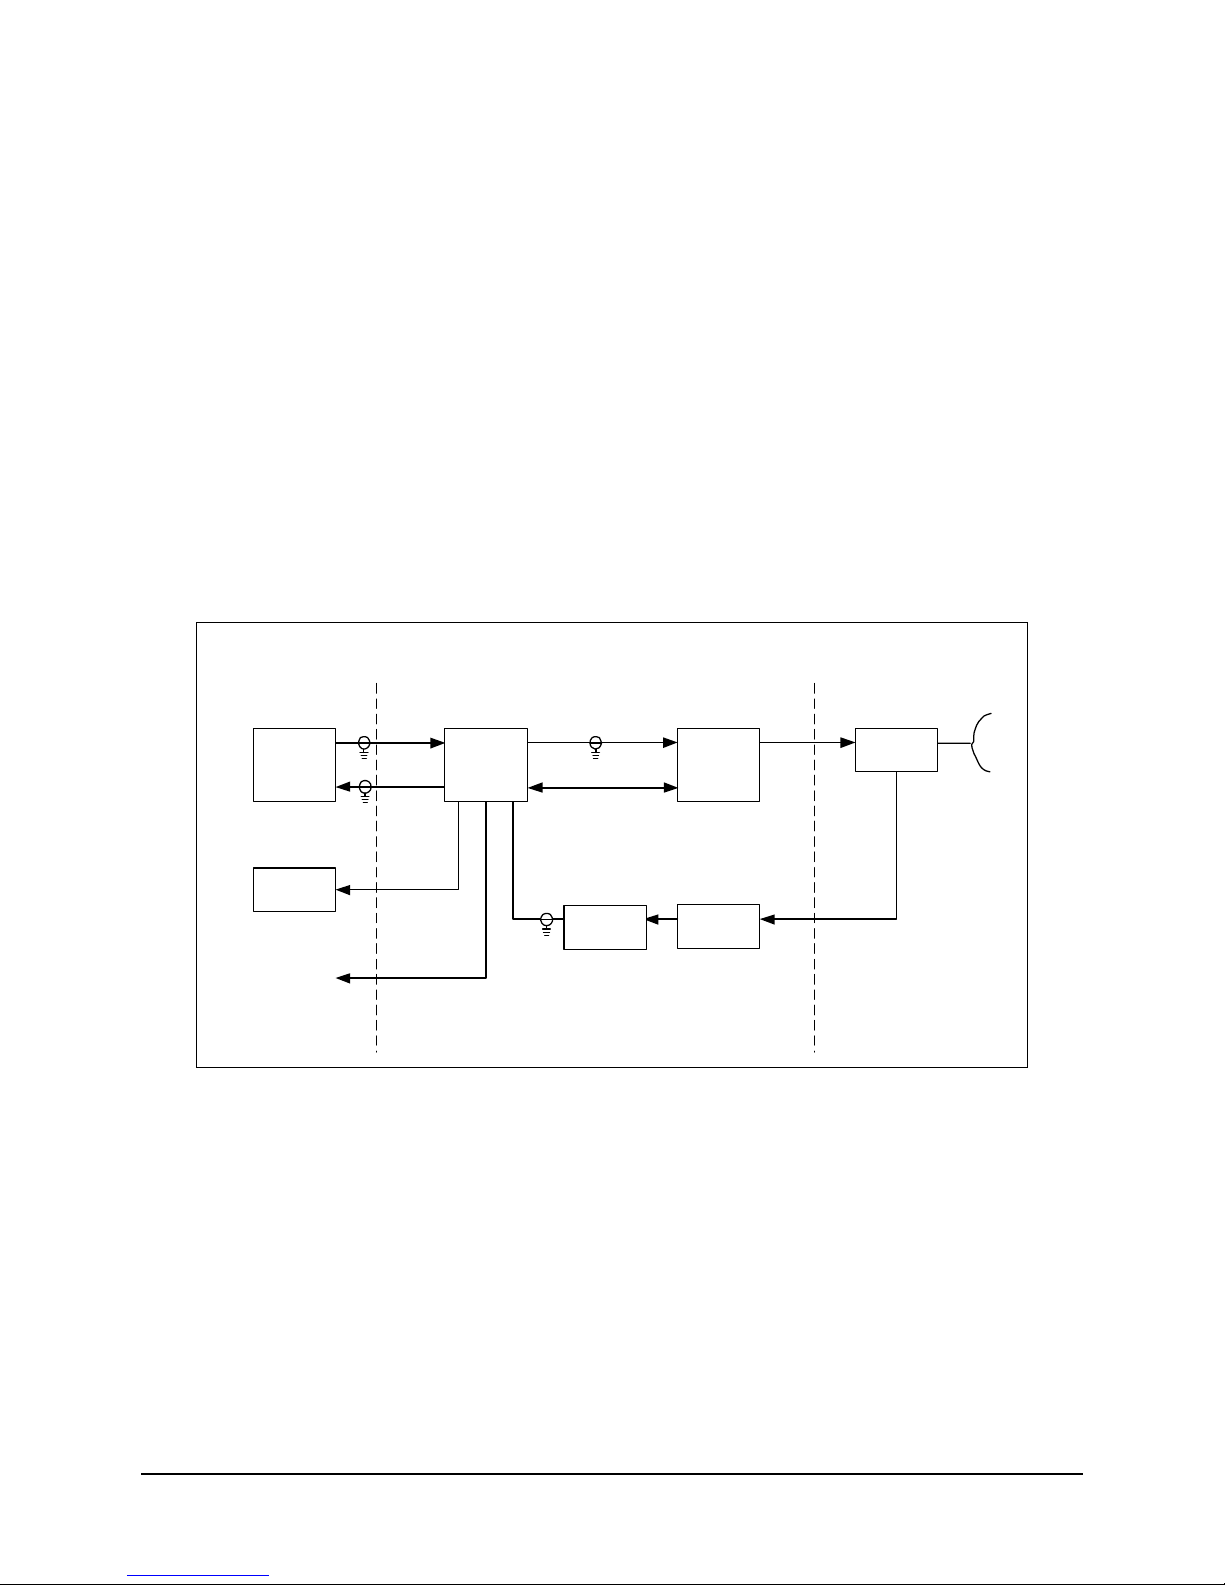
1.1.5 Single-Thread KST-2000A System
A block diagram of a single-thread, KST-2000A system is shown in Figure 1-3.
Note: The modem, the remote M&C, OMT, and the antenna are not part of the
KST-2000A system and are shown for reference only.
Indoor Units
(Reference Only)
TX
Modem
RX
70 or 140 MHz
TX
Converter
Unit
Ku-Band
M&C (Power)
HPA
Ku-Band
Reference Only
Antenna
OMT
Remote
M&C
L-Band
RX Monitor
Ku-Band &
DC Power
LNA
TRF
Ku-Band
Figure 1-3. Single Thread KST-2000A System
The M&C remote control, whose operation is described in Chapter 3, is used to set the
operating parameters of the KST-2000A/B system such as transmit and receive
frequency, gain, etc.; and to monitor the operation of the system. Connection to the
remote M&C is only required during setup and for interrogating the system health status.
Alternately, the keypad/display can be used to set the operating parameters of the KST2000A/B and to query the system for faults. Connection to a remote terminal is not
required for the keypad/display to function, as the keypad/display is totally independent
of the remote control system.
In the transmit (Uplink) direction, the converter unit receives a 70 MHz ± 20 MHz signal
(140 MHz ± 40 MHz signal optional) at –25 to –45 dBm from a modem via a 50 or 75
Ω
coaxial cable. The converter’s input connector for this signal is a type N, female.
The converter unit performs a block conversion (non-inverted sense) first to S-Band, then
to Ku-Band. The exact frequency output and power level are set by the user via the
remote M&C or keypad/display. The converter output is coupled to an HPA via a coaxial
cable with a 50
Ω, female, type N connector at the converter output.
1–6
Page 21

Ku- Band Satellite Transceiver Revision 9
Introduction MN/KST2000AB.IOM
The HPA receives the Ku-Band input from the converter and amplifies it to the
user-selected level.
For KST-2000A/B SSPAs of ≤ 8 Watts, prime power is supplied by the converter via
the M&C cable, while SSPAs > 8 Watts require a separate power source. The
output power of the SSPA is set by the user via the remote M&C or keypad, and this
output is connected to the feed of the antenna via WR-75 waveguide.
In the receive (Downlink) direction, the received Ku-Band signal from the antenna is
offset in frequency from the transmitted signal allowing rejection of the transmitted
signal by the Transmit Reject Filter (TRF). The exact receive frequency is set by the user
via the remote M&C, or entered using the keypad (on keypad/display equipped
transceivers). The received signal is amplified in an LNA whose output is coupled to the
converter’s input via a coaxial cable with type N connectors. This same cable is used to
provide prime power (+15 VDC) to the LNA.
The converter unit performs a block down conversion (non-inverted sense) first to
L-Band, then to 70 MHz (or 140 MHz if that option was ordered). An output is provided
at L-Band (950 to 1700 MHz) to monitor the received signal. This is particularly useful
during set up and fault finding.
1–7
Page 22
Ku- Band Satellite Transceiver Revision 9
Introduction MN/KST2000AB.IOM
1.1.6 Single-Thread KST-2000B System
A block diagram of the KST-2000B, single-thread Ku-Band system is shown in
Figure 1-4. The operation of KST-2000B system is identical to the KST-2000A system
described in section 1.1.3 except in the receive (downlink) portion.
With the KST-2000B system, a LNB replaces the LNA and the block down converter
from Ku-Band to L-Band in the converter unit. In this configuration, the LNB sets the
received frequency range. The LNB to converter cable carries the LNB’s L-Band output,
LNB prime power (+15 VDC) and a 10 MHz reference signal from the converter to the
LNB.
Indoor Units
(Reference Only)
TX
Modem
RX
Remote
M&C
L-Band
RX Monitor
L-Band,
DC Power &
10 MHz Ref.
Ku-Band
M&C (Power)
LNB
HPA
TRF
Ku-Band
Ku-Band
70 or 140 MHz
Converter
Unit
TX
Figure 1-4. Single Thread KST-2000B Block Diagram
Reference Only
Antenna
OMT
1–8
Page 23
Ku- Band Satellite Transceiver Revision 9
Introduction MN/KST2000AB.IOM
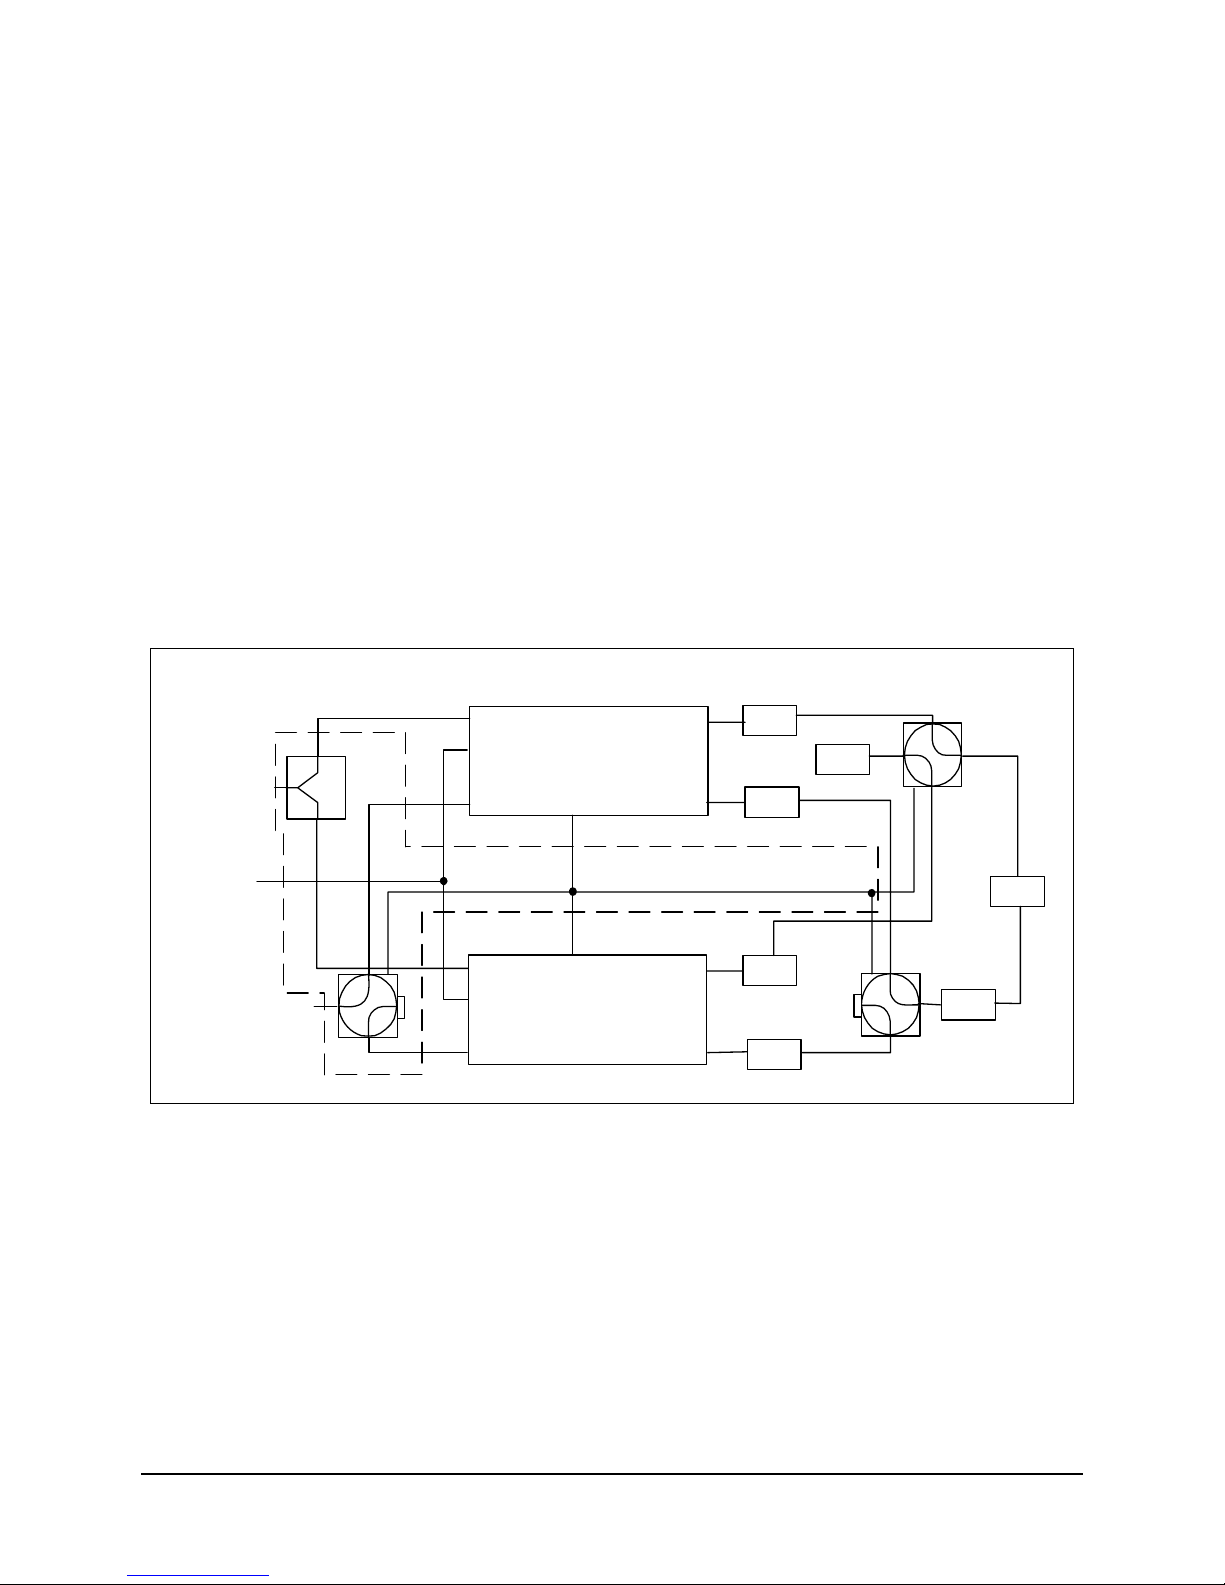
1.1.7 Redundant System
A block diagram of a redundant KST-2000A system is shown in Figure 1-5. For the
KST-2000B, LNBs replace the LNAs. The KST-2000A/B contains all the logic and
circuitry to sense the need to switch channels and to drive the RF switches.
The basic operation of the redundant system is identical to the single thread except that
two independent TX and RX channels are provided. Initial selection of TX and RX
channels is via the remote M&C or keypad.
During operation, and when a fault is detected in one channel, an automatic switchover to
the other channel occurs. The RJU-2000 provides IF I/O selection and converter interface
connections.
TX IF
REMOTE
M&C
TX IF
REMOTE
C0NVERTER UNIT
RX IF
1 : 1
TX RF
RX RF
HPA
LNA
RJU-2000
1 : 1
C0NVERTER UNIT
TX RF
RX RF
HPA
LNA
RX IF
TX IF
REMOTE
RX IF
Figure 1-5. Redundant KST-2000A System Block Diagram
LOAD
OMT
TRF
1–9
Page 24
Ku- Band Satellite Transceiver Revision 9
Introduction MN/KST2000AB.IOM
1.2 Specifications
The basic KST-2000A/B specifications are listed in this section.
Table 1-2 Converter Unit Specification
Table 1-3 System Transmit Characteristics
Table 1-4 LNA Characteristics
Table 1-5 LNB Characteristics
Table 1-6 SSPA Characteristics
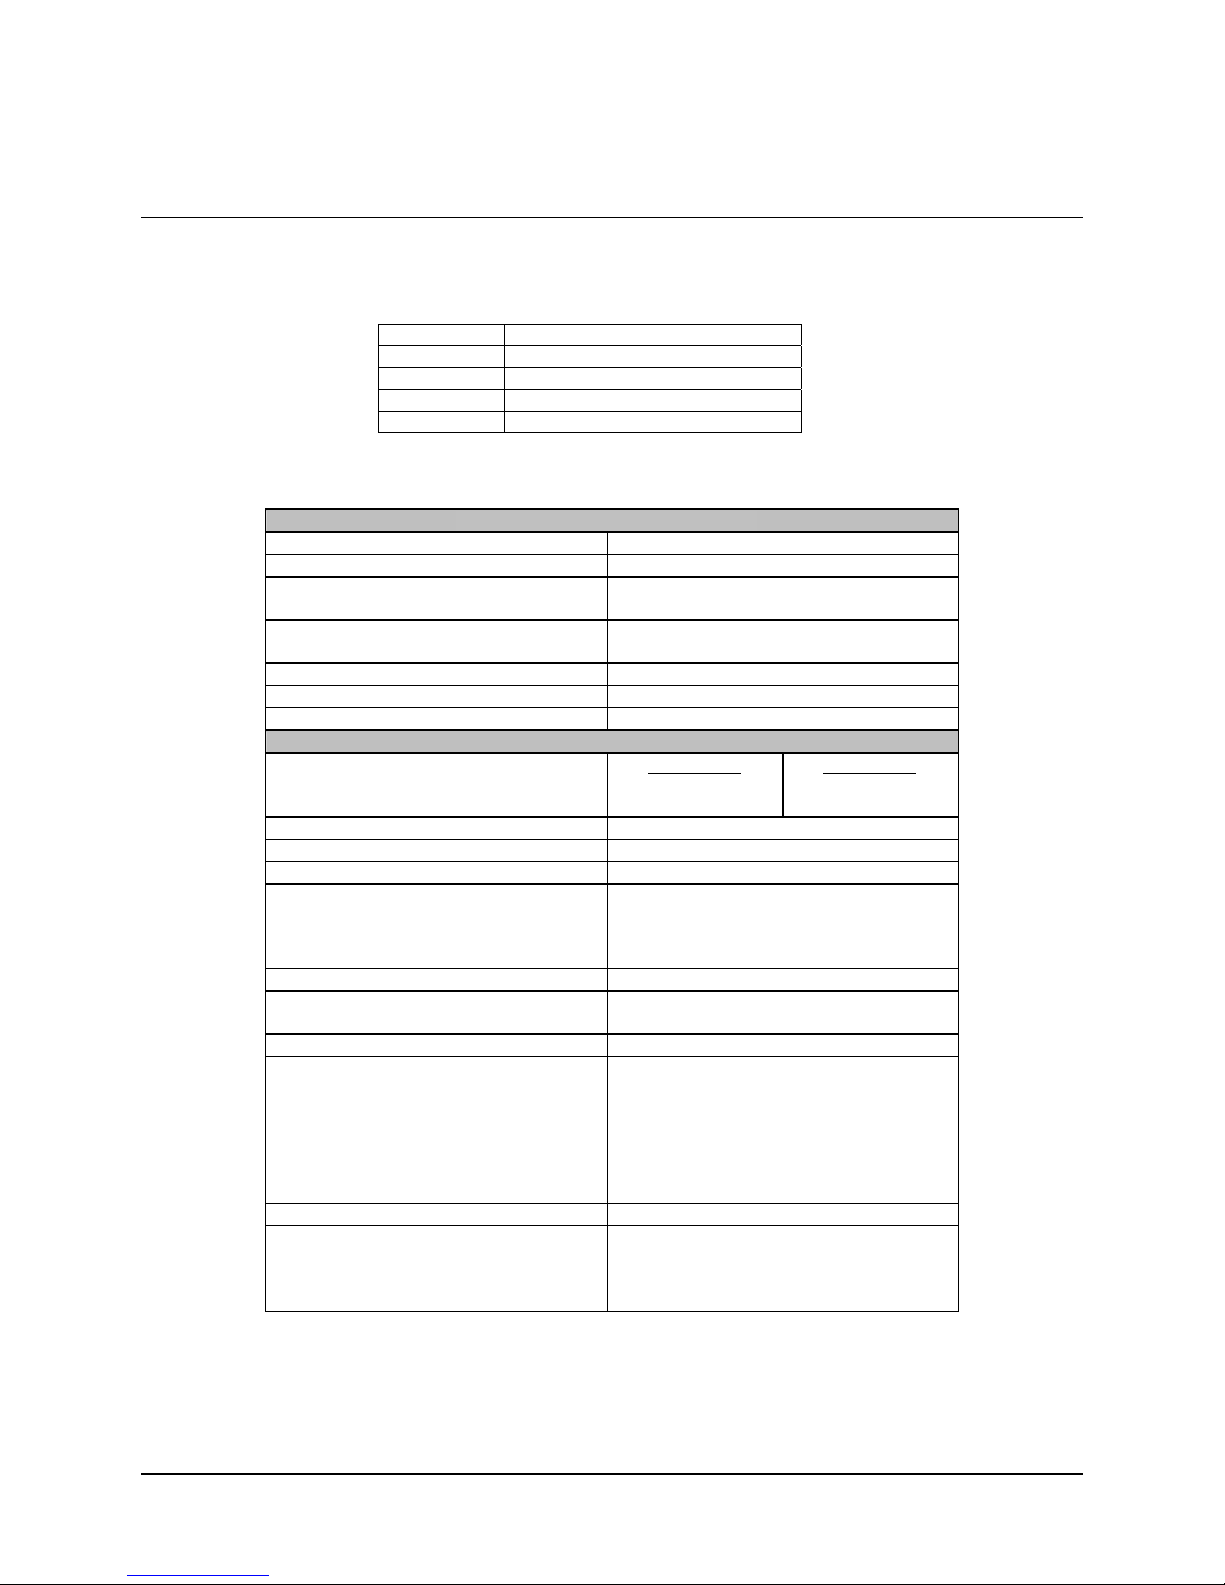
Table 1-2. Converter Unit Specifications
Converter Transmit Characteristics
Output Frequency 13.75 to 14.5 GHz in 1 MHz steps
Input Frequency 50 to 90 MHz (100 to 180 MHz optional)
Input Power Level –25 to –45 dBm operational
–10 dBm survival
Gain 42 dB nominal at mid-range user
attenuation setting
User Attenuation Range 0 to 20 dB in 1 dB steps
Power Output at 1 dB Compression + 15 dBm minimum
Transmit Phase Noise Exceeds IESS 308/309 requirements
Converter Receive Characteristics
Input Frequency KST-2000A
10.95 to 12.75
GHz
Output Frequency 50 to 90 MHz (100 to 180 MHz optional)
Gain 45 dB maximum
User Attenuation Range 0 to 20 dB in 1 dB steps
Gain Variation with Frequency
(at a fixed temperature)
Any 40 MHz band
Entire operating band
Power Output at 1 dB Compression +16 dBm minimum
Power Output Stability over
Temperature (at a fixed frequency)
Phase Noise Exceeds IESS 308/309 requirements
Spurious Signals
Signal Related
Non-Signal Related
Third Order Products –33 dBc for two carriers each at +6 dBm
Auxiliary Output Monitor
Frequency
Gain
Connector
2.0 dB peak-to-peak
3.0 dB peak-to-peak
4.0 dB peak-to-peak
–50 dBc at –5 dBm output
–35 dBc at <250 kHz from carrier
–87 dBm max referenced to converter
input for the KST-2000A
–126 dBm max referenced to the LNB
input for the KST-2000B
950 to 1700 MHz
20 dB relative to carrier input
Type N, female, 50Ω
KST-2000B
950 to 1700 MHz
1–10
Page 25
Ku- Band Satellite Transceiver Revision 9
Introduction MN/KST2000AB.IOM
Table 1-2. Converter Unit Specifications (Continued)
General Converter Characteristics (Continued)
Prime Power 85 to 264 VAC, 47 to 63 Hz, <200 W(Optional
–48 VDC input)
Keypad/Display Interface Weatherproof 16 character LED display with
Up (S), Down (T), Left (W ), Right ( X),
[Clear] and [Enter] pushbuttons
Serial Data Interface (User
Selectable)
Serial Data Baud (User Selectable) 300, 600, 1200, 2400, 4800, 9600, 19200
Discrete Alarm Outputs
Uplink Summary Alarm
Downlink Summary Alarm
System Summary Alarm
External LED Indicators Prime Power On/TX RF ON
IF Input/Output Connectors
TX Output/RX Input Connectors
Size 21.75 H x 8.25W x 8.00D inches
Weight 33 lbs. (16 kg)
Temperature –40 to +550C (-40 to +1310F) operational
EIA-232, EIA-485, or EIA-422 half duplex
Form “C” Relay Contacts
Form “C” Relay Contacts
Form “C” Relay Contacts
Summary Fault
Type N Female, 50Ω
Type N Female, 50Ω
(55.2H x 20.95W x 20.32D cm)
–50 to +75
0
C (–67 to +1670F) survival
Table 1-3. System Transmit Characteristics (with SSPAs of ≤ 40W)
Parameter Characteristics
Gain Stability over temperature, AGC on,
fixed frequency
Gain variation with frequency
70 ± 20 MHz
140 ± 40 MHz
Spurious signals
Signal related
< 250 kHz
Non-signal related
2.0 dB peak-to-peak
2.0 dB peak-to-peak
3.0 dB peak-to-peak
–50 dBc at 6 dB below P
–35 dBc at 6 dB below P
–24 dBm/4 kHz for 2W unit
–21 dBm/4 kHz for 4W unit
–18 dBm/4 kHz for 8W unit
–15 dBm/4 kHz for 16W unit
–13 dBm/4 kHz for 25W unit
–13 dBm/4 kHz for 32W unit
–12 dBm/4 kHz for 40W unit
dB
1
dB
1
1–11
Page 26

Ku- Band Satellite Transceiver Revision 9
Introduction MN/KST2000AB.IOM
Table 1-4. LNA Characteristics
LNA Specification
Input VSWR 1.25:1 max.
Output VSWR 1.25:1 max
Gain Flatness:
10.95 to 12.75 GHz
10.95 to 11.7 GHz
11.7 to 12.2 GHz
12.25 to 12.75 GHz
± 2.0 dB/full band
± 0.50 dB/40 MHz
± 1.5 dB/full band
± 0.25 dB/40 MHz
± 1.5 dB/full band
± 0.25 dB/40 MHz
± 1.5 dB/full band
± 0.25 dB/40 MHz
Gain vs. Temperature ± 1.5 dB Max.
Operating Temperature
1 dB Gain Comp. Pt.
Third Order Intercept Point
Group Delay:
Linear
Parabolic
Ripple
-40 to +60°C (–40
to + 140°F)
+10 dBm
+8 dBm or +20 dBm (optional)
+20 dBm
+18 dBm or +30 dBm (optional)
0.01 ns/MHz
0.001 ns/MHz
2
0.1 ns/peak-to-peak
Power Connector Powered by the KSAT through the coax
RF Input W/G WR-75 Cover
Input Power, Nominal +12 to +24 VDC at 100 mA
Table 1-5. LNB Characteristics
LNB Characteristics
Frequency 10.95 to 11.70 GHz
11.70 to 12.20 GHz
12.25 to 12.75 GHz
Gain @ 25°C
55 dB minimum, 60 dB typical
1 dB Gain Comp. PT. + 10 dBm, minimum
Noise Figure @ 25°C
0.9 dB, typical
RF Input Waveguide WR-75
Input Power + 15 V, 400 mA maximum
Output
Operating Temperature
Type N female, 50Ω
–40 to +55°C (–40 to 131°F)
Operating Humidity 0 to 100% RH
Storage Temperature
–50° to +80°C (–58 to +176°F)
Size 2.5W x 5.7L x 1.6H inches (approximately)
(6.5W x 14.5L x 4H cm)
Weight < 2 lbs. (< 0.9 kg)
1–12
Page 27
Ku- Band Satellite Transceiver Revision 9
Introduction MN/KST2000AB.IOM
1–13
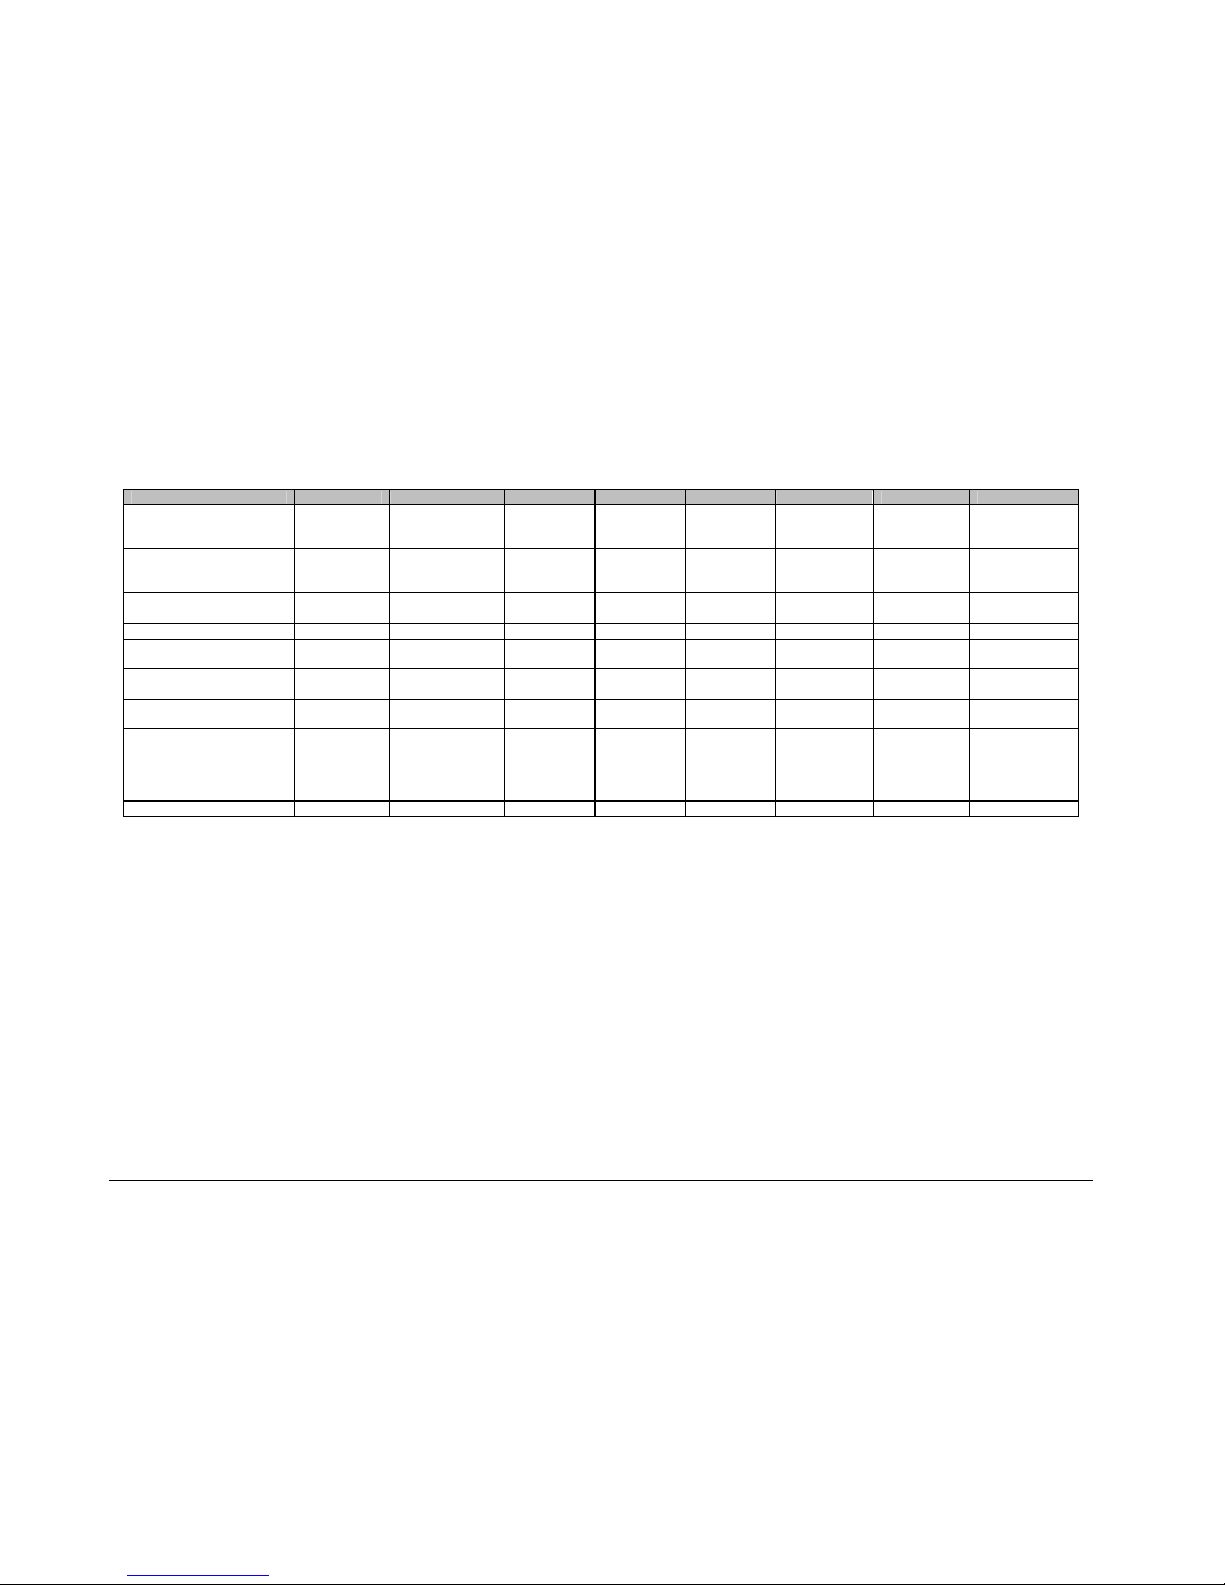
Table 1–6. SSPA Characteristics
Parameter 2W SSPA 4W SSPA 8W SSPA 16W SSPA 25W SSPA 32W SSPA 40W SSPA 80W SSPA
Frequency
Range
13.75 to
14.5 GHz
(See Note 1)
13.75 to
14.5 GHz
13.75 to
14.5 GHz
13.75 to
14.5 GHz
13.75 to
14.5 GHz
13.75 to
14.5 GHz
13.75 to
14.5 GHz
Power output at 1 dB
Compression at 25
0
C:
Guaranteed
+ 33 dBm
+ 36 dBm
+ 39 dBm
+ 42 dBm
+ 44 dBm
+ 45 dBm
+ 46 dBm
Third Order Intermodulation + 41 dBm
(Intercept pt)
+ 44 dBm
(Intercept pt)
+ 47 dBm
(Intercept pt)
+ 50 dBm
(Intercept pt)
+ 52 dBm
(Intercept pt)
+ 53 dBm
(Intercept pt)
+ 54 dBm
(Intercept pt)
Gain (Nominal) 27 dB 30 dB 33 dB 38 dB 40 dB 41 dB 44 dB
Gain Variation with
Temperature
2.0 dB p-p 2.0 dB p-p 2.0 dB p-p 2.0 dB p-p 2.0 dB p-p 2.0 dB p-p 2.0 dB p-p
Input Connector Type N,
Female, 50Ω
Type N,
Female, 50Ω
Type N,
Female, 50Ω
Type N,
Female, 50Ω
Type N,
Female, 50Ω
Type N,
Female, 50Ω
Type N,
Female, 50Ω
Output Connector WR-75
W/G flange
WR-75
W/G flange
WR-75
W/G flange
WR-75
W/G flange
WR-75
W/G flange
WR-75
W/G flange
WR-75
W/G flange
Input Power +9.75 VDC
from
converter
(30W)
+9.75 VDC
from converter
(36W)
+9.75 VDC
from
converter
(90W)
85-264 VAC,
47-63 Hz
(180W),
Optional –36
to -72 VDC
85-264 VAC,
47-63 Hz
(360W)
Optional –36
to -72 VDC
85-264 VAC
47-63 Hz
(380W)
Optional –36
to -72 VDC
85-264 VAC
47-63 Hz
(390W)
Optional –36
to -72 VDC
Refer to
amplifier
documentation
Weight 5 lb (2.3 kg) 8 lb (3.7 kg) 9 lb (4.0 kg) 24 lb (11 kg) 47 lb (21 kg) 52 lb (21 kg) 52 lb (21 kg)
Notes:
1. Optional: 14.0 to 14.5 GHz.
2. Optional: 13.75 to 14.5 GHz.
Page 28

Ku- Band Satellite Transceiver Revision 9
Introduction MN/KST2000AB.IOM
1–14
NOTES:
Page 29

Chapter 2. INSTALLATION
This chapter provides system equipment and external connections information for both
single thread and redundant systems. Refer to Appendix C (single-thread equipment) and
Appendix D (redundant equipment) for installation procedures specific to particular
mounting applications.
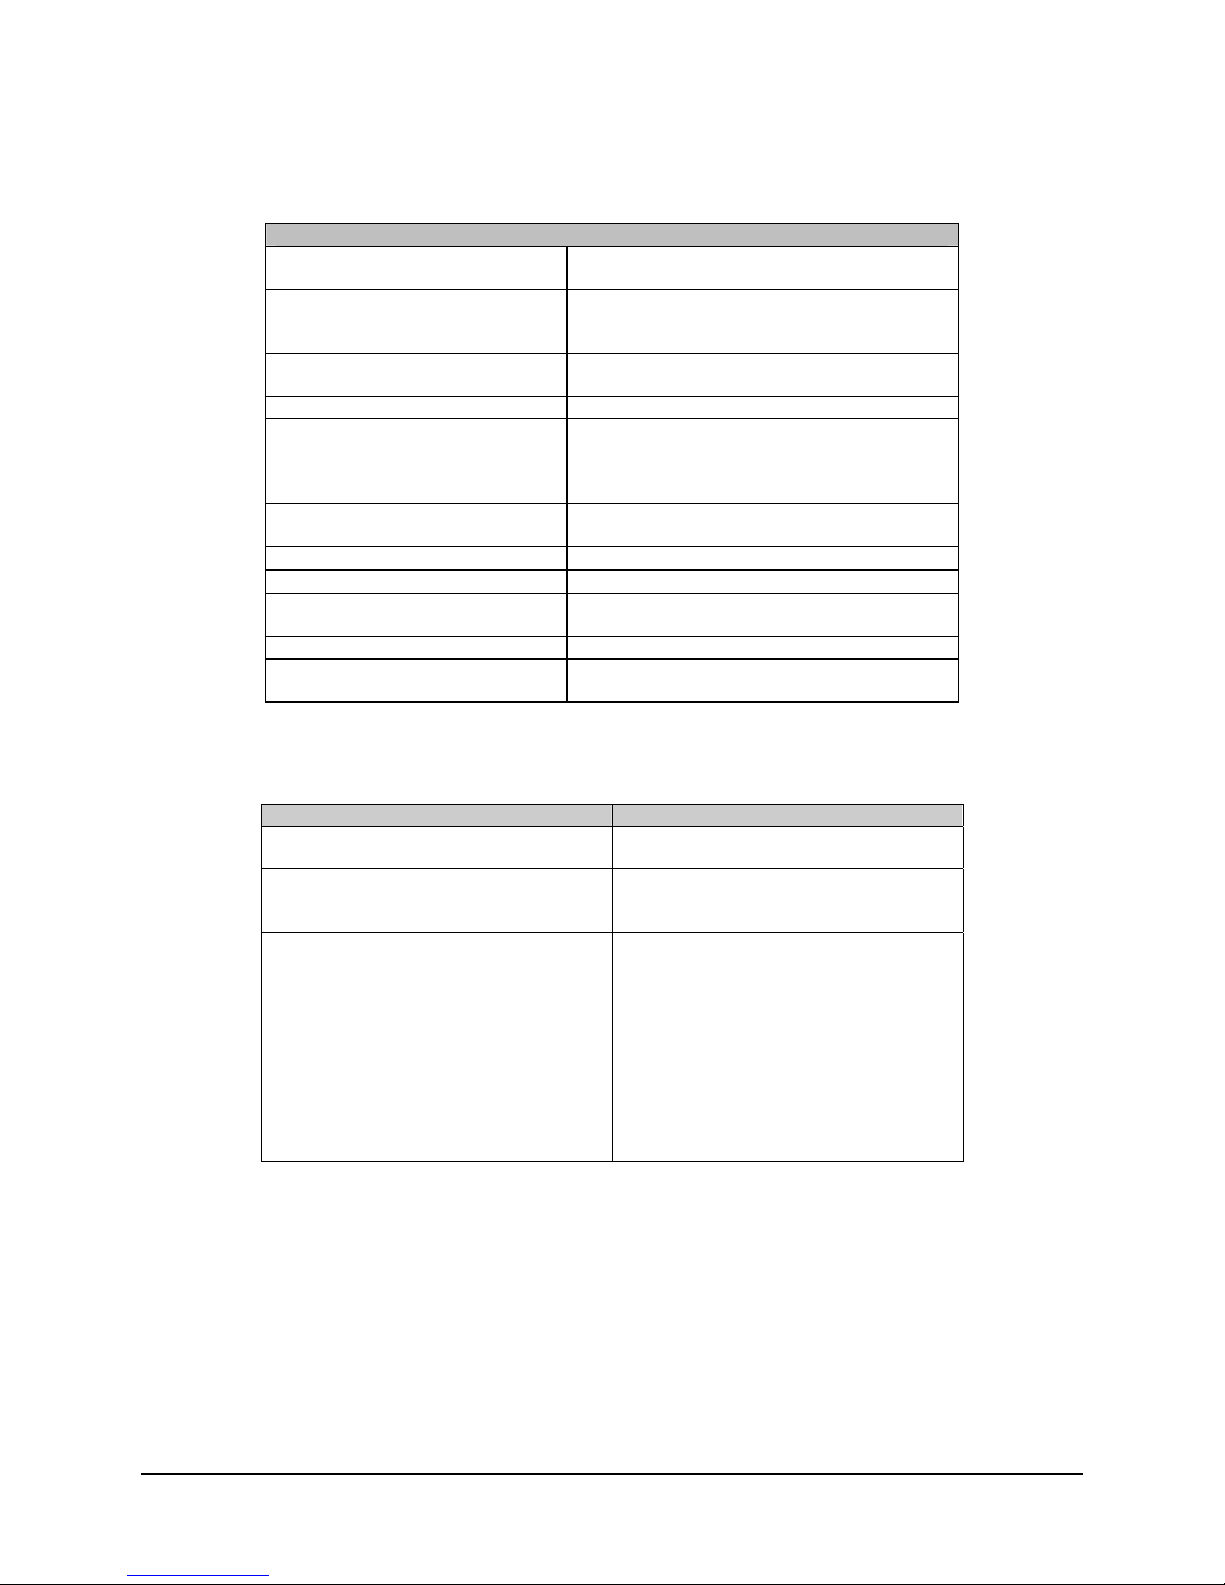
2.1. Single-Thread System Components
The standard components delivered with a single-thread system include:
QTY Description
1 Base converter unit
1 HPA (no HPA necessary for the +15dBm requirement)
1 LNA (KST-2000A system) or LNB (KST-2000B system)
As Required 12ft (3.66m) Prime power cables for all converter units and applicable
amplifiers
As Required 5ft (1.52m) Interlink cabling
As Required Mounting hardware for a spar mounted offset antenna. (see
Note)
Note: Antenna type shall be indicated when ordering the KST-2000A/B unit.
2–1
Page 30

Ku-Band Satellite Transceiver Revision 9
Installation MN/KST2000AB.IOM
2.2. Redundant System Components
The standard delivered components included with a redundant system are:
QTY Description
2 Base converter units
2 HPA (no HPA necessary for the +15dBm requirement)
2 LNA (KST-2000A system) or LNB (KST-2000B system)
As Required 12ft (3.66m) Prime power cables for all converter units and applicable amplifiers
1 RJU-2000 switch junction box
As Required Interlink cabling from the base converters to the RJU-2000 switch junction box
1 15ft (4.57m) Interlink cable for the RX 1:1 waveguide LNA assembly (mounted directly to the
OMT)
1 10ft (3.05m) Interlink cable for the TX 1:1 waveguide HPA assembly (TX switching for
+15dBm 1:1 system is provided via coaxial switch)
1 3ft (1m) Flexible waveguide (connects the output of TX switch to the TX port of the OMT)
As Required Mounting hardware for a spar mounted offset antenna. (see Note)
1 M&C mating connector
Note: Antenna type shall be indicated when ordering the KST-2000A/B unit.
2–2
Page 31

Ku-Band Satellite Transceiver Revision 9
Installation MN/KST2000AB.IOM
2.3. Description of Options
Table 2-1. Description of Options
KST2000A TX ONLY OPTION
(System ordered as KST-2000A. KST-2000B TX only N/A)
LNA OPTIONS (10.95 to 12.75GHz):
(KST2000A only) 85° KLNA noise temperature
(KST2000A only) 60db gain KLNA
(KST2000A only) 85° KLNA noise temperature and 60 dB gain
(KST2000A only) Special LNA requirements outside those previously indicated
LNB OPTIONS (discrete narrow bands at 1.1db max NF only):
(KST2000B only) 10.95 to 11.70 GHz Europe and also Intelsat (11.20 to 11.70 GHz)
(KST2000B only) 11.70 to 12.20 GHz North American
(KST2000B only) 12.25 to 12.75 GHz Aussat
MOUNTING HARDWARE OPTIONS:
Standard Prodelin spar offset antenna
(base converter units are pole-mounted for redundant systems)
Standard Channel Master spar offset antenna
(base converter units are pole-mounted for redundant systems)
Non-standard single thread converter pole-mount Kit
No mounting hardware beyond the “pick off points” on the completed assembly
For mounting requirements outside those previously indicated, please consult the factory for availability.
CABLING OPTIONS:
No RF (and IF for 1:1 system) or control cabling. Includes only the prime power cable(s) and applicable MS
connectors
For cabling requirements outside those previously indicated, please consult the factory for availability.
2–3
Page 32

Ku-Band Satellite Transceiver Revision 9
R
Installation MN/KST2000AB.IOM
2.4. Electrical Connections
2.4.1. Converter Unit
The external connections on the converter unit are shown in Figure 2-1 and listed in
Table 2-2. The connections are described in the following paragraphs.
J7
RF IN
J8
HPA
REF IN
J10
1:1
J9
J6
RF
OUT
GND
ERDE
J5
RX MON
J1
PRIME
POWE
FAULT
F1
REMOTE
F2
J2
TX ON
J4
IF
OUT
J3
IF IN
Figure 2-1. I/O View of KST-2000A/B Converter Unit
2–4
Page 33

Ku-Band Satellite Transceiver Revision 9
Installation MN/KST2000AB.IOM
Table 2-2. Converter Unit External Connections
Ref. Name Connector Type Function
J1 PRIME
POWER
J2 REMOTE 26 pin circular,
J3 IF IN Type N, Female TX IF Input 70 MHz or optionally 140 MHz
J4 IF OUT Type N, Female RX IF Output 70 MHz or optionally 140 MHz
J5 RX MON Type N, Female L-Band Receive Monitor (970-1700MHz)
J6 RF OUT Type N, Female 13.75 to 14.5 GHz TX out to HPA
J7 RF IN Type N, Female KST-2000A
J8 HPA 10 pin circular,Female HPA M&C Interface
J9 REF IN Type N, Female External system reference input, 5 or 10
J10 1:1 32 pin circular,
3/4 pin circular Male Prime AC/DC Power Input
Remote M&C Interface
Female
10.95 to 12.75 GHz
RX in from LNA
MHz
at 6 dBm min.
Redundancy Control
Female
KST-2000B
950 to 1700 MHz
from LNB
2.4.1.1 AC Prime Power Connector (J1)
Prime power is supplied to the converter unit (and for SSPAs of ≤ 8 Watts) through a
3-pin circular male connector (J1) as in Figure 2-2. Prime power input requirements are
85 to 264 VAC, 47 to 63 Hz, 200 watts. The J1 connections are listed in Figure 2-2 for
pin assignments.
Note: Pin C (ground) is adjacent to the connector notch.
2–5
Pin Function Color
A Line Brown
B Neutral Blue
C Ground Green/Yellow
Mating connection is molded power cord
Comtech PN
Figure 2-2. Prime Power Input (J1)
CA/84914-0223
Page 34

Ku-Band Satellite Transceiver Revision 9
Installation MN/KST2000AB.IOM
2.4.1.2 Optional –48VDC Prime Power Connector (J1)
Prime power is supplied to the converter unit (and for SSPAs of ≤ 8 Watts) through a
4-pin circular male connector (J1). For the converter unit, the prime power input
requirement is -36 to -48 VDC, 200 watts.
Optional –48VDC Power Connection
Pin Function
A + VDC
B Ground
C - VDC
D No Connect
Mating connector is a Comtech P/N
CN/STPG04F01(Amphenol PT06E-12-4S(SR))
2.4.1.3 Remote Connector (J2)
The Remote Connector (J2) is a 26-pin, circular, female connector (P/N: PT06E1626P(SR) ). It is used to allow remote control and monitoring of KST-2000A/B operating
parameters. Interface is via EIA-232, EIA-485, or EIA-422 half-duplex. Refer to Table
2-3 for pin assignments.
Note: The user must assemble this cable. Figure 2-3 shows the connections for an
EIA-232 adapter for use with a PC COM port.
Table 2-3. Remote M&C Connector (J2) Pin Assignments
Pin Signal Description
A -TX/-RX or –RX only (see Note) – EIA-485 TX/RX or – EIA-422 RX
B -TX/-RX or –TX only (see Note) –EIA-485 TX/RX or – EIA-422 TX
C +TX/+RX or +RX only (see
Note)
D +TX/+RX or +TX only (see Note) + EIA-485 TX/RX or + EIA-422 TX
E RXD EIA-232 receive data
F RTS EIA-232 ready to send (tied to CTS)
G TXD EIA-232 transmit data
H DSR EIA-232 data set ready
J GND Ground
K LNA Power +15 VDC to LNA
+ EIA-485 TX/RX or + EIA-422 RX
2–6
Page 35

Ku-Band Satellite Transceiver Revision 9
Installation MN/KST2000AB.IOM
L LNA Power Return +15 VDC Return from LNA
M RESET Reset (momentary low resets
system)
N GND Ground
P CTS EIA-232 clear to send (tied to RTS)
R GND Ground
S +12V (KP10 Power) KP10 power supply output
T 2/4 wire (see note) EIA-485/EIA-422 operation selection
U UL_FLT_NC Uplink fault relay, closed = fault
V UL_FLT_COM Uplink fault relay common
W UL_FLT_NO Uplink fault relay, open = fault
X DL_FLT_NC Downlink fault relay, closed = fault
Y DL_FLT_COM Downlink fault relay common
Z DL_FLT_NO Downlink fault relay, open = fault
a SUM_FLT_NO Summary fault relay, open = fault
b SUM_FLT_NC Summary fault relay, closed = fault
c SUM_FLT_COM Summary fault relay, common
Notes:
1. These signals can be configured as EIA-485, 2-wire, half-duplex or EIA-422, 4-wire,
half-duplex.
2. In 2-wire mode, pins A and B are tied together as are pins C and D.
3. To select 2-wire operation, pin T is left open. Tie pin T to ground for EIA-422
(4-wire) operation.
2–7
Page 36

Ku-Band Satellite Transceiver Revision 9
Installation MN/KST2000AB.IOM
Figure 2-3. Serial (EIA-232) Adapter Cable Wiring Diagram
2.4.1.4 IF IN Connector (J3)
The IF IN connector (J3) is a Type N, female connector used to connect the IF at 70 MHz
(140 MHz optional) at –25 to – 45 dBm from the modem to the converter unit. Either
50Ω or 75Ω cables may be used to connect to J3.
2.4.1.5 IF OUT Connector (J4)
The IF OUT connector (J4) is a Type N, female connector used to connect the IF at
70 MHz (140 MHz optional) from the converter unit to the modem. Either 50Ω or 75Ω
cables may be used to connect to J4.
2–8
Page 37

Ku-Band Satellite Transceiver Revision 9
Installation MN/KST2000AB.IOM
2.4.1.6 RX MON Connector (J5)
The RX MON connector (J5) provides the received (downlink) signal at L-Band (950 to
1700 MHz) for monitoring. This signal has a gain of 20 dB relative to the carrier.
Connector J5 is a Type N, female connector. Nominal output impedance is 50Ω.
Parameter Frequency Frequency Frequency
Ku-Band Frequency, GHz 10.95 to
11.699
Subtract the DRO Frequency,
GHz
RX MON at L-Band, MHz 950 to 1699 950 to 1499 950 to 1450
–10.0 –10.75 –11.3
11.70 to
12.249
12.25 to
12.75
2.4.1.7 RF OUT Connector (J6)
The RF OUT connector (J6) is a type N, female, 50Ω connector used to connect the
converter unit’s output at Ku-Band (uplink) to an HPA. Power output at 1 dB
compression is +15 dBm minimum.
2.4.1.8 RF IN Connector (J7)
The RF IN connector (J7) is a type N, female, 50Ω connector used to connect the LNA’s
output at Ku-Band (downlink) to the converter unit for the KST-2000A. This same
connector is used to connect the LNB's output at L-Band to the converter unit for the
KST-2000B.
2–9
Page 38

Ku-Band Satellite Transceiver Revision 9
Installation MN/KST2000AB.IOM
2.4.1.9 HPA Connector (J8)
The HPA connector (J8) is a 10 pin circular, female (ITT #KPT02E-12-105) connector
used for HPA M&C and power functions. Refer to Table 2-5 for pin assignments for 2, 4,
8, 16, 25, 32, and 40 watt SSPAs. Pin assignments vary based on the amplifier type
selected.
Table 2-4. HPA Connector (J8) Pin Assignments (CEFD SSPA)
Pin Signal Description
A IPA Communications line A
B IPB Communications line B
C +10V +10V Power Supply Output (N/A on 16, 25, 32 & 40W)
D +10V +10V Power Supply Output (N/A on 16, 25, 32 & 40W)
E +10V +10V Power Supply Output (N/A on 16, 25, 32 & 40W)
F +10V +10V Power Supply Output (N/A on 16, 25, 32 & 40W)
G +10V_RTN +10V Power Supply Output (N/A on 16, 25, 32 & 40W)
H +10V_RTN +10V Power Supply Output (N/A on 16, 25, 32 & 40W)
J +10V_RTN +10V Power Supply Output (N/A on 16, 25, 32 & 40W)
K +10V_RTN +10V Power Supply Output (N/A on 16, 25, 32 & 40W)
Notes:
1. For a CEFD SSPA, J8 (external circular connector) is routed internally to J10 on
the M&C PC assembly AS/8876 (refer to Table 2-4).
2. Non-KST specific SSPA application, J8 (external circular connector) is routed
internally to J11 on the M&C PC assembly AS/8876, (refer to Table 2-5).
3. For a TWTA application, J8 (external circular connector) is routed internally to
J12 on the M&C PC assembly AS/8876, (refer to Table 2-6).
Table 2-5. HPA Connector (J8) Pin Assignments (Non-KST Specific SSPA)
SSPA Pin Converter Pin Signal Description
H A RF_ENA RF enable, open collector output, active low
– B N/C Not connected
– C N/C Not connected
– D N/C Not connected
C E THERM Thermistor input connection
– F N/C Not connected
D G HPA_IN1 SSPA summary fault input, active low
G/R H CMD_RTN Command return (tie to SSPA GND)
E J ANA_IN Analog input from SSPA (0 to +10VDC) Output
a K GND Signal ground reference
2–10
Power
Page 39

Ku-Band Satellite Transceiver Revision 9
Installation MN/KST2000AB.IOM
Table 2-6. HPA Connector (J8) Pin Assignments (TWTA Connection)
Pin Signal Description
A HV_EN High voltage enable, open collector output, active
low
B HTR_STBY Heater standby, open collector output, active low
C FLT_RST Fault reset, open collector output, active low
D HPA_IN1 Input from TWTA, heater timer complete, active low
E HPA_IN2 Input from TWTA, TWT temperature fault, active low
F HPA_IN3 Input from TWTA, high voltage on, active low
G HPA_IN4 Input from TWTA, summary fault, active low
H GND Status/control return
J ANA_IN Analog input from TWTA (0 to +10VDC)
K GND Analog signal return
2.4.1.10 REF IN Connector (J9)
The REF IN connector (J9) allows the user to operate the system with an external
reference instead of the built-in system reference. An external signal of 5 or 10 MHz,
at +6 dBm minimum, may be applied to the 50Ω, Type N, female connector.
2–11
Page 40

Ku-Band Satellite Transceiver Revision 9
Installation MN/KST2000AB.IOM
2.4.1.11 1:1 Connector (J10)
The 1:1 (J10) connector is a 32-pin circular, female connector used in redundant
applications for unit communications and switch control. Refer to Table 2-7 for pin
assignments.
Table 2-7. 1:1 Connector (J10) Pin Assignments
Pin Signal Description
A UL_FLT_OUT U/L Fault output – wires to adjacent unit UL_FLT_IN
B DL_FLT_OUT D/L Fault output – wires to adjacent unit DL_FLT_IN
C TX_SW_CMD Transmit switch command – momentary +28 VDC
output
D RX_SW_CMD Receive switch command – momentary +28 VDC output
E IF_SW_CMD IF switch command – momentary +28 VDC output
F UL_OL_IND U/L online indicator – wires to adjacent unit UL_OL_IN
G DL_OL_IND D/L online indicator – wires to adjacent unit DL_OL_IN
H ENA_OUT Redundancy enable – wires to adjacent unit ENA_IN
J MODE_1_OUT Mode output – wires to adjacent unit MODE_1_IN
K MODE_2_OUT Mode output – wires to adjacent unit MODE_2_IN
L MODE_2_IN Mode input – wires to adjacent unit MODE_2_OUT
M MODE_1_IN Mode input – wires to adjacent unit MODE_1_OUT
N DL_OL_IN D/L online – wires to adjacent unit DL_OL_IND
P UL_OL_IN U/L online input – wires to adjacent unit UL_OL_IND
R DL_FLT_IN D/L fault input – wires to adjacent unit DL_FLT_OUT
S UL_FLT_IN U/L fault input – wires to adjacent unit UL_FLT_OUT
T CONTINUITY Continuity detection – wires to adjacent unit CONT RTN
U A/B_UNIT Unit designator GND = A unit, open = B unit
V ENA_IN Enable input – wires to adjacent unit ENA_OUT
W IF_IND_B IF switch, position B indicator input
X IF_IND_A IF switch, position A indicator input
Y RX_IND_B RX switch, position B indicator input
Z RX_IND_A RX switch, position A indicator input
a TX_IND_B TX switch, position B indicator input
b TX_IND_A TX switch, position A indicator input
c IF_IND_COM IF switch indicator common
d RX_IND_COM RX switch indicator common
e TX_IND_COM TX switch indicator common
f IF_CMD_COM IF switch command common
g RX_CMD_COM RX switch command common
h TX_CMD_COM TX switch command common
j CONT_RTN Continuity return – wires to adjacent unit continuity
2–12
Page 41

Ku-Band Satellite Transceiver Revision 9
Installation MN/KST2000AB.IOM
2.4.2. Data SSPAs
2.4.2.1 2 and 4 Watt SSPA Connections
The 2 and 4 Watt SSPAs have a Type N, female (50Ω) connector (J1) at one end for the
Ku-Band input and a WR-75 waveguide isolator and waveguide filter (J2) at the other
end for the Ku-Band output. Also at the input is the M&C control/power cable connector
(J3) for connection to the HPA (J8) connector on the converter unit.
2.4.2.2 8 Watt SSPA Connections
The 8 Watt SSPA has a Type N, female (50Ω) connector (J1) at one end for the Ku-Band
input and a WR-75 waveguide isolator (J2) at the other end for the Ku-Band output. Also
at the input is the M&C control/power cable connector (J3) for connection to the HPA
(J8) connector on the converter unit. The HPA’s cooling fan is externally connected at J4
at the factory, and this connection should not be removed. Refer to Table 2-8 for pin
assignments.
Table 2-8. Fan (J4) Pin Assignments
Pin Function
A +FAN (+12V)
B –FAN (GND)
C N/C
2–13
Page 42

Ku-Band Satellite Transceiver Revision 9
Installation MN/KST2000AB.IOM
2.4.2.3 16 Watt SSPA Connections
The 16 Watt SSPA input and output connections are shown in Figure 2-4
AC IN
J2
M/C
GND
ERDE
J1
RF IN
Figure 2-4. 16Watt SSPA
Note: When replacing fuses in the 16 Watt SSPA, use 6.3 amp, 3AG fuses, (2 each).
AC Line Input Connector (J3)
Mating connection is molded power cord
Comtech PN
AC Power Connection
Pin Function Color
A Line Brown
B Neutral Blue
C Ground Green/Yellow
CA/84914-0223
Optional –48V DC DC Power
Connection
Pin Function
A + VDC
B Ground
C - VDC
D No Connect
Mating connector is a Comtech P/N
CN/STPG04F01(Amphenol PT06E-124S(SR))
2–14
Page 43

Ku-Band Satellite Transceiver Revision 9
Installation MN/KST2000AB.IOM
Connectio
n
J1 RF Input N-Type, Female N-Type, Male
J2 M&C
J3 AC/DC-Line Main Power See above tables
Function Description Mating Connector
Interface
ITT#KPT02E-12105
ITT#KPT06E-12105
Figure 2-5. I/O Connectors for the 16 Watt SSPA
2–15
Page 44

Ku-Band Satellite Transceiver Revision 9
Installation MN/KST2000AB.IOM
Figure 2-6. Output Connection for the 16 Watt SSPA
(Waveguide)
2–16
Page 45

Ku-Band Satellite Transceiver Revision 9
Installation MN/KST2000AB.IOM
2.4.2.4 25 / 32 / 40 Watt SSPA Connections
The 25/32/40 Watt SSPA input and output connections are shown in Figure 2-7.
Figure 2-7. 25/32/40 Watt SSPA
Note: When replacing fuses in the 25/32/40 Watt SSPA, use 6.3 amp, 3AG fuses, (2 each).
AC Line Input Connector (J3)
Mating connection is molded power cord
Comtech PN
AC Power Connection
Pin Function Color
A Line Brown
B Neutral Blue
C Ground Green/Yellow
CA/84914-0223
2–17
Page 46

Ku-Band Satellite Transceiver Revision 9
Installation MN/KST2000AB.IOM
Optional –48V DC DC Power
Connection
Pin Function
A + VDC
B Ground
C - VDC
D No Connect
Mating connector is a Comtech PN
CN/MS-PLST4F01(ITT Cannon
CA06COM-E-18-10SB(ROHS 4-06))
Connectio
n
J1 RF Input N-Type, Female N-Type, Male
J2 M&C
J3 AC/DC-Line Main Power See tables above
Function Description Mating Connector
Interface
ITT#KPT02E-12105
ITT#KPT06E-12105
Figure 2-8. I/O Connectors for the 25/32/40 Watt SSPA
2–18
Page 47

Ku-Band Satellite Transceiver Revision 9
Installation MN/KST2000AB.IOM
Figure 2-9. Output Connection for the 25/32/40 Watt SSPA
(Waveguide)
2–19
Page 48

Ku-Band Satellite Transceiver Revision 9
Installation MN/KST2000AB.IOM
2.4.2.5 80 Watt SSPA Connections
Note: The data is supplied by the vendor and accompanies the unit.
2.4.3. LNA Connections
Note: The power supply for the LNA is supplied by the KST-2000A.
The RF input of the LNA is a WR-75 waveguide flange. The RF output of the LNA is a
type N, female, 50Ω connector. The LNA power supply is applied to the RF output
connector, normally +15 V at 250 mA.
2.4.4. LNB Connections
Note: The power supply for the LNB is supplied by the KST-2000B.
The RF input of the LNB is a WR-75 waveguide flange. The RF OUT/REF/PWR IN
connector of the LNB is a type N, 50Ω connector. It supplies the block-converted output
of 950 to 1700 MHz, and accepts +15 V at 400 mA, and a 10 MHz reference signal.
2–20
Page 49

Chapter 3. OPERATION
This chapter provides the following information: Initial setup (single-thread system),
initial setup (redundant system), RJU-2000 Redundant Junction Unit description, 1:1 redundant KST-2000A/B system operation, Up converter description, and Down converter
description.
3.1 Initial Setup (Single-Thread System)
This section details the procedures necessary to laboratory test a single-thread
KST-2000A/B system for the first time. Refer to Figure 3-1 for system setup.
Note: Ensure that the termination selected for the HPA output is sized to handle the
HPA output power.
1. Apply power to the KST-2000A/B.
2. After a few seconds ensure that the GREEN TX ON LED is flashing, and the
fault LED is extinguished. Refer to Section 4 if this is not the case.
3. Using a KP-10 or PC equipped with a terminal or Windows™ based M&C pro-
gram, ensure communication is available to the system M&C, via J2, remote
connector. (Refer to M&C software manual, P/N MN/M&CWIN.IOM)
Default Communication Parameters Address 1
Baud Rate 9600
Parity Even
Stop bits 2
Data length 7 bits
3–1
Page 50

Ku-Band Satellite Transceiver Revision 9
Operation MN/KST2000AB.IOM
If the communication parameters for the system are not known, the Windows™ based M&C system has a facility that will search all combinations of
address, baud rate, and parity until communication is established with the
system.
Using the KP-10 or terminal program, send a miscellaneous command such
as EQUIPMENT TYPE (see Appendix B.8) and confirm a response is displayed. The Windows™ based status screen will turn from RED to GRAY
when communication with the KST-2000A/B is established.
MONITOR
PC
OR
KP-10
TO DEMOD
FROM MOD
J2 REMOTE
J4 IF OUT 1:1 J10
J3 IF IN RF OUT J6
N/C
J1
HPA J2
J3
AC POWER
SOURCE
EXTERNAL
5/10 MHZ
REFERENCE
(OPTIONAL)
EARTH
GROUND
HPA J8
J1 PRIME RF IN J7
POWER
J9 REF IN
GND (ERDE)
KST-2000A/B
Figure 3-1. Single-Thread System
LNA/LNB
3–2
Page 51

Ku-Band Satellite Transceiver Revision 9
Operation MN/KST2000AB.IOM
3.1.1 Uplink Setup
Step Procedure Troubleshooting
1 Apply a 70 MHz (140 MHz) signal at a
known level between –25 and –45
dBm to the IF IN (J3) connector of the
KST-2000A/B.
2 Set the up converter to the desired RF
TX frequency using the appropriate
commands from the KP10 terminal, or
Windows™ M&C.
3 Before proceeding, ensure that the
HPA is properly terminated.
4 Enable external faults, execute the
appropriate HPA Power and Heater
commands
5 Turn the RF output of the up converter
ON.
6 Using an appropriate frequency meas-
uring device, ensure that the output of
the HPA (measured through the coupler or attenuator) is at the correct frequency.
7 Using an appropriate RF power meas-
uring device, set the up converter attenuation until the power measured at
the output of the coupler or attenuator
is at the correct value.
8 Turn the RF output of the up converter
off.
The AGC function is selected as ON.
The AGC will not function below a
– 45 dBm input level.
1. If the AGC function is selected as
OFF, lower input levels can be
used limited only by noise.
2. See Section 3.12 for more information on the AGC function.
1. See the up converter frequency
select command (Appendix B.3).
2. If an error message is received,
see Appendix B.2.3 to determine
the cause.
If a directional coupler and termination is used or an attenuator is used,
note the value.
See Appendix B.4 HPA commands.
1. See Appendix B.3 system configuration commands.
2. There should be no up converter
faults at this time.
1. If an external 5 or 10 MHz source
is used, the internal reference
will automatically frequency-lock
to it.
2. Ensure that there are no reported
reference faults using the commands in Appendix B.9, Reference Current Faults.
3. If the internal, high-stability oscillator is used, its frequency can
be fine tuned using the reference
frequency adjust command.
4. See Appendix B.3. Allow at least
30 minutes warm-up before adjusting the oscillator.
See Appendix B.3.
See Appendix B.3.
3–3
Page 52

Ku-Band Satellite Transceiver Revision 9
Operation MN/KST2000AB.IOM
3.1.2 Downlink Setup
Step Procedures Troubleshooting
Apply a signal in the appropriate receive
1
frequency range according to the following
table at a known level (approximately –95
dBm) to the LNA or LNB input.
KST-2000A
10-95 to 12.75 GHz
KST-2000B
10.95 to 11.70 GHz
11.70 to 12.20 GHz
12.25 to 12.75 GHz
2 Set the down converter to the desired RX
operating frequency.
3 Using an appropriate power measuring
device attached to the IF OUT connector
(J4), set the down converter attenuator
until the desired downlink gain is attained.
4
1. Execute a <Clear Stored Faults>
command to clear the fault log, wait a
few moments.
2. Execute a <System Fault Status>
command to verify.
5 1. Remove the AC power from the unit.
2. Remove the 70 MHz (140 MHz) test
source.
3. Remove the RX signal source.
4. Remove the coupler/attenuator from
the HPA.
6 1. The system is ready for final installa-
tion to the antenna feed.
2. Perform the rest of the system alignment to applicable international, national, or local regulations.
1. If the LNA or LNB is using power
supplied by the KST-2000A/B,
enable the LNA (or LNB) power
– see Appendix B.5.
2. After a 10-minute warm-up, perform an LNA (or LNB) calibration, and enable LNA (or LNB)
faults if desired.
3. See Appendix B.5.
1. See Appendix B.3.
2. There should not be any existing
receive system faults.
3. See Appendix B.9.
See Appendix B.3.
Note: At this point there should be
no existing faults.
See Appendix B.9.
3–4
Page 53

Ku-Band Satellite Transceiver Revision 9
Operation MN/KST2000AB.IOM
3.2 Initial Setup Redundant System
The following procedures are necessary to laboratory test a redundant KST-2000A/B system for
the first time. Refer to the “Communications with Redundant Systems” section in the “M&C
Software for Windows™” manual.
Step Procedure Remarks
1 Ensure that the system is set up , except the HPA
waveguide switch must be connected to a coupler termination or attenuator. and that the output of the
waveguide switches have not been attached to the
OMT.
2 Remove the PL/3003-1 cable connection between J2,
REMOTE, of the KST-2000A/B, unit B, and the
RJU-2000.
3 Apply AC power to KST-2000A/B, unit A.
4 Using a KP-10, or a PC equipped with a terminal, or
Windows™ based M&C program, ensure
communication with unit A via the RJU-2000 Remote
connector J6. If communication is established use the
address command (<add/AS_x{cr}) to set unit A to
address 2.
If communication is not established begin trouble-
shooting. Ensure the proper cabling from the
computer to the RJU. Ensure that the communication
parameters of the computer match that of the KST-
2000A. Ensure the proper mode of communication is
being used (RS-485 or RS-422 see page 2-6 of this
manual). If necessary connect directly to KST unit A,
use RS-232 if the cabling is available. Use a terminal
emulator and poll the KST with the command
<*/AS_{cr}, this will globally poll the KST for it’s
address which is the most common problem.
Delete If the communication parameters for the
system are not known, the Windows based M&C
system has a utility that will search all combinations of
address, baud rate, and parity until communication is
established with the system.
5 1. Repeat steps 2, 3 and 4 for Unit B.
2. Ensure that the remote serial address differs from
Unit A, typically set to address 3.
6 Reconnect the M&C cable between J4 of the
RJU-2000 and J2 of KST-2000A/B Unit A, and
between J5 of the RJU-2000 and J2 of KST-2000A/B
Unit B
7 Ensure that serial communications through the
RJU-2000, J6 connector, to each KST-2000A/B is still
possible (RS-485 or RS-422 only).
Unit A determination is made by the PL/80841 cable P1 connection.
KST-2000A Default Communication
Parameters:
Address 1
Baud Rate 9600
Parity Even
Stop bits 2
Data Length 7 bits
1. Using the KP-10 or terminal pro-
2. Confirm a response is displayed.
gram, send a miscellaneous command such as EQUIPMENT TYPE
(see Appendix B.8).
3. The Windows™ based status screen
will turn from RED to GRAY when
communications with the
KST-2000A/B is established.
The Windows™ based status screen will turn
from RED to GRAY when communications
with the KST-2000A/B is established. Use
option/configuration to select redundancy.
3–5
Page 54

Ku-Band Satellite Transceiver Revision 9
Operation MN/KST2000AB.IOM
Step Procedure Remarks
8 Use the RFMC program a KP-10, or terminal
emulator, access unit A, enable backup operation in
manual mode using the remote commands listed in
Appendix B.6.
9 1. Using the backup manual operation command to
Unit A, place Unit A uplink and downlink online.
2. Ensure unit A reports that both its uplink and
downlink are on-line.
10 Perform the uplink setup steps listed in Section 3.1.1 Perform the downlink setup steps listed in Sec-
11 1. Using the backup manual operation command to
Unit B, place Unit B uplink and downlink online.
2. Ensure that unit B reports its uplink and downlink
are both online.
12 Repeat step 14 for Unit B uplink. Repeat step 14 for Unit B downlink.
13 Turn the RF output of the up converters of Unit A and
B On.
14 Execute a Reset Redundancy Fault command, to
Units A and B.
15 1. At this point there should not be any existing
faults.
2. Execute a <Clear Stored Faults> command to
clear the fault logs of Unit A and Unit B, wait a
few moments.
3. Execute a <System Fault Status> command to
Units A and B, and a common equipment stored
faults command to verify.
16 Remove AC power from Units A and B, remove the
70 MHz (140MHz) test source from RJU-2000 J12,
the RX signal source, and coupler/attenuator from the
TX switch.
17 1. The system is ready for final installation to the
antenna feed.
2. Perform the rest of the system alignment to
applicable international, national, or local standards.
See Appendix B.6.
tion 3.1.2
See Appendix B.6.
See Appendix B.3.
See Appendix B.9.
See Appendix B.9.
Note: If the KP-10 is used to communicate with the RJU-2000, the user must manually enter the
transceiver address. Using the global address will create anomalies.
3–6
Page 55

Ku-Band Satellite Transceiver Revision 9
Operation MN/KST2000AB.IOM
Note: For a redundant system, each KST-2000A/B must have a different serial address
for the M&C through the RJU-2000 to work properly. Also, due to the parallel nature of
the M&C interface only EIA-485, and EIA-422, communications are supported
through this device.
(2 places)
PL/8085-2
(2 places)
Figure 3-2. 1:1 Redundant System Block Diagram
3–7
Page 56

Ku-Band Satellite Transceiver Revision 9
Operation MN/KST2000AB.IOM
3.3 Redundant Junction Unit Description
Two KST-2000A/B systems combined with the RJU-2000 form a highly flexible 1:1 redundant transceiver system. There are three modes of operation supported requiring remote intervention only in the case of initial setup.
RJU-2000.
Figure 3-3 shows the front panel of the
Figure 3-3. RJU-2000 Front Panel
3–8
Page 57

Ku-Band Satellite Transceiver Revision 9
)
(J5)
Operation MN/KST2000AB.IOM
3.3.1 3.3.1 RJU-2000 Description
Refer to Figure 3-4 RJU-2000 block diagram.
TX A (J7
TX IF ( J12)
TX B (J8)
RX A (J9)
RX IF J11
RX B (J10)
M&C A (J4)
M&C (J6)
M&C B
RX SW STATUS / CONTROL
IF SW STATUS / CONTROL
TX SW STATUS / CONTROL
INTERNAL
TERMINATION
OFFLINE
UNIT
RS-485/422
FAULT A
FAULT B
RX (J2)SW
1:1
(J3)
TX (J1) SW
Figure 3-4. RJU-2000 Block Diagram
The RJU-2000 performs several functions vital to correct operation of the redundant
KST-2000A/B system. It performs IF splitting of the TX IF input for application to each
of the KST-2000A/B up converter inputs. Using an IF splitter on the uplink input maintains an IF input to each up converter, ensuring correct AGC operation in the offline uplink.
The RJU-2000 houses an RX IF transfer switch that is used to select the proper down
converter output for application to the RX IF output port (J11). The offline down converter output is internally terminated within the RJU-2000. This switch is not accessible
to the user. The redundant system always maintains the position of this switch to correspond to the position of the RX waveguide switch. This ensures that the proper receive IF
output signal is always presented to the user at J11.
The RJU-2000 has four weatherproof switch position indicators on its front panel. This
enables the operator to quickly determine the online/offline status of each of the system’s
up and downlinks. The green ON LINE indicators illuminate when the corresponding
link is online, and extinguish when a link is offline. These LEDs are powered by diode
“OR’d” voltages supplied by the KST-2000A/Bs.
3–9
Page 58

Ku-Band Satellite Transceiver Revision 9
Operation MN/KST2000AB.IOM
The RJU-2000 combines the individual REMOTE interface of each of the KST-2000A/B
systems into a common system M&C connector (J6). Because of the “Parallel” nature of
this interface, only EIA-485 (2 wire) and EIA-422 (4 wire), half duplex serial communications are supported. This connector provides a diode “OR’d” power supply to power a
KP-10, and routes unit A and B uplink and downlink fault relay outputs to the user. The
RJU-2000 performs status signal routing between KST-2000A/B unit A and B and switch
position command/indicators to each of the KST-2000A/B and TX RX and IF switches.
This is done through the 1:1 connector (J3) and TX (J1) and RX (J2) switch interfaces.
3.4 Connector Descriptions
3.4.1 TX Switch Connector (J1)
The TX switch connector (J1), is a 6-pin, MS style male connector. It routes position
commands and indicators from the TX switch to each KST-2000A/B. Refer to
Table 3-1 for connector pinout.
Table 3-1. Connector J1 Pinout Description
Pin Description
A Switch position A command, 500 ms +28VDC pulse
B Switch command common
C Switch position B command, 500 ms +28VDC pulse
D Switch position A indicator (D and E connected position A)
E Switch position indicator common
F Switch position B indicator, (E and F connected position B)
3.4.2 RX Switch Connector (J2)
The RX switch connector (J2) is a 6-pin, MS style male connector. It routes position
commands and indicators from the RX waveguide switch to each KST-2000A/B. Refer to
Table 3-2 for connector pinout.
Table 3-2. Connector J2 Pinout Description
Pin Description
A Switch position A command, 500 ms +28VDC pulse
B Switch command common
C Switch position B command, 500 ms +28VDC pulse
D Switch position A indicator (D and E connected position A)
E Switch position indicator common
F Switch position B indicator, (E and F connected position B)
3–10
Page 59

Ku-Band Satellite Transceiver Revision 9
Operation MN/KST2000AB.IOM
3.4.3 1:1 Interface Connector (J3)
The 1:1 interface connector (J3) is a 26-pin, MS style, female connector. It routes status
and commands between KST-2000A/Bs and switches. Refer to
pinout.
Table 3-3. 1:1 Interface Connector J3 Pinout Description
Pin Signal Description
A TX_SW_CMD TX switch position A command
B RX_SW_CMD RX switch position A command
C IF_SW_CMD IF switch position A command
D A/B_UNIT GND, indicates unit A
E IF_IND_B IF switch position B indicator
F IF_IND_A IF switch position A indicator
G RX_IND_A RX switch position B indicator
H RX_IND_A RX switch position A indicator
J TX_IND_B TX switch position B indicator
K TX_IND_A TX switch position A indicator
L A_IND_COM Unit A indicator common
M A_CMD_COM Unit B command common
N GND Ground
P TX_SW_CMD TX switch position B command
R RX_SW_CMD RX switch position B command
S IF_SW_CMD IF switch position A command
T A/B_UNIT GND, indicates unit A
U IF_IND_B IF switch position B indicator
V IF_IND_A IF switch position A indicator
W RX_IND_B RX switch position B indicator
X RX_IND_A RX switch position A indicator
Y TX_IND_B TX switch position B indicator
Z TX_IND_A TX switch position A indicator
a B_IND_COM Unit A indicator common
b B_CMD_COM Unit B command common
c GND Ground
Table 3-3 for connector
3–11
Page 60

Ku-Band Satellite Transceiver Revision 9
Operation MN/KST2000AB.IOM
3.4.4 RFTA Remote Interface Connector (J4)
The RFTA remote interface connector (J4) is a 26-pin, MS style female connector. It
routes serial interface signals, KP-10 power, and uplink and downlink fault information
from Unit A J2 remote to RJU-2000 J6, interface M&C connector. Refer to
Table 3-4 for connector pinout.
Table 3-4. RFTA Remote Interface Connector J4 Pinout Description
Pin Signal Description
A –TX/RX –RX –EIA-485 TX/RX or –EIA-422 RX
B –TX/RX –TX –EIA-485 TX/RX or –EIA-422 TX
C +TX/RX +RX +EIA-485 TX/RX or +EIA-422 RX
D +TX/RX +TX +EIA-485 TX/RX or +EIA-422 TX
E N/C No connection
F N/C No connection
G N/C No connection
H N/C No connection
J GND Ground
K N/C No connection
L GND Ground
M RESET Reset, (momentary low resets system)
N GND Ground
P N/C No connection
R GND Ground
S +12V +12VDC (KP-10 power supply output)
T 2/4 wire EIA-485 (open)/EIA-422 (ground) opera-
tion
U UL_FLT_NC Uplink fault relay, closed = fault
V UL_FLT_COM Uplink fault relay, common
W UL_FLT_NO Uplink fault relay open = fault
X DL_FLT_NC Downlink fault relay, closed = fault
Y DL_FLT_COM Downlink fault relay common
Z DL_FLT_NO Downlink fault relay, open = fault
a N/C No connection
b N/C No connection
c N/C No connection
3–12
Page 61

Ku-Band Satellite Transceiver Revision 9
Operation MN/KST2000AB.IOM
3.4.5 RFTB Remote Interface Connector (J5)
The RFTB remote interface connector (J5) is a 26-pin, MS style female connector. It
routes serial interface signals, KP-10 power, and uplink and downlink fault information
from Unit B J2 remote to RJU-2000 J6, interface M&C connector. Refer to
connector pinout.
Table 3-5. RFTB Remote Interface Connector J5 Pinout Description
Pin Signal Description
A –TX/RX –RX –EIA-485 TX/RX or –EIA-422 RX
B –TX/RX –TX –EIA-485 TX/RX or –EIA-422 TX
C +TX/RX +RX +EIA-485 TX/RX or +EIA-422 RX
D +TX/RX +TX +EIA-485 TX/RX or +EIA-422 TX
E N/C No connection
F N/C No connection
G N/C No connection
H N/C No connection
J GND Ground
K N/C No connection
L GND Ground
M RESET Reset, (momentary low resets system)
N GND Ground
P N/C No connection
R GND Ground
S +12V +12VDC (KP-10 power supply output)
T 2/4 wire EIA-485 (open)/EIA-422 (ground) opera-
tion
U UL_FLT_NC Uplink fault relay, closed = fault
V UL_FLT_COM Uplink fault relay, common
Table 3-5 for
W UL_FLT_NO Uplink fault relay open = fault
X DL_FLT_NC Downlink fault relay, closed = fault
Y DL_FLT_COM Downlink fault relay common
Z DL_FLT_NO Downlink fault relay, open = fault
a N/C No connection
b N/C No connection
c N/C No connection
3–13
Page 62

Ku-Band Satellite Transceiver Revision 9
Operation MN/KST2000AB.IOM
3.4.6 Interface M&C Connector (J6)
The interface M&C connector (J6) is a 26-pin, MS style, female connector. It provides
the system M&C interface with EIA-485 or EIA-422 control of the redundant
KST-2000A/B, provides diode OR’d +12V power for a KP-10, and routes uplink and
downlink fault relay contacts from each KST-2000A/B to the remote M&C system. Refer
Table 3-6 for connector pinout.
to
Table 3-6. Interface M&C Connector J6 Pinout Description
Pin Signal Description
A –TX/RX –RX –EIA-485 TX/RX or –EIA-422 RX
B –TX/RX –TX –EIA-485 TX/RX or –EIA-422 TX
C +TX/RX +RX +EIA-485 TX/RX or +EIA-422 RX
D +TX/RX +TX +EIA-485 TX/RX or +EIA-422 TX
E ULA_FLT_NC Uplink A fault relay, closed = fault
F ULA_FLT_COM Uplink A fault relay common
G ULA_FLT_NO Uplink A fault relay, open = fault
H N/C No connection
J GND Ground
K N/C No connection
L GND Ground
M RESET Reset, (momentary low resets system)
N GND Ground
P N/C No connection
R GND Ground
S +12V +12VDC (KP-10 power supply output)
T 2/4 wire EIA-485 (open)/EIA-422 (ground) opera-
tion
U ULB_FLT_NC Uplink B fault relay, closed = fault
V ULB_FLT_COM Uplink B fault relay, common
W ULB_FLT_NO Uplink B fault relay open = fault
X DLB_FLT_NC Downlink B fault relay, closed = fault
Y DLB_FLT_COM Downlink B fault relay common
Z DLB_FLT_NO Downlink B fault relay, open = fault
a DLA_FLT_NC Downlink A fault relay, closed = fault
b DLA_FLT_COM Downlink A fault relay common
c DLA_FLT_NO Downlink A fault relay, open = fault
3–14
Page 63

Ku-Band Satellite Transceiver Revision 9
Operation MN/KST2000AB.IOM
3.4.7 Other Connectors
TXA IF OUT Connector (J7)
TXB IF OUT Connector (J8)
RXA IF IN Connector (J9)
RXB IF IN Connector (J10)
RX IF OUT Connector (J11)
TX IF IN Connector (J12)
The TXA IF OUT connector (J7), is a type N, female connector
used to route the transmit IF signal (70 or 140 MHz) to
KST-2000A/B Unit A, IF INPUT. From the system TX IF IN port
(J12). Nominal impedance 50Ω, unbalanced.
The TXB IF OUT connector (J8), is a type N, female connector
used to route the transmit IF signal (70 or 140 MHz) to
KST-2000A/B Unit B, IF INPUT. From the system TX IF IN port
(J12). Nominal impedance is 50Ω, unbalanced.
The RXA IF IN connector (J9) is a type N, female connector used
to route the received IF signal (70 or 140 MHz) from KST-2000A/B,
Unit A IF OUTPUT to the system RX IF OUT (J11). Nominal impedance is 50Ω, unbalanced.
The RXB IF IN connector (J10) is a type N, female connector used
to route the received IF signal (70 or 140 MHz) from KST-2000A/B,
Unit B IF OUTPUT to the system RX IF OUT (J11). Nominal impedance 50Ω, unbalanced.
The RX IF OUT connector (J11), is a type N female connector used
to connect the RX IF signal (70 or 140 MHz) from the online
KST-2000A/B down converter to the modem. Nominal impedance
is 50Ω, unbalanced.
The TX IF IN connector (J12), is a type N, female connector used
to route the 70 or 140 MHz IF signal from a modem, through an IF
splitter to each of the KST-2000A/B IF input of the up converters.
Nominal impedance is 50Ω, unbalanced.
3.5 Indicators Description
TX A Online Indicator
TX B Online Indicator
RX A Online Indicator
RX B Online Indicator
The TX A online indicator is a weatherproof, green LED that illuminates when uplink A is online, and extinguishes when uplink A is
offline.
The TX B online indicator is a weatherproof, green LED that illuminates when uplink B is online, and extinguishes when uplink B is
offline.
RX A online indicator is a weatherproof, green LED that illuminates
when downlink A is online, and extinguishes when downlink A is
offline.
The RX B online indicator is a weatherproof, green LED that illuminates when downlink B is online, and extinguishes when downlink B
is offline.
3–15
Page 64

Ku-Band Satellite Transceiver Revision 9
Operation MN/KST2000AB.IOM
3.6 1:1 Redundant KST-2000A/B System Operation
This section details the 1:1 redundant KST-2000A/B system operation. Error! Reference source not found. shows a typical 1:1 system block diagram, comprising:
• Two KST-2000A/B transceiver systems
• One RJU-2000 redundancy junction unit
• Associated cables and hardware
The 1:1 redundant system is a highly flexible signal protection system with three
user-selectable modes of operation.
The key components that make up the redundancy system are the:
• RJU-2000
• 1:1 interconnect cable
• TX and RX waveguide switches
The RJU-2000 provides TX and RX IF signal routing functions, and command and status
signal routing throughout the system.
The 1:1 interconnect cable routes status and control signals between the KST-2000A/Bs
and the TX/RX switches through the RJU-2000.
This cable also designates the A Unit and B Unit KST-2000A/B, so
strict attention must be paid to how this is connected into the system.
IMPORTANT
Figure 3-9 shows a redundant KST-2000A/B, and the location of the A Unit. The same is
true for the interconnecting cables between the redundant HPA assembly and redundant
LNA/B assembly.
The A Unit connector of this cable (P1) must be connected to the A
Unit KST-2000A/B, otherwise the system will not operate properly.
3–16
Page 65
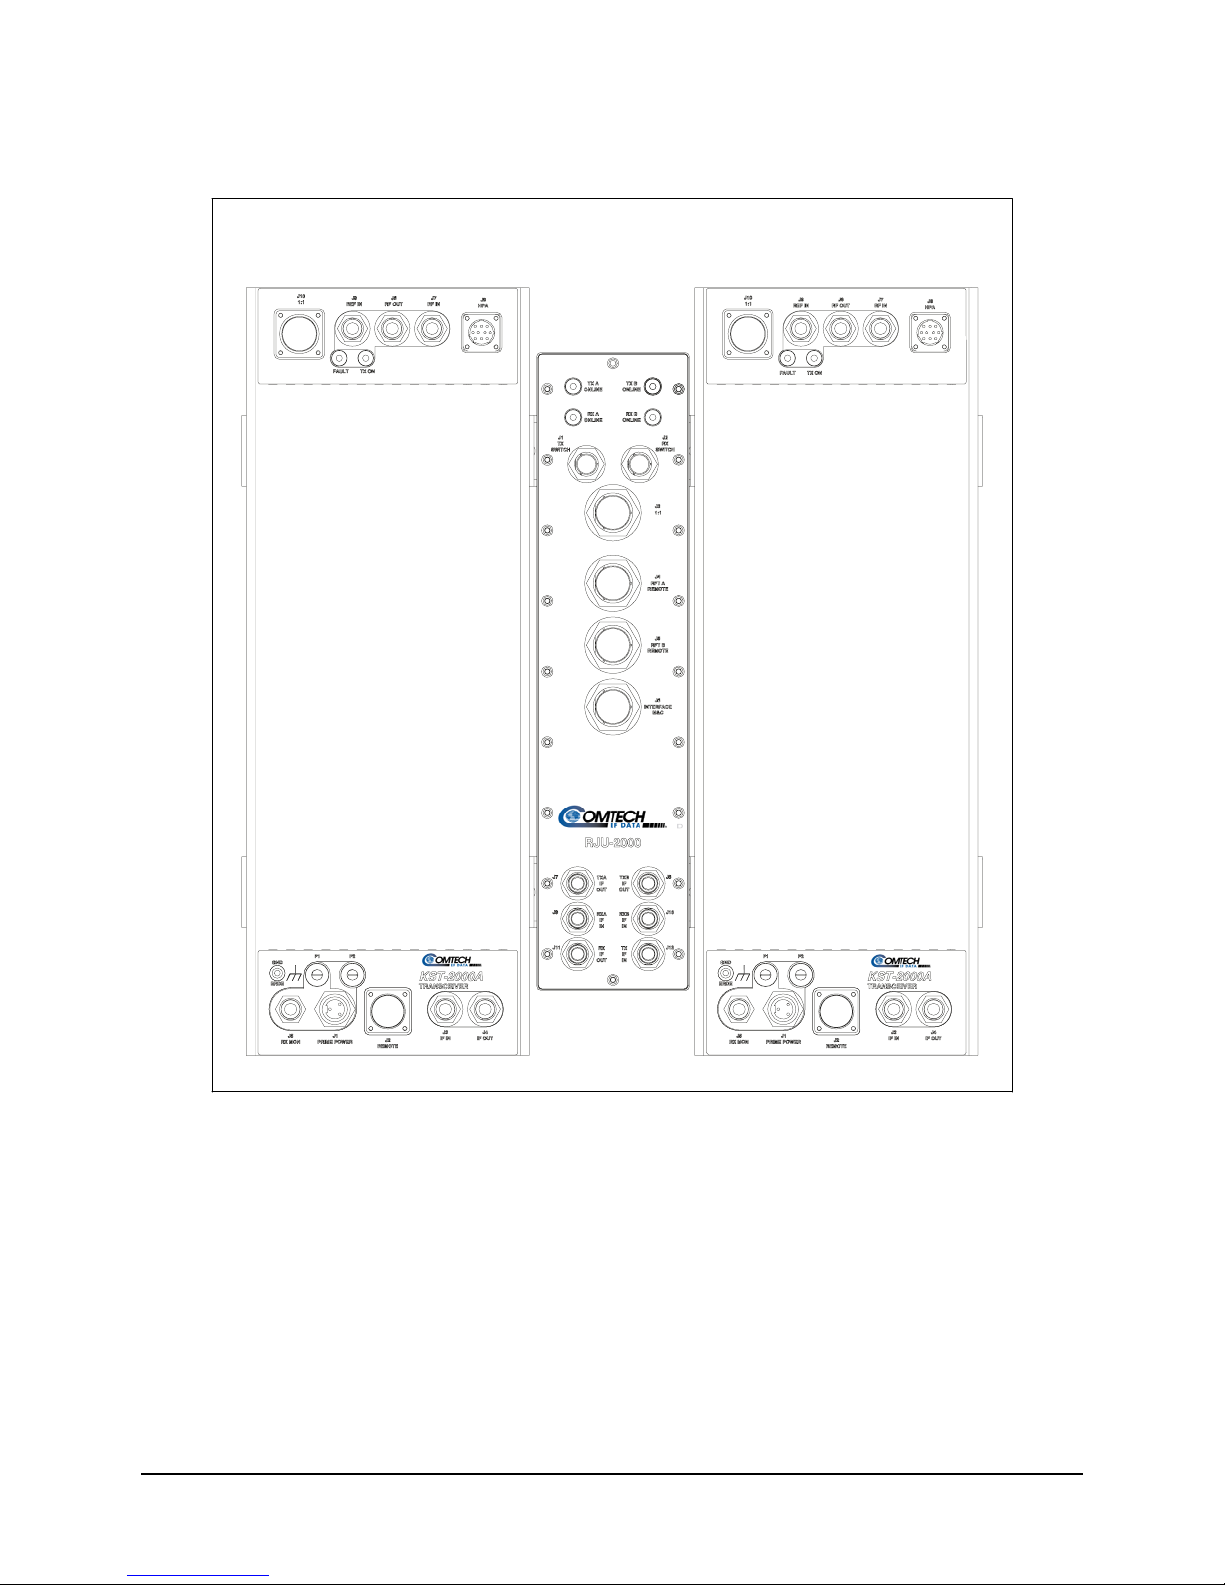
Ku-Band Satellite Transceiver Revision 9
Operation MN/KST2000AB.IOM
Unit A Unit B
Figure 3-5. Redundant KST-2000A/B System Showing Units A and B Designation
3–17
Page 66

Ku-Band Satellite Transceiver Revision 9
Operation MN/KST2000AB.IOM
Figure 3-10 shows the positions of the A side on the redundant HPA.
B
Figure 3-6. Redundant HPA Assembly
A
3–18
Page 67

Ku-Band Satellite Transceiver Revision 9
Operation MN/KST2000AB.IOM
Figure 3-11 shows the position of the A side on the redundant LNA/B assembly.
AB
Figure 3-7. Redundant LNA/B Assembly
3–19
Page 68

Ku-Band Satellite Transceiver Revision 9
Operation MN/KST2000AB.IOM
Each KST-2000A/B has built-in redundancy logic and the capability to control a TX, RX,
and IF switch. The 1:1 interconnect cable designates an A Unit and a B Unit. An A Unit
will become the primary interface for remote backup configuration commands. In addition, the A Unit will control the A position of the TX, RX, and IF switches; likewise the
B Unit controls the B position of the TX, RX, and IF switches.
The A Unit will pass operating mode and configuration information to the B Unit. The
B Unit will accept these commands through the 1:1 interface only. Fault information for
each unit is also passed to the other through this interface, so each KST-2000A/B is
aware of the fault status of the other. Uplink and downlink online assertions are made
through this interface also, thereby informing the other KST-2000A/B of which unit is
currently online. Whenever there is contention between the units, unit A always prevails.
This can happen when the A Unit uplink is online, and B Unit downlink is online, and
automatic dependent mode is enabled. In this mode, the entire up and down link of the
system must pass through a single KST-2000A/B; so, the A Unit will place its downlink
online.
The user-selectable operating modes of the redundant KST-2000A/B are:
• Manual mode
• Automatic, independent switching
• Automatic, chain switch (dependent)
In order to enable any backup operating mode, a KP-10, or a PC running a terminal or
Windows ™ based M&C system is required. The user will not be able to enable backup
operation unless the RJU-2000 and two KST-2000A/B’s are connected via the 1:1 interconnect cable. The backup enable and backup mode of operation can only be selected
through the A Unit. Refer to Appendix B.6 for an explanation of these commands. Once
these commands are accepted by the A Unit, the B Unit will also assume this configuration automatically.
The default setup after backup mode has been enabled will be manual mode and the uplink and downlink switch position indicators will report the actual position of the TX and
RX switch.
In manual mode, the operator has full control over the uplink and downlink switch positions. They can be controlled through the Interface M&C (J6) with serial commands, or
manually by removing the weather-tight covers on the waveguide switches, and manually
rotating the switch. If the RX waveguide switch position is changed in this manner, the
RX IF switch will automatically change its position to match. This ensures that the entire
downlink selected is the one that is output by the system. If remote commands are issued
to place an uplink or downlink online, the command is issued to the KST-2000A/B unit
that will be assuming control.
3–20
Page 69

Ku-Band Satellite Transceiver Revision 9
Operation MN/KST2000AB.IOM
For example: to place Unit B uplink online, the remote backup manual operation
command to Unit B’s uplink will be issued. Refer to Appendix B.6.
In the manual mode, as well as any other backup enabled operating mode, the
switch position indicators on the RJU-2000 will indicate which uplink and downlink
is online by illuminating an appropriate LED indicator. Generally, after the redundant KST-2000A/B system has been set up for its final operating condition, automatic system operation/protection mode is enabled.
In automatic mode, remote backup manual operation commands will be ignored by
the system, and manual interference of the TX or RX waveguide switch position will
be overridden by the system.
Two types of automatic protection are supported by the KST-2000A/B:
• Automatic, independent switching – In this automatic protection mode, each
KST-2000A/B will monitor uplink and downlink fault inputs from the other
KST-2000A/B. Independent switching of the uplinks and downlinks can occur.
For example: A fault in an online uplink will cause the the offline KST-2000A/B to
place its uplink online by transferring the TX waveguide switch to its position. In
this scenario, the downlink path remains unchanged until a fault occurs in the
online downlink. If a standby link is faulted, no switching will occur until either the
A or B link fault clears.
• Automatic, chain switch (dependent switching) mode – Operation in this mode is
similar to automatic independent operation, except that when a fault occurs both
the up and down link of the faulted KST-2000A/B are transferred offline.
Possible Redundancy Errors:
In the automatic modes, if the 1:1 interface cable is removed from one of the
KST-2000A/Bs, the remaining attached KST-2000A/B will assume control of both
the uplink and downlink. Both KST-2000A/Bs will report a 1:1 cable fault.
The KST-2000A/B in backup enabled mode will report a TX, RX, or IF switch fault
if the corresponding cable is removed from a switch, or if the position indicators are
malfunctioning.
Both of these errors require that either:
• Backup mode be disabled, and then re-enabled.
Reference: Refer to Appendix B.6 after the fault is cleared, or
• A reset redundancy faults command is issued to each unit.
Reference: Refer to Appendix B.9.
3–21
Page 70

Ku-Band Satellite Transceiver Revision 9
Operation MN/KST2000AB.IOM
3.7 Reference Oscillator
The reference oscillator assembly (Figure 3-12) consists of a high stability, 10 MHz,
Oven Controlled, Voltage Controlled, Crystal Oscillator (OCVCXO), a 72 MHz oscillator, and a micro-controller.
EXTERNAL
REFERENCE
PHASE
DETECTOR
10 MHz OCVCXO
MICRO
CONTROLLER
FAULT /
STATUS
72 MHz
GENERATOR
I2C
Figure 3-8. Reference Oscillator
The reference oscillator assembly can accept an external 5 or 10 MHz input signal ≤ +6
dBm. The reference oscillator has an onboard phase detector which is used to frequency
lock the 10 MHz oscillator to the external reference. A bias voltage output from the phase
detector is read into the microcontroller via an A to D converter. The
microcontroller interprets this bias voltage and generates a tuning voltage output proportional to the phase/frequency difference between the onboard oscillator and the external
reference input. This output is applied to the tuning voltage input on the OCVCXO to
shift its operating frequency to maintain frequency lock with the external input.
The 10 MHz OCVCXO is a high stability, low phase noise, crystal oscillator. It has a tuning voltage input which can be used to fine tune the oscillator frequency. When the
KST-2000A/B is operating without an external 5 or 10 MHz input, the M&C generates a
bias voltage which can be changed remotely. That sets the oscillator frequency.
When an external reference is applied, the KST-2000A/B will generate a bias voltage of
sufficient level to keep the 10 MHz reference frequency locked to the external input. The
10 MHz output is amplified and distributed to the down converter, where it is the reference for the DROs. It also serves as the reference frequency for the 72 MHz oscillator.
The 72 MHz VCXO is phase locked to the 10 MHz reference. The 72 MHz output of the
VCXO is amplified and distributed throughout the KST-2000A/B to provide a reference
frequency for the up converter and portions of the down converter.
3–22
Page 71

Ku-Band Satellite Transceiver Revision 9
Operation MN/KST2000AB.IOM
The microcontroller performs several operations on the reference assembly.
• It monitors the external reference status, and if an external input is detected, will
try to frequency-lock the 10 MHz oscillator.
• It monitors the 10 MHz oscillator oven current to determine when the oscillator
is warmed enough to provide a stable output.
• It sends control words to the 72 MHz PLL.
• It gathers and reports fault and status information to the KST-2000A/B M&C as-
sembly.
3.8 Monitor and Control (M&C)
The Monitor and Control (M&C) monitors the KST-2000A/B and provides configuration
updates to the up converter, down converter, and HPA when necessary. Refer to
Figure 3-13.
RAM
ROM
LED
EXT
INPUT
232 / 422
KEYPAD
DISPLAY
CONTROL
STATUS
EXT
OUTPUT
FAULT
RELAY
1:1
485
MODULE
COMM
M&C
LNA
CTRL
I2C
TEMP RAM
ANALOG
MON
EXT
IN
MON
Figure 3-9. Monitor and Control (M&C) Block Diagram
The KST-2000A/B configuration parameters are maintained on battery locked RAM,
which provides recovery after power down.
The M&C functions include extensive fault and status reporting, as well as 1:1 redundancy logic. All KST-2000A/B functions are accessible through the remote communications interface.
3–23
Page 72

Ku-Band Satellite Transceiver Revision 9
Operation MN/KST2000AB.IOM
The M&C is composed of the following sections:
• Microcontroller/UART • D to A and A to D converters
• Fault relays • ROM/RAM
• LNA power control • 1:1 redundancy logic
• Intermodule COMM interface • External I/O interface
The microcontroller is a Dallas 80C310 operating at 16 MHz. The microcontroller contains 256 bytes of internal RAM. The external ROM is 29F040 (512 kbytes). The battery
backed RAM is 8 kbytes in size.
The non-volatile RAM allows the KST-2000A/B to retain configuration information
without prime power for 1 year.
The UART supports serial asynchronous communication (remote port) with a maximum
data rate of 19200 bit/s. The communications type can be EIA-232, EIA-485 (2-wire), or
EIA-422 (4-wire) half duplex.
The DAC supplies a voltage that fine tunes the reference oscillator operating frequency.
The ADC monitors the internal power supply voltages, as well as external temperature
and analog inputs from SSPAs and TWTAs.
The three fault relay outputs are failsafe. They will indicate a fault in the event of a power
outage. The three relays are uplink fault, downlink fault, and summary fault.
The M&C has built-in redundancy logic. It reads switch position and external status information from the waveguide switches and the other KST-2000A/B. It provides control
information based on these inputs.
The M&C has a step-up power supply that is enabled during switch transfers. The supply
generates +28VDC at more than 1 amp to control the waveguide switches. After the
switch transfer is complete, the +28VDC supply is shut down. The M&C has a switching
regulator that can generate +15VDC at 200 mA to power an external LNA/B. This voltage can be enabled or disabled via the remote interface. The M&C monitors the LNA
current and generates a fault if the LNA/B current draw increases or decreases excessively.
The M&C can generate external discrete commands for operation of more than 25W
SSPAs and TWTAs. The M&C also monitors alarm and status outputs from these devices.
The M&C communicates status and control information to the up converter, down converter and 25 W and lower SSPAs via a high speed EIA-485 interface.
3–24
Page 73

Ku-Band Satellite Transceiver Revision 9
2
Operation MN/KST2000AB.IOM
3.8.1 Up Converter Description
The up converter accepts a 70 MHz (140 MHz) IF input signal and translates it to an output frequency in the range of 13.750 to 14.500 GHz. The up converter consists of two
modules: the IF to S-Band module and the S- to Ku-Band module.
The IF to S-Band module translates the 70 MHz (140 MHz) IF input to an output frequency in the range of 2,330 to 3,080 MHz. Refer to Figure 3-14 for a block diagram of
the IF to S-Band module.
MX1 MX
70/140
MHZ
GAIN
CONTROL
DETECT
72 MHZ
REF
L01
1035 (70)
960 (140)
L02
3.435-4.185 (70)
3.430-4.180 (140)
Figure 3-10. IF to S-Band Converter Module Block Diagram
23303080
MHZ
The 70 MHz (140 MHz) IF input is first amplified, and then applied to an electronically
variable attenuator. This attenuator is controlled via the local M&C to provide calibrated
1dB attenuation steps over a 20 dB attenuation range. The signal is then amplified and
heterodyned with a fixed frequency LO1. The desired sideband of this process is selected
via bandpass filtering and applied to the second up conversion stage MX2. LO2 is a low
noise synthesized source, whose output covers 750 MHz in 1 MHz steps. The output of
the second up conversion stage is a signal in the 2330 to 3080 MHz frequency range.
This signal is applied to the input of the S- to Ku-Band module.
This module is slightly different for the 70 MHz and 140 MHz IF input options. As
shown in Figure 3-14, the LOs are tuned to different frequencies and filtering is different.
3–25
Page 74

Ku-Band Satellite Transceiver Revision 9
Operation MN/KST2000AB.IOM
23303080 MHZ
L03
16.830
GHZ
72 MHZ
REF
13.750 to
14.500 GHZ
Figure 3-11. S to Ku-Band Up Converter Module
The S- to Ku-Band up converter module (
Figure 3-11) performs block up conversion of
the 2330 to 3080 MHz signal input to an output in the range of 13.750 to 14.500 GHz.
This is done by mixing the IF input with a fixed frequency Dielectric Resonator Oscillator (DRO), operating at 16.830 GHz. The correct sideband of this process is amplified
and filtered before being applied to the isolated output of the module.
3.9 Ku- to L-Band Down Converter Description (KST-2000A)
The Ku- to L-Band converter (Figure 3-16) accepts an RF signal in the range of 10.95 to
12.75 GHz, and translates it to an output frequency in the range of 950 to 1700 MHz. It
does this by pre-selecting the RF frequency range and block converting using one of
three phase locked DROs.
The DROs operate at 10.0, 10.75, and 11.3 GHz, and are automatically selected when the
down converter is tuned. The down converter can supply +15V through its RF input connector to power an external LNA. The LNA power can be turned on or off via remote
M&C command. The down converter also provides an additional L-Band output for signal monitoring purposes.
This module is not in-place for the KST-2000B as block down conversion is performed
by the LNB.
10.95 to
12.75 GHZ
+15V
LNA PWR
Figure 3-12. Ku to L-Band Down Converter Module Block Diagram
10 MHZ
REF
3–26
11.3 GHZ
10.75 GHZ
10.0 GHZ
9501700 MHZ
L BAND
MONITOR
950-1700 MHZ
Page 75

Ku-Band Satellite Transceiver Revision 9
Operation MN/KST2000AB.IOM
3.10 L-Band to IF Down Converter Description (KST-2000A/B)
The L-Band to IF down converter (Figure 3-17) accepts an RF input in the frequency
range of 950 to 1700 MHz and translates it to an output of 70 (140) MHz. The RF input
to this module can be supplied by the Ku to L-Band down converter housed within the
KST-2000A, or from an externally mounted Low Noise Block down converter (LNB) in
the KST-2000B version. Interface circuitry is added to this module for the
KST-2000B in addition to an L-Band monitor coupler as shown by the dotted lines in
Figure 3-13.
950-1700
MHZ
L-BAND
MONITOR
INTERFACE
72 MHZ
REF
1.6-2.35
GHZ
720 (70)
790 (140)
0-20 dB STEP
ATTENUATOR
70/140
MHZ
Figure 3-13. L-Band to IF Down Converter Block Diagram
The 950 to 1700 MHz input is first pre-selected and then heterodyned with a local oscillator in the range of 1.6 to 2.35 GHz to generate the first IF signal of 650 MHz. The 650
MHz signal is then mixed with 790 or 720 MHz to generate the 70 or 140 MHz output.
The IF output frequency of the second down conversion stage is then amplified and applied to a 0 to 20 dB step attenuator with 1 dB steps. The overall L-Band down converter
tunes in a frequency step-size of 1 MHz across the 950 to 1700 MHz band.
This module is slightly different for the 70 and 140 MHz options.
3–27
Page 76

Ku-Band Satellite Transceiver Revision 9
Operation MN/KST2000AB.IOM
3.11 Automatic Gain Control (AGC)
Note: AGC function only available with SSPAs of ≤ 25W.
The KST-2000A/B incorporates a closed-loop Automatic Gain Control (AGC) function
that maintains the system gain, as measured from the TX IF input to the Ku-Band output
of the Comtech EF Data supplied SSPA, at the user’s preset value despite the effects of
aging, operating temperature, or cabling loss. This is not a Automatic Level Control
(ALC) function, but a true AGC that maintains the gain of the system constant independent of input and output absolute levels. This is important to multicarrier operation, when
individual carriers turn On/Off and the level of the remaining carriers must remain unaffected. This function is designed to operate with only Comtech EF Data SSPAs that incorporate a calibrated output detector. The transceiver can be set to operate in either the
AGC, non-AGC, or MANUAL gain mode.
3–28
Page 77

Ku-Band Satellite Transceiver Revision 9
Operation MN/KST2000AB.IOM
3.11.1 Operation
The AGC function is implemented by using two calibrated RF detectors.
• The first detector monitors the TX input (70 or 140 MHz; amplitude range of
–25 to –45 dBm). The DC voltage from the detector is converted to a digital
word in an A/D converter and read by the main processor.
• The second detector monitors the output signal of the SSPA. This detector is calibrated for five frequencies over the output frequency range. Additionally, the
second detector calibration covers output power from the saturation point of the
amplifier down to 30 dB (approximately) below saturation.
The calibration data is stored in a non-volatile memory within each SSPA making all
SSPAs interchangeable without loss of system gain accuracy. The estimate of output
power corresponds to the detector voltage linearly interpolated between nearby frequency
and power steps stored in memory. The main processor reads the estimated output power
from the SSPA and computes an error function as follows:
Gain Error = SSPA Output Power – Input Power – Gain_Max + UCA
Where Gain_Max is the maximum specified gain of the entire transceiver (converter unit
plus SSPA) and UCA is the value of the up converter attenuator and is set by:
<add/UCA_xx.x (Appendix B)
The main processor processes this data and generates an analog voltage that adjusts the
up converter attenuator to drive the error function to zero.
3–29
Page 78

Ku-Band Satellite Transceiver Revision 9
Operation MN/KST2000AB.IOM
When the uplink AGC is enabled (<add/UAGC_ON) the display value of UCA will include a decimal point. Attenuation is adjustable over a range of 0 to 20 dB in 1 dB steps.
When the uplink AGC is disabled (<add/UAGC_OFF) the displayed value of UCA does
not include the decimal point.
3.11.2 Fault and Error Response
Table 3-7 shows how the AGC system reacts to power outages, system faults and operation outside the specified limits.
Table 3-7. AGC Fault and Error Response
Problem Response/Notes
If the transceiver prime power fails The UCA value is effect prior to the failure is restored on power up.
If the input signal (70 or 140 MHz) is removed or is set to ≤ –45dBm.
If the user enters a value of UCA that is low
for a set input level.
If the input power is increased, such that
the SSPA is driven into saturation.
Loop fault occurs when the Gain Error is
nonzero for >5 out 255 iterations of the
processor control loop.
INSUFFICIENT INPUT POWER fault is
generated when the IF input power transitions from normal power to low power (< –
45 dBm).
EXCESSIVE INPUT POWER fault is generated when the IF input power transitions
from normal power to high power (> –25
dBm).
The LOOP, INSUFFICIENT INPUT POWER, and EXCESSIVE INPUT POWER faults
can be displayed by issuing the AGC current faults command (<add/AGS_) . The allowed ranges of IF input power and UCA settings are limited by the SSPA saturation and
detector range to the shaded area defined in Figure 3-18.
1. The internal Up Converter attenuator is set to its maximum value
(minimum gap).
2. The value of UCA is not affected.
3. The output power will slowly increase for several seconds until the
gain error reaches zero, when the input signal is reapplied.
1. The SSPA will be driven into saturation and the value of UCA will
automatically increase (Gain decreased) in steps of 1 dB until the
SSPA output power is below saturation.
2. The new (increased) value of UCA is displayed at the user’s interface. Even if the input power is reduced, the new value of UCA will
remain fixed.
1. The value of UCA is increased (Gain decreased) in steps of 1 dB
until the SSPA is below saturation.
2. The new value of UCA is displayed at the user’s interface. Even if
the input power is reduced, the new value of UCA will remain
fixed.
1. A top level AGS_Fault is reported.
2. Excessive cable loss between the converter unit and the SSPA
can cause this condition.
3. If the AGC is enabled and the RF is commanded Off
(<add/RF_OFF), this fault is registered.
Under this condition, a top level AGS_fault is reported and the internal
up converter attenuator is set to its maximum value (minimum RF output). The value of UCA is not affected. When the input signal increases
above –45 dBm, the output power will slowly increase for several seconds until the gain error reaches zero.
Under this condition, a top level AGS_Fault is reported. If the combination of the input power and the up converter attenuator is such that the
SSPA is driven into saturation, the value of the UCA will automatically
increase in steps of 1 dB until the SSPA output power is below saturation. The new value of UCA is displayed at the user’s interface. Even if
the input power is reduced, the new values of UCA will remain fixed.
3–30
Page 79

Ku-Band Satellite Transceiver Revision 9
Operation MN/KST2000AB.IOM
SSPA Power Saturation
Boundary
Allowed Up Converter
Attenuation, dB (UCA)
-50 -45
-40
Allowed IF Input Power Range,
Figure 3-14. AGC Operating Region
3.11.3 Manual Gain Operation
With AGC disabled, the closed loop control of the uplink path is disabled. The SSPA
saturation, INSUFFICIENT INPUT POWER, EXCESSIVE INPUT POWER, and LOOP
faults are not monitored or reported as faults. The status of the AGS fault is displayed as
OK. In this mode, the system gain is not accurately defined as in the AGC mode, because
the accuracy of the up converter’s programmable attenuator and the static gains of the uplink amplifiers determine the gain.
When this mode is selected, UCA will display as an integer (with no decimal point), and
the allowed range of the UCA is 0 to 55 dB in 1 dB steps. The accuracy of the attenuator
is not guaranteed and degrades at high values.
-35 -30
dBm
-25
-20
3–31
Page 80

Ku-Band Satellite Transceiver Revision 9
Operation MN/KST2000AB.IOM
Notes:
_______________________________________________________________________
_______________________________________________________________________
_______________________________________________________________________
_______________________________________________________________________
_______________________________________________________________________
_______________________________________________________________________
_______________________________________________________________________
_______________________________________________________________________
_______________________________________________________________________
_______________________________________________________________________
_______________________________________________________________________
_______________________________________________________________________
_______________________________________________________________________
_______________________________________________________________________
_______________________________________________________________________
_______________________________________________________________________
_______________________________________________________________________
_______________________________________________________________________
_______________________________________________________________________
_______________________________________________________________________
_______________________________________________________________________
_______________________________________________________________________
_______________________________________________________________________
_______________________________________________________________________
_______________________________________________________________________
_______________________________________________________________________
_______________________________________________________________________
_______________________________________________________________________
_______________________________________________________________________
_______________________________________________________________________
_______________________________________________________________________
_______________________________________________________________________
_______________________________________________________________________
_______________________________________________________________________
_______________________________________________________________________
_______________________________________________________________________
_______________________________________________________________________
_______________________________________________________________________
_______________________________________________________________________
_______________________________________________________________________
_______________________________________________________________________
_______________________________________________________________________
_______________________________________________________________________
_______________________________________________________________________
_______________________________________________________________________
3–32
Page 81

Chapter 4. FAULT INDICATION
This section describes fault indication and isolation methods for the KST-2000A/B system. Routine maintenance for the system consists only of assuring air flow for cooling of
the units, particularly assuring that debris does not prohibit proper fan function on HPAs
so equipped. A system fault is indicated in three ways:
• An external LED
• Form C relay contacts
• The remote M&C control
4.1 Fault Indication
The KST-2000A/B converter unit has two external LED indicators as shown pictorially
in Figure 2-1. The TX ON indicator is GREEN when illuminated, and the FAULT indicator is RED.
When prime power is applied to the KST-2000A/B and the HPA is transmitting power,
the TX ON indicator is a steady GREEN. The indicator flashes when prime power is applied but the HPA is not transmitting. The FAULT indicator is a steady RED when any
fault is detected by the internal M&C processor.
The REMOTE connector (J2) has pins assigned (see Chapter 2, section 2.2 for pin assignments) for the contacts on two form C relays, one for the uplink and one for the
downlink. Normally open contacts close and normally closed contacts open when there
is a fault in any part of the uplink or downlink. Fault isolation requires the use of the remote M&C as described in section 4.2.
AND ISOLATION
4–1
Page 82

Ku-Band Satellite Transceiver Revision 9
Fault Indication and Isolation MN/KST2000AB.IOM
4.2 Fault Isolation
System faults are reported on the Fault Log screen in the Windows™ based remote M&C
software. (Alternatively, they may be viewed in the terminal mode as shown in
Appendix B).
and relays. In some cases, items listed in
Table 4-1 lists the KST-2000A/B faults and their indication in the LEDs
Table 4-1 give no LED or relay indication when
they occur because they are not equipment faults but are useful for troubleshooting problems.
4.3 Stored Faults
Each of the major modules within the KST-2000A/B (Upconverter, Downconverter,
HPA, LNA/LNB, and Reference), together with the AGC function and the Common
Equipment, report their individual fault status to the main M&C. Each time there is a
change in the fault status, that status is stored in a non-volatile memory on the main
M&C. Note that each event corresponds to a change in status. Therefore, when a fault occurs, that constitutes one status change, and when that fault clears, another event occurs.
The M&C can store up to 10 fault status conditions.
After 10 fault status changes are logged, no further logging can take place until the Clear
Stored Faults (<add/CLSF) command is issued. Refer to Appendix B, Table B-7 for the
fault commands to access the fault status of each function. When the fault status is queried, such as <add/HS–, the response returned will indicate how many stored faults are
actually stored. To retrieve the individual fault status, issue the appropriate stored fault
command with the corresponding stored fault number, such as <add/HSF_2. That particular fault condition will be returned. Note that the stored fault numbers (locations) are 0
through 9 inclusive.
It is good maintenance practice to query the stored faults and record them in a logbook or
other permanent record and then issue the clear stored fault command, <add/CLSF_.
There is no time stamp associated with these stored faults. Noting them in a logbook is
the only way to establish an approximate time reference.
4–2
Page 83

Ku-Band Satellite Transceiver Revision 9
Fault Indication and Isolation MN/KST2000AB.IOM
Table 4-1. KST-2000A/B Fault Tree
COMMON EQUIPMENT FAULTS
M&C MODULE X X
-7 VOLT POWER SUPPLY X X
+7 VOLT POWER SUPPLY X X
+12 VOLT POWER SUPPLY X X
+17 VOLT POWER SUPPLY X X
TX REDUNDANCY SWITCH X2 X2
RX REDUNDANCY SWITCH X 2 X2
IF REDUNDANCY SWITCH X2 X2
REDUNDANCY FAULT LINE CABLE X2 X2
AGC FAULTS
EXCESSIVE INPUT POWER
INSUFFICIENT INPUT POWER
AGC LOOP CONVERGE
LNA FAULTS
LNA MODULE FAULT X1 X1 X1
REFERENCE FAULTS
EXTERNAL 10MHz LOCK DETECT XX
EXTERNAL PHASE NOISE X X
EXTERNAL RANGE X X
72MHz LOCK DETECT X X
OSCILLATOR WARM/COLD X
UC FAULTS
UC MODULE X X X X X
S-BAND SYNTHESIZER LOCK DETECT X X X X X
KU BAND SYNTHESIZER LOCK DETECT X X X X X
LATCHED S BAND SYNTH. LOCK DETECT
LATCHED KU BAND SYNTH. LOCK
DETECT
INTER-PROCESSOR COMMUNICATIONS X X X X X
DC FAULTS
DC MODULE X X X
L-BAND SYNTHESIZER LOCK DETECT X X X
KU BAND SYNTHESIZER LOCK DETECT X X X
LATCHED L BAND SYNTH. LOCK DETECT
LATCHED KU BAND SYNTH. LOCK
DETECT
INTER-PROCESSOR COMMUNICATIONS X X X
R
T
T
T
S
F
X
X
O
R
U
F
T
P
L
U
E
T
D
O
O
F
F
F
F
(1) (2) (3)
X
R
R
F
F
L
L
E
E
D
D
S
F
O
L
L
A
I
S
D
H
I
N
G
S
U
U
M
M
M
M
A
A
R
R
Y
Y
F
F
A
A
U
U
L
L
T
T
L
R
E
E
D
L
A
Y
D
U
L
L
F
F
A
A
U
U
L
L
T
T
R
R
E
E
L
L
A
A
Y
Y
4–3
Page 84

Ku-Band Satellite Transceiver Revision 9
Fault Indication and Isolation MN/KST2000AB.IOM
HPA FAULTS ( Comtech EFData)
HPA MODULE X1 X1 X1 X1 X1
BIAS VOLTAGE #1 - #9 X1 X1 X1 X1 X1
-5 VOLT POWER SUPPLY X1 X1 X1 X1 X1
+9.75 VOLT POWER SUPPLY X1 X1 X1 X1 X1
INTER-PROCESSOR COMMUNICATIONS X1 X1 X1 X1 X1
HPA FAULTS (OEM SSPA)
HPA MODULE X1 X1 X1 X1 X1
HPA FAULTS (TWTA)
HPA MODULE X1 X1 X1 X1 X1
HIGH VOLTAGE X1 X1 X1 X1 X1
TEMPERATURE X1 X1 X1 X1 X1
Legend
Note Fault/Alarm Relay Test Points Connector/Pins
1 SUMMARY FAULT J2: a (NO), c (COM), b(NC)
2 UL FAULT J2: W (NO), V (COM), U (NC)
3 DL FAULT J2: Z (NO), Y (COM), X (NC)
X1 FAULTS IF NOT MASKED OFF N/A
X2 ONLY ACTIVE WHEN
REDUNDANCY ENABLED
R
T
T
T
S
F
X
X
O
R
U
F
T
P
L
U
E
T
D
O
O
F
F
F
F
X
R
R
F
F
L
L
E
E
D
D
S
F
O
L
L
A
I
S
D
H
I
N
G
N/A
S
U
U
M
M
M
M
A
A
R
R
Y
Y
F
F
A
A
U
U
L
L
T
T
L
R
E
E
D
L
A
Y
D
U
L
L
F
F
A
A
U
U
L
L
T
T
R
R
E
E
L
L
A
A
Y
Y
4–4
Page 85

Chapter 5. KEYPAD / DISPLAY
A display overview includes, the menu tree, the organization, the navigating of menu
selections, the parameters (ranges) of the programmable values, and finally, the
interaction of the keypad/display, remote control (EIA-232, EIA-422, EIA-485) and FSK
is explained.
5.1 Keypad/Display Overview
The KST-2000A/B equipped with an optional keypad/display provides the user with a
simple method of controlling or monitoring the KST2000 transceiver.
The keypad/display unit is a weatherproof 16 character LED display with 6 keys to
provide data entry to the KST-2000A/B. The display characters can easily be seen in
bright sunlight as well as dark environments. While the keypad/display is a weatherproof
device, a case mounted swing away cover elements adds a second layer of protective
isolation. This second cover will ensure the keypad/display is protected from the natural
elements such as the sun, rain, and snow and can also protect the display during a system
installation or transportation
.
5–1
Page 86

Ku-Band Satellite Transceiver Revision 9
Operation MN/KST2000AB.IOM
5.2 Front Panel Keypad/Display
The front panel (Figure 5-1) provides the local user interface, which can be used to
configure and monitor the status of the terminal.
Figure 5-1. KST-2000A/B Terminal Keypad
The front panel features a 16-character, 2-line LED display, and a 6-button keypad which
provides for sophisticated functions, yet is easy to use. All functions are accessible at the
front panel by entering one of six main categories of “SELECT” menus:
• Configuration (CONFIG)
• Monitor
• Faults
• Utility
• System
• Redundancy (REDUNDCY)
5–2
Page 87

Ku-Band Satellite Transceiver Revision 9
Operation MN/KST2000AB.IOM
5.2.1 Front Panel Controls
The terminal is locally operated by using the front panel keypad. The keypad consists of
six keys. Each key has its own logical function or functions.
Key Description
[ENTER] This key is used to select a displayed function or to execute a change to the
terminal’s configuration.
[CLEAR] This key is used for backing out of a selection or to cancel a configuration
change, which has not been executed using [ENTER]. Pressing [CLEAR]
generally returns the display to the previous selection.
[W ] and [ X] These keys are used to move to the next selection, or to move the cursor for
certain functions.
[S] and [T] These keys are used primarily to change configuration data (numbers), but are
also used at times to move from one section to another.
The terminal front panel control uses a tree-structured menu system (Figure 5-3) to access
and execute all functions. The base level of this structure is the sign-on message, which is
displayed at the front panel upon terminal power-up (Figure 5-2).
• Line 1 of the sign-on message displays the terminal model number.
• Line 2 displays the version number of the firmware implemented in the terminal.
Note: The firmware/software referenced in this manual may be an earlier version of the
actual firmware/software supplied with the unit.
Figure 5-2. KST-2000A/B Sign On Message
5–3
Page 88

Ku-Band Satellite Transceiver Revision 9
Operation MN/KST2000AB.IOM
Figure 5-3. Principle Menu Trees
5–4
Page 89

Ku-Band Satellite Transceiver Revision 9
Operation MN/KST2000AB.IOM
5.3 The Menu Structure
The main level of the menu system is the SELECT: CONFIG menu (Figure 5-4), which
may be accessed from the base level by pressing any of the arrow keys. From the
SELECT menu, any one of six functional categories may be selected:
• Configuration functions (CONFIG)
• Monitor functions
• Fault functions
• Utility functions
• System functions
• Redundancy functions
W ] or [ X] to move from one selection to
Press [
another.
Figure 5-4. Select Menu
When the desired category is displayed on line 2, press [ENTER]. Once the category has
been entered, move to the desired function by pressing [
W ] or [ X].
5–5
Page 90

Ku-Band Satellite Transceiver Revision 9
Operation MN/KST2000AB.IOM
5.3.1 Configuration
Terminal configuration may be viewed or changed by entering the CONFIG menu
(below) from the SELECT menu on the front panel.
Enter the selected configuration menu by pressing [ENTER]. Press [
the selected configuration parameters. To change a configuration parameter, press
[ENTER] to begin the change process, at which point the arrow keys can be used to make
the changes.
After the changes are made and the display represents the correct parameters, execute the
change by pressing [ENTER]. When [ENTER] is pressed, the necessary programming is
initiated by the KST-2000A/B.
To undo a parameter change prior to executing it, simply press [CLEAR].
W ] or [X] to view
Figure 5- 5. Configuration Menu
5–6
Page 91

Ku-Band Satellite Transceiver Revision 9
Operation MN/KST2000AB.IOM
The following listing describes each Configuration function in detail.
Function Description
SELECT Selects any one of the three “preset” configurations.
The user must first program (store) the configuration parameters in the
PROGRAM menu. This "select" function is similar to the "recall" portion of a
"save/recall" parameter feature. Note: This function will recall and program
the up and down converter frequencies and attenuation values that were
stored in program locations 1, 2, or 3.
On entry, the current Select parameter will appear in the menu. Press [S] or
[T] to select 1, 2, 3, or None. Press [ENTER] to execute the change. If the
user has not previously programmed any settings using the PROGRAM
menu, the Select menu option will be "None" and it will not be possible to load
any user selectable parameters.
PROGRAM Programs or clears the current frequency and attenuator settings as one of
the three “preset” selections.
On entry, 1*, 2*, or 3* will appear in the window. Note: 1 , 2 , 3, or any
combination of the "*" or " " indicators can also appear depending on which
user program locations are currently used. Press [W
cursor from left to right. When the flashing cursor is on any of the “*”s, press
[S] or [T] to turn the “*” ON or OFF. When the “*” is ON, press [ENTER] to
store the current frequency and attenuation parameters in the preset location
at the cursor. When the “*” is OFF, press [ENTER] to clear stored parameters
in the preset location to the left of the “*”. To recall any of the present
selections, use the SELECT menu, and select 1, 2, or 3. Press [ENTER].
RF OUTPUT Programs the RF output to ON, WRM, or OFF.
The OFF command will keep the RF output turned off under all conditions.
The WRM command is a conditional ON command telling the RF output to
come on after the unit is warmed up and meets the stability requirements.
The ON command is an override instructing the output to be on and ignores
the warm start.
On entry, the current status of the output is displayed. Press an Arrow key to
select ON, WRM, or OFF. Press [ENTER] to execute the change.
U/C FREQ Programs the up converter frequency between 13.75 and 14.50 MHz, in
1.0 MHz steps.
On entry, the current up converter frequency is displayed with the flashing
cursor on the first programmable character. Press [W
flashing cursor. Press [S] or [T] to increment or decrement the digit at the
flashing cursor. Press [ENTER] to execute the change.
Note: The frequency is programmable within the specified range in 1.0 MHz
steps. When the transmitter frequency is changed, the transmitter is
automatically turned OFF to prevent the possible swamping of other
channels. To turn the transmitter ON, use the RF OUTPT (RF output) menu.
D/C FREQ Programs the down converter frequency between 10.95 and 12.75 MHz, in
1.0 MHz steps.
On entry, the current down converter frequency is displayed with the flashing
cursor on the first programmable character. Press [W
flashing cursor. Press [S] or [T] to increment or decrement the digit at the
flashing cursor. Press [ENTER] to execute the change.
] or [ X] to move the
] or [ X] to move the
] or [ X] to move the
5–7
Page 92

Ku-Band Satellite Transceiver Revision 9
Operation MN/KST2000AB.IOM
U/C ATTN Programs the up converter output power attenuation from 0 to 25 dB, in 1.0
dB steps.
On entry, the current up converter attenuation is displayed with a flashing
cursor. Press [S] or [T] to increase or decrease the output power
attenuation in 1.0 dB steps. Press [ENTER] to execute the change.
D/C ATTN Programs the down converter input power attenuation from 0 to 20 dB, in 1.0
dB steps.
On entry, the current down converter attenuation is displayed w ith a flashing
cursor. Press [S] or [T] to increase or decrease the input power attenuation
in 1.0 dB steps. Press [ENTER] to execute the change.
LNA PWR Programs the setting that provides power to the LNA or LNB.
Options are "OFF" or "ON". “ON” means LNA power will be available on the
center conductor of the coax cable (J4). “OFF” means DC power will be
removed from the coax cable. LNA voltage typical: 15 VDC, 20% tolerance.
LNA FLT Programs the LNA fault enable parameter.
“ON” means the system will declare an LNA fault when applicable.
“OFF” means all LNA faults will be ignored by the system.
CALIB. Calibrates the LNA power consumption.
Enables the user to calibrate the unit to determine the normal LNA or LNB
power consumption. This only needs to be performed once during the initial
installation. If [ENTER] is pressed, the M&C will perform an analog-to-digital
conversion of the LNA current, and store the value in the Electrically-Erasable
Programmable Read-Only Memory (EEPROM). During the normal operation,
the M&C will monitor the LNA current, and compare it to the stored value. If
the LNA deviates by
± 30%, a fault will be declared.
REF ADJ Allows adjustment of the 10.000 MHz reference frequency to compensate for
long-term drift. The setting varies from 1 to 255.
XFLT EN Enables or disables the external fault input.
When ON is selected, all of the HPA, SSPA, and TWTA faults work normally.
When OFF is selected, the HPA, SSPA, and TWTA faults will be masked and
not reported via the display or remote control.
AGC EN Automatic Gain Control enable or disable.
When ON is selected, the AGC function maintains the system gain, as
measured from the TX IF input to the Ku-Band output of the Comtech
supplied SSPA, at the user's preset value despite the effects of aging,
operating temperature, or cabling loss. If "OFF" is selected, system gain will
not be monitored or controlled. Note: also when AGC is programmed to the
"OFF" mode, the up converter attenuation will not display a decimal point as a
courtesy indication that the AGC function is off.
HPA PWR HPA power enable or disable.
On entry, the currently selected parameter will appear. Press an Arrow key to
select ON or OFF. Press [ENTER] to execute the change. When ON is
selected, the DC voltage is supplied to the HPA. Note: This command is for
Comtech EF Data SSPAs only. Selecting "OFF" removes power from the
SSPA.
LOCKMODE Locks the keypad/display to prevent the changing of data.
Options are LOCKED and DISABLED. When "DISABLED" is selected, the
keypad/display will operate normally. If "LOCKED" is selected, the [Enter] key
is disabled a brief message is displayed indicating the keypad is in lock mode.
Selecting LOCKMODE "DISABLED" will restore the keypad/display to its
normal operating mode.
5–8
Page 93

Ku-Band Satellite Transceiver Revision 9
Operation MN/KST2000AB.IOM
5.3.2 Monitor
The SELECT: MONITOR (Figure 5-6) menu is accessible from the SELECT menu.
When the MONITOR menu is entered, press [
Each monitor function is displayed in real time for as long as it is selected.
W ] or [X] to select the desired function.
Figure 5-6. Monitor Menu
The following listing describes each monitor function in detail.
Function Description
U/C TEMP Up converter temperature monitor.
Range: -40 to +90° C (-40 to 194° F)
D/C TEMP Down converter temperature monitor.
Range: -40 to +90° C (-40 to 194° F)
HPA TEMP HPA temperature monitor.
Range: -40 to +90° C (-40 to 194° F)
M&C TEMP M&C temperature monitor.
Range: -40 to +90° C (-40 to 194° F)
PWR FCTR The PWR FCTR is a power factor of the output power of
the CEFD HPA. In actuality, power factor is a very
close indication of the output power. This function is
only available with Comtech supplied SSPAs.
SUM FLTS SUM FLTS are the summary faults of the complete
KST-2000A/B system. If there are any faults present,
they can be seen via a FLT indication in this menu.
5–9
Page 94

Ku-Band Satellite Transceiver Revision 9
Operation MN/KST2000AB.IOM
5.3.3 Faults
The SELECT: FAULTS menu is accessible from the SELECT menu (
entry, from the Select Menu, a Select Sub-level menu is displayed (Figure 5-8) allowing
access to several categories of faults.
The "*" indicator surrounding the *SELECT* display indicates the user is in the
FAULTS sub menu.
Press the [
W ] or [X] keys to select the desired fault category. Pressing [Enter] will enter
the indicated faults category and display the current status "OK" or "FLT" for the
displayed KST-2000A/B system. Pressing any arrow key will display the next monitored
system. Pressing the [Clear] key once will return the user to the faults menu, while
pressing the [Clear] key twice will return the user to the main SELECT menu.
Note: The upper level SELECT menu indicates "-SELECT-" while the faults menu
indicates "*SELECT*". This is done to distinguish the upper level select from the faults
level select menus.
Figure 5-7). Upon
Figure 5-7. Faults Menu Figure 5-8. Faults Sub-Level
5–10
Page 95

Ku-Band Satellite Transceiver Revision 9
Operation MN/KST2000AB.IOM
The following listing describes each fault function in detail.
Function Description
POWER
-7V PWR -7 VDC
+7V PWR +7 VDC
+12V +12 VDC
+17V PWR +17 VDC
D/C
D/C "FLT" indicates a down converter module fault.
LSYN L-Band synthesizer lock fault
D/KSYN K-Band synthesizer lock fault
D/C PROG D/C programming Fault
U/C
U/C "FLT" indicates an up converter module fault
SSYN S-Band synthesizer lock fault
U/KSYN Ku-Band synthesizer lock fault
U/C PROG U/C programming fault
CEFD HPA
HPA HPA fault
-5V PWR -5 VDC
+9.75V +9.75 VDC
HPA PROG HPA programming fault
OEM HPA
HPA HPA fault
TWTA
HPA HPA fault
TEMP Temperature fault
AGC
EIP Excessive Input Power
IIP Insufficient Input Power
Monitors the specific voltages as indicated below
"FLT" indicates the -7 VDC is out of the allowable range.
"FLT" indicates the +7 VDC is out of the allowable range.
"FLT" indicates the +12 VDC is out of the allowable range.
"FLT" indicates the +17 VDC is out of the allowable range.
Down Converter
"FLT" Indicates the main M&C has lost communication with the microcontroller on the down converter assembly.
Up Converter
"FLT" Indicates the main M&C has lost communication with the microcontroller on the up converter assembly.
Comtech EF Data High Powered Amplifier
"FLT" indicates the HPA module micro-controller has reset.
"FLT" indicates the HPA -5VDC is out of the allowable range.
"FLT" indicates the HPA +9.75 VDC is out of the allowable range.
"FLT" Indicates the main M&C has lost communication with the micro-
controller on the CEFD SSPA.
"FLT" is a summary fault for one of the internal fault monitoring systems
within the OEM HPA.
Traveling wave tube amplifier
"FLT" is a summary fault for one of the internal fault monitoring systems
within the TWTA.
"FLT" Indicates excessive temperature within the TWTA.
Automatic Gain Control
"FLT" indicates input power is to high and may need to be attenuated.
"FLT" indicates low power input or no input at all.
5–11
Page 96

Ku-Band Satellite Transceiver Revision 9
Operation MN/KST2000AB.IOM
LOOP AGC loop fault
"FLT" usually with EIP or IIP "FLT" above. "FLT" indicates the AGC loop
circuit not tracking the input or output properly.
SYSTEM
LNA LNA fault
72 MHZ 72 MHz oscillator fault
M/C PROG M&C programming fault
REDUNDCY
TXS Transmit switch
RXS Receive switch
IFS IF switch
RFLC Redundancy cable
"FLT" indicates the current monitor has detected an out of range current
value.
"FLT" indicates the M&C cannot communicate to one or more devices on the
M&C assembly.
Redundancy
"FLT" indicates the WG switch transmit side not operating or not indicating
position properly.
"FLT" indicates the WG switch receive side not operating or not indicating
position properly.
Located in the RJU-503. "FLT" indicates the IF switch not operating or not
indicating position properly.
"FLT" indicates backup operation is selected and the KST-2000A/B detects a
discontinuity in the redundancy cable.
5–12
Page 97

Ku-Band Satellite Transceiver Revision 9
Operation MN/KST2000AB.IOM
5.3.4 Utility
The SELECT: UTILITY (
the UTILITY menu is entered, press [
The utility menu is where the system firmware information can be found along with the
type of HPA used with the system. In this utility menu, the down arrow key [
second function key that will display additional information about the currently displayed
item.
Figure 5-9) menu is accessible from the SELECT menu. When
W ] or [X] to select the desired function.
T] acts as a
Figure 5-9. Utility Menu
Function Description
M&C Firmware Displays the M&C firmware number and revision.
The release date can be displayed by pressing the down arrow key [T].
D/C Firmware Displays the down converter firmware number and revision.
The release date can be displayed by pressing the down arrow key [T].
U/C Firmware Displays the up converter firmware number and revision.
The release date can be displayed by pressing the down arrow key [T].
HPA Firmware Displays the HPA firmware number and revision.
The release date can be displayed by pressing the down arrow key [T].
HPA Type Displays the HPA type: CEFD, OEM, or TWTA
For CEFD HPAs, the specified wattage of the HPA can be displayed by
pressing the down arrow key [T].
5–13
Page 98

Ku-Band Satellite Transceiver Revision 9
Operation MN/KST2000AB.IOM
5.3.5 System
The SELECT: SYSTEM (
When the SYSTEM menu is entered, press [
Figure 5-10) menu is accessible from the SELECT menu.
W ] or [X] to select the desired function.
Figure 5-10. System Menu
The system menu is where the operating parameters of the KST-2000A/B can be
configured. The remote communications parameters can be set (address, baud rate,
parity) as well as the setting for local (keypad) or remote mode of operation.
Settings that affect the display can be configured in this menu. The selection of one of
three receive bands can be set (KST-2000B only).
Function Description
COMM Selects between Remote and Local operation.
Remote mode is the default mode of communication.
The communications priority is defined as: 1. Remote control, 2. FSK.
With REMOTE is selected; the EIA-232, EIA-422, and EIA-485
communication is active. FSK will be enabled approximately 10 seconds
after the last EIA-232, EIA-422, or EIA-485 message has been completed.
If the user is using the keypad/display, LOCAL would be selected. In local
mode, all remote communications are disabled (including FSK). This prevents
more than one user from having control of the KST-2000A/B at the same
time. Remote communications can be re-enabled at any time simply by
selecting "REMOTE" in the SYSTEM>COMM menu.
5–14
Page 99

Ku-Band Satellite Transceiver Revision 9
Operation MN/KST2000AB.IOM
LTIMEOUT Sets the Local mode timeout.
As stated above, remote mode is the default mode of operation. The KST2000A/B will automatically switch from LOCAL mode to REMOTE mode after
the last key press has occurred and the time period set in the LTIMEOUT
menu has expired. The time is configurable from 1-9 hours (default = 4 hrs)
and starts counting after the last key press has occurred.
Note: If the system has returned to remote mode, local communications can
be re-enabled at any time by selecting "LOCAL" in the SYSTEM>COMM
menu.
REM BAUD Programs the baud rate of the terminal.
On entry, the currently selected baud rate of the terminal will be displayed. To
change the baud rate, press [S] or [T] to select a baud rate from 300 to
19200 baud. Press [ENTER] to execute the changes. Available baud rates
are 300, 600, 1200, 2400, 4800, 9600 and 19200.
REM ADDR Programs the terminal remote address.
On entry, the currently selected address of the terminal is displayed with the
flashing cursor on the "ones" character. Press [S] or [T] to change the
desired address of the terminal from 1 to 255. The [W ]
allow skipping to the "tens" or "hundreds" columns. Press [ENTER] to
execute the change.
REM COMM Programs the parity bit to EVEN, ODD or NONE.
On entry, the currently selected parity is displayed. Changing parity can also
affect the number of data bits and stop bits. Press an Arrow key to select one
of the valid options: 7,E,2 (default), 7,O,2, or 8,N,1. Press [ENTER] to
execute the change.
DISPTIME Programs the amount of time the display will stay illuminated. After the time
expires, the display will go dark until any key is pressed. Display time range
is 10-999 seconds. Default 300 seconds (5 minutes).
RCV BAND KST-2000B only. Sets the receive band to one of three bands:
Band A: 10.950 - 11.700 GHz
Band B: 11.700 - 12.200 GHz
Band C: 12.250 - 12.750 GHz
DISPTEST Tests the display characters by rotating through the alphanumeric character
set.
or [ X] arrow buttons
5–15
Page 100

Ku-Band Satellite Transceiver Revision 9
Operation MN/KST2000AB.IOM
5.3.6 Redundancy
The SELECT: REDUNDANCY (Figure 5-11) menu is accessible from the SELECT
menu. When the REDUNDANCY menu is entered, press [
function.
W ] or [X] to select the desired
Figure 5-11. Redundancy Menu
The redundancy menu category provides all of the necessary controls to configure a
redundant KST-2000A/B system. The backup transceiver can be manually switched to be
the "online" unit with a few button presses. Auto dependency or independency can switch
an up converter, down converter or both if desired and a real time backup status monitor
can be observed by selecting the BKSTATUS menu display.
Function Description
5–16
 Loading...