

Comtech EF Data KPA-040, KPA-080, KPA-020IN, KPA series, KPA-100 Installation And Operation Manual
Page 1

Ku-Band Indoor Solid-State Power Amplifier Series
IMPORTANT NOTE: The information contained in this document supersedes all previously
published information regarding this product. Product specifications are subject to change
without prior notice.
KPA
Installation and Operation Manual
Part Number MN/KPA.IOM
Revision 1
October 29, 2010
Part Number MN/KPA.IOM Revision 1
Page 2

Comtech EF Data, 2114 West 7th Street, Tempe, Arizona 85281 USA, 480.333.2200, FAX: 480.333.2161
Copyright © Comtech EF Data, 2010. All rights reserved. Printed in the USA.
Page 3
Errata A
Comtech EF Data Documentation Update
Subject: AddTPEandTPSCommands/QueriestoAppendixC.REMOTECONTROL
Sect.C.6.1RemoteCommandsandQueries(FWVersion2.X.XandHigher)
OriginalManualPart
Number/Rev: MN/KPA.IOMRev1
ErrataNumber/
PLMDocumentID: ER‐KPA‐EA1
PLMCONumber: C‐0027379
Comments: Theupdatedinformationwillbeincorpor
ofthemanual:
AddTPEandTPSCommands/QueriestoAppendC.REMOTECONTROL
Sect.C.6.1RemoteCommandsandQueries(FWVersion2.X.Xand
Higher),pageC‐16:
atedintothenextformalrevision
ER-KPA-EA1 THIS DOCUMENT IS NOT SUBJECT TO REVISION/UPDATE! PLM CO C-0027379 Page 1 of 2
Page 4

ErrataAforMN/KPA.IOMRev1 AddTPEandTPSCommands/QueriestoAppendixC
Thispag
eisintentionallyblank.
ER-KPA-EA1 THIS DOCUMENT IS NOT SUBJECT TO REVISION/UPDATE! PLM CO C-0027379 Page 2 of 2
Page 5

Table of Contents
TABLE OF CONTENTS .............................................................................................................. III
TABLES ..................................................................................................................................... VII
FIGURES ................................................................................................................................... VII
PREFACE ................................................................................................................................... IX
About this Manual
..................................................................................................................................... ix
Disclaimer ................................................................................................................................................ ix
Reporting Comments or Suggestions Concerning this Manual ............................................................... ix
Military Standards ..................................................................................................................................... ix
Conventions and References ...................................................................................................................... x
Metric Conversion .................................................................................................................................... x
Recommended Standard Designations ..................................................................................................... x
Trademarks ............................................................................................................................................... x
Cautions and Warnings .............................................................................................................................. x
Electrical Safety and Compliance ............................................................................................................. xi
Electromagnetic Compatibility (EMC) Compliance ............................................................................... xi
European Low Voltage Directive (LVD) ................................................................................................. xi
Warranty Policy ........................................................................................................................................ xii
Limitations of Warranty ......................................................................................................................... xii
Exclusive Remedies ............................................................................................................................... xiii
Customer Support .................................................................................................................................... xiv
Online Customer Support ...................................................................................................................... xiv
CHAPTER 1. INTRODUCTION ........................................................................................... 1–1
1.1 Overview ..................................................................................................................................... 1–1
1.2 Functional Description .............................................................................................................. 1–2
1.3 KPA Specifications..................................................................................................................... 1–5
1.3.1 KPA-020IN Specifications ...................................................................................................... 1–5
1.3.2 KPA-040 Specifications .......................................................................................................... 1–6
1.3.3 KPA-080 Specifications ................................................................................................ 1–7
iii
Page 6

KPA Ku-Band Indoor Solid-State Power Amplifier Revision 1
Table of Contents MN/KPA.IOM
1.3.4 KPA-100 Specifications ................................................................................................ 1–8
1.3.5 Dimensional Envelopes ................................................................................................ 1–9
CHAPTER 2. INSTALLATION ............................................................................................ 2–1
2.1 Unpacking and Inspection ......................................................................................................... 2–1
2.2 Rack Mounting the KPA ........................................................................................................... 2–2
2.2.1 Installation of the Optional Rack Slides ................................................................... 2–2
CHAPTER 3. CONNECTORS AND PINOUTS ................................................................... 3–1
3.1 Connector Overview .................................................................................................................. 3–1
3.2 RF Connections .......................................................................................................................... 3–3
3.2.1 J1 RF IN / Tx IN Connectors ................................................................................................... 3–3
3.2.2 J2 RF OUT Connector ............................................................................................................. 3–3
3.3 Utility Connections .................................................................................................................... 3–4
3.3.1 Sample Port Connectors (Front Panel) .................................................................................... 3–4
3.3.2 J4 REDUNDANT LOOP Connector ....................................................................................... 3–4
3.3.3 J5 DISCRETE CONTROL Connector .................................................................................... 3–5
3.3.4 J8 10/100 ETHERNET Connector .......................................................................................... 3–6
3.3.5 J9A EXT REF IN / J9B EXT REF OUT Connectors .............................................................. 3–6
3.3.6 J7 RF SWITCH Connector ...................................................................................................... 3–7
3.3.7 J6 COM 1 Connector ............................................................................................................... 3–7
3.4 Power / Ground Connections .................................................................................................... 3–8
3.4.1 Alternating Current Prime Power Switch and Connector ........................................................ 3–8
3.4.2 Chassis Ground Connector ...................................................................................................... 3–8
CHAPT
ER 4. FLASH UPGRADING .................................................................................... 4–1
4.1 Flash Upgrading via Internet .................................................................................................... 4–1
4.2 Ethernet FTP Upload Procedure .............................................................................................. 4–2
CHAPTER 5. FRONT PANEL OPERATION ....................................................................... 5–1
5.1 Introduction ................................................................................................................................ 5–1
5.1.1 Startup Checklist ..................................................................................................................... 5–2
5.1.2 LED Indicators ........................................................................................................................ 5–2
5.1.3 Keypad ..................................................................................................................................... 5–3
5.1.4 Front Panel Display ................................................................................................................. 5–4
5.2 Opening Screen .......................................................................................................................... 5–4
5.3 SELECT: (Main) Menu ............................................................................................................. 5–5
5.3.1 SELECT: Config (Configuration) ........................................................................................... 5–6
iv
Page 7

KPA Ku-Band Indoor Solid-State Power Amplifier Revision 1
Table of Contents MN/KPA.IOM
5.3.1.1 CONFIG: Remote (Remote Control) .............................................................................. 5–6
5.3.1.2 CONFIG: Amp ............................................................................................................. 5–10
5.3.1.3 CONFIG: FltRec (Fault Recovery) Menu Branches ..................................................... 5–11
5.3.1.4 CONFIG: Redundancy Menu Branches ....................................................................... 5–11
5.3.1.5 CONFIG: ExtRef (External Reference) ........................................................................ 5–13
5.3.2 SELECT: Monitor ................................................................................................................. 5–13
5.3.2.1 MONITOR: Faults ........................................................................................................ 5–14
5.3.2.2 MONITOR: Stored ....................................................................................................... 5–14
5.3.2.3 MONITOR: Power ....................................................................................................... 5–15
5.3.2.4 MONITOR: Vltgs ......................................................................................................... 5–15
5.3.2.5 MONITOR: PS (Power Supply) ................................................................................... 5–15
5.3.2.6 MONITOR: Temp ........................................................................................................ 5–15
5.3.2.7 MONITOR: FETs ......................................................................................................... 5–15
5.3.3 SELECT: Utility .................................................................................................................... 5–15
5.3.3.1 UTILITY: Date/Time ................................................................................................... 5–16
5.3.3.2 UTILITY: CID (Circuit ID) .......................................................................................... 5–16
5.3.3.3 UTILITY: PowerMon ................................................................................................... 5–16
5.3.3.4 UTILITY: Firmware ..................................................................................................... 5–17
5.3.3.5 UTILITY: RefOsc ......................................................................................................... 5–17
5.3.4 SELECT: Front Panel ............................................................................................................ 5–18
5.3.4.1 Front Panel: Brightness ................................................................................................. 5–18
5.3.4.2 Front Panel: Lamp Test ................................................................................................. 5–18
CHAPTER 6. KPA ETHERNET MANAGEMENT ............................................................... 6–1
6.1 Overview ..................................................................................................................................... 6–1
6.2 Ethernet Ma
nagement Interface Protocols .............................................................................. 6–1
6.3 SNMP Interface .......................................................................................................................... 6–1
6.3.1 Management Information Base (MIB) Files ............................................................................ 6–2
6.3.2 SNMP Community Strings ...................................................................................................... 6–2
6.4 Telnet Interface .......................................................................................................................... 6–3
6.5 Web Server (HTTP) Interface .................................................................................................. 6–4
6.5.1 Web Server page Introduction ................................................................................................. 6–4
6.5.2 Web Server Interface Access ................................................................................................... 6–4
6.5.3 Web Server Menu Tree ............................................................................................................ 6–5
6.5.4 Web Server page Descriptions ................................................................................................ 6–5
6.5.4.1 Home pages ..................................................................................................................... 6–6
6.5.4.1.1 Home (Splash) page .................................................................................................. 6–6
6.5.4.1.2 Home | Support page................................................................................................. 6–7
6.5.4.2 Admin pages ................................................................................................................... 6–8
6.5.4.2.1 Admin | Access page................................................................................................. 6–8
6.5.4.2.2 Admin | SNMP page ............................................................................................... 6–10
6.5.4.3 Config (Configuration) pages ....................................................................................... 6–11
6.5.4.3.1 Config | Amplifier page .......................................................................................... 6–11
6.5.4.3.2 Config | Utility page ............................................................................................... 6–13
6.5.4.3.3 Config | Redundancy page ...................................................................................... 6–14
v
Page 8

KPA Ku-Band Indoor Solid-State Power Amplifier Revision 1
Table of Contents MN/KPA.IOM
6.5.4.4 Status pages ................................................................................................................... 6–16
6.5.4.4.1 Status | Events page ................................................................................................ 6–16
6.5.4.4.2 Status | Status page ................................................................................................. 6–17
6.5.4.4.3 Status | FETs page .................................................................................................. 6–18
APPENDIX A. MAINTENANCE AND TROUBLESHOOTING ........................................... A–1
A.1 Introduction ............................................................................................................................... A–1
A.2 Maintenance Testing ................................................................................................................. A–2
A.2.1 Test Point Samples ............................................................................................................. A–2
A.3 Troubleshooting ........................................................................................................................ A–2
A.3.1 Troubleshooting Guide ....................................................................................................... A–3
APPENDIX B. KPA REDUNDANT OPERATIONS ............................................................ B–1
B.1 Introduction ............................................................................................................................... B–1
B.2 Redundancy Operation ............................................................................................................ B–2
B.3 Redundancy Kit Installation .................................................................................................... B–2
B.3.1 Redundancy Kit Control Cabling ....................................................................................... B–4
B.4 Gain Equalization of Redundant Units ................................................................................... B–8
B.4.1 Case Examples ................................................................................................................... B–9
APPENDIX C. REMOTE CONTROL .................................................................................. C–1
C.1 Overview .................................................................................................................................... C–1
C.2 EIA-485 ...................................................................................................................................... C–1
C.3 EIA-232 ...................................................................................................................................... C–2
C.4 Basic Protocol ............................................................................................................................ C–2
C.5 Packet Structure
....................................................................................................................... C–3
C.5.1 Start of Packet .................................................................................................................... C–3
C.5.2 Target Address ................................................................................................................... C–4
C.5.3 Address Deli miter .............................................................................................................. C–4
C.5.4 Instruction Code ................................................................................................................. C–4
C.5.5 Instruction Code Qualifier .................................................................................................. C–4
C.5.5.1 Backward Compatibility Code Qualifier ....................................................................... C–5
C.5.6 Optional Message Argu ments ............................................................................................ C–5
C.5.7 End of Packet ..................................................................................................................... C–6
C.6 Remote Control Using FW Version 2.X.X and Higher (CURRENT) .................................. C–7
C.6.1 Remote Commands and Queries (FW Version 2.X.X and Higher) ................................... C–8
vi
Page 9

KPA Ku-Band Indoor Solid-State Power Amplifier Revision 1
Table of Contents MN/KPA.IOM
C.7 Remote Control Using Firmware Version 1.X.X (OLD) ..................................................... C–17
C.7.1 Old Utility Commands ..................................................................................................... C–18
C.7.2 Old Configuration Commands ......................................................................................... C–20
C.7.3 Old Operating Mode Commands ..................................................................................... C–21
C.7.4 Old Status Commands ...................................................................................................... C–22
C.7.5 Old Stored Alarms ............................................................................................................ C–28
C.7.6 Error Processing ............................................................................................................... C–29
C.7.7 Configuration Errors ........................................................................................................ C–29
C.7.8 Time-Outs ........................................................................................................................ C–29
Tables
Table 3-1. KPA Interface Connectors Summary ...................................................................................... 3–2
Table 3-2. J4 Redundancy Loop Connector Pinout ................................................................................. 3–4
Table 3-3. J5 DISCRETE CONTROL Connector Pinout (Standalone or 1:1 Redundant Systems) ....... 3–5
Table 3-4. J5 DISCRETE CONTROL Connector Pinout (1:2 Redundant Systems) .............................. 3–6
Table 3-5. J7 RF SWITCH Connector Pinout ......................................................................................... 3–7
Table 3-6. J6 COM 1 Connector Pinout (EIA-232/EIA-485 Interface) ................................................... 3–7
Table B-1. KPA Redundancy Kits – Parts List ........................................................................................ B–6
Figures
Figu r e 1-1. C o m tech EF D a t a KPA Fam ily of Ku - B and Soli d - State Amplifier s .......................................... 1–1
Figure 1-2. KPA-020IN/-040 Block Diagram .......................................................................................... 1–3
Figure 1-3. KPA-080/-100 Block Diagram ............................................................................................... 1–4
Figure 1-4. KPA-020IN Dimensional Envelope (Shown with Optional Slide Railings Installed) ........... 1–9
Figure 1-5. KPA-040/-080/-100 Dimensional Envelope (Shown with Optional Slide Railings Installed) 1–10
Figure 2-1. Installation of Optional Heavy-Duty Rack Slides (CEFD P/N FP/SL00004) ........................ 2–3
Figure 3-1. KPA Rear Panel Views .......................................................................................................... 3–1
Figure 4-1. Flash Upgrade via Internet ..................................................................................................... 4–1
Figure 5-1. KPA-XXX Front Panel View ................................................................................................. 5–1
Figure 5-2. KPA Front Panel Keypad ....................................................................................................... 5–3
Figure 5-3. KPA Front Panel Keypad ....................................................................................................... 5–4
Figure 5-4. KPA Principle Menu Tree ...................................................................................................... 5–5
Figure 6-1. KPA Home (Splash) page ...................................................................................................... 6–6
Figure 6-2. KPA Home | Support page ..................................................................................................... 6–7
Figure 6-3. Admin | Access page .............................................................................................................. 6–8
Figure 6-4. Admin | SNMP page ............................................................................................................ 6–10
Figure 6-5. Config | Amplifier page ........................................................................................................ 6–11
Figure 6-6. Config | Utility page ............................................................................................................. 6–13
Figure 6-7. Config | Redundancy page ................................................................................................... 6–14
Figure 6-8. Status | Events page .............................................................................................................. 6–16
Figure 6-9. Status | Status page ............................................................................................................... 6–17
Figure 6-10. Status | FETs page .............................................................................................................. 6–18
Figure B-1. 1:1 Redundancy Block Diagram ........................................................................................... B–2
Figure B-2. 1:1 Redundancy Installation – Complete .............................................................................. B–3
Figure B-3. KPA Redundancy System – Control Cabling Schematics ................................................... B–4
Figure B-4. 1:1 Redundancy Kit Assembly ............................................................................................. B–7
vii
Page 10

KPA Ku-Band Indoor Solid-State Power Amplifier Revision 1
Table of Contents MN/KPA.IOM
This page is deliberately blank.
viii
Page 11

About this Manual
This manual provides installation and operation information for the Comtech EF Data family of
Ku-Band Indoor Solid-State Power Amplifiers (ISSPAs) – the KPA-020IN, KPA-040, KPA-080, and
KPA-100. This is a technical document intended for earth station engineers, technicians, an d ope ra tors
responsible for the operation and maintenance of the KP As.
PREFACE
Revision 1 of this manual represents a complete rewrite in which all content has been updated in its
entirety and re-ordered to conform to current Comtech EF Data Technical Publication s standards
and practices.
Disclaimer
Comtech EF Data has reviewed this manual thoroughly in order that it will be an easy-to-use
guide to your equipment. All statements, technical information, and recommendations in this
manual and in any guides or related documents are believed reliable, but the accuracy and
completeness thereof are not guaranteed or warranted, and they are not intended to be, nor should
they be understood to be, representations or warranties concerning the products described.
Further, Comtech EF Data reserves the right to make changes in the specifications of the products
described in this manual at any time without notice and without obligation to notify any person of
such changes.
If you have any questions regarding your equipment or the information in this manual, please
contact Comtech EF Data’s Customer Support Department during normal business hours.
Reporting Comments or Suggestions Concerning this Manual
Comments and suggestions regarding the content and design of this manual are appreciated. To
submit comments, please contact the Comtech EF Data Technical Publications department:
Military Standards
References to “MIL-STD-188” apply to the 114A series (i.e., MIL-STD-188-114A), which
provides electrical and functional characteristics of the unbalanced and balanced voltage digital
interface circuits applicable to both long haul and tactical communications. Specifically, these
TechnicalPublications@comtechefdata.com
ix
Page 12
KPA Ku-Band Indoor Solid-State Power Amplifier Revision 1
Preface MN/KPA.IOM
references apply to the MIL-STD-188-114A electrical characteristics for a balanced voltage
digital interface circuit, Type 1 generator, for the full range of data rates. For more information,
refer to the Department of Defense (DOD) MIL-STD-188-114A, “Electrical Characteristics of
Digital Interface Circuits.”
Conventions and References
Metric Conversion
Metric conversion information is located on the inside back cover of this manual. This information
is provided to assist the operator in cross-referencing non-Metric to Metric conversions.
Recommended Standard Designations
The Recommended Standard (RS) designation has been superseded by the new designation of the
Electronic Industries Association (EIA). References to the old designation may be shown only
when depicting actual text displayed on the screen of the unit (RS-232, RS-485, etc.). All other
references in the manual will be shown with the EIA designation.
Trademarks
Windows is a trademark of the Microsoft Corporation. Other product names mentioned in this
manual may be trademarks or registered trademarks of their respective companies and are hereby
acknowledged.
The User should carefully review the information that follows.
IMPORTANT
Cautions and Warnings
IMPORTANT or NOTE indicates a statement that is associated with the task being
IMPORTANT
performed or information critical for proper equipment function.
CAUTION indicates a hazardous situation that, if not avoided, may result in minor or
moderate injury. CAUTION may also be used to indicate other unsafe practices or
risks of property damage.
WARNING indicates a potentially hazardous situation that, if not avoided, could
result in death or serious injury.
x
Page 13
KPA Ku-Band Indoor Solid-State Power Amplifier Revision 1
Preface MN/KPA.IOM
Electrical Safety and Compliance
This product contains a Lithium Battery. DANGER OF EXPLOSION EXISTS if the
battery is incorrectly replaced. Replace only with the same or equivalent type
WARNING
CAUTION
recommended by the manufacturer. Dispose of used batteries in accordance with
local and national regulations
This equipment has been designed to minimize exposure of personnel to hazards. The
operators and technicians must:
• Know how to work around, with, and on high voltage and high RF power level
equipment.
• Exercise every precaution to ensure personnel safety.
• Exercise extreme care when working near high voltages/high RF power level
equipment.
• Be familiar with the warnings presented in this manual.
• Disconnect the power supply cord before servicing the ISSPA.
Electromagnetic Compatibility (EMC) Compliance
Properly shielded cables for DATA I/O are required in order to meet the European
Electromagnetic Compatibility (EMC) Directive (EN55022, EN50082-1). More specifically,
IMPORTANT
these cables must be shielded from end-to-end, ensuring a continuous ground shield.
In accordance with European Directive 2004/108/EEC, the KPA family of products has been
shown, by independent testing, to comply with the following standards:
Emissions: EN 55022 Class B – Limits and Methods of Measurement of Radio
Interference Characteristics of Information Technology Equipment.
(Also tested to FCC Part 15 Class B.)
Immunity: EN 55024 – Information Technology Equipment: Immunity Characteristics,
Limits, and Methods of Meas urement.
European Low Voltage Directive (LVD)
The following information is applicable for the European Low Voltage Directive (2006/95/EC):
Symbol Description
<HAR>
Type of power cord required for use in the European Community.
CAUTION: Double-pole/Neutral Fusing
!
ACHTUNG: Zweipolige bzw. Neutralleiter-Sicherung
xi
Page 14
KPA Ku-Band Indoor Solid-State Power Amplifier Revision 1
Preface MN/KPA.IOM
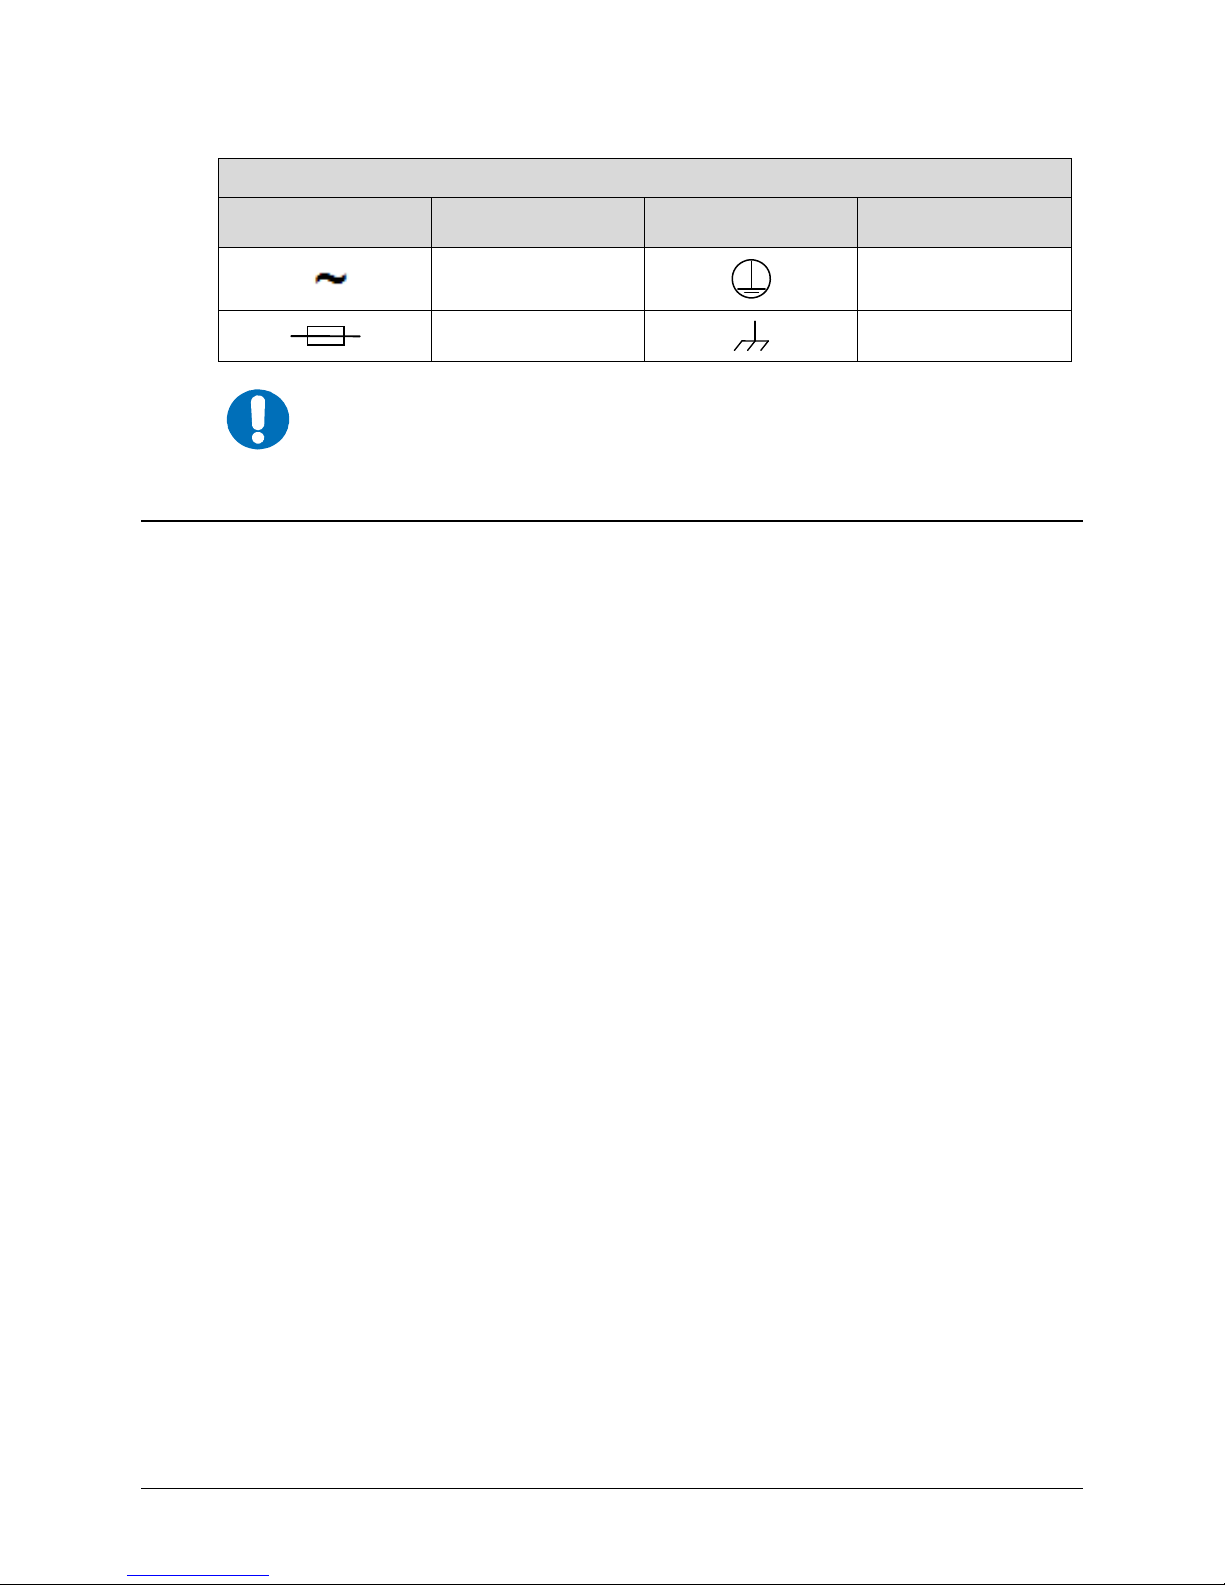
International Symbols
Symbol Definition Symbol Definition
For additional symbols, refer to Cautions and Warnings listed earlier in this
IMPORTANT
Preface.
Warrant y Policy
Comtech EF Data products are warranted against defects in material and workmanship for a specific
period from the date of shipment, and this period varies by product. In most cases, the warranty
period is two years. During the warranty period, Comtech EF Data will, at its option, repair or
replace products that prove to be defective. Repairs are warranted for the remainder of the origin al
warranty or a 90 day extended warranty, whichever is longer. Contact Comtech EF Data fo r the
warranty period specific to the product purchased.
For equipment under warranty, the owner is responsible for freight to Comtech EF Data and all
related customs, taxes, tariffs, insurance, etc. Comtech EF Data is responsible for the freight charges
only for return of the equipment from the factory to the owner. Co mtech EF Data will return the
equipment by the same method (i.e., Air, Express, Surface) as the equipment was sent to Comtech
EF Data.
Alternating Current
Fuse
Protective Earth
Chassis Ground
All equipment returned for warranty repair must have a valid RMA number issued prior to return
and be marked clearly on the return packaging. Comtech EF Data strongly recommends all
equipment be returned in its original packaging.
Comtech EF Data Corporation’s obligations under this warranty are limited to repair or replacement
of failed parts, and the return shipment to the buyer of the repaired or replaced parts.
Limitations of Warranty
The warranty does not apply to any part of a product that has been installed , altered, repaired, or
misused in any way that, in the opinion of Comtech EF Data Corporation, would affect the
reliability or detracts from the performance o f any part of the produ ct, or is damaged as the result of
use in a way or with equipment that had not been previously approved by Comtech EF Data
Corporation.
The warranty does not apply to any product or parts thereof where the serial numb er or the serial
number of any of it s pa r ts ha s been altered, defaced, or removed.
The warranty does not cover damage or loss incurred in transportation of the product.
xii
Page 15

KPA Ku-Band Indoor Solid-State Power Amplifier Revision 1
Preface MN/KPA.IOM
The warranty does not cover replacement or repair necessitated by loss or damage from any cause
beyond the control of Comtech EF Data Corporation, such as lightning or other natural and weather
related events or wartime environme nts .
The warranty does not cover any labor involved in the removal and or reinstallation of warranted
equipment or parts on site, or any labor required to diagnose the necessity for repair or replacement.
The warranty excludes any responsibility by Comtech EF Data Corporation for incidental or
consequential damages arising from the use of the equip ment or p ro duct s, or for any inability to use
them either separate from or in combination with any other equipment or products.
A fixed charge established for each product will be imposed for all equipment returned for warranty
repair where Comtech EF Data Corporation cannot identify the cause of the reported failure.
Exclusive Remedies
Comtech EF Data Corporation’s warranty, as stated is in lieu of all other warranties, expressed,
implied, or statutory, including those of merchantability and fitness for a particular purpose. The
buyer shall pass on to any purchaser, lessee, or other user of Comtech EF Data Corporation’s
products, the aforementioned warranty, and shall indemnify and hold harmless Co mtech EF Data
Corporation from any claims or liability of such purchaser, lessee, or user based upon allegations
that the buyer, its agents, or employees have made additional warrant ies or representations as to
product preference or use.
The remedies provided herein are the buyer’s sole and exclusive remedi es. Comtech EF Data sha ll
not be liable for any direct, indirect, special, incidental, or consequential damages, whether based on
contract, tort, or any other legal theory.
xiii
Page 16

KPA Ku-Band Indoor Solid-State Power Amplifier Revision 1
Preface MN/KPA.IOM
Customer Support
Refer to p. xii in this Preface for information regarding this product’s Warranty Policy.
Contact the Comtech EF Data Customer Support Department for:
• Product support or training
• Reporting comments or suggestions concerning manuals
• Information on upgrading or returning a product
A Customer Support representative may be reached during normal business hours at:
Comtech EF Data
Attention: Customer Support Department
2114 West 7th Street
Tempe, Arizona 85281 USA
480.333.2200 (Main Comtech EF Data number)
480.333.4357 (Customer Support Desk)
480.333.2161 FAX
To return a Comtech EF Data product (in-warranty and out-of-warranty) for repair or
replacement:
• Contact the Comtech EF Data Customer Support Department during normal business
hours. Be prepared to supply the Customer Support representative with the model number,
serial number, and a description of the problem.
• Request a Return Material Authorization (RMA) number from the Comtech EF Data
Customer Support representative.
• Pack the product in its original shipping carton/packaging to ensure that the product is
not damaged during shipping.
• Ship the product back to Comtech EF Data. (Shipping charges should be prepaid.)
Online Customer Support
An RMA number can be requested electronically by accessing Comtech EF Data’s online
Support page (
• Click the Service hyperlink, then read the Return Material Authorization section for
detailed instructions on Comtech EF Data’s return procedures.
• Click [Send RMA Request] on the Support page or the RMA Request hyperlink provided
in the Service | Return Material Authorization section; fill out the Billing Information,
Return Information, and Unit to be Returned sections completely, then click [Send em ail]
www.comtechefdata.com/support.asp). From this page:
– or –
• Send an e-mail providing this same detailed information to the Customer Support
Department at service@comtechefdata.com.
xiv
Page 17
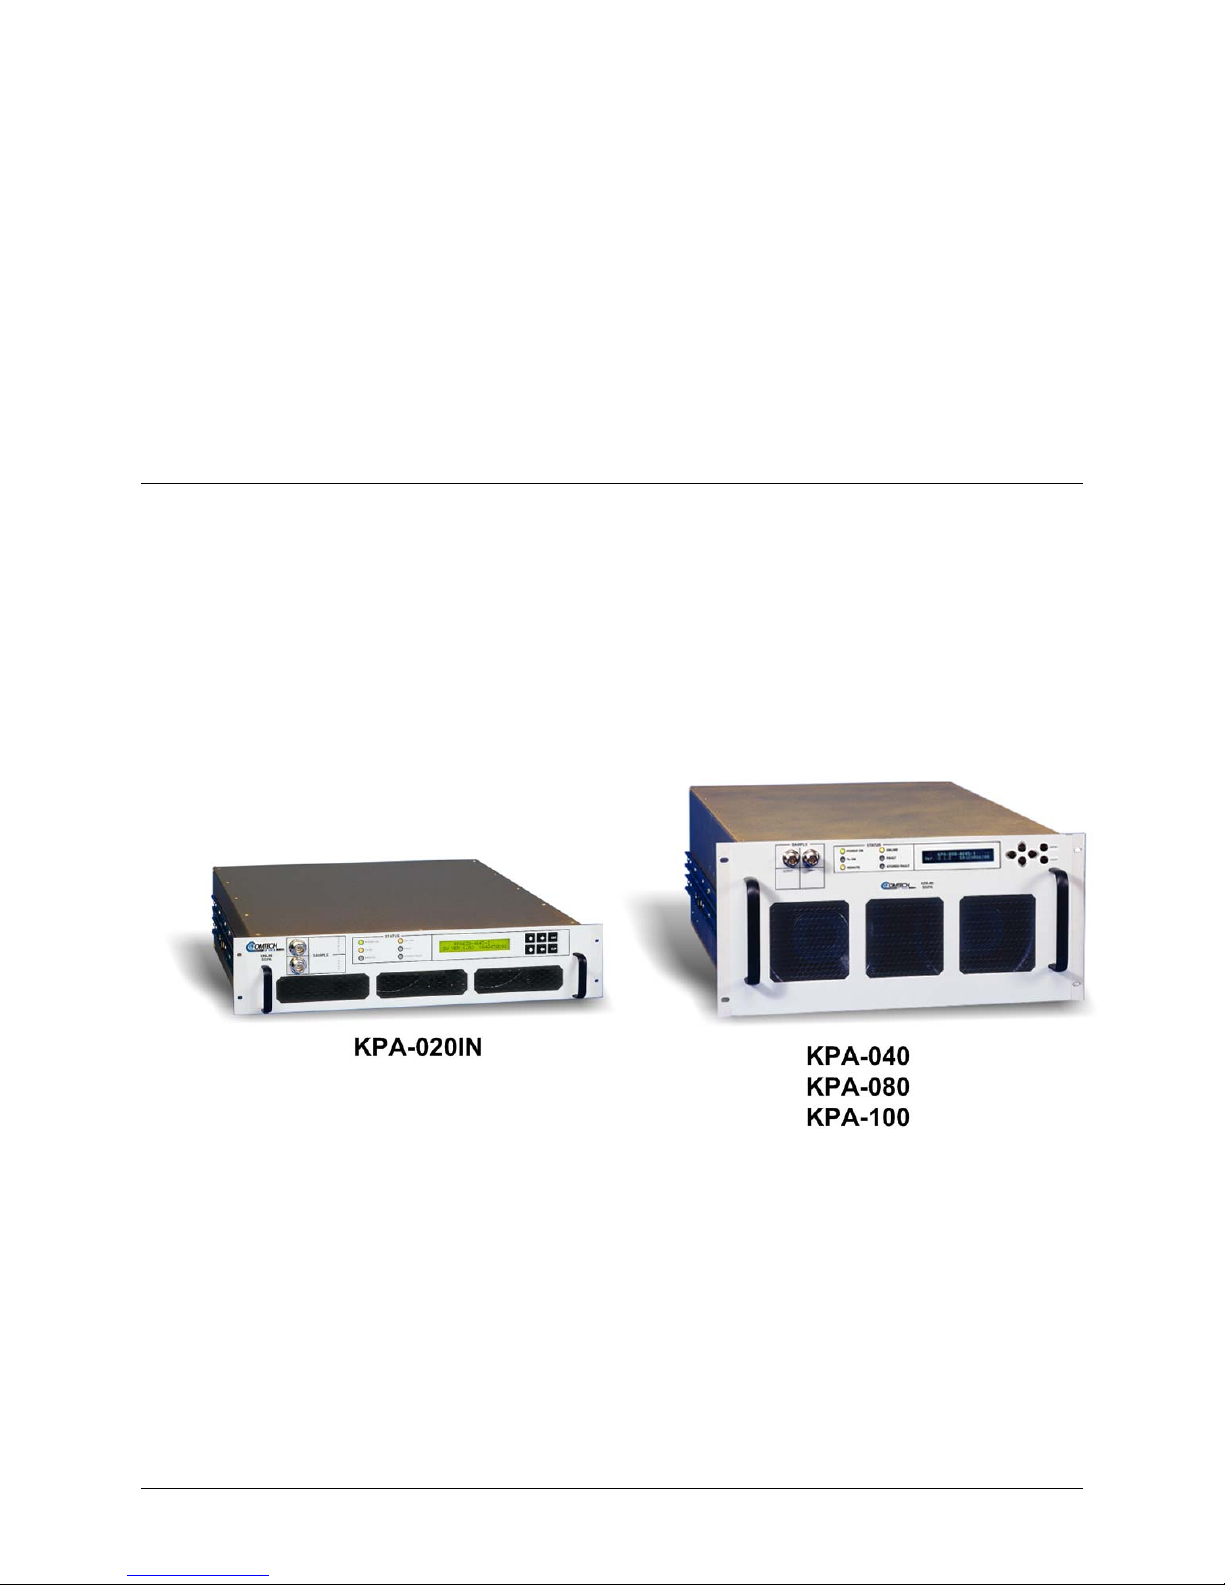
1.1 Overview
The Comtech EF Data Ku-Band Solid-State Power Amplifier (KPA) family of products, shown
in Figure 1-1, is a line of Indoor
communication systems or satellite uplink data systems. The KPA operates over the RF input
frequency range of 14.0 to 14.5 GHz and provides a cost effective and more reliable replacement
for Traveling Wave Tube (TWT) amplifiers in Ku-Band terminals.
Due to its small form factor, it is also ideal for the construction of small “flyaway” terminals,
medium size (equivalent to Intelsat F) earth stations, hub earth stations for small to medium size
private networks, or point-to-point links.
Chapter 1. INTRODUCTION
Solid-State Power Amplifiers (ISSPAs) designed for use in
Figure 1-1. Comtech EF Data KPA Family of Ku-Band So lid-State A mplif iers
1–1
Page 18

Ku-Band Solid-State Power Amplifier Revision 1
Introduction MN/KPA.IOM
1.2 Functional Description
Each KPA ISSPA is constructed with highly reliable Gallium Arsenide Field Effect Transistors
(GaAs FETs). With Third-Order Intermodulation products from 4 to 6 dB better than TWT
ratings, the Comtech EF Data unit replaces TWTs with saturated power levels of up to twice the
KPA’s rated output. These KPAs also provide a Mean Time Between Failure (MTBF) that is 4 to
5 times greater than the typical TWT MTBFs.
The KPA is designed to be rack-mounted in a standard 19-inch (48 cm) rack or cabinet by hardmounting the unit to the rack’s front mounting rails using the front panel mounting holes;
optionally, rack slides may be installed onto the chassis that allow servicing of the unit without its
removal from the rack. Handles at the front of the unit facilitate easy installation into and removal
from the rack.
All user controls, indicators, and displays for local and remote operation – as well as the RF Input
and Output sample test ports – are located on the front panel of the unit. User external interface
connectors are located on the chassis rear panel.
Two internally mounted exhaust fans provide cooling – cool air is taken in through the front panel
and exhausted out the rear panel.
An AC power connector and On/Off switch are located on the chassis rear panel. A six-foot AC
power cord is supplied with the unit.
On the pages that follow, Figure 1-2 and Figure 1-3 depict the b
lock diagrams for the available
KPAs. Each KPA chassis consists of a power supply, fan assembly, front panel assembly,
monitor/control processor (MCP), and a Comtech EF Data SSPA module. The KPA is designed
using a Comtech EF Data low loss combining technique and an MCP based temperature versus
gain compensation.
The front panel features:
• A Vacuum Fluorescent Display for user-friendly visual status update (Liquid Crystal
Diode display for KPA-020IN and older KPA-040/-080/-100 units)
• The six-button cursor array is used to set or change operating parameters
• Six Light-Emitting Diodes (LEDs) provide quick reference to binary status points
• Input and output sample ports at –20 dBc and–40 dBc provide easy test point access
Each unit has the ability to function as a 1:1 or 1:2 redundancy controller in the backup mode.
The optional redundancy configuration is implemented by attaching a ganged waveguide/coax
transfer switch(es) to input and output connectors of the amplifiers with a combination coaxial
cable and waveguide kit. When the backup KPA is commanded into the controller mode, it
monitors the online KPAs for faults. A faulted online unit may be disconnected and replaced
without affecting the online power amplifier. For detailed information about using the KPA in 1:1
or 1:2 redundancy, see Appendix B. KPA REDUNDANT OPERATIONS.
1–2
Page 19
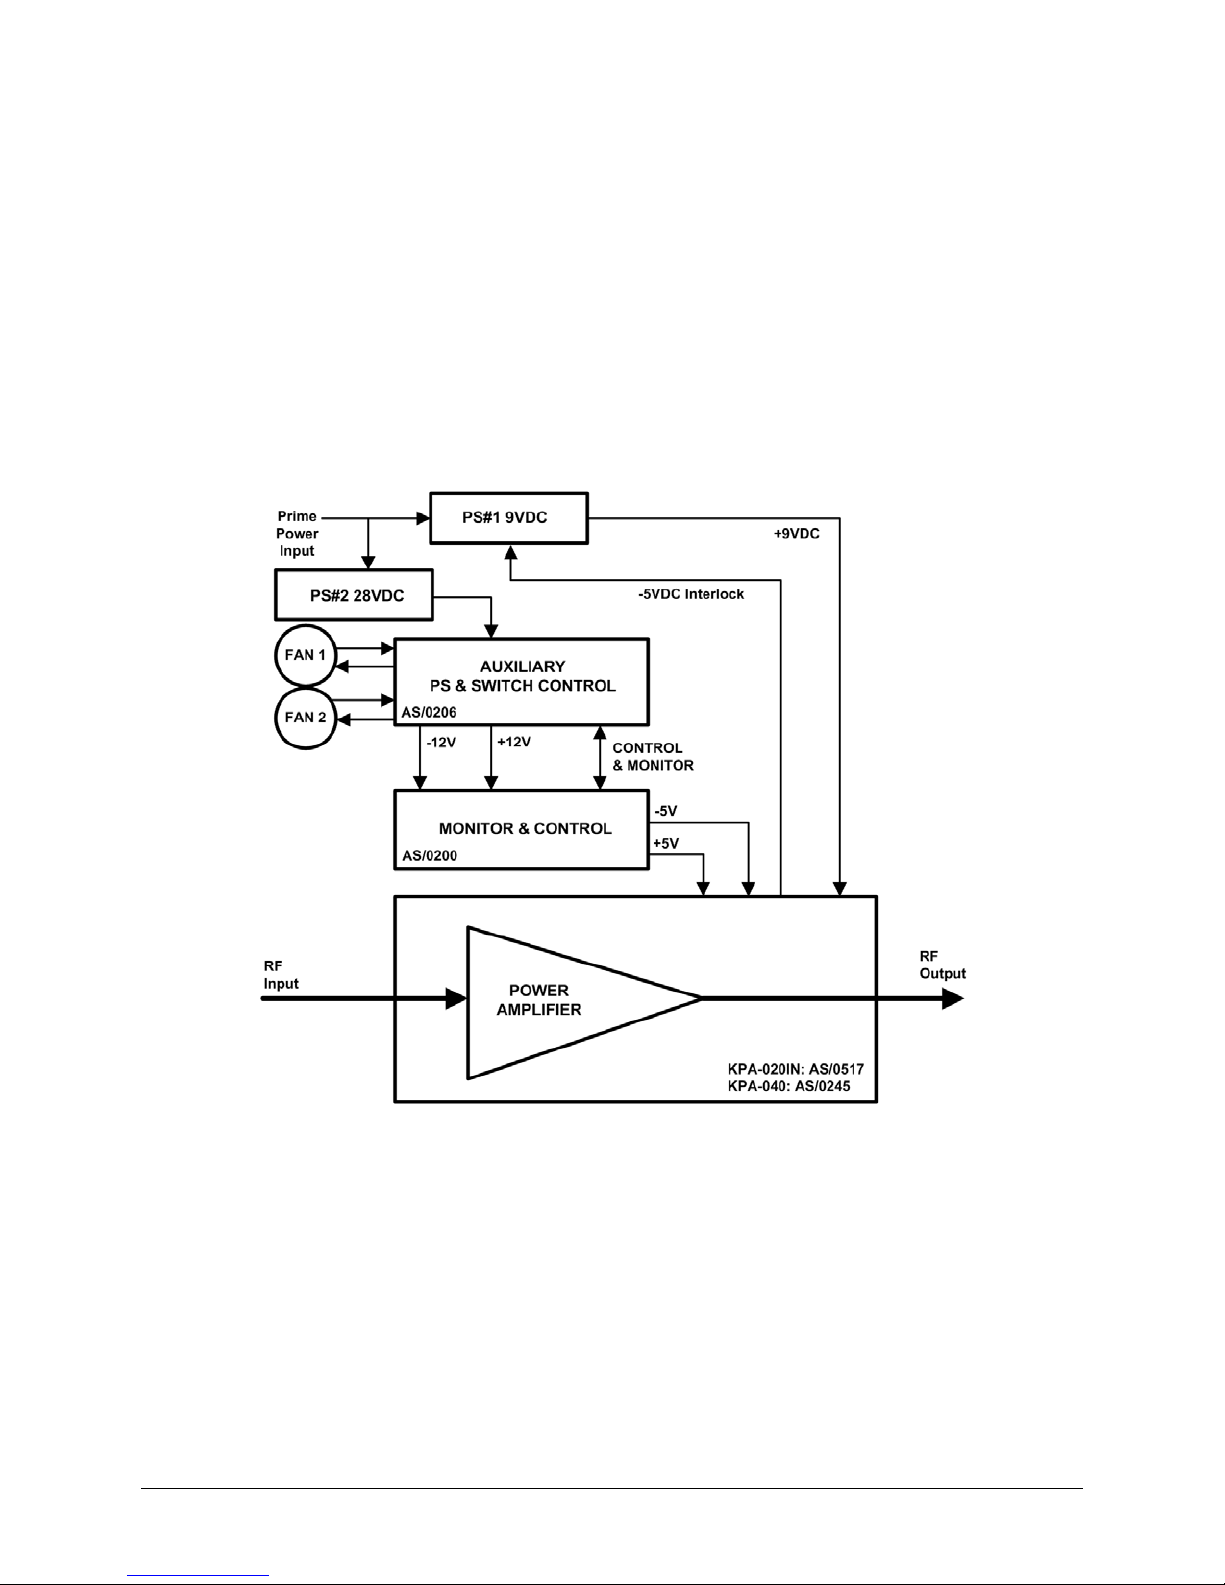
Ku-Band Solid-State Power Amplifier Revision 1
Introduction MN/KPA.IOM
Figure 1-2. KPA-020IN/-040 Block Diagram
1–3
Page 20
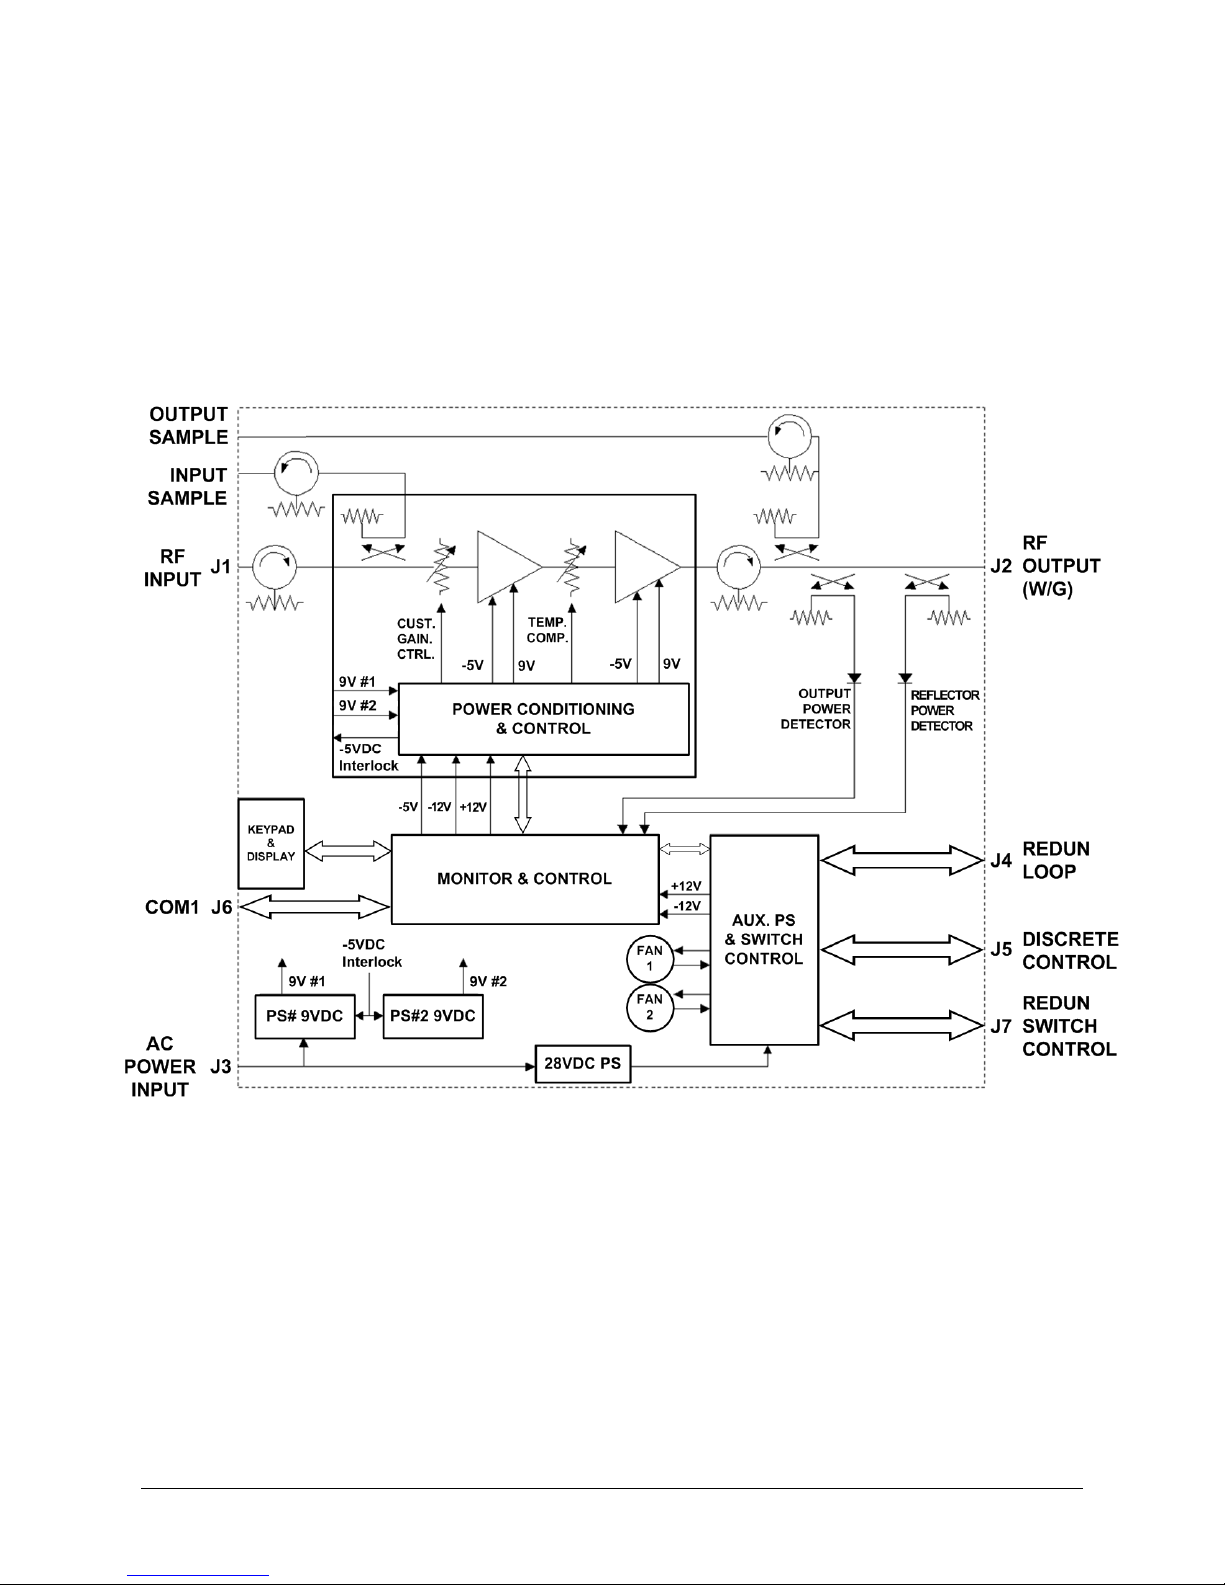
Ku-Band Solid-State Power Amplifier Revision 1
Introduction MN/KPA.IOM
Figure 1-3. KPA-080/-100 Block Diagram
1–4
Page 21
Ku-Band Solid-State Power Amplifier Revision 1
Ω
Ω
Introduction MN/KPA.IOM
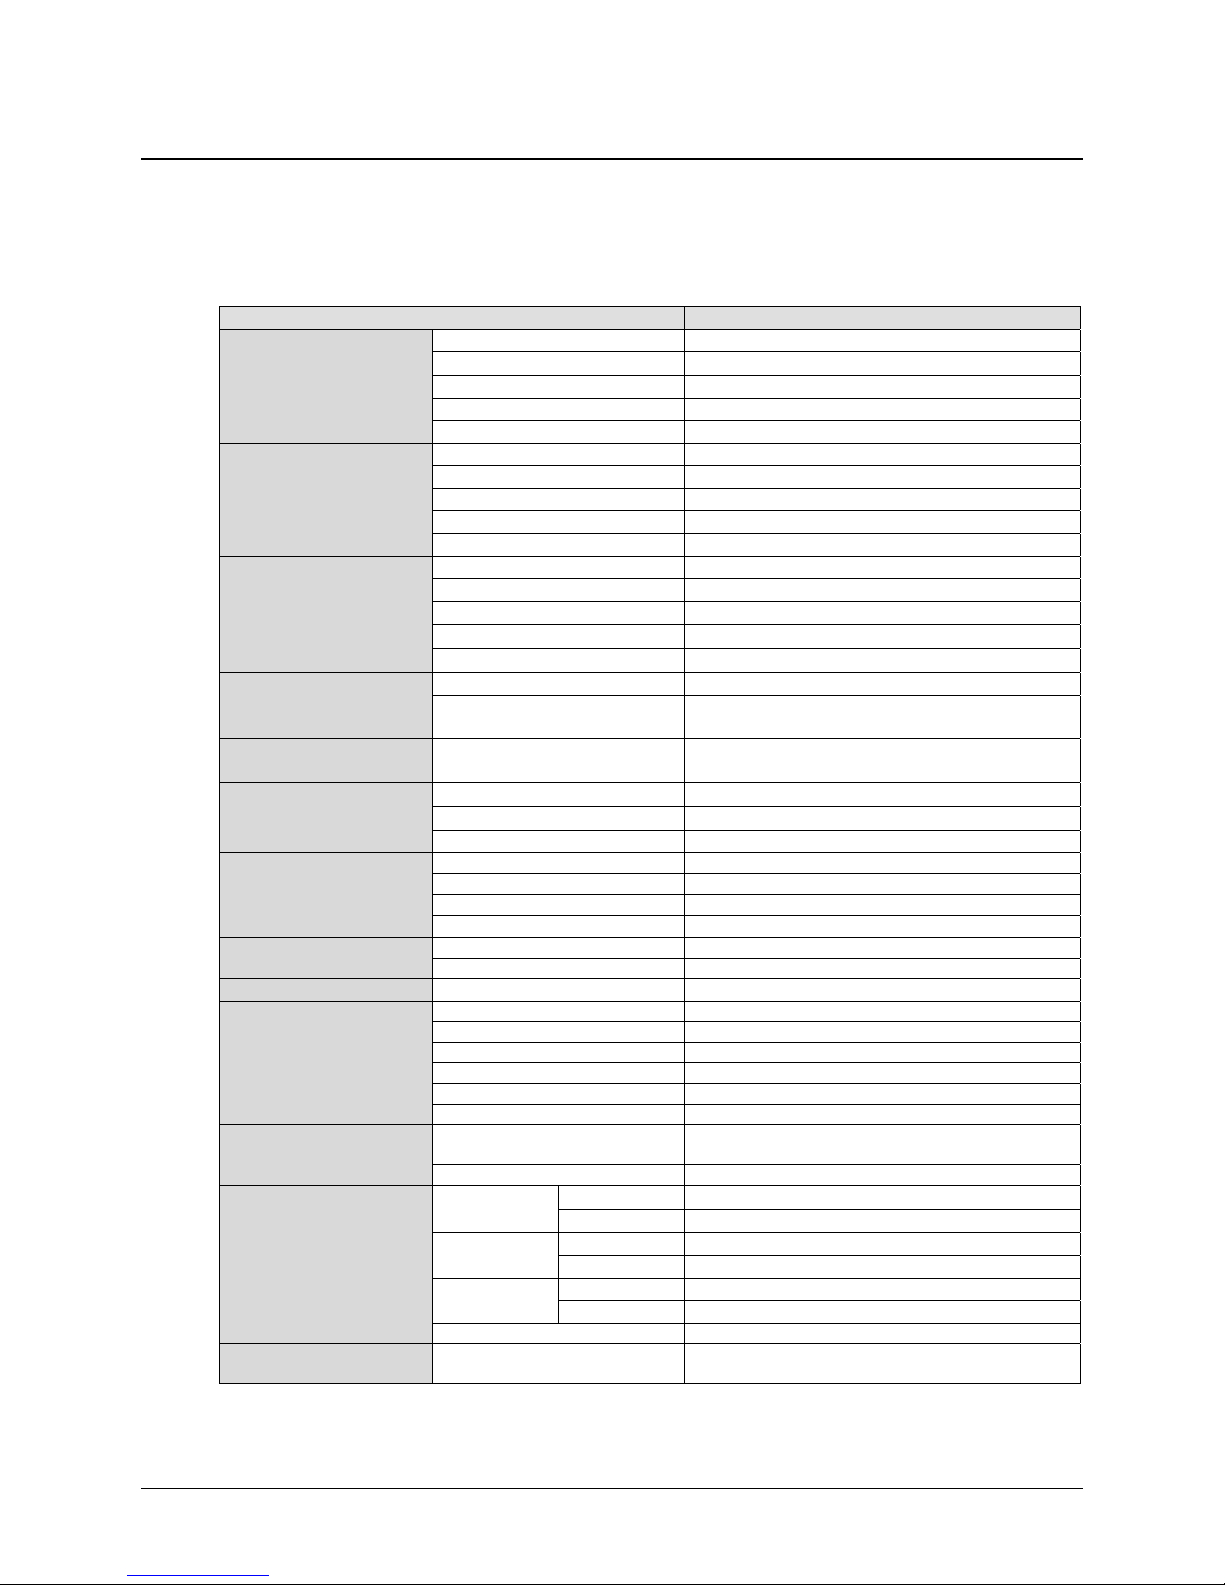
1.3 KPA Specifications
1.3.1 KPA-020IN Specifications
Parameters Specifications
Input
Output
Gain
Third Order Modulation
AM to PM Conversion
Group Delay (per 40
MHz)
Front Panel
Remote Control
Alarms
LEDs
Mechanical
Environmental
Power Requirements
Level -10dBm Typical
Impedance
Noise Figure 10 dB Typical, 15 dB max @ max gain
VSWR 1.25: 1 maximum
Connector SMA Female
Frequency 14.0 to 14.5 GHz
Power 42.5 dBm minimum @ 1 dB Compression
Mute 60 dB
VSWR 1.25:1 maximum
Connector WR75G Waveguide
Linear 50 dB minimum, 53 dB Typical
Adjust 20 dB in 0.25 dB steps
Fill Band
Per 40 MHz
0 to +50°C (32 to 122°F) ± 0.75dB
Intercept +56.5 dBm minimum, 59.0 Typical
Products -25 dBc max, -30 dBc typical @ 3 dB total
Output 2.0 degrees typical
Linear
Parabolic
Ripple 1.0 ns Peak-to-Peak
Display 24 x 2 LCD
Data Entry Cursor Control Keypad (6 keys)
Output Sample
Input Sample
COM Port EIA-232 or EIA-485
Protocol ASCII
Summary Fault Form C
Power On Green
Fault Red
Stored Fault Red
TX On Yellow
Online Yellow
Remote Yellow
Envelope 3.5H x 19W x 24D inches
Weight TBD
Temperature Operating
Storage
Humidity Operating
Storage 0 to 100% Noncondensing
Altitude Operating
Storage 50, 000 ft
Shock Normal Commercial Shipping and Handling
VAC 90 to 135 or 180 to 270 VAC, 47 to 63 Hz
50Ω
± 0.75 dB
± -0.25 dB
backoff from rated P1dB (two tones, Δf+MHz)
3.0 max @ 42.5 dBm
± 0.03 ns/MHz
± 0.0025 ns/MHz
Type N female, 50
Type N female, 50
(8.89H x 48.26W x 60.96D cm)
0 to 50°C (32 to 122°F)
–40 to 70°C (–40 to 158°F)
10 to 95% Noncondensing
15, 000 ft MSL
400W (Auto Select)
2
, –40 dBc
, –20 dBc
1–5
Page 22

Ku-Band Solid-State Power Amplifier Revision 1
Ω
Ω
Introduction MN/KPA.IOM
1.3.2 KPA-040 Specifications
Parameters Specifications
Input
Output
Gain
Third Order Modulation
AM to PM Conversion
Group Delay (per 40
MHz)
Front Panel
Remote Control
Alarms
LEDs
Mechanical
Environmental
Power Requirements
Level 10 dBm Typical
Impedance
Noise Figure 10 dB typical, 15 dB maximum @ max gain
VSWR 1.25:1 Maximum
Connector SMA Female
Frequency 14.0 to 14.5 GHz
Power 45.5 dBm min @ 1 dB Compression
Mute -60 dB
Impedance
VSWR 1.25:1 Maximum
Connector WR75G Waveguide
Linear 60.0 dB minimum, 63 dB typical
Adjust 20 dB in 0.25 dB steps
Fill Band
Per 40 MHz
0 to +50°C (32 to 122°F) ± 0.50 dB @ center frequency
Intercept +53.5 dBm minimum, 56.0 dBm typical
Products -30 dBc typical @ –25 dBc maximum
Output 2.0 degrees typical, 3.0 maximum @ rated output
Linear
Parabolic
Ripple 1.0 ns Peak-to-Peak
Display 24 x 2 LCD
Data Entry Cursor Control Keypad (6 keys)
Output Sample
Input Sample
COM Port
Protocol
Summary Fault Form C
Power On Green
Fault Red
Stored Fault Red
TX On Yellow
Online Yellow
Remote Yellow
Envelope 7H x 19W x 24D inches
Weight TBD
Temperature Operating
Storage
Humidity Operating
50Ω
50 Ω
± 0.75 dB
± 0.25 dB
± 1.00 dB full band
3 dB total backoff (2 tones, Δf = 1 MHz)
± 0.03 ns/MHz
± 0.03 ns/MHz
Type N, 50
Type N, 50
EIA-232 or EIA-485
ASCII
(18H x 48.26W x 60.96D cm)
0 to 50°C (32 to 122°F)
–40 to 70°C (–40 to 158°F)
2
, –40 dBc
, –20 dBc
10 to 95% Noncondensing
Storage 0 to 100% Noncondensing
Altitude Operating
15, 000 ft MSL
Storage 50, 000 ft
Shock Normal Commercial Shipping and Handling
VAC 90 to 135 VAC, or 180 to 270 VAC, 47 to 63
Hz, 600W (Auto-Select)
1–6
Page 23

Ku-Band Solid-State Power Amplifier Revision 1
Ω
Ω
Introduction MN/KPA.IOM
1.3.3 KPA-080 Specifications
Parameters Specifications
Input
Output
Gain
Third Order Modulation
AM to PM Conversion
Group Delay (per 40
MHz)
Front Panel
Remote Control
Alarms
LEDs
Mechanical
Environmental
Power Requirements
Impedance
Noise Figure 10 dB typical, 15 dB maximum @ max gain
VSWR 1.25:1 Maximum
Connector SMA Female
Frequency 14.0 to 14.5 GHz
Power 48.5 dBm min @ 1 dB Compression
Mute 60 dB
Impedance
VSWR 1.25:1 Maximum
Connector WR75G Waveguide
Linear 61 dB minimum, 64 dB typical
Adjust 20 dB in 0.25 dB steps
Fill Band
Per 40 MHz
0 to +50°C (32 to 122°F) ± 0.50 dB @ center frequency
Products -30 dBc typical @ –25 dBc maximum @ 3 dB
Output 2.0 degrees typical, 3.0 maximum @ rated output
Linear
Parabolic
Ripple 1.0 ns Peak-to-Peak
Display 24 x 2 LCD
Data Entry Cursor Control Keypad (6 keys)
Output Sample
Input Sample
COM Port
Protocol
Summary Fault Form C
Power On Green
Fault Red
Stored Fault Red
TX On Yellow
Online Yellow
Remote Yellow
Envelope 8.75H x 19W x 24D inches
Weight 75 lbs (34 kg)
Temperature Operating
Storage
Humidity Operating
Storage 0 to 100% Noncondensing
Altitude Operating
Storage 50, 000 ft
Shock Normal Commercial Shipping and Handling
VAC
50Ω
50 Ω
± 0.75 dB
± -0.25 dB
± 1.00 dB full band
total backoff (2 tones, Δf = 1 MHz)
± 0.03 ns/MHz
± 0.003 ns/MHz
Type N female, 50
Type N female, 50
EIA-232 or EIA-485
ASCII
(22.22H x 48.26W x 60.96D cm)
0 to 50°C (32 to 122°F)
–40 to 70°C (–40 to 158°F)
10 to 95% Noncondensing
15, 000 ft MSL
180 to 270 VAC, 47 to 63 Hz
1100W nominal
2
, –40 dBc
, –20 dBc
1–7
Page 24

Ku-Band Solid-State Power Amplifier Revision 1
Ω
Ω
Introduction MN/KPA.IOM
1.3.4 KPA-100 Specifications
Parameters Specifications
Input
Output
Gain
Third Order Modulation
AM to PM Conversion
Group Delay (per 40
MHz)
Front Panel
Remote Control
Alarms
LEDs
Mechanical
Environmental
Power Requirements
Level -10 dBm Typical
Impedance
Noise Figure 10 dB typical, 15 dB maximum @ max gain
VSWR 1.25:1 Maximum
Connector SMA Female
Frequency 14.0 to 14.5 GHz
Power 49.5 dBm min @ 1 dB Compression
Mute -60 dB
Impedance
VSWR 1.25:1 Maximum
Connector WR75G Waveguide
Linear 65 dB minimum, 70 dB typical
Adjust 20 dB in 0.25 dB steps
Fill Band
Per 40 MHz
0 to +50°C (32 to 122°F) ± 0.50 dB @ center frequency
Products -30 dBc typical @ –25 dBc maximum @ 3 dB
Output 2.0 degrees typical, 3.0 maximum @ rated output
Linear
Parabolic
Ripple 1.0 ns Peak-to-Peak
Display 24 x 2 LCD
Data Entry Cursor Control Keypad (6 keys)
Output Sample
Input Sample
COM Port
Protocol
Summary Fault Form C
Power On Green
Fault Red
Stored Fault Red
TX On Yellow
Online Yellow
Remote Yellow
Envelope 8.75H x 19W x 24D inches
Weight 75 lbs (34 kg)
Temperature Operating
Storage
Humidity Operating
Storage 0 to 100% Noncondensing
Altitude Operating
Storage 50, 000 ft
Shock Normal Commercial Shipping and Handling
VAC
50Ω
50 Ω
± 0.75 dB
± 0.25 dB
± 1.00 dB full band
total backoff (2 tones, Δf = 1 MHz)
± 0.03 ns/MHz
± 0.003 ns/MHz
Type N female, 50
Type N female, 50
EIA-232 or EIA-485
ASCII
(22.22H x 48.26W x 60.96D cm)
0 to 50°C (32 to 122°F)
–40 to 70°C (–40 to 158°F)
10 to 95% Noncondensing
15, 000 ft MSL
180 to 270 VAC, 47 to 63 Hz
1100W nominal
2
, –40 dBc
, –20 dBc
1–8
Page 25
Ku-Band Solid-State Power Amplifier Revision 1
Introduction MN/KPA.IOM
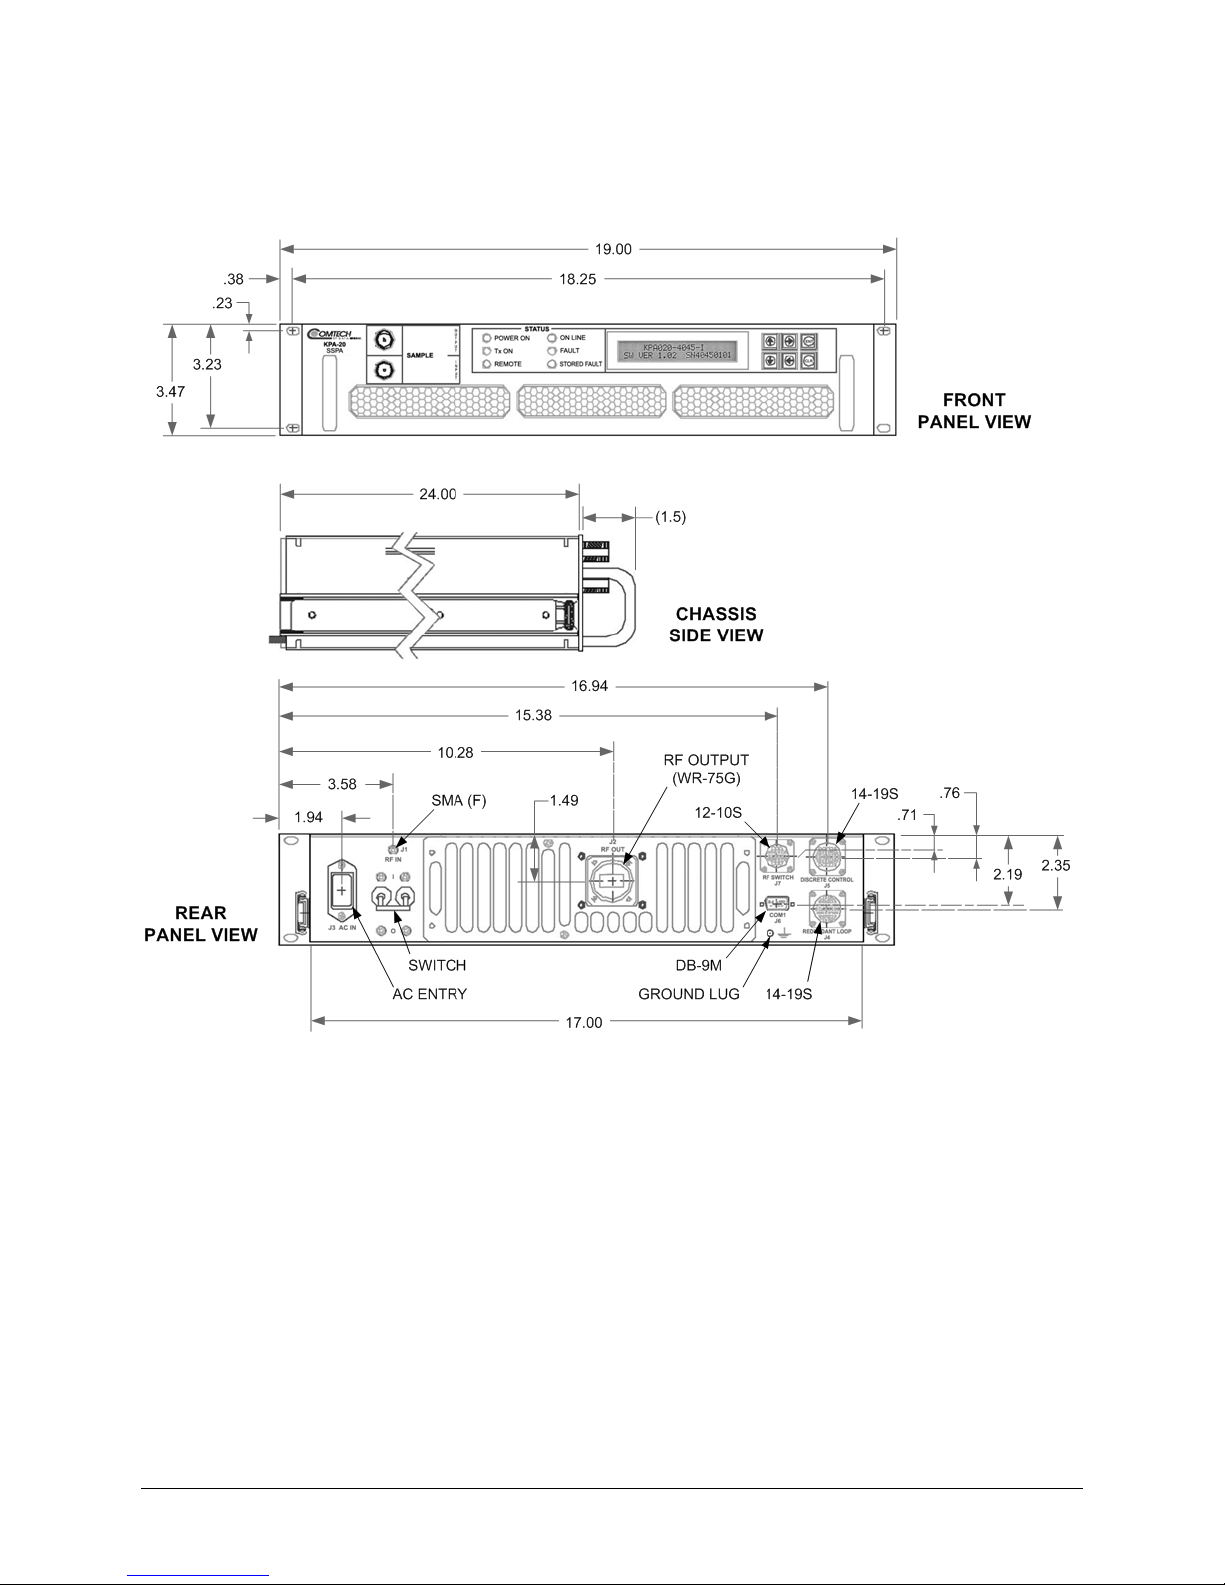
1.3.5 Dimensional Envelopes
Figure 1-4. KPA-020IN Dimensional Envelope
(Shown with Optional Slide Railings Installed)
1–9
Page 26

Ku-Band Solid-State Power Amplifier Revision 1
Introduction MN/KPA.IOM
Figure 1-5. KPA-040/-080/-100 Dimensional Envelope
(Shown with Optional Slide Railings Installed)
1–10
Page 27
Chapter 2. INSTALLATION
2.1 Unpacking and Inspection
The KPA ISSPA and its Installation and Operation Manual are packaged and shipped in a preformed, reusable cardboard carton containing foam spacing for maximum shipping protection.
Do not use any cutting tool that will extend more than 1 inch into the container.
CAUTION
Unpack and inspect the unit as follows:
Step Procedure
This can cause damage to the unit.
1
2
3
4
5
6
7
8
Inspect shipping containers for damage.
If shipping containers are damaged, keep them until the contents of the shipment have
been carefully inspected and checked for normal operation.
Remove the packing list from th e outsid e of the shi pping ca rton.
Open the carton and remove the contents.
Check the contents against the packing list to verify completeness of the shipment.
If physical damage is evident, contact the carrier and Comtech EF Data immediately
and submit a damage report.
Test the unit for proper operation.
If the unit needs to be returned to Comtech EF Data, use the original shipping container.
Be sure to keep all shipping materials for the carrier's inspection.
2–1
Page 28
KPA Ku-Band Indoor Solid State Power Amplifier Revision 1
Installation MN/KPA.IOM
2.2 Rack Mounting the KPA
The KPA is designed to be rack-mounted in a standard 19-inch (48 cm) rack or cabinet by hardmounting the unit to the rack’s front mounting rails using the front panel mounting holes/
Handles at the front of the units facilitate easy installation into and removal from the rack.
Optionally, rack slides may be installed onto the chassis that allow servicing of the unit without
its removal from the rack.
The KPA-020IN chassis is a 3RU unit requiring 4 inches (10 cm) of panel height space. The
KPA-040/-080/-100 units are 5RU units requiring 8.75 inches (22 cm) of panel height space.
Two internally mounted exhaust fans provide cooling – cool air is taken in through the front panel
and exhausted out the rear panel. Locate the KPA so that the input and output airflow paths
are not obstructed or restricted. This will minimize the amplifier operating temperature.
It is important to ensure that there is adequate clearance for ventilation in the rack. In rack
systems where there is high heat dissipation, provide forced-air cooling by installing top- or
bottom-mounted fans or blowers.
2.2.1 Installation of the Optional Rack Slides
The following table identifies the rack slides options that may be purchased for use with the KPA
unit (take note that the 5RU units require a heavy duty, dual rail rack slide).
KPA Unit Rack Slide (CEFD P/N) Description
FP/SL0007 22” Rack Slide Se t (single rail )
KPA-020IN
KPA-040
KPA-080
KPA-100
FP/SL0008 24 ” Rack Slide Se t (single rail )
FP/SL0006 26 ” Rack Slide Se t (single rail )
FP/SL0004 24” Heavy Duty Rack Slide Set (dual rail)
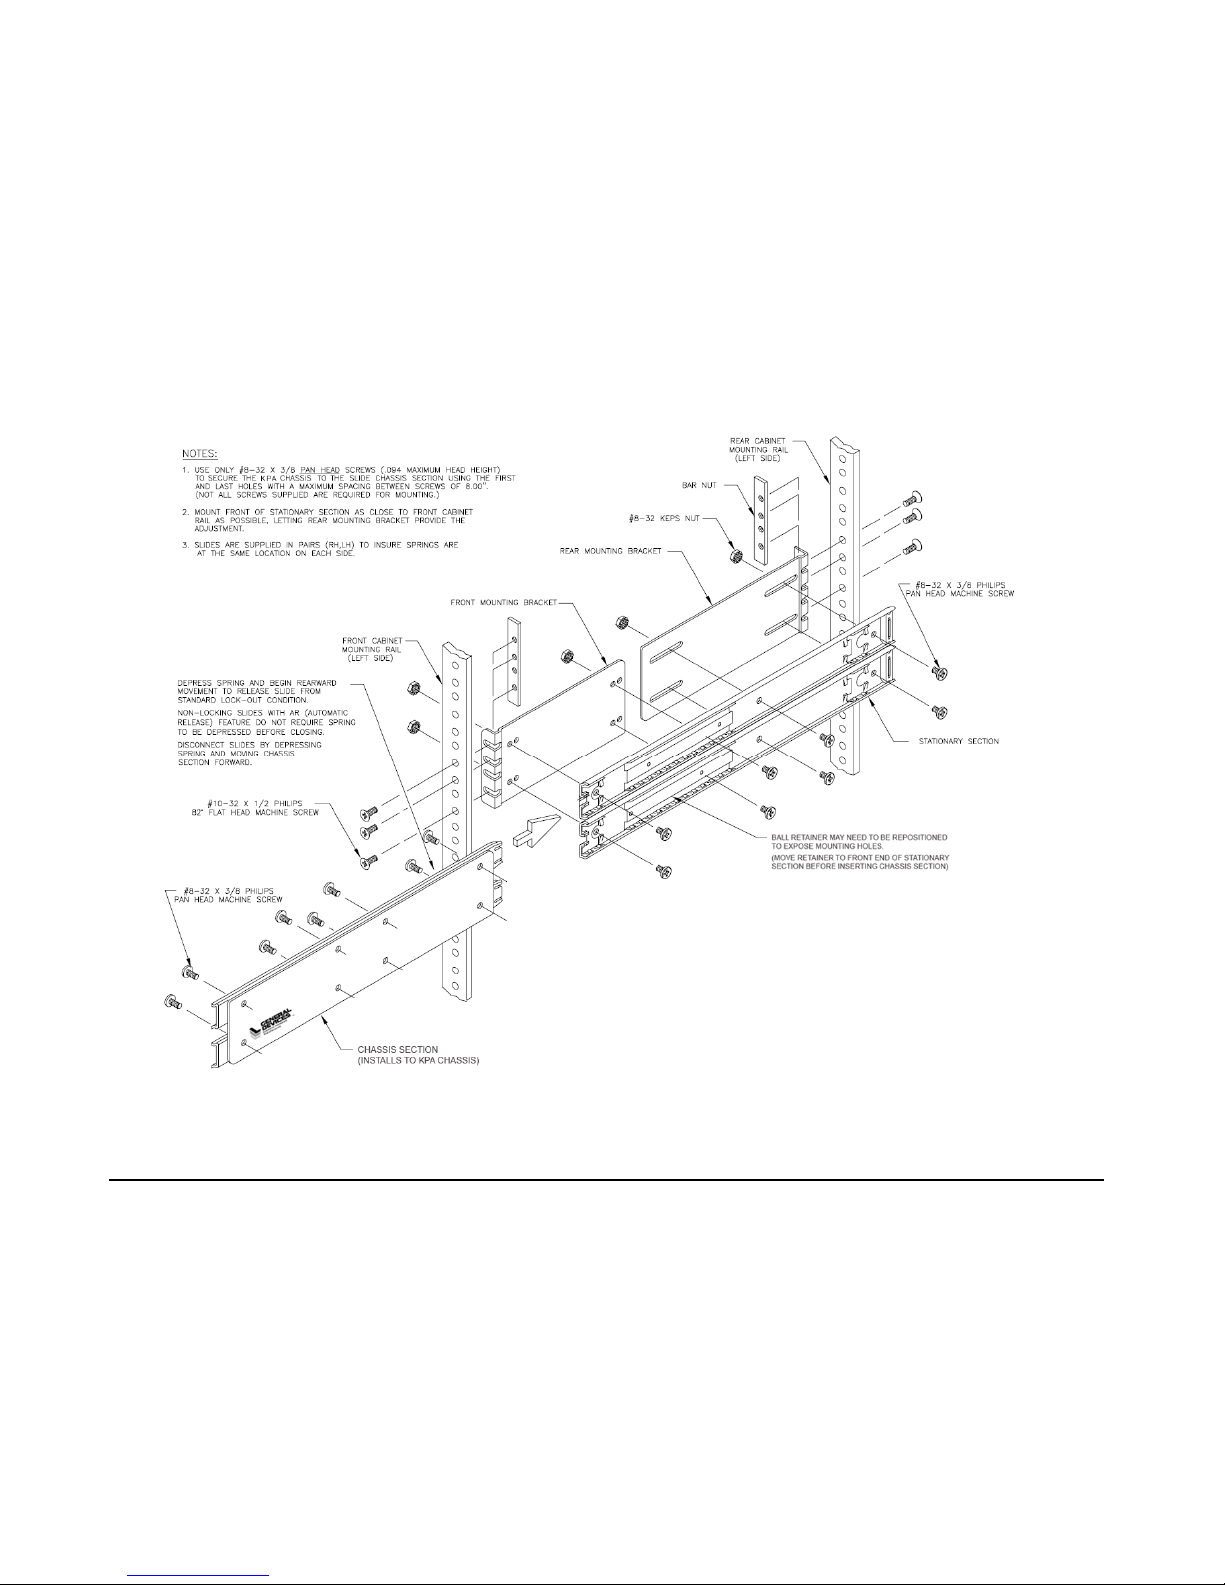
Install the rack slides as follows:
Step Procedure
Typical for either side of the KPA ch assi s, instal l the “ch assi s secti on ” of the rack sli de to
1
2
the KPA chassis side, using the pan head machine scr ews provided with the rack slide
installation kit.
Typical for either side of the rack cabinet: using the mounting hardware provided
with the rack slide installation kit, install the “stationary section” of the rack slide,
either to the interior wall of the cabinet (for single rail rack slides) or, for the heavyduty rack slides, to the front and rear mounting rails of the cabinet as shown in
Figure 2-1.
Install the KPA unit into position by ma ting the chassis-mounted rails into the cabinetmounted stationary portion of the rack slide. Be sure that the ball retainer for either slide
3
has first been positioned forward befo re inst alling t he chas sis secti on.
The user may leave the unit free in place (to slide on the rails freely) or, alternately, bolt
the unit into place via the slotted front panel mounting holes.
2–2
Page 29
KPA Ku-Band Indoor Solid State Power Amplifier Revision 1
Installation MN/KPA.IOM
2–3
Figure 2-1. Installation of Optional Heavy-Duty Rack Slides (CEFD P/N FP/SL00004)
Page 30

KPA Ku-Band Indoor Solid State Power Amplifier Revision 1
Installation MN/KPA.IOM
2–4
Notes:
Page 31

Chapter 3. CONNECTORS AND
3.1 Connector Overview
The KPA ISSPA rear panel connectors, shown in Figure 3-1, provide all necessary external
connections between the unit and other equipment. Table 3-1 on
connectors provided on the rear panel interface (as well as the front panel sample ports), grouped
according to service function.
PINOUTS
the next page summarizes the
KPA-020IN Unit
KPA-040/-080/-100 Units
Figure 3-1. KPA Rear Panel Views
3–1
Page 32

KPA Ku-Band Indoor Solid-State Power Amplifier Revision 1
Connectors and Pinouts MN/KPA.IOM
Table 3-1. KPA Interface Connectors Summary
Connector Group
RF
Sect. 3.2
Utility
Sect. 3.3
Power/Ground
Sect 3.5
Ref
Des
J1 KPA-020IN: RF IN
J2 RF OUT WR75G Waveguide
N/A SAMPLE | INPUT Type ‘N’ Female Front Panel –20 dBc and –40 dBc test
N/A SAMPLE | OUTPUT
J4** REDUNDANT LOOP 19-pin Circular Conn Unit-to-Unit Redundant Connection
J5 DISCRETE
J8* 10/100 ETHERNET RJ-45 female CAT5 10/100 BaseT Management and
J9A* EXT REF IN BNC Female External Reference Input
J9B* EXT REF OUT BNC Female External Reference Output
J7** RF SWITCH 10-pin Circular Conn Waveguide Switch Interface
J6 COM1 9-pin Type ‘D’ male Serial Remote Comms Interface
J3 AC IN See Sect. 3.5.1 Chassis prime power input
N/A (Ground) #10-32 stud Common chassis ground
Name Connector Type Function
Type ‘SMA’ Female RF Input
KPA-040: Tx IN
KPA-080
KPA-100
RF Output
Flange
sample ports
19-pin Circular Conn User ISSPA M&C
CONTROL
Data
(EIA-232 or EIA-485)
Notes:
1. * KPA-040/-080/-100 units only (not provided on the KPA-020IN).
2. ** Used in redundant operations only. See Appendix B. KPA REDUNDANT OPERATIONS
for further information about use of the KPA in 1:1 or 1:2 redundant systems.
3–2
Page 33

KPA Ku-Band Indoor Solid-State Power Amplifier Revision 1
Connectors and Pinouts MN/KPA.IOM
3.2 RF Connections
3.2.1 J1 RF IN / Tx IN Connectors
KPA-020IN Unit KPA-040/-080/-100 Units
Connector Type Description Direction
SMA RF Signal In
3.2.2 J2 RF OUT Connector
Connector Type Description Direction
WR75G Waveguide Flange RF Signal Out
3–3
Page 34

KPA Ku-Band Indoor Solid-State Power Amplifier Revision 1
Connectors and Pinouts MN/KPA.IOM
3.3 Utility Connections
3.3.1 Sample Port Connectors (Front Panel)
The SAMPLE INPUT / OUTPUT ports are Type ‘N’ female connectors,
providing easy user access –20 dBc and –40 dBc test points on the KPA
front panel.
Name Connector Type Description Direction
SAMPLE | OUTPUT
Type ‘N’ Female
SAMPLE | INPUT Output
–20 dBc / –40 dBc
Sample Test Port
Input
3.3.2 J4 REDUNDANT LOOP Connector
The J4 Redundant Loop connector is a 19-pin circular connector, type
MS3112E14-19S. The pin-out specification is contained in Table 3-2.
This connector is used only
B. KPA REDUNDANT OPERATIONS for further information about
use of the KPA in 1:1 or 1:2 redundancy.
Mating connector: ITT KPT06J14-19P or MS3116J14-19P
in redundant configurations – see Appendix
Table 3-2. J4 Redundancy Loop Connector Pinout
Pin # Description Pin # Description
A Loop In 1 L SumFlt 2 NO
B ADDR 2 M SumFlt 2 Common
C Loop In 2 N Local Loop Out
D Loop Out 2 P SumFlt 1 NO
E ADDR Common R SumFlt 1 Common
F ADDR 1 S Local SumFlt Common
G Loop Out 1 T Local SumFlt NO
H HSB +RX/TX U No Connect
J HSB – RX/TX V No Connect
K Local Loop In
3–4
Page 35

KPA Ku-Band Indoor Solid-State Power Amplifier Revision 1
Connectors and Pinouts MN/KPA.IOM
3.3.3 J5 DISCRETE CONTROL Connector
The J5 DISCRETE CONTROL connector is the primary input for
monitoring and controlling the ISSPA. It is a 19-pin circular connector, type
MS3112E14-19S. The pinout specification for Standalone or 1:1 Redundant
Systems is provided in Table 3-3; fo
Table 3-4.
See Appendix B. KPA REDUNDANT OPERATIONS for
further information about use of the KPA in 1:1 or 1:2 redundant systems.
Mating connector: ITT: KPT06J14-19P or MS3116J14-19P.
Table 3-3. J5 DISCRETE CONTROL Connector Pinout (Standalone or 1:1 Redundant Systems)
Pin # Signal Name Description
A Auto Select Momentary short to pin F to force entire subsystem to Auto
Mode.
B BU-1 Command Momentary short to pin F to force backup of KPA #1.
C Priority 2 Sel Not applicable for 1:1 system
D BU-2 Command Not applicable for 1:1 system
E 2 Online NO Not applicable for 1:1 system
F Remote Common Control – Remote Common.
G Online Common Online Status Common.
H BU Online NO Open when Online, all other conditions tied to Pin G.
J Manual Select Momentary short to pin F to force entire subsystem to Manual
Mode.
K 1 Online NO Open when Online, all other conditions tied to Pin G.
L 2 Fault NO Not applicable for 1:1 system
M Priority 1 SEL Momentary short to pin F to set KPA #1 as High priority.
N Fault Common Fault Status Common.
P BU Fault NO Open when faulted, else tied to Pin N.
R BU Offline CMD Momentary short to pin F to force backup KPA Offline.
S 1 Fault NO Open when faulted, else tied to Pin N.
r 1:2 Redundant Systems, refer to
3–5
Page 36
KPA Ku-Band Indoor Solid-State Power Amplifier Revision 1
Connectors and Pinouts MN/KPA.IOM
Table 3-4. J5 DISCRETE CONTROL Connector Pinout (1:2 Redundant Systems)
Pin # Signal Name Description
A Auto Select Momentary short to pin F to force entire subsystem to Auto Mode.
B BU-1 Command Momentary short to pin F to force backup of KPA #1.
C Priority 2 Sel Momentary short to pin F to set KPA #2 as HIGH priority.
D BU-2 Command Momentary short to pin F to force backup of KPA #2.
E 2 Online NO Open when Online, all other conditions tied to pin G. see Note 1.
F Remote Common Control – Remote Common.
G Online Common Online Status Common.
H BU Online NO Tied to pin G when Redundancy functioning correctly, all other
conditions OPEN. See Note 2.
J Manual Select Momentary short to pin F to force entire subsystem to Manual
Mode.
K 1 Online NO Open when Online, all other conditions tied to Pin G. see Note 1.
L 2 Fault NO Open when faulted, else tied to Pin N.
M Priority 1 SEL Momentary short to pin F to set KPA #1 as HIGH priority.
N Fault Common Fault Status Common.
P BU Fault NO Open when faulted, else tied to Pin N.
R BU Offline CMD Momentary short to pin F to force backup KPA Offline.
S 1 Fault NO Open when faulted, else tied to Pin N.
Notes:
1. Online status subject to state of Pin H.
2. When Open, can indicate loss of power or cabling problem. Online State of unit not
determinable when open.
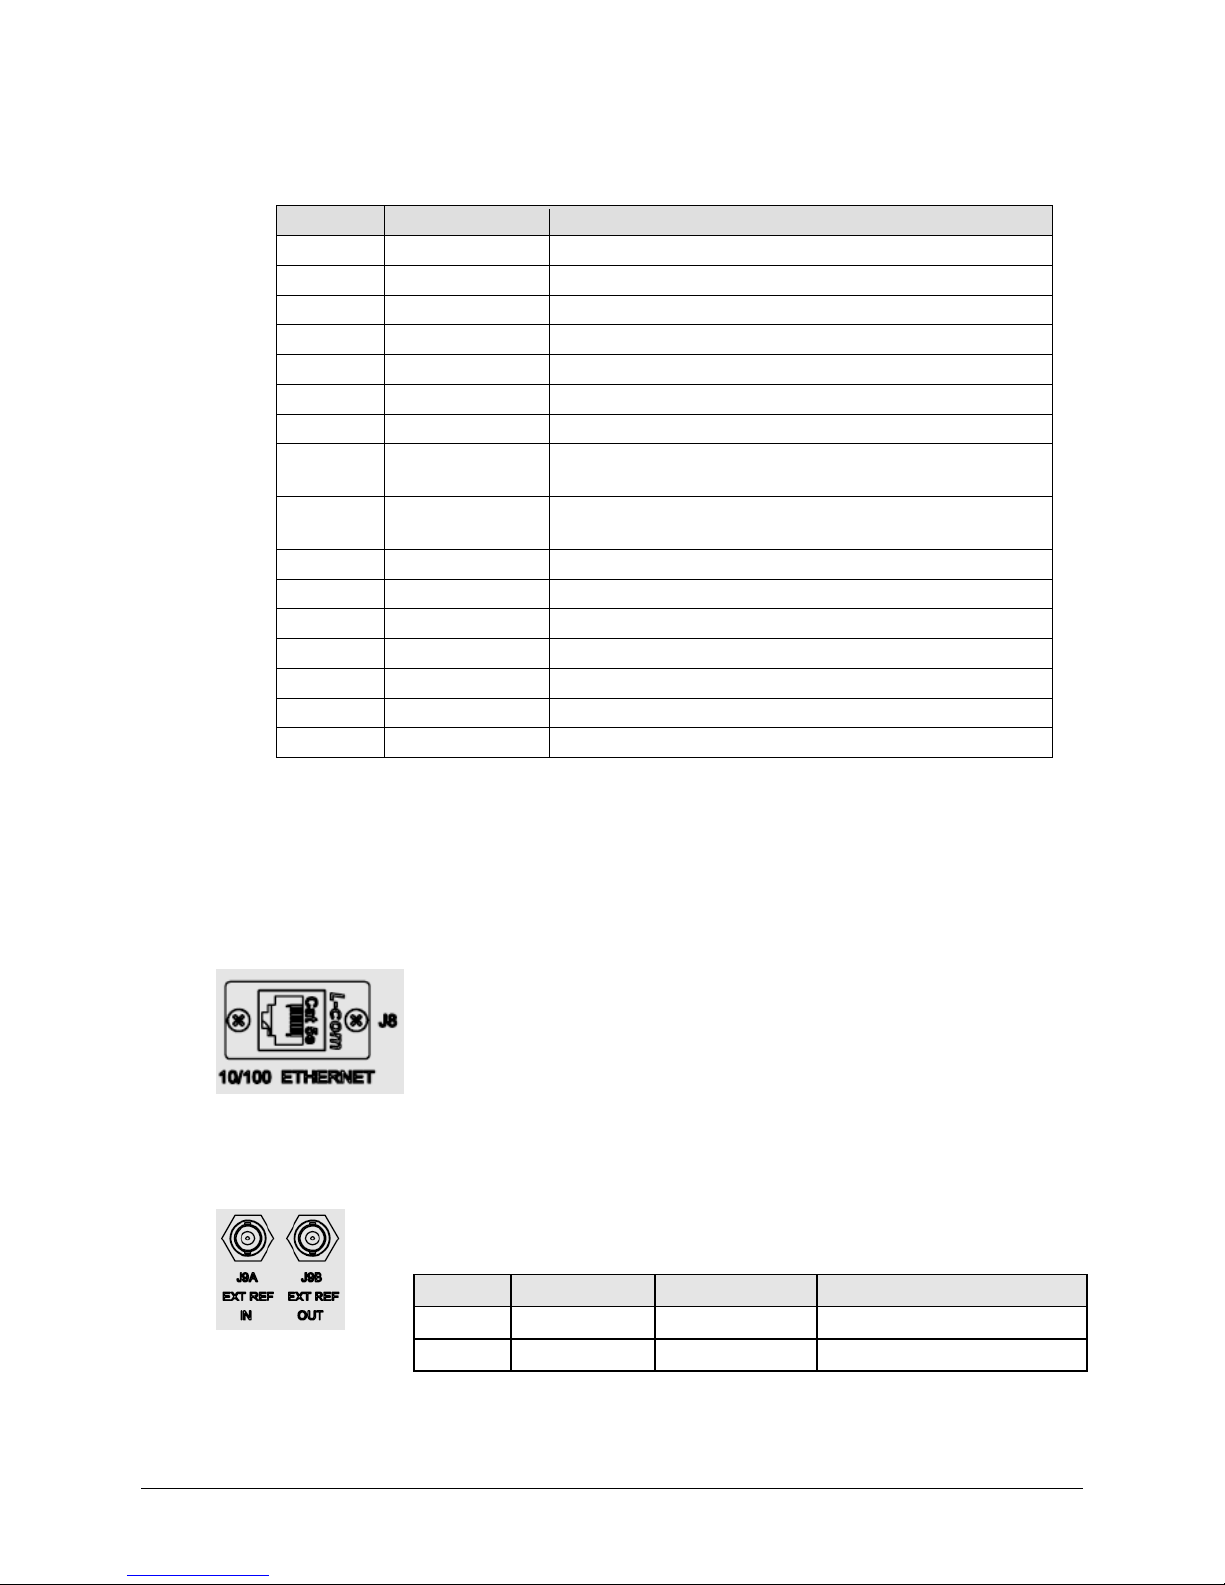
3.3.4 J8 10/100 ETHERNET Connector
The J8 10/100 ETHERNET connector is not provided on the
KPA-020IN unit. This RJ-45 connector provides the CAT5 10/100 BaseT
interface for management and data exchange between the unit and the user.
3.3.5 J9A EXT REF IN / J9B EXT REF OUT Connectors
The J9A EXT REF IN and J9BN EXT REF OUT connectors are not
provided on the KPA-020IN unit.
REF DES Name Connector Type Description
J9A EXT REF IN BNC External Reference Input
J9B EXT REF OUT BNC External Reference Output
3–6
Page 37

KPA Ku-Band Indoor Solid-State Power Amplifier Revision 1
Connectors and Pinouts MN/KPA.IOM
3.3.6 J7 RF SWITCH Connector
The J7 RF SWITCH connector is a 10-pin circular connector, type
MS3112E12-10S. Used only in redundant configurations, it functions as
the waveguide switch interface connector. The pinout specification is
contained in Table 3-5. See Appendix B. K
PA REDUNDANT
OPERATIONS for further information about use of the KPA in 1:1 or
1:2 redundant systems.
Table 3-5. J7 RF SWITCH Connector Pinout
Pin Description
A Command BU-1
B Command Common
C Command 1 Online
D IND 1 Online
E IND Common
F IND BU Online
G Command BU-2
H Command BU-2
J IND 2 Online
K No Connect
3.3.7 J6 COM 1 Connector
The J6 COM 1 connector is a 9-pin Type ‘D’ female (DB-9F) connector
that provides the EIA-232/EIA-485 Interface. The pinout specifications
are provided in Table 3-6.
Mating Connector: 9-pin T
Table 3-6. J6 COM 1 Connector Pinout (EIA-232/EIA-485 Interface)
Pin # EIA-232 EIA-485 4-Wire EIA-485 2-Wire
1 No Connect Ground (GND) Ground (GND)
2 Transmit Data (TD) No Connect No Connect
3 Receive Data (RD) No Connect No Connect
4 No Connect +TX Signal +RX/TX Signal Loop In
5 Ground (GND) -TX Signal Compliment -RX/TX Signal Complement Loop In
Unit Ready – always
6
high (DSR)
Request to Send.
7
Looped to CTS (RTS)
8 Clear to Send (CTS) +RX Signal +RX/TX Signal Loop Out
9 No Connect -RX Signal Complement -RX/TX Signal Complement Loop Out
No Connect No Connect
No Connect No Connect
ype ‘D’ male connector (DB-9M).
3–7
Page 38
KPA Ku-Band Indoor Solid-State Power Amplifier Revision 1
Connectors and Pinouts MN/KPA.IOM
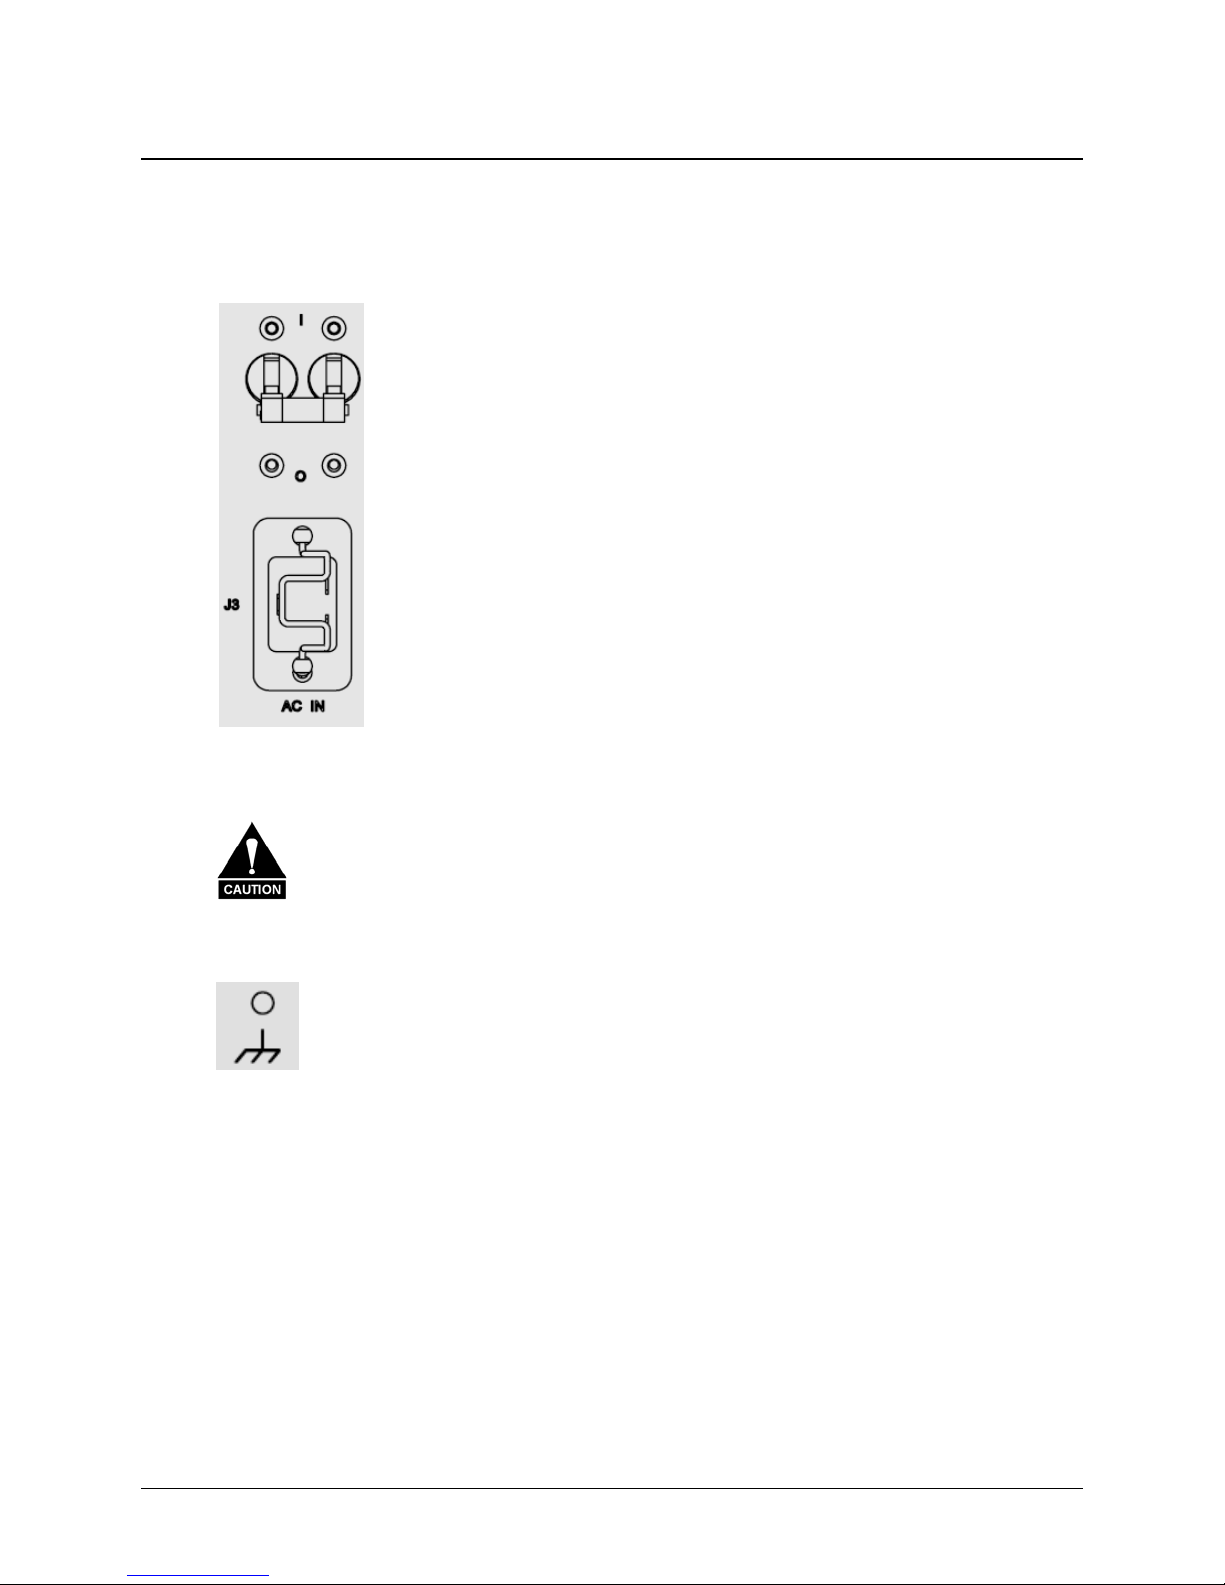
3.4 Power / Ground Connections
3.4.1 Alternating Current Prime Power Switch and Connector
The On/Off prime power switch is located on the rear of the chassis adjacent to
the prime power input connector. The circuit breaker is rated for 30 Amps.
A standard, detachable, non-locking, 3-prong power cord (IEC plug) supplies
the Alternating Current (AC) power to the unit via the prime power input
connector. Note that the specification for the power source is specific to the
unit as follows:
• For KPA-020IN only – 90 to 135 VAC, 47 to 63 Hz
• For KPA-040 only – 90 to 270 VAC, 47 to 63 Hz
• For KPA-080/-100 only – 180 to 270 VAC, 47 to 63 Hz
3.4.2 Chassis Ground Connector
PROPER GROUNDING PROTECTION IS REQUIRED: The installation instructions
require that the integrity of the protective earth must be ensured and that the
equipment shall be connected to the protective earth connection at all times.
Therefore, it is imperative during inst allation, configuration, and operation that the
user ensures that the unit has been properly grounded using the ground stud
provided on the rear panel of the unit.
A #10-32 stud is provided for connecting a common chassis ground among
equipment.
Note: The AC power connector provides the safety ground.
3–8
Page 39

Chapter 4. FLASH UPGRADING
4.1 Flash Upgrading via Internet
The KPA ISSPAs use ‘Flash memory’ technology internally, which makes upgrading the
firmware very simple. For current KPA-040/-080/-100 production models, updates can now be
sent via the Internet (Figure 4-1), via E
This chapter outlines the complete upgrading process as follows:
• New firmware can be downloaded via the Internet to an external M&C PC.
• The upgrade can be performed without opening the KPA by simply connecting the unit to
the serial port or Ethernet port of the M&C PC.
• The firmware update is transferred, via File Transfer Protocol (FTP), to the KPA.
-mail, or on CD.
Figure 4-1. Flash Upgrade via Internet
4–1
Page 40

KPA Ku-Band Indoor Solid-State Power Amplifier Revision 1
Flash Upgrading MN/KPA.IOM
4.2 Ethernet FTP Upload Procedure
Follow the steps provided in this section. Once the upload is complete, the KPA’s top-level
display screen will appear (for more information, see Chapter 5. FRONT PANEL
OPERATION) as shown in Step 10 of this procedure.
Note: This procedure is applicable to KPA-040/-080/-100 production units featuring the J8 10/100
ETHERNET connector on the rear panel. For the KPA- 020IN, FTP Upload is accomplished via
Telnet / HyperTerminal configured as Telnet Client using the KPA-020IN’s J6 COM1 serial port.
See Chapter 6. KPA ETHERNET MANAGEMENT for further information.
Step Procedure
1
Identify the reflashable product, firmware number, and version for download:
The current base unit M&C version can be viewed at the top level display on the KPA front
panel (press the CLEAR key several times to view). The firmware information can also be
found within the Utility: Firmware Æ Boot menu tree. For more information, refer to
Chapter 5. KPA FRONT PANEL OPERATION.
Alternately, when using the Web Server Interface, the Bootrom, Bulk, App, and FPGA
firmware loads may be viewed in the Firmware Information section of the Status | Status
page. For more information, refer to Chapter 6.5 Web Server (HTTP ) Interface.
2
3
Create a temporary folder (directory) on an external M&C PC:
• For Windows Explorer: Select File > New > Folder to create a new folder, then
rename it from “New Folder” to "temp" or another convenient, unused name.
Assuming "temp" works, a "c:\temp" folder should now be created.
Note: The drive letter c: is used in this example. Any valid writable drive letter
can be used.
• For Windows Command-line: Click [Start] on the Windows taskbar, then click
the “Run...” icon (or, depending on Windows OS versions prior to Windows 95,
click the “MS-DOS Prompt” icon from the Main Menu). Then, to open a
Command-line window…
o For Windows 95 or Windows 98 – Type “command”.
o For any Windows OS versions later
“command”.
Alternately, from [Start], select All Programs > Accessorie s > Command
Prompt.
At the Command-line prompt (c:\>), type “mkdir temp” or “md temp” (without
quotes – mkdir and md stand for make directory). This is the same as creating a
new folder from Windows Explorer. There should now be a "c:\temp" subdirectory
created (where c: is the drive letter used in this example).
Download the correct firmware file to this temporary folder. As shown in Figure 4-1:
a)
Go online to: www.comtechefdata.com
b) From the Home page menu bar, click the Support tab;
c) Click the Software Downloads drop-down or hyperlink from the Support page;
d) Click the Download Flash and Software Update Files icon;
e) Click the (Select a Product Line:) Amplifiers hyperlink provided on the Flash
and Software Update Files page;
f) Click the KPA product hyperlink;
g) Select the appropriate firmware hyperlink.
than Windows 98 – Type “cmd” or
;
4–2
Page 41

KPA Ku-Band Indoor Solid-State Power Amplifier Revision 1
Flash Upgrading MN/KPA.IOM
3
(cont)
4
5
6
About Firmware Numbers, File Versions, and Formats: Comtech EF Data’s Web site
catalogues its flashable firmware upgrade files by product type (e.g., KPA, converter, etc.)
and specific model/optional configuration. The hyperlinks appear as per the example to the
right. For the KPA, the firmware download hyperlink appears as F0000086X_V###, where
‘X’ denotes the revision letter, and ### represents the firmware version.
The current version firmware release is provided. If applicable, one version prio r to the
current release is also available. Be sure to identify and download the desired version.
The downloadable files are stored in two formats: *.exe (self-extracting) and *.zip
(compressed). Some firewalls will not allow the downloading of *.exe files. In this case,
download the *.zip file instead.
For additional help with "zipped" file types, refer to PKZIP for Windows, WinZip, or
ZipCentral help files. PKZIP for DOS is not supported due to file naming conventions.
Extract the files into the temporary folder on the M&C PC. At least three files should be
extracted:
• FW-0000086x.bin (where ‘x’ denotes the bulk image revision letter);
ReleaseNotes_ISSPA_v###.pdf (where ‘###’ denotes the firmware version);
•
Confirm that the files have been extracted to the specified temporary folder on the
M&C PC. Using Command-line, type “cd c:\temp” to change to the temporary directory
created in Step 2, then use the “dir” command to list the files extracted from the
downloaded archive file.
Connect the external M&C PC from either the KPA’s J6 COM1 serial port (for the
KPA-020IN only), or the J8 10/100 Ethernet port (for all other KPA models) via a hub or
a switch or directly to the PC with a crossover cable.
7
8
9
Send a “ping” command to the KPA to verify the connection and communication.
First, determine the IP address of the unit by using the front panel:
SELECT: Configuration Æ Remote Æ Ethernet ÆAddress
Then, using Command-line to PING: At the Command-line prompt, type “ping
xxx.xxx.xxx.xxx” (where ‘xxx.xxx.xxx.xxx’ is the IP address of the KPA).
The results should confirm whether or not the KPA is connected and communicating.
Initiate an FTP session with the KPA (this example uses Command-line):
a) From the M&C PC, at the prompt type “ftp xxx.xxx.xxx.xxx” where ‘xxx.xxx.xxx.xxx’
is the IP address of the KPA.
b) Verify the FTP transfer is binary by typing "bin".
c) Type "prompt" then type "hash" to facilitate the file transfers.
Transfer the files:
Type "put FW-00000086x.bin bulk:" (where ‘x’ denotes the revision letter) to begin the file
transfer.
Note: The destination “bulk:” must be all lower case.
Allow a few seconds for the file to transfer.
4–3
Page 42

KPA Ku-Band Indoor Solid-State Power Amplifier Revision 1
Flash Upgrading MN/KPA.IOM
10
Verify the file transfer.
a) The M&C PC should report that the file transfer has occurred, and the display on the
KPA will report:
Programming APP flash…
Please wait…
b) The process sequences through several blocks – this will take several minutes. When
it has finished, the KPA front panel will display:
KPA-080-4045-I
Ver. X.X.X SNXXXXXXXXX
c) Terminate the FTP session by typing "bye" and closing the Command-line window.
d) Recycle the power and wait for the unit to reboot.
e) Verify that the new file loaded using the procedure in Step 1.
The Ethernet FTP Upload Procedure is now complete.
4–4
Page 43

5.1 Introduction
The user can fully control and monitor the operation of the KPA ISSPA from the front panel
using the keypad and display. Nested menus are used, which display all available options and
prompt the user to carry out a required action.
Figure 5-1 identifies the key operational features of the front panel – both the original (obsolete)
and current panel layouts. The function of each feature is explained in greater detail in this
chapter.
LED Indicators
Chapter 5. FRONT PANEL
OPERATION
Original (Obsolete) Front Panel Layout
Liquid Crystal Diode
Vacuum Fluorescent Display
Current Front Panel Layout
(LCD) Display
(VFD)
Keypad
Figure 5-1. KPA-XXX Front Panel View
5–1
Page 44

KPA Ku-Band Indoor Solid-State Power Amplifier Revision 1
Front Panel Operation MN/KPA.IOM
5.1.1 Startup Checklist
The user should always perform the following checklist before operating the KPA:
Step Procedure
1
2
3
4
Check to ensure that the installation is complete.
Verify that the KPA is connected to the proper Prime Power Source, RF input, and
RF output.
Switch on the Prime Power Switch (located on the rear panel).
Once the Prime Power Switch has been switched on, verify that the cooling fans are
operating and that the six STATUS LED indicators appear as follows:
• POWER ON – ON (yellow)
• Tx ON – OFF
• REMOTE – ON (yellow)
• ONLINE – ON (yellow)
• FAULT – OFF
• STORED FAULT – OFF
5.1.2 LED Indicators
LED Color Condition (When Lit)
POWER ON Green
Tx ON Yellow
REMOTE Yellow
ONLINE Yellow
FAULT Red
The operational behaviors of the six front panel
LED indicators is as follows:
Indicates that power is applied to the unit.
Indicates that the transmit function of the unit is on. This
LED indicator reflects the actual condition of the transmit
function.
Indicates that the unit is operating in remote control mode,
where commands and data are transferred via an EIA-485
(EIA-232 is optional) serial communications link.
Indicates that the unit is operating online to transmit data.
Indicates that a fault condition exists.
STORED FAULT Red
Indicates that the fault has been logged and stored. The
fault may or may not be active.
5–2
Page 45

KPA Ku-Band Indoor Solid-State Power Amplifier Revision 1
Front Panel Operation MN/KPA.IOM
5.1.3 Keypad
As the manufacturing process of the KPA has evolved, there have been two keypad layouts as
shown in Figure 5-2:
Layout 1: Protruding Square Button
(KPA-020IN only – obsolete all other units)
Layout 2: Protruding Round Button
(current production units)
Figure 5-2. KPA Front
The function of the keypad is as follows:
ENTER
(ENT)
CLEAR
(CLR)
◄ ►
(Left, Right)
▲ ▼
(Up, Down)
This key is used to select a displayed function or to execute a modem
configuration change. From the opening screen, pressing ENTER once takes
the user to the SELECT: (Main) menu.
This key is used to back out of a selection or to cancel a configuration change
which has not been executed using ENTER. Pressing CLEAR generally returns
the display to the previous selection or, if pressed repeatedly, to the opening
screen. From the opening screen, pressing CLEAR once takes the user to the
SELECT: (Main) menu.
These keys are used primarily to move to the next menu screen section. At
times, they may also be used to move the cursor position (e.g., when editing a
parameter value or label character).
These keys are used primarily used to move from one menu screen parameter
selection to another. At times, they may also be used to edit configuration value
digits (numbers) or label characters (e.g., letters).
The current production unit’s keypad has an auto-repeat feature. If a key is held
down for more than 1 second, the key action will repeat, automatically, at the
IMPORTANT
rate of 15 keystrokes per second. This is particularly useful when editing
numeric fields, with many digits, such as frequency or data rate.
Panel Keypad
5–3
Page 46

KPA Ku-Band Indoor Solid-State Power Amplifier Revision 1
Front Panel Operation MN/KPA.IOM
5.1.4 Front Panel Display
As the manufacturing process of the KPA has evolved, there have been two display layouts as
shown in Figure 5-3:
Layout 1: Liquid Crystal Diode (LCD)
(KPA-020IN only – obsolete all other units)
Layout 2: Vacuum Fluorescent Display (VFD)
(current production units)
Figure 5-3. KPA Front
Panel Keypad
Display Type: Depending on the production version of the unit, the KPA features either a Liquid
Crystal Display (LCD), featured on the KPA-020IN units and older KPA-040/-080/-100 units,
while all current production versions of the KPA-040/-080/-100 units feature a Vacuum
Fluorescent Display (VFD).
Both front panel displays are active displays showing two lines of 24 characters each. However,
while the brightness of either display can be controlled by the user, compared to the original LCD
the blue-lit display of the currently used VFD provides superior viewing characteristics and does
not suffer problems of viewing angle or contrast.
Cursor Feature: On most menu screens, the user will observe a flashing solid block cursor,
which blinks at a once-per-second rate. This indicates the currently selected item, digit, or field.
Where this solid block cursor would obscure the item being edited (e.g., a numeric field) the
cursor will automatically change to an underline cursor.
Screen Saver Feature: If the user were to display the same screen for weeks at a time, the
display could become ‘burnt’ with this image. To prevent this, the unit has a ‘screen saver’
feature that will activate after 1 hour. The top line of for display saver features for display
message ‘Circuit ID:’ and a user-input text string; the bottom line reads ‘Press any key….’.
When for display saver activates, the message moves from right to left across for display, then
wraps around. Pressing any key restores the previous screen.
5.2 Opening Screen
KPA-XXX-4045-I
Ver. X.X.X SNXXXXXXXXX
The opening screen displays whenever power is first applied to the unit; from any other nested
menu, it is accessible by pressing CLEAR repeatedly. The specific product, currently loaded
firmware, and the unit’s unique serial number are identified on this display.
5–4
Page 47

KPA Ku-Band Indoor Solid-State Power Amplifier Revision 1
Front Panel Operation MN/KPA.IOM
5.3 SELECT: (Main) Menu
SELECT: Config Monitor
Utility FrontPanel (◄ ► E)
Figure 5-4 illustrates the hierarchal structure of the front panel principle menu tree from the
SELECT: menu on down. The amplifier commands are in a tree structured menu format
designed for access and execution of all control functions, and to prevent the execution of an
invalid entry by the operator.
The SELECT: menu screen is immediately accessible from the opening screen by pressing
ENTER or CLEAR or, from any other nested menu, by repeatedly pressing CLEAR as needed,
until it reappears.
Figure 5-4. KPA Principle Menu Tree
5–5
Page 48

KPA Ku-Band Indoor Solid-State Power Amplifier Revision 1
Front Panel Operation MN/KPA.IOM
Use the ◄ ► arrow keys to select from the choices shown, then press ENTER. The following
table identifies each menu branch available from the SELECT: (Main) menu, its content section
in this chapter, and the functional description of each branch:
Menu Branch Sect Description
Config
Monitor 5.3.2
Utility 5.3.3
FrontPanel 5.3.4
5.3.1
Used to fully configure the KPA.
Provides read-only displays reflecting the operational and alarm status of the
KPA’s power supplies, internal temperature, RF output power level, and RF
FETs; allows the user to read or clear stored fault logs.
Used to adjust operational parameters such as the system time and date,
serial communications, LCD brightness and contrast, etc.
Used to adjust front panel display brightness and run the LED (lamp) test.
5.3.1 SELECT: Config (Configuration)
CONFIG: Remote Amp
FltRec Redundancy ExtRef
Select Remote, Amp, FltRec, Redundancy, or ExtRef using the ◄ ► arrows keys, then press
ENTER to continue.
5.3.1.1 CONFIG: Remote (Remote Control)
Remote: Entry Mode
Serial Ethernet (◄ ► E)
Select Entry Mode, Serial, or Ethernet using the ◄ ► arrow keys, then press ENTER.
CONFIG: Remote Æ Entry Mode
Remote: Local Serial
Ethernet (◄ ► E)
Select Local, Serial, or Ethernet using the ◄ ► arrow keys, then press ENTER.
If Local is selected, then remote control will be disabled. Remote monitoring is still possible.
CONFIG: Remote Æ Serial
Serial Config: Interface
Address Baudrate Format
Note: In Remote Æ Serial mode, in addition to Serial M&C being enabled, Telnet connection is
also allowed, which enables Telnet M&C for amplifiers configured for redundant operation.
Select Interface, Address, Baudrate, or Format using the
5–6
◄ ► arrow keys, then press ENTER.
Page 49

KPA Ku-Band Indoor Solid-State Power Amplifier Revision 1
Front Panel Operation MN/KPA.IOM
If Serial Config: Interface is selected:
M&C Bus Interface: RS232
RS485-2W RS485-4W (◄ ►)
Select RS232 (only with the KPA-020IN), RS485-2W (2-wire), or RS485-4W (4-wire) by
using the ◄ ► arrow keys, then press ENTER. Operation is automatically set to the selected
M&C bus interface, and the user is then returned to Remote: Serial submenu.
If Serial Config: Address is selected:
Remote Address: 0001
(◄ ► ▲ ▼ E)
The valid range of addresses is from 1 to 9997. Use the ◄ ► arrow keys to select the
character to edit, then the ▲ ▼ arrow keys to edit the value of the digit, then press ENTER.
If Serial Config: Baudrate is selected:
Local M&C Bus Baud Rate:
19200 Baud (▲ ▼ E)
To edit the baud rate of the remote control bus connected locally to the M&C computer,
change the value using the
baud are available. Press ENTER when done.
▲ ▼ arrow keys. Values of 2400, 4800, 9600, 19200, and 38400
Note: The asynchronous character format is FIXED at 8 data bits, 1 stop bit, no parity (8-N-1).
If Serial Config: Format is selected:
Serial Port Data Format:
8 Data, 1 Stop, Par None
Edit the serial port data format of the remote control bus connected locally to the M&C
computer. The value is changed using the
Data Bits Select 7 or 8.
Stop Bits Select 1 or 2.
Parity Select Odd, Even, or None.
▲ ▼ arrow keys. Note the following:
Press ENTER when done. The asynchronous character format default is 8 data bits, 1 stop bit,
and no
parity (8-N-1).
CONFIG: Remote Æ Ethernet (KPA-040/-080/-100 ONLY)
This command is not valid for KPA-020IN operation.
IMPORTANT
NOTE: In Remote Æ Ethernet mode, serial monitoring is allowed; however, serial control is
not allowed except for use of the LRS (Local/Remote Status) commands/queries.
Ethernet Config: Gateway
Address MAC SNMP (◄ ►)
5–7
Page 50

KPA Ku-Band Indoor Solid-State Power Amplifier Revision 1
Front Panel Operation MN/KPA.IOM
Select the parameter to configure – Gateway, Address, MAC, or SNMP – using the ◄ ► arrow
keys, then press ENTER.
If Ethernet Config: Gateway is selected:
Ethernet IP Gateway:
192.168.001.002 (◄ ► ▲ ▼)
Edit the IP Gateway Address for the Ethernet M&C port for this unit. Use the ◄ ► arrow
keys to select the character to edit, then the ▲ ▼ arrow keys to edit the value of the digit.
Press ENTER when done.
If Ethernet Config: Address is selected:
Ether IP Address/Range:
192.168.001.002/24(◄ ►,▲ ▼)
Edit the IP Address and Range for the Ethernet M&C port for this unit. Use the ◄ ► arrow
keys to select the character to edit, then the ▲ ▼ arrow keys to edit the value of the digit.
Press ENTER when done.
If Ethernet Config: MAC is selected:
M&C Port MAC Address:
00-06-B0-00-01-06 (ENTER)
This read-only menu shows the unit MAC address. Once the MAC address has been noted,
exit this menu by pressing ENTER or CLEAR.
If Ethernet Config: SNMP is selected:
SNMP:
Community Traps (◄ ► E)
Use the ◄ ► arrow keys to select the parameter to configure: Community or Traps.
If SNMP: Community is selected:
SNMP Community:
Read Write Trap (◄ ► E)
Use the ◄ ► arrow keys to select the community to edit: Read, Write, or Trap.
If SNMP Community: Read is selected:
Read Community: (◄ ► ▲ ▼ E)
public
The user may view or edit the SNMP Read Community string. To edit, first use the ◄
► arrows keys to select the character to edit, then the ▲ ▼ arrows keys to edit that
character. Press ENTER when done.
If SNMP Community: Write is selected:
Write Community:(◄ ► ▲ ▼ E)
private
5–8
Page 51

KPA Ku-Band Indoor Solid-State Power Amplifier Revision 1
Front Panel Operation MN/KPA.IOM
The user may view or edit the SNMP Write Community string. To edit, first use the ◄
►arrows keys to select the character to edit, then the ▲ ▼ arrows keys to edit that
character. Press ENTER when done.
If SNMP Community: Trap is selected:
Trap Community:(◄ ► ▲ ▼ E)
comtech
The user may view or edit the SNMP Trap Community string. To edit, first use the ◄
►arrows keys to select the character to edit, then the ▲ ▼ arrows keys to edit that
character. Press ENTER when done.
Note: For the preceding menus, only the first 20 characters on the bottom line are
available. All printable ASCII characters are available with the exception of the
backslash (ASCII code 92) and ~ (ASCII code 126). When the user has composed the
string and has pressed ENTER, all trailing spaces are removed from the Community
string upon entry.
If SNMP: Traps is selected:
SNMP Trap IP Address:
IP1 IP2 Version
Use the ◄ ► arrow keys to select IP1, IP2, or Version, then press ENTER.
If SNMP Trap IP Address: IP1 or IP2 is selected:
Trap IP #1:
000.000.000.000(◄ ► ▲ ▼ E)
Trap IP #2:
000.000.000.000(◄ ► ▲ ▼ E)
The user may edit the Trap Destination’s IP Addresses. To edit, first use the ◄ ►
arrow keys to select the digit to edit, then the ▲ ▼ arrow keys to edit the value of that
digit. Press ENTER when done.
Note: If both Trap IP Addresses are 000.000.000.000, it means Traps are disabled.
If SNMP Trap IP Address: Version is selected:
Trap Version:
SNMPv1 SNMPv2 (◄ ► E)
Select the trap version – SNMPv1 or SNMPv2 – using the ▲ ▼ arrow keys, then
press ENTER.
5–9
Page 52

KPA Ku-Band Indoor Solid-State Power Amplifier Revision 1
Front Panel Operation MN/KPA.IOM
5.3.1.2 CONFIG: Amp
Amp: Attenuation State
Mute (◄ ► E)
Select Attenuation, Amplifier, or Mute using the ◄ ► arrows keys, then press ENTER to
continue. Note the following:
Selection Description
Attenuation
(KPA-040/-080/-100 ONLY)
Amplifier Control supply voltage to RF FETS. The default mode is ON.
Mute Provides KPA mute control. The default is OFF.
If Attenuation is selected:
Input and displays the KPA attenuation setting which is selected between 0.00
dB to 20.00 dB in 0.25 dB steps. The default setting is 10.00 dB.
command is not valid for KPA-020IN operation.
This
IMPORTANT
This command is not valid for KPA-020IN operation.
Attenuation: 10.00 dB
Select the KPA attenuation setting using ▲ ▼ arrow keys to select a value between 0.00 dB to
20.00 dB (in 0.25 dB steps). The default setting is 10.00 dB. Press ENTER when done.
Note: This command is valid only in Remote Æ Local mode. If the user attempts to edit this
setting while in Remote Æ Serial or Remote Æ Ethernet mode, the following message
displays:
THIS UNIT IS CURRENTLY
IN REMOTE MODE!!
If State is selected:
Amplifier: OFF ON
(◄ ► E)
Select the Amplifier State as OFF or ON using the ◄ ► arrow keys, then press ENTER.
Note: This command is valid only in Remote Æ Local mode. If the user attempts to edit this
setting while in Remote Æ Serial or Remote Æ Ethernet mode, the following message
displays:
THIS UNIT IS CURRENTLY
IN REMOTE MODE!!
If Mute is selected:
Amp Mute: OFF ON
(◄ ► E)
Select the Amplifier Mute control as OFF or ON using the ◄ ► arrow keys, then press ENTER.
5–10
Page 53

KPA Ku-Band Indoor Solid-State Power Amplifier Revision 1
Front Panel Operation MN/KPA.IOM
Note: This command is valid only in Remote Æ Local mode. If the user attempts to edit this
setting while in Remote Æ Serial or Remote Æ Ethernet mode, the following message
displays:
THIS UNIT IS CURRENTLY
IN REMOTE MODE!!
5.3.1.3 CONFIG: FltRec (Fault Recovery) Menu Branches
Fault Recovery: Manual
Automatic (◄ ► E)
Select Fault Recovery as Manual or Automatic using the ◄ ► arrows keys, then press ENTER.
5.3.1.4 CONFIG: Redundancy Menu Branches
Comtech EF Data’s KPA family of SSPAs are designed to automatically sense
and configure into Redundancy Mode when the redundant loop cable is
IMPORTANT
connected between the two (i.e., 1:1) or three (i.e., 1:2) KPAs comprising the
redundant subsystem.
The designation of each KPA in a redundant subsystem is determined
automatically via the redundancy interface cable connected – polling on the
dedicated redundancy bus will not begin until the redundancy loop cable is
connected.
This display indicates the current operating mode – Standalone or Redundancy. When the KPA
is operating in Standalone mode – that is, no additional KPAs are recognized as active – the
display appears as follows:
Redundancy Mode: OFF
(E)
With the KPA in Standalone mode, the nested menus that follow will n ot be visible/selectable. Press
ENTER or CLEAR to return to the previous menu.
Otherwise, when a valid redundancy configuration is detected, a read-only display will first appear:
If 1:1 Redundancy is recognized:
Redundancy Mode: ON
SSPA #BU 1:1 (E)
If 1:2 Redundancy is recognized:
Redundancy Mode: ON
SSPA #BU 1:2 Pri=1 (E)
Press ENTER to continue to configure 1:1 or 1:2 redundant operations, or press CLEAR to return to
the previous menu.
If 1:1 Redundancy is recognized:
Config: Auto/Manual Mode
Backup Mode
5–11
Page 54

KPA Ku-Band Indoor Solid-State Power Amplifier Revision 1
Front Panel Operation MN/KPA.IOM
If 1:2 Redundancy is recognized:
Config: Auto/Manual Mode
Backup Mode Priority
For 1:1 configurations, select Auto/Manual Mode or Backup Mode using the ◄ ► arrow keys,
then press ENTER.
For 1:2 configurations, select Auto/Manual Mode, Backup Mode, or Priority using the
arrow keys, then press ENTER.
The operations that follow are typical for both 1:1 and 1:2 redundant operations unless otherwise
indicated.
If Auto/Manual Mode is selected:
◄ ►
Operating Mode: Manual
Automatic (◄ ► E)
Select Manual or Automatic using the ◄ ► arrows keys, then press ENTER to continue.
If Backup Mode is selected:
Note: This submenu is enabled only in Remote Æ Local mode, and with Redundancy
Auto/Manual Mode set to Manual. If the user attempts to access this submenu either while
in Remote Æ Serial or Remote Æ Ethernet mode, or with Redundancy Æ Auto/Manual
Mode set as Automatic, this submenu is disabled and, in its place, the following message
displays:
NOT IN MANUAL MODE OR
NOT ACTIVE
Otherwise:
SSPA #1 OFFSET: X.XX dB
Active Backup: NO
For 1:2 configurations only: On the top line, use the ▲ ▼ arrow keys to select the desired
Backup KPA (i.e., SSPA #1
always fixed as ‘1’.
For 1:1 and
On the top line, set the dB offset used for Gain Equalization for the selected Backup KPA. Use
the ◄ ► arrow keys to select the numeral to edit, then using the ▲ ▼ arrow keys to edit the
value of that digit (the valid range, in dB, is -7.00 to +7.00).
On the second line, use the ▲ ▼ arrow keys to set operation of the specified Backup KPA:
• The default setting is NO (i.e., the Backup KPA remains in standby mode).
• Select FORCED to toggle/activiate the selected Backup KPA, then press ENTER to
If Priority is selected (1:2 configurations only):
1:2 configurations:
take the primary unit OFFLINE, and take the selected Backup KPA ONLINE.
or SSPA #2). For 1:1 configurations, note that this number is
Priority SSPA: SSPA#1
SSPA#2
5–12
Page 55

KPA Ku-Band Indoor Solid-State Power Amplifier Revision 1
Front Panel Operation MN/KPA.IOM
Use the ◄ ► arrows keys to select which Backup KPA in the configuration should serve as the
priority unit in the 1:2 redundancy system – SSPA#1 or SSPA#2 – then press ENTER.
Note: In 1:1 configurations, this submenu is not accessible, as this number is always fixed as ‘1’.
5.3.1.5 CONFIG: ExtRef (External Reference)
This command is not valid for KPA-020IN operation.
IMPORTANT
ExtRef LD Alarm Mask:
Alarm Fault Masked (◄ ► E)
Select Alarm, Fault, or Masked using the ◄ ► arrow keys, then press ENTER. Note the following:
Selection Description
Alarm
Fault
Mask No alarm or fault will be generated.
5.3.2 SELECT: Monitor
MONITOR: Faults Stored
Power Vltgs PS Temp FETs
Causes an Alarm to be generated whenever the unit sees that:
a) External Reference is selected, and
b) There is no signal activity at the External Reference port.
No action, other than event logging, will occur.
Causes a Transmit Traffic fault to be generated whenever the unit sees that:
a) External Reference is selected, and
b) There is no signal activity at the External Reference port.
The Monitor menus provide a collection of read-only status report screens, plus a management
menu for the viewing and handling of stored faults.
Typical for all displays, the screen will indicate “FT” when a fault condition exists for a specific
feature; otherwise, “OK” is indicated when no faults are detected.
From any menu, the user may press ENTER or CLEAR to return to the previous menu.
The display examples that follow are provided for reference only, and will vary depending on the
active, operating configuration.
Select
Faults, Stored, Power, Vltgs, PS, Temp, or FETs using the ◄ ► arrow keys, then
press ENTER.
5–13
Page 56

KPA Ku-Band Indoor Solid-State Power Amplifier Revision 1
Front Panel Operation MN/KPA.IOM
5.3.2.1 MONITOR: Faults
Current Faults: Voltages
PS Temp Fan Other(◄ ► E)
Select Voltages, PS, Temp, Fan, or Other using the ◄ ► arrow keys, then press ENTER.
If Voltages is selected:
+15V = OK +7.5V = OK
+5V = OK -5V = OK (E)
If PS (Power Supply) is selected:
28VDC PS = OK
RF Power Supply = OK
Temp (Temperature) is selected:
TEMP = OK
(E)
If Fan is selected:
FAN1 = OK
FAN2 = OK (E)
If Other is selected:
BUC = OK
ExtRef = OK (E)
5.3.2.2 MONITOR: Stored
Stored Events: View
Clear-All (◄ ► E)
Select View or Clear-All using the ◄ ► arrow keys, then press ENTER.
If View is selected:
Log05: 10/11/10 10:37:32
Info - Log CLEAR (▲ ▼)
The user may scroll backwards or forwards through the entries in the stored events log by
using the
stored events log can store up to 255 events.
▲ ▼ arrow keys. Press ENTER or CLEAR to return to the previous menu. The
The top line of the display indicates the log entry number, and the date and time of the entry.
Note that in accordance
IMPORTANT
The bottom line of the display shows the event that has been logged and stored.
DAY-MONTH-YEAR format.
with European convention, the date is shown in
5–14
Page 57

KPA Ku-Band Indoor Solid-State Power Amplifier Revision 1
Front Panel Operation MN/KPA.IOM
If Clear-All is selected:
Clear All Stored Events:
No Yes (◄ ► E)
Choose No or Yes using the ◄ ► arrow keys, then press ENTER. If Yes is selected, the
stored events log is cleared, and the user is taken directly back to the previous menu.
5.3.2.3 MONITOR: Power
Forward Power: <19.0 dBm
Reverse Power: <12.0 dBm
5.3.2.4 MONITOR: Vltgs
+15V=14.6 +7.5V=7.9
+5V=5.0 -5V=-5.0 (E)
5.3.2.5 MONITOR: PS (Power Supply)
28VDC PS = 27.2
RF Power Supply = 9.1
5.3.2.6 MONITOR: Temp
Amplifier Temp = 45 C
5.3.2.7 MONITOR: FETs
RF FET Q01 : 20mA
RF FET Q02 : 72mA (▲ ▼)
The user may scroll backwards or forwards through the displayed RF Power Field Effect
Transistors (FETs) by using the ▲ ▼ arrow keys.
Note the following:
• For KPA-040 only – RF FET Q01 through Q14.
• For KPA-020IN/-080/-100 – RF FET Q01 through Q27.
5.3.3 SELECT: Utility
UTILITY: Date/Time CID
PowerMon Firmware RefOsc
Select Date/Time, CID, PowerMon, Firmware, or RefOsc using the ◄ ► arrow keys,
then press ENTER.
5–15
Page 58

KPA Ku-Band Indoor Solid-State Power Amplifier Revision 1
Front Panel Operation MN/KPA.IOM
5.3.3.1 UTILITY: Date/Time
Edit Real-Time Clock:
12:00:00 24/09/10(◄ ►▲▼E)
Edit the time and date settings of the real-time clock by selecting the digit to be edited using
the ◄ ► arrow keys, then changing the value of the digit using the ▲ ▼ arrow keys. Press
ENTER when done.
Note that in accordance with
DAY
IMPORTANT
-MONTH-YEAR format.
5.3.3.2 UTILITY: CID (Circuit ID)
Edit Circuit ID:(◄ ►,▲ ▼)
24 CHARACTER TST MESSAGE
Edit the Circuit ID string by using the ◄ ► and ▲ ▼ arrow keys. Only the bottom line is
available (24 characters). Set the cursor position on the bottom line using the ◄ ► arrow keys,
then edit the character using the ▲ ▼ keys. The following characters are available:
[Space] ( ) * + -, . / 0-9 and A-Z.
Once the Circuit ID string is composed, press ENTER.
5.3.3.3 UTILITY: PowerMon
Forward Power Mon Offset
Reverse Power Mon Offset
This function allows the user to calibrate (fine tune) the RF Power Monitor for a specific carrier
frequency. The RF Power Monitor is factory-calibrated at the KPA center frequency. The user
can adjust (offset) the display level using this function.
European convention, the date is shown in
Select Forward Power Mon Offset or Reverse Power Mon Offs et using the ◄ ► arrow keys,
then, press ENTER.
If Forward Power Mon Offset is selected:
Forward RF Power Monitor
Offset = +5.8 dBm
Set the cursor position on the bottom line using the ◄ ► arrow keys, then edit the numeric
value using the ▲ ▼ keys. The range is within -6.0 to +6.0 dBm, in 0.1 dBm steps.
If Reverse Power Mon Offset is selected:
Reverse RF Power Monitor
Offset = -5.8 dBm
Set the cursor position on the bottom line using the ◄ ► arrow keys, then edit the numeric
value using the ▲ ▼ keys. The range is within -6.0 to +6.0 dBm, in 0.1 dBm steps.
5–16
Page 59

KPA Ku-Band Indoor Solid-State Power Amplifier Revision 1
Front Panel Operation MN/KPA.IOM
5.3.3.4 UTILITY: Firmware
IMPORTANT
THESE MENUS ARE INTENDED FOR DIAGNOSTIC PURPOSES ONLY. DO NOT
CHANGE AN IMAGE UNLESS OTHERWISE INSTRUCTED BY COMTECH EF
DATA CUSTOMER SUPPORT.
Firmware Info: Boot Bulk
App FPGA
This series of submenus is used to view information about the KPA internal firmware. Select
Boot, Bulk, App, or FPGA using the
If Boot is selected:
◄ ► arrow keys, then press ENTER.
Boot: FW-0000085
X.X.X MM/DD/YY
If Bulk is selected:
Bulk: FW0000392
X.X.X MM/DD/YY
If App is selected:
App: FW00000393
X.X.X MM/DD/YY
If FPGA is selected:
Boot: FW-0000088
X.X.X MM/DD/YY
5.3.3.5 UTILITY: RefOsc
Note: This display is used for debugging purposes only.
Reference Oscillator:
Information Adjust (◄ ► E)
Select Information or Adjust using the ◄ ► arrow keys, then press ENTER.
If Information is selected, the raw voltage of the voltage tuning monitor and the external
reference status are displayed. For example:
Ref Osc: Vtune = 04.8
ExtRef: N/A
Press ENT or CLR to return to the previous menu.
If Adjust is selected:
Reference Frequency
Adjust 87
The reference oscillator adjustment may be manipulated with this menu. Use the ◄ ► arrow
keys to select the numeral to edit, then the ▲ ▼ arrow keys to edit the value of the selected
5–17
Page 60

KPA Ku-Band Indoor Solid-State Power Amplifier Revision 1
Front Panel Operation MN/KPA.IOM
numeral, then press ENT. The default Reference Frequency tuning adjustment is 87, with
allowable values from 0 to 255.
5.3.4 SELECT: Front Panel
Front Panel: Brightness
Lamp Test (◄ ► E)
Select Brightness or Lamp Test using the ◄ ► arrow keys, then press ENTER.
5.3.4.1 Front Panel: Brightness
Display Brightness:
100%
To edit the display brightness, use the ▲ ▼ arrow keys. The values of brightness that can be
selected are 25%, 50%, 75%, or 100%. Press ENTER when the brightness is suitable.
5.3.4.2 Front Panel: Lamp Test
Lamp Test:
START
The Lamp Test menu runs a performance diagnostic on the front panel LED Indicator array. This
test does otherwise affect KPA operations while running. Press ENTER to begin the test – as the
LEDs cycles through the Lamp Test, the following message displays:
Lamp Test:
TESTING
5–18
Page 61

6.1 Overview
Chapter 6. KPA ETHERNET
MANAGEMENT
This chapter is not valid for KPA-020IN operation.
IMPORTANT
The sections that follow describe functionality of the KPA Ethernet Management Interfaces. Note
that many of the operations featured in this chapter may also be executed via the KPA’s front
panel and via serial remote control. Refer to Chapter 5. FRONT PANEL OPERATION, and
Appendix C. REMOTE CONTROL for supplemental descriptions of the configuration,
monitor and control functionality that is afforded by the protocols featured in this chapter.
6.2 Ethernet Management Interface Protocols
The KPA’s 10/100 BaseT Ethernet Management Interface supports three (3) different
management protocols:
• SNMP with public and private MIB
• Telnet interface for remote product M&C
• Web Server (HTTP) Interface for complete product management
6.3 SNMP Interface
The Simple Network Management Protocol (SNMP) is an application-layer protocol designed to
facilitate the exchange of management information between network devices. The KPA SNMP
agent supports both SNMPv1 and SNMPv2c.
For proper SNMP operation, the ISSPA MIB files must be used with the
associated version of the KPA M&C. Please refer to the ISSPA Software
IMPORTANT
Release Notes for information on the required FW/SW compatibility.
6–1
Page 62

KPA Ku-Band Indoor Solid-State Power Amplifier Revision 1
Ethernet Management MN/KPA.IOM
6.3.1 Management Information Base (MIB) Files
MIB files are used for SNMP remote management and consist of Object Identifiers (OID’s). Each
OID is a node that provides remote management of a particular function. A MIB file is a tree of
nodes that is unique to a particular device. The following MIB files are associated with the KPA:
MIB File/Name Description
FW-0000141-.mib
Comtech EF Data
Root MIB file
FW-0000139-.mib
ISSPA MIB
FW-0000140-.mib
ISSPA Traps MIB
These MIB files should be compiled in a MIB Browser or SNMP Network Monitoring System server.
ComtechEFData MIB file gives the root tree for ALL Comtech EF Data SSPA
products and consists of only the following OID:
Name: comtechEFData
Type: MODULE-IDENTITY
OID: 1.3.6.1.4.1.6247
Full
path: iso(1).org(3).dod(6).internet(1).private(4).enterprises(1).comtechEFData(6247)
Module: ComtechEFData
MIB file consists of all of the OID’s for management of the KPA functions
Trap MIB file is provided for SNMPv1 traps common for the KPA.
6.3.2 SNMP Community Strings
The KPA uses community strings as a password scheme that provides authentication before
gaining access to the KPA agent’s MIBs.
In SNMPv1 and SNMPv2c, the community string is sent unencrypted in the SNMP packets.
Caution must be taken by the network administrator to ensure that SNMP packets travel only over
a secure and private network if security is a concern. A packet sniffer can easily obtain the
community string by viewing the SNMP traffic on the network.
The community string is entered into the MIB Browser or Network Node Management software
and is used to authenticate users and determine access privileges to the SNMP agent.
The user defines three Community Strings for SNMP access:
• Read Community default = public
• Write Community default = private
• Trap Community default = comtech
6–2
Page 63

KPA Ku-Band Indoor Solid-State Power Amplifier Revision 1
Ethernet Management MN/KPA.IOM
6.4 Telnet Interface
The KPA provides a Telnet interface for the purpose of Equipment M&C via the standard
equipment Remote Control protocol.
The Telnet interface requires user login at the Administrator level and Read/Write level.
The screen capture to the
right shows the login process:
Once logged into the Telnet
interface as Administrator,
the user can access the
standard remote control
interface defined in
Appendix C. REMOTE
CONTROL, as shown in
the example to the right:
There is a disadvantage when using Windows Command-line as Telnet Client. Since Commandline cannot translate a ‘\r’ to a ‘\r\n’ for the messages coming from Telnet Server, the multi-line
command response (for example, FRW? response) will be displayed as one line, with the latter
lines overwriting the previous lines.
In order to view the full response messages, CEFD recommends using HyperTerminal
configured as Telnet Client. To do so, configure HyperTerminal as follows:
1. Ensure that connection is made
using TCP/IP (Winsock) instead of
COM1 or COM2, as shown her to
the left.
2. ASCII Setup (File Æ Properties Æ
Settings Æ ASCII Setup): Check
the "Send line ends with line
feeds" option in the ASCII Sending
section and the "Append line
feeds to incoming line ends"
option in the ASCII Receiving
section, as shown to the far right.
6–3
Page 64

KPA Ku-Band Indoor Solid-State Power Amplifier Revision 1
Ethernet Management MN/KPA.IOM
Login and remote command
execution via HyperTerminal
configured as Telnet Client
appears as shown:
6.5 Web Server (HTTP) Interface
6.5.1 Web Server page Introduction
The embedded Web Server application provides the user with an easy to use interface to
configure and monitor all aspects of the KPA. These Web pages have been designed for optimal
performance when using Microsoft’s Internet Explorer Version 5.5 or higher (the examples
shown use Internet Explorer Version 7.0).
The user can fully control and monitor base operations of the KPA
from the Web Server Interface. By rolling the cursor over the
navigation tabs located at the top of each page (right), the user can
select from the available nested tabs.
6.5.2 Web Server Interface Access
To initiate a Web session with the KPA, from the PC type http://www.xxx.yyy.zzzz (where
“www.xxx.yyy.zzz” represents the IP address of the unit) into the Address area of the Web browser:
Once the valid IP address is entered, Before any further access to the
pages can granted, the User is prompted for a User Name and
Password via the Login Window, similar to the example shown at
right.
Default User name – comtech
Default Password – comtech
Type the User Name and Password, then click [OK].
6–4
Page 65

KPA Ku-Band Indoor Solid-State Power Amplifier Revision 1
Ethernet Management MN/KPA.IOM
Once the valid User name and
Password are accepted, the user will
see the KPA Web Server Interface
“splash” page, similar to the example
shown at right:
6.5.3 W e b Server Menu Tree
The operations available through this interface are illustrated by this menu tree:
Home Admin Config Status
Home Access Amplifier Events
Support SNMP Utility Status
The KPA Web Server Interface provides access to four navigation tabs (shown in blue):
• Home • Admin • Config (Configuration) • Status
Beyond this top-level row of navigation tabs, the diagram illustrates the available nested page
hyperlinks (shown in grey) afford the user in-depth functionality.
Click any tab or select any hyperlink to continue.
6.5.4 Web Server page Descriptions
The sections and subsections that follow detail the Web pages accessible via hyperlink from the
navigation tabs as shown in the menu tree diagram provided in Sect. 6.5.3:
Sect. 6.5.
Sect. 6.5.4.2 Admin pages
Sect. 6.5.4.3 Config pages
Sect. 6.5.4.4 Status pages
4.1 Home pages
Redundancy FETs
6–5
Page 66

KPA Ku-Band Indoor Solid-State Power Amplifier Revision 1
Ethernet Management MN/KPA.IOM
6.5.4.1 Home pages
Select the Home or Support hyperlink to continue.
6.5.4.1.1 Home (Splash) page
Figure 6-1. KPA Home (Splash) page
From any location within the Web Server Interface, the user can select the Home tab or ‘Home |
Home’ hyperlink to return back to this page. Note that the information on this page is unit-
specific and changes according to the actual KPA unit in use. This figure shows, as the example,
the Web Server Interface for a KPA-080 unit.
6–6
Page 67

KPA Ku-Band Indoor Solid-State Power Amplifier Revision 1
Ethernet Management MN/KPA.IOM
6.5.4.1.2 Home | Support page
Figure 6-2. KPA Home | Support page
The ‘Home | Support’ page (Figure 6-2) uses SMTP
(Simple Mail Transport Protocol) to submit
questions about or report problems with the KPA to Comtech EF Data Modem Support
(cdmipsupport@comtechefdata.com
).
The user should type in the pertinent contact information – Name, Company, Telephone, and
E-mail address – in the Contact Information section, then use the Problem Report section to
compose a message consisting of up to 256 characters maximum.
For this page to operate correctly, the modem’s administrator is required to
specify the SMTP server, domain name, and destination on the Admin | Access
IMPORTANT
page (see Sect. 6.5.4.2.1).
Once the Contact Information is entered and a message composed in the Problem Report text
window, click [Submit E-mail] to send the message.
6–7
Page 68

KPA Ku-Band Indoor Solid-State Power Amplifier Revision 1
Ethernet Management MN/KPA.IOM
6.5.4.2 Admin pages
The ‘Admin’ pages provide the means to set up the access parameters required to facilitate
communication with the KPA Web Server Interface.
The Admin pages are available only to users who have logged in using the
IMPORTANT
Administrator Name and Password.
Select the Access or SNMP hyperlink to continue.
6.5.4.2.1 Admin | Access page
Figure 6-3. Admin | Access page
The ‘Admin | Access’ page (Figure 6-3) provid
e-mail server, and the host IP addresses to facilitate communication with the KPA Web Server
Interface.
Network Maintenance
• IP Gateway: Enter an IP Gateway Address for the Ethernet M&C port for this unit.
• IP Address/Range: Enter an IP address and a subnet mask to define a unique class of
machines that are allowed access.
• MAC Address: This parameter is read-only and cannot be changed.
Once the desired changes have been made in this section, click [Change IP Address] to save these
settings. Otherwise, click [Reset] to cancel any changes and restore the previously saved
parameters.
es the means to set up user names, pa sswords, the
6–8
Page 69

KPA Ku-Band Indoor Solid-State Power Amplifier Revision 1
Ethernet Management MN/KPA.IOM
System Account Access Information
• Read/Write, Read Only and Admin Names and Passwords:
The factory defaults for these names/passwords are:
o Read Only monitor/1234
o Read/Write opcenter/1234
o Admin comtech/comtech
Note the following:
o These Name fields can be any alphanumeric combination with a maximum
length of 10 characters.
o These Password fields can be any alphanumeric combination with a maximum
length of 10 characters.
• SMTP Server: Specify the mail server IP address from where e-mail is to be sent.
• SMTP Domain Name / Destination: The Administrator can assign the SMTP Domain
Name and Destination. This is required if the e-mail feature of the ‘Home | Support’
page (Sect. 6.5.3.2) is to be used.
o For SMTP Domain Name, specify the domain of the e-mail server (usually
found to the right of the @ symbol in an e-mail address).
o For SMTP Domain Destination, specify the e-mail recipient name (usually
found to the left of the @ symbol in an e-mail address).
Once the desired configuration settings have been made on this page, click [Submit Admin] to
save these changes.
6–9
Page 70

KPA Ku-Band Indoor Solid-State Power Amplifier Revision 1
Ethernet Management MN/KPA.IOM
6.5.4.2.2 Admin | SNMP page
Figure 6-4. Admin | SNMP page
The ‘Admin | SNMP’ page (Figure 6-4) sets and returns administration information for the
KPA’s Sim
the configuration parameters available on this page, refer to Chapter 5. FRONT PANEL
OPERATION and Sect. 6.3 SNMP INTERFACE.
ple Network Management Protocol (SNMP) feature. For further details pertaining to
Note the following:
• Simple Network Management: Use the drop-dow n menu to select a s Enable d or Disabled.
• Read and Write Community String: The factory defaults assigned for these parameters are,
respectively, public and private. Otherwise, assign the desired parameters using any
combination of characters and a length of 0 - 20 character s in these fields.
• SNMP Contact / SNMP Name / SNMP Location: Assign the pertinent administrator’s
information to each field using any combination of characters and a length of 0 - 20
characters in these fields.
• Enable Authentication Trap: Use the drop-down menu to select as Enabled or D isabled.
• Trap IP 1 / Trap IP 2: Up to two SNMP Trap IP addresses may be assigned.
• Trap Version: Use the drop-down menu to select the Trap Version SNMPv1 or SNMPv2.
• Trap Community String: The factory default assigned for this parameter is public. The
SNMP Trap Community String can be any combination of characters and a length of 0 20 characters.
Once the desired configuration settings have been made on this page, the user should then click
[Submit SNMP] to save these changes. Otherwise, click [Reset] to cancel any changes and
restore the previously saved parameters.
6–10
Page 71

KPA Ku-Band Indoor Solid-State Power Amplifier Revision 1
Ethernet Management MN/KPA.IOM
6.5.4.3 Config (Configuration) pages
The ‘Config’ pages provide the means to set up the KPA’s operational parameters for Standalone
or Redundant operations.
Select the Amplifier, Utility, or Redundancy hyperlink to continue.
6.5.4.3.1 Config | Amplifier page
Figure 6-5. Config | Amplifier page
The ‘Config | Amplifier’ page (Figure 6-5) sets and returns administration inform
ation for the
KPA’s Simple Network Management Protocol (SNMP) feature. For further details pertaining to
the configuration parameters available on this page, refer to Chapter 5. FRONT PANEL
OPERATION and Sect. 6.3 SNMP INTERFACE.
Amplifier
• Attenuation: Enter an attenuation value (in dB) between 0.00 and 20.00.
• Mute: Use the drop-down menu to select Mute as On or Off.
• Amplifier: Use the drop-down menu to select Amplifier operation as On or Off.
• Fault Recovery: Use the drop-down menu to select Fault Recovery as Automatic or
Manual.
Once the desired configuration settings have been made in this section, the user should then click
[Change Configuration] to save these changes. Otherwise, click [Reset] to cancel any changes
and restore the previously saved parameters.
Serial
• Interface Type: Use the d rop-down menu to select the remot e serial interface as RS-232,
RS-485 2-wire, or RS-485 4-wire.
• Remote Address: Enter a remote address from 0 to 9999.
6–11
Page 72

KPA Ku-Band Indoor Solid-State Power Amplifier Revision 1
Ethernet Management MN/KPA.IOM
• Baud Rate: Use the drop-down menu to select the baud rate as 2400, 4800, 9600, 19200,
or 38400.
• Data Format – Data Bits: Use the drop-down menu to select the Data Bits as 8 or 7.
• Data Format – Stop Bits: Use the drop-down menu to select the Data Bits as 1 or 2.
• Data Format – Parity: Use the drop-down menu to select Parity as Odd, Even, or None.
Once the desired configuration settings have been made in this section, the user should then click
[Change Serial Configuration] to save these changes. Otherwise, click [Reset] to cancel any
changes and restore the previously saved parameters.
Alarm Mask
Use the drop-down menu to define the External Reference Lock Detected alarm as Masked or
Active, then click [Submit] to save this setting.
6–12
Page 73
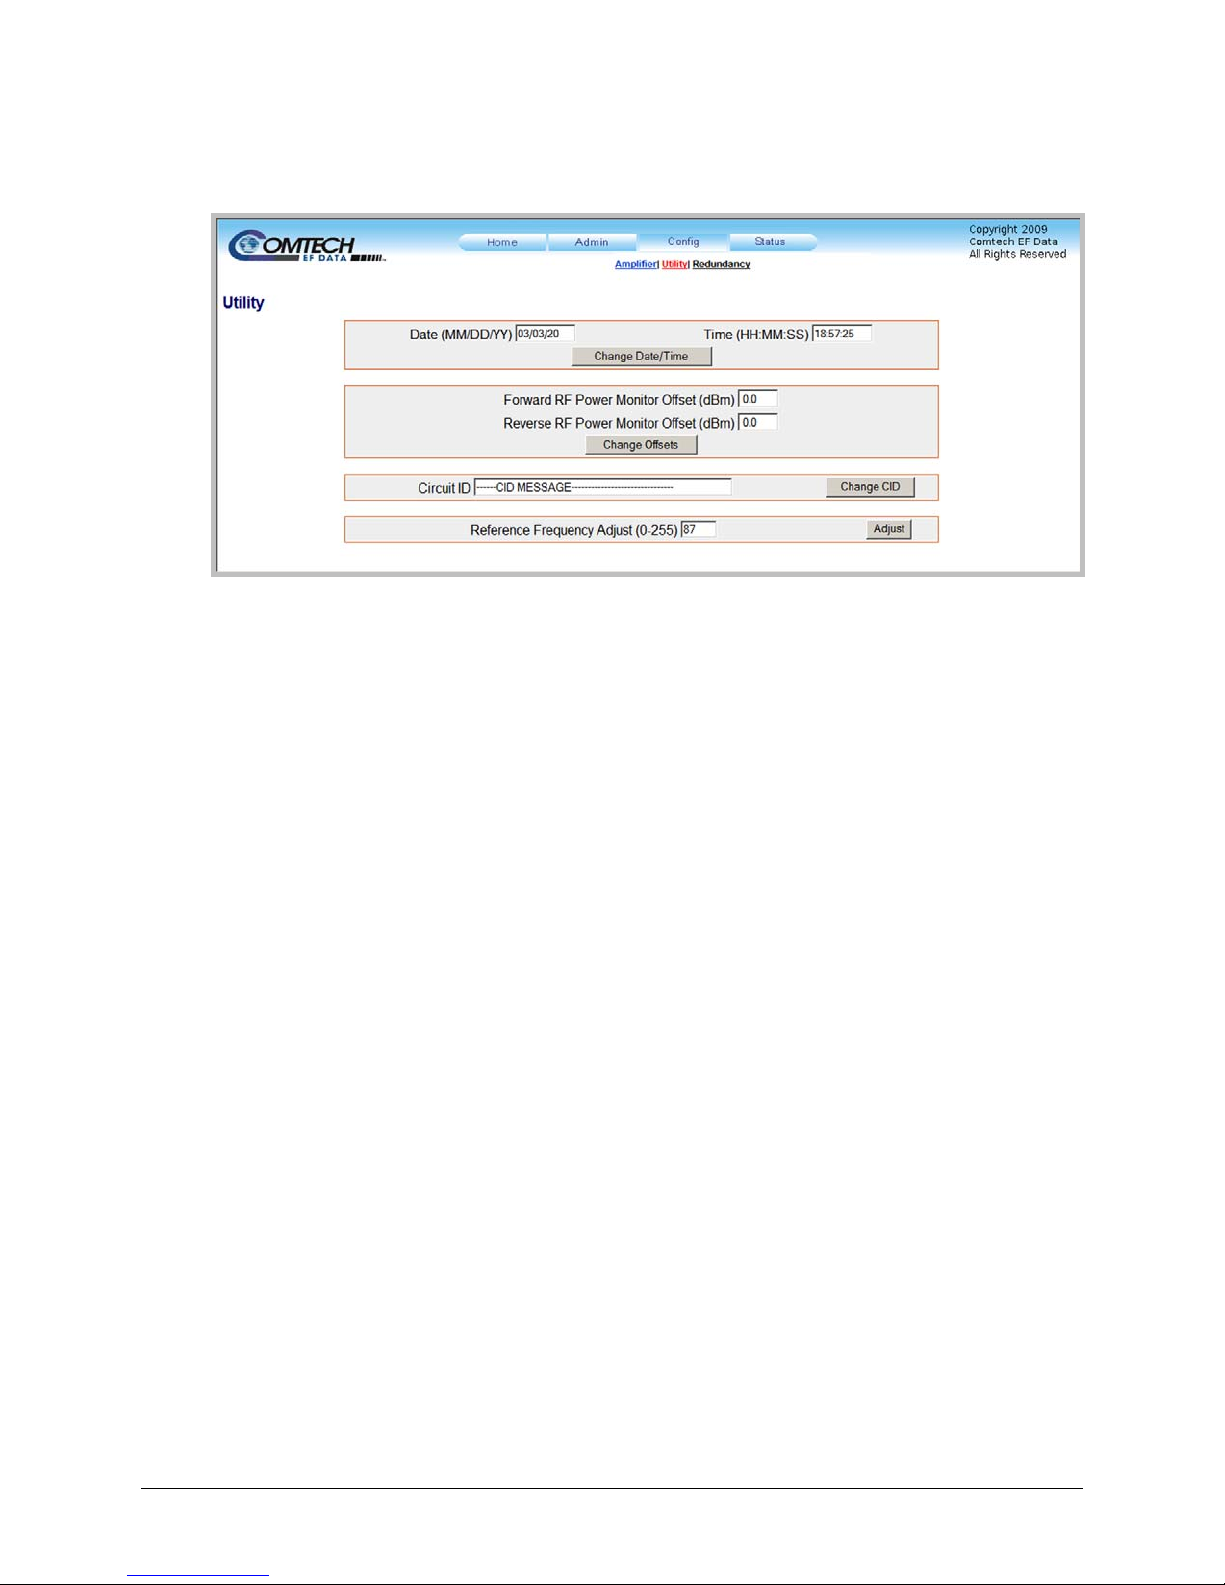
KPA Ku-Band Indoor Solid-State Power Amplifier Revision 1
Ethernet Management MN/KPA.IOM
6.5.4.3.2 Config | Utility page
Figure 6-6. Config | Utility page
The ‘Config | Utility’ page (Figure 6-6) is used
to adjust or customize a variety of KPA
operation features.
Note the following:
• Date: The user may enter a date using MM/DD/YY format
(where MM = month [01 to 12], DD = day [01 to 31], and YY = year [00 to 99]).
• Time: The user may enter a time using HH:MM:SS format
(where HH = hour [00 to 23], MM = minutes [00 to 59], and SS = seconds [00 to 59]).
Once the desired date and time have been entered in this section, click [Change
Date/Time] as needed to save these changes.
• Forward RF Power Monitor Offset (dBm) and Reverse RF Power Monitor Offset
(dBm): For either, enter an offset value (in dBm) from -6.0 to +6.0.
Once the desired offsets have been entered in this section, click [Change Offsets] as
needed to save these changes.
• Circuit ID: The user may enter a Circuit ID string of up to 24 characters.
Once the desired string has been entered in this section, click [Change CID] as needed to
save this change.
• Reference Frequency Adjust: The user may enter an adjustment value from 0 to 255.
Once the desired value has been entered in this section, click [Adjust] as needed to save
this change.
6–13
Page 74

KPA Ku-Band Indoor Solid-State Power Amplifier Revision 1
Ethernet Management MN/KPA.IOM
6.5.4.3.3 Config | Redundancy page
Comtech EF Data’s KPA family of SSPAs are designed to automatically sense
and configure into Redundancy Mode when the redundant loop cable is
IMPORTANT
Redundancy page in Standalone Configuration (no redundant units recognized by system)
connected between the two (i.e., 1:1) or three (i.e., 1:2) KPAs comprising the
redundant subsystem.
The designation of each KPA in a redundant subsystem is determined
automatically via the redundancy interface cable connected – polling on the
dedicated redundancy bus will not begin until the redundancy loop cable is
connected.
Redundancy page in Automatic Mode
Redundancy page in Manual Mode
The ‘Config | Redundancy’ page (Figure 6-7) is u
redundant operations. The active Redundancy Mode is identified on this page as 1:1, 1:2, or
OFF, and the appearance of the page itself varies depending on its Operating Mode.
Figure 6-7. Config | Redundancy page
sed to control the operational parameters for
6–14
Page 75

KPA Ku-Band Indoor Solid-State Power Amplifier Revision 1
Ethernet Management MN/KPA.IOM
Redundancy Mode
This read-only section provides the following information:
• The active system operating status is identified as ON or OFF (when OFF, the
configuration sections that follow on this page are not accessible).
• The active operating unit – i.e., the Primary KPA or Backup KPA – is identified.
• The active redundancy configuration – 1:1 or 1:2 – is identified.
Automatic/Manual Mode (1:1 or 1:2 Redundancy)
Use the provided drop-down menu to select the backup operation mode as Automatic or Manual.
Priority Select (1:2 Redundancy only)
Use the provided drop-down menu to select the desired Backup KPA as SSPA#1 or SSPA#2.
Note that, for 1:1 configurations, the priority unit number is always fixed as SSPA#1.
Once the desired operational settings have been selected for the operating mode and backup
priority (1:2 redundancy only), click [Change Redundancy Config] as needed to save these
settings.
Backup Mode (1:1 or 1:2 Redundancy, Manual Mode only)
When Automatic Mode has been selected as the Operating Mode, this section of the
Redundancy page is inaccessible.
Use the provided drop-down menu to force SSPA#1 or, for 1:2 redundancy only, SSPA#2 to
replace the active operating KPA as the primary unit.
Note that, for 1:1 configurations, the Backup KPA is always fixed as SSPA#1.
Once the desired Backup KPA has been selected, click [Change Backup Mode] to take the
primary unit OFFLINE, and take the selected Backup KPA ONLINE.
6–15
Page 76

KPA Ku-Band Indoor Solid-State Power Amplifier Revision 1
Ethernet Management MN/KPA.IOM
6.5.4.4 Status pages
The ‘Status’ pages provide the user with the means to monitor operations, review and manipulate
the stored events, review configuration parameters, etc.
Select the Events, Status, or FETs hyperlink to continue.
6.5.4.4.1 Status | Events page
Figure 6-8. Status | Events page
The ‘Status | Events’ page (Figure 6-8) provi
des the user with the means to monitor the current
operating state (i.e., OK or faulted) of a variety of features, and provides a scrollable stored
events window showing the logged system faults and events.
Current Faults
This read-only section provides the current operating state of the KPA. The information provided
may vary based on the KPA’s active/optional operating features.
Events Log Section
• Unread Stored Events: Displays the total number of unread stored events in the
scrollable events window. As stored event groups are displayed, this number adjusts
downward accordingly.
• Read Next Five Events: Click to buffer the next group of five stored events into the
scrollable events window.
• Clear Events Log: Click to wipe clean the stored events log.
• Initialize Events Pointer: Click to reset the log’s internal pointer.
6–16
Page 77

KPA Ku-Band Indoor Solid-State Power Amplifier Revision 1
Ethernet Management MN/KPA.IOM
Once the desired settings have been entered, click [Submit] as needed to execute update of this
section.
6.5.4.4.2 Status | Status page
Figure 6-9. Status | Status page
The read-only ‘Status | Status’ page (Figure 6-9) provides the user with the
means to monitor
the current operating status of a variety of features; provides identification parameters for the unit
itself (e.g.., part number, model number, etc.); and identifies the currently running firmware (i.e.,
the software revision, and the individual firmware part numbers, versions, revision letters, and
release dates).
6–17
Page 78

KPA Ku-Band Indoor Solid-State Power Amplifier Revision 1
Ethernet Management MN/KPA.IOM
6.5.4.4.3 Status | FETs page
Figure 6-10. Status | FETs page
The read-only ‘Status | FETs’ page (Figure 6-10) provides the user with the
means to monitor
the current operating status of the KPA’s RF Power Field Effect Transistors (FETs).
Note the following:
• For KPA-040 only – RF FET Q01 through Q14.
• For KPA-020IN/-080/-100 – RF FET Q01 through Q27.
6–18
Page 79

Appendix A. MAINTENANCE AND
TROUBLESHOOTING
A.1 Introduction
Information about the KPA’s operational features and overall functionality is provided
throughout this manual as follows:
For information about: Refer to:
KPA operation, including block diagrams, functional descriptions,
summary of specifications, dimensional envelopes
Initial installation and setup of KPA in Standalon e configurations Chapter 2. INSTALLATION
KPA external user interfaces Chapter 3. CONNECTORS and PINOUTS
Updating KPA operational firmware Chapter 4. FLASH UPGRADING
M&C using the KPA Front Panel Chapter 5. KPA FRONT PANEL OPERATION
M&C using the KPA Web Server Interface (not valid with KPA-020IN) Chapter 6. KPA ETHERNET MANAGEMENT
Installation, setup, and operation of the KPA in 1:1 a nd 1:2
Redundant Operations
M&C using the Remote Control Interface Appendix C. REMOTE CONTROL
Maintenance and Troubleshooting Tips This appendix (Appendix A)
Chapter 1. INTRODUCTION
Appendix B. KPA REDUNDANT OPERATIONS
A–1
Page 80

KPA Ku-Band Indoor Solid-State Power Amplifier Revision 1
Appendix A MN/KPA.IOM
A.2 Maintenance Testing
Note the following:
• The KPA-080 is a Ku-Band SSPA having an RF output level of +48.5 dBm at 1 dB
compression.
• The KPA-100 is a Ku-Band SSPA having an RF output level of +49.5 dBm at 1 dB
compression.
A.2.1 Test Point Samples
The RF input and output can be monitored at the front panel’s RF Sample Test Points (Type ‘N’
Input and Output connectors are provided). The sample RF input level is -20 dBc nominal, and
the RF output level is -40 dBc nominal. Actual measured data for these sample ports is located on
the front panel.
A.3 Troubleshooting
Operating problems can be identified by first observing the STATUS LED indicators on the KPA
front panel. When a fault condition is indicated, the specific fault or faults can be further
investigated by viewing the information provided via the front panel or, where applicable, the
Web Server Interface:
• From the front panel – Review the pertinent SELECT: MONITOR Æ Faults
submenus; further information can be obtained by viewing the stored events logs using
the SELECT: MONITOR Æ Stored Æ View menu. See Chapter 5. KPA FRONT
PANEL OPERATION for further information about KPA operations using the front
panel.
• From the Web Server Interface – Select the ‘Status | Events’ page. See Sect. 6.5.
in Chapter 6. KPA ET
The user should also check the status of the mute condition, either by using the front panel
SELECT: CONFIG Æ Amp Æ Mute menu, or viewing the Web Server Interface’s ‘Config |
Amplifier’ page (i.e., ‘Mute = On’ means that the amplifier will be muted).
HERNET MANAGEMENT for further information.
4.4.1
A–2
Page 81

KPA Ku-Band Indoor Solid-State Power Amplifier Revision 1
Appendix A MN/KPA.IOM
A.3.1 Troubleshooting Guide
Issue Possible Cause(s) Solution(s)
Unit does not turn on
(No front panel display, no
front panel LEDs lit, no fans)
Fan(s) do not turn On.
Display not turning on,
missing text, or incorrect
backlighting.
1. Check power cord connections.
2. Faulty wiring to 28V power supply.
3. 28V power supply fault.
Faulty wiring or bad connections.
Firmware not properly seated. Fans a r e m icropro c e s s o r c o n trolled a n d m o n i t ored:
Faulty 28V power supply. Check th e o u t p ut v ol t a g e o f t h e 28 V p o we r su p p ly :
Failed fan or faulty control circuitry. Fan defective:
1. Firmware not properly seated.
2. Faulty wiring or bad connections.
3. Failed display or display control card.
4. Circuitry on AS/0200 or AS/0206
PCB.
1. Ensure power cord is connected.
2. With input power cord disconnected, check
wiring and connections to 28V power supply.
Reconnect power cord.
3. Check output of 28 VDC power supply.
Remove and replace 28V power supply.
At power-up, the fans are sequenced on. In
normal operation, the second fan does not turn on
until 3 seconds (approximately) after the first fan:
1. Check AS/0206 PCB to ensure connections at
P4 and P5 are not loose.
2. Check cable connection at the fans. There
should be 24 VDC (approximately) between
the two pins at the fan.
3. Check cable wiring if faulty or return to factory
for repair.
1. Ensure U11 and U12 on AS/0200 are
properly seated.
2. Remove and replace AS/0200 PCB if
damaged.
1. Either via the front panel SELECT: Monitor
Æ PS menu, Web Server Interface ‘Status |
Status’ page, or by using a voltmeter.
2. Ensure that 28V is present.
1. Replace fan.
2. Return to factory for repair re replacement.
1. Ensure U11 and U12 on AS/0200 are properly
seated.
2. Ensure good cable connections from M&C
cards AS/0200 and AS/0206 to display card
located behind front panel. Check cable wiring
and if required return cables to factory.
3. Return to factory for repair.
4. Return to factory for repair.
A–3
Page 82

KPA Ku-Band Indoor Solid-State Power Amplifier Revision 1
Appendix A MN/KPA.IOM
Issue Possible Cause(s) Solution(s)
No RF output or ≤ output
level.
1. Mute function activated.
2. Amplification = Off feature activated.
3. Large customer attenuation values
selected.
4. Input power level not correct.
5. Faulty input connections from 9V
supplies.
6. Fault KPA control cable or
connection.
Failed KPA amplifier module. This can usually be determined by using
the Monitor menu to check the DC
current levels being drawn by each
transistor inside the amplifier module.
Any transistor (QX) current that is 50%
more or less than normal would probably
indicate a failure.
1. Check the configuration menu to determine if
mute function has been activated. Mute = On
Means that the unit is muted. Turn Mute
feature to Off to allow RF amplification of the
input signal.
2. The amplification = Off feature allows for
lower current draw from the prime power
source under standby conditions. To obtain
RF output, ensure that this feature is set to
amplification = On.
3. Check the Attenuation = XX setting in the
configuration menu. Lower value to get more
gain.
4. Use the input sample port on the front panel
to determine that the input power level is as
specified. Remove and replace the input
cable.
5. Use the Monitor menu to check the internal
level of the PS1 and PS2. The levels should
be near 9V. If not correct, use a voltmeter to
measure the voltage where the #8 wires enter
the amplifier unit. With Unit Off, tighten
connections if necessary.
6. Check the 25-pin ribbon cable connection at
the amplifier module and at AS/0200 PCB.
Tighten as necessary.
Nominal Values:
Q1 = 20mA
Q2 = 100 mA
Q3, Q4 = 1.0 A
Q5, Q6, Q7 = 2.0 A
Q8 to Q19 = 2.25 A
Q20 to Q27 = 5.5 A
No remote control
communication
1. Incorrect cable connections.
2. Improper communication settings
3. Entry mode of unit set to LOCAL.
between KPA and controlling
terminal.
A–4
There are no user serviceable parts inside the
amplifier module. Return to factory for repair.
1. Ensure cable is connected properly.
2. Check settings of KPA along with remote
control terminal software.
3. Change entry mode setting in Configuration
menu to Remote.
Page 83

KPA Ku-Band Indoor Solid-State Power Amplifier Revision 1
Appendix A MN/KPA.IOM
Issue Possible Cause(s) Solution(s)
Amplifier Temperature Fault
1. Operating temperature limits
exceeded.
2. Air intake or air exhaust paths
obstructed.
3. Fan failed.
4. Defective transistors in amplifier
module.
1. Do not exceed 50°C (122°F) ambient input
air temperature.
2. Remove obstructions to ensure adequate air
flow and proper amplifier cooling.
3. Check fan operation. Remove and replace
fan(s) as required.
4. Use Monitor menu to check transistor
currents. Compare readings with the
specified nominal values. Report excessive
readings to the manufacturer for repair.
There are no user serviceable parts inside
the KPA amplifier module.
Note: The KPA amplifier module contains an internal temperature monitor that will shut off the
unit (i.e. turn off the 9V supplies) if the heat sink temperature becomes excessive. This
prevents the overheating and destruction of the transistors. After cooling down below the trip
point, the unit will automatically restart.
9V power supply fault (PS1
and/or PS2)
1. Faulty wire or connection.
2. Excessive current draw from
transistor inside amplifier module.
3. Faulty power supply.
1. Check cable and connections from PS1 and
PS2 to amplifier module. On outside of
module, measure voltage. Reading should
be = 9.0 ± 0.5 VDC.
2. Use Monitor menus to check transistor
currents. Record excessive values and
return entire unit to manufacturer for repair.
3. Return failed power supply for repair.
Replace with the new power supply.
Faulty/Improper Redundancy
Switch Operation
1. Faulty wiring or connections.
2. Improper settings.
1. Ensure that the RF and control cables are
connected. Poor RF performances would
tend to indicate a faulty KPA
cable/connector.
a. Improper switch control would indicate
a problem with the control cables.
b. Ensure the ends of the cables labeled
backup are connected to the backup
unit.
2. Check redundancy setup in Configuration
menu.
A–5
Page 84

KPA Ku-Band Indoor Solid-State Power Amplifier Revision 1
Appendix A MN/KPA.IOM
Notes:
A–6
Page 85

Appendix B. KPA REDUNDANT
B.1 Introduction
Comtech EF Data’s KPA family of ISSPAs are designed to automatically
sense and configure into Redundancy Mode when the redundant loop cable
IMPORTANT
All Comtech EF Data KPAs are designed to operate in both standalone and redundant
configurations. Every KPA contains the circuitry and logic necessary to perform all the functions
of a backup controller in both a 1:1 and 1:2 configuration. This includes the ability to monitor and
control up to two RF waveguide switch assemblies. As note previously, the KPA has additionally
been designed to automatically detect whether it is in a standalone or redundancy system. These
features greatly simplify redundancy configurations from both the cost and operational
complexity standpoint.
is connected. Polling on the dedicated redundancy bus will not begin until
the redundancy loop cable is connected. Each KPA’s designation in a
redundant subsystem is determined automatically via the redundancy
interface cable connected between the two (i.e., 1:1) or three (i.e., 1:2) KPAs
in the redundant configuration.
OPERATIONS
In a redundant configuration, the backup KPA in the redundancy subsystem auto matically monitors
the configuration and status for each of the primary (chained) KPAs. This information is
communicated via the dedicated serial interface between the KPAs.
If a primary KPA fails, the backup detects this event and automatically reconfigures itself to the
proper attenuation setting and positions the waveguide switch to provide minimal loss o f traffic.
A result of this design is to greatly lessen the throughput requirements (i.e. polling rate) of earth
station monitor and control systems. The backup KPA handles all of the time-critical tasks,
allowing the earth station monitor and control system to focus on less intelligent subsystems.
B–1
Page 86

KPA Ku-Band Indoor Solid-State Power Amplifier Revision 1
Appendix B MN/KPA.IOM
B.2 Redundancy Operation
Figure B-1. 1:1 Redundancy Block Diagram
Figure B-1 shows the bloc
k diagram for a typical 1:1 redundant system. Whether 1:1 or 1:2
redundant operations are employed, note the following:
Normal Operation
Controller Mode With the backup SSPA in the controller mode, it monitors the Online Unit(s) for faults.
Fault
Waveguide
Incoming RF signals are routed through the primary online SSPA (1:1), or SSPA (1:2) to
the system output(s) by the combination waveguide/coax switch(es).
When a fault occurs in an Online Unit, the backup SSPA automatically configures itself
with the settings of the faulted Online Unit. (These now active settings also incorporated
any user defined offsets that may have been programmed into the Backup Unit.)
The position of the waveguide/coax switch also is automatically changes to route the
signal through the Backup Unit, thereby minimizing the loss of traffic.
B.3 Redundancy Kit Installation
Comtech EF Data KPAs are easily configured for optional redundant operation by using an optional
Redundancy Kits. These kits include all the necessary control, semi-rigid, and wav eguide cabling,
and the appropriate waveguide/coax switches and t erm ination s. Figure B-2 and Figure B-4 sho
typical 1:1 redundant system assembly; the associated parts lists are provided in Table B-1.
As
shown, the primary and backup KPAs are typically installed adjacent to one another in a
standard 19-inch wide (48 cm) equipment rack. Because of the configuration of the dual Waveguide
Coax Switch, the upper KPA always acts as the “Backup” unit.
w a
Note: Redundancy kits are available for 1:2 configurations, and provide all required cabling and
switches. As 1:2 Redundancy Kits are typically designed to a customer’s unique specifications,
B–2
Page 87
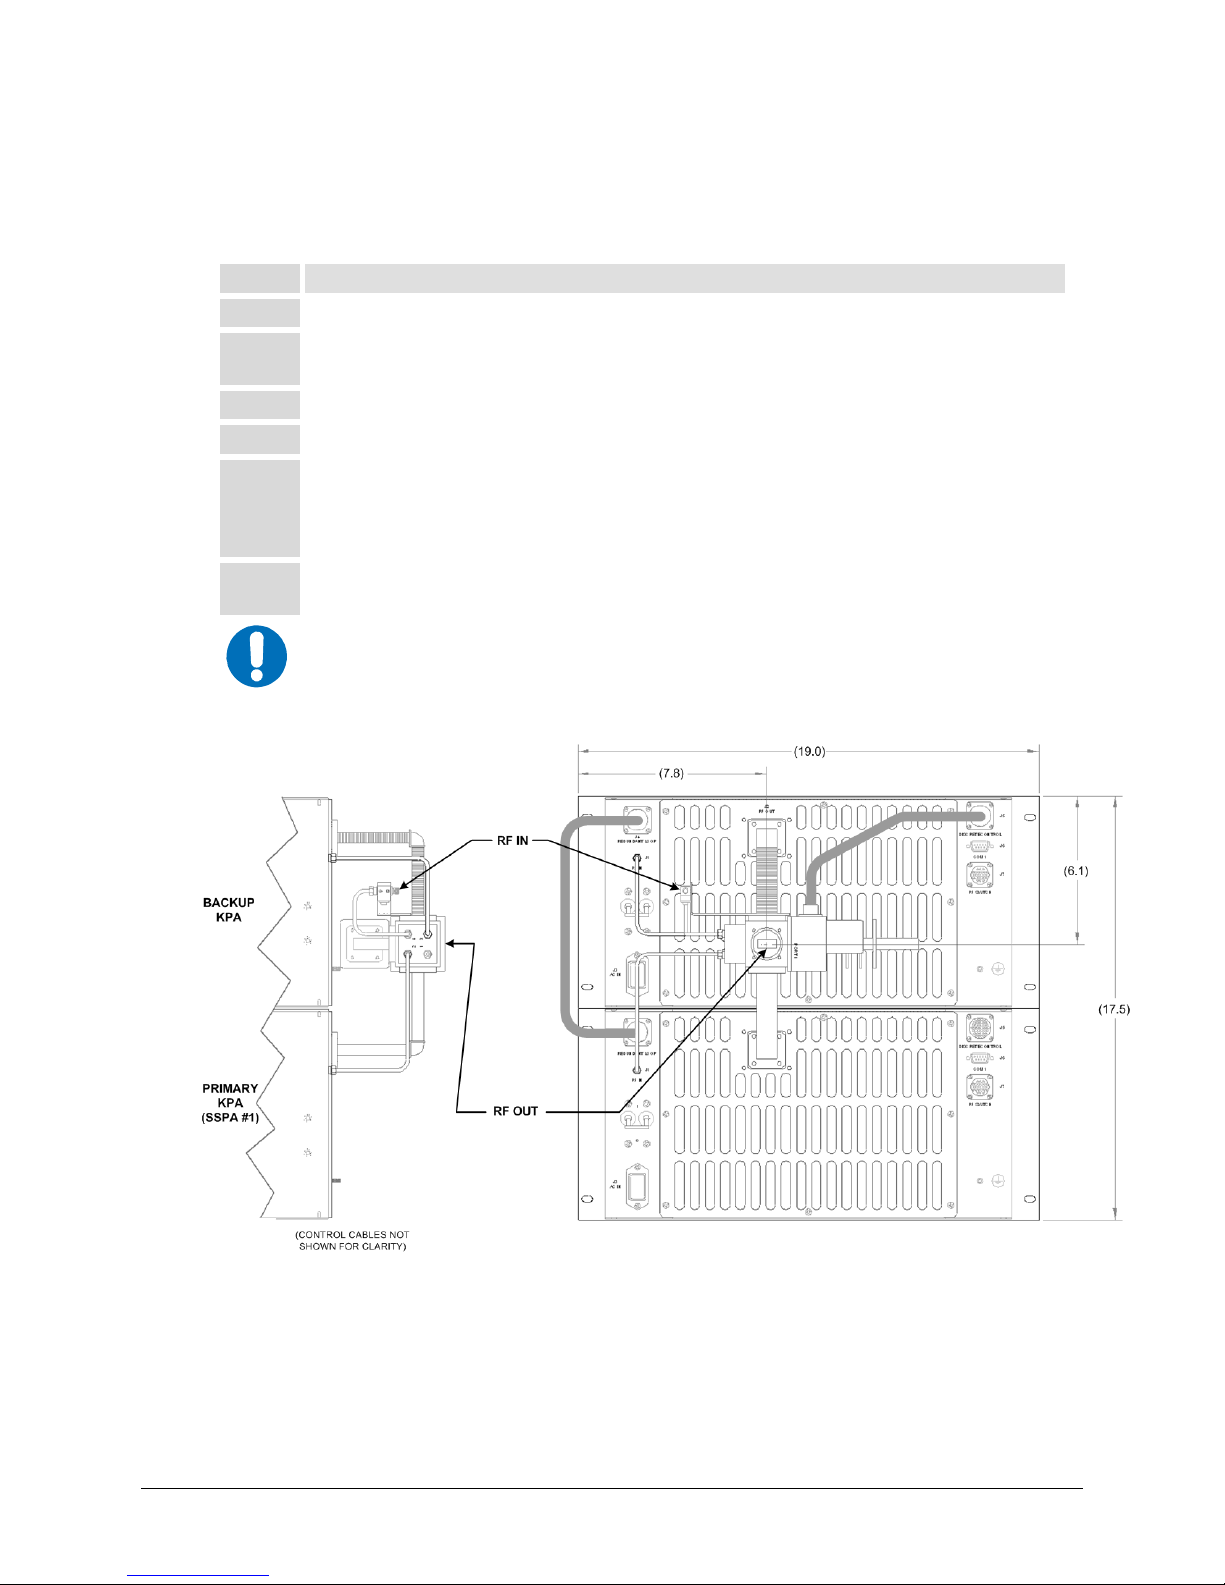
KPA Ku-Band Indoor Solid-State Power Amplifier Revision 1
Appendix B MN/KPA.IOM
they are not shown in this manual. Contact Comtech EF Data for 1:2 Redundancy Kits and their
pertinent installation diagrams and assembly instructions.
Perform the installation as follows (refer also to Figure B-2 and Figure B-4):
Step Procedure
1 Assemble the waveguide load and bend to the proper port of the switch.
2 Attach the rigid lower waveguide arm, using the supplied screws. The switch should be installed with
“Port 1” facing outward.
3 The upper Waveguide (flexible arm) along with the isolator bracket should be installed next.
4 Complete the installation by attaching the coaxial cables, coaxial load, and control cables.
5 Note that the installation of the control cables determines which unit will function as the backup KPA.
Due to the nature of the dual WG-coax switch, this will always be the upper unit. Therefore, the end
of the redundant loop cable (40, Figure 2-1) labeled “BU SSPA,” should be connected to J4 of the
upper (backup) unit.
6 The appropriate end of the control cable attaching to the Waveguide Switch (Item 50) should also be
attached to the Backup Unit at the J7 RF SWITCH connector.
A gasket must be installe d betwe en each w avegui de i nte rface. If both wav egui de
surfaces are grooved, use a thick gasket. If only one surface is grooved, use a
IMPORTANT
thin gasket.
Figure B-2. 1:1 Redundancy Installation – Complete
B–3
Page 88

KPA Ku-Band Indoor Solid-State Power Amplifier Revision 1
Appendix B MN/KPA.IOM
B.3.1 Redundancy Kit Control Cabling
For either a 1:1 or a 1:2 redundant system, two control cable assemblies are required for setup as
shown in Figure B-3. Othe
1:1 System Control Cabling 1:2 System Control Cabling
r RF coaxial cables and waveguides are require d as shown in Figure B-4.
Figure B-3. KPA Redun
dancy System – Control Cabling Schematics
The redundant loop cable used for interconnection of the KPAs via their J4 REDUNDANT
LOOP connectors, as shown in Figure B-3 and Figure B-4,
has the following characteristics:
• The cable assembly is not a “straight through” cable.
• The cable assembly is labeled “BACKUP” on one end, and “KPA#1” on the other end.
• The cable assembly is wired so that, when connected to two KPAs, one KPA will
automatically configure itself as the Backup Controller and the other KPA will automatically
configure itself as the ‘Primary KPA’.
• The backup KPA communicates to the primary KPA via a serial interface that is also
provided by this cable assembly. This interface is used by the Backup KPA to acquire
configuration information from KPA #1. This interface additionally provides th e link for
virtual addressing as described in this manual in Appendix C. REMOTE CONTROL.
• Also included in this cable assembly are summary fault relay contacts that are used by the
backup KPA as an input to its switching logic.
For 1:2 redundancy systems, note that the functionality describ ed for the 1:1 cable assembly also
applies to the 1:2 cable assembly; the only difference is that there is now a third connector, labeled
“KPA#2”, daisy-chained onto the cable assembly. When a third Comtech EF Data KPA is
connected via this cable assembly, it will automatically configure itself as ‘Primary KPA #2.’
A second cable assembly – a six-wire assemb ly – connects the Backup Unit’s J7 RF SWITCH
connector to the Waveguide Switch.
B–4
Page 89

KPA Ku-Band Indoor Solid-State Power Amplifier Revision 1
Appendix B MN/KPA.IOM
This page is intentionally blank.
B–5
Page 90

KPA Ku-Band Indoor Solid-State Power Amplifier Revision 1
Appendix B MN/KPA.IOM
B–6
Table B-1. KPA Redundancy Kits – Parts List
ITEM CEFD PART NO.
QUANTITY (PER ASSY)
DESCRIPTION
A
S/0435
KPS-040
10
CA/RF0075
1 –
Cable, Switch P3 to Backup (Upper) J1
CA/RF0063
– 1
20
CA/RF0076
1 –
Cable, Switch P2 to SSPA#1 (Lower) J1
CA/RF0064
– 1
30 CA/RF0065
1 1
Cable, Switch P4 to Isolator
40 CA/WR0006
1 1
Cable, Redundant Loop
50 CA/WR0007
1 1
Cable, Waveguide Switch to Backup (Upper) J7
60 CN/CX2001-6501-00
1 1
Connector – OSM, SMS, Plug Terminator
70 FP/BR0042 1
1
Bracket, Isolator Mounting
80
FP/WG0045
1 –
Waveguide, WR75, Backup (Upper) 90°
FP/WG0022
– 1
90
FP/WG0046
1 –
Waveguide, WR75, SSPA#1 (Lower) 90°
FP/WG0023
– 1
100 FP/WG0024
1 1
Waveguide, WR75, Elbow 90°
110 FP/WG0025
1 1
Waveguide, WR75, Termination 100W
120 GA/GSKTWR75FULL
7 7
Gasket, WR75, Full Thickness
130
03P1068 2
–
Screw, Philips Head, 0-80 x 3/16 LG
HW/1.6MM
–
2
1.6mm Screw
140 HW/632X3/8SHCS-B
32 32
Screw, Socket Head Cap, 6-32 x 3/8 LG, Black
150 HW/6-SPLIT
32 32
Split Lock Washer, Stainless Steel, #0
160
RF/ISHF037306-001
1 –
RF – ISO, 13-16G, SMA – F/F
RF/ISQC140145-1FF
– 1
170
SW/WG-754AO
1 –
Switch, WR75, O-Ring, Dual WGSMA
SW/WG-3SAG
– 1
180 XX/P-SUPERO-LUBE
A/R
A/R
Parker Super O-Lube, 2 oz
Page 91

KPA Ku-Band Indoor Solid-State Power Amplifier Revision 1
Appendix B MN/KPA.IOM
B–7
Figure B-4. 1:1 Redundancy Kit Assembly
BACKUP
KPA
PRIMARY
KPA
(SSPA#1)
Page 92

KPA Ku-Band Indoor Solid-State Power Amplifier Revision 1
Appendix B MN/KPA.IOM
B.4 Gain Equalization of Redundant Units
To equalize the gain between the Backup Unit and the Online Unit(s), Gain Offset adjustment is
accomplished via the Backup Unit.
Before continuing, make sure that:
a) All external interface connections have been completed as outlined in
IMPORTANT
To determine the relative gain of the Backup Unit versus the Online unit(s):
Step Procedure
Sect. B.3, and
b) The Online Unit is online and transmitting
observing the Online Unit’s front panel LEDs, and through the pertinent
configuration menus.
– this can be verified by
1
2
3
4
5
Apply an RF signal to the RF redundancy input isolator. Monitor the output power
level at the waveguide switch output. (Make sure not to apply too large of an input
signal which will saturate the amplifiers. Also be sure to have a properly rated load
to measure the output power.)
Adjust the input signal power level and attenuation of the Online Unit to arrive at the
desired output power level.
Record the output level of the Online Unit in dBm.
Force the Backup Unit to be the active path as outlined in the CONFIGURATION
Menu. Ensure the Offset Value at this point is 0.0 dBm. Record the output level in
dBm of the Backup Unit.
If the output levels are equal, no more adjustment is necessary. Otherwise proceed
as follows.
Section Notes:
B–8
Page 93

KPA Ku-Band Indoor Solid-State Power Amplifier Revision 1
Appendix B MN/KPA.IOM
B.4.1 Case Examples
Case 1. Backup Å Online unit(s)
1. Ensure the Online Unit
attenuation is set to a value in dB greater than or equal (≥ ) to the
difference in levels measured above.
2. With the Backup Unit forced to be the active unit, adjust the OFFSET value in the
CONFIG: Redundancy Æ SSPA#1 menu to approximately the difference measured
previously. This will be a negative
(-) number.
3. Toggle between the Online and Backup units as being the active path by forcing and un-
forcing a backup through the Backup Unit’s CONFIG: Redundancy Æ SSPA#1 menu.
Ensure the output levels measured are equal. If necessary, re-adjust the Offset Value until
equal levels are measured. (Note that the Backup Unit’s total attenuation level as now
indicated in the CONFIG: Amp Æ Attenuation menu will be equal to the setting of the
Online Unit less
For Example: Online Unit Output Level 47.00 dBm
the OFFSET value.)
Backup Unit Output Level 45.25 dBm
Backup Unit Offset Value 0.00 dBm
Online Attenuation Setting 3.00 dB (must be >1.75 dB)
AFTER TOGGLING AND ADJUSTING:
Backup Offset Value -1.75 dB
Section Notes:
New Equalized Output Level 47.0 dBm
Backup Attenuation Setting 1.25 dB (3+(-1.75) = 1.25)
B–9
Page 94

KPA Ku-Band Indoor Solid-State Power Amplifier Revision 1
Appendix B MN/KPA.IOM
Case 2. Backup Æ Online unit(s)
1. With the Backup Unit forced to be the active unit, adjust the Offset Value in the
CONFIG: Redundancy menu to roughly the difference measured previously. This will
be a positive
(+) number.
2. Toggle between the online and Backup Units as being the active path by forcing and un-
forcing a backup through the Backup Unit’s CONFIG: Redundancy Æ SSPA#1 menu.
Make sure the output levels measured are equal. If necessary, re-adjust the Offset Value
until equal levels are measured. (Note that the Backup Unit total attenuation level as now
indicated in the CONFIG: Amp Æ Attenuation menu will be equal to the setting of the
Online Unit plus
For Example: Online Unit Output Level 47.00 dBm
the Offset Value.)
Backup Unit Output Level 48.75 dBm
Backup Unit Offset Value 0.00 dBm
Online Attenuation Setting 3.00 dB
AFTER TOGGLING AND ADJUSTING:
Section Notes:
Backup Offset Value +1.75 dB
New Equalized Output Level 47.00 dBm
Backup Attenuation Setting 4.75 dB (3+(+1.75) = 4.75)
B–10
Page 95

C–1
Appendix C. REMOTE CONTROL
C.1 Overview
This appendix describes the protocol and message command set for remote monitor and control of the KPA ISSPA.
The electrical interface is either an EIA-485 multi-drop bus (for the control of many devices) or an EIA-232 connection (for the control of
a single device), and data is transmitted in asynchronous serial form using ASCII characters. Control and status information is transmitted
in packets of variable length, in accordance with the structure and protocol defined in later sections.
The default port is EIA-485 (2-wire); selection is made via the front panel CONFIG: Remote Æ Serial Æ Interface menu. See
Chapter 5. KPA FRONT PANEL OPERATION for further information.
C.2 EIA-485
For applications where multiple devices are to be monitored and controlled, a full-duplex (or 4-wire plus ground) EIA-485 is preferred.
Half-duplex (2-wire plus ground) EIA-485 is possible, but is not preferred. In full-duplex EIA-485 communication, there are two separate,
isolated, independent, differential-mode twisted pairs, each handling serial data in different directions.
It is assumed that a 'Controller' device (a PC or dumb terminal) transmits data in a broadcast mode via one of the pairs. Many 'Target'
devices are connected to this pair, and all simultaneously receive data from the Controller. The Controller is the only device with a linedriver connected to this pair – the Target devices have only line-receivers connected.
In the other direction, on the other pair each Target has a tri-state line driver connected, and the Controller has a line-receiver connected.
All the line drivers are held in high-impedance mode until one (and only one) Target transmits back to the Controller. Each Target has a
unique address, and each time the Controller transmits, the address of the intended recipient Target is included in a framed 'packet' of data.
Page 96

KPA Ku-Band Indoor Solid-State Power Amplifier Revision 1
Appendix C MN/KPA.IOM
C–2
All of the Targets receive the packet, but only one (the intended) will reply. The Target enables its output line driver and transmits its
return data packet back to the Controller in the other direction, on the physically separate pair.
EIA-485 (full duplex) summary:
• Two differential pairs – one pair for Contr oller-to- Target, one pai r for Target-to-C ontroller .
• Controller-to-Target pair has o ne line driver (C ontrol ler), a nd all Ta rgets have li ne-re ceivers.
• Target-to-Controller pair has one line receiver (Controller), and all Targets have Tri-State drivers.
C.3 EIA-232
This is a much simpler configuration in which the Controller device is connected directly to the Target via a two-wire-plus-ground
connection. Controller-to-Target data is carried, via EIA-232 electrical levels, on one conductor, and Target-to-Controller data is carried in
the other direction on the other conductor.
C.4 Basic Protocol
Whether in EIA-232 or EIA-485 mode, all data is transmitted as asynchronous serial characters, suitable for transmission and reception by
a UART. The asynchronous character format is 8-N-1 (8 data bits, no parity, one stop bit). Five (5) baud rates are supported: 2400 baud,
4800 baud, 9600 baud, 19200 baud, and 38400 baud.
All data is transmitted in framed packets. The Controller is assumed a PC or ASCII dumb terminal that is in charge of the process of
monitor and control. The Controller is the only device that is permitted to initiate, at will, the transmission of data. Targets are only
permitted to transmit when they have been specifically instructed to do so by the Controller.
All bytes within a packet are printable ASCII characters, less than ASCII code 127. In this context, the Carriage Return and Line Feed
characters are considered printable.
All messages from Controller-to-Target require a response (with one exception). This will be either to return data that has been requested by the
Controller, or to acknowledge reception of an instruction to change the configuration of the Target. The exception to this is when the Controller
broadcasts a message (such as Set Time/Date) using Address 0, when the Target is set to EIA-485 mode .
Page 97

KPA Ku-Band Indoor Solid-State Power Amplifier Revision 1
Appendix C MN/KPA.IOM
C–3
C.5 Packet Structure
Controller-to-Target
Start of Packet Target Address Address Delimiter Instruction Code Code Qualifier Optional Arguments End of Packet
<
ASCII code 60
(1 character)
(4 characters)
/
ASCII code 47
(1 character)
(3 characters)
= or ?
ASCII codes 61 or
63
(1 character)
(n characters)
Carriage Return
ASCII code 13
(1 character)
Example: <0412/MUT=1{CR}
Target-to-Controller
Start of Packet Target Address Address Delimiter Instruction Code Code Qualifier Optional Arguments End of Packet
>
ASCII code 62
(1 character)
(4 characters)
/
ASCII code 47
(1 character)
(3 characters)
=, ?, !, or *
ASCII codes
61, 63, 33, or 42
(1 character)
(From 0 to n
characters)
Carriage Return,
Line Feed
ASCII codes 13,10
(2 characters)
-OR-
Carriage Return,
Line Feed
ASCII codes 13,10
(3 characters)
Example: >0412/MUT=1{CR}{LF}
If it is an error message or an old remote command, ‘]’ will show at the end.
Example: >1?ATT_INVALID PARAMETER'cr''lf']
C.5.1 Start of Packet
Controller-to-Target: This is the character ‘<’ (ASCII code 60).
Target-to-Controller: This is the character ‘>’ (ASCII code 62).
Because this is used to provide a reliable indication of the start of packet, these two characters may not appear anywhere else within the
body of the message. The only exceptions are in command RMS and CMS where the response is “FWPWR=<19.0”.
Page 98

KPA Ku-Band Indoor Solid-State Power Amplifier Revision 1
Appendix C MN/KPA.IOM
C–4
C.5.2 Target Address
Up to 9,999 devices can be uniquely addressed. In both EIA-232 and EIA-485 applications, the permissible range of values is 1 to 9999. It
is programmed into a target unit using the remote control port.
IMPORTANT
The controller sends a packet with the address of a target - the destination of the packet. When the target responds,
the address used is the same address, to indicate to the controller the source of the packet. The controller does not
have its own address.
C.5.3 Address Delimiter
This is the “forward slash” character '/ ' (ASCII code 47).
C.5.4 Instruction Code
This is a three-character alphabetic sequence that identifies the subject of the message. Wherever possible, the instruction codes have been
chosen to have some significance. This aids in the readability of the message if seen in its raw ASCII form. Both upper and lower case
alphabetic characters may be used (A-Z ASCII codes 65-90 and a-z ASCII codes 97-122).
C.5.5 Instruction Code Qualifier
This is a single character, which further qualifies the preceding instruction code. Code Qualifiers obey the following rules:
1. From Controller-to-Target, the only permitted values are:
Symbol Definition
=
(ASCII code 61)
The = code is used as the assignment operator, and is used to indicate that the p arameter defined by the precedin g byte
should be set to the value of the argument(s) that follow it.
Example: In a message from Controller to Target, MUT=1 would mean ‘enable the mute function.’
?
(ASCII code 63)
The ? (ASCII code 63) is used as the query operator, and is used to indicate that the Target should return the current value
of the parameter defined by the preceding byte.
Example: In a message from Controller to Target, MUT? would mean ‘return the current state of the mute function.’
Page 99

KPA Ku-Band Indoor Solid-State Power Amplifier Revision 1
Appendix C MN/KPA.IOM
C–5
2. From Target-to-Controller, the only permitted value is:
Symbol Definition
=
(ASCII code 61)
The = code is used in two ways:
First, if the controller has sent a query code to a target (for example MUT?, meaning ‘is mute enable or disable?’), the
target would respond with MUT=x, where x represents the state in question: 1 being ‘enable’ and 0 being disable.
Second, if the controller sends an instruction to set a parameter to a part icular value, then, pr oviding the value s ent in the
argument is valid, the target will acknowledge the message by replying with MUT= (with no message arguments).
3. The KPA will display the following error messages:
>DEV?COM_COMMAND UNRECOGNIZED'cr''lf']
>DEV?COM_INVALID PARAMETER'cr''lf']
>DEV?COM_DEVICE IN LOCAL MODE'cr''lf']
>DEV?COM_DEVICE IN AUTO MODE'cr''lf']
>DEV?COM_COMMAND NOT AVAILABLE'cr''lf']
>DEV?COM_DEVICE IS NOT IN SERIAL MODE'cr''lf']
>DEV?COM_DEVICE IS NOT IN ETHERNET MODE'cr''lf']
C.5.5.1 Backward Compatibility Code Qualifier
The current firmware version (FW Ver. 2.X.X and higher) supports both the current and old (FW Ver. 1.X.X) remote commands and
queries, and is therefore backward compatible.
The KPA uses code qualifier ‘_’ to identify the command as an old (i.e., FW Ver. 1.X.X) remote command. If it is, it will respond
with the old format:
<001/MUT_OFF'cr'
>001/MUT_OFF'cr''lf']
SEE SECT. C.7 FOR THE LISTING OF OLD REMOTE COMMANDS.
C.5.6 Optional Message Arguments
Arguments are not required for all messages. Arguments are ASCII codes for the characters 0 to 9 (ASCII codes 48 to 57), period (ASCII
code 46), and comma (ASCII code 44).
Page 100

KPA Ku-Band Indoor Solid-State Power Amplifier Revision 1
Appendix C MN/KPA.IOM
C–6
C.5.7 End of Packet
Controller-to-Target: This is the ‘Carriage Return’ character (ASCII code 13).
Target-to-Controller: This is the two-character sequence ‘Carriage Return’, ‘Line Feed’ (ASCII codes 13 and 10). Both indicate the
valid termination of a packet.
For the error message or the old remote command, it is the three-character sequence ‘Carriage Return’, ‘Line Feed’, ‘]’ (ASCII codes 13,
10, and 93).
All indicate the valid termination of a packet.
 Loading...