

Page 1

p
EQ90 Series
Group Delay/Amplitude Equalizer
Installation and O
eration Manual
Part Number MN/EQ900.IOM Revision 2
Page 2

EQ90 Series
Comtech EFData is an ISO 9001
Registered Company.
Group Delay/Amplitude Equalizer
Installation and Operation Manual
Part Number MN/EQ90.IOM
Revision 2
June 14, 1998
Copyright © Comtech EFData, 2000. All rights reserved. Printed in the USA.
Comtech EFData, 2114 West 7th Street, Tempe, Arizona 85281 USA, (480) 333-2200, FAX: (480) 333-2161.
Page 3

Customer Support
Contact the Comtech EFData Customer Support Department for:
• Product support or training
• Information on upgrading or returning a product
• Reporting comments or suggestions concerning manuals
A Customer Support representative may be reached at:
Comtech EFData
Attention: Customer Support Department
2114 West 7th Street
Tempe, Arizona 85281 USA
(480) 333-2200 (Main Comtech EFData Number)
(480) 333-4357 (Customer Support Desk)
(480) 333-2161 FAX
or, E-Mail can be sent to the Customer Support Department at:
service@comtechefdata.com
Contact us via the web at www.comtechefdata.com
1. To return a Comtech EFData product (in-warranty and out-of-warranty) for
repair or replacement:
2. Request a Return Material Authorization (RMA) number from the Comtech
EFData Customer Support Department.
3. Be prepared to supply the Customer Support representative with the model
number, serial number, and a description of the problem.
4. To ensure that the product is not damaged during shipping, pack the product in
its original shipping carton/packaging.
5. Ship the product back to Comtech EFData. (Shipping charges should be prepaid.)
For more information regarding the warranty policies, see Warranty Policy, p. viii.
.
ii Rev. 2
Page 4

Table of Contents
CHAPTER 1. INTRODUCTION..................................................................................1–1
1.1 Overview..................................................................................................................................................... 1–1
1.2 Description of Equipment .........................................................................................................................1–3
1.2.1 Functional Description........................................................................................................................1–3
1.2.2 Mechanical Description.......................................................................................................................1–3
1.3 Specification ............................................................................................................................................... 1–4
1.4 Dimensional Envelope ............................................................................................................................... 1–6
CHAPTER 2. INSTALLATION...................................................................................2–1
2.1 Unpacking................................................................................................................................................... 2–1
2.2 Installation.................................................................................................................................................. 2–2
2.3 External Connectors.................................................................................................................................. 2–4
2.3.1 Channel Monitor ................................................................................................................................. 2–5
2.4 Chassis Ground.......................................................................................................................................... 2–5
CHAPTER 3. OPERATION.........................................................................................3-1
3.1 Front Panel Indicators................................................................................................................................3-1
3.2 Rear Panel Control and Connectors .........................................................................................................3-3
3.3 Equalizer Adjustments...............................................................................................................................3-5
3.3.1 Power ON.............................................................................................................................................3-5
3.4 Alignment Procedures................................................................................................................................3-5
Rev. 2 iii
Page 5
Errata B
Comtech EFData Documentation Update
Subject:
Date:
Document:
Part Number:
Collating Instructions:
Comments:
The following addition is provided to revise the unit.
Change Specifics:
Add DC Input Filter Module pinouts
September 7, 2005
EQ-90 IF Group Delay Equalizer
Part Number MN/RC1160.EA1
Attach this page to 2-2
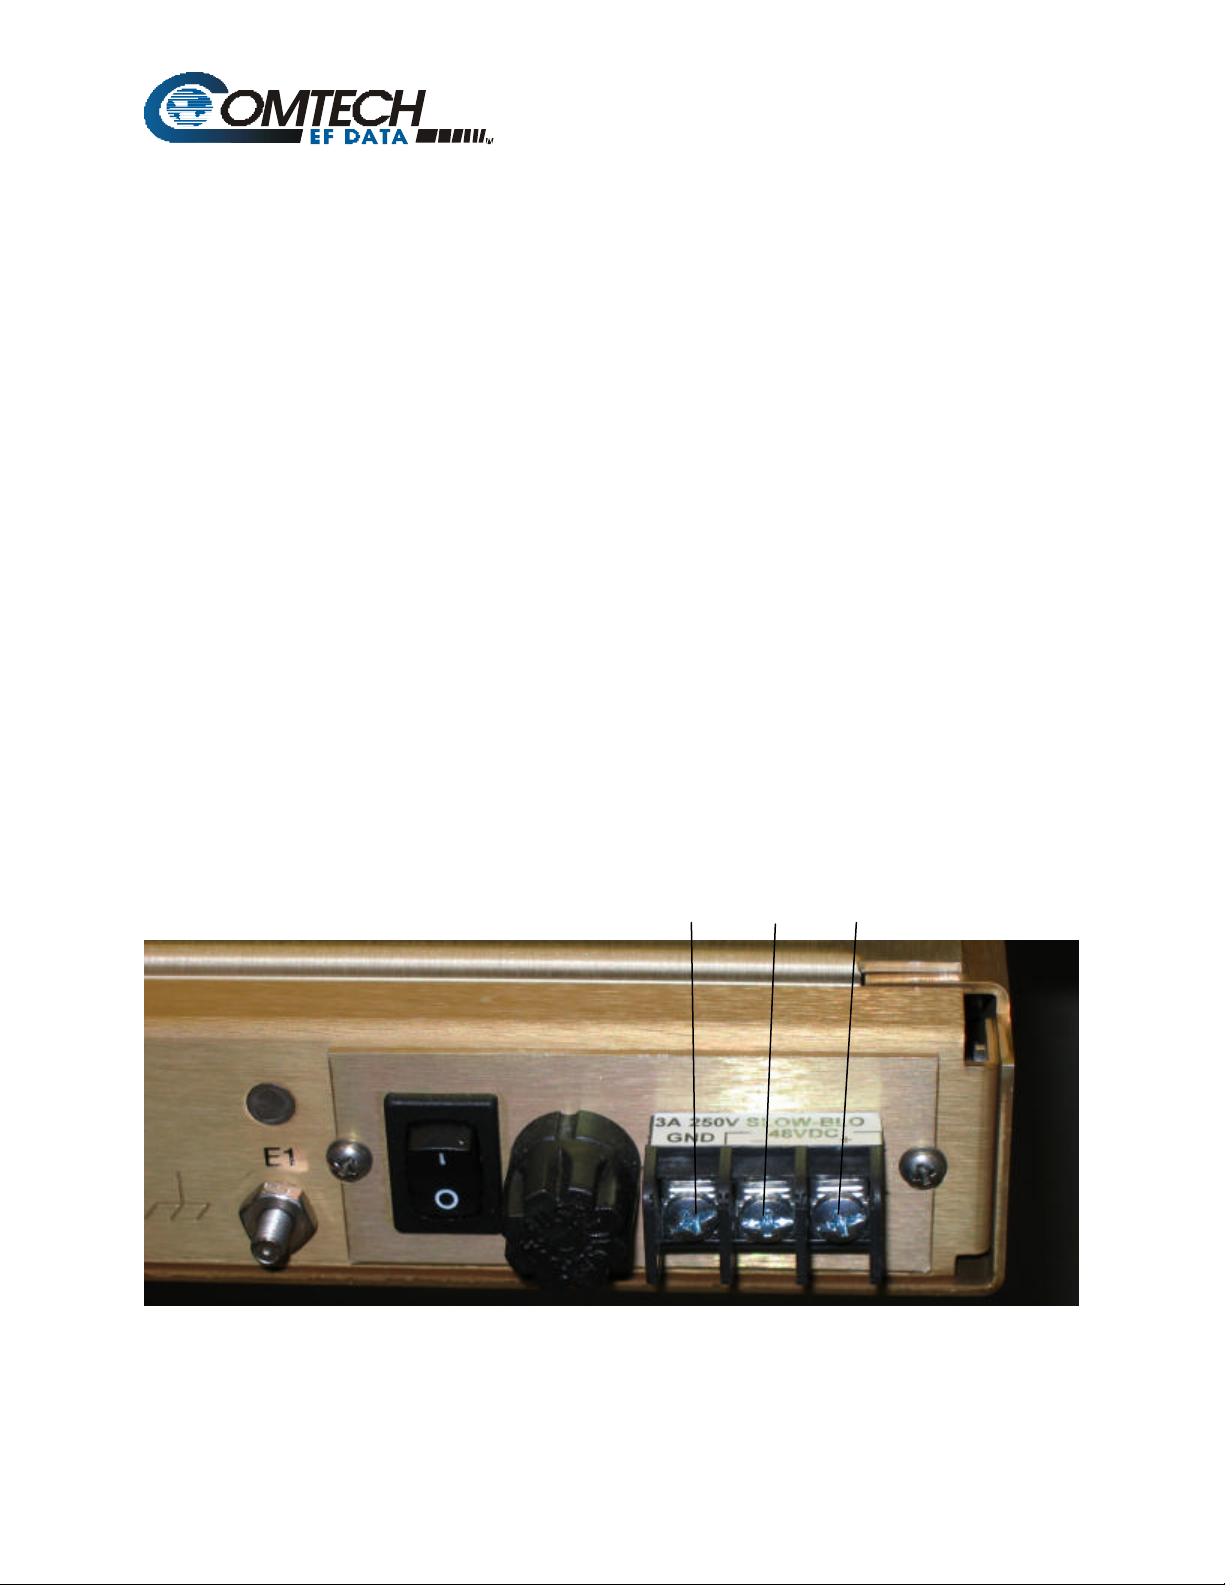
2.3.1 DC Filter Input Module
The DC Input Filter Module (shown in Figure Figure 2-1) has pinouts listed in Table 2-1. Input
voltage range: -36 to -72 VDC.
A B C
Figure 2-1. DC Input Filter Module
Filename: T_ERRATA 1
Page 6

Table 2-1. DC Input Filter Module
Pin # Signal Name Wire Colors Wiring Options
A Ground Green/Yellow Earth Ground Earth Ground
B Negative Black -48 VDC 0 VDC
C Positive Red 0 VDC +48 VDC
Filename: T_ERRATA 2
Page 7

Preface EQ90 Series
3.4.1 Equalizer Adjustment...........................................................................................................................3-5
3.4.2 Alignment to a Specific Delay Requirement......................................................................................3-11
3.4.3 Slope Equalizer Adjustment...............................................................................................................3-15
3.4.4 System Integration Alignment Procedure..........................................................................................3-16
CHAPTER 4. MAINTENANCE...................................................................................4–1
4.1 Checkout..................................................................................................................................................... 4–1
4.2 Troubleshooting.........................................................................................................................................4–2
4.3 Replacement Procedures...........................................................................................................................4–3
4.3.1 Chassis Cover...................................................................................................................................... 4–3
4.3.2 Equalizer Modules .............................................................................................................................. 4–3
4.3.3 Power Supply Assembly .....................................................................................................................4–3
4.3.4 Fuse Replacement ............................................................................................................................... 4–4
4.3.5 Spare Parts........................................................................................................................................... 4–4
APPENDIX A. APPLICATION NOTE ....................................................................... A–1
A.1 Introduction..........................................................................................................................................A–1
A.2 Operational Parameters....................................................................................................................... A–2
A.3 Fault Monitor........................................................................................................................................ A–3
A.4 Monitor Interface.................................................................................................................................A–3
GLOSSARY ................................................................................................................g–1
iv Rev. 2
Page 8

EQ90 Series Preface
Figures
Figure 1-1. EQ90 Series Group Delay/Amplitude Equalizer Assembly..............................................1–2
Figure 1-2. Dimensional Envelope.......................................................................................................1–6
Figure 2-1. Typical Rack Installation................................................................................................... 2–3
Figure 2-2. Equalizer Power and Interface Connectors ........................................................................ 2–4
Figure 3-1. Front Panel Indicators.........................................................................................................3-2
Figure 3-2. Rear Panel Control and Connectors....................................................................................3-3
Figure 3-3. Equalizer Module...............................................................................................................3-6
Figure 3-4. Alignment Setup.................................................................................................................3-8
Figure 3-5. Effect on Delay of Varying C Switch.................................................................................3-8
Figure 3-6. Effect on Delay of Varying “L”........................................................................................3-10
Figure 3-7. Effect on Amplitude of Varying “R”................................................................................3-10
Figure 3-8. Effect on Amplitude of Varying “R”................................................................................3-11
Figure 3-9. Multi-Pole Bandpass Filter Delay Response ....................................................................3-11
Figure 3-10. Single-Section Equalizer Delay Response......................................................................3-12
Figure 3-11. Composite Delay Response............................................................................................3-12
Figure 3-12. Equalizer Composite Delay Response............................................................................3-14
Figure 3-13. All Sections Tuned 1 MHz Lower in Frequency............................................................3-14
Figure 3-14. All Sections Tuned 1 MHz Higher In Frequency...........................................................3-15
Figure 3-15. System Integration Alignment Test Setup......................................................................3-16
Figure 3-16. Typical Satellite Transponder Delay..............................................................................3-17
Figure 3-17. Required Equalizer Delay Characteristic........................................................................3-17
Figure 3-18. Ideal Composite Delay Result........................................................................................3-18
Figure 3-19. Typical Half Transponder Video Carrier Delay.............................................................3-19
Figure 3-20. Required Equalized Delay Characteristic.......................................................................3-19
Figure 3-21. Ideal Composite Delay Result........................................................................................3-20
Figure 3-22. Typical Delay Characteristic..........................................................................................3-20
Figure 3-23. Shifted Equalizer Delay Characteristic...........................................................................3-21
Figure 3-24. Resultant Composite Delay Characteristic.....................................................................3-21
Figure 3-25. Transponder Delay Characteristic ..................................................................................3-23
Figure 3-26. Equalizer Delay Characteristic.......................................................................................3-23
Figure 3-27. Resultant Composite Delay Characteristic.....................................................................3-24
Figure 3-28. Transponder Delay Characteristic ..................................................................................3-24
Figure 3-29. Equalizer Offset Delay Characteristic............................................................................3-25
Figure 3-30. Resultant Composite Delay Characteristic.....................................................................3-25
Figure 4-1. Equalizer Component Locations ....................................................................................... 4–5
Tables
Table 1-1. Electrical Specifications and Operational Characteristics.......................................... 1–4
Table 2-1. Single Channel Equalizer Rear Panel Mating Connectors......................................... 2–5
Table 2-2. Dual Channel Equalizer Rear Mating Connectors .....................................................2–5
Table 3-1. Front Panel Indicator Functions..................................................................................3-2
Table 3-2. Rear Panel Controls and Connector Functions ...........................................................3-4
Table 3-3. Equalizer Module Control Functions..........................................................................3-6
Table 3-4. Peak-to-Peak Delay Magnitude ................................................................................3-13
Table 4-1. Equalizer Troubleshooting Procedure........................................................................ 4–2
Table 4-2. Equalizer Spare Parts................................................................................................. 4–5
Rev. 2 v
Page 9

Preface EQ90 Series
Overview of Changes to Previous Edition
A summary of the changes made to Rev. 1 are as follows:
• Manual updated for styles and conventions relative to Comtech EFData format.
About this Manual
This manual provides installation and operation information for the EFData EQ-90 Series
Group Delay/Amplitude Equalizer. This is a technical document intended for earth
station engineers, technicians, and operators responsible for the operation and
maintenance of the EQ-90.
Conventions and References
Cautions and Warnings
CAUTION indicates a hazardous situation that, if not avoided, may result in
minor or moderate injury. CAUTION may also be used to indicate other
CAUTION
unsafe practices or risks of property damage.
WARNING indicates a potentially hazardous situation that, if not avoided,
could result in death or serious injury.
WARNING
Metric Conversion
Metric conversion information is located on the inside back cover of this manual. This
information is provided to assist the operator in cross-referencing English to Metric
conversions.
Recommended Standard Designations
Recommended Standard (RS) Designations have been superseded by the new designation
of the Electronic Industries Association (EIA). References to the old designations are
shown only when depicting actual text displayed on the screen of the unit (RS-232, RS-
vi Rev. 2
Page 10
EQ90 Series Preface
485, etc.). All other references in the manual will be shown with the EIA designations
(EIA-232, EIA-485, etc.) only.
Military Standards
“MIL-STD-188” apply to the 114A series (i.e., MIL-STD-188-114A), which provides
electrical and functional characteristics of the unbalanced and balanced voltage digital
interface circuits applicable to both long haul and tactical communications. Specifically,
these references apply to the MIL-STD-188-114A electrical characteristics for a balanced
voltage digital interface circuit, Type 1 generator, for the full range of data rates. For
more information, refer to the Department of Defense (DOD) MIL-STD-188-114A,
“Electrical Characteristics of Digital Interface Circuits.”
Trademarks
Windows is a trademark of Microsoft Corporation. Other product names mentioned in
this manual may be trademarks or registered trademarks of their respective companies
and are hereby acknowledged.
Reporting Comments or Suggestions Concerning this Manual
Comments and suggestions regarding the content and design of this manual will be
appreciated. To submit comments, please contact the Comtech EFData Customer Support
Department.
Low Voltage Directive (LVD)
The following information is applicable for the European Low Voltage Directive
(EN60950):
<HAR>
!
International Symbols:
Symbol Definition Symbol Definition.
Type of power cord required for use in the European Community.
CAUTION: Double-pole/Neutral Fusing.
ACHTUNG: Zweipolige bzw. Neutralleiter-Sicherung.
Alternating Current.
Fuse.
Safety Ground.
Chassis Ground.
Rev. 2 vii
Page 11

Preface EQ90 Series
Warranty Policy
This Comtech EFData product is warranted against defects in material and workmanship
for a period of one year from the date of shipment. During the warranty period, Comtech
EFData will, at its option, repair or replace products that prove to be defective.
For equipment under warranty, the customer is responsible for freight to Comtech
EFData and all related custom, taxes, tariffs, insurance, etc. Comtech EFData is
responsible for the freight charges
the customer. Comtech EFData will return the equipment by the same method (i.e., Air,
Express, Surface) as the equipment was sent to Comtech EFData.
only
for return of the equipment from the factory to
Limitations of Warranty
The foregoing warranty shall not apply to defects resulting from improper installation or
maintenance, abuse, unauthorized modification, or operation outside of environmental
specifications for the product, or, for damages that occur due to improper repackaging of
equipment for return to Comtech EFData.
No other warranty is expressed or implied. Comtech EFData specifically disclaims the
implied warranties of merchantability and fitness for particular purpose.
Exclusive Remedies
The remedies provided herein are the buyer's sole and exclusive remedies. Comtech
EFData shall not be liable for any direct, indirect, special, incidental, or consequential
damages, whether based on contract, tort, or any other legal theory.
Disclaimer
Comtech EFData has reviewed this manual thoroughly in order that it will be an easy-touse guide to your equipment. All statements, technical information, and
recommendations in this manual and in any guides or related documents are believed
reliable, but the accuracy and completeness thereof are not guaranteed or warranted, and
they are not intended to be, nor should they be understood to be, representations or
warranties concerning the products described. Further, Comtech EFData reserves the
right to make chang es in the specifications of the products described in this m anual at any
time without notice and without obligation to notify any person of such changes.
If you have any questions regarding your equipment or the information in this manual,
please contact the Comtech EFData Customer Support Department.
viii Rev. 2
Page 12

Errata A
Comtech EFData Documentation Update
Subject:
Date:
Document:
Part Number:
Collating Instructions:
Comments:
The following changes provide additional Table 2-3 and updates to paragraph 2.3.1. This
information will be incorporated into the next r evision.
Changes to Table 2-2. Summar y Alarm Interface Connector J3 Pin
Assignments
October 18, 2000
EQ90 Group Delay/Amplitude Equalizer Installation and Operation
Manual, Rev. 2, dated June 14, 1998
MN/EQ90.EA2
Attach this page to page 2-5
Change Specifics:
Table 2-3. Summary Alarm Interface Connector J3 Pin Assignments
Pin No. Assignment
1,2
3 Normally Open (Equalizer Operational). Referenced to pin 4.
4 Common
5,6 Not Used
7 Alarm Out (Open, Equalizer Operational). Referenced to pin 8.
8 Alarm Common
9 Normally Closed (Equalizer Operational). Referenced to pin 4.
Not Used
2.3.1 Channel Monitor
The alarm monitor output connector (J3) provides a summary fault status out put to a summary
alarm panel, or annunciator type device, or redundancy switching equipm ent . Refer to Table 2-3
for pin assignments.
EQ90 REV 2 ERRATA A.DOC
1
Page 13

This chapter contains an introduction, a description of the equipment, its purpose and
capabilities, and major characteristics and specifications.
1.1 Overview
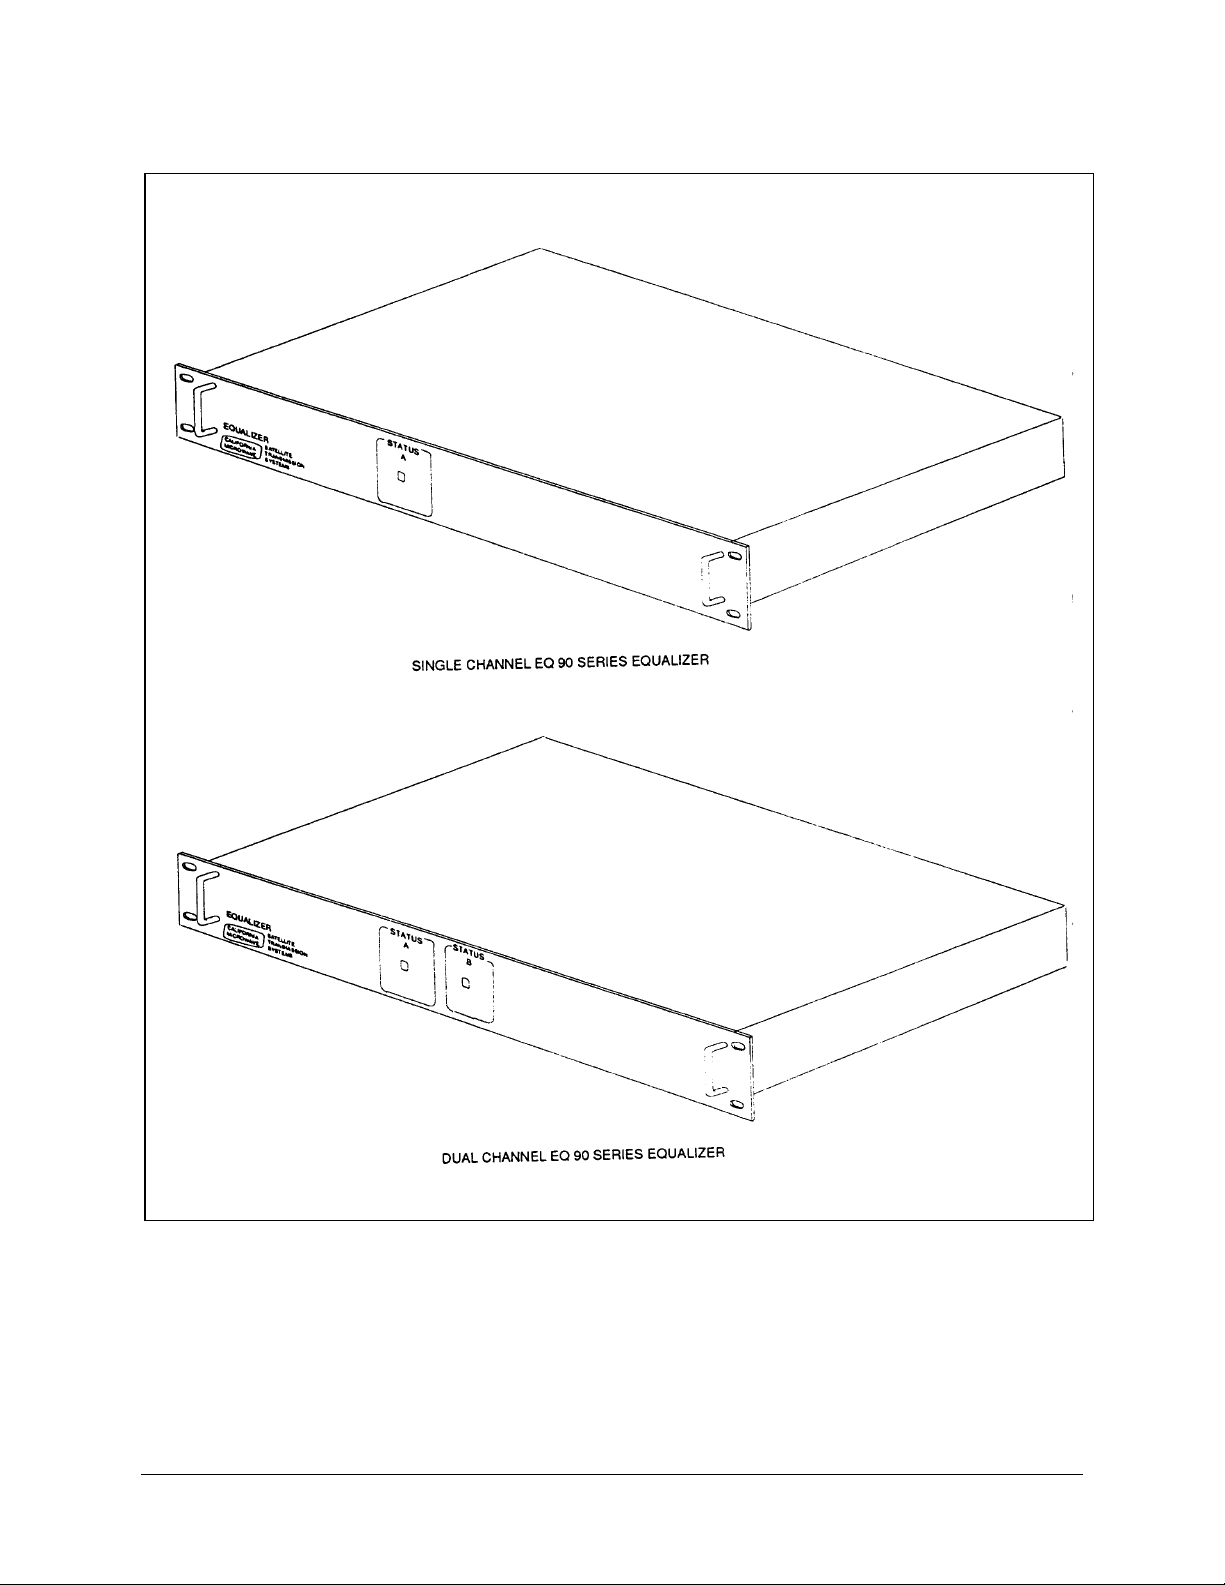
This chapter provides instructions for the EQ90 Series Group Delay/Amplitude
Equalizer Assembly (Figure 1-1), herein after referred to as, “the equalizer.” Two
versions of the equalizer are manufactured:
Single channel unit
•
Dual channel unit
•
The single channel unit (D68563) and dual channel unit (D68564) can be equipped for a
70 or 140 MHz input/output signal.
The 10-section 70 MHz delay equalization PCB is contained in the internal equalizer
assembly A1 and A2. The PCB contains a switch which enables or disables the alarm
output from the equalizer due to a low IF output signal level. The switch is accessed by
removing the equalizer top cover. The cover on the internal assembly A1 or A2 is labeled
BYPASS or LVL MON.
In the LVL MON position, the IF output signal level is monitored. In the event,
•
the IF signals level falls below
-20 dBm nominal, an alarm indicated on the front panel of the equalizer and
reported to external monitor and control equipment.
In the BYPASS position, an alarm will result only if the internal power supply
•
fails.
Chapter 1.
INTRODUCTION
1
Rev. 2 1–1
Page 14
Introduction EQ90 Amplitude Equalizer
Figure 1-1. EQ90 Series Group Delay/Amplitude Equalizer Assembly
1–2 Rev. 2
Page 15

EQ90 Amplitude Equalizer Introduction
1.2 Description of Equipment
1.2.1 Functional Description
The equalizer is intended to be used in ground-based satellite transmit (TX) and receive
(RX) communications systems. It provides delay equalization to compensate for nonlinear delay distortions by:
Up and Down Converters
•
High Power Amplifiers
•
High Power Multiplex Combiners
•
Satellite Filters
•
Waveguide
•
The equalizer is designed as a stand-alone device that can be installed in a 70 or
140 MHz signal path to provide delay equalization of the uplink or downlink.
1.2.2 Mechanical Description
The equalizer is contained in a 1.75 inch (4.4 cm) tall, slide-mounted drawer designed to
mount directly in a standard Electronics Industries Association (EIA) equipment rack or
cabinet. The drawer, when fully extended on its slides, permits rear panel connector
access.
A removable top cover, secured to the chassis with two screws, provides access to the
internal modules.
Rev. 2 1–3
Page 16
Introduction EQ90 Amplitude Equalizer
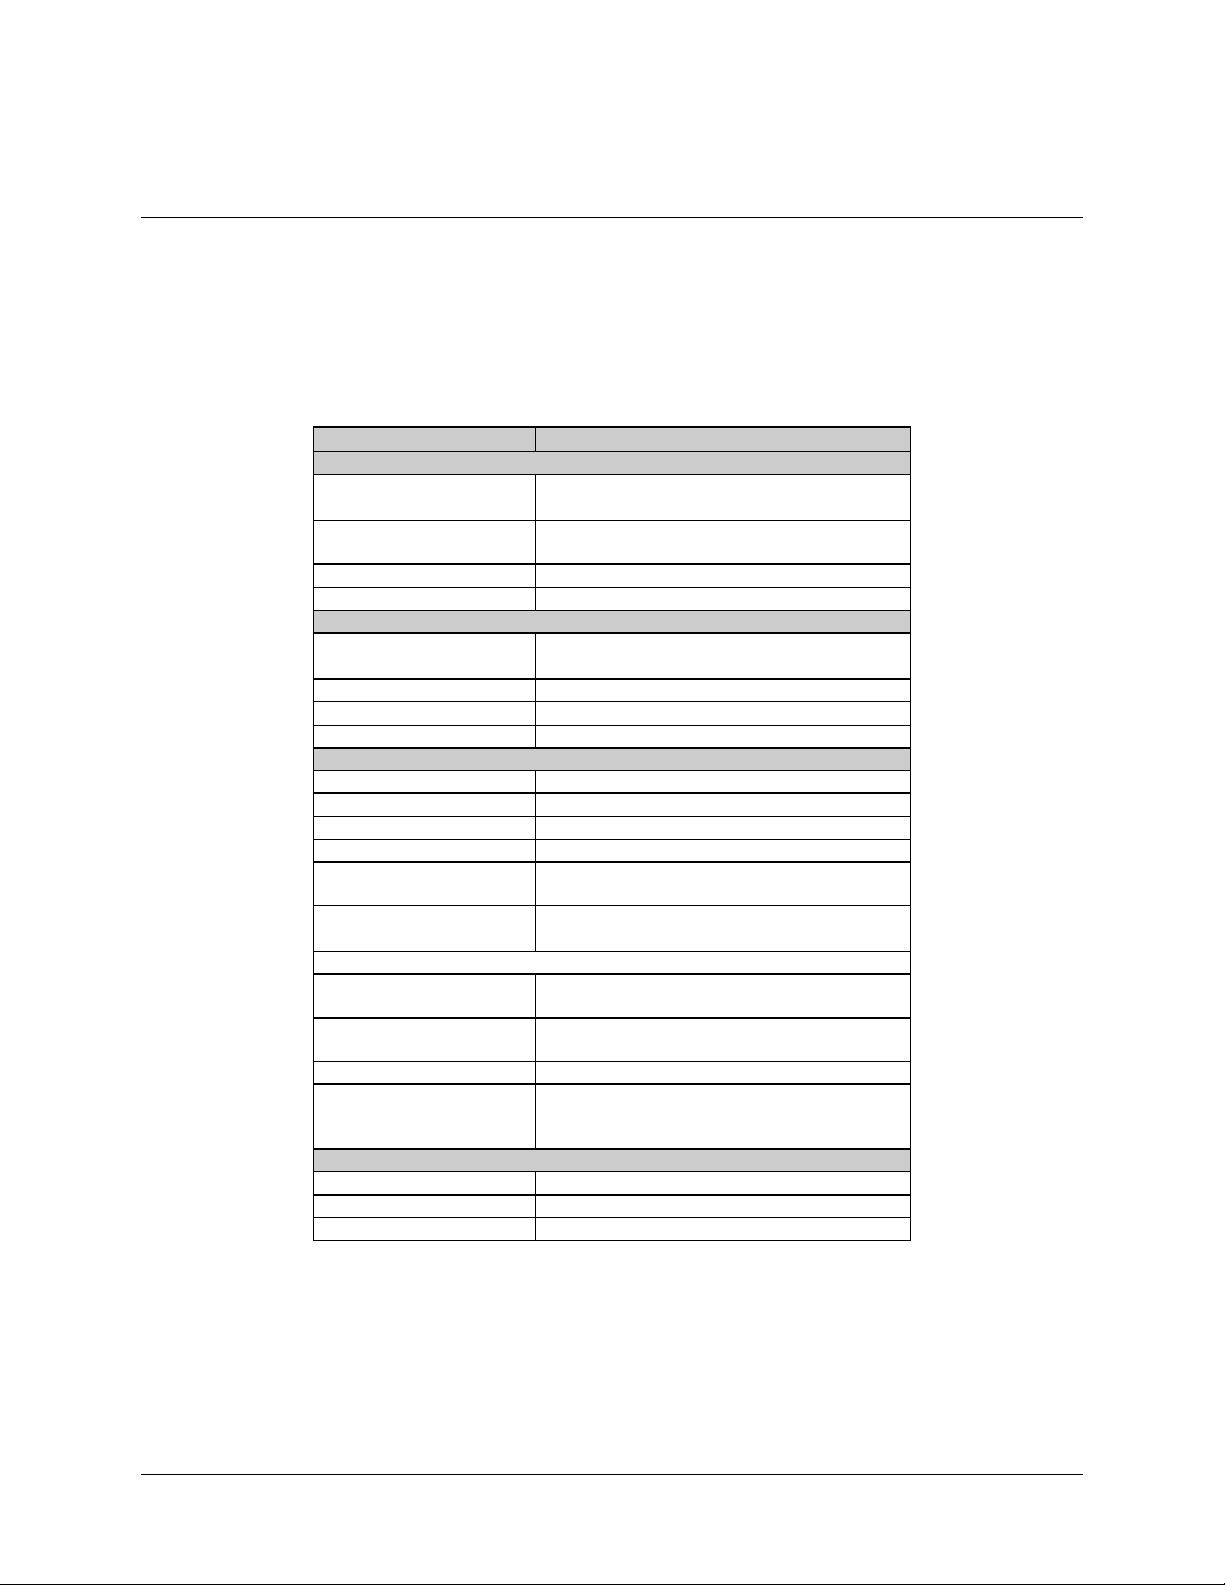
1.3 Specification
Refer to Table Chapter 1-1 for the electrical and operational characteristics of the
equalizer.
Table Chapter 1-1. Electrical Specifications and Operational
Characteristics
Characteristic Specification
IF Input
Frequency
Level -15 dBm maximum (single carrier)
Impedance
Return Loss 20 dB
Frequency
Level 0 dB nominal
Impedance
Return Loss 20 dB
Gain 15 dB nominal
Amplitude Response
1 dB Compression +8 dBm
Third Order Intercept Point +18 dBm
Group Delay
(All Sections Off)
Amplitude Equalization
Adjustment Range
Delay Equalization Adjustment Range/per section
70 MHz < 15 ns/36 MHz
140 MHz < 10 ns/72 MHz
IF Fail Trip Point Approx. -20 dBm
Fault/Status Type Relay contact output
Voltage
Frequency 47 to 63 Hz
Power Consumption 10 VA/Nominal
70 MHz ± 18 MHz
140 MHz ± 36 MHz
-18 dBm maximum. (multi-carrier composite)
75 Ω, unbalanced
IF Output
70 MHz ± 18 MHz
140 MHz ± 36 MHz
75Ω, unbalanced
Input to Output
Adjustable to ± 0.15 dB
< 2 ns
3 dB/36 MHz minimum (70 MHz)
±
3 dB/72 MHz minimum (140 MHz)
±
>40 ns/36 MHz
> 30 ns/72 MHz
1 Form ‘C’
1 Form ‘A’
Primary Power Requirements
84 to 265 VAC ± 10%
1–4 Rev. 2
Page 17
EQ90 Amplitude Equalizer Introduction
Table 1-1. Electrical Specifications and Operational Characteristics (Continued)
Temperature
Operating
Storage
Operating 0 to 95%, non-condensing
Storage 0 to 100%
Operating to 10,000 feet (3.048 km) ASL
Storage to 50,000 feet (15.24 km) ASL
Shock and Vibration As encountered in normal commercial
Front Panel Indicators Power/Status
0° to +50°C (32° to 122°F)
-30° to +75°C (-22° to +167°F)
Humidity
Altitude
shipping, handling, and operation.
Rev. 2 1–5
Page 18
Introduction EQ90 Amplitude Equalizer
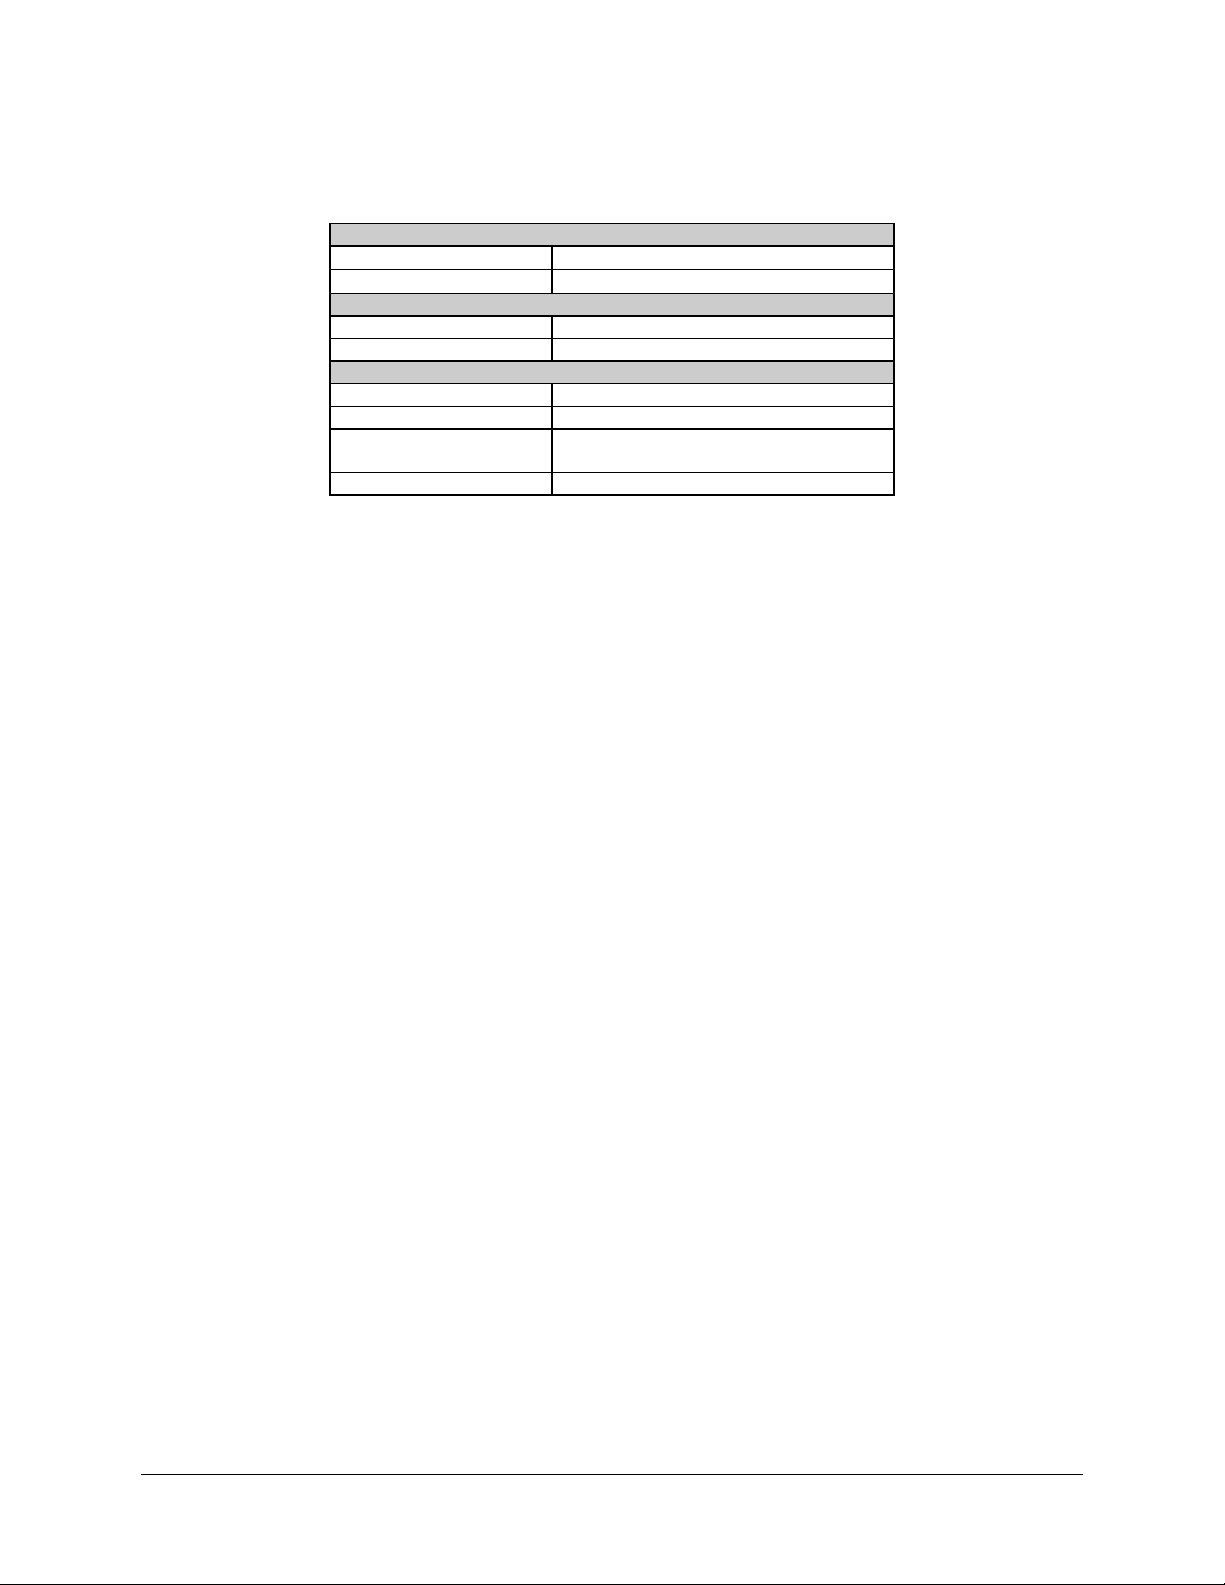
1.4 Dimensional Envelope
Refer to Figure 1-2 for the dimensional envelope of the equalizer.
Note:
All dimensions are in inches, centimeters are in parenthesis.
19.00
(48.26)
1.00
(2.54)
20.00
(50.8)
(4.45)
1.75
Figure 1-2. Dimensional Envelope
1–6 Rev. 2
Page 19

Chapter 2.
INSTALLATION
2
This chapter provides unpacking and installation instructions, and a description of
external connections and backward alarm information.
The equipment contains parts and assemblies sensitive to damage by
Electrostatic Discharge (ESD). Use ESD precautionary procedures when
CAUTION
touching, removing, or inserting PCBs.
2.1 Unpacking
The modem and manual are packaged in pre-formed, reusable, cardboard cartons
containing foam spacing for maximum shipping protection.
Do not use any cutting tool that will extend more than 1 inch into the
container. This can cause damage to the modem.
CAUTION
Unpack the equalizer as follows:
Rev. 2 2–1
1. Cut the tape at the top of the carton indicated by OPEN THIS END.
2. Remove the cardboard/foam space covering the equalizer.
3. Remove the equalizer, manual, and power cord from the carton.
4. Save the packing material for storage or reshipment purposes.
5. Inspect the equipment for any possible damage incurred during shipment.
6. Check the equipment against the packing list to ensure the shipment is correct.
7. Refer to Section 2.2 for installation instructions.
Page 20

Installation EQ90 Series Group Delay/Amplitude Equalizer
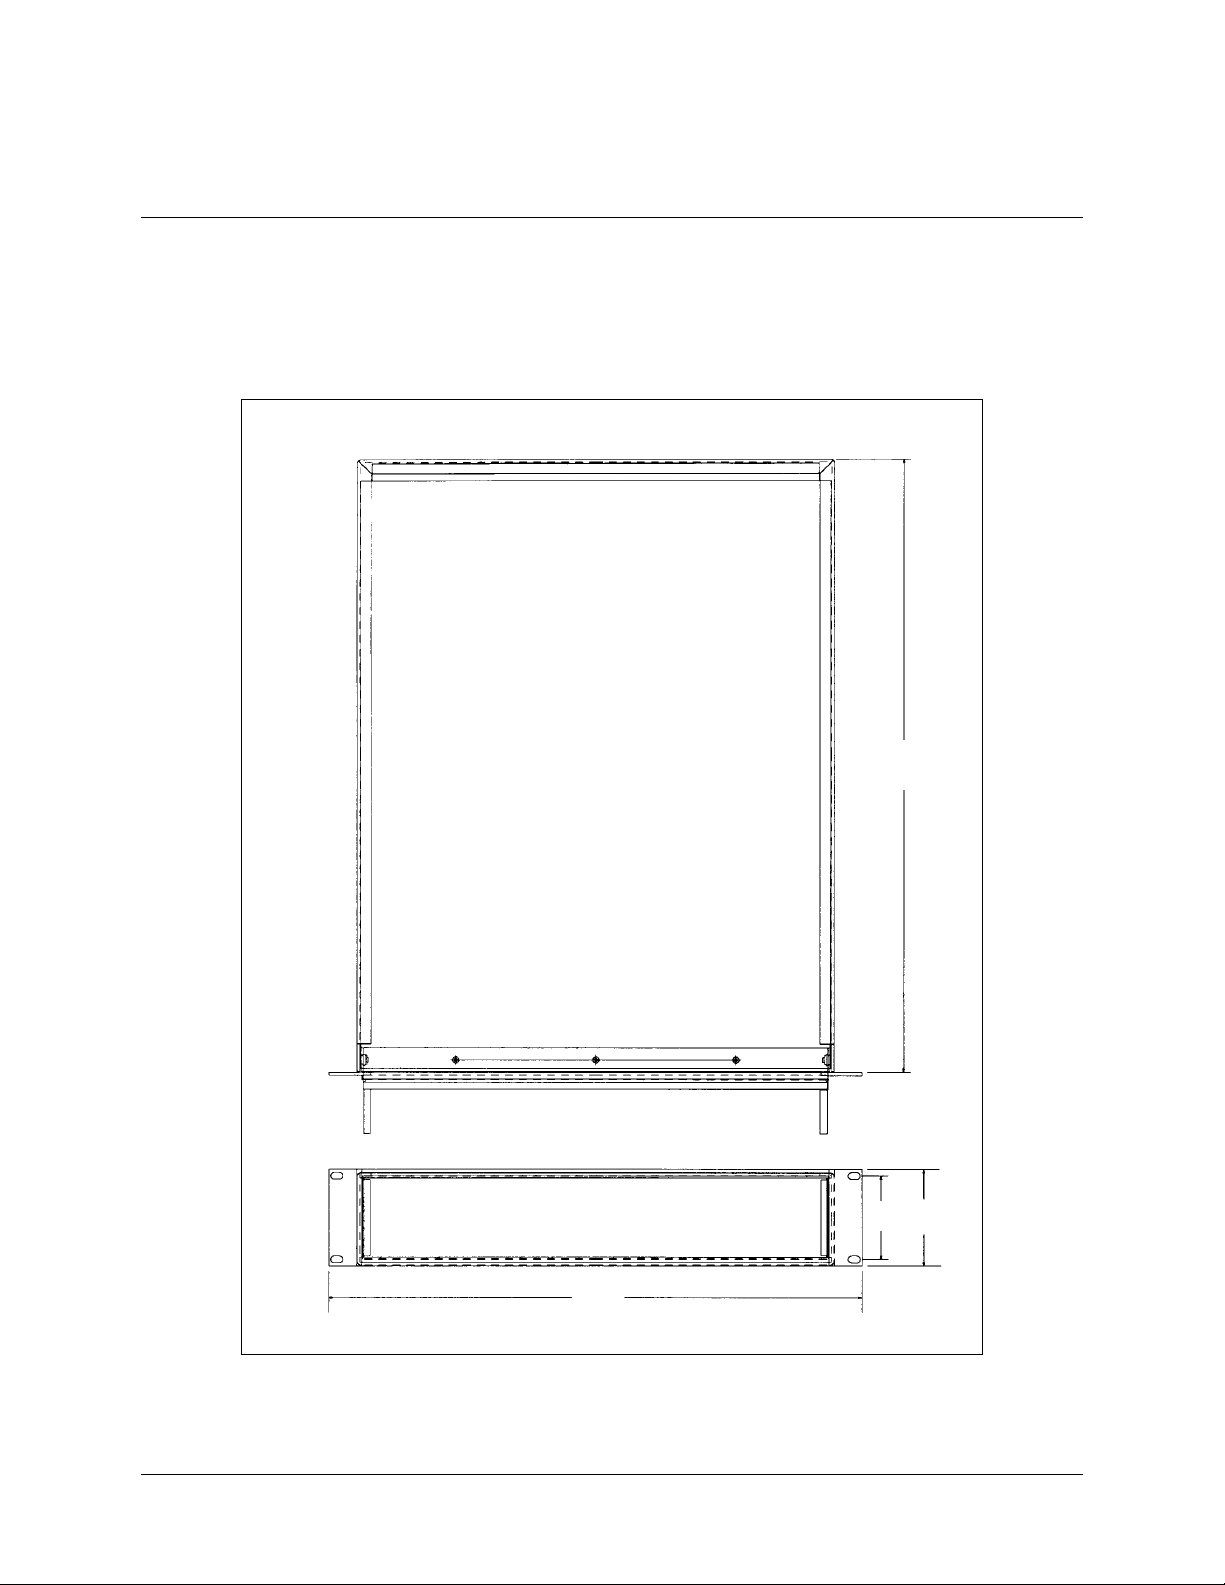
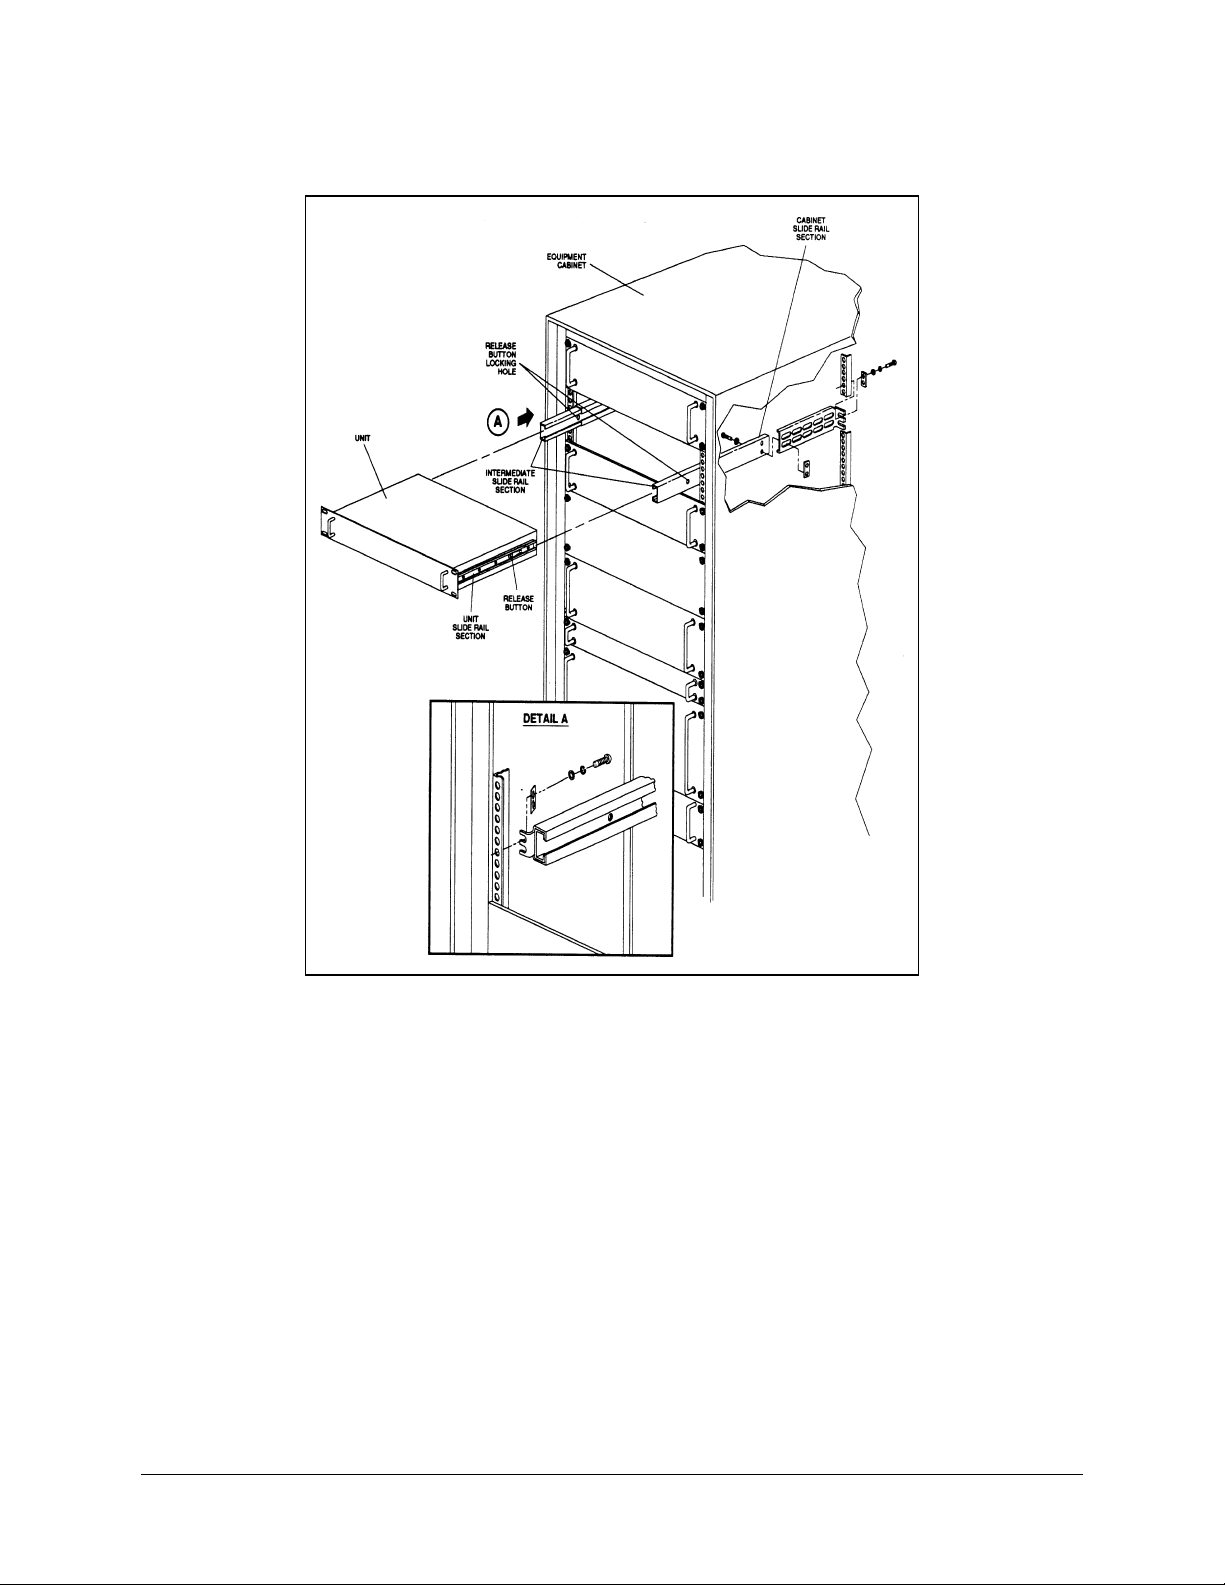
2.2 Installation
Note:
Omit Steps 1, 2, and 3 if the cabinet slide sections with extenders are already
installed within the equipment rack at the proper elevation, and the chassis slide sections
are mounted on the equalizer chassis.
1. Attach chassis slide sections (Figure 2-1) to equalizer with four number 8-32
screws and lockwashers on each side of chassis.
2. Attach mounting bracket to rear of each cabinet slide section with two number
10-32 screws and flatwashers and nut plates. Before tightening hardware, adjust
mounting brackets so that mounting surfaces of brackets butt up against
mounting surfaces of equipment rack.
3. At the proper elevation within the equipment rack, mount slides with mounting
bracket to equipment rack as follows:
a. Mount each mounting bracket to rear cabinet mounting surface with
modified nut plates (optional) and two number 10-32 screws, lockwashers,
and flatwashers.
b. Mount each slide to front cabinet mounting surface with modified nut plates
and two number 10-32 screws, lockwashers, and flatwashers.
4. Slide cabinet slide extenders out to fully extended and locked positions.
5. Lift equalizer into position so that chassis slide sections are aligned with cabinet
slide extenders and slide chassis slide sections into cabinet slide extenders. Slide
equalizer back until slide release buttons on chassis slide sections snap into holes
in cabinet slide sections.
6. Connect all cables to associated rear panel connectors.
7. Press in slide release buttons, push equalizer fully into rack, and install
appropriate hardware for front panel mounting flanges to secure equalizer to
rack.
2–2 Rev. 2
Page 21
EQ90 Series Group Delay/Amplitude Equalizer Installation
Figure 2-1. Typical Rack Installation
Rev. 2 2–3
Page 22

Installation EQ90 Series Group Delay/Amplitude Equalizer
123
456
9
Q
2.3 External Connectors
The rear panel provides all the necessary external connections between the equalizer and
other equipment. Refer to Figure 2-2 connector locations, and Table 2-1and Table 2-2
for connector descriptions.
CHAN B
MONITOR
B
OUT
B
IN
DUAL CHANNEL EQUALIZER
SINGLE CHANNEL E
CHAN A
MONITOR
CHAN A
MONITOR
13
13
UALIZER
7
A
OUT
7891011
A
OUTAIN
8
A
IN
E1
12
E1
12
10 11
Figure 2-2. Equalizer Power and Interface Connectors
2–4 Rev. 2
Page 23

EQ90 Series Group Delay/Amplitude Equalizer Installation
Table 2-1
Nomenclature and Item No. Ref Des Connector Type Mating Conne c tor
Primary Power Input
(11, Figure 2-2)
IF Input (8) A IN Type BNC, female
IF Output (7) A OUT Type BNC, female
Channel A Monitor (13) 9-pin D, female
Ground (12) E1
. Single Channel
IEC-320 Socket with Belden 17250-C North American
Equalizer Rear Panel Mating Connectors
18 AWG and NEMA UL Listed plug, or Belden Type 17820
with Harmonized Cordage.
Table 2-2. Dual Channel Equalizer Rear Mating Connectors
Nomenclature and Item No. Ref Des Connector Type Mating Conne c tor
Primary Power Input
(1, 11, Figure 2-2)
IF Output (8) A IN Type BNC, female
IF Output (7) A OUT Type BNC, female
IF Output (6) B IN
IF Output (5) B OUT
Channel A Monitor (13) Plug
Channel B Monitor (4) Screw
Ground (12) E1
AC1
AC2
IEC-320 Socket with Belden 17250-C North American
18 AWG and NEMA UL Listed plug, or Belden Type 17820
with Harmonized Cordage.
2.3.1 Channel Monitor
The alarm monitor output connector (J3) provides a summary fault status output to a
summary alarm panel, or annuciator type device, or redundancy switching equipment.
2.4 Chassis Ground
A number 10-32 threaded ground stud (E1) is provided on the rear panel of the
equalizer. This ground stud is connected to the chassis and should be connected, via a
1/2 inch or 1 inch ground braid, to the cabinet ground to form the ground reference point
of the system installation.
This ground should be connected at all times for the safety of equipment service
personnel.
Rev. 2 2–5
Page 24

Installation EQ90 Series Group Delay/Amplitude Equalizer
This page is intentionally left blank.
2–6 Rev. 2
Page 25

This chapter contains operating instructions for the equalizer. Included in this section are
descriptions of the operating modes, configurations, functions, and indicators.
3.1 Front Panel Indicators
Refer to Figure Chapter 3-1 for an illustration of the equalizer front panel indicators, and
Table Chapter 3-1 for descriptions of the indicator functions.
Note:
The functions for the single channel equalizer indicators are identical to those of
the dual channel model.
Chapter 3.
OPERATION
3
Rev. 2 3-1
Page 26

Operation EQ90 Amplitude Equalizer
EQUALIZER
EQUALIZER
STATUS
A
1
EQ90
SINGLE CHANNEL EQUALIZER
2
STATUS STATUS
AB
3
EQ90
DUAL CHANNEL EQUALIZER
Figure Chapter 3-1. Front Panel Indicators
Table Chapter 3-1. Front Panel Indicator Functions
Item Nomenclature Function
1 or 2 STATUS A Indicator Dual color (Red/Green) indicator. Lights
green when prime power is applied to the
equalizer, and the rear panel on/off
switch is set to ON. Also lights green to
indicate that no faults exist within the
equalizer. Lights red to indicate loss of
the IF input signal or IF output signal
level is falling below the alarm threshold
setting (-20 dBm nominal) when the
equalizer module switch is set to LVL
MON position.
3 STATUS B Indicator Dual color (Red/Green) indicat or. Lights
green when prime power is applied to the
equalizer, and the rear panel on/off
switch is set to ON. Also lights green to
indicate that no faults exist within the
equalizer. Lights red to indicate loss of
the IF input signal or IF output signal
level is falling below the alarm threshold
setting (-20 dBm nominal) when the
equalizer module switch is set to LVL
MON position.
3-2 Rev. 2
Page 27

EQ90 Amplitude Equalizer Operation
123
456
9
Q
3.2 Rear Panel Control and Connectors
Refer to Figure Chapter 3-2 for an illustration of the equalizer rear panel control and
connectors, and Table Chapter 3-2 for descriptions of the function of each control and
connector.
Note:
The functions for the single channel equalizer controls and indicators are identical.
CHAN B
MONITOR
B
OUT
B
IN
DUAL CHANNEL EQUALIZER
SINGLE CHANNEL E
CHAN A
MONITOR
13
CHAN A
MONITOR
13
UALIZER
Figure Chapter 3-2. Rear Panel Control and Connectors
7
A
OUT
7891011
A
OUTAIN
8
A
IN
E1
12
E1
12
10 11
Rev. 2 3-3
Page 28

Operation EQ90 Amplitude Equalizer
Table Chapter 3-2. Rear Panel Controls and Connector Functions
Item Nomenclature Function
1 AC Power Receptacle AC voltage input assembly, which
provides AC input power filtering for
channel “B” power supply.
2 On/Off Switch Applies primary AC input voltage to the
internal power supply.
3 Fuse Receptacle Contains two 2A fuses to protect the
equalizer from excessive current draw.
4 CHAN B Monitor
Connector
5 B OUT Connector BNC type, female connector that routes
6 B IN Connector BNC type, female connector that routes
7 A OUT Connector BNC type, female connector that routes
8 A IN Connector BNC type, female connector that routes
9 Fuse Receptacle Contains two 2A fuses to protect the
10 On/Off Switch Applies primary AC input voltage to the
11 AC P ower Receptacle AC voltage input assembly that provides
12 Connector E1 Provides equalizer ground connection to
13 CHAN A MONITOR
Connector
9-pin, D-type female connector provides
summary alarm to an annunciator device,
summary alarm panel, or redundancy
switching equipment.
the IF signal output from the equalizer to
external equipment.
the IF signal input from external
equipment to the equalizer.
the IF signal output from the equalizer to
external equipment.
the IF signal input from external
equipment to the equalizer.
equalizer from excessive current draw.
internal power supply.
AC input power filtering for the channel
“A” power supply.
cabinet or earth station ground system.
9-pin, D-type female connector provides
summary alarm to an annunciator device,
summary alarm panel, or redundancy
switching equipment.
3-4 Rev. 2
Page 29

EQ90 Amplitude Equalizer Operation
3.3 Equalizer Adjustments
3.3.1 Power ON
To turn the equalizer on, proceed as follows:
1. Set rear panel power switch to (1, Figure Chapter 3-1) to the ON position and
verify that front panel STATUS indicator light(s) is green.
2. Gain access to the level monitor switch as follows:
a. Remove the equalizer cover. Remove the cover on the 10-section 70 MHz
(6-section 70 MHz option) delay equalizer assembly labeled A1 or A2
(BYPASS or LVL MON).
b. In the LVL MON position, the IF output signal level is monitored. In the
event the IF signal falls below –20 dB nominal, an alarm indicated on the
front panel will be ON.
c. In the BYPASS position, an alarm will be ON indicating; INTERNAL
POWER SUPPLY failure.
3. Set the level monitor switch LVL MON position and verify front panel STATUS
indicator light(s) red.
4. Set the level monitor switch to BYPASS position and verify front panel
STATUS indicator light(s) green.
3.4 Alignment Procedures
This section describes the procedures required to adjust and align the equalizer.
3.4.1 Equalizer Adjustment
The equalizer module, illustrated in Figure Chapter 3-3, shows the relationship of
adjustment and switches to function. Table Chapter 3-3 provides the function for the
switches on the equalizer module.
Rev. 2 3-5
Page 30

Operation EQ90 Amplitude Equalizer
234
6
1
C
R
L
DELAY
EQ6
RREQ7
DELAY
OUT
IN
OUT
L
C
IN
R
R
EQ5
OUT
C
L
OUT
DELAY
RREQ8
DELAY
L
C
IN
IN
R
R
EQ4
OUT
C
L
OUT
DELAY
RREQ9
DELAY
L
C
IN
IN
R
R
DELAY
OUT
IN
R
EQ3
C
C
L
EQ10
L
OUT
DELAY
R
IN
R
R
EQ2
C
L
OUT
DELAY
BYPASS
LVL MON
IN
R
R
EQ1
SLP
ADJ
C
L
DELAY
IN
OUT
R
GAIN
ADJ
8
5
7
Figure Chapter 3-3. Equalizer Module
Table Chapter 3-3. Equalizer Module Control Functions
Item Nomenclature Function
1 R Switch Used to adjust the amplitude response.
(Refer to Figure Chapter
for the signal pattern.)
3-7
2 L Switch Used to adjust the delay peak magnitude.
(Refer to Figure Chapter
3 C Switch Used to adjust the del ay peak cent er freq uency. (Refer to Figure Chapter
f or the signal pattern.)
3-6
3-5
for the signal pattern.)
4 IN/OUT Switch Used to insert an equalizer delay section to, or remove from, the signal path.
5 R Switch Used to adjust the amplitude response. (Refer to Figure Chapter
3-8
for the
signal pattern.)
6 GAIN ADJ Potentiometer Used to set the IF output signal gain level (nominally 15 dB).
7 SLP ADJ Potentiometer
Used to provide ± 3 dB amplitude slope equalization.
8 BYPASS/LVL MON Switch Used to activate the IF output signal level monitoring function. The minimum
signal level required to avoid an alarm condition is -20 dB. In the BYPASS
position, the signal level is not monitored. However, a power supply failure
will result in an alarm condition.
3-6 Rev. 2
Page 31

EQ90 Amplitude Equalizer Operation
The 10-section 70 MHz (140 MHz option) delay equalization PCB is contained in the
internal equalizer assembly A1 and A2. The PCB contains a switch which enables or
disables the alarm output from the equalizer due to a low IF output signal level.
Removing the equalizer top cover accesses the BYPASS/LVL MON switch (8,
•
Figure 3-3).
The cover on the internal assembly A1 or A2 is labeled BYPASS or LVL
•
MON.
In the LVL MON position, the IF output signal is monitored. In the event the
•
IF signal level falls below -20 dBm nominal, an alarm is indicated on the
front panel of the equalizer and reported to external monitor and control
equipment.
In the BYPASS position, an alarm will result only if the internal power
•
supply fails.
The equalizer is made up of 6 or 10 equalizer sections with four adjustments and one
IN/OUT switch (4, Figure 3-3) for each section.
The R switches (1, 5) affect the amplitude characteristic of each section in the
•
equalizer.
Adjustment of the L switch (2) will affect the frequency of peak delay as well as
•
the magnitude of the delay peak. The variable capacitors are used to return the
delay peak to its initial center frequency.
The C switch (3) control the center frequency of the delay peak. As the
•
frequency of the delay peak is varied from 52 to 88 MHz, the magnitude of delay
over a
36 MHz bandwidth centered on the delay peak frequency will remain essentially
constant.
The IN/OUT switch (4) inserts or removes the equalizer section from the signal
•
path.
Each section of a module is initially adjusted separately with all other sections bypassed
by setting the associated IN/OUT switch (4) to out.
The test setup for measurement of the group delay and amplitude response is shown in
Figure Chapter 3-4. The following procedure describes the four adjustments made to one
equalizer section:
Equalizer Adjustment
•
Alignment to a Specific Delay Requirement
•
Slope Equalizer Adjustment
•
System Integration Alignment Procedure
•
Rev. 2 3-7
Page 32

Operation EQ90 Amplitude Equalizer
3-8 Rev. 2
Page 33

EQ90 Amplitude Equalizer Operation
DELAY
(NS)
CENTER
IF
MLA
TX
MLA
TX
70 TO 140 MHz
-15 dBm
IN
IF
OUT
EQUALIZER
MODULE
EQUALIZER
Figure Chapter 3-4. Alignment Setup
Figure Chapter 3-5 through Figure Chapter 3-20 depict oscilloscope patterns as displayed
on a Microwave Link Analyzer (MLA).
Refer to Figure Chapter 3-5 for a typical MLA display.
C MAX
FREQUENCY
IF FREQUENCY (MHz)
C MIN
Figure Chapter 3-5. Effect on Delay of Varying C Switch
Rev. 2 3-9
Page 34

Operation EQ90 Amplitude Equalizer
Adjustment of the variable inductors, L switch (2, Figure 3-3) will affect the frequency
of peak delay as well as the magnitude of the delay peak. The variable capacitors are
used to return the delay peak to its initial center frequency (Figure Chapter 3-6).
When the capacitors and inductors are varied, the flatness of the amplitude
characteristics changes. The effect of varying the R switch (1, Figure Chapter 3-3) upon
amplitude response is shown in Figure Chapter 3-7. This adjustment affects the
amplitude tilt rather than peaking. An amplitude slope appears near the frequency of the
delay peak.
The effect of varying the R switch (5, Figure Chapter 3-3) upon amplitude is shown in
Figure Chapter 3-8. This control adjusts the degree of peaking or amplitude depth near
the vicinity of the delay peak.
The variable capacitors can vary the delay peak frequency beyond the 52 to 88 MHz
(104 to 176 MHz) frequencies for all values of inductance. The inductance can vary the
peak delay over 36 MHz bandwidth from <15 to> 40 ns peak-to-peak. The amplitude
adjustments can always return the amplitude response for the equalizer to ≤ 0.15 dB
peak-to- peak.
After changing the frequency of peak delay for any section, the amplitude may require
readjustment for maximum flatness before proceeding to adjust another section. When
properly adjusted for amplitude flatness, bypassing the equalizer section will generally
effect the overall gain by ≤ 0.3 dB.
When two or more adjacent sections are inserted into the signal path there will be an
interaction between sections. This interaction is reflected only in the overall amplitude
response characteristic and is at its worst when all sections are tuned to the same
frequency. Thus, the frequencies between sections are staggered as much as possible to
minimize the interaction.
Complete the module adjustment by adjusting the GAIN ADJ potentiometer
(6, Figure Chapter 3-3) control to provide an overall gain of 15 dB and SLP ADJ
potentiometer (7) control to minimize overall amplitude slope. Record the delay shapes,
frequencies, and amplitude responses of each section separately to provide a future
reference point in the event a module fails and must be replaced.
3-10 Rev. 2
Page 35

EQ90 Amplitude Equalizer Operation
L MAX
DELAY
(NS)
AMPLITUDE
DELAY
(NS)
IF FREQUEN CY ( MHz)
L MIN
Figure Chapter 3-6. Effect on Delay of Varying “L”
IF FREQUENCY (MHz)
Figure Chapter 3-7. Effect on Amplitude of Varying “R”
Rev. 2 3-11
Page 36

Operation EQ90 Amplitude Equalizer
AMPLITUDE
DELAY
(NS)
DELAY
(NS)
IF FREQUENCY (MHz)
DELAY
Figure Chapter 3-8. Effect on Amplitude of Varying “R”
3.4.2 Alignment to a Specific Delay Requirement
The following principles shall be understood before attempting this
alignment procedure. Damage to the equipment may be the result.
CAUTION
Multi-pole bandpass filters having a nearly maximally flat response will exhibit a group
delay characteristic as shown in Figure Chapter 3-9. This shape is largely parabolic and
may be slightly flat about its center frequency and slightly tilted at its edges.
IIF FREQUENCY (MHz)
Figure Chapter 3-9. Multi-Pole Bandpass Filter Delay Response
3-12 Rev. 2
Page 37

EQ90 Amplitude Equalizer Operation
DELAY
(NS)
DELAY
(SN)
A single group delay equalizer exhibiting the same peak-to-peak delay, as the filter may
appear as shown in Figure Chapter 3-10. Combining the filter and equalizer response will
produce a delay response as shown in Figure Chapter 3-11. A substantial delay ripple
may be the result (which is not desirable in most cases). This ripple response occurs
because the equalizer delay response is not parabolic in shape. The equalizer response is
actually parabolic only over a narrow frequency range near its delay peak.
IF FREQUENCY (MHz)
Figure Chapter 3-10. Single-Section Equalizer Delay Response
IF FREQUENCY (MHz)
Figure Chapter 3-11. Composite Delay Response
Rev. 2 3-13
Page 38

Operation EQ90 Amplitude Equalizer
The parabolic bandwidth of the equalizer can be increased in one of two ways.
• The first involves using two equalizers, each with half the required peak delay,
and tuning them both to the same center frequency. This increases the parabolic
bandwidth by a factor of two.
The second method requires two equalizers of the same delay but stagger-tuned
•
about the center frequency of the filter. This method can increase the parabolic
bandwidth between two and four times depending upon the delay ripple
requirements.
The second method of equalization requires fewer sections to achieve an equalized
response, and in addition, permits adjustment for non-symmetrical filter delay responses.
As additional delay equalizers are added to the system, their frequencies will be set
further and further away from the transponder center frequency.
Equalizer parameters for the satellite equalizer, which will provide a nearly ideal
parabolic group delay response over a 36 MHz bandwidth with a peak-to-peak (P-P)
delay magnitude of 40 ns are as shown in Figure Chapter 3-4.
Table Chapter 3-4. Peak-to-Peak Delay Magnitude
Section
Number
1 56.5 14
2 67.8 14
3 77.5 14
4 62.5 14
5 72.0 14
6 83.5 14
Center Frequency
(MHz)
P-P Delay Over
36 MHz (ns)
Note:
The adjacent equalizer sections are frequency staggered to minimize interactions.
The peak-to-peak delay is measured about the center frequency of the equalizer delay
peak after its amplitude response was for maximum flatness, over the 52 to 88 MHz IF
bandwidth. The above parameters will produce an equalizer group delay characteristic as
shown in Figure Chapter 3-12.
3-14 Rev. 2
Page 39

EQ90 Amplitude Equalizer Operation
AMPLIUDE
DELA Y
(NS)
EQUALIZER
Y
fo
40
NS
fo = 70 Mhz
0.1 dB/CM
36 MHz
DELA Y
Figure Chapter 3-12. Equalizer Composite Delay Response
By adjusting all sections 1 MHz above or below the given frequencies, a 17 ns linear
positive or negative slope is achieved (refer to Figure Chapter 3-13 and Figure Chapter
3-14). Thus, small frequency offsets achieve large linear delay components. A frequency
offset of only 4 MHz will produce linear delay components of about 70 to 80 ns.
Smaller IF bandwidths require fewer sections, which can be, spaced closer together in
frequency to achieve the desired delay response.
DELAY COMPONENT
LINEAR DELA
COMPONENT
IF FREQUENCY (MHz)
Figure Chapter 3-13. All Sections Tuned 1 MHz Lower in Frequency
Rev. 2 3-15
Page 40

Operation EQ90 Amplitude Equalizer
DELA Y
(NS)
EQUALIZER
Y
DELAY COMPONENT
IF FREQUENCY (MHz)
LINEAR DELA
COMPONENT
Figure Chapter 3-14. All Sections Tuned 1 MHz Higher In Frequency
The overall amplitude response can be adjusted to less than 0.15 dB peak-to-peak for the
entire equalizer. The procedure for amplitude response adjustment is as follows:
1. Center the MLA frequency to the desired frequency of the equalizer. The sweep
bandwidth of the MLA should be 36 MHz.
2. Adjust the delay inductors and the delay capacitors until the specific peak-topeak delay response is achieved.
3. Adjust the amplitude adjustments for maximum flatness.
3.4.3 Slope Equalizer Adjustment
The SLP ADJ potentiometer (7, Figure 3-3) corrects for any residual amplitude slope in
the system. Adjustments within the slope equalizer range from 3.00 dB negative slope to
3.00 dB positive slope. The residual amplitude slope in a satellite system can be due to
any component in the system or their aggregates, including runs of cables, Waveguide,
etc. The slope compensation is usually accomplished as part of the system integration
procedure.
3-16 Rev. 2
Page 41

EQ90 Amplitude Equalizer Operation
3.4.4 System Integration Alignment Procedure
Note:
The following description assumes that the equalizer has been tuned to the inverse
of the satellite transponder group delay characteristic.
The last stage of the adjustment procedure involves matching the delay characteristic of
the satellite transponder and that of the equalizer. Final adjustments of the equalizer may
be required to remove residual linear, parabolic and/or delay ripple components.
A typical test setup block diagram required for this process is shown in Figure Chapter 3-
15.
Figure Chapter 3-16 shows a typical ideal full transponder delay characteristic. The
equalizer must have an inverse delay characteristic as shown in Figure Chapter 3-17. The
two delay characteristics when combined would ideally provide the composite delay
result shown in Figure Chapter 3-18.
In actual practice, the transponder delay characteristic is rarely symmetrical or smooth as
shown in Figure Chapter 3-16 and it is rare for any two-satellite transponder to have the
same delay shape and magnitude. If the RF carrier remains at the transponder center
frequency, as the IF bandwidths of the carrier in use narrows, the transponder group
delay will be progressively reduced. However, it is typical that narrow bandwidth RF
carriers will be shifted towards one of the two transponder band edges.
70
MHz
U/C, IPA
IFL, HPA
RF, MUX
140
OR
MHz
LNA, IFL
D/C
ANT
MLA
TX
MLA
TX
UUT
Figure Chapter 3-15. System Integration Alignment Test Setup
Rev. 2 3-17
Page 42

Operation EQ90 Amplitude Equalizer
DELAY
(NS)
DELAY
(NS)
IF FREQUENCY (MHz)
Figure Chapter 3-16. Typical Satellite Transponder Delay
IF FREQUENCY (MHz)
Figure Chapter 3-17. Required Equalizer Delay Characteristic
3-18 Rev. 2
Page 43

EQ90 Amplitude Equalizer Operation
DELAY
(NS)
IF FREQUENCY (MHz)
Figure Chapter 3-18. Ideal Composite Delay Result
Figure Chapter 3-19 shows the typical group delay response of a 17.5 MHz bandwidth
carrier such as half transponder video. In this case, the RF carrier is shifted lower in
frequency (relative to transponder center frequency) by about 8 to 9 MHz. The resultant
transponder delay contains a mixture of linear and parabolic delay coefficients. The
required equalizer delay must be the inverse of the transponder delay as shown in Figure
Chapter 3-20 resulting in an ideal composite delay result as shown in Figure Chapter 3-
21.
Once the equalizer has been pre-aligned to a required inverse delay characteristic, it is
advisable to perform a station loopback delay test through the assigned transponder with
the equipment which will be used to transmit the actual carrier. Adjustments may be
required depending upon the resultant measured delay characteristic.
Figure Chapter 3-22 through Figure Chapter 3-24 illustrates how the composite delay
would appear if the transponder or equalizer frequency were shifted slightly with respect
to one another. The resultant composite delay appears as a linear slope. The direction of
this slope is dependent upon the direction of frequency offset. In this case, a negative
slope signals that a positive frequency shift is required of the equalizer characteristic to
achieve a flat composite result. Frequency offsets of as little as 0.5 MHz can result in
substantial delay slopes. In this case, a very slight increase in every equalizer section
frequency is required to preserve the delay characteristics while altering the composite
slope.
Rev. 2 3-19
Page 44

Operation EQ90 Amplitude Equalizer
DELAY
(NS)
DELAY
(NS)
IF FREQUENCY (MHz)
Figure Chapter 3-19. Typical Half Transponder Video Carrier Delay
IF FREQUENCY (MHz)
Figure Chapter 3-20. Required Equalized Delay Characteristic
3-20 Rev. 2
Page 45

EQ90 Amplitude Equalizer Operation
DELA
(
S)
DELAY
(NS)
N
Y
IF FREQUENCY (MHz)
Figure Chapter 3-21. Ideal Composite Delay Result
IF FREQUENCY (MHz)
Figure Chapter 3-22. Typical Delay Characteristic
Rev. 2 3-21
Page 46

Operation EQ90 Amplitude Equalizer
DELAY
(NS)
)
DELAY
(NS)
IF FREQUENCY (MHz
Figure Chapter 3-23. Shifted Equalizer Delay Characteristic
IF FREQUENCY (MHz)
Figure Chapter 3-24. Resultant Composite Delay Characteristic
Figure Chapter 3-25 through Figure Chapter 3-27 illustrates what would happen to the
composite delay shape if the equalizer had more delay than the satellite transponder. The
inverse composite delay characteristics would result if the equalizer had less delay than
the satellite transponder. The direction of the curve determines how the equalizer is to be
adjusted. In this instance, equalizer sections tuned to frequencies above 70 MHz must be
adjusted to even higher frequencies.
3-22 Rev. 2
Page 47

EQ90 Amplitude Equalizer Operation
The amount of frequency shift is directly proportional to the amount of frequency offset.
For example:
A section tuned to 80 MHz would have to be offset twice as much as one tuned
•
to 70 MHz.
Sections tuned to 70 MHz require no frequency adjustment.
•
Sections below 70 MHz require the same treatment as those tuned above 70
•
MHz, except in the opposite frequency direction.
These adjustments affect the magnitude of delay without greatly affecting the
•
delay shape.
The same effect can be achieved by reducing or increasing each equalizer section delay,
depending upon its particular frequency location. Although the overall effect is the same,
adjusting delay magnitude also has the effect of changing frequency of the delay section,
which complicates the adjustment process. The order of adjustment should be:
1. Eliminate linear delay.
2. Eliminate parabolic delay.
3. Reduce delay ripple.
Reduction of the magnitude of delay ripple will require adjustments of the delay
magnitude and frequency of equalizer sections, which are centered near the frequency of
the delay ripple. This process is slow and tedious, and will require many trial and error
attempts before the ripple magnitude is below acceptable levels. It is advisable during the
adjustment process to maintain a record of adjustments made so that backtracking is
possible if a series of adjustments yields poor results.
The delay characteristics discussed to this point have been largely parabolic in shape,
which is ideal for equalization. Actual transponder delays may appear more trapezoidal,
as shown in Figure Chapter 3-28, with straight-line segments. Figure Chapter 3-29 and
Figure Chapter 3-30 demonstrates the effect of an equalizer frequency offset. By using
straight line approximations of the actual characteristics, one can determine the cause of
the composite response shape and thus arrive at a correct course of action to obtain a
delay equalized composite response.
After the satellite delay characteristic has been properly equalized, it will be necessary to
adjust the equalizer for a flat amplitude characteristic. This is best accomplished on the
equalizer itself using an MLA.
Once the equalization and amplitude adjustments have been completed it is advisable to
record the amplitude and delay characteristic of each section of each equalizer module by
itself so that a backup or replacement equalizer module can be properly set without
resorting to removing traffic from the satellite transmission path.
Rev. 2 3-23
Page 48

Operation EQ90 Amplitude Equalizer
DELAY
(NS)
)
DELAY
(NS)
)
Be sure to reset the gain of the equalizer section before proceeding with other
measurements.
IF FREQUENCY (MHz
Figure Chapter 3-25. Transponder Delay Characteristic
IF FREQUENCY (MHz
Figure Chapter 3-26. Equalizer Delay Characteristic
3-24 Rev. 2
Page 49

EQ90 Amplitude Equalizer Operation
DELAY
(NS)
DELAY
(NS)
)
IF FREQUENCY (MHz)
Figure Chapter 3-27. Resultant Composite Delay Characteristic
IF FREQUENCY (MHz
Figure Chapter 3-28. Transponder Delay Characteristic
Rev. 2 3-25
Page 50

Operation EQ90 Amplitude Equalizer
DELAY
(NS)
DELAY
(NS)
IF FREQUENCY (MHz)
Figure Chapter 3-29. Equalizer Offset Delay Characteristic
IF FREQUENCY (MHz)
Figure Chapter 3-30. Resultant Composite Delay Characteristic
3-26 Rev. 2
Page 51

EQ90 Amplitude Equalizer Operation
At this point, the SLP ADJ (7, Figure 3-3) potentiometer of the slope equalizer can be
readjusted to minimize the amplitude variations in the system as follows:
1. Connect a -20 dB IF output of a MLA transmitter to the equalizer IF input
connector.
2. Adjust GAIN ADJ potentiometer (6, Figure Chapter 3-3) for +15 dB of gain.
3. Adjust the SLP ADJ potentiometer (7, Figure Chapter 3-3) so the output of the
module as measured on the MLA receiver presents a flat response.
Note:
The slope adjusts resistor provides for up to ± 3.0 dB of positive or
negative amplitude slope adjustment range.
Rev. 2 3-27
Page 52

This chapter describes the following:
System Checkout
•
Troubleshooting
•
Replacement Procedures
•
4.1 Checkout
This equipment contains parts and assemblies sensitive to damage by ESD.
Use ESD precautionary procedures when touching, removing, or inserting
CAUTION
Note:
operation and should be performed after initial installation or whenever the equalizer is
suspected of being inoperative. If a discrepancy is detected during the checkout
procedure, refer to the troubleshooting to locate the cause of the fault. After the fault is
located and the repair effected, perform a final checkout procedure before returning the
unit to service.
To perform the equalizer checkout, proceed as follows:
PCBs.
The checkout procedure in this section provides an indication of overall equalizer
1. Set rear panel power switch (10, Figure 3-2) to 1 (on) position and verify that
front panel indicator status lights.
2. Tag and disconnect system cables attached to the equalizer assembly.
3. Connect a -20 dBm, 75Ω, 70 MHz (140 MHz option) signal source to rear panel
connector A IN and terminate A OUT into 75Ω BNC termination cable.
Chapter 4.
MAINTENANCE
4
Rev. 2 4–1
Page 53

Maintenance EQ90 Amplitude Equalizer
4. Set the BYPASS/LVL MON switch (8, Figure 3-3) to the LVL MON position
and verify that the front panel STATUS indicator lights green.
5. Remove the A IN signal input to the equalizer and observe that STATUS
indicator lights (red).
6. Disconnect the signal source and termination cables.
7. Reconnect the system cables to the equalizer assembly.
4.2 Troubleshooting
The troubleshooting procedures listed in Table 4-1 is designed to aid service personnel in
locating faulty assemblies and components in the equalizer. The troubleshooting
procedure lists the symptoms that could be detected during the checkout procedure and
operation and the probable causes for each symptom. The last column of the procedure
gives the corrective action required to isolate and correct the malfunction. When it is
necessary to replace and assembly or component, refer to the replacement procedures of
Paragraph 4.6.
Table 4-1. Equalizer Troubleshooting Procedure
Symptom Probable cause Corrective Action
Front panel STATUS indicator out 1. No power applied to unit. 1. Check that primary AC power is applied to rear
panel power receptacle.
2. Fuse. 2. Check fuse. Rep lace if open.
3. Power Supply 3 Check for +12 VDC at the output of the power
supply. If +12 VDC is not present, replace
power supply.
STATUS LED lights red 1. Power Supply 1a Refer to DC interconnect diagram and ensure
+5 and -5 VDC is present at connectors J4, pin
3 and 5.
1b If voltage is no t present, replace power supply
assembly.
2. Equalizer 2a Measure the output power level of the
equalizer; the peak or continuous wave output
power level shall be above -20 dBm.
2b If the po wer levels are correct and below
-20 dBm, set the LVL MON switch on the
equalizer module to the BYPASS position.
4–2 Rev. 2
Page 54

EQ90 Amplitude Equalizer Maintenance
4.3 Replacement Procedures
The following paragraphs describe the procedures for replacing assemblies and
components in the equalizer. The following procedures assume that power has been
disconnected and the unit has been removed from it's mounting and set in a safe work
area. For parts location and spare parts information, refer to Paragraph 4.3.5.
4.3.1 Chassis Cover
Remove the chassis cover as follows:
1. Remove and retain the two screws that secure the cover to the chassis.
2. Remove the cover.
4.3.2 Equalizer Modules
Replace an equalizer module, proceed as follows:
1. Remove chassis cover (Para. 4.3.1).
2. Disconnect cable assemblies at module connectors A IN and AN OUT.
3. Remove the six screws securing the equalizer cover to the equalizer PCB.
4. Remove standoffs and replace PCB by reversing above Steps 1, 2, and 3.
4.3.3 Power Supply Assembly
Replace the power supply assembly proceed as follows:
1. Remove chassis cover (Para. 4.3.1).
2. Disconnect cable assembly from power supply connector J1 and J2.
3. Turn equalizer over and remove the four screws securing power supply assembly
to the chassis.
4. Install replacement power supply assembly by reversing above Steps 1, 2, and 3.
Rev. 2 4–3
Page 55

Maintenance EQ90 Amplitude Equalizer
4.3.4 Fuse Replacement
Replace fuse in the power supply rear panel AC power receptacle, proceed as follows:
1. Remove power cord from primary power receptacle.
2. Using small screwdriver, pry locking tab of fuse holder to release fuse holder
from rear panel power receptacle and remove fuse holder from receptacle.
3. Remove fuse from fuse holder and install replacement fuse in fuse holder.
4. Insert fuses holder into power receptacle and press inward until fuse holder
locking tab snaps into place.
4.3.5 Spare Parts
Figure 4-1 illustrates the location of the equalizer module and components and Table 4-2
lists the spare parts for the equalizer.
4–4 Rev. 2
Page 56

EQ90 Amplitude Equalizer Maintenance
Figure 4-1. Equalizer Component Locations
Table 4-2. Equalizer Spare Parts
Item Manufacturer Part Number
10 Section 70 MHz Delay Equalizer Printed Circuit Board EFData D68302-1
6 Section 70 MHz Delay Equalizer PCB EFData D68302-2
6 Section 140 MHz Delay Equalizer PCB EFData D69978-2
Triple Output Power Supply (30 Watt) EFData A68466-1
LED Assembly EFData PL68557-1
Rev. 2 4–5
Page 57

Maintenance EQ90 Amplitude Equalizer
This page is intentionally left blank.
4–6 Rev. 2
Page 58

A
This appendix describes the application note for EQ90 Series Group Delay/Amplitude
Equalizer.
A.1 Introduction
The following application note is provided for the new product line of equalizers.
The purpose of this application note is to ensure that the EQ90 series of equalizer
specifications are understood for successful integration of this product into a system
environment.
The EQ90-70X-XX series of equalizers are designed to replace the DEQ-701, 702, 703,
and 723 series of 70 MHz equalizers.
The EQ90-14X-XX series of equalizers are designed to replace the DEQ-713, 714, 732,
and 733 series of 140 MHz equalizers.
Appendix A.
APPLICATION NOTE
Rev. 2 A–1
Page 59

Application Note EQ90 Amplitude Equalizer
A.2 Operational Parameters
Attention must be paid to IF levels and how external parameters are adjusted to achieve
optimum results from the equalizer.
The equalizer is specified for a nominal +15 dB gain. The gain will vary slightly,
approximately ± 1.5 dB over the 0° to 50°C (32 to 132°F) operating temperature range.
Composite IF input levels should not exceed -15 dBm, however:
If attenuation at the input of the equalizer is required, use the minimum amount
•
of attenuation necessary to achieve the equalizers specified input level. The
equalizer has a high noise figure, the same as the DEQ-7XX series of equalizers,
which is typically 34 dB.
Use the highest IF input signal level possible that will increase the equalizers
•
overall signal-to-noise ratio.
If the gain of the equalizer needs to be reduced, it should be done at the IF output
•
using fixed attenuators. Attenuating the IF output of the equalizer will reduce the
output noise power of the equalizer which is typically -125 dBm/Hz.
A–2 Rev. 2
Page 60

EQ90 Amplitude Equalizer Application Note
A.3 Fault Monitor
The equalizer monitors the IF output signal level and power supplies for fault conditions.
These alarms are summed and reported to the rear panel monitor connector and front
panel status indicator(s).
Normally the equalizer is set to monitor the IF output signal level.
If no signal is present at the output of the unit, a sum fault will be generated.
•
The alarm detection circuitry will not detect the loss of a single carrier in a
multi-carrier environment.
If the equalizers composite output level falls below a factory preset threshold,
•
(-20 dBm), the equalizer will generate a sum fault condition.
If level monitoring is not desired because output signal levels are too low, a
•
switch located on the equalizer module can bypass the output detection feature.
When level detection is bypassed, the equalizer fault circuitry will only monitor
•
the equalizers internal power supply.
A.4 Monitor Interface
The monitor interface of the equalizer is designed to facilitate 1:1 and 1:N redundancy
implementations when using an equalizer.
The equalizer will interface directly to V90 and V901 frequency converters via a 9-pin
female, female D ribbon cable. The channel monitor port of the equalizer is connected to
the J6 rear panel connection on these converters.
This connection places the sum fail relay contacts of the equalizer in parallel with the
fault relay contacts of the converter. V90 and V901 converters can report the fault status
of an equalizer, connected to J6, to remote M&C facilities.
The equalizer also will directly interface to the Automatic Redundancy Controller (ARC)
via a 9-pin male, female D ribbon cable. The channel monitor port of the equalizer is
connected to one of the rear panel input connections, J2, or J3, of the ARC.
Rev. 2 A–3
Page 61

Application Note EQ90 Amplitude Equalizer
This page is intentionally left blank.
A–4 Rev. 2
Page 62

G
Glossary
The following is a list of acronyms and abbreviations that may be found in this manual.
Acronym/
Abbreviation
Ω
A Ampere
AC Alternating Current
ADJ Adjust
AGC Automatic Gain Control
AIS Alarm Indication Signal
ASK Amplitude Shift Keying
ASYNC Asynchronous
AUPC Automatic Uplink Power Control
AUX 1 Auxiliary 1
BB Baseband
BCD Binary Coded Decimal
BER Bit Error Rate
BER CONT BIT Error Rate Continuous
bit/s bits per second
C Celsius
CCITT International Telephone and Telegraph Consultative Committee
CDMA Code Division Multiple Access
CH Channel
CHNL Channel
CIC Common Interface Circuit
CL Carrier Loss
CLK Clock
CLR Clear
Coax Coaxial
Codec Coder/Decoder
COM Common
CPU Central Processing Unit
cr Carriage Return
CRC Cyclic Redundancy Check
CRT Cathode Ray Tube
Ohms
Definition
Rev. 2 g–1
Page 63

Glossary EQ90 Amplitude Equalizerl
CS Clear to Send
CSC Comstream Compatible
CSMA Carrier Sense Multiple Access
CTS Clear to Send
CU Channel Unit
CW Continuous Wave
D/C Down Converter
DAC Digital-to-Analog Converter
DAMA Demand Assignment Multiple Access
dB Decibels
dB/Hz Decibels/Hertz (unit of carrier-to-noise density ratio)
dBc Decibels referred to carrier
dBm Decibels referred to 1.0 milliwatt
dBm0 The signal magnitude in dBm referenced to the nominal level at that
point
dBW Decibels referred to 1.0 watt
DC Direct Current
DDS Direct Digital Synthesis
Demod Demodulator
DET Detector
DM Data Mode
DPCM Differential Pulse Code Modulation
DPSK Differential Phase Shift Keying
DSP Digital Signal Processing
DSR Data Signal Rate
DTE Data Terminal Equipment
Eb/N0
Bit Energy-to-Noise Ratio
EFD EFData Compatible
EIA Electronic Industries Association
ESC Engineering Service Circuit or Engineering Service Channel
ESD Electrostatic Discharge
EXC External Clock
EXT External Reference Clock
FIFO First in/First Out
FW Firmware
GHz
Gigahertz (10
9
hertz)
GND Ground
HI STAB High Stability
HPA High Power Amplifier
Hz Hertz (cycle per second)
I&Q In-Phase and Quadrature
I/O Input/Output
k
kilo (10
3
)
KΩ kilo-ohms
kbit/s
kHz
Kilobits per second (10
Kilohertz (10
3
Hertz)
3
bits per second)
ks/s Kilosymbols Per Second (103 symbols per second)
kW
Kilowatt (10
3
Watts)
LAN Local Area Network
LCD Liquid Crystal Display
LED Light-Emitting Diode
lf Line Feed
mA Milliamperes
Max Maximum
Mbit/s Megabits per second
MHz
Megahertz (10
6
Hertz)
g–2 Rev. 2
Page 64

EQ90 Amplitude Equalizer Glossary
Min Minimum or Minute
Mod Modulator
ms
n
Millisecond (10
nano (10
-3
-9
second)
)
N/A Not Applicable
NACK Negative Acknowledgment
ns
Nanosecond (10
-9
second)
P-P Peak-to-Peak
PCB Printed Circuit Board
PK Peak
PPM Parts Per Million
PS Power Supply
PWR Power
REF Reference
s Second
SCPC Single Channel Per Carrier
SCR Serial Clock Recei ve
SCT Serial Clock Transmit
SCTE Serial Clock Transmit External
SD Send Data
SFS Subframe Sync
SMS Satellite Multiservice System
SN Signal-to-Noise Ratio
SSB Single-sideband
SSPA Solid State Power Amplifier
ST Send Timing
SW Switch
SYNC Synchronize
TX Transmit (Transmitter)
U/C Up converter
V Volts
VAC Volts, Alternating Current
VCO Voltage-Controlled Oscillator
VCXO Voltage-Controlled Crystal Oscillator
VDC Volts, Direct Current
VSWR Voltage Standing Wave Ratio
W Watt
WG Waveguide
Rev. 0 g–3
Page 65

Glossary EQ90 Amplitude Equalizerl
This page is intentionally left blank.
g–4 Rev. 2
Page 66

METRIC CONVERSIONS
Units of Length
Unit
1 centimeter — 0.3937 0.03281 0.01094
1 inch 2.540 — 0.08333 0.2778
1 foot 30.480 12.0 — 0.3333
1 yard 91.44 36.0 3.0 —
Centimeter
Inch
Foot
Yard
Mile
6.214 x 10
1.578 x 10
1.893 x 10
5.679 x 10
Meter
-6
-5
-4
-4
0.01 — —
0.254 — 25.4
0.3048 — —
0.9144 — —
Kilometer Millimeter
1 meter 100.0 39.37 3.281 1.094
1 mile
1 mm — 0.03937 — — — — — —
1 kilometer — — — — 0.621 — — —
1.609 x 10
5
6.336 x 10⁴ 5.280 x 10³ 1.760 x 10³
6.214 x 10
-4
—
— — —
1.609 x 10³
1.609 —
Temperature Conversions
Ounce
Troy
Formulas
C = (F - 32) * 0.555
F = (C * 1.8) + 32
Pound
Avoir.
Pound
Troy
Kilogram
Unit
32° Fahrenheit
212° Fahrenheit
-459.6° Fahrenheit
°°°°
Fahrenheit
—
—
—
°°°°
Centigrade
0
(water freezes)
100
(water boils)
273.1
(absolute 0)
Units of Weight
Unit
1 gram — 0.03527 0.03215 0.002205 0.002679 0.001
Gram
Ounce
Avoirdupois
1 oz. avoir. 28.35 — 0.9115 0. 0625 0.07595 0.02835
1 oz. troy 31.10 1.097 — 0.06857 0.08333 0.03110
1 lb. avoir. 453.6 16.0 14.58 — 1.215 0.4536
1 lb. Troy 373.2 13.17 12.0 0.8229 — 0.3732
1 kilogram
1.0 x 10
3
35.27 32.15 2.205 2.679 —
Page 67

Page 68

2114
WEST 7TH STREET TEMPE ARIZONA
85281
480 • 333 • 2200
480 • 333
• 2161
USA
PHONE
FAX
 Loading...