

Page 1
Bedienungsanleitung/Garantie
Gebruiksaanwijzing/Garantie • Mode d’emploi/Garantie
Instrucciones de servicio/Garantía • Istruzioni per l’uso/Garanzia
Instruction Manual/Guarantee • Instrukcja obsługi/Gwarancja
A használati utasítás/Garancia
Projektions-Uhrenradio
Projectieklokradio • Radio réveil à projection
Radio con reloj de proyección • Radiosveglia a proiezione
Projection Clock Radio • Projekcyjne radio z budzikiem
Kivetítős rádiós óra
MRC 665 P
05-MRC 665 P 1 27.05.2008, 15:50:35 Uhr_TH
Page 2

Inhalt
Inhoud • Sommaire • Indice • Indice • Contents • Spis treści • Tartalom
D
Übersicht Bedienelemente . . . . . . . . . . . . . . . . . . . . . . . . . .Seite 3
Bedienungsanleitung . . . . . . . . . . . . . . . . . . . . . . . . . . . . . . .Seite 4
NL
Overzicht bedieningselementen . . . . . . . . . . . . . . . . . . . . . .Pagina 3
Gebruiksaanwijzing . . . . . . . . . . . . . . . . . . . . . . . . . . . . . . . .Pagina
F
Aperçu des éléments de commande . . . . . . . . . . . . . . . . . . .Page 3
Mode d’emploi . . . . . . . . . . . . . . . . . . . . . . . . . . . . . . . . . . .Page
E
Vista de conjunto Elementos de mando . . . . . . . . . . . . . . . .Página 3
Instrucciones de servicio . . . . . . . . . . . . . . . . . . . . . . . . . . . .Página
I Descrizione dei singoli pezzi . . . . . . . . . . . . . . . . . . . . . . . .Pagina 3
Istruzioni per l’uso . . . . . . . . . . . . . . . . . . . . . . . . . . . . . . . . .Pagina
GB
Control element overview . . . . . . . . . . . . . . . . . . . . . . . . . . .Page 3
Instruction Manual . . . . . . . . . . . . . . . . . . . . . . . . . . . . . . . . .Page
PL
Przegląd elemetów obsługi . . . . . . . . . . . . . . . . . . . . . . . . .Strona 3
Instrukcja obsługi . . . . . . . . . . . . . . . . . . . . . . . . . . . . . . . .Strona
Gwarancja . . . . . . . . . . . . . . . . . . . . . . . . . . . . . . . . . . .Strona 3
H
A hasznalt elemek megtekintése . . . . . . . . . . . . . . . . . . . . .Oldal 3
A hasznalati utasítás . . . . . . . . . . . . . . . . . . . . . . . . . . . . . .Oldal
Seite
Pagina
Page
Página
Pagina
Page
Strona
3
Oldal
12
7
2
2
2
3
8
4
3
Technische Daten .................................... 7
Technische gegevens .............................
Données techniques ............................... 1
Datos técnicos .......................................
Dati tecnici .........................................
Technical Data ......................................
Dane techniczne .....................................
Műszaki adatok ......................................
....
...
9
14
19
24
2
7
29
34
7
40
2
05-MRC 665 P 2 06.05.2005, 12:50:37 Uhr
Page 3
Übersicht der Bedienelemente
Overzicht van de bedieningselementen • Liste des différents éléments de commande
Indicación de los elementos de manejo • Elementi di comando
Overview of the Components •
A kezelő elemek áttekintéseé
Przegląd elementów obłsugi
3
05-MRC 665 P 3 06.05.2005, 12:50:38 Uhr
Page 4
D
Lesen Sie vor Inbetriebnahme dieses Gerätes die Bedienungsanleitung sehr sorgfältig
durch und bewahren Sie diese inkl. Garantieschein, Kassenbon und nach Möglichkeit den
Karton mit Innenverpackung gut auf. Falls Sie das Gerät an Dritte weitergeben, geben Sie
auch die Bedienungsanleitung mit.
• Um das Risiko von Feuer oder einem elektrischen Schlag zu vermeiden, sollten Sie das
Gerät nicht Regen oder Feuchtigkeit aussetzen. Das Gerät nicht in unmittelbarer Nähe
von Wasser betreiben (z.B. Badezimmer, Schwimmbecken, feuchte Keller).
• Verwenden Sie das Gerät nur für den vorgesehenen Zweck.
• Das Gerät ausschließlich an eine vorschriftsmäßig installierte Steckdose anschließen.
Achten Sie darauf, dass die angegebene Spannung mit der Spannung der Steckdose
übereinstimmt.
• Bei Verwendung von externen Netzteilen auf die richtige Polarität und Spannung
achten, Batterien stets richtigherum einlegen.
• Das Gerät so aufstellen, dass vorhandene Lüftungsöffnungen nicht verdeckt werden.
• Niemals das Gehäuse des Gerätes öffnen. Durch unsachgemäße Reparaturen können
erhebliche Gefahren für den Benutzer entstehen. Bei Beschädigung des Gerätes, insbesondere des Netzkabels, das Gerät nicht mehr in Betrieb nehmen, sondern von einem
Fachmann reparieren lassen. Netzkabel regelmäßig auf Beschädigungen prüfen.
• Ein defektes Netzkabel darf nur vom Hersteller, unserem Kundendienst oder einer
ähnlich qualifi zierten Person durch ein gleichwertiges Kabel ersetzt werden, um Gefährdungen zu vermeiden.
• Benutzen Sie das Gerät längere Zeit nicht, ziehen Sie den Netzstecker aus der Steckdose, bzw. entnehmen Sie die Batterien.
Diese Symbole können sich ggfs. auf dem Gerät befi nden und sollen Sie auf folgendes
hinweisen:
Das Blitz-Symbol soll den Benutzer auf Teile im Inneren des Gerätes hinweisen,
die gefährlich hohe Spannungen führen.
Das Symbol mit Ausrufezeichen soll den Benutzer auf wichtige Bedienungsoder Wartungs-Hinweise in den Begleitpapieren hinweisen.
Allgemeine Sicherheitshinweise
4
05-MRC 665 P 4 06.05.2005, 12:50:39 Uhr
Page 5

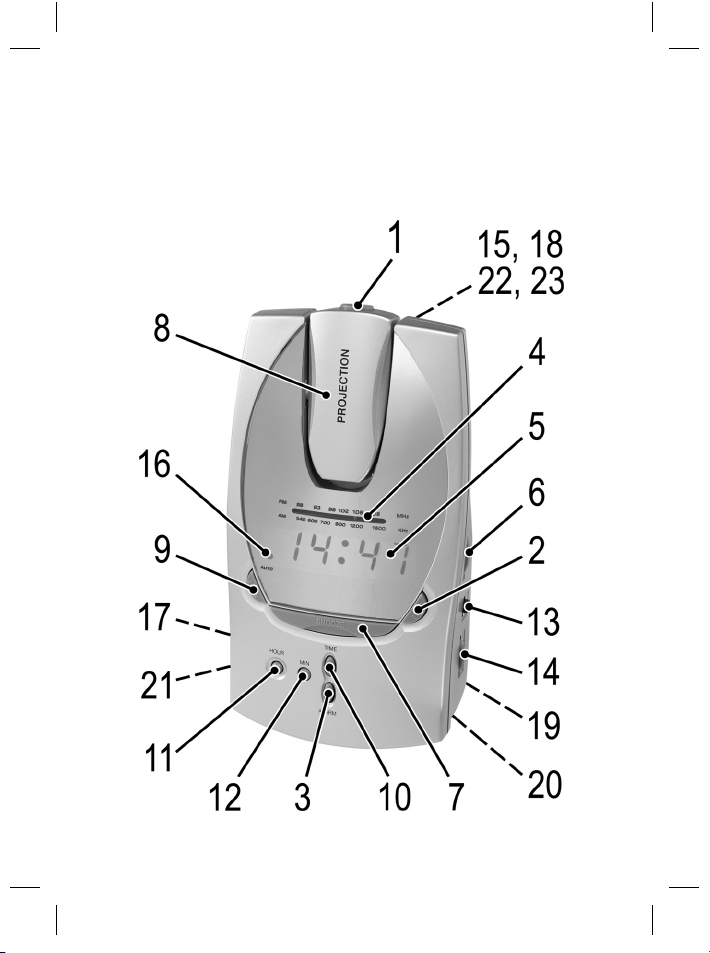
Übersicht der Bedienelemente
1 Linse 14 VOLUME - / + (Lautstärke) Regler
2 SLEEP Taste 15 FOCUS Regler
3 ALARM Taste 16 LED Anzeige für aktivierte
4 Senderskala Weckfunktion (AUTO)
5 LED Display 17 PROJECTION ON/OFF Schalter
6 TUNING Regler 18 MIN Taste Projektor
7 SNOOZE Taste 19 Wurf-Antenne
8 Schwenkbarer Projektor 20 Batteriefach
9 AL.OFF Taste (Alarm aus) 21 Funktionsschalter
10TIME Taste(ON/ OFF/ AUTO/ BUZZ)
11 HOUR Taste 22 Funktionstaste Zeit einstellen
12 MIN Taste (TIME) Projektor
13 Bandwahlschalter (AM/FM) 23 HOUR Taste Projektor
Inbetriebnahme
Stecken Sie den Netzstecker in eine vorschriftsmäßig installierte Schutzkontakt
Steckdose 230 V, 50 Hz.
Sendereinstellung
Schieben Sie den Funktionsschalter (21) auf Position ON und wählen Sie mit dem
Bandwahlschalter (13) das gewünschte Frequenzband
FM = UKW, AM = MW.
Wählen Sie, durch Drehen des TUNING Reglers (6), einen Sender. Die Senderskala (4) zeigt die abgestimmte Frequenz an.
Einstellen der Uhrzeit
Stunden: TIME Taste (10) und gleichzeitig die HOUR Taste (11) drücken.
Minuten: TIME Taste (10) und gleichzeitig die MIN Taste (12) drücken.
Einstellen der Weckzeit
Stunden: ALARM Taste (3) und gleichzeitig die HOUR Taste (11) drücken.
Minuten: ALARM Taste (3) und gleichzeitig die MIN Taste (12) drücken.
Mit Radio wecken
• Nachdem Sie die Weckzeit eingestellt und einen Radiosender ausgewählt
haben, schieben Sie den Funktionsschalter (21) in Position AUTO. Im Display
(5) leuchtet ein Punkt bei AUTO (16).
• Sobald Ihre angegebene Weckzeit erreicht wird, schaltet sich das Radio ein.
Es ertönt der ausgewählte Sender in der zuvor eingestellten Lautstärke.
D
5
05-MRC 665 P 5 06.05.2005, 12:50:40 Uhr
Page 6

Mit Summer wecken
D
• Möchten Sie nicht mit dem Radiosignal geweckt werden, schieben Sie den
Funktionsschalter (21) in Position BUZZ.
• Anstelle des Radiosignals ertönt nun beim Erreichen der Weckzeit ein Signalton.
Zum Abstellen des Signaltons, den Funktionsschalter (21) auf Position OFF schieben oder die AL.OFF Taste (9) drücken.
Intervall-Weckautomatik
Die automatisch eingestellte Weckfunktion kann mit der SNOOZE Taste (7) für ca.
9 Minuten ausgeschaltet werden. Nach ca. 1 Stunde schaltet sich die Weckfunktion bis zum nächsten Tag vollständig ab.
Verzögertes Ausschalten
• Die Funktion verzögertes Ausschalten können Sie nutzen in den Schalterpositionen OFF/AUTO oder BUZZ.
• Durch Drücken der SLEEP Taste (2) wird das Radio nach 59 Minuten bzw.
1 Std. 59 Min. ausgeschaltet. Die Ausschaltzeit kann durch gleichzeitiges
Drücken der SLEEP- und der MIN Taste (12), bzw. HOUR Taste (11), verstellt
werden.
• Mit der SNOOZE Taste (7) kann diese Funktion wieder aufgehoben werden.
Projektion
Sie haben die Möglichkeit, mit diesem Gerät die Uhrzeit an die Wand, bzw. an die
Decke zu projizieren. Schieben Sie dazu den Schalter Projektion (17) in Position
ON. Sie können den Projektor (8) nach vorne bzw. nach hinten schwenken. An
der Rückseite des Projektors befi ndet sich ein Einstellrad (15), mit dem Sie die
Schärfe der projizierten Anzeige einstellen können.
Die Uhrzeit des Projektors muss unabhängig vom Gerät eingestellt werden. Benutzen Sie hierzu die Tasten auf der Rückseite des Projektors (8).
Stunden: TIME Taste Projektor (22) und gleichzeitig die HOUR Taste Projektor
Minuten: TIME Taste Projektor (22) und gleichzeitig die MIN Taste Projektor (18)
(23) drücken.
drücken.
Einlegen der Batterie für die Gangreserve
(Batterien nicht im Lieferumfang enthalten)
Sollte es zu einem Stromausfall kommen oder wird der Netzstecker des Gerätes
aus der Steckdose gezogen, werden, bei eingelegten Gangreservebatterie, die
Einstellungen beibehalten.
6
05-MRC 665 P 6 06.05.2005, 12:50:40 Uhr
Page 7

1. Öffnen Sie das Batteriefach (20) auf der Rückseite.
2. Verbinden Sie eine 9 V, E-Blockbatterie mit dem Anschluss. Achten Sie auf
richtige Polarität.
3. Wird das Gerät längere Zeit nicht benutzt, nehmen Sie bitte die Batterie aus
dem Gerät, um ein „Auslaufen“ von Batteriesäure zu vermeiden.
Achtung: Batterien gehören nicht in den Hausmüll. Bitte geben Sie verbrauchte
Batterien bei zuständigen Sammelstellen oder beim Händler ab.
Werfen Sie Batterien niemals ins Feuer.
Reinigung
• Ziehen Sie vor der Reinigung den Netzstecker.
• Reinigen Sie das Gerät mit einem leicht feuchten Tuch ohne Zusatzmittel.
• Tauchen Sie das Gerät nicht ins Wasser.
Technische Daten
Modell: ................................................................................................................MRC P
Spannungsversorgung: .................................................................................... 230 V, 50 Hz
Leistungsaufnahme: ....................................................................................................... 5 W
Batterie Gangreserve: ............................................................................................9 V-Block
Schutzklasse: ..................................................................................................................... ΙΙ
Frequenzband: ............................................................................UKW / FM 8 , ~ 108 MHz
8 0
...............................................................MW / AM 5 ~ 16 kHz...............
Technische Änderungen vorbehalten!
566
0004
Konformitätserklärung
Hiermit erklärt die Firma Clatronic International GmbH, dass sich das Gerät MRC P
in Übereinstimmung mit den grundlegenden Anforderungen, der europäischen Richtlinie
für elektromagnetische Verträglichkeit und der Niederspannungsrichtlinie
(93/68/EWG und 2006/95/EG)
(2004/108/EG)
befi ndet.
566
D
7
05-MRC 665 P 7 06.05.2005, 12:50:41 Uhr
Page 8

D
Bedeutung des Symbols „Mülltonne“
Schonen Sie unsere Umwelt, Elektrogeräte gehören nicht in den Hausmüll.
Nutzen Sie die für die Entsorgung von Elektrogeräten vorgesehenen Sammelstellen und
geben dort Ihre Elektrogeräte ab, die Sie nicht mehr benutzen werden.
Sie helfen damit die potenziellen Auswirkungen, durch falsche Entsorgung, auf die Umwelt
und die menschliche Gesundheit zu vermeiden.
Sie leisten damit Ihren Beitrag zur Wiederverwertung, zum Recycling und zu anderen
Formen der Verwertung von Elektro- und Elektronik-Altgeräten.
Informationen, wo die Geräte zu entsorgen sind, erhalten Sie über Ihre Kommunen oder die
Gemeindeverwaltungen.
8
05-MRC 665 P 8 06.05.2005, 12:50:41 Uhr
Page 9
Algemene veiligheidsinstructies
Lees vóór de ingebruikname van dit apparaat de handleiding uiterst zorgvuldig door en
bewaar deze goed, samen met het garantiebewijs, de kassabon en zo mogelijk de doos
met de binnenverpakking. Geef ook de handleiding mee wanneer u de machine aan derden
doorgeeft.
• Voorkom risico’s voor brand en elektrische schokken en stel het apparaat niet bloot
aan regen of vocht. Gebruik het apparaat niet in de directe nabijheid van water (bijv.
badkamer, zwembad, vochtige kelder).
• Gebruik het apparaat uitsluitend voor het daarvoor bestemde doel.
• Sluit het apparaat uitsluitend aan op een correct geïnstalleerde contactdoos. Let op dat
de aangegeven spanning overeenstemt met de spanning van de contactdoos.
• Let bij het gebruik van externe adapters op de juiste polariteit en spanning en plaats
batterijen altijd in de juiste richting.
• Plaats het apparaat zodanig dat de aangebrachte luchtopeningen niet worden afgedekt.
• Open nooit de behuizing van het apparaat. Door ondeskundige reparaties kunnen
aanzienlijke gevaren voor de gebruiker ontstaan. Neem het apparaat niet meer in
gebruik wanneer het apparaat - en in het bijzonder de kabel - beschadigingen vertoont,
maar laat het eerst door een vakman repareren. Controleer de kabel regelmatig op
beschadigingen.
• Een defecte kabel mag alleen door de fabrikant, onze technische dienst of een soortgelijk gekwalifi ceerd persoon worden vervangen. Alleen zo kunnen gevaren vermeden
worden.
• Onderbreek de stroomtoevoer of verwijder de batterijen wanneer u denkt, het apparaat
langere tijd niet te gebruiken.
Volgende symbolen kunnen op uw apparaat zijn aangebracht. Zij hebben de volgende
betekenis:
Het bliksemsymbool wijst de gebruiker op onderdelen in het inwendige van het
apparaat die gevaarlijk hoge spanning voeren.
Het symbool met het uitroepteken verwijst naar belangrijke bedienings- en
onderhoudsinstructies in de begeleidende documentatie.
NL
9
05-MRC 665 P 9 06.05.2005, 12:50:42 Uhr
Page 10

NL
1 Lens 15 FOCUS-regelaar
2 SLEEP-toets 16 LED-display voor geactiveerde
3 ALARM-toets wekfunctie (AUTO)
4 Zenderschaal 17 PROJECTION ON/OFF-schakelaar
5 LED-display 18 MIN-toets projector
6 TUNING-regelaar 19 Draadantenne
7 SNOOZE-toets 20 Batterijenvakje
8 Zwenkbare projector 21 Functieschakelaar
9AL.OFF-toets (Alarm uit)(ON/ OFF/ AUTO/ BUZZ)
10 TIME-toets 22 Functietoets tijd instellen
11 HOUR-toets (TIME) projector
12 MIN-toets 23 HOUR-toets projector
13 Bandkeuzeschakelaar (AM/FM)
14 VOLUME - / + (Geluidssterkte)
Overzicht van de bedieningselementen
regelaar
Ingebruikname
Steek de netsteker in een correct geïnstalleerde en geaarde contactdoos
230 V, 50 Hz.
Zenderinstelling
Schuif de functieschakelaar (21) naar de stand ON en kies met de bandkeuzeschakelaar (13) de gewenste frequentieband
FM = UKW, AM = MW.
Kies een zender door aan de TUNING-regelaar (6) te draaien. De zenderschaal
(4) geeft de ingestelde frequentie weer.
De kloktijd instellen
Uren: Druk toets TIME (10) en toets HOUR (11) gelijktijdig in.
Minuten: Druk toets TIME (10) en toets MIN (12) gelijktijdig in.
De wektijd instellen
Uren: Druk toets ALARM (3) en toets HOUR (11) gelijktijdig in.
Minuten: Druk toets ALARM (3) en toets MIN (12) gelijktijdig in.
Wekken met radio
• Wanneer u de wektijd hebt ingesteld en een radiozender hebt uitgekozen,
schuift u de functieschakelaar (21) naar de stand AUTO. Op het display (5)
brandt een punt bij AUTO (16).
10
05-MRC 665 P 10 06.05.2005, 12:50:42 Uhr
Page 11

• Zodra de door u ingestelde wektijd is bereikt, schakelt de radio in. U hoort dan
de uitgekozen zender in de door u ingestelde geluidssterkte.
Wekken met de zoemer
• Indien u niet door de radio gewekt wilt worden, schuift u de functieschakelaar
(21) naar de stand BUZZ.
• In plaats van een radiosignaal hoort u nu een signaal bij het bereiken van de
wektijd.
Schuif de functieschakelaar (21) naar de stand OFF of druk de AL.OFF-toets (9) in
om het signaal uit te schakelen.
Automatische wekinterval
De automatisch ingestelde wekfunctie kan door het indrukken van de SNOOZEtoets (7) ca. 9 minuten worden uitgeschakeld. Na ongeveer 1 uur schakelt de
wekfunctie uit tot de volgende dag.
Inslaapfunctie
• U kunt de inslaapfunctie in de schakelstanden OFF/AUTO of BUZZ activeren.
• Wanneer u de SLEEP-toets (2) indrukt, schakelt de radio na 59 minuten of
1 uur 59 min. uit. U kunt de uitschakeltijd veranderen door tegelijkertijd de
SLEEP- en de MIN-toets (12) resp. de HOUR-toets (11) in te drukken.
• Druk de SNOOZE-toets (7) in om deze functie weer te deactiveren.
Projectie
Met dit apparaat kunt u de kloktijd aan de muur of aan het plafond projecteren.
Schuif hiervoor de projectieschakelaar (17) naar de stand ON. U kunt de projector
(8) naar voor of naar achter zwenken. Op de achterzijde van de projector bevindt
zich een stelwieltje (15) waarmee u de scherpte van de geprojecteerde weergave
kunt instellen.
De kloktijd van de projector moet los van het apparaat worden ingesteld.
Gebruik hiervoor de toetsen aan de achterzijde van de projector (8).
Uren: TIME-toets projector (22) en tegelijkertijd de HOUR-toets projector (23)
indrukken.
Minuten: TIME-toets projector (22) en tegelijkertijd de MIN-toets projector (18)
indrukken.
NL
Bufferbatterij voor de gangreserve plaatsen
(niet bij levering inbegrepen)
Bij geplaatste bufferbatterij blijven de apparaatinstellingen behouden wanneer
de stroom uitvalt of de netsteker van het apparaat uit de contactdoos getrokken
wordt.
11
05-MRC 665 P 11 06.05.2005, 12:50:43 Uhr
Page 12

1. Open het batterijvakje (20) aan de achterzijde.
NL
Sluit een 9 V E-blokbatterij aan op de aansluiting. Let goed op de juiste polariteit.
2.
3. Verwijder de batterij wanneer het apparaat gedurende een langere periode
niet wordt gebruikt. Zo voorkomt u lekkage van het batterijzuur.
Let op: batterijen horen niet in het huisafval. Geef verbruikte batterijen af bij het
gemeentelijke milieupark of bij de handelaar.
Gooi batterijen nooit in het vuur.
Reiniging
• Trek vóór de reiniging van het apparaat altijd de steker uit de contactdoos.
• Reinig het apparaat met een enigszins vochtige doek zonder reinigingsmiddelen.
• Dompel het apparaat nooit onder water.
Technische gegevens
Model: .................................................................................................................MRC P
Spanningstoevoer:............................................................................................ 230 V, 50 Hz
Opgenomen vermogen:.................................................................................................. W
Batterij gangreserve: ................................................................................................9 V-blok
Beschermingsklasse:.......................................................................................................... ΙΙ
Frequentiebereik:.........................................................................UKW / FM 8 , ~ 108 MHz
...............................................................MW / AM 5 ~ 16 kHz............ 0004
Dit apparaat is gekeurd conform de op dit moment van toepassing zijnde CE-richtlijnen
zoals bijvoorbeeld elektromagnetische compatibiliteit en laagspanningsvoorschriften en is
geconstrueerd volgens de nieuwste veiligheidstechnische voorschriften.
Technische wijzigingen voorbehouden!
8 0
566
5
12
05-MRC 665 P 12 06.05.2005, 12:50:43 Uhr
Page 13

Betekenis van het symbool ‘vuilnisemmer’
Bescherm ons milieu, elektrische apparaten horen niet in het huisafval.
Maak voor het afvoeren van elektrische apparaten gebruik van de voorgeschreven verza-
melpunten en geef daar de elektrische apparaten af die u niet meer gebruikt.
Daardoor helpt u de potentiële effecten te voorkomen die een verkeerde afvoer op het milieu
en de menselijke gezondheid kunnen inwerken.
Op deze wijze levert u uw bijdrage aan het hergebruik, de recycling en andere verwerkings-
vormen voor oude elektronische en elektrische apparaten.
Voor informatie over verzamelpunten voor uw apparaten kunt u contact opnemen met uw
gemeente of gemeenteadministratie.
NL
13
05-MRC 665 P 13 06.05.2005, 12:50:44 Uhr
Page 14
F
Lisez attentivement ce mode d’emploi avant de mettre l’appareil en marche pour la première
fois. Conservez le mode d’emploi ainsi que le bon de garantie, votre ticket de caisse et si
possible, le carton avec l’emballage se trouvant à l’intérieur. Si vous remettez l‘appareil à
des tiers, veuillez-le remettre avec son mode d‘emploi.
• Pour éviter tout risque d’incendie ou d’électrocution ne mettez en aucun cas votre
appareil en contact avec la pluie ou de l’humidité. Ne laissez jamais fonctionner votre
appareil à proximité d’eau (par ex. salle de bains, bassin de piscine, cave humide).
• N’utilisez l’appareil qu’aux fi ns auxquelles il est destiné.
• Ne branchez l’appareil que dans une prise de courant en bon état de fonctionnement.
Veillez à ce que la tension électrique de l’appareil corresponde à celle indiquée sur la
prise de courant.
• Si vous utilisez une alimentation électrique externe, vérifi ez la polarité et la tension
électrique. Placez toujours correctement les piles.
• Installez toujours l’appareil de façon à ce que les ouvertures de ventilation ne soient pas
obstruées.
• N’ouvrez jamais le bloc moteur de l’appareil. Des réparations mal appropriées peuvent
entraîner des risques importants pour l’utilisateur. En cas d’endommagement de
l’appareil, en particulier du câble d’alimentation, ne mettez plus l’appareil en marche et
laissez un spécialiste se charger de la réparation. Contrôlez régulièrement le bon état
du câble d’alimentation.
• Pour éviter tout risque, seul le fabricant, son service après-vente ou un spécialiste à
qualifi cation similaire sont aptes à remplacer un câble défectueux par un câble équivalent.
• Si l’appareil n’est pas utiliser pendant assez longtemps, débranchez le câble
d’alimentation ou retirez les piles.
Vous pouvez éventuellement trouver ces symboles sur l’appareil, qui ont la signifi cation suivante:
L’éclair indique à l’utilisateur les pièces dangereuses, situées à l’intérieur de
l’appareil, qui conduisent de hautes tensions.
Le point d’exclamation attire l’attention de l’utilisateur sur les remarques importantes d’utilisation et d’entretien données dans les documents de l’appareil.
Conseils généraux de sécurité
14
05-MRC 665 P 14 06.05.2005, 12:50:44 Uhr
Page 15

Liste des différents éléments de commande
1 Lentille 14 Variateur VOLUME - / + (son)
2 Bouton SLEEP 15 Variateur FOCUS
3 Bouton ALARM 16 Affi chage lumineux pour
4 Bande de fréquences fonction réveil activée (AUTO)
5 Affi chage lumineux 17 Bouton PROJECTION ON/OFF
6 Variateur TUNING 18 Bouton MIN projecteur
7 Bouton SNOOZE 19 Antenne fl exible
8 Projecteur inclinable 20 Compartiment à piles
9 Bouton AL.OFF (Alarme Off) 21 Sélecteur de fonctions
10Bouton TIME(ON/ OFF/ AUTO/ BUZZ)
11 Bouton HOUR 22 Touche de programmation de
12 Bouton MIN l’heure (TIME) sur le projecteur
13 Sélecteur de fréquences (AM/FM) 23 Bouton HOUR projecteur
Avant la première utilisation
Branchez l’appareil dans une prise de courant en bon état de fonctionnement de
230 V, 50 Hz.
Réglage des émetteurs
Réglez le sélecteur de fonctions (21) sur la position ON et sélectionnez la bande
de fréquence désirée à l’aide du sélecteur de fréquences (13)
FM = UKW, AM = MW.
Choisissez un émetteur en tournant le bouton TUNING (6). La bande de fréquences (4) indique la fréquence captée.
Programmation de l’heure
Heures: enfoncez simultanément les boutons TIME (10) et HOUR (11).
Minutes: enfoncez simultanément les boutons TIME (10) et MIN (12).
Programmation du réveil
Heures: enfoncez simultanément les boutons ALARM (3) et HOUR (11).
Minutes: enfoncez simultanément les boutons ALARM (3) et MIN (12).
Se réveiller avec la radio
• Après avoir programmé l’heure de réveil et choisi une station radio, positionnez
le sélecteur de fonctions (21) sur AUTO. Un point apparaît sur l’écran (5) sur
AUTO (16).
• Dès que l’heure de réveil programmée est atteinte, la radio se met en marche.
La station de radio choisie est alors émise avec le volume préalablement réglé.
F
15
05-MRC 665 P 15 06.05.2005, 12:50:45 Uhr
Page 16

Se réveiller avec le buzzer
F
• Si vous ne voulez pas être réveillé par la radio, déplacez le sélecteur de fonctions (21) sur la position BUZZ.
• Lorsque l’heure de réveil est atteinte, au lieu de la radio, vous entendez un
signal sonore.
Pour arrêter le signal sonore, déplacez le sélecteur de fonctions (21) sur la position OFF ou enfoncez la touche AL.OFF (9).
Réveil automatique à intervalles
La fonction réveil réglée automatiquement peut être stoppée pour env. 9 minutes à
l’aide de la touche SNOOZE (7). Après env. 1 heure, la fonction réveil est complètement désactivée jusqu’au lendemain matin.
Arrêt différé
• Vous pouvez utiliser la fonction d’arrêt différé sur les positions OFF/AUTO ou
BUZZ.
• Si vous enfoncez la touche SLEEP (2), la radio s’arrêtera après 59 minutes ou
1 heure 59 minutes. L’heure à laquelle s’arrête l’appareil peut être changée en
enfonçant simultanément les touches SLEEP et MIN (12), ou HOUR (11).
• Vous pouvez désactiver cette fonction en enfonçant la touche SNOOZE (7).
Projection
Vous avez la possibilité grâce à cet appareil de projeter l’heure sur un mur ou un
plafond. Il suffi t pour cela de déplacer le bouton de projection (17) sur la position
ON. Vous pouvez incliner le projecteur (8) vers l’avant ou l’arrière. Au dos du projecteur se trouve une bague de réglage (15) grâce à laquelle vous pouvez régler
la netteté de l’affi chage projeté.
L’heure du projecteur doit être programmée indépendamment de l’appareil.
Utilisez pour cela les boutons situés au dos du projecteur (8).
Heures: Enfoncez simultanément les touches projecteur TIME (22) et HOUR (23).
Minutes: Enfoncez simultanément les touches projecteur TIME (22) et MIN (18).
Installez les piles relais dans l’appareil
(non compris dans la livraison)
En cas de coupure de courant ou si le câble d’alimentation est débranché de
l’appareil, les programmations ne sont conservées que si les piles relais se trouvent dans l’appareil.
1. Ouvrez le compartiment à piles (20) situé au dos de l’appareil.
2. Reliez une pile monobloc E de 9V au raccordement. Veillez à respecter la
polarité.
16
05-MRC 665 P 16 06.05.2005, 12:50:45 Uhr
Page 17

3. Si l’appareil n’est pas utilisé pendant un certain temps, retirez la pile pour
éviter qu’elle ne coule.
Attention: ne jetez pas les piles avec vos ordures ménagères. Vous êtes priés de
vous débarrasser de vos piles usagées auprès d’un service de recyclage adéquat
ou du fabricant.
Ne jetez jamais de piles dans le feu.
F
Nettoyage
• Débranchez toujours l’appareil avant de le nettoyer.
• Lavez l’appareil avec un torchon légèrement humide sans détergent.
• Ne plongez jamais l’appareil dans l’eau.
Données techniques
Modèle: ...............................................................................................................MRC P
Alimentation:..................................................................................................... 230 V, 50 Hz
Consommation: .............................................................................................................. 5 W
Pile relais:................................................................................................................ Bloc 9 V
Classe de protection:.......................................................................................................... ΙΙ
Bande de fréquence: ...................................................................UKW / FM 8 , ~ 108 MHz
8 0
...............................................................MW / AM 5 ~ 16 kHz...... 0004
Cet appareil a été contrôlé d’après toutes les directives européennes actuelles applicables,
comme par exemple concernant la compatibilité électromagnétique et la basse tension.
Cet appareil a été fabriqué en respect des réglementations techniques de sécurité les plus
récentes.
Sous réserve de modifi cations techniques.
566
17
05-MRC 665 P 17 06.05.2005, 12:50:46 Uhr
Page 18

F
Signifi cation du symbole „Elimination“
Protégez votre environnement, ne jetez pas vos appareils électriques avec les ordures
ménagères.
Utilisez, pour l’élimination de vos appareils électriques, les bornes de collecte prévues à cet
effet où vous pouvez vous débarrasser des appareils que vous n’utilisez plus.
Vous contribuez ainsi à éviter les impacts potentiels dans l’environnement et sur la santé de
chacun, causés par une mauvaise élimination de ces déchets.
Vous contribuez aussi au recyclage sous toutes ses formes des appareils électriques et
électroniques usagés.
Vous trouverez toutes les informations sur les bornes d’élimination des appareils auprès de
votre commune ou de l’administration de votre communauté.
18
05-MRC 665 P 18 06.05.2005, 12:50:46 Uhr
Page 19

Indicaciones generales de seguridad
Antes de la puesta en servicio de este aparato lea detenidamente el manual de instrucciones y guarde éste bien incluido la garantía, el recibo de pago y si es posible también el
cartón de embalaje con el embalaje interior. En caso de dejar el aparato a terceros, también
entregue el manual de instrucciones.
• Vd. no debe dejar expuesto el aparato ni a la lluvia ni a la humedad, a fi n de disminuir
así el riesgo de incendio o de sacudida eléctrica. Por tanto, no debe utilizar el aparato
cerca de agua – por ejemplo, cerca de la bañera, de una piscina o de un sótano húmedo.
• Utilice el aparato únicamente para la fi nalidad para la que ha sido construido.
• El aparato se ha de conectar únicamente a una caja de toma de corriente instalada
reglamentariamente. Cerciórese de que la tensión indicada concuerda con la tensión de
la caja de enchufe.
• Preste atención a que sea correcta la polaridad cuando se empleen fuentes de alimentación externas. Las pilas se han de introducir siempre correctamente.
• El aparato se ha de dejar puesto de modo que no se tapen los orifi cios de aireación
existentes.
• Jamás se abrirá la carcasa del cuerpo del aparato. Las reparaciones mal hechas pueden
generar considerables peligros para el usuario. En caso de estar deteriorado el aparato, en
especial el cable de conectar a red, ya no se ha de poner más en servicio el aparato, sino
que se hará que lo repare un especialista. Controle periódicamente el cable de conexión a
red para ver si se ha deteriorado.
• Sólo el fabricante, nuestro servicio posventa o un técnico con una cualifi cación similar
pueden cambiar un cable defectuoso por otro similar, para evitar todo tipo de riesgo.
• Saque de la toma de corriente la clavija de conectar a la red o bien quite las pilas
cuando no se vaya a usar el aparato durante largo tiempo.
Estos símbolos pueden encontrarse en caso dado en el aparato, y son para indicar lo
siguiente:
El símbolo del rayo advierte al usuario que hay componentes internos del
aparato que pueden tener tensiones peligrosamente altas.
El símbolo con el signo de exclamación advierte al usuario que hay instrucciones de manejo y de mantenimiento importantes en la documentación que va
adjunta.
E
19
05-MRC 665 P 19 06.05.2005, 12:50:46 Uhr
Page 20

E
1 Lente 14 Regulador de VOLUME - / +
2 Botón-SLEEP (Volumen)
3 Botón-ALARM 15 Regulador FOCUS
4 Escala de emisoras 16 Visualizador LED para función
5 Visualizador LED activada de llamada (AUTO)
6 Regulador TUNING 17 PROJECTION ON/OFF-interruptor
7 Botón-SNOOZE 18 Botón-MIN proyector
8 Proyector inclinable 19 Antena de cable
9 Botón-AL.OFF (Alarma apagado) 20 Compartimiento para baterías
10 Botón-TIME 21 Selector de funciones
11Botón-HOUR(ON/ OFF/ AUTO/ BUZZ)
12 Botón-MIN 22 Tecla de función para ajustar
13 Conmutador selector de bandas la hora
Indicación de los elementos de manejo
(AM/FM) (TIME) proyector
23 Botón-HOUR proyector
Puesta en marcha
Introduzca la clavija en una caja de enchufe con tomatierra 230V, 50Hz e instalada
por la norma.
Regulación de la emisora
Ponga el botón de función (21) en posición ON y elija con el conmutador selector
de bandas (13) la banda de frecuencias deseada
FM = UKW, AM = MW.
Elija una emisora, girando el regulador TUNING (6). La escala de emisoras (4)
indica la frecuencia ajustada.
Regulación de la hora
Horas: Presionar el botón TIME (10) y al mismo tiempo botón HOUR (11).
Minutos: Presionar el botón TIME (10) y al mismo tiempo botón MIN (12).
Regulación de la hora de despertar
Horas: Presionar el botón ALARM (3) y al mismo tiempo botón HOUR (11).
Minutos: Presionar el botón ALARM (3) y al mismo tiempo botón MIN (12).
Llamada con la radio
• Después de haber ajustado la hora de llamada y seleccionado un emisor,
empuje el selector de funciones (21) en la posición AUTO. En el visualizador
(5) se ilumina un punto en AUTO (16).
20
05-MRC 665 P 20 06.05.2005, 12:50:47 Uhr
Page 21

• Al alcanzar la hora de llamada, la radio se conectará. Se escuchará el emisor
seleccionado en el volumen que usted ha ajustado.
Llamada con el zumbador
• Si no desea ser despertado con la señal de la radio, empuje el selector de
funciones (21) a la posición BUZZ.
• En vez de la señal de la radio, se escuchará ahora al alcanzar la hora de
llamada un tono de señal.
Para desconectar la señal de la radio, debe empujar el selector de funciones (21)
a la posición OFF o presionar la tecla AL.OFF (9).
Espertador automático en intervalo
La función regulada del despertar automático se puede apagar para aprox.
9 minutos con el botón SNOOZE (7). Después de aprox. 1 hora esta función se
desconectára completamente hasta el próximo día.
Desconexión retrasada
• La función de desconexión retardada la puede utilizar mediante los interruptores OFF/AUTO o BUZZ.
• Presionando la tecla SLEEP (2) se desconectará la radio después de 59 minutos es decir 1h 59min. La hora de desconexión se puede regular pulsando al
mismo tiempo las teclas SLEEP- y MIN (12), es decir HOUR (11).
• Con el botón SNOOZE (7) se puede desactivar esta función.
Proyección
Con este aparato tiene la posibilidad de proyectar el horario en la pared o en el
techo. Para esto empuje el interruptor PROJECTION (17) en posición ON. Puede
inclinar el proyector (8) hacia adelante o hacia atrás. En la parte posterior del
proyector se encuentra una rueda de ajuste (15), con la cual puede ajustar la
nitidez de la indicación proyectada.
La hora del proyector se debe ajustar independientemente de la hora del aparato.
Utilice para ello los botones ubicados en la parte posterior del proyector (8).
Horas: Tecla TIME Proyector (22) y al mismo tiempo pulsar la tecla HOUR
Proyector (23).
Minutos: Tecla TIME Proyector (22) y al mismo tiempo pulsar la tecla MIN
Proyector (18).
E
21
05-MRC 665 P 21 06.05.2005, 12:50:48 Uhr
Page 22

E
En caso de que ocurriese un corte de corriente o se retirase la clavija de red de la
caja de enchufe, no se perderían las ajustaciones, si se ha introducido la batería
de reserva de cuerda.
1. Abra el compartimiento de la batería (20) en la parte posterior.
2. Coloque una batería de bloque E de 9 V. Tenga cuidado con la polaridad.
3. En caso de no utilizar el aparato por largo tiempo, retire la batería para evitar
Cuidado: Las baterías no se colocan en el aseo domiciliario. Por favor, entregue
las baterías utilizadas en los lugares de recolección o en los negocios donde las
venden.
Nunca arroje baterías al fuego.
Introducir baterías para la reserva de cuerda
(no está incluido en el suministro)
que se derrame el ácido de la misma.
Limpieza
• Antes de cada limpieza saque el enchufe de la caja de enchufe.
• Debe limpiar el aparato con un paño poco humedecido y sin detergentes.
• No sumerja el aparato en agua.
Datos técnicos
Modelo: ...............................................................................................................MRC P
Suministro de tensión:...................................................................................... 230 V, 50 Hz
Consumo de energía:..................................................................................................... 5 W
Pila de reserva:.................................................................................................... Bloque 9 V
Clase de protección:........................................................................................................... ΙΙ
Gama de frecuencias:............................................................................ FM 8 , ~ 108 MHz
............................................................................. AM 5 ~ 16 kHz0004
Este aparato se ha examinado según las normativas actuales y vigentes de la Comunidad
Europea, como p.ej. compatibilidad electromagnética y directiva de baja tensión y se ha
construido según las más nuevas especifi caciones en razón de la seguridad.
No reservamos el derecho de efectuar modifi caciones técnicas.
08
566
22
05-MRC 665 P 22 06.05.2005, 12:50:48 Uhr
Page 23

Signifi cado del símbolo „Cubo de basura“
Proteja nuestro medio ambiente, aparatos eléctricos no forman parte de la basura doméstica.
Haga uso de los centros de recogida previstos para la eliminación de aparatos eléctricos y
entregue allí sus aparatos eléctricos que no vaya a utilizar más.
Ayudará en evitar las potenciales consecuencias, a causa de una erronéa eliminación de
desechos, para el medio ambiente y la salud humana.
Con ello, contribuirá a la recuperación, al reciclado y a otras formas de reutilización de los
aparatos viejos eléctricos y electrónicos.
La información cómo se debe eliminar los aparatos, se obtiene en su ayuntamiento o su
administración municipal.
E
23
05-MRC 665 P 23 06.05.2005, 12:50:48 Uhr
Page 24

I
Prima di mettere in funzione questo apparecchio, leggere molto attentamente le istruzioni
per l’uso e conservarle con cura unitamente al certifi cato di garanzia, allo scontrino e, se
possibile, alla scatola di cartone con la confezione interna. Se passate l‘apparecchio a terzi,
consegnate anche le istruzioni per l‘uso.
• Per evitare il rischio di incendio o di scosse, non si deve mai tenere l’apparecchio sotto
la pioggia o in ambienti umidi. Quindi non usare l’apparecchio nelle immediate vicinanze
di acqua, per esempio in prossimità di una vasca, di una piscina o in una cantina umida.
• Utilizzare l’apparecchio solo per l’uso previsto.
• Collegare l’apparecchio esclusivamente ad una presa installata a norma. Fare attenzione a che la tensione indicata corrisponda alla tensione della presa.
• Se si impiegano alimentatori esterni, fare attenzione all’esattezza di polarità e di tensione, inserire le batterie sempre correttamente.
• Collocare l’apparecchio in modo che le aperture per l’aerazione esistenti non vengano coperte.
• Non togliere mai la protezione dell’apparecchio. Riparazioni non a regola d’arte possono
causare notevoli pericoli per l’utente. Se l’apparecchio presenta danni, soprattutto nella
zona del cavo di collegamento, non metterlo più in funzione, ma farlo riparare prima da
un esperto. Esaminare regolarmente il cavo di collegamento alla rete per verifi care che
non ci siano danni.
• Un cavo di collegamento difettoso può essere sostituito con un cavo equivalente solo
dal produttore, dal nostro servizio assistenza o da persone similmente qualifi cate, al fi ne
di evitare pericoli.
• Se l’apparecchio non viene usato per un periodo di tempo prolungato, togliere il blocchetto alimentatore dalla presa ovvero estrarre le batterie.
Questi simboli possono trovarsi eventualmente sull’apparecchio e rimandano ai seguenti elementi:
Il simbolo del lampo fa presente all’utente la presenza di pezzi all’interno
dell’apparecchio che possono produrre alte tensioni pericolose.
Il simbolo con il punto esclamativo fa presente all’utente la presenza di importanti avvertenze per l’uso e la manutenzione nei fogli di accompagnamento
dell’apparecchio.
Norme di sicurezza generali
24
05-MRC 665 P 24 06.05.2005, 12:50:49 Uhr
Page 25

Elementi di comando
1 Lente 14 Regolatore VOLUME - / +
2 Tasto SLEEP (volume)
3 Tasto ALARM 15 Regolatore FOCUS
4 Scala emittenti radio 16 Display LED per funzione
5 Display LED sveglia attivata (AUTO)
6 Regolatore TUNING 17 PROJECTION ON/OFF Interruttore
7 Tasto SNOOZE 18 Tasto MIN proiettore
8 Proiettore orientabile 19 Antenna a fi lo
9 Tasto AL.OFF (Allarme spento) 20 Vano batterie
10 Tasto TIME 21 Selettore funzioni
11Tasto HOUR(ON/ OFF/ AUTO/ BUZZ)
12 Tasto MIN 22 Impostare il selettore tempo
13 Selettore di banda (AM/FM) (TIME) proiettore
23 Tasto HOUR proiettore
Messa in esercizio
Infi lare la spina in una presa regolarmente installata con contatto di terra da
230 V, 50 Hz.
Scelta del trasmettitore
Mettete l’interruttore di accensione (21) su ON e con l’interruttore di frequenza (13)
selezionate la banda di frequenza desiderata
FM = UKW, AM = MW.
Selezionate un’emittente girando la manopola TUNING (6). La scala delle stazioni
radio (4) indica la frequenza selezionata.
Impostazione dell’ora
Ore: premete il tasto TIME (10) e contemporaneamente il tasto HOUR (11).
Minuti: premete il tasto TIME (10) e contemporaneamente il tasto MIN (12).
Impostazione della sveglia
Ore: premete il tasto ALARM (3) e contemporaneamente il tasto HOUR (11).
Minuti: premete il tasto ALARM (3) e contemporaneamente il tasto MIN (12).
Sveglia con la radio
• Dopo aver impostato la sveglia e selezionato un’emittente radio, mettere il
selettore funzioni (21) sulla posizione AUTO. Nel display (5) si accende un punto
in AUTO (16).
25
I
05-MRC 665 P 25 06.05.2005, 12:50:49 Uhr
Page 26

• All’ora indicata la radio si accende. L’emittente selezionata risuona nel volume
I
impostato.
Sveglia con ronzio
• Se non desiderate essere svegliati con il segnale radio, spingete il selettore
funzioni (21) nella posizione BUZZ.
• Al posto del segnale radio, all’ora impostata risuona un segnale acustico.
Per spegnere il segnale acustico, spingete il selettore funzioni (21) su OFF o
premete il tasto AL.OFF (9).
Allarme ad intervalli
L’allarme inserito automaticamente si può spegnere con il tasto SNOOZE (7) per
ca. 9 minuti. Dopo un’ora circa l’allarme si disinserisce completamente fi no al
giorno dopo.
Spegnimento a tempo
• Si può utilizzare la funzione sleep quando l’apparecchio è impostato su OFF/
AUTO o BUZZ.
• Premendo il tasto SLEEP (2) la radio si spegne dopo 59 minuti o dopo 1 ora e
59 minuti. La durata nella quale l‘ apparecchio è spento è impostabile premendo contemporaneamente i tasti SLEEP e MIN (12), oppure il tasto HOUR (11).
Con il tasto SNOOZE (7) si può annullare questa funzione.
•
Proiezione
Con questo apparecchio è possibile proiettare l’ora sulla parete o sul soffi tto. A
questo scopo spingere il pulsante PROJECTION (17) nella posizione ON. Si può
orientare il proiettore (8) in avanti o all’indietro. Sulla parte retro dell‘ apparecchio
si trova una rotellina di regolazione (15), con la quale si può regolare la nitidezza
della visualizzazione proiettata.
L’ora del proiettore deve essere impostata indipendentemente dall’apparecchio.
Adoperate i tasti sul retro del proiettore (8).
Ore: Premere contemporaneamente il tasto proiettoreTIME (22) e il tasto
Minuti: Premere contemporaneamente il tasto proiettoreTIME (22) e il tasto
proiettore HOUR (23) .
proiettore MIN (18) .
Inserimento delle batterie di riserva
(non incluso nella fornitura)
Nel caso di interruzione di corrente o se si stacca la spina, con le batterie di riserva inserite, le impostazioni rimangono.
26
05-MRC 665 P 26 06.05.2005, 12:50:50 Uhr
Page 27

1. Aprire il vano batteria (20) sul lato posteriore.
2. Collegare all’attacco una batteria stilo E da 9 V, facendo attenzione alla corretta polarità.
3. Se non si usa l’apparecchio per un lungo periodo, togliere la batteria
dall’apparecchio, per evitare la „fuoriuscita“ dell’acido della batteria.
Attenzione: le batterie non vanno smaltite insieme ai rifi uti domestici. La preghia-
mo di depositare le batterie usate presso i centri di raccolta appositi oppure presso
i rivenditori.
Non gettare mai le batterie nel fuoco.
Pulizia
• Prima di pulire estraete la spina.
• Pulite l’apparecchio con un panno leggermente inumidito senza additivi.
• Non immergete l’apparecchio in acqua.
Dati tecnici
Modello: ..............................................................................................................MRC P
Alimentazione rete:........................................................................................... 230 V, 50 Hz
Consumo di energia: ...................................................................................................... 5 W
Batterie di riserva:................................................................................................. blocco 9 V
Classe di protezione:.......................................................................................................... ΙΙ
...........
Gamma di frequenza:..................................................................
FM 8 , ~ 108 MHz
............................................................................. AM 5 ~ 16 kHz0004
Questo apparecchio è stato controllato sulla base di tutte le direttive CE attuali in vigore in
questo settore, quali per esempio la normativa in materia di compatibilità elettromagnetica
e la direttiva in materia di bassa tensione, ed è stato costruito conformemente alle norme di
sicurezza più moderne.
Con riserva di apportare modifi che tecniche.
566
08
I
27
05-MRC 665 P 27 06.05.2005, 12:50:50 Uhr
Page 28

I
Signifi cato del simbolo „Eliminazione“
Salvaguardare l’ ambiente, gli elettrodomestici non vanno eliminati come rifi uti domestici.
Per l’ eliminazione degli elettrodomestici, fare uso die posti di raccolta previsti per questo
tipo e porre quegli elettrodomestici che non sono più in uso.
Si contribuisce così ad evitare un effetto potenziale sull’ ambiente e sulla salute, dovuto
magari ad una eliminazione sbagliata.
Questo signifi ca un contributo personale alla riutilizzazione, al riciclaggio e altre forme di
utilizzazione di elettrodomestici ed apparecchi elettronici usati.
Si possono trovare le corrispondenti informazioni sugli appositi luoghi di raccolta, nelle
amministrazioni die comuni.
28
05-MRC 665 P 28 06.05.2005, 12:50:51 Uhr
Page 29

General Safety Instructions
Read the operating instructions carefully before putting the appliance into operation and
keep the instructions including the warranty, the receipt and, if possible, the box with the
internal packing. If you give this device to other people, please also pass on the operating
instructions.
• To avoid the risk of fi re or an electric shock, you should not expose the device to rain
or moisture. Consequently, do not use the device in the immediate vicinity of water - for
example near a bath tub, a swimming pool or in a damp cellar.
• Use the device only for the intended purpose.
• Only connect the device at a properly installed plug socket. Pay attention that the
specifi ed voltage corresponds to the voltage of the plug socket.
• When using external mains supply, pay attention to the correct polarity and voltage.
Always place the batteries in the correct direction.
• Assemble the device in such a way that the available ventilation openings are not
covered.
• Never open the housing of the device. Incorrect repairs can constitute a considerable
risk for the user. Should the device become damaged, in particular the mains supply
cable, do not operate the device any longer, but rather have it repaired by an expert.
Check the mains supply cable regularly for damage.
• For safety reasons a broken or damaged mains lead may only be replaced by an
equivalent lead from the manufacturer, our customer service department or a similary
qualifi ed person.
• If the device is not used for a longer period, remove the plug connector from the plug
socket or take out the batteries.
These symbols may be found on the machine and are intended to indicate the following:
The lightning symbol should advise the user of parts in the inside of the device
which carry dangerously high voltage levels.
The symbol with an exclamation mark should advise the user of important
operation or maintenance instructions in the accompanying documentation.
GB
29
05-MRC 665 P 29 06.05.2005, 12:50:51 Uhr
Page 30

GB
1 Lens 14 VOLUME control - / + (Volume)
2 SLEEP button 15 FOCUS control
3 ALARM button 16 LED display for activated
4 Tuning band alarm function (AUTO)
5 LED display 17 PROJECTION ON/OFF switch
6 TUNING control 18 MIN button projector
7 SNOOZE button 19 Throw-out aerial
8 Swiveling projector 20 Battery compartment
9 AL.OFF button (Alarm off) 21 Function selector switch
10 TIME button (ON/ OFF/ AUTO/ BUZZ)
11 HOUR button 22 Function switch for
12 MIN button projector time adjustment (TIME)
13 Band selector (AM/FM) 23 HOUR button projector
Overview of the Components
Putting into function
Insert the plug into a properly installed 230 V, 50 Hz power socket.
Radio station tuning
Shift the function switch (21) to the ON position and select the desired frequency
with the band selector (13)
FM = UKW, AM = MW.
Select a station by turning the TUNING control (6). The tuning scale (4) indicates
the selected frequency.
Setting of the Clock
Hours: Press the TIME key (10) and the HOUR key (11) simultaneously.
Minutes: Press the TIME key (10) and the MIN key (12) simultaneously.
Setting of the Alarm
Hours: Press the ALARM key (3) and the HOUR key (11) simultaneously.
Minutes: Press the ALARM key (3) and the MIN key (12) simultaneously.
Radio alarm
• Once the alarm times are set and a radio station has been selected, shift the
function selector (21) to „AUTO“. A dot in the display (5) appears next to AUTO
(16).
• As soon as the alarm time is reached, the radio is switched on. The selected
radio station plays at the set volume.
30
05-MRC 665 P 30 06.05.2005, 12:50:51 Uhr
Page 31

Buzzer alarm
• If you would not like to be woken up by the radio, turn the function switch (21)
to the BUZZ position.
• Instead of the radio, the buzzer goes off when the alarm time is reached.
To turn off the alarm, push the function switch (21) to the OFF position or press
the AL.OFF button (9).
Automatic Alarm Interval
The automatically set alarm function can be shut off for approximately 9 minutes
with the SNOOZE key (7). After approximately 1 hour the alarm function is shut off
completely until the next day.
Delayed Shut-Off
• The delayed shut-off function can be used when the switch is in the positions
OFF/AUTO or BUZZ.
• When the SLEEP button (2) is pressed, the radio switches off after 59 minutes
or 1 hour and 59 minutes. The shut-off time can be adjusted by simultaneously
pressing the SLEEP and the MIN button (12) or the HOUR button (11).
• This function can be cancelled with the SNOOZE key (7).
Projection
With this device you can project the time on the wall or on the ceiling. Shift the
PROJECTION switch (17) to the ON position. You can swing the projector (8)
either to the front or backwards. On the back of the projector there is a dial (15)
with which you can adjust the sharpness of the projected display.
The time displayed by the projector has to be set independently of the machine.
Use the keys on the rear of the projector (8).
Hours: Press the TIME button of the projector (22) and the HOUR button of the
projector (23) simultaneously.
Minutes: Press the TIME button of the projector (22) and the MIN button of the
projector (18) simultaneously.
GB
Inserting the power reserve batteries
(not supplied)
If there is a power cut or the mains plug has been removed from the power socket,
the settings will be retained if the power reserve batteries are inserted.
1. Open the battery compartment (20) on the back.
2. Connect a 9 V, E compound battery to the supply connection. Please ensure
the correct polarity.
31
05-MRC 665 P 31 06.05.2005, 12:50:52 Uhr
Page 32

3. If the device is not used for a prolonged period of time, please take the batte-
GB
ries out in order to prevent leakage of battery acid.
Note: Do not dispose of batteries in the domestic waste. Please return used batteries to the relevant collection points or the shop where they were bought.
Never throw batteries into a fi re.
Cleaning
• Remove the plug before cleaning.
• Clean the appliance with a slightly humid cloth without any additives.
• Do not dip the appliance in water.
Technical Data
Model: .................................................................................................................MRC P
Power supply:................................................................................................... 230 V, 50 Hz
Power consumption:....................................................................................................... 5 W
Battery power reserve: ...........................................................................................9 V block
Protection class: ................................................................................................................. ΙΙ
Frequency range: ........................................................................
...
...
............................................................................ AM
This device has been tested according to all relevant current CE guidelines, such as electromagnetic compatibility and low voltage directives, and has been constructed in accordance
with the latest safety regulations.
Subject to technical changes without prior notice!
.........
FM 8 , ~ 108 MHz
5 ~ 16 kHz0004
08
566
32
05-MRC 665 P 32 06.05.2005, 12:50:53 Uhr
Page 33

Meaning of the “Dustbin” Symbol
Protect our environment: do not dispose of electrical equipment in the domestic waste.
Please return any electrical equipment that you will no longer use to the collection points
provided for their disposal.
This helps avoid the potential effects of incorrect disposal on the environment and human
health.
This will contribute to the recycling and other forms of reutilisation of electrical and electronic
equipment.
Information concerning where the equipment can be disposed of can be obtained from your
local authority.
GB
33
05-MRC 665 P 33 06.05.2005, 12:50:53 Uhr
Page 34

PL
Przed uruchomieniem urządzenia proszę bardzo dokładnie przeczytać instrukcję obsługi. Proszę
zachować ją wraz z kartą gwarancyjną, paragonem i w miarę możliwości również kartonem z opakowaniem wewnętrznym. Przekazując urządzenie innej osobie, oddaj jej także instrukcję obsługi.
• Urządzenie chronić należy przed deszczem i wilgocią, aby zapobiec groźbie pożaru lub
porażeniu prądem. Nie należy go więc używać w pobliżu wody, a więc przykładowo w
pobliżu wanny, basenu lub w zawilgoconej piwnicy.
• Urządzenie należy używać tylko zgodnie z jego przeznaczeniem.
• Urządzenie należy podłączyć tylko i wyłącznie do przepisowo zamontowanego gniazdka.
Proszę zwrócić uwagę na to, żeby podane napięcie zgadzało się z napięciem w gniazdku.
• W przypadku używania oddzielnych zasilaczy należy zwrócić uwagę na biegunowość
i napięcie, baterie muszą zostać włożone do urządzenia zgodnie z oznaczoną
biegunowością.
• Urządzenie należy w taki sposób ustawić, żeby istniejące otwory wentylacyjne nie
zostały przykryte.
• Nigdy nie wolno otwierać obudowy urządzenia. Niefachowo przeprowadzone naprawy
mogą być groźne w skutkach dla użytkownika. Przy uszkodzeniu urządzenia, w
szczególności kabla sieciowego, urządzenie nie może być używane dopóki nie zostanie
naprawione przez osobę z wymaganymi uprawnieniami. Przewód zasilający należy
regularnie sprawdzać, czy nie jest uszkodzony.
• W razie awarii proszę nie naprawiać urządzenia samemu lecz skorzystać z pomocy autoryzowanego specjalisty.Jeżeli przewód zasilający nieodłączalny ulegnie uszkodzeniu,
to powinien on być wymieniony u wytwórcy lub w specjalnym zakładzie naprawczym
albo przez wykwalifi kowaną osobę w celu uniknięcia zagrożenia.
• Jeżeli urządzenie nie będzie przez dłuższy czas używane, należy wyciągnąć wtyczkę z
gniazdka lub wyjąć baterie.
Poniższe symbole mogą znajdować się na urządzeniu i mają zwracać Państwa uwagę na:
Ogólne wskazówki bezpieczeństwa
Symbol błyskawicy ma zwrócić uwagę użytkownika na znajdujące się we
wnętrzu urządzenia części, które są pod niebezpiecznie wysokim napięciem.
Symbol z wykrzyknikiem ma zwrócić uwagę użytkownika na znajdujące
się w załączonych dokumentach ważne wskazówki związane z obsługą i
konserwacją urządzenia.
34
05-MRC 665 P 34 06.05.2005, 12:50:53 Uhr
Page 35

Przegląd elementów obsługi
Soczewka
1
Przycisk SLEEP (siła głosu)
2
Przycisk ALARM
3
Skala nadajników
4
Wyświetlacz z diodą wskazująca aktywną funkcję
5
elektroluminescencyjną budzenia (AUTO)
Regulator TUNING
6
Przycisk SNOOZE
7
Ruchomy projektor
8
Przycisk AL.OFF
9
(Alarm wyłączony)
Przycisk TIME(ON/ OFF/ AUTO/ BUZZ)
10
Przycisk HOUR
11
Przycisk MIN czasu (TIME) projektor
12
Przełącznik pasma (AM/FM)
13
Regulator VOLUME - / +
14
Regulator FOCUS
15
Dioda elektroluminescencyjna
16
PROJECTION ON/OFF-przełącznik
17
Przycisk MIN projektor
18
Zwijana antena
19
Kieszeń na baterie
20
Przełącznik wyboru funkcji
21
Przycisk funkcyjny ustawianie
22
Przycisk HOUR
23
Uruchomienie
Podłączyć wtyczkę do prawidłowo zainstalowanego gniazda z zestykiem ochronnym 230 V 50 Hz.
Ustawianie wybranej stacji
Ustaw przełącznik ustawiania funkcji (21) w pozycji ON i przy pomocy klawisza
wyboru pasma (13) wybierz pasmo
FM = UKF, AM = MW.
Przekręcając regulator TUNING (6) proszę ustawić wybraną stację nadawania.
Skala częstotliwości nadawania (4) wskazuje wybraną częstotliwość.
Ustawianie czasu
Godziny: wciśnij równocześnie przycisk TIME (10) i klawisz oznaczony literą
Minuty: wciśnij równocześnie przycisk TIME (10) i klawisz oznaczony literą
Ustawianie czasu budzenia
Godziny: wciśnij równocześnie przycisk ALARM (3) i klawisz oznaczony literą
Minuty: wciśnij równocześnie przycisk ALARM (3) i klawisz oznaczony literą
HOUR (11).
MIN (12).
HOUR (11).
MIN (12).
PL
35
05-MRC 665 P 35 06.05.2005, 12:50:54 Uhr
Page 36

Budzenie przy pomocy radia
PL
• Gdy ustawią Państwo godzinę budzenia i wybiorą odpowiednią stację nadawania, proszę przesunąć przełącznik funkcyjny (21) na pozycję „AUTO“. Na
wyświetlaczu (5) przy AUTO (16) pojawi się świecący punkt.
• Gdy nadejdzie ustawiona godzina budzenia radio włączy się. Usłyszą Państwo
wcześniej ustawioną stację nadającą we wcześniej ustawionej sile głosu.
Budzenie przy pomocy brzęczyka
• Jeżeli nie chcą Państwo być budzeni sygnałem radiowym proszę przesunąć
przełącznik funkcyjny (21) na pozycję BUZZ.
• W miejsce sygnału radiowego w porze budzenia usłyszą Państwo sygnał
brzęczyka.
Aby wyłączyć sygnał dźwiękowy proszę przekręcić przłącznik funkcyjny (21) na po
zycję OFF lub nacisnąć przycisk ALARM (3).
Interwałowa automatyka budzenia
Automatycznie włączona funkcja budzenia, poprzez wciśnięcie przycisku SNOOZE (7) może zostać przerwana na ok. 9 minut. Po ok. jednej godzinie funkcja
budzenia wyłącza się całkowicie aż do następnego dnia.
Opóźnione wyłączanie
• Z funkcji wyłączania z opóźnieniem mogą Państwo korzystać przy ustawieniu
przełącznika na pozycji OFF/AUTO lub BUZZ.
• Po naciśnięciu przycisku SLEPP (2) radio zostanie wyłączone po 59 minutach
ewent. 1 godz. 59 minutach. Czas wyłączania można przestawiać, wciskając
jednocześnie przyciski SLEEP i MIN (12), wzgl. przycisk HOUR (11).
• Po wciśnięciu klawisza SNOOZE (7) zostaje przywrócone pierwotne ustawienie.
Projekcja
Urządzenie posiada opcję projekcji godziny na ścianę. W tym celu należy ustawić
przełącznik PROJEKTION (17) w pozycji ON (włączone). Można obracać rzutnik
(8) do przodu lub do tyłu. Z tyłu projektora znajduje się kółko nastawcze (15),
którym mogą Państwo ustawiać ostrość rzutowanego obrazu.
Godzina wskazywana przez projektor musi być ustawiana niezależnie od
urządzenia. Do jej ustawiania używaj przycisków znajdujących się na tylnej ścianie
projektora (8).
Godziny: Wciskać jednocześnie przycisk projektora TIME (22) i przycisk projekto-
Minuty: Wciskać jednocześnie przycisk projektora TIME (22) i przycisk projekto-
ra HOUR (23).
ra MIN (18).
36
05-MRC 665 P 36 06.05.2005, 12:50:55 Uhr
Page 37

Założenie baterii rezerwowych
(nie objęte dostawą)
W przypadku awarii zasilania lub wyciągnięcia wtyczki z kontaktu, ustawienia
zostaną zachowane, o ile wcześniej włożono baterie rezerwy chodu.
1. Proszę otworzyć kieszeń na baterie (20) znajdującą się z tyłu urządzenia.
2. Proszę połączyć baterię blokową 9 V, E z podłączeniem. Proszę pamiętać o
właściwej polarności.
3. Jeżeli nie korzystają Państwo z urządzenia przez dłuższy czas proszę wyjąć z
niego baterie, aby zapobiec „wyciekowi” kwasu akumulatorowego.
Uwaga: baterii nie należy wyrzucać do kosza na śmieci. Proszę pozbywać się
zużytych baterii oddając je we właściwych punktach lub w sklepie.
Proszę nigdy nie wrzucać baterii do ognia.
Czyszczenie
• Przed czyszczeniem urządzenia proszę wyłączyć je z sieci.
• Urządzenie proszę czyścić używając lekko zwilżonej ścierki bez środków
czyszczących.
• Proszę nie wsadzać urządzenia do wody.
Dane techniczne
Model: .................................................................................................................MRC P
Napięcie zasilające:.......................................................................................... 230 V, 50 Hz
Pobór mocy: ................................................................................................................... 5 W
Bateria rezerwowa:............................................................................................ blokowa 9 V
Stopień ochrony:................................................................................................................. ΙΙ
Zakres częstotliwości:...................................................................UKF / FM 8 , ~ 108 MHz
...................................................................MW / AM 5 ~ 16 kHz0004
Masa netto: .................................................................................................................... 0,5 kg9
566
08
PL
Niniejsze urządzenie odpowiada wymaganiom normy bezpieczeństwa użytkowania oraz
spełnia wymagania dyrektywy niskonapięciowej i kompatybilności elektromagnetycznej.
Zastrzega się prawo do zmian technicznych!
37
05-MRC 665 P 37 06.05.2005, 12:50:55 Uhr
Page 38

PL
Przyznajemy 24 miesiące gwarancji na produkt licząc od daty zakupu.
W tym okresie będziemy bezpłatnie usuwać w terminie 14 dni od daty dostarc-
zenia wadliwego sprzętu z kartą gwarancyjną do miejsca zakupu wszystkie uszkodzenia powstałe w tym urządzeniu na skutek wady materiałów lub wadliwego
wykonania, naprawiając oraz wymieniając wadliwe części lub (jeśli uznamy za
stosowne) wymieniając całe urządzenie na nowe.
Sprzęt do naprawy powinien być dostarczony w komplecie wraz z dowodem
zakupu oraz z ważną kartą gwarancyjną do sprzedawcy w miarę możliwości
w oryginalnym opakowaniu lub innym odpowiednim dla zabezpieczenia przed
uszkodzeniem. W razie braku kompletnego opakowania fabrycznego, ryzyko uszkodzenia sprzętu podczas transportu do i z miejsca zakupu ponosi reklamujący.
Naprawa gwarancyjna nie dotyczy czynności przewidzianych w instrukcji obsługi,
do wykonania których zobowiązany jest użytkownik we własnym zakresie i na
własny koszt.
Gwarancja nie obejmuje:
• mechanicznych, termicznych, chemicznych uszkodzeń sprzętu i wywołanych
nimi wad,
• uszkodzeń powstałych w wyniku działania sił zewnętrznych takich jak
wyładowania atmosferyczne, zmiana napięcia zasilania i innych zdarzeń
losowych,
• nieprawidłowego ustawienia wartości napięcia elektrycznego, zasilanie z
nieodpowiedniego gniazda zasilania,
• sznurów połączeniowych, sieciowych, żarówek, baterii, akumulatorów,
• uszkodzeń wyrobu powstałych w wyniku niewłaściwego lub niezgodnego z
instrukcją jego użytkowania, przechowywania, konserwacji, samowolnego
zrywania plomb oraz wszelkich przeróbek i zmian konstrukcyjnych dokonanych
przez użytkownika lub osoby niepowołane,
• roszczeń z tytułu parametrów technicznych wyrobu, o ile są one zgodne z
podanymi przez producenta,
• prawidłowego zużycia i uszkodzeń, które mają nieistotny wpływ na wartość lub
działanie tego urządzenia.
Karta gwarancyjna bez pieczątki sklepu, daty sprzedaży, nie wypełniona,
źle wypełniona, ze śladami poprawek, nieczytelna wskutek zniszczenia, bez
możliwości ustalenia miejsca sprzedaży oraz dołączonego dowodu zakupu jest
nieważna.
Korzystanie z usług gwarancyjnych nie jest możliwe po upływie daty ważności
gwarancji. Gwarancja na części lub całe urządzenie, które są wymieniane kończy
się, wraz z końcem gwarancji na to urządzenie.
WARUNKI GWARANCJI
38
05-MRC 665 P 38 06.05.2005, 12:50:55 Uhr
Page 39

Wszystkie inne roszczenia, wliczając w to odszkodowania są wykluczone chyba,
że prawo przewiduje inaczej. Roszczenia wykraczające poza tą umowę nie są
uwzględniane przez tą gwarancję.
Gwarancja na sprzedany towar konsumpcyjny nie wyłącza, nie ogranicza ani
nie zawiesza uprawnień kupującego wynikających z niezgodności towaru z
umową.
Gwarancja oraz zawarte w niej warunki obowiązują na terenie Rzeczpospolitej
Polskiej.
Znaczenie symbolu „Pojemnik na śmieci“
Proszę oszczędzać nasze środowisko, sprzęt elektryczny nie należy do śmieci domowych.
Proszę korzystać z punktów zbiorczych, przewidzianych do zdawania sprzętu elektryczne-
go, i tam proszę oddawać sprzęt elektryczny, którego już nie będą Państwo używać.
Tym sposobem pomagają Państwo unikać potencjalnych następstw niewłaściwego usuwa-
nia odpadów, mających wpływ na środowisko i zdrowie ludzi.
Tą drogą przyczyniają się Państwo do ponownego użycia, do recyklingu i do innych form
wykorzystania starego sprzętu elektrycznego i elektronicznego.
Informacje, gdzie można zdać sprzęt, otrzymają Państwo w swoich urzędach komunalnych
lub w administracji gminy.
PL
39
05-MRC 665 P 39 06.05.2005, 12:50:56 Uhr
Page 40

H
A készülék használatba vétele előtt gondosan olvassa végig a használati utasítást, és
őrizze meg a garancialevéllel, a pénztári nyugtával és lehetőleg a csomagolókartonnal, ill.
az abban lévő bélésanyaggal együtt! Amennyiben a készüléket harmadik személynek adja
tovább, a használati útmutatót is adja a készülékhez.
• A tűzkeletkezés vagy az áramütés kockázatának elkerülése végett ne tegye ki a készüléket esőnek vagy nedvességnek! Ne működtesse a készüléket víz közvetlen közelében
(pl. fürdőszobában, úszómedence mellett, nedves pincében).
• Csak arra a célra használja a készüléket, mire készült!
• Mindig csak előírásszerűen szerelt konnektorba csatlakoztassa a készüléket! Ügyeljen
rá, hogy a megadott feszültség egyezzen a hálózati feszültséggel!
• Külső áramforrás használata esetén ügyeljen a megfelelő polaritásra és feszültségre, az
elemeket mindig jó irányban helyezze be!
• Úgy állítsa fel a készüléket, hogy ne záródjanak el a meglévő szellőzőnyílások!
• Soha ne nyissa ki a készülék burkolatát! A szakszerűtlen javítások jelentős veszély
forrásai lehetnek a használók számára. Ha a készülék, különösen a hálózati csatlakozó
kábel megsérült, a készüléket nem szabad üzembe helyezni, hanem előbb szakemberrel meg kell javíttatni. Rendszeresen ellenőrizendő, hogy a hálózati csatlakozó kábelen
nincs-e sérülés.
• Veszélyhelyzetek elkerülése végett a hibás csatlakozó kábelt csak a gyártóval, a mi
vevőszolgálatunkkal vagy hasonló szakképzettségű más személlyel szabad pótoltatni
azonos értékű kábellel.
• Ha hosszabb időn át nem használja a készüléket, húzza ki a csatlakozó dugaszt a
konnektorból, ill. vegye ki belőle az elemeket!
Adott esetben a készüléken az alábbi szimbólumokat láthatja, amelyek a következőkre
hívják fel az Ön fi gyelmét:
Általános biztonsági rendszabályok
A villám-szimbólum olyan alkatrészekre fi gyelmeztet a készülék belsejében,
amelyek veszélyesen nagy feszültséget vezetnek.
A felkiáltójellel ellátott szimbólum a kísérőpapírokban található fontos kezelési
vagy karbantartási útmutatásokra hívja fel a használó fi gyelmét.
40
05-MRC 665 P 40 06.05.2005, 12:50:56 Uhr
Page 41

A kezelő elemek áttekintése
Lencse
1
SLEEP gomb (hangerő) szabályzó
2
ALARM gomb
3
Adóskála
4
LED-display kijelző LED (AUTO)
5
TUNING szabályzó
6
SNOOZE gomb ON/OFF (be/ki)
7
Állítható irányú vetítő
8
AL.OFF gomb
9
(Ébresztőhang kikapcsolva)
TIME gomb
10
HOUR gomb(ON/ OFF/ AUTO/ BUZZ)
11
MIN gomb
12
Hullámsávváltó (AM/FM) (TIME)
13
VOLUME - / +
14
FOCUS szabályzó
15
Az aktivált ébresztő funkciót
16
PROJECTION vetítő
17
MIN gomb kapcsoló
18
Kivetőantenna
19
Elemtartó rekesz
20
Funkcióválasztó kapcsoló
21
Vetítő óraidő-beállító funkciógomb
22
HOUR gomb kapcsoló
23
Üzembe helyezés
Dugja a csatlakozó dugaszt előírásszerűen szerelt, 230 V, 50 Hz-es földelt konnektorba!
Adóbeállítás
Tolja a funkciókapcsolót (21) ON állásba, és válassza ki a hullámsávváltóval (13) a
kívánt frekvenciasávot:
FM = URH, AM = középhullám.
A TUNING gomb (6) forgatásával válasszon ki egy adóállomást! A behangolt
frekvenciát az adóskála (4) kijelzi.
Az óraidő beállítása
Óra: Nyomja egyidejűleg a TIME-as (10) és az HOUR-ös (11) gombot.
Perc: Nyomja egyidejűleg a TIME-as (10) és a MIN-os (12) gombot.
Az ébresztési idő beállítása
Óra: Nyomja egyidejűleg a ALARM-as (3) és az HOUR-ös (11) gombot.
Perc: Nyomja egyidejűleg a ALARM-as (3) és a MIN-os (12) gombot.
Ébresztés rádióval
• Miután beállította az ébresztési időt, és kiválasztott egy rádióadót, tolja a
funkciókapcsolót (21) AUTO állásba! A display-n (5) kigyullad egy pont az
AUTO-nál (16).
41
H
05-MRC 665 P 41 06.05.2005, 12:50:57 Uhr
Page 42

• Amikor a megadott ébresztési idő elérkezik, a rádió magától bekapcsol. Fel-
H
hangzik a kiválasztott adó hangja az előzetesen beállított hangerővel.
Ébresztés zümmögővel
• Ha nem akarja, hogy rádiójel ébressze, tolja a funkciókapcsolót (21) BUZZ
állásba!
• Ilyenkor az ébresztési idő elérkeztekor a rádió hangja helyett jelzőhang
hallatszik.
A jelzőhang elnémításához tolja a funkciókapcsolót (21) OFF állásba, vagy nyomja
meg az AL.OFF gombot (9)!
Intervallumos ébresztésismétlő automatika
Az automatikusan beállított ébresztő funkciót a SNOOZE gombbal (7) kb. 9 percre
ki lehet kapcsolni. Kb. 1 óra elteltével az ébresztő funkció a következő napig
teljesen kikapcsol.
Késleltetett kikapcsolás
• A késleltetett kikapcsolás funkciót az OFF/AUTO vagy a BUZZ kapcsolóállásban lehet használni.
• Ha megnyomja a SLEEP gombot (2), a rádió 59 perc, ill. 1 óra 59 perc elteltével kikapcsol. A kikapcsolási időt a SLEEP és a MIN gomb (12), ill. az HOUR
gomb (11) egyidejű lenyomásával lehet állítani.
• Ezt a funkciót a SNOOZE gombbal (7) ismét meg lehet szüntetni.
Kivetítés
Ez a készülék lehetőséget ad arra, hogy kivetítse az óraidőt a falra, ill. a mennyezetre. Tolja ehhez a vetítőkapcsolót (17) ON állásba! A vetítőt (8) hajthatja
előre, ill. hátra. A vetítő hátlapján van egy forgatható gomb (15), amellyel a vetített
kijelzés élességét lehet állítani.
A vetítő óraidejét a készüléktől függetlenül kell beállítani. Ehhez a vetítő (8) hátlapján található gombokat kell használni.
Óra: Egyszerre nyomjuk meg a kivetítő TIME (22) és HOUR (23) gombjait.
Perc: Egyszerre nyomjuk meg a kivetítő TIME (22) és MIN (18) gombjait.
Helyezze be a működésbiztosító tartalékelemet!
(nem hozzá adott tartozék)
Behelyezett tartalékelemek biztosítják, hogy a beállítások akkor is megmaradjanak, ha áramkimaradás van, vagy ha a hálózati dugaszt kihúzzák a konnektorból.
42
05-MRC 665 P 42 06.05.2005, 12:50:58 Uhr
Page 43

1. Nyissa ki a hátfalon lévő elemtartó rekeszt (20)!
2. Kössön össze egy 9 voltos tömbelemet a csatlakozóval! Ügyeljen a megfelelő
polaritásra!
3. Ha hosszabb időn át nem használja a készüléket, vegye ki belőle az elemet,
nehogy „kifusson” az akkumulátorsav!
Figyelem: Az elem nem a háztartási szemétbe való! Adja le használt elemeit
valamelyik illetékes gyűjtőhelyen vagy a kereskedőnél!
Soha ne dobjon elemet a tűzbe!
H
Tisztítás
• Tisztítás előtt húzza ki a dugaszt a konnektorból!
• Enyhén nedves ruhával, adalékszer nélkül tisztítsa a készüléket!
• Ne mártsa a készüléket vízbe!
Műszaki adatok
Modell: ................................................................................................................MRC P
Feszültségellátás:............................................................................................. 230 V, 50 Hz
Teljesítményfelvétel: ....................................................................................................... 5 W
Elem menettartaléka: ............................................................................................. 9 V-blokk
Védelmi osztály:.................................................................................................................. ΙΙ
Frekvenciatartományok: .............................................................. URH / FM 8 , ~ 108 MHz
.................................................................MW / AM
8 0
5 ~ 16 kHz0004
Ezt a készüléket az Európa Tanács minden vonatkozó aktuális irányelve szerint (pl. elektromágnesesség-elviselő képesség vagy kisfeszültség-elviselő képesség) ellenőriztük, és a
legújabb biztonságtechnikai előírások szerint készült.
Megjegyezzük az esetleges müszaki változásokat!
566
43
05-MRC 665 P 43 06.05.2005, 12:50:58 Uhr
Page 44

H
A „kuka“ piktogram jelentése
Kímélje környezetünket, az elektromos készülékek nem a háztartási szemétbe valók!
Használja az elektromos készülékek ártalmatlanítására kijelölt gyűjtőhelyeket, ott adja le
azokat az elektromos készülékeit, amelyeket többé már nem kíván használni!
Ezzel segítséget nyújt ahhoz, hogy elkerülhetők legyenek azok a hatások, amelyeket a
helytelen „szemétre dobás“ gyakorolhat a környezetre és az emberi egészségre.
Ezzel hozzájárul az újrahasznosításhoz, a recyclinghoz és a kiöregedett elektromos és
elektronikus készülékek értékesítésének egyéb formáihoz.
Az önkormányzatoknál vagy a polgármesteri hivatalokban tájékoztatást kaphat arról, hogy
hova viheti a kiselejtezett készülékeket.
44
05-MRC 665 P 44 06.05.2005, 12:51:05 Uhr
Page 45

05-MRC 665 P 45 06.05.2005, 12:51:05 Uhr
Page 46

D-47906 Kempen/Germany · Industriering Ost 40
Internet: http://www.clatronic.de · email: info@clatronic.de
05-MRC 665 P 46 06.05.2005, 12:51:06 Uhr
Stünings Medien, Krefeld • 05/05
 Loading...