

Page 1
R
38966-05-MRC 460 P 17.07.2003 16:37 Uhr Seite 1
Bedienungsanleitung/Garantie
Instruction Manual/Guarantee
Instrukcja obsługi/Gwarancja
Instrucciones de servicio/Garantía
Betjeningsvejledning/garanti
Istruzioni per l’uso/Garanzia
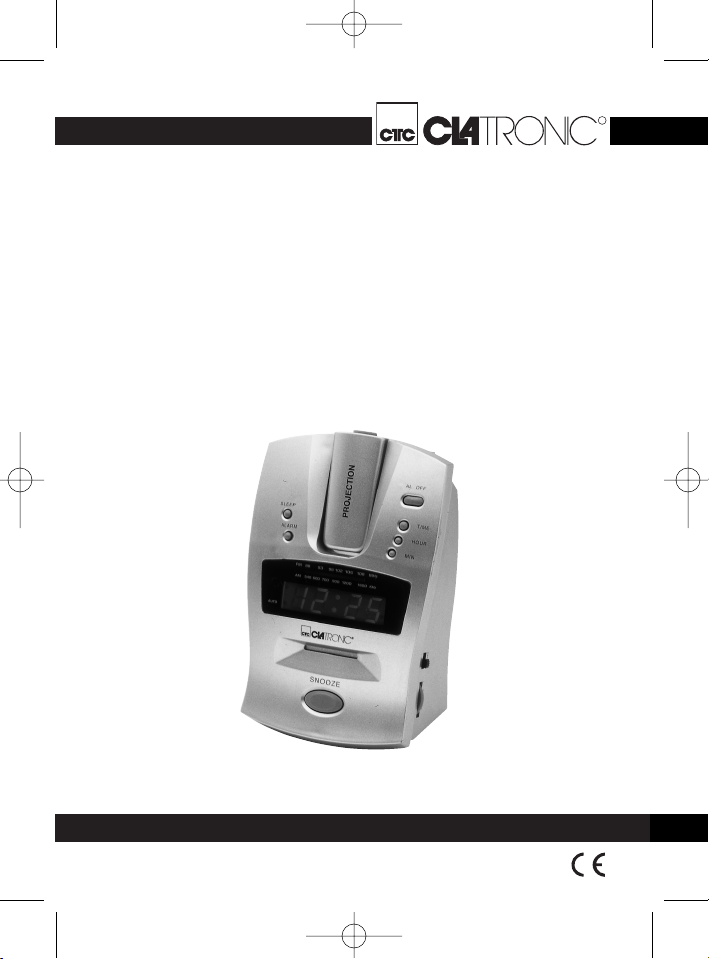
Projektions-Uhrenradio
Projection Clock Radio
Projekcyjne radio z budzikiem
Radio con reloj de proyección
Projektions-clockradio
Radiosveglia a proiezione
MRC 460 P
Page 2

38966-05-MRC 460 P 17.07.2003 16:37 Uhr Seite 2
Inhalt
Contents • Spis treści • Indice • Inhold • Indice
Übersicht Bedienelemente . . . . . . . . . . . . . . . . . . . . . . . . . .Seite 3
D
Bedienungsanleitung . . . . . . . . . . . . . . . . . . . . . . . . . . . . . . .Seite 4
Garantie . . . . . . . . . . . . . . . . . . . . . . . . . . . . . . . . . . . . . . . .Seite 6
Control element overview . . . . . . . . . . . . . . . . . . . . . . . . . . .Page 3
GB
Instruction Manual . . . . . . . . . . . . . . . . . . . . . . . . . . . . . . . . .Page 7
Guarantee . . . . . . . . . . . . . . . . . . . . . . . . . . . . . . . . . . . . . .Page 9
Przegląd elemetów obsługi . . . . . . . . . . . . . . . . . . . . . . . . .Strona 3
PL
Instrukcja obsługi . . . . . . . . . . . . . . . . . . . . . . . . . . . . . . . .Strona 10
Gwarancja . . . . . . . . . . . . . . . . . . . . . . . . . . . . . . . . . . .Strona 12
Vista de conjunto Elementos de mando . . . . . . . . . . . . . . . .Página 3
E
Instrucciones de servicio . . . . . . . . . . . . . . . . . . . . . . . . . . . .Página 14
Garantia . . . . . . . . . . . . . . . . . . . . . . . . . . . . . . . . . . . . . . . .Página 16
Beskrivelse af de enkelte dele . . . . . . . . . . . . . . . . . . . . . . . .Pagina 3
DK
Betjeningsvejledning . . . . . . . . . . . . . . . . . . . . . . . . . . . . . . .Pagina 17
Garanti . . . . . . . . . . . . . . . . . . . . . . . . . . . . . . . . . . . . . . . . .Pagina 19
I Descrizione dei singoli pezzi . . . . . . . . . . . . . . . . . . . . . . . .Pagina 3
Istruzioni per l’uso . . . . . . . . . . . . . . . . . . . . . . . . . . . . . . . . .
Garanzia . . . . . . . . . . . . . . . . . . . . . . . . . . . . . . . . . . . .Pagina 22
Pagina 20
Page 3
38966-05-MRC 460 P 17.07.2003 16:37 Uhr Seite 3
2
3
4
5
6
7
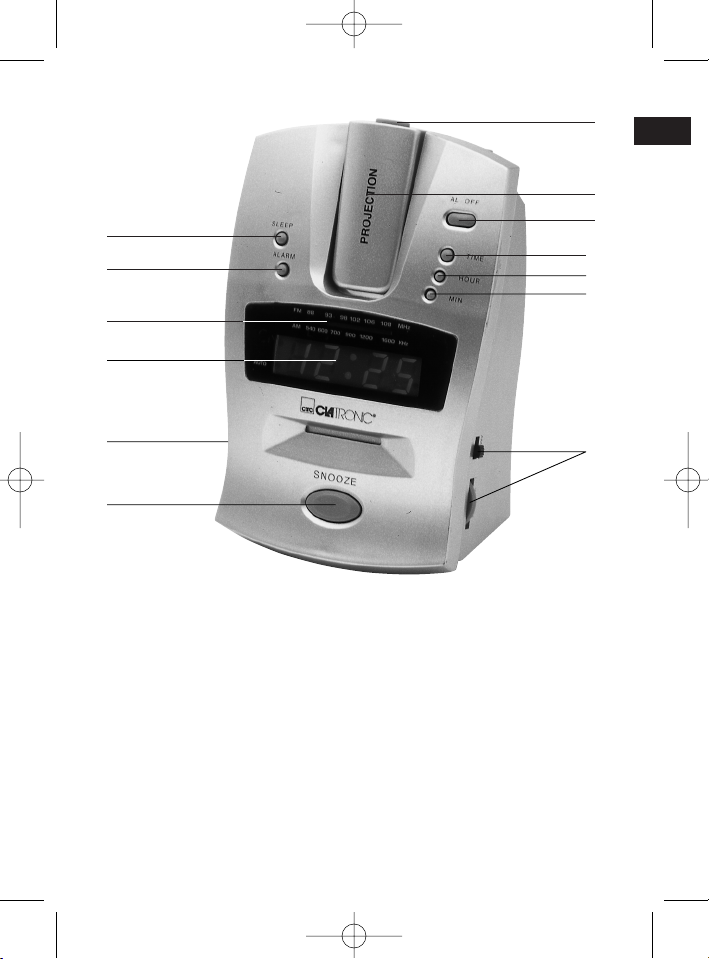
Übersicht der Bedienelemente
1 Linse
2 SLEEP-Taste
3 ALARM-Taste
4 Senderskala
5 LED-Display
6 Funktionsschalter und Ein- / Ausschalter für Projektion
7 SNOOZE-Taste
8 Schwenkbarer Projektor
9 AL. OFF-Taste
10 TIME-Taste
11 HOUR-Taste
12 MIN-Taste
13 TUNING, Bandwahlschalter (AM / FM), VOLUME
1
8
9
10
11
12
13
3
D
Page 4
38966-05-MRC 460 P 17.07.2003 16:37 Uhr Seite 4
D
Um das Risiko von Feuer oder einem elektrischen Schlag zu vermeiden, sollten
Sie das Gerät nicht Regen oder Feuchtigkeit aussetzen. Das Gerät daher nicht in
unmittelbarer Nähe von Wasser benutzen – beispielsweise in der Nähe einer Badewanne, eines Schwimmbeckens oder einem feuchten Keller.
Verwenden Sie das Gerät nur für den vorgesehenen Zweck.
Das Gerät ausschließlich an eine vorschriftsmäßig installierte Steckdose
anschließen. Achten Sie darauf, daß die angegebene Spannung mit der Spannung
der Steckdose übereinstimmt.
Bei Verwendung von externen Netzteilen auf die richtige Polarität und Spannung
achten, Batterien stets richtig herum einlegen.
Das Gerät so aufstellen, daß vorhandene Lüftungsöffnungen nicht verdeckt werden.
Niemals das Gehäuse des Gerätes öffnen. Durch unsachgemäße Reparaturen
können erhebliche Gefahren für den Benutzer entstehen. Bei Beschädigung des
Gerätes, insbesondere des Netzkabels, das Gerät nicht mehr in Betrieb nehmen,
sondern von einem Fachmann reparieren lassen. Netzkabel regelmäßig auf
Beschädigungen hin prüfen.
Ein defektes Netzkabel darf nur vom Hersteller, unserem Kundendienst oder einer
ähnlich qualifizierten Person durch ein gleichwertiges Kabel ersetzt werden, um
Gefährdungen zu vermeiden.
Wenn das Gerät längere Zeit nicht benutzt wird, ziehen Sie den Netzstecker aus
der Steckdose bzw. entnehmen Sie die Batterien.
Diese Symbole befinden sich ggf. auf dem Gerät und sollen Sie auf folgendes
hinweisen:
Allgemeine Sicherheitshinweise
Das Blitz-Symbol soll den Benutzer auf Teile im Inneren des Gerätes hinweisen, die gefährlich hohe Spannungen führen.
Das Symbol mit Ausrufezeichen soll den Benutzer auf wichtige
Bedienungs- oder Wartungs-Hinweise in den Begleitpapieren hinweisen.
4
Page 5
38966-05-MRC 460 P 17.07.2003 16:37 Uhr Seite 5
Inbetriebnahme
Sendereinstellung
Schieben Sie den Funktionsschalter (6) auf Position ON und wählen Sie mit dem
Bandwahlschalter (13) das gewünschte Frequenzband. FM = UKW, AM = MW.
Wählen Sie durch Drehen des TUNING-Knopfes (13) einen Sender. Die
Senderskala (4) zeigt die abgestimmte Frequenz an.
Einstellen der Uhrzeit
Stunden: TIME-Taste (9) und gleichzeitig die H-Taste (11) drücken.
Minuten: TIME-Taste (9) und gleichzeitig die M-Taste (12) drücken.
Einstellen der Weckzeit
Stunden: ALARM-Taste (3) und gleichzeitig die H-Taste (11) drücken.
Minuten: ALARM-Taste (3) und gleichzeitig die M-Taste (12) drücken.
Schieben Sie zum Aktivieren der Weckfunktion den Funktionsschalter (6) auf
Position AUTO. Im LED-Display (5) leuchtet eine rote LED auf.
In der Position BUZZER werden Sie anstelle des eingestellten Senders mit einem
Signalton geweckt.
Projektion
Sie haben die Möglichkeit, mit diesem Gerät die Uhrzeit an die Wand, bzw. an die
Decke zu projizieren. Schieben Sie dazu den Schalter PROJEKTION (6) in Position
ON. Sie können den Projektor (8) nach vorne bzw. nach hinten schwenken. Auf der
Rückseite des Projektors befindet sich ein Einstellrad, mit dem Sie die Schärfe der
projektierten Anzeige einstellen können.
Die Uhrzeit des Projektors muss getrennt von der des Gerätes eingestellt werden.
Benutzen Sie dazu die Tasten auf der Rückseite des Projektors.
Stunden: TIME-Taste und gleichzeitig die HOUR-Taste drücken.
Minuten: TIME-Taste und gleichzeitig die MIN-Taste drücken.
Intervall-Weckautomatik
Die automatisch eingestellte Weckfunktion kann mit der SNOOZE-Taste (7) für ca.
9 Minuten ausgeschaltet werden. Nach ca. 1 Stunde schaltet sich die Weckfunktion
bis zum nächsten Tag vollständig ab.
Verzögertes Ausschalten
Durch Drücken der SLEEP-Taste (2) wird das Radio für 59 Minuten eingeschaltet.
Die Einschaltzeit kann mit der M-Taste (12) verstellt werden.
Mit der SNOOZE-Taste (7) kann diese Funktion wieder aufgehoben werden.
D
5
Page 6
38966-05-MRC 460 P 17.07.2003 16:37 Uhr Seite 6
Uhrzeit-Gangreserve (Backup-Batterie)
D
An der Rückseite des Gerätes befindet sich ein Batteriefach.
Setzen Sie eine 9 V-Blockbatterie ein.
Diese dient als Speicherpuffer der Einstellungen bei einem Stromausfall.
Reinigung
• Ziehen Sie vor der Reinigung den Netzstecker.
• Reinigen Sie das Gerät mit einem leicht feuchten Tuch ohne Zusatzmittel.
• Tauchen Sie das Gerät nicht ins Wasser.
Dieses Gerät entspricht den einschlägigen CE-Richtlinien und
ist nach den neuesten sicherheitstechnischen Vorschriften gebaut.
Technische Änderungen vorbehalten!
Garantie
Wir übernehmen für das von uns vertriebene Gerät eine Garantie von 24 Monaten
ab Kaufdatum (Kassenbon).
Innerhalb der Garantiezeit beseitigen wir unentgeltlich Mängel des Gerätes, die auf
Material- oder Herstellungsfehler beruhen, durch Reparatur oder Umtausch.
Als Garantienachweis gilt der Kaufbeleg. Ohne diesen Nachweis kann ein
Austausch oder eine Reparatur nicht kostenlos erfolgen.
Im Garantiefall geben Sie bitte das vollständige Gerät in der Originalverpackung
zusammen mit dem Kassenbon an Ihren Händler.
Glasbruchschäden und Defekte an Zubehörteilen führen nicht zum Umtausch des
Gerätes, sondern werden kostenlos im Austausch zugesendet. In diesem Fall nicht
das Gerät einschicken, sondern nur das jeweilige defekte Zubehörteil bestellen!
Reinigung, Wartung oder der Austausch von Verschleißteilen fällt nicht in den
Rahmen der Garantie und ist deshalb kostenpflichtig.
Die Garantie erlischt bei Fremdeingriff.
Nach der Garantie
Nach Ablauf der Garantiezeit können Reparaturen vom entsprechenden
Fachhandel oder Reparaturservice kostenpflichtig ausgeführt werden.
6
Page 7
38966-05-MRC 460 P 17.07.2003 16:37 Uhr Seite 7
General safety instructions
To avoid the risk of fire or an electric shock, you should not expose the device to
rain or moisture. Consequently, do not use the device in the immediate vicinity of
water - for example near a bath tub, a swimming pool or in a damp cellar.
Use the device only for the intended purpose.
Only connect the device at a properly installed plug socket. Pay attention that the
specified voltage corresponds to the voltage of the plug socket.
When using external mains supply, pay attention to the correct polarity and voltage.
Always place the batteries in the correct direction.
Assemble the device in such a way that the available ventilation openings are not
covered.
Never open the housing of the device. Incorrect repairs can constitute a considerable risk for the user. Should the device become damaged, in particular the mains
supply cable, do not operate the device any longer, but rather have it repaired by an
expert. Check the mains supply cable regularly for damage.
For safety reasons a broken or damaged mains lead may only be replaced by an
equivalent lead from the manufacturer, our customer service department or a
similary qualified person.
If the device is not used for a longer period, remove the plug connector from the
plug socket or take out the batteries.
These symbols are to be found on the device and should serve to inform you of the
following:
The lightning symbol should advise the user of parts in the inside of the
device which carry dangerously high voltage levels.
The symbol with an exclamation mark should advise the user of important
operation or maintenance instructions in the accompanying documentation.
Overview of the Components
1 Lens 8 Swiveling projector
2 SLEEP button 9 AL. OFF button
3 ALARM button 10 TIME button
4 Tuning band 11 HOUR button
5 LED display 12 MIN button
6 Function switch and 13 TUNING, band selector
On/Off switch for projection (AM / FM), VOLUME
7 SNOOZE button
GB
7
Page 8

38966-05-MRC 460 P 17.07.2003 16:37 Uhr Seite 8
GB
Radio station tuning
Shift the function switch (6) to the ON position and select the desired frequency
with the band selector (13). FM = UKW, AM = MW.
Choose the desired station by turning the TUNING knob (13). The tuning scale (4)
indicates the selected frequency.
Setting of the Clock
Hours: Press the TIME key (9) and the H key (11) simultaneously.
Minutes: Press the TIME key (9) and the M key (12) simultaneously.
Setting of the Alarm
Hours: Press the ALARM key (3) and the H key (11) simultaneously.
Minutes: Press the ALARM key (3) and the M key (12) simultaneously.
Shift the function switch (6) to the AUTO position to activate the alarm function. A
red LED lights up on the LED display (5). When the BUZZER position is selected, a
buzz signal will be emitted instead of the selected radio station when the alarm
rings.
Projection
With this device you can project the time on the wall or on the ceiling. Shift the
PROJECTION switch (6) to the ON position.You can swing the projector (8) either
to the front or backwards. On the rear of the projector there is a setting knob, which
you can use to adjust the sharpness of the projected display.
The projector clock is to be set separately from that of the device. Use the keys on
the rear of the projector.
Hours: Press the TIME key and the HOUR key simultaneously.
Minutes: Press the TIME key and the MIN key simultaneously.
Automatic Alarm Interval
The automatically set alarm function can be shut off for approximately 9 minutes
with the SNOOZE key (7). After approximately 1 hour the alarm function is shut off
completely until the next day.
Delayed Shut-Off
By pressing the SLEEP key (2) the radio is switched on for 59 minutes.
The switch on time can be set with the M key (12).
This function can be cancelled with the SNOOZE key (7).
Putting into function
8
Page 9

38966-05-MRC 460 P 17.07.2003 16:37 Uhr Seite 9
Clock power reserve (backup battery)
A battery compartment is located on the back of the appliance.
Insert a 9 V block battery.
It is used as a memory buffer for the settings in case of blackout.
Cleaning
• Remove the plug before cleaning.
• Clean the appliance with a slightly humid cloth without any additives.
• Do not dip the appliance in water.
This appliance conforms with the CE directives for radio interference suppression
and low-voltage safety and has been built to meet current safety requirements.
Subject to technical changes without prior notice!
Warranty
We undertake to guarantee the appliance sold by our company for 24 months as of
the date of purchase (cash receipt).
During the life of the warranty we shall provide for the repair or replacement of the
appliance owing to material or manufacturing defects absolutely free of charge.
Proof for the warranty is provided by the purchase document.The replacement and
repair will not be performed free of charge without this proof of purchase.
Should the warranty be valid, please consign the complete appliance in its original
packing together with the cash receipt to your local dealer.
You are not entitled to the replacement of the appliance owing to broken glass parts
and faulty accessories. However, said parts will be replaced free of charge. In this
case only the faulty accessory needs to be ordered without sending back the whole
appliance!
The cleaning, servicing and replacement of wear parts are not covered by this warranty and hence are to be paid for.
The warranty is terminated in case of handling on the part of Third parties.
GB
After the warranty
Once the warranty has expired, repairs can be carried out by specialized technicians or repair services against the payment of the service.
9
Page 10

38966-05-MRC 460 P 17.07.2003 16:37 Uhr Seite 10
Ogólne wskazówki związane z bezpieczną obsługą
PL
Urządzenie chronić należy przed deszczem i wilgocią, aby zapobiec groźbie
pożaru lub porażeniu prądem. Nie należy go więc używać w pobliżu wody, a
więc przykładowo w pobliżu wanny, basenu lub w zawilgoconej piwnicy.
Urządzenie należy używać tylko zgodnie z jego przeznaczeniem.
Urządzenie należy podłączyć tylko i wyłącznie do przepisowo zamontowanego
gniazdka.
Proszę zwrócić uwagę na to, żeby podane napięcie zgadzało się z napięciem w
gniazdku.
W przypadku używania oddzielnych zasilaczy należy zwrócić uwagę na biegunowość i napięcie, baterie muszą zostać włożone do urządzenia zgodnie z oznaczoną biegunowością.
Urządzenie należy w taki sposób ustawić, żeby istniejące otwory wentylacyjne
nie zostały przykryte.
Nigdy nie wolno otwierać obudowy urządzenia. Niefachowo przeprowadzone
naprawy mogą być groźne w skutkach dla użytkownika. Przy uszkodzeniu
urządzenia, w szczególności kabla sieciowego, urządzenie nie może być
używane dopóki nie zostanie naprawione przez osobę z wymaganymi uprawnieniami. Kabel sieciowy należy regularnie sprawdzać, czy nie jest uszkodzony.
W celu uniknięcia niebezpieczeństwa, uszkodzony kabel podłączenia do sieci
może być wymieniany na kabel tej samej jakości wyłącznie przez producenta,
nasz serwis lub inną osobę o odpowiednich kwalifikacjach.
Jeżeli urządzenie nie będzie przez dłuższy czas używane, należy wyciągnąć
wtyczkę z gniazdka lub wyjąć baterie.
Poniższe symbole znajdują się na urządzeniu i mają zwrócić uwagę Państwa na
następujące rzeczy:
Symbol błyskawicy ma zwrócić uwagę użytkownika na znajdujące się
we wnętrzu urządzenia części, które są pod niebezpiecznie wysokim
napięciem.
Symbol z wykrzyknikiem ma zwrócić uwagę użytkownika na znajdujące
się w załączonych dokumentach ważne wskazówki związane z
obsługą i konserwacją urządzenia.
10
Page 11

38966-05-MRC 460 P 17.07.2003 16:37 Uhr Seite 11
Przegląd elementów obsługi
1 Soczewka 7 Przycisk SNOOZE
2 Przycisk SLEEP 8 Ruchomy projektor
3 Przycisk ALARM 9 Przycisk AL.OFF
4 Skala nadajników 10 Przycisk TIME
5 Wyświetlacz z diodą 11 Przycisk HOUR
elektroluminescencyjną 12 Przycisk MIN
6 Przełącznik funkcyjny oraz 13 TUNING, przełącznik pasma
włącznik / wyłącznik projekcji (UKW, MW), VOLUME
Uruchomienie
Ustawianie wybranej stacji
Ustaw przełącznik ustawiania funkcji (6) w pozycji ON i przy pomocy klawisza
wyboru pasma (13) wybierz pasmo
Pokręcając gałką TUNING –STROJENIE (13) wybierz stację.
Skala częstotliwości nadawania (4) wskazuje wybraną częstotliwość.
Ustawianie czasu:
Godziny: wciśnij równocześnie przycisk TIME (9) i klawisz oznaczony literą H (11).
Minuty: wciśnij równocześnie przycisk TIME (9) i klawisz oznaczony literą M (12).
Ustawianie czasu budzenia:
Godziny: wciśnij równocześnie przycisk ALARM (3) i klawisz oznaczony literą H (11).
Minuty: wciśnij równocześnie przycisk ALARM (3) i klawisz oznaczony literą M (12).
Aby uruchomić funkcję budzenia ustaw przełącznik ustawiania funkcji (6) w
pozycji AUTO. Na wyświetlaczu ciekłokrystalicznym (5) zaświeci się czerwona
dioda. Gdy ustawimy klawisz w pozycji BUZZER, obudzi nas nie dźwięk radia,
lecz sygnał alarmu.
Projekcja
Urządzenie posiada opcję projekcji godziny na ścianę. W tym celu należy ustawić przełącznik PROJEKCJA (6) w pozycji ON (włączone). Można obracać rzutnik (8) do przodu lub do tyłu. Na tylnej stronie rzutnika znajduje się pokrętło do
nastawiania ostrości rzucanego na ścianę obrazu.
Godzina wyświetlana na projektorze musi zostać ustawiona oddzielnie niż godzina na urządzeniu. Do jej ustawiania używaj przycisków znajdujących się na tylnej
ścianie projektora.
Godziny: wciśnij równocześnie przycisk TIME i klawisz oznaczony literą HOUR.
Minuty: wciśnij równocześnie przycisk TIME i klawisz oznaczony literą MIN.
FM = UKF, AM = MW.
PL
11
Page 12

38966-05-MRC 460 P 17.07.2003 16:37 Uhr Seite 12
Interwałowa automatyka budzenia:
PL
Automatycznie włączona funkcja budzenia, poprzez wciśnięcie przycisku
SNOOZE (7) może zostać przerwana na ok. 9 minut. Po ok. jednej godzinie
funkcja budzenia wyłącza się całkowicie aż do następnego dnia.
Opóźnione wyłączanie
Wciśnięcie klawisza SLEEP (2) powoduje włączenie radia na 59 minut.
Czas włączenia można zmienić używając klawisza oznaczonego literą M (12).
Po wciśnięciu klawisza SNOOZE (7) zostaje przywrócone pierwotne ustawienie.
Rezerwa chodu zegara (bateria rezerwowa)
W tylnej części obudowy znajduje się miejsce na baterię. Proszę włożyć tam
baterię 9V.
Służy ona do zasilania pamięci z dokonanymi ustawieniami systemowymi w
przypadku przerwy w dostawie prądu.
Czyszczenie
• Przed czyszczeniem urządzenia proszę wyłączyć je z sieci.
• Urządzenie proszę czyścić używając lekko zwilżonej ścierki bez środków czyszczących.
• Proszę nie wsadzać urządzenia do wody.
Niniejsze urządzenie odpowiada normom CE sieci tradiowo-telewizyjnej i
bezpieczeństwa niskonapięciowego oraz zbudowane jest według najnowszej
techniki bezpieczeństwa pracy.
Zastrzega się prawo do zmian technicznych!
WARUNKI GWARANCJI
Przyznajemy 24 miesięcy gwarancji na produkt licząc od daty zakupu.
W tym okresie będziemy bezpłatnie usuwać w terminie 14 dni od daty dostarczenia wadliwego sprzętu z kartą gwarancyjną do miejsca zakupu wszystkie uszkodzenia powstałe w tym urządzeniu na skutek wady materiałów lub wadliwego
wykonania, naprawiając oraz wymieniając wadliwe części lub (jeśli uznamy za stosowne) wymieniając całe urządzenie na nowe.
Sprzęt do naprawy powinien być dostarczony w komplecie wraz z dowodem
zakupu oraz z ważną kartą gwarancyjną do sprzedawcy
oryginalnym opakowaniu lub innym odpowiednim dla zabezpieczenia przed uszkodzeniem. W razie braku kompletnego opakowania fabrycznego, ryzyko uszkodzenia sprzętu podczas transportu do i z miejsca zakupu ponosi reklamujący.
Naprawa gwarancyjna nie dotyczy czynności przewidzianych w instrukcji obsługi,
do wykonania których zobowiązany jest użytkownik we własnym zakresie i na
własny koszt.
12
w miarę możliwości w
Page 13

38966-05-MRC 460 P 17.07.2003 16:37 Uhr Seite 13
Gwarancja nie obejmuje:
• mechanicznych, termicznych, chemicznych uszkodzeń sprzętu i wywołanych
nimi wad,
• uszkodzeń powstałych w wyniku działania sił zewnętrznych takich jak wyładowania atmosferyczne, zmiana napięcia zasilania i innych zdarzeń losowych,
• nieprawidłowego ustawienia wartości napięcia elektrycznego, zasilanie z nieodpowiedniego gniazda zasilania,
• sznurów połączeniowych, sieciowych, żarówek, baterii, akumulatorów,
• uszkodzeń wyrobu powstałych w wyniku niewłaściwego lub niezgodnego z
instrukcją jego użytkowania, przechowywania, konserwacji, samowolnego
zrywania plomb oraz wszelkich przeróbek i zmian konstrukcyjnych dokonanych
przez użytkownika lub osoby niepowołane,
• roszczeń z tytułu parametrów technicznych wyrobu, o ile są one zgodne z
podanymi przez producenta,
• prawidłowego zużycia i uszkodzeń, które mają nieistotny wpływ na wartość lub
działanie tego urządzenia.
Karta gwarancyjna bez pieczątki sklepu, daty sprzedaży, nie wypełniona, źle
wypełniona, ze śladami poprawek, nieczytelna wskutek zniszczenia, bez
możliwości ustalenia miejsca sprzedaży oraz dołączonego dowodu zakupu jest
nieważna.
Korzystanie z usług gwarancyjnych nie jest możliwe po upływie daty ważności
gwarancji. Gwarancja na części lub całe urządzenie, które są wymieniane kończy
się, wraz z końcem gwarancji na to urządzenie.
Wszystkie inne roszczenia, wliczając w to odszkodowania są wykluczone chyba, że
prawo przewiduje inaczej. Roszczenia wykraczające poza tą umowę nie są
uwzględniane przez tą gwarancję.
Gwarancja oraz zawarte w niej warunki obowiązują na terenie Rzeczpospolitej
Polskiej.
PL
13
Page 14

38966-05-MRC 460 P 17.07.2003 16:37 Uhr Seite 14
E
Indicaciones generales para su seguridad
Vd. no debe dejar expuesto el aparato ni a la lluvia ni a la humedad, a fin de disminuir así el riesgo de incendio o de sacudida eléctrica.
Por tanto, no debe utilizar el aparato cerca de agua – por ejemplo, cerca de la
bañera, de una piscina o de un sótano húmedo.
Utilice el aparato únicamente para la finalidad para la que ha sido construido.
El aparato se ha de conectar únicamente a una caja de toma de corriente instalada
reglamentariamente. Cerciórese de que la tensión indicada concuerda con la tensión de la caja de enchufe.
Preste atención a que sea correcta la polaridad cuando se empleen fuentes de alimentación externas. Las pilas se han de introducir siempre correctamente.
El aparato se ha de dejar puesto de modo que no se tapen los orificios de aireación existentes.
Jamás se abrirá la carcasa del cuerpo del aparato. Las reparaciones mal hechas
pueden generar considerables peligros para el usuario.
En caso de estar deteriorado el aparato, en especial el cable de conectar a red, ya
no se ha de poner más en servicio el aparato, sino que se hará que lo repare un
especialista. Controle periódicamente el cable de conexión a red para ver si se ha
deteriorado.
Sólo el fabricante, nuestro servicio posventa o un técnico con una cualificación
similar pueden cambiar un cable defectuoso por otro similar, para evitar todo tipo
de riesgo.
Saque de la toma de corriente la clavija de conectar a la red o bien quite las pilas
cuando no se vaya a usar el aparato durante largo tiempo.
Estos símbolos están puestos en el aparato y sirven para aludir a lo siguiente:
El símbolo del rayo advierte al usuario que hay componentes internos del
aparato que pueden tener tensiones peligrosamente altas.
El símbolo con el signo de exclamación advierte al usuario que hay
instrucciones de manejo y de mantenimiento importantes en la documentación que va adjunta.
Indicación de los elementos de manejo
1 Lente 8 Proyector inclinable
2 Botón-SLEEP 9 Botón-AL.OFF
3 Botón-ALARM 10 Botón-TIME
4 Escala de emisoras 11 Botón-HOUR
5 Visualizador LED 12 Botón-MIN
6 Interruptor de función e interruptor 13 TUNING, conmutador selector
para activar / desactivar la proyección de bandas (AM/FM), VOLUME
7 Botón SNOOZE
14
Page 15

38966-05-MRC 460 P 17.07.2003 16:37 Uhr Seite 15
Puesta en marcha
Regulación de la emisora
Ponga el botón de función (6) en posición ON y elija con el conmutador selector de
bandas (13) la banda de frecuencias deseada. FM = UKW, AM = MW.
Girando el botón TUNING (13) puede elegir una emisora.
La escala de emisoras (4) indica la frecuencia ajustada.
Regulación de la hora
Horas=Presionar el botón TIME (9) y al mismo tiempo botón H (11).
Minutos=Presionar el botón TIME (9) y al mismo tiempo botón M (12).
Regulación de la hora de despertar
Horas=Presionar el botón ALARM (3) y al mismo tiempo botón H (11).
Minutos=Presionar el botón ALARM (3) y al mismo tiempo botón M (12).
Para activar la función de despertar, ponga el botón de función (6) en posición
AUTO. En el visualizador de LED (5) se ilumina un LED rojo.En la posición BUZZER (tono zumbador) será despertado en vez con la emisora con un tono de
señal.
Proyección
Con este aparato tiene la posibilidad de proyectar el horario en la pared o en el
techo. Para esto empuje el interruptor PROJEKTION (6) en posición ON. Puede
inclinar el proyector hacia adelante o hacia atrás. En la parte trasera del proyector
se encuentra la ruedecita de ajuste con la que puede ajustar la nitidez de la indicación a proyectar.
La hora del proyector debe ajustarse separadamente de la hora del equipo. Utilice
para ello los botones ubicados en la parte posterior del proyector.
Horas=Presionar el botón TIME y al mismo tiempo botón HOUR.
Minutos=Presionar el botón TIME y al mismo tiempo botón MIN.
Espertador automático en intervalo
La función regulada del despertar automático se puede apagar para aprox. 9 minutos con el botón SNOOZE (7). Después de aprox.1 hora esta función se desconectára completamente hasta el próximo día.
Desconexión retrasada
Presionando el botón SLEEP (2) se conectára la radio para 59 minutos.
El tiempo de conexión se puede cambiar con el botón M (12).
Con el botón SNOOZE (7) se puede desactivar esta función.
E
15
Page 16

38966-05-MRC 460 P 17.07.2003 16:37 Uhr Seite 16
Horario-Reserva de cuerda (Batería-Backup)
E
En la parte trasera del aparato se encuentra una caja de baterías.
Introduzca una batería de bloque 9V. Esta tendrá la función de reserva de memoria
en caso de que haya un corte de corriente.
Limpieza
• Antes de cada limpieza saque el enchufe de la caja de enchufe.
• Debe limpiar el aparato con un paño poco humedecido y sin detergentes.
• No sumerja el aparato en agua.
Este aparato responde a las directivas de CE para la supresión de interferencias y
la seguridad de baja tensión y ha sido construido según las últimas prescripciones
de seguridad técnica.
No reservamos el derecho de efectuar modificaciones técnicas.
Garantía
Este producto está garantizado por nosotros durante 24 meses a partir de la fecha
de adquisición (factura de compra).
En el tiempo de garantía nos hacemos cargo de eliminar gratuitamente mediante
reparación o cambio todos los defectos del aparato debidos a una imperfecta fabricación o a los materiales.
La garantía tendrá validez con la factura de compra.Si no dispone de la factura no
se podrá realizar el cambio o la reparación de forma gratuita.
En caso de garantía debe llevar el producto completo con el embalaje original y la
factura de compra a su establecimiento de adquisición.
En caso de rotura de cristal y defectos en los accesorios no se cambia el aparato,
sino se recambian los accesorios en envío gratuito. ¡En este caso no envíe todo el
aparato, sino encargue solamente la pieza defecta!
La limpieza, el mantenimiento o el cambio de piezas que se desgastan no entran
en la garantía y deben ser abonados por usted.
La garantía no tendrá validez si el defecto es ocasionado por tercera personas.
Después de la garantía
Cuando se haya expirado la garantía las reparaciones se realizan por el comercio
especializado o el servicio al cliente y serán abonados por usted.
16
Page 17

38966-05-MRC 460 P 17.07.2003 16:37 Uhr Seite 17
Generelle sikkerhedshenvisninger
Undgå brandfare eller risiko for elektrisk stød ved ikke at udsætte apparatet for regn
eller fugt. Apparatet må derfor ikke bruges tæt ved vand - eksempelvis i nærheden
af badekar, svømmebassiner eller i en fugtig kælder.
Brug kun apparatet til det beregnede formål.
Opstil apparatet, således at eksisterende ventilationsåbninger ikke tildækkes.
Apparatets kabinet må aldrig åbnes. Ukyndig reparation kan medføre betydelige
risici for brugeren. Har apparatet og især netledningen taget skade, må apparatet
ikke tages i brug. Få det repareret af en fagmand. Kontrollér netledningen for beskadigelser med jævne mellemrum.
For at undgå risici må en defekt netledning kun udskiftes med en ækvivalent ledning af fabrikanten, vores kundeservice eller en tilsvarende kvalificeret person.
Tr æk hhv. netstikket ud af stikkontakten eller fjern batterierne, hvis apparatet ikke
bruges i længere tid.
Disse symboler findes på apparatet og har følgende betydninger:
Lyn-symbolet henviser brugeren til dele med farlige høje spændinger, pla-
ceret inde i apparatet.
Symbolet med udråbstegn henviser brugeren til vigtige vejledninger i de
medfølgende papirer vedrørende betjening og vedligeholdelse.
Oversigt over betjeningsanordningerne
1 Linse 8 Svingbart projektionsapparat
2 SLEEP-knap 9 Al. OFF-knap
3 ALARM-knap 10 TIME-knap
4 Programskala 11 HOUR-knap
5 LED-display 12 MIN-knap
6 Funktionsvælger og 13 TUNING, båndvælger
tænd-/sluk-knap til projektion (AM / FM), VOLUME
7 SNOOZE-knap
Ibrugtagning
Indstilling af radiostation
Skub funktionsvælgeren (6) på ON og vælg det ønskede frekvensbånd, FM eller
AM, med båndvælgeren (13). FM = UKW, AM = MW.
Indstil radiostationen ved at dreje på TUNING-knappen (13). Programskalaen (4)
viser den finindstillede frekvens.
DK
17
Page 18

38966-05-MRC 460 P 17.07.2003 16:37 Uhr Seite 18
Indstilling af klokkeslæt
DK
Timer: Tryk samtidigt på TIME-knappen (9) og H-knappen (11).
Minutter: Tryk samtidigt på TIME-knappen (9) og M-knappen (12).
Indstilling af tidspunkt for vækning
Timer: Tryk samtidigt på ALARM-knappen (3) og H-knappen (11).
Minutter: Tryk samtidigt på ALARM-knappen (3) og M-knappen (12).
Vækkefunktionen aktiveres ved at skubbe funktionsvælgeren (6) hen på AUTO.
I LED-displayet (5) lyser en rød LED. Står funktionsvælgeren på BUZZER, lyder der
en signaltone på vækningstidspunktet. Der tændes ikke for radioen.
Projektion
Det er muligt at projicere klokkeslættet på væggen resp. på loftet med dette apparat. Det sker ved at skubbe PROJEKTION-knappen (6) på ON.
Projektionsapparatet (8) kan svinges fremad eller bagud. Ved hjælp af indstillingshjulet på projektionsapparatets bagside kan skarpheden af den projicerede visning
indstilles.
Klokkeslættet på projektoren skal indstilles særskilt fra klokkeslættet på apparatet.
Hertil benyttes knapperne på bagsiden af projektoren.
Timer: Tryk samtidigt på TIME-knappen og HOUR-knappen.
Minutter: Tryk samtidigt på TIME-knappen og MIN-knappen.
Interval-vækkeautomatik
Den automatisk indstillede vækkefunktion kan afbrydes i ca. 9 minutter med
SNOOZE-knappen (7). Vækkefunktionen afbrydes fuldstændigt indtil næste dag
efter ca. 1 time.
Udskudt slukning
Ved at trykke på SLEEP-knappen (2) tændes der for radioen i 59 minutter.
Tidspunktet for slukning kan reguleres via M-knappen (12).
Med SNOOZE-knappen (7) kan denne funktion ophæves.
Ur – sikring ved strømsvigt (backup-batteri)
Der findes et batterirum på apparatets bagvæg.
Isæt et 9 V blokbatteri.
Det tjener som bufferlager for indstillingerne ved strømsvigt.
Rengøring
• Tr æk netstikket ud før rengøringen.
• Rengør apparatet med en lidt fugtet klud uden tilsætningsmidler.
• Apparatet må aldrig kommes i vand.
18
Page 19

38966-05-MRC 460 P 17.07.2003 16:37 Uhr Seite 19
Ovnen er i overensstemmelse med gældende EF-direktiver og konstrueret i henhold til nyeste sikkerhedstekniske forskrifter.
Tekniske ændringer forbeholdes!
Garanti
Vi yder en garanti på det af os solgte apparat i 24 måneder fra købsdatoen (kassebon).
Via reparation eller ombytning afhjælper vi vederlagsfrit mangler på apparatet i
garantiperioden, som skyldes materiale- eller fabrikationsfejl.
Købsnotaen gælder som garantibevis. Uden dette bevis er det ikke muligt at ombyt-
te eller reparere apparatet uden beregning.
Det komplette apparat i originalemballagen bedes overgivet til forhandleren sammen med kassebonen, hvis der gøres brug af garantien.
Apparatet ombyttes ikke ved glasbrud og fejl på tilbehør.Disse dele udskiftes og til-
sendes uden beregning. I dette tilfælde skal apparatet ikke indsendes.Derimod
bestilles den enkelte defekte del af tilbehøret!
Garantien omfatter ikke rengøring, service eller udskiftning af sliddele og vil derfor
blive beregnet.
Garantien ophører ved ukyndig behandling.
Efter garantiens udløb
Efter udløbet af garantiperioden kan reparationer udføres af den tilsvarende for-
handler eller reparationsservice mod beregning.
DK
19
Page 20

38966-05-MRC 460 P 17.07.2003 16:37 Uhr Seite 20
I
Per evitare il rischio di incendio o di scosse, non si deve mai tenere l’apparecchio
sotto la pioggia o in ambienti umidi. Quindi non usare l’apparecchio nelle immediate
vicinanze di acqua, per esempio in prossimità di una vasca, di una piscina o in una
cantina umida.
Utilizzare l’apparecchio solo per l’uso previsto.
Collegare l’apparecchio esclusivamente ad una presa installata a norma. Fare
attenzione a che la tensione indicata corrisponda alla tensione della presa. Se si
impiegano alimentatori esterni, fare attenzione all’esattezza di polarità e di tensione, inserire le batterie sempre correttamente.
Collocare l’apparecchio in modo che le aperture per l’aerazione esistenti non vengano coperte.
Non togliere mai la protezione dell’apparecchio. Riparazioni non a regola d’arte
possono causare notevoli pericoli per l’utente. Se l’apparecchio presenta danni,
soprattutto nella zona del cavo di collegamento, non metterlo più in funzione, ma
farlo riparare prima da un esperto. Esaminare regolarmente il cavo di collegamento
alla rete per verificare che non ci siano danni.
Un cavo di collegamento difettoso può essere sostituito con un cavo equivalente
solo dal produttore, dal nostro servizio assistenza o da persone similmente qualificate, al fine di evitare pericoli.
Se l’apparecchio non viene usato per un periodo di tempo prolungato, togliere il
blocchetto alimentatore dalla presa ovvero estrarre le batterie.
Questi simboli si trovano sull’apparecchio e intendono far presente quanto segue:
Avvertenze generali per la sicurezza
Il simbolo del lampo fa presente all’utente la presenza di pezzi all’interno
dell’apparecchio che possono produrre alte tensioni pericolose.
Il simbolo con il punto esclamativo fa presente all’utente la presenza di
importanti avvertenze per l’uso e la manutenzione nei fogli di accompagnamento dell’apparecchio.
Elementi di comando
1 Lente 8 Proiettore orientabile
2 Tasto SLEEP 9 Tasto per spegnere l’allarme
3 Tasto ALARM 10 Tasto TIME
4 Scala emittenti radio 11 Tasto HOUR
5 Display LED 12 Tasto MIN
6 Commutatore e tasto on/off 13 TUNING, selettore di banda
per la proiezione (AM/FM), VOLUME
7 Tasto SNOOZE
20
Page 21

38966-05-MRC 460 P 17.07.2003 16:37 Uhr Seite 21
Messa in esercizio
Scelta del trasmettitore
Mettete l’interruttore di accensione (6) su ON e con l’interruttore di frequenza (13)
selezionate la banda di frequenza desiderata. FM = UKW, AM = MW.
Girando la manopola TUNING (13) selezionate una stazione radio.
La scala delle stazioni radio (4) indica la frequenza selezionata.
Impostazione dell’ora
Ore: premete il tasto TIME (9) e contemporaneamente il tasto H (11).
Minuti: premete il tasto TIME (9) e contemporaneamente il tasto M (12).
Impostazione della sveglia
Ore: premete il tasto ALARM (3) e contemporaneamente il tasto H (11).
Minuti: premete il tasto ALARM (3) e contemporaneamente il tasto M (12).
Per attivare la funzione di sveglia spingete l’interruttore di funzione (6) sulla posizio-
ne AUTO. Nel display (5) si accende un LED rosso. Nella posizione BUZZER,
sarete svegliati da un segnale acustico invece che dalla radio.
Proiezione
Con questo apparecchio è possibile proiettare l’ora sulla parete o sul soffitto. A questo scopo spingere il pulsante PROIEZIONE (6) nella posizione ON. Si può orientare il proiettore (8) in avanti o all’indietro. Sul retro del proiettore si trova una rotella
con cui si può regolare la nitidezza della proiezione.
L’orologio del proiettore deve essere impostato separatamente da quello dell’appa-
recchio. Adoperate i tasti sul retro del proiettore.
Ore: premete il tasto TIME e contemporaneamente il tasto HOUR.
Minuti: premete il tasto TIME e contemporaneamente il tasto MIN.
Allarme ad intervalli
L’allarme inserito automaticamente si può spegnere con il tasto SNOOZE (7) per
ca. 9 minuti. Dopo un’ora circa l’allarme si disinserisce completamente fino al giorno dopo.
Spegnimento a tempo
Premendo il tasto SLEEP (2) la radio si accende per 59 minuti.
Il periodo di accensione si può regolare con il tasto M (12).
Con il tasto SNOOZE (7) si può annullare questa funzione.
I
21
Page 22

38966-05-MRC 460 P 17.07.2003 16:37 Uhr Seite 22
Riserva orologio (Batteria di backup)
I
Sul retro dell’apparecchio c’è un vano batterie.
Inserite una batteria da 9 V che si innescherà nel caso manchi la corrente per evitare differimenti orari.
Pulizia
• Prima di pulire estraete la spina.
• Pulite l’apparecchio con un panno leggermente inumidito senza additivi.
• Non immergete l’apparecchio in acqua.
Questo apparecchio corrisponde alle norme CE per i disturbi radio e la sicurezza
contro le correnti a basso voltaggio ed è stato costruito in base alle più recenti
norme tecniche di sicurezza.
Con riserva di apportare modifiche tecniche.
Garanzia
A partire dalla data di acquisto, questo prodotto è garantito dal produttore per un
periodo di 24 mesi (scontrino).
Durante la durata della garanzia, il produttore eliminerà gratuitamente difetti dell'apparecchio dovuti a imperfezioni di produzione o di materiale, eventualmente cambiando l' unità oppure procedendo con le dovute riparazioni.
La garanzia è valida solo con lo scontrino. Senza l' esibizione dello scontrino non è
possibile fare svolgere le riparazioni gratuitamente.
In caso di riparazioni con garanzia, è necessario ritornare al produttore l' apparecchio intero, nell'imballaggio originale, accompagnato dallo scontrino.
In caso di rottura di vetro e difetti agli accessori, i pezzi necessari verranno spediti
in cambio gratuitamente. In questo caso è necessario di non spedire l' intero appa-
recchio, ma ordinare solo l' accessorio difettoso!
Pulizia, manutenzione e scambio non fanno parte della garanzia e sono perciò
sono soggetti a spese.
La garanzia perde la sua validità se l'apparecchio è sottomesso all' intervento di
terzi.
Dopo la garanzia
Quando la garanzia è scaduta, le riparazioni devono essere effettuate da un negozio od un servizio specializzato, contro pagamento.
22
Page 23

38966-05-MRC 460 P 17.07.2003 16:37 Uhr Seite 23
Technische Daten
Modell: MRC 460 P
Spannungsversorgung: 230 V, 50 Hz
Frequenzbereiche: UKW/FM 87,5-108 MHz
MW/AM 540-1600 KHz
Pufferbatterie: 9 V-Block
Schutzklasse:
Dieses Gerät entspricht den CE-Richtlinien.
Bitte führen Sie das ausgediente Gerät
einer umweltgerechten Entsorgung zu.
ΙΙ
D-47906 Kempen/Germany · Industriering-Ost 40
Internet: http://www.clatronic.de · email: clatronic@t-online.de
Stünings, Krefeld • 08/00
 Loading...